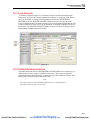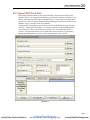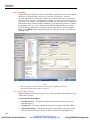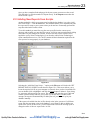
1
DPCTrack2 TM Calibration Management Software Users Manual August 2011 © 2011 Fluke Corporation. All rights reserved. All product names are trademarks of their respective companies. Quality Fluke Products Online at: www. GlobalTestSupply.com [email protected] License Agreement This software and accompanying documentation are protected by United States copyright law and also International Treaty provisions. Any use of this software in violation of copyright law or the terms of this agreement will be prosecuted fully. DPCTrack2 is copyright © 2011 by the Fluke Corporation, all rights reserved. Fluke authorizes you to make archival copies of this software for the sole purpose of backing up and protecting your investment from loss. Under no circumstances may you copy this software or documentation for the purposes of distribution to others. Under no conditions may you remove the copyright notices made part of the software documentation. Fluke warrants that the software will function as described in this document or in the online help for a period of 60 days from receipt. If you encounter a bug or deficiency, we will require a problem report detailed enough to allow us to find and fix the problem. If you properly notify us of such a software problem within the warranty period, Fluke will update the defective software at no cost to you. Fluke assumes no liability for the use of DPCTrack2 beyond the original purchase price of the software. In no event will Fluke be liable to you for additional damages, including any lost profits, lost savings, or other incidental or consequential damages arising out of the use of or inability to use these programs, even if Fluke has been advised of the possibility of such damages. By using this software you agree to the terms of this section. If you do not agree, you should immediately return the entire DPCTrack2 package. All Fluke product names are trademarks or registered trademarks of the Fluke Corporation. Other brand and product names are trademarks or registered trademarks of their respective holders. Quality Fluke Products Online at: www. GlobalTestSupply.com [email protected] Table of Contents Chapter Title 1 Introduction Page ......................................................................................... 1-1 1.1 Introduction..................................................................................................1-3 2 Installing DPCTrack2 .......................................................................... 2-1 2.1 DPCTrack2 Installation ...............................................................................2-3 2.2 System Requirements ..............................................................................2-3 2.3 Procedures ...............................................................................................2-3 2.4 Licensing .................................................................................................2-3 3 Getting Started .................................................................................... 3-1 3.1 Starting the Program ....................................................................................3-3 3.2 Logging onto the System .............................................................................3-3 3.3 Security ........................................................................................................3-3 3.4 Predefined User Groups, User IDs and Passwords ......................................3-4 3.5 About the Sample Records...........................................................................3-4 3.6 Import DPCTrack Data ................................................................................3-4 3.7 Common Usage Scenario.............................................................................3-5 3.7.1 Instrument Record Creation / Revision / Retirement ..........................3-5 3.7.2 Test Instrument Record Creation / Revision / Retirement...................3-5 3.7.3 Use of your Company’s Calibration Program .....................................3-5 3.7.4 Upload/Download................................................................................3-5 3.7.5 Reports.................................................................................................3-6 4 Home Screen ....................................................................................... 4-1 4.1 Using the Home Screen ...............................................................................4-3 4.2 Menu Toolbar ..............................................................................................4-3 4.2.1 File Menu..............................................................................................4-3 4.2.2 Tools Menu...........................................................................................4-5 4.2.3 Records Menu.......................................................................................4-8 4.2.4 Reports Menu .......................................................................................4-8 4.2.5 Lists Menu ............................................................................................4-8 4.2.6 Help Menu ............................................................................................4-8 4.3 Main Toolbar ...............................................................................................4-9 i Quality Fluke Products Online at: www. GlobalTestSupply.com [email protected] DPCTrack2 Users Manual 4.4 Navigation Toolbar ......................................................................................4-9 4.5 Work Area....................................................................................................4-9 5 Overview of Standard Screens........................................................... 5-1 5.1 Standard Screens..........................................................................................5-3 5.2 Overview of Buttons....................................................................................5-4 5.2.1 Add New Record ..................................................................................5-4 5.2.2 Save Record..........................................................................................5-4 5.2.3 Copy Current Record............................................................................5-4 5.2.4 Find Record ..........................................................................................5-4 5.2.5 List Records..........................................................................................5-4 5.2.6 Cancel Changes ....................................................................................5-4 5.2.7 Print Master Report ..............................................................................5-4 5.2.8 Preview Master Report .........................................................................5-4 5.2.9 Show Work History ..............................................................................5-4 5.2.10 Close Form .........................................................................................5-4 5.2.11 Help ....................................................................................................5-4 5.3 Data Fields/Lists Menu ................................................................................5-4 5.4 File Menu.....................................................................................................5-5 5.5 Edit Menu ....................................................................................................5-5 5.6 Reports Menu...............................................................................................5-5 6 User Administration and Levels of Access....................................... 6-1 6.1 Employee Record Screen.............................................................................6-3 6.1.1 General Info Tab...................................................................................6-3 6.1.3 Force Log Off User ..............................................................................6-5 6.2 User Groups Screen .....................................................................................6-5 6.2.1 Group Type...........................................................................................6-5 6.2.2 Members Tab........................................................................................6-6 6.2.3 Access Levels Tab ................................................................................6-6 6.2.4 Reminder Options Tab .........................................................................6-7 6.3 User Administration Screen.........................................................................6-8 7 System Options ................................................................................... 7-1 7.1 System Options ............................................................................................7-3 7.1.1 Database Name .....................................................................................7-3 7.2 System Settings Tab.....................................................................................7-4 7.2 System Settings Tab.....................................................................................7-4 7.2.1 Last Date The System Database Was Backed Up ................................7-4 7.2.2 Number Of Days Between Backup Warnings ......................................7-4 7.2.3 Number Of Days Before User’s Password Expires..............................7-4 7.2.4 Number of Logons Before Disabling (“0” = Never Disable) ...............7-4 7.2.5 Minimum Password Length..................................................................7-4 7.2.6 Number Of Passwords To Remember ..................................................7-4 7.2.7 Minimum Password Age To Allow Change (Days).............................7-5 7.2.8 Number Of Minutes Before Time-Out .................................................7-5 7.2.9 System Date Format .............................................................................7-5 7.2.10 System Decimal Number Format .......................................................7-5 7.2.11 Default Skin........................................................................................7-5 7.2.12 Allow User Skin Override ..................................................................7-5 7.2.15 Warn On Overdue Test Instruments During Cal Entry ......................7-6 ii Quality Fluke Products Online at: www. GlobalTestSupply.com [email protected] Contents (continued) 8 User Defined Labels ............................................................................ 8-1 8.1 User Defined Labels ....................................................................................8-3 8.2 Column Descriptions ...................................................................................8-3 8.3 Modifying Field Labels ...............................................................................8-4 9 Company Record Screen.................................................................... 9-1 9.1 Company Records........................................................................................9-3 9.2 Tabbed Notebook Section............................................................................9-3 9.2.1 General Info Tab...................................................................................9-3 9.2.1.1 Address Lines 1 & 2, City, State, Zip & Country .........................9-3 9.2.1.2 Contact, Phone & Email................................................................9-3 9.2.2 Other Addresses Tab ............................................................................9-4 9.2.3 Options Tab ..........................................................................................9-4 9.2.4 Default Reports Tab .............................................................................9-7 9.3 Change Company Name ..............................................................................9-7 10 User Defined Variables and User Defined Lists ............................... 10-1 10.1 User Defined Options & Required Fields ..................................................10-3 10.2 Adding User Defined Variables.................................................................10-3 10.2.1 Selecting a File Type ..........................................................................10-3 10.2.2 Entering the Variable Name ...............................................................10-4 10.2.3 Selecting the Field Data Type ............................................................10-4 10.2.4 Deleting a User Defined Variable ......................................................10-5 10.2.5 Reordering User Defined Variables ...................................................10-5 10.3 User Defined Lists .....................................................................................10-6 10.3.1 Creating a New List Type...................................................................10-6 10.3.2 Creating List Entries for New List Types...........................................10-6 10.4 Configuring Required Fields......................................................................10-7 11 Reminders ............................................................................................ 11-1 11.1 Reminders ..................................................................................................11-3 11.2 Printing Reminders ....................................................................................11-4 12 Standard Lists ..................................................................................... 12-1 12.1 Standard Lists ............................................................................................12-3 12.2 List Screens................................................................................................12-3 12.2.1 Calibration Frequency ........................................................................12-3 12.2.2 Status ..................................................................................................12-4 12.2.3 Signal Type.........................................................................................12-5 12.2.5 Locations ............................................................................................12-5 12.2.6 Department .........................................................................................12-5 12.2.7 Vendors...............................................................................................12-6 12.2.8 Instrument Type..................................................................................12-6 12.2.9 Responsible Technician......................................................................12-6 12.2.10 Calibration Type...............................................................................12-7 12.2.11 Classification ....................................................................................12-7 12.2.12 Document Type ................................................................................12-7 12.2.13 Equipment Type ...............................................................................12-8 iii Quality Fluke Products Online at: www. GlobalTestSupply.com [email protected] DPCTrack2 Users Manual 13 Document Records Screen................................................................. 13-1 13.1 Document Records.....................................................................................13-3 13.2 Tabbed Notebook Section..........................................................................13-4 13.2.1 General Info Tab.................................................................................13-4 13.2.2 Signatures Tab ....................................................................................13-5 13.2.3 Procedure Tab.....................................................................................13-5 13.3 File Menu Options .....................................................................................13-5 13.3.1 New Record[Ctrl + N] ........................................................................13-5 13.3.2 Save Record[Ctrl + S] ........................................................................13-5 13.3.3 Find Record[Ctrl + F].........................................................................13-5 13.3.4 Print Record[Ctrl + P] ........................................................................13-5 13.3.5 Print Preview].....................................................................................13-5 13.3.6 List Records........................................................................................13-5 13.3.7 Delete Record .....................................................................................13-6 13.3.8 Close Form .........................................................................................13-6 13.3.9 Exit DPCTrack2 .................................................................................13-6 14 Equipment Record Screen.................................................................. 14-1 14.1 Equipment Records....................................................................................14-3 14.2 Tabbed Notebook Section..........................................................................14-3 14.2.1 General Info Tab.................................................................................14-3 14.2.2 Additional Info Tab ............................................................................14-4 14.2.3 Instruments/Loops Tab .......................................................................14-4 14.2.4 User Defined Tab ...............................................................................14-4 14.2.5 Notes Tab............................................................................................14-5 14.3 File Menu Options .....................................................................................14-5 14.3.1 New Record[Ctrl + N] ........................................................................14-5 14.3.2 Save Record[Ctrl + S] ........................................................................14-5 14.3.3 Find Record[Ctrl + F].........................................................................14-5 14.3.4 List Records........................................................................................14-5 14.3.5 Delete Record .....................................................................................14-5 14.3.6 Close Form .........................................................................................14-6 14.3.7 Exit DPCTrack2 .................................................................................14-6 15 Instrument Record Screen.................................................................. 15-1 15.1 Instrument Records ....................................................................................15-3 15.2 Tabbed Notebook Section..........................................................................15-3 15.2.1 General Info Tab.................................................................................15-3 15.2.2 Calibration Points Tab ........................................................................15-5 15.2.3 Additional Info Tab ............................................................................15-16 15.2.4 User Defined Tab ...............................................................................15-17 15.2.5 Notes Tab............................................................................................15-17 15.3 File Menu Options .....................................................................................15-17 15.3.1 New Record [Ctrl + N] .......................................................................15-17 15.3.2 Copy Record [Ctrl + Y] ......................................................................15-17 15.3.3 Save Record [Ctrl + S] .......................................................................15-17 15.3.4 Find Record [Ctrl + F]........................................................................15-17 15.3.5 List Records [Ctrl + L] .......................................................................15-17 15.3.6 Show Work History [Ctrl + K] ...........................................................15-17 15.3.7 Delete Record .....................................................................................15-17 15.3.8 Close Form .........................................................................................15-18 15.3.9 Exit DPCTrack2 .................................................................................15-18 iv Quality Fluke Products Online at: www. GlobalTestSupply.com [email protected] Contents (continued) 16 Loop Record Screen ........................................................................... 16-1 16.1 Loop Records.............................................................................................16-3 16.2 Tabbed Notebook Section..........................................................................16-3 16.2.1 General Info Tab.................................................................................16-4 16.2.2 Calibration Points Tab ........................................................................16-5 16.2.3 Additional Info Tab ............................................................................16-5 16.2.4 User Defined Tab ...............................................................................16-6 16.2.5 Notes Tab............................................................................................16-6 16.3 File Menu Options .....................................................................................16-6 16.3.1 New Record[Ctrl + N] ........................................................................16-6 16.3.2 Copy Record[Ctrl + Y] .......................................................................16-6 16.3.3 Save Record[Ctrl + S] ........................................................................16-7 16.3.4 Find Record[Ctrl + F].........................................................................16-7 16.3.5 List Records[Ctrl + L] ........................................................................16-7 16.3.6 Show Work History[Ctrl + K] ............................................................16-7 16.3.7 Delete Record .....................................................................................16-7 16.3.8 Close Form .........................................................................................16-7 16.3.9 Exit DPCTrack2 .................................................................................16-7 17 Test Instrument Record Screen ......................................................... 17-1 17.1 Test Instrument Records ............................................................................17-3 17.2 Tabbed Notebook Section..........................................................................17-3 17.2.1 General Info Tab.................................................................................17-3 17.2.2 Calibration Points Tab ........................................................................17-5 17.2.3 Additional Info Tab ............................................................................17-5 17.2.4 User Defined Tab ...............................................................................17-5 17.2.5 Notes Tab............................................................................................17-5 17.3 File Menu Options .....................................................................................17-5 17.3.1 New Record[Ctrl + N] ........................................................................17-5 17.3.2 Copy Record[Ctrl + Y] .......................................................................17-5 17.3.3 Save Record[Ctrl + S] ........................................................................17-5 17.3.4 Find Record[Ctrl + F].........................................................................17-5 17.3.5 List Records[Ctrl + L] ........................................................................17-6 17.3.6 Show Work History[Ctrl + K] ............................................................17-6 17.3.7 Delete Record .....................................................................................17-6 17.3.8 Close Form .........................................................................................17-6 17.3.9 Exit DPCTrack2 .................................................................................17-6 18 Upload/Do wnload Screen ................................................................... 18-1 18.1 Getting Started ...........................................................................................18-3 18.2 File Menu Options .....................................................................................18-4 18.2.1 Initiate Download/Upload ..................................................................18-4 18.2.2 Close Form .........................................................................................18-4 18.2.3 Exit DPCTrack2 .................................................................................18-4 18.3 Features......................................................................................................18-4 18.3.1 Clear Calibrator Memory....................................................................18-4 18.3.2 Set Calibrator Date/Time to Current Date/Time ................................18-5 18.3.3 View Number of Test Results ............................................................18-5 18.3.4 View/Edit Session Log .......................................................................18-5 18.4 Lists............................................................................................................18-5 18.5 Help............................................................................................................18-5 18.6 Options.......................................................................................................18-5 18.6.1 Download Options..............................................................................18-5 18.6.2 Upload Options...................................................................................18-7 v Quality Fluke Products Online at: www. GlobalTestSupply.com [email protected] DPCTrack2 Users Manual 18.7 Downloading Calibration Items as Tasks ..................................................18-7 18.7.1 Download By......................................................................................18-7 18.7.2 Tag List Operations ............................................................................18-9 18.7.3 Tag List Edit Functions ......................................................................18-10 18.7.4 Tag List Information Functions..........................................................18-10 18.7.5 Adding to the Tag List........................................................................18-11 18.7.6 Removing Items from the Tag List.....................................................18-11 18.7.7 Tag Construction ................................................................................18-11 18.8 Uploading Results as Calibrations .............................................................18-12 18.8.1 Assign Technician to Calibrations......................................................18-12 18.8.2 Default Calibration Type for Uploaded Calibrations .........................18-13 18.8.3 Default Test Instrument Warning Options .........................................18-13 18.8.4 Initiate Upload ....................................................................................18-13 18.9 Test Instrument Recognition......................................................................18-16 19 Calibration Screen............................................................................... 19-1 19.1 Calibration Records ...................................................................................19-3 19.2 Tabbed Notebook Section..........................................................................19-3 19.2.1 Header Fields......................................................................................19-3 19.2.2 Item Info (As of Calibration Record Entry Date)...............................19-4 19.2.3 General Calibration Info.....................................................................19-4 19.3 Test Results Tab.........................................................................................19-5 19.3.1 Test Point Groups ...............................................................................19-5 19.3.2 Separate As Found/As Left Inputs......................................................19-6 19.3.3 Modifying Calibration Specifications ................................................19-6 19.3.4 Classifying the Result of a Calibration...............................................19-7 19.3.5 Automatic Warnings and Messages ...................................................19-8 19.3.6 Warnings and Messages That May Appear as a Result of Options and Default Settings.............................................................19-9 19.3.7 Entering Calibrations in Multi-Mode .................................................19-10 19.4 Test Instruments Tab..................................................................................19-11 19.4.1 How Instrument Types Affect the Available Test Instrument List ....19-12 19.4.2 Show All.............................................................................................19-12 19.5 SOP Tab.....................................................................................................19-12 19.6 User Defined Tab.......................................................................................19-12 19.7 Notes Tab...................................................................................................19-13 20 Import DPCTrack Data ........................................................................ 20-1 20.1 Import DPCTrack Data ..............................................................................20-3 20.1.1 Field Mapping ....................................................................................20-4 20.1.2 Frequency Mapping............................................................................20-4 20.2 Possible Errors/Warnings...........................................................................20-5 20.3 Compatibility Limitations..........................................................................20-5 20.3.1 Limitations For Instrument Imports ...................................................20-5 20.3.2 Limitations For History Imports.........................................................20-5 21 Advanced Queries ............................................................................... 21-1 21.1 Advanced Queries......................................................................................21-3 21.1.1 Running Previously Saved Advanced Queries ...................................21-3 21.1.2 Creating New Advanced Queries and Modifying Existing Queries...21-3 21.1.3 Action Button Sets..............................................................................21-9 21.1.4 Navigating Between Records Included in an Advanced Query List ..21-10 21.1.5 Printing Lists and Saving Them to External Files ..............................21-11 21.1.6 Using Advanced Queries in Other Parts of the Program ....................21-11 vi Quality Fluke Products Online at: www. GlobalTestSupply.com [email protected] Contents (continued) 22 DPCTrack Explorer.............................................................................. 22-1 22.1 DPCTrack Explorer ...................................................................................22-3 22.1.1 Grouping.............................................................................................22-4 22.1.2 Pop-up Menu Options ....................................................................22-4 22.1.3 Status Indicator Icons .........................................................................22-5 22.1.4 Resetting the Tree...............................................................................22-5 22.1.5 Displaying Additional Information ....................................................22-5 23 Reporting System................................................................................ 23-1 23.1 Reports .......................................................................................................23-3 23.1.1 Report Parameters Tab .......................................................................23-3 23.1.2 Advanced Selection Tab.....................................................................23-4 23.2 Other Options Available on the Reports Menu..........................................23-5 23.2.1 Set Report Directory...........................................................................23-5 23.2.2 Report Maintenance............................................................................23-6 23.3 Printing ..................................................................................................23-6 23.4 Setting Up New Reports ............................................................................23-6 23.4.1 Custom Reports ..................................................................................23-6 23.4.2 Report Maintenance............................................................................23-7 23.5 Adding New Reports from Scripts.............................................................23-9 23.6 Deleting Reports ........................................................................................23-10 24 The Logged Data Screen .................................................................... 24-1 24.1 What is Logged Data?................................................................................24-3 24.2 Uploading Logged Data.............................................................................24-4 24.2.1 Selecting Port......................................................................................24-4 24.2.2 Upload Logs Button ...........................................................................24-5 24.2.3 Show Logged Data Button .................................................................24-6 24.2.4 Log Record .........................................................................................24-6 24.3 Viewing Log Records ................................................................................24-8 24.3.1 Listing Log Records ...........................................................................24-9 24.3.2 Navigating Log Records.....................................................................24-9 24.4 Viewing Logged Data Report ....................................................................24-10 25 Backing Up and Restoring Data......................................................... 25-1 25.1 Backing Up ................................................................................................25-3 25.2 Restore From Backup ................................................................................25-4 26 Troubleshooting .................................................................................. 26-1 26.1 Troubleshooting - Downloading Instruments as Tasks..............................26-3 26.2 Troubleshooting - Device Communication................................................26-3 26.3 Troubleshooting - Uploading Results ........................................................26-4 Appendix A Report Descriptions Listed by Groups ..................................... A-1 Alert Group ........................................................................................................A-1 Calibration Alert Report ................................................................................A-1 Failed Calibrations Report.............................................................................A-1 Calibration Group ..............................................................................................A-1 Calibration Bar Code Label...........................................................................A-1 Calibration Label ...........................................................................................A-1 Instrument Calibration Report (Spec Summary) ...........................................A-1 Instrument Calibration Report (Specs/Test Point).........................................A-1 vii Quality Fluke Products Online at: www. GlobalTestSupply.com [email protected] DPCTrack2 Users Manual Instrument Test Point Analysis......................................................................A-2 Instrument Test Point Trend ..........................................................................A-2 Loop Calibration Report (Spec Summary) ....................................................A-2 Loop Calibration Report (Specs/Test Point) .................................................A-2 Loop Test Point Analysis ..............................................................................A-2 Loop Test Point Trend...................................................................................A-2 Test Instrument Calibration (Spec Summary) ...............................................A-2 Test Instrument Calibration (Specs/Test Point).............................................A-2 Test Instrument Test Point Analysis..............................................................A-3 Test Instrument Test Point Trend ..................................................................A-3 Company Group.................................................................................................A-3 Events Due (This Company) .........................................................................A-3 Document Group................................................................................................A-3 Document Report...........................................................................................A-3 Documents Due Report .................................................................................A-3 Equipment Group...............................................................................................A-3 Equipment Bar Code Label ...........................................................................A-3 Instrument Group...............................................................................................A-3 Instrument Bar Code Label............................................................................A-3 Instrument Master (Spec Summary)..............................................................A-3 Instrument Master (Specs/Test Point) ...........................................................A-3 Instrument Worksheet (Spec Summary)........................................................A-4 Instrument Worksheet (Spec/Test Point).......................................................A-4 Instrument Due Report ..................................................................................A-4 Inventory Group.................................................................................................A-4 Instrument Inventory .....................................................................................A-4 Loop Inventory ..............................................................................................A-4 Test Instrument Inventory .............................................................................A-4 Logged Data Group ...........................................................................................A-4 Data Log Report ............................................................................................A-4 Loop Group........................................................................................................A-4 Loop Bar Code Label ....................................................................................A-4 Loop Master (Spec Summary).......................................................................A-4 Loop Master (Spec/Test Point)......................................................................A-5 Loop Worksheet (Spec Summary) ................................................................A-5 Loop Worksheet (Specs/Test Point) ..............................................................A-5 Loops Due Report..........................................................................................A-5 Test Instrument Group .......................................................................................A-5 Test Instrument Bar Code Label....................................................................A-5 Test Instrument Master (Spec Summary)......................................................A-5 Test Instrument Master (Specs/Test Point) ...................................................A-5 Test Instrument Reverse Traceability............................................................A-5 Test Instrument Worksheet (Spec Summary)................................................A-5 Test Instrument Worksheet (Specs/Test Point) .............................................A-5 Test Instrument Due Report ..........................................................................A-6 User Group.........................................................................................................A-6 Active Users Report ......................................................................................A-6 Security Log Report ......................................................................................A-6 Appendix B Frequently Asked Questions ..................................................... B-1 Frequently Asked Questions List.......................................................................B-1 viii Quality Fluke Products Online at: www. GlobalTestSupply.com [email protected] Chapter 1 Introduction Title 1.1 Page Introduction............................................................................................. 1-3 1-1 Quality Fluke Products Online at: www. GlobalTestSupply.com [email protected] DPCTrack2 Users Manual 1-2 Quality Fluke Products Online at: www. GlobalTestSupply.com [email protected] Introduction 1.1 Introduction 1 1.1 Introduction This manual has been designed to fit the way users say they work. It is set up logically, focusing on different areas of the program in the order that they will most likely be used. The emphasis is on getting the job done in the easiest and most efficient way possible. This manual was also written under the assumption that the DPCTrack2 program being used is a full program, including all calibration and system security features. In addition, it is assumed that the reader has been given access to all areas of the program, however, this may not be the case. If you notice that the company name, menu items, speed buttons, screen options, etc. are grayed out, either the program you purchased did not include those features or your User ID has not been granted access to those areas of the program. The initial content of this manual will provide you with an overview of how to get started with the software installation instructions, logon procedures and standard screen features. All screens have a uniform look with similar speed buttons and menus, making it easy for you to adapt to the system quickly. Each subsequent chapter individually addresses one of the program’s screens or major functions. In each of these chapters you will find a full description and explanation of the screens features, as well as detailed, hands-on operating instructions. The online help system included with DPCTrack2 is full of useful information, similar to that provided in this manual. It is available at all times when using the program, either by accessing the Help menu, left-clicking the speed buttons labeled as such, or by pressing the “F1” key. 1-3 Quality Fluke Products Online at: www. GlobalTestSupply.com [email protected] DPCTrack2 Users Manual 1-4 Quality Fluke Products Online at: www. GlobalTestSupply.com [email protected] Chapter 2 Installing DPCTrack2 Title 2.1 2.2 2.3 2.4 Page DPCTrack2 Installation .......................................................................... 2-3 System Requirements ......................................................................... 2-3 Procedures .......................................................................................... 2-3 Licensing ............................................................................................ 2-3 2-1 Quality Fluke Products Online at: www. GlobalTestSupply.com [email protected] DPCTrack2 Users Manual 2-2 Quality Fluke Products Online at: www. GlobalTestSupply.com [email protected] Installing DPCTrack2 2.1 DPCTrack2 Installation 2 2.1 DPCTrack2 Installation 2.2 System Requirements To use the DPCTrack2, it is recommended that you have the following hardware and software: • A Pentium class 667 MHz or higher computer with a minimum of 256 MB of RAM (512 MB or more recommended) • Windows XP or later operating system versions • A hard disk with at least 500 MB of free space 2.3 Procedures Single-User License: • Insert the DPCTrack2 CD into your computer’s CD-ROM drive. If the program does not autostart, Run “setup.exe”. Follow the prompts on your screen to complete installation. 2.4 Licensing The first time you run DPCTrack2 you will see the “DPCTrack2 Licensing” screen with three options. See Figure 2.1 below. Start Trial: This will allow you to enter DPCTrack2 for the first 60 days of use without further action. After 60 days, all features of the DPCtrack2 System except those to Upload, Download & View the Logs will be restricted. Your trial program comes preconfigured with sample data organized under a company called “Fluke Customer”. If you wish to change this default name you may do so when you start your trial. See Figure 2.2 Register: Registering the trial will enable you to receive sales support during the evaluation process. Customers are given the option to register at the following times: • During the 1st run when they select to run a Trial (instead of Activate) • Every time a Trial expiration warning is shown (if they have not already registered) • Through a menu option Help Register Now (if they have not already registered) The registration process is identical, regardless of when the option is selected. The customer is prompted to enter their basic information – Company, First Name, Last Name, email & Phone Activate: Upon selecting Activate you will be prompted for a POP # and other information for verification. This data is sent for confirmation and used to generate an Activation Code which will be sent to you for entry it into the DPCTrack2 System. 2-3 Quality Fluke Products Online at: www. GlobalTestSupply.com [email protected] DPCTrack2 Users Manual Figure 2.1 Figure 2.2 2-4 Quality Fluke Products Online at: www. GlobalTestSupply.com [email protected] Installing DPCTrack2 2.1 DPCTrack2 Installation • 2 Notes The installation directory [INSTALLDIR] defaults to: “C:\DPCTrack2”. This can be overridden during the installation process. • The data directory [DATADIR] defaults to: “C:\ DPCTrack2\Data”. This can also be overridden during the installation process. The data directory can be on a shared network storage device but only this version of DPCTrack2 that is currently being installed will be able to access it. 2-5 Quality Fluke Products Online at: www. GlobalTestSupply.com [email protected] DPCTrack2 Users Manual 2-6 Quality Fluke Products Online at: www. GlobalTestSupply.com [email protected] Chapter 3 Getting Started Title 3.1 3.2 3.3 3.4 3.5 3.6 3.7 3.7.1 3.7.1.1 3.7.1.2 3.7.1.3 3.7.2 3.7.3. 3.7.4 3.7.4.1 3.7.4.2 3.7.5 Page Starting the Program................................................................................ Logging Onto the System ........................................................................ Security.................................................................................................... Predefined User Groups, User IDs and Passwords.................................. About the Sample Records ...................................................................... Import DPC/Track Data........................................................................... Common Usage Scenario ........................................................................ Instrument Record Creation / Revision / Retirement ............................ Creating Instrument Records in DPCTrack2......................................... Revising a Master Record...................................................................... Retiring an Instrument ........................................................................... Test Instrument Record Creation / Revision / Retirement..................... Use of your Company’s Calibration Program ......................................... Upload/Download.................................................................................. Downloading Tasks ............................................................................... Uploading Results ................................................................................. Reports................................................................................................... 3-3 3-3 3-3 3-4 3-4 3-4 3-5 3-5 3-5 3-5 3-5 3-5 3-5 3-5 3-6 3-6 3-6 3-1 Quality Fluke Products Online at: www. GlobalTestSupply.com [email protected] DPCTrack2 Users Manual 3-2 Quality Fluke Products Online at: www. GlobalTestSupply.com [email protected] Getting Started 3.1 Starting the Program 3 3.1 Starting the Program To start DPCTRACK2, double-click on the DPCTrack2 icon located in the DPCTrack2 Group. (Multiple instances of DPCTrack2 may not be run concurrently on the same machine.) 3.2 Logging onto the System Upon starting DPCTrack2, you will receive a login screen. Login the first time using the default Admin credentials given below in the Admin user group description section. The first time you log on, you will be prompted to change the default password to one of your own choosing. DPCTrack2 is password protected, so every time you want to use the system, you will have to enter your "User ID" and "Password". Both the User ID and Password may be any combination of letters or numbers, although there may be a minimum password length required, depending on your System settings. (See Chapter 7 SYSTEM OPTIONS, for details regarding minimum password length.) Also both the User ID and Passwords are not Case Sensitive. Figure 3.1 shown below, is the screen you will see every time you log onto DPCTrack2. Figure 3.1 3.3 Security As a measure to prevent unauthorized individuals from gaining access to your records, DPCTrack2 offers a security feature whereby the administrator may set the number of times an unsuccessful logon can occur before disabling a User ID. This value is set in the SYSTEM OPTIONS screen which is available from the File menu at the top left of your HOME screen (see Chapter 7 for details). An unsuccessful logon occurs when a user enters an incorrect password for their User ID. When the maximum number of unsuccessful logons is reached, DPCTrack2 will automatically disable the user, thus denying them access to the system. When this occurs, only a User that is a member of the “ADMIN” group can re-enable the User ID. See Chapter 6 for more information on how to re-enable a user. 3-3 Quality Fluke Products Online at: www. GlobalTestSupply.com [email protected] DPCTrack2 Users Manual 3.4 Predefined User Groups, User IDs and Passwords DPCTRACK2 includes three (3) predefined User Access Groups with Users assigned to them and one (1) Technician Group with one Technician assigned. The predefined User Groups are: ADMIN, USER, and READONLY. The Technician Group is TECH. All DPC/Track users must be assigned to one of the predefined User Access Groups. The following is a list of the pre-defined User Groups and their descriptions: Admin The Admin (Administrator) has full access to all areas of DPCTrack2. Most notably, the Admin has the ability to perform administrative responsibilities, such as modifying system options, backing up data, adding technicians and other users, adding user defined variables, deleting data, among other tasks. Typically, only one person should serve as the Admin of the DPCTrack2 program. The User ID and default password for the Admin User group is Admin/Admin. User The access rights of the User differ from those of the Admin in that a User cannot perform administrative tasks. The User has the ability to approve changes, add or modify records, download and upload tasks to the calibrator and view logged data. The User ID and default password for the User User Group is User/User. Read Only The access rights of the READONLY user are further restricted than those of the User in that existing data may only be read. However, READONLY user may download and upload tasks to the calibrator for the purpose of generating Test Results records. The User ID and default password for READONLY User Group is READONLY/READONLY. Technician There are no access rights for the Technician. The Technician is there for display purposes only e.g. for Who Calibrated or Responsible Technician. There is no User ID or password for the Technician. 3.5 About the Sample Records DPCTrack2 includes a number of sample records intended to help you learn the operations and features of the program. After becoming familiar with DPCTrack2, you may want to delete the sample records so as not to interfere with your “real” data. (The sample records could potentially be included within your reports and data analysis.) 3.6 Import DPC/Track Data This will allow users to Import DPC/Track data (Instruments, History and Procedures) into the database. See Chapter 04 Home screen, subsection 4.2.2 Tools Menu. 3-4 Quality Fluke Products Online at: www. GlobalTestSupply.com [email protected] Getting Started 3.7 Common Usage Scenario 3 3.7 Common Usage Scenario This scenario applies to the activities performed by personnel supporting the DPCTrack2 database such as for instrument calibrations maintained in the DPCTrack2 database and/or instrument creation/revision/retirement. 3.7.1 Instrument Record Creation / Revision / Retirement Instrument Records may be created or revised in DPCTrack2 for an instrument when it is determined that its calibration information will be maintained in the DPCTrack2 database. For existing DPC/Track clients you may move your DPC/Track data to the new DPCTrack2 database. See Chapter 20 of the User Manuals for information about importing your data. 3.7.1.1 Creating Instrument Records in DPCTrack2 The Administrator or User will select the “Instruments” button and open the “Instrument Record” screen, and select “Add New Record” icon to create a new Instrument Record in DPCTrack2 and “Approve” the record. When setting up the calibration points for an instrument, select the “Show DPC Settings” to allow you to configure your Source Mode and Measure Mode. This provides the compatibility between the signal type and the Source Mode and Measure Mode 3.7.1.2 Revising a Master Record To revise a Master record, , the Administrator or User will access the Master Record Data Instrument Record, Loop Record, and/or Test Instrument Record), edit and save the master record data. 3.7.1.3 Retiring an Instrument To retire an instrument, the Administrator or User or will access the Instrument Record; change the status to your Company’s retired status and save the master instrument record data. 3.7.2 Test Instrument Record Creation / Revision / Retirement DPCTrack2 stores data for Test Instruments separately. The Administrator or User will select the “Test Instruments” button and open the “Test Instrument Record” screen, and select “Add New Record” icon to create a new Test Instrument Record in DPCTrack2 and “Approve” the record. Test Instrument records may be associated with a calibration record for certification and verification purposes. Calibration records will always retain the Test Instrument assigned regardless of the Test Instrument’s status, therefore it is recommended that you do not delete Test Instrument records. 3.7.3. Use of your Company’s Calibration Program The Administrator or User will select “Reports” “Company” “Events Due (This Company)” from the Home screen to generate an Events Due Report from DPCTrack2 to determine the monthly list of instruments due for calibration for the upcoming month. 3.7.4 Upload/Download The Upload/Download screen is used for calibrator communication. The Administrator or User will select the “Upload/Download” button to open the “Upload/Download” screen. Tasks can be downloaded to the calibrator and Test Results can be uploaded from the calibrator to the DPCTrack2 database. During any Download or Upload operation, the Options screen allows default values to be set for tasks or results created. Additionally, calibration records are created when results are uploaded and authorized. DPCTrack2 also associates the calibration record with the appropriate instrument record. See Chapter 18 for more Upload/Download details. 3-5 Quality Fluke Products Online at: www. GlobalTestSupply.com [email protected] DPCTrack2 Users Manual 3.7.4.1 Downloading Tasks There are several methods to choose from to generate a list of Tags to download. Before initiating the download, connect the calibrator to the serial port and turn the calibrator on. Your calibrator information should display in the “Calibrator Info” section of the Upload/Download screen. If the information is not displayed, click the Refresh button. See Figure 3.2. Select the tags you wish to download and then select the “Initiate Download” button. After the download process is complete, perform the test with the calibrator. Figure 3.2 3.7.4.2 Uploading Results To Upload results to DPCTrack2, make sure the calibrator is connected and powered on, then select the “Initiate Upload” button. You will be required to authorize the results before they will be added to DPCTrack2. 3.7.5 Reports After uploading the test results, you can then view your results within DPCTrack2. To review your results, select the Reports menu in the Home Screen or view the Calibration record for the instrument by selecting the Calibration button and selecting the instrument you wish to preview. 3-6 Quality Fluke Products Online at: www. GlobalTestSupply.com [email protected] Chapter 4 Home Screen Title 4.1 4.2 4.2.1 4.2.1.1 4.2.1.1 4.2.1.2 4.2.1.3 4.2.1.4 4.2.1.5 4.2.1.6 4.2.1.7 4.2.1.8 4.2.2 4.2.2.1 4.2.2.2 4.2.2.3 4.2.2.4 4.2.2.5 4.2.2.6 4.2.2.7 4.2.3 4.2.4 4.2.5 4.2.6 4.3 4.4 4.5 Page Using the Home Screen .......................................................................... 4-3 Menu Toolbar ......................................................................................... 4-3 File Menu ........................................................................................... 4-3 User Logon..................................................................................... 4-4 User Logoff .................................................................................... 4-4 Change Password ........................................................................... 4-4 Change User ................................................................................... 4-4 User Administration ....................................................................... 4-4 Employee Records ......................................................................... 4-4 Group Records ............................................................................... 4-4 System Options .............................................................................. 4-4 Exit DPCTrack2 ............................................................................. 4-4 Tools Menu......................................................................................... 4-5 Backup Database............................................................................ 4-5 User Defined Variables .................................................................. 4-5 User Defined Labels....................................................................... 4-5 User Defined Lists.......................................................................... 4-5 Required Fields .............................................................................. 4-5 Change Company Name ................................................................ 4-5 Import DPCTrack Data .................................................................. 4-5 Records Menu..................................................................................... 4-8 Reports Menu ..................................................................................... 4-8 Lists Menu .......................................................................................... 4-8 Help Menu .......................................................................................... 4-8 Main Toolbar .......................................................................................... 4-9 Navigation Toolbar ................................................................................. 4-9 Work Area .............................................................................................. 4-9 4-1 Quality Fluke Products Online at: www. GlobalTestSupply.com [email protected] DPCTrack2 Users Manual 4-2 Quality Fluke Products Online at: www. GlobalTestSupply.com [email protected] Home Screen 4.1 Using the Home Screen 4 4.1 Using the Home Screen Figure 4.1 below, is the system’s HOME SCREEN. This is the main screen you work from when you are using DPCTrack2. It has the buttons and menu items used to activate every other branch and/or function of the system. Keep in mind that the buttons and menu items that are available to a user at any given time are strictly dependent upon the level of system access that they have been granted. An overview of this screen’s sections is provided below. However, for more detailed information on any of the items mentioned, please refer to the pages dedicated to those topics in the other sections of this manual. Figure 4.1 4.2 Menu Toolbar The menu toolbar contains six (6) menus, File, Tools, Records, Reports, Lists, and Help, each of which enables you to perform a number of different actions or functions related to the system. 4.2.1 File Menu Opening the File menu when the HOME SCREEN is displayed provides you with the following options: (See Figure 4.2 below) 4-3 Quality Fluke Products Online at: www. GlobalTestSupply.com [email protected] DPCTrack2 Users Manual 4.2.1.1 User Logon This option will be grayed out unless there is not a User logged on. If there is no User logged on this option and Exit DPCTrack2 will be the only accessible choices. Selecting this option with no User logged on, will bring up the DPCTrack2 logon screen. 4.2.1.1 User Logoff This will logoff the current user but will not close DPCTrack2 4.2.1.2 Change Password This will open a new screen requiring the current user to change their password 4.2.1.3 Change User This will logoff the current user but will not close DPCTrack2 4.2.1.4 User Administration This screen allows the user to add Employees, Copy an employee record, View a selected Group or Employee record, (This is covered in depth in Chapter 6) 4.2.1.5 Employee Records This screen allows the user to view, add or change employee records. (This is covered in depth in Chapter 6) 4.2.1.6 Group Records This screen allows the user to add/delete members for groups, the levels of access for each group and reminder options. (This is covered in depth in Chapter 6) 4.2.1.7 System Options This screen allows the user to change or modify options that are system wide. (This is covered in depth in Chapter 7) 4.2.1.8 Exit DPCTrack2 This will logoff the current user and close DPCTrack2 Figure 4.2 Figure 4.3 4-4 Quality Fluke Products Online at: www. GlobalTestSupply.com [email protected] Home Screen 4.2 Menu Toolbar 4 4.2.2 Tools Menu The Tools menu (See Figure 4.3 above) provides a drop down with the following: 4.2.2.1 Backup Database This is a shortcut to the Backup utility (See Chapter 25) 4.2.2.2 User Defined Variables This screen allows users to create, modify and delete fields that will be displayed in the appropriate User Defined tabs on the Item screens (See Chapter 10) 4.2.2.3 User Defined Labels This is a shortcut to the User Labels Definition screen where users can view and edit Labels (See Chapter 8) 4.2.2.4 User Defined Lists This screen allows the user to add, modify and delete User Defined Lists (See Chapter 10) 4.2.2.5 Required Fields This screen allows you to set Fields that must be filled in before a Record can be Approved or a Calibration can be Finalized. 4.2.2.6 Change Company Name This screen allows users that are in the “ADMIN” Group to change the Company name. 4.2.2.7 Import DPCTrack Data This will allow users to Import DPC/Track data (Instruments, History and Procedures) into the database. 4-5 Quality Fluke Products Online at: www. GlobalTestSupply.com [email protected] DPCTrack2 Users Manual Figure 4.4 4.2.2.7.1 File Location Before you start the Import process, it is recommended that you perform a Backup of your DPCTrack2 database, (refer to Section 4.2.2.1 above) and an Export of your Instruments, History & Procedures in DPC/Track to make sure that you have the most up to date records. Refer to the DPC/Track User Manual for more information. If you know the location for the files you can type the path or select the “Find” button. Select the following files: History – hist_out.asc Instrument – inst_out.asc Procedure – proc_out.asc You may also change the location of the Log file, (it will default to the same location that the executable resides.) 4-6 Quality Fluke Products Online at: www. GlobalTestSupply.com [email protected] Home Screen 4.2 Menu Toolbar 4 4.2.2.7.2 Field Mapping The “Field Mapping” section allows you to set the “Status”. The dropdown will contain a list of existing Statuses in the system. The screen allows you to map the Location, Responsible & Area fields of DPC/Track to new or different fields in DPCTrack2. The “Frequency Mapping” section allows you to attempt to map your frequencies from DPC/Track format to DPCTrack2 format. 4.2.2.7.3 Validate Files The “Validate Files” button will check that the files have the right extension. 4.2.2.7.4 Initiate Import After you have mapped all areas and validated the file extensions, you can then select the “Initiate Import” button. You will receive a confirm message first. The “Field Mapping” section will be replaced with a “Results” section. See figure 4.5 below. Figure 4.5 4-7 Quality Fluke Products Online at: www. GlobalTestSupply.com [email protected] DPCTrack2 Users Manual 4.2.3 Records Menu The Records menu provides you with access to the main screens that also may be accessed through the Records Toolbar. See Figure 4.6 below. Figure 4.6 Figure 4.7 Figure 4.8 Figure 4.9 4.2.4 Reports Menu The Reports menu (See Figure 4.7) provides you with access to all areas of the program’s Reporting System, including all standard reports and the REPORT MAINTENANCE SCREEN, which is used to add new reports to the system. The Set Report Directory allows the user to change which directory to retrieve the reports from (See Chapter 23). 4.2.5 Lists Menu The Lists Menu (See Figure 4.8) allows the user to add, modify and delete the user defined lists. (See Chapter 10) The Refresh Reminders tab is a shortcut to the reminders screen and will refresh the reminder screen (See Chapter 11) 4.2.6 Help Menu The Help menu activates the program’s online help system or displays the "About" box, which will give you specific details regarding the DPCTrack2 system you are working with. (Note: Online Help can also be accessed by pressing the “F1” key on your keyboard.) See Figure 4.9 4-8 Quality Fluke Products Online at: www. GlobalTestSupply.com [email protected] Home Screen 4.3 Main Toolbar 4 4.3 Main Toolbar The Main Toolbar, found at the top of your HOME SCREEN contains the company. This toolbar also contains two (2) action buttons, which provide quick access to View Reminders or the DPCTrack Explorer. • View Reminders – Selecting this button will open the Reminders screen. The information provided, depends on your group associations and the reminder options selected for each group. For more information on Reminders see Chapter 11. • DPCTrack Explorer - The DPCTrack Explorer adds a pane to the side of the HOME SCREEN that enables you to quickly view all of the company’s records, as well as their relationships to one another. See Chapter 22 for more on the DPCTrack Explorer. 4.4 Navigation Toolbar The Record Toolbar, found at the left of your HOME SCREEN, contains eight (8) buttons, which provide quick access to the various screens in the system. Each button gives you access to one of the following screens: • Company Record: For a more detailed explanation see Chapter 9 • Master Instrument Record: For a more detailed explanation see Chapter 15 • Loop Record: For a more detailed explanation see Chapter 16 • Equipment Record: For a more detailed explanation see Chapter 14 • Test Instrument Record: For a more detailed explanation see Chapter 17 • Calibrations: For a more detailed explanation see Chapter 19 • Document Records: For a more detailed explanation see Chapter 13 • Upload/Download: For a more detailed explanation see Chapter 18 • Logged Data: For a more detailed explanation see Chapter 24 Right-clicking anywhere on this toolbar allows you to Show or Hide the button captions to allow more room in the Work Area, and also gives you access to change the “Skin” or appearance of the application. See Chapter 7 for more information on options involved in setting application skins. 4.5 Work Area This is the large section of the HOME SCREEN with the DPCTrack2 background (see Figure 4.1 on the first page of this section). When you invoke any of the screens by clicking the appropriate speed button, it will be displayed in this area. Since DPCTrack2 is a Windows® based program, you can open more than one screen at a time and minimize or maximize them according to your needs. This part of the HOME SCREEN also displays the name and User ID of the program’s current user. You may change the background or logo image on your DPCTrack2 clients by replacing the “background.jpg” located in your DPCTrack2 installation directory. 4-9 Quality Fluke Products Online at: www. GlobalTestSupply.com [email protected] DPCTrack2 Users Manual 4-10 Quality Fluke Products Online at: www. GlobalTestSupply.com [email protected] Chapter 5 Overview of Standard Screens Title 5.1 5.2 5.2.1 5.2.2 5.2.3 5.2.4 5.2.5 5.2.6 5.2.7 5.2.8 5.2.9 5.2.10 5.2.11 5.3 5.4 5.5 5.6 Page Standard Screens..................................................................................... 5-3 Overview of Buttons............................................................................... 5-4 Add New Record ................................................................................ 5-4 Save Record........................................................................................ 5-4 Copy Current Record.......................................................................... 5-4 Find Record ........................................................................................ 5-4 List Records........................................................................................ 5-4 Cancel Changes .................................................................................. 5-4 Print Master Report ............................................................................ 5-4 Preview Master Report ....................................................................... 5-4 Show Work History............................................................................ 5-4 Close Form ......................................................................................... 5-4 Help .................................................................................................... 5-4 Data Fields/Lists Menu........................................................................... 5-4 File Menu................................................................................................ 5-5 Edit Menu ............................................................................................... 5-5 Reports Menu.......................................................................................... 5-5 5-1 Quality Fluke Products Online at: www. GlobalTestSupply.com [email protected] DPCTrack2 Users Manual 5-2 Quality Fluke Products Online at: www. GlobalTestSupply.com [email protected] Overview of Standard Screens 5.1 Standard Screens 5 5.1 Standard Screens Each of the eight (8) screens available from the HOME SCREEN’S Navigation Toolbar has similar features. This enables you to quickly become familiar with DPCTrack2. With a single click of the mouse, you can easily move in and out of different records, preview reports, print reports, save records, add new ones and access the program’s help system. The screen shown below is the MASTER INSTRUMENT RECORD. It is typical of every other standard screen. This screen’s sub-category Toolbar contains fifteen (15) different action buttons, although some screens in the program may not contain all of these if they are not applicable. In addition, the Toolbar also has an Advanced Query Name field with buttons providing quick access to the ADVANCED QUERY SCREEN and queries that have been saved in the system. You may view each button’s function by slowly moving the mouse along the Toolbar. As you do this, each button’s function will be displayed in a yellow hint box. To use an action button, click it with your mouse. Each button and its function are illustrated in Figure 5.1 shown below. The Master Instrument Record screen is used for this demonstration. All screens that have Listing and/or Querying capabilities will have a Status Bar added to the form to display various information about the selection and positioning in the List. Screens with List capability will include a Status Bar item with a ticker showing record N of M where M is the number of records in the current list and N is the current records position. Screens with Advanced Query capabilities will include a Status Bar item with the name of the current Query. If the current Query is not named then the Selection Criteria will be displayed. Figure 5.1 5-3 Quality Fluke Products Online at: www. GlobalTestSupply.com [email protected] DPCTrack2 Users Manual 5.2 Overview of Buttons 5.2.1 Add New Record This button will create a new Record. If you have made any changes, you will be prompted to save your work. 5.2.2 Save Record This button will Save any changes you have made to the record. 5.2.3 Copy Current Record This button will create a Copy of the current record. All fields will be copied except: ID, Serial Number, First & Last Cal dates, Approved by, Notes and any User Defined Signatures 5.2.4 Find Record This button will invoke a new screen where the user can find a record by either entering the ID or Serial Number. The user can either enter the full value or a partial value. If a partial value is entered, a list of possible matches will be displayed and the Current Query will reflect the value entered into the search. 5.2.5 List Records This button will list all master records for that item type. Right clicking on the list will give the user options to export or print. 5.2.6 Cancel Changes This button will Cancel all changes made to the record since the last save. 5.2.7 Print Master Report This button will print the master report. 5.2.8 Preview Master Report This button will create a preview of the master report. 5.2.9 Show Work History This button will open a new screen that will display all the work history (if the record has no history, the screen will not open). Double clicking on a listed record will open that record. 5.2.10 Close Form This button will close the current screen. If you have unsaved changes, you will be prompted to save them. 5.2.11 Help This button will open the Help screen. 5.3 Data Fields/Lists Menu If a data field has a drop-down list located to its right, then the selections available for that field must be chosen from that list. All of the drop-down lists may be populated by entering information for those fields in the Lists menu at the top of the screen. Throughout the program, if a field has a New button next to it, you may add new entries to its drop-down list just by clicking the button with your mouse. Data fields that do not have a corresponding drop-down list are text fields into which anything may be typed. 5-4 Quality Fluke Products Online at: www. GlobalTestSupply.com [email protected] Overview of Standard Screens 5.4 File Menu 5 Note DPCTrack2 offers a “quick-typing” feature that enables you to insert a selection from a drop-down list by typing the first few letters. Using this feature is a convenient way to save time when entering data. 5.4 File Menu When a standard screen is open, the File menu changes to offer you similar options to that of the sub-category Toolbar shown in Figure 5.1 on the previous page. For example, from the File menu on the Instrument screen you may select from the following choices: “New Record”, “Copy Record”, “Save Record”, “Find Record”, “List Records”, “Show Work History”, “Delete Record”, “Close Form” and “Exit DPCTrack2. (Depending on the user’s access level, some options will be grayed out and not accessible) 5.5 Edit Menu When a standard screen is open, the Edit menu provides you with “Cut”, “Copy” and “Paste” functions to be used either within the same record or between records. In addition, this menu gives you the ability to modify the field labels on the particular screen that is open (see Chapter 8 for details regarding “User Defined Labels”). There is an option to “Check Requirements”, this will show any fields that still need to be populated before the record can be Approved. This menu also contains two commands titled “Insert Before Current Test Point” and “Delete Current Test Point”. Both of these are for use within the Calibration Points tab of any screen that allows for entry of calibration specifications. These will be discussed in more detail later in this manual. Note: If the item has no calibration points these selections will be grayed out and not available. The menu contains commands titled “Copy Current Test Point Group” which is available only if the current record is currently displaying a test point group in the Calibration Points tab. Finally, the “Load Test Point Group From Item” command gives another method of adding a test point group. These final four items will be discussed in more detail later in this manual. 5.6 Reports Menu When a standard screen is open, the Reports menu provides you with the ability to print and/or preview several different reports applicable to the particular record you are currently working in. See Chapter 24 for more information. 5-5 Quality Fluke Products Online at: www. GlobalTestSupply.com [email protected] DPCTrack2 Users Manual 5-6 Quality Fluke Products Online at: www. GlobalTestSupply.com [email protected] Chapter 6 User Administration and Levels of Access Title Page 6.1 Employee Record Screen........................................................................ 6-3 6.1.1 General Info Tab................................................................................. 6-3 6.1.1.1 Password Activation/Expiry........................................................... 6-4 6.1.1.2 Additional Info ............................................................................... 6-4 6.1.1.3 Administration Privileges............................................................... 6-4 6.1.2 Group Membership Tab ..................................................................... 6-5 6.1.3 Force Log Off User ............................................................................ 6-5 6.2 User Groups Screen ................................................................................ 6-5 6.2.1 Group Type......................................................................................... 6-5 6.2.2 Members Tab...................................................................................... 6-6 6.2.3 Access Levels Tab.............................................................................. 6-6 6.2.3.1 Customized Record Access............................................................ 6-6 6.2.4 Reminder Options Tab ....................................................................... 6-7 6.3 User Administration Screen.................................................................... 6-8 6-1 Quality Fluke Products Online at: www. GlobalTestSupply.com [email protected] DPCTrack2 Users Manual 6-2 Quality Fluke Products Online at: www. GlobalTestSupply.com [email protected] User Administration and Levels of Access 6.1 Employee Record Screen 6 6.1 Employee Record Screen DPCTrack2 is equipped to handle multiple users. The EMPLOYEE RECORD screen is accessed from the File menu at the top left corner of the Home Screen. This screen (Figure 6.1 below) is used to create employee records for users of the system. Once an employee record has been established, it may then be assigned to one or more User Groups. Access to the database is controlled at the Group level. Therefore, a user’s level of access is dependent upon the User Group(s) that he/she has been assigned to. There is no limit to the number of employee records that may be added to the system Note DPCTrack2 does not allow for the addition of User Groups. Figure 6.1 6.1.1 General Info Tab This tab is used to record general information about the employee. The Name and User ID are required fields. Every individual using the system must have their own unique ID since it is required as part of the logon procedure. A user’s ID may be any combination of letters or numbers. The user’s full name should also be entered in the appropriate field, as it is used in tracking modification history and approvals throughout the system. There is a limit of 50 characters for each of these fields. When a new employee record is added, the person entering the record must assign the user a password that the user will be forced to change when they log on for the first time. The initial password must be entered into both the New password and New password confirmation fields on this screen. There is a limit of 20 characters for each of these fields. 6-3 Quality Fluke Products Online at: www. GlobalTestSupply.com [email protected] DPCTrack2 Users Manual 6.1.1.1 Password Activation/Expiry The Activation Date is the date a user’s current password became effective and the Password Expires On field shows the date that the user’s password will expire. This date is determined by the system in accordance with the value entered into the field for Number Of Days Before User’s Password Expires in the SYSTEM OPTIONS screen. (See Chapter 7) However, the password expiration date may be manually set if it should differ from the default expiration date. When a user’s password has expired, they will be informed of this the next time they log onto the system, at which time they will be prompted to create a new password. You can force a user to change their password at any time by left-clicking the Reset Password button on their employee record. Performing this action will result in the two password fields appearing on the screen again so that an, initial, one-time use, logon password can be assigned. Left-clicking the Disable/Enable User button allows you to disable or enable users at any time. Disabling a user restricts them from logging on to the system. The system may also disable a user if they have exceeded the allowed number of unsuccessful logons. (The # of Logons Before Disabling value is set in the SYSTEM OPTIONS screen, Chapter 7) If a user’s ID has been disabled then the button on this screen will read Enable User. If a user’s ID is currently enabled, the button will read Disable User. 6.1.1.2 Additional Info The Title, Phone, Fax and Email Address fields are available so that you may record additional information about the employee. There is a limit of 50 characters for each of these fields. They are not required fields, but this information can be useful when working in other areas of the program. In addition, you may associate an employee with a vendor by making a selection from the Associated Vendor drop-down list. The vendor names that appear on this list will be all vendors that have already been added to the system through the “Vendors” option on the Lists menu. See Chapter 12 for more information. 6.1.1.3 Administration Privileges Finally, users of DPCTrack2 can be considered “System Administrators”. Any Employee that is a member of the ADMIN Group will have System Administrators rights. 6-4 Quality Fluke Products Online at: www. GlobalTestSupply.com [email protected] User Administration and Levels of Access 6.2 User Groups Screen 6 6.1.2 Group Membership Tab This tab (shown in Figure 6.2) is used to assign the employee to one or more user groups that have already been established. You may move groups back and forth between the two boxes by using the center arrow buttons. All of the groups that currently exist in the system will be listed by their group ID and description in the Available Groups box. You may assign the employee to a group, by highlighting the desired group(s) and clicking the Move Selected button. This will move the selected group(s) to the Groups This Person Is A Member Of box, creating the assignment. Figure 6.2 6.1.3 Force Log Off User There may be instances when you will need to force another user’s ID off the system. This can be accomplished by performing the following actions. (Keep in mind however, that you may only log off another user if you are in the ADMIN Group.) While in the Home Screen, select “Employee Records” from File menu. Once you are in the EMPLOYEE RECORD screen, open the record of the employee whose ID needs to be logged off and select “Force Log Off User” from the File menu. A message will appear on the screen confirming that the user has been successfully logged off the system. 6.2 User Groups Screen Access to DPCTrack2 is controlled via User Groups which individuals are assigned to. The USER GROUPS screen may be accessed by selecting “Group Record” from the File menu while the Home Screen is open. 6.2.1 Group Type User groups must be one of two types- “User Access” or “Technician”. If you are viewing the Technician Group, the Access Levels and Reminder Options tabs disappear from the screen, thus limiting you to only selecting members for the group. Assigning an employee to a “Technician” group does not give them any access to DPCTrack2. It 6-5 Quality Fluke Products Online at: www. GlobalTestSupply.com [email protected] DPCTrack2 Users Manual means that their name will appear on drop-down lists for fields like Who Calibrated and Responsible Technician found on various screens throughout the program. For an employee to have the ability to log onto DPCTrack2, they must also be assigned to at least one “User Access” group. If you are viewing one of the User Access Groups, the Access Levels and Reminder Options tabs will remain on the screen, enabling you to variably set the group’s access to records, system options, etc. All employees who have been assigned to a “User Access” group will have access to the program. 6.2.2 Members Tab On the Members tab on the USER GROUPS screen you will find the names of all employees who have records in the system and will be listed in the Available Users box. You may move employee names back and forth between the two boxes by using the center arrow buttons. For example, to assign employees to the group, highlight them with your mouse and click the Move Selected button (>). To assign all employees at once, click the Move All button (>>). 6.2.3 Access Levels Tab This tab (shown in Figure 6.4) is used to configure the user group’s level of access to many different system functions, options and record types. Check marks may be placed in the boxes for those items that the group should have access to. When a user’s group is not allowed access to particular areas of the program, then all buttons, menu items and/or screen items directly associated with those areas will be grayed out and inaccessible to the users who belong to that group. 6.2.3.1 Customized Record Access The Customized Record Access section of the screen contains drop-down lists for every record type in the program. See figure 6.4. You may determine the group’s access to all record types by making selections from the drop-down lists. • No Access- Means that the entire screen will be inaccessible to the users. • Read Only- Will allow users to view the data, but they will not be able to manipulate it in any way. • Add/Modify- Will allow the group’s members to add and modify records of that type. • Delete- Will allow them to add, modify and delete records of that type. • Modify Finalized- Will allow the user to modify calibration records that have been finalized. • Delete Finalized- Will allow the user to delete calibration records that have been finalized. 6-6 Quality Fluke Products Online at: www. GlobalTestSupply.com [email protected] User Administration and Levels of Access 6.2 User Groups Screen 6 Figure 6.4 6.2.4 Reminder Options Tab This tab (shown in Figure 6.5) is used to determine when and what reminders will appear on the screen when a member of the current group is logged onto the system. Place check marks in the boxes that you which to receive reminders for. You can configure the REMINDERS screen to automatically appear At Startup. To select this option, place a check mark in the box. Figure 6.5 6-7 Quality Fluke Products Online at: www. GlobalTestSupply.com [email protected] DPCTrack2 Users Manual DPCTrack2 also gives you the ability to view reminders for calibrations that are coming due within a specified time period. To turn on this feature place a check in the box and select an amount of days and save. 6.3 User Administration Screen The USER ADMINISTRATION screen (Figure 6.6) may be used as a quick-reference screen for all employee and group records. The File menu and sub-category toolbar in the USER ADMINISTRATION screen provide you with several different options and buttons regarding employee and group records. The “Add New Employee” option will open the EMPLOYEE RECORD screen, allowing you to quickly enter new records. If you would like to copy an employee record, highlight it with your mouse and select “Copy Employee” from the File menu or click the Copy Employee button. You may view any of the employee or group records listed, by highlighting them and selecting “View User/Group Record”. Finally, you may “List All Logged On Users” and then “Logoff Selected User”. Highlight the user, then select this menu option or click the Logoff Selected User button to log the user off the system. Figure 6.6 6-8 Quality Fluke Products Online at: www. GlobalTestSupply.com [email protected] Chapter 7 System Options Title Page 7.1 System Options ....................................................................................... 7-3 7.1.1 Database Name................................................................................... 7-3 7.2 System Settings Tab................................................................................ 7-4 7.2 System Settings Tab................................................................................ 7-4 7.2.1 Last Date The System Database Was Backed Up .............................. 7-4 7.2.2 Number Of Days Between Backup Warnings.................................... 7-4 7.2.3 Number Of Days Before User’s Password Expires............................ 7-4 7.2.4 Number of Logons Before Disabling (“0” = Never Disable) ............. 7-4 7.2.5 Minimum Password Length ............................................................... 7-4 7.2.6 Number Of Passwords To Remember ................................................ 7-4 7.2.7 Minimum Password Age To Allow Change (Days)........................... 7-5 7.2.8 Number Of Minutes Before Time-Out ............................................... 7-5 7.2.9 System Date Format ........................................................................... 7-5 7.2.10 System Decimal Number Format ....................................................... 7-5 7.2.11 Default Skin........................................................................................ 7-5 7.2.12 Allow User Skin Override .................................................................. 7-5 7.2.1.13 Explorer Display Format................................................................ 7-5 7.2.14 Load DPCTrack Explorer on Startup ............................................. 7-6 7.2.15 Warn On Overdue Test Instruments During Cal Entry ...................... 7-6 7-1 Quality Fluke Products Online at: www. GlobalTestSupply.com [email protected] DPCTrack2 Users Manual 7-2 Quality Fluke Products Online at: www. GlobalTestSupply.com [email protected] System Options 7.1 System Options 7 7.1 System Options The SYSTEM OPTIONS screen is accessed from the File menu at the top left corner of the Home Screen. When performing the initial setup of DPCTrack2, it is recommended that you begin by setting the “System Settings”. The SYSTEM OPTIONS screen is used to establish various settings that will affect the entire system as a whole. Only users whose groups have been given access to “System Options” can modify these settings. Choosing the “System Options” command from the File menu, located on the top left corner of your HOME SCREEN will invoke the SYSTEM OPTIONS screen. See Figure 7.1 below. Figure 7.1 7.1.1 Database Name This field is used to record the name of your DPCTrack2 database. The default database name is Walltrack. 7-3 Quality Fluke Products Online at: www. GlobalTestSupply.com [email protected] DPCTrack2 Users Manual 7.2 System Settings Tab This page (Figure 7.1) is used to establish many different settings, all of which affect the entire system as a whole. 7.2.1 Last Date The System Database Was Backed Up This field is used to record the last date that your DPCTrack2 database was backed up. While running an Access version of DPCTrack2, it is very important for your program administrator to backup your database files on a regular basis. This is a way of preventing any loss of information in the case of a system or machine malfunction. The date shown in this field is automatically updated every time a backup is performed. For more information about how to backup your database, see Chapter 25. 7.2.2 Number Of Days Between Backup Warnings This field allows you to enter the number of days you want to pass before you get a reminder to backup your database files. Any numeric value may be entered into this field up to 9,999 days. The system uses the date shown in the field previously mentioned, to calculate when the reminder should appear on the screen. When it comes time for the backup reminder to appear, you will see it as you try to exit the system. At this time you may then proceed with the backup and the date shown in the previous field will be updated to the current date. If, at this time, you inform the system that the files have already been backed up, then you will be asked if you want the backup date reset. Otherwise, you may choose to ignore the reminder, in which case it will continue to come up every time you exit the system or until the backup date is manually reset. If the number of days is set to 0, then you will not be reminded. 7.2.3 Number Of Days Before User’s Password Expires This field is used to set the amount of days to pass before a user’s password expires. Any numeric value may be entered into this field up to 9,999 days. When a user’s password has expired, he/she is instructed by the system to enter a new one at the time of logon. (Note: The date shown in the Expiration Date field on the Employee Record screen will override this setting. For example, if you have set the Number Of Days Before User’s Password Expires field to “30”, but the Expiration Date on a user’s employee record is not until 6 months from now, then they will not be forced to change their password every 30 days. The user’s password will not expire until the Expiration Date on their employee record is reached.) 7.2.4 Number of Logons Before Disabling (“0” = Never Disable) This field is used to set the number of unsuccessful logon attempts that are allowed before a user’s ID is disabled. When a user is disabled, only another user whose group has access to employee records can re-enable them. Any numeric value may be entered into this field with a maximum of 99. Entering “0” will prevent the system from ever disabling a user, despite the number of unsuccessful tries. Refer to Chapter 6 for more details about unsuccessful logon tries and re-enabling users if the system has disabled them. 7.2.5 Minimum Password Length This field is used to set the minimum length that a user’s password must be. Any numeric value may be entered into this field with a maximum character of 20. Once a value is established, if a user attempts to enter a new password that does not contain at least the required amount of characters, then it will not be accepted and the user will be forced to enter a new password that does meet the minimum character requirement. 7.2.6 Number Of Passwords To Remember This field is used to set the number of passwords that the system will remember for each user ID in the system. Any numeric value may be entered into this field with a maximum 7-4 Quality Fluke Products Online at: www. GlobalTestSupply.com [email protected] System Options 7.2 System Settings Tab 7 of 99. Entering a value greater than zero prevents users from continually using the same password over and over. The higher the number used, the greater your system security will be. For example, if you enter “1”, then when a user’s password expires, the system will remember the last password the individual used, and force them to enter a different password before they can use their original one again. 7.2.7 Minimum Password Age To Allow Change (Days) Depending upon the setup of the system, users may be forced to change their password when it expires. However, DPCTrack2 also allows for a user to manually change their password at their discretion by typing a new password into the New Password and New password confirmation fields during a logon. Therefore, this system option is used to establish the minimum age in days that a user’s password must be before they may manually change it. Any numeric value may be entered into this field up to a value of 999, so once a value has been set, users will be restricted from changing their password unless it has met the minimum age requirement established. Note The Number of Days Before User’s Password Expires must be greater than Minimum Password Age. 7.2.8 Number Of Minutes Before Time-Out This field is used to set the number of minutes that are allowed to pass before a user’s workstation times-out due to inactivity. Any numeric value may be entered into this field up to a value of 99,999 minutes. When the workstation times-out, a logon screen titled “Session Locked” will appear. You must then enter your password in order to unlock the program and continue working. Any unsaved data or records that you were working with prior to the session time-out will be available after logging back onto the program. 7.2.9 System Date Format This field is used to set the system date format that you would like to see throughout the program. You may select one of the three options that are available on the field’s dropdown list. Once you have made your selection and saved the setting, the data format selected will be seen in every area of the program where a date field exists. 7.2.10 System Decimal Number Format This field is used to set the decimal number format that you would like to see throughout the program. You may select one of the two options that are available on the field’s dropdown list. Once you have made your selection and saved the setting, the decimal number format selected will be seen in every area of the program where a number field exists. 7.2.11 Default Skin This field is used to define the default skin that DPCTrack2 will use the first time a user logs in. 7.2.12 Allow User Skin Override This field is used to control whether or not users have the option of setting the application skin. When this option is turned off the Skins submenu will not appear when the user right-clicks on the Record Toolbar. 7.2.1.13 Explorer Display Format This setting allows you to define how the DPCTrack Explorer will be displayed: • Item ID • Item ID : Description • Description : Item ID 7-5 Quality Fluke Products Online at: www. GlobalTestSupply.com [email protected] DPCTrack2 Users Manual 7.2.14 Load DPCTrack Explorer on Startup If this is checked, DPCTrack Explorer will load during startup. If this option is unchecked DPC/Track Explorer will not load on startup, allowing for the system to load quicker. The User will still be able to select the DPCTrack Explorer button and navigate as usual. Customers with large databases may wish to check this option, so DPCTrack2 will load quicker. 7.2.15 Warn On Overdue Test Instruments During Cal Entry The Warnings section of this tab contains one check box labeled, Warn On Overdue Test Instruments during Cal Entry. Marking this box will instruct the system to warn you when you have assigned a test standard to a calibration record that was overdue for calibration at the time. This setting will affect the entire system as a whole and is not modifiable at any other level in the system. 7-6 Quality Fluke Products Online at: www. GlobalTestSupply.com [email protected] Chapter 8 User Defined Labels Title 8.1 8.2 8.3 Page User Defined Labels ............................................................................... 8-3 Column Descriptions .............................................................................. 8-3 Modifying Field Labels .......................................................................... 8-4 8-1 Quality Fluke Products Online at: www. GlobalTestSupply.com [email protected] DPCTrack2 Users Manual 8-2 Quality Fluke Products Online at: www. GlobalTestSupply.com [email protected] User Defined Labels 8.1 User Defined Labels 8 8.1 User Defined Labels The USER DEFINED LABELS DEFINITION screen can be accessed by selecting the “User Defined Labels” option on the Tools menu located on the top left of your Home Screen. DPCTrack2 gives you the ability to customize the program in many ways. One of the easiest ways to configure your system to meet your needs is to change field label names. For example, you may prefer to call the Instrument ID field “Asset Number” or the Current Company field “Current Department”. This screen (Figure 8.1) has six different columns, while each row is dedicated to one individual field in the program. Figure 8.1 8.2 Column Descriptions The DB Field Name column shows the fields’ actual database names. The Table Name column shows all of the areas of the program where the fields exist. The Default Label column shows the label that each field in the program defaulted to upon installation. The Default Short Label column shows the label that certain fields appearing on reports and in grids throughout the program defaulted to upon installation. These first four columns are locked and cannot be modified. “Short Labels” are those that will appear in grids throughout the program on reports where there is limited room. In the case of standard reports, all user defined field label names are automatically transferred to the program’s standard reports. Therefore, certain fields require a shorter label to be declared because there is limited room for them on the reports. These fields are those that often appear in reports’ calibration specification sections. For all of these types of fields, a short label must be established. Any fields that do not have a Default Short Label do not require that one be entered. 8-3 Quality Fluke Products Online at: www. GlobalTestSupply.com [email protected] DPCTrack2 Users Manual 8.3 Modifying Field Labels The Current Label and Short Label columns, which are the only ones that contain modifiable text, show the current labels of all fields both in the program and on reports. These are the columns actually used to make changes. To modify any field label, page down to the field whose label you want to change, delete the current name, type in the new label name and tab off the cell. To save your changes, click the Save button on the screen’s toolbar. You are limited to 50 characters on the Current Label, and 20 on the Short Label. The USER LABELS DEFINITION screen may also be accessed while working in many of the individual screens in the program. Select “Labels” from the Edit menu while the screen is open. This is often a more convenient way to modify field label names because the only fields listed in the USER LABELS DEFINITION screen are those that exist in the currently opened screen. Selecting “User Defined Labels” from the Tools menu from the Home Screen brings up all of the fields in the program at once. Note Changing a label through an individual screen will also change the label in all areas where the label exists. Finally, the grid in the USER LABELS DEFINITION screen may be exported at any time by right-clicking anywhere on it with your mouse. This action will invoke an option box providing you with the ability to save the grid to an Excel spreadsheet. 8-4 Quality Fluke Products Online at: www. GlobalTestSupply.com [email protected] Chapter 9 Company Record Screen Title Page 9.1 Company Records................................................................................... 9-3 9.2 Tabbed Notebook Section....................................................................... 9-3 9.2.1 General Info Tab................................................................................. 9-3 9.2.1.1 Address Lines 1 & 2, City, State, Zip & Country .......................... 9-3 9.2.1.2 Contact, Phone & Email................................................................. 9-3 9.2.2 Other Addresses Tab .......................................................................... 9-4 9.2.3 Options Tab ........................................................................................ 9-4 9.2.3.1 Force Calibration Failure ............................................................... 9-4 9.2.3.2 Users Cannot Finalize Calibrations They Entered ......................... 9-4 9.2.3.3 Prevent Duplicate IDs Across All Record Types........................... 9-4 9.2.3.4 [Allow, Warn, or Restrict] If Calibrated Item Is Not Approved .... 9-5 9.2.3.5 Allow The User To Finalize Incomplete Calibrations ................... 9-5 9.2.3.6 Prevent Accuracy Modifications During Calibration..................... 9-5 9.2.3.7 Require Reason For Failure On A Failed Calibration.................... 9-5 9.2.3.8 Only Show Active Test Instruments .............................................. 9-5 9.2.3.9 [Allow, Warn, or Restrict] On Use Of An Unapproved Test Instrument ............................................................................ 9-5 9.2.3.10 Font Colors..................................................................................... 9-5 9.2.3.11 Default Values................................................................................ 9-6 9.2.3.12 Statuses........................................................................................... 9-6 9.2.4 Default Reports Tab ........................................................................... 9-7 9.3 Change Company Name ......................................................................... 9-7 9-1 Quality Fluke Products Online at: www. GlobalTestSupply.com [email protected] DPCTrack2 Users Manual 9-2 Quality Fluke Products Online at: www. GlobalTestSupply.com [email protected] Company Record Screen 9.1 Company Records 9 9.1 Company Records DPCTrack2 has the ability to store and track data for one company in the system. Your company’s record must be established before you can enter any device information. You will be required to enter a Company name during installation. To view or modify an existing company record, select the speed button labeled “Company” from the Record Toolbar, this action will invoke the COMPANY RECORD screen shown in Figure 9.1 below. 9.2 Tabbed Notebook Section The tabbed notebook section of the COMPANY RECORD screen contains four (4) different sub-screens or “pages” available for data entry. These pages are logically grouped on the tabs of the notebook. Each page and its associated fields are described below. To open a page, click its tab with your mouse. Figure 9.1 9.2.1 General Info Tab This tab page (Figure 9.1) may be used to enter all of the general information about a company. In the fields provided you may type the company’s full name, address, phone number, contact person and e-mail address. 9.2.1.1 Address Lines 1 & 2, City, State, Zip & Country These are alpha/numeric fields, each of these fields are limited to 255 characters. 9.2.1.2 Contact, Phone & Email These are alpha/numeric fields, each of these fields are limited to 50 characters. 9-3 Quality Fluke Products Online at: www. GlobalTestSupply.com [email protected] DPCTrack2 Users Manual 9.2.2 Other Addresses Tab This tab page is used to document additional addresses for the company such as Shipping Address and Billing Address. For your convenience, this screen contains “Copy” buttons that may be used when all or some of the company’s addresses are the same. To copy addresses from another section, click the appropriate button with your mouse. 9.2.3 Options Tab This tab (Figure 9.2) contains some important data entry options that will affect master records. Figure 9.2 9.2.3.1 Force Calibration Failure This is a setting that when selected will not allow a failed calibration (one with at least one as-left value that is outside of the acceptable limits) to be saved as a passed calibration. 9.2.3.2 Users Cannot Finalize Calibrations They Entered This is a setting that when selected restricts users from finalizing calibration records that they entered into the system requiring another user to logon and finalize the calibration. 9.2.3.3 Prevent Duplicate IDs Across All Record Types This option, if checked, will prevent the duplication of an ID across different record types. So, if there is an Instrument ID “123” you will not be able enter a Loop ID of “123”. This option is not allowed if there are already duplicate IDs existing in the database. 9-4 Quality Fluke Products Online at: www. GlobalTestSupply.com [email protected] Company Record Screen 9.2 Tabbed Notebook Section 9 9.2.3.4 [Allow, Warn, or Restrict] If Calibrated Item Is Not Approved This setting is used to manage the entry of calibration records for approved and unapproved item Master Records (Master Records for Instruments, Loops and Test Instruments). Selecting “Allow” for this field, will enable users to enter calibration records for items whose Master Records have not been approved yet, while selecting “Restrict” for this field will keep users from entering calibration records for items whose Master Records are not approved yet. Finally, if “Warn” is selected, then when a user attempts to enter a calibration record for an unapproved record, a message will appear on the screen warning them of this. 9.2.3.5 Allow The User To Finalize Incomplete Calibrations This is a setting that when selected will allow users to finalize calibration records that are “Incomplete” (have the Incomplete radio button checked). If this option is not selected, then users will be restricted from finalizing incomplete calibrations. 9.2.3.6 Prevent Accuracy Modifications During Calibration This is a setting that when selected will not allow you to modify any accuracy information for an item such as its Stated Accuracy, Resolution, etc. when you enter a calibration record for it. 9.2.3.7 Require Reason For Failure On A Failed Calibration This is an option that when selected will not allow you to save a failed calibration record unless an entry has been made in the Reason For Failure field. 9.2.3.8 Only Show Active Test Instruments This is an option that when selected will restrict the display of Test Instruments in the CALIBRATION screen to only those Test Instruments that are currently assigned an active status (on whose record has the Indicates an Active Status box marked). All Test Instruments in the system for the company that are not assigned an active status will not be displayed on the screen and therefore will not be available for assignment to a calibration record. 9.2.3.9 [Allow, Warn, or Restrict] On Use Of An Unapproved Test Instrument This is a setting that is used to manage the selection of approved and unapproved Test Instruments in the CALIBRATION screen. Selecting “Allow” for this field will enable users to assign unapproved Test Instruments to calibration records, while selecting “Restrict” for this field will prevent users from selecting unapproved Test Instruments. In fact, if “Restrict” is selected than any unapproved Test Instruments entered for the current company will not even be listed in the Available Test Instruments box, regardless of their current status. Finally, if “Warn” is selected, than when a user attempts to select an unapproved Test Instrument to be moved to the Test Instruments Used in Calibration box, a message will appear on the screen warning them that they have chosen a currently unapproved test standard. 9.2.3.10 Font Colors The Font Colors option allows the user to assign a font color to data in Calibration Records when the Spec Limit is Exceeded. This allows the user to easily see Calibration Data that exceeds limits. 9-5 Quality Fluke Products Online at: www. GlobalTestSupply.com [email protected] DPCTrack2 Users Manual 9.2.3.11 Default Values 9.2.3.11.1 Stay On Schedule This default value affects Instrument, Loop and Test Instrument records. Even though you may activate this feature here, the check box also exists (Labeled Keep On Schedule) in the MASTER INSTRUMENT, LOOP and TEST INSTRUMENT screens. Therefore, you can override it as needed, in those areas of the program. For more information see Chapter 15. 9.2.3.11.2 Default Input Resolution This is a default value that determines the number of decimal places that will automatically appear on the Calibration Points tab for input values on new Instrument, Loop and Test Instrument records within this Company. You may select any value from the field’s drop-down list. Of course, not all of your Instrumentation will require the same number of decimal places for their input values, but if a large portion of your items require 3 decimal places (.001), then it makes sense to make this a company default for all records input values, this will save you keystrokes later. Once this default value has been entered and saved on this screen, it will affect all new entries made to the company from that point on. Records entered prior to the establishment of this default value will not be affected by the change. This field also exists in the MASTER INSTRUMENT, LOOP and TEST INSTRUMENT screens, therefore, you may override the default on an individual item basis. 9.2.3.11.3 Default Spec Resolution This is a default value that determines the number of decimal places that will automatically appear in the calibration specification grids for Instrument, Loop, and Test Instrument records. You may delete or change it by typing over the existing value. For example, selecting “0.001” in this box will instruct the system to round all numeric values (input, output values, etc.) to “.001”. (8 is the maximum number of decimal places DPCTrack2 is capable of.) Keep in mind, however that this field also exists in the MASTER INSTRUMENT, LOOP and TEST INSTRUMENT screens, therefore, you may override the default on an individual item basis. 9.2.3.12 Statuses Statuses in DPCTrack2 serve a very important function in managing work flow and tagging items or work that is pending, completed, or failed. The Statuses, when utilized, assist the system in determining when items or work should appear in the REMINDERS screen or on scheduling reports like “Events Due” or “Calibration Worksheets”. In addition, when the Calibration Passed Status and Calibration Failed Status are used, the system can automatically change an item’s status to match its calibration result, which in turn may generate an alert. Statuses may be added to each field’s drop-down list by either selecting “Status” from the Lists menu or clicking the New button next to any of the status fields. When you enter a new status into the system you must decide whether the status will be an Active status or not. 9-6 Quality Fluke Products Online at: www. GlobalTestSupply.com [email protected] Company Record Screen 9.3 Change Company Name 9 9.2.3.12.1 Calibration Passed Status This field is used to declare the status that an item (Instrument, Loop or Test Instrument) should change to if it passes calibration. When the passed calibration is entered, upon saving, a message will appear asking if you would like the system to automatically update the item’s status. A few examples of statuses that would make sense for this field are “In Service” or “Active”. 9.2.3.12.2 Calibration Failed Status This field is used to declare the status that an item (Instrument, Loop or Test Instrument) should change to if it fails calibration. When the failed calibration is entered, upon saving, a message will appear asking if you would like the system to automatically update the item’s status. A few examples of statuses that would make sense for this field are “Out of Service” or “Needs Repair”. 9.2.4 Default Reports Tab This tab page provides the fields in which to assign default reports to this company that will be used when printing directly from a particular screen in the program. 9.3 Change Company Name DPCTrack2 gives you the opportunity to change the Company name. From the HOME screen select TOOLS → “Change Company Name”. You must be a member of the ADMIN group to access this feature. 9-7 Quality Fluke Products Online at: www. GlobalTestSupply.com [email protected] DPCTrack2 Users Manual 9-8 Quality Fluke Products Online at: www. GlobalTestSupply.com [email protected] Chapter 10 User Defined Variables and User Defined Lists Title Page 10.1 User Defined Options & Required Fields............................................... 10-3 10.2 Adding User Defined Variables.............................................................. 10-3 10.2.1 Selecting a File Type .......................................................................... 10-3 10.2.2 Entering the Variable Name ............................................................... 10-4 10.2.3 Selecting the Field Data Type ............................................................ 10-4 10.2.3.1 Text ................................................................................................ 10-4 10.2.3.2 Decimal .......................................................................................... 10-4 10.2.3.3 Integer ............................................................................................ 10-4 10.2.3.4 Date ................................................................................................ 10-4 10.2.3.5 List ................................................................................................. 10-4 10.2.3.6 File ................................................................................................. 10-4 10.2.3.7 Signature ........................................................................................ 10-4 10.2.4 Deleting a User Defined Variable ...................................................... 10-5 10.2.5 Reordering User Defined Variables ................................................... 10-5 10.3 User Defined Lists .................................................................................. 10-6 10.3.1 Creating a New List Type................................................................... 10-6 10.3.2 Creating List Entries for New List Types........................................... 10-6 10.4 Configuring Required Fields .................................................................. 10-7 10-1 Quality Fluke Products Online at: www. GlobalTestSupply.com [email protected] DPCTrack2 Users Manual 10-2 Quality Fluke Products Online at: www. GlobalTestSupply.com [email protected] 10 User Defined Variables and User Defined Lists 10.1 User Defined Options & Required Fields 10.1 User Defined Options & Required Fields Because DPCTrack2 is used in such a wide variety of industries, it is impossible to create a program that will accommodate individual needs and requirements. Therefore, DPCTrack2 enables you to add an unlimited amount of user defined variables (or new fields) to the program. In addition, you may specify what kind of data your users must enter into the new fields. All user defined variables added to the system will become a part of the User Defined tab on the screen to which they are defined. The screen that you use to create user defined variables is the USER VARIABLE DEFINITION screen (shown in Figure 10.1). It can be accessed by selecting "User Defined Variables" from the Tools menu while the Home Screen is open. Figure 10.1 10.2 Adding User Defined Variables 10.2.1 Selecting a File Type When adding a new user defined variable to the system, you must first decide in which screen it should reside. From the File Type drop-down list, you may select from one of the following: “Calibration”, “Equipment” “Instrument”, “Loop” and “Test Instrument”. As you select different file types from the drop-down list, the screen will change to show only those user defined variables that have already been entered for the currently selected file. Figure 10.1 above shows seven user defined variables that were entered for the CALIBRATION screen. 10-3 Quality Fluke Products Online at: www. GlobalTestSupply.com [email protected] DPCTrack2 Users Manual 10.2.2 Entering the Variable Name Once you have selected the file type that you would like to work with, you may proceed to add the fields. To begin, you must click the Add New Variable button. You will see a new row appear on the screen. You can enter the title of the new field in the Name field. This is alpha/numeric text field with a field length of thirty five characters. 10.2.3 Selecting the Field Data Type As mentioned on the previous page, you may specify the kind of data that your users will be required to enter into the new fields. Once you have entered the field name, you may then select the data type from the Type drop-down list. This drop-down list is illustrated in Figure 10.1 on the previous page. 10.2.3.1 Text Selecting the “Text” data type will allow users to enter data in any format that they choose. 10.2.3.2 Decimal Selecting the “Decimal” data type will require users to enter a numeric value with decimal points. 10.2.3.3 Integer Selecting the “Integer” data type will require users to enter a numeric value with no decimal points. 10.2.3.4 Date Selecting the “Date” data type will require users to enter a date value into the field. The format of the date will depend upon the date format that was selected in the SYSTEM OPTIONS screen. See Chapter 7 for more information. 10.2.3.5 List Selecting the “List” data type will require users to make a selection from a drop-down list that is also user defined. Any user defined lists that have already been added to the system will be listed on the drop-down list in the User Defined List Type field on the USER VARIABLE DEFINITION SCREEN. If you need to add a new list type, you may do it directly from this screen by selecting “Add List Type” from the File menu. In addition, user defined list types may be used at the same time for many user defined variables throughout the system. (User defined lists will be discussed in further detail later in this chapter.) 10.2.3.6 File Selecting the “File” data type will allow users to insert a file name or URL into the user defined variable on whichever screen it is located. The file name can only be inserted into the field by clicking the (…) button and locating the file on your workstation or server. For a URL, you must select “Enter URL” from the (…) button and type the entry into the field provided. Once a valid file or URL name is in the field, you may then open it directly from that screen by double-clicking it or selecting “Open Link” from the menu invoked by the (…) button. 10.2.3.7 Signature Selecting the “Signature” data type allows you to add an additional level of electronic signature to your records. When this type of user defined variable is added to a screen, it will appear with a check box. To record the electronic signature in the field, check the box and save the record. The full name of the user who saved the record and the date and time of the save will be recorded in the field. 10-4 Quality Fluke Products Online at: www. GlobalTestSupply.com [email protected] 10 User Defined Variables and User Defined Lists 10.2 Adding User Defined Variables Once you have completed all of the steps required for creating the new field, you may click the Save Variable button to move onto another file type or click the Add New Variable button again to add another field to the file type currently displayed. 10.2.4 Deleting a User Defined Variable To delete a user defined variable, highlight its name in the USER VARIABLE DEFINITION SCREEN and hit the “Delete” or “Backspace” key on your keyboard, then click the Save Variable speed button. If data has already been entered into this field elsewhere in the program, a warning message will appear confirming your intention to delete the field. Please note that when a user defined variable is deleted, all data entered into that field is deleted as well. 10.2.5 Reordering User Defined Variables If you have more than one user defined variable on a screen, you may reorder their appearance at any time. To do this you must first select the File Type whose fields you would like to rearrange. Once the screen’s user defined variables are displayed, select “Reorder Variables…” from the File menu. This will invoke the REORDER USERDEFINED VARIABLES screen shown in Figure 10.2. Figure 10.2 To reorder the fields select a field name and click the Move Selected Variable Up or Move Selected Variable Down button as desired. Once you have rearranged the fields as necessary, click the OK button. As soon as you are returned to the USER VARIABLE DEFINITION screen you will see the fields listed in the order you configured. This is the same order that the variables will appear on the screen in which they reside 10-5 Quality Fluke Products Online at: www. GlobalTestSupply.com [email protected] DPCTrack2 Users Manual 10.3 User Defined Lists 10.3.1 Creating a New List Type DPCTrack2 already comes equipped with many standard lists that may have entries added to them via the Lists menu or New buttons found throughout the program. However, the program also gives you the ability to create your own lists that may be applied to the user defined variables that you have created. To do this, from the Tools menu while the Home Screen is open, you must first select “User Defined Lists”, “Edit List Types”. This will invoke the USER-DEFINED LIST TYPES screen shown in Figure 10.3. You may enter the name of the new list type into the User Defined List Types field and click the Save button. You are limited to 50 characters. Every list type that is entered through this screen will also become available from the Tools menu under the “User Defined Lists” option. In this screen you may click the List button to view all list types currently entered into the system and if you need to delete a list type that has not been used, select it from the list, click OK, then click the Delete button. The list and all of its entries will be removed from the system. If however, entries from the list type have already been used elsewhere in the program, you will not be allowed to delete it. Figure 10.3 10.3.2 Creating List Entries for New List Types Once you have created new list types, you will need to populate them with entries. To do this, select “User Defined Lists” from the Tools menu and choose the name of the list type you would like to make entries for. When you choose a list type from the menu, the screen will look exactly like that in Figure 10.4 except for its title, which will match the name of the list type selected. Figure 10.4 Figure 10.4 above, shows the screen for a new list type called “Yes/No”. It works in the same way as the USER DEFINED LIST TYPES screen. You may enter the name of the new entry into the field and click the Save button. You can enter up to 50 characters in the field. You may click the List button to view all entries that have been added for the list type and if you need to delete an entry that has not been used, select it from the list, 10-6 Quality Fluke Products Online at: www. GlobalTestSupply.com [email protected] 10 User Defined Variables and User Defined Lists 10.4 Configuring Required Fields click OK, then click the Delete button. The list entry will be removed from the system and will no longer appear on the drop-down lists of any fields that are using its list type. If however, the selection has already been used somewhere, you will not be allowed to delete it. 10.4 Configuring Required Fields DPCTrack2 also gives you the ability to require completion of standard and user defined fields in each of five (5) different screens in the program in order to save, approve or finalize a record. Completion of most fields in the MASTER INSTRUMENT RECORD, LOOP RECORD and TEST INSTRUMENT RECORD screens, can be required in order to approve a record of any of these types. Additionally, completion of fields in the CALIBRATION screen can be required in order to finalize a record, while completion of fields in the EQUIPMENT RECORD screen can be required in order to save a record. The establishment of required fields is done through the REQUIRED FIELDS screen, which is accessed by selecting “Required Fields” from the Tools menu in the Home Screen. When you select this menu option an additional selection box will appear with each of the five (5) different record types, “Instrument”, “Loop”, “Test Instrument”, “Equipment” and “Calibration” for which fields may be made required. To select a screen or record type to configure required fields for, left-click the one desired in the selection box. The configuring of required fields for each record type must be done on an individual basis. Figure 10.5 Regardless of the record type that you select, the Required Fields screen will appear (see Figure 10.5). The name of the item or record type selected will be shown in the screen’s Item Type field, which is inaccessible. Additionally, the standard fields whose completion can be required will be listed in the Database Fields section’s Available box, while all user defined fields currently existent in the selected screen will be listed in the User Defined Variables section’s Available box. To make fields required, just highlight them in each of their Available boxes and use the center arrow buttons as applicable to move them to the Required boxes. If any fields shown in either of the Required boxes need to be removed, use the arrow buttons as applicable again, to move them back to the appropriate Available box. The removal of a 10-7 Quality Fluke Products Online at: www. GlobalTestSupply.com [email protected] DPCTrack2 Users Manual field name from a Required box eliminates completion of that field as a requirement for save, approval or finalization of a record in the screen in which it resides. Note User defined variables that are of an “Integer” or “Decimal” type cannot be required for a record since a value of “0” may denote a real or null value. Therefore any user defined variables of these types will not be listed in Required Fields screen. Once you have completed selection of required fields for a particular record type, click the Save button. You may then close the Required Fields screen and move onto establishing required fields for a different record type by selecting a different record type from the “Required Fields” option on the Home Screen’s Tools menu. Figure 10.6 When required fields have been set for a particular screen or record type you will be restricted from performing certain actions, as applicable, for the screen you are working in when those required fields have not been completed. For example, Figure 10.6 displays the typical message that will appear in the MASTER INSTRUMENT RECORD screen when the required fields have not been filled in and a user attempts to approve a record. If you are uncertain of the field requirements for a particular record type, this information is available by selecting “Check Requirements” from the screen’s Edit menu. This will display a message box detailing the fields that still need to be completed within the screen in order to approve the record (Instruments, Loops, and Test Instruments), finalize the record (Calibrations) or just save the record (Equipment). 10-8 Quality Fluke Products Online at: www. GlobalTestSupply.com [email protected] Chapter 11 Reminders Title 11.1 11.2 Page Reminders ............................................................................................... 11-3 Printing Reminders ................................................................................. 11-4 11-1 Quality Fluke Products Online at: www. GlobalTestSupply.com [email protected] DPCTrack 2 Users Manual 11-2 Quality Fluke Products Online at: www. GlobalTestSupply.com [email protected] Reminders 11.1 Reminders 11 11.1 Reminders DPCTrack2 comes equipped with a reminder system, whereby overdue calibrations and alerts will appear on the REMINDERS screen. There are many different types of reminders that may appear in this screen ranging from Late Calibrations to Show Incomplete Calibrations. The REMINDERS screen may be invoked manually by selecting “View Reminders” from the Main Toolbar when the Home Screen is open. However, depending on your User Group Reminder Options, it is more likely that the REMINDERS screen will automatically appear at program start-up. Figure 11.1 Access to the REMINDERS screen and what appears in that screen is determined at the user group level (see Chapter 6). Some users may only see items awaiting approval or finalization, while others will only see late calibrations. Basically, what appears in the screen depends upon the user group(s) that you belong to and the Reminder Options of those groups. The REMINDERS screen can be seen in Figure 11.1. It contains a tree view of the company and their reminder items, separated by the departments to which the reminders’ master records are currently associated with. Any reminder items whose master records are not associated with a department will appear under the “N/A” group. Within the tree, you may expand and collapse each reminder as needed. To view the details of all of the reminders listed, click the Expand All button. To condense the list, click the Collapse All button. To see the details of only one reminder at a time, click the plus (+) sign to the left of the lines. To collapse the reminders, click the minus (-) sign. You may also access the master record for each reminder, for example the master instrument record for an overdue instrument calibration by double-clicking it on the screen. 11-3 Quality Fluke Products Online at: www. GlobalTestSupply.com [email protected] DPCTrack 2 Users Manual 11.2 Printing Reminders Not only may records shown in the REMINDERS screen be accessed by double clicking them one at a time with your mouse, but you may also print the entire list in any format that you choose. To customize your printer setup, click the Print Setup button. Your screen will look like that shown in Figure 11.2. Figure 11.2 In the PRINT SETUP screen you can change the size, style and color of the report’s fonts including its headers in both the report’s header and footer. To do this, click the Edit Font buttons in those sections of the screen. The reminders, when printed, will appear exactly as they do in the REMINDERS screen, but with the entire tree expanded so that all details can be seen. Therefore, you may decide to indent rows so that the information is easier to read. Select a different number from the Row Indent section’s drop-down list. As you select different numbers, Heading and Date on the screen will change positions to illustrate how the report will look when printed. You may also select additional data to be included in the report’s header and/or footer. Highlight any of the items listed in the Available boxes and use the center arrow keys to move them to the desired Displayed boxes. Selecting “Other” will invoke the INPUT FORM screen in which you may type an additional item to be shown in the header or footer. For example, Figure 11.2 above shows that when a reminder report is printed with this setup, that a title, the name of the person who printed it and the date and time at which it was printed will appear in the report’s header. In the report’s footer an additional field called “Date Distributed” will be shown. With this printed on the report, the user could then write in the date that the report was sent out to those requiring it. To save your print settings, click the Set as Defaults button, then click OK. Once you are back in the REMINDERS screen, click the Print button and proceed as you normally would when printing a document from your computer. Your print settings will remain as you arranged unless you modify them again. 11-4 Quality Fluke Products Online at: www. GlobalTestSupply.com [email protected] Chapter 12 Standard Lists Title Page 12.1 Standard Lists ......................................................................................... 12-3 12.2 List Screens............................................................................................. 12-3 12.2.1 Calibration Frequency ........................................................................ 12-3 12.2.1.1 Frequencies Based on “Months” or “Years”.................................. 12-4 12.2.1.2 Frequencies Based on “Weeks” ..................................................... 12-4 12.2.2 Status .................................................................................................. 12-4 12.2.3 Signal Type......................................................................................... 12-5 12.2.4 Manufacturer .................................................................................. 12-5 12.2.5 Locations ............................................................................................ 12-5 12.2.6 Department ......................................................................................... 12-5 12.2.7 Vendors .............................................................................................. 12-6 12.2.8 Instrument Type ................................................................................. 12-6 12.2.9 Responsible Technician...................................................................... 12-6 12.2.10 Calibration Type................................................................................. 12-7 12.2.11 Classification ...................................................................................... 12-7 12.2.12 Document Type .................................................................................. 12-7 12.2.13 Equipment Type ................................................................................. 12-8 12-1 Quality Fluke Products Online at: www. GlobalTestSupply.com [email protected] DPCTrack2 Users Manual 12-2 Quality Fluke Products Online at: www. GlobalTestSupply.com [email protected] Standard Lists 12.1 Standard Lists 12 12.1 Standard Lists Many of the standard fields in DPCTrack2 have drop-down lists that are user defined. This gives you the ability to customize many areas of the program to meet your needs. All of the standard user defined lists can be accessed from the Lists menu at the top of the HOME SCREEN. You will find thirteen (13) list screen options on the Lists menu: “Calibration Frequency”, “Status”, “Signal Type”, “Manufacturer”, “Locations”, “Department”, “Vendors”, “Instrument Type”, “Responsible Technician”, “Calibration Type”, “Classification”, “Document Type”, and “Equipment Type”. Each of these screens allows you to enter selections that will appear on those fields’ drop-down lists throughout the program. 12.2 List Screens To enter list information, click each option with your mouse. Every list type has its own screen in which you may add, modify or delete entries on its drop-down list. (If a list screen does not contain a Delete button, then go to the File menu while the screen is open and select “Delete Record”.) Once a list entry has been assigned to a record in the system, it cannot be deleted. For example, if you have created a status called “In Service” and it has been assigned to at least one Instrument, Loop, Equipment or Test Instrument record you will not be able to delete it from your database. Figure 12.1 12.2.1 Calibration Frequency This list option allows you to define and set up specific frequencies that can be applied to all items that get calibrated. Calibration frequencies help the program calculate due dates for item calibrations. Common ones would be “Yearly”, “Semi-annually”, “Quarterly”, etc. There are several options with regard to the setup of a frequency that are outlined and discussed in detail below. The Calibration Frequency title is limited to 40 characters. 12-3 Quality Fluke Products Online at: www. GlobalTestSupply.com [email protected] DPCTrack2 Users Manual 12.2.1.1 Frequencies Based on “Months” or “Years” For frequencies based upon “Months” or “Years” (“Months” or “Years” is selected from the screen’s drop-down list), the Keep On End of Month box will be available. Checking the Keep On End of Month box for a calibration frequency will instruct the system, when calculating a due date based upon the frequency, to always use the last day of the month that the item will be due for calibration as its actual due date. Additionally, the Allow system to Roll Dates Forward if Actual Event Date is within section provides you with two (2) options. Selection of the [#] Days of Scheduled Event Date circle allows you to declare exactly how many days before the due date, that a calibration can be successfully completed and still have the next due date automatically roll forward. Any numeric value may be entered into this field, and the number used can be different for every calibration frequency entered into the database. Selection of the Calendar Month of Scheduled Event Date circle will allow for the calibration to be completed up to one (1) calendar month before the due date, taking into consideration the actual number of days within the month. If this setting is selected, the Days of Scheduled Event Date circle will be grayed out and inaccessible since it is not applicable. 12.2.1.2 Frequencies Based on “Weeks” Frequencies based upon “Weeks” has similar setting options to those based on “Months” or “Years”. For frequencies based upon “Weeks” (“Weeks” is selected from the screen’s drop-down list), the Keep On End of Week box will be available. Checking the Keep On End of Week box for a calibration frequency will instruct the system, when calculating a due date based upon the frequency, to always use the last day of the week in which the item will be due for calibration as its actual due date. Additionally, the Allow system to Roll Dates Forward if Actual Event Date is within section provides you with two (2) options. Selection of the [#] Days of Scheduled Event Date circle allows you to declare exactly how many days before the due date, that a calibration can be successfully completed and still have the next due date automatically roll forward. Any numeric value may be entered into this field, and the number used can be different for every calibration frequency entered into the database. Selection of the Calendar Week of Scheduled Event Date circle will allow for the calibration to be completed up to one (1) calendar week before the due date. If this setting is selected, the Days of Scheduled Event Date circle will be grayed out and inaccessible since it is not applicable. (Note: A calendar week in DPCTrack2 runs from Sunday through Saturday.) Note If the calibration is unsuccessful or fails, that no dates will be rolled forward. 12.2.2 Status This list option allows you to create statuses that may be applied to all types of items and records in the system. As mentioned in Chapter 9, statuses in DPCTrack2 serve a very important function in managing work flow and tagging items or work that is pending, have been completed or have failed. Examples of statuses that may be applicable to your records are “In Service”, “Out of Service”, “Decommissioned”, “New Instrument” or “Storage”, “Open Work”, “Completed Work”, “Assigned” and “Canceled”. 12-4 Quality Fluke Products Online at: www. GlobalTestSupply.com [email protected] Standard Lists 12.2 List Screens 12 When entering a new status you must first decide if it is an active status, the Indicates an Active Status box is checked. Marking this box instructs the system to show items that have been given this status on calibration scheduling reports like “Events Due” and “Calibration Worksheets” and in the REMINDERS screen. For example, you would probably want to see items with a status of “In Service” on calibration scheduling reports and in the REMINDERS screen, but you would not want to see items that have a status of “Decommissioned”. Therefore, on the status record for “Decommissioned” you would leave this check box blank. You are limited to 50 characters in this field. You may add new statuses by using this menu option, or you can add them by clicking the New button next to the Status fields in various screens throughout the program. 12.2.3 Signal Type This list option allows you to create different units of measurement such as “psig” and “mA” which are pertinent to Instrument, Loop and Test Instrument calibrations. You may add these by using this menu option. You are limited to 50 characters in this field. (Note: If you choose to import symbols into this field, [examples; °, µ ] the quick type feature will be disabled) 12.2.4 Manufacturer This list option allows you to enter the information about the person, group, or company that manufacturers the asset. The MANUFACTURER screen provides you with fields in which to enter a manufacturer’s name, address, phone number, fax number and contact person, however the only information required to save a new record is the manufacturer’s name. You may add manufacturers by using this menu option, or you can add them by clicking the New button next to the Manufacturer fields in various screens throughout the program. You are limited to 50 characters for the Manufacture. The Address Line 1 & 2, City, State, Zip and Country are limited to 255 characters. The Phone, Fax and Contact are limited to 50 characters. 12.2.5 Locations This list option allows you to enter another physical site for your company. This screen has two tabs, General Info and Building Info. On the General Info tab you may enter the location’s name and directions to the facility. The Location name is limited to 50 characters and the directions are limited to 3,996 characters. On the Building tab you may enter any buildings that are located at that site. To enter a new building, type it into the small field on the right and click the Add New button. You are limited to 50 characters. You will see that the new building name is added to the Building box on the left. You may add as many Buildings to each location as needed. To delete a building from the location, highlight it in the “Building” box on the left and click the Delete Selected button. If the Building is in use, you will not be allowed to delete it. New locations and buildings may be added by using this menu option, or you can add them by clicking the New button next to the Location and Building fields in various screens throughout the program. 12.2.6 Department This list option allows you to enter different areas for your company, which may then be assigned various record types throughout the system. You may add departments by using this menu option, or you can add them by clicking the New button next to the Department fields in various screens throughout the program. You are limited to 50 characters in this field. 12-5 Quality Fluke Products Online at: www. GlobalTestSupply.com [email protected] DPCTrack2 Users Manual 12.2.7 Vendors This list option allows you to enter the person or company that sells or services your instruments. The VENDOR screen provides you with fields in which to enter a vendor’s name, address, phone number, fax number and contact person, however only the vendor’s name is required to save a new record. You are limited to 50 characters in this field. You may add vendors by using this menu option, or you can add them by clicking the New button next to the “Vendor Name” fields in various screens throughout the program. Vendors can only be edited or deleted through this screen. A Vendor cannot be deleted if it is in use. The Address Line 1 & 2, City, State, Zip and Country are limited to 255 characters. The Phone, Fax and Contact are limited to 50 characters. 12.2.8 Instrument Type This list option allows you to create different device types such as “Transmitter”, “Analyzer”, “Pressure” or “Temperature”. Instrument types are useful in tracking data as well as limiting the number of test instruments that can be used for particular calibrations. (See Chapter 17 for information about entering test instruments and their connection to instrument types.) You may add instrument types by using this menu option, or you can add them by clicking the New button next to the Instrument Type field in MASTER INSTRUMENT RECORD screen. You are limited to 50 characters in this field. 12.2.9 Responsible Technician This list option allows you to add names of technicians who perform your calibrations or are responsible for your equipment, once added they will be available in the drop-down lists for fields like Who Calibrated and Responsible Technician. This screen has several different sections. Figure 12.2 12-6 Quality Fluke Products Online at: www. GlobalTestSupply.com [email protected] Standard Lists 12.2 List Screens 12 When the screen initially opens (see figure 12.2) the Employees Not in this Group box shows all employees that have been entered into the system and the Current Members of this Group box shows the names of all employees who belong to the “Technician” group in the system If you need to add one or more existing employees to the current group, highlight the names in the Employees Not in this Group box and click the Assign button. The employees’ names will be moved to the New Members to be Added box. If you need to add a new employee to the group, type their Name, (Title and Email are optional) into the fields labeled as such and click the Add and Assign button. The employee’s name will be moved to the New Members to be Added box. (This also adds a new EMPLOYEE record to the system for this person.) If you need to remove a new employee from the group, highlight the name in the New Members to be Added box and click the Deassign button. Once you have made all of your changes, click the Save button, the names in the New Members to be Added will be automatically moved up to the Current Members of this Group section and the screen will close. You may add Technicians names to groups by using this menu option, or you can add them by clicking the New button next to the Responsible Technician or Who Calibrated fields in various screens throughout the program. 12.2.10 Calibration Type This list option allows you to create calibration types such as “Scheduled”, “Repair” or “Initial Cal” that may be assigned to your calibration records. This screen allows you to Add or Delete calibration types. If the calibration type is in use it cannot be deleted. You are limited to 50 characters in this field. 12.2.11 Classification This list option allows you to create classifications such as “GMP Critical” or “NonGMP” that may be assigned to an Instrument, Loop, Equipment and Test Instrument Records. You must add new classifications from this menu because there is no New button for it anywhere else in the system. You are limited to 50 characters in this field. 12.2.12 Document Type This list option allows you to define different document types such as “SOP”, “Assay” or “Manufacturer’s Specifications” that may be applied to document records that you store in your database. You are limited to 50 characters in this field. Placing a check mark in the Make Available as a SOP box allows documents of that type to be available on the Document ID drop down list found in many other screens in the program. The Document ID field can be found in the following screens: MASTER INSTRUMENT RECORD, LOOP RECORD and TEST INSTRUMENT RECORD. A document number that appears in a Document ID field elsewhere in the program is considered to be that item’s SOP (Standard Operating Procedure) and will appear on the SOP tab of the CALIBRATION screen when a calibration record is entered for that item. Keep in mind that if none of the document types entered have the Make Available as a SOP box marked, then only document IDs whose records have not been given a Document Type at all will be available for selection on the Document ID field throughout the program. You may add document types by using this menu option, or you can add them by clicking the New button next to the Document Type field in the DOCUMENT RECORDS screen. 12-7 Quality Fluke Products Online at: www. GlobalTestSupply.com [email protected] DPCTrack2 Users Manual 12.2.13 Equipment Type This list option allows you to create system types such as “Pump” or “Tank”. Entries made in this screen will appear on the Equipment Type drop down list in the EQUIPMENT RECORD screen. You may add equipment types by using this menu option, or you can add them by clicking the New button next to the Equipment Type field on the EQUIPMENT RECORD screen. You are limited to 50 characters in this field. 12-8 Quality Fluke Products Online at: www. GlobalTestSupply.com [email protected] Chapter 13 Document Records Screen Title Page 13.1 Document Records.................................................................................. 13-3 13.2 Tabbed Notebook Section....................................................................... 13-4 13.2.1 General Info Tab................................................................................. 13-4 13.2.1.1 Document Type.............................................................................. 13-4 13.2.1.2 Effective Date, Expiration Date, Date Active, & Date Inactive..... 13-4 13.2.1.3 Location & Building ...................................................................... 13-4 13.2.1.4 Active ............................................................................................. 13-4 13.2.1.5 Physical Location ........................................................................... 13-4 13.2.1.6 SOP Type ....................................................................................... 13-4 13.2.1.7 Linked File ..................................................................................... 13-4 13.2.1.8 Review Frequency, Review Date, Last Review Date, Next Review Date.................................................................................. 13-5 13.2.2 Signatures Tab .................................................................................... 13-5 13.2.3 Procedure Tab..................................................................................... 13-5 13.3 File Menu Options .................................................................................. 13-5 13.3.1 New Record[Ctrl + N] ........................................................................ 13-5 13.3.2 Save Record[Ctrl + S] ........................................................................ 13-5 13.3.3 Find Record[Ctrl + F]......................................................................... 13-5 13.3.4 Print Record[Ctrl + P] ........................................................................ 13-5 13.3.5 Print Preview]..................................................................................... 13-5 13.3.6 List Records........................................................................................ 13-5 13.3.7 Delete Record ..................................................................................... 13-6 13.3.8 Close Form ......................................................................................... 13-6 13.3.9 Exit DPCTrack2 ................................................................................. 13-6 13-1 Quality Fluke Products Online at: www. GlobalTestSupply.com [email protected] DPCTrack2 Users Manual 13-2 Quality Fluke Products Online at: www. GlobalTestSupply.com [email protected] Document Records Screen 13.1 Document Records 13 13.1 Document Records Document records are required for most quality assurance programs. The DOCUMENT RECORDS screen is accessed by clicking the speed button labeled “Documents” on the Record Toolbar. DPCTrack2 gives you the ability to create, manage and link many different types of documents to other types of records in the system. The DOCUMENT RECORDS screen is used to add, display, modify and, if necessary, delete document records. All document numbers that are entered in this screen will appear on the Documents tab of other screens in the program so that they may be associated with records of that type. In addition, some document numbers may appear on the Document ID drop-down list that can also be found in other screens in the program. (Refer to the “Document Type” section in Chapter 12 for more information about making documents available on Document ID drop-down lists.) Keep in mind however, that once document number has been associated with another record in the program, it can no longer be deleted from the system. Figure 13.1 13-3 Quality Fluke Products Online at: www. GlobalTestSupply.com [email protected] DPCTrack2 Users Manual 13.2 Tabbed Notebook Section The tabbed notebook section of the DOCUMENT RECORDS screen contains a total of three (3) different sub-screens or “pages” available for data entry. To open a page, click its tab with your mouse. Each page and its associated fields are described below. 13.2.1 General Info Tab The General Info tab (shown in Figure 13.1) allows you to enter general information about the document like its Type, Physical Location, Active Date, etc. In addition you may give the document a Review Frequency and Review Dates which may assist you in document management. 13.2.1.1 Document Type This field allows you to define the document type by selecting one from the drop down list or selecting “New” and creating one. You are limited to 50 characters in this field. If you choose a Document Type that does not have the check box “Make Available as an SOP” checked then it will not be displayed in the drop down fields for Instruments, Loops & Test Instruments. 13.2.1.2 Effective Date, Expiration Date, Date Active, & Date Inactive These date fields are optional unless you would like to receive a Reminder when the Document expires. (If no date is filled in for expiration date, no reminder will be generated). 13.2.1.3 Location & Building For more information on these fields see Chapter 12. 13.2.1.4 Active This check box must be checked in order to receive reminders. Only one revision can be checked as Active. 13.2.1.5 Physical Location This field may be populated with up to 100 characters. 13.2.1.6 SOP Type This field may be populated with up to 50 characters. 13.2.1.7 Linked File The Linked File field on this screen allows you to select an external file that may then be accessed directly from the screen. Additionally, you may also enter the name of URL link to be invoked directly from DPCTrack2. If a file is to be linked, then it must be inserted by clicking the (…) button and selecting from one of the following: 13.2.1.7.1 Choose File Selecting this option will open a new screen where you may choose a file that you have access to on your computer or network. Once the file has been chosen select Open and you will be returned to the Document Record screen with the file you chose filled in on the Linked File. To access and view the file, either double-click the file name in the field or by clicking the (…) button and selecting “Open Link”. 13.2.1.7.2 Enter URL Selecting this option will invoke a screen in which to type the name of the URL (for example, “www.primetechpa.com”). The launching of a URL link is done in the same manner as the opening of a file, simply double-click it or choose “Open Link” from the (…) button’s menu. 13-4 Quality Fluke Products Online at: www. GlobalTestSupply.com [email protected] Document Records Screen 13.3 File Menu Options 13 13.2.1.7.3 Clear Link Selecting this option will clear the Linked File. 13.2.1.7.4 Open Link This option will open the Link. You may also double click the link to open it. 13.2.1.8 Review Frequency, Review Date, Last Review Date, Next Review Date These fields are to help you manage your Document Records. The frequency and date fields have to be filled in manually. This is optional. 13.2.2 Signatures Tab This tab allows for users to signoff and Approve the document. Also listed is the Entered By and Modified By information. 13.2.3 Procedure Tab This tab may be used to type information regarding the document that will be available for review during a calibration event if the Document is assigned to the master record. There is a limit of 3,996 characters of text that can be entered. 13.3 File Menu Options 13.3.1 New Record[Ctrl + N] Selecting this option will open a blank Document Record screen. The Document ID and Revision Number must be entered before you can save the record. 13.3.2 Save Record[Ctrl + S] Selecting this option will save modifications made to the Document Record. 13.3.3 Find Record[Ctrl + F] Selecting this option will open the Find Document Record screen. The Document ID and Revision Number must be entered to find the Document Record. 13.3.4 Print Record[Ctrl + P] Selecting this option will print the Document Report for the current document open. In addition, the Page Setup screen will open allowing parameters to be defined by the user that help determine how a printed page will appear. The parameters include the size, source, page orientation, margins, and printer selection. 13.3.5 Print Preview] Selecting this option will allow you to view the Document Report for the current document open. 13.3.6 List Records This List option differs from the one on the Header Row as it will let you choose between 4 (four) different list options: • List All – Will list All records, Current Query remains “Default”. • List Active – Will list all records with that have the Active checkbox checked, Current Query changes to (Active = “True”). • List Inactive – Will list all records with that have the Active checkbox unchecked, Current Query changes to (Active = “False”). • List Approved – Will list all records that have the Approved checkbox checked, Current Query changes to (Approved By <> “”). 13-5 Quality Fluke Products Online at: www. GlobalTestSupply.com [email protected] DPCTrack2 Users Manual 13.3.7 Delete Record Use this option to Delete a Document Record. In order to be able to Delete a Document you must be a member of a Group that has Delete access to Document records and the Document is not associated with any records. 13.3.8 Close Form Closes the Document screen. 13.3.9 Exit DPCTrack2 Use this option to close DPCTrack2. You will be prompted to save any work before DPCTrack2 closes. 13-6 Quality Fluke Products Online at: www. GlobalTestSupply.com [email protected] Chapter 14 Equipment Record Screen Title Page 14.1 Equipment Records................................................................................. 14-3 14.2 Tabbed Notebook Section....................................................................... 14-3 14.2.1 General Info Tab................................................................................. 14-3 14.2.1.1 Location, & Building ..................................................................... 14-3 14.2.1.2 Equipment Type ............................................................................. 14-3 14.2.1.3 Manufacture ................................................................................... 14-3 14.2.1.4 Model Number, & Serial Number.................................................. 14-3 14.2.1.5 Status.............................................................................................. 14-4 14.2.2 A dditional Info Tab ............................................................................... 14-4 14.2.2.1 Department..................................................................................... 14-4 14.2.2.2 P+ID Number, & P+ID Revision Number ..................................... 14-4 14.2.3 Instruments/Loops Tab....................................................................... 14-4 14.2.4 User Defined Tab ............................................................................... 14-4 14.2.5 Notes Tab ........................................................................................... 14-5 14.3 File Menu Options .................................................................................. 14-5 14.3.1 New Record[Ctrl + N] ........................................................................ 14-5 14.3.2 Save Record[Ctrl + S] ........................................................................ 14-5 14.3.3 Find Record[Ctrl + F]......................................................................... 14-5 14.3.4 List Records........................................................................................ 14-5 14.3.5 Delete Record ..................................................................................... 14-5 14.3.6 Close Form ......................................................................................... 14-6 14.3.7 Exit DPCTrack2 ................................................................................. 14-6 14-1 Quality Fluke Products Online at: www. GlobalTestSupply.com [email protected] DPCTrack2 Users Manual 14-2 Quality Fluke Products Online at: www. GlobalTestSupply.com [email protected] 14 Equipment Record Screen 14.1 Equipment Records 14.1 Equipment Records In DPCTrack2, “Equipment” is defined as a unit that does not get calibrated, but consists of one or more Instruments and/or Loops that do. Equipment may be control panels, vessels, machinery, etc. Although it is not necessary to create Equipment records or use this section of the program, associating Instruments and Loops with Equipment is a good way to create more detailed records. It also gives you the ability to run advanced queries that include Equipment IDs, allowing you to isolate your data and efficiently assign work. The IDs of all Equipment records entered in this screen will be added to the Equipment ID drop-down list in the MASTER INSTRUMENT and LOOP screens. The EQUIPMENT RECORD screen shown below in Figure 14.1 is used to add, modify and if necessary, delete Equipment records. However, once an Equipment ID has been associated with another record it can no longer be deleted from the system. Figure 14.1 14.2 Tabbed Notebook Section The tabbed notebook section of the EQUIPMENT RECORD screen contains five (5) different sub-screens or “pages” available for data entry. To open a page, click its tab. Each page and its associated fields are described below. 14.2.1 General Info Tab This tab page (displayed in Figure 14.1) contains the fields in which to enter the general information about the Equipment. 14.2.1.1 Location, & Building These fields may be filled in from the drop down lists. For more information see Chapter 12. 14.2.1.2 Equipment Type This field can be populated either be selecting from the drop down list or creating a new Equipment Type. For more information see Chapter 12. 14.2.1.3 Manufacture This field can be populated either be selecting from the drop down list or creating a new Manufacture. For more information see Chapter 12. 14.2.1.4 Model Number, & Serial Number These fields can be filled in as needed. Each field can contain up to 100 characters. 14-3 Quality Fluke Products Online at: www. GlobalTestSupply.com [email protected] DPCTrack2 Users Manual 14.2.1.5 Status This field can be populated either be selecting from the drop down list or creating a new Status. For more information see Chapter 1214.2.1.6 Classification. This field may be filled in from the drop down list. For more information see Chapter 12. 14.2.2 Additional Info Tab The Additional Info tab contains three (3) additional fields. On this screen, you will also see the date, time and person(s) responsible for the entry of the record and for the most recent modification made. 14.2.2.1 Department This field can be populated either be selecting from the drop down list or creating a new Department. For more information see Chapter 12. 14.2.2.2 P+ID Number, & P+ID Revision Number These fields can be filled as needed. Each field can contain up to 50 characters. 14.2.3 Instruments/Loops Tab The Instruments/Loops tab on this screen (see Figure 14.2) lists all of the Instruments and Loops that have been associated with the Equipment record. None of the data shown on this tab is modifiable, nor can the Instrument or Loop records shown be accessed directly from this screen. Figure 14.2 14.2.4 User Defined Tab This tab page contains all user defined variables (fields) that have been set up for the EQUIPMENT RECORD screen. (See Chapter 10 for instructions about how to set up user defined variables.) 14-4 Quality Fluke Products Online at: www. GlobalTestSupply.com [email protected] 14 Equipment Record Screen 14.3 File Menu Options 14.2.5 Notes Tab This tab page is used to enter and/or view notes for the Equipment record. To enter a new note, click the Add a Note button. Type text into the field provided and click the Save Record button on the screen’s toolbar. Once a note is entered and saved for the record it cannot be modified or deleted. As new notes are added, they will be inserted at the top of those listed (most recent notes first). As the record acquires multiple notes, you may change their order by clicking the Sort Ascending/Descending button. 14.3 File Menu Options 14.3.1 New Record[Ctrl + N] Selecting this option will open a blank Equipment Record screen. The Equipment ID must be entered before you can save the record. 14.3.2 Save Record[Ctrl + S] Selecting this option will save Equipment data. 14.3.3 Find Record[Ctrl + F] Selecting this option will open the Find Equipment screen allowing searches by Equipment ID or Serial Number. 14.3.4 List Records Selecting this button will open the list screen, where all records are listed. On this screen you have the option to scroll through the field or activate an Advanced Query. 14.3.5 Delete Record This option will allow you to Delete the Equipment Record. If the Equipment has any components (Instruments and/or Loops) you will not be able to Delete the record. (See Figure 14.3) If you do not have access to Delete Equipment Records, this option will be grayed out and not available. Figure 14.3 14-5 Quality Fluke Products Online at: www. GlobalTestSupply.com [email protected] DPCTrack2 Users Manual 14.3.6 Close Form Closes the Equipment screen. 14.3.7 Exit DPCTrack2 Use this option to close DPCTrack2. You will be prompted to save any work before DPCTrack2 closes. 14-6 Quality Fluke Products Online at: www. GlobalTestSupply.com [email protected] Chapter 15 Instrument Record Screen Title Page 15.1 Instrument Records ................................................................................. 15-3 15.2 Tabbed Notebook Section....................................................................... 15-3 15.2.1 General Info Tab................................................................................. 15-3 15.2.1.1 Manufacture ................................................................................... 15-3 15.2.1.2 Model Number, & Serial Number.................................................. 15-3 15.2.1.3 Status, & Status Modification Date................................................ 15-4 15.2.1.4 Department..................................................................................... 15-4 15.2.1.5 Classification.................................................................................. 15-4 15.2.1.6 Equipment ID ................................................................................. 15-4 15.2.1.7 Instrument Type ............................................................................. 15-4 15.2.1.8 Document ID.................................................................................. 15-4 15.2.1.9 Calibration Frequency.................................................................... 15-4 15.2.1.10 First Cal Date, Last Cal Date, & Next Cal Date ............................ 15-4 15.2.1.11 Keep on Schedule........................................................................... 15-4 15.2.1.12 Approved By, & Approved On ...................................................... 15-5 15.2.1.13 Associated Loops ........................................................................... 15-5 15.2.2 Calibration Points Tab........................................................................ 15-5 15.2.2.1 Test Type........................................................................................ 15-6 15.2.2.2 # Cal Points .................................................................................... 15-8 15.2.2.3 Show DPC Settings ........................................................................ 15-9 15.2.2.4 Input Signal Information ................................................................ 15-11 15.2.2.5 Output Signal Information ............................................................. 15-12 15.2.2.6 Stated Accuracy ............................................................................. 15-12 15.2.2.7 Entering Data and Calculating Limits in the Calibration Specifications Grid........................................................................ 15-13 15.2.2.8 Modifying Data in the Calibration Specifications Grid ................. 15-14 15.2.2.9 Test Point Groups........................................................................... 15-15 15.2.3 Additional Info Tab ............................................................................ 15-16 15.2.3.1 Location & Building ...................................................................... 15-16 15.2.3.2 Responsible Technician ................................................................. 15-16 15.2.3.3 Warranty Exp Date & Exp Man Hrs .............................................. 15-16 15.2.3.4 P+ID Number & P+ID Revision Number...................................... 15-17 15.2.3.5 Vendors .......................................................................................... 15-17 15.2.4 User Defined Tab ............................................................................... 15-17 15.2.5 Notes Tab ........................................................................................... 15-17 15.3 File Menu Options .................................................................................. 15-17 15.3.1 New Record [Ctrl + N] ....................................................................... 15-17 15.3.2 Copy Record [Ctrl + Y]...................................................................... 15-17 15-1 Quality Fluke Products Online at: www. GlobalTestSupply.com [email protected] DPCTrack2 Users Manual 15.3.3 15.3.4 15.3.5 15.3.6 15.3.7 15.3.8 15.3.9 Save Record [Ctrl + S] ....................................................................... 15-17 Find Record [Ctrl + F]........................................................................ 15-17 List Records [Ctrl + L] ....................................................................... 15-17 Show Work History [Ctrl + K]........................................................... 15-17 Delete Record ..................................................................................... 15-17 Close Form ......................................................................................... 15-18 Exit DPCTrack2 ................................................................................. 15-18 15-2 Quality Fluke Products Online at: www. GlobalTestSupply.com [email protected] Instrument Record Screen 15.1 Instrument Records 15 15.1 Instrument Records The INSTRUMENT RECORD screen is used to add, display, modify and, if necessary, delete Instrument records. This screen is where you enter all of the Instrument’s information that will remain constant, such as model number and serial number. The Instrument records that you enter will act as the templates for creating calibration records for those Instruments. The INSTRUMENT RECORD screen is accessed by clicking the speed button labeled “Instruments” on the Record Toolbar. To add an Instrument select New and enter an Instrument ID, this is limited to 32 characters. The Description field is optional and is limited to 100 characters. Figure 15.1 15.2 Tabbed Notebook Section The tabbed notebook section of the INSTRUMENT RECORD screen contains five (5) different sub-screens or “pages” available for data entry. These pages are logically grouped on the tabs of the notebook. To open a tab page, click it with your mouse. Each page and its associated fields are described below. Note It is not necessary to fill in all empty fields. However, you must enter an Instrument ID to save a new record. 15.2.1 General Info Tab This tab (Figure 15.1) allows you to enter general information about the Instrument. 15.2.1.1 Manufacture This field may be populated by either selecting from the drop down menu or entering a new Manufacture. See Chapter 12 for more information. 15.2.1.2 Model Number, & Serial Number These fields can be filled in as needed. Each field can contain up to 100 characters. 15-3 Quality Fluke Products Online at: www. GlobalTestSupply.com [email protected] DPCTrack2 Users Manual 15.2.1.3 Status, & Status Modification Date This field may be populated by either selecting from the drop down menu or entering a new Status. See Chapter 12 for more information. Upon saving the record the Status Modification Date field will be filled in. This field will also change if the Status is changed from the Calibration screen. 15.2.1.4 Department This field may be populated by either selecting from the drop down menu or entering a new Department. See Chapter 12 for more information. 15.2.1.5 Classification This field can be filled in from the drop down list. For more information see Chapter 12 15.2.1.6 Equipment ID This field can filled in from the drop down list. For more information see Chapter 14 15.2.1.7 Instrument Type This field may be populated by either selecting from the drop down menu or entering a new Instrument Type. See Chapter 12 for more information. 15.2.1.8 Document ID This field can be filled in from the drop down list. For more information see Chapter 13 15.2.1.9 Calibration Frequency This field can be filled in from the drop down list. For more information see Chapter 12 15.2.1.10 First Cal Date, Last Cal Date, & Next Cal Date These fields do not have to be filled in when entering a new Instrument. These fields will populate when a passing Calibration is entered. It is recommended to at least fill in the next Cal Date field, as this will generate reminders if the record has an Active status. 15.2.1.11 Keep on Schedule In addition to the check box here, this field may be selected at the Company level. (Chapter 9) If this field is already selected, then this field will already be checked. This can be overridden on an individual basis. A checkmark in this box will instruct the system to maintain the exact calibration frequency and date you have specified for the Instrument, despite calibrations or work that may be performed on a date that does not exactly match the Instrument’s due date. For example, imagine that you have an Instrument with a yearly calibration frequency that is due for calibration on June 1, 2003, but is calibrated early, on May 25, 2003. As long as the Keep On Schedule check box is marked for this item, DPCTrack2 will roll the calibrated Instrument’s next due date forward to June 1, 2004 (maintaining June 1st as the date to be calibrated). However, if this box were not checked and the same situation occurred, the system would have rolled the next due date forward to May 25, 2004 (maintaining the yearly frequency, but changing the actual date to be calibrated). Please note that the Keep On End Of Month calibration frequency setting will override the Keep On Schedule setting. See Chapter 12 for more details about entering calibration frequencies. 15-4 Quality Fluke Products Online at: www. GlobalTestSupply.com [email protected] Instrument Record Screen 15.2 Tabbed Notebook Section 15 15.2.1.12 Approved By, & Approved On When this box is checked and saved, the fields will be filled in with the user and a date & time when it was approved. (Please note that if you have not been granted approval power for Instruments, the Approved by box will be grayed out and inaccessible.) 15.2.1.13 Associated Loops If the Instrument has been associated with any Loops, then that information will also be displayed in the Associated Loops box. If this is the case, then those Loop records can be invoked directly from this screen by double-clicking their listings in the box. 15.2.2 Calibration Points Tab This page (Figure 15.2) contains fields in which to enter calibration information for the Instrument, such as # of cal points, stated accuracy, resolution, etc. This information is then used by the system to calculate the high and low spec and control limits for the Instrument’s calibration. DPCTrack2 allows you to create test point groups, which may help you organize this information, especially if the Instrument requires a more complicated calibration. Not all Instruments will require the use of multiple test point groups, however an Instrument like a multimeter may require that it’s high and low limits be calculated from multiple ranges so the use of several different test point groups would be imperative. Figure 15.2 15-5 Quality Fluke Products Online at: www. GlobalTestSupply.com [email protected] DPCTrack2 Users Manual To begin adding this information, you must first click the Add Group button, which will bring up blank calibration specification fields and a blank grid. Your screen will look similar to that in Figure 15.2 just without any data. You may enter any Group Name you like (up to 50 characters) and continue through the rest of the fields. The information entered for each group will remain unique to that group. As you enter information into each field and hit the tab key, the values you have entered or the selections you have made will automatically be inserted into the calibration specifications grid below. The number of rows in the grid is determined by the number of test points you enter into the # of Cal Pts field. 15.2.2.1 Test Type For standard input-output tests, leave this field blank. Two additional test types are provided and are needed, described below. 15.2.2.1.1 Manual Pass/Fail After the Test Type Package is selected in the Test Type field on the Calibration Points tab of the instrument record, the screen refreshes to display the Manual Pass/Fail format as shown in Figure 15.3. This can be used to capture the Pass or Fail of any test without measurement data, either via Calibration record entry or via DPC download. Test Inputs: The inputs can be set to default values to appear when entering a Calibration record, they can also be changed during a Calibration event. • • • As Found Result o Pass – Select Pass if there are no As Found out of tolerances. o Fail – Select Fail if there are As Found out of tolerances. o Unknown – Select Unknown if As Found vales are not applicable. o Blank – Leaving the field blank will default to “Not Entered” which will have the same result as “Unknown”. As Left Result o Pass – Select Pass if there are no As Left out of tolerances. o Fail – Select Fail if there are As Left out of tolerances. o Unknown - Select Unknown if As Left vales are not applicable. o Not Entered – Select Not Entered if As Left values were not recorded. o Blank – leaving this field blank will result in the Pass/Fail logic to be determined by the As Found Result. Test Performed o No – If this field is set to ‘No’ or is left Blank, no failure fields will be set regardless of other data entered for this Group. The Calibration can be saved as either Passed or Failed. o Yes – If set to ‘Yes’ it will use the information in the As Found and As Left fields to determine the Pass/Fail results. 15-6 Quality Fluke Products Online at: www. GlobalTestSupply.com [email protected] Instrument Record Screen 15.2 Tabbed Notebook Section 15 Figure 15.3 15.2.2.1.2 Fluke Switch Test This Test Type allows users to perform a Switch test via the DPC or via manual entry on the Calibration screen with one or two set points and an optional reset point check. See Figure 15.4 Figure 15.4 15-7 Quality Fluke Products Online at: www. GlobalTestSupply.com [email protected] DPCTrack2 Users Manual Test Setup • # of Set Points - Choice of One or Two. • Input Type - The list of Signal Types is available for selection. This is the engineering unit used to drive the switch to its Set or Reset State • Resolution - Select up to eight decimal places (0.00000001) • Trip Function o Trip Continuity o Trip DCV o Trip ACV • Step Size – To set the increment used with the up/down arrow keys on the DPC unit during a manual switch test execution. • Set Point +/- - Used to determine the Spec Limits for each Set Point • Has Reset Point – Checked, there will be “Deadband” fields • Deadband Min & Deadband Max – The deadband is the range through which an input can be changed without causing an observable response; these fields represent the Low and High pass/fail limits for the deadband, which is found when the Reset Point is detected Set Point Settings – For each Set Point the user must configure the following settings. Each setting corresponds to a similar or equivalent setting: • Direction o Low – Set Point trips on a decreasing signal o High – Set Point trips on an increasing signal • Set Point – the target Set Point value • Set State o o • For Trip Continuity: Short – Set Point trips when the circuit is closed Open – Set Point trips when the circuit is opened For Trip DCV or ACV Low – Set Point trips at a low voltage reading High – Set Point trips at a high voltage reading Set Point Range and Deadband Range – These read-only fields help the user by displaying the acceptable Set Point and Reset Point values for passing the test, assuming the Set Point is found to match the target set point exactly. 15.2.2.2 # Cal Points The number of rows in the grid is determined by the number of test points you enter into the # of Cal Pts field. You can enter a maximum of 999 calibration points for each group. You can increase the number of calibration points and they will be added to the end of the list. If you decrease the number of calibration points you will receive a warning upon tabbing off the field alerting the user that data will be lost. If you select “Yes” at the warning the points will be deleted from the bottom level(s). To add an additional calibration point in a specific placement, click any where on the grid below where you 15-8 Quality Fluke Products Online at: www. GlobalTestSupply.com [email protected] Instrument Record Screen 15.2 Tabbed Notebook Section 15 would like a new point added and select “Edit” & “Insert Before Current Test Point”. To delete a specific point, click anywhere on that line and select “Edit” & “Delete Current Test Point”. You will NOT receive a warning. To undo your changes, click on the red X to cancel your changes. 15.2.2.3 Show DPC Settings Clicking the Show DPC Settings button will allow you to configure your Source Mode and Measure Mode. This provides the compatibility between the signal type and the Source Mode and Measure Mode 15.2.2.3.1 Source Mode Options Depending on the Source Mode that you select from the dropdown, different options will appear: (not all options will be available for all Source Modes) The following options are available on all SOURCE MODE selections. • Loop Power Source The calibrator supplies loop power at 28 V or 24 V DC 24V 28V NOTE: The 75x Series does not support 28V Loop Power, but attempts to download devices using 28V will automatically use 24V. External (Off) Use Default – The setting is controlled by the Options tab of the Upload/Download screen • Delay (sec) If the process instrument needs more time to settle than the calibrator’s normal settling time (about 2 seconds) at each new stimulus level, enter that time in seconds for Delay. • Reading Method Normal (UEV Off) UEV On(User Entered Value) Enables technicians to record calibration results that were sourced and/or measured by other devices such as panel meters or readout-only devices. Use Default – The setting is controlled by the Options tab of the Upload/Download screen • Unit Type Custom Units enable you to map one unit to another, such as mV to ºC or ºF. Allows you to use the Fluke 74x or 75x Series with millivolt output accessories such as the Fluke 80T-IR Temperature Probe, and to document tests using nonsupported units such as parts per million or revolutions per minute. Normal – No additional scaling is performed. PCT Display – lets you scale the output as a percentage in accordance with the input requirements. • Damping - smoothing of the last several readings, On Off 15-9 Quality Fluke Products Online at: www. GlobalTestSupply.com [email protected] DPCTrack2 Users Manual When the following SOURCE MODES are selected, these additional selections will be available: Frequency • Wave Form – for more information see your Fluke Documenting Process Calibrator Users Manual Sine Square • Amplitude – Manually entered numeric value RTD - Resistance Temperature Detectors • Probe Type RTD Cu 10, a =0.004270 RTD Ni 120, a=0.006720 RTD Pt 100, a=0.003850 RTD Pt 100, a=0.003916 RTD Pt 100, a=0.003926 (IPTS-68) RTD Pt 1000, a=0.003850 RTD Pt 200, a=0.003850 RTD Pt 500, a=0.003850 • # of Wires – The DPC can only handle 2 Wire RTD sourcing. TC - Thermocouple • Probe Type - Type of Thermocouple B K T BP L U C N XK E R J S CJC Settings - reference (cold) junction temperature compensation • External • Internal TC Linear mV When simulating temperature in As Found/As Left procedures, steps may be linear by mV potential. • TC Linear 0% • TC Linear 100% 15-10 Quality Fluke Products Online at: www. GlobalTestSupply.com [email protected] Instrument Record Screen 15.2 Tabbed Notebook Section 15 15.2.2.3.1 Measure Mode Options Depending on the Measure Mode that you select from the dropdown, different options will appear: (not all options will be available for all Measure Modes) The following options are available on all MEASURE MODE selections. • Reading Method – same as SOURCE MODE setting • Unit Type – same as SOURCE MODE setting • Damping – same as SOURCE MODE setting • Min/Max Disp – This option activates or deactivates the corresponding front-panel option on your DPC for Min and Max display. On Off When the following Measure Modes are selected, these additional selections will be available: RTD • Probe Type– same as SOURCE MODE setting • # of Wires – The DPC can handle 2, 3 or 4 wires for measure TC • Probe Type– same as SOURCE MODE setting • CJC Mode – same as SOURCE MODE setting • Digital PV – This Mode is used to capture HART PV values for the As Found and As Left readings. It is only used for Measure. 15.2.2.4 Input Signal Information 15.2.2.4.1 Input Type Selection of the Input Type can be made from that field’s drop-down list, which contains the signal types that have been entered through the Lists menu. (See Chapter 12) If the signal type needed is not yet on the list, you can add it through the “Lists” menu. You may enter up to 50 characters in this field. 15.2.2.4.2 In Resolution When adding a new test point group, the value shown in the In Res field will default to the same value set in the Company Record screen, see Chapter 9. To select a different input resolution, select it from the In Res field’s drop-down list. As you select different resolutions, you will notice that the In Low Range and In High Range fields will adjust accordingly. 15.2.2.4.3 In Low Range & In High Range The In Low Range and In High Range fields are used to record the Instrument’s full input range. Any numeric value may be entered into each of these fields. Entering an Instrument’s input range is important if you plan to allow the system to auto-assign the Instrument’s input values into the calibration specifications grid. 15-11 Quality Fluke Products Online at: www. GlobalTestSupply.com [email protected] DPCTrack2 Users Manual 15.2.2.5 Output Signal Information 15.2.2.5.1 Output Type Entering the Instrument’s Output Type is done in the same manner that you selected the Input Type. Both the Input and Output Type drop-down lists will contain the same selections. If the signal type needed is not yet on the list, you can add it through the “Lists” menu. You may enter up to 50 characters in this field. 15.2.2.5.2 Out Resolution When adding a new test point group, the value shown in the Out Res field will default to the same value set in the Company Record screen, see Chapter 9. To select a different output resolution, select it from the Output Res field’s drop-down list. As you select different resolutions, you will notice that the Out Low Range and Out High Range fields will adjust accordingly. 15.2.2.5.3 Out Low Range & Out High Range The Out Low Range and Out High Range fields are used to record the Instrument’s full output range. Any numeric value may be entered into each of these fields. If the Instrument’s stated accuracy uses “Percent of Range” in any way, it is very important that you enter the correct output range for the device since this is used in conjunction with the Range Acc % to calculate the item’s low and high limits. 15.2.2.6 Stated Accuracy There are five stated accuracies that come standard with the system. The default value is Percent of Range 15.2.2.6.1 Percent of Range Selecting “Pct of Range” will instruct the system to calculate the high and low limits from a percent of the Instrument’s full output range. For example, 1% of a range of 0-100 psig would make the limits plus or minus 1 psig at each test point. To use this stated accuracy, you must fill in the Out Low Range and Out High Range fields. (Note: This may also be used in conjunction with a Plus/Minus value.) 15.2.2.6.2 Percent of Reading Selecting “Pct of Reading” will instruct the system to calculate the high and low limits from a percent of each test point’s output value. For example, 1% of a test point of 50 Deg C would make the limits for that test point plus or minus 0.5 Deg C. 1% of a test point of 75 Deg C would make the limits for that test point plus or minus 0.75 Deg C. (Note: This may also be used in conjunction with a Plus/Minus value.) 15.2.2.6.3 Percent of Reading Range Selecting “Pct of Reading Range” will instruct the system to use a combination of the Range Acc% and the Reading Acc% to calculate the high and low limits. For example, imagine you have a test point of 10 GPM, with an output range of 0-100 GPM. With a Range Accy% of 1% and a Reading Acc% of 2%, the high and low limits would be plus or minus 1.2 GPM. (1% of 0-100 = 1 and 2% of 10 = 0.2. Therefore, 1 + 0.2 = 1.2 making the low limit 8.8 GPM and the high limit 11.2 GPM) to use this stated accuracy, you must fill in the Out Low Range and Out High Range fields. (Note: This may also be used in conjunction with a Plus/Minus value.) 15-12 Quality Fluke Products Online at: www. GlobalTestSupply.com [email protected] Instrument Record Screen 15.2 Tabbed Notebook Section 15 15.2.2.6.4 Plus or Minus Selecting “Plus/Minus” will instruct the system to calculate the high and low limits for each test point as plus or minus a discreet value. For example, +/- 3 mV at a test point of 100 mV would result in a low limit of 97 mV and a high limit of 103 mV. 15.2.2.6.5 Manual Selecting “Manual” will result in the system not performing any calculations for you, even if you have entered values into the accuracy % or plus/minus fields. With this stated accuracy selected you must manually enter all input, output and limit values into the cells in the grid. 15.2.2.7 Entering Data and Calculating Limits in the Calibration Specifications Grid 15.2.2.7.1 Correlation to Output Before input, output and low/high limit values are entered into the calibration specifications grid, you should set the Correlation to Output field. This is not to say that the correlation selected cannot be changed after the grid is populated, in fact DPCTrack2 will auto-update the grid if the correlation is changed any time after the grid is populated. However, the logical flow for entering data on this screen includes setting this field before entering input values and calculating limits. The default value is Linear. The Correlation to Output field contains three (3) options on its drop-down list, “Linear”, “Manual” and “Square Root”. Selecting either “Linear” or “Square Root” for this field will enforce that type of correlation between the Instrument’s input and output values. For example, if you select to enforce a “Linear” correlation, then with input values of 4.00, 12.00 and 20.00 mA (for an input range of 4-20 mA), the corresponding output values will automatically be calculated by the system as 0.00, 50.00 and 100.00 psig (for an output range of 0-100 psig). If you select a “Square Root” Correlation to Output then with the same input range and input values, the system would calculate the output values to be 0.00, 70.71 and 100.00 respectively. With either “Linear” or “Square Root” selected for the Correlation to Output field, you will be restricted from modifying any of the output values in the grid unless you reset the Correlation to Output field to “Manual” which allows for manual modification of the output values. 15.2.2.7.2 Linear or Square Root Correlation to Output If the calibration you are going to perform on the Instrument is linear or square root and you have filled in all of the required fields in the gray section of the screen and selected the correct Correlation to Output, then you may click the Calculate button. Clicking this button will invoke a dialog box with two (2) options, “Auto-Assign Input” and “Calculate Limits”. Selecting “Auto-Assign Input” will instruct the system to populate the In Val cells in the grid with the correct input values as calculated from the number of calibration points selected and the Instruments input range. In addition, the system will also automatically calculate and fill in the cells in the Out Val column reflecting the selected correlation. If you prefer to manually enter the Instrument’s input values, then type those values into the appropriate cells in the grid. As you enter each input value, you will notice that the corresponding output value for each setpoint will still be automatically calculated by the system. Once the input values have been entered into the grid either manually or by the system, then click the Calculate button again and select “Calculate Limits” to have the system automatically calculate the low and high spec and control limits (if applicable) for each setpoint. At this point if you elect to manually modify any of the input values then hitting the tab key after making the modification will trigger the system to recalculate that setpoint’s output value and low/high limits. 15-13 Quality Fluke Products Online at: www. GlobalTestSupply.com [email protected] DPCTrack2 Users Manual Its is important to note that if you elect to enforce a linear or square root relationship between input and output values on an item’s record, that you are electing to do so in any calibration records entered for the item as well. If “Linear” or “Square Root” is selected for the Correlation to Output field on the Instrument’s record, then in the CALIBRATION screen when you enter a new calibration record for it, you will be able to modify any of the input values, but none of the output value cells in the grid will be editable. Additionally, if any of the input values are modified, the corresponding output values will automatically be recalculated to reflect the selected relationship. 15.2.2.7.3 Manual Correlation to Output If you selected “Manual” for the Correlation to Output field, then clicking the Calculate button provides you with six different options, two of which are “Auto-Assign Inputs, calculate LINEAR outputs and limits” and “Auto-Assign Inputs, calculate SQUARE ROOT outputs and limits”. Selecting either of these two options will fill in all of the input and output values for you and calculate the low and high spec and control limits (if applicable) all at the same time. Keep in mind that in order to utilize either of these two functions, you must have entered data into all input and output range fields. If you would like to enter your input values manually, you may do this and then click the Calculate button to select “Calculate LINEAR outputs and limits” or “Calculate SQUARE ROOT outputs and limits”. Selecting either of these two options will calculate the output and limit values for each test point based upon the input values you entered and the information entered into the fields in the gray area of the screen. To have the system fill in only the grid’s input values, click the Calculate for this Group button and select “Auto-Assign Inputs”. Selecting this option will instruct the system to use a combination of the number of calibration points and the input range entered in the gray area of the screen to calculate the input values for the calibration. If you prefer to enter all input and output values manually, you may do this and then click the Calculate button to have the system just calculate the high and low limits. Again, if you have elected not to enforce any specific relationship between the Instrument’s input and output values by selecting “Manual” for the Correlation to Output field, then all of this information will be available for modification when entering a calibration record for the Instrument, as well. 15.2.2.8 Modifying Data in the Calibration Specifications Grid Once the calibration specifications grid is populated, the data shown may be modified further. The In Type, Std Accy, In Res, Out Res and Out Type cells can only be modified by activating each cell’s drop-down list. All other cells may be modified by typing over the current value. To activate a cell’s drop-down list, first click the cell to put it into focus, then click it a second time (towards its right side). When the drop-down arrow appears, a third click will drop the list down, allowing you to make another selection. You also have the ability to widen any or all of the columns with your mouse, to facilitate easier viewing. If you have made changes to the grid that will affect any of the input, output and/or limit values, click the Calculate button again and choose the appropriate option to recalculate these. If after making modifications to the data in the calibration specifications grid, you decide to change back to the default selections shown in the gray section of the screen, you may do this very easily by clicking the Restore Defaults button. Clicking the Restore Defaults button will invoke a box that gives you four different options, “Restore All”, “Restore Input Signals to Defaults”, “Restore Output Signals to Defaults” and “Restore Accuracies to Defaults”. Select the appropriate option from the list. 15-14 Quality Fluke Products Online at: www. GlobalTestSupply.com [email protected] Instrument Record Screen 15.2 Tabbed Notebook Section 15 15.2.2.9 Test Point Groups To add additional test point groups to an Instrument record click the Add Group button for every new group needed. This will add a new group below the last one. To delete a test point group from the record, display the group to be deleted by using the Next Group and Previous Group buttons as needed, then click the Delete Group button. This will remove the test point group entirely from the record and move those below it, up one. To change the order of the test point groups in a record, display each group to be moved, one at a time, and click the Move Group Up and Move Group Down buttons as needed. Other methods for adding new test point groups to the Instrument are located in the Edit menu. The “Copy Current Test Point Group” command will create a new group as a copy of the currently displayed group. This option is only available when the current record has a test point group, and if the record can be modified by the current user. The new group appears at the end of the test point group list, much like the Add Group function, but as a copy of the previously selected group. This feature is helpful in saving time spent performing repetitive data entry of similar groups of test points and similar ranges. The “Load Test Point Group From Item” command opens a dialog for selecting a test point group from another item in the Company. The LOAD CALIBRATION SPECIFICATION screen is shown in Figure 15.5 below. Figure 15.5 The screen opens with no item selected. First, select an Item Type, then an item ID (the label on this field will change according to the selected Item Type.) Selecting an item displays that item’s Description and Instrument Type for Instrument records. Click Load Specs to bring in a read-only view of all the test point groups available on this item. To copy one of these groups as a new group for the current Instrument record, navigate using the Previous Group and Next Group buttons on this form and click OK to select the group. The Cancel button can be used to cancel the addition of a new group. 15-15 Quality Fluke Products Online at: www. GlobalTestSupply.com [email protected] DPCTrack2 Users Manual You also have the ability within a single test point group to insert a test point or delete one from those shown. To insert a new test point, place your cursor somewhere within the row before which you would like the new test point to be placed, then select “Insert Before Current Test Point” from the Edit menu. To insert a new test point at the bottom of those shown, increase the “# of Cal Pts” to the number needed. A new row will be inserted at the bottom of the grid for every new test point added. To delete a test point from the grid, place your cursor anywhere within the row of the test point to be deleted, and then select “Delete Current Test Point” from the Edit menu. This will remove the selected test point entirely from the test point group. 15.2.3 Additional Info Tab This page (Figure 15.6) allows you to record additional information about the Instrument You can also see the date, time and person(s) responsible for the entry of the record and for the most recent modification made. Figure 15.6 15.2.3.1 Location & Building These fields can be populated by either selecting from the drop down list or selecting “New” and adding a new Location or Building. See Chapter 12 for more information. 15.2.3.2 Responsible Technician This field can be populated by selecting from the drop down list or selecting “New” and adding a new technician. See Chapter 12 for more information. 15.2.3.3 Warranty Exp Date & Exp Man Hrs These are optional fields. 15-16 Quality Fluke Products Online at: www. GlobalTestSupply.com [email protected] Instrument Record Screen 15.3 File Menu Options 15 15.2.3.4 P+ID Number & P+ID Revision Number These fields are optional. Each field can hold up to 100 characters. (Process & Instrumentation Diagram or Piping & Instrumentation Diagram) 15.2.3.5 Vendors In this field you can also note the Vendors Which Sell or Service the Instrument. To do this highlight the vendor(s) desired, and click the appropriate arrow button between the two list boxes. (For more information on adding Vendors see Chapter 12) 15.2.4 User Defined Tab This tab page contains all user defined variables (fields) that have been set up for the INSTRUMENT RECORD screen. (See Chapter 10 for instructions about how to set up user defined variables.) 15.2.5 Notes Tab This tab page is used to enter and/or view notes for the Instrument record. To enter a new note, click the Add a Note button. Type text into the field provided and click the Save Record button on the screen’s toolbar. Once a note is entered and saved for the record it cannot be modified or deleted. As new notes are added, they will be inserted at the top of those listed (most recent notes first). As the record acquires multiple notes, you may change their order by clicking the Sort Ascending/Descending button. 15.3 File Menu Options The following File Menu Options are for the Instrument Record. 15.3.1 New Record [Ctrl + N] Selecting this option will open a blank Instrument Record screen. The Instrument ID must be entered before you can save the record. 15.3.2 Copy Record [Ctrl + Y] This button will create a Copy of the current record. All fields will be copied except: ID, Serial Number, First & Last Cal dates, Approved by, Notes and any User Defined Signatures. 15.3.3 Save Record [Ctrl + S] Selecting this option will save Instrument data. 15.3.4 Find Record [Ctrl + F] Selecting this option will open the Find Instrument screen allowing searches by Instrument ID or Serial Number. 15.3.5 List Records [Ctrl + L] Selecting this button will open the list screen, where all records are listed. On this screen you have the option to scroll through the field or activate an Advanced Query. 15.3.6 Show Work History [Ctrl + K] This button will open a new screen that will display all the work history (if the record has no history, the screen will not open). Double clicking on a listed record will open that record. 15.3.7 Delete Record This option will allow you to delete the Instrument Record. If the Instrument is a component of any Loop records, it will have to be removed from the Loop before the record can be deleted. If you do not have access to Delete Instrument Records, this option will be grayed out and not available. 15-17 Quality Fluke Products Online at: www. GlobalTestSupply.com [email protected] DPCTrack2 Users Manual 15.3.8 Close Form Closes the Instrument screen. 15.3.9 Exit DPCTrack2 This option will close DPCTrack2. If you have any unsaved work on any screens you will be prompted to Save before DPCTrack2 closes. 15-18 Quality Fluke Products Online at: www. GlobalTestSupply.com [email protected] Chapter 16 Loop Record Screen Title Page 16.1 Loop Records.......................................................................................... 16-3 16.2 Tabbed Notebook Section....................................................................... 16-3 16.2.1 General Info Tab................................................................................. 16-4 16.2.1.1 Location & Building ...................................................................... 16-4 16.2.1.2 Responsible Technician ................................................................. 16-4 16.2.1.3 Status.............................................................................................. 16-4 16.2.1.4 Department..................................................................................... 16-4 16.2.1.5 Classification.................................................................................. 16-4 16.2.1.6 Equipment ID ................................................................................. 16-4 16.2.1.7 Document ID.................................................................................. 16-4 16.2.1.8 Calibration Frequency.................................................................... 16-4 16.2.1.9 First Cal Date, Last Cal Date & Next Cal Date ............................. 16-4 16.2.1.10 Keep On Schedule.......................................................................... 16-4 16.2.1.11 Approved By & Approved On ....................................................... 16-5 16.2.2 Calibration Points Tab........................................................................ 16-5 16.2.3 Additional Info Tab ............................................................................ 16-5 16.2.3.1 P+ID Number & P+ID Revision Number...................................... 16-5 16.2.3.2 Expected Man Hours...................................................................... 16-5 16.2.4 User Defined Tab ............................................................................... 16-6 16.2.5 Notes Tab ........................................................................................... 16-6 16.3 File Menu Options .................................................................................. 16-6 16.3.1 New Record[Ctrl + N] ........................................................................ 16-6 16.3.2 Copy Record[Ctrl + Y]....................................................................... 16-6 16.3.3 Save Record[Ctrl + S] ........................................................................ 16-7 16.3.4 Find Record[Ctrl + F]......................................................................... 16-7 16.3.5 List Records[Ctrl + L] ........................................................................ 16-7 16.3.6 Show Work History[Ctrl + K]............................................................ 16-7 16.3.7 Delete Record ..................................................................................... 16-7 16.3.8 Close Form ......................................................................................... 16-7 16.3.9 Exit DPCTrack2 ................................................................................. 16-7 16-1 Quality Fluke Products Online at: www. GlobalTestSupply.com [email protected] DPCTrack2 Users Manual 16-2 Quality Fluke Products Online at: www. GlobalTestSupply.com [email protected] Loop Record Screen 16.1 Loop Records 16 16.1 Loop Records As with the equipment section, it is sometimes useful to associate Instruments with Loops and even to provide separate calibration certificates for each Loop. DPCTrack2 gives you the ability to manage Loop information. Just like the INSTRUMENT RECORD screen, the MASTER LOOP RECORD screen is used to enter all of the Loop’s information that will remain constant, such as classification and department. The Loop records that you enter will act as the templates for creating calibration records for those Loops. The MASTER LOOP RECORD screen is accessed by clicking the speed button labeled “Loops” on Record Toolbar. Figure 16.1 16.2 Tabbed Notebook Section The tabbed notebook section of the MASTER LOOP RECORD screen contains five (5) different sub-screens or “pages” available for data entry. These pages are logically grouped on the tabs of the notebook. To open a tab page click it with your mouse. Each page and its associated fields are described below. Note It is not necessary to fill in all empty fields. However, you must enter a Loop ID in order to save a new record. 16-3 Quality Fluke Products Online at: www. GlobalTestSupply.com [email protected] DPCTrack2 Users Manual 16.2.1 General Info Tab This page (Figure 16.1) allows you to enter general information about the Loop. 16.2.1.1 Location & Building These fields may be filled in from the drop down lists or you may select New. For more information see Chapter 12. 16.2.1.2 Responsible Technician This field can be populated either be selecting from the drop down list or select New. For more information see Chapter 12. 16.2.1.3 Status This field can be populated either be selecting from the drop down list or creating a new Status. For more information see Chapter 12. 16.2.1.4 Department This field can be populated either be selecting from the drop down list or creating a new Department. For more information see Chapter 12. 16.2.1.5 Classification This field may be filled in from the drop down list. For more information see Chapter 12. 16.2.1.6 Equipment ID This field can be filled in from the drop down list. For more information see Chapter 14. 16.2.1.7 Document ID This field can filled in from the drop down list. For more information see Chapter 13. 16.2.1.8 Calibration Frequency This field can filled in from the drop down list. For more information see Chapter 12. 16.2.1.9 First Cal Date, Last Cal Date & Next Cal Date These fields do not have to be filled in when entering a new Instrument. These fields will populate when a passing Calibration is entered. It is recommended to at least fill in the next Cal Date field, this will generate reminders. 16.2.1.10 Keep On Schedule In addition to the check box here, this field may be selected at the Company level. (Chapter 9) If this field is selected, then this field will already be checked. This can be overridden on an individual basis. A checkmark in this box will instruct the system to maintain the exact calibration frequency and date you have specified for the Instrument, despite calibrations or work that may be performed on a date that does not exactly match the Instrument’s due date. For example, imagine that you have an Instrument with a yearly calibration frequency that is due for calibration on June 1, 2003, but is calibrated early, on May 25, 2003. As long as the Keep On Schedule check box is marked for this item, DPCTrack2 will roll the calibrated Instrument’s next due date forward to June 1, 2004 (maintaining June 1st as the date to be calibrated). However, if this box were not checked and the same situation occurred, the system would have rolled the next due date forward to May 25, 2004 (maintaining the yearly frequency, but changing the actual date to be calibrated). Please note that the Keep On End Of Month calibration frequency setting will override the Keep On Schedule setting. See Chapter 12 for more details about entering calibration frequencies. 16-4 Quality Fluke Products Online at: www. GlobalTestSupply.com [email protected] Loop Record Screen 16.2 Tabbed Notebook Section 16 16.2.1.11 Approved By & Approved On When this box is checked and saved, the fields will be filled in with the user and a date & time when it was approved. (Please note that if you have not been granted approval rights for Loops, the Approved by box will be grayed out and inaccessible.) 16.2.2 Calibration Points Tab This page contains fields in which to enter calibration information for the Loop, such as # of Calibration points, Stated Accuracy, Resolution, etc. Entering calibration specification information for Loops is done in exactly the same manner as it is done for Instruments, therefore you may reference Chapter 15 (Master Instrument Record) for more information on how to use this screen. 16.2.3 Additional Info Tab This tab page (Figure 16.2 below) is used among other things to note the Instruments that comprise the Loop. The Available Instruments list box shows every instrument that has been entered as a MASTER INSTRUMENT RECORD for the Company. And since Instruments in DPCTrack2 may be associated with any number of different Loops, the list of available instruments for any Loop will always contain the full master list of Instrument IDs. The list box labeled Instruments Which Make Up This Loop will show those Instruments that you designate as a part of the Loop. To move an Instrument from one box to the other, highlight it with your mouse and use the center arrow buttons as needed. In addition, you may change the order of the Instruments listed in the Instruments Which Make Up This Loop box by highlighting each of them and then clicking the up/down arrows located to the right of the box. The Additional Info tab also contains the date, time and person(s) responsible for the entry of the record and for the most recent modification made. Note The addition of a new calibration record for an Instrument assigned to a Loop, will not automatically update the next due date of its Loop. Conversely, the addition of a new calibration record for a Loop, will not automatically update the calibration due dates of its component Instruments. 16.2.3.1 P+ID Number & P+ID Revision Number These fields can be filled as needed. Each field can contain up to 50 characters. 16.2.3.2 Expected Man Hours The Expected Man Hours field may be used to document the amount of time that is expected for the item’s calibration or repair. 16-5 Quality Fluke Products Online at: www. GlobalTestSupply.com [email protected] DPCTrack2 Users Manual Figure 16.2 16.2.4 User Defined Tab This tab page contains all user defined variables (fields) that have been set up for the MASTER LOOP RECORD screen. (See Chapter 8 for instructions about how to set up user defined variables.) 16.2.5 Notes Tab This tab page is used to enter and/or view notes for the Loop record. To enter a new note, click the Add a Note button. Type text into the field provided and click the Save Record button on the screen’s toolbar. Once a note is entered and saved for the record it cannot be modified or deleted. As new notes are added, they will be inserted at the top of those listed (most recent notes first). As the record acquires multiple notes, you may change their order by clicking the Sort Ascending/Descending button. 16.3 File Menu Options The following File Menu Options are for the Loop Record. 16.3.1 New Record[Ctrl + N] Selecting this option will open a blank Master Loop Record screen. The ID must be entered before you can save the record. 16.3.2 Copy Record[Ctrl + Y] This button will create a Copy of the current record. All fields will be copied except: ID, Serial Number, First & Last Cal dates, Approved by, Notes and any User Defined Signatures. 16-6 Quality Fluke Products Online at: www. GlobalTestSupply.com [email protected] Loop Record Screen 16.3 File Menu Options 16 16.3.3 Save Record[Ctrl + S] Selecting this option will save Master Loop data. 16.3.4 Find Record[Ctrl + F] Selecting this option will open the Find Master Loop screen allowing searches by Master Loop ID or Serial Number. 16.3.5 List Records[Ctrl + L] Selecting this button will open the list screen, where all records are listed. On this screen you have the option to scroll through the field or activate an Advanced Query. 16.3.6 Show Work History[Ctrl + K] This button will open a new screen that will display all the work history (if the record has no history, the screen will not open). Double clicking on a listed record will open that record. 16.3.7 Delete Record This option will allow you to Delete the Loop Record. If you do not have access to Delete Loop Records, this option will be grayed out and not available. 16.3.8 Close Form Closes the Master Loop screen. 16.3.9 Exit DPCTrack2 This option will close DPCTrack2. If you have any unsaved work on any screens you will be prompted to Save before DPCTrack2 closes. 16-7 Quality Fluke Products Online at: www. GlobalTestSupply.com [email protected] DPCTrack2 Users Manual 16-8 Quality Fluke Products Online at: www. GlobalTestSupply.com [email protected] Chapter 17 Test Instrument Record Screen Title Page 17.1 Test Instrument Records ......................................................................... 17-3 17.2 Tabbed Notebook Section....................................................................... 17-3 17.2.1 General Info Tab................................................................................. 17-3 17.2.1.1 Manufacture ................................................................................... 17-3 17.2.1.2 Model Number, & Serial Number.................................................. 17-3 17.2.1.3 Document ID.................................................................................. 17-4 17.2.1.4 Status, & Status Modification Date................................................ 17-4 17.2.1.5 Use This Test Instrument When Calibrating the Following Instrument Type ........................................................................... 17-4 17.2.1.6 Calibration Frequency.................................................................... 17-4 17.2.1.7 First Cal Date, Last Cal Date, & Next Cal Date ............................ 17-4 17.2.1.8 Keep on Schedule........................................................................... 17-4 17.2.1.1.9 Date Sent for Cal & Date Returned................................................ 17-5 17.2.1.10 Approved By, & Approved On ...................................................... 17-5 17.2.2 Calibration Points Tab........................................................................ 17-5 17.2.3 Additional Info Tab ............................................................................ 17-5 17.2.4 User Defined Tab ............................................................................... 17-5 17.2.5 Notes Tab ........................................................................................... 17-5 17.3 File Menu Options .................................................................................. 17-5 17.3.1 New Record[Ctrl + N] ........................................................................ 17-5 17.3.2 Copy Record[Ctrl + Y]....................................................................... 17-5 17.3.3 Save Record[Ctrl + S] ........................................................................ 17-5 17.3.4 Find Record[Ctrl + F]......................................................................... 17-5 17.3.5 List Records[Ctrl + L] ........................................................................ 17-6 17.3.6 Show Work History[Ctrl + K]............................................................ 17-6 17.3.7 Delete Record ..................................................................................... 17-6 17.3.8 Close Form ......................................................................................... 17-6 17.3.9 Exit DPCTrack2 ................................................................................. 17-6 17-1 Quality Fluke Products Online at: www. GlobalTestSupply.com [email protected] DPCTrack2 Users Manual 17-2 Quality Fluke Products Online at: www. GlobalTestSupply.com [email protected] Test Instrument Record Screen 17.1 Test Instrument Records 17 17.1 Test Instrument Records For a variety of reasons relating to quality control and record-keeping issues, DPCTrack2 stores data for Test Instruments separately. This screen is used to add, display, modify, and if necessary delete Test Instrument records. In this section, you may add your company’s test equipment. The TEST INSTRUMENT RECORD screen is accessed by clicking the speed button labeled “Test Instruments” on the Record Toolbar. 17.2 Tabbed Notebook Section The tabbed notebook section of the TEST INSTRUMENT RECORD screen contains five (5) different sub-screens or “pages” available for data entry. These pages are logically grouped on the tabs of the notebook. Each page and its associated fields are described below. Figure 17.1 Note It is not necessary to fill in all available fields. Only a Test Instrument ID is required to save a new record. 17.2.1 General Info Tab This tab (Figure 17.1) allows you to enter general information about the Test Instrument like its manufacturer, vendor, model number, serial number, status, etc. 17.2.1.1 Manufacture This field may be populated by either selecting from the drop down menu or entering a new Manufacture. See Chapter 12 for more information. 17.2.1.2 Model Number, & Serial Number These fields can be filled in as needed. Each field can contain up to 100 characters. 17-3 Quality Fluke Products Online at: www. GlobalTestSupply.com [email protected] DPCTrack2 Users Manual 17.2.1.3 Document ID This field can filled in from the drop down list. For more information see Chapter 13 17.2.1.4 Status, & Status Modification Date This field may be populated by either selecting from the drop down menu or entering a new Status. See Chapter 12 for more information. Upon saving the record the Status Modification Date field will be filled in. This field will also change if the Status is changed from the Calibration screen. 17.2.1.5 Use This Test Instrument When Calibrating the Following Instrument Type Documenting what “types” of Instruments a Test Instrument can calibrate helps in record keeping and in limiting the selection of available Test Instruments when entering a new calibration record. Instrument types may be very general like “Pressure” or “Temperature” or they may be more specific like “Level Transmitter” or “Flowmeter”. The terminology is completely user-defined, allowing the system to be flexible enough to meet your needs. The bottom portion of the General Info tab on the TEST INSTRUMENT RECORD screen contains two list boxes showing the instrument types that can and cannot be calibrated by the current Test Instrument. To move instrument types back and forth between the two lists, highlight the Instrument type(s) to be moved and click the appropriate center arrow button. Utilizing these two boxes allows you to limit the display of available Test Instruments on the CALIBRATION RECORD screen, to test only the Instruments that are designated for use on the type of Instrument that is being calibrated. (See Chapter 12 for instructions on how to enter “Instrument Types”.) If an Instrument has not been designated an Instrument Type, then all Test Instruments which have been entered into the system will be displayed in the Available Test Instruments box on the CALIBRATION RECORD screen. 17.2.1.6 Calibration Frequency This field can filled in from the drop down list. For more information see Chapter 12 17.2.1.7 First Cal Date, Last Cal Date, & Next Cal Date These fields do not have to be filled in when entering a new Instrument. These fields will populate when a passing Calibration is entered. It is recommended to at least fill in the next Cal Date field, this will generate reminders. 17.2.1.8 Keep on Schedule In addition to the check box here, this field may be selected at the Company level. (Chapter 9) If this field is already selected, then this field will already be checked. This can be overridden on an individual basis. A checkmark in this box will instruct the system to maintain the exact calibration frequency and date you have specified for the Instrument, despite calibrations or work that may be performed on a date that does not exactly match the Instrument’s due date. For example, imagine that you have an Instrument with a yearly calibration frequency that is due for calibration on June 1, 2003, but is calibrated early, on May 25, 2003. As long as the Keep On Schedule check box is marked for this item, DPCTrack2 will roll the calibrated Instrument’s next due date forward to June 1, 2004 (maintaining June 1st as the date to be calibrated). However, if this box were not checked and the same situation occurred, the system would have rolled the next due date forward to May 25, 2004 (maintaining the yearly frequency, but changing the actual date to be calibrated). Please note that the Keep On End Of Month calibration frequency setting will override the Keep On Schedule setting. See Chapter 12 for more details about entering calibration frequencies. 17-4 Quality Fluke Products Online at: www. GlobalTestSupply.com [email protected] Test Instrument Record Screen 17.3 File Menu Options 17 17.2.1.1.9 Date Sent for Cal & Date Returned These fields are to be filled in manually and are optional. 17.2.1.10 Approved By, & Approved On When this box is checked and saved, the fields will be filled in with the user and a date & time when it was approved. (Please note that if you have not been granted approval power for Test Instruments, the Approved by box will be grayed out and inaccessible.) 17.2.2 Calibration Points Tab This page contains fields in which to enter calibration information for the Test Instrument, such as # of cal points, stated accuracy, resolution, etc. Entering calibration specification information for Test Instruments is done in exactly the same manner as it is done for instruments, therefore you may reference Chapter 15 (Master Instrument Record) for more information on how to use this screen. 17.2.3 Additional Info Tab This page allows you to record additional information about the Test Instrument like its location, responsible technician, warranty expiration date, etc. You can also note which vendors sell or service the Test Instrument. To do this highlight the vendor desired, and click the appropriate arrow buttons between the two list boxes labeled Available Vendors and Vendors Which Sell or Service This Test Instrument. (Vendor records are added through the Lists menu at the top of the Home Screen, see Chapter 12) Additionally, you can see the date and time of the last modification made to the Test Instrument record. 17.2.4 User Defined Tab This tab page contains all user defined variables (fields) that have been set up for the TEST INSTRUMENT RECORD screen. (See Chapter 8 for instructions about how to set up user defined variables.) 17.2.5 Notes Tab This tab page is used to enter and/or view notes for the test instrument record. To enter a new note, click the Add a Note button. Type text into the field provided and click the Save Record button on the screen’s toolbar. Once a note is entered and saved for the record it cannot be modified or deleted. As new notes are added, they will be inserted at the top of those listed (most recent notes first). As the record acquires multiple notes, you may change their order by clicking the Sort Ascending/Descending button. 17.3 File Menu Options The following File Menu Options are for the Test Instrument Record 17.3.1 New Record[Ctrl + N] Selecting this option will open a blank Test Instrument Record screen. The Instrument ID must be entered before you can save the record. 17.3.2 Copy Record[Ctrl + Y] This button will create a Copy of the current record. All fields will be copied except: ID, Serial Number, First & Last Cal dates, Approved by, Notes and any User Defined Signatures 17.3.3 Save Record[Ctrl + S] Selecting this option will save Test Instrument data. 17.3.4 Find Record[Ctrl + F] Selecting this option will open the Find Test Instrument screen allowing searches by Test Instrument ID or Serial Number. 17-5 Quality Fluke Products Online at: www. GlobalTestSupply.com [email protected] DPCTrack2 Users Manual 17.3.5 List Records[Ctrl + L] Selecting this button will open the list screen, where all records are listed. On this screen you have the option to scroll through the field or activate an Advanced Query. 17.3.6 Show Work History[Ctrl + K] This button will open a new screen that will display all the work history (if the record has no history, the screen will not open). Double clicking on a listed record will open that record. 17.3.7 Delete Record This option will allow you to Delete the Test Instrument Record. If you do not have access to Delete Test Instrument Records, this option will be grayed out and not available. 17.3.8 Close Form Closes the Test Instrument screen 17.3.9 Exit DPCTrack2 This option will close DPCTrack2. If you have any unsaved work on any screens you will be prompted to Save before DPCTrack2 closes. 17-6 Quality Fluke Products Online at: www. GlobalTestSupply.com [email protected] Chapter 18 Upload/Download Screen Title Page 18.1 Getting Started ........................................................................................ 18-3 18.2 File Menu Options .................................................................................. 18-4 18.2.1 Initiate Download/Upload .................................................................. 18-4 18.2.2 Close Form ......................................................................................... 18-4 18.2.3 Exit DPCTrack2 ................................................................................. 18-4 18.3 Features................................................................................................... 18-4 18.3.1 Clear Calibrator Memory ................................................................... 18-4 18.3.2 Set Calibrator Date/Time to Current Date/Time ................................ 18-5 18.3.3 View Number of Test Results ............................................................ 18-5 18.3.4 View/Edit Session Log ....................................................................... 18-5 18.4 Lists......................................................................................................... 18-5 18.5 Help......................................................................................................... 18-5 18.6 Options.................................................................................................... 18-5 18.6.1 Download Options.............................................................................. 18-5 18.6.1.1 Default Loop Power ....................................................................... 18-5 18.6.1.2 User Entered Values (UEV)........................................................... 18-5 18.6.1.3 Setup/Wrapup Messages ................................................................ 18-6 18.6.1.4 Default Temperature Standard ....................................................... 18-6 18.6.1.5 Fluke Options................................................................................. 18-6 18.6.2 Upload Options................................................................................... 18-7 18.6.2.1 Update Item’s Status on Failure or Success ................................... 18-7 18.6.2.2 Add Note to All Calibrations Indicating Make, Model, and Serial # of Device (if Available) ................................................... 18-7 18.7 Downloading Calibration Items as Tasks ............................................... 18-7 18.7.1 Download By...................................................................................... 18-7 18.7.1.1 By Cals Due ................................................................................... 18-7 18.7.1.2 By Query ........................................................................................ 18-8 18.7.1.3 By Configuration............................................................................ 18-8 18.7.2 Tag List Operations ............................................................................ 18-9 18.7.3 Tag List Edit Functions ...................................................................... 18-10 18.7.4 Tag List Information Functions.......................................................... 18-10 18.7.5 Adding to the Tag List........................................................................ 18-11 18.7.6 Removing Items from the Tag List .................................................... 18-11 18.7.7 Tag Construction ................................................................................ 18-11 18.8 Uploading Results as Calibrations .......................................................... 18-12 18.8.1 Assign Technician to Calibrations...................................................... 18-12 18.8.1.1 Who Calibrated .............................................................................. 18-12 18.8.1.2 Options ........................................................................................... 18-13 18-1 Quality Fluke Products Online at: www. GlobalTestSupply.com [email protected] DPCTrack2 Users Manual 18.8.2 Default Calibration Type for Uploaded Calibrations ......................... 18-13 18.8.3 Default Test Instrument Warning Options ......................................... 18-13 18.8.4 Initiate Upload .................................................................................... 18-13 18.8.4.1 Result Duplicates ........................................................................... 18-14 18.8.4.2 Calibration Record: Authorizing.................................................... 18-15 18.9 Test Instrument Recognition................................................................... 18-16 18-2 Quality Fluke Products Online at: www. GlobalTestSupply.com [email protected] 18 Upload/Download Screen 18.1 Getting Started 18.1 Getting Started Downloading refers to the transferring of one or more items as tasks to the Calibrator. Uploading pertains to copying of the calibration results and logged data to DPCTrack2 as calibration records. Figure 18.1 shows the Upload/Download screen. Figure 18.1 18-3 Quality Fluke Products Online at: www. GlobalTestSupply.com [email protected] DPCTrack2 Users Manual 18.2 File Menu Options With the Upload/Download screen open, the following File menu options are available. Figure 18.2 18.2.1 Initiate Download/Upload Selecting this option will begin the download/upload process. 18.2.2 Close Form Selecting this option will close the Upload/Download screen 18.2.3 Exit DPCTrack2 Selecting this option will close entire application 18.3 Features This menu contains the following features: 18.3.1 Clear Calibrator Memory If supported, this menu item will clear the current connected calibrator's memory, after displaying a confirmation message. Note Once results and procedures are cleared from your DPC they cannot be restored. 18-4 Quality Fluke Products Online at: www. GlobalTestSupply.com [email protected] 18 Upload/Download Screen 18.4 Lists 18.3.2 Set Calibrator Date/Time to Current Date/Time If supported, this menu item will call a function which resets the internal clock of the calibrator device to your PC's current system date and time. 18.3.3 View Number of Test Results If supported, a message will appear indicating the number of calibration results that are contained within the calibrator's memory. 18.3.4 View/Edit Session Log DPCTrack2 keeps a useful log of Uploads, Downloads and Memory Clears in a log. See Session Logging for more information. 18.4 Lists Many of the standard fields in DPCTrack2 have drop-down Lists that are User Defined. This gives you the ability to customize many areas of the program to meet your needs. All of the Standard Lists can be accessed from the Lists menu. For further information about lists see Chapter 12. 18.5 Help See Chapter 2 for more on the Help menu. 18.6 Options During any Download or Upload operation, the Options screen allows default values to be set for tasks or results created. After modifying options the user may select Save as Default to save the current options as the default options for the next time the open the screen. The Reset button will return the current set of options to the previously saved defaults. 18.6.1 Download Options Options for transferring items as tasks to the Documenting Calibrator. 18.6.1.1 Default Loop Power The Fluke calibrators have a power source available for transmitters and other instruments/loops that may need a separate power source. Choose your desired setting from the dropdown list, and all downloaded tasks will default to this setting when they are performed on the calibrator. 18.6.1.2 User Entered Values (UEV) A user-entered value allows the technician to overwrite the actual measured or sourced value with another numeric value, which is stored as the result. This value is used as the value stored in DPCTrack2. Choose either Source or Measure or both Source and Measure UEV to enable Source, Measure or both user-entered values. User-entered values can be useful for recording information that is read by some other means than the calibrator's actual sourcing or measuring capabilities 18-5 Quality Fluke Products Online at: www. GlobalTestSupply.com [email protected] DPCTrack2 Users Manual 18.6.1.3 Setup/Wrapup Messages You can make messages display on the calibrator before and/or after the calibration procedure. The following options are available for message prompts: No Message None Displays the first Note that was added to the Instrument or Loop. First Note Most Recent Note Displays the Note that was added most recently to the Instrument or Loop. Item Description Fields Displays the calibrated item's ID, Company, Location, Building, Department, Associated Document, Associated Equipment, and Serial Number (if applicable) Custom Message Custom Messages are to be entered into the text area directly under the dropdown list that indicates what the setup message is comprised of. SOP Procedure Displays the Procedure field of the Instrument or Loop’s associated Document ID. See Chapter 13 on Documents. If a message's size is beyond the current calibrator's limit, as much of the message will be processed as possible and may be broken into multiple screens. 18.6.1.4 Default Temperature Standard This value may be set to use the current calibrator's default but may also be overridden for the current download session to ITS-90 or IPTS-68. 18.6.1.5 Fluke Options 18.6.1.5.1 Show Prompt on Device for: DPCTrack2 enables the tester to provide additional information about the tests they perform in the field through the employment of six checkboxes on the Download Options page. If a checkbox is selected, then the tester will be prompted for that information. The tester’s response to the prompt(s) is saved as part of the testing information on a per Tag ID basis. The tester can decide if the prompt(s) will be presented before or after the test. 18.6.1.5.2 Show Prompt (Before/After): The tester can decide if the prompt(s) will be presented before or after the test. 18-6 Quality Fluke Products Online at: www. GlobalTestSupply.com [email protected] 18 Upload/Download Screen 18.7 Downloading Calibration Items as Tasks 18.6.1.5.3 Preserve <x% > Memory for Results: Every calibrator has a certain amount of memory, which is broken up into tasks and results, somehow. By downloading, we erase the results memory and replace the tasks memory with our newly created procedures. This option allows the tester to save a defined percentage of the memory for calibration results. 18.6.2 Upload Options Options for copying of the calibration results from the Calibrator to DPCTrack2 as calibration records. 18.6.2.1 Update Item’s Status on Failure or Success If you upload a calibration, you can automatically update the instrument or loop's status from Out of Service to In Service, or vice versa, according to the results of the calibration record. Check this box to perform this action automatically. You can still go into your master records and change this afterwards. 18.6.2.2 Add Note to All Calibrations Indicating Make, Model, and Serial # of Device (if Available) This option will add a brief message to a new Note on every new Calibration record added. This note will show the user the manufacturer, model number, and serial number of the device used for upload. 18.7 Downloading Calibration Items as Tasks This function is used to create a calibration task on a calibrator. Every calibrator has a certain amount of memory, which is broken up into tasks and results. By downloading, we erase the results memory and replace the tasks memory with our newly created procedures. Important All task downloads will completely erase ALL procedures and results from the current calibrator's memory. ALWAYS double check to make sure that you are not erasing any data that you have not recorded elsewhere. 1. Select 'Download to Calibrator' from the Action checkbox. 2. Make sure your calibrator is set up for communication. 3. Be sure that you have properly set up the signal types used in the instruments you plan to download. See Signal Type Setup. 18.7.1 Download By There are three methods to choose from for generating a list of Tags to download. 18.7.1.1 By Cals Due This option gives you a list of Instruments or Loops which are due before or on the specified Due Date. Leave the date field blank for all available items. To add an item to the list of Tags to be downloaded, simply check the checkbox next to it. Clicking on any item displays information in a memo box to the right of the checklist area. When a particular item cannot be added to the tag list, it is unavailable for checking and the reason it cannot be downloaded is displayed with the item information in the memo box. 18-7 Quality Fluke Products Online at: www. GlobalTestSupply.com [email protected] DPCTrack2 Users Manual Click Refresh List if you change the due date entered and want to reload the list. Use the Backspace key to remove the Due Date value. 18.7.1.2 By Query This option allows you to use an Instrument or Loop advanced query to add or remove Tags from the list of Tags to be Downloaded. Each query tab has the same functions: New Query: Clicking the New button brings up the Advanced Query screen, with which you can build a new query for the selected record type. Modify Query: Clicking the Modify button allows you to modify the current query, or create a new one if a query has not been loaded. View Options: Selection Criteria- This displays the criteria of the current query in a grid format. Query Preview- This previews the selected query in a displayed grid. Check List- This option generates a check list of calibration items that are found using the current query. Clicking on any item displays information in a memo box to the right of the checklist area. When a particular item cannot be added to the tag list, it is unavailable for checking and the reason it cannot be downloaded is displayed with the item information in the memo box. You can switch between view options for the current query by clicking each option on the group of radio buttons. Add All- This button attempts to add every valid calibration item found within the query's results to the list of Tags to be Downloaded. Any errors that occur are displayed after the function attempts to add all items found to the tag list. Remove All - This button will attempt to remove every calibration item found within the query's results from the list of Tags to be Downloaded. 18.7.1.3 By Configuration This download option displays an organizational view of your DPCTrack2 data. Instruments, and Loops that are used as components of other Loops, or Equipment records. Each item appears as a sub-item of the record it is attached to. All downloadable items appear with an icon indicating their item type. To add an item to the list of Tags to be downloaded, simply check the checkbox next to it. Clicking on any item displays information in a memo box to the right of the checklist area. When a particular item cannot be added to the tag list, it is unavailable for checking and the reason it cannot be downloaded is displayed with the item information in the memo box. Click Refresh if the database has changed and you need to redisplay the organizational view. For more information, see also Tag List Operations and Tag Construction. At this point, you may click the Initiate Download button to start the downloading process. This may take a few moments, depending on how many tags you have generated. During this process, some tags may cause errors. Clicking the Help button on any error message box will automatically bring you to the appropriate Help topic. See Also: Error Message Index. If an item cannot be downloaded, but others selected can, those items that do not cause any errors will still be downloaded. 18-8 Quality Fluke Products Online at: www. GlobalTestSupply.com [email protected] 18 Upload/Download Screen 18.7 Downloading Calibration Items as Tasks Upon completion of a successful download, a message appears which reads "# procedure(s) downloaded successfully", where '#' is the number of procedures downloaded without error. If all selected instruments cause irreconcilable errors, the message "Download Aborted. No procedures downloaded." will appear. After either of these messages occurs, you can disconnect your calibrator and begin using any successfully downloaded procedures. 18.7.2 Tag List Operations On the Download screen, the list of Tags to be downloaded provides an exact list of the items that the utility will attempt to download. It also allows you to view details about the tag like input and output ranges and signal types. See Figure 18.3 below. Figure 18.3 18-9 Quality Fluke Products Online at: www. GlobalTestSupply.com [email protected] DPCTrack2 Users Manual 18.7.3 Tag List Edit Functions These functions are available from the Options popup menu and by right-clicking on the list itself. Clear All - Clears all Tags from the list. Clear Instruments - Clears all Instrument Tags from the list. Clear Loops - Clears all Loop Tags from the list. Remove Selected and All Related Tags - If the currently selected Tag is an Instrument or a Loop, all other related Tags. Figure 18.4 18.7.4 Tag List Information Functions Selecting View Details for Selected Tag from the popup menu, or by double-clicking the list itself will bring up the View Tag Details screen. See Figure 18.5 below. This screen displays the Item Type, Item Code, Group Number, Group Name, Input Signal Type, Input Low Range, Input High Range, Output Signal Type, Output Low Range, Output High Range, and Number of Test Points for the currently selected Tag. Click OK to close this screen. 18-10 Quality Fluke Products Online at: www. GlobalTestSupply.com [email protected] 18 Upload/Download Screen 18.7 Downloading Calibration Items as Tasks Figure 18.5 18.7.5 Adding to the Tag List See 18.7 Downloading Calibration Items as Tasks for more on selecting Instruments and/or Loops to add to the Tag list. If a tag could not be added to the list, a reason will be displayed in a message prompt. 18.7.6 Removing Items from the Tag List Highlight an item and use the Delete key on your keyboard to remove an item from the list, or select an item and right-click on the list and Remove Selected and All Related Tags. Lastly you may select the item, click the Options… button and then select Remove Selected and All Related Tags. 18.7.7 Tag Construction Downloaded Tasks are identified by their Tag. A Tag, in this utility, is a unique name given to a particular test point group, existing on a particular Instrument or Loop record. In order to differentiate between multiple test point groups, this utility uses a group number prefix method. For example, Instrument INST-01, test point group #2 would become the Tag "G2-INST01". 18-11 Quality Fluke Products Online at: www. GlobalTestSupply.com [email protected] DPCTrack2 Users Manual 18.8 Uploading Results as Calibrations You can use DPCTrack2 to Upload Calibration results as new calibration records (See Figure 18.6 below). For more information about calibration records, see Chapter 19 Calibration Records. Figure 18.6 1. Make sure your calibrator and PC are connected. See Setting Up Communications for more info. 2. Check the desired options for uploading calibrations. See chapter 18.6.2 above. 18.8.1 Assign Technician to Calibrations 18.8.1.1 Who Calibrated Choose your desired "Who Calibrated" value or corresponding option from the main screen. The DPCTrack2 Calibration screen has a field for 'Who Calibrated' - That is, a field for the Technician who performed this calibration. The Fluke calibrators can supply an ID value for the technician using the device. This ID can be associated with the DPCTrack2 User ID, and further associated with a Technician's Name. Note For the program to recognize the User ID, it must be entered into the device exactly as it appears in the User ID field in the DCPTrack2 Employee Screen. 18-12 Quality Fluke Products Online at: www. GlobalTestSupply.com [email protected] 18 Upload/Download Screen 18.8 Uploading Results as Calibrations 18.8.1.2 Options A. Assign Technician to All Uploaded Calibrations (Ignore Uploaded ID) This option will assign the selected Technician (or blank option) to every uploaded calibration record, no matter what ID is sent back from the connected device. B. Assign Technician to Calibrations with Unassigned or Unknown Technicians This option will first check to see if the User ID uploaded from the calibrator matches an available Technician. If so, that Technician's name is used for the 'Who Calibrated' field in the Calibration record. If the ID is not found, the selected Technician (or blank option) will be entered in the 'Who Calibrated' field for that Calibration record. C. Use Technician ID as Uploaded from Device on All Calibrations (If Name Found) If the User ID retrieved from the device matches an available Technician, that Technician's name is used for the 'Who Calibrated' field in the Calibration record. If not, the field is simply left blank. 18.8.2 Default Calibration Type for Uploaded Calibrations Choose your desired "Calibration Type" value for all uploaded calibrations. 18.8.3 Default Test Instrument Warning Options Choose your desired Test Instrument Warning Options. During upload, the calibrator and other auxiliary test standards may or may not be recognized by the system. If so, certain warnings may apply according to your DPCTrack2 company options. A. Not Found: If the Test Instrument is not found in the database, this type of warning may occur. B. Out of Calibration: If the Test Instrument is not found in the database, but the Next Calibration Date is before today's date, this type of warning may occur. C. Not Approved: If the Test Instrument is found in the database, but is not currently approved, this type of warning may occur. The default behavior of DPCTrack2 is to add a note to a calibration record that has references to non-existence, out of calibration or unapproved test instruments. The note is designed to give later reviewers more information about associated test standards. These default actions can be overridden for the upload session and then individually on the Test Instruments tab of the Authorize Calibration Screen. 18.8.4 Initiate Upload This process will automatically: 1. Upload all result data from the connected calibrator. 2. Skip over any Non-DPCTrack2 result data, such as aborted tasks with no calibration results. This data is considered incomplete and will not be added to your DPCTrack2 database. 3. Identify all valid results as being an Instrument or Loop and identify the test point group number for each one. 4. Add the calibrator and any Auxiliary Equipment found to the list of 'Test Instruments Used' in the calibration record screen. They are searched by Manufacturer, Model and Serial Number values, so be sure to check that the correct test instruments are listed. See also: Test Instrument Recognition (Chapter 18.9) 5. Check for the calibration due date of the calibrator and other auxiliary test equipment, if found in the database, and construct a set of warnings to appear in the 18-13 Quality Fluke Products Online at: www. GlobalTestSupply.com [email protected] DPCTrack2 Users Manual Authorize Calibration Screen. See Test Instrument Recognition in Chapter 18.9 for more information. 6. Process all test points and readings according to the item's default test point groups if found, or it will generate default information for those test points and groups that are not found in the database. 7. Build a new Calibration record and display the Authorize Calibration Screen, for verification of all processed and uploaded data. 8. If authorized, the program will add the displayed record as a new, unfinalized Calibration record. To finalize or check over your calibration records, start DPCTrack2, log in with your user name and password, and open the Calibration Record Screen. Note When the Upload is completed, you may be asked if you want to clear the calibrator memory. (This is to prevent re-upload of calibration results.) See the Warnings below if you choose to clear the memory at this point: • Cauton Incomplete tasks will be cleared from memory in this process. Keep track of any instruments you may need to re-download. • Non-uploadable results will be cleared from memory in this process. Record all data that you wish to keep separately. • If result data is not cleared, it may be unintentionally uploaded again, and duplicate calibration records may result. This is why it is recommended that you clear the calibrator of data following a successful Upload. 18.8.4.1 Result Duplicates The upload function of the program only allows for one new calibration record for a particular Instrument or Loop during one Upload session. If multiple results are Uploaded for a particular tag, the utility will display the date and time (if available) of the result record and ask the user to choose the one group that should be added to the current calibration record. If you need to upload both cal records, perform the upload twice, choosing different groups each time the Group Result Duplicate screen appears. 18-14 Quality Fluke Products Online at: www. GlobalTestSupply.com [email protected] 18 Upload/Download Screen 18.8 Uploading Results as Calibrations 18.8.4.2 Calibration Record: Authorizing DPCTrack2 contains a special feature that allows you to Authorize or Skip each Calibration result record uploaded from the device. It does this function via the Authorize Calibration Screen (Shown in Figure 18.7). Figure 18.7 (Authorize Calibration Screen) 18.8.4.2.1 Action Buttons Authorize - This new calibration record will be added to the system, and all indicated date rolling and item closing will be performed Authorize All - See below for more on Authorizing an entire Upload session. Skip - This button will cause the current calibration addition to be canceled. No changes are made to the database, and other calibration records can still be added. This button is useful when uploading more than once from a given calibrator and the user has already created the current result as a Calibration record in the database. Help - Opens this Help System. Screen Fields For most screen fields, see the DPCTrack2 Help System - Calibration Screen for more information. Only certain have special meaning in this utility. "Roll Dates and/or Close These Items for Successful Calibration" This checklist operates exactly the same as the same checklist in the Calibration screen. The user is required to check which updates they would like to proceed with, if the calibration has passed. 18-15 Quality Fluke Products Online at: www. GlobalTestSupply.com [email protected] DPCTrack2 Users Manual "Messages" This read-only tree view box will display messages similar to the following as they apply to the current calibration record: "This Calibration has Failed." "This Calibration has been Found Out of Spec." This list will contain warnings for out of spec As Found and As Left results, as well as warnings for Incomplete Calibrations. "Reason for Failure" This field may be required for data entry if Require Reason for Failure on Failed Cal option is turned ON for the current Company record. "Test Instruments/SOP/User Defined" Tab The SOP and User-Defined portions of this tab simply contain the default values that may be filled in for User-Defined Variables and the SOP tab. The Test Instruments section contains the listing of Test Instruments used for the current calibration. There may or may not be associated warnings for each listed item. The warning condition is indicated by the color of the icon for each Test Instrument's ID or description. The warning action and actual warning message data are found by expanding the tree (double-clicking or clicking the (+) button). GREEN: No warnings and this item will be added to the list of Test Instruments used YELLOW: Warnings possible, but the item will be added to the list of Test Instruments used RED: Either the item does not exist or the warnings attached prevent the item from being added to the list of Test Instruments Used. For each item you can choose to add a note for the warning or ignore the warning for this calibration record. This is accomplished by highlighting the Test Instrument you want to decide on and using the radio buttons that appear to the right of the Test Instrument list. “Authorize All” If there are any calibrations left to add, this button will display a dialog that displays all updates that will occur if any of the displayed uploaded calibrations are passing cals. Preview Updates Screen - This screen displays the same updates as those that are checked by default in the Authorize Calibration Screen. This gives the user the opportunity to cancel the automatic authorization of all the remaining calibrations. The user can decide to continue the normal pattern of Authorization by clicking “No” at this dialog, or they can choose to Auto-Authorize all uploaded calibrations by clicking “Yes.” 18.9 Test Instrument Recognition You can enter your calibrators and any other test equipment connected to the calibrators (for example, pressure modules) as Test Instruments. 18-16 Quality Fluke Products Online at: www. GlobalTestSupply.com [email protected] Chapter 19 Calibration Screen Title Page 19.1 Calibration Records ................................................................................ 19-3 19.2 Tabbed Notebook Section....................................................................... 19-3 19.2.1 Header Fields...................................................................................... 19-3 19.2.1.1 Item Type ....................................................................................... 19-3 19.2.1.2 Item ID ........................................................................................... 19-3 19.2.1.3 Calibration ID ................................................................................ 19-4 19.2.1.4 Calibrated & Scheduled Dates ....................................................... 19-4 19.2.1.5 Cal Frequency ................................................................................ 19-4 19.2.2 Item Info (As of Calibration Record Entry Date)............................... 19-4 19.2.3 General Calibration Info..................................................................... 19-4 19.2.3.1 Temperature & Humidity............................................................... 19-4 19.2.3.2 Calibration Type ............................................................................ 19-4 19.2.3.3 Certificate #.................................................................................... 19-4 19.2.3.4 Who Calibrated .............................................................................. 19-4 19.2.3.5 Man Hours...................................................................................... 19-4 19.2.3.6 Reason for Failure .......................................................................... 19-4 19.2.3.7 # of Cal Points................................................................................ 19-4 19.2.3.8 Finalized, Finalized By & Date Finalized...................................... 19-4 19.2.3.9 Automatic Date Rolling Functionality ........................................... 19-4 19.3 Test Results Tab...................................................................................... 19-5 19.3.1 Test Point Groups ............................................................................... 19-5 19.3.2 Separate As Found/As Left Inputs...................................................... 19-6 19.3.3 Modifying Calibration Specifications ................................................ 19-6 19.3.4 Classifying the Result of a Calibration............................................... 19-7 19.3.5 Automatic Warnings and Messages ................................................... 19-8 19.3.6 Warnings and Messages That May Appear as a Result of Options and Default Settings ............................................................. 19-9 19.3.6.1 [Warn, Restrict, Allow] If Calibrated Item Is Not Approved ........ 19-9 19.3.6.2 Force Calibration Failure ............................................................... 19-9 19.3.6.3 Users Cannot Finalize Calibration They Entered........................... 19-9 19.3.6.4 Require Reason For Failure On A Failed Calibration.................... 19-10 19.3.6.5 Allow The User To Finalize Incomplete Calibrations ................... 19-10 19.3.6.6 Only Show Active Test Instruments .............................................. 19-10 19.3.6.7 [Allow, Warn, or Restrict] On Use Of An Unapproved Test Instrument .................................................................................... 19-10 19.3.7 Entering Calibrations in Multi-Mode ................................................. 19-10 19.4 Test Instruments Tab .............................................................................. 19-11 19.4.1 How Instrument Types Affect the Available Test Instrument List .... 19-12 19-1 Quality Fluke Products Online at: www. GlobalTestSupply.com [email protected] DPCTrack2 Users Manual 19.4.2 Show All............................................................................................. 19-12 19.5 SOP Tab.................................................................................................. 19-12 19.6 User Defined Tab.................................................................................... 19-12 19.7 Notes Tab................................................................................................ 19-13 19-2 Quality Fluke Products Online at: www. GlobalTestSupply.com [email protected] 19 Calibration Screen 19.1 Calibration Records 19.1 Calibration Records This screen is used to add, display, modify and if necessary, delete the results of an Instrument, Loop, Test Instrument or System calibration. Once you have entered Master Instrument, Loop and Test Instrument records, you may create calibration records based upon the data you already established in the database. The CALIBRATION screen is accessed by clicking the speed button labeled “Calibrations” on the Record Toolbar. Figure 19.1 Note It is not necessary to fill in all empty fields. However, you must enter an Item ID, the Calibration Date, and either select “Pass”, “Fail” or “Incomplete” to save a new record. 19.2 Tabbed Notebook Section The tabbed notebook section of the CALIBRATION screen contains six (6) different subscreens or “pages” available for data entry. These pages are logically grouped on the tabs of the notebook. To open a tab page, click it with your mouse. Each page and its associated fields are described below. 19.2.1 Header Fields These fields will always appear at the top of the page no matter what tabbed page you are on 19.2.1.1 Item Type When adding a new record you must first select the Item Type from the drop down list (Instrument, Loop or Test Instrument) 19.2.1.2 Item ID There are two ways to enter an ID. If you know the ID you may type it in. (quick type does not function in this field) If you are not sure of the item’s ID number, you may click the (…) button next to the ID field. This will invoke a master list of all items of the selected type. Selecting an item from the list and clicking the OK button will insert that ID into the field. 19-3 Quality Fluke Products Online at: www. GlobalTestSupply.com [email protected] DPCTrack2 Users Manual 19.2.1.3 Calibration ID When a new calibration record is saved, the System assigns it a unique number, which then appears in this field indefinitely. 19.2.1.4 Calibrated & Scheduled Dates DPCTrack2 automatically inserts today’s date into the Calibrated field, but this date can be modified by typing a new one into the field. The date in the Scheduled Date would be the date that the item is actually due for the calibration. 19.2.1.5 Cal Frequency This field will fill in automatically when the ID is selected. If the item does not have a frequency set up then this field will be blank. This field can not be modified. 19.2.2 Item Info (As of Calibration Record Entry Date) This portion of the page contains information pulled from the ID type entered. This field is not modifiable and will not change. (Example: If the location changed after the calibration was completed, this calibration record would always show the Location at the time the Calibration was performed) 19.2.3 General Calibration Info This portion of the page contains general information about the calibration. 19.2.3.1 Temperature & Humidity These two fields are alpha numeric and you can enter up to 20 characters in each. 19.2.3.2 Calibration Type This field can be filled in by selecting from the drop down list. For more information see Chapter 12 19.2.3.3 Certificate # This is an optional alpha numeric field available to help manage your calibrations. You can enter up to 20 Characters. 19.2.3.4 Who Calibrated You may either choose from the drop down list or to add a technician select New. For more information see Chapter 12 19.2.3.5 Man Hours This field can manually entered up to 9,999.99 19.2.3.6 Reason for Failure This field can be set as “Required” Company level have been turned on. If this option is turned on and a “Failed” calibration is entered, you will not be able to save until a reason is given. This is an alpha numeric field up to 50 characters. 19.2.3.7 # of Cal Points This field will list the amount of calibration points, if any, and is not modifiable. 19.2.3.8 Finalized, Finalized By & Date Finalized This check box is for finalization of a calibration. Depending on your settings, this box may not be accessible and grayed out. The Finalized By & Date Finalized fields will be filled in upon saving a Finalized calibration. 19.2.3.9 Automatic Date Rolling Functionality Keep in mind that when a new calibration record is entered for an Instrument, Loop or Test Instrument, DPCTrack2 is designed to automatically roll its next scheduled calibration date forward another frequency cycle upon a passing calibration. When 19-4 Quality Fluke Products Online at: www. GlobalTestSupply.com [email protected] 19 Calibration Screen 19.3 Test Results Tab entering a calibration, if the date calibrated is within the period of the current frequency, a checkbox will appear in the Roll Dates and/or Close These Items On Calibration Completion box on the Calibration Information tab (for more information on configuring frequencies see Chapter 12). The text of the checkbox indicates the current due date and the next scheduled date that will be applied to the item upon a successful calibration. Once a new calibration record is saved, all events that took place as a result of the entered calibration will be listed, but grayed out and inaccessible in the Roll Dates and/or Close These Items On Calibration Completion box. These events include next due date that may have been rolled forward for calibration and updates to the item’s status. From the time the calibration is saved, this information will always be available on the record. Additionally, you may double-click any of the items listed to open the specified record. 19.3 Test Results Tab Once you have finished entering data on the Calibration Information tab you may proceed to enter the results of the calibration on the Test Results tab shown in Figure 19.2. All test points will be listed in order and grouped accordingly. You may use the Next Group and Previous Group buttons at the top of the tab to move between test point groups, if applicable. 19.3.1 Test Point Groups The Point column lists all test points for the current group by group number and test point number. All found as and left as values may be entered into the columns labeled as such in the Readings section of the grid. The calibration record shown in Figure 19.2 has the Separate As Found/As Left Inputs box unchecked, it shows both rows for each individual test point. If the box was checked then you would have to toggle between the two fields. Figure 19.2 19-5 Quality Fluke Products Online at: www. GlobalTestSupply.com [email protected] DPCTrack2 Users Manual If you are not utilizing Separate As Found/As Left Inputs and the left as value for a test point is the same as the found as value, then you can enter the Fnd As value, click on the Lft As cell, and just hit the equal (=) key on your keyboard to automatically transfer the same value to the Lft As cell. (This will only work if the Lft As value is blank.) If you need to see more information about the item such as accuracies and/or limits you may display this information on the screen by selecting “Columns” from the View menu at the top of the screen. This will give you the option of choosing the additional information that you would like to see. Additionally, the Show Group Details button will provide you with any other information for the test point group (as entered on the item’s master record) that is not already shown on the screen. When you add a new calibration record, any information entered into the Description column on the record providing the calibration specification source will automatically appear in this column on the CALIBRATION screen. You then have the option of modifying the default descriptions and/or adding new information into the other Description cells. 19.3.2 Separate As Found/As Left Inputs Marking this box will allow you to record separate as found and as left input values when entering calibration records for Instruments, Loops, and/or Test Instruments. The ability to document separate as found and as left inputs is useful when performing calibrations in which it is very difficult to reach the nominal input value as stated on the item’s master record. The Separate As Found/As Left Inputs setting provides the ability to recalculate an item’s expected output values and low and high limits to accurately reflect the input values that were achieved during the calibration. When entering a calibration using Separate As Found/As Left Inputs you have the ability to change the view in the grid to either simplify things or give you a big picture view of the calibration. The button to the right of the Separate As Found/As Left Inputs box toggles to provide you with four (4) different options. Clicking this button with your mouse allows you to view and enter Left As values (Enter Left As or View Left As), view only the Fnd As values (View Found As), or view both columns at the same time (View Found As/Left As). If the View Found As/Left As option is on then, every other cell appears with five (5) dashes (-----) denoting that values are not required in those cells. (Note: If the Separate As Found/As Left Inputs box is not marked, the toggle button will not appear on the screen.) 19.3.3 Modifying Calibration Specifications If you need to change any of the information or values in the calibration specifications grid, for example input signals, resolutions, signal types etc., you may do this by clicking the Modify Specs button. Doing this will open up most of the grid’s cells and make them available for modification. The only columns that will stay inaccessible are those that are in the Point and Input Specifications sections. The values in the Nom In Val and In +/columns represent the target setpoint for each input value in addition to the Input Tolerance, while the data in the G-# column denotes each row by group number and test point number within that group. If your changes will affect the output values, low and high spec limits then click the Recalculate button to select from one of the following three options, “Calculate LINEAR outputs and limits”, “Calculate SQUARE ROOT outputs and limits” or “Calculate Limits”. (Note: If the item is set to “Linear” then the “Calculate SQUARE ROOT” will not be accessible and if set to “Square Root” then “Calculate LINEAR outputs and limits” will not be accessible. If “Manual” is selected then both will be available) Once 19-6 Quality Fluke Products Online at: www. GlobalTestSupply.com [email protected] 19 Calibration Screen 19.3 Test Results Tab you have finished making modifications, you may click the Protect Specs button to shield the columns again from accidental modification. The Protect Specs button appears when you click the Modify Specs button, see Figure 19.3 for an example. Figure 19.3 There are several important things to remember when you elect to modify the calibration specifications for an item when entering its calibration record. These are as follows: Modifying an item’s calibration specifications in the CALIBRATION screen will not alter its master record. Permanent changes to calibration specs must be made in the MASTER INSTRUMENT, LOOP RECORD or TEST INSTRUMENT screens. If a “Linear” or “Square Root” Correlation to Output was selected on the calibrated item’s master record, then the output values in the grid on the CALIBRATION screen will not be modifiable, however any changes made to input values will automatically trigger an update to their corresponding output values. Options selected on the COMPANY RECORD screen may affect your ability to modify information in the calibration specifications grid. (See Chapter 9 for more information.) 19.3.4 Classifying the Result of a Calibration Depending on the results of the calibration, you may select Pass, Fail or Incomplete in the box above the test point grid. If you do not select an option, the System will not allow you to save the calibration. In addition, if the Adjusted to Improve box is applicable to your calibration, it is suggested that you check it since this can be used as selection criteria in advanced queries. By default, this can be used to indicate that the item was adjusted between the As Found and As Left tests. DPCTrack2 provides you with the ability to mark an unfinished calibration as “Incomplete”. The Incomplete circle can only be chosen if neither of the other two result circles have been selected. Denoting a calibration record as incomplete instructs the System to ignore the information currently entered on the record so that saving it does not generate any failure or out of tolerance warnings and none of the dates are rolled forward. This feature allows you to save your work often without affecting the state of the current item, or enter calibrations that may take hours or even days to obtain appropriate readings. 19-7 Quality Fluke Products Online at: www. GlobalTestSupply.com [email protected] DPCTrack2 Users Manual 19.3.5 Automatic Warnings and Messages There are several automatic warnings and messages that may appear on your screen as you save a new calibration record. In this case the term “automatic” refers to the fact that the appearance of these warnings and messages does not hinge upon the selection of any Company options or default settings that may have been established in the database. Figure 19.4 1. If you attempt to save a new record but have not selected the Pass, Fail or Incomplete circle, the System will warn you of this and you will not be able to continue with the save until one of them is selected. 2. If you try to save a failed calibration record, but you have selected the Pass circle instead of the Fail circle, the System will also warn you (see Figure 19.4). In addition, this warning screen will also tell you at which test point(s), in which groups the item failed. When the message screen appears, you may click the Yes button to instruct the System to automatically mark the Fail circle for you, thus saving the record as a failed calibration. If you click the No button, the new record will be saved as a passed calibration and the Pass circle will remain selected. Finally, clicking the Cancel button will return you to the unsaved record. Conversely, if the Fail circle is selected, but there are not any test points that were actually left outside of the acceptable spec limits, then upon saving the record the System will warn you of this and ask if you would like the Pass circle selected instead. 3. There is also warning that will be displayed if there are any “Found As” readings that are out of tolerance. This warning will be displayed on every save. 4. If during a calibration the item specs have changed, then the user will receive a warning message. This warning will be displayed on every save. 5. Another message that may appear on your screen when saving a new calibration record has to do with the current status of the Instrument, Loop or Test Instrument. If in the company’s COMPANY RECORD, you chose a Calibration Failed Status and a Calibration Passed Status (see Chapter 9), then a message may appear asking if you would like to have the System change the status of the item for you. The appearance of this message depends upon the results of the calibration, whether the Pass or Fail button has been selected for the record. 19-8 Quality Fluke Products Online at: www. GlobalTestSupply.com [email protected] 19 Calibration Screen 19.3 Test Results Tab For example, imagine that you are in the process of saving a calibration record that failed. If the item’s current status is “In Service”, but the Calibration Failed Status that was declared in its COMPANY RECORD was “Needs Repair”, then a message will appear asking if you would like to have the item’s status changed from “In Service” to “Needs Repair”. Conversely, if you are saving a passed calibration and the item’s current status is “Needs Repair”, but the Calibration Passed Status that was declared was “In Service”, then a message will appear asking if you would like to have the item’s status changed to “In Service”. It is important to remember that you do not need to wait for the program to suggest a status change. The Status field on the Test Results tab will remain active in the Calibration screen until the record is saved. Therefore, prior to saving a new record, you can manually change an item’s status at any time so that as soon as the new record is saved the status will have been changed on the item’s master record as well. 19.3.6 Warnings and Messages That May Appear as a Result of Options and Default Settings There are other warnings and messages that may appear when you save a calibration record. The appearance of these warnings and messages depends upon the selection of various Company options and default settings that may have been established in the database. 19.3.6.1 [Warn, Restrict, Allow] If Calibrated Item Is Not Approved This setting is used to manage the entry of calibration records for approved and unapproved item master records (master records for Instruments, Loops and Test Instruments). For more information see Chapter 9 If “Allow” was selected for this field in the COMPANY RECORD screen, then you will be able to enter calibration records for items whose master records have not been approved yet. If this is the case, then no messages will appear on the screen when adding a new calibration record for an unapproved item. If “Restrict” or “Warn” was selected, then when you attempt to initiate a new calibration record for an unapproved item, an appropriate message will appear on the screen to let you know whether or not you may proceed. If “Warn” was selected, you may get a warning while saving the record that the current item is not approved. 19.3.6.2 Force Calibration Failure This is an option that when selected will not allow a failed calibration (one with at least one as-left value that is outside of the acceptable limits) to be saved as a passed calibration. If this check box was marked in the COMPANY RECORD screen, (see Chapter 9) then upon attempting to save a failed calibration with the Pass circle marked, the message that usually details the test point groups that have failed test points informs you that the System will automatically reset the result to the Fail circle instead. You can either accept this action by clicking OK or cancel the save process by clicking Cancel. If the out of tolerance Lft As values are then adjusted to within tolerance, the Pass circle may be selected again, in which case the forced failure message will no longer appear on the screen when the record is saved. 19.3.6.3 Users Cannot Finalize Calibration They Entered This is an option that disallows the same user to enter and then finalize a calibration record. If this check box was marked in the COMPANY RECORD screen, (see Chapter 9) then upon attempting to save a calibration record that you both initially entered and then finalized, a message will appear on the screen informing you that you cannot proceed with the save until the Finalized box is unchecked. 19-9 Quality Fluke Products Online at: www. GlobalTestSupply.com [email protected] DPCTrack2 Users Manual 19.3.6.4 Require Reason For Failure On A Failed Calibration This is an option that when selected will not allow you to save a failed calibration record unless the Reason for Failure field has been completed. If this check box was marked in the COMPANY RECORD screen, (see Chapter 9) then upon attempting to save a failed calibration without this field filled in, a message will appear on the screen instructing you that you cannot proceed with the save until a Reason for Failure is documented. 19.3.6.5 Allow The User To Finalize Incomplete Calibrations This is an option that when selected will allow “Incomplete” calibrations records (ones whose Incomplete circle is marked) to be finalized. If this check box was not marked in the COMPANY RECORD screen, (see Chapter 9) then the Finalized box will be grayed out on any calibration marked as incomplete. Once the Pass or Fail circle is marked, the Finalized box will become accessible again. If this check was marked in the COMPANY RECORD screen, then the Finalized box will always be available regardless of the circle selected. 19.3.6.6 Only Show Active Test Instruments This is an option that if selected on the Company screen, (see Chapter 9) will restrict the display of Test Instruments in the CALIBRATION screen to only those Test Instruments that are currently assigned an “active” status (on whose record has the Show items with this status on calibration scheduling reports box marked). All Test Instruments in the System that are not assigned an “active” status or if their status is left blank will not be displayed on the screen and therefore will not be available for assignment to a calibration record. 19.3.6.7 [Allow, Warn, or Restrict] On Use Of An Unapproved Test Instrument This is a setting that is used to manage the selection of approved and unapproved Test Instruments in the CALIBRATION screen. If “Allow” was chosen for this field, from the Company screen, (see Chapter 9) then users will be able to assign unapproved Test Instruments to calibration records without any warning message appearing on the screen. If “Restrict” was selected for this field then any unapproved Test Instruments will not even be listed in the Available Test Instruments box, regardless of their current status. Finally, if “Warn” was selected, than when a user attempts to select an unapproved Test Instrument to be moved to the Test Instruments Used in Calibration box, a message will appear on the screen warning them that they have chosen a currently unapproved test standard. 19.3.7 Entering Calibrations in Multi-Mode DPCTrack2 provides you with the ability to add multiple calibrations at once without having to save each one before moving onto the next. This is done by selecting “Turn on Multi-Mode” from the Multi-Mode menu at the top of the Calibration screen. When this method of record entry is selected, the top of the Calibration screen will then hold the IDs of each calibration in progress and the advanced query section and toggle buttons will disappear. (See Figure 19.5). To select multiple items to work on at the same time, initiate each calibration record just as you would normally by clicking the “Add New Record” button, selecting the appropriate Item Type and entering the item’s ID. As each new calibration is started, it will be posted at the top of the screen in the toolbar. You may also select calibration records that have already been saved to view and/or work with in “Multi-Mode”. To add existing calibrations to your current group, click the “List Records” button and doubleclick the desired calibrations one by one from the list. 19-10 Quality Fluke Products Online at: www. GlobalTestSupply.com [email protected] 19 Calibration Screen 19.4 Test Instruments Tab Once a calibration record is completed and saved, the text on its button will turn black and its ID will no longer contain the word “New” next to it. (Note: Each calibration record must be saved individually. Calibration records cannot be saved as a group.) Figure 19.5 Calibrations may be dropped from the current group at any time regardless of whether or not they have been saved. To remove an open calibration record from the current “MultiMode” group, select its button in the toolbar or select it from the Multi-Mode menu, then choose “Drop Current Calibration” from the menu. This will remove the selected calibration from the current group. To turn off the “Multi-Mode” functionality you must drop all but one record from the active group, then choose “Turn off Multi-Mode”, again from the Multi-Mode menu. Note: Upon exiting from the Calibration screen, MultiMode will turn off and will have to be reactivated. 19.4 Test Instruments Tab This tab page allows you to document the Test Instruments that were used in the calibration. It has two list boxes, titled Available Test Instruments and Test Instruments Used in Calibration. Noting the Test Instruments used in calibrations is necessary for most Quality Assurance programs. It can also be useful in the investigation of problem calibrations, and allows for users to perform reverse traceability on their instrumentation. All Test Instruments IDs listed are followed by the name of the company that owns them to make for easier identification. You may select any number of Test Instruments from the Available Test Instruments list and move them to the Test Instruments Used in Calibration list. To do this, highlight the Test Instruments desired and click the center arrow buttons, as needed. 19-11 Quality Fluke Products Online at: www. GlobalTestSupply.com [email protected] DPCTrack2 Users Manual 19.4.1 How Instrument Types Affect the Available Test Instrument List If you have entered a calibration for an Instrument that has been assigned an Instrument Type, (see Chapter 17) then only the Test Instruments that were set to calibrate that Instrument type will be listed in the Available Test Instruments box. If the Instrument Type field on the Instrument’s master record was left blank, then all Test Instruments will be displayed in the Available Test Instruments box. Note that this functionality is not applicable to calibrations entered for Loops, Systems or other Test Instruments. In addition, the "Quick View" function allows you to view information from each Test Instrument’s master record. To do this, highlight one or more Test Instruments and rightclick with your mouse. A box labeled “Quick View of Selected Test Instruments” will appear. Click this box with your mouse and every Test Instrument you highlighted will appear in a grid showing their model numbers, serial numbers, statuses, etc. 19.4.2 Show All Selecting the Show All button will show all Test Instruments regardless of Instrument Types 19.5 SOP Tab This tab displays information about the SOP that was linked to the calibrated item. It shows the SOP Number, Revision Number, SOP Title and any data entered onto the Procedure tab of the SOP record. This page is a read-only screen meaning that it cannot be modified in any way. It is included in the CALIBRATION screen so that it may be easily referenced. The Change SOP button allows you to document the actual SOP that was followed when the calibration was performed, if it differed from that recorded on the item’s master record. To record a different SOP number with a calibration record, click the Change SOP button. This action will invoke the Select Calibration Procedure Used screen. In this screen you may then highlight the SOP desired and click the Change button. If however, you would like to remove the current SOP, but not replace it, then click the Clear SOP button. Keep in mind that if you elect to change or add a SOP used for the calibration of an item, it will only appear on that calibration record. The item’s master record will not be affected in any way. 19.6 User Defined Tab This tab page contains all user defined variables (fields) that have been set up for the CALIBRATION screen. (See Chapter 10 for instructions about how to set up user defined variables.) Note If the CALIBRATION screen contains user defined variables whose names match user defined variables on the calibrated item’s Master record and the variable is NOT a signature, the value will be filled in as a default value from the master record upon initial calibration entry. However, the user can still modify the user defined variables in the CALIBRATION screen. 19-12 Quality Fluke Products Online at: www. GlobalTestSupply.com [email protected] 19 Calibration Screen 19.7 Notes Tab 19.7 Notes Tab This tab page is used to enter and/or view notes for the calibration record. To enter a new note, click the Add a Note button. Type text into the field provided and click the Save Record button on the screen’s toolbar. Once a note is entered and saved for the record it cannot be modified or deleted. As new notes are added, they will be inserted at the top of those listed (most recent notes first). As the record acquires multiple notes, you may change their order by clicking the Sort Ascending/Descending button. 19-13 Quality Fluke Products Online at: www. GlobalTestSupply.com [email protected] DPCTrack2 Users Manual 19-14 Quality Fluke Products Online at: www. GlobalTestSupply.com [email protected] Chapter 20 Import DPCTrack Data Title Page 20.1 Import DPCTrack Data ........................................................................... 20-3 20.1.1 Field Mapping .................................................................................... 20-4 20.1.2 Frequency Mapping............................................................................ 20-4 20.2 Possible Errors/Warnings ....................................................................... 20-5 20.3 Compatibility Limitations....................................................................... 20-5 20.3.1 Limitations For Instrument Imports ................................................... 20-5 20.3.2 Limitations For History Imports......................................................... 20-5 20-1 Quality Fluke Products Online at: www. GlobalTestSupply.com [email protected] DPCTrack2 Users Manual 20-2 Quality Fluke Products Online at: www. GlobalTestSupply.com [email protected] Import DPCTrack Data 20.1 Import DPCTrack Data 20 20.1 Import DPCTrack Data DPCTrack2 allows the ability to move data from DPC/Track to the new DPCTrack2 database. Before you can perform the Import, you will need to perform an Export of your History, Instruments and Procedures from DPC/Track, to ensure that you have the most up-to-date records. For more information about Exporting records from your DPC/Track database, refer to your DPC/Track User Manual. The Import DPCTrack Data screen can be accessed from the Home screen by selecting TOOLS → “Import DPCTrack Data”. You must be a member of the ADMIN group to access this screen. The screen shown below (Figure 20.1) is separated into three (3) sections. The first section allows you to identify the current locations of your History, Instruments & Procedures, as well as, define the destination of the Log file. Figure 20.1 20-3 Quality Fluke Products Online at: www. GlobalTestSupply.com [email protected] DPCTrack2 Users Manual 20.1.1 Field Mapping The second section shows you how your old DPC/Track data will be mapped into DPCTrack2. The Status field will default to the first status defined e.g ”In Service” in the list, “Responsible” in DPC/Track will be mapped to “Responsible Technician” in DPCTrack2, “Location” will be mapped to “Location”, “Area” in DPC/Track will be mapped to “Building” in DPCTrack2. See 20.3.1 Limitations For Instrument Imports for further explanation. The Default Testpoints (in %) are the percent of span for the input testpoint if “Default” was specified in DPC/Track. The output span will be determined by the “Correlation to Output” as designated for the given item in DPCTrack2. If the data in these fields does not exist, the program will create them. 20.1.2 Frequency Mapping The third section allows you to map your DPC/Track intervals into DPCTrack2 calibration frequencies. Figure 20.2 shows the Auto Map feature has already matched 4 of the frequencies. You can then choose from the existing frequencies to match them manually, or if the frequency does not exist, you can close the Import DPCTrack screen and add the frequencies that you need. Figure 20.2 When all your fields have been mapped, you can select the “Validate Files” to make sure that the file structures are correct. Note It is recommended that you perform a Backup of the database before you Import data. This will give you an opportunity to review the error log, fix any problems, restore the database and perform another Import if necessary. Selecting “Initiate Import” will open a conformation screen. (If there are any fields that have not been mapped, you will also see an additional warning.) Selecting “No” will cancel the Import. Selecting “Yes” will initiate the Import. Upon completion of the Import, you will receive a conformation screen. The log can be viewed either on the screen, or you can navigate to the Log file. All records imported will have the Approved checkbox checked with a corresponding Time/Date stamp. 20-4 Quality Fluke Products Online at: www. GlobalTestSupply.com [email protected] Import DPCTrack Data 20.2 Possible Errors/Warnings 20 20.2 Possible Errors/Warnings • Duplicate ID – If the ID already exists for the same Item Type in the database, the record will not be imported. • Duplicate ID’s for different Item Types – If the Company setting for “Prevent Duplicate ID’s Across All Record Types” is checked, then the record will Not be imported if a record already exists with the same ID. • Tag IDs (Instruments) or Loop IDs that are greater than thirty two (32) characters – DPCtrack2 has field length restrictions and if either of these ID fields are too long the ID will not be created. • List Items and open text fields that exceed the field length limits will be truncated: o Manufacture – 50 characters o Responsible Technician – 50 characters o Signal Type – 50 Characters o Model & Serial Number – 100 characters 20.3 Compatibility Limitations 20.3.1 Limitations For Instrument Imports The following is a list of limitations: • Description Field – The Description field is new to DPCTrack2 and Imported records will use the same value as the “Instrument Type”. • Buildings – Buildings in DPCTrack2 are a component of a Location, if the Location field in DPC/Track is blank, then a Location of “Not Specified” will be created and the Building will be assigned as a component. • Test Equipment – Test Equipments in DPC/Track are NOT imported. These records will have to be manually entered into DPCTrack2. 20.3.2 Limitations For History Imports The following is a list of limitations: • Next Cal Date – When possible the utility will attempt to calculate the “Next Cal Date” on the Instrument screen. To do this, the Instrument record must have a calibration frequency assigned. • Test Equipment Used For Calibrations – DPCTrack2 will list the Test Equipment used for calibrations (if any) with the value listed for the Serial Number. If the Serial Number field is blank, the Test Equipment will NOT be associated to the calibration. • History Records Without a Valid ID – If the Tag ID does not exist as a record in DPC/Track, DPCTrack2 or if the Tag ID is blank, the calibration history will NOT be imported. Note There is no limit to how many times you can import your data, but keep in mind that if you perform multiple imports with the same “history_out.asc” file, you will create duplicate calibration results in DPCTrack2. 20-5 Quality Fluke Products Online at: www. GlobalTestSupply.com [email protected] DPCTrack2 Users Manual Example: An Import is performed that creates 40 Instruments each with 3 calibration results. Your log file indicates that 3 calibration results for the same Instrument ID were not imported because the “ID Does Not Exist in the Database”. If you manually create the Instrument ID and run the import again, there will be no change to the previously imported Instrument records but 3 additional calibration results will be created for the original Instruments. Note If the Instrument record already exists in DPCTrack2, the import will NOT update the record. Note The following records will not be migrated into DPCTrack2 from DPCTrack files • Instrument Records with no Tag ID • Instrument Records with a Tag ID longer than 32 characters • Instrument Records with duplicate Tag IDs (first one will be migrated, subsequent ones will be kicked out) • History Records with a blank Tag ID • History Records that do not have a corresponding Instrument record in the database • History Records that are not one of the following types: o 74x Binary o Manual Binary o Manual Analog o 702 Analog o 74x Analog o 74x Logged Data 20-6 Quality Fluke Products Online at: www. GlobalTestSupply.com [email protected] Chapter 21 Advanced Queries Title Page 21.1 Advanced Queries................................................................................... 21-3 21.1.1 Running Previously Saved Advanced Queries ................................... 21-3 21.1.2 Creating New Advanced Queries and Modifying Existing Queries... 21-3 21.1.2.1 Display Fields Section.................................................................... 21-4 21.1.2.2 Sort Fields Section ......................................................................... 21-5 21.1.2.3 Selection Criteria Section............................................................... 21-5 21.1.2.4 Wildcard Characters (Matching Parts of Strings using “LIKE” and “NOT LIKE”) ......................................................... 21-6 21.1.2.5 Using Date Field Key Words ......................................................... 21-8 21.1.3 Action Button Sets.............................................................................. 21-9 21.1.3.1 Action Buttons Set 1 (shown beside the Selection Criteria During Query Execution box)....................................................... 21-9 21.1.3.2 Action Buttons Set 2 (shown below the Selection Criteria During Query Execution box)....................................................... 21-10 21.1.4 Navigating Between Records Included in an Advanced Query List .. 21-10 21.1.5 Printing Lists and Saving Them to External Files .............................. 21-11 21.1.6 Using Advanced Queries in Other Parts of the Program.................... 21-11 21-1 Quality Fluke Products Online at: www. GlobalTestSupply.com [email protected] DPCTrack2 Users Manual 21-2 Quality Fluke Products Online at: www. GlobalTestSupply.com [email protected] Advanced Queries 21.1 Advanced Queries 21 21.1 Advanced Queries In each of the main screens in DPCTrack2, (except the Company screen) you have the option of listing all of the records that have been entered into the system for the company. This option is available from either the File menu or the sub-category toolbar in each of those screens (see Chapter 5). When pulling up a list however, DPCTrack2 lets you go further by giving you the ability to perform more detailed inquiries and saving them for later use. These are referred to as, “Advanced Queries”. Using advanced queries allows you to generate more refined record lists based upon specific sets of criteria determined by you. 21.1.1 Running Previously Saved Advanced Queries Every main screen has an Advanced Query Name field in its header. This drop-down list will always contain the names of all queries previously saved for the current record type. To run a previously saved query, select it from the drop-down list and click the Execute Query button next to the field. 21.1.2 Creating New Advanced Queries and Modifying Existing Queries To create a new query or modify an existing one you must actually access the ADVANCED QUERY screen. This may be done in one of two ways. First, you must have one of the record screens in the program open, then either click the Open Advanced Query button in the record screen’s header (Figure 21.1) or click the List Records button on the screen’s sub-category toolbar. Once in the full list of records, click the button labeled Advanced at the top of the list grid screen. (Please note that although advanced queries can be created and accessed in many areas of the program, for the sake of clarity and consistency, the MASTER INSTRUMENT screen will be used as the basis for all examples and instructions included in this section.) Figure 21.1 21-3 Quality Fluke Products Online at: www. GlobalTestSupply.com [email protected] DPCTrack2 Users Manual The ADVANCED QUERY screen (shown in Figure 21.2) has several different sections, each of which is described below. To build an advanced query you can define criteria in each of the sections or any combination of the sections. The selection options for each area of the screen are comprised of every field in the record type you are currently working in. This includes any user defined variables added to the record type. In addition, all fields will be listed under their current label names. This is important to note if you have modified field label names (see Chapter 8). For example, if you changed the label of the Instrument ID field to “Asset #”, “Asset #” will appear in each section’s field name list. “Instrument ID” will not be shown. Figure 21.2 21.1.2.1 Display Fields Section This section lets you determine which fields you want to be displayed in the advanced query list. To select a field that you want displayed, highlight it in the Available Fields box and click the Add button. This will move it to the Other Fields To Display box. To move it back, highlight it again and click the Remove button. You may also change the order in which they are to appear. To do this, highlight one of the fields in the “Other Fields to Displayed” and use the Move arrows to define the order. The fields displayed should include at least those that will be used in the selection criteria for the query, but keep in mind that you may choose as many fields as you like to appear in the list. For example, if you were building a query to list all instruments calibrated yearly, then you would probably want to at least display the Calibration Frequency field. However, to make the list more detailed, you could also have each instrument’s Model Number and Serial Number displayed. Please note that the ID Number and Description fields will always be displayed in advanced query lists. There is no option to remove these. 21-4 Quality Fluke Products Online at: www. GlobalTestSupply.com [email protected] Advanced Queries 21.1 Advanced Queries 21 21.1.2.2 Sort Fields Section This section lets you determine how the advanced query records should be sorted. For example, you might want to generate a query list in which the instrument records shown are sorted by Department. Sorting by one or more fields is not necessary, however it will make your advanced query listings more organized. To select a field to sort by, highlight it in the Available Fields box and click the Add button. To move it back, highlight it again and click the Remove button. 21.1.2.3 Selection Criteria Section This section, which comprises the entire gray area of the screen, is the most important part of constructing an advanced query. It is in this section, that you state the selection criteria that must be met in order for a record to be included on the query list generated. If you plan to use at least two different sets of selection criteria then you must click either the And or Or circle. If you choose And, the query will include those records that meet all of the selection criteria you have defined. If you choose Or, the query will include records that meet either one set of selection criteria or the other. If you are only going to use one set of selection criteria, then it does not matter which circle is marked. For every set of selection criteria that you decide to use in your query, you must perform the following steps: 1. Choose a field from the Selection Field Name drop-down list. 2. Select an Operation (i.e. =, >, <, etc.). 3. Enter a Selection Value. Depending on the type of Selection Field Name you chose in Step 1, the Selection Value may either be typed into this field manually or selected from a drop-down list. For example, if your Selection Value were a date, then you would key the desired date into the field or select a date keyword from the drop-down list. However, if the value is a manufacturer, then the manufacturer’s name can only be inserted into the field by selecting it from the drop-down list. (The drop-down list is activated upon declaration of the Selection Field Name in Step 1. In this example, it would contain all manufacturers that have been assigned to at least one instrument record in the system for the company.) 4. Once you have performed Steps 1-3, you must click the Add To Selection Criteria button which will move it into the Selection Criteria During Query Execution box. 5. Click the Execute button to generate the query list. An example of a completed advanced query can be seen in Figure 21.3 on the next page. It shows an advanced query for the MASTER INSTRUMENT RECORD screen that will generate a list of every instrument manufactured by “Foxboro” and is calibrated “Annually”. The query will also sort the listed records by their Last Cal Date. Finally, data from the following fields will be shown for each record included in the query list: Instrument ID, Description, Calibration Frequency, Last Cal Date and Manufacturer. 21-5 Quality Fluke Products Online at: www. GlobalTestSupply.com [email protected] DPCTrack2 Users Manual Figure 21.3 21.1.2.4 Wildcard Characters (Matching Parts of Strings using “LIKE” and “NOT LIKE”) In addition to building queries for an, exact selection criteria, you may also build queries using wildcard characters to match a likeness. For example, you can build a query that generates a list of all instruments whose description is “LIKE” (or contains the words), “pressure” and “valve”. Whether the instrument’s description is “pressure relief valve” or “pressure control valve”, it will appear on a list generated by the execution of this type of advanced query. When constructing these types of queries, you should substitute wildcard characters (% or _ ) for the unknown parts of the string. If you know how many characters are in the missing part of the string, you should use one or more underscore ( _ ) characters; otherwise, the percent (%) character is appropriate. To build the pressure valve query mentioned on the previous page, you would perform the following steps: 1. Assuming that “pressure valve” is part of at least one instrument’s description, first choose Description from the Selection Field Name drop-down list. 2. Select “LIKE” from the Operation drop-down list. 3. Type “%pressure%valve%” into the Selection Value field. 4. Finally, click the Add To Selection Criteria button to move it into the Selection Criteria During Query Execution box. Your screen will look like the one shown in Figure 21.4. 5. Click the Execute button to generate a query list showing all instruments with “pressure valve” in their description. 21-6 Quality Fluke Products Online at: www. GlobalTestSupply.com [email protected] Advanced Queries 21.1 Advanced Queries 21 Figure 21.4 In this example, you use the percent (%) wildcard since you are not sure how many characters are in the missing parts of the description. Conversely, if you wanted to pull up a query list showing every instrument that did not have “pressure” and “valve” in its description, then you would perform the same steps, but instead you would insert “NOT LIKE” into the Operation field. An example where the _ wildcard would be useful is as follows: 1. Imagine that all of your Instrument ID’s begin with “INST” followed by a dash and two numeric characters, starting with “01”. Using the underscore ( _ ) wildcard, you could pull up a query list showing all instruments whose ID’s are in the “21’s”. To do this you would perform the following steps: 2. Select Instrument ID from the Selection Field Name drop-down list. 3. Choose “LIKE” from the Operation drop-down list. 4. Enter “INST-2_” into the Selection Value field. 5. Finally, click the Add To Selection Criteria button to move it into the Selection Criteria During Query Execution box. Your screen will look like the one shown in Figure 21.5 below. 6. Click the Execute button to generate a query list showing ten instruments, beginning with “INST-21” and ending with “INST-29”. 21-7 Quality Fluke Products Online at: www. GlobalTestSupply.com [email protected] DPCTrack2 Users Manual Figure 21.5 21.1.2.5 Using Date Field Key Words You also have the ability to use date field key words in advanced queries. Date field key words like “End of week”, “End of month”, “End of year”, “Today” and “Tomorrow” are useful for queries involving dates, that may be used on a regular basis. Using this functionality, you could build an advanced query to show all instruments that are due for calibration by the “End of month” date, then save and execute it on a monthly basis. Using the “End of month” date field key word instructs the system to always substitute the last day of the current month into the selection criteria. To do this you would perform the following steps: 1. Select Next Cal Date from the Selection Field Name drop-down list. 2. Choose “< =” from the Operation drop-down list. 3. Choose “End of month” from the Selection Value field’s drop-down list. 4. Finally, click the Add To Selection Criteria button to move it into the Selection Criteria During Query Execution box. Your screen will look like the one shown in Figure 21.6 below. 5. Click the Execute button to generate a query list showing all instruments due for calibration by the end of the current month. 21-8 Quality Fluke Products Online at: www. GlobalTestSupply.com [email protected] Advanced Queries 21.1 Advanced Queries 21 Figure 21.6 21.1.3 Action Button Sets 21.1.3.1 Action Buttons Set 1 (shown beside the Selection Criteria During Query Execution box) 21.1.3.1.1 Remove To remove selection criteria from the Selection Criteria During Query Execution box, select any portion of the line of text with your mouse and click the Remove button. 21.1.3.1.2 Group When you have multiple sets of selection criteria in your query, the Group button may be used to put parentheses around those sets that you want to keep together. For example, imagine you have built a query with the following three sets of selection criteria: (Status = In Service OR Status = Out of Service) AND Cal Due Date = Today Using the Group button to put parentheses around the first two sets of selection criteria forces the system to use them together. This will result in a query list consisting of two types of instruments. Some will have a status of “In Service” and a calibration due date equal to today’s date; the others will have a status of “Out of Service” and a calibration due date equal to today’s date. If you do not group the statuses together, the system will pull up a list with two other types of instruments. Some will have a status of “Out of Service” and a calibration due date equal to today’s date, while the others will have a status of “In Service” with no regard to calibration due date. To group two or more sets of selection criteria together, highlight them with your mouse and click the Group button. You will notice that when you do this, an extra set of parentheses appears around those sets of selection criteria. 21-9 Quality Fluke Products Online at: www. GlobalTestSupply.com [email protected] DPCTrack2 Users Manual 21.1.3.1.3 Ungroup All To ungroup two or more sets of selection criteria, highlight them with your mouse and click the Ungroup All button. You will notice when you do this that the extra parentheses disappear. 21.1.3.1.4 Move Up or Move Down You may also change the order of two or more sets of selection criteria in your query. To do this highlight the one(s) you want to move and click the appropriate button, Move Up or Move Down. 21.1.3.2 Action Buttons Set 2 (shown below the Selection Criteria During Query Execution box) 21.1.3.2.1 Execute The Execute button applies the criteria you have selected (and that are currently displayed in the Selection Criteria During Query Execution box) to all of the records in the system for the company, thus generating the query list. 21.1.3.2.2 Save The Save button is used to save the query with a unique name so it may be applied and used again at another time. If you modify a previously saved query and want to save it under a different name, you can do this with the Save As button. 21.1.3.2.3 Retrieve The Retrieve button is used to find previously saved queries so that they may be executed again. 21.1.3.2.4 Reset The Reset button is used to automatically clear the details currently shown on the ADVANCED QUERY screen so that you may begin building a different query. 21.1.3.2.5 Cancel The Cancel button returns you to the last list of records you were in and the Help button activates the online HELP SYSTEM. 21.1.3.2.6 Delete The Delete button is used to delete a previously saved query from the system. To do this, click the Delete button. This will invoke the “User Query” box, which has a drop-down list containing all queries saved in the system for the company. From the drop-down list, select the query to be deleted and click the OK button. A message will then appear to confirm the successful deletion of the advanced query. 21.1.4 Navigating Between Records Included in an Advanced Query List Once a query list has been generated and is currently displayed on your screen, you may click the OK button to return to the main screen you are working in. Doing this will isolate the listed query records from all other records of that type in the system. This will allow you to use the navigation buttons to toggle between only those records that were included on the query list, so you may view each record individually. While an advanced query is active, click the Find Record button and attempt to pull up a record that was not included in the current query list, a message will appear on the screen warning you of this. Clicking the Yes button at the message will pull up the specified record, but the current advanced query and its generated list will be deactivated, thus enabling you to once again navigate between all records of that type in the system for the company. Clicking the No button will not pull up the specified record, but the program will confirm its presence in the database. In addition, the current advanced query and its generated list of records will remain active. 21-10 Quality Fluke Products Online at: www. GlobalTestSupply.com [email protected] Advanced Queries 21.1 Advanced Queries 21 To return to the full list of instruments in the database, you must perform the following steps: 1. Return to the ADVANCED QUERY screen. 2. Once in the ADVANCED QUERY screen, click the Reset button. 3. Once the query details are cleared from the screen, click the Execute button. The list generated will once again include all records in the system for the company. Another option is to exit out of the screen and reopen the screen. 21.1.5 Printing Lists and Saving Them to External Files Any list generated in DPCTrack2 may be printed and/or saved to an external file allowing you to distribute them manually, via paper, e-mail, etc. To do this, pull up any list of records on your screen and right-click anywhere on the list with your mouse. This will invoke a dialog box with four different options, “Save To Excel Spreadsheet”, “Save To Text File”, “Print” and “Print Setup”. Selecting one of the first two options will enable you to save the list in either format in a selected location. Save the file under a unique name, then access and utilize it as desired. Selecting “Print Setup” will invoke the PRINT SETUP screen. In the PRINT SETUP screen you can change the size, style and color of the fonts in both the report’s header and footer. To do this, click the Edit Font buttons in those sections of the screen. The list, when printed, will appear exactly as it does on your screen. Therefore, you may decide to increase or decrease the widths of the columns shown in the list. Select a different number from the “Column Spacing” section’s drop-down list. As you select different numbers, “ColA”, “ColB”, etc. will change positions to illustrate how the list will look when printed. You may also select additional data to be included in the report’s header and/or footer. Highlight any of the items listed in the “Available” boxes and use the center arrow keys to move them to the desired “Displayed” boxes. Selecting “Other” will invoke the INPUT FORM screen in which you may type additional information to be shown in the printout’s header or footer. To save your print settings, click the Set as Defaults button, then click OK. Once you are back in the list screen, click the Print button and proceed as you normally would when printing a document from your computer. Your print settings will remain as you configured until you modify again. 21.1.6 Using Advanced Queries in Other Parts of the Program Once you have built and saved advanced queries, they become available for reporting purposes. To do this, select a report to run, enter any required parameter values, click the Advanced Selection tab then choose a query to report with. (See Chapter 23 for more information about using advanced queries with reports.) 21-11 Quality Fluke Products Online at: www. GlobalTestSupply.com [email protected] DPCTrack2 Users Manual 21-12 Quality Fluke Products Online at: www. GlobalTestSupply.com [email protected] Chapter 22 DPCTrack Explorer Title Page 22.1 DPCTrack Explorer ................................................................................ 22-3 22.1.1 Grouping............................................................................................. 22-4 22.1.2 Pop-up Menu Options .................................................................... 22-4 22.1.3 Status Indicator Icons ......................................................................... 22-5 22.1.4 Resetting the Tree............................................................................... 22-5 22.1.5 Displaying Additional Information .................................................... 22-5 22-1 Quality Fluke Products Online at: www. GlobalTestSupply.com [email protected] DPCTrack2 Users Manual 22-2 Quality Fluke Products Online at: www. GlobalTestSupply.com [email protected] DPCTrack Explorer 22.1 DPCTrack Explorer 22 22.1 DPCTrack Explorer DPCTrack Explorer allows you to quickly view all of the company’s records, as well as their relationships to one another. This tool (shown in Figure 22.1) may be accessed by selecting “DPCTrack Explorer” from the Main Toolbar on the Home Screen. Figure 22.1 By default, the box on the left side of the screen lists each item type individually along with all of the records of that item type that currently exist for the company. Expanding the tree for Equipment and Loops allows you to view all of those items’ components as well as related records. In addition, highlighting any individual item on the screen will display all of its details in the box in the display pane. The floating display window can also be docked/undocked to the left side of the screen by clicking the button in the upper right of the display window. (See Figure 22.2 for an example.) The side toolbar can be resized by clicking and dragging the splitter bar that appears on the right edge of the DPCTrack Explorer. 22-3 Quality Fluke Products Online at: www. GlobalTestSupply.com [email protected] DPCTrack2 Users Manual 22.1.1 Grouping Another useful tool found in this screen is the ability to group the list of items that appear on the tree by different fields: Item Type, Classification, Department, Frequency, Location, Manufacturer, Responsible Technician, Scheduled, Work Due by Department and Work Due by Location. . Grouping the tree grants you faster access to the category of your choice. For example, when grouping by Location you can more easily see the items that should be in the current Location or Building you are performing work in. To change the grouping on the tree, select a field name from the top drop-down list. For example, Figure 22.2 below illustrates the Location grouping. Items with no Location assigned appear in the <Blank> folder, and all other items are categorized by their Location and Building values. Figure 22.2 Note The selected filter will be saved when you close the Explorer and will be selected by default the next time you open it. 22.1.2 Pop-up Menu Options Right-clicking on an item in the tree gives you a variety of options, depending on the type of item that is selected. Context-Specific Menu Options: • “Expand Selected” – This option expands the selected item if there are any subitems attached to it. • “Expand All” – This option expands all items with sub-items in all visible folders. • “Open Selected Item” - This option opens the corresponding record screen for the selected record and navigates directly to that record. If the corresponding record 22-4 Quality Fluke Products Online at: www. GlobalTestSupply.com [email protected] DPCTrack Explorer 22.1 DPCTrack Explorer 22 screen is already open, it will attempt to navigate to the selected record. Note You can also open the selected item if it has no sub-items by doubleclicking the item. • “Enter Calibration Record” - This option opens the Calibration Record screen and automatically chooses the current item as the basis for a new calibration history record. 22.1.3 Status Indicator Icons All items are indicated by an icon that is the same as their Records Toolbar button icon. During some situations, an additional icon may appear to the left of these icons to indicate a particular situation: This icon indicates an overdue item. 22.1.4 Resetting the Tree You may reset the tree of items shown on the Explorer by right-clicking the DPCTrack Explorer button and clicking “Refresh Tree”. If DPCTrack Explorer is already open, it will refresh and reopen. If DPCTrack Explorer is not open, “Refresh Tree” will also open the Explorer. 22.1.5 Displaying Additional Information The DPCTrack Explorer can be displayed 3 (three) different ways: • Item ID • Item ID : Description • Description : Item ID The settings to change the display for DPCTrack Explorer are on the SYSTEM OPTIONS screen, Below are screen shots of the three options. See Figures 22.3 – 22.5 Figure 22.3 ID Only Figure 22.4 ID & Description Figure 22.5 Description & ID 22-5 Quality Fluke Products Online at: www. GlobalTestSupply.com [email protected] DPCTrack2 Users Manual 22-6 Quality Fluke Products Online at: www. GlobalTestSupply.com [email protected] Chapter 23 Reporting System Title Page 23.1 Reports.................................................................................................... 23-3 23.1.1 Report Parameters Tab ....................................................................... 23-3 23.1.2 Advanced Selection Tab..................................................................... 23-4 23.2 Other Options Available on the Reports Menu....................................... 23-5 23.2.1 Set Report Directory........................................................................... 23-5 23.2.2 Report Maintenance............................................................................ 23-6 23.3 Printing ............................................................................................... 23-6 23.4 Setting Up New Reports ......................................................................... 23-6 23.4.1 Custom Reports .................................................................................. 23-6 23.4.2 Report Maintenance............................................................................ 23-7 23.4.2.1 General Info Tab ............................................................................ 23-7 23.4.2.2 Report Parameters Tab................................................................... 23-8 23.5 Adding New Reports from Scripts.......................................................... 23-9 23.6 Deleting Reports ..................................................................................... 23-10 23-1 Quality Fluke Products Online at: www. GlobalTestSupply.com [email protected] DPCTrack2 Users Manual 23-2 Quality Fluke Products Online at: www. GlobalTestSupply.com [email protected] Reporting System 23.1 Reports 23 23.1 Reports DPCTrack2 comes equipped with many standard reports, all of which were designed with Business Object’s Crystal Reports™. Reports in DPCTrack2 may be accessed from the Reports menu in the Home Screen. This menu lists every report group already established in the system. To use an individual report, highlight its group, then select it from the full list of reports in that group. A complete list of all of the program’s standard reports, in addition to descriptions of each report can be found in Chapter 24 of this user manual. When you select a report to run, the View Report screen will open with the selected report’s title appearing in the View Report Screen Header. This screen (shown in Figure 23.1 below) is comprised of two tabs, Report Parameters and Advanced Selection. Figure 23.1 23.1.1 Report Parameters Tab The Report Parameters tab is used to enter specific parameter values if they are required to run the selected report. Parameter values, which will limit the data shown, may be an item ID, a specific calibration date, a date range, a file name or a test point number. For example, to print an “Instruments Due Report” showing all instruments that are due for calibration in a particular month, you must enter the starting and ending dates of that month. 23-3 Quality Fluke Products Online at: www. GlobalTestSupply.com [email protected] DPCTrack2 Users Manual 23.1.2 Advanced Selection Tab DPCTrack2’s reporting system helps you run more specific reports by allowing you to use advanced queries you have saved, if the report supports it. The Advanced Selection tab (shown in Figure 23.2) is used to select a query to apply to the selected report. To use an advanced query in a report you must perform the following steps: 1. Select the desired report from the Reports menu. 2. Enter valid report parameter values, if required, then go to the Advanced Selection tab. In the Advanced Selection tab select the query you would like to use from the Choose Existing Selection drop-down list. (Every advanced query you have saved for the record type you are reporting on will be available on the drop-down list.) Once you have chosen a query, its details will be shown on the screen. 3. If you would like to include the parameter values requested on the Report Parameters tab, then check the box titled, Include Report Parameters in Record Selection. If you would prefer to run the report only with the advanced query you have chosen, then leave the box unchecked so that the parameters are ignored. (If there are no parameters this box is not presented.) 4. Once you have completed steps 1-3, you may click the Report Preview button or Print. Figure 23.2 23-4 Quality Fluke Products Online at: www. GlobalTestSupply.com [email protected] Reporting System 23.2 Other Options Available on the Reports Menu 23 From the Advanced Selection tab, you may also create a new advanced query or modify an existing query by choosing the New or Modify buttons located to the right of the Choose Existing Selection field. Both of these buttons will invoke the ADVANCED QUERY screen. To modify an existing query, you must first select it from the Choose Existing Selection field’s drop-down list and then click the Modify button. (See Chapter 21 for information about creating or modifying advanced queries.) It is important to note that due to the characteristics of their design or their intended use, some standard reports cannot be run with the use of an advanced query. Below is a list of all standard reports in DPCTrack2 that cannot be used with an advanced query: Active Users Report Instrument Test Point Analysis Test Instrument Test Point Analysis Calibration Alert Report Instrument Test Point Trend Test Instrument Test Point Trend Company Configuration Loop Test Point Analysis Test Instrument Reverse Traceability Document Report Loop Test Point Trend User Lists Events Due (This Company) System Options Active Users Failed Calibrations Report Security Log Report If a report cannot be used with an advanced query, then the Advanced Selection tab will not be present. 23.2 Other Options Available on the Reports Menu The Reports menu at the top of the Home Screen provides two additional options that are very important when working with DPCTrack2’s reporting system. 23.2.1 Set Report Directory Selecting “Set Report Directory” from the Reports menu invokes the SELECT DIRECTORY screen (shown in Figure 23.3). This screen is used to specify the directory in which your DPCTrack2 report files reside. When you initially install DPCTrack2, the standard report files will automatically be located in the correct directory. Please note that you should not change this default location unless you must have your reports reside in another directory on your computer or on your network. 23-5 Quality Fluke Products Online at: www. GlobalTestSupply.com [email protected] DPCTrack2 Users Manual Figure 23.3 23.2.2 Report Maintenance Selecting “Report Maintenance” from the Reports menu invokes the REPORT MAINTENANCE screen. This screen is used to install new reports into your DPCTrack2 system or modify the setup of existing reports. 23.3 Printing Once you have selected to print, click the Print button and proceed as you normally would when printing a report from the program. The associated worksheets will be printed in order and grouped together. 23.4 Setting Up New Reports 23.4.1 Custom Reports Although DPCTrack2 comes equipped with many standard reports, some users choose to have reports customized to meet their specific needs. If you have chosen to create your own custom reports or have decided to have Prime Technologies customize them for you, once a report has been modified or a new one designed, it must then be installed into your DPCTrack2 program. 23-6 Quality Fluke Products Online at: www. GlobalTestSupply.com [email protected] Reporting System 23.4 Setting Up New Reports 23 23.4.2 Report Maintenance To install a new or modified an existing report, you must first select “Report Maintenance” from the Reports menu that is available when the Home Screen is open. This will invoke the REPORT MAINTENANCE screen shown in Figure 23.4. Figure 23.4 23.4.2.1 General Info Tab This tab page is used to enter the general information about the new report. In the field labeled Report Name, you must enter a unique name for the report so that it may be distinguishable from the other reports already in the system. This field has a limit of 50 characters. The field labeled File Name is used to enter the actual file name of the report (as it is listed in your Report Directory). Note You must move the report into the designated directory before you enter the file name. In addition, the file name must contain the ".rpt" extension. If you are not sure of the file's name, click the Browse button next to the “File Name” field to select from a list of all reports in the Report Directory. The Report Description field is used to enter a description of the new report. This field does not need to contain data, however it is useful for documenting specific information about the new report such as its author or its function. This field has a limit 3,996 characters. If there is a chance that you will use advanced queries when executing the new report, then you must make a selection from the drop-down list for the Query Type Used For Further Selection field. The selections available on the drop-down list are the table names of every screen in the program where advanced queries may be used. The query type selected must match the main data table that was used in the report’s design. For example, if you are installing a new calibration report, you should choose "CALIBRAT" from the drop-down list for this field so that advanced queries created and saved for the CALIBRATION screen will be available for use when executing this new report. 23-7 Quality Fluke Products Online at: www. GlobalTestSupply.com [email protected] DPCTrack2 Users Manual Finally, the Report Group field is used to designate the report group that the new report should be included in. To choose an existing report group for the new report to reside in, select one from the field’s drop-down list. If the report group desired is not listed, click the New button next to the field to add it to the system. 23.4.2.2 Report Parameters Tab This tab page (Figure 23.5) is used to establish the parameters that will be required to run the new report. Parameters are useful in that they allow you to limit the number of reports that are generated by the system at any one time. If parameters were included in the report’s design, then it is necessary to enter them here. For example, the figure below shows two parameters used for the “Instruments Due Report” which comes as a standard report with your system. This report uses date parameters so that it can show all instruments that are due for calibration within a period of time or date range specified by the user. Without date parameters, the report would show every instrument in the system for the current company regardless of when they were due. Figure 23.5 If parameters were not used in the new report's design then you do not need to utilize this tab page in any way. Examples of standard reports that do not use parameters are the inventory reports and master reports. Most reports however, have parameters that were hard-coded in their design, in which case the fields for Variable Name must read exactly the same as the parameters that were entered into the report's design. If the parameters shown on this screen do not match those in the report’s design, the program will not be able to run it and you will see an error message appear on your screen when you attempt to preview or print the report. The fields for Variable Type can only be filled with data selected from the drop-down lists. Variable types must correspond directly to the variable names you are using (e.g. Date, Instrument ID, Status, etc). In addition, the selections shown on these drop-down lists cannot be deleted, added to or modified. Finally, the fields for Variable Screen Prompt are used to enter the wording that you would like to appear on the Report Parameters tab page of the REPORTING SYSTEM screen (e.g. Start Date, End Date, Instrument ID, etc.). 23-8 Quality Fluke Products Online at: www. GlobalTestSupply.com [email protected] Reporting System 23.5 Adding New Reports from Scripts 23 Once you have completed both tab pages for the new report you must save the record. This will make it a selection under its “Report Group” on the Reports menu when the Home Screen is open. 23.5 Adding New Reports from Scripts Another method by which a new report may be added to the database is to select “Add New From Script…” from the File menu. This method enables you to automatically add the report and its setup to your system so that you do not have to manually perform the steps described earlier in this section. To use this method you must first copy the new report file into the correct report directory and secondly you must have the correct .ini file in your possession and residing somewhere on your computer or network. In most cases this .ini file will have been supplied to you by Prime Technologies if you elected to utilize Prime Technologies’ report customization services. The .ini file contains all the information required for the new report to be setup properly in your database. Figure 23.6 Selecting the “Add New From Script…” option on the File menu will invoke the GET REPORT INSTALL SCRIPT screen shown in Figure 23.6. This screen allows you to locate the required .ini file on your computer or network. Once you have located the file you can double-click or highlight it and click the Open button to initiate it. Upon doing so, a message will appear on your screen. This message will state the report’s title and confirm your decision to add it to your system. If you click the Yes button on the message, the report will automatically be added just as if you had set it up in your database manually. If the report to be added from the .ini file already exists in the system or if a different report with the same name exists in the database, you will not be able to add the new report to the system. If this occurs, you will either need to delete the existing report or change the name of the new report in the .ini. file. 23-9 Quality Fluke Products Online at: www. GlobalTestSupply.com [email protected] DPCTrack2 Users Manual 23.6 Deleting Reports The deletion of a report from your database is also done through the REPORT MAINTENANCE screen and is accomplished by performing the following steps: 1. With the REPORT MAINTENANCE screen open, click the List Records button on the sub-category toolbar. 2. While in the list screen, select the report you would like to delete and click OK so that the record is displayed on the screen. 3. From the screen’s File menu, select “Delete Report”. 4. When the confirmation message appears, click OK. 5. The program will then confirm that the report was deleted successfully and it will no longer appear as a selection on the Reports menu. 23-10 Quality Fluke Products Online at: www. GlobalTestSupply.com [email protected] Chapter 24 The Logged Data Screen Title Page 24.1 What is Logged Data?............................................................................. 24-3 24.2 Uploading Logged Data.......................................................................... 24-4 24.2.1 Selecting Port ..................................................................................... 24-4 24.2.2 Upload Logs Button ........................................................................... 24-5 24.2.3 Show Logged Data Button ................................................................. 24-6 24.2.4 Log Record ......................................................................................... 24-6 24.2.4.1 Data Log ID ................................................................................... 24-6 24.2.4.2 Item Type ....................................................................................... 24-6 24.2.4.3 Item ID ........................................................................................... 24-6 24.2.4.4 Tag ID ............................................................................................ 24-6 24.2.4.5 Logged By...................................................................................... 24-6 24.2.4.6 Manufacturer .................................................................................. 24-6 24.2.4.7 Model Number ............................................................................... 24-6 24.2.4.7 Serial Number ................................................................................ 24-7 24.2.4.8 Start Time....................................................................................... 24-7 24.2.4.9 Stop Time....................................................................................... 24-7 24.2.4.10 # Values.......................................................................................... 24-7 24.2.4.11 # Values Req .................................................................................. 24-7 24.2.4.12 # Source Value ............................................................................... 24-7 24.2.4.13 # Time Interval............................................................................... 24-7 24.2.4.14 Min Value ...................................................................................... 24-7 24.2.4.15 Max Value...................................................................................... 24-7 24.2.4.16 Date Entered................................................................................... 24-7 24.2.4.17 Entered By...................................................................................... 24-7 24.3 Viewing Log Records ............................................................................. 24-8 24.3.1 Listing Log Records ........................................................................... 24-9 24.3.2 Navigating Log Records..................................................................... 24-9 24.4 Viewing Logged Data Report ................................................................. 24-10 24-1 Quality Fluke Products Online at: www. GlobalTestSupply.com [email protected] DPCTrack2 Users Manual 24-2 Quality Fluke Products Online at: www. GlobalTestSupply.com [email protected] The Logged Data Screen 24.1 What is Logged Data? 24 24.1 What is Logged Data? Among the many features of DPCTrack2 is the Logged Data screen See Figure 24.1 below. Fluke Documenting Process Calibrators allow users to log and capture data over time to help spot, diagnose and prevent intermittent problems or anomalies that can cause facility down time. Figure 24.1 The Logged Data screen allows users to import recorded data from the Fluke calibrator directly to the DPCTrack2 database. Logged data is used to monitor specified conditions in a selected environment and record periodic measurements. This data is typically not associated with any Tag ID, though it may be, and therefore stands alone as an independent record and given a unique Log ID. Example: Record the periodic conditions of a chamber by taking five readings per minute over a ten minute span. These readings are saved as a log and uploaded to the DPCTrack2 database and available for review and interpretation. Note Uploading data through the Upload/Download screen will not transfer Logged Data from the calibrator to the DPCTrack2 database. Logged Data can only be uploaded through the Logged Data screen. 24-3 Quality Fluke Products Online at: www. GlobalTestSupply.com [email protected] DPCTrack2 Users Manual 24.2 Uploading Logged Data To upload Logged Data from the Fluke calibrator to the DPCTrack2 database, first plug the calibrator into the appropriate port on your workstation, turn the calibrator on, and select the Upload Logged Data button at the top of the screen. 24.2.1 Selecting Port Select the appropriate port in the Ports section, and click Calibrator Info below to verify the application is recognizing the calibrator correctly. Figure 24.2 shows the calibrator info. If there are no ports present or incorrect calibrator information is displayed, select the Refresh button to refresh the Ports. Figure 24.2 24-4 Quality Fluke Products Online at: www. GlobalTestSupply.com [email protected] The Logged Data Screen 24.2 Uploading Logged Data 24 24.2.2 Upload Logs Button Next, click the Upload Logs button see Figure 24.3 below, the application will automatically upload all logs present on the calibrator to the DPCTrack2 database. Figure 24.3 24-5 Quality Fluke Products Online at: www. GlobalTestSupply.com [email protected] DPCTrack2 Users Manual 24.2.3 Show Logged Data Button After the Upload is complete, click the Show Logged Data button to navigate to the Logged Data record you just uploaded. See Figure 24.4 below. Figure 24.4 24.2.4 Log Record Upon navigating to the record you just uploaded, several automatically populated fields are visible. This portion of the page contains information pulled from the logged record and the Tag ID. These fields are not modifiable. They include: 24.2.4.1 Data Log ID This field displays the log record identifier assigned by the system. 24.2.4.2 Item Type This field displays the asset type i.e. Instrument or Loop for which the logged data was captured. 24.2.4.3 Item ID This field displays the asset identifier for the Instrument or Loop. 24.2.4.4 Tag ID This field displays the asset identifier entered on the calibrator, at the time of upload, for the Instrument or Loop. This may or may not be the same as the Item ID. 24.2.4.5 Logged By This field displays the ID of the individual responsible for the upload. 24.2.4.6 Manufacturer This field displays the manufacturer for the Instrument or Loop ID associated with the Tag ID. 24.2.4.7 Model Number This field displays the model number for the Instrument or Loop ID associated with the Tag ID. 24-6 Quality Fluke Products Online at: www. GlobalTestSupply.com [email protected] The Logged Data Screen 24.2 Uploading Logged Data 24 24.2.4.7 Serial Number This field displays the serial number for the Instrument or Loop ID associated with the Tag ID. 24.2.4.8 Start Time A Time/Date Stamp is visible reflecting when the Logging for this Log record began. 24.2.4.9 Stop Time A Time/Date Stamp is visible reflecting when the Logging for this Log record ended. 24.2.4.10 # Values This field displays the number of readings actually taken for this Log record. 24.2.4.11 # Values Req This field displays the number of readings requested be taken for this Log record. 24.2.4.12 # Source Value This field displays the energy amount provided. 24.2.4.13 # Time Interval This field displays the segment of time between readings. 24.2.4.14 Min Value This field displays the minimum value of the uploaded Log record with the corresponding unit. 24.2.4.15 Max Value This field displays the maximum value of the uploaded Log record with the corresponding unit. 24.2.4.16 Date Entered A Time/Date Stamp is visible reflecting when the Log was uploaded. 24.2.4.17 Entered By This field displays the user that entered the Log upload. 24-7 Quality Fluke Products Online at: www. GlobalTestSupply.com [email protected] DPCTrack2 Users Manual 24.3 Viewing Log Records After uploading Logged Data from the calibrator, individual logs are saved to the DPCTrack2 database and assigned a unique Log ID. If you attached a Tag ID to the log on the calibrator, the upload will automatically attach applicable item information to the log record. See 24.5 below. Figure 24.5 24-8 Quality Fluke Products Online at: www. GlobalTestSupply.com [email protected] The Logged Data Screen 24.3 Viewing Log Records 24 24.3.1 Listing Log Records To access a list of all uploaded Logged Data records click the List button (folder icon) on the Logged Data screen’s toolbar or select File List Records. Figure 24.6 shows the list of uploaded Log records. Figure 24.6 24.3.2 Navigating Log Records Like other record types in DPCTrack2, users may navigate between Logged Data records by using the green navigation arrows at the top of the screen. 24-9 Quality Fluke Products Online at: www. GlobalTestSupply.com [email protected] DPCTrack2 Users Manual 24.4 Viewing Logged Data Report DPCTrack2 comes with several standard reports, including the Data Log Trend report. To view this report, simply click the Report Preview button. See Figure 24.7 below. Figure 24.7 The report may be printed from either the Logged Data screen or the Report Preview screen by clicking the Print Report button on the top toolbar. 24-10 Quality Fluke Products Online at: www. GlobalTestSupply.com [email protected] Chapter 25 Backing Up and Restoring Data Title 25.1 25.2 Page Backing Up ............................................................................................. 25-3 Restore From Backup ............................................................................. 25-4 25-1 Quality Fluke Products Online at: www. GlobalTestSupply.com [email protected] DPCTrack2 Users Manual 25-2 Quality Fluke Products Online at: www. GlobalTestSupply.com [email protected] Backing Up and Restoring Data 25.1 Backing Up 25 25.1 Backing Up Since you are running a Microsoft® Access version of DPCTrack2, it is recommended that you back up your database files on a regular basis. Backing up your data regularly is your insurance policy that information will never be lost. Selecting “Backup Database” from the Tools menu at the top of the Home Screen provides you with an easy way to do this. Selecting this option will open the SELECT A BACKUP DATABASE FROM FILE screen shown in Figure 25.1 Backing up DPCTrack2 does not delete any information from your system. It makes a copy of your data, which may then be stored in a secure location. Figure 25.1 When backing up your data, you may select the directory that you would like the copy of your data to be sent to. (This will default to the “Backups” folder) The file name will default to “<today’s date_dpctrack2_backup.mdb” is the file name for your DPCTrack2 database and should be left as it is shown on the screen. Note The file extension “.mdb” cannot be modified. Once you have selected a backup file destination, click the Save button. When the backup has completed, a confirmation message will appear on your screen. A system reminder may be set so that you never forget to back up your database. This reminder functionality is available in all versions of DPCTrack2. In the SYSTEM OPTIONS screen you may enter a value for “Number of Days Between Backup Warnings” See Chapter 7 for more information. Based upon this number the system will bring up a routine reminder. For example, if you enter “30” into this field, then every 30 days a reminder will appear on your screen as you try to shut down the program. (Note that only users whose groups have the ability to perform backups will see this reminder.) 25-3 Quality Fluke Products Online at: www. GlobalTestSupply.com [email protected] DPCTrack2 Users Manual When the reminder appears on your screen you may proceed with the automatic backup. Once the backup has finished, the date shown in the field for Last date the system database was backed up, which is also located on the SYSTEM OPTIONS screen, will be changed to the current date. When the reminder message appears, you inform the system that the files have already been backed up, then you will be asked if you would like the date reset. You may choose to ignore the reminder, in which case it will continue to come up every time you exit the system or until the backup date is manually reset. 25.2 Restore From Backup To restore your database from a backup, first either change the file name of the existing database or move it to another location. Then, navigate to the “Backup” folder and copy the backup file and paste it into the “Data” folder. Change the file name to “DPCTrack2.mdb”. If you have changed the database location during installation, choose that folder instead of “Data”. 25-4 Quality Fluke Products Online at: www. GlobalTestSupply.com [email protected] Chapter 26 Troubleshooting Title 26.1 26.2 26.3 Page Troubleshooting - Downloading Instruments as Tasks........................... 26-3 Troubleshooting - Device Communication............................................. 26-3 Troubleshooting - Uploading Results ..................................................... 26-4 26-1 Quality Fluke Products Online at: www. GlobalTestSupply.com [email protected] DPCTrack2 Users Manual 26-2 Quality Fluke Products Online at: www. GlobalTestSupply.com [email protected] Troubleshooting 26.1 Troubleshooting - Downloading Instruments as Tasks 26 26.1 Troubleshooting - Downloading Instruments as Tasks Possible problems: • Make sure the test point groups you are attempting to download have ALL of the following: Input Signal Type, Output Signal Type, Input High Limit, Input Low Limit, Output High Limit, Input Low Limit, and Specification and Limit In and Out values for each test point. • Also, ensure that both signal types are associated with the appropriate options for both Input and Output. See Signal Type setup for more. • Ensure that all test point values (“In Val” column) are within the Input Low Range and Input High Range of the device. Ensure that all Modes selected can be configured in the same combination on your DPC unit. For example, TC Source and TC Measure cannot be used at the same time. 26.2 Troubleshooting - Device Communication Possible communication problems: • Be sure to check that the COM port you are using is present on your computer. • If no COM ports are present, click the refresh button • If refresh does not complete (i.e. progress bar continues to run for an excessive period of time) then press Alt+ F4 to close the application, and if able, disconnect any other comm devices and retry after reconnecting them. • Be sure the cable is connected to the calibrator properly, and to your PC's serial port as well. Consult your calibrator's documentation for the correct method of connection. • Programs that use a serial port to connect to other external devices, such as Palm Pilots, should be shut down when using this program with that same serial port. The computer needs to recognize that the COM port is free, and can be used for communication with the calibrator device. 26-3 Quality Fluke Products Online at: www. GlobalTestSupply.com [email protected] DPCTrack2 Users Manual 26.3 Troubleshooting - Uploading Results Possible uploading problems: • If the Tag used for a result stored on the calibrator is not found in the Instrument or Loop screens, the user will be prompted to save the result to a file. To avoid this, create an Instrument or Loop record with an ID matching the Tag entered on the Calibrator before uploading. • Remember that after Authorizing a calibration during Upload, the user may review and update the Calibration record in the Calibration Screen if there are additional values to view, edit, or remove from the record. 26-4 Quality Fluke Products Online at: www. GlobalTestSupply.com [email protected] Appendix A Report Descriptions Listed by Groups Alert Group Calibration Alert Report This report shows all Instruments, Test Instruments and Loops, calibrated within a specified period of time that had at least one “As-Found” value that was outside of its high or low spec limit. Failed Calibrations Report This report shows all Instruments, Test Instruments and Loops that failed calibration within a specified period of time. Calibration Group Calibration Bar Code Label Bar codes are visual representations of alphanumeric characters designed to be read by a scanner. This Bar Code Label contains the item’s Bar Code ID, Item’s ID, the name of the Technician who performed the Calibration, the Last Calibration Date and its Next Due Date. Bar code labeling provides numerous advantages to indexing, itemizing and tracking. Dimensions for this label are 2” X 2”. Calibration Label These labels help comply with the requirements for generic calibration industry standards requirements. This label contains a Title, the Item’s ID, the name of the Technician who performed the Calibration, the Calibration Date and its Next Due Date. Dimensions for this label are 1 ¾ “W X 1” H. Instrument Calibration Report (Spec Summary) This is a completed calibration report for Instruments showing some master information, results of the calibration (calibration specs plus “As-Found” and “As-Left” values and deviation percentage), and Test Instrument(s) used. This is a good report to choose for those Instruments whose calibrations are fairly simple, those with test points that remain consistent with regard to stated accuracy, accuracy percentage and resolution since this information is summarized at the top of the report. Instrument Calibration Report (Specs/Test Point) This is also a completed calibration report for Instruments, although this report shows more detail than the one previously described. This is a good report to choose for those Instruments whose calibrations are more complex. It includes the same information as the A-1 Quality Fluke Products Online at: www. GlobalTestSupply.com [email protected] DPCTrack2 Users Manual other calibration report, but instead of summarizing the stated accuracy, accuracy percentage and resolution at the top of the report, it displays this information for each test point individually. Instrument Test Point Analysis This report shows an analysis of a single Instrument calibration. A line graph is included so that you may easily compare the expected, As-Found, and As-Left values for the calibration. Instrument Test Point Trend This report allows you to trend an Instrument’s maximum deviation over a specified period of time. A line graph is included so that you may easily view this information. Loop Calibration Report (Spec Summary) This is a completed calibration report for Loops showing some master information, results of the calibration (calibration specs plus “As-Found” and “As-Left” values and deviation percentage), its comprising Instrument(s), and the Test Instrument(s) used. This is a good report to choose for those Loops whose calibrations are fairly simple- those with test points that remain consistent with regard to stated accuracy, accuracy percentage and resolution since this information is summarized at the top of the report. Loop Calibration Report (Specs/Test Point) This is also a completed calibration report for Loops, although this report shows more detail than the one previously described. This is a good report to choose for those Loops whose calibrations are more complex. It includes the same information as the other Loop calibration report, but instead of summarizing the stated accuracy, accuracy percentage and resolution at the top of the report, it displays this information for each test point individually Loop Test Point Analysis This report shows an analysis of a single Loop calibration. A line graph is included so that you may easily compare the expected, As-Found and As-Left values for the calibration. Loop Test Point Trend This report allows you to trend a Loop’s maximum deviation over a specified period of time. A line graph is included so that you may easily view this information. Test Instrument Calibration (Spec Summary) This is a completed calibration report for Test Instruments showing some master information, results of the calibration (calibration specs plus “As-Found” and “As-Left” values and deviation percentage), and the Test Instrument(s) used. This is a good report to choose for those Test Instruments whose calibrations are fairly simple- those with test points that remain consistent with regard to stated accuracy, accuracy percentage and resolution since this information is summarized at the top of the report. Test Instrument Calibration (Specs/Test Point) This is also a completed calibration report for Test Instruments, although this report shows more detail than the one previously described. This is a good report to choose for those Test Instruments whose calibrations are more complex. It includes the same information as the other Test Instrument calibration report, but instead of summarizing the stated accuracy, accuracy percentage and resolution at the top of the report, it displays this information for each test point individually. A-2 Quality Fluke Products Online at: www. GlobalTestSupply.com [email protected] Report Descriptions Listed by Groups Company Group A Test Instrument Test Point Analysis This report shows an analysis of a single Test Instrument calibration. A line graph is included so that you may easily compare the expected, As-Found and As-Left values for the calibration. Test Instrument Test Point Trend This report allows you to trend a Test Instrument’s maximum deviation over a specified period of time. A line graph is included so that you may easily view this information. Company Group Events Due (This Company) This report shows all Instrument, Loops and Test Instruments due for calibration and all SOP’s that have expired within a specified period of time for the company. Document Group Document Report This report can be printed for each Document record entered into the system for the company. It shows all of the information entered for a Document including the procedure tab. On the Document Report Parameters Tab, the specific Document Number and Revision Number must be specified. Documents Due Report This report lists all Documents that will expire within a specified date range. Equipment Group Equipment Bar Code Label This Bar Code Label contains the actual Bar Code, Item ID, Description and the Last Calibration Date and its Next Due Date. They may also be scanned back into the program making the entry of data, creation of records and/or the taking of a physical inventory faster and easier. Dimensions for this label are 2” X 2”. Instrument Group Instrument Bar Code Label This Bar Code Label contains the actual Bar Code, Item ID, Description and the Last Calibration Date and its Next Due Date. They may also be scanned back into the program making the entry of data, creation of records and/or the taking of a physical inventory faster and easier. Dimensions for this label are 2” X 2”. Instrument Master (Spec Summary) This is a report that shows all of the master information for an Instrument, with the stated accuracy, accuracy percentage and resolution information for the calibration test points summarized at the top of the report. Instrument Master (Specs/Test Point) This is also a report that shows all of the master information for an Instrument, however it is more detailed in that the stated accuracy, accuracy percentage and resolution information are displayed for each test point individually. A-3 Quality Fluke Products Online at: www. GlobalTestSupply.com [email protected] DPCTrack2 Users Manual Instrument Worksheet (Spec Summary) This report looks similar to the Instrument Calibration Report (Spec Summary) except for the fact that it has blank lines on which to write the “As-Found” and “As-Left” values for the Instrument’s calibration. It also has an area in which to document the Test Instrument(s) used, comments and whether the Instrument passed or failed. You can print out worksheets for all Instruments due for calibration within a specified period of time and give them to your technician to complete on the job. Instrument Worksheet (Spec/Test Point) This report is similar to the other Instrument worksheet except for the fact that it lists the stated accuracy, accuracy percentage and resolution for each individual test point, as opposed to summarizing this information at the top of the report. Instrument Due Report This report lists all the Instruments that will be due for calibration within a specified date range. Inventory Group Instrument Inventory This report shows a list of all Instruments entered for the company. The following fields from the Master Instrument Record are displayed on the report: Instrument ID, Description, Manufacturer, Model Number, Serial Number, Last Cal Date, Next Cal Due, and Status. Loop Inventory This report shows a list of all Loops entered for the Company. The following fields from the Master Loop Record are displayed on the report: Loop ID, Description, Manufacturer, Last Cal Date, Next Cal Due, and Status. Test Instrument Inventory This report lists all Test Instruments entered into the system for the company. The following fields from the Master Loop Record are displayed on the report: Test Instrument ID, Description, Manufacturer, Model Number, Serial Number, Last Cal Date, Next Cal Due, and Status. Logged Data Group Data Log Report This report shows an analysis of a single Logged Record. A line graph is included so that you may easily view the source values / logged data readings taken over a number of readings / time. Loop Group Loop Bar Code Label This Bar Code Label contains the actual Bar Code, Item ID, Description and the Last Calibration Date and its Next Due Date. They may also be scanned back into the program making the entry of data, creation of records and/or the taking of a physical inventory faster and easier. Dimensions for this label are 2” X 2”. Loop Master (Spec Summary) This is a report that shows all of the master information for a Loop, with the stated accuracy, accuracy percentage and resolution information for the calibration test points summarized at the top of the report. A-4 Quality Fluke Products Online at: www. GlobalTestSupply.com [email protected] Report Descriptions Listed by Groups Test Instrument Group A Loop Master (Spec/Test Point) This is also a report that shows all of the master information for a Loop, however it is more detailed in that the stated accuracy, accuracy percentage and resolution information are displayed for each test point individually. Loop Worksheet (Spec Summary) This report looks similar to the Loop Calibration Report (Spec Summary) except for the fact that it has blank lines on which to write the “As-Found” and “As-Left” values for the Loop’s calibration. It also has an area in which to document the Test Instrument(s) used, comments and whether the Loop passed or failed. You can print out worksheets for all Loops due for calibration within a specified period of time and give them to your technician to complete on the job. Loop Worksheet (Specs/Test Point) This report is similar to the other Loop worksheet except for the fact that it lists the stated accuracy, accuracy percentage and resolution for each individual test point, as opposed to summarizing this information at the top of the report. Loops Due Report This report lists all of the Loops that will be due for calibration within a specified date range. Test Instrument Group Test Instrument Bar Code Label This Bar Code Label contains the actual Bar Code, Item ID, Description and the Last Calibration Date and its Next Due Date. They may also be scanned back into the program making the entry of data, creation of records and/or the taking of a physical inventory faster and easier. Dimensions for this label are 2” X 2”. Test Instrument Master (Spec Summary) This is a report that shows all of the master information for a Test Instrument, with the stated accuracy, accuracy percentage and resolution information for the calibration test points summarized at the top of the report. Test Instrument Master (Specs/Test Point) This is also a report that shows all of the master information for a Test Instrument, however it is more detailed in that the stated accuracy, accuracy percentage and resolution information are displayed for each test point individually. Test Instrument Reverse Traceability This report shows all Instruments, Test Instruments and Loops that were calibrated by a particular Test Instrument during a specified period of time. Test Instrument Worksheet (Spec Summary) This report looks similar to the Test Instrument Report (spec summary) except for the fact that it has blank lines on which to write the “As-Found” and “As-Left” values for the Test Instrument’s calibration. It also has an area in which to document the Test Instrument(s) used, comments and whether the Test Instrument passed or failed. You can print out worksheets for all Test Instruments due for calibration within specified period of time and give them to your technician to complete on the job. Test Instrument Worksheet (Specs/Test Point) This report is similar to the other Test Instrument worksheet except for the fact that it lists the stated accuracy, accuracy percentage and resolution for each individual test point, as opposed to summarizing this information at the top of the report. It has an area to record A-5 Quality Fluke Products Online at: www. GlobalTestSupply.com [email protected] DPCTrack2 Users Manual the Test Instrument(s) used, comments, and whether the Test Instrument passed or failed. It has blanks lines to record the stated accuracy, accuracy percentage and resolution for each individual test point. Test Instrument Due Report This report lists all Test Instruments that will be due for calibration within a specified date range. User Group Active Users Report This report shows the User IDs and Names of all users who are currently logged onto DPCTrack2. Security Log Report This report shows all user logon activity (with exact time stamp and Log Details: successful logon, invalid user ID and/or password attempts, forced log offs, time expired, etc..) recorded within a specified date range. A-6 Quality Fluke Products Online at: www. GlobalTestSupply.com [email protected] Appendix B Frequently Asked Questions Frequently Asked Questions List Q. I get an error message, “Error 114”, when attempting to preview or print a report. A. The report directory is not set correctly. To set it correctly, go to the Reports menu then select “Set Report Directory”. Please Note: When you initially install DPCTrack2 the standard report files will automatically be located in the subdirectory labeled “Reports” (Access program). You should not change this default location unless you have your reports reside in another directory on your computer or on your network. Q. I get an error message, “Error 519” when attempting to preview or print a report. A. One of the report parameters entered on the report’s record is incorrect. Open the report’s record in the REPORT MAINTENANCE screen and make sure that all the report parameter Variable Names and Variable Types match those in the design of the report. Q. I get an error message “Error 534” when attempting to preview or print a report. A. This happens because the report is already open on the user’s screen. The report cannot be opened more than once simultaneously. If working with reports locally, on their own workstation, then reboot the machine. If working with reports on a server, restart DPCTrack2 and try again. Q. Why does my item(s) not show up on scheduling reports like the “Events Due Report” and “Calibration Worksheets”? A. In order for records with statuses (Loops, Instruments and Test Instruments) to appear on scheduling reports like the “Events Due Report” and “Calibration Worksheets” you must first assign them a status that is considered active. To do this, go to the Lists menu at the top of the Home Screen and choose “Statuses”. For each active status (i.e., “In Service”), mark the box labeled Indicates an Active Status and save the record. B-1 Quality Fluke Products Online at: www. GlobalTestSupply.com [email protected] DPCTrack2 Users Manual Q. How come my Document ID’s are not showing up on the “Document ID” dropdown lists? A. The SOP Type assigned to those documents do not have the Make Available as an SOP box marked. Q. One of my Calibration Frequencies is misspelled, how do I change that? A. The first step is to go to the Lists menu and select “Calibration Frequency”. Then in the CALIBRATION FREQUENCY screen, add the new calibration frequency with the correct spelling, and save the record. The next step is to go to all the records that are using the frequency with the wrong spelling and change them to the frequency with the correct spelling. Once the frequency with the incorrect spelling is no longer being used, you may go back to the CALIBRATION FREQUENCY screen, open the record for the misspelled frequency, then select FILE “Delete Record”. If the misspelled frequency is still in use, you will get a warning to inform you of this. The best way to filter out records that are using a particular list item is to create and run an advanced query. To create and run an advance query, follow these steps: 1. Imagine that you have a calibration frequency spelled “Weekley” and you wish to change it to “Weekly”. First, you would open the MASTER INSTRUMENT RECORD screen (or any other screen where there are records currently using term “Weekley”. 2. Click the Open Advanced Query button on the screen’s toolbar to open the ADVANCED QUERY screen. 3. In the Display Fields section, move select “Calibration Frequency” to the Other Fields To Display box. 4. In the Selection Criteria section select, “Calibration Frequency” from the Selection Field Name drop-down list. 5. Select “=” from the Operation drop-down list. 6. Select “Weekley” from the Selection Value drop-down list. 7. Click the Add To Selection Criteria button. 8. Click the Execute button. This will generate a list of all records that are currently using the Calibration Frequency called “Weekley”. 9. From the list, select each item one by one to change the frequency to the correct one. Q. I get a message saying “Maximum users exceeded. Try again later” A. This message indicates that the maximum number of “Licensed Users’ are currently logged onto the program. You must either wait for another user to log off, freeing up a seat, or if you are in the ADMIN group, you could force log off a User. Note Manually forcing off another user will cause them to lose any unsaved work. Q. Do I need to fill in all fields when creating a new record? A. You do not need to fill all empty fields when creating a new record. In most cases only an ID is necessary to save a new record. For calibration records, the Item Type, ID and Calibrated fields are required. For document records, a B-2 Quality Fluke Products Online at: www. GlobalTestSupply.com [email protected] Frequently Asked Questions Frequently Asked Questions List B Document ID and Revision Number are necessary for saving a new record. You will be warned by the system if you have not completed all the fields required to save a particular record. Q. I attempted to set up a chronological numbering system for my instruments, but the order is still incorrect. What did I do wrong? A. If you have decided to set up a chronological numbering system for the items in your database, do not begin with the number “1”, instead begin with “01” or “001” depending on the number of records that you plan to enter in the system for that record type. This will insure that your entries will remain in the order that you intend. Q. What is the Copy Record button for? A. If you are entering many Instruments, Loops or Test Instruments of the same make, model number, description, etc., utilize the Copy Record button (available on the toolbar of each of those screens) so that you only have to enter a new ID, serial number (if applicable) and calibration dates. Please note though that copying an Instrument record does not copy its association with Loop records, also copying a Loop will not copy the “Instruments That Make Up This Loop” into the newly created Loop. Q. Are there any typing short cut features in DPCTrack2? A. Yes. All date fields throughout the system have “Hot Keys”. Type the following letters or symbols to insert these dates if on the System Option screen you have chosen one of the following date formats, “mm/dd/yyyy” or “dd/mm/yyyy” • “T” = Today’s date. • “M” = first day of the current month. (Type “M” again and the date will change to the first date of the previous month) • “H” = Last day of the current month or the last date of the month currently shown in the field. (Type “H” again and the date will change to the last day of the next month) • “Y” = First day of the current year. (Type “Y” again and the date will change to the first day of the previous year) • “R” = Last day of the current year or the last date of the year currently shown in the field. (Type “R” again and the date will change to the last day of the next year) • “+” = Forward the date currently displayed. • “-“ = Reverse the date currently displayed. For date fields using the ‘dd-mmm-yyyy’ format, the “+” and “-“ shortcuts are available, in addition to the following: • “Shift” + “Home” = Today’s date. • “Page Up” = First day of the current year. (Type “Page Up” again and the date will change to the first day of the previous year) • “Page Down” = Last day of the current year. B-3 Quality Fluke Products Online at: www. GlobalTestSupply.com [email protected] DPCTrack2 Users Manual (Type “Page Down” again and the date will change to the last day of the next year) • “Home” = First day of the current month. (Type “Home” again and the date will change to the first date of the previous month) • “End” = Last day of the current month. (Type “End” again and the date will change to the last day of the next month) Q. Must I enter both “Found As” and “Left As” Values if the values are the same when entering a calibration record? A. Not always. If the calibration record being entered does not use Separate As Found/As Left Inputs, then once you enter a “Fnd As” value you may tab to the corresponding “Lft As” cell and hit the “=” key. This will copy the exact “Fnd As” value into the “Lft As” cell. Note: The field must be blank for this to work. Q. After making changes to a record and saving it, I realized that I did not need to make the changes. Why didn’t my Cancel Changes button work? A. The Cancel Changes button will work anytime before the changes are saved. Once a record has been saved though, its previous data cannot be restored. Q. What is the “Quick Type” feature? A. All fields in the system with an associated drop-down list have a “Quick Type” feature. This means that you may begin typing the desired entry (as long as it is already on the drop-down list) and DPCTrack2 will automatically insert it into the field. Q. Can I print lists generated from Advanced Queries? A. Right-clicking on any grid list that you have generated, for example a list resulting from an Advanced Query, will allow you to export it to a variety of different formats like a Microsoft Excel® or Word® document. In addition, you will also see an option to print the list directly from DPCTrack2. Q. Why am I not able to make changes to the test point grid in the CALIBRATION screen? A. If you would like to make changes to the test point grid in the CALIBRATION screen, you can do this by clicking the Modify Specs button. This will open up the grid and allow you to modify any of the cells present. All numeric cells can be modified by typing over the existing value; all signal type, stated accuracy or resolution cells can only be modified by activating the cell’s drop-down list. In addition, clicking the Recalculate button will recalculate the high/low spec and /or control limits if those are affected by your changes. To make the grid inaccessible again, click the Protect Specs button and continue to enter the rest of your data. However, performing these actions will not update the item’s master record. Permanent changes must actually be made in the item’s master screen. Please keep in mind though that several settings such as Prevent Accuracy Modifications During Calibration in the COMPANY RECORD screen, selection of a “Linear” or “Square Root” Correlation to Output for an item may affect your ability to modify various information in the calibration specifications grid. B-4 Quality Fluke Products Online at: www. GlobalTestSupply.com [email protected] Frequently Asked Questions Frequently Asked Questions List Q. If I modify an existing master record, will my changes affect calibration records previously entered for that item? A. Making modifications to an existing master Instrument, Loop or Test Instrument record will not affect the calibration records previously entered for that item. Since master records are in essence, templates to be used in the addition of calibration records, any modifications made to one of these will only be seen when the user enters a new calibration record for that item. Q. Why am I not able to use an advanced query to run some of the standard reports in the system? A. Due to the characteristics of their design or their intended use, some standard reports cannot be run with the use of an advanced query. Below is a list of all standard reports in DPCTrack2 that cannot be used with an advanced query: Active Users Report B Loop Test Point Analysis Document Report Loop Test Point Trend Events Due (This Company) Security Log Report Instrument Bar Code Label Test Instrument Test Point Analysis Instrument Test Point Analysis Test Instrument Test Point Trend Instrument Test Point Trend Test Instrument Reverse Traceability Q. What options do I have when exporting data from reports? A. All reports generated may be exported in a variety of formats to a number of different destinations including e-mail. To do this, preview a report on your screen, then click the Export button on the top of the Report Preview screen to make your selections. Q. How do I set up calibration frequencies correctly? A. The “Calibration Frequency” list option allows you to define and set up specific frequencies that can be applied to all items that get calibrated. Calibration frequencies help the program calculate due dates for item calibrations. Common ones would be “Yearly”, “Semi-annually”, “Quarterly”, etc. Selecting the Keep On End of Month box for a frequency will instruct the system, when calculating a due date based upon the frequency, to always use the last day of the month that the item will be due. In addition, the Allow system to Roll Dates Forward if Actual Event Date is within [#] Days of Scheduled Event Date field allows you to declare exactly how soon before the due date, or a calibration can be successfully completed and still have the next due date automatically roll forward. Any numeric value may be entered into this field, and the number used can be different for every calibration frequency entered into the database. B-5 Quality Fluke Products Online at: www. GlobalTestSupply.com [email protected] DPCTrack2 Users Manual B-6 Quality Fluke Products Online at: www. GlobalTestSupply.com [email protected]