1
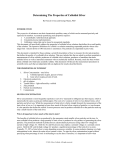
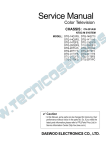
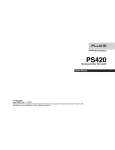
®
TS 25D
Test Set
Users Guide
PN 2451820
October 2005 Rev. 1 2/09
©2005, 2009 Fluke Corporation. All rights reserved. Printed in China.
All product names are trademarks of their respective companies.
LIMITED WARRANTY AND LIMITATION OF LIABILITY
Each Fluke Networks product is warranted to be free from defects in material and workmanship under
normal use and service. The warranty period for the mainframe is 18 months and begins on the date of
purchase. Parts, accessories, product repairs and services are warranted for 90 days, unless otherwise stated.
Ni-Cad, Ni-MH and Li-Ion batteries, cables or other peripherals are all considered parts or accessories. The
warranty extends only to the original buyer or end user customer of a Fluke Networks authorized reseller,
and does not apply to any product which, in Fluke Networks’ opinion, has been misused, abused, altered,
neglected, contaminated, or damaged by accident or abnormal conditions of operation or handling. Fluke
Networks warrants that software will operate substantially in accordance with its functional specifications
for 90 days and that it has been properly recorded on non-defective media. Fluke Networks does not warrant
that software will be error free or operate without interruption.
Fluke Networks authorized resellers shall extend this warranty on new and unused products to end-user
customers only but have no authority to extend a greater or different warranty on behalf of Fluke Networks.
Warranty support is available only if product is purchased through a Fluke Networks authorized sales outlet
or Buyer has paid the applicable international price. Fluke Networks reserves the right to invoice Buyer for
importation costs of repair/replacement parts when product purchased in one country is submitted for repair
in another country.
Fluke Networks warranty obligation is limited, at Fluke Networks option, to refund of the purchase price,
free of charge repair, or replacement of a defective product which is returned to a Fluke Networks
authorized service center within the warranty period.
To obtain warranty service, contact your nearest Fluke Networks authorized service center to obtain return
authorization information, then send the product to that service center, with a description of the difficulty,
postage and insurance prepaid (FOB destination). Fluke Networks assumes no risk for damage in transit.
Following warranty repair, the product will be returned to Buyer, transportation prepaid (FOB destination).
If Fluke Networks determines that failure was caused by neglect, misuse, contamination, alteration, accident
or abnormal condition of operation or handling, or normal wear and tear of mechanical components, Fluke
Networks will provide an estimate of repair costs and obtain authorization before commencing the work.
Following repair, the product will be returned to the Buyer transportation prepaid and the Buyer will be
billed for the repair and return transportation charges (FOB Shipping point).
THIS WARRANTY IS BUYER’S SOLE AND EXCLUSIVE REMEDY AND IS IN LIEU OF ALL OTHER WARRANTIES,
EXPRESS OR IMPLIED, INCLUDING BUT NOT LIMITED TO ANY IMPLIED WARRANTY OR MERCHANTABILITY OR
FITNESS FOR A PARTICULAR PURPOSE. FLUKE NETWORKS SHALL NOT BE LIABLE FOR ANY SPECIAL, INDIRECT,
INCIDENTAL OR CONSEQUENTIAL DAMAGES OR LOSSES, INCLUDING LOSS OF DATA, ARISING FROM ANY
CAUSE OR THEORY.
Since some countries or states do not allow limitation of the term of an implied warranty, or exclusion or
limitation of incidental or consequential damages, the limitations and exclusions of this warranty may not
apply to every buyer. If any provision of this Warranty is held invalid or unenforceable by a court or other
decision-maker of competent jurisdiction, such holding will not affect the validity or enforceability of any
other provision.
4/04-18
Fluke Networks
PO Box 777
Everett, WA 98206-0777
USA
Table of Contents
Title
Page
Introduction ...................................................................................................................................................... 1
Registration ....................................................................................................................................................... 1
Contacting Fluke Networks .............................................................................................................................. 1
Safety Information ............................................................................................................................................ 2
Design Features ................................................................................................................................................. 2
Differences Between TS25D and TS25D CO Models ....................................................................................... 2
Physical Characteristics ..................................................................................................................................... 2
Speaker ....................................................................................................................................................... 4
Belt Clip ...................................................................................................................................................... 4
Line Cord .................................................................................................................................................... 4
Battery ........................................................................................................................................................ 4
Headset ....................................................................................................................................................... 4
Display Icons ............................................................................................................................................... 4
Modes and Functions ........................................................................................................................................ 6
Monitor Mode ............................................................................................................................................ 6
Talk Mode .................................................................................................................................................. 6
Data Lockout .............................................................................................................................................. 6
Data Lockout Override .............................................................................................................................. 7
High Voltage Lockout ................................................................................................................................ 7
Low Voltage Lockout ................................................................................................................................. 8
Talk Battery ................................................................................................................................................ 8
Caller ID/Call Waiting ID ............................................................................................................................ 9
Toner .......................................................................................................................................................... 9
DTMF Detection ......................................................................................................................................... 10
Call and Dialing Functions ................................................................................................................................ 10
Originating a Call ....................................................................................................................................... 10
Answering a Call ........................................................................................................................................ 11
Disconnecting a Call .................................................................................................................................. 11
Last Number Redial .................................................................................................................................... 11
Memory Dialing ......................................................................................................................................... 11
Speed Dialing (TS25D CO) ......................................................................................................................... 11
Memory Programming .............................................................................................................................. 12
Call List ....................................................................................................................................................... 13
Configuring the Test Set ................................................................................................................................... 14
Settings Screen ........................................................................................................................................... 14
Tone/Pulse Dialing ..................................................................................................................................... 14
Timing ......................................................................................................................................................... 14
i
TS25D Test Set
Users Guide
Pause Duration ....................................................................................................................................14
Flash Duration .....................................................................................................................................14
System Timeout ..........................................................................................................................................15
Speaker Timeout ........................................................................................................................................15
Data Lockout ..............................................................................................................................................15
Firmware Version .......................................................................................................................................15
Factory Settings ..........................................................................................................................................16
Maintenance ......................................................................................................................................................16
Keypad Care ...............................................................................................................................................16
Replacing the Battery ................................................................................................................................16
Replacing the Line Cord .............................................................................................................................17
Specifications .....................................................................................................................................................18
ii
®
TS 25D Test Set
Introduction
Contacting Fluke Networks
WCaution
Legal requirements may exist regarding
permission to connect equipment to a
Telecom network operated by a public
network operator.
The TS25D Test Set is a lightweight portable test
telephone used by installers, repair technicians and
other authorized personnel for temporary
communication and for servicing and installing analog
voice telephone lines.
Registration
Registering your product with Fluke Networks gives
you access to valuable information on product updates,
troubleshooting tips, and other support services. To
register, fill out the online registration form on the
Fluke Networks website at www.flukenetworks.com/
registration.
www.flukenetworks.com
[email protected]
+1-425-446-4519
•
Australia: 61 (2) 8850-3333 or 61 3 9329 0244
•
Beijing: 86 (10) 6512-3435
•
Brazil: 11 3759 7600
•
Canada: 1-800-363-5853
•
Europe: +44-(0)1923-281-300
•
Hong Kong: 852 2721-3228
•
Japan: 03-3434-0510
•
Korea: 82 2 539-6311
•
Singapore: 65-6799-5566
•
Taiwan: (886) 2-227-83199
•
USA: 1-800-283-5853
•
Anywhere in the world: +1-425-446-4519
Visit our website for a complete list of phone numbers.
1
TS25D Test Set
Users Guide
Safety Information
The following IEC symbols are used either on the test
set or in the manual:
W
Warning: Risk of personal injury. See the
manual for details.
Caution: Risk of damage or destruction to
equipment or software. See the manual
for details.
X
Warning: Risk of electric shock.
.
Earth ground
P
Conformité Européenne. Conforms to
relevant European Union directives.
~
Do not put products containing circuit
boards into the garbage. Dispose of
circuits boards in accordance with local
regulations.
WXWarning
Do not use the test set if it is damaged.
Before you use the test set, inspect the case.
Look for cracks or missing plastic. Pay
particular attention to the insulation
surrounding the connectors.
If this product is used in a manner not
specified by the manufacturer, the
protection provided by the product may be
impaired.
Design Features
Design features of the TS25D Test Set include:
•
•
•
•
•
2
Three main modes: Talk (off-hook), Monitor (onhook and listening), and Off
Data Lockout and Override
Low and High Voltage Lockout
Last Number Redial
Mute Function
•
•
•
•
•
•
•
•
•
•
•
•
•
Hook Flash
Memory Dialing
Tone and Pulse Dialing
Displays Voltage when on-hook
Displays Current when off-hook
Polarity Indication
Detect and Display Caller ID/Call Waiting ID
(CIDCW)
Toner
Talk Battery
DTMF Detection including A-D
Headset Compatible
Field Replaceable Battery
Field Replaceable Line Cord
Differences Between TS25D
and TS25D CO Models
The information in this guide applies to the standard
TS25D Test Set and the TS25D CO (Central Office) Test
Set, except where noted. Differences between the two
models are described in the following sections:
•
•
•
•
•
•
Speaker, page 4
Belt Clip, page 4
Line Cord, page 4
Speed Dialing, page 11
System Timeout, page 15
Speaker Timeout, page 15
Physical Characteristics
Figure 1 and the following sections describe the tester’s
features.
Physical Characteristics
cac01.eps
Power and Talk/
Monitor switch
Puts the test set in Talk (T) or Monitor (M) mode. The center position turns the test set off.
Arrows keys
The left/up arrow key moves the LCD display’s cursor left or up. The right/down arrow key
moves the cursor right or down.
SEL
The SEL (Select) key selects the highlighted menu entry. It also lets you enter the menu from
Talk or Monitor modes.
BACK
The BACK key lets you go backwards through the menus. Pressing BACK also turns off the
Toner and Talk Battery functions.
Numeric Keypad
The numeric keypad is used to dial telephone numbers and make function selections. The
keypad includes 12 standard dialing keys, the asterisk ( ) key, and pound (#) key.
SPKR
The SPKR (speaker) key turns the speaker on, increases its volume, and turns the speaker off.
FLSH
The FLSH (flash) key causes a timed interruption of the loop current. Hook flashing is commonly
used for call waiting functions on residential lines. Some PBX setups or telephone office
switches may use this signal to put a call on hold or to activate a special function.
∗
The FLSH key is also enters a pause when entering telephone numbers in the test set’s memory.
LNR
To redial the most recently dialed number, take the test set off-hook then press LNR (Last
Number Redial).
MUTE
The MUTE key mutes and unmutes the microphone (handset or headset).
Figure 1. Physical Characteristics
3
TS25D Test Set
Users Guide
Speaker
Battery
The TS25D Test Set’s speaker allows hands-free
listening in both Talk and Monitor Mode. Pressing the
SPKR key will turn the speaker on. Pressing the SPKR
key again will increase the speaker’s volume. Pressing
the SPKR key a third time will turn the speaker off.
The battery compartment is on the back of the tester.
See “Replacing the Battery” on page 16.
On the standard TS25D Test Set, the speaker turns off
when you switch between Monitor and Talk modes. If
you turn off the test set while the speaker is on, the
speaker will be off next time you turn on the test set.
On the TS25D CO Test Set, the speaker stays on when
you switch between Monitor and Talk modes. If you
turn off the test set while the speaker is on, the speaker
will be on next time you turn on the test set.
WCaution
Be sure the test set is not near your ear
when you turn on the speaker, as the
volume can be quite loud.
Belt Clip
An optional battery door with a belt clip is available for
the standard TS25D Test Set. For information on
availability of the optional belt clip, contact your local
Fluke Networks distributor.
Note
If the test set fails to operate properly at any
time, first replace the battery and retest before
sending the test set in for repair.
A 9 V alkaline battery must be installed for the test set
to operate. Do not use rechargeable batteries.
When the battery icon shows a low battery, the battery
has anywhere from a few hours to several days of life
remaining depending on how the test set is used. The
battery will be used up much faster if the Talk Battery
function or the speaker is used.
If the test set ever stops working, replace the battery. If
it still doesn’t work, contact Fluke Networks Technical
Support.
Headset
On the TS25D Test Set, an audio jack is available for the
connection of a headset. The 3.5 mm jack is located on
the side of test set. The TS25D Kit (Model 25501109)
comes with a headset.
The TDS25D CO Test Set has a belt clip on the battery
door.
For information on availability of additional headsets
or replacement headsets, contact your local Fluke
Networks authorized distributor.
Line Cord
Display Icons
See Figure 1.
Figure 2 describes the icons used on the LCD display.
The test set is equipped with a field replaceable line
cord. The line cord is attached to the test set at the
transmitter end of the test set.
The line cord included with the standard TS25D Test Set
has angled bed-of-nails clips. The line cord included
with the TS25D CO Test Set has a 346A plug. Extension
line cords for the 346A plug are sold separately.
For information on availability of line cords, contact
your local Fluke Networks authorized distributor.
4
Physical Characteristics
cac02.eps
Polarity
In Monitor or Talk mode, the polarity icon indicates the dc polarity of the line. The Tip-Ring icon
with no X indicates the red test lead is connected to the Ring (negative) side of the line and the
black test lead is connected to the Tip (positive) side of the line. When the Tip-Ring polarity icon
has an X through it, the test leads are reversed; that is, the red test lead is connected to the Tip
(positive) side and the black test lead is connected to the Ring (negative) side. No icon appears
when the leads are disconnected or the line is not powered.
Battery
The battery icon indicates the battery’s charge level. The battery level is continuously displayed in
Monitor and Talk mode.
On/off hook
The telephone icon tells you if the test set is on or off hook.
Mute
The MUTE icon appears when the microphone is muted.
Tone/Pulse
In tone mode the icon is a T; in pulse mode it is a P.
Speaker
volume
The speaker icon appears when the speaker is on.
Memory dial
locations
The test set lets you store 10 numbers in ten memory locations (0 through 9). The icon shows the
number of the active memory location.
V
mA
The test set displays the voltage across Tip and Ring when the test set is on-hook. The test set
displays the current it draws from the line when off-hook.
Voltmeter range: 0 Vdc to 250 Vdc
Current meter range: 0 mA to 110 mA
Figure 2. TS25D Test Set Icons
5
TS25D Test Set
Users Guide
Modes and Functions
WXWarning
When testing circuits which are close to a
battery source, the pops in the handset
receiver that result from clipping onto a line
may be quite loud. Although there is
protection against acoustic shock built into
the test set, if the receiver is held tightly
against the ear, acoustical shock may occur.
Monitor Mode
Monitor mode is primarily for audio monitoring of the
Tip and Ring pair while on hook. In Monitor mode, the
test set has a high input impedance, which allows
monitoring of the line without disrupting
conversations or data signaling if present. The test set
draws no direct current from the line and it transmits
no signals to the line. Also, in Monitor mode, the TS25D
monitors for high-speed data signals on the line. If the
test set detects data it will display DATA DETECTED on
the LCD. If there is no high- speed data on the line, the
LCD will display NO DATA.
In Monitor mode, the test set is typically used to
perform one or more of the following procedures:
•
Verification that a line is idle when looking for a
line to borrow
•
Listening for noise on the line
•
Performing a test for the presence of high
frequency data on the line
•
Measuring the DC voltage from Tip to Ring
•
Detecting DTMF signals
•
Monitoring line polarity
The TS25D will respond to incoming ringing signals
when it is in Monitor mode. It does not detect ringing
signals when it is off.
6
Talk Mode
When the test set is connected to a working analog
telephone line and is switched to Talk mode, the test
set will go off-hook and draw dial tone. An off-hook
TS25D test Set works like a standard telephone. When
off-hook, the test set is used to perform its main
purpose, which is to verify the proper operation of
analog voice telephone lines or to establish temporary
communications on a “borrowed” pair.
In both Talk and Monitor mode you can change the
receiver’s volume level by pressing the Up or Down
arrow keys.
Each time the test set is switched to Talk mode, it
quickly tests the line for high-speed data and for DC
voltage before it goes off-hook. If there is no highspeed data on the line, and there is enough DC voltage
to go off-hook on (>3 V), the test set will go off-hook
without you ever noticing that the tests have been
performed.
Occasionally you may run into the situation where you
have accidentally connected to a line carrying highspeed data or where you have connected to a line with
either too little or too much DC voltage to go off-hook
on. The data and voltage tests are designed to detect
these conditions and are discussed in the following
sections.
Data Lockout
When the test set is switched to Talk mode, it tests the
line for high-speed data signals and for DC voltage
before it goes off-hook. If data is detected in the
frequency band from 20 kHz to about 1 MHz, the test
set will refuse to go off-hook and the LCD will display
DATA DETECTED, DOWN ARROW TO OVERRIDE. This
mode is called Data Lockout mode. In the Data Lockout
mode, the test set is kept on-hook, “locked out”,
despite having been switched to Talk Mode. Data
Lockout Mode prevents accidental corruption of data
transmissions while working in modern
telecommunications cable environments that have a
mix of analog telephone and data services.
Modes and Functions
There is often no way to know by inspection or by
audio monitoring if the wire pair you are connecting to
is a high-speed data line or not. Most high-speed data
is above the human hearing range so listening to the
line in Monitor mode may not allow you to identify it
as a data line. If you see the DATA DETECTED message,
chances are you have accidentally connected to a data
line. If so, disconnect the test set from the line, being
careful not to short the clip leads together in the
process.
WCaution
If you have accidentally connected to a data
line, do not press the down arrow because
overriding will cause the test set to go offhook and take the data service down.
In some situations you may want to go off-hook, as
described in the next section.
Data Lockout Override
WCaution
Shorting the Tip and Ring leads together
while connected to a data line will cause
disruption to the data.
Whenever you try to go off-hook on a high-speed data
line, the TS25D Test Set will go into Data Lockout mode
and will not go off-hook. This is to protect data
services, most of which would be corrupted by loading
the line with the low impedance of an off-hook
telephone. But ADSL (Asymmetrical Digital Subscriber
Line) is a different circumstance.
ADSL is a high-speed data service intentionally
designed to co-exist on the same wire pair as standard
analog telephone service. If you try to go off-hook on a
wire pair carrying both ADSL and analog telephone
service, the TS25D Test Set will detect the ADSL data
signal and go into Data Lockout mode as it would on
any data line. You will see the message DATA
DETECTED, DOWN ARROW TO OVERRIDE. Now, if you
want to go off-hook to access the analog phone service
sharing the line with ADSL, press the down arrow as
instructed on the LCD.
The test set will override the lockout, will go off-hook
and draw dial tone without disturbing the co-existing
ADSL service. The TS25D Test Set has circuitry that
protects the ADSL service when it is off-hook. Going
off-hook on ADSL lines is the most common use of
Lockout Override.
There is another case where the override function may
be needed. You may encounter the rare circumstance
where the analog telephone line you connect to is not
carrying any data but there is enough high frequency
noise on the line that theTS25D Test Set thinks there is
high-speed data on the line. If you know you are
connected to such a line, use the Lockout Override
function to go off-hook. This usually only happens
when the telephone line is near a commercial AM
radio broadcast antenna.
There is a provision for turning the data lockout
function off. When Data Lockout is turned off, the test
set will go off hook on a powered line when switched
to Talk (T), even if data is present. When Data Lockout
is off, the test set will still detect data in Monitor mode.
To learn how to turn Data Lockout on and off, refer to
the System Configuration section.
High Voltage Lockout
WCaution
Do not short the test set leads to each other
while it is connected to a line carrying high
voltage.
The TS25D Test Set is designed for use in environments
where analog voice lines co-exist with lines that carry
high DC voltages. When the TS25D Test Set is switched
to Talk mode, it tests the line for high-speed data and it
measures the DC voltage on the line before it goes offhook. If the DC voltage exceeds 140 V, the test set will
prevent itself from going off-hook and will display
HIGH VOLTAGE LOCKOUT.
-continued-
7
TS25D Test Set
Users Guide
Going off-hook on a line carrying a high dc voltage can
damage the power supply feeding the line. The test set
will prevent this from occurring. Unlike the data
lockout, there is no provision for the operator to
override a high voltage lockout. Lines with voltages
exceeding 140 Vdc do not carry analog voice services. If
you encounter a high voltage lockout, switch the Talk/
Monitor switch back to Monitor (M) and carefully
remove the test leads from the line.
Talk Battery
The TS25D Test Set can power a dry telephone wire pair
to enable voice communications between itself and
another test telephone connected to the other end of
the pair. After turning on Talk Battery at your end, the
person at the other end should take his test set offhook. If the test set at the other end has talk battery
capability, it should not be enabled.
The Talk Battery function provides the following:
Low Voltage Lockout
Each time the test set is switched to Talk mode, it tests
the line for high-speed data signals and it measures the
DC voltage on the line before it goes off-hook. If there
is less than 3 V on the line, there is not enough voltage
for the test set to go off-hook and the LCD will display
LOW VOLT LOCKOUT, DOWN ARROW FOR TALK
BATTERY.
The Low Voltage Lockout message indicates that there
is very little or no voltage on the telephone line — not
enough voltage for the test set to perform off-hook
operations. The most common cause of this message is
when the test set is switched to Talk mode and it is
either not connected to anything or it is connected to
an un-powered pair of wires (dry loop). In this state you
have the option of activating the test set’s Talk Battery
function.
There is one additional line condition that should be
mentioned. When the test set, connected to a line
carrying data signals but no DC voltage, is switched to
Talk mode, the LCD will display DATA DETECTED AND
LOW VOLT LOCKOUT. Some data services have no
associated DC voltage. The low impedance of the
TS25D Test Set’s off-hook state would corrupt these
types of services. Thus the test set does not have any
provision to override the lockout when this line
condition is encountered.
In any of the test set’s lockout states, removing the test
set from the line condition that is causing the lockout
automatically clears the lockout condition.
8
•
Communications capability on 26 gauge wire pairs
up to about 1000 feet, longer on larger gauges.
•
A continuity test.
When Talk Battery is active, the LCD displays LINE =
SHORTED if the test set is connected to a short circuit of
0 Ω to about 100 Ω.
To enable Talk Battery:
1
Connect the test set to a dry pair.
2
Set the slide switch to the Talk (T) position.
3
Press the down arrow when the message LOW
VOLT LOCKOUT, DOWN ARROW FOR TALK
BATTERY appears.
Note
The Talk Battery function drains the 9 V battery
more quickly than other TS25D Test Set
functions.
Modes and Functions
Caller ID/Call Waiting ID
Toner
The TS25D Test Set will detect and display both onhook and off-hook caller ID messages. This is useful for
verifying that a customer’s Caller ID service is working
properly. Caller ID (CID) messages are received when
the receiving telephone is on-hook. Call Waiting ID
(CIDCW) messages are received when the receiving
telephone has already established a call to a second
party and a third party places a call to your line.
The Toner function is useful when tracing the routing
of a pair of wires. When the Toner is activated, the
TS25D Test Set generates a tone onto the wire pair the
test set is connected to. The routing of the wire pair
can then be traced by using an inductive Tone Probe to
pick up the tone.
To perform Caller ID detection:
1
Connect the test set to the pair of wires you want
to trace.
2
Set the slide switch to the Monitor (M) position.
3
Press the SEL button once to activate the test set’s
menu.
4
Use the Down arrow key to scroll the cursor down
to the TONER entry.
5
Press the SEL key. The Toner will be activated and
the LCD will display TONER ACTIVE.
1
2
Connect the test set to Tip and Ring of the
customer’s phone line. Either remove the
customer’s phone from the line or leave it onhook.
Set the slide switch to the Monitor (M) position. If
there is another line in the building, call from that
line to the line the test set is connected to, or
arrange for someone to call the line the test set is
connected to. When the call comes in, you will
hear the first ring, and then the received Caller ID
message will be displayed on the test set’s LCD.
To perform Call Waiting ID:
1
Connect the test set to Tip and Ring of the
customer’s phone line. Either remove the
customer’s phone from the line or leave it onhook.
2
Set the slide switch to the Talk (T) position and
establish a voice call to a second party. If there is
another line in the building, call from that line to
the line the test set is connected to, or arrange for
someone to call the line the test set is connected
to. When the call comes in, you will hear the Call
Waiting Alert tone. This will be followed by the
CAS tone and the Caller ID message. When the
Caller ID message is received by the test set it will
be displayed on the LCD.
3
If the received Caller ID message has errors, the
test set will display LINE ERROR.
To use the Toner:
To turn off the Toner press the BACK key.
If you accidentally connect to a data line, when you try
to turn on the Toner you will get a message DATA
DETECTED TONER NOT AVAILABLE. Remove the test
set from the line.
The Toner on the test set is intended for use on dry (unpowered) pairs of wire. Before turning on the Toner,
verify that the wire pair you are connected to is not
carrying DC voltage by checking the test set’s voltmeter
in the upper right corner of the LCD. The Toner is only
available when the TS25D Test Set is in Monitor mode.
9
TS25D Test Set
Users Guide
Call and Dialing Functions
DTMF Detection
The TS25D Test Set allows the user to capture DTMF
tones generated on a telephone line by telephones, fax
machines, modems or any other DTMF generating
device. This feature is useful when you suspect the
customer’s telephone equipment is not generating
proper DTMF signals.
To detect DTMF tones:
Note
Remove the protective film that covers the LCD
display before using your test set.
Originating a Call
To originate a call:
1
Connect the test set to Tip and Ring of the line
under test.
2
Switch the test set to Monitor (M) mode.
3
Put the customer’s telephone in Tone Dialing
mode and take it off-hook.
4
Dial a number on the customer’s phone. The
number dialed will be detected and displayed on
the test set’s LCD.
5
Verify that the number on the LCD is the same as
the number you dialed.
1
Clip the test set to Tip and Ring of a powered
subscriber loop.
2
Switch the test set to Monitor (M) mode and listen
to the line to verify it is idle.
3
If not idle, disconnect the test set from the line.
4
If the line appears to be idle, set the slide switch to
the Talk (T) position.
5
If no data is detected, the test set will go off hook.
6
If high-speed data is detected, the test set will not
go off hook (will lockout) and will display DATA
DETECTED, DOWN ARROW TO OVERRIDE,
indicating the presence of data. Try another line or
you can override the data lockout (see Data
Lockout Override).
7
The numeric keypad, LNR key, or memory dialing
may be used to dial a number for originating a
call.
The TS25D Test Set will detect and display the
DTMF tones for 0-9, , #, A-D.
∗
To clear the LCD screen, switch the test set off, and then
back to Monitor mode. DTMF detection is only
available when the TS25D Test Set is in Monitor mode.
To disconnect a call, switch the test set off, or to
monitor, or remove the clip leads from the line.
10
Call and Dialing Functions
Answering a Call
Memory Dialing
To answer an incoming call:
The TS25D Test Set allows the user to dial preprogrammed numbers in either Tone or Pulse mode. If
dialing in Pulse mode and the stored number contains
an asterisk ( ) or pound (#) symbol, the digits will be
ignored.
1
Place the test set in Monitor mode to respond to
incoming ringing signals.
2
If a ringing signal is received, set the slide switch to
the Talk (T) position. The test set automatically
tests for high-speed data on the line.
3
If no data is detected, the test set will go off hook.
4
If data is detected, test set will lock out and display
the message DATA DETECTED, DOWN ARROW TO
OVERRIDE.
5
∗
To activate Memory Dialing:
1
Connect the test set to a working telephone line
and go off-hook by setting the slide switch to the
Talk (T) position.
2
Press the SEL key. The Main menu is displayed.
3
At the Main menu, highlight CALL PHONEBOOK
with the arrow keys, then press the SEL key. The
list of phonebook entries is displayed. Pressing the
arrow keys lets you scroll through all locations (0
through 9). The small number in the upper right of
the LCD tells you which memory location you have
selected.
4
Select the desired phonebook entry with the
arrow keys, then press SEL key, or enter a number
(0 through 9) on the keypad. The number is
automatically dialed.
To go off hook with data present you can override
the data lockout (see Data Lockout Override).
Disconnecting a Call
To disconnect a call, switch the test set off, or to
Monitor, or remove the clip leads from the line.
Last Number Redial
If a call is not successful and you wish to redial the same
number, do the following:
1
2
Switch the test set off, then set the slide switch to
the Talk (T) position.
After the test set goes off-hook press the LNR key.
The last number dialed will be automatically
redialed.
The last number redial function is available in either
the Pulse or Tone Mode. The method of dialing is not
stored with the number. The redial memory has a 23digit capacity.
In Tone Dialing mode, the dialing keys that are
permitted to be stored in LNR memory include
1,2,3,4,5,6, 7,8,9,0, , and #. If the asterisk ( ) and
pound (#) keys are pressed in Pulse mode they will be
ignored.
∗
∗
Speed Dialing (TS25D CO)
With the TS25D CO Test Set, you can dial numbers from
memory as described above, or you can use the speed
dialing feature, as follows:
1
Connect the TS25D CO Test Set to the telephone
line.
2
Set the slide switch to the Talk (T) position, and
listen for a dial tone.
3
Once you hear dial tone, press the BACK key
followed by the number of the memory location
(0 through 9) containing the telephone number
you want to dial.
The telephone number in the selected memory
location will be automatically dialed.
11
TS25D Test Set
Users Guide
Memory Programming
7
Each memory location will store a phone number up to
23 digits in length. If you enter more than 23 digits only
the first 23 will be remembered.
After the entry is complete, press the SEL key to
save the entry and return to the list of editing
options.
8
Highlight 2 - EDIT NUMBER and press the SEL key
or press the 2 key.
9
The screen will change to NUMBER. Enter the
phone number using the test set’s keypad. This
time pressing a dialing key will cause the number
on the key to be entered. Use the Up arrow to
erase characters. In this case, the Up arrow moves
the cursor to the left.
To store a new phone number:
1
Set the slide switch to the Talk (T) or Monitor (M)
position.
2
Press the SEL key.
3
When the Main menu is displayed, highlight EDIT
PHONEBOOK with the arrow keys, then press the
SEL key. The list of phonebook entries is displayed.
When you scroll through the entries, the number
in the upper right of the screen indicates which
one of the 10 memory locations you have selected.
If you have no phonebook entries or if you are
viewing this screen for the first time, it will be
blank.
4
Select an empty memory location (0 through 9)
with the arrow keys then press the SEL key, or use
the number keys. A list of phonebook editing
options appears.
5
Highlight 1 - EDIT NAME and press the SEL key.
6
The screen will change to NAME. Enter the name
you want to assign to this Phonebook entry using
the test set’s keypad. Example: The 2 key gives you
four possible characters: A, B, C, and 2. If you press
the 2 key once, the letter A is entered at the
cursor’s location. If you rapidly press the 2 key
three times, the letter C is entered. If you rapidly
press the 2 key four times, the number 2 is
entered. After entering the desired character, wait
a moment for the cursor to move one space to the
right then enter the next character. Enter the
remaining characters in the same manner. The
asterisk key ( ) provides a space on the first press
and an asterisk on the second press. The 1 key
provides &, dash (-), forward slash (/), quote (‘),
period (.), or 1 depending on how many times you
press the key. Use the Up arrow to erase
characters. In this case, the Up arrow moves the
cursor to the left.
On the Number screen, the FLSH key changes its
normal meaning and becomes the PAUSE key. As
you enter numbers into memory, if you press the
FLSH key, a pause is entered at the cursor location.
A comma is used to represent a pause. Pauses are
used to put time delays into a string of numbers.
The default pause duration is 4 seconds.
10 After the entry is complete, press the SEL key to
save the entry and return to the list of editing
options.
11 Press the BACK key twice to return to the Main
menu, or press it three times to return to the main
operating screen.
To edit an existing stored number:
1
Switch the test set to Talk (T) or Monitor (M) mode.
2
Press the SEL key.
3
When the Main menu is displayed, highlight EDIT
PHONEBOOK with the arrow keys, then press the
SEL key. The list of phonebook entries is
displayed. When you scroll through the entries,
the number in the upper right of the screen
indicates which one of the 10 memory locations
you have selected. Pressing the arrow keys lets you
scroll through all locations (0 through 9).
∗
12
4
Move the cursor to the memory location you wish
to edit and press the SEL key.
5
If you want to edit the name in the phonebook,
highlight 1 - EDIT NAME and press the SEL key.
Call and Dialing Functions
6
The screen displays NAME and the text entry
previously stored in this location. Modify the text
using the Up arrow to erase text and the test set’s
keypad to enter new text. Example: The 2 key
gives you four possible characters: A, B, C, and 2. If
you press the 2 key once, the letter A is entered at
the cursor’s location. If you rapidly press the 2 key
three times, the letter C is entered. If you rapidly
press the 2 key four times, the number 2 is
entered.
After entering the desired character, wait a
moment for the cursor to move one space to the
right then enter the next character. Enter the
remaining characters in the same manner. The
asterisk key ( ) provides a space on the first press
and an asterisk on the second press. The 1 key
provides &, dash (-), forward slash (/), quote (‘),
period (.), or 1 depending on how many times you
press the key.
∗
7
11 Pressing the BACK key three times will take you
back up through the menu selections to the main
operating screen.
The Edit function will timeout after 15 seconds of
inactivity.
To delete a phonebook number:
1
Move the cursor to the desired memory location,
using the arrow keys, then press the SEL key to
select.
2
Move cursor to DELETE ENTRY using the arrow
keys and press the SEL key, or enter 3 for DELETE
ENTRY on the keypad.
3
Press the SEL key to delete the entry and exit from
the field.
4
Press the BACK key to return to the Main menu.
Use the Up arrow to erase characters. In this case,
the Up arrow moves the cursor to the left.
The Delete function will timeout after 15 seconds of
inactivity.
After the entry is complete, press the SEL key to
save the entry and return to the list of editing
options.
Call List
8
If you want to edit the number, highlight 2 - EDIT
NUMBER and press the SEL key.
9
The screen will change to NUMBER and display this
memory location’s existing phone number. Modify
the number using the Up arrow to erase numbers
and the test set’s keypad to enter new numbers. In
this screen, pressing a number key enters the
number.
On the Number screen, the FLSH key changes its
normal meaning and becomes the PAUSE key. As
you enter numbers into memory, if you press the
FLSH key, a pause is entered at the cursor location.
A comma is used to represent a pause. Pauses are
used to put time delays into a string of numbers.
The default pause duration is 4 seconds.
10 After the entry is complete, press the SEL key to
save the entry and return to the list of editing
options.
The TS25D Test Set retains the last 3 outgoing and last 3
incoming phone numbers in its Call List. Incoming
numbers are recorded when Caller ID messages are
received. Outgoing numbers are recorded when you
dial a number. The most recently received number is
put on top of the list. The Call List is available for
viewing when the test set is on-hook. You can view and
dial from the Call List when the test set is off-hook. To
use the Call List:
1
Set the slide switch to the Talk (T) position.
2
Press the SEL key. The Main menu is displayed.
3
Highlight the CALL LIST option with the arrow
keys, then press the SEL key.
4
Highlight INCOMING or OUTGOING with the
arrow keys, then press the SEL key, or press either
1 for INCOMING or 2 for OUTGOING.
-continued-
13
TS25D Test Set
Users Guide
5
6
Once the incoming or outgoing list is displayed,
you can highlight the desired number with the
arrow keys. Each list is limited to three entries.
If the test set is off-hook, press the SEL key to dial
the selected entry.
Timing
Use the Timing option to set the Pause duration and
the Flash duration.
Pause Duration
To set the Pause duration:
Configuring the Test Set
1
This section tells you how to use the menus to
configure the test set.
Set the slide switch to the Talk (T) or Monitor (M)
position.
2
From the Settings screen, highlight TIMING with
the arrow keys, then press the SEL key, or press 2
on the keypad.
3
Press 1 - PAUSE DURATION.
4
Highlight the desired pause seconds with the
arrow keys, then press the SEL key, or press one of
the following keys on the keypad:
Settings Screen
To access the Settings screen:
1
Set the slide switch to the Talk (T) or Monitor (M)
position.
2
Press the SEL key.
3
At the Main menu, highlight SETTINGS with the
arrow keys and press the SEL key. You will see a
sub-menu with the following three selections:
TONE/PULSE, TIMING and SYSTEM
CONFIGURATION. These menu items provide
access to the selections for configuring the test set.
Tone/Pulse Dialing
1 - 3 seconds
2 - 4 seconds
3 - 5 seconds
The default pause length is 4 seconds.
Flash Duration
To set the hook flash duration:
1
Set the slide switch to the Talk (T) or Monitor (M)
position.
2
From the Settings screen, highlight TIMING with
the arrow keys, then press the SEL key, or press 2
on the keypad.
3
Press 2 - FLASH DURATION.
4
Highlight the desired flash seconds with the arrow
keys, then press the SEL key, or press one of the
following keys on the keypad:
To set Tone or Pulse dialing:
1
At the Main menu, highlight SETTINGS with the
arrow keys, then press the SEL key.
2
Highlight Tone/Pulse with the arrow keys, then
press the SEL key, or press 1 on the keypad.
3
Press either 1 for TONE or 2 for PULSE. The Tone or
Pulse icon is displayed at the top of the screen (see
Figure 2).
1 - 400 ms
2 - 600 ms
3 - 800 ms
The default hook flash duration is 600 ms.
One flash is performed for each press of the FLSH key.
Holding the FLSH key down does not repeatedly flash
the switch hook.
14
Configuring the Test Set
System Timeout
4
The System Timeout function turns off the tester after
a selected period of inactivity. After the test set turns
off, you can turn it on by switching the Talk/Off/
Monitor switch to off then to either Talk or Monitor.
1 - 2 minutes (TS25D CO default)
2 - 5 minutes (TS25D default)
3 - 10 minutes
To set the system timeout period:
1
Set the slide switch to the Talk (T) or Monitor (M)
position.
2
From the Settings screen, highlight SYSTEM
CONFIGURATION with the arrow keys, then press
the SEL key, or press 3 on the keypad.
3
Press 1 - SYSTEM TIMEOUT.
4
Highlight the desired time with the arrow keys,
then press the SEL key, or press one of the
following keys on the keypad:
TS25D
TS25D CO
1 - 30 minutes
1 - 5 minutes (default)
2 - 60 minutes (default)
2 - 60 minutes
3 - Never
3 - Never
Speaker Timeout
The test set’s speaker uses more battery power than
most other functions. To extend battery life, the
Speaker Timeout function turns off the speaker after a
selected period of inactivity.
After the speaker turns off, you can turn it back on by
pressing the SPKR button.
To set the speaker timeout period:
1
Set the slide switch to the Talk (T) or Monitor (M)
position.
2
From the Settings screen, highlight SYSTEM
CONFIG with the arrow keys, then press the SEL
key, or press 3 on the keypad.
3
Press 2 - SPKR TIMEOUT.
Highlight the desired time with the arrow keys,
then press the SEL key, or press one of the
following keys on the keypad:
Data Lockout
The Data Lockout function is may be turned on or off.
The default setting is ON.
1
Set the slide switch to the Talk (T) or Monitor (M)
position.
2
From the Settings screen, highlight SYSTEM
CONFIGURATION with the arrow keys, then press
the SEL key, or press 3 on the keypad.
3
Press 3 - DATA LOCKOUT.
4
Highlight the desired setting with the arrow keys,
then press the SEL key, or press 1 for ON or 2 for
OFF.
When data lockout is set to OFF, the test set will still
detect data and will display DATA DETECTED, but it will
not lockout.
Firmware Version
To view current Firmware version:
1
Set the slide switch to the Talk (T) or Monitor (M)
position.
2
From the Settings screen, highlight SYSTEM
CONFIG with arrow keys, then press the SEL key, or
press 3 on the keypad.
3
Use the Down arrow key to scroll down to
VERSION. Press 4 for VERSION. The version of
software is displayed on the screen.
4
Use the BACK key to return to the previous menu.
15
TS25D Test Set
Users Guide
Factory Settings
You can reset the TS25D Test Set to its original factory
settings. If you do this, the factory settings will be
restored and the entries in your phonebook and the
phone numbers in the Call Lists will be deleted. If you
don’t want to erase the phonebook entries, don’t reset
to defaults.
To reset the test set to its factory default settings:
1
Set the slide switch to the Talk (T) or Monitor (M)
position.
2
Press the SEL key.
3
Select the SETTINGS screen and highlight SYSTEM
CONFIGURATION with the arrow keys and press
the SEL key.
4
5
If moisture should get inside the test set, let the test set
dry at normal room temperature for 24 hours. DO NOT
HEAT THE TEST SET. Moisture can provide a leakage
path that may conduct hazardous voltages to you. DO
NOT USE the test set if wet.
Keypad Care
Daily use of your test set results in various liquids, dirt,
and other foreign material building up in your keypad.
The keypad may be cleaned by using a soft toothbrush
with soap and water. Do not use a petroleum-based or
chlorinated cleaning agent as it will harm the keypad.
Let the test set dry before use.
Replacing the Battery
WCaution
Use the Down arrow key to scroll down to
FACTORY RESET and then press the SEL key.
The screen will display PRESS LNR TO RESTORE
FACTORY SETTINGS. If you are sure you want to
restore the factory default settings then press the
LNR key. If you do not want to restore the factory
settings, press the BACK key.
Maintenance
Handling batteries should be done with
care. Do not allow the terminals to be
shorted together. Dispose of battery
properly to ensure contacts cannot short.
Disposal may be restricted by local laws.
To replace the battery (see Figure 3):
1
Turn the test set off.
2
Place the test set on a work surface, face down.
The work surface should be non-abrasive.
3
Using a Phillips screwdriver, remove the single
cover screw attaching the battery door cover to
the back of the test set.
4
Remove the battery door cover and the old 9 V
battery from the test set. Properly discard the
battery.
5
Insert a new 9 V battery. Make sure the polarity is
correct.
WXWarning
To avoid electric shock, do not perform any
servicing other than that contained in the
operating instructions unless you are
qualified to do so.
Disconnect clips from any metallic
connections before performing any
maintenance.
WCaution
Do not use CRC Cable Clean or any similar
chlorinated solvent on the test set. Doing so
will damage the test set.
®
16
Note
Do not over tighten screw. Over tightening will
strip the plastic.
Maintenance
6
Replace the test set’s battery door cover on the
test set and secure with single cover screw. Do not
over tighten the screw.
To replace the line cord (see Figure 3):
1
Turn the test set off.
2
Place the test set on a protected work surface, face
down.
3
Using a Phillips screwdriver, remove the single
cover screw attaching the battery door cover to
the back of the test set.
4
Remove the battery door cover.
5
Loosen the two screws that hold the line cords to
the PCB.
6
Using needle nose pliers or one of the line cord
clips, remove the two screws and washers from the
line cord connectors.
7
Position the screw lugs of a new line cord on the
PCB. Make sure the crimp barrel offset side of the
screw lugs is up (see Figure 4) and that the line
cord screw lugs are flush against the PCB.
Note
Do not over tighten screw. Over tightening will
strip the plastic.
8
Fasten the red wire lug to the PCB (Ring) with
screw and washer.
9
Fasten the black wire lug to the PCB (Tip) with
screw and washer.
cac03.eps
Figure 3. Battery and Line Cord Replacement
Replacing the Line Cord
Note
See Figure 3.
A worn out or damaged line cord can be replaced by
the user. To obtain a replacement line cord contact
your local distributor or Fluke Networks.
WWarning
Disconnect from telephone network when
replacing line cord.
It is important to install the red and black wires
as shown in Figure 3 so the polarity icon will
work correctly.
10 Push both line cord wires down into the notch in
the case.
11 Replace the test set’s battery door cover on the
test set and secure with single cover screw. Do not
over tighten the screw — doing so could damage
the test set.
17
TS25D Test Set
Users Guide
DTMF Output
Tone Frequency
Error
±1.5 % maximum
Tone Level
–1 dBm combined (typical)
High versus Low
Tone Difference
2 dB ± 2 dB
Memory Dialing
Memory
Capacity
10 speed dial memories plus
one last number redial
memory
Digit Capacity
23 digits per memory
Pause Duration
User programmable
Default: 4 seconds
Hook Flash Duration
User programmable
Default: 600 ms
Automatic Speaker
Shut Off Duration
User programmable
TS25D default: 5 minutes
TS25D CO default: 2 minutes
Battery
9 V alkaline or lithium battery
cac04.eps
Figure 4. Orientation of Line Cord Screw Lugs
Specifications
Electrical
Return Loss
>14 dB (ref 600 Ω)
DC Resistance
Off-Hook
150 Ω nominal
On-Hook
>1 MΩ
AC Impedance
Physical
Measurement
7.8 in x 2.7 in x 1.6 in
(20 cm x 6.8 cm x 4 cm)
Weight
10 ounces (284 g)
Environmental
Off-Hook
600 Ω nominal; 300 Hz to
3400 Hz
On-Hook
>120 kΩ; 300 Hz to 3400 Hz
Rotary Dial Output
Temperature Range
Operating
32°F to 122 °F (0 °C to 50 °C)
Storage
-40 °F to 150 °F
(-40 °C to 65 °C)
Pulsing Rate
10 pps ±1 pps
Altitude
Up to 10,000 ft (3,000 m)
Break/Make
Ratio
60/40
Relative Humidity
5 % to 95 %
Interdigit
Interval
>300 ms
Resistance
During Break
>100 kΩ
Certifications and Compliance
Conformité Européenne. Conforms to
relevant European Union directives.
Notes
Specifications subject to change without notice.
This product has been safety certified for indoor use
only.
18