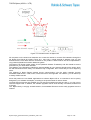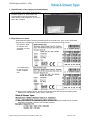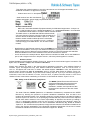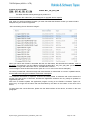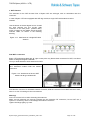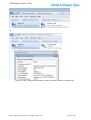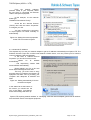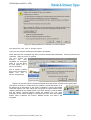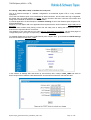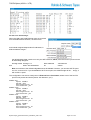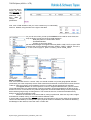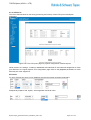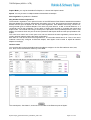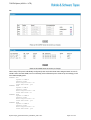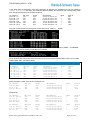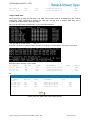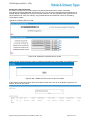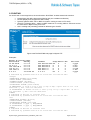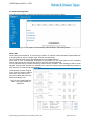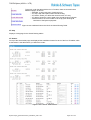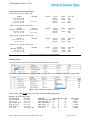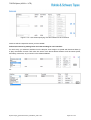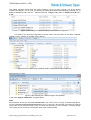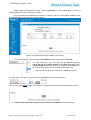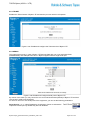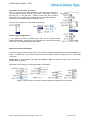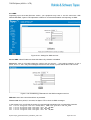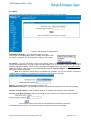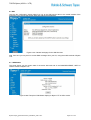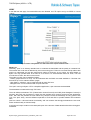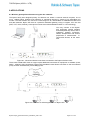
1
Bytton LTE Industrial-grade Cellular Router for 3G+/4G Networks User’s Manual 2013 topex-3.0.6-FA-S TOPEX Bytton (HSPA+ / LTE) Congratulations! Thank you for buying the Bytton LTE product from ROHDE & SCHWARZ TOPEX S.A. and congratulation for your wise choice. Bytton LTE has the following features: Very High Throughput – download data rates up to 42 Mbps over HSPA+, depending upon the type of modem selected and the capability of the mobile network used – LTE ready, data rates up to 100 Mbps over LTE networks with dual antennas - wired (Ethernet) data transfers between clients up to 100 Mbps - wireless local data transfers up to 54 Mbps with the standard 802.11g embedded AP and speeds up to 150 Mbps with the optional 802.11n wireless access point (also available with antenna Diversity feature) Cross network capabilities – Dual SIM variant – the dual SIM version uses two SIM cards (not concurrently) for increased availability: when the primary carrier fails or you get out of the coverage area, Bytton LTE automatically switches to the second mobile data provider. Rugged metal case, compact and reliable - the metallic case in ruggedized, ensuring reliable operation even in extreme environment conditions - extended temperature range available upon request, up to the -30oC to +80oC! - the compact size makes it easy to carry and use. Remote control and monitoring – ready for machine to machine applications, including remote control and monitoring of the fleet of Bytton machines while located out in the field – features one or two serial ports for connection to legacy equipments – adapter device for mounting on industrial standard DIN Rail (to be placed in watertight enclosures for outdoors usage) – dedicated Management Server, remote utility for Web-based administration and configuring of single units or group provisioning, distant monitoring and automated service managemnt tasks. High Security – stateful packet inspection firewall for Internet connection – 128 bits encryption for wireless clients, WEP and WPA with TKIP or AES encryption – secure HTTP (HTTPS) access to configuration pages – secure SSH remote management - embedded VPN tunnels (GRE, IPSec, PPTP, OVPN) - MAC filtering and 802.1x certificates authentication Ease of Use – web based configuration interface; – login as admin or superuser, allows access to simple or advanced configurations – embedded server for dynamic IP configuration of the clients (DHCP) Advanced Internet Connection Management – automatic connection establishment on traffic detection – automatic disconnection on lack of traffic – complete network address translation (NAT) support - flexible assignement of physical Ethernet ports - QoS (traffic marking and shaping for Layer 2, Layer 3 and Application Layer) VPN and IP tunneling – versatile settings for IP tunneling - embedded support for GRE, IPSec, OVPN, PPTP - you can define up to 20 IPSEC tunnels - allow easy building of secure virtual private networks - other kinds of secure tunnels available upon request. ByttonLTE(full)_genericUsermanual_sw306FAS_revN.1.docx Page: 2 / 290 TOPEX Bytton (HSPA+ / LTE) Bridge capability – you may define several bridges between up to four interfaces of the equipment, - each bridge may be considered a kind of software switch that can be used to connect multiple Ethernet interfaces (either physical or virtual), while sharing a single IP subnet - bridging a physical eth network interface of Bytton with an Open VPN-driven network tap interface at two separate locations, both distant Ethernet networks are merged as if they were a single Ethernet subnet. OVPN available – in addition to other kinds of versatile, advanced tunneling that may be for VPN, Bytton provides support for the OpenVPN Client; – OpenVPN is simple, very easy to install and configure – it can be installed on nearly any platform, the configuration principle remains the same on any platform – TAP/TUN interface options are available so you can choose to build either Ethernet (Bridged) or IP (Routed) VPNs with the embedded OVPN software. Virtual Routing Tables - the Virtual RT feature acts like a logical router, using a single routing table for each instance - provides a way to configure multiple routing instances on a single hardware router Easy Firmware Updating – automatic update process using the web configuration interface, locally or remote Low Power Consumption (less than 10 Watts) – the low power consumption means reduced heat dissipation, hence no cooling fans required – no moving parts means you get higher reliability and no noise. Serial Interfaces - variant with one or two programmable serial (RS-232) interfaces available; the serial interface allows remote control of “legacy” devices – older equipments that feature a serial interface - TCP server option lets you to remotely access the serial interfaces via telnet. Diversity antennas - MIMO Enabled - both the 3G+ modem and the WiFi access point of the equipment are available in MIMO variant - with two antenna connectors each; the usage of multiple antennas for diversity ensures higher speed, increased throughput or better signal quality. Flexible ETH port assignment – the wan0/lan0 connector may be assigned, form the Web configuration interface, either to the LAN or to WAN/LAN (a second remote network) - the local ETH ports may be grouped in a switch according to your requirements: all three, just two, or they can be allotted individual IP addresses for each; you can specify for every ETH port the speed, auto-negotiation feature, operation in full duplex of half duplex mode. . Advanced firewall – SPI firewall with “iptables” for filtering and NAT, fully configurable from the Web pages. Static and Dynamic routing – You may completely define several static routes, using Quagga or Kernel for routing – Quagga routing program (RIP, OSPF and BGP protocols implemented) Advanced functions for the "superuser" – this login mode allows access to additional items in several Web configuration pages, while the section “Stuff” provides reporting via e-mail, self-provisioning by loading configuration files and testing the bandwidth Various "services" available – besides the basic capabilities, of Voice and Data over advanced mobile networks, the Services section povides different additional features, such asa SNMP, VRRP, Telnet, email-2-sms, DDNS, NTP client, and so on; ByttonLTE(full)_genericUsermanual_sw306FAS_revN.1.docx Page: 3 / 290 TOPEX Bytton (HSPA+ / LTE) SMS Read / Send - you can send and receive SMS messages from the Web interface, using the modem module and the one or two SIM cards used on the equipment; Multiple networks and technologies supported – different types of mobile modems available, for different frequency bands, mobile technologies and data rates, HSPA+ with speeds of 42 Mbps; the modules for LTE (4G) connections with antenna diversity allow download speeds of 100 Mbps – can connect to mobile networks in the 850/900/1800/1900 MHz ranges for GSM/GPRS and respectively 850/900/1900/2100 MHz ranges for WCDMA, respectively 2600 MHz for LTE. – backward compatibility form HSPA+ down to GPRS and GSM. ByttonLTE(full)_genericUsermanual_sw306FAS_revN.1.docx Page: 4 / 290 TOPEX Bytton (HSPA+ / LTE) Conformity! ByttonLTE(full)_genericUsermanual_sw306FAS_revN.1.docx Page: 5 / 290 TOPEX Bytton (HSPA+ / LTE) WEEE Directive Compliance This symbol applied on your product or on its packaging means that this product fulfils the WEEE Directive. The product shall not be recycled as household waste; it will be disposed separately as sorted waste. Regarding to WEEE Directive the recycling EE equipments must be accomplish separately in purpose of natural resources preserving and to avoid the occurring negative effects about human health and environment. The acquired product shall not be treated like household waste at the end of its life and will be returned to ROHDE & SCHWARZ TOPEX S.A. Company at the address: ROMANIA, Bucharest, Feleacu Street no 10, code 014186 or given to a specialized firm. WEEE Directive Please do not dispose your ROHDE & SCHWARZ TOPEX S.A. product as unsorted waste (household waste), recycle it to protect the environment. Separate the packages according to waste disposal options and sort it for recycling. For supplementary information contact us to: Phone: +4021 408.39.00 or www.topex.rohde-schwarz.com ByttonLTE(full)_genericUsermanual_sw306FAS_revN.1.docx Page: 6 / 290 TOPEX Bytton (HSPA+ / LTE) Table of Contents 1. INTRODUCTION ................................................................................................................................................. 16 2. PACKAGE CONTENT ........................................................................................................................................ 19 3. Equipment Functions and Identification ........................................................................................................... 20 3.1 What is Bytton ICR? ...................................................................................................................................... 20 3.2 Identification of the equipment model/variant ............................................................................................... 22 3.3 Significance of labels..................................................................................................................................... 22 3.4 Software Information ..................................................................................................................................... 25 4. INSTALLATION.................................................................................................................................................... 27 4.1 Establishing the best location ...................................................................................................................... 27 4.2 Mounting (hardware installation) ................................................................................................................. 27 4.2.1 Horizontal Mounting ................................................................................................................................ 27 4.2.2 Rail Mounting ........................................................................................................................................... 28 4.3 Identification of connectors........................................................................................................................... 30 4.4. Connecting the data cables......................................................................................................................... 32 4.5. Configuring and installing the SIM card (s)............................................................................................... 37 4.6. Connecting the external antennas ............................................................................................................. 40 4.7. Power Up........................................................................................................................................................ 43 4.8. Status indicators ........................................................................................................................................... 44 5. CONFIGURATION .............................................................................................................................................. 45 5.1 Using the Web Interface ............................................................................................................................... 45 5.1.1 Set up a connection ................................................................................................................................ 45 5.1.2 Automatic IP Address ............................................................................................................................. 47 5.1.3 Manual IP Settings.................................................................................................................................. 48 5.1.4 First Connection ...................................................................................................................................... 49 5.1.5 Secure Connection HTTPS ................................................................................................................... 49 5.1.6 Log-in to Bytton LTE ............................................................................................................................... 51 5.1.7 Multiple Log-in to the Web-interface of Bytton ................................................................................... 52 5.1.8 MENU Items............................................................................................................................................. 55 5.2 LAN .................................................................................................................................................................. 59 5.2.1 IP Settings ................................................................................................................................................ 59 5.2.2 Software configuration of the ETH switch ........................................................................................... 65 5.2.3 Using “SW (LAN1, LAN2)” to disable two local ports ........................................................................ 74 5.2.4 Commit ..................................................................................................................................................... 79 5.2.5 DHCP Settings ........................................................................................................................................ 80 5.2.6 WiFi Settings............................................................................................................................................ 88 5.2.7 “802.1x” Settings ..................................................................................................................................... 94 5.2.8 Bridge ........................................................................................................................................................ 97 5.2.9 “Interface Status” and “Test Net” features ........................................................................................ 101 5.2.10 VLAN..................................................................................................................................................... 115 5.2.11 ETH Ports............................................................................................................................................. 120 5.2.12 MTU ...................................................................................................................................................... 127 5.3 WAN ............................................................................................................................................................... 131 5.3.1. Settings.................................................................................................................................................. 131 5.3.2. WAN Management .............................................................................................................................. 136 5.3.3. WAN Port .............................................................................................................................................. 137 5.3.5. PPP ........................................................................................................................................................ 140 5.3.6. PPP Advanced Settings...................................................................................................................... 143 5.4. TUNNELS .................................................................................................................................................... 148 5.4.1 GRE......................................................................................................................................................... 149 5.4.2 IPSEC ..................................................................................................................................................... 151 5.4.3 PPTP ....................................................................................................................................................... 161 5.4.4 OVPN ...................................................................................................................................................... 162 5.5 ROUTING ......................................................................................................................................................... 167 5.4.1 Firewall ................................................................................................................................................... 169 5.4.2 Static Routes ......................................................................................................................................... 177 5.4.3 Dynamic routes ..................................................................................................................................... 185 5.4.4 Virtual Routing Table ............................................................................................................................ 188 ByttonLTE(full)_genericUsermanual_sw306FAS_revN.1.docx Page: 7 / 290 TOPEX Bytton (HSPA+ / LTE) 5.4.5 Quality of Services ................................................................................................................................ 198 5.5 SYSTEM ........................................................................................................................................................ 211 5.5.1 Status ...................................................................................................................................................... 212 5.5.2 Logs......................................................................................................................................................... 215 5.5.3 Update .................................................................................................................................................... 219 5.5.4 Password ................................................................................................................................................ 223 5.5.5 Defaults................................................................................................................................................... 224 5.5.6 Hardware factory defaults.................................................................................................................... 225 5.5.7 Save CFG............................................................................................................................................... 226 5.5.8 Load CFG ............................................................................................................................................... 227 5.6 SERVICES .................................................................................................................................................... 230 5.6.1 VRRP ...................................................................................................................................................... 231 5.6.2 SNMP ...................................................................................................................................................... 232 5.6.3 TELNET .................................................................................................................................................. 234 5.6.4 SERIAL ................................................................................................................................................... 234 5.6.5 SMS......................................................................................................................................................... 236 5.6.6 DDNS ...................................................................................................................................................... 238 5.6.7 NTP ......................................................................................................................................................... 239 5.6.8 E-mail to SMS ........................................................................................................................................ 242 5.6.9 Reset ....................................................................................................................................................... 246 5.7 SIM ................................................................................................................................................................. 247 5.7.1 SIM Status .............................................................................................................................................. 247 5.7.2 SIM Settings........................................................................................................................................... 250 5.7.3 SMS Read .............................................................................................................................................. 253 5.7.4 SMS Send .............................................................................................................................................. 255 5.8 Stuff ................................................................................................................................................................ 256 5.8.1 E-mail ...................................................................................................................................................... 257 5.8.2 Auto-configuration ................................................................................................................................. 259 5.8.3 BW test ................................................................................................................................................... 262 5.8.4 Actual Speed Test Results .................................................................................................................. 266 5.9 Status Page .................................................................................................................................................. 270 6 TECHNICAL SPECIFICATIONS for Bytton LTE .................................................................................... 273 7. OPERATING ENVIRONMENT ........................................................................................................................ 276 8 APPLICATIONS .................................................................................................................................................. 277 8.1 Wireless gateway/firewall/router using the 3G+ networks..................................................................... 277 8.2 M2M Field Applications ............................................................................................................................... 278 9 Glossary ............................................................................................................................................................... 280 10 Annex 1 – Antennas for ByttonICR ................................................................................................................ 287 ByttonLTE(full)_genericUsermanual_sw306FAS_revN.1.docx Page: 8 / 290 TOPEX Bytton (HSPA+ / LTE) Index of figures: Figure 1-1: Bytton LTE featuring one or two RS-232 ports (SER1, SER2). ......................................................16 Figure 1-2: Photo of Bytton LTE with two serial ports, FXS phone interface, two SIM cards, Wi-Fi and slot for USB. .................................................................................................................................................................18 Figure 1-3: Drawing and photo of antenna diversity: up to two antennas for Mobile and Wi-Fi. ....................18 Figure 2-1: Illustrations of the content of the package of Bytton ICR .................................................................19 Figure 3-1: Connecting the local clients to Internet via broadband mobile data network. ...............................20 Figure 3-2: General (field) applications of the Bytton ICR wireless router .........................................................20 Figure 3-3: Bytton ICR acts as a router for wired and wireless local networks .................................................20 Figure 3-4: Firewall function of Bytton ICR .............................................................................................................21 Figure 4-1: Horizontal mounting of Bytton ICR. ......................................................................................................27 Figure 4-2: Schematic of Bytton ICR attached to a DIN Rail ...............................................................................28 Figure 4-3: Attach the mechanical adapter to the back of the case of Bytton ICR ..........................................29 Figure 4-4: Attach the equipment to the DIN rail, by means of the adapter. .....................................................29 Figure 4-5: Bytton LTE fastened to the DIN rail .....................................................................................................29 Figure 4-6: Image of indicators and Connectors of Bytton ICR with one serial interface ................................30 Figure 4-7: Drawing of indicators and connectors of an “advanced” Bytton LTE, fully equipped. .................30 Figure 4-8: Connecting all the cables and accessories to Bytton........................................................................32 Figure 4-9: Connecting the LAN cables ...................................................................................................................32 Figure 4-10: Connecting the WAN cable .................................................................................................................34 Figure 4-11: Connecting the serial cables to Bytton LTE .....................................................................................36 Figure 4-13: Location of the one or two slots for SIM cards.................................................................................38 Figure 4-14: Illustration of the four steps sequence of inserting the SIM card into Bytton LTE. ....................40 Figure 4-15: Inserting the connector of the GSM/3G Mobile Antenna ..............................................................41 Figure 4-16: Inserting the connectors for the LTE Mobile Antennas (one or two pcs.) ..................................41 Figure 4-17: Bytton LTE with four antenna connectors, two for LTE (4G Mobile) and two for N-type WiFi access point. .........................................................................................................................................................41 Figure 4-17: Attachment of a single WiFi Stick Antenna .....................................................................................42 Figure 4-18: Attachment of the two WiFi Antenna for N-type wireless AP .......................................................42 Figure 4-19: Location of indicator LEDs ..................................................................................................................44 Figure 5-1: Go to “network and Internet” in the Control Panel .............................................................................45 Figure 5-2: Go to “Network and Internet” to create a network connection for Bytton LTE. ............................46 Figure 5-3: Setting the network properties for the ETH connection to Bytton ...................................................47 Figure 5-4: Setting automatically IP for the connection to Bytton........................................................................47 Figure 5-5: Manually establishing IP parameters for the connection to Bytton .................................................48 Figure 5-6: Enter the default IP address of the Web page into your browser. ..................................................49 Figure 5-7: Changing the default IP address of Bytton LTE.................................................................................49 Figure 5-8: Security Alert for the https connection.................................................................................................49 Figure 5-9: Warning about the certificate of a trusted website. ...........................................................................50 Figure 5-10: Security Alert from Internet Explorer about the secure connection (encrypted page)...............50 Figure 5-11: Connecting to the configuration Web page of Bytton LTE. ............................................................51 Figure 5-12: Authentication required - enter user name (admin) and password. .............................................51 Figure 5-13: Indication of remote user and location. .............................................................................................51 Figure 5-14: Login error message – Unauthorized! ...............................................................................................51 Figure 5-15a: Log-in as “admin”. .............................................................................................................................52 Figure 5-15b: Log-in as “superuser”........................................................................................................................53 Figure 5-16a: Web configuration page, listing sub-menu items for “admin”. .....................................................55 Figure 5-16b: Web configuration page, listing all sub-menu items for “superuser”. .........................................56 Figure 5-17: LAN configuration Webpage, with subpages. ..................................................................................59 Figure 5-18: LAN configuration page, IP Settings..................................................................................................59 Figure 5-19: Changing the default IP address of Bytton on the LAN – several examples ..............................60 Figure 5-20: LAN configuration page, Additional IP Address Tables..................................................................60 Figure 5-21: LAN configuration page, access the link Loopback. .......................................................................64 Figure 5-22: LAN configuration page, set IP for the Loopback test link. ............................................................64 Figure 5-23: Commit Settings command – aspect of progress bar “Saving changes”. ...................................79 Figure 5-24: LAN webpage – DHCP Server. .........................................................................................................80 Figure 5-25: Open Network and Sharing Center to verify the assignment of IP addresses. ..........................81 Figure 5-26: The General tab of the connection to Bytton LTE shows its current state. .................................81 Figure 5-27: The Details tab of the connection to Bytton LTE shows its IP address. ......................................81 Figure 5-28: Using the “Forward to” option for DHCP Server in LAN configuration webpage........................82 Figure 5-29: Select Manual or Automatic for DSN Servers..................................................................................82 ByttonLTE(full)_genericUsermanual_sw306FAS_revN.1.docx Page: 9 / 290 TOPEX Bytton (HSPA+ / LTE) Figure 30a: When Automatic option is chosen, the next fields are inactive (grey color). ................................82 Figure 5-30b: Select Manual instead of Automatic for DSN Servers..................................................................82 Figure 5-31: Click the link “Filter List MAC” to use this feature. ..........................................................................83 Figure 5-32: The MAC list, which is empty in the beginning. ...............................................................................83 Figure 5-33: Adding and editing entries in the table “Filter List MAC”. ...............................................................83 Figure 5-34: Defining MAC entries in the table “Filter List MAC”. .......................................................................84 Figure 5-35: Defining MAC entries in the table “Filter List MAC”. .......................................................................87 Figure 5-36: Editing MAC entries in the table “Filter List MAC”. ..........................................................................87 Figure 5-37: The LAN page for WiFi Settings. ........................................................................................................88 Figure 5-35: Select the Radio Channels of the WiFi Access Point. ....................................................................91 Figure 5-38: Select and set up the WEP Security features. .................................................................................92 Figure 5-39: Select and set up the advanced WPA Security features. ..............................................................92 Figure 5-40: Enable and configure MAC Security for WiFi. ..................................................................................93 Figure 5-41: 802.1x Settings, by default Disabled. ................................................................................................94 Figure 5-42: Enable and configure settings for 802.1x EAPOL. ..........................................................................95 Figure 5-43: Embedded Help for the parameters of 802.1x authentication for EAPOL...................................96 Figure 5-44: “Bridge” configuration page, empty in the beginning. .....................................................................97 Figure 5-45: Edit an entry in the “Bridge” table. .....................................................................................................98 Figure 5-46: Several entries in the “Bridge” table. .................................................................................................99 Figure 5-47: Bridges showing up in “Bridge Status”. .............................................................................................99 Figure 5-48: The same bridges in the “Routes” table. ...........................................................................................99 Figure 5-49: Details of bridges in the “Bridge Status” table. ..............................................................................100 Figure 5-50: The window “Interface Status” and the corresponding link present in several configuration pages. ..................................................................................................................................................................101 Figure 5-51: The link “Test Net” at the bottom of the “Interface Status” page. ..............................................109 Figure 5-52: Features of the“Test Net” page. .......................................................................................................109 Figure 5-54: Commands available in “Network Tests” page. .............................................................................114 Figure 5-55: The “VLAN” page with several virtual LANs defined.....................................................................115 Figure 5-56: The “ETH ports” page for physical configuration of Ethernet ports. ...........................................120 Figure 5-56: The “ARP Table” with multiple entries.............................................................................................126 Figure 5-57: The “MTU” window of the LAN configuration page. ......................................................................127 Figure 5-58: The WAN webpage. ...........................................................................................................................131 Figure 5-59: Webpage for setting WAN Interface type and Failover. ...............................................................131 Figure 5-60: Example of setting up primary and secondary WAN Interfaces, using Failover. .....................135 Figure 5-61: Output route via cabled Ethernet connection wan. .......................................................................135 Figure 5-62: Output route via wireless connection ppp1. ...................................................................................135 Figure 5-63: Webpage for setting up WAN Port in the WAN settings. .............................................................137 Figure 5-64: Selection of address type (Automatic) for WAN Port in the page for WAN...............................137 Figure 5-65: Examples of setting Static address for WAN Eth interface in the WAN pages. .......................138 Figure 5-66: Setting the name servers for static IP on the ETH Interface for WAN. ......................................138 Figure 5-67: Settings for PPP over Ethernet connection in webpage for WAN. .............................................139 Figure 5-68: Settings for PPP link for the embedded radio modem of Bytton ICR.........................................140 Figure 5-69a: Settings for PPP link in case of Dual-SIM Bytton equipment. ...................................................141 Figure 5-69b: Settings for the second SIM of the PPP wireless link, in case of dual-SIM Bytton LTE device. ..............................................................................................................................................................................141 Figure 5-70: Advanced PPP Settings for the embedded modem of Bytton LTE. ...........................................143 Figure 5-71: PPP Advanced settings –parameters for the wireless Data Link. ..............................................144 Figure 5-72: PPP Check Data Link settings Bytton LTE.....................................................................................145 Figure 5-73: Enabling the “PPP Check Data Link” feature:...............................................................................145 Figure 5-74: Example of editing settings for “PPP Check Data Link” and explanation of parameters......145 Figure 5-75: Example with values of settings for the “PPP Check Data Link” feature. ..................................146 Figure 5-76: Aspect of the “TUNNELS” web configuration page. . ...................................................................148 Figure 5-77: Example of maximal “TUNNELS” Web page, with six sub-pages. .............................................148 Figure 5-78: Aspect of GRE section of the “TUNNELS” Web page..................................................................149 Figure 5-79: Add New and Edit an entry in the GRE table of the “TUNNELS” Web page. ...........................149 Figure 5-80: Saving a complete entry into the GRE table. .................................................................................149 Figure 5-81: The IPSEC configuration table, empty. ...........................................................................................151 Figure 5-82: Global IPSEC settings, on top of the IPSEC configuration table. ...............................................152 Figure 5-83: Configuring the Global IPSEC settings. ..........................................................................................152 Figure 5-84: Specific IPSEC settings. ....................................................................................................................153 Figure 5-85: Define or modify the Specific IPSEC settings. ...............................................................................154 Figure 5-86: Using the link “Configure Authentication Keys”. ............................................................................155 ByttonLTE(full)_genericUsermanual_sw306FAS_revN.1.docx Page: 10 / 290 TOPEX Bytton (HSPA+ / LTE) Figure 5-87: IPSEC Web page for managing RSA and PSK keys, and x.509 certificates. ..........................156 Figure 5-88: Generate local RSA key and set or generate remote PSK key. .................................................157 Figure 5-98: Upload the certificate files for X.509. ...............................................................................................158 Figure 5-90a: “IPSEC STATUS” when no tunnel is raised. ................................................................................158 Figure 5-90b: “IPSEC STATUS” for one IP Sec tunnel. ......................................................................................159 Figure 5-90c: “IPSEC STATUS” for three IP Sec tunnels. .................................................................................160 Figure 5-91 Web configuration page for PPTP, disabled. .................................................................................161 Figure 5-92: Setting up parameters as Client for PPTP. ....................................................................................161 Figure 5-93: OVPN page for secure Tunnels. ......................................................................................................162 Figure 5-94: Configure the parameters for Open VPN. ......................................................................................163 Figure 5-94: Edit the certificate for Certified Authority. .......................................................................................163 Figure 5-96: Edit the certificate for CRT Client.....................................................................................................164 Figure 5-97: Edit the certificate for Client’ KEY for OVPN..................................................................................165 Figure 5-98 The ROUTING web page for Bytton LTE. .......................................................................................167 Figure 5-99: The Firewall web page (Port Froward and Iptables Rules)..........................................................169 Figure 5-100: Additional links in the Firewall page. .............................................................................................170 Figure 5-101: Topmost section of the Firewall web page, Port Forward ........................................................170 Figure 5-102: IP tables (accept/reject rules) section of the Firewall web page ...............................................172 Figure 5-103: The link “Advanced Iptables Add” ..................................................................................................173 Figure 5-104: Directly writing firewall rules (settings in iptables).......................................................................173 Figure 5-105: Viewing the Active Rules of the firewall of Bytton ICR. ..............................................................174 Figure 5-107: Actual listing of Active Rules of the firewall of Bytton ICR. ........................................................175 Figure 5-108: Example and explanations for Advanced Iptables Add firewall rules. .....................................176 Figure 5-109: Routes – display and definition of static routes. ..........................................................................177 Figure 5-110: Static Routes – upper panel, display of static routes..................................................................178 Figure 5-111: Static Routes – lower panel, table for defining display of routes. .............................................178 Figure 5-112: Routes – Static Routes Display. ....................................................................................................179 Figure 5-113: Routes – Definition of Static Routes. ............................................................................................180 Figure 5-114: Routes – Selecting Interface for Static Routes. ...........................................................................180 Figure 5-115: Routes – Embedded help for defining static routes ....................................................................182 Figure 5-116: Interface Status – shows the current state of all network interfaces. .......................................184 Figure 5-117: Details of Interface Status window, including the “Reload” button. ..........................................184 Figure 5-118: ROUTING page – section Dynamic Routes. ................................................................................185 Figure 5-119: Dynamic ROUTING page –“VTY Shell” shows up when Dynamic Routing is enabled. .......186 Figure 5-120: Entering commands and parameters in “VTY Shell”. .................................................................187 Figure 5-121: Actual results of the commands entered in “VTY Shell” console. ............................................187 Figure 5-122: Aspect of Virtual Routing Table window in the Routing section................................................188 Figure 5-123: Virtual Table with status, route list and table of definitions........................................................188 Figure 5-124: Ading new entries into the Virtual Routing Table. .......................................................................189 Figure 5-125: Additional links to the left of the Virtual Routing Table. ..............................................................190 Figure 5-126: Virtual Table Routes. .....................................................................................................................190 Figure 5-127: Examples of VT Routes listing. .....................................................................................................191 Figure 5-128: Define new Virtual Table entries. ..................................................................................................191 Figure 5-129: Show Route in VT Status. ..............................................................................................................192 Figure 5-130: Show Rule and Show Route sections in VT Status. ..................................................................193 Figure 5-131: Full VT Status page, with VT list, Show Rule and Show Route sections..............................194 Figure 5-132: Quality of Service configuration page. ..........................................................................................198 Figure 5-133: Table for Quality of Service Marking .............................................................................................199 Figure 5-134: Editing the QoS MarkingTable .......................................................................................................200 Figure 5-135: Detailed examples of QoS page ....................................................................................................201 Figure 5-136: Active QoS Marking page ...............................................................................................................203 Figure 5-137: Editing the QoS Marking table........................................................................................................204 Figure 5-138: Aspect of the QoS Class page .......................................................................................................205 Figure 5-139: QoS Class topmost pane, listing of classes ................................................................................205 Figure 5-140: QoS Class bottom pane, definition of classes ............................................................................206 Figure 5-141: QoS Class specifying TOS and classes for each interface ......................................................207 Figure 5-141: QoS Class – adding and edition the entries for each interface................................................208 Figure 5-141: Completed QoS table .....................................................................................................................209 Figure 5-142: TOS rules generated in the Bzttonţs firewall ..............................................................................210 Figure 5-143: Aspect of the SYSTEM Web Page. ...............................................................................................211 Figure 5-144: Aspects of System Status Web Page with Ethernet link up. .....................................................212 Figure 5-144: Aspects of SYSTEM Status Web Page with PPP link online. ...................................................212 ByttonLTE(full)_genericUsermanual_sw306FAS_revN.1.docx Page: 11 / 290 TOPEX Bytton (HSPA+ / LTE) Figure 5-145: Alternate example of Status sub-page for System, with two DHCP clients conected...........213 Figure 5-146: Examples of DHCP leases in System Status. .............................................................................213 Figure 5-147: Using the “Reload” button located at the bottom.........................................................................214 Figure 5-148: Examples of state of the PPP link and Start/Stop button...........................................................214 Figure 5-149: Aspect of the System Log of Bytton LTE......................................................................................215 Figure 5-150: The beginning of a typical System Log. ........................................................................................216 Figure 5-151: The beginning of a typical System Log. ........................................................................................217 Figure 5-152: Setting Remote Log IP for the System Log. .................................................................................217 Figure 5-153: System Log running with “Remote” settings. ...............................................................................218 Figure 5-154: Syslog Statistics in Kiwi Syslog Daemon. ...................................................................................218 Figure 5-155: Kiwi Syslog Daemon showing the remote System Log for Bytton LTE. ..................................218 Figure 5-156: Update feature in the System webpage of Bytton LTE. ............................................................219 Figure 5-157: Search for the image file to update into Bytton LTE. ..................................................................219 Figure 5-158: Listing of a directory holding several firmware image files. .......................................................220 Figure 5-159: Location of the “Updates” folder, holding the firmware image files. .........................................220 Figure 5-160: Selecting the software image to be uploaded..............................................................................220 Figure 5-161: Opening in Notepad the associated file with Check Sum. .........................................................221 Figure 5-162: “Firmware Update” window with the control sum filled-in. .........................................................221 Figure 5-163: The “Firmware Update” window with progress bar that shows uploading of a new firmware version for Bytton. ..............................................................................................................................................221 Figure 5-164: Red progress bar indicating actual upload of firmware. .............................................................222 Figure 5-165: System Status showing firmware version prior to the upload of firmware. .............................222 Figure 5-166: System Status showing firmware version following succesful firmware update. ...................223 Figure 5-167: Password – changing the login password for Bytton.................................................................223 Figure 5-168: Defaults – loading the factory default settings. ............................................................................224 Figure 5-169: Loading Defaults – the progress bar “Updating Settings, please wait!”. .................................224 Figure 5-170: The Save command – Saving the “bytton.sav” file. ....................................................................226 Figure 5-171: Saving the configuration file with the option “Save As“. .............................................................226 Figure 5-172: Message that confirms the saving the configuration file for Bytton ICR. .................................227 Figure 5-173: The Load command – selecting the file with the settings previously saved. ..........................227 Figure 5-174: “Choose File to Upload” – navigating for the configuration file you want. ...............................228 Figure 5-175: Press Send to load the saved settings form the configuration file you have selected. .........228 Figure 5-176: System Load – progress bar while loading a file holding the saved settings. .......................229 Figure 5-177: The Web interface is unavailable while Bytton ICR restarts with the new configuration. .....229 Figure 5-178 Bytton LTE begins operation with the loaded configuration. .....................................................229 Figure 5-179: SERVICES – configuration web page for “services”. ................................................................230 Figure 5-180: Illustration of different menus for SERVICES. .............................................................................230 Figure 5-181: VRRP Services – setting the virtual router protocol. ................................................................231 Figure 5-182: Configuring VRRP – edit the setting for the virtual router.........................................................231 Figure 5-183: SERVICES SNMP – enable and configure the network management...................................232 Figure 5-184: Define and configure SNMP Communities...................................................................................233 Figure 5-185: Set up IP and netmask for a SNMP Community. ........................................................................233 Figure 5-186: Using local and global “Save” buttons for the SNMP Communities created. .........................233 Figure 5-187: Enable and configure the Telnet service of Bytton LTE. ............................................................234 Figure 5-188: Enable and Configure Serial ports of Bytton LTE. ......................................................................234 Figure 5-189: parameters for the serial connection(s) ........................................................................................235 Figure 5-190: Examples of remote connection parameter settings for the serial link ....................................235 Figure 5-191: Settings for SMS services ...............................................................................................................236 Figure 5-192: Establishing parameters for the SMS managemnt service........................................................236 Figure 5-193: Examples of actual SMS received on a mobile phone, form the remote Bytton LTE equipment ............................................................................................................................................................237 Figure 5-194: Services: Settings for the Dynamic DNS ......................................................................................238 Figure 5-195: Enabling the Dynamic DNS Server ...............................................................................................238 Figure 5-196: Drop list for selecting the name of Dynamic DNS Service ........................................................239 Figure 5-197 Enabling and choosing server for the NTP Client service ..........................................................239 Figure 5-198: Examples of current time display when NTP Service is enabled .............................................240 Figure 5-200: Time jumps when NTP service become active, as seen in the system logs. .........................242 Figure 5-201: Configuration page for the E-mail to SMS feature of Bytton. ....................................................242 Figure 5-202: Configure the E-mail to SMS feature of Bytton............................................................................243 Figure 5-203: Preparing a dedicated E-mail account to be used with the SMS feature of Bytton .............243 Figure 5-204: Configure the E-mail to SMS feature of Bytton............................................................................244 Figure 5-205: Settings for Reset button.................................................................................................................246 ByttonLTE(full)_genericUsermanual_sw306FAS_revN.1.docx Page: 12 / 290 TOPEX Bytton (HSPA+ / LTE) Figure 5-206: Entering time value for Periodical reset of the data connection................................................246 Figure 5-207: General web page for the SIM Services .......................................................................................247 Figure 5-208: Example of SIM Status display for Bytton LTE in HSPA mode ................................................247 Figure 5-209: SIM Status examples (for different Romanian carriers). ...........................................................248 Figure 5-210: Several examples of SIM Status for the “Mobile Carrier B” provider ......................................248 Figure 5-211: Actual examples of “SIM Status” page showing IMSI and respectively IMEI codes ............248 Figure 5-22: SIM Status with “error” messages, when the SIM card or module is busy ..............................249 Figure 5-213: Cell information in the SIM Status page ......................................................................................249 Figure 5-214: SIM Settings for the dual-SIM Bytton ICR. ..................................................................................250 Figure 5-215: Sim Settings for the single SIM Bytton equipment ......................................................................250 SIM Settings for the Dual-SIM Bytton LTE ............................................................................................................250 Figure 5-216: PIN for first SIM card and corresponding SC Number ..............................................................251 SIM Settings for the Single-SIM Bytton LTE .........................................................................................................251 Figure 5-217: Audio Settings for TX and RX .......................................................................................................251 Figure 5-218: SIM Settings for Network Mode ....................................................................................................252 Figure 1-219: SIM Settings for the order of Mobile Network selection. ...........................................................252 Figure 5-220: SIM – “SMS Read” window, empty. .............................................................................................253 Figure 5-221 List of received text messages displayed in “SMS Read”. ........................................................253 Figure 5-222: Deleting one of the messages in the list “SMS Read” ...............................................................254 Figure 5-223: Displaying a new message at the bottom of the list “SMS Read” ...........................................254 Figure 5-224: Updated list of sorted messages following a new “Read” command. .....................................254 Figure 5-225: SIM pages - SMS Send. .................................................................................................................255 Figure 5-226: Section “Stuff” of the configuration Web pages for Superuser. ..............................................256 Figure 5-227: Status reporting via E-mail .............................................................................................................257 Figure 5-228: Enabling and configuring the SMTP service for reporting e-mail. ...........................................257 Figure 5-229: Enable or disable and configure the Authentication feature.....................................................258 Figure 5-230: Configure the other parameters for E-mail reporting of Bytton. ...............................................258 Figure 5-231: Autoprovisioning – settings for automatic retrieval of configuration file. ................................259 Figure 5-232: Aspect of the fields of “Autoprovisioning” when the feature is Disabled and respectively Enabled. ...............................................................................................................................................................259 Figure 5-233: Aspect of the fields of “Autoprovisioning” when the feature is Disabled and respectively Enabled. ...............................................................................................................................................................260 Figure 5-234: Aspect of the fields of “Autoprovisioning” when the feature is Disabled and respectively Enabled. ...............................................................................................................................................................260 Figure 5-235: Retrieving the Auto-configuration file by using FTP. .................................................................260 Figure 5-237: Fill-in the required fields for FTP transfer of the “Autoprovisioning” information...................260 Figure 5-238: Configuring the TFTP client of Bytton to get the Auto.cfg file . ................................................261 Figure 5-239: Bandwidth Testing – data speed tests performed over Bytton LTE........................................262 Figure 5-240: Enable Bandwidth Testing. ............................................................................................................262 Figure 5-241: Bandwidth Testing using FTP. ......................................................................................................263 Figure 5-242: Start the Bandwidth Test using FTP. ...........................................................................................263 Figure 5-243: Actual result of BW Testing – transfer speed measurement using Bytton as router. ...........263 Figure 5-244: Several BW Tests that were performed for Bytton using the FTP option. .............................264 Figure 5-245: Using IPERF for BW Tests of the Topex wireless router.........................................................265 Figure 5-246: Configuring IPERF for BW testing over Bytton...........................................................................266 Figure 5-247: Download and Upload speed tests on “My 3G speed” site. ....................................................266 Figure 5-248: Speed test for large files, using Mobile Speed test.com site. ..................................................267 Figure 5-249: Speed test when the Ethernet port is used for WAN.................................................................268 Figure 5-250: Speed test when the 3G wireless module is used for WAN.....................................................269 Figure 5-251: Detailed speed tests for the same Bytton while PPP1 wireless link is used for WAN. ........269 Figure 5-252: Accessing the “Status page” link. .................................................................................................270 Figure 5-253: Status page example – access and aspects for “connection stopped”. ................................270 Figure 5-254: Other status page example – no registration, error indication. ..............................................271 Figure 5-255: Another two examples of Status page for Bytton ICR. ..............................................................271 Figure 8-1: Wired and wirelss local clients connected to the Bytton wireless router. ...................................277 Figure 8-2: Illustration of SOHO applications for Bytton ICR. ............................................................................277 Figure 8-3: Illustration of distributed and field applications for Bytton ICR. .....................................................278 Figure 8-4: Bytton ICR used for serial connection to legacy equipments. .......................................................279 Figure 11-1: Drawing of the Mobile Antenna for 2G/3G, with magnetic base and connection cable. ........287 Figure 11-2: Photo of the Mobile Antenna for 2G/3G, with magnetic base and connection cable. ............287 Figure 11-3: High Gain Yagi Antennas and Cables for GSM/HSPA. ..............................................................288 Figure 11-4: General image of the Mobile Antenna for 4G, with magnetic base and connection cable ...289 ByttonLTE(full)_genericUsermanual_sw306FAS_revN.1.docx Page: 13 / 290 TOPEX Bytton (HSPA+ / LTE) Figure 11-5: Photo of diversity-enabled Bytton, with two stick antennas for WiFI and two connectors for the 4G Mobile antennas. ...................................................................................................................................290 Figure 11-6: Schematic drawing of the “AUX and MAIN” markings of antenna connectors, both for Mobile (LTE network) and for Wi-Fi (type N). .............................................................................................................290 ByttonLTE(full)_genericUsermanual_sw306FAS_revN.1.docx Page: 14 / 290 TOPEX Bytton (HSPA+ / LTE) RECORD OF CHANGES MADE BY ISSUE DATE NUMBER OF PARAGRAPH A* M D TITLE OR BRIEF DESCRIPTION Firmware NAME A May 2012 All A,M,D First draft Orange-3.0.0-FA-O-b C. Malide B, C June, July All A,M,D Orange-3.0.0-FA-O C. Malide E, F July All A,M,D Revision New labels, MIMO –enabled variant, four antennas “Eth x” interfaces renamed, Alias, VRT, QOS Updating firmware form 3.0.1FAS to 3.0.3 topex-3.0.3-FA-S C. Malide All A,M,D Corrections and Feedback from Q.A. Same firmware C. Malide Implemented corrections; feedback form Support, generated index of figures Same firmware C. Malide Documented new and modified features in firmware Firmware version 3.0.5 C. Malide Corrections and customer feedback, disabling two Eth ports added Same firmware C. Malide Modifications and corrections requested by the designer topex-3.0.5-FA-S-g C. Malide Latest firmware, conformity, list of figures topex-3.0.6-FA-S C. Malide Modifications and corrections form the feedback topex-3.0.6-FA-S C. Malide Reduce file size, insert examples of MAC filtering topex-3.0.6-FA-S C. Malide G 1 Sept All H 3 oct All I A,M,D 21 Mar 2013 All N A,M,D 21 Mar 2013 All M A,M,D 11 dec All L A,M,D 6 dec All K A,M,D 25 oct All J A,M,D A,M,D 27 Mar 2013 ByttonLTE(full)_genericUsermanual_sw306FAS_revN.1.docx Page: 15 / 290 TOPEX Bytton (HSPA+ / LTE) 1. INTRODUCTION Embedded Modem The embedded modem of Bytton ICR may be a 4G (LTE) or 3.5G (HSPA+) or 3G (UMTS/HDSPA) engine multi-mode device, downwards compatible with 2G (GPRS/ EDGE/ GSM) networks. It measures in real-time the RF signal level strength of the mobile network and lets the user to freely choose the 2G or 3G+ network. Thus it provides access rates up to the maximum possible for each mobile voice/data network. This way you may talk, download files or surf the Web without cabled connections almost anywhere, at any time. When you are out of the coverage of very high speed networks such as LTE or HSPA/UMTS, you can still get services on the wireless Internet with alternative access via GPRS/EDGE/GSM network in your area. The embedded multiband modem covers almost all of the frequency bands of the world (multiband for LTE, dual band for UMTS/HSPA+ and tri-band or quad band for GSM/GPRS/EDGE! Serial interface(s) For connection to legacy devices, Bytton LTE can feature one or two configurable RS-232 or RS485 ports on the front panel. By means of the Web configuration menu you may control the serial interface (RS232) of Bytton LTE and its associated IP services. Figure 1-1: Bytton LTE featuring one or two RS-232 ports (SER1, SER2). Note: Your actual equipment may not look exactly as described above! ByttonLTE(full)_genericUsermanual_sw306FAS_revN.1.docx Page: 16 / 290 TOPEX Bytton (HSPA+ / LTE) Available variants Bytton is a very versatile equipment; it features inside one motherboard that can get several types of plug-in daughter boards, according to the functions requested by the customer. Because of this, your actual equipment may not look identical to the pictures presented in the manual, and may not have all the features described. The main variants / options are: several types of mobile modules, for 2G or 3G+ networks (UMTS, HSDPA, HSPA+), and even LTE (assuring up to100 Mbps peak download rate), or for different frequency bands: 850/900/1800/1900 MHz for GSM/GPRS/EDGE, 2100 MHz for HSDPA or HSPA+, 800/900/1800/2100/2600 MHz for LTE and so on. The external aspect of the equipment remains the same for all variants of modules, but the capabilities (and price!) are different. Some type of modules feature antenna diversity (MIMO capabilities): connection of two Mobile antennas, for diversity reception or for achieving higher data rates. Thus, special Bytton equipments may feature four antenna connectors, two for the MOB mobile data network (HSPA+, LTE) and two for the embedded Wi-Fi module. GPS capability is also available, for mobile units, powered form the car battery; no voice capabilities and no Wi-Fi, with two data SIMs (not concurrently) for higher availability and with serial interface(s) for legacy devices. It has holders for two data SIMs; the device may be used with one or two SIM cards. It may feature one serial interface (SER2). still no voice capabilities but with Wi-Fi for wireless local connection, a single data SIM. The four Ethernet connectors are present In this case the connector for Wi-Fi antenna is present, located near the center of the front panel, together with the corresponding indicator LED for Wi-Fi. No serial interface! with voice capability (one FXS interface located to the left) and also with Wi-Fi, one voice/data SIM card. The connector for Wi-Fi antenna is present, together with the corresponding LED for Wi-Fi. Since there are not two mobile modules (it cannot perform LTE for two mobile carriers), the variants with telephone port always use a single SIM card. BYT_4G_FC1/ BYT_3G_FC1, the variant with one serial interfaces, labeled “SER”, available for connections to legacy equipments. No voice capabilities, no Wi-Fi antenna and hence no Wi-Fi indicator, a single SIM card. The RS-232 interface feature RJ-45 connectors on the front panel. the Lite (low cost) variant of the equipment, a Topex Bytton LTE with no voice capabilities and no Wi-Fi, a single data SIM, and no serial interfaces. Out of the four Eth ports, there are two LAN ports, one configurable WAN0/LAN0 port, and the dedicated WAN port; There is an even simpler variant, with no SIM and hence mobile data capability, used as an advanced network router. The front panel features just four ETH ports, one SER. Advanced variants with one or two serial interfaces, and one or two SIM cards besides the Mobile antenna and the four ETH ports. The two serial ports labeled “SER1” and respectively “SER2” are available for connections to legacy equipments. The RS-232 interfaces feature RJ-45 connectors on the front panel. The phone line interface (FXS) is missing, but the Wi-Fi access point can be present, for wireless connection of equipments in the field. The front panel features, from left to right: the circular antenna connector Mob, two SER connectors, the round Wi-Fi connector for wireless antenna, the four Ethernet connectors (WAN, WAN0/LAN0, LAN2, and LAN1), the recessed Reset button and the PWR jack for power supply! ByttonLTE(full)_genericUsermanual_sw306FAS_revN.1.docx Page: 17 / 290 TOPEX Bytton (HSPA+ / LTE) - the most advanced variants, with full complement of features: two serial interfaces, two SIM cards, also FXS interface for analog fixed telephone and USB connection. The serial ports labeled “SER1” and respectively “SER2” are available for connections to legacy equipments. The RS-232 interfaces feature RJ-45 connectors on the front panel. To the right of the serial connectors, there is also a slot for USB 2.0. Figure 1-2: Photo of Bytton LTE with two serial ports, FXS phone interface, two SIM cards, Wi-Fi and slot for USB. Note: This picture may not be identical to the aspect of your own Bytton router! - Antenna diversity versions. These Bytton equipments may feature with two connectors for MOBILE antennas and also two connectors for Wi-Fi. Thus it features up to four antenna connectors, labeled MAIN and respectively AUX both for the mobile data network and for the embedded Wireless Access point: Both the LTE modem and the embedded Wi-Fi access point of Bytton LTE have MIMO capabilities, meaning they can operate with two antennas for achieving diversity (higher bandwidth or higher tolerance to perturbations, thus achieving increased capacity and / or robustness). There are several sub-variants of MIMO Bytton equipments available, for instance, as you can see in the photo, it may have two antenna connectors for the mobile data network, but only one connector for the Wi-Fi antenna! Figure 1-3: Drawing and photo of antenna diversity: up to two antennas for Mobile and Wi-Fi. The advanced variants with FXS port and respectively with USB slot, and also the special version with up to four antennas, are available only upon special request! In order to ensure a correct installation / configuration and a good operation of the Bytton LTE equipment, the manufacturer strongly recommends you to study this manual before attempting operation. ByttonLTE(full)_genericUsermanual_sw306FAS_revN.1.docx Page: 18 / 290 TOPEX Bytton (HSPA+ / LTE) 2. PACKAGE CONTENT The component elements that you may identify upon opening the Bytton LTE package are shown below. When you open the equipment package, please ensure, using this list of items, that you have the full content. Component Image Component Description Bytton LTE unit in its metallic case. It is a 3G/4G router with embedded firewall an tunneling solution for wired and/or wireless local computer networks, which allows secure, mobile, high-speed access to Internet using the 3G+ network or other WAN connections Power supply: switching mains adapter Input: 100-240VA.C Output: 12VD.C. / 2.1A Power Max. Output : 24 W Ethernet cable for local network connection A piece of UTP straight cable, with RJ-45 connectors. Stick antenna for Wi-Fi Special antenna for the embedded Access Point, the connector can be bended at 90o or rotated for getting the best signal. The N-type Wi-Fi may use dual antennas. Antenna, adequate for the mobile module used on the respective Bytton. It may be a quad band stick for GSM / HSPA+ with magnetic base and 2,5 m long cable. In case of Bytton LTE fitted with 4G modules, in the package are shipped 1-2 multiband coil antennas especially for LTE networks. LTE technology can use dual antennas for diversity, so two antennas will be included in the Bytton LTE package. - CD with User’s Manual - Warranty Certificate Figure 2-1: Illustrations of the content of the package of Bytton ICR ByttonLTE(full)_genericUsermanual_sw306FAS_revN.1.docx Page: 19 / 290 TOPEX Bytton (HSPA+ / LTE) 3. Equipment Functions and Identification 3.1 What is Bytton ICR? The Bytton ICR equipment from Topex is versatile advanced router for wireless broadband Internet access using 3G+ or 4G technology. As data router, Bytton ICR achieves a direct connection, transparent for the user, between the local networks (Ethernet and/or Wi-Fi) and the GSM/GPRS/EDGE (2G), or UMTS/HSDPA/HSPA+ (3G/3G+) and even 4G up to 100Mbps using LTE mobile communications networks. Still, if you are in an area where you have only UMTS or GPRS, or even GSM coverage, you may use Bytton LTE in conjunction with the respective networks. For wireless WAN connection, it uses an embedded radio modem for the GSM, GPRS/EDGE, HSPA+ or LTE mobile network. Its 3G/4G capabilities assure high speed Internet access, up to the topmost limit of the respective data network. Figure 3-1: Connecting the local clients to Internet via broadband mobile data network. The Bytton LTE equipment also can feature one or two serial (RS-232 / RS-485) ports, allowing connection to legacy requirements, different devices that feature serial ports. Figure 3-2: General (field) applications of the Bytton ICR wireless router Figure 3-3: Bytton ICR acts as a router for wired and wireless local networks ByttonLTE(full)_genericUsermanual_sw306FAS_revN.1.docx Page: 20 / 290 TOPEX Bytton (HSPA+ / LTE) Figure 3-4: Firewall function of Bytton ICR All computers on the wired local networks can access the Internet or remote VPN networks through the 3G Router from Rohde & Schwarz Topex S.A., using only a single external IP address. One can rest assured that the local area network connected to our product is safe because we have implemented a very powerful firewall and intrusion detection system. The Bytton LTE Router makes usage of NAT (Network Address Translation) and SPI firewall to ensure protection for your local wired networks. The features of the firewall are identical to those available to Linux servers throughout the world, which are well renowned for their safety. This firewall is fully configurable, but it is also easy to use for beginning users. The software of Bytton Router assures secure communication over the public networks, through embedded VPN tunnels – GRE, IPSec, OVPN and PPTP are supported. For instance, you can define up to twenty IPSEC tunnels! Since this product is Linux based, applications to enhance Bytton ICR or to customize it can be quickly designed by our software developers, according to the special needs of various clients. Our best technical experts are available for your technical questions around the clock, if you sign up our technical support offer. In addition, the software upgrades can be done remotely via Internet, and are free of charge. The Bytton family is a highly versatile solution; its embedded firmware can be easily upgraded over the Internet. ByttonLTE(full)_genericUsermanual_sw306FAS_revN.1.docx Page: 21 / 290 TOPEX Bytton (HSPA+ / LTE) 3.2 Identification of the equipment model/variant On the bottom of the case of each Rohde & Schwarz Topex S.A. device there are several labels or tags that indicate the characteristics and compliance, as you can see in this example: 3.3 Significance of labels These adhesive labels contain information about the manufacturer, type, model, certification, approval and compliance to UE and international or USA directives such as FCC. See here the label for a Bytton ICR operating over 3G+ networks: - and respectively for the 4G (LTE) version of Bytton ICR: As shown in the example above, the labels include barcodes and refer to the following data: - Manufacturer identification (name, phone, web site); - Model identification, and details of variant, in this case the type and frequencies of mobile networks it works with, and the type of mobile modules: ByttonLTE(full)_genericUsermanual_sw306FAS_revN.1.docx Page: 22 / 290 TOPEX Bytton (HSPA+ / LTE) This allows the network operator to check the terminal as one of its approved models, so no additional certification or approval is required; - Product name and / or description: - Serial number form the manufacturer: - Rating and Weight: power supply requirements and mass. Network identification: - IMEI code, International Mobile Equipment Identity for SIM based equipments. A unique 15or 17-digit number such as <<269751923786501>> or <<355060025698866>> that identifies an individual mobile station to a GSM or UMTS network handset. This IMEI code is on all GSM and UMTS mobile terminals, commonly found in Europe, Asia, Africa and increasingly in America. When the Rohde & Schwarz Topex S.A. device features several mobile modules (there are voice/data routers featuring two, four modules or more) - it will have, correspondingly, more IMEI labels - one for each mobile modem; - - Identification for the Ethernet network can include MAC for local and remote side. Bytton ICR features several MACs, for its up to four Ethernet interfaces. Typically these are MAC LAN, the Media Access Control address (unique hardware number) on the local network side and MAC WAN, the Media Access Control address on the side of the external network. As can be seen in the example above, Bytton ICR has one MAC for WAN, one for the WAN/LAN port 3, and a single one for the LAN ports 2 and 1, which are joined together in a switch; Default connect Default IP address of the Rohde & Schwarz Topex S.A. device in the local LAN and type of connection. For Bytton ICR, the default is https, with IP address 192.168.1.1 Warning! Please read carefully this label or the manual before attempting connection, since different Rohde & Schwarz Topex S.A.equipments may have different default IP addresses, such as 172.16.173.20. or 10.0.0.1. The Bytton ICR router has, as shown the default address: 192.168.1.1. Also, the label and the manual clearly specifies the type of connection, which is HTTPS. Most Rohde & Schwarz Topex S.A. devices such a secure connection, only a few use the ordinary http link. If you try to use the wrong type of connection, even if the IP address is correct, it will not work, so please read the manual or look at the “Default connect” label before establishing a connection to the Rohde & Schwarz Topex S.A. box. EMC, Safety, and CE Directive Compliance. The WEEE (Waste Electrical and Electronic Equipment Statement) directive places an obligation on EU-based manufacturers, distributors, retailers, and importers to take back electronics products at the end of their useful life. The sister Directive, ROHS (Restriction of Hazardous Substances) complements the WEEE Directive by banning the presence of specific hazardous substances such as lead in the products at the design phase. The “forbidden waste bin” symbol shown on the label of Rohde & Schwarz Topex S.A. device or on its packaging indicates that this product must not be disposed of with other waste. Instead, it is the user’s responsibility to dispose of the device by handing it over to a designated collection point for the recycling of electrical and electronic waste. By means of the RoHS (Restriction of the Use of Hazardous Substances) tag, Rohde & Schwarz Topex S.A. SA. confirms that its products comply with the chemical concentration limitations set forth in the directive 2002/95/EC of the European Parliament (Restriction Of the use of certain Hazardous Substances in electrical and electronic equipment - RoHS) ByttonLTE(full)_genericUsermanual_sw306FAS_revN.1.docx Page: 23 / 290 TOPEX Bytton (HSPA+ / LTE) Product version (CODE): CODE: BYT_3G_F2O_SM This label indicates exactly what type of product it is. You must mention this code when you call Support for upgrade and for repairs. Also, when you perform software upgrade, you must check that the firmware version you want to load is adequate for your model of equipment. See next a listing of such firmware “images”: When you load a new firmware, remember that this, the first letters, that describe the hardware, must be the same – for instance if you own a Bytton VoIP with the label “BYT_3G_F2Y1_2W_SM” you should look for firmware images with names like “FA-S”, and not other versions! The three digits show the firmware revision (such as 2.0.7 or 3.0.6 in the above examples). Of course you can load a firmware image with more features, a customized or a newer / updated version, but the letters describing the hardware model must correspond. The hardware information is important, however the Code printed on adhesive tab cannot ensure the precise type and version of firmware, because the application software can very easily be updated or upgraded by the user. After such a firmware update, the application program running on the Rohde & Schwarz Topex S.A. device may no longer be the same that was described by the label on the bottom of the case of the device. To learn about the current firmware, please use the Web interface of the device, as shown in the next paragraph! ByttonLTE(full)_genericUsermanual_sw306FAS_revN.1.docx Page: 24 / 290 TOPEX Bytton (HSPA+ / LTE) 3.4 Software Information The Web interface displays some of the information described above, but also important additional information, which is NOT available through the adhesive tags. Such information is related to the serial of the motherboard of the device, or the software version actually running on it. For this you must access the System> Status page. Just enter into the browser the URL for the page: https://192.168.1.1 System Status The updated information about serial number, hardware version, current firmware, uboot and kernel can be found in the option Status – System Information of the menu page SYSTEM, as shown here: To be able to see this Status page, one must be logged-on to the Bytton VoIP device. As can be seen in these examples: System Status Firmware version: topex-3.0.5-FA-S-g Ethernet link up PPP link offline PPPOE link offline System uptime: 12:41:16 up 13 min, load average: 0.31, 0.44, 0.12 DHCP Leases: 1363094988 6c:f0:49:76:24:4b 192.168.1.12 VO000073 01:6c:f0:49:76:24:4b ByttonLTE(full)_genericUsermanual_sw306FAS_revN.1.docx Page: 25 / 290 TOPEX Bytton (HSPA+ / LTE) Or: System Status Firmware version: topex-3.0.6-FA-S Ethernet link up PPP link online, IP=10.96.148.115 PPPOE link offline System uptime: 19:27:57 up 20 min, load average: 0.22, 0.14, 0.07 DHCP Leases: 1363095959 00:06:4f:02:15:82 192.168.1.13 VO000073 01:00:06:4f:02:15:82 1363095959 6c:f0:49:76:24:4b 192.168.1.12 * 01:6c:f0:49:76:24:4b two categories of information are displayed in System Status: Equipment info, permanent data, which is important for this chapter – the exact firmware version; System info, with temporary (current) data, such as state of different links (ETH, PPP, PPPoE) uptime, load, DHCP leases, etc; The permanent identification info shown refers to the Firmware version: topex-3.0.5-FA-S-g, topex-3.0.6FA-S, orange-3.0.1-FA-O and so on. Format for the Name of the firmware image file: [brand]-[version]-[type]-[release]-[package].trx brand - indicates the brand used for the respective firmware. It may be Topex, Omniacom, Vodafone, Orange , etc. version – the firmware version, three numbers divided by decimal points, such as 1.2.1 or 2.0.7 or 3.0.6 type - mobile network used for the product ( HSPA, CDMA, UMTS, GPRS, EDGE) release – the “release” field may contain up to three letter: 1 – Type of platform, such as F 2 - Type of mobile modem used, such as A 3 – Standard or special requirements package - P - plastic, M - metal Examples: topex-0.5.9-cdma-nad-p.trx orange-3.0.1-FA-O.trx topex-3.0.6-FA-S ByttonLTE(full)_genericUsermanual_sw306FAS_revN.1.docx Page: 26 / 290 TOPEX Bytton (HSPA+ / LTE) 4. INSTALLATION In order to ensure the proper operation of the Bytton ICR equipment you must follow the set-up steps shown below: Establish the best location Identification of connectors Mounting (Hardware installation) Connecting the data cables Connecting the telephone cables (for the versions with FXS port) Configuring and installing the SIM cards Connecting the external antennas (for Mobile and respectively for Wi-Fi) Power up. 4.1 Establishing the best location In order to determine the best location for the ROHDE & SCHWARZ TOPEX S.A. router please have in mind these considerations: • If you use wired connections, the length of the Ethernet cables that connects the Bytton routers the network must not exceed 100 meters. • Bytton ICR should be placed on a flat, sturdy surface located as far from the ground as possible. A high location, on the wall or on top of a desk or a shelf is best both for the GPRS or HSPA+ connection. Also, Bytton ICR should be kept clear of obstructions and away from heat sources, direct sunlight and heavy-duty electrical equipment. • To ensure good coverage to all of the wireless mobile devices in your area Bytton ICR should be installed in a central place in the building. Normally the antennas should be in vertical position, but if reflections occur, you may get better results by changing their orientation. • For power supply, use only the adapter shipped with Bytton ICR. The jacks of different power supplies may fit but the polarity, current, voltage or regulation factor may not be compatible. • While the device is in operation, the antennas of the Bytton ICR unit should be at least 30 centimeters away from any human being. 4.2 Mounting (hardware installation) The Bytton ICR router can be mounted horizontally, by means simply placing it on a flat surface, or into a rack, attached to a DIN rail, using the supplied mechanical adapter. 4.2.1 Horizontal Mounting This kind of mounting is the simplest, you just place the metallic case of Bytton on a flat surface! The respective surface must be level and strong enough to hold the weight of Bytton ICR together with its cables (power supply, antennas, wired LAN or WAN connections, serial and so on). Figure 4-1: Horizontal mounting of Bytton ICR. ByttonLTE(full)_genericUsermanual_sw306FAS_revN.1.docx Page: 27 / 290 TOPEX Bytton (HSPA+ / LTE) A desk, table or shelf is good place for the installation of Bytton ICR wireless router. Generally, the best location for Bytton ICR is in the middle of the place where you want to have wireless coverage. Installing Bytton LTE on a shelf higher up, with no obstructions around, ensures the best performance for the mobile modem. Take care to avoid obstructions, in order to ensure adequate cooling of the equipment! 4.2.2 Rail Mounting For good environmental protection and outdoors usage, the Bytton ICR router must be placed inside a waterproof and dust enclosure. To this purpose, Bytton LTE was designed to be easily mountable on a standard DIN rail (omega rail, 35 mm wide), by means of a mechanical adapter. The adapter bracket is attached to the corresponding holes at back of the Bytton unit, as shown in the following drawing: Figure 4-2: Schematic of Bytton ICR attached to a DIN Rail Mounting of the equipment Attaching the Bytton box to the rail is done with the help of a mechanical adapter (mounting kit). This mounting kit includes a mechanical adapter, a bracket with hooks and clamps that allows easy clipping / unclipping of the Bytton case to the Omega DIN rail. ByttonLTE(full)_genericUsermanual_sw306FAS_revN.1.docx Page: 28 / 290 TOPEX Bytton (HSPA+ / LTE) The steps required to mount Bytton LTE on the standard omega DIN Rail are described next: 1. first, attach the mechanical adapter (bracket) to the back of the metallic case of Bytton. The fastening is done by means of a pair of M3 mechanical screws – use two M3 x 8 screws. Figure 4-3: Attach the mechanical adapter to the back of the case of Bytton ICR Correct position for the adapter The upper part of the adapter (the one with two hooks) must be towards the left of the Bytton case (the edge opposed to the side with the power jack). 2 attach the Bytton ICR equipment to the DIN Rail, as indicated in the schematic drawing (only the adapter is figured): Figure 4-4: Attach the equipment to the DIN rail, by means of the adapter. To attach it, clip the assembly (Bytton + bracket mounted on it) onto the upper side of the DIN rail with the two upper hooks. The lower clamp is not yet attached to the rail, allowing you to move the Bytton equipment over the DIN rail, to the left or to the right. 2. slide the Bytton assembly on the DIN rail When Bytton has been moved to the intended location, press it towards the back so that the lower clamps also fastens to the DIN rail. Now Bytton ICR equipment is locked into place over the DIN rail:DIN rail, up to the position you want. View from the back, after complete attachment to the rail: Figure 4-5: Bytton LTE fastened to the DIN rail Note: No matter how the equipment is mounted, always take care to ensure adequate cooling of the Bytton ICR mobile terminal. ByttonLTE(full)_genericUsermanual_sw306FAS_revN.1.docx Page: 29 / 290 TOPEX Bytton (HSPA+ / LTE) 4.3 Identification of connectors Bytton ICR features several external connectors and indicators, as described next.. Figure 4-6: Image of indicators and Connectors of Bytton ICR with one serial interface The concrete have: o o o o appearance depends upon the current equipping of the Bytton LTE, for instance you may two SIM slots or a single one one, two or none serial interfaces connector and indicator for Wi-Fi access point dual antenna connectors for Mobile and /or for Wi-Fi, and so on – the example above is for a unit with a single serial interface, two SIM holders, and Wi-Fi capabilities! Typically, on the front panel of the Bytton LTE equipment there are, from left to right: Figure 4-7: Drawing of indicators and connectors of an “advanced” Bytton LTE, fully equipped. a first circular RF connector (female), for the Mobile antenna (labeled MOB) in case of antenna diversity modules for LTE, there are two MOB connectors, labeled “AUX” and respectively “MAIN”. Always thread the connector for Main first! one, two or none RJ45 connector for serial data link (labeled SER1, SER2) near the center, a second circular RF connector (male, with protruding pin), for the wireless local network (labeled Wi-Fi) in case of wireless AP type N, that use antenna diversity, instead of one Wi-Fi there are again two antenna connectors for Wi-Fi. They are also labeled “AUX” and respectively “MAIN”. The connectors for multiple antennas replace the SER connectors, thus the Bytton LTE equipments featuring three or four antenna connectors cannot have also connectors for serial connections; under these, the one or two slot (tray holder) for the SIM card(s), each with its small yellow pushbutton (labeled respectively SIM1 and SIM2) near the center, three optical indicators: LEDs for RF Signal, Data and respectively Wi-Fi access point (labeled SGN, DATA, Wi-Fi). Note: for equipments that are not fitted with the Wi-Fi module, both the Wi-Fi connector and the associated Wi-Fi indicator will be missing! ByttonLTE(full)_genericUsermanual_sw306FAS_revN.1.docx Page: 30 / 290 TOPEX Bytton (HSPA+ / LTE) A group of four female metallic RJ45 connectors for Ethernet network connections, with different assignments: The first (rightmost) female metallic RJ45 connector (labeled WAN) is for the external network The two leftmost ones (labeled LAN1, LAN2) are in a physical switch, and logically they are in a bridge with the wireless local network (Wi-Fi). These two ports can be also assigned individual IP addresses. The middle connector (labeled respectively WAN 0/LAN 0) may be configured from the Web configuration pages, according to your requirements. As its name suggests, the either to a second external, Wide Area Network, or to the switch for the local network (LAN); All four ETH connectors include yellow and green indicator LEDs. the black Reset button, recessed (labeled RST) below it, the Power LED, of green color Towards the right edge, the round connector for the power supply jack, (labeled PWR) (12VDC) . Antenna Diversity Variants The versions of Bytton LTE equipment for antenna diversity or MIMO (multiple input/output) feature two antenna connectors (labeled MAIN and respectively AUX) for the Mobile network and / or for the Wi-Fi access point. As can be seen, these multiple-antenna variants have no room on the front panel for SER, USB or FXS connectors! ByttonLTE(full)_genericUsermanual_sw306FAS_revN.1.docx Page: 31 / 290 TOPEX Bytton (HSPA+ / LTE) 4.4. Connecting the data cables To ensure a proper functioning of the Bytton ICR unit, you must make the right cable connections, as described below. Figure 4-8: Connecting all the cables and accessories to Bytton For local network connection: Use standard UTP network cables (CUT 5) fitted with RJ45 connectors at both ends. The cables can be either straight-through or crossover, since the three-port switch of Bytton ICR is auto-crossover. Figure 4-9: Connecting the LAN cables ByttonLTE(full)_genericUsermanual_sw306FAS_revN.1.docx Page: 32 / 290 TOPEX Bytton (HSPA+ / LTE) One short length of RJ-45 cable is supplied with the BYTTON Router. You may use either 10Base-T or 100Base-T connection, and both types of Ethernet connections maybe used on the same time. The network cables are to be inserted with one end into the RJ-45 sockets of the Bytton LTE equipment labeled LAN1 or LAN2, also LAN0 when it is configured as local port. Take care, when each of the LAN ports gets an individual IP address, the connections must be performed accordingly, the ports are no longer identical! The same applies for the situation when you disable two of the local ports so only one LAN port is usable – you must insert the Ethernet cable into the right port! The opposite end of the UTP cable can be inserted in switches or hubs or directly into PCs or specific equipment with the respective IP configured. The corresponding LED indicators embedded into each of the connectors on the front panel should light up, showing at first physical connection (the green LED) then also data traffic on the respective Ethernet interface (the yellow LED). WAN0/LAN0 connection: Take care when the configurable ETH connector labeled “WAN0/LAN0” is set to secondary WAN instead of LAN. By default, all three LAN ports are connected in the same switch, so it does not matter at all which of the LAN ports you use for connection (LAN1, 2, 3 are all the same): ByttonLTE(full)_genericUsermanual_sw306FAS_revN.1.docx Page: 33 / 290 TOPEX Bytton (HSPA+ / LTE) But when you set an IP for the WAN0/LAN0 port, it will be taken off from the switch and treated as a WAN port, leaving only the two rightmost ETH connectors in a switch for the Local cabled network: In this case, you must take care where you connect the LAN cable(s) and where the one or two WAN cable(s)! For WAN connection: Plug one end of the cable into the RJ45 port labeled “WAN” on the front panel of the Bytton LTE device and the other end into the Ethernet port of the DSL, Cable modem or other equipment that achieves a connection to the external network. Figure 4-10: Connecting the WAN cable The leftmost ETH connector is always the WAN port. But you may set from the Web configuration pages the WAN0/LAN0 connector also as WAN port, and then connect the WAN cable accordingly! ByttonLTE(full)_genericUsermanual_sw306FAS_revN.1.docx Page: 34 / 290 TOPEX Bytton (HSPA+ / LTE) Connecting the serial cable(s) : In case of R&S Topex equipments fitted with serial interfaces, you may connect legacy devices fitted with serial interfaces to the Bytton rICR outer, using special serial cables. Serial connectors Bytton features on the front panel one or two RJ-45 connectors for the serial interfaces. These connector don’t have embedded LED indicators, and the metallic casing is tied to the electrical ground. This is why special connection cables must be used, which feature a RJ-45 male connector towards the Bytton LTE and a DB-9 female or DB-25 male or female connector towards the legacy equipment (type DTE or DCE). Software configuration You can establish from the Web configuration interface how your data packet will be is sent over the serial interfaces: with 7 or 8 bit words, with or without start, stop, and parity bits, what kind of flow control shall be used (X-On/X-Off, none or hardware), and of course the transfer speed. But you cannot select from the Web interface if the serial link is RS-232 or EIA-485, this is established at the factory! Type of serial link When you order the Bytton LTE equipment with serial interfaces, you must specify, whether the serial interface shall be RS-232 or RS-485. The selection is done in the manufacturing process, the type cannot be changed via Web interface for configuration or by means of jumpers. This choice determines the voltage level and the pin assignment on the RJ-45 connectors. RS-232 RS-232 connection in not of the minimal "3-wire" type, consisting only of transmit data, receive data, and ground, but includes also hardware flow control: it also uses the RTS and CTS lines ( 5-wire version). RTS is “ Request To Send”, issued from the DTE towards the DCE, telling it to be prepared, while CTS is “Clear To Send”, issued by the DCE to show that it is ready to accept data. RS-485 When you specify the variant with serial interfaces implementing the EIA-485 standard, you get an interface with multi-drop capability, which may be used effectively over long distances and in electrically noisy environments. The RS-485 variant is often used in industrial environments and similar field applications. Bytton LTE implements the full-duplex, four wires mode of operation. The signal ground is also available on the connector, although it is not absolutely required. The connector has a termination resistor connected across the two wires of each pair, to eliminate reflections and two powered resistors to bias the lines apart when the lines are not being driven. RJ-45 Serial Connector Pinout PIN Number 1 2 3 4 5 6 7 8 RS-232 RTS TX GND RX RS-485 TX -TX RX -RX GND CTS The other pins of the serial connectors are not currently used. The metallic casing of the connectors is tied to the signal ground. ByttonLTE(full)_genericUsermanual_sw306FAS_revN.1.docx Page: 35 / 290 TOPEX Bytton (HSPA+ / LTE) Connection Just insert the RJ-45 connector into the corresponding receptacle (SER1 or SER2) on the front panel of Bytton LTE, as shown: Figure 4-11: Connecting the serial cables to Bytton LTE For power supply: To power the Bytton LTE unit, just insert the jack of the power supply adapter into the supply connector. Do not yet plug the adapter into the 230VA.C. mains outlet on the wall. Figure 4-12: Connecting the power supply to Bytton The special adapter from Rohde & Schwarz Topex S.A., which is part of the Bytton LTE package, supplies the voltage required to power the equipment. It is an external power supply adapter (Input 100-240VAC, 50 or 60 Hz, output [email protected], power output max. 24W). Note: The adapter is the disconnection device (there is no POWER switch), so the 230 VAC socket-outlet shall be installed near the equipment and shall be easily accessible. Warning ! Use only the power supply adapter shipped in the equipment package. Using of other kinds of power supplies may cause damage to the equipment. To avoid accidents or damage to the equipment, follow the steps described earlier. First, connect the antenna, and then the power supply adapter. You should avoid connecting or removing the antennas while the Bytton LTE equipment is powered, shut it down before handling the antennas. ByttonLTE(full)_genericUsermanual_sw306FAS_revN.1.docx Page: 36 / 290 TOPEX Bytton (HSPA+ / LTE) 4.5. Configuring and installing the SIM card (s) Your Bytton equipment may feature a single slot of two slots (dual SIM version) for SIM cards. In order for the Bytton LTE router to work, it must have at least one valid SIM card with subscription to the GSM/GPRS/EDGE, UMTS/HSPA or LTE mobile data carrier where you want to connect to. Configuring the SIM card The SIM card(s) that is used must be active. - Each SIM card must be configured before it is inserted into the slot of Bytton LTE. - For configuring the SIM card you may use an ordinary GSM cell phone. The required configurations are: PIN CODE REQUEST – if you disable (from the menu of the mobile phone) PIN CODE REQUEST security option, then you will not be asked to enter it. Alternatively, the PIN code can be enabled and you may enter it form the Web page used for configuration. In this case, take care to enter the correct PIN code before inserting the SIM card, to avoid PUK locking! Disable GSM services – Mobile operators offers you different supplementary services for calls. When you use the Bytton LTE mobile data interface is recommended that these options to be disable, because they are available only with additional costs. Inserting the SIM card(s) The SIM card(s) must be inserted into the special slot(s) of the Bytton LTE equipment as shown here. ByttonLTE(full)_genericUsermanual_sw306FAS_revN.1.docx Page: 37 / 290 TOPEX Bytton (HSPA+ / LTE) The slots for SIM card are located on the front panel (the one with the indicators and connectors), to the left of the one or two MOB antennas, towards the bottom (under the SER connectors, if these are present). In case of dual-SIM equipments, the two slots for SIM trays are side by side, as shown in the illustration. For inserting or extracting the SIM card use the mobile holder (removable tray) for the respective SIM card. To actuate the holder, press the little yellow button that is located to the right of each SIM slot. Handle with care when extracting SIM cards. inserting or Figure 4-13: Location of the one or two slots for SIM cards ! When inserting or changing the SIM card, the equipment must be powered off. ByttonLTE(full)_genericUsermanual_sw306FAS_revN.1.docx Page: 38 / 290 TOPEX Bytton (HSPA+ / LTE) For inserting the SIM card(s) follow the next steps: 1. Push the little yellow button to eject the SIM carrier. 2. Pull out the holder (tray) for the SIM card. 3. Insert the SIM card into the holder, with the cut (notched) corner orientated upwards and the side with contacts toward you. ByttonLTE(full)_genericUsermanual_sw306FAS_revN.1.docx Page: 39 / 290 TOPEX Bytton (HSPA+ / LTE) 4. Push the holder with the SIM card back into the slot and push to close. Be careful not to drop the SIM out of the tray and to insert the holder properly into the slot! Figure 4-14: Illustration of the four steps sequence of inserting the SIM card into Bytton LTE. This procedure must also be followed when you replace the SIM card of the Bytton LTE equipment. 4.6. Connecting the external antennas To ensure a good quality of transmission and reduce radio interference, always use the antennas shipped in the Bytton ICR package. These antennas are specially designed for the respective frequency bands: - 800/850/900/1800 MHz for the GSM / GPRS / EDGE - in the 900 and 2100 MHz range for UMTS / HSPA+ networks, - 800/900/1800/2100 MHz and 2600 MHz for LTE - and respectively 2100 MHz for Wi-Fi. The antennas must be connected to Bytton LTE via the respective RF circular connector(s) located on the front panel of the metallic case, starting from the left. There are some differences, according to the type of mobile module and wireless access point that is fitted in your Bytton LTE: different types of antennas shall be used, corresponding to the respective frequency bands, and one or two antennas may be required (there are dual connectors for the antenna diversity – enabled modules). Mobile Antenna There are two possible cases: the mobile module of Bytton may be either for GSM/3G networks, or for 4G (LTE). This is clearly specified on the product label: Or: ByttonLTE(full)_genericUsermanual_sw306FAS_revN.1.docx Page: 40 / 290 TOPEX Bytton (HSPA+ / LTE) This choice dictates the number and type of mobile antennas to be used: 1.GSM/HSPA For 2G/3G+ modules, a single antenna is used, the small multi-band stick antenna for 2G/3G+ is provided in the package. The cable for this antenna must be threaded into the circular connector of Bytton LTE labeled “MOB”, located to the left of the metallic case (the first connector to the left), as shown in the illustration: Figure 4-15: Inserting the connector of the GSM/3G Mobile Antenna 2. LTE The 4G networks use a different type of antenna, and generally two antennas are required, to achieve the higher bandwidth specific to LTE (it operates in diversity or MIMI mode). The one or two antennas for LTE must be threaded to the corresponding Mobile connectors, located to the left of the front panel, and labeled “AUX” and respectively “MAIN”: Figure 4-16: Inserting the connectors for the LTE Mobile Antennas (one or two pcs.) Note: In case of dual MOB connectors for diversity antennas, don’t forget to connect first the antenna for Main , and only then the second antenna for the Aux connector! If only the Main antenna is connected, diversity will not operate the performances will be lower, but if you connect only the Aux antenna, the system may not work at all! Figure 4-17: Bytton LTE with four antenna connectors, two for LTE (4G Mobile) and two for N-type WiFi access point. Warning! When your site has low level of Mobile signal, it may not be possible to use the full UMTS, HSPA+ or LTE technology without a special, high gain antenna (type Yagi, high directivity). You should get such an antenna and install it in a higher position (the roof of the building), directed towards the base station of the mobile network carrier, in order to get best results. For further information about the different Mobile antennas available for Bytton ICR, please see Annex 1. ByttonLTE(full)_genericUsermanual_sw306FAS_revN.1.docx Page: 41 / 290 TOPEX Bytton (HSPA+ / LTE) 3. WiFi Antenna The antennas for the WiFi Access Point of Bytton ICR are stick-type, with an articulation near the connector. In case of Bytton LTE units equipped with WiFi b/g module, a single WiFi stick antenna must be inserted. Use the sleeve of the 90 degree bent to thread the stick antenna into the circular male connector on the front panel (marked “WiFi), which is located in the middle, above the three indicator LEDs, as shown in the following drawing. Figure 4-17: Attachment of a single WiFi Stick Antenna Dual WiFi connectors Bytton LTE equipments fitted with “N” type access point may feature dual connectors for WiFi, to achieve better coverage and higher bandwidth. Thus you shall thread two stick antennas for WiFi! Here also, you must observe the “Main” and “Aux” indications written under the antenna connectors: Figure 4-18: Attachment of the two WiFi Antenna for N-type wireless AP Note that the connector for the Mobile network is female, while the connector for the WiFi antenna is male, there is no risk of inserting the incorrect antenna. Warning! Don’t use excessive force when threading the antennas. Make sure the antennas are securely screwed into the respective RF connectors, but do NOT use a spanner or screw key, which could damage the antenna connector! Tighten the flange lightly, by hand. ByttonLTE(full)_genericUsermanual_sw306FAS_revN.1.docx Page: 42 / 290 TOPEX Bytton (HSPA+ / LTE) The different types of stick antennas are omnidirectional and have vertical polarization, they should be placed in vertical or horizontal position, depending of the local RF field condition for the respective frequencies bands. In case of antenna diversity (MIMO) versions of the Bytton LTE equipment, the dual antennas shall be connected in the same way, only taking into account that there are two of them, and the Main antenna must always be connected first, and then the Aux antenna: Notice: The Bytton LTE unit and its antennas should be placed such as to be as far as possible from appliances or office equipment that is sensitive to radio interference (microwave ovens, copiers, TV sets, PC displays, and multimedia systems). For best results, try to find for the WiFi and respectively HSPA+ or LTE antennas a place of maximum signal reception. In addition, the antenna must NOT be located near heavy-duty equipment that may generate electromagnetic interferences, such as electric motors or heaters. 4.7. Power Up Power up Bytton ICR by simply inserting the adapter into the wall outlet and the router will start working. You should see the green PWR indicator LED lighting up immediately. The other optical indicators may be active after all firmware components are loaded and running, and this takes some time – up to two minutes – but the green PWR indicator should ON as soon as you connect the power supply jack. Warning: Remember that the adapter is the disconnection device (there is no POWER switch on Bytton LTE), so the 230 VAC socket-outlet shall be installed near the equipment and must be easily accessible. ByttonLTE(full)_genericUsermanual_sw306FAS_revN.1.docx Page: 43 / 290 TOPEX Bytton (HSPA+ / LTE) 4.8. Status indicators Bytton LTE has several optical indicators (different color LEDs) that shows the status of the device. These indicators may light up continuously or flash to show activation, type of network, signal strength or data traffic. Figure 4-19: Location of indicator LEDs - Group of indicators in the center SGN – Red LED, shows for the intensity of the RF signal. Off indicates no mobile network connection, or no registration. Blinking show activity, when the signal is stronger, the blinking becomes faster. For instance, when you insert a wrong SIM, at startup the indicator will blink, since the equipment tries to register to the mobile network, but then it will turn off, when the equipment finds out that registration is not possible. Note: In case of Bytton LTE devices that are not equipped with Mobile modules, the SGN led will be also missing! DATA – green LED. Indicates active connection to the mobile data network, and its type. If it lights up steadily, the network is 2G technology, when it blinks, it means the network is 3G. WiFi – green LED, lights up to indicate that the WiFi function is active (enabled). This one also, together with the WiFi antenna, may be missing in care of equipments not fitted with wireless access point! Note: 1. When the Bytton device is not equipped with WiFi mobile Access Point, the corresponding indicator will also be missing! 2.Also, when the WiFi of Bytton is set to “Station” instead of the default “Access Point” function, the green indicator LED will be turned OFF – even if the wireless module is active, it acts as a client, not as server. - Power LED, under the recessed Reset button PWR – Green LED. Off = no power, On indicates that Bytton LTE is powered. Of course, if the power supply voltage is off, no indicator LED will light! RST – Reset button. Its actual function is established from software (in the web interface, SERVICES>Reset). It can also perform a hardware reset to defaults, when you execute the prescribed procedure. - Pair of yellow/green rectangular LEDs embedded into each ETH connector WAN – Green LED. Off = no cable connected to the WAN, On = physical connection to Ethernet network (an UTP cable was connected to the respective input). Yellow LED: blinking = shows data traffic (send or receive) through that connector. LAN 1, LAN2 and LAN0/WAN0 – Green LED. Off = no cable connected to the respective LAN input, On = physical connection to Ethernet network (an UTP cable was connected to the respective input). Yellow LED: On shows data connection, blinking = shows data traffic (send or receive) through that connector. The rate of blinking is always proportional to the data transfers, so when Bytton LTE is used as an Ethernet router, the difference between the WAN and LAN sides is clearly visible to the naked eye! ByttonLTE(full)_genericUsermanual_sw306FAS_revN.1.docx Page: 44 / 290 TOPEX Bytton (HSPA+ / LTE) 5. CONFIGURATION Bytton LTE can properly perform its functions of wireless high-speed router with the default settings. However, it can be easily configured to meet various usage scenarios. “Configuring” or programming the equipment means adequate setting of all the parameters. The embedded Linux firmware allows you to configure Bytton LTE without the need of additional software on the computer used for programming. You just need a web browser as configuration terminal. This means that Bytton LTE may be used on any computer platform and is not restricted to a certain operating system! Using the web browser, the configuration can be performed remotely: the desktop PC or notebook may be connected to the Bytton LTE Router either directly or through a switch by means of the wired (Ethernet) connection. Prior to using this Bytton LTE equipment you should check the basic settings to guarantee it will work in your environment (for instance, it may be required to change the default IP address). 5.1 Using the Web Interface The default address of the webpage of the Bytton LTE device from Rohde & Schwarz Topex S.A. is 192.168.1.1. It is recommended that you use this address, provided that the configuration of your local network allows this. And, of course, if there is a single Bytton device in that network! When you install several Bytton LTE in the same LAN, you must change their respective IP addresses. 5.1.1 Set up a connection First, you should establish an Ethernet connection to the Bytton LTE unit you want to configure. Go to “Network Connections” on your computer and define a connection to be used for the Bytton LTE router. For instance, under Windows 7 Professional, In Control Panel you must choose “Network and Internet” Figure 5-1: Go to “network and Internet” in the Control Panel You should use for the ETH connection a significant name, such as “Bytton_LTE” or ”Bytton4G”. See below examples of configuration on a computer with two network adapters, the PICe GBE Controller being used for the connection to the company’s network, while Realtek RTL8139 is used for connection to the Bytton router: ByttonLTE(full)_genericUsermanual_sw306FAS_revN.1.docx Page: 45 / 290 TOPEX Bytton (HSPA+ / LTE) Or: Figure 5-2: Go to “Network and Internet” to create a network connection for Bytton LTE. ByttonLTE(full)_genericUsermanual_sw306FAS_revN.1.docx Page: 46 / 290 TOPEX Bytton (HSPA+ / LTE) From the network adapters (network cards) of your computer, select the one which is connected via Ethernet cable to the Bytton equipment. In this example, it is the network board type: ”Realtek RTL8139/810x Family”. Check the box “Internet Protocol (TCP/IP) and click the button “Properties” to configure your PC. You may configure the connection to Topex Bytton LTE either manually or automatically. Figure 5-3: Setting the network properties for the ETH connection to Bytton 5.1.2 Automatic IP Address The simplest way is to set your network adapter to get its IP address automatically from Bytton LTE. The Rohde & Schwarz Topex S.A. mobile router features a DHCP server, so it can provide your PC with the correct IP address, DNS and Gateway. In this case, in “Internet Protocol Properties” you should check the boxes: “Obtain an IP address automatically” - and respectively “Obtain DNS server address automatically”. Reset (reboot) your PC to be sure these network settings become valid. This way, you won’t have to worry anymore about your settings, the Bytton LTE equipment will take care of providing your computer with adequate IP address and DNS. Figure 5-4: Setting automatically IP for the connection to Bytton In the status bar at the bottom of the screen you should see the icon of the Bytton link blinking, and a first message will show up: “Bytton LTE acquiring network address” or “Identifying” while the network adapter gets a local IP address from the DHCP server of the Bytton equipment. ByttonLTE(full)_genericUsermanual_sw306FAS_revN.1.docx Page: 47 / 290 TOPEX Bytton (HSPA+ / LTE) 5.1.3 Manual IP Settings As an alternative, you can set the network parameters manually. By default, Bytton LTE has the IP address 192.168.1.1 and the standard Netmask 255.255.255.0, and these settings are used in the example below. However, it does not make sense to use manual settings for the default configuration, rather you should use manual settings if your local network has some special requirements, which the automatic configuration cannot satisfy. In case of manual settings, in “Internet Protocol Properties” you must fill in the corresponding values: - the IP address could be from 192.168.1.2 up to 192.168.1.254; to be sure you don’t fall over the address of another device of your LAN, a value of 11 is suggested, instead of 2 which is the absolute minimum available value - the Subnet mask must be the standard one, 255.255.255.0 - the Default gateway must be 192.168.1.1 - the same address 192.168.1.1 is to be used for the “Preferred DNS server” . Figure 5-5: Manually establishing IP parameters for the connection to Bytton In the status bar at the bottom of the screen you should see the link icon blinking, and a message will show up: “Bytton LTE is now connected”. An alternate example of manual settings, when the IP address of Bytton LTE is 10.0.0.1: Note: When you use for your local network a Proxy Server, you must set an exception for Bytton ICR wireless router, because otherwise you won’t be able to access the Bytton LTE equipment! You should enter the IP address of the Bytton LTE device (by default 192.168.1.1) in the list of exceptions for the Proxy server: “Do not use proxy server for addresses beginning with …” ByttonLTE(full)_genericUsermanual_sw306FAS_revN.1.docx Page: 48 / 290 TOPEX Bytton (HSPA+ / LTE) 5.1.4 First Connection To configure the Bytton LTE product using the web interface, just open your favorite web browser and type the default IP address as the URL: https://192.168.1.1/ as shown: Figure 5-6: Enter the default IP address of the Web page into your browser. If you cannot connect to the Bytton LTE router because of problems in the settings of the IP address, you must go back to the factory default settings. Press the “RESET” button for at least three seconds. The equipment reboots and starts operating with the factory default settings. These include the IP address 192.168.1.1, allowing you to connect to the Rohde & Schwarz Topex S.A. wireless router in order to configure it. After reaching the configuration web pages at the default IP address, you may change the IP address of the device according to your requirements! For instance, you can use addresses in the range https://172.27.168.xxx/ or https://10.0.58.1, as shown in this example: Figure 5-7: Changing the default IP address of Bytton LTE. 5.1.5 Secure Connection HTTPS Note that Bytton LTE uses a secure web connection (https) so you may get several warning messages like this one: Figure 5-8: Security Alert for the https connection. or similar warnings mentioning “Website Certified by an Unknown Authority”: ByttonLTE(full)_genericUsermanual_sw306FAS_revN.1.docx Page: 49 / 290 TOPEX Bytton (HSPA+ / LTE) Figure 5-9: Warning about the certificate of a trusted website. You should click „Yes”, „OK” or „Accept” to go on. Type “OK” to accept the certificate for the Bytton LTE website. Other “Security Error” messages may warn you about “Domain Name Mismatch”, referring to the security certificate. Again click “OK” to continue. You may receive the warning “You have requested an encrypted page” or “You are about to view pages over a secure connection”. This is normal, it shows that you are connected to Bytton LTE over a secure, encrypted link. Figure 5-10: Security Alert from Internet Explorer about the secure connection (encrypted page). The secure connection is confirmed by the “padlock” symbol that shows up in the status bar at the bottom of the screen, indicating a secure (encrypted) connection. Bytton LTE uses 128-bit SSL encryption to prevent hackers from capturing passwords and sensitive data. The same security is used by banks and the military. Internet Explorer shows the padlock icon only when everything on the entire webpage is encrypted. But even when the browser doesn't show a padlock, the "https://" address means your data is still encrypted. ByttonLTE(full)_genericUsermanual_sw306FAS_revN.1.docx Or Page: 50 / 290 TOPEX Bytton (HSPA+ / LTE) 5.1.6 Log-in to Bytton LTE From the fist configuration screen you may select either: - status display - configuration pages - Rohde & Schwarz Topex S.A. webpage Click the link of interest to you! Figure 5-11: Connecting to the configuration Web page of Bytton LTE. Now you will be asked to enter a user name and a password to access the configuration page of Rohde & Schwarz Topex S.A. Bytton LTE equipment. For the administrator of the system network, the default user name is admin and the password is 99admin11. Later, you may change this password using the web configuration page, as described in the paragraph about Password. For security reasons, it is strongly recommended to change as soon as possible the default password with one of your own choice. Also, you should NOT mark in your browser the checkbox “Remember my password”. Figure 5-12: Authentication required - enter user name (admin) and password. The log-in name is shown in the “Remote User” field, below the “Location” information: Figure 5-13: Indication of remote user and location. The Administrator “admin” has more rights, access to additional settings, which a normal user does not require (advanced routing configurations and settings for drivers). If you type a different user name, or if you enter an incorrect password more than three times in a row, you will get the error message: “401 Unauthorized” ! Connect again and be careful to enter the correct name and password. Figure 5-14: Login error message – Unauthorized! ByttonLTE(full)_genericUsermanual_sw306FAS_revN.1.docx Page: 51 / 290 TOPEX Bytton (HSPA+ / LTE) 5.1.7 Multiple Log-in to the Web-interface of Bytton Generally, a complex system has several log-in types: different username and passwords, allowing correspondingly more or les management rights. These various users are allowed access to different sets of configurable parameters. When someone logs in as user, administrator or super-user, he will have accordingly different management rights, access to some functions only or to all of the functions of the system. For Bytton ICR, two types of log-in are currently implemented, as Admin and respectively as Super-User. Admin The username is admin and the corresponding default password (that you should replace afterwards with one of your own) is 99admin11, as illustrated below: Figure 5-15a: Log-in as “admin”. Following a successful log-in, you will see the Menu available for the user “admin”: ByttonLTE(full)_genericUsermanual_sw306FAS_revN.1.docx Page: 52 / 290 TOPEX Bytton (HSPA+ / LTE) Superuser The privileged user authenticates as “superuser”, with corresponding default password of “98superuser12”. Here also one should change as soon as possible this generic password with a specific one, known only by him and authorized persons! Figure 5-15b: Log-in as “superuser”. Following successful log-in as “superuser”, the corresponding main page Menu for the Rohde & Schwarz Topex S.A. Bytton LTE router should be shown on screen:. As can be seen, the “superuser” has access to at least one additional item of Menu, in this case than last menu element, called “Stuff”, which holds sub-pages for configuration of advanced features such as Email reporting, Auto-configuration and Bandwidth testing. Also, some of the sub-pages that both “admin” and “superuser” can see are more populated (have several features accessible) when you log-in as super-user instead of administrator. This will be detailed further on, with actual examples! ByttonLTE(full)_genericUsermanual_sw306FAS_revN.1.docx Page: 53 / 290 TOPEX Bytton (HSPA+ / LTE) After the configuration page of interest to you is loaded (BW test in the example below), you can change any setting you need, and then click the Save button at the bottom of the screen to save it in the current page: Finally use the Commit button at the bottom of the Menu, to make these changes permanent after the restarting of the Bytton LTE equipment: ByttonLTE(full)_genericUsermanual_sw306FAS_revN.1.docx Page: 54 / 290 TOPEX Bytton (HSPA+ / LTE) 5.1.8 MENU Items There are several sections (Menu items) on the configuration page of Bytton LTE device, as shown in the images below. Defending upon the type of authorization, you may have access to all the features, or only to some of them: Figure 5-16a: Web configuration page, listing sub-menu items for “admin”. ByttonLTE(full)_genericUsermanual_sw306FAS_revN.1.docx Page: 55 / 290 TOPEX Bytton (HSPA+ / LTE) When you log in as superuser, you will see (and thus be able to configure) additional sub-pages, as shown in the full menu to the right. These supplementary items are, respectively: - LAN >Bridge LAN> VLAN LAN> 802.1X LAN> Eth Port LAN> MTU. - TUNNELS> IPSEC TUNNELS> OVPN TUNNELS> PPTP. - ROUTING> Dynamic ROUTING> Virtual RT ROUTING> QOS. - SYSTEM> Update SYSTEM> Defaults SYSTEM> Save CFG SYSTEM> Load CFG. - SERVICES> VRRP. - Stuff> Email Stuff> Auto.cfg Stuff> BW test. The menu items “WAN” and “SIM“ have Not been detailed here, since they remain identical in both cases, they provide the same features for both kinds of users. So for these sub-pages the menu elements remain the same, no matter how you log-in to the Web configuration interface of Bytton LTE. Figure 5-16b: Web configuration page, listing all sub-menu items for “superuser”. ByttonLTE(full)_genericUsermanual_sw306FAS_revN.1.docx Page: 56 / 290 TOPEX Bytton (HSPA+ / LTE) These menu items (sub-pages for configuration) allow you to modify the settings for: 1. HOME: this home page for configuration of the equipment. 2. LAN: settings for the local wired (Ethernet) network, for the wireless LAN (Wi-Fi - embedded Access Point, when present), additional IPs, advanced configuration of each LAN/WAN port of the switch, parameters for 802.1x authorization, configuring bridges, defining Virtual LANs and establishing MTU for each interface; 3. WAN: parameters for remote network - Ethernet, PPP including AT commands, switching from primary to secondary WAN interface, etc ; 4. TUNNELS: settings for the tunnels used for VPN (type GRE, IPSEC, Open VPN, PPTP etc.) 5. ROUTING: firewall, routing, NAT (network address translation), dynamic routes, virtual routing tables, settings for the Quality of Service traffic shaping and prioritization; 6. SYSTEM: Shows current status and performs operating system functions (logs, firmware update, save/load configuration, change of password, return to defaults); 7. SERVICES: Allows you to configure additional services (such as Dynamic DND, NTP, serial interface for equipments fitted with SER ports, SMS service, VRRP, configuration of Reset button and so on); 8. SIM: Shows info and change settings for the SIM card(s) and mobile module, allows viewing, sending out and receiving SMS messages; 9. VOICE: In case of equipments that have voice capabilities (FXS telephone interface), this page shows info and allows you to modify parameters for the voice calls performed via Bytton LTE 10. Stuff: advanced “stuff”, such as status reporting via email, self-configuration by importing a .cfg file from a specified address, and bandwidth testing by timing file transfers. Depending upon the actual firmware version running on your Bytton 3G+ router, you may or may not have access to all these configuration sections. Also the number of accessible sub-sections depends upon the level of authorization, for instance for the same firmware, when you log in as a simple user or as admin you will see fewer sub-pages as one who authenticates to the system as “superuser”. Only the “WAN” and “SIM” configuration sub-page is always the same, no matter if you are a simple user, Admin or super-user. This happens since the configuration of mode of connecting to the remote network and information about the state of the SIM card and mobile module, its settings, and sending and receiving text messages are features available for all the users of Bytton LTE, no matter what level of authorization they have! The Menu bar is located to the left, and features the button Commit at its bottom. On top of the web page, after the Rohde & Schwarz Topex S.A. logo, you will see a “Location” indication, which reminds you where you are on the Web interface. In this example, the section is LAN and the subsection IP Settings for LAN. Under the Location information you can see “Remote User”, which shows you the name that was used for log-in, Admin or respectively Superuser as shown in the above example. Note: After you change the settings in any page, if you want to use the new settings, don’t forget to press the “Save” button if you want to keep these settings. Otherwise, if you click any other link, you will reach another configuration page, and the new settings will be lost. ByttonLTE(full)_genericUsermanual_sw306FAS_revN.1.docx Page: 57 / 290 TOPEX Bytton (HSPA+ / LTE) To make these new parameter permanent, i.e. available even after restarting or resetting the equipment, you need to use the Commit button located at the bottom of the Menu list. This will save the new settings into the permanent memory of the Bytton LTE router. Additional menu items available for Superuser: As you can see, the sub-pages are the same, but several of them now include more items than in case of logging-in as Admin. The explanation in the manual are for the full version of the Web pages, respectively for logging-in as “superuser”. When you log-in as “admin” or as a simple user, some of the sub-pages described will not be available! ByttonLTE(full)_genericUsermanual_sw306FAS_revN.1.docx Page: 58 / 290 TOPEX Bytton (HSPA+ / LTE) 5.2 LAN This first group features several pages of settings related to the local wired network: for primary and secondary IP and net mask, switch assignment, configuration of the second LAN/WAN port, parameters for the DHCP servers and MAC filterin, for the WiFi Access Point when your Bytton equipment has this feature, for bridging between different networks, for Virtual LANs, for 802.1X authentication and respectively detailed information, configuration for each of the ETH interfaces of the equipment and MTU values: Figure 5-17: LAN configuration Webpage, with subpages. 5.2.1 IP Settings On the LAN side, settings include primary and additional IP addresses, Loopback, switch configuration and LAN0/WAN0 assignment: Figure 5-18: LAN configuration page, IP Settings Settings for the IP LAN address of the Bytton LTE 3G+ router are the standard ones: IP Address and Netmask. These settings control how the Rohde & Schwarz Topex S.A. equipment connects into your local wired (Ethernet) computer network. ByttonLTE(full)_genericUsermanual_sw306FAS_revN.1.docx Page: 59 / 290 TOPEX Bytton (HSPA+ / LTE) The default address value is 192.168.1.1 and the associated net mask is 255.255.255.0. But you may change these default settings, if the configuration of your network requires this, for instance 10.0.0.1. as shown in the image above. See below other examples: r Figure 5-19: Changing the default IP address of Bytton on the LAN – several examples Use the “Save” button to save the settings, then “Commit” (down on the column to the left of the screen) to make permanent the IP settings. Usually the IP address allocated for Bytton LTE on the LAN side is a non-routable (internal) address. After you change this IP address, you will need to reload the configuration page by typing the new IP address in your browser, if not redirected automatically. Additional IP The firmware allows you to set up supplementary IP addresses for the Bytton LTE (Aliases). “IP Aliasing” refers to the possibility of setting up multiple network addresses on the same low-level network device driver, in this case multiple IP addresses for the Ethernet or PPP interfaces of Bytton LTE. Use the blue link to go to the configuration page for the alternate IP addresses and net mask: At fist, the table with additional IP’s is empty, as shown: Figure 5-20: LAN configuration page, Additional IP Address Tables Use the link Add New to create a new entry, the button Edit to enter / select parameters: For each of the Interfaces available from the drop list, you can set one or several IP addresses with the corresponding subnet masks: You may assign to the equipment as many alternate IP addresses as you wish, for each of the interfaces of the Bytton equipment. ByttonLTE(full)_genericUsermanual_sw306FAS_revN.1.docx Page: 60 / 290 TOPEX Bytton (HSPA+ / LTE) Note that in this case also the “Interface” drop list will show, besides the usual physical interfaces: BR0, WAN, Embedded Modem, WiFi station (when WiFi is set to Station and Ad Hoc instead of access point) , it will show also as options the logical interfaces: bridges, Virtual LANs, GRE, IPSEC or OPEN VPN tunnels, and so on: Use individual Save buttons to the right to save the settings for each supplementary IP addresses, then the big “Save and Reload” button at the bottom of the page. When you want to go back to the IP Settings page, click the link BACK. ByttonLTE(full)_genericUsermanual_sw306FAS_revN.1.docx Page: 61 / 290 TOPEX Bytton (HSPA+ / LTE) Examples: When Bytton has a single IP in the local network and a fixed IP for the Ethernet WAN, the Interfaces will be: And the corresponding routing table is very simple: After you set the additional IP’s over the available interfaces of Bytton: ByttonLTE(full)_genericUsermanual_sw306FAS_revN.1.docx Page: 62 / 290 TOPEX Bytton (HSPA+ / LTE) The Iface status changes accordingly: br0 Link encap:Ethernet HWaddr 00:19:70:49:F3:D7 inet addr:10.0.0.1 Bcast:10.0.0.255 Mask:255.255.255.0 UP BROADCAST RUNNING MULTICAST MTU:1500 Metric:1 RX packets:309 errors:0 dropped:0 overruns:0 frame:0 TX packets:403 errors:0 dropped:0 overruns:0 carrier:0 collisions:0 txqueuelen:0 RX bytes:35375 (34.5 KiB) TX bytes:114640 (111.9 KiB) br0:0 Link encap:Ethernet HWaddr 00:19:70:49:F3:D7 inet addr:10.0.0.254 Bcast:10.0.0.255 Mask:255.255.255.252 UP BROADCAST RUNNING MULTICAST MTU:1500 Metric:1 br0:1 Link encap:Ethernet HWaddr 00:19:70:49:F3:D7 inet addr:10.0.59.18 Bcast:10.255.255.255 Mask:255.255.255.254 UP BROADCAST RUNNING MULTICAST MTU:1500 Metric:1 lan Link encap:Ethernet HWaddr 00:50:C2:F5:23:2A UP BROADCAST RUNNING MULTICAST MTU:1500 Metric:1 RX packets:373 errors:0 dropped:0 overruns:0 frame:0 TX packets:394 errors:1 dropped:0 overruns:0 carrier:0 collisions:0 txqueuelen:1000 RX bytes:54536 (53.2 KiB) TX bytes:114226 (111.5 KiB) Base address:0x2200 lan0 Link encap:Ethernet HWaddr 00:50:C2:F5:23:27 inet addr:192.168.148.148 Bcast:192.168.148.151 Mask:255.255.255.252 UP BROADCAST MULTICAST MTU:1500 Metric:1 RX packets:0 errors:0 dropped:0 overruns:0 frame:0 TX packets:1 errors:0 dropped:0 overruns:0 carrier:0 collisions:0 txqueuelen:1000 RX bytes:0 (0.0 B) TX bytes:46 (46.0 B) Base address:0x2000 lan0:4 Link encap:Ethernet HWaddr 00:50:C2:F5:23:27 inet addr:172.168.27.59 Bcast:172.168.27.255 UP BROADCAST MULTICAST MTU:1500 Metric:1 Base address:0x2000 Mask:255.255.255.0 wan Link encap:Ethernet HWaddr 00:50:C2:F5:23:29 inet addr:192.168.1.148 Bcast:192.168.255.255 Mask:255.255.0.0 UP BROADCAST RUNNING MULTICAST MTU:1500 Metric:1 RX packets:28186 errors:16 dropped:0 overruns:0 frame:0 TX packets:135 errors:0 dropped:0 overruns:0 carrier:0 collisions:0 txqueuelen:1000 RX bytes:1745238 (1.6 MiB) TX bytes:17015 (16.6 KiB) Base address:0x3000 wan:2 Link encap:Ethernet HWaddr 00:50:C2:F5:23:29 inet addr:192.168.148.3 Bcast:192.168.148.255 Mask:255.255.255.0 UP BROADCAST RUNNING MULTICAST MTU:1500 Metric:1 Base address:0x3000 wan:3 Link encap:Ethernet HWaddr 00:50:C2:F5:23:29 inet addr:192.168.148.149 Bcast:192.168.148.255 Mask:255.255.255.254 UP BROADCAST RUNNING MULTICAST MTU:1500 Metric:1 ByttonLTE(full)_genericUsermanual_sw306FAS_revN.1.docx Page: 63 / 290 TOPEX Bytton (HSPA+ / LTE) Base address:0x3000 wlan0 Link encap:Ethernet HWaddr 00:19:70:49:F3:D7 UP BROADCAST RUNNING MULTICAST MTU:1500 Metric:1 RX packets:0 errors:0 dropped:0 overruns:0 frame:0 TX packets:135 errors:0 dropped:0 overruns:0 carrier:0 collisions:0 txqueuelen:1000 RX bytes:0 (0.0 B) TX bytes:13640 (13.3 KiB) The respective additional addresses show up also in the Routing Table of Bytton: Kernel IP routing table Destination Gateway 10.0.59.18 0.0.0.0 192.168.148.148 0.0.0.0 10.0.0.252 0.0.0.0 192.168.148.148 0.0.0.0 172.168.27.0 0.0.0.0 10.0.0.0 0.0.0.0 192.168.148.0 0.0.0.0 192.168.0.0 0.0.0.0 0.0.0.0 192.168.1.8 Genmask 255.255.255.254 255.255.255.254 255.255.255.252 255.255.255.252 255.255.255.0 255.255.255.0 255.255.255.0 255.255.0.0 0.0.0.0 Flags U U U U U U U U UG Metric 0 0 0 0 0 0 0 0 0 Ref 0 0 0 0 0 0 0 0 0 Use 0 0 0 0 0 0 0 0 0 Iface br0 wan br0 lan0 lan0 br0 wan wan wan Loopback This is a virtual local interface, used for test purposes. Figure 5-21: LAN configuration page, access the link Loopback. Click the blue link “Loopback” to enter its configuration page, as shown next: Figure 5-22: LAN configuration page, set IP for the Loopback test link. Here you can set up the IP address to be used for loopback. Or Or: ByttonLTE(full)_genericUsermanual_sw306FAS_revN.1.docx Page: 64 / 290 TOPEX Bytton (HSPA+ / LTE) Click the button Save to save the new value, then the link BACK to go back to the LAN>IP settings to configure other parameters. After reboot, the Loopback IP answers to PING at the respective address: PING 127.168.1.2 (127.168.1.2): 56 data 64 bytes from 127.168.1.2: seq=0 ttl=64 64 bytes from 127.168.1.2: seq=1 ttl=64 64 bytes from 127.168.1.2: seq=2 ttl=64 64 bytes from 127.168.1.2: seq=3 ttl=64 64 bytes from 127.168.1.2: seq=4 ttl=64 64 bytes from 127.168.1.2: seq=5 ttl=64 64 bytes from 127.168.1.2: seq=6 ttl=64 64 bytes from 127.168.1.2: seq=7 ttl=64 64 bytes from 127.168.1.2: seq=8 ttl=64 64 bytes from 127.168.1.2: seq=9 ttl=64 bytes time=0.595 time=0.394 time=0.460 time=0.466 time=0.395 time=0.395 time=0.397 time=0.391 time=0.397 time=0.395 ms ms ms ms ms ms ms ms ms ms 5.2.2 Software configuration of the ETH switch This is a feature of LAN>IP settings, but it allows versatile, detailed configuration, thus it is described in a full sub-chapter. The four-port switch/router of Bytton LTE is fully configurable via software, through the Web interface. You can leave three ETH ports in the LAN switch, or set configuration for each one. For this purpose, there are two clickable links located at the bottom of the page “IP Settings for LAN” as shown: Structure or Ethernet Ports Bytton features a bank of four ETH connectors, which may be finely configured via software. The two leftmost ones, LAN1 and LAN2, are in a physical switch, while the other two are connected to a hardware router, so they may be individually configured. The hardware switch is also configurable via Web interface. Thus, each of the four Ethernet ports can be finely tuned, individually or joined together with other ports, according to the actual requirements: The leftmost ETH connectors, LAN1 and LAN2, are in a switch for the local LAN, while the rightmost ETH connector, WAN, is for the remote network. But the WAN0/LAN0 connector, as its name suggests, is fully configurable, you can assign it either to the switch of the local network, or to the wide area network! Click the blue link “SW (LAN1 LAN2)” located at the bottom: ByttonLTE(full)_genericUsermanual_sw306FAS_revN.1.docx Page: 65 / 290 TOPEX Bytton (HSPA+ / LTE) to enter the configuration sub-page for the dual-port ETH switch of Bytton, as shown here: When left to the default SW (switch) option, as shown above, both ETH ports are in a hardware switch and thus share the same IP. By default, the third ETH port also in this switch. In this default situation, the fields below are colored in gray, showing that they are inactive (you cannot edit these IP addresses and associated netmasks): There is a default “bridge”, br0, a sort of logical switch, that connects lan, lan0 and the port for WiFi, wlan0. In this case, “lan” is the generic name for the two-ports switch holding Ethernet interfaces lan1 and lan2: This default bridge cannot be deleted, but it can be programmed to join more or less wired or wireless ports. You can set the two-port switch it to LAN 1_LAN2 instead of the default SW. Now the fields under SW are no longer gray, now they can be edited – you are allowed to enter the corresponding IP addresses: ByttonLTE(full)_genericUsermanual_sw306FAS_revN.1.docx Page: 66 / 290 TOPEX Bytton (HSPA+ / LTE) The Bridge Status indication changes accordingly: Also, you can see now that the default bridge br0, joins together, besides wlan0, three wired ETH ports, lan0, lan1 and lan2, which after being individually configured, are now distinct ports, as shown: This arrangement shows up also in Iface status: br0 Link encap:Ethernet HWaddr 00:19:70:49:F3:D7 inet addr:172.168.1.1 Bcast:172.168.1.255 Mask:255.255.255.0 UP BROADCAST RUNNING MULTICAST MTU:1500 Metric:1 RX packets:0 errors:0 dropped:0 overruns:0 frame:0 TX packets:0 errors:0 dropped:0 overruns:0 carrier:0 collisions:0 txqueuelen:0 RX bytes:0 (0.0 B) TX bytes:0 (0.0 B) lan Link encap:Ethernet HWaddr 00:50:C2:F5:23:2A UP BROADCAST RUNNING MULTICAST MTU:1500 Metric:1 RX packets:0 errors:0 dropped:0 overruns:0 frame:0 TX packets:11 errors:3 dropped:0 overruns:0 carrier:0 collisions:0 txqueuelen:1000 RX bytes:0 (0.0 B) TX bytes:546 (546.0 B) Base address:0x2200 lan0 Link encap:Ethernet HWaddr 00:50:C2:F5:23:27 UP BROADCAST MULTICAST MTU:1500 Metric:1 RX packets:0 errors:0 dropped:0 overruns:0 frame:0 TX packets:1 errors:0 dropped:0 overruns:0 carrier:0 collisions:0 txqueuelen:1000 RX bytes:0 (0.0 B) TX bytes:46 (46.0 B) Base address:0x2000 lan1 Link encap:Ethernet HWaddr 00:50:C2:F5:23:2A UP BROADCAST RUNNING MULTICAST MTU:1500 Metric:1 RX packets:0 errors:0 dropped:0 overruns:0 frame:0 TX packets:5 errors:0 dropped:0 overruns:0 carrier:0 collisions:0 txqueuelen:0 RX bytes:0 (0.0 B) TX bytes:250 (250.0 B) lan2 Link encap:Ethernet HWaddr 00:50:C2:F5:23:2A UP BROADCAST RUNNING MULTICAST MTU:1500 Metric:1 RX packets:0 errors:0 dropped:0 overruns:0 frame:0 TX packets:5 errors:0 dropped:0 overruns:0 carrier:0 collisions:0 txqueuelen:0 RX bytes:0 (0.0 B) TX bytes:250 (250.0 B) mon.wlan0 Link encap:UNSPEC HWaddr 00-19-70-49-F3-D7-10-07-00-00-00-00-00-00-00-00 ByttonLTE(full)_genericUsermanual_sw306FAS_revN.1.docx Page: 67 / 290 TOPEX Bytton (HSPA+ / LTE) UP BROADCAST RUNNING MULTICAST MTU:1500 Metric:1 RX packets:70 errors:0 dropped:0 overruns:0 frame:0 TX packets:0 errors:0 dropped:0 overruns:0 carrier:0 collisions:0 txqueuelen:1000 RX bytes:6113 (5.9 KiB) TX bytes:0 (0.0 B) wan Link encap:Ethernet HWaddr 00:50:C2:F5:23:29 inet addr:192.168.1.148 Bcast:192.168.255.255 Mask:255.255.0.0 UP BROADCAST RUNNING MULTICAST MTU:1500 Metric:1 RX packets:12495 errors:0 dropped:0 overruns:0 frame:0 TX packets:233 errors:0 dropped:0 overruns:0 carrier:0 collisions:0 txqueuelen:1000 RX bytes:785556 (767.1 KiB) TX bytes:69700 (68.0 KiB) Base address:0x3000 wlan0 Link encap:Ethernet HWaddr 00:19:70:49:F3:D7 UP BROADCAST RUNNING MULTICAST MTU:1500 Metric:1 RX packets:0 errors:0 dropped:0 overruns:0 frame:0 TX packets:5 errors:0 dropped:0 overruns:0 carrier:0 collisions:0 txqueuelen:1000 RX bytes:0 (0.0 B) TX bytes:320 (320.0 B) Should you set different IPs for the two interfaces, lan1 and lan2, as shown: Now a single ETH, lan0, is left in the “logical switch for local connections” bridge br0, together with the WiFi interface wlan0: Correspondingly, Ifaces will show: br0 Link encap:Ethernet HWaddr 00:19:70:49:F3:D7 inet addr:172.168.1.1 Bcast:172.168.1.255 Mask:255.255.255.0 UP BROADCAST RUNNING MULTICAST MTU:1500 Metric:1 RX packets:0 errors:0 dropped:0 overruns:0 frame:0 TX packets:0 errors:0 dropped:0 overruns:0 carrier:0 collisions:0 txqueuelen:0 RX bytes:0 (0.0 B) TX bytes:0 (0.0 B) lan Link encap:Ethernet HWaddr 00:50:C2:F5:23:2A UP BROADCAST RUNNING MULTICAST MTU:1500 Metric:1 RX packets:61 errors:0 dropped:0 overruns:0 frame:0 TX packets:1 errors:1 dropped:0 overruns:0 carrier:0 collisions:0 txqueuelen:1000 RX bytes:7654 (7.4 KiB) TX bytes:46 (46.0 B) Base address:0x2200 lan0 Link encap:Ethernet HWaddr 00:50:C2:F5:23:27 UP BROADCAST MULTICAST MTU:1500 Metric:1 RX packets:0 errors:0 dropped:0 overruns:0 frame:0 TX packets:1 errors:0 dropped:0 overruns:0 carrier:0 ByttonLTE(full)_genericUsermanual_sw306FAS_revN.1.docx Page: 68 / 290 TOPEX Bytton (HSPA+ / LTE) collisions:0 txqueuelen:1000 RX bytes:0 (0.0 B) TX bytes:46 (46.0 B) Base address:0x2000 lan1 Link encap:Ethernet HWaddr 00:50:C2:F5:23:2A inet addr:172.168.1.13 Bcast:172.168.1.15 Mask:255.255.255.252 UP BROADCAST RUNNING MULTICAST MTU:1500 Metric:1 RX packets:0 errors:0 dropped:0 overruns:0 frame:0 TX packets:0 errors:0 dropped:0 overruns:0 carrier:0 collisions:0 txqueuelen:0 RX bytes:0 (0.0 B) TX bytes:0 (0.0 B) lan2 Link encap:Ethernet HWaddr 00:50:C2:F5:23:2A inet addr:172.168.1.15 Bcast:172.168.1.255 Mask:255.255.255.0 UP BROADCAST RUNNING MULTICAST MTU:1500 Metric:1 RX packets:0 errors:0 dropped:0 overruns:0 frame:0 TX packets:0 errors:0 dropped:0 overruns:0 carrier:0 collisions:0 txqueuelen:0 RX bytes:0 (0.0 B) TX bytes:0 (0.0 B) mon.wlan0 Link encap:UNSPEC HWaddr 00-19-70-49-F3-D7-10-07-00-00-00-00-00-00-00-00 UP BROADCAST RUNNING MULTICAST MTU:1500 Metric:1 RX packets:88 errors:0 dropped:0 overruns:0 frame:0 TX packets:0 errors:0 dropped:0 overruns:0 carrier:0 collisions:0 txqueuelen:1000 RX bytes:7665 (7.4 KiB) TX bytes:0 (0.0 B) wan Link encap:Ethernet HWaddr 00:50:C2:F5:23:29 inet addr:192.168.1.148 Bcast:192.168.255.255 Mask:255.255.0.0 UP BROADCAST RUNNING MULTICAST MTU:1500 Metric:1 RX packets:14449 errors:0 dropped:0 overruns:0 frame:0 TX packets:417 errors:0 dropped:0 overruns:0 carrier:0 collisions:0 txqueuelen:1000 RX bytes:923597 (901.9 KiB) TX bytes:141158 (137.8 KiB) Base address:0x3000 The Routing table in this case will be: Kernel IP routing table Destination Gateway 172.168.1.12 0.0.0.0 172.168.1.0 0.0.0.0 192.168.0.0 0.0.0.0 0.0.0.0 192.168.1.8 Genmask 255.255.255.252 255.255.255.0 255.255.0.0 0.0.0.0 Flags U U U UG Metric 0 0 0 0 Ref 0 0 0 0 Use 0 0 0 0 Iface lan1 br0 wan wan Second WAN To configure the second Eth Wan port of Bytton IC, click the other blue link, “LAN0/WAN0” , located at the bottom of “IP Settings for LAN” LAN configuration page: to enter the configuration sub-page for the LAN0/WAN0 ETH interface of Bytton, as shown: ByttonLTE(full)_genericUsermanual_sw306FAS_revN.1.docx Page: 69 / 290 TOPEX Bytton (HSPA+ / LTE) Thus, when you leave it to the default “LAN0”, the port labeled LAN0/WAN0 (eth0) will remain bridged in the LAN switch, together with the other two interfaces that are unconditionally for LAN: The bridge also includes the WiFi embedded access point (wlan0). But, should you set it to WAN0 instead of the default LAN0, without IP, it will be taken out of the LAN switch and act as a secondary WAN port, with or (as in this example) without specific IP: Now the bridge br0 joins only lan and wlan0: The new settings can also be seen in Iface status: br0 Link encap:Ethernet HWaddr 00:19:70:49:F3:D7 inet addr:10.0.0.1 Bcast:10.0.0.255 Mask:255.255.255.0 UP BROADCAST RUNNING MULTICAST MTU:1488 Metric:1 RX packets:453 errors:0 dropped:0 overruns:0 frame:0 TX packets:971 errors:0 dropped:0 overruns:0 carrier:0 collisions:0 txqueuelen:0 RX bytes:49026 (47.8 KiB) TX bytes:187994 (183.5 KiB) lan Link encap:Ethernet HWaddr 00:50:C2:F5:23:2A UP BROADCAST RUNNING MULTICAST MTU:1500 Metric:1 RX packets:920 errors:0 dropped:0 overruns:0 frame:0 TX packets:1095 errors:1 dropped:0 overruns:0 carrier:0 collisions:0 txqueuelen:1000 RX bytes:88417 (86.3 KiB) TX bytes:89562 (87.4 KiB) Base address:0x2200 lan1 Link encap:Ethernet HWaddr 00:50:C2:F5:23:2A inet addr:172.168.1.13 Bcast:172.168.1.255 Mask:255.255.255.0 UP BROADCAST RUNNING MULTICAST MTU:1500 Metric:1 RX packets:0 errors:0 dropped:0 overruns:0 frame:0 TX packets:547 errors:0 dropped:0 overruns:0 carrier:0 collisions:0 txqueuelen:0 ByttonLTE(full)_genericUsermanual_sw306FAS_revN.1.docx Page: 70 / 290 TOPEX Bytton (HSPA+ / LTE) RX bytes:0 (0.0 B) lan2 TX bytes:44758 (43.7 KiB) Link encap:Ethernet HWaddr 00:50:C2:F5:23:2A inet addr:172.168.1.15 Bcast:172.168.255.255 Mask:255.255.255.254 UP BROADCAST RUNNING MULTICAST MTU:1500 Metric:1 RX packets:0 errors:0 dropped:0 overruns:0 frame:0 TX packets:547 errors:0 dropped:0 overruns:0 carrier:0 collisions:0 txqueuelen:0 RX bytes:0 (0.0 B) TX bytes:44758 (43.7 KiB) mon.wlan0 Link encap:UNSPEC HWaddr 00-19-70-49-F3-D7-10-07-00-00-00-00-00-00-00-00 UP BROADCAST RUNNING MULTICAST MTU:1500 Metric:1 RX packets:17878 errors:0 dropped:0 overruns:0 frame:0 TX packets:0 errors:0 dropped:0 overruns:0 carrier:0 collisions:0 txqueuelen:1000 RX bytes:1671613 (1.5 MiB) TX bytes:0 (0.0 B) wan Link encap:Ethernet HWaddr 00:50:C2:F5:23:29 inet addr:192.168.1.148 Bcast:192.168.255.255 Mask:255.255.0.0 UP BROADCAST RUNNING MULTICAST MTU:1500 Metric:1 RX packets:408697 errors:4 dropped:0 overruns:0 frame:0 TX packets:1712 errors:0 dropped:0 overruns:0 carrier:0 collisions:0 txqueuelen:1000 RX bytes:25637960 (24.4 MiB) TX bytes:355713 (347.3 KiB) Base address:0x3000 The new configuration is also seen in the ETH Port>Port Status pane: Wan0 usage When you specify a certain IP and corresponding netmask for the second WAN port, wan0: This new address will be visible in Ifaces as “lan0” : br0 Link encap:Ethernet HWaddr 00:19:70:49:F3:D7 inet addr:172.168.1.1 Bcast:172.168.1.255 Mask:255.255.255.0 UP BROADCAST RUNNING MULTICAST MTU:1500 Metric:1 RX packets:142 errors:0 dropped:0 overruns:0 frame:0 TX packets:60 errors:0 dropped:0 overruns:0 carrier:0 ByttonLTE(full)_genericUsermanual_sw306FAS_revN.1.docx Page: 71 / 290 TOPEX Bytton (HSPA+ / LTE) collisions:0 txqueuelen:0 RX bytes:22825 (22.2 KiB) TX bytes:11603 (11.3 KiB) lan Link encap:Ethernet HWaddr 00:50:C2:F5:23:2A UP BROADCAST RUNNING MULTICAST MTU:1500 Metric:1 RX packets:204 errors:0 dropped:0 overruns:0 frame:0 TX packets:63 errors:1 dropped:0 overruns:0 carrier:0 collisions:0 txqueuelen:1000 RX bytes:39576 (38.6 KiB) TX bytes:11741 (11.4 KiB) Base address:0x2200 lan0 Link encap:Ethernet HWaddr 00:50:C2:F5:23:27 inet addr:192.168.148.148 Bcast:192.168.148.151 Mask:255.255.255.252 UP BROADCAST MULTICAST MTU:1500 Metric:1 RX packets:0 errors:0 dropped:0 overruns:0 frame:0 TX packets:1 errors:0 dropped:0 overruns:0 carrier:0 collisions:0 txqueuelen:1000 RX bytes:0 (0.0 B) TX bytes:46 (46.0 B) Base address:0x2000 The second WAN IP that you have defined shows up and also in the Routing Table: Kernel IP routing table Destination Gateway 192.168.148.148 0.0.0.0 172.168.1.0 0.0.0.0 192.168.0.0 0.0.0.0 0.0.0.0 192.168.1.8 Genmask 255.255.255.252 255.255.255.0 255.255.0.0 0.0.0.0 Flags U U U UG Metric 0 0 0 0 Ref 0 0 0 0 Use 0 0 0 0 Iface lan0 br0 wan wan Access on WAN side over alternate IP – example; Suppose you set up “192.168.148.148” as alternate IP address over the WAN interface: Following a Commit command and restart, the Bytton LTE equipment will be now accessible on the WAN side, through its port labeled “WAN0/LAN”, at the address for second WAN that was set previously: ByttonLTE(full)_genericUsermanual_sw306FAS_revN.1.docx Page: 72 / 290 TOPEX Bytton (HSPA+ / LTE) It also does answer to PING command connected via its WAN0 interface: in the 192.168.xxx.yyy network where Bytton LTE ByttonLTE(full)_genericUsermanual_sw306FAS_revN.1.docx Page: 73 / 290 is now TOPEX Bytton (HSPA+ / LTE) 5.2.3 Using “SW (LAN1, LAN2)” to disable two local ports This is an extreme example of software configuration! As mentioned, Bytton LTE is a very versatile equipment. Out of the four Ethernet ports, one is dedicated to WAN connection, but the others are fully configurable. By default, they are joined together in a switch, but you can take LAN1 and LAN2 out of this switch and assign them individual IP addresses and subnet masks. A powerful application of this technique is software disabling of two of the Ethernet ports of Bytton LTE, as described below. Suppose you use Bytton ICR in an application that requires that the router features a single LAN port for the users. There are better solution than placing covers over the extra ports or asking the manufacturer NOT to assemble the respective RJ-45 connectors! The disabling of the ports that are not used may be performed from software, via the Web pages of configuration (when you log-in as Superuser), respectively IP Settings, as explained below: To software-disable two of the three LAN Ethernet ports of Bytton ICR, go to the Menu LAN>IP Settings and click the blue link “SW LAN1_LAN2”. In the window “IP Settings SW” that shows up, set the SW (LAN1, LAN2) to LAN1_LAN2 and enter for both LAN ports the IP address ”255.255.255.255” and the subnet mask also “255.255.255.255”: ByttonLTE(full)_genericUsermanual_sw306FAS_revN.1.docx Page: 74 / 290 TOPEX Bytton (HSPA+ / LTE) Save this settings with Save then use Commit to make the changes permanent. Following a reboot, the Bytton equipment starts operating with the new parameters, and now LAN1 and LAN2, although physically active, are disabled from software. When you connect a cable to them, nothing happens! The browsers will show you error messages such as: Or: The green LED in the connector lights up, and the yellow LED is permanently ON, it does not blink to indicate data traffic – the respective Ethernet port is physically preset, but disabled by software! On the computer connected to the disabled ports of Bytton ICR, Network Status will show “No Network access”, instead of the of the normal display: When you ask for details, it will show Windows-default, not usable IP address of 169.254.43.24! ByttonLTE(full)_genericUsermanual_sw306FAS_revN.1.docx Page: 75 / 290 TOPEX Bytton (HSPA+ / LTE) Also, the operating system command “ipconfig” will show the respective Ethernet port as being “unoperational”: The Windows Network Diagnostic tool will try to troubleshoot the unresponsive Ethernet port, but will give up: Now only the port LAN0 is active for the local network. This can be seen very well in “Bridge Status”, where only the interface “lan0” is present: And it may be seen also in the “Interface Status” window, as shown below: ByttonLTE(full)_genericUsermanual_sw306FAS_revN.1.docx Page: 76 / 290 TOPEX Bytton (HSPA+ / LTE) Explanations: br0 Link encap:Ethernet HWaddr 00:19:70:49:F3:D7 inet addr:172.168.1.1 Bcast:172.168.1.255 Mask:255.255.255.0 UP BROADCAST RUNNING MULTICAST MTU:1500 Metric:1 RX packets:11348 errors:0 dropped:0 overruns:0 frame:0 TX packets:14116 errors:0 dropped:0 overruns:0 carrier:0 collisions:0 txqueuelen:0 RX bytes:3559084 (3.3 MiB) TX bytes:13263482 (12.6 MiB) lan Link encap:Ethernet HWaddr 00:50:C2:F5:23:2A UP BROADCAST RUNNING MULTICAST MTU:1500 Metric:1 RX packets:0 errors:0 dropped:0 overruns:0 frame:0 TX packets:1 errors:1 dropped:0 overruns:0 carrier:0 collisions:0 txqueuelen:1000 RX bytes:0 (0.0 B) TX bytes:46 (46.0 B) Base address:0x2200 lan0 Link encap:Ethernet HWaddr 00:50:C2:F5:23:27 UP BROADCAST RUNNING MULTICAST MTU:1500 Metric:1 RX packets:11543 errors:7 dropped:0 overruns:0 frame:0 TX packets:14134 errors:0 dropped:0 overruns:0 carrier:0 collisions:0 txqueuelen:1000 RX bytes:3785632 (3.6 MiB) TX bytes:13264310 (12.6 MiB) Base address:0x2000 lan1 Link encap:Ethernet HWaddr 00:50:C2:F5:23:2A UP BROADCAST RUNNING MULTICAST MTU:1500 Metric:1 RX packets:0 errors:0 dropped:0 overruns:0 frame:0 TX packets:0 errors:0 dropped:0 overruns:0 carrier:0 collisions:0 txqueuelen:0 RX bytes:0 (0.0 B) TX bytes:0 (0.0 B) lan2 Link encap:Ethernet HWaddr 00:50:C2:F5:23:2A ByttonLTE(full)_genericUsermanual_sw306FAS_revN.1.docx Page: 77 / 290 TOPEX Bytton (HSPA+ / LTE) wan UP BROADCAST RUNNING MULTICAST MTU:1500 Metric:1 RX packets:0 errors:0 dropped:0 overruns:0 frame:0 TX packets:0 errors:0 dropped:0 overruns:0 carrier:0 collisions:0 txqueuelen:0 RX bytes:0 (0.0 B) TX bytes:0 (0.0 B) Link encap:Ethernet HWaddr 00:50:C2:F5:23:29 inet addr:192.168.1.148 Bcast:192.168.1.255 Mask:255.255.255.0 UP BROADCAST RUNNING MULTICAST MTU:1500 Metric:1 RX packets:62185 errors:17 dropped:0 overruns:0 frame:0 TX packets:10270 errors:0 dropped:0 overruns:0 carrier:0 collisions:0 txqueuelen:1000 RX bytes:16237000 (15.4 MiB) TX bytes:3560509 (3.3 MiB) Base address:0x3000 The bridge Br0 is practiqually identical to lan0, which is the only active LAN port. Iterface Status br0 lan0 Link encap:Ethernet HWaddr 00:50:C2:F5:23:27 inet addr:192.168.1.1 Bcast:192.168.1.255 Mask:255.255.255.0 inet6 addr: fe80::250:c2ff:fef5:2327/64 Scope:Link UP BROADCAST RUNNING MULTICAST MTU:1500 Metric:1 RX packets:20912 errors:0 dropped:0 overruns:0 frame:0 TX packets:28612 errors:0 dropped:0 overruns:0 carrier:0 collisions:0 txqueuelen:0 RX bytes:5041033 (4.8 MiB) TX bytes:32298418 (30.8 MiB) Link encap:Ethernet HWaddr 00:50:C2:F5:23:27 inet6 addr: fe80::250:c2ff:fef5:2327/64 Scope:Link UP BROADCAST RUNNING MULTICAST MTU:1500 Metric:1 RX packets:21380 errors:0 dropped:0 overruns:0 frame:0 TX packets:28624 errors:0 dropped:0 overruns:0 carrier:0 collisions:0 txqueuelen:1000 RX bytes:5596158 (5.3 MiB) TX bytes:32315725 (30.8 MiB) Base address:0x2000 Its traffic goes out via wan port. The lan1 and lan2 ports, have absolutely nil data traffic. The LAN1 and LAN2 ports do show up in the “Interface” dorp list, but they are disabled from software, they behave as they did not exist! They do not have IP addresses, only their respective MACs (HWaddr) lan1 Link encap:Ethernet HWaddr 00:50:C2:F5:23:2A inet6 addr: fe80::250:c2ff:fef5:232a/64 Scope:Link UP BROADCAST RUNNING MULTICAST MTU:1500 Metric:1 RX packets:0 errors:0 dropped:0 overruns:0 frame:0 TX packets:6 errors:0 dropped:0 overruns:0 carrier:0 collisions:0 txqueuelen:0 RX bytes:0 (0.0 B) TX bytes:492 (492.0 B) lan2 Link encap:Ethernet HWaddr 00:50:C2:F5:23:2A inet6 addr: fe80::250:c2ff:fef5:232a/64 Scope:Link UP BROADCAST RUNNING MULTICAST MTU:1500 Metric:1 RX packets:0 errors:0 dropped:0 overruns:0 frame:0 TX packets:6 errors:0 dropped:0 overruns:0 carrier:0 collisions:0 txqueuelen:0 RX bytes:0 (0.0 B) TX bytes:492 (492.0 B) ByttonLTE(full)_genericUsermanual_sw306FAS_revN.1.docx Page: 78 / 290 TOPEX Bytton (HSPA+ / LTE) 5.2.4 Commit The “Commit” option described here is not specific to LAN section, but rather it is a general option for the Bytton LTE equipment. If you performed configuration changes, using the “Save” button is not enough since it saves the modifications only into the temporary memory. You should always press the “Commit” button if you want to make these changes permanent. This button is located at the bottom of the Menu list, to the left side of the screen. You will see a “Commit Settings” message and, underneath it, a red progress bar over black background which says: “Saving changes, please wait …” Figure 5-23: Commit Settings command – aspect of progress bar “Saving changes”. The message is really necessary, saving will take some times, because the changed settings are saved into permanent (Flash) memory of the equipment. Bytton LTE is unavailable during Commit, you will see an error message for the broken connection. Then the equipment resets, and when it starts again, the new set of parameters will be active. Warning! While committing changes, when resetting Bytton LTE or while loading a new program image, the equipment will cease operation for a few seconds. This means all connections: data link, WiFi, serial, LAN and WAN will be interrupted, then will resume when Bytton LTE starts again. For instance, the status bar at the bottom of the screen will temporary indicate that the LAN connection with Bytton LTE is not available (“cable unplugged” or “limited connectivity” message and connection icon with a red “x”. Then Bytton LTE restarts with the new parameters, and the LAN connection is immediately restored. ByttonLTE(full)_genericUsermanual_sw306FAS_revN.1.docx Page: 79 / 290 TOPEX Bytton (HSPA+ / LTE) 5.2.5 DHCP Settings Settings for the DHCP server of the local network, servers used for DNS, and MAC addresses filtering: Figure 5-24: LAN webpage – DHCP Server. DHCP Server: Enabled, Disabled or Forward to. By default it is Enabled, thus the Bytton LTE router acts as a DHCP server for the local network: it will dynamically assign IP addresses to clients on the internal network. The Bytton LTE Wireless Router supports up to 254 IP addresses for your wireless network. When set to DISABLED, the IP addresses must be manually assigned by the network administrator. The option Forward to means the local requests for DHCP will be handled by a remote server, instead of Bytton. Warning: If you enable the DHCP feature of Bytton LTE, make sure that there is no other DHCP server in your local network! Start IP: Starting IP Address. The DHCP server allocates IP addresses in a user specified range (a pool of addresses). The Start option sets the first IP address in the pool. End IP: End IP Address. The End option sets the end IP address, the last address in the pool to be assigned by the DHCP server in your local network. Note 1: if the DHCP server is disabled, the fields below it, Start IP and End IP, will be displayed in grey color. This shows you that the respective parameters are disabled. Note 2: Remember that the default IP address of Bytton LTE is 192.168.1.1, so the Start IP must be 192.168.1.2 or greater, but smaller than 192.168.1.254. You should set an adequate IP range for DHCP usage, for instance form 10 to 20 for a small network , or from 20 to 50 in case of a larger network. ByttonLTE(full)_genericUsermanual_sw306FAS_revN.1.docx Page: 80 / 290 TOPEX Bytton (HSPA+ / LTE) Note 3: Of course, the DHCP setting must be correlated with the IP address of Rohde & Schwarz Topex S.A. Bytton LTE. For instance, if the requirements of your network compel you to use an IP such as 10.0.0.1, instead of the default IP address “192.168.1.1.”, the DHCP server must be also set for the same range of IP addresses, respectively from 10.0.0.xxx where xxx is from 10 up to 20: Alternately, when the primary IP of the Bytton LTE box has been set to 172,168.1.1, instead of the default IP address “192.168.1.1.”, the DHCP server must be also set for the same range of IP addresses, 172.168.1.yyy, where yyy may be from 10 up to 20 or a wider range: To check the correct assignment of IP address, double click the icon corresponding to the Bytton LTE network connection on the desktop of your computer. Click the link “Open Network and Sharing Center: Figure 5-25: Open Network and Sharing Center to verify the assignment of IP addresses. The Status window for the network connection will appear, as shown. Fist, Click on the tab “General” to see general information (status, Internet access, connection duration, connection speed) about the respective network connection “Bytton_LTE ”: Figure 5-26: The General tab of the connection to Bytton LTE shows its current state. The “Support” or ”Details” window tells you that the IP address has been “Assigned by DHCP” and is in this example 192.168.1.12 (inside the range 10-20 that you have specified). You can also verify that the default gateway is 192.168.1.1 (the Bytton LTE device) and the Subnet Mask is 255.255.255.0. Figure 5-27: The Details tab of the connection to Bytton LTE shows its IP address. Forward to ByttonLTE(full)_genericUsermanual_sw306FAS_revN.1.docx Page: 81 / 290 TOPEX Bytton (HSPA+ / LTE) You may select the third option, “Forward to”, to pass the DHCP requests to a remote server, instead of the local Bytton LTE equipment. In this case, you must complete the IP address of that server, such as 192.168.144.88 in this example, and select the interface (IF) over which the DHCP requests will be forwarded (BR) for wired LAN or WiFi, WAN port, PPP link of embedded modem, or LAN0/WAN0 configurable port). Figure 5-28: Using the “Forward to” option for DHCP Server in LAN configuration webpage. As you may notice, in addition to the “real”, physical interfaces mentioned above, the drop list for IF will also list all the virtual, logical interfaces that are defined on your Bytton LTE equipment: - LAN3/WAN, when the WAN0/LAN0 port is taken out of the LAN switch and assigned to a secondary WAN - GRE tunnels: gret1, gret2 - IPSEC tunnels: ipsec1, ipsec2, and so on - Virtual LANs - Bridges between different interfaces: br1, br2, br3. - Open VPNs (OVPN_TAP0) And so on. After reboot, the assignment of IP addresses will be performed by the remote DHCP server: DNS Servers: Select which primary and secondary servers for DNS (Domain Name Service) that will be used. Options are Automatic (default) and Manual. Figure 5-29: Select Manual or Automatic for DSN Servers. When you leave the setting to the default Automatic, the equipment will look for DNS servers in the local or remote networks. Also, when you have chosen “Automatic”, the fields below will be colored in gray, indicated they are not editable! Figure 30a: When Automatic option is chosen, the next fields are inactive (grey color). Should you select the option “Manual” instead of “Automatic”, then you must complete the IP addresses of the two Nameservers (primary and alternate) yourself. Figure 5-30b: Select Manual instead of Automatic for DSN Servers. ByttonLTE(full)_genericUsermanual_sw306FAS_revN.1.docx Page: 82 / 290 TOPEX Bytton (HSPA+ / LTE) As can be seen from the examples above, the servers for DNS may be either in the local network or over the Internet or WAN. Filter List MAC Click the first blue link located at the bottom to reach this feature. It is an additional security feature, for the whole Bytton ICR equipment. Figure 5-31: Click the link “Filter List MAC” to use this feature. The “MAC” window shows up, where you can selectively accept or reject access form specific physical addresses. By default, this list is empty, you should use the link “Add New” at the bottom to create new entries: Figure 5-32: The MAC list, which is empty in the beginning. An additional security feature, for the whole equipment – you can allow LAN traffic only form the MAC addresses that you specify here, or you can deny traffic for certain MAC addresses. You can also block the respective user to a certain IP address. By default the table is empty, you must Add new entries, then Edit and Save them: Figure 5-33: Adding and editing entries in the table “Filter List MAC”. By default, it is Disabled, meaning this MAC filtering feature is inactive. ByttonLTE(full)_genericUsermanual_sw306FAS_revN.1.docx Page: 83 / 290 TOPEX Bytton (HSPA+ / LTE) To activate it, fist, select either Allow, or Deny, then define the addresses which will be permitted, respectively rejected. You can add as many records as you like in this table, but bear in mind that the rule you choose (either Accept them or Deny these MACs) will apply for al physical addresses and IP addresses in the list! Figure 5-34: Defining MAC entries in the table “Filter List MAC”. IP – it establishes a fixed IP address for the respective MAC source. When you choose Allow, and type a value in the field ”IP” , the client with the respective MAC will get the corresponding IP address, like the 10.0.0.17 as shown the example above. Instead of a dynamic address, assigned by DHCP, he will always have the same address that you establish here. ByttonLTE(full)_genericUsermanual_sw306FAS_revN.1.docx Page: 84 / 290 TOPEX Bytton (HSPA+ / LTE) Example of usage for “Filter List MAC”: 1. First, identify the MAC of the device that you want to connect to the bytton ICR equipement, such as the ntework card of the PC computer in this case: 2. Enter this physical address into the field MAC, after choosing Allow as action for the MACs in the list: 3. Save this configuration and Add new MAC values, if required: 4. When all required MAC values are entered, use Commit to make permament these settings 5. After reboot, Bytton will take into consideration only the equipment that features on the corresponding Ethernet pot the MAC that you have ByttonLTE(full)_genericUsermanual_sw306FAS_revN.1.docx Page: 85 / 290 TOPEX Bytton (HSPA+ / LTE) specified: 6. This MAC is also visible in the ARP Table of ETH Port, for the br0 interface: 7. When you try to connect other devices, with different MAC values, to the respective LAN port or to the other available Ethernet ports of the equipment, they will be ingnored – connection is permitted only for devices whoose physical addresses have been inserted in the MAC list! Notes: 1. A similar feature, called “MAC Security“ , is also available in the Web page “WiFi Settings” (see the next chapter). 2.The MAC Security for WiFi lets you specify up to five physical addresses whose access will be selective allowed or denied. But the respective feature applied only to the wireless clients connected to Bytton LTE, while Filter List MAC described previously applies to all local connections, no matter if they are cabled Ethernet or WiFi! 3.The MAC filtering feature does not guarantee a high level of security, since the hardware address can be faked. Thus, you should not rely solely on MAC filtering to assure security of your local network! Additional DHCP: Click the last link at the bottom to reach that window for configuration additional DHCP services: ByttonLTE(full)_genericUsermanual_sw306FAS_revN.1.docx Page: 86 / 290 TOPEX Bytton (HSPA+ / LTE) This feature allows you to set up additional DHC services, over different interfaces of Bytton. You may choose the interface form the drop list, then set up the start and end Ip addresses, and finally the lease time, for each of these interfaces, as shown Figure 5-35: Defining MAC entries in the table “Filter List MAC”. At fist the list is empty, as shown: You must use the link “Add new” to the left to add a new entry, and then edit and Save it: Figure 5-36: Editing MAC entries in the table “Filter List MAC”. ByttonLTE(full)_genericUsermanual_sw306FAS_revN.1.docx Page: 87 / 290 TOPEX Bytton (HSPA+ / LTE) 5.2.6 WiFi Settings Here you can establish the settings for the embedded wireless Access Point (802.11b/g base station) of the Bytton LTE router: Figure 5-37: The LAN page for WiFi Settings. Note: The MAC addresses set from this page, are the unique MAC assigned to the network interfaces of the client devices connected to Bytton router. ByttonLTE(full)_genericUsermanual_sw306FAS_revN.1.docx Page: 88 / 290 TOPEX Bytton (HSPA+ / LTE) Wireless access: You may enable or disable the wireless access to the Bytton LTE device. When enabled, the green LED marked “WiFi” on the front panel lights up. “ESSID” is the character string that you want to be broadcast as the name of your wireless network. By default, the Wireless Access is Enabled. When you set to to Disable, the Wi-Fi features will be inactive, the front panel LED turns off. To indicate inactivity, all the following fields will be colored in gray, showing you that this section is inactive (you cannot perform changes here). ESSID: name of the Wireless LAN. ESSID is a unique name, of length up to 32 characters, which identifies the embedded wireless Access Point of BYTTON in the wireless LAN. All devices in the wireless network must have the same ESSID. We strongly recommend changing the default, which is ByttonHSPA. ESSID Visibility: Shows or hides the ID, making your router visible/invisible to others. By default an ESSID is visible, meaning it is being broadcasted to all Wi-Fi devices placed in its area, thus making the network prone intruders. Operating Mode: Access Point – standard mode of operation, Bytton LTE acts as a base station for several Wi-Fi clients. Station – BYTTON acts as a Wi-Fi client instead, it connects to an existing Access Point. Bridge – performs transparent bridging between two remote Access Points, also known as Wireless Distribution System (WDS) that allows connecting to several APs. It is most commonly as a Wi-Fi repeater located midway between two APs. Connection Mode: It has two options, Infrastructure and Ad-Hoc. Infrastructure: default operation mode. Several Wi-Fi clients can connect to the Bytton LTE equipment, which is acting as server. The “Infrastructure” mode takes full advantage of the AP's ability to cover wide areas. Ad-Hoc: two wireless clients interconnect directly, without the need for an AP. In this connection mode, the Bytton links directly to a computer with Wi-Fi or an AP that is set to work in Ad-Hoc mode. The “Ad Hoc” Mode is easier to set up, thus recommended for a very small or temporary network. This setting is related to the previous one - usually, the “Ad-Hoc” connection is used when Operating Mode is set to “Station”. When you set “Operating Mode” to Station instead of the default Access Point, an additional link show up below this fields, “Check AP”. Obviously, since Bytton is now a Wi-Fi client, it must see the WiFi base stations that are active in the area! ByttonLTE(full)_genericUsermanual_sw306FAS_revN.1.docx Page: 89 / 290 TOPEX Bytton (HSPA+ / LTE) Click the link Check AP A pop-up window titled “Check AP” appears, showing the active WiFi Access Points that can be detected. Each AP name has a corresponding “Connect” link, click it to connect to the respective WiFi base station. : Notes: 1. When you set the Bytton’s WiFi to Station instead of Access Point, its green indicator LED will turn off: the wireless module is active, but it functions as a client, not as server! 2. If you look at Bridge Status, you will notice that BR0 now contains only the “lan” Ethernet port, wlan0 was taken out of the default local bridge: 3. As a consequence of being removed from the default bridge “br0”, in this configuration the WiFi module acting as client (Station) shows up in the Interfaces drop list as “WiFI_sta”, a distinct interface or Bytton, while previously in was included in the BR0 default local bridge! Connections to WiFi AP’s In the System Log of Bytton LTE you o can see these connections: Jul Jul Jul Jul Jul Jul Jul Jul Jul Jul Jul Jul Jul Jul 13 13 13 13 13 13 13 13 13 13 13 13 13 13 13:06:30 13:05:50 13:06:01 13:06:01 13:06:05 13:06:30 13:06:31 13:06:31 13:06:31 13:07:01 13:08:01 13:09:01 13:09:01 13:10:01 bytton bytton bytton bytton bytton bytton bytton bytton bytton bytton bytton bytton bytton bytton user.notice root: LOG guestwifi user.info kernel: br0: port 2(wlan0) entering learning state cron.err crond[1640]: USER root pid 5330 cmd net_moni cron.err crond[1640]: USER root pid 5331 cmd ntpcr user.info kernel: br0: port 2(wlan0) entering forwarding state user.notice root: LOG guestwifi user.notice root: CONNECT ON WIFI AP: guestwifi user.info kernel: device wlan0 left promiscuous mode user.info kernel: br0: port 2(wlan0) entering disabled state cron.err crond[1640]: USER root pid 5510 cmd net_moni cron.err crond[1640]: USER root pid 5633 cmd net_moni cron.err crond[1640]: USER root pid 5744 cmd net_moni cron.err crond[1640]: USER root pid 5745 cmd ntpcr cron.err crond[1640]: USER root pid 5864 cmd net_moni ByttonLTE(full)_genericUsermanual_sw306FAS_revN.1.docx Page: 90 / 290 TOPEX Bytton (HSPA+ / LTE) Jul 13 13:10:59 bytton user.notice root: LOG Productie Jul 13 13:11:00 bytton user.notice root: CONNECT ON WIFI AP: Productie Jul 13 13:11:01 bytton cron.err crond[1640]: USER root pid 6038 cmd net_moni ………………………………………………………………………… Also, in ROUTING>Routes you can see now the route for the wlan local wireless interface: Kernel IP routing table Destination Gateway 10.64.64.65 0.0.0.0 192.168.148.4 0.0.0.0 172.27.1.0 0.0.0.0 191.168.1.0 0.0.0.0 192.168.0.0 0.0.0.0 0.0.0.0 10.64.64.65 Genmask 255.255.255.255 255.255.255.254 255.255.255.0 255.255.255.0 255.255.0.0 0.0.0.0 Flags UH U U U U UG Metric 0 0 0 0 0 0 Ref 0 0 0 0 0 0 Use 0 0 0 0 0 0 Iface ppp1 wan wlan0 br0 wan ppp1 The wifi connection to “172.27.1.1” may be also seen in the System Log: Jul 19 10:46:23 bytton user.info kernel: cfg80211: Calling CRDA to update world regulatory domain Jul 19 10:46:29 bytton user.notice root: LOG guestwifi Jul 19 10:46:30 bytton user.notice root: CONNECT ON WIFI AP: guestwifi Jul 19 10:46:30 bytton user.debug kernel: wlan0: authenticate with 00:15:f2:3d:60:36 (try 1) Jul 19 10:46:30 bytton user.debug kernel: wlan0: authenticated Jul 19 10:46:30 bytton user.debug kernel: wlan0: associate with 00:15:f2:3d:60:36 (try 1) Jul 19 10:46:30 bytton user.debug kernel: wlan0: RX AssocResp from 00:15:f2:3d:60:36 (capab=0x401 status=0 aid=3) Jul 19 10:46:30 bytton user.debug kernel: wlan0: associated Jul 19 10:46:34 bytton daemon.info dnsmasq[1213]: read /etc/hosts - 1 addresses Jul 19 10:46:57 bytton daemon.info dnsmasq[1213]: read /etc/hosts - 1 addresses Jul 19 10:47:01 bytton cron.err crond[1670]: USER root pid 3310 cmd net_moni Jul 19 10:47:03 bytton daemon.info dnsmasq[1213]: reading /etc/resolv.conf Jul 19 10:47:03 bytton daemon.info dnsmasq[1213]: using nameserver 172.27.1.1#53 Jul 19 10:47:03 bytton daemon.info dnsmasq[1213]: using nameserver 8.8.8.8#53 ------------------------------------------------------------------------------ Radio Channel: Selects the Wi-Fi channel in the 2400 MHz band. In this band there are up to 14 channels, placed 5 MHz apart. When left on “Auto” (default setting) and the AP will automatically select the radio channel with the strongest signal. If instead of Auto, you are selecting a certain channel, make sure all devices are broadcasting on the same channel. This setting may be left on default, and changed only when experiencing interference with other devices. Figure 5-35: Select the Radio Channels of the WiFi Access Point. ByttonLTE(full)_genericUsermanual_sw306FAS_revN.1.docx Page: 91 / 290 TOPEX Bytton (HSPA+ / LTE) WEP Security: Enables or disables WEP (Wired Equivalent Privacy) encryption. WEP encryption is used to protect data transmitted from one end point to another. The encryption level (64-bit or 128-bit) is given by the length of the WEP Key you enter. If you enable WEP, these fields become active as shown here: WEP Key 1 … 4: The data keys used for encryption/decryption. There are up to four keys, their values must be the same on the BYTTON Access Point and on the wireless stations connected to it. When using a 64-bit WEP encryption key, the password must be 5 characters long, and when using 128-bit WEP encryption key the password must be 10 characters long. Figure 5-38: Select and set up the WEP Security features. WEP Key Index: shows which key is active. You may have a list of pre-defined keys out of which the system administrator periodically chooses the active one. The selected WEP key is automatically published to the clients of the Access Point. Warning: WEP is a basic encryption method and it was designed to provide a level of privacy equivalent to an unsecured wired LAN, so you should not rely only on WEP for protection. WPA sec: WPA Security Settings for Wi-Fi Protected Access, a Wi-Fi standard designed to improve the security features of WEP. It features improved data encryption through the temporal key integrity protocol (TKIP) and user authentication, through the extensible authentication protocol (EAP). EAP is built on a secure public-key encryption system to ensure that only authorized network users can access the Wi-Fi network. You can select to Disable the WPA security, or to use PSK or PSK2 keys. PSK means "pre-shared keys": the keys are public, every user is given the same passphrase. The pre-shared key version is called WPA-Personal or WPA2-Personal, while the more secure version using 802.1X server authentication is WPA-Enterprise or WPA2-Enterprise. In this case you must enter the respective key in the “WPA Key” field, the select the type of cryptography to be used for WPA: You can select for cryptography TKIP, AES or both. TKIP - Temporal Key Integrity Protocol is an enhanced data encryption technology that provides important data encryption enhancements, including a per-packet key-mixing function, a message integrity check (MIC), an extended initialization vector (IV) with sequencing rules, and a re-keying mechanism. AES - Advanced Encryption Standard, which is an encryption algorithm highly recommended to ensure privacy of commercial transactions in the private sector. Figure 5-39: Select and set up the advanced WPA Security features. Of course, you should replace the default, generic passphrase (WPA Key ) “99wpapskkey11” with a password of your own! ByttonLTE(full)_genericUsermanual_sw306FAS_revN.1.docx Page: 92 / 290 TOPEX Bytton (HSPA+ / LTE) MAC Security Controls access to the Wi-Fi network based upon MACs (physical addresses of the client devices) By default MAC Security is Disabled, allowing any wireless client to connect, without checking its MACaddress. You can enter up to five MAC addresses to be filtered by this kind of physical ID security. Figure 5-40: Enable and configure MAC Security for WiFi. Disabled: by default the MAC-based security feature is disabled, so the fields below are gray (inactive). Allow: only users with the MAC addresses listed below will be allowed to join the local wireless network. Deny: the users with the MAC addresses listed below will be denied access to the Wi-Fi network. “Allow” is used to assure access only for authorized users, with known MAC addresses. “Deny” should be used to prevent access for specific users, who have no right to access the wireless LAN, or which are legitimate, but whose computers become infected with a virus or other malware – the administrator temporary blocks their access, to prevent the spreading of the virus into the local network Warning: The filtering of MAC ID’s is not a proof security solution, you should not rely only on it to ensure security for the Wi-Fi network. MAC addresses over a network could be faked, unauthorized persons can use Identity Theft (MAC Spoofing) to simulate MAC ID’s that are allowed to join the network. ByttonLTE(full)_genericUsermanual_sw306FAS_revN.1.docx Page: 93 / 290 TOPEX Bytton (HSPA+ / LTE) 5.2.7 “802.1x” Settings This page controls settings related to the configuration for EAPOL, according to the standard 802.1X2004 (Specification IEEE 802.1X-2004). By default, it is Disabled: Figure 5-41: 802.1x Settings, by default Disabled. When you need to use 802.1x authentication, you must Enable and configure this feature, as shown: 802.1X Enabled WEP/WPA WPA Eapol Version 1 Eap_reauth_period 780 EAP Mesage Eap_conenc Eapol_key_index_workaround ByttonLTE(full)_genericUsermanual_sw306FAS_revN.1.docx Page: 94 / 290 TOPEX Bytton (HSPA+ / LTE) Figure 5-42: Enable and configure settings for 802.1x EAPOL. After you have enabled this feature, it will control authentication on the LAN side, allowing access only to the clients which are acknowledged by a Radius server. For details, please see the embedded help page: ##### IEEE 802.1X-2004 related configuration # Require IEEE 802.1X authorization #ieee8021x=1 # IEEE 802.1X/EAPOL version # Is implemented based on IEEE Std 802.1X-2004 which defines EAPOL ByttonLTE(full)_genericUsermanual_sw306FAS_revN.1.docx Page: 95 / 290 TOPEX Bytton (HSPA+ / LTE) # version 2. However, there are many client implementations that do not handle # the new version number correctly (they seem to drop the frames completely). #eapol_version=2 # Optional displayable message sent with EAP Request-Identity. The first \0 # in this string will be converted to ASCII-0 (nul). This can be used to # separate network info (comma separated list of attribute=value pairs); see, # e.g., draft-adrangi-eap-network-discovery-07.txt. #eap_message=hello #eap_message=hello\0networkid=netw,nasid=foo,portid=0,NAIRealms=example.com # WEP rekeying (disabled if key lengths are not set or are set to 0) # Key lengths for default/broadcast and individual/unicast keys: # 5 = 40-bit WEP (also known as 64-bit WEP with 40 secret bits) # 13 = 104-bit WEP (also known as 128-bit WEP with 104 secret bits) #wep_key_len_broadcast=5 #wep_key_len_unicast=5 # Rekeying period in seconds. 0 = do not rekey (i.e., set keys only once) #wep_rekey_period=300 # EAPOL-Key index workaround (set bit7) for WinXP Supplicant (needed only if # only broadcast keys are used) eapol_key_index_workaround=0 # EAP reauthentication period in seconds (default: 3600 seconds; 0 = disable # reauthentication). #eap_reauth_period=3600 # Use PAE group address (01:80:c2:00:00:03) instead of individual target # address when sending EAPOL frames with driver=wired. This is the most common # mechanism used in wired authentication, but it also requires that the port # is only used by one station. #use_pae_group_addr=1 ##### RADIUS client configuration ############################################# # for IEEE 802.1X with external Authentication Server, IEEE 802.11 # authentication with external ACL for MAC addresses, and accounting # RADIUS authentication server #auth_server_addr=127.0.0.1 #auth_server_port=1812 #auth_server_shared_secret=secret # RADIUS accounting server #acct_server_addr=127.0.0.1 #acct_server_port=1813 #acct_server_shared_secret=secret Figure 5-43: Embedded Help for the parameters of 802.1x authentication for EAPOL. Log examples of 802.11 authentication: Jun 25 10:58:31 bytton daemon.info hostapd: wlan0: STA 58:1f:aa:dd:e2:f5 IEEE 802.11: authenticated Jun 25 10:58:31 bytton daemon.info hostapd: wlan0: STA 58:1f:aa:dd:e2:f5 IEEE 802.11: associated (aid 2) Jun 25 10:58:31 bytton daemon.info hostapd: wlan0: STA 58:1f:aa:dd:e2:f5 RADIUS: starting accounting session 00000023-00000001 Jun 25 10:58:31 bytton daemon.info dnsmasq[1230]: DHCPREQUEST(br0) 10.0.0.14 58:1f:aa:dd:e2:f5 Jun 25 10:58:31 bytton daemon.info dnsmasq[1230]: DHCPACK(br0) 10.0.0.14 58:1f:aa:dd:e2:f5 cPhone4 ---------------------------------Jun 25 11:30:46 bytton daemon.info hostapd: wlan0: STA 58:1f:aa:dd:e2:f5 IEEE 802.11: disassociated ByttonLTE(full)_genericUsermanual_sw306FAS_revN.1.docx Page: 96 / 290 TOPEX Bytton (HSPA+ / LTE) 5.2.8 Bridge This page lets you to define and configure bridges between different physical or virtual interfaces of the Bytton LTE equipment. “Bridging” is a technique for creating a virtual, wide-area Ethernet LAN, running on a single subnet, by joining different physical or logical interfaces. In the beginning, the Bridge table is empty. Figure 5-44: “Bridge” configuration page, empty in the beginning. Bridging in Bytton LTE is a logical extension of the concept of Ethernet switch, bringing together several real or for logical interfaces. Bridging for Ethernet networks essentially involves combining an Ethernet interface with one or more virtual TAP interfaces and joining them together under the umbrella of a single bridge interface. Generally, Ethernet bridges represent the software analog to a physical Ethernet switch. The Ethernet bridge can be thought of as a kind of software switch which can be used to connect multiple Ethernet interfaces (either physical or virtual) on a single machine while sharing a single IP subnet. Most of the applications are related to building virtual private networks, for instance by bridging a physical Ethernet interface with an OpenVPN-driven TAP interface at two separate locations, it is possible to logically merge both Ethernet networks, as if they were a single Ethernet subnet. The Bridge feature of Bytton LTE consist of a table (by default empty) and several useful links beneath it. ByttonLTE(full)_genericUsermanual_sw306FAS_revN.1.docx Page: 97 / 290 TOPEX Bytton (HSPA+ / LTE) These clickable links include: - Bridge Help, - displaying the State of the bridges defined, - displaying advanced info about all the Interfaces of the equipment: To create new bridge, use Add New, then Edit: Figure 5-45: Edit an entry in the “Bridge” table. In the table, enter an IP address and net mask for the new bridge (br2 in the above example) and choose from the IF drop list the up to four interfaces (IF1 to IF4) that will be joined in the bridge. After a reboot of the Bytton equipment, these bridges (br1, br2, br3) will be active. Note that the drop list displays all the interfaces available, not just the physical ones (BR0, WAN and Embedded Modem), as can be seen in the fist example. When you have defined several bridges, virtual LANs, GRE or IPSEC tunnels, Open VPN TAPs, etc, then all those interfaces will be present in the drop list “Interface”, as illustrated in the second example. ByttonLTE(full)_genericUsermanual_sw306FAS_revN.1.docx Page: 98 / 290 TOPEX Bytton (HSPA+ / LTE) You can define as many bridges as you need:: Figure 5-46: Several entries in the “Bridge” table. Once you define a bridge (br1, br2, br3 in these examples), they show up in Bridge Status: Figure 5-47: Bridges showing up in “Bridge Status”. And also the program automatically inserts the corresponding routes for them: Figure 5-48: The same bridges in the “Routes” table. And it also adjusts the Linux firewall to permit the packets to flow freely over the newly created interfaces. ByttonLTE(full)_genericUsermanual_sw306FAS_revN.1.docx Page: 99 / 290 TOPEX Bytton (HSPA+ / LTE) Bridge Status: You can check the state of the three bridges created above by the link “BR Status: Figure 5-49: Details of bridges in the “Bridge Status” table. Each bridge has an unique ID hex numbe, such as “8000.00197049f3d”7. This number shows up when the bridge is in effect, that means after you issued a “Commit”. In the example above, the bridge br3 does not use ETH interfaces, so it dos not show up with the “interfaces” list, Notice that “br0” exists by default, you cannot delete it. This bridge joins together interfaces wlan0 and lan, when WAN0/LAN0 was removed form the local switch and was assigned an IP address to be used for WAN, And it joins lan0, wlan0 and lan whenever WAN0/LAN0 is still connected in the three-port LAN switch and does not have an IP for WAN (the default situation). ByttonLTE(full)_genericUsermanual_sw306FAS_revN.1.docx Page: 100 / 290 TOPEX Bytton (HSPA+ / LTE) 5.2.9 “Interface Status” and “Test Net” features These are auxiliary features, not items of the main menu, but they deserve a special chapter for their description, since they are both useful and complex (each of them opens up a Web page with several parameters and fields): Interface Status: This link is present at the bottom of several of the LAN configuration pages of the Web interface for Bytton LTE, as shown: etc. Figure 5-50: The window “Interface Status” and the corresponding link present in several configuration pages. When you click this link, it brings up a page that shows info about the state of all the current network interfaces (real and virtual, physical and logical, bridges and so on) of the equipment: br0 Link encap:Ethernet HWaddr 00:19:70:49:F3:D7 inet addr:172.168.1.1 Bcast:172.168.1.255 Mask:255.255.255.0 UP BROADCAST RUNNING MULTICAST MTU:1500 Metric:1 RX packets:383 errors:0 dropped:0 overruns:0 frame:0 TX packets:365 errors:0 dropped:0 overruns:0 carrier:0 collisions:0 txqueuelen:0 RX bytes:57956 (56.5 KiB) TX bytes:124681 (121.7 KiB) br1 Link encap:Ethernet HWaddr 00:50:C2:F5:23:27 inet addr:10.0.58.27 Bcast:10.0.58.255 Mask:255.255.255.0 UP BROADCAST RUNNING MULTICAST MTU:1500 Metric:1 RX packets:0 errors:0 dropped:0 overruns:0 frame:0 TX packets:0 errors:0 dropped:0 overruns:0 carrier:0 collisions:0 txqueuelen:0 RX bytes:0 (0.0 B) TX bytes:0 (0.0 B) lan Link encap:Ethernet HWaddr 00:50:C2:F5:23:2A UP BROADCAST RUNNING MULTICAST MTU:1500 Metric:1 RX packets:410 errors:0 dropped:0 overruns:0 frame:0 TX packets:368 errors:1 dropped:0 overruns:0 carrier:0 collisions:0 txqueuelen:1000 RX bytes:73340 (71.6 KiB) TX bytes:124819 (121.8 KiB) Base address:0x2200 lan0 Link encap:Ethernet HWaddr 00:50:C2:F5:23:27 inet addr:192.168.148.148 Bcast:192.168.148.151 UP BROADCAST MULTICAST MTU:1500 Metric:1 ByttonLTE(full)_genericUsermanual_sw306FAS_revN.1.docx Mask:255.255.255.252 Page: 101 / 290 TOPEX Bytton (HSPA+ / LTE) RX packets:0 errors:0 dropped:0 overruns:0 frame:0 TX packets:1 errors:0 dropped:0 overruns:0 carrier:0 collisions:0 txqueuelen:1000 RX bytes:0 (0.0 B) TX bytes:46 (46.0 B) Base address:0x2000 lo Link encap:Local Loopback inet addr:127.0.0.1 Mask:255.0.0.0 UP LOOPBACK RUNNING MTU:16436 Metric:1 RX packets:530 errors:0 dropped:0 overruns:0 frame:0 TX packets:530 errors:0 dropped:0 overruns:0 carrier:0 collisions:0 txqueuelen:0 RX bytes:29284 (28.5 KiB) TX bytes:29284 (28.5 KiB) mon.wlan0 Link encap:UNSPEC HWaddr 00-19-70-49-F3-D7-10-07-00-00-00-00-00-00-00-00 UP BROADCAST RUNNING MULTICAST MTU:1500 Metric:1 RX packets:50 errors:0 dropped:0 overruns:0 frame:0 TX packets:0 errors:0 dropped:0 overruns:0 carrier:0 collisions:0 txqueuelen:1000 RX bytes:4313 (4.2 KiB) TX bytes:0 (0.0 B) wan Link encap:Ethernet HWaddr 00:50:C2:F5:23:29 inet addr:192.168.1.148 Bcast:192.168.255.255 Mask:255.255.0.0 UP BROADCAST RUNNING MULTICAST MTU:1500 Metric:1 RX packets:6043 errors:0 dropped:0 overruns:0 frame:0 TX packets:174 errors:0 dropped:0 overruns:0 carrier:0 collisions:0 txqueuelen:1000 RX bytes:382541 (373.5 KiB) TX bytes:26281 (25.6 KiB) Base address:0x3000 wlan0 Link encap:Ethernet HWaddr 00:19:70:49:F3:D7 UP BROADCAST RUNNING MULTICAST MTU:1500 Metric:1 RX packets:0 errors:0 dropped:0 overruns:0 frame:0 TX packets:41 errors:0 dropped:0 overruns:0 carrier:0 collisions:0 txqueuelen:1000 RX bytes:0 (0.0 B) TX bytes:13386 (13.0 KiB) “Iface Status” shows details about all the interfaces of Bytton. Info about the real Ethernet interfaces include MAC (physical address), Internet address (logical address), Broadcast, subnet mask, MTU value, metric, statistics (packets, errors, collisions, mega bytes transferred) for the reception (RX) and respectively transmission (RX). br0 Link encap:Ethernet HWaddr 00:19:70:49:F3:D7 inet addr:172.168.1.1 Bcast:172.168.1.255 Mask:255.255.255.0 UP BROADCAST RUNNING MULTICAST MTU:1500 Metric:1 RX packets:230 errors:0 dropped:0 overruns:0 frame:0 TX packets:139 errors:0 dropped:0 overruns:0 carrier:0 collisions:0 txqueuelen:0 RX bytes:15484 (15.1 KiB) TX bytes:13454 (13.1 KiB) br1 Link encap:Ethernet HWaddr 00:50:C2:F5:23:27 inet addr:10.0.30.17 Bcast:10.0.255.255 Mask:255.255.0.0 UP BROADCAST RUNNING MULTICAST MTU:1500 Metric:1 RX packets:6719 errors:0 dropped:0 overruns:0 frame:0 TX packets:0 errors:0 dropped:0 overruns:0 carrier:0 collisions:0 txqueuelen:0 RX bytes:429564 (419.4 KiB) TX bytes:0 (0.0 B) lan Link encap:Ethernet HWaddr 00:50:C2:F5:23:2A UP BROADCAST RUNNING MULTICAST MTU:1500 Metric:1 RX packets:291 errors:0 dropped:0 overruns:0 frame:0 TX packets:142 errors:1 dropped:0 overruns:0 carrier:0 collisions:0 txqueuelen:1000 RX bytes:26140 (25.5 KiB) TX bytes:13592 (13.2 KiB) Base address:0x2200 lan0 Link encap:Ethernet HWaddr 00:50:C2:F5:23:27 inet addr:192.168.148.254 Bcast:192.168.151.255 Mask:255.255.252.0 UP BROADCAST RUNNING MULTICAST MTU:1500 Metric:1 RX packets:8063 errors:0 dropped:0 overruns:0 frame:0 TX packets:103 errors:0 dropped:0 overruns:0 carrier:0 collisions:0 txqueuelen:1000 RX bytes:1729782 (1.6 MiB) TX bytes:4738 (4.6 KiB) Base address:0x2000 ByttonLTE(full)_genericUsermanual_sw306FAS_revN.1.docx Page: 102 / 290 TOPEX Bytton (HSPA+ / LTE) lan0.2 Link encap:Ethernet HWaddr 00:50:C2:F5:23:27 inet addr:172.27.168.253 Bcast:172.27.171.255 Mask:255.255.252.0 UP BROADCAST RUNNING MULTICAST MTU:1500 Metric:1 RX packets:0 errors:0 dropped:0 overruns:0 frame:0 The logical or virtual interfaces, such as bridges, are indicated by a digital point, such as “0.2” or “1.5” or by numbers following the name (br1). Being just aliases, they share all the same physical address, and they show no information about actual data transfers (bytes and packets sent and received). Br0 is the default bridge, lan is the physical two-port Ethernet switch, wan is the Ethernet WAN connection while lan0 is the LAN/WAN configurable port. When you configure each local port with its own IP address, lan1 and lan2 will also show up (by default they are joined in the same physical switch). Wlan0 is the wireless LAN (the embedded WiFi access point). Lo is the Local Loopback interface. The same parameters are shown for the virtual, local loopback interface, at the standard address for loopback, “127.0.0.1”. Since it is a loopback interface, the number of bytes sent out will always be identical to the number of bytes received. A few commented examples will show how Iface Status may be used to find out what is going on over the interfaces of Bytton LTE: br0 Link encap:Ethernet HWaddr 00:19:70:49:F3:D7 inet addr:10.0.0.1 Bcast:10.0.0.255 Mask:255.255.255.0 UP BROADCAST RUNNING MULTICAST MTU:1500 Metric:1 RX packets:939212 errors:0 dropped:0 overruns:0 frame:0 TX packets:2177060 errors:0 dropped:0 overruns:0 carrier:0 collisions:0 txqueuelen:0 RX bytes:53567762 (51.0 MiB) TX bytes:3226717991 (3.0 GiB) lan Link encap:Ethernet HWaddr 00:50:C2:F5:23:2A UP BROADCAST RUNNING MULTICAST MTU:1500 Metric:1 RX packets:939249 errors:90 dropped:0 overruns:0 frame:0 TX packets:2177088 errors:1 dropped:0 overruns:0 carrier:0 collisions:0 txqueuelen:1000 RX bytes:66719815 (63.6 MiB) TX bytes:3226719279 (3.0 GiB) Base address:0x2200 mon.wlan0 Link encap:UNSPEC HWaddr 00-19-70-49-F3-D7-00-00-00-00-00-00-00-0000-00 UP BROADCAST RUNNING MULTICAST MTU:1500 Metric:1 RX packets:5813 errors:0 dropped:0 overruns:0 frame:0 TX packets:0 errors:0 dropped:0 overruns:0 carrier:0 collisions:0 txqueuelen:1000 RX bytes:493200 (481.6 KiB) TX bytes:0 (0.0 B) wan Link encap:Ethernet HWaddr 00:50:C2:F5:23:29 inet addr:192.168.1.148 Bcast:192.168.1.255 Mask:255.255.255.0 UP BROADCAST RUNNING MULTICAST MTU:1500 Metric:1 RX packets:2285694 errors:114 dropped:0 overruns:0 frame:0 TX packets:937458 errors:0 dropped:0 overruns:0 carrier:0 collisions:0 txqueuelen:1000 RX bytes:3233247828 (3.0 GiB) TX bytes:60998194 (58.1 MiB) Base address:0x3000 In this instance, the connection to the Internet is done via the Ethernet WAN port. Large downloads were performed, you can see that the 3 GiB of data enters via WAN and gets out via LAN. See also the corresponding routing table: ByttonLTE(full)_genericUsermanual_sw306FAS_revN.1.docx Page: 103 / 290 TOPEX Bytton (HSPA+ / LTE) When the connection is achieved via 3G/4G mobile network instead or cabled Ethernet, Iface Status reflects the changes – data comes in via ppp1 and gets out through lan. The wan traffic is nil, while the WiFi interface wlan0 is active, but not used for data transfers: br0 Link encap:Ethernet HWaddr 00:19:70:49:F3:D7 inet addr:10.0.0.1 Bcast:10.0.0.255 Mask:255.255.255.0 UP BROADCAST RUNNING MULTICAST MTU:1500 Metric:1 RX packets:79688 errors:0 dropped:0 overruns:0 frame:0 TX packets:147260 errors:0 dropped:0 overruns:0 carrier:0 collisions:0 txqueuelen:0 RX bytes:6811273 (6.4 MiB) TX bytes:200265195 (190.9 MiB) lan Link encap:Ethernet HWaddr 00:50:C2:F5:23:2A UP BROADCAST RUNNING MULTICAST MTU:1500 Metric:1 RX packets:79737 errors:4 dropped:0 overruns:0 frame:0 TX packets:147300 errors:1 dropped:0 overruns:0 carrier:0 collisions:0 txqueuelen:1000 RX bytes:7931397 (7.5 MiB) TX bytes:200267035 (190.9 MiB) Base address:0x2200 mon.wlan0 Link encap:UNSPEC HWaddr 00-19-70-49-F3-D7-00-00-00-00-00-00-00-00-00-00 UP BROADCAST RUNNING MULTICAST MTU:1500 Metric:1 RX packets:9621 errors:0 dropped:0 overruns:0 frame:0 TX packets:0 errors:0 dropped:0 overruns:0 carrier:0 collisions:0 txqueuelen:1000 RX bytes:831943 (812.4 KiB) TX bytes:0 (0.0 B) ppp1 Link encap:Point-to-Point Protocol inet addr:93.122.148.36 P-t-P:10.64.64.65 Mask:255.255.255.255 UP POINTOPOINT RUNNING NOARP MULTICAST MTU:1500 Metric:1 RX packets:145818 errors:0 dropped:0 overruns:0 frame:0 TX packets:77754 errors:0 dropped:0 overruns:0 carrier:0 collisions:0 txqueuelen:3 RX bytes:197537140 (188.3 MiB) TX bytes:6328242 (6.0 MiB) wan Link encap:Ethernet HWaddr 00:50:C2:F5:23:29 inet addr:192.168.1.148 Bcast:192.168.1.255 Mask:255.255.255.0 UP BROADCAST MULTICAST MTU:1500 Metric:1 RX packets:0 errors:0 dropped:0 overruns:0 frame:0 TX packets:0 errors:0 dropped:0 overruns:0 carrier:0 collisions:0 txqueuelen:1000 RX bytes:0 (0.0 B) TX bytes:0 (0.0 B) Base address:0x3000 And the corresponding routing table: Another example with bridge br1 created, lan0 and lan as distinct ports, still connecting via mobile modem over ppp1: br0 Link encap:Ethernet HWaddr 00:19:70:49:F3:D7 inet addr:10.0.0.1 Bcast:10.0.0.255 Mask:255.255.255.0 UP BROADCAST RUNNING MULTICAST MTU:1500 Metric:1 RX packets:160416 errors:0 dropped:0 overruns:0 frame:0 TX packets:298549 errors:0 dropped:0 overruns:0 carrier:0 collisions:0 txqueuelen:0 RX bytes:11770863 (11.2 MiB) TX bytes:412043839 (392.9 MiB) br1 Link encap:Ethernet HWaddr 00:50:C2:F5:23:29 inet addr:172.168.144.15 Bcast:172.168.144.15 Mask:255.255.255.252 UP BROADCAST RUNNING MULTICAST MTU:1500 Metric:1 RX packets:66410 errors:0 dropped:0 overruns:0 frame:0 TX packets:0 errors:0 dropped:0 overruns:0 carrier:0 ByttonLTE(full)_genericUsermanual_sw306FAS_revN.1.docx Page: 104 / 290 TOPEX Bytton (HSPA+ / LTE) collisions:0 txqueuelen:0 RX bytes:3467166 (3.3 MiB) TX bytes:0 (0.0 B) lan Link encap:Ethernet HWaddr 00:50:C2:F5:23:2A UP BROADCAST RUNNING MULTICAST MTU:1500 Metric:1 RX packets:160518 errors:3 dropped:0 overruns:0 frame:0 TX packets:298568 errors:1 dropped:0 overruns:0 carrier:0 collisions:0 txqueuelen:1000 RX bytes:14025308 (13.3 MiB) TX bytes:412045038 (392.9 MiB) Base address:0x2200 lan0 Link encap:Ethernet HWaddr 00:50:C2:F5:23:27 UP BROADCAST MULTICAST MTU:1500 Metric:1 RX packets:113 errors:0 dropped:0 overruns:0 frame:0 TX packets:28 errors:0 dropped:0 overruns:0 carrier:0 collisions:0 txqueuelen:1000 RX bytes:12119 (11.8 KiB) TX bytes:2112 (2.0 KiB) Base address:0x2000 ppp1 Link encap:Point-to-Point Protocol inet addr:93.122.148.36 P-t-P:10.64.64.65 Mask:255.255.255.255 UP POINTOPOINT RUNNING NOARP MULTICAST MTU:1500 Metric:1 RX packets:299890 errors:0 dropped:0 overruns:0 frame:0 TX packets:161518 errors:0 dropped:0 overruns:0 carrier:0 collisions:0 txqueuelen:3 RX bytes:408205520 (389.2 MiB) TX bytes:11469615 (10.9 MiB) wan Link encap:Ethernet HWaddr 00:50:C2:F5:23:29 inet addr:192.168.1.148 Bcast:192.168.1.255 Mask:255.255.255.0 UP BROADCAST RUNNING MULTICAST MTU:1500 Metric:1 RX packets:73692 errors:16 dropped:0 overruns:0 frame:0 TX packets:178 errors:0 dropped:0 overruns:0 carrier:0 collisions:0 txqueuelen:1000 RX bytes:5698342 (5.4 MiB) TX bytes:7516 (7.3 KiB) Base address:0x3000 And the corresponding routing table: Other examples: br0 Link encap:Ethernet HWaddr 00:19:70:49:F3:D7 inet addr:10.0.0.1 Bcast:10.0.0.255 Mask:255.255.255.0 UP BROADCAST RUNNING MULTICAST MTU:1500 Metric:1 RX packets:10092 errors:0 dropped:0 overruns:0 frame:0 TX packets:17301 errors:0 dropped:0 overruns:0 carrier:0 collisions:0 txqueuelen:0 RX bytes:799516 (780.7 KiB) TX bytes:22576730 (21.5 MiB) gret1 Link encap:UNSPEC HWaddr 0A-00-3A-25-00-00-00-00-00-00-00-00-00-00-00-00 inet addr:10.0.58.8 P-t-P:10.0.58.8 Mask:255.255.255.254 UP POINTOPOINT RUNNING NOARP MULTICAST MTU:1476 Metric:1 RX packets:0 errors:0 dropped:0 overruns:0 frame:0 TX packets:0 errors:0 dropped:0 overruns:0 carrier:0 collisions:0 txqueuelen:0 RX bytes:0 (0.0 B) TX bytes:0 (0.0 B) lan Link encap:Ethernet HWaddr 00:50:C2:F5:23:2A UP BROADCAST RUNNING MULTICAST MTU:1500 Metric:1 RX packets:9584 errors:0 dropped:0 overruns:0 frame:0 TX packets:16878 errors:1 dropped:0 overruns:0 carrier:0 collisions:0 txqueuelen:1000 RX bytes:870647 (850.2 KiB) TX bytes:22358900 (21.3 MiB) ByttonLTE(full)_genericUsermanual_sw306FAS_revN.1.docx Page: 105 / 290 TOPEX Bytton (HSPA+ / LTE) Base address:0x2200 lan0.4 Link encap:Ethernet HWaddr 00:50:C2:F5:23:27 inet addr:192.168.148.255 Bcast:192.168.148.255 Mask:255.255.255.0 UP BROADCAST RUNNING MULTICAST MTU:1500 Metric:1 RX packets:0 errors:0 dropped:0 overruns:0 frame:0 TX packets:0 errors:0 dropped:0 overruns:0 carrier:0 collisions:0 txqueuelen:0 RX bytes:0 (0.0 B) TX bytes:0 (0.0 B) lan0:2 Link encap:Ethernet HWaddr 00:50:C2:F5:23:27 inet addr:172.27.168.244 Bcast:172.27.168.255 UP BROADCAST MULTICAST MTU:1500 Metric:1 Base address:0x2000 lo Mask:255.255.255.0 Link encap:Local Loopback inet addr:127.0.0.1 Mask:255.0.0.0 UP LOOPBACK RUNNING MTU:16436 Metric:1 RX packets:1221 errors:0 dropped:0 overruns:0 frame:0 TX packets:1221 errors:0 dropped:0 overruns:0 carrier:0 collisions:0 txqueuelen:0 RX bytes:68033 (66.4 KiB) TX bytes:68033 (66.4 KiB) mon.wlan0 Link encap:UNSPEC HWaddr 00-19-70-49-F3-D7-10-07-00-00-00-00-00-00-00-00 UP BROADCAST RUNNING MULTICAST MTU:1500 Metric:1 RX packets:1582 errors:0 dropped:0 overruns:0 frame:0 TX packets:0 errors:0 dropped:0 overruns:0 carrier:0 collisions:0 txqueuelen:1000 RX bytes:122456 (119.5 KiB) TX bytes:0 (0.0 B) ppp1 Link encap:Point-to-Point Protocol inet addr:93.122.148.36 P-t-P:10.64.64.65 Mask:255.255.255.255 UP POINTOPOINT RUNNING NOARP MULTICAST MTU:1500 Metric:1 RX packets:16822 errors:0 dropped:0 overruns:0 frame:0 TX packets:9646 errors:0 dropped:0 overruns:0 carrier:0 collisions:0 txqueuelen:3 RX bytes:22149899 (21.1 MiB) TX bytes:704660 (688.1 KiB) wan Link encap:Ethernet HWaddr 00:50:C2:F5:23:29 inet addr:192.168.1.148 Bcast:192.168.255.255 Mask:255.255.0.0 UP BROADCAST RUNNING MULTICAST MTU:1500 Metric:1 RX packets:28290 errors:9 dropped:0 overruns:0 frame:0 TX packets:4 errors:0 dropped:0 overruns:0 carrier:0 collisions:0 txqueuelen:1000 RX bytes:1784161 (1.7 MiB) TX bytes:269 (269.0 B) Base address:0x3000 wlan0 Link encap:Ethernet HWaddr 00:19:70:49:F3:D7 UP BROADCAST RUNNING MULTICAST MTU:1500 Metric:1 RX packets:629 errors:0 dropped:0 overruns:0 frame:0 TX packets:605 errors:0 dropped:0 overruns:0 carrier:0 collisions:0 txqueuelen:1000 RX bytes:99197 (96.8 KiB) TX bytes:255677 (249.6 KiB) The corresponding Routes table: ByttonLTE(full)_genericUsermanual_sw306FAS_revN.1.docx Page: 106 / 290 TOPEX Bytton (HSPA+ / LTE) No LAN in the default bridge! When the LAN1 and LAN2 Ethernet ports are removed from the default Ethernet switch, as shown here: and instead assigned independent IP addresses, in different address ranges : the default bridge, br0, contains now only the WiFi interface, wlan0, since the four ETH ports are now all individually assigned : br0 bridge name bridge id 8000.00197049f3d7 STP enabled no interfaces wlan0 Note: as mentioned, the default bridge br0 cannot be deleted. However, you can take all ETH ports out of it, as shwn here. If you als disable the Wi-Fi acces point, the default bridge will be … empty, it will contain no ports! This configuration can also be clearly seen in Ethernet Port > Port Status, where each of the four Eth ports is now present and active (shows “link detected - yes”): STATUS wan Speed: 100Mb/s Duplex: Full Auto-negotiation: on Link detected: yes STATUS lan0 Speed: 100Mb/s Duplex: Full Auto-negotiation: on Link detected: yes STATUS lan1 Speed: 100Mb/s Duplex: Full Auto-negotiation: on Link detected: yes STATUS lan2 Speed: 100Mb/s Duplex: Full Auto-negotiation: on Link detected: yes ByttonLTE(full)_genericUsermanual_sw306FAS_revN.1.docx Page: 107 / 290 TOPEX Bytton (HSPA+ / LTE) The corresponding additional ports, LAN1 and LAN2, show up in “Interface Status”: lan Link encap:Ethernet HWaddr 00:50:C2:F5:23:2A UP BROADCAST RUNNING MULTICAST MTU:1500 Metric:1 RX packets:76 errors:0 dropped:0 overruns:0 frame:0 TX packets:1 errors:1 dropped:0 overruns:0 carrier:0 collisions:0 txqueuelen:1000 RX bytes:11149 (10.8 KiB) TX bytes:46 (46.0 B) lan0 Link encap:Ethernet HWaddr 00:50:C2:F5:23:27 UP BROADCAST RUNNING MULTICAST MTU:1500 Metric:1 RX packets:16332 errors:0 dropped:0 overruns:0 frame:0 TX packets:1 errors:0 dropped:0 overruns:0 carrier:0 collisions:0 txqueuelen:1000 RX bytes:1013345 (989.5 KiB) TX bytes:46 (46.0 B) lan1 Link encap:Ethernet HWaddr 00:50:C2:F5:23:2A inet addr:10.0.58.119 Bcast:10.0.255.255 Mask:255.255.0.0 UP BROADCAST RUNNING MULTICAST MTU:1500 Metric:1 RX packets:0 errors:0 dropped:0 overruns:0 frame:0 TX packets:0 errors:0 dropped:0 overruns:0 carrier:0 collisions:0 txqueuelen:0 lan2 Link encap:Ethernet HWaddr 00:50:C2:F5:23:2A inet addr:172.168.27.245 Bcast:172.168.255.255 Mask:255.255.255.254 UP BROADCAST RUNNING MULTICAST MTU:1500 Metric:1 RX packets:0 errors:0 dropped:0 overruns:0 frame:0 TX packets:0 errors:0 dropped:0 overruns:0 carrier:0 collisions:0 txqueuelen:0 and they will also be present in the Routing table: Kernel IP routing table Destination Gateway 10.64.64.65 0.0.0.0 172.168.27.244 0.0.0.0 192.168.148.254 0.0.0.0 191.168.1.0 0.0.0.0 10.0.0.0 0.0.0.0 192.168.0.0 0.0.0.0 0.0.0.0 10.64.64.65 Genmask 255.255.255.255 255.255.255.254 255.255.255.254 255.255.255.0 255.255.0.0 255.255.0.0 0.0.0.0 Flags UH U U U U U UG Metric 0 0 0 0 0 0 0 Ref 0 0 0 0 0 0 0 Use 0 0 0 0 0 0 0 Iface ppp1 lan2 lan0 br0 lan1 wan ppp1 From now on, the newly created LAN1 and LAN2 ports will be displayed as options in the “Interfaces” drop list which shows up in several configuration menus of the Bytton LTE equipment: ByttonLTE(full)_genericUsermanual_sw306FAS_revN.1.docx Page: 108 / 290 TOPEX Bytton (HSPA+ / LTE) Test Net – tools for testing the networks At the bottom of the “ Interface Status” subpage, there is another clickable link called “Test_Net”. This is used to open a window that allows testing of the network where Bytton LTE is connected: Figure 5-51: The link “Test Net” at the bottom of the “Interface Status” page. This “Test” page features several tools used to thoroughly test the network: Figure 5-52: Features of the“Test Net” page. ByttonLTE(full)_genericUsermanual_sw306FAS_revN.1.docx Page: 109 / 290 TOPEX Bytton (HSPA+ / LTE) Network test You can issue PING commands to different addresses, trace the route to a specified IP, or send other network commands. The results are always shown in the upper pane, called “Test”: For instance, you may PING different destination IP addresses (the default 127.0.0.1 is the loopback), specifying the number of test packets (5 in this example) and the size of their data payload, in bytes (55 data bytes in this example). When you choose the value “zero” for the payload, the packets will by instead eight bytes long: PING 127.0.0.1 (127.0.0.1): 0 data bytes 8 bytes from 127.0.0.1: seq=0 ttl=64 8 bytes from 127.0.0.1: seq=1 ttl=64 8 bytes from 127.0.0.1: seq=2 ttl=64 8 bytes from 127.0.0.1: seq=3 ttl=64 --- 127.0.0.1 ping statistics --4 packets transmitted, 4 packets received, 0% packet loss The longer the data packets sent, the higher propagation delay you will see: PING 127.0.0.1 (127.0.0.1): 14008 bytes from 127.0.0.1: 14008 bytes from 127.0.0.1: 14008 bytes from 127.0.0.1: 14008 bytes from 127.0.0.1: 14008 bytes from 127.0.0.1: 14000 seq=0 seq=1 seq=2 seq=3 seq=4 data bytes ttl=64 time=1.731 ttl=64 time=1.293 ttl=64 time=1.245 ttl=64 time=1.343 ttl=64 time=1.248 ms ms ms ms ms --- 127.0.0.1 ping statistics --5 packets transmitted, 5 packets received, 0% packet loss round-trip min/avg/max = 1.245/1.372/1.731 ms PING 127.0.0.1 (127.0.0.1): 48000 data bytes 48008 bytes from 127.0.0.1: seq=0 ttl=64 time=5.103 ms 48008 bytes from 127.0.0.1: seq=1 ttl=64 time=4.125 ms 48008 bytes from 127.0.0.1: seq=2 ttl=64 time=8.758 ms --- 127.0.0.1 ping statistics --3 packets transmitted, 3 packets received, 0% packet loss round-trip min/avg/max = 4.125/5.995/8.758 ms When both addresses are in the local networ, the time of waiting for the answer is short: PING 127.0.0.1 (127.0.0.1) from 192.168.1.148: 31 data bytes 39 bytes from 127.0.0.1: seq=0 ttl=64 time=0.572 ms 39 bytes from 127.0.0.1: seq=1 ttl=64 time=0.374 ms 39 bytes from 127.0.0.1: seq=2 ttl=64 time=0.374 ms --- 127.0.0.1 ping statistics --3 packets transmitted, 3 packets received, 0% packet loss round-trip min/avg/max = 0.374/0.440/0.572 ms The results are displayed in the upper panel, in the example below for four packets of 455 data bytes each (463 bytes overall length) – response and propagation delay. When you repeat the test another time, the results are close, but the response time are not exactly identical : ByttonLTE(full)_genericUsermanual_sw306FAS_revN.1.docx Page: 110 / 290 TOPEX Bytton (HSPA+ / LTE) PING 127.0.0.1 (127.0.0.1): 455 data bytes 463 bytes from 127.0.0.1: seq=0 ttl=64 time=0.556 ms 463 bytes from 127.0.0.1: seq=1 ttl=64 time=0.413 ms 463 bytes from 127.0.0.1: seq=2 ttl=64 time=0.404 ms 463 bytes from 127.0.0.1: seq=3 ttl=64 time=0.402 ms --- 127.0.0.1 ping statistics --4 packets transmitted, 4 packets received, 0% packet loss round-trip min/avg/max = 0.402/0.443/0.556 ms The “Source” field (inactive when left to the default value 0.0.0.0) allows you to Ping the destination with a different IP than the real one. Longer round-trip delays are specific to mobile conections: PING 209.202.254.14 (209.202.254.14) from 192.168.1.148: 31 data bytes 39 bytes from 209.202.254.14: seq=0 ttl=116 time=2711.108 ms 39 bytes from 209.202.254.14: seq=1 ttl=116 time=3260.654 ms 39 bytes from 209.202.254.14: seq=2 ttl=116 time=3064.698 ms --- 209.202.254.14 ping statistics --3 packets transmitted, 3 packets received, 0% packet loss round-trip min/avg/max = 2711.108/3012.153/3260.654 ms PING 209.202.254.14 (209.202.254.14) from 192.168.1.148: 31 data bytes 39 bytes from 209.202.254.14: seq=0 ttl=116 time=3189.314 ms 39 bytes from 209.202.254.14: seq=1 ttl=116 time=3080.604 ms 39 bytes from 209.202.254.14: seq=2 ttl=116 time=3276.955 ms --- 209.202.254.14 ping statistics --3 packets transmitted, 3 packets received, 0% packet loss round-trip min/avg/max = 3080.604/3182.291/3276.955 ms In the same destination-source configuration, and with identical size and number of PING packets, when Ethernet connection is used for WAN, the round-trip delays will be much shorter that in the previous case, when connection was achieved via PPP1: PING 209.202.254.14 (209.202.254.14) from 192.168.1.148: 39 bytes from 209.202.254.14: seq=0 ttl=111 time=127.213 39 bytes from 209.202.254.14: seq=1 ttl=111 time=132.594 39 bytes from 209.202.254.14: seq=2 ttl=111 time=127.035 31 data bytes ms ms ms --- 209.202.254.14 ping statistics --3 packets transmitted, 3 packets received, 0% packet loss round-trip min/avg/max = 127.035/128.947/132.594 ms PING 209.202.254.14 (209.202.254.14) from 192.168.1.148: 39 bytes from 209.202.254.14: seq=0 ttl=111 time=127.440 39 bytes from 209.202.254.14: seq=1 ttl=111 time=127.259 39 bytes from 209.202.254.14: seq=2 ttl=111 time=126.909 31 data bytes ms ms ms --- 209.202.254.14 ping statistics --3 packets transmitted, 3 packets received, 0% packet loss round-trip min/avg/max = 126.909/127.202/127.440 ms ByttonLTE(full)_genericUsermanual_sw306FAS_revN.1.docx Page: 111 / 290 TOPEX Bytton (HSPA+ / LTE) Other network debugging tools are also available in the “Test Net” utility page. TRACE For instance, the “Trace IP/NS” box allows you to trace the route towards the respective IP address and also looks up for addresses of nameservers used along this route. The default Internet site to be traced is “google.ro”, since it is both relevant and supposedly always on. See below a few examples of trace-ing different targets under various conditions of connecting to Internet: traceroute to www.topex.ro (193.226.61.45), 30 hops max, 38 byte packets 1 * * * 2 172.20.175.201 (172.20.175.201) 64.266 ms 59.407 ms 47.852 ms 3 172.20.182.46 (172.20.182.46) 71.693 ms 59.468 ms 47.834 ms 4 MobileCarrierB.RoNIX.Ro (217.156.113.33) 63.496 ms 51.125 ms 47.809 ms 5 EuroWEB.RoNIX.Ro (217.156.113.6) 71.198 ms 47.609 ms 51.548 ms 6 ewro-crli1.qrli2.buh.ew.ro (81.24.28.198) 59.608 ms 47.121 ms 51.730 ms 7 ip4-81-24-28-213.euroweb.ro (81.24.28.213) 67.992 ms 71.139 ms 48.347 ms 8 webhosting.euroweb.ro (193.226.61.45) 67.754 ms 51.118 ms 47.859 ms And respectively: traceroute to k.ro (194.102.255.23), 30 hops max, 38 byte packets 1 46.108.17.161 (46.108.17.161) 2.827 ms 3.334 ms 2.638 ms 2 basarabia.20ge.adnettelecom.ro (46.108.3.165) 3.056 ms 2.532 ms 2.764 ms 3 cr-rbas.40gbps.adnettelecom.ro (46.108.4.217) 2.982 ms 2.950 ms 3.019 ms 4 cr-cr2.40gbps.adnettelecom.ro (46.108.4.221) 2.893 ms 3.282 ms 2.900 ms 5 95.77.112.137 (95.77.112.137) 2.785 ms 3.276 ms 3.157 ms 6 ro-buh01a-rd1-te-1-2-v519.upcnet.ro (95.77.36.249) 3.667 ms ro-buh01ard1-v1796.upcnet.ro (95.77.36.61) 3.811 ms ro-buh01a-rd1-te-1-1v518.upcnet.ro (95.77.36.245) 3.157 ms 7 ro-buh01a-ra1-v1324.astralnet.ro (95.77.36.122) 3.644 ms 3.034 ms 3.221 ms 8 www.k.ro (194.102.255.23) 3.397 ms 3.547 ms 3.295 ms Using the air (3G) interface: traceroute to topex.ro (193.226.61.45), 30 hops max, 38 byte packets 1 * * * 2 172.20.175.201 (172.20.175.201) 1064.733 ms 1030.544 ms 1127.839 ms 3 172.20.182.46 (172.20.182.46) 1139.473 ms 1118.869 ms 1019.323 ms 4 MobileCarrierB.RoNIX.Ro (217.156.113.33) 1262.126 ms 1163.873 ms 1235.038 ms 5 EuroWEB.RoNIX.Ro (217.156.113.6) 1327.847 ms 1206.329 ms 1363.900 ms ByttonLTE(full)_genericUsermanual_sw306FAS_revN.1.docx Page: 112 / 290 TOPEX Bytton (HSPA+ / LTE) 6 ewro-crli1.qrli2.buh.ew.ro (81.24.28.198) 1247.112 ms 1271.456 ms 1306.368 ms 7 ip4-81-24-28-213.euroweb.ro (81.24.28.213) 1355.474 ms 1139.117 ms 1139.388 ms 8 webhosting.euroweb.ro (193.226.61.45) 1259.150 ms 1250.796 ms 1119.130 ms And respectively: traceroute to k.ro (194.102.255.23), 30 hops max, 38 byte packets 1 * * * 2 172.20.175.201 (172.20.175.201) 2332.538 ms 1386.267 ms 1419.006 ms 3 172.20.182.46 (172.20.182.46) 1363.214 ms 1270.032 ms 2586.818 ms 4 MobileCarrierB-peer.astralnet.ro (83.103.173.38) 1283.790 ms 1324.193 ms 1451.071 ms 5 ro-buh01a-ri1-ge-2-1-2-v792.astralnet.ro (83.103.173.37) 1507.310 ms 1258.578 ms 1207.041 ms 6 95.77.36.69 (95.77.36.69) 1163.062 ms 1155.097 ms 986.773 ms 7 ro-buh01a-rd1-te-1-3-v520.upcnet.ro (95.77.36.253) 920.070 ms ro-buh01ard1-te-1-2-v519.upcnet.ro (95.77.36.249) 1298.911 ms ro-buh01a-rd1-te-1-1v518.upcnet.ro (95.77.36.245) 1238.873 ms 8 ro-buh01a-ra1-v1324.astralnet.ro (95.77.36.122) 1150.084 ms 591.061 ms 638.912 ms 9 www.k.ro (194.102.255.23) 626.859 ms 695.420 ms 591.892 ms When the Ethernet connection is used for WAN instead of the PPP1 link, response times are faster: traceroute: warning: topex.ro has multiple addresses; using 172.27.168.7 traceroute to topex.ro (172.27.168.7), 30 hops max, 38 byte packets 1 voluntarigw.topex.ro (192.168.1.8) 0.629 ms 0.522 ms 0.978 ms 2 10.0.144.2 (10.0.144.2) 1.932 ms 1.950 ms 2.434 ms 3 172.27.168.7 (172.27.168.7) 2.363 ms 2.529 ms 1.956 ms Or: traceroute to k.ro (194.102.255.23), 30 hops max, 38 byte packets 1 46.108.17.161 (46.108.17.161) 2.804 ms 2.191 ms 2.263 ms 2 basarabia.20ge.adnettelecom.ro (46.108.3.165) 2.421 ms 2.130 ms 2.146 ms 3 cr-rbas.40gbps.adnettelecom.ro (46.108.4.217) 16.352 ms 2.396 ms 2.317 ms 4 cr-cr2.40gbps.adnettelecom.ro (46.108.4.221) 2.403 ms 2.222 ms 2.378 ms 5 95.77.112.137 (95.77.112.137) 2.327 ms 3.272 ms 2.306 ms 6 ro-buh01a-rd1-v1796.upcnet.ro (95.77.36.61) 2.789 ms ro-buh01a-rd1-te-11-v518.upcnet.ro (95.77.36.245) 2.617 ms 3.874 ms 7 ro-buh01a-ra1-v1324.astralnet.ro (95.77.36.122) 3.117 ms 2.704 ms 3.123 ms 8 www.k.ro (194.102.255.23) 2.426 ms 2.315 ms 2.399 ms And respectively for the default for target google.ro: traceroute: warning: www.google.ro has multiple addresses; using 173.194.39.87 traceroute to www-cctld.l.google.com (173.194.39.87), 30 hops max, 38 byte packets 1 46.108.17.161 (46.108.17.161) 3.184 ms 2.300 ms 2.192 ms 2 basarabia.20ge.adnettelecom.ro (46.108.3.165) 2.186 ms 2.115 ms 2.150 ms 3 cr-rbas.40gbps.adnettelecom.ro (46.108.4.217) 2.485 ms 2.311 ms 2.186 ms 4 72.14.213.18 (72.14.213.18) 37.016 ms 32.275 ms 31.882 ms 5 72.14.238.44 (72.14.238.44) 32.337 ms 32.057 ms 32.083 ms 6 72.14.236.68 (72.14.236.68) 32.768 ms 35.371 ms 35.273 ms 7 209.85.241.213 (209.85.241.213) 47.464 ms 47.781 ms 58.493 ms 8 72.14.234.251 (72.14.234.251) 47.933 ms 50.867 ms 48.061 ms 9 bud01s10-in-f23.1e100.net (173.194.39.87) 47.493 ms 47.361 ms 47.254 ms ByttonLTE(full)_genericUsermanual_sw306FAS_revN.1.docx Page: 113 / 290 TOPEX Bytton (HSPA+ / LTE) Commands Finally, the field “Command” allows access to the BusyBox utility. This is a a single small executable that combines tiny versions of many common UNIX utilities. These utilities generally have fewer options than their full-featured GNU counterparts, but still the included optionstprovide the expected functionality and behave very much like the complete versions. BusyBox is designed to minimize size and to work with limited resources, thus is well fitted for embedded operating systems such as Bytton LTE. See below a few examples: Linux bytton 2.6.34 #66 Tue Jun 12 17:31:38 EEST 2012 ppc unknown -rwxr-xr-x -rwxr-xr-x -rwxr-xr-x -rwxr-xr-x drwxr-xr-x 1 1 1 1 2 root root root root root root root root root root 4074 4041 583 3582 160 Jun Jun Jun Jun Jun 13 13 13 13 13 11:13 11:13 11:13 11:13 11:13 8021x.awk 8021x.html AT.html addip.html adm. Or Filesystem rootfs /dev/root tmpfs tmpfs tmpfs tmpfs tmpfs tmpfs tmpfs proc devpts sysfs 1k-blocks 57344 57344 100352 100352 100352 100352 0 100352 100352 0 0 0 Used Available Use% Mounted on 15432 41912 27% / 15432 41912 27% / 1176 99176 1% /tmp 1176 99176 1% /etc 1176 99176 1% /var 1176 99176 1% /dev 0 0 0% /proc 1176 99176 1% /mnt 1176 99176 1% /www 0 0 0% /proc 0 0 0% /dev/pts 0 0 0% /sys Figure 5-54: Commands available in “Network Tests” page. Should you enter an incorrect or ambiguous command, Busybox promots you for the correct syntax and available options. ByttonLTE(full)_genericUsermanual_sw306FAS_revN.1.docx Page: 114 / 290 TOPEX Bytton (HSPA+ / LTE) 5.2.10 VLAN This page configure the settings for the Virtual LANs of Bytton LTE. Figure 5-55: The “VLAN” page with several virtual LANs defined. A virtual or logical LAN is a subgroup in the physical local area network, which is created by software. It functions at Layer 2, unlike IP sub-networks which operate at Layer 3 level. R&S Topex’s ByttonICR implements VLANs according to the IEEE standard 802.1q. This specifies additional bits (flags) to the data packets, marking them for prioritization and/or routing for VLAN. The “VLAN” table explained here lets you define several logical networks – for each one you must set up the Interface to be used, ID number for the respective VLAN, IP address and corresponding net mask, then establish the MTU. ByttonLTE(full)_genericUsermanual_sw306FAS_revN.1.docx Page: 115 / 290 TOPEX Bytton (HSPA+ / LTE) At first the table is empty, you must use Add New to create an additional entry, then Edit to change the parameters. Also, each VLAN definition that you have entered may be individually saved or deleted, using the links to the right of the table. As you can see, when you set up the Interface to be used for each VLAN, the drop list shows not only the three physical interfaces: - BR0 (Eth ports for LAN and WiFi clients - Embedded Modem - Primary or secondary WAN, but also all the bridges and logical interfaces (IPSEC, GRE, PPTP or Open VPN Tunnels) that you have defined previously: IPSEC1, GRET1, GRET2, br0.2, br1, 2, 3, wan.3, lan.04, ppp1.4, ipsec1.5, OVPN_TUN or OVPN_TAP0! Or: What is a VLAN? First, let’s remember what is a “normal” LAN: one should consider not just the geographical definition (small area, just a few computers) since a FDDI network has thousands of users and an Internet Protocol "Class A" LAN can in theory accommodate more than 16 million devices organized into subnets! The logical definition is more important: a LAN is a single broadcast domain, just one subnet. The broadcast domain is a restricted area in which information can be transmitted for all devices in the domain to receive. In this domain, any network equipment can transmit data directly to other equipment or device without going through a routing device. The reverse is also true, routers block broadcasts by design, so they must sit between LANs. Between the members or the same LAN no routing is performed, there are only hubs, bridges and switches. Instead, routing is required between different LANs! A virtual LAN is a logical domain where broadcasts and multicasts go only to the nodes in the respective virtual LAN. Membership is not dependent upon physical location or hardware, but instead is defined by the Manager of the network, hence the name “virtual LAN”. ByttonLTE(full)_genericUsermanual_sw306FAS_revN.1.docx Page: 116 / 290 TOPEX Bytton (HSPA+ / LTE) Why use VLANs? - to minimize the broadcast domain. Broadcasts are required for the normal function of a network. Many protocols and applications depend on broadcast communication to function properly. But certain network devices will send out large amounts of broadcast traffic that can really slow down the network, especially when it reaches a certain size, usually 600 devices or more. A layer 2 switched network is in a single broadcast domain and the broadcasts can reach the network segments which are so far where a particular broadcast has no scope and consume available network bandwidth. A layer 3 device (typically a router) is used to segment a broadcast domain. VLANs may be used to segment a network, thus limiting the amount of broadcast: by segmenting a large LAN to smaller VLANs, the broadcast traffic will / can be reduced as each broadcast will be sent on to the relevant VLAN only. With VLAN, there will be less ARP messages and broadcasts! - for Security. VLANs can be used as a security device to prevent specific hosts from seeing other hosts. The VLAN technique may help to restrict sensitive traffic originating from an enterprise department within itself. In a VLAN network environment, with multiple broadcast domains, the network Administrators have control over each port and user. Now malicious user can no longer just plug their workstation into any switch port and sniff the network traffic using a packet sniffer. The network administrator controls each port and whatever resources it is allowed to use. Usage of VLAN means an increase in security, since the information is encapsulated in an additional level and possibly analyzed. VLANs can separate traffic logically within a switch or station, son one VLAN can not communicate directly with stations on another VLAN. You can may also restrict which are allowed to communicate with other VLANs, thus improving security. For instance, you could set up a guest VLAN that only allows access to the Internet, not to other machines in the local network. Another “VoIP phone VLAN” may be created especially for IP phones only. Generally, inside a company, different sections, departments, buildings, floors, or even individual computers may be set up into their own networks, as large pr small as really required! - Much greater flexibility in usage and more flexibility in administration. Use: A VLAN has the same attributes as a physical local area network (LAN), but it allows for end stations to be grouped together even if they are not located on the same network switch or even in the same building. To physically replicate the functions of a VLAN, it would be necessary to install a separate, parallel collection of network cables and equipment which are kept separate from the primary network. Compared to this hardware approach, when you use VLANs, a new logical subgroup within a local area network may be simply created via software, fast and with low costs, instead of manually moving Ethernet cables in the network switches. Since Virtual LANs are location-independent, the VLAN of a certain department may be all over the building. Users can move to another office or another building while remaining in the same LAN. One of the greatest advantages of VLANs is precisely this: when a computer is physically moved to another location, it can remain logically in the same VLAN without any need for hardware reconfiguration. Management: LAN membership is easily defined by the network manager. All modifications to the network are easier to perform, since all the architecture can be changed by simple parametering of the switches via the Web configuration interface of Bytton. VLAN membership can be configured through software instead of physically relocating devices or connections. - Costs: Any software implementation is cheaper than its hardware counterpart. Segmenting a large VLAN to smaller VLANs costs less than creating a routed network with routers because normally routers are more expensive than simple switches! Also, since traffic between different LANs is routed, it is better to keep all traffic in a single LAN and avoid WAN links, which are expensive! ByttonLTE(full)_genericUsermanual_sw306FAS_revN.1.docx Page: 117 / 290 TOPEX Bytton (HSPA+ / LTE) Using VLANs: After defining the VLANs in the table, such as this: Or: then issuing a Commit command to make the changes permanent, the VLAN interfaces will be visible in Interface Status: br0.19 Link encap:Ethernet HWaddr 00:50:C2:F5:23:2A inet addr:109.166.184.149 Bcast:109.255.255.255 Mask:255.0.0.0 UP BROADCAST RUNNING MULTICAST MTU:1500 Metric:1 RX packets:0 errors:0 dropped:0 overruns:0 frame:0 TX packets:0 errors:0 dropped:0 overruns:0 carrier:0 collisions:0 txqueuelen:0 RX bytes:0 (0.0 B) TX bytes:0 (0.0 B) br0.2 Link encap:Ethernet HWaddr 00:50:C2:F5:23:2A inet addr:10.0.58.19 Bcast:10.0.58.255 Mask:255.255.255.0 UP BROADCAST RUNNING MULTICAST MTU:1500 Metric:1 RX packets:0 errors:0 dropped:0 overruns:0 frame:0 TX packets:0 errors:0 dropped:0 overruns:0 carrier:0 collisions:0 txqueuelen:0 RX bytes:0 (0.0 B) TX bytes:0 (0.0 B) br0.2.4 Link encap:Ethernet HWaddr 00:50:C2:F5:23:2A inet addr:172.168.254.197 Bcast:172.168.254.199 Mask:255.255.255.252 UP BROADCAST RUNNING MULTICAST MTU:1473 Metric:1 RX packets:0 errors:0 dropped:0 overruns:0 frame:0 TX packets:0 errors:0 dropped:0 overruns:0 carrier:0 collisions:0 txqueuelen:0 RX bytes:0 (0.0 B) TX bytes:0 (0.0 B) lan0.14 Link encap:Ethernet HWaddr 00:50:C2:F5:23:27 inet addr:127.27.155.203 Bcast:127.255.255.255 Mask:255.255.255.254 UP BROADCAST RUNNING MULTICAST MTU:1500 Metric:1 RX packets:0 errors:0 dropped:0 overruns:0 frame:0 TX packets:0 errors:0 dropped:0 overruns:0 carrier:0 collisions:0 txqueuelen:0 RX bytes:0 (0.0 B) TX bytes:0 (0.0 B) lan0.15 Link encap:Ethernet HWaddr 00:50:C2:F5:23:27 ByttonLTE(full)_genericUsermanual_sw306FAS_revN.1.docx Page: 118 / 290 TOPEX Bytton (HSPA+ / LTE) inet addr:127.27.254.98 Bcast:127.27.254.99 Mask:255.255.255.252 UP BROADCAST RUNNING MULTICAST MTU:1500 Metric:1 RX packets:0 errors:0 dropped:0 overruns:0 frame:0 TX packets:0 errors:0 dropped:0 overruns:0 carrier:0 collisions:0 txqueuelen:0 RX bytes:0 (0.0 B) TX bytes:0 (0.0 B) wan.18 Link encap:Ethernet HWaddr 00:50:C2:F5:23:29 inet addr:192.168.148.254 Bcast:192.168.148.255 Mask:255.255.255.252 UP BROADCAST RUNNING MULTICAST MTU:1473 Metric:1 RX packets:0 errors:0 dropped:0 overruns:0 frame:0 TX packets:0 errors:0 dropped:0 overruns:0 carrier:0 collisions:0 txqueuelen:0 RX bytes:0 (0.0 B) TX bytes:0 (0.0 B) wan.20 Link encap:Ethernet HWaddr 00:50:C2:F5:23:29 inet addr:203.194.198.31 Bcast:203.194.198.255 Mask:255.255.255.0 UP BROADCAST RUNNING MULTICAST MTU:1480 Metric:1 RX packets:0 errors:0 dropped:0 overruns:0 frame:0 TX packets:0 errors:0 dropped:0 overruns:0 carrier:0 collisions:0 txqueuelen:0 RX bytes:0 (0.0 B) TX bytes:0 (0.0 B) wan:0 Link encap:Ethernet HWaddr 00:50:C2:F5:23:29 inet addr:192.168.148.4 Bcast:192.168.148.255 Mask:255.255.255.0 UP BROADCAST RUNNING MULTICAST MTU:1500 Metric:1 Base address:0x3000 The corresponding routes have been added in the static Routing Table of Bytton LTE: Kernel IP routing table Destination Gateway Genmask Flags Metric Ref Use Iface 10.64.64.65 0.0.0.0 255.255.255.255 UH 0 0 0 ppp1 194.102.255.23 0.0.0.0 255.255.255.255 UH 0 0 0 wan 127.27.155.202 0.0.0.0 255.255.255.254 U 0 0 0 lan0.14 172.168.254.196 0.0.0.0 255.255.255.252 U 0 0 0 br0.2.4 192.168.148.252 0.0.0.0 255.255.255.252 U 0 0 0 wan.18 127.27.254.96 255.255.255.252 U 0 0 0 lan0.15 0.0.0.0 10.0.0.0 0.0.0.0 255.255.255.0 U 0 0 0 br0 192.168.148.0 0.0.0.0 255.255.255.0 U 0 0 0 wan 203.194.198.0 0.0.0.0 255.255.255.0 U 0 0 0 wan.20 10.0.58.0 0.0.0.0 255.255.255.0 U 0 0 0 br0.2 172.27.0.0 0.0.0.0 255.255.0.0 U 0 0 0 lan0 192.168.0.0 0.0.0.0 255.255.0.0 U 0 0 0 wan 109.0.0.0 0.0.0.0 255.0.0.0 U 0 0 0 br0.19 0.0.0.0 192.168.1.8 0.0.0.0 UG 0 0 0 wan ByttonLTE(full)_genericUsermanual_sw306FAS_revN.1.docx Page: 119 / 290 TOPEX Bytton (HSPA+ / LTE) 5.2.11 ETH Ports This menu element allow for fine tuning (monitoring and control) of each ETH ports of the Bytton equipment: Figure 5-56: The “ETH ports” page for physical configuration of Ethernet ports. While previous “IP settings”, including LAN0/WAN0 and individual IP and netmask assignment for each port referred to the logical aspects, this configuration page refers to the physical parameters for each Ethernet port of the equipment! ETH Ports: For each of these four ports you can establish precisely the network operating parameters: Respectively Duplex mode, Speed , Auto-negotiation and local name: ByttonLTE(full)_genericUsermanual_sw306FAS_revN.1.docx Page: 120 / 290 TOPEX Bytton (HSPA+ / LTE) Duplex Mode: you may let the default Full duplex, or choose Half duplex instead Speed: You may choose 1/10 Mbps instead of the default 10/100 Mps. Auto-negotiation: by default it is Enabled. Why disable the Auto-negotiation? The automatic negotiation is an optional function of the IEEE 802.3u Fast Ethernet standard that enables Ethernet adapters to exchange automatically information over a link, about speed and duplex abilities. By default, the ETH ports of Bytton LTE are set to auto-negotiation, since different users may connect to it, having several types of network adapters. The users may have either a 10 Mb, a 100 Mb Ethernet, or a 10/100 Mb card in their notebooks, so the switch of Bytton must be able to negotiate their speed and duplex mode. The manual fine-tuning of these ports is provided to solve possible problems, which could happen, for instance when one port on the link operates at half-duplex while the other port operates at fullduplex. This could occur when one or both ports on a link are reset and the auto-negotiation process does not result in both link partners having the same configuration. Both sides of a link should have auto-negotiation on, or both sides should have it off. Thus, if the user’s notebook cannot fully configure its Ethernet adapter, then Bytton must be able to adjust its network adapter accordingly! Interface name You can also edit (change) the default names that Bytton assigns to its four Eth interfaces: wan, lan0, lan1, lan2, but this name will be valid only in this table: After Commit and reboot, the new names will show up in the ETH Ports table: Or: The central pane, “Port Status”, shows the current state of the Ethernet ports of Bytton. ByttonLTE(full)_genericUsermanual_sw306FAS_revN.1.docx Page: 121 / 290 TOPEX Bytton (HSPA+ / LTE) In the example below, the wan port is with the default settings (auto negotiation, full duplex) and is active for a 100Mbps connection, while lan0 was set to half duplex, speed of 10 Mbps and is not in use (no link actually detected): After a reboot, the new parameters for operation of Eth ports will be active, and will show up in the “ETH Port” panel located in the middle of the window, as shown in the following examples: Or: ByttonLTE(full)_genericUsermanual_sw306FAS_revN.1.docx Page: 122 / 290 TOPEX Bytton (HSPA+ / LTE) Or: When every ETH port is individually configured (LAN1 and LAN2 have been assigned each its own IP, LAN0 is set to second WAN, but not connected), all four Ethernet ports will show up accordingly in the Port Status display pane: STATUS wan Speed: 100Mb/s Duplex: Full Auto-negotiation: on Link detected: yes STATUS lan0 Speed: 10Mb/s Duplex: Half Auto-negotiation: off Link detected: no STATUS lan1 Speed: 100Mb/s Duplex: Full Auto-negotiation: on Link detected: yes STATUS lan2 Speed: 100Mb/s Duplex: Full Auto-negotiation: on Link detected: yes. ByttonLTE(full)_genericUsermanual_sw306FAS_revN.1.docx Page: 123 / 290 TOPEX Bytton (HSPA+ / LTE) The routing table will also show the routes for the local ETH ports whose IP addresses have been individually assigned: Kernel IP routing table Destination Gateway Genmask Flags Metric Ref Use Iface 193.57.235.84 192.168.1.8 255.255.255.255 UGH 0 0 0 wan 172.168.1.12 0.0.0.0 255.255.255.252 U 0 0 0 lan2 10.0.0.0 0.0.0.0 255.255.255.0 U 0 0 0 br0 172.168.1.0 0.0.0.0 255.255.255.0 U 0 0 0 lan1 192.168.0.0 0.0.0.0 255.255.0.0 U 0 0 0 wan 0.0.0.0 192.168.1.8 0.0.0.0 UG 0 0 0 wan ARP TABLE What is it? Generally, the Address Resolution Protocol (ARP) is a computer networking protocol for determining a network host's link layer or hardware address when only its Internet Layer (IP) or Network Layer address is known. This function is critical in local area networking as well as for routing internetworking traffic across gateways (routers) based on IP addresses when the next-hop router must be determined. ARP was defined as early as 1982 by RFC 826. Each computer from a network maintains its own table of the mapping from Layer 3 addresses IP addresses such as 10.0.0.12 ) to Layer 2 addresses (physical Ethernet addresses or MACs such as 31:fc:01:90:e5:c7 ). In a modern computer this is maintained almost entirely by ARP packets on the local network and it thus often called the ARP table (cache)' as opposed to “table for Layer 2 addresses”'. or Currently, due to the overwhelming prevalence of IPv4 and Ethernet in general networking, ARP is most frequently used to translate IPv4 addresses (OSI Layer 3) into Ethernet MAC addresses (OSI Layer 2). In the next generation Internet Protocol, IPv6, ARP's functionality is provided by the Neighbor Discovery Protocol (NDP). ByttonLTE(full)_genericUsermanual_sw306FAS_revN.1.docx Page: 124 / 290 TOPEX Bytton (HSPA+ / LTE) In the ARP cache of ByttonICR, each entry shows the IP address, the hardware type (as 0x1 instead of „10Mbps Ethernet”), the flags, the hardware address (MAC), and optionally the corresponding mask and the name assigned to the respective device: IP address 192.168.1.2 172.168.1.13 192.168.1.8 192.168.1.88 192.168.144.22 192.168.149.5 HW type 0x1 0x1 0x1 0x1 0x1 0x1 Flags 0x2 0x2 0x2 0x2 0x2 0x2 HW address 00:0e:0c:4a:91:9c 00:06:4f:02:15:82 b4:99:ba:a9:37:5c f4:ce:46:fb:b5:da 6c:f0:49:76:24:4b 6c:62:6d:ad:61:7b Mask * * * * * * Device wan br0 wan wan wan lan0 The type of ARP entries may be dynamic (most often used), static or … invalid! Or:: The invalid entries are the ones which show up incomplete or with MAC values of fffffffff… or 00000000, the device may not be actually connected to the network. Since dynamic ARP entries are the most common, the correct name would be ARP Cache, since a table implies rather static, persistent values: ARP Table IP address 192.168.1.2 172.168.1.13 192.168.1.8 192.168.151.161 192.168.1.88 192.168.144.22 192.168.149.5 HW type 0x1 0x1 0x1 0x1 0x1 0x1 0x1 Flags 0x2 0x2 0x2 0x2 0x2 0x2 0x2 HW address 00:0e:0c:4a:91:9c 00:06:4f:02:15:82 b4:99:ba:a9:37:5c 00:50:c2:e4:b0:c3 f4:ce:46:fb:b5:da 6c:f0:49:76:24:4b 6c:62:6d:ad:61:7b Mask * * * * * * * Device wan br0 wan lan0 wan wan lan0 Other examples or ARP Table shown on Bytton LTE: IP address 172.27.168.7 10.0.0.13 172.27.168.70 HW type 0x1 0x1 0x1 Flags 0x0 0x2 0x0 HW address 00:00:00:00:00:00 00:06:4f:02:15:82 00:00:00:00:00:00 Mask * * * Device lan0 br0 lan0 IP address 172.27.168.70 10.0.0.13 192.168.1.8 172.27.168.7 HW type 0x1 0x1 0x1 0x1 Flags 0x0 0x2 0x2 0x0 HW address 00:00:00:00:00:00 00:06:4f:02:15:82 b4:99:ba:a9:37:5c 00:00:00:00:00:00 Mask * * * * Device lan0 br0 wan lan0 IP address 172.27.168.70 172.27.168.170 10.0.0.13 HW type 0x1 0x1 0x1 Flags 0x0 0x0 0x2 HW address 00:00:00:00:00:00 00:00:00:00:00:00 00:06:4f:02:15:82 Mask * * * Device lan0 lan0 br0 Respectively: ByttonLTE(full)_genericUsermanual_sw306FAS_revN.1.docx Page: 125 / 290 TOPEX Bytton (HSPA+ / LTE) 192.168.1.8 172.27.168.7 0x1 0x1 0x2 0x0 b4:99:ba:a9:37:5c 00:00:00:00:00:00 * * wan lan0 Usage of ARP table All IP devices must have an ARP table. This ARP cache can be used for troubleshooting the network connectivity. When everything is working fine with ARP, you will have a dynamic ARP entry that is complete (both MAC and IP values are there). But if you do not have a complete entry, if you encounter problems: you can clear your ARP cache: Arp –d * and then retry again to establish communication, by pinging the remote device you want to connect to: New ARP table, showing correct entries: IP address 172.27.168.70 10.0.0.13 172.27.168.7 HW type 0x1 0x1 0x1 Flags 0x0 0x2 0x0 HW address 00:00:00:00:00:00 00:06:4f:02:15:82 00:00:00:00:00:00 Mask * * * Device lan0 br0 lan0 Or: ARP Table IP address Device 192.168.177.1 192.168.1.13 192.168.1.88 192.168.1.8 HW type Flags HW address Mask 0x1 0x1 0x1 0x1 0x2 0x2 0x0 0x2 d8:d3:85:b9:98:b8 00:06:4f:02:15:82 00:00:00:00:00:00 b4:99:ba:a9:37:5c * * * * wan br0 br0 wan Reload <> Figure 5-56: The “ARP Table” with multiple entries. ByttonLTE(full)_genericUsermanual_sw306FAS_revN.1.docx Page: 126 / 290 TOPEX Bytton (HSPA+ / LTE) 5.2.12 MTU The last element of the LAN menu allows you to set the values for MTU. Figure 5-57: The “MTU” window of the LAN configuration page. Note: Although “MTU” shows up in the LAN section, it allows you to set the MTU values for all interfaces of Bytton LTE, including for WAN and Wan0, not just for the local Eth or wireless interfaces. Why is MTU important: Generally MTU ( Maximum Transmission Unit) is the largest physical packet size, measured in bytes, that a packet- or frame-based network (such as the Internet) can transmit unaltered. All messages which are larger than the MTU will divided into smaller packets and only after fragmentation will be sent out through the network. Every network has a different MTU, which is set by the network administrator. The minimum value that an MTU can be set to is 68. Also, for network protocols other than TCP, different MTU sizes may apply. On your machine (PC computer or Bytton LTE) you must also set the MTU value in accordance with the specific settings of the data network you use. Ideally, you want the MTU to be the same as the smallest MTU of all the networks between your machine and a message's final destination. Otherwise, if your messages are larger than any one of the intervening MTUs, they will get broken up (fragmented), which slows down considerably the transmission speeds. When the large packet encounters a router that can't handle that large a packet, it will ask for retransmission – also reducing data rates. On the other hand, if you set a too small MTU size “just to be sure”, this means relatively more overhead because of the header and more acknowledgements that must to be transmitted and handled – another cause of reduced throughput. Hence, there is always an optimal range of MTU values that you should try to observe! Optimal values Most Ethernet networks have an MTU of 1500, which is the default MTU setting for Windows 95 and later. On the other hand, the link via point-to-point protocol has a negotiated MTU, which is usually between 500 and 2000 bytes. In practice the MTU of many PPP connections is 576, so when you connect to the Internet via PPP1 link using the embedded modem, you should your Bytton's MTU value to 576 too. ATM (asynchronous transfer mode) has a fixed MTU of 48 bytes only. Other types of high speed networks feature a much higher MTU value, for instance Token Ring uses 4096 and the fiber optics networks FDDI employs a value of 4352! ByttonLTE(full)_genericUsermanual_sw306FAS_revN.1.docx Page: 127 / 290 TOPEX Bytton (HSPA+ / LTE) You should always bear in mind that the MTU is the maximum physical value. Thus, in many instances the net payload (logical size) must be smaller. For example, when you use tunnels, they add up specific headers to the packets, so you must reduce the MTU to achieve an overall length no greater that 1500! The same holds true for PPP over Ethernet, you must take into account the extra encapsulation, the actual length must be smaller, in order not to exceed the 1500 bytes limit! The real MTU depends upon the actual carrier that you use to connect to Internet, for instance several ADSL providers have a MTU larger than 1500, so that the Ethernet packets that are transmitted via ADSL will not be over this limit. In practice, trial and error is the only sure way of finding the optimal MTU for each case. It works like this: you issue a PING command towards your Internet provider with the options “–f” (set Don’t Fragment flag in the packet) and – l 1472 (specifies the size): ping -f -l 1472 k.ro or ping –f –l 1462 209.123.109.175 and watch for the results: If the answer is OK (O% loss), you can increase the MTU value (1472) by 10 and try again. Continue with larger and larger values until you receive the error message: "Packet needs to be fragmented." The message is quite clear: the value of 1482 is too high, the packets need to be fragmented, but you have set the flag “DF” (Do Not Fragment) so the packets cannot be transmitted. You get “100% loss” for the PING data packets! Repeat this step by decreasing your current MTU value by 10 and using the PING command again. Continue until you no longer receive a message that the packets are fragmented. Verify this by pinging with successive size increments / decrements smaller than ten, as shown: 1473 is too large! ByttonLTE(full)_genericUsermanual_sw306FAS_revN.1.docx Page: 128 / 290 TOPEX Bytton (HSPA+ / LTE) “1472” seems to be just right! The final result is that this is your best MTU value for the respective interface and provider. Bytton LTE lets you specify the optimal MTU value for each of the physical or logical interfaces of the equipment: The drop list lets you choose from all the available interfaces of the equipment: Or: Select the corresponding MTU value, save the individual entry, then use the button “Save and Reload” at the bottom of the page and the option Commit to make the changes permanent! ByttonLTE(full)_genericUsermanual_sw306FAS_revN.1.docx Page: 129 / 290 TOPEX Bytton (HSPA+ / LTE) Note that the VLAN table also allows you to set the MTU value for each of the VLANs you create: The corresponding values set up for MTU over different interfaces can be seen in Iface Status: br1 Link encap:Ethernet HWaddr 00:50:C2:F5:23:27 inet addr:10.0.58.39 Bcast:10.0.255.255 Mask:255.255.0.0 UP BROADCAST RUNNING MULTICAST MTU:1472 Metric:1 RX packets:0 errors:0 dropped:0 overruns:0 frame:0 TX packets:0 errors:0 dropped:0 overruns:0 carrier:0 collisions:0 txqueuelen:0 RX bytes:0 (0.0 B) TX bytes:0 (0.0 B) gret1 Link encap:UNSPEC HWaddr 0A-00-3A-25-00-00-00-00-00-00-00-00-00-00-00-00 inet addr:10.0.58.27 P-t-P:10.0.58.27 Mask:255.255.255.254 UP POINTOPOINT RUNNING NOARP MULTICAST MTU:1410 Metric:1 RX packets:0 errors:0 dropped:0 overruns:0 frame:0 TX packets:0 errors:0 dropped:0 overruns:0 carrier:0 collisions:0 txqueuelen:0 RX bytes:0 (0.0 B) TX bytes:0 (0.0 B) lan0 Link encap:Ethernet HWaddr 00:50:C2:F5:23:27 inet addr:192.168.148.148 Bcast:192.168.148.151 Mask:255.255.255.252 UP BROADCAST MULTICAST MTU:1472 Metric:1 RX packets:0 errors:0 dropped:0 overruns:0 frame:0 TX packets:1 errors:0 dropped:0 overruns:0 carrier:0 collisions:0 txqueuelen:1000 RX bytes:0 (0.0 B) TX bytes:46 (46.0 B) Base address:0x2000 ppp1 Link encap:Point-to-Point Protocol inet addr:93.122.148.36 P-t-P:10.64.64.65 Mask:255.255.255.255 UP POINTOPOINT RUNNING NOARP MULTICAST MTU:1500 Metric:1 RX packets:673 errors:0 dropped:0 overruns:0 frame:0 TX packets:562 errors:0 dropped:0 overruns:0 carrier:0 collisions:0 txqueuelen:3 RX bytes:489621 (478.1 KiB) TX bytes:78692 (76.8 KiB) wan Link encap:Ethernet HWaddr 00:50:C2:F5:23:29 inet addr:192.168.1.148 Bcast:192.168.255.255 Mask:255.255.0.0 UP BROADCAST RUNNING MULTICAST MTU:1500 Metric:1 RX packets:50840 errors:13 dropped:0 overruns:0 frame:0 TX packets:49 errors:0 dropped:0 overruns:0 carrier:0 collisions:0 txqueuelen:1000 RX bytes:3121857 (2.9 MiB) TX bytes:13690 (13.3 KiB) Base address:0x3000 wlan0 Link encap:Ethernet HWaddr 00:19:70:49:F3:D7 UP BROADCAST RUNNING MULTICAST MTU:1500 Metric:1 RX packets:0 errors:0 dropped:0 overruns:0 frame:0 TX packets:147 errors:0 dropped:0 overruns:0 carrier:0 collisions:0 txqueuelen:1000 RX bytes:0 (0.0 B) TX bytes:16962 (16.5 KiB) ByttonLTE(full)_genericUsermanual_sw306FAS_revN.1.docx Page: 130 / 290 TOPEX Bytton (HSPA+ / LTE) 5.3 WAN Here are the pages for configuring the WAN (remote network) side of the Bytton LTE router Figure 5-58: The WAN webpage. This WAN Home-page briefly describes your options in setting the WAN connection. 5.3.1. Settings Allow you to select the type of the interface you use for WAN connection, the usage of fail-over and of masquerading: Figure 5-59: Webpage for setting WAN Interface type and Failover. ByttonLTE(full)_genericUsermanual_sw306FAS_revN.1.docx Page: 131 / 290 TOPEX Bytton (HSPA+ / LTE) Primary Interface: You can select either: 11. Embedded modem (PPP link) 12. PPP over Ethernet (PPPoE) 13. Ethernet Port Secondary Interface: You can select either: 14. Embedded modem (PPP link) 15. PPP over Ethernet (PPPoE) 16. Ethernet Port As you can see, there are two options for interfaces, primary and secondary. If the “Fail over” feature is enabled, when the primary WAN interface is no longer available, the Bytton LTE equipment automatically switches to the secondary interface. Fail-over: When Enabled, the equipment will automatically switch from the primary WAN interface to the secondary interface, in case the main connection is broken . By default it is disabled. Ping IP: an external address that will be periodically pinged. If it does not answer, Rohde & Schwarz Topex S.A. Bytton will decide whether the primary interface for the Internet is unavailable and it will switch to the secondary interface. Ping Interval: the time period for pinging the respective address, for example ten or 25 seconds in the above example. If the interval is too small, even a momentary interruption will cause the unneeded switching from the primary WAN interface to the alternate one. But if the period is too long, for some time there will be no Internet connection available (the primary WAN interface has failed but the secondary one has not yet been put in use). Masquerade: Enable or Disable masquerading. Click the link located at the bottom, above the “Save” button, to go to the secondary page with settings for NAT (masquerade). The NAT table is by default empty or contains just the most used outgoing interfaces, WAN and PPP, so in the beginning you should use Add New if you need new entries: ByttonLTE(full)_genericUsermanual_sw306FAS_revN.1.docx Page: 132 / 290 TOPEX Bytton (HSPA+ / LTE) You can define as many Masquerading rules as you need: After applying a Commit, you can see the new masquerading rules as active in the automated Firewall of Bytton LTE: Firewall view rule # Generated by iptables-save v1.4.10 on Tue Dec 11 15:01:05 2012 *nat :PREROUTING ACCEPT [973:87799] :OUTPUT ACCEPT [226:13596] :POSTROUTING ACCEPT [168:10080] -A POSTROUTING -o ppp3 -j MASQUERADE -A POSTROUTING -o ppp3 -j MASQUERADE -A POSTROUTING -o wan -j MASQUERADE -A POSTROUTING -o ppp1 -j MASQUERADE COMMIT # Completed on Tue Dec 11 15:01:05 2012 Note: Although masquerading may be applied for all interfaces of the Bytton LTE device, it makes sense only for remote networks, this is why the “NAT” sub-page was places inside the WAN menu. NAT –what and why? It performs IP Masquerading or NAT (translation of source and destination IP addresses and port numbers upon data packets). Network Address Translation basically allows a single device, such as the Bytton LTE router, to act as agent between the a public network (such as the Internet) and one or several local (or private) networks. This means that for the representation of the entire group of local machines to anything outside their network just a single unique IP address is required! Besides this “address range compression” feature, NAT is also used for Security and Administration. Implementation of dynamic NAT automatically creates a firewall between your internal network and outside networks or the Internet. Dynamic NAT allows only connections that originate inside the stub domain. Another l benefit of NAT is simpler network administration. Changes to the internal networks may be performed easily since the only external IP address either belongs to the router or comes from a pool of global addresses. And in case of changing the host for various services, it is enough to change the inbound mapping with the new inside local address at the router to reflect the new host. When the Internet provider that you connect to performs the masquerading at its location, you do not need to do NAT anymore, you should leave this option Disabled. This is why the NAT table of Bytton LTE does allow selective masquerading, you can select to enable or not NAT for each of the interfaces: ByttonLTE(full)_genericUsermanual_sw306FAS_revN.1.docx Page: 133 / 290 TOPEX Bytton (HSPA+ / LTE) Save each individual entry, then use the button “Save and Reload” The Firewall of Bytton LTE will automatically generate the corresponding NAT rules, in the example below, for enabling masquerading over ppp1 and respectively wan interfaces: ByttonLTE(full)_genericUsermanual_sw306FAS_revN.1.docx Page: 134 / 290 TOPEX Bytton (HSPA+ / LTE) Examples of Failover action: In your office you have a local network with cable or ADSL as WAN connection, which uses Bytton LTE as a backup link. You should set the Primary Interface to “Ethernet port” and the secondary one to the embedded mobile modem: Figure 5-60: Example of setting up primary and secondary WAN Interfaces, using Failover. In normal operation all computers in your local network will reach the Internet via ETH port, so the Ethernet link is up and the PPP link (GPRS/EDGE or UMTS/HSPA modem) is disconnected: The routing is done via 192.168.1.8 gateway in the Ethernet WAN network using the interface “wan”: Figure 5-61: Output route via cabled Ethernet connection wan. When the Ethernet link is broken, the PPP link goes up (online) automatically: or: and the access to Internet is performed through the HSPA modem (the “ppp1” interface) via generic 10.64.64.65 gateway. Figure 5-62: Output route via wireless connection ppp1. The Traceroute utility shows mobile connection to MobileCarrierB provider: traceroute to topex.ro (193.226.61.45), 30 hops max, 38 byte packets 1 * * * 2 172.20.175.201 (172.20.175.201) 516.496 ms 211.253 ms 259.951 ms 3 172.20.182.46 (172.20.182.46) 227.587 ms 250.843 ms 239.680 ms 4 MobileCarrierB.RoNIX.Ro (217.156.113.33) 239.418 ms 206.806 ms 220.147 ms 5 EuroWEB.RoNIX.Ro (217.156.113.6) 171.422 ms 211.237 ms 247.920 ms 6 ewro-crli1.qrli2.buh.ew.ro (81.24.28.198) 179.884 ms 211.249 ms 179.924 ms 7 ip4-81-24-28-213.euroweb.ro (81.24.28.213) 187.525 ms 199.069 ms 187.046 ms 8 webhosting.euroweb.ro (193.226.61.45) 219.948 ms 179.375 ms 187.124 ms ByttonLTE(full)_genericUsermanual_sw306FAS_revN.1.docx Page: 135 / 290 TOPEX Bytton (HSPA+ / LTE) 5.3.2. WAN Management Some firmware versions allow you to establish control over it, but the feature does exist in all Bytton equipments – management of the machine via Web page from the remote, WAN side, as opposed to the local, LAN side. This control Enables of Disables the management of the Bytton LTE equipment over the WAN side. By default, the management from WAN is enabled (permitted). “Management” means the access to the Web configuration page of the equipment and of SSH from the WAN side. By default, it is Enabled, which means the you can access the web pages of Bytton not only form the local network, but also from the remote (WAN) side. When you set it to Disabled instead, the configurations pages of Bytton LTE and SSH will be closed (no longer accessible) from the WAN side. In this case you will be able to access the Web configuration page of Bytton only form the BR0 (Ethernet and WiFi) side. Note: Here “WAN” refers to all distant (as opposed to local) networks, be they Ethernet connections, PPP link over the 3G+ mobile module, PPP over Ethernet, IPSEC or GRE secure tunnels for VPN, etc. The current firmware version (topex-3.0.1-FA-S) does not have this control, which means that Web management via WAN is always enabled! As you can see in the following examples, the Web interface for configuring Bytton LTE is accessible both on the local side (addresses in range 10.0.0.xxx): And also on the WAN side (addresses in class 192.168.1.yyy): ByttonLTE(full)_genericUsermanual_sw306FAS_revN.1.docx Page: 136 / 290 TOPEX Bytton (HSPA+ / LTE) 5.3.3. WAN Port Whenever you use an Ethernet interface for WAN connection, you must fill in the settings “IP Settings for the WAN Ethernet Interface”. Figure 5-63: Webpage for setting up WAN Port in the WAN settings. Address Type: options are Static or DHCP Assigned. .Default is “DHCP Assigned”, which means that the IP address of the WAN Ethernet Interface will be automatically assigned by a DHCP server. Note that in this case the fields following this option are inactive, as shown below. They are colored in gray, because you cannot write values into them. Figure 5-64: Selection of address type (Automatic) for WAN Port in the page for WAN. See the corresponding Routing Table for Automatic WAN (the ppp1 link has been stopped) Kernel IP routing table Destination Gateway 10.0.0.0 0.0.0.0 192.168.148.0 0.0.0.0 172.27.0.0 0.0.0.0 192.168.0.0 0.0.0.0 Genmask 255.255.255.0 255.255.255.0 255.255.0.0 255.255.0.0 Flags U U U U Metric 0 0 0 0 Ref 0 0 0 0 Use 0 0 0 0 Iface br0 wan lan0 wan When you select ”Static” instead of DHCP, then you must also fill in the: IP Address value on the WAN side, Netmask for this address , and address of the Gateway used for routing. You must also specify the name servers. ByttonLTE(full)_genericUsermanual_sw306FAS_revN.1.docx Page: 137 / 290 TOPEX Bytton (HSPA+ / LTE) Figure 5-65: Examples of setting Static address for WAN Eth interface in the WAN pages. Corresponding routing table for Static WAN address of 192.168.1.148 with 192.168.1.8 gateway: Kernel IP routing table Destination Gateway 10.0.0.0 0.0.0.0 192.168.148.0 0.0.0.0 172.27.0.0 0.0.0.0 192.168.0.0 0.0.0.0 0.0.0.0 192.168.1.8 Genmask 255.255.255.0 255.255.255.0 255.255.0.0 255.255.0.0 0.0.0.0 Flags U U U U UG Metric 0 0 0 0 0 Ref 0 0 0 0 0 Use 0 0 0 0 0 Iface br0 wan lan0 wan wan Name servers When you use a static IP address for connection on the Wan side, you must also complete the fields for the name servers to be used. The field nameserver1 is for the primary server and the nameserver 2 field for the optionally secondary (alternate) name server. These name servers may be on the local network or on the Internet, as illustrated in the examples below: Figure 5-66: Setting the name servers for static IP on the ETH Interface for WAN. Example: When you set up these two nameservers to be used with the WAN port, as shown: The System Log will show accordingly how they are used when Bytton achieves a connection through the WAN port: Jul 4 10:20:36 bytton daemon.info Jul 4 10:20:36 bytton daemon.info Jul 4 10:20:36 bytton daemon.info Jul 4 10:20:36 bytton daemon.info 00:06:4f:02:15:82 Jul 4 10:20:36 bytton daemon.info 00:06:4f:02:15:82 VO000073 dnsmasq[1201]: dnsmasq[1201]: dnsmasq[1201]: dnsmasq[1201]: reading /etc/resolv.conf using nameserver 172.27.168.7#53 using nameserver 192.168.1.88#53 DHCPREQUEST(br0) 10.0.0.13 dnsmasq[1201]: DHCPACK(br0) 10.0.0.13 ByttonLTE(full)_genericUsermanual_sw306FAS_revN.1.docx Page: 138 / 290 TOPEX Bytton (HSPA+ / LTE) 5.3.4. PPPoE Settings for the connection used Point-to Point Protocol over the Ethernet. PPPoE is a protocol for encapsulating the PPP link over Ethernet, thus providing the benefits of PPP, such as security (encryption) and control of connection (data rate) over an 802.3 network. It is used for broadband Internet connections, such as DSL or ADSL, thus it is useful when the WAN connection of Bytton LTE is achieved by a cable or ADSL modem instead of the HSDPA network. Figure 5-67: Settings for PPP over Ethernet connection in webpage for WAN. Settings are the same as for “normal” PPP, except that the modem-related parameters and command strings are missing here. Username: The user name used for log-in to the Internet account supplied by your ISP. Ask your Internet provider for details! Some Internet providers need the complete account name together with the hosting domain, the same as for an e-mail address: [email protected], while other ISPs require that you type here just the name of your account. Password: The password used for authenticating to your Internet account. Redial Period: time in seconds until redialing a connection, if it was broken, such as 5 seconds. Idle Time: Bytton LTE can disable the connection when there is no more data traffic. If no data packet is sent through the interface for a specified period of time, the Internet connection will be broken. This is useful in case of connections where you pay per connected time. You can specify this time interval, in seconds. When the interval is too short, even a momentary lack of activity (no data traffic) will cause the Internet connection to be interrupted. If you set the time interval to 0 (zero), the connection will remain always on, even if there is no data traffic on the remote interface. This feature is especially important for connections where you are charged for the total connection time, no matter the data traffic: to avoid unnecessary expenses, you should set BYTTON to disconnect when there is no data traffic. MTU: value for the Maximum Transmission Unit. MTU is the largest physical packet size, measured in bytes, which a network can transmit. Messages larger than this will be fragmented into several packets. Different networks have different values for MTU, which is set by the network administrator. It is important to set the optimal MTU value, if it is incorrectly set the data transfers will be slow. The default MTU size is 576 for many PPP connections, 1024 for a modem connection, 1500 for Ethernet networks, etc. The same applies for MRU (maximum receive unit). ByttonLTE(full)_genericUsermanual_sw306FAS_revN.1.docx Page: 139 / 290 TOPEX Bytton (HSPA+ / LTE) At the data level, the equivalent of MTU is MSS (see further on in the manual), so you should also set this parameter accordingly. 5.3.5. PPP Settings for the PPP connections achieved via embedded radio modem. To ensure high versatility together with ease of use, this page has just settings for the APN, username and password, while several specialized configurations, which are less often used - for modem, for connection and for routing - are located on the “PPP Advanced Settings” page (the first link at the bottom) : Figure 5-68: Settings for PPP link for the embedded radio modem of Bytton ICR. Note: The single-Sim variant has, of course, a single entry for APN and a single username/password pair, but in case of Dual-SIM versions, there will be two, one for each SIM, so you will see, as detailed below, “APN Sim0” and respectively “APN Sim1”, “Username Sim0” and so on. APN Sim0: Access Point Name, the name of an access point for the first mobile data network (GSM/GPRS/EDGE or UMTS/HSPA). The settings here must match with the instructions of your mobile service provider. Some mobile Internet carriers rely on authentication via SIM card (Caller ID, IMSI) and thus allow a blank user name and password while other mobile service providers require additional user name and password for authentication. Username Sim0: The user name used for log-in to the first 3G (UMTS or HSPA) wireless network, such as “internet” or “mobileoperator” Password Sim0: The password used for authentication for the respective carrier. You should ask your provider for these settings. Some network operators do not need username and password; log-in is allowed or not based upon Caller ID or other equipment-specific identification feature. Examples: The current SIM card works with APN “lant”. The carrier MobileCarrierB may have as APN internet, with the user “guest” and pass also “guest”, while Vodafone provider has as APN of “internet.vodafone.ro” with user name “internet.vodafone” and password “vodafone”. ByttonLTE(full)_genericUsermanual_sw306FAS_revN.1.docx Page: 140 / 290 TOPEX Bytton (HSPA+ / LTE) ---------------------------------------------------------Dual SIM operation--------------------------------------------------------For the dual-SIM variant of the equipment, as shown in the illustration to the left, there are: two identical groups of settings, corresponding to the two SIM card, labeled Sim0 and respectively Sim1, - and also parameters related to the switching form one mobile data carrier to another provider (the “Second Sim” group): Figure 5-69a: Settings for PPP link in case of Dual-SIM Bytton equipment. For single-SIM equipments, or for dual-SIM devices where only one SIM is used, the settings explained previously are enough. But when you have two SIM cards, and want to use both, you must Enable the usage of the second SIM, then you must also fill in the conditions for switching (how Bytton decides that the link is broken) and the above SIM parameters for the second subscriber card, “Sim1”. The values are different, since the second SIM is used precisely for connecting to a different wireless data network. Second SIM: In case of dual-SIM equipments, it Enables or disable usage of the second SIM cad as backup for the data connection. The default is Disabled. Figure 5-69b: Settings for the second SIM of the PPP wireless link, in case of dual-SIM Bytton LTE device. Parameters for switching between SIM cards Check link interval: time interval that Bytton expects reply for the IP destination of the probe (the delay between successive pings, in second)s. Suggested value is about 20 (default). Send pack number: number of data packets sent as probe to verify the link. Default is 10. Switch SIM if reply less than: minimum number for probe packets that must be answered. With the above settings, when Bytton LTE pings the destination of the probe and receives only four replies or less, it will decide that the current PPP link is unavailable, so it will switch to the second SIM card. ByttonLTE(full)_genericUsermanual_sw306FAS_revN.1.docx Page: 141 / 290 TOPEX Bytton (HSPA+ / LTE) Probe Destination IP: the IP address of the destination of the probe. Bytton sends out PING probes to the address you have specified in this field, and if it receives no answer from it, BYTTON concludes that the primary data connection is broken and it must switch to the secondary, Sim1. ----------------------------------------------------------------------------------------------------------------------------------------Idle Time: Bytton LTE can disable the dial-up connection when there is no more data traffic. If no data packet is sent through the mobile data link, the Internet connection will be broken. You can specify this time interval, in seconds. If you set the time interval to 0 (zero), the dial-up connection will remain always on, even if there is no data traffic on the remote interface. When it detects outgoing data traffic, Bytton LTE automatically performs dial-up, in order to connect to the Internet. This feature is especially useful in case of mobile date networks where you must pay for the connection time, so the bill goes up while the PPP link is on, even if there is no data traffic over it! When you need to set or modify the detailed modem-related parameters, click the link “PPP Advanced Settings” located towards the bottom of the PPP settings page. The second link, located right at the bottom of the PPP settings page is “PPP Check Data Link”, which establishes how the verification of the PPP data link works. The sub-pages for these links are explained next: ByttonLTE(full)_genericUsermanual_sw306FAS_revN.1.docx Page: 142 / 290 TOPEX Bytton (HSPA+ / LTE) 5.3.6. PPP Advanced Settings Click the link “PPP Advanced Settings” located at the bottom of the PPP web page. This “advanced” section controls the parameters of the Point-toPoint Protocol for the internal data terminal, in this case the embedded GSM/HSPA+ or LTE modem. Figure 5-70: Advanced PPP Settings for the embedded modem of Bytton LTE. You need to change these advanced settings when you go to a region with different settings, if you use a different network operator or when you replace the embedded HSPA modem with another, external 3G modem that requires special parameters. AT Commands: Here you can enter commands to be sent to the modem that connects to the mobile carrier. AT Init Command #1, 2, 3: Enter the character strings for the AT commands used to initialize the modem, such as: AT+CGDCONT=1,"IP","lant". Depending on the specifications of the mobile module and of your 3G provider, you may need only one AT command or several. ByttonLTE(full)_genericUsermanual_sw306FAS_revN.1.docx Page: 143 / 290 TOPEX Bytton (HSPA+ / LTE) There are five “AT Init Command” fields, if there is no need to use all of them, fill the remaining with “AT”. You should not leave empty fields in this section! AT Dial Command: Dial String, the AT command used to dial to the ISP, which includes the mobile phone number to be dialed. The AT command for dialing is ATD, and the telephone number for most mobile data operators is a short one, such as *99# or *99#***1. This is a formal number, the command tells the modem to dial the data carrier. When using up-to-date modems, this phone number is no longer required, the intelligent modem already “knows” which number to dial for the data connection. Connection settings Here you may set up the parameters for the PPP connection to the mobile Internet provider. Figure 5-71: PPP Advanced settings –parameters for the wireless Data Link. Authentication – allows you to select the method of authentication since the two SIM cards may be for different carriers, you can select authentication method separately for SIM0 and SIM1. . Default means it will authenticate upon request from the server, it accepts both PAP and CHAP, while PAP means it will force accepting only PAP (password authentication), refusing CHAP, and respectively CHAP means it will accept only CHAP (challenge authentication) and refuse PAP PAP, Password Authentication Protocol, the most basic form of authentication, used by Basic Authentication feature built into the HTTP protocol. Here your users name and password are transmitted over a network and compared to a table of name-password pairs (passwords stored in the table are typically encrypted). It is simple but does not ensure security. CHAP, Challenge Handshake Authentication Protocol, is a more advanced method, type challenge/response. Here the authentication agent (typically a network server) sends to the client program a key to be used to encrypt the username and password. This enables the username and password to be transmitted in an encrypted form to protect them against eavesdroppers. The ID value is increased with each CHAP dialogue to protect against replay attacks, so CHAP provides a moderate degree of security. Route: Default route: Disabled or Enabled. This is a new feature, allows you to ask the Internet provider for a static address. Usually, the ISP assigns you the first available address each time you connect. Now you have the options either to accept the dynamic address assigned by DHCP or to ask for a specific static address. In this case should Disable the default route, and then you must fill the other parameters too the IP Address, and Gateway. When you finish with the setting of advanced parameters, click on the link “BACK” located at the bottom to return to the WAN > PPP page. ByttonLTE(full)_genericUsermanual_sw306FAS_revN.1.docx Page: 144 / 290 TOPEX Bytton (HSPA+ / LTE) PPP Check Data Link Here you can set how the verification of the PPP data link will be performed. By default, this feature is disabled – its fields are colored in gray, to show that you cannot edit them. Figure 5-72: PPP Check Data Link settings Bytton LTE. First you must Enable it, then use Edit to perform changes of the way how Bytton LTE checks the data link and finally Save. Figure 5-73: Enabling the “PPP Check Data Link” feature: For verification of the link, the Bytton LTE equipment sends out a specified number of ping packets, at certain time interval, to a destination IP. You can also specify the source (SRC) IP or the source outgoing interface. Check link - Enable or disable the verification of the link. If you enable this feature, it only will work for PPP > IDLE TIME "0" (as explained previous, when idle time is set to zero, the PPP connection will be always on, so there is no more need for verification). Ping & Check sends out PING (probing) packets and listens for reply to them, while the Check option only listens for verification packets form an active source. Interval - Time interval, in seconds, to check the status of the data link, default is 1500. Figure 5-74: Example of editing settings for “PPP Check Data Link” and explanation of parameters. No. of pack - Number of ping packet to be send after time Interval, such as 3, 4 or 5 packets. ByttonLTE(full)_genericUsermanual_sw306FAS_revN.1.docx Page: 145 / 290 TOPEX Bytton (HSPA+ / LTE) IP - remote IP address that Bytton will response at ping command. This must be a IP address that will either answer to the ping command issued by Bytton, or generate PING packets for Bytton LTE to listen to. SRC IP – The source IP for PING packets. You can send ping with a “source IP”. This can be LAN, Loopback or Tunnel IP. If this IP is left with the default to 0.0.0.0 value, the Bytton equipment will ping with source IP of the outgoing interface. Action - the last field defines the action to be taken when ping replay is not received. By default it is disabled, but you can set the Bytton equipment to restart the PPP data connection when it detects a broken link. In the System Log you can see this feature in operation, look for the messages which say “Link is Up” or respectively “ Link is Down”: Jul 16 11:37:25 bytton user.info kernel: PHY: mdio@e0102120:05 - Link is Down Jul 16 11:38:01 bytton cron.err crond[1865]: USER root pid 3289 cmd net_moni Jul 16 11:38:18 bytton daemon.info dnsmasq[1244]: DHCPREQUEST(br0) 10.0.0.13 00:06:4f:02:15:82 Jul 16 11:38:18 bytton daemon.info dnsmasq[1244]: DHCPACK(br0) 10.0.0.13 00:06:4f:02:15:82 VO000073 Jul 16 11:38:34 bytton daemon.info hostapd: wlan0: STA 60:fb:42:39:48:86 IEEE 802.11: authenticated Jul 16 11:39:01 bytton cron.err crond[1865]: USER root pid 3579 cmd net_moni Jul 16 11:39:04 bytton user.info kernel: PHY: mdio@e0102120:05 - Link is Up 100/Full Jul 16 11:39:06 bytton daemon.info dnsmasq[1244]: DHCPINFORM(br0) 10.0.0.13 00:06:4f:02:15:82 Jul 16 11:39:06 bytton daemon.info dnsmasq[1244]: DHCPACK(br0) 10.0.0.13 00:06:4f:02:15:82 VO000073 Jul 16 11:39:53 bytton user.notice root: SAVE CONFIG DONE Jul 16 11:39:58 bytton user.info kernel: PHY: mdio@e0102120:05 - Link is Down Jul 16 11:40:01 bytton cron.err crond[1865]: USER root pid 3949 cmd net_moni Jul 16 11:40:21 bytton user.info kernel: PHY: mdio@e0102120:05 - Link is Up 100/Full Jul 16 11:42:01 bytton cron.err crond[1865]: USER root pid 4604 cmd net_moni Jul 16 12:11:39 Jul 16 12:11:52 100/Full Jul 16 12:14:47 100/Full Jul 16 12:14:47 state Jul 16 12:14:51 Jul 16 12:14:51 state Jul 16 12:15:01 Jul 16 12:15:38 100/Full bytton user.info kernel: PHY: mdio@e0102120:05 - Link is Down bytton user.info kernel: PHY: mdio@e0102120:05 - Link is Up bytton user.info kernel: PHY: mdio@e0102120:04 - Link is Up bytton user.info kernel: br1: port 1(lan0) entering learning bytton user.info kernel: PHY: mdio@e0102120:04 - Link is Down bytton user.info kernel: br1: port 1(lan0) entering disabled bytton cron.err crond[1864]: USER root pid 3709 cmd net_moni bytton user.info kernel: PHY: mdio@e0102120:05 - Link is Up - Examples: Check link Enabled Interval 3600 No. of pack 3 IP 74.125.87.106 SRC IP 0.0.0.0 (default) Action Reset data link Figure 5-75: Example with values of settings for the “PPP Check Data Link” feature. ByttonLTE(full)_genericUsermanual_sw306FAS_revN.1.docx Page: 146 / 290 TOPEX Bytton (HSPA+ / LTE) With the above settings, Bytton will send every hour (3600 seconds) a number of three ping packets to the remote IP address “74.125.87.106”, with IP source the IP of the SIM connection. When Bytton LTE does no longer receive a reply to the PING issued, it will restart (reset) the SIM data connection. Warning! The number of ping packets must not be excessively large, and the checking interval must not be too small, because this could generate a heavy traffic over the data link. See below calculations of the traffic load for different settings. Traffic load calculation: 60 bytes for one ping packet * 3 packets = 180 bytes for one hour 180 * 24 = 4320 bytes for one day 4320 * 31 = 133920 bytes per months 133920 * 12 = 1607040 bytes per year 1607040 / 1024 = 1569.37 KB per year 1569.375 /1024 = 1.53 MB per year. ByttonLTE(full)_genericUsermanual_sw306FAS_revN.1.docx Page: 147 / 290 TOPEX Bytton (HSPA+ / LTE) 5.4. TUNNELS Settings for the IP tunneling, which allow building of secure virtual private networks over public data networks. Figure 5-76: Aspect of the “TUNNELS” web configuration page. These “Tunnels Configuration Pages” has several sections, according to the type of tunnels you want to use: GRE, IPSEC, PPTP, Open VNP and so on. Depending upon the actual firmware revision running on your Bytton LTE, the Tunnels web page may contain several types of tunnels, form three to six sub-pages. For instance, besides GRE and IPSEC which are present in all software revisions, you may have also PPTP, PPTPD, OVPN and respectively L2TP, as shown below: Figure 5-77: Example of maximal “TUNNELS” Web page, with six sub-pages. The current version of Bytton LTE has available configuring pages for the GRE, IPSEC, Open VPN and respectively PPTP tunnels . ByttonLTE(full)_genericUsermanual_sw306FAS_revN.1.docx Page: 148 / 290 TOPEX Bytton (HSPA+ / LTE) 5.4.1 GRE Settings for the GRE IP Tunnels, which is used when you need to perform IP tunneling in order to achieve a Virtual Private Network using several Bytton LTE devices interconnected over the 3G mobile communications network. Figure 5-78: Aspect of GRE section of the “TUNNELS” Web page. Setting GRE tunnels. At fist, the table for GRE tunnels is empty. Use Add New to add new records into the table, then Edit to enter the required parameters: Figure 5-79: Add New and Edit an entry in the GRE table of the “TUNNELS” Web page. Save each entry with the button to the right of the respective row:. Figure 5-80: Saving a complete entry into the GRE table. And finally use the “Save and Reload” button at the bottom of the screen. Int. - it lists the name of the GRE tunnel interface that will be configured: gret1, 2, 3 and so on. Remote Endpoint - IP of the Remote device that will host the distant endpoint of the GRE tunnel. Local Endpoint - IP Local of the interface that will host local endpoint of the GRE tunnel. If this is set to 0.0.0.0, the IP of local interface that have route to Remote endpoint IP will be used. IP tunnel - GRE tunnel is a point to point tunnel, thus each tunnel must have a IP. This is Local IP on the tunnel interface. ByttonLTE(full)_genericUsermanual_sw306FAS_revN.1.docx Page: 149 / 290 TOPEX Bytton (HSPA+ / LTE) Netmask - Netmask for IP tunnel. Key - a “Key” for the GRE tunnel. It is a 32 bit number (values from 0 to 4294967295). This Key field is intended to be used for identifying an individual traffic flow within a tunnel. Note that this Key field is not involved in any sort of security (despite its name.) Examples: When you will set: Int. gret1 Remote Endpoint 172.168.1.10 Local Endpoint 0.0.0.0 IP tunnel 10.10.10.2 Netmask 255.255.255.252 Key off This will create a GRE tunnel with interface "gret1" from any local interface IP with remote 172.168.1.10. The local gret1 interface will have IP: 10.10.10.2 and net mask 255.255.255.252 Also, this will automatically add a route towards this interface, that you will be able to see in see it in Routing > Routes, in this example you will have: Destination Gateway 10.10.10.0 0.0.0.0 Genmask 255.255.255.252 U Flags Metric Ref Use Iface 0 0 0 gret1 Depending upon the actual requirements of your application, you may use a single GRE tunnel, or several, with different parameters for each tunnel gret1, gret2, gret3 and so on. See the first two gre tunnels now present in the routing table of Bytton LTE: Kernel IP routing table Destination Gateway 192.168.144.208 0.0.0.0 10.10.10.0 0.0.0.0 Genmask Flags Metric Ref 255.255.255.254 U 0 0 255.255.255.252 U 0 0 Use Iface 0 gret2 0 gret1 In the “Interfaces” drop list, together with the physical interfaces and the other logical interfaces of the equipment: And also in the firewall rules: Firewall view rule # Generated by iptables-save v1.4.10 on Tue Dec 11 15:21:00 2012 :OUTPUT ACCEPT [175:31270] -A INPUT -i lo -j ACCEPT -A INPUT -p gre -j ACCEPT -A INPUT -m state --state RELATED,ESTABLISHED -j ACCEPT -A INPUT -i ppp3 -j ACCEPT -A FORWARD -i br0 -j ACCEPT -A FORWARD -p gre -j ACCEPT -A FORWARD -m state --state RELATED,ESTABLISHED -j ACCEPT COMMIT # Completed on Tue Dec 11 15:21:00 2012 ByttonLTE(full)_genericUsermanual_sw306FAS_revN.1.docx Page: 150 / 290 TOPEX Bytton (HSPA+ / LTE) 5.4.2 IPSEC The IPSEC page allows you to configure the three types of IPSEC tunnels available, to configure the keys used for authentication and to see the current status of the IPSEC tunnels that are active. At first, the table is empty: Figure 5-81: The IPSEC configuration table, empty. You may configure the IPSEC tunnel in three different situations: - between two different networks, “Network to Network”, assures communication between any hosts situated in two separate networks, the data will be encrypted; This can be accomplished only when both gateways over which the tunnel is configured have public and sstatic IP addresses; - between two gateways, one being your Bytton device and the other a remote equipment, “Gateway to Gateway “. Only the communication between the two gateways will be encrypted. This kind of IPSE tunnel also can be accomplished only when both gateways over which the tunnel is configured have public and static IP addresses; - between a gateway in the field (the Bytton LTE unit) and the remote network of the company. This kind of application is called “road warrior”, because the agent is on the road and he must connect safely to the company’s network over a public network such as the Internet.This kind of IPSEC tunnel is used to accomplish secure communication between the company's gateway/network (which has a static IP address) and a remote user in the field, the road warrior, who’s IP address changes(he gets dynamic IP addresses from the Mobile data carrier) For each of the situations described above, the IPSEC tunnel must be configured accordingly. There are two kinds of settings for the IPSEC tunnels, global and specific to each tunnel. ByttonLTE(full)_genericUsermanual_sw306FAS_revN.1.docx Page: 151 / 290 TOPEX Bytton (HSPA+ / LTE) Global IPSEC Settings These settings will apply to all tunnels configured on the Bytton machine.They are located in the upper part of the page: Figure 5-82: Global IPSEC settings, on top of the IPSEC configuration table. The Global IPSEC settings inlude using the default route interface for all tunnels, and respectively using NAT for traversing the routes through a firewall. Use Default Route Interface for all Tunnels - the interface with the default route will be used for bringing up all the tunnels NAT Traversal - router is behind NAT - specifies whether or not the router is behind a NAT/Firewall Figure 5-83: Configuring the Global IPSEC settings. Or each option, select Yes of No , then press Save. When you choose YES for usage of the default route interface (this is the default setting), this will override any other "Interface" setting defined in each "Specific Tunnel Configuration". This means that when you define an individual GRE tunnel, the filed “Interface” will not be editable, it will show “Default Route”, since it is the same for all tunnels of Bytton LTE. ByttonLTE(full)_genericUsermanual_sw306FAS_revN.1.docx Page: 152 / 290 TOPEX Bytton (HSPA+ / LTE) Specific IPSEC Tunnel Settings When you select NO instead for usage of the default route interface for al tunnels, then "Interface" setting can / must be defined in each "Specific Tunnel Configuration". Now the field “Interface” shows a drop list, allowing you to choose for each tunnel one of the physical interfaces of the Bytton LTE equipment. Set up specific IPSEC Tunnel Settings: Here are set the parameters that are specific for each tunnel, which are located at the bottom of the page: Figure 5-84: Specific IPSEC settings. At fist the table is empty, as shown above, so you must use Add new to define each IPSEC tunnel: Use Del to erase an existing tunnel definition, or Edit to open up the large window for defining the parameters for each IPSEC tunnel: ByttonLTE(full)_genericUsermanual_sw306FAS_revN.1.docx Page: 153 / 290 TOPEX Bytton (HSPA+ / LTE) Figure 5-85: Define or modify the Specific IPSEC settings. Description - is an optional setting, it only helps identifying the tunnel. Interface - when global setting "Use default route interface for all tunnels" is set to yes, the specific interface won't be available for modification Max. Bandwidth – you can choose from three availble values to limit the bandwidth on the tunnel. When set to no limit the tunnel will use all the bandwidth it needs from the available bandwidth Tunnel Type - this setting is scenario dependent. Default value is "tunnel" Tunnel mode is most commonly used to encrypt traffic between secure IPSec gateways or to connect an end-station running IPSec software to an IPSec gateway. Transport mode is used between end-stations supporting IPSec, or between an end-station and a gateway, when the gateway is being treated as a host. Initialize Initialize – when you choose this option, upon bootup Bytton will automatically bring up the tunnel interface and it will send initialization message to the remote party Wait Initialization - Upon bootup iBytton will automatically bring up the tunnel interface then it will wait for initialization message from the remote party ByttonLTE(full)_genericUsermanual_sw306FAS_revN.1.docx Page: 154 / 290 TOPEX Bytton (HSPA+ / LTE) Authentication Method – Select either PSK, RSA or x.509 certificate. based on the authentication method chosen, the Authentication Keys will have to be configured accordingly. To configure the Authentication Keys go back to the IPSEC main page and select the link Configure Authentication Keys located towards the bottom: Figure 5-86: Using the link “Configure Authentication Keys”. IKE (Internet Key Exchange) Settings - phase 1 parameters, negotiation of the keying channel. The Internet Key Exchange (IKE) is an IPsec (Internet Protocol Security) standard protocol used to ensure security for virtual private network (VPN) negotiation and remote host or network access. In fact, IKE protocol is the main part of the IPSEC implementation, and is used to negotiate secret key material between two parties, called the initiator and responder. IKE also provides mutual authentication by authenticating both of the parties to each other. It was first time specified in IETF Request for Comments (RFC) 2409. IKE defines an automatic means of negotiation and authentication for IPsec security associations (SA). Security associations are security policies defined for communication between two or more entities; the relationship between the entities is represented by a key. KE builds upon the Oakley protocol and ISAKMP. It uses X.509 certificates for authentication which are either pre-shared or distributed using DNS and a Diffie–Hellman key exchange to set up a shared session secret from which cryptographic keys are derived. IKE Encryption - encryption algorithm must be the same as the one configured on the remote party IKE Hash - hashing algorithm must be the same as the one configured on the remote party IKE Diffie-Hellmann – also the Diffie-Hellmann group must be the same as the one configured on the remote party IKE Key Life – time value for the IKE key, must be same value as set on the remote party. Aggressive Mode Two modes are available for negotiating the IKE: either "Main" or "Aggressive". The Main Mode usesa a six step negotiation so it is slower but more secure. The Aggressive mode is faster but less secure. Choose either: Yes - Aggressive Mode negotiation will be used ( 3-steps negotiation ) No - Main Mode negotiation will be used ( 6 steps negotiation ) – safer ESP (Encapsulating Security Payload) Settings - phase 2 parameters, nogotiation of the data channel ESP Encryption - encryption algorithm, of course it must be the same as the one configured on the remote party The default value is 3DES. You can choose AES instead, and select the variant for 128, 192 or 256 bits. ESP Hash - hashing algorithm, md5 os sha1. It must be the same as the one configured on the remote party ESP PFS - Yes/No - Enables/Disables the use of DiffieHelmann Group in data channel negotiation ESP DiffieHellman - Diffie-Hellmann group, eithr 2 or 5, it also must be the same as the one configured on the remote party ByttonLTE(full)_genericUsermanual_sw306FAS_revN.1.docx Page: 155 / 290 TOPEX Bytton (HSPA+ / LTE) ESP Key Life – duration of validity of the ESP key, must be same value as on the remote party Dead Peer Detection Settings Dead Peer Detection is used to detect whether the peer is alive or not. When the peer is detected as dead, the IPSec and IKE Security Association are deleted. Dead peer detection , defined in RFC 3706, is an alternative mechanism that is more scalable than the IKE “keepalives” in detecting dead IPSec peers. DPD specifies that when traffic is occurring between the peers; there is no need to send a keepalive to check for liveliness of the peer, proof of the availability of the peer is considered the IPSec traffic itself. Set up PDP parameters: Interval Timeout Action DPD Features: Dead Peer Detection tries to solve the shortcomings of IKE keepalive or heartbeat schemes. While keepalives and heartbeats methods mandate exchange of messagess at regular intervals, when using DPD, each peer's DPD state is largely independent of the other's. A peer is free to request proof of liveliness from the other party when it needs it - not atpre-esteblished, periodical intervals. This asynchronous property of DPD exchanges allows fewer messages to be sent, and this is how DPD achieves greater scalability. However, the send/receive of periodic keepalive messages has the advantage of earlier detection of dead peers. After you finished defining the individual settings for each IPSEC tunnel, you must configure the authentication keys for RSA, PSK and upload the X.509 certificate files. Click the link “Configure Authentication Keys” shown here: The fields shown in red indicate that you need to enter or generate a key: Figure 5-87: IPSEC Web page for managing RSA and PSK keys, and x.509 certificates. ByttonLTE(full)_genericUsermanual_sw306FAS_revN.1.docx Page: 156 / 290 TOPEX Bytton (HSPA+ / LTE) Generate the local keys or enter the remote keys: Or: Figure 5-88: Generate local RSA key and set or generate remote PSK key. Configure PSK key: ByttonLTE(full)_genericUsermanual_sw306FAS_revN.1.docx Page: 157 / 290 TOPEX Bytton (HSPA+ / LTE) Setting the X.509 Certificates: For secure connections, the web browsers use SSL authentication with "X.509" certificates. This "Digital Certificate Standard" was issued by ITU-T for the secure management and distribution of digitally signed certificates across secure Internet networks. The strong authentication goes beyond a simple password to verify user identity, using instead advanced credentials, which are created by cryptographic means. Upload the certificate files for X.509: Figure 5-98: Upload the certificate files for X.509. Finally, the link “IPSEC STATUS” opens a window that displays the current state of the IPSEC tunnels. Figure 5-90a: “IPSEC STATUS” when no tunnel is raised. IP Sec Status shows information about the IPSEC tunnels which are up on the Bytton equipment. For instace, for this IP Sec tunnel: ByttonLTE(full)_genericUsermanual_sw306FAS_revN.1.docx Page: 158 / 290 TOPEX Bytton (HSPA+ / LTE) IP Sec Status will display this information Figure 5-90b: “IPSEC STATUS” for one IP Sec tunnel. 000 interface lo/lo ::1:500 000 interface lo/lo 127.0.0.1:500 000 interface wan/wan 192.168.144.29:500 000 interface br0/br0 192.168.1.1:500 000 interface br0:0/br0:0 192.168.1.195:500 000 %myid = (none) 000 debug none 000 000 "ipsec1": 122.168.1.0/24===192.168.143.34...192.168.143.32===192.169.100.0/24; unrouted; eroute owner: #0 000 "ipsec1": ike_life: 7900s; ipsec_life: 1500s; rekey_margin: 540s; rekey_fuzz: 100%; keyingtries: 3 000 "ipsec1": dpd_action: restart; dpd_delay: 10s; dpd_timeout: 15s; 000 "ipsec1": policy: PSK+ENCRYPT+TUNNEL; prio: 24,24; interface: ; 000 "ipsec1": newest ISAKMP SA: #0; newest IPsec SA: #0; 000 "ipsec1": IKE algorithms wanted: 5_000-1-2, 000 "ipsec1": IKE algorithms found: 5_192-1_128-2, 000 "ipsec1": ESP algorithms wanted: 3_000-1, 000 "ipsec1": ESP algorithms loaded: 3_192-1_128, 000 "ipsec2": 122.100.0.0/16===193.227.143.35...193.227.173.9===193.0.0.0/8; unrouted; eroute owner: #0 000 "ipsec2": ike_life: 9155s; ipsec_life: 1150s; rekey_margin: 540s; rekey_fuzz: 100%; keyingtries: 3 000 "ipsec2": dpd_action: restart; dpd_delay: 40s; dpd_timeout: 25s; 000 "ipsec2": policy: RSASIG+ENCRYPT+TUNNEL+PFS; prio: 16,8; interface: ; 000 "ipsec2": newest ISAKMP SA: #0; newest IPsec SA: #0; 000 "ipsec2": IKE algorithms wanted: 5_000-2-5, 000 "ipsec2": IKE algorithms found: 5_192-2_160-5, 000 "ipsec2": ESP algorithms wanted: 3_000-1, ; pfsgroup=5; 000 "ipsec2": ESP algorithms loaded: 3_192-1_128, 000 "ipsec3": 122.168.0.0/16===192.168.144.253...117.115.83.92[117.115.83.205]===127.27.0.0/16; unrouted; eroute owner: #0 000 "ipsec3": ike_life: 43200s; ipsec_life: 3600s; rekey_margin: 540s; rekey_fuzz: 100%; keyingtries: 3 000 "ipsec3": dpd_action: restart; dpd_delay: 8s; dpd_timeout: 12s; 000 "ipsec3": policy: RSASIG+ENCRYPT+PFS; prio: 16,16; interface: ; 000 "ipsec3": newest ISAKMP SA: #0; newest IPsec SA: #0; 000 "ipsec3": IKE algorithms wanted: 7_256-2-2, 000 "ipsec3": IKE algorithms found: 7_256-2_160-2, 000 "ipsec3": ESP algorithms wanted: 12_256-2, ; pfsgroup=2; 000 "ipsec3": ESP algorithms loaded: 12_256-2_160, ByttonLTE(full)_genericUsermanual_sw306FAS_revN.1.docx Page: 159 / 290 TOPEX Bytton (HSPA+ / LTE) 000 Performance: uptime: 6 minutes, since Mar 22 16:20:36 2013 worker threads: 9 idle of 16, job queue load: 0, scheduled events: 0 loaded plugins: aes des sha1 sha2 md5 fips-prf random x509 pubkey xcbc hmac gmp kernel-netlink stroke Listening IP addresses: 192.168.144.29 192.168.1.1 192.168.1.195 Connections: Reload Figure 5-90c: “IPSEC STATUS” for three IP Sec tunnels. ByttonLTE(full)_genericUsermanual_sw306FAS_revN.1.docx Page: 160 / 290 TOPEX Bytton (HSPA+ / LTE) 5.4.3 PPTP This allows you to define a Point-to-Point Tunnel, which will be used to securely transmit data packets from one VPN node to another over a public network such as the Internet. By default, it is disabled: Figure 5-91 Web configuration page for PPTP, disabled. Bytton LTE can be set up to operate as a Client for the PTP tunneling protocol. Figure 5-92: Setting up parameters as Client for PPTP. ByttonLTE(full)_genericUsermanual_sw306FAS_revN.1.docx Page: 161 / 290 TOPEX Bytton (HSPA+ / LTE) 5.4.4 OVPN Here are the settings for the Open VPN tunnel of Bytton: Figure 5-93: OVPN page for secure Tunnels. Why Open VPN? OVPN is a recent addition to the range of secure IP tunnels supported by Bytton for the purpose of securely tunnel the data through a single TCP/UDP port over an unsecured network such as mobile Internet and thus establish VPNs. OVPN is simple, easy to set up and use, and still powerful. GRE and IPSec have been implemented previously, but now you can use OpenVPN too, on the Bytton LTE equipments! While other VPN solutions often use proprietary or non-standard mechanisms, OpenVPN has a modular concept, both for underlying security and for networking. OPN does not suffer from the complexity that characterizes other VPN implementations like the market leader IPSec. However, it is versatile and powerful - it provides features which that go beyond the scope of every other VPN implementations. For instance, OpenVPN offers two different basic modes, which run either as Layer 2 or Layer 3 VPN. Thus, OpenVPN tunnels on Layer 2 can also transport Ethernet frames, IPX packets, and Windows Network Browsing packets (NETBIOS), all of which are problems in most other VPN solutions. It extends the protection of the central firewall in the company's main office to all users out in the field, which are connected via OVPN tunnels. OpenVPN connections can be tunneled through almost every firewall and proxy. The OVPN Server running on Bytton LTE can be configured to run either as a TCP, or as UDP. As can bee seen from the configuration page, just a single port in the firewall must be opened to allow incoming connections. Its masquerading feature means there are no problems with NAT - Both OpenVPN server and clients can be within a network using only private IP addresses. Every firewall can be used to send the tunnel traffic to the other tunnel endpoint. It also provide Transparent, high-performance support for dynamic IPs, Both tunnel endpoints can have low-cost broadband access with dynamic IPs. The changes of IP on either side will be seldom seen by the users. ByttonLTE(full)_genericUsermanual_sw306FAS_revN.1.docx Page: 162 / 290 TOPEX Bytton (HSPA+ / LTE) OVPN can be configures either as TUN or TAP interface – TAP operates at layer 2 level and simulates Ethernet frames, while the Tunnel interface operates with layer 3 packets, like IP packets. Tap can be used to create a network bridge, while TAB is used with routing. But finally, the biggest advantage of OpenVPN is that it seems to be extremely easy to install and configure – compare its Web configuration page to the ones for GRE or IPSEC! To use OVPN, fist Enable this feature, the set up the parameters: Figure 5-94: Configure the parameters for Open VPN. Use the blue clickable links at the bottom to edit accordingly the certificates and keys for Open VPN: Of course, you will need to define and edit suitable Certificates: for Certification Authority, Figure 5-94: Edit the certificate for Certified Authority. ByttonLTE(full)_genericUsermanual_sw306FAS_revN.1.docx Page: 163 / 290 TOPEX Bytton (HSPA+ / LTE) Then for CRT Client : Figure 5-96: Edit the certificate for CRT Client. ByttonLTE(full)_genericUsermanual_sw306FAS_revN.1.docx Page: 164 / 290 TOPEX Bytton (HSPA+ / LTE) and respectively for the Client’s Key: Figure 5-97: Edit the certificate for Client’ KEY for OVPN. Accordingly, the Open VPN interface will show up in the Interfaces drop list either with TUN or TAP as suffix! The corresponding routing rules will also be automatically inserted in the iptables table, look for the “tap0” entries: # Generated by iptables-save v1.4.10 on Wed Jul 4 10:43:48 2012 *filter :INPUT ACCEPT [235:26609] :FORWARD ACCEPT [0:0] :OUTPUT ACCEPT [662:105191] -A INPUT -i lo -j ACCEPT -A INPUT -m state --state RELATED,ESTABLISHED -j ACCEPT -A INPUT -i tap0 -j ACCEPT -A FORWARD -i br0 -j ACCEPT -A FORWARD -p gre -j ACCEPT -A FORWARD -m state --state RELATED,ESTABLISHED -j ACCEPT -A FORWARD -p tcp -m tcp --tcp-flags SYN,RST SYN -j TCPMSS --clamp-mss-to-pmtu -A FORWARD -i tap0 -j ACCEPT -A OUTPUT -p tcp -m tcp --tcp-flags SYN,RST SYN -j TCPMSS --clamp-mss-to-pmtu COMMIT # Completed on Wed Jul 4 10:43:48 2012 # Generated by iptables-save v1.4.10 on Wed Jul 4 10:43:48 2012 ByttonLTE(full)_genericUsermanual_sw306FAS_revN.1.docx Page: 165 / 290 TOPEX Bytton (HSPA+ / LTE) *mangle :PREROUTING ACCEPT [1021:95186] :INPUT ACCEPT [917:80339] :FORWARD ACCEPT [87:14031] :OUTPUT ACCEPT [664:105325] :POSTROUTING ACCEPT [751:119356] COMMIT # Completed on Wed Jul 4 10:43:48 2012. *filter :INPUT ACCEPT [58:3040] :FORWARD ACCEPT [0:0] :OUTPUT ACCEPT [1165:98890] -A INPUT -i lo -j ACCEPT -A INPUT -i br0 -j ACCEPT -A INPUT -p gre -j ACCEPT -A INPUT -m state --state RELATED,ESTABLISHED -j ACCEPT -A INPUT -p tcp -m tcp --dport 2601 -j ACCEPT -A INPUT -p tcp -m tcp --dport 2604 -j ACCEPT -A INPUT -p udp -m udp --dport 161 -j ACCEPT -A INPUT -p udp -m udp --dport 162 -j ACCEPT -A INPUT -i tap0 -j ACCEPT -A INPUT -p udp -m udp --dport 4500 -j ACCEPT -A INPUT -p ipv6-auth -j ACCEPT -A INPUT -p udp -m udp --sport 500 --dport 500 -j ACCEPT -A INPUT -p ipv6-crypt -j ACCEPT -A INPUT -p tcp -m tcp --dport 0 -j ACCEPT -A INPUT -p tcp -m tcp --dport 0 -j ACCEPT -A FORWARD -p gre -j ACCEPT -A FORWARD -m state --state RELATED,ESTABLISHED -j ACCEPT -A FORWARD -p tcp -m tcp --tcp-flags SYN,RST SYN -j TCPMSS --clamp-mss-to-pmtu -A FORWARD -d 193.76.244.115/32 -p tcp -m tcp --dport 47 -j ACCEPT -A FORWARD -i tap0 -j ACCEPT -A OUTPUT -p tcp -m tcp --tcp-flags SYN,RST SYN -j TCPMSS --clamp-mss-to-pmtu COMMIT # Completed on Mon Jul 16 13:57:06 2012 An example of System>Logs where, because of incorrect open VPN settings, the OVPN tunnel could non be achieved: Jul 23 07:26:46 bytton daemon.warn openvpn[1852]: NOTE: OpenVPN 2.1 requires '--script-security 2' or higher to call user-defined scripts or executables Jul 23 07:26:46 bytton daemon.notice openvpn[1852]: Re-using SSL/TLS context Jul 23 07:26:46 bytton daemon.notice openvpn[1852]: LZO compression initialized Jul 23 07:26:46 bytton daemon.notice openvpn[1852]: Control Channel MTU parms [ L:1542 D:138 EF:38 EB:0 ET:0 EL:0 ] Jul 23 07:26:46 bytton daemon.notice openvpn[1852]: Socket Buffers: R=[112640->131072] S=[112640>131072] Jul 23 07:26:46 bytton daemon.notice openvpn[1852]: Data Channel MTU parms [ L:1542 D:1450 EF:42 EB:135 ET:0 EL:0 AF:3/1 ] Jul 23 07:26:46 bytton daemon.notice openvpn[1852]: Local Options hash (VER=V4): '41690919' Jul 23 07:26:46 bytton daemon.notice openvpn[1852]: Expected Remote Options hash (VER=V4): '530fdded' Jul 23 07:26:46 bytton daemon.notice openvpn[1852]: UDPv4 link local: [undef] Jul 23 07:26:46 bytton daemon.notice openvpn[1852]: UDPv4 link remote: 192.168.143.142:1194 Jul 23 07:26:49 bytton daemon.err openvpn[1852]: read UDPv4 [EHOSTUNREACH|EHOSTUNREACH]: No route to host (code=113) Jul 23 07:27:46 bytton daemon.err openvpn[1852]: TLS Error: TLS key negotiation failed to occur within 60 seconds (check your network connectivity) Jul 23 07:27:46 bytton daemon.err openvpn[1852]: TLS Error: TLS handshake failed Jul 23 07:27:46 bytton daemon.notice openvpn[1852]: TCP/UDP: Closing socket Jul 23 07:27:46 bytton daemon.notice openvpn[1852]: SIGUSR1[soft,tls-error] received, process restarting Jul 23 07:27:46 bytton daemon.notice openvpn[1852]: Restart pause, 2 second(s). ------------------------------------ ByttonLTE(full)_genericUsermanual_sw306FAS_revN.1.docx Page: 166 / 290 TOPEX Bytton (HSPA+ / LTE) 5.5 ROUTING As can be seen in the image below, the section about “ROUTING” includes several sub-sections: Firewall (see and define both packet filtering and port or address redirection) Routes (display and configure the static routes) Dynamic (selects OSPF, RIP or BGP for dynamic routing, access to VTY shell) Virtual R.T (Routing table) - allows multiple instances of a routing table to exist and work at the same time in Bytton acting as a route QoS - marking and prioritizing packets for different types of traffic Figure 5-98 The ROUTING web page for Bytton LTE. Examples: Kernel IP routing table Destination Gateway 10.64.64.65 0.0.0.0 10.0.0.0 0.0.0.0 192.168.148.0 0.0.0.0 172.27.0.0 0.0.0.0 192.168.0.0 0.0.0.0 0.0.0.0 10.64.64.65 Genmask 255.255.255.255 255.255.255.0 255.255.255.0 255.255.0.0 255.255.0.0 0.0.0.0 # Generated by iptables-save v1.4.10 on Tue *mangle :PREROUTING ACCEPT [1073:84945] :INPUT ACCEPT [998:80489] :FORWARD ACCEPT [66:4168] :OUTPUT ACCEPT [1198:174430] :POSTROUTING ACCEPT [1264:178598] -A PREROUTING -s 10.65.0.0/16 -i br0 -p udp 0x22/0xff -j TOS --set-tos 0x20/0xff -A POSTROUTING -d 44.229.72.0/22 -o lan0 -p tos 0x00/0xff -j TOS --set-tos 0x38/0xff COMMIT # Completed on Tue Dec 11 15:26:40 2012 # Generated by iptables-save v1.4.10 on Tue *nat :PREROUTING ACCEPT [78:5376] :OUTPUT ACCEPT [98:5864] :POSTROUTING ACCEPT [119:7092] -A POSTROUTING -o ppp3 -j MASQUERADE -A POSTROUTING -o ppp1 -j MASQUERADE COMMIT # Completed on Tue Dec 11 15:26:40 2012 # Generated by iptables-save v1.4.10 on Tue ByttonLTE(full)_genericUsermanual_sw306FAS_revN.1.docx Flags UH U U U U UG Metric 0 0 0 0 0 0 Ref 0 0 0 0 0 0 Use 0 0 0 0 0 0 Iface ppp1 br0 wan lan0 wan ppp1 Dec 11 15:26:39 2012 -m udp --sport 4057 -m tos --tos tcp -m tcp --sport 4057 -m tos -- Dec 11 15:26:40 2012 Dec 11 15:26:40 2012 Page: 167 / 290 TOPEX Bytton (HSPA+ / LTE) *filter -A INPUT -i lo -j ACCEPT -A INPUT -i br0 -j ACCEPT -A INPUT -p gre -j ACCEPT -A INPUT -m state --state RELATED,ESTABLISHED -j ACCEPT -A INPUT -i ppp3 -j ACCEPT -A INPUT -p udp -m udp --dport 161 -j ACCEPT -A INPUT -p udp -m udp --dport 162 -j ACCEPT -A INPUT -i tun0 -j ACCEPT -A FORWARD -i br0 -j ACCEPT -A FORWARD -p gre -j ACCEPT -A FORWARD -m state --state RELATED,ESTABLISHED -j ACCEPT -A FORWARD -p tcp -m tcp --tcp-flags SYN,RST SYN -j TCPMSS --clamp-mss-to-pmtu -A FORWARD -i ppp3 -j ACCEPT -A FORWARD -i tun0 -j ACCEPT -A OUTPUT -p tcp -m tcp --tcp-flags SYN,RST SYN -j TCPMSS --clamp-mss-to-pmtu COMMIT # Completed on Tue Dec 11 15:26:40 2012 Or: Kernel IP routing table Destination Gateway 10.64.64.65 0.0.0.0 195.74.234.12 0.0.0.0 10.0.58.44 0.0.0.0 192.168.148.148 0.0.0.0 192.168.144.0 0.0.0.0 10.0.0.0 0.0.0.0 109.73.221.0 0.0.0.0 192.168.0.0 0.0.0.0 10.0.0.0 0.0.0.0 0.0.0.0 10.0.58.1 Genmask 255.255.255.255 255.255.255.254 255.255.255.252 255.255.255.252 255.255.255.0 255.255.255.0 255.255.255.0 255.255.0.0 255.0.0.0 0.0.0.0 Flags UH U U U U U U U U UG Metric 0 0 0 0 0 0 0 0 0 0 Ref 0 0 0 0 0 0 0 0 0 0 Use 0 0 0 0 0 0 0 0 0 0 Iface ppp1 br2 br3 lan0 wan.3 br0 br4 wan br1 br1 And respectively: # Generated by iptables-save v1.4.10 on Mon Jul 16 14:10:41 2012 *mangle :PREROUTING ACCEPT [1467:112797] :INPUT ACCEPT [1204:85519] :FORWARD ACCEPT [68:7025] :OUTPUT ACCEPT [1922:278113] :POSTROUTING ACCEPT [2057:287583] COMMIT # Completed on Mon Jul 16 14:10:41 2012 # Generated by iptables-save v1.4.10 on Mon Jul 16 14:10:41 2012 *nat :PREROUTING ACCEPT [290:28646] :OUTPUT ACCEPT [224:14409] :POSTROUTING ACCEPT [240:16782] -A PREROUTING -i br0 -p tcp -m tcp --dport 21 -j DNAT --to-destination 193.76.244.115:47 -A POSTROUTING -o ppp1 -j MASQUERADE -A POSTROUTING -o wan -j MASQUERADE COMMIT # Completed on Mon Jul 16 14:10:41 2012 # Generated by iptables-save v1.4.10 on Mon Jul 16 14:10:41 2012 *filter :INPUT ACCEPT [51:1632] :FORWARD ACCEPT [68:7025] :OUTPUT ACCEPT [1725:267192] -A INPUT -i lo -j ACCEPT -A INPUT -i br0 -j ACCEPT -A INPUT -p gre -j ACCEPT -A INPUT -m state --state RELATED,ESTABLISHED -j ACCEPT ByttonLTE(full)_genericUsermanual_sw306FAS_revN.1.docx Page: 168 / 290 TOPEX Bytton (HSPA+ / LTE) -A INPUT -p tcp -m tcp --dport 2601 -j ACCEPT -A INPUT -p tcp -m tcp --dport 2604 -j ACCEPT -A INPUT -p udp -m udp --dport 161 -j ACCEPT -A INPUT -p udp -m udp --dport 162 -j ACCEPT -A INPUT -i tap0 -j ACCEPT -A INPUT -p udp -m udp --dport 4500 -j ACCEPT -A INPUT -p ipv6-auth -j ACCEPT -A INPUT -p udp -m udp --sport 500 --dport 500 -j ACCEPT -A INPUT -p ipv6-crypt -j ACCEPT -A INPUT -p tcp -m tcp --dport 0 -j ACCEPT -A INPUT -p tcp -m tcp --dport 0 -j ACCEPT -A FORWARD -p gre -j ACCEPT -A FORWARD -m state --state RELATED,ESTABLISHED -j ACCEPT -A FORWARD -p tcp -m tcp --tcp-flags SYN,RST SYN -j TCPMSS --clamp-mss-to-pmtu -A FORWARD -d 193.76.244.115/32 -p tcp -m tcp --dport 47 -j ACCEPT -A FORWARD -i tap0 -j ACCEPT -A OUTPUT -p tcp -m tcp --tcp-flags SYN,RST SYN -j TCPMSS --clamp-mss-to-pmtu COMMIT # Completed on Mon Jul 16 14:10:41 2012 5.4.1 Firewall Bytton ICR comes with a default firewall configuration, which ensures the security of your local network. Thus the Firewall table is at first empty, here you should define additional forwarding and filtering rules: Figure 5-99: The Firewall web page (Port Froward and Iptables Rules). The “Firewall” page section includes both NAT (redirecting addresses), port forwarding (PAT) and Firewall (accepts or rejects data packets). ByttonLTE(full)_genericUsermanual_sw306FAS_revN.1.docx Page: 169 / 290 TOPEX Bytton (HSPA+ / LTE) Thus the Bytton ICR Firewall configuration page features two distinct sections: upper pane “Port Forward” and lower pane “Iptables Rules”, each one with its own “Add new” and “Help” links: Figure 5-100: Additional links in the Firewall page. At the bottom of the Firewall page there are another three clickable links, “Advanced Iptables” “View Active Rules” and respectively “MASQUERADE”, which will open additional sections. Port forward This section allows the forwarding of firewall ports from the Bytton LTE equipment to a local computer from the coverage area of the router. First use Add New to add a record (by default the table is empty), then Edit to change the parameters: Figure 5-101: Topmost section of the Firewall web page, Port Forward It forwards a port from a Interface with public IP (WAN) to a interface (LAN) with a private IP. Example how to forward port 80 TCP from SIM data connection to LAN interface IP 192.168.1.10, over the same port. No. Interface Protocol IP D Port S SameP/NewP Port D 1 PPP Embeded TCP 192.168.1.10 80 SP 0 ByttonLTE(full)_genericUsermanual_sw306FAS_revN.1.docx Page: 170 / 290 TOPEX Bytton (HSPA+ / LTE) This will generate to firewall "View Active Rule"; after Save > Commit the next rules: The following rules will be generated - in *nat section: -A PREROUTING -i ppp1 -p tcp -m tcp --dport 80 -j DNAT --to-destination 192.168.1.10:80 and respectively in the * filter section: -A FORWARD -d 192.168.1.10 -p tcp -m tcp --dport 80 -j ACCEPT To forward port 8080 TCP from SIM data connection to LAN interface IP 192.168.1.11, over port 80. No. Interface Protocol 1 PPP Embedded TCP IP D Port S SameP/NewP Port D 192.168.1.11 8080 NP 80 This will generate also to the firewall the next rules: In *nat section: -A PREROUTING -i ppp1 -p tcp -m tcp --dport 8080 -j DNAT --to-destination 192.168.1.11:80 and in the * filter section: -A FORWARD -d 192.168.1.11 -p tcp -m tcp --dport 80 -j ACCEPT . Interface – select the type of the used interface in order to communicate with the Bytton equipment. The available options are: BR0 – the default bridge that joins all local (wireless or wired) ports of Bytton; WAN Ethernet port – the WAN port; PPP interface – the Embedded_Modem for mobile (UMTS / HSPA) connection; GRET1 – the first GRE IP tunnel. OPVPN_TAP0 – the Open VPN tunnel, working in TAP mode As you can see, in addition to the physical, “real” interfaces, drop list shows all logical interfaces that you have defined on the system: bridges, virtual LANs, GRE, IPSEC or Open VPN tunnels, and so on. Protocol – select the IP protocol. TCP and UDP protocols are used for communications, while the ICMP protocol is for the “ping” command; IP D – The IP Destination field. It contains the IP address of the computer where the firewall ports will be forwarded. If you enabled rule but leave the IP to the default "0.0.0.0", then no rule will be added to iptables. Port S – The source port – represents the number of the port that will be forwarded; Same P / New P – This section allows you to select two options: - SP – when this option is selected the source port typed in the Port S field will be forwarded on the same port to the computer with the IP address from the IP D field. If you select the “SP” option, the “Port D” field will be filled only with the 0 value; NP – if you select this option, you will have to fill the “Port D” area with the number of the new port to which you want to forward the port from the “Port S” field. Port D – the destination port. This area is filled when the “NP” option is selected in the “Same P / New P” section. It represents the number of port where the source port is forwarded. ByttonLTE(full)_genericUsermanual_sw306FAS_revN.1.docx Page: 171 / 290 TOPEX Bytton (HSPA+ / LTE) IP tables rules For each interface, you can select, depending upon direction, protocol, IP address and port number, if the respective data packets will be accepted or deleted (DROP): Figure 5-102: IP tables (accept/reject rules) section of the Firewall web page No – the number of the rule for the iptables: 1, 2 and so on. Interface - select the type of the used interface in order to communicate with the Bytton equipment. The available options are the same as for the Port forward section; Direction – select “Input” to open a communication link or “Output” to get out from the Bytton equipment; Protocol – select the communication protocol used. The options are TCP, UDP or ICMP; IP – the IP address of the computer from the coverage area of the Bytton, in the case when in the “Direction” field is set “Forward”. When it is set the “Input” option the IP address will not be filled; Port – the number of source port which will be open; D/A – Accept or Drop the respective rule. ByttonLTE(full)_genericUsermanual_sw306FAS_revN.1.docx Page: 172 / 290 TOPEX Bytton (HSPA+ / LTE) Use the link “Advanced Iptables Add” to go directly to the IP tables window and set up additional rules: Figure 5-103: The link “Advanced Iptables Add” You can define firewall rules in this table (expert use only): Figure 5-104: Directly writing firewall rules (settings in iptables) General info: The firewall has several sections, for pre-routing, post-routing, input, output and forwarding of data packets. This refers to the moment of time for the data packets: PREROUTING: before effective routing, as soon as the packets are received by an interface. POSTROUTING: after the local routing is performed, but before leaving an interface INPUT: Right before they are sent a local process, the rules apply to external packets that are sent to the equipment. OUTPUT: Right after they are generated by a local process, rules apply to packets that et out of the BYTTON router. FORWARD: transfer operations, the data packets are coming in through one interface and getting out via another interface. All these sections may be seen and changed or supplemented in the “Firewall Settings”. Don’t forget to use the “Save” button at the bottom! ByttonLTE(full)_genericUsermanual_sw306FAS_revN.1.docx Page: 173 / 290 TOPEX Bytton (HSPA+ / LTE) View Active Rules When you click this link, a web page opens up allowing you to see the active rules for the firewall, rules that you have set in the previous section. Note that at the beginning (on top of the page you can see a line that says “generated by iptables on Date / Time”, where the timestamp indicates the real moment when the new rules have been saved into the Bytton LTE equipment. Examples of such timestamps: View the active rules: Figure 5-105: Viewing the Active Rules of the firewall of Bytton ICR. ByttonLTE(full)_genericUsermanual_sw306FAS_revN.1.docx Page: 174 / 290 TOPEX Bytton (HSPA+ / LTE) Firewall view rule # Generated by iptables-save v1.4.2 on Mon Mar 18 15:39:16 2013 *mangle -A PREROUTING -i br0 -p tcp -m tcp --dport 1070 -m tos --tos 0x00/0xff -j TOS --set-tos 0x20/0xff -A PREROUTING -s 79.51.0.0/16 -i ipsec2 -p udp -m udp --sport 30512 -m tos --tos 0x26/0xff -j TOS --set-tos 0x40/0xff COMMIT # Completed on Mon Mar 18 15:39:16 2013 # Generated by iptables-save v1.4.2 on Mon Mar 18 15:39:16 2013 *nat :PREROUTING ACCEPT [8679:520048] :OUTPUT ACCEPT [233:15324] :POSTROUTING ACCEPT [202:12963] -A POSTROUTING -o wan -j MASQUERADE -A POSTROUTING -o ppp1 -j MASQUERADE COMMIT # Completed on Mon Mar 18 15:39:16 2013 # Generated by iptables-save v1.4.2 on Mon Mar 18 15:39:16 2013 *filter :INPUT ACCEPT [468:49705] :FORWARD ACCEPT [2:376] :OUTPUT ACCEPT [2204:160634] -A INPUT -s 192.168.1.179/32 -i br0 -p tcp -m tcp --dport 80 -j ACCEPT -A INPUT -i lo -j ACCEPT -A INPUT -i br0 -j ACCEPT -A INPUT -p gre -j ACCEPT -A INPUT -m state --state RELATED,ESTABLISHED -j ACCEPT -A INPUT -p udp -m udp --dport 161 -j ACCEPT -A INPUT -p udp -m udp --dport 162 -j ACCEPT -A INPUT -i tap0 -j ACCEPT -A INPUT -p udp -m udp --dport 4500 -j ACCEPT -A INPUT -i ipsec0 -j ACCEPT -A INPUT -p ipv6-auth -j ACCEPT -A INPUT -p udp -m udp --sport 500 --dport 500 -j ACCEPT -A INPUT -p ipv6-crypt -j ACCEPT -A FORWARD -d 64.65.23.117/32 -p udp -m udp --dport 1071 -j DROP -A FORWARD -i br0 -j ACCEPT -A FORWARD -p gre -j ACCEPT -A FORWARD -m state --state RELATED,ESTABLISHED -j ACCEPT -A FORWARD -p tcp -m tcp --tcp-flags SYN,RST SYN -j TCPMSS --clamp-mss-topmtu -A FORWARD -i tap0 -j ACCEPT -A FORWARD -i ipsec0 -j ACCEPT -A OUTPUT -p tcp -m tcp --tcp-flags SYN,RST SYN -j TCPMSS --clamp-mss-topmtu COMMIT # Completed on Mon Mar 18 15:39:16 2013 Figure 5-107: Actual listing of Active Rules of the firewall of Bytton ICR. ByttonLTE(full)_genericUsermanual_sw306FAS_revN.1.docx Page: 175 / 290 TOPEX Bytton (HSPA+ / LTE) Advanced Iptables Add This link provides you access to a console where you can add and edit rules for routing: Figure 5-108: Example and explanations for Advanced Iptables Add firewall rules. The firewall and advanced packet routing can be configured using the iptables commands. For more information, see http://www.netfilter.org. Warning! Please remember that if you change the default values you may compromise your network security by allowing entrusted access. These configuration options need an advanced level of knowledge regarding network security and Linux kernel packet handling. Note: As you may see, the visible settings of the NAT/firewall configuration page are quite few. This happens because the basic rules for address translation and packet filtering are already defined, and they are not directly accessible to the user. Since they can’t be changed, they are not visible! What you see are the additional rules, the ones that you are allowed to modify, to supplement or delete. The firmware of Bytton LTE automatically installs the basic rules that are required. For instance, if you enable the Webcam feature, the firmware opens the port 2000 for TCP traffic, if you enable the NTP service it opens port 123 for UDP traffic, and so on. ByttonLTE(full)_genericUsermanual_sw306FAS_revN.1.docx Page: 176 / 290 TOPEX Bytton (HSPA+ / LTE) 5.4.2 Static Routes Routing means determining and prescribing the path or method used for forwarding data packets. This option page is concerned with fixed (static) routes. It shows the current routing table for Bytton LTE and allows you to define several static routes. Figure 5-109: Routes – display and definition of static routes. Note that the Static Routes configuration screen also has two distinct parts: the upper pane displays the current routing table, such as: Kernel IP routing table Destination Gateway 10.64.64.65 0.0.0.0 194.102.255.23 192.168.1.8 195.74.234.12 0.0.0.0 10.0.0.0 0.0.0.0 192.168.144.0 0.0.0.0 10.0.0.0 0.0.0.0 192.168.148.0 0.0.0.0 192.168.0.0 0.0.0.0 10.0.0.0 0.0.0.0 Genmask 255.255.255.255 255.255.255.255 255.255.255.254 255.255.255.252 255.255.255.0 255.255.255.0 255.255.255.0 255.255.0.0 255.0.0.0 Flags UH UGH U U U U U U U Metric 0 0 0 0 0 0 0 0 0 Ref 0 0 0 0 0 0 0 0 0 Use 0 0 0 0 0 0 0 0 0 Iface ppp1 wan br2 br0 wan.3 br0 wan wan br1 Or: ByttonLTE(full)_genericUsermanual_sw306FAS_revN.1.docx Page: 177 / 290 TOPEX Bytton (HSPA+ / LTE) Figure 5-110: Static Routes – upper panel, display of static routes. Here you can only see the existing static routes for Bytton LTE (default routes, gateway, masquerading if used, interface used, and so on), you cannot perform changes; the lower pane allows you to define several static routes: Or: Figure 5-111: Static Routes – lower panel, table for defining display of routes. ByttonLTE(full)_genericUsermanual_sw306FAS_revN.1.docx Page: 178 / 290 TOPEX Bytton (HSPA+ / LTE) Static Route Display Figure 5-112: Routes – Static Routes Display. The routes are shown top downwards from the most specific to the least specific. Destination - the destination network or host system. Declaring a default route means adding a route with 0.0.0.0 as its destination. Gateway - the access gateway the respective routing entry points to. If this field has only zeroes (0.0.0.0) or an asterisk (*), this means no gateway is used, the destination network is connected directly to the computer. Genmask - the bit mask applied to the destination. It shows the “generality” of the route. Flags - indicator flags that describe some characteristics of the route. Such flags are: U - the route is active and operating, the interface to be used is up; G - the route uses an external gateway ( the network interfaces of the system supply routes to the networks which are directly connected, all other routes use external gateways. Thus, the networks which are directly connected don’t have the G flag, but it is activated for all other routes ). H – it is a route towards a single host instead of a network. D - the table entry has been generated dynamically, either by a routing protocol or by a an ICMP redirect message (see section 3.5). M – this route was modified by a dynamic routing protocol; R - the route vas re-activated following update by dynamic routing protocol. Routes may be configured as passive or static even when a protocol for dynamic routing is used. Other fields refer to the Metric (routing cost), the number of references to this route, etc, Finally, Iface is the name of the network interface used for this route. For Ethernet interfaces the names will be lan0, lan1, lan2 and so on, for the PPP interfaces the names will be ppp1, ppp2, for WAN you have wan and wan0, for the GRE tunnels, gret1, gret2 and so on, while the default bridge is br0 and the VLAN is br0.2. Static Route Definition Such a static route is a possible path from a device to its destination or to another host. You must insert predefined rules of routing for BYTTON in case you append one or several network equipments such as routers behind the Bytton LTE device, to share the same connection to the mobile Internet. This way the Bytton router will be able to know where it may deliver the data packets coming from the Internet with different destination IP addresses. ByttonLTE(full)_genericUsermanual_sw306FAS_revN.1.docx Page: 179 / 290 TOPEX Bytton (HSPA+ / LTE) At first, the routing table is empty, so you must use Add New to create a new entry: then Edit to modify it and finally the Save button to individually save the respective rule. Figure 5-113: Routes – Definition of Static Routes. For each route shown as above you may perform these settings: Route: How it will be defined – statically, by the kernel (operating system) or dynamically, by the Quagga routing program: IP: Address of the remote network or host to which you want to assign a static route. Netmask: the subnet mask determines which portion of the destination IP address is the network part and which is the host part. Router: the gateway to be used, enter here the IP address of the router which allows for contact between Bytton and the remote host or network. If you specify a gateway here, it will send the route to the next router. This specified Router must be reachable first! If the Router is “off”, then you need to set up an interface. Interface: the interface to be used for the respective route. This setting forces the route to be associated with the specified device. You may select one of the following available options: BR0 for local network (WIFI and LAN Ethernet ports), WAN Ethernet port, PPP (embedded HSPA modem), PPPoE (PPP link over the Ethernet), or Router. Figure 5-114: Routes – Selecting Interface for Static Routes. ByttonLTE(full)_genericUsermanual_sw306FAS_revN.1.docx Page: 180 / 290 TOPEX Bytton (HSPA+ / LTE) When you choose for interface “Router”, of course you will need to set a Router IP. Here also, besides the physical interfaces shown above, the Drop list for “Interface” includes all logical (virtual) interfaces: GRE tunnels, IPSEC tunnels, LAN0/Wan0 port, bridges defined, Virtual LANs, Open VPN or PPTP tunnels, and so on: Metric: Routing now features also the metric parameter: in case of multiple paths to the destination, you may specify the metric for each route (0, 1, and 2 etc). The routing program will check the metric to select the shortest route for the data packets. After performing changes over the firewall and routing settings, it is recommended that you click again the link “View Active Rules”, explained previously, to check that the rules generated by iptables are the ones you really want. See below an example of such routes: # Generated by iptables-save v1.4.10 on Fri Jun 22 07:49:03 2012 *filter :INPUT ACCEPT [364:46765] :FORWARD ACCEPT [50:4214] :OUTPUT ACCEPT [2398:251024] -A INPUT -i lo -j ACCEPT -A INPUT -i br0 -j ACCEPT -A INPUT -p gre -j ACCEPT -A INPUT -m state --state RELATED,ESTABLISHED -j ACCEPT -A INPUT -i ppp3 -j ACCEPT -A INPUT -i tap0 -j ACCEPT -A FORWARD -p gre -j ACCEPT -A FORWARD -m state --state RELATED,ESTABLISHED -j ACCEPT -A FORWARD -p tcp -m tcp --tcp-flags SYN,RST SYN -j TCPMSS --clamp-mss-to-pmtu -A FORWARD -d 193.76.244.115/32 -p tcp -m tcp --dport 47 -j ACCEPT -A OUTPUT -p tcp -m tcp --tcp-flags SYN,RST SYN -j TCPMSS --clamp-mss-to-pmtu COMMIT # Completed on Fri Jun 22 07:49:03 2012 # Generated by iptables-save v1.4.10 on Fri Jun 22 07:49:03 2012 *nat :PREROUTING ACCEPT [375:39168] :OUTPUT ACCEPT [279:18046] :POSTROUTING ACCEPT [186:11701] -A PREROUTING -i br0 -p tcp -m tcp --dport 21 -j DNAT --to-destination 193.76.244.115:47 -A POSTROUTING -o ppp3 -j MASQUERADE -A POSTROUTING -o tap0 -j MASQUERADE -A POSTROUTING -o ppp1 -j MASQUERADE -A POSTROUTING -o wan -j MASQUERADE COMMIT # Completed on Fri Jun 22 07:49:03 2012 ByttonLTE(full)_genericUsermanual_sw306FAS_revN.1.docx Page: 181 / 290 TOPEX Bytton (HSPA+ / LTE) For further details, click the “Routes help” link examples: to see the embedded help with In the Routes web page you have the following columns: No. Route IP Netmask Router Interface Metric No - Number of the route. Route - Type of the route: Static - will add a static route. Quagga - will send the route to Dynamic route Daemon. IP - Ip that you like to add a route. Netmask - Netmask for IP. Ex: route to IP: 10.10.10.1 netmask 255.255.255.255 will add a host route. route to IP: 10.10.10.1 netmask 255.255.255.0 will fail to be add netmask / ip conflict. route to a network: 10.10.10.0 netmask 255.255.255.0 New EX: Route add to host from 10.216.240.225 to 10.216.240.230 If a route to a network is needed you will set IP = Network IP not a Host IP. For this example the corect connfig is: IP=10.216.240.224 Netmask=255.255.255.248 Address: Netmask: Wildcard: => Network: HostMin: HostMax: Broadcast: Hosts/Net: 10.216.240.225 00001010.11011000.11110000.11100 001 255.255.255.248 = 29 11111111.11111111.11111111.11111 000 0.0.0.7 00000000.00000000.00000000.00000 111 10.216.240.224/29 10.216.240.225 10.216.240.230 10.216.240.231 6 00001010.11011000.11110000.11100 00001010.11011000.11110000.11100 00001010.11011000.11110000.11100 00001010.11011000.11110000.11100 Class A, Private Internet 000 001 110 111 Router (or gateway) - Will send the route to the next router. The specified Router must be reachable first. If Router is off you need to set a interface. Interface - Will add the route to interface. Force the route to be associated with the specified device. If interface is Router you need to set a Router IP. Metric - set the metric field in the routing table. Figure 5-115: Routes – Embedded help for defining static routes ByttonLTE(full)_genericUsermanual_sw306FAS_revN.1.docx Page: 182 / 290 TOPEX Bytton (HSPA+ / LTE) Interface Status: When you click the link “Interface Status”, it will show the state of all network interfaces of the Bytton LTE device, external or internal, physical or virtual. Interface Status has been explained in the chapter about LAN, but it is used also here, since it shows the logical interfaces created over the Bytton equipment: br0 Link encap:Ethernet HWaddr 00:19:70:49:F3:D7 inet addr:10.0.0.1 Bcast:10.0.0.255 Mask:255.255.255.0 UP BROADCAST RUNNING MULTICAST MTU:1488 Metric:1 RX packets:455237 errors:0 dropped:0 overruns:0 frame:0 TX packets:1189164 errors:0 dropped:0 overruns:0 carrier:0 collisions:0 txqueuelen:0 RX bytes:30974697 (29.5 MiB) TX bytes:1754139440 (1.6 GiB) br1 Link encap:Ethernet HWaddr 16:7A:CD:4F:F3:83 inet addr:94.243.164.98 Bcast:94.255.255.255 Mask:255.255.255.254 UP BROADCAST RUNNING MULTICAST MTU:1500 Metric:1 RX packets:0 errors:0 dropped:0 overruns:0 frame:0 TX packets:0 errors:0 dropped:0 overruns:0 carrier:0 collisions:0 txqueuelen:0 RX bytes:0 (0.0 B) TX bytes:0 (0.0 B) lan Link encap:Ethernet HWaddr 00:50:C2:F5:23:2A UP BROADCAST RUNNING MULTICAST MTU:1500 Metric:1 RX packets:454877 errors:174 dropped:0 overruns:0 frame:0 TX packets:1189543 errors:1 dropped:0 overruns:0 carrier:0 collisions:0 txqueuelen:1000 RX bytes:37377143 (35.6 MiB) TX bytes:1754266004 (1.6 GiB) Base address:0x2200 lan0 Link encap:Ethernet HWaddr 00:50:C2:F5:23:27 UP BROADCAST RUNNING MULTICAST MTU:1488 Metric:1 RX packets:1179 errors:0 dropped:0 overruns:0 frame:0 TX packets:2224 errors:0 dropped:0 overruns:0 carrier:0 collisions:0 txqueuelen:1000 RX bytes:260820 (254.7 KiB) TX bytes:409600 (400.0 KiB) Base address:0x2000 lo Link encap:Local Loopback inet addr:127.0.0.1 Mask:255.0.0.0 UP LOOPBACK RUNNING MTU:16436 Metric:1 RX packets:15664 errors:0 dropped:0 overruns:0 frame:0 TX packets:15664 errors:0 dropped:0 overruns:0 carrier:0 collisions:0 txqueuelen:0 RX bytes:877964 (857.3 KiB) TX bytes:877964 (857.3 KiB) mon.wlan0 Link encap:UNSPEC HWaddr 00-19-70-49-F3-D7-10-07-00-00-00-00-00-0000-00 UP BROADCAST RUNNING MULTICAST MTU:1500 Metric:1 RX packets:7450 errors:0 dropped:0 overruns:0 frame:0 TX packets:0 errors:0 dropped:0 overruns:0 carrier:0 collisions:0 txqueuelen:1000 RX bytes:650277 (635.0 KiB) TX bytes:0 (0.0 B) wan Link encap:Ethernet HWaddr 00:50:C2:F5:23:29 inet addr:192.168.1.148 Bcast:192.168.255.255 Mask:255.255.0.0 UP BROADCAST RUNNING MULTICAST MTU:1500 Metric:1 RX packets:1420977 errors:272 dropped:0 overruns:0 frame:0 TX packets:451456 errors:0 dropped:0 overruns:0 carrier:0 collisions:0 txqueuelen:1000 RX bytes:1767668651 (1.6 GiB) TX bytes:34203167 (32.6 MiB) ByttonLTE(full)_genericUsermanual_sw306FAS_revN.1.docx Page: 183 / 290 TOPEX Bytton (HSPA+ / LTE) Base address:0x3000 wan:0 Link encap:Ethernet HWaddr 00:50:C2:F5:23:29 inet addr:192.168.148.254 Bcast:192.168.148.255 Mask:255.255.255.252 UP BROADCAST RUNNING MULTICAST MTU:1500 Metric:1 Base address:0x3000 wlan0 Link encap:Ethernet HWaddr 00:19:70:49:F3:D7 UP BROADCAST RUNNING MULTICAST MTU:1500 Metric:1 RX packets:0 errors:0 dropped:0 overruns:0 frame:0 TX packets:2124 errors:0 dropped:0 overruns:0 carrier:0 collisions:0 txqueuelen:1000 RX bytes:0 (0.0 B) TX bytes:339480 (331.5 KiB) Figure 5-116: Interface Status – shows the current state of all network interfaces. Use the button “Reload” located at the bottom to read the latest statistics about the network interfaces of Bytton LTE: Figure 5-117: Details of Interface Status window, including the “Reload” button. ByttonLTE(full)_genericUsermanual_sw306FAS_revN.1.docx Page: 184 / 290 TOPEX Bytton (HSPA+ / LTE) 5.4.3 Dynamic routes The last configuration page in “Routing” is for dynamic routing. As an alternative to defining static routes for the connection of your network to the Internet using Bytton, you may choose Dynamic Routing. Figure 5-118: ROUTING page – section Dynamic Routes. You may select to leave the Dynamic Routing Disabled (the default setting) or to use either RIP, OSPF or BGP algorithm for dynamic routing. In the Dynamic mode of routing, you need not specify fixed routes. Instead, the router adjusts automatically to physical changes in the layout of the network and it exchanges routing tables with other routers. The available options for dynamic routes are: RIP - Routing Information Protocol. It was the first routing protocol implemented for dynamic routing and hence it is widely used. RIP is a distance-vector routing protocol. The route of the data packets is determined in such way as to have the fewest possible number of hops between the source and the destination. OSPF - Open Shortest Path First. This is a link state routing protocol, as opposed to distance vector protocol (RIP). It is an Internet standard IGP defined in RFCs 1583 1793 and RFC 2328. OSPF Runs directly over IP and interfaces with SNMP for configuration and control purposes. As a link-state routing protocol, OSPF contrasts with RIP and IGRP, which are distance -vector routing protocols The SPF (shortest path first) algorithm used by OSPF has the advantage is that it results in smaller more frequent updates everywhere, thus it makes for a stable network. Its disadvantage is that it is intensive, it requires for processing more CPU power and memory. BGP - Border Gateway Protocol). It is a protocol for exchanging routing information between gateway hosts (each has its own router) in a network of “autonomous systems” (AS). For this, it maintains a table of IP networks or 'prefixes' which designate network reach-ability among autonomous systems. BGP does not use traditional Interior Gateway Protocol (IGP) metrics like RIP or OSPF, but instead makes routing decisions based on path, network policies and/or rule-sets. BGP has been created to replace the Exterior Gateway Protocol (EGP) protocol to allow fully decentralized routing in order to transition from the core network model to a decentralized system that is more like the present day Internet. Since 1994, version four of the BGP has been in use on the Internet. All previous versions are now obsolete. And since January 2006, version 4 is codified in RFC 4271, which went through more than 20 drafts based on the earlier RFC 1771 version 4. ByttonLTE(full)_genericUsermanual_sw306FAS_revN.1.docx Page: 185 / 290 TOPEX Bytton (HSPA+ / LTE) Why BGP? Obviously, most Internet users do not employ BGP directly. But almost every Internet service providers have to use BGP in order to establish routing between one another (especially if they are multihomed). Thus, even if less well-known, BGP is one of the most important protocols of the Internet! And very large private IP networks use BGP internally, allowing the joining of a number of large OSPF networks where the OSPF protocol itself would become inoperative. Also, the usage of BGP allows for increased redundancy. This is why the Dynamic routing feature of Bytton LTE does include the BGP protocol too, besides RIP and OSPF. Quagga routing Quagga is a routing software suite for Unix platforms such as Linux, and it has been embedded into the Bytton LTE firmware. It provides implementations of OSPF, RIP and BGP-4. The architecture of Quagga consists of a core daemon and several clients which typically implement a routing protocol and communicate routing updates to the daemon. Currently there are clients for various dynamic routing protocols: OSPF, RIP and BGPv4+. In order to configure the static or dynamic routes with Quagga, the system administrator must connect to the programming console of BYTTON via SSH. Topex Bytton LTE lets you choose for dynamic routing the protocol that you think is the best for the actual condition of your applications. Don’t forget to click the Save button and then “Commit” to make permanent the change you performed! VTY console When you enable Dynamic routing (select RIP, OSPF or BGP), a new link appears in the configuration window, “Web VTY Shell”: Figure 5-119: Dynamic ROUTING page –“VTY Shell” shows up when Dynamic Routing is enabled. ByttonLTE(full)_genericUsermanual_sw306FAS_revN.1.docx Page: 186 / 290 TOPEX Bytton (HSPA+ / LTE) When you click on the link Web VTY Shell, the web shell for the Quagga program show up, allowing you to enter advanced commands for Quagga routing: Figure 5-120: Entering commands and parameters in “VTY Shell”. See below some results of using the Web console for Quagga: Figure 5-121: Actual results of the commands entered in “VTY Shell” console. ByttonLTE(full)_genericUsermanual_sw306FAS_revN.1.docx Page: 187 / 290 TOPEX Bytton (HSPA+ / LTE) 5.4.4 Virtual Routing Table This page lets you define, configure and analyze the Virtual routing tables on Bytton: Figure 5-122: Aspect of Virtual Routing Table window in the Routing section. What is VR? Virtual routing and forwarding is a technology included in IP network routers that allows multiple instances of a routing table to exist in a single router, and work simultaneously. This way network paths can be segmented without using multiple devices. Since traffic is now automatically segregated, VR increases not only functionality but also increases network security and can eliminate the need for encryption and authentication. not only individual users, but also several big Internet service providers take advantage of VR to create separate virtual private networks for customers, this is why the Virtual routing and forwarding method is also referred to as VPN routing and forwarding. Virtual Routing acts like a logical router, as shown below it displays the routes in each of the up to four Virtual Tables that you have defined over Bytton LTE: Figure 5-123: Virtual Table with status, route list and table of definitions. ByttonLTE(full)_genericUsermanual_sw306FAS_revN.1.docx Page: 188 / 290 TOPEX Bytton (HSPA+ / LTE) In the beginning, the Virtual table is empty: So you must first define, using the link Add New, up to four Virtual Table entries (VT1 to VT4): Figure 5-124: Ading new entries into the Virtual Routing Table. Each of the four VT entries may join up to six interfaces of the Bytton equipment. Choose for every VT entry the corresponding interfaces (IF1 to IF6) from the drop list: Next, you will define the routes for each of these Virtual Routing entries. For this, use the links located at the bottom of the page: VT Links ByttonLTE(full)_genericUsermanual_sw306FAS_revN.1.docx Page: 189 / 290 TOPEX Bytton (HSPA+ / LTE) To the left, under the table with the four VT entries, there are several links to additional pages, as shown: o Add New, to add a new entry (maximum four) o VT Help, help that explains about Virtual Routing o VT Routes, where you define the routes for each VT entry o VT Status, shows the current state of the Virtual Routing on Bytton o Interface Status, the current state of all the physical and logical interfaces of the Bytton equipment. Figure 5-125: Additional links to the left of the Virtual Routing Table. VT Help Displays a Help page for the Virtual Routing tables. VT Routes: On top of the Virtual table page are displayed the established routes for each of the four VR tables, while at the bottom is the table where you define the routes: Figure 5-126: Virtual Table Routes. ByttonLTE(full)_genericUsermanual_sw306FAS_revN.1.docx Page: 190 / 290 TOPEX Bytton (HSPA+ / LTE) List of current routes for each VT: Route List Virtual Table VT1 target 10.0.59.64/ 10.0.0.0/ 10.0.0.0/ 172.27.0.0/ gateway 30 24 24 16 source proto static static static static scope link link proto static static static scope source proto static static scope link link dev tbl lan0 lan0 source proto static static static scope link link link dev tbl br0 br0 lan0 10.0.0.1 link dev tbl br0 br0 br0 lan0 Route List Virtual Table VT2 target 192.168.148.148/ 31 172.27.0.0/ 16 10.0.0.0/ 16 gateway 192.168.1.8 source 10.0.0.1 link dev tbl wan lan0 br0 Route List Virtual Table VT3 target 172.27.0.0/ 16 73.0.0.0/ 8 gateway Route List Virtual Table VT4 target 192.168.1.236/ 30 10.0.0.0/ 24 172.27.0.0/ 16 gateway Figure 5-127: Examples of VT Routes listing. Defining routes: At first, this table is empy, so you must use Add New to create a new rule, then choose for this route the IP and net mask, the router and / or the interface to be used, and the metric: Figure 5-128: Define new Virtual Table entries. These routes, being virtual, will not show up in the ROUTING>Routes page: Kernel IP routing table Destination Gateway 10.64.64.65 0.0.0.0 10.0.0.0 0.0.0.0 192.168.148.0 0.0.0.0 172.27.0.0 0.0.0.0 192.168.0.0 0.0.0.0 0.0.0.0 10.64.64.65 Genmask 255.255.255.255 255.255.255.0 255.255.255.0 255.255.0.0 255.255.0.0 0.0.0.0 ByttonLTE(full)_genericUsermanual_sw306FAS_revN.1.docx Flags UH U U U U UG Metric 0 0 0 0 0 0 Ref 0 0 0 0 0 0 Use 0 0 0 0 0 0 Iface ppp1 br0 wan lan0 wan ppp1 Page: 191 / 290 TOPEX Bytton (HSPA+ / LTE) VT Status Shows the detailed state of the Virtual Routing Tables. A few examples are shown below: When no virtual Routes have been yet defined on Bytton: Virtual RT status Show Rule 0: 32766: 32767: from all lookup local from all lookup main from all lookup default Show Route target 10.64.64.65 172.168.1.0/ 24 default 127.255.255.255 10.81.121.148 172.168.1.0 172.168.1.1 172.168.1.255 127.0.0.0 127.0.0.1 127.0.0.0/ 8 gateway 10.64.64.65 broadcast local broadcast local broadcast broadcast local local source 10.81.121.148 172.168.1.1 proto kernel kernel scope link link 127.0.0.1 10.81.121.148 172.168.1.1 172.168.1.1 172.168.1.1 127.0.0.1 127.0.0.1 127.0.0.1 kernel kernel kernel kernel kernel kernel kernel kernel link host link host link link host host dev ppp1 br0 ppp1 lo ppp1 br0 br0 br0 lo lo lo tbl local local local local local local local local Figure 5-129: Show Route in VT Status. As you can see, there is no “Virtual Table x” sections, just the general rules and respectively routes active on the equipment are shown! After you have defined Virtual routing tables 1 and 2: Virtual Table VT1 10.0.59.64/30 dev br0 proto static scope link metric 20 10.0.0.0/24 dev br0 proto static scope link 10.0.0.0/24 via 10.0.0.1 dev br0 proto static metric 15 172.27.0.0/16 dev lan0 proto static scope link Route List Virtual Table VT1 target 10.0.59.64/ 10.0.0.0/ 10.0.0.0/ 172.27.0.0/ gateway 30 24 24 16 source 10.0.0.1 proto static static static static scope link link link dev tbl br0 br0 br0 lan0 Virtual Table VT2 172.27.0.0/16 dev lan0 proto static scope link 10.0.0.0/16 via 10.0.0.1 dev br0 proto static metric 15 Show Rule 0: 1011: 1012: 1023: 1024: 1031: 1032: 1041: 1042: 1043: 32766: 32767: from from from from from from from from from from from from all all all all all all all all all all all all lookup local iif br0 lookup VT1 iif lan0 lookup VT1 iif lan0 lookup VT2 iif ppp1 lookup VT2 iif lan0 lookup VT3 iif ppp1 lookup VT3 iif br0 lookup VT4 iif lan0 lookup VT4 iif tap0 lookup VT4 lookup main lookup default ByttonLTE(full)_genericUsermanual_sw306FAS_revN.1.docx Page: 192 / 290 TOPEX Bytton (HSPA+ / LTE) Show Route target 192.168.1.236/ 10.0.0.0/ 172.27.0.0/ 172.27.0.0/ 10.0.0.0/ 10.0.0.0/ 192.168.148.0/ 172.27.0.0/ 192.168.0.0/ default 172.27.0.0/ 10.0.59.64/ 10.0.0.0/ 10.0.0.0/ 172.27.0.0/ 192.168.1.148 127.255.255.255 172.27.0.0 10.0.0.1 192.168.148.255 10.0.0.0 192.168.255.255 192.168.148.4 192.168.0.0 192.168.148.0 172.27.255.255 172.27.168.71 10.0.0.255 127.0.0.0 127.0.0.1 127.0.0.0/ gateway 30 24 16 16 16 24 24 16 16 source scope link link link link 10.0.0.1 192.168.148.4 172.27.168.71 192.168.1.148 proto static static static static static kernel kernel kernel kernel link link link 192.168.1.148 127.0.0.1 172.27.168.71 10.0.0.1 192.168.148.4 10.0.0.1 192.168.1.148 192.168.148.4 192.168.1.148 192.168.148.4 172.27.168.71 172.27.168.71 10.0.0.1 127.0.0.1 127.0.0.1 127.0.0.1 static static static static static kernel kernel kernel kernel kernel kernel kernel kernel kernel kernel kernel kernel kernel kernel kernel kernel 10.0.0.1 link link link link 192.168.1.8 16 30 24 24 16 10.0.0.1 local broadcast broadcast local broadcast broadcast broadcast local broadcast broadcast broadcast local broadcast broadcast local local 8 link host link link host link link link host link link link host link link host host dev br0 br0 lan0 lan0 br0 br0 wan lan0 wan wan lan0 br0 br0 br0 lan0 wan lo lan0 br0 wan br0 wan wan wan wan lan0 lan0 br0 lo lo lo tbl VT4 VT4 VT4 VT2 VT2 VT3 VT1 VT1 VT1 VT1 local local local local local local local local local local local local local local local local For VT4 also: Virtual Table VT4 192.168.1.236/30 dev br0 proto static scope link 10.0.0.0/24 dev br0 proto static scope link 172.27.0.0/16 dev lan0 proto static scope link metric 10 Route List Virtual Table VT4 target 192.168.1.236/ 30 10.0.0.0/ 24 172.27.0.0/ 16 gateway source proto static static static scope link link link dev tbl br0 br0 lan0 Figure 5-130: Show Rule and Show Route sections in VT Status. Show Rule 0: from 1011: from 1012: from 1041: from 1042: from 1043: from 32766: from 32767: from all all all all all all all all lookup local iif br0 lookup VT1 iif lan0 lookup VT1 iif br0 lookup VT4 iif lan0 lookup VT4 iif tap0 lookup VT4 lookup main lookup default Show Route target 192.168.1.236/ 30 10.0.0.0/ 24 172.27.0.0/ 16 192.168.148.148/ 31 172.27.0.0/ 16 10.0.0.0/ 16 10.64.64.65 10.0.0.0/ 24 192.168.148.0/ 24 172.27.0.0/ 16 192.168.0.0/ 16 default gateway source 192.168.1.8 10.0.0.1 93.122.250.36 10.0.0.1 192.168.148.4 172.27.168.71 192.168.1.148 10.64.64.65 ByttonLTE(full)_genericUsermanual_sw306FAS_revN.1.docx proto static static static static static static kernel kernel kernel kernel kernel scope link link link link link link link link link dev tbl br0 VT4 br0 VT4 lan0 VT4 wan VT2 lan0 VT2 br0 VT2 ppp1 br0 wan lan0 wan ppp1 Page: 193 / 290 TOPEX Bytton (HSPA+ / LTE) As you can see, Virtual Table Status has three distinct panes: Figure 5-131: Full VT Status page, with VT list, Show Rule and Show Route sections. As can bee seen, this table is much too large to properly fit in a single screen page! ByttonLTE(full)_genericUsermanual_sw306FAS_revN.1.docx Page: 194 / 290 TOPEX Bytton (HSPA+ / LTE) This is why it will be explained section by section. The VT Status table has: - an upper part, showing each of the four VT tables and rules lists: Virtual Table VT1 10.0.59.64/30 dev br0 proto static scope link metric 20 10.0.0.220/30 dev br0 proto static scope link metric 12 10.0.0.0/24 dev br0 proto static scope link 10.0.0.0/24 via 10.0.0.1 dev br0 proto static metric 15 172.27.0.0/16 dev lan0 proto static scope link Route List Virtual Table VT1 target gateway 10.0.59.64/ 30 10.0.0.220/ 30 10.0.0.0/ 24 10.0.0.0/ 24 10.0.0.1 172.27.0.0/ 16 source proto static static static static static scope link link link link dev tbl br0 br0 br0 br0 lan0 Virtual Table VT2 39.41.125.78/31 dev lan0 proto static scope link metric 15 172.27.0.0/16 dev lan0 proto static scope link 10.0.0.0/16 via 10.0.0.1 dev br0 proto static metric 15 Route List Virtual Table VT2 target gateway 39.41.125.78/ 31 172.27.0.0/ 16 10.0.0.0/ 16 10.0.0.1 source Virtual Table VT3 192.168.148.208/30 dev wan proto static scope link 192.168.0.0/16 dev wan proto static scope link Route List Virtual Table VT3 target gateway 192.168.148.208/ 30 192.168.0.0/ 16 source Virtual Table VT4 192.168.1.236/30 dev br0 proto static scope link 10.0.0.0/24 dev br0 proto static scope link 172.27.0.0/16 dev lan0 proto static scope link Route List Virtual Table VT4 target gateway 192.168.1.236/ 30 10.0.0.0/ 24 172.27.0.0/ 16 ByttonLTE(full)_genericUsermanual_sw306FAS_revN.1.docx source proto static static static scope link link dev tbl lan0 lan0 br0 metric 20 proto static static scope link link dev tbl wan wan metric 10 proto static static static scope link link link dev tbl br0 br0 lan0 Page: 195 / 290 TOPEX Bytton (HSPA+ / LTE) - a middle pane “Show Rule”, Show Rule 0: 1011: 1012: 1023: 1024: 1031: 1032: 1041: 1042: 1043: 32766: 32767: - from from from from from from from from from from from from all all all all all all all all all all all all lookup local iif br0 lookup VT1 iif lan0 lookup VT1 iif lan0 lookup VT2 iif ppp1 lookup VT2 iif wan lookup VT3 iif ppp1 lookup VT3 iif br0 lookup VT4 iif lan0 lookup VT4 iif tap0 lookup VT4 lookup main lookup default and a main part, “Show Route”, located at the bottom, where each route is shown: Show Route target 192.168.1.236/ 30 10.0.0.0/ 24 172.27.0.0/ 16 192.168.148.148/ 31 172.27.0.0/ 16 10.0.0.0/ 16 10.64.64.65 10.0.0.0/ 24 192.168.148.0/ 24 172.27.0.0/ 16 192.168.0.0/ 16 default 172.27.0.0/ 16 73.0.0.0/ 8 10.0.59.64/ 30 10.0.0.0/ 24 10.0.0.0/ 24 172.27.0.0/ 16 192.168.1.148 127.255.255.255 172.27.0.0 10.0.0.1 192.168.148.255 10.0.0.0 gateway source 93.122.250.36 10.0.0.1 192.168.148.4 172.27.168.71 192.168.1.148 proto static static static static static static kernel kernel kernel kernel kernel 192.168.1.148 127.0.0.1 172.27.168.71 10.0.0.1 192.168.148.4 10.0.0.1 static static static static static static kernel kernel kernel kernel kernel kernel 192.168.1.8 10.0.0.1 scope link link link link link link link link link 10.64.64.65 10.0.0.1 local broadcast broadcast local broadcast broadcast ByttonLTE(full)_genericUsermanual_sw306FAS_revN.1.docx link link link link link host link link host link link dev tbl br0 VT4 br0 VT4 lan0 VT4 wan VT2 lan0 VT2 br0 VT2 ppp1 br0 wan lan0 wan ppp1 lan0 VT3 lan0 VT3 br0 VT1 br0 VT1 br0 VT1 lan0 VT1 wan local lo local lan0 local br0 local wan local br0 local Page: 196 / 290 TOPEX Bytton (HSPA+ / LTE) 93.122.250.36 192.168.255.255 192.168.148.4 192.168.0.0 192.168.148.0 172.27.255.255 172.27.168.71 10.0.0.255 127.0.0.0 127.0.0.1 127.0.0.0/ 8 local broadcast local broadcast broadcast broadcast local broadcast broadcast local local 93.122.250.36 192.168.1.148 192.168.148.4 192.168.1.148 192.168.148.4 172.27.168.71 172.27.168.71 10.0.0.1 127.0.0.1 127.0.0.1 127.0.0.1 kernel kernel kernel kernel kernel kernel kernel kernel kernel kernel kernel host link host link link link host link link host host ppp1 wan wan wan wan lan0 lan0 br0 lo lo lo local local local local local local local local local local local The fields (columns) of this “Show Route” section are: - target, the destination IP together with its netmask, such as 192.168.1.236/ 20 or 94.243.164.98/ 31; - gateway, which may be an actual gateway such as 192.168.1.2 or “broadcast” or “local” - source, the source IP address, such as 10.81.86.155 or 172.2.168.71; - proto, the routing protocol, which may be static or kernel - scope, which may be link or host - device, which may be wan, lan, br0, br1, ppp1 or lo - routing table, one of the virtual tables VT1 … VT4, or local. ByttonLTE(full)_genericUsermanual_sw306FAS_revN.1.docx Page: 197 / 290 TOPEX Bytton (HSPA+ / LTE) 5.4.5 Quality of Services The “Quality of Service” (QoS) section involves prioritization of network traffic by marking and prioritizing the data packets. First you mark the packets, then you divide them into classes, to ensure adequate performance for critical applications. Figure 5-132: Quality of Service configuration page. Why QoS? Generally, “QoS” refers to several networking technologies and techniques that are used with the goal of providing provide guarantees on the ability of the equipment network to deliver predictable results. In our case, QoS is targeted at assuring the performance of the Bytton router. QoS is especially important for the multimedia of Internet applications such as VoIP, video streaming and other consumer services. Since some core networking technologies such as Ethernet were not designed to support prioritized traffic or guaranteed performance levels, the equipment must have the means of implementing QoS solutions across the Internet! ByttonLTE(full)_genericUsermanual_sw306FAS_revN.1.docx Page: 198 / 290 TOPEX Bytton (HSPA+ / LTE) In order to partition network traffic into multiple priority levels or classes of service, Packet Marking and Classification features are used. For example, by using the three precedence bits in the Type of service (ToS) field of the IP packet header, the data packets can be categorized into a limited set of up to six traffic classes. In Bytton’s QOS, this is done by “QOS Marking” and respectively “QOS Class”. Following classification of the packets, other QoS features may be utilized to assign the appropriate traffic handling policies including allocation of bandwidth, congestion management, etc for each of the classes of traffic that were defined. At the bottom left of the QOS Web page there are three links to corresponding sub-pages: - QOS Marking QOS Class Marking Help QoS marking At first, this table is empty, use Add New to add a new entry: Figure 5-133: Table for Quality of Service Marking Then you can Edit and Save the respective entry, as shown: ByttonLTE(full)_genericUsermanual_sw306FAS_revN.1.docx Page: 199 / 290 TOPEX Bytton (HSPA+ / LTE) Figure 5-134: Editing the QoS MarkingTable QDISC qdisc qdisc qdisc qdisc qdisc qdisc qdisc qdisc qdisc qdisc qdisc qdisc qdisc qdisc qdisc qdisc qdisc qdisc qdisc qdisc qdisc qdisc qdisc qdisc qdisc pfifo_fast 0: dev wlan0 root refcnt 2 bands 3 priomap 1 2 2 2 1 2 0 0 1 1 1 1 1 1 1 1 prio 1: dev lan0 root refcnt 2 bands 2 priomap 1 1 1 1 1 1 1 1 1 1 1 1 1 1 1 1 pfifo 11: dev lan0 parent 1:1 limit 1000p htb 12: dev lan0 parent 1:2 r2q 3 default 0 direct_packets_stat 0 sfq 1211: dev lan0 parent 12:11 limit 127p quantum 1514b perturb 10sec sfq 1212: dev lan0 parent 12:12 limit 127p quantum 1514b perturb 10sec sfq 1213: dev lan0 parent 12:13 limit 127p quantum 1514b perturb 10sec ingress ffff: dev lan0 parent ffff:fff1 ---------------prio 1: dev wan root refcnt 2 bands 2 priomap 1 1 1 1 1 1 1 1 1 1 1 1 1 1 1 1 pfifo 11: dev wan parent 1:1 limit 1000p htb 12: dev wan parent 1:2 r2q 3 default 0 direct_packets_stat 27 sfq 1211: dev wan parent 12:11 limit 127p quantum 1514b perturb 10sec sfq 1212: dev wan parent 12:12 limit 127p quantum 1514b perturb 10sec sfq 1213: dev wan parent 12:13 limit 127p quantum 1514b perturb 10sec ingress ffff: dev wan parent ffff:fff1 ---------------pfifo_fast 0: dev lan root refcnt 2 bands 3 priomap 1 2 2 2 1 2 0 0 1 1 1 1 1 1 1 1 prio 1: dev br0 root refcnt 2 bands 2 priomap 1 1 1 1 1 1 1 1 1 1 1 1 1 1 1 1 pfifo 11: dev br0 parent 1:1 limit 1p htb 12: dev br0 parent 1:2 r2q 3 default 0 direct_packets_stat 31 sfq 1211: dev br0 parent 12:11 limit 127p quantum 1514b perturb 10sec sfq 1212: dev br0 parent 12:12 limit 127p quantum 1514b perturb 10sec sfq 1213: dev br0 parent 12:13 limit 127p quantum 1514b perturb 10sec ingress ffff: dev br0 parent ffff:fff1 ---------------pfifo_fast 0: dev ppp1 root refcnt 2 bands 3 priomap 1 2 2 2 1 2 0 0 1 1 1 1 1 1 1 1 pfifo_fast 0: dev mon.wlan0 root refcnt 2 bands 3 priomap 1 2 2 2 1 2 0 0 1 1 1 1 1 1 1 1 CLASS class prio 1:1 parent 1: leaf 11: class prio 1:2 parent 1: leaf 12: class htb 12:11 parent 12:1 leaf 1211: class htb 12:1 root rate 1200Kbit ceil class htb 12:13 parent 12:1 leaf 1213: class htb 12:12 parent 12:1 leaf 1212: prio 1 rate 600000bit ceil 1200Kbit burst 2Kb cburst 2Kb 1200Kbit burst 2Kb cburst 2Kb prio 3 rate 240000bit ceil 1200Kbit burst 2Kb cburst 2Kb prio 2 rate 360000bit ceil 1200Kbit burst 2Kb cburst 2Kb FILTER filter protocol ip pref 1 u32 filter protocol ip pref 1 u32 fh 800: ht divisor 1 filter protocol ip pref 1 u32 fh 800::800 order 2048 key ht 800 bkt 0 flowid 1:1 match 00380000/00380000 at 0 filter protocol ip pref 3 u32 filter protocol ip pref 3 u32 fh 801: ht divisor 1 filter protocol ip pref 3 u32 fh 801::800 order 2048 key ht 801 bkt 0 flowid 1:2 match 00000000/00000000 at 12 filter protocol ip pref 11 u32 filter protocol ip pref 11 u32 fh 801: ht divisor 1 ByttonLTE(full)_genericUsermanual_sw306FAS_revN.1.docx Page: 200 / 290 TOPEX Bytton (HSPA+ / LTE) filter protocol ip pref 11 u32 fh match 00400000/00400000 at 0 filter protocol ip pref 11 u32 fh match 00010000/00ff0000 at 8 filter protocol ip pref 12 u32 filter protocol ip pref 12 u32 fh filter protocol ip pref 12 u32 fh match 00480000/00480000 at 0 filter protocol ip pref 12 u32 fh match 00060000/00ff0000 at 8 match 05000000/0f00ffc0 at 0 match 00100000/00ff0000 at 32 filter protocol ip pref 20 u32 filter protocol ip pref 20 u32 fh filter protocol ip pref 20 u32 fh match 00000000/00000000 at 12 801::800 order 2048 key ht 801 bkt 0 flowid 12:11 801::801 order 2049 key ht 801 bkt 0 flowid 12:11 800: ht divisor 1 800::800 order 2048 key ht 800 bkt 0 flowid 12:12 800::801 order 2049 key ht 800 bkt 0 flowid 12:11 802: ht divisor 1 802::800 order 2048 key ht 802 bkt 0 flowid 12:13 Figure 5-135: Detailed examples of QoS page QoS Details: On top of the QOS page you can see the “QDISC” listing. qdisc qdisc qdisc qdisc qdisc qdisc qdisc qdisc qdisc qdisc qdisc qdisc qdisc qdisc qdisc qdisc qdisc qdisc pfifo_fast 0: dev wlan0 root refcnt 2 bands 3 priomap 1 2 2 2 1 2 0 0 1 1 1 1 1 1 1 1 prio 1: dev lan0 root refcnt 2 bands 2 priomap 1 1 1 1 1 1 1 1 1 1 1 1 1 1 1 1 pfifo 11: dev lan0 parent 1:1 limit 1000p htb 12: dev lan0 parent 1:2 r2q 3 default 0 direct_packets_stat 0 sfq 1211: dev lan0 parent 12:11 limit 127p quantum 1514b perturb 10sec sfq 1212: dev lan0 parent 12:12 limit 127p quantum 1514b perturb 10sec sfq 1213: dev lan0 parent 12:13 limit 127p quantum 1514b perturb 10sec ingress ffff: dev lan0 parent ffff:fff1 ---------------prio 1: dev wan root refcnt 2 bands 2 priomap 1 1 1 1 1 1 1 1 1 1 1 1 1 1 1 1 pfifo 11: dev wan parent 1:1 limit 1000p htb 12: dev wan parent 1:2 r2q 3 default 0 direct_packets_stat 272 sfq 1211: dev wan parent 12:11 limit 127p quantum 1514b perturb 10sec sfq 1212: dev wan parent 12:12 limit 127p quantum 1514b perturb 10sec sfq 1213: dev wan parent 12:13 limit 127p quantum 1514b perturb 10sec ingress ffff: dev wan parent ffff:fff1 ---------------pfifo_fast 0: dev lan root refcnt 2 bands 3 priomap 1 2 2 2 1 2 0 0 1 1 1 1 1 1 1 1 prio 1: dev br0 root refcnt 2 bands 2 priomap 1 1 1 1 1 1 1 1 1 1 1 1 1 1 1 1 pfifo 11: dev br0 parent 1:1 limit 1p --------------------------------------------------------------------------------Qdisc means “queue discipline” , it is an algorithm that manages the queue of an interface, either incoming (ingress) or outgoing (egress). Qdisc’s function is of a scheduler. In each case when the packets are in a queue, for instance over the output interface and input interfaces of the equipment, some type of scheduler is required. The default scheduler, invisible to the end user, is simply a FIFO (First-In, First-Out) but qdisc can assign priorities, it will rearrange the packets entering the scheduler's queue in accordance with the rules you have defined. “Scheduling” is the mechanism by which packets are (re)-arranged between input and output of a certain interface queue. In general, any set of traffic control mechanisms on an output queue can be regarded as a scheduler, because packets are arranged for output. ByttonLTE(full)_genericUsermanual_sw306FAS_revN.1.docx Page: 201 / 290 TOPEX Bytton (HSPA+ / LTE) The queuing discipline algorithm used in for implementing QOS in Bytton LTE is classful, meaning that it includes several different classes of traffic, and can apply filters, in order to shape the traffic for each class. The terminal classes in a particular queuing discipline are known as a leaf class by analogy to the tree structure of the classes. You can see below “leaf11”, “leaf12” and so on: CLASS class class class class class class prio 1:1 parent 1: leaf 11: prio 1:2 parent 1: leaf 12: htb 12:11 parent 12:1 leaf 1211: htb 12:1 root rate 1200Kbit ceil htb 12:13 parent 12:1 leaf 1213: htb 12:12 parent 12:1 leaf 1212: prio 1 rate 600000bit ceil 1200Kbit burst 2Kb cburst 2Kb 1200Kbit burst 2Kb cburst 2Kb prio 3 rate 240000bit ceil 1200Kbit burst 2Kb cburst 2Kb prio 2 rate 360000bit ceil 1200Kbit burst 2Kb cburst 2Kb Next, the filters associated to each class are shown: FILTER filter protocol ip pref 1 u32 filter protocol ip pref 1 u32 fh 800: ht divisor 1 filter protocol ip pref 1 u32 fh 800::800 order 2048 key ht 800 bkt 0 flowid 1:1 match 00380000/00380000 at 0 filter protocol ip pref 3 u32 filter protocol ip pref 3 u32 fh 801: ht divisor 1 filter protocol ip pref 3 u32 fh 801::800 order 2048 key ht 801 bkt 0 flowid 1:2 match 00000000/00000000 at 12 filter protocol ip pref 11 u32 filter protocol ip pref 11 u32 fh 801: ht divisor 1 filter protocol ip pref 11 u32 fh 801::800 order 2048 key ht 801 bkt 0 flowid 12:11 match 00400000/00400000 at 0 filter protocol ip pref 11 u32 fh 801::801 order 2049 key ht 801 bkt 0 flowid 12:11 match 00010000/00ff0000 at 8 filter protocol ip pref 12 u32 filter protocol ip pref 12 u32 fh 800: ht divisor 1 filter protocol ip pref 12 u32 fh 800::800 order 2048 key ht 800 bkt 0 flowid 12:12 match 00480000/00480000 at 0 filter protocol ip pref 12 u32 fh 800::801 order 2049 key ht 800 bkt 0 flowid 12:11 match 00060000/00ff0000 at 8 match 05000000/0f00ffc0 at 0 match 00100000/00ff0000 at 32 filter protocol ip pref 20 u32 filter protocol ip pref 20 u32 fh 802: ht divisor 1 filter protocol ip pref 20 u32 fh 802::800 order 2048 key ht 802 bkt 0 flowid 12:13 match 00000000/00000000 at 12 Links At the bottom of the screen, under the last listing (FILTER) there are three clickable links: QOS Marking, QOS Class and respectively the Help for QOS packet marking and sorting into classes. ByttonLTE(full)_genericUsermanual_sw306FAS_revN.1.docx Page: 202 / 290 TOPEX Bytton (HSPA+ / LTE) QOS Marking This page marks the data packets according to type (input or output), source/destination IP, port number and protocol used: Figure 5-136: Active QoS Marking page It also has two parts, the upper area displays the current marking rules, while the table for packet marking per direction and IP is located at the bottom. Marking List Chain PREROUTING (policy ACCEPT 2918 packets, 218K bytes) pkts bytes target prot opt in out source 0 0 TOS tcp -- wan * 0.0.0.0/0 TOS set 0x28/0xff 0 0 TOS udp -- br1 * 10.0.0.220/30 spt:48006 tos match 0x32/0xff TOS set 0x70/0xff 0 0 TOS udp -- lan0 * 39.41.125.78/31 spt:31022 tos match 0x28/0xff TOS set 0x88/0xff 0 0 TOS udp -- wlan0 * 10.0.59.120/30 spt:48007 tos match 0x2f/0xff TOS set 0x98/0xff destination 192.168.148.208/30 tcp dpt:81 0.0.0.0/0 udp 0.0.0.0/0 udp 0.0.0.0/0 udp Chain INPUT (policy ACCEPT 2793 packets, 207K bytes) pkts bytes target prot opt in out source destination Chain FORWARD (policy ACCEPT 13 packets, 1894 bytes) pkts bytes target prot opt in out source destination Chain OUTPUT (policy ACCEPT 2199 packets, 158K bytes) pkts bytes target prot opt in out source destination Chain POSTROUTING (policy ACCEPT 2214 packets, 161K bytes) pkts bytes target prot opt in out source 0 0 TOS udp -- * lan0 0.0.0.0/0 tos match 0x22/0xff TOS set 0x20/0xff 0 0 TOS udp -- * wan 0.0.0.0/0 dpt:31021 TOS set 0x38/0xff 0 0 udp -- * wlan0 0.0.0.0/0 dpt:397 tos match 0x46/0xff ByttonLTE(full)_genericUsermanual_sw306FAS_revN.1.docx destination 10.0.0.0/16 udp dpt:4 193.25.46.0/24 udp 87.0.0.0/8 udp Page: 203 / 290 TOPEX Bytton (HSPA+ / LTE) Marking Table In this table, which is empty at first, each entry must specify the direction (IN or OUT), the source or destination IP and corresponding Net mask, the protocol (either TCP, UDP or all), Type of Service (TOS) enabling or not and corresponding TOS match, TOS marking (enable or disable) and corresponding TOS value: Each record in the marking table may be individually deleted or edited Figure 5-137: Editing the QoS Marking table When you finished entering TOS marking and matching values, use the general Save, the long button called “Save and Reload” located at the bottom of the page: ByttonLTE(full)_genericUsermanual_sw306FAS_revN.1.docx Page: 204 / 290 TOPEX Bytton (HSPA+ / LTE) QOS Class After marking the packets, you must separate them into classes of traffic. The “QOS Class” page does this, sorts the data packets into several pre-defined classes. Figure 5-138: Aspect of the QoS Class page The “QOS Class” page also has two distinct panes, the upper table, predefined but which may be extended or modified (except for the topmost class, which is reserved for VoIP): Figure 5-139: QoS Class topmost pane, listing of classes ByttonLTE(full)_genericUsermanual_sw306FAS_revN.1.docx Page: 205 / 290 TOPEX Bytton (HSPA+ / LTE) And respectively the bottom part, where you assign for each Interface the upload and download figures, and Class distribution according to TOS value: Figure 5-140: QoS Class bottom pane, definition of classes “QoS Class” upper table has 3+1 pre-defined classes, named respectively VOIP, Min Delay, Interactive and Default, with corresponding decreasing priorities 0,1, 2, 3, 4 and rates out of the 100% total. You can see that VoIP traffic is placed above the other classes: - it does not have a rate specified, but instead “fifo” – first-in, first-out scheduling; - it cannot be edited, it has no Edit link to the right, like the other classes! You may edit each of the other classes, changing the priorities, rates and burst assignment (in addition to the respective percent assigned), or add up additional classes: QOS Class Entries In the beginning, the bottom QOS Class table is empty: so you must use Add New to create new entries in the table, ByttonLTE(full)_genericUsermanual_sw306FAS_revN.1.docx Page: 206 / 290 TOPEX Bytton (HSPA+ / LTE) Figure 5-141: QoS Class specifying TOS and classes for each interface And then edit the respective entries you have added ! Define QoS classes by setting limits and value marking for each interface: For each entry, you select an Interface from the drop list, then assign to it Upload and Download limits (in K bps), then define for each TOS value into which of the above-defined Classes it will be sorted (VOIP, Min Delay, Interactive, etc) or leave it to the default Disabled: Or : ByttonLTE(full)_genericUsermanual_sw306FAS_revN.1.docx Page: 207 / 290 TOPEX Bytton (HSPA+ / LTE) Do this for each of the interfaces where you need to shape the traffic: Figure 5-141: QoS Class – adding and edition the entries for each interface ByttonLTE(full)_genericUsermanual_sw306FAS_revN.1.docx Page: 208 / 290 TOPEX Bytton (HSPA+ / LTE) Finally, the QOS Class table shall look somehow like this: Figure 5-141: Completed QoS table The Bytton firmware automatically generates the corresponding firewall rules (labeled TOS), as can be seen in the next examples: *mangle -A PREROUTING -d 192.168.148.208/30 -i wan -p tcp -m tcp --dport 81 -j TOS -set-tos 0x28/0xff -A PREROUTING -s 10.0.0.220/30 -i br1 -p udp -m udp --sport 48006 -m tos --tos 0x32/0xff -j TOS --set-tos 0x70/0xff -A PREROUTING -s 39.41.125.78/31 -i lan0 -p udp -m udp --sport 31022 -m tos -tos 0x28/0xff -j TOS --set-tos 0x88/0xff -A PREROUTING -s 10.0.59.120/30 -i wlan0 -p udp -m udp --sport 48007 -m tos -tos 0x2f/0xff -j TOS --set-tos 0x98/0xff -A POSTROUTING -d 10.0.0.0/16 -o lan0 -p udp -m udp --dport 4 -m tos --tos 0x22/0xff -j TOS --set-tos 0x20/0xff -A POSTROUTING -d 193.25.46.0/24 -o wan -p udp -m udp --dport 31021 -j TOS -set-tos 0x38/0xff -A POSTROUTING -d 87.0.0.0/8 -o wlan0 -p udp -m udp --dport 397 -m tos --tos 0x46/0xff COMMIT ByttonLTE(full)_genericUsermanual_sw306FAS_revN.1.docx Page: 209 / 290 TOPEX Bytton (HSPA+ / LTE) Firewall view rule # Generated by iptables-save v1.4.2 on Mon Mar 18 17:06:40 2013 *mangle -A PREROUTING -i br0 -p tcp -m tcp --dport 1070 -m tos --tos 0x00/0xff -j TOS --set-tos 0x20/0xff -A PREROUTING -s 79.51.0.0/16 -i ipsec2 -p udp -m udp --sport 30512 -m tos --tos 0x26/0xff -j TOS --set-tos 0x40/0xff -A PREROUTING -d 10.10.10.64/30 -i ipsec2 -p udp -m udp --dport 534 -m tos --tos 0x22/0xff -j TOS --set-tos 0x48/0xff COMMIT # Completed on Mon Mar 18 17:06:41 2013 # Generated by iptables-save v1.4.2 on Mon Mar 18 17:06:41 2013 *nat -A POSTROUTING -o wan -j MASQUERADE -A POSTROUTING -o ppp1 -j MASQUERADE COMMIT # Completed on Mon Mar 18 17:06:41 2013 # Generated by iptables-save v1.4.2 on Mon Mar 18 17:06:41 2013 *filter :INPUT ACCEPT [159:15747] :FORWARD ACCEPT [0:0] :OUTPUT ACCEPT [1458:141258] -A INPUT -s 192.168.1.179/32 -i br0 -p tcp -m tcp --dport 80 -j ACCEPT -A INPUT -i lo -j ACCEPT -A INPUT -i br0 -j ACCEPT -A INPUT -p gre -j ACCEPT -A INPUT -m state --state RELATED,ESTABLISHED -j ACCEPT -A INPUT -p udp -m udp --dport 161 -j ACCEPT -A INPUT -p udp -m udp --dport 162 -j ACCEPT -A INPUT -i tap0 -j ACCEPT -A INPUT -p udp -m udp --dport 4500 -j ACCEPT -A INPUT -i ipsec0 -j ACCEPT -A INPUT -p ipv6-auth -j ACCEPT -A INPUT -p udp -m udp --sport 500 --dport 500 -j ACCEPT -A INPUT -p ipv6-crypt -j ACCEPT -A FORWARD -d 64.65.23.117/32 -p udp -m udp --dport 1071 -j DROP -A FORWARD -i br0 -j ACCEPT -A FORWARD -p gre -j ACCEPT -A FORWARD -m state --state RELATED,ESTABLISHED -j ACCEPT -A FORWARD -p tcp -m tcp --tcp-flags SYN,RST SYN -j TCPMSS --clamp-mss-topmtu -A FORWARD -i tap0 -j ACCEPT -A FORWARD -i ipsec0 -j ACCEPT -A OUTPUT -p tcp -m tcp --tcp-flags SYN,RST SYN -j TCPMSS --clamp-mss-topmtu COMMIT # Completed on Mon Mar 18 17:06:41 2013 BACK Figure 5-142: TOS rules generated in the Bzttonţs firewall ByttonLTE(full)_genericUsermanual_sw306FAS_revN.1.docx Page: 210 / 290 TOPEX Bytton (HSPA+ / LTE) 5.5 SYSTEM Shows the current state of the Bytton LTE equipment and the logs, also allowing you to perform several system-related operations. Figure 5-143: Aspect of the SYSTEM Web Page. The system configuration pages include these settings: - Status, displays the current status of the BYTTON LTE equipment - Logs, shows the log file - Update, you may perform firmware update - Password, allows modification of the password - Defaults, restores the factory default settings - Save, saves the current configuration of Bytton LTE - Load, loads a configuration previously saved. ByttonLTE(full)_genericUsermanual_sw306FAS_revN.1.docx Page: 211 / 290 TOPEX Bytton (HSPA+ / LTE) 5.5.1 Status Shows the current state of the Bytton LTE system: Figure 5-144: Aspects of System Status Web Page with Ethernet link up. Or: Figure 5-144: Aspects of SYSTEM Status Web Page with PPP link online. Other example, with the PPP link offline, this time: System Status Firmware version: topex-3.0.6-FA-S Ethernet link up PPP link offline PPPOE link offline System uptime: 17:35:14 up 9 min, load average: 0.23, 0.23, 0.12 ByttonLTE(full)_genericUsermanual_sw306FAS_revN.1.docx Page: 212 / 290 TOPEX Bytton (HSPA+ / LTE) DHCP Leases: 1363631698 00:06:4f:02:15:82 192.168.1.13 VO000073 01:00:06:4f:02:15:82 1363631597 6c:f0:49:76:24:4b 192.168.1.12 * 01:6c:f0:49:76:24:4b Reload Stop PPP Figure 5-145: Alternate example of Status sub-page for System, with two DHCP clients conected. This System Status page displays information about the following items: o Firmware version: version of the firmware running on Bytton LTE: you may see “Firmware version is company-1.2.3 –NETWORK-xyz” in the above example, and so on. The company may be topex MobileCarrierB or omniacom, the firmware version can be 2.7.1 or 3.0.6, while the final letters (such as FA_S) indicate the type, model (kind of mobile module, fitted with additional options) or customized software. o State of the PPP data link, which uses the embedded modem of the Bytton equipment. It may be in one of these states: online (active), o offline or stopped. Stopped means it is Disabled, while Offline may indicate temporary connection hang-up, but it activates when Bytton sends/receives data traffic. If the PPP o link is online, the IP allotted by your provider will also be shown. o State of the PPPOE data link, which uses the WAN Ethernet port for the PPP connection. o PPP link online, IP=93.122.148.36 System uptime: time since the last restart of the Topex Bytton LTE equipment, both in full format (hours:minutes:seconds) and short format (up 1 minute) “System uptime: 11:41:59 up 4:50”; o Load average: “0.06, 0.04, 0.01” or “load average: 1.50, 1.67, 1.71 “ - info about system loading (maximum value / average value / number of active processes) o DHCP Leases: temporary assigned IP addresses and their corresponding MAC, host name, validity period, etc. DHCP Leases: 1340747490 00:1d:e0:5e:c2:ab 10.0.0.16 DL * 1340747274 6c:f0:49:76:24:4b 10.0.0.15 VO000073 01:6c:f0:49:76:24:4b 1340747241 00:06:4f:02:15:82 10.0.0.13 * 01:00:06:4f:02:15:82 1340747209 60:fb:42:39:48:86 10.0.0.20 Mihais-iPod 01:60:fb:42:39:48:86 o Or: 1342559449 1342565970 1342550614 1342566557 a0:88:b4:7a:18:cc 24:ab:81:90:d2:b8 60:fb:42:39:48:86 00:06:4f:02:15:82 10.0.0.12 10.0.0.10 10.0.0.20 10.0.0.13 Blues * Pauls-iPhone 01:24:ab:81:90:d2:b8 Mihais-iPod 01:60:fb:42:39:48:86 VO000073 01:00:06:4f:02:15:82 Figure 5-146: Examples of DHCP leases in System Status. The “Reload” button at the bottom of the page refreshes Bytton LTE's status information. The “Please reload!” message appears when the internal PPP link is in a transition state: “PPP link starting”. ByttonLTE(full)_genericUsermanual_sw306FAS_revN.1.docx Page: 213 / 290 TOPEX Bytton (HSPA+ / LTE) Since this state is by definition temporary, you must click the Reload button in order to get the current status of the PPP link. Or: Figure 5-147: Using the “Reload” button located at the bottom. Start/Stop PPP This feature allows you to manually start and stop the PPP link. When PPP link status is online, the button will display “Stop”, since it now allows you to stop the PPP link (break the connection). After you have stopped the PPP connection, the same button changes its name to “Start PPP”, obliviously if the connection is stopped, you may want to start it again! See below a few examples: Figure 5-148: Examples of state of the PPP link and Start/Stop button. ByttonLTE(full)_genericUsermanual_sw306FAS_revN.1.docx Page: 214 / 290 TOPEX Bytton (HSPA+ / LTE) The shutting down or restarting of the PPP mobile data link may be seen below in the extracts from the system logs: Jun 26 10:01:49 bytton daemon.info pppd[5747]: CHAP authentication succeeded Jun 26 10:01:49 bytton daemon.notice pppd[5747]: CHAP authentication succeeded Jun 26 10:01:49 bytton daemon.debug pppd[5747]: sent [CCP ConfReq id=0x1 ] Jun 26 10:01:49 bytton daemon.debug pppd[5747]: sent [IPCP ConfReq id=0x1 ] Jun 26 10:01:49 bytton daemon.debug pppd[5747]: rcvd [LCP ProtRej id=0x2 80 fd 01 01 00 0f 1a 04 78 00 18 04 78 00 15 03 2f] Jun 26 10:01:53 bytton daemon.warn pppd[5747]: Could not determine remote IP address: defaulting to 10.64.64.65 Jun 26 10:01:53 bytton daemon.info dnsmasq[1199]: reading /etc/resolv.conf Jun 26 10:01:53 bytton daemon.info dnsmasq[1199]: using nameserver 62.217.193.65#53 Jun 26 10:01:53 bytton daemon.notice pppd[5747]: local IP address 93.122.148.36 Jun 26 10:01:53 bytton daemon.notice pppd[5747]: remote IP address 10.64.64.65 Jun 26 10:01:53 bytton daemon.notice pppd[5747]: primary DNS address 62.217.193.1 Jun 26 10:01:53 bytton daemon.notice pppd[5747]: secondary DNS address 62.217.193.65 Jun 26 10:01:53 bytton daemon.debug pppd[5747]: Script /etc/ppp/ip-up started (pid 5777) Jun 26 10:01:53 bytton daemon.info dnsmasq[1199]: read /etc/hosts - 1 addresses Jun 26 10:02:16 bytton daemon.debug pppd[5747]: Script /etc/ppp/ip-up finished (pid 5777), status = 0x0 Jun 26 10:02:19 bytton user.notice root: RESTART SERVICES Jun 26 10:36:32 bytton user.info kernel: br0: port 1(wlan0) entering forwarding state Jun 26 10:38:57 bytton user.notice root: Stop PPP: user Jun 26 10:38:57 bytton daemon.info pppd[3604]: Terminating on signal 2 Jun 26 10:38:57 bytton daemon.info pppd[3604]: Connect time 3.2 minutes. Jun 26 10:38:57 bytton daemon.info pppd[3604]: Sent 319574 bytes, received 7986431 bytes. Jun 26 10:38:57 bytton daemon.debug pppd[3604]: Script /etc/ppp/ip-down started (pid 4547) Jun 26 10:38:57 bytton daemon.debug pppd[3604]: sent [LCP TermReq id=0x2 "User request"] Jun 26 10:38:57 bytton daemon.debug pppd[3604]: rcvd [LCP TermAck id=0x2] Jun 26 10:38:57 bytton daemon.notice pppd[3604]: Connection terminated. 5.5.2 Logs Shows the system log: Figure 5-149: Aspect of the System Log of Bytton LTE. ByttonLTE(full)_genericUsermanual_sw306FAS_revN.1.docx Page: 215 / 290 TOPEX Bytton (HSPA+ / LTE) The log is a place where all the applications running on the Bytton LTE equipment store their output messages: status reports, confirmation or error messages, activity, and so on. It is a plain text (thus easy to interpret) record of actions taken by the software as it runs on Bytton LTE: changes made, devices and drivers detected, files added or deleted, communication with the modem, network settings, and so on. See below some samples of this LOG file: Jan 1 00:00:35 bytton user.info kernel: sierra 1-1:1.3: device disconnected Jan 1 00:00:35 bytton user.info kernel: sierra ttyUSB4: Sierra USB modem converter now disconnected from ttyUSB6 Jan 1 00:00:35 bytton user.info kernel: sierra 1-1:1.6: device disconnected Jan 1 00:00:35 bytton user.info pbx: CONFIG FILE: /tmp/.pbx Jan 1 00:00:35 bytton user.info pbx: wrong number of parameters request 7 - act ring = 0! Jan 1 00:00:35 bytton user.info pbx: pbx 0.2.3 started Jan 1 00:00:35 bytton user.info pbx: rmote run Jan 1 00:00:35 bytton user.info pbx: voice run Jan 1 00:00:35 bytton user.info pbx: modem run Jan 1 00:00:35 bytton user.info pbx: voice port opened Jan 1 00:00:36 bytton user.notice root: Selected sim: 0 Jan 1 00:00:37 bytton user.info kernel: br0: port 2(lan) entering forwarding state Jan 1 00:00:37 bytton user.info pbx: clips active Jan 1 00:00:40 bytton user.notice root: GSM MONI to CROND Jan 1 00:00:42 bytton user.notice root: Start Quagga Sep 28 07:50:56 bytton user.notice root: NTP SYNC to CROND Sep 28 07:50:56 bytton user.info kernel: USB Serial support registered for pl2303 Sep 28 07:50:56 bytton user.info kernel: usbcore: registered new interface driver pl2303 Sep 28 07:50:56 bytton user.info kernel: pl2303: Prolific PL2303 USB to serial adaptor driver Sep 28 07:50:57 bytton user.notice root: CK for USB - Serial Sep 28 07:50:57 bytton user.notice root: Have USB - Serial port /dev/ttyS1 Sep 28 07:51:01 bytton user.info kernel: usb 1-1: Sierra USB modem converter now attached to ttyUSB6 Sep 28 07:51:02 bytton user.info pbx: modem port opened Sep 28 07:51:03 bytton user.info kernel: br0: port 3(wlan0) entering forwarding state Sep 28 07:51:11 bytton user.notice root: Selected SIM0 Sep 28 07:51:11 bytton user.info pbx: clips active ……………………..etc. At startup, the system log records how the Bytton LTE machine begins operation, so the first messages are those generated bu the “kernel” operationg system. Also, the NTP client or other timekeeping ressources are not yet running, so the time stamps are always “Jan.1 00:00:xx” Jan 1 00:00:22 bytton Jan 1 00:00:22 bytton Jan 1 00:00:22 bytton Jan 1 00:00:22 bytton Jan 1 00:00:22 bytton Jan 1 00:00:22 bytton Jan 1 00:00:22 bytton Jan 1 00:00:22 bytton Jan 1 00:00:22 bytton Technologies Inc. Jan 1 00:00:22 bytton Jan 1 00:00:22 bytton Jan 1 00:00:22 bytton Jan 1 00:00:22 bytton bytes) Jan 1 00:00:22 bytton bytes) Jan 1 00:00:22 bytton syslog.info syslogd started: BusyBox v1.11.2 user.warn kernel: bio: create slab at 0 user.info kernel: vgaarb: loaded user.notice kernel: SCSI subsystem initialized user.info kernel: usbcore: registered new interface driver usbfs user.info kernel: usbcore: registered new interface driver hub user.info kernel: usbcore: registered new device driver usb user.info kernel: Freescale Elo / Elo Plus DMA driver user.info kernel: Sangoma WANPIPE Router v1.1 (c) 1995-2000 Sangoma user.info user.info user.info user.info kernel: kernel: kernel: kernel: cfg80211: Calling CRDA to update world regulatory domain Switching to clocksource timebase NET: Registered protocol family 2 IP route cache hash table entries: 2048 (order: 1, 8192 user.info kernel: TCP established hash table entries: 8192 (order: 4, 65536 user.info kernel: TCP bind hash table entries: 8192 (order: 3, 32768 bytes) Figure 5-150: The beginning of a typical System Log. Afterwards, the other application begiin to run on the equipment. Correspondingly, in the log you will see records of the kernel or of the user, debug messages, info or warnings: Dec 12 11:25:20 bytton user.info kernel: sierra 1-1:1.6: Sierra USB modem converter detected Dec 12 11:25:20 bytton user.info kernel: usb 1-1: Sierra USB modem converter now attached to ttyUSB6 Dec 12 11:25:20 bytton user.info pbx: modem port opened Dec 12 11:25:26 bytton daemon.err openvpn[2801]: TCP: connect to 192.168.143.142:1194 failed, will try again in 5 seconds: No route to host Dec 12 11:25:30 bytton user.notice root: Selected SIM0 ByttonLTE(full)_genericUsermanual_sw306FAS_revN.1.docx Page: 216 / 290 TOPEX Bytton (HSPA+ / LTE) Dec Dec Dec Dec Dec Dec Dec Dec Dec Dec Dec Dec Dec Dec Dec Dec Dec 12 12 12 12 12 12 12 12 12 12 12 12 12 12 12 12 12 11:25:30 11:25:31 11:25:31 11:25:31 11:25:31 11:25:31 11:25:33 11:25:33 11:25:33 11:25:33 11:25:33 11:25:33 11:25:33 11:25:33 11:25:33 11:25:33 11:25:33 bytton bytton bytton bytton bytton bytton bytton bytton bytton bytton bytton bytton bytton bytton bytton bytton bytton user.info pbx: clips active user.info pbx: ONLINE user.info pbx: clips active user.info pbx: voice running user.notice root: Tring on SIM0:0 daemon.notice pppd[1621]: pppd 2.4.4 started by root, uid 0 user.notice root: DATA START daemon.info pppd[1621]: Serial port initialized. local2.info chat[1629]: timeout set to 20 seconds local2.info chat[1629]: abort on (BUSY) local2.info chat[1629]: abort on (NO CARRIER) local2.info chat[1629]: abort on (NO DIALTONE) local2.info chat[1629]: abort on (ERROR) local2.info chat[1629]: send (AT+CGDCONT=1,"IP","internet"^M) local2.info chat[1629]: expect (OK) local2.info chat[1629]: ^M local2.info chat[1629]: OK The log is very helpful when troubleshooting. It may be saved on your PC (simply use “Save As” option of your browser) for further examination. To update the Log, press the “Save and Reload” button located at the bottom of the screen. Figure 5-151: The beginning of a typical System Log. Remote Log IP: There you enter the address where the log will be sent upon occurrence of events. Use this IP setting to send the log messages to a remote location. Figure 5-152: Setting Remote Log IP for the System Log. When you leave this address to the default “0.0.0.0” it means the log won’t be sent, it will be available only locally. After issuing a “Commit”, the Bytton LTE will restart operation, with the log sent to the remote machine. ByttonLTE(full)_genericUsermanual_sw306FAS_revN.1.docx Page: 217 / 290 TOPEX Bytton (HSPA+ / LTE) The System>Logs window the Web browser will be empty, since the log is sent only to the specified IP address” Figure 5-153: System Log running with “Remote” settings. Note: The remote machine must run a Syslog client, such as the “syslogd” daemon under Linux or a corresponding syslog client application for Windows. An example of a free Syslog Daemon program for Windows is Kiwi , from Kiwi Enterprises: Figure 5-154: Syslog Statistics in Kiwi Syslog Daemon. See below an extract form the screen of the Kiwi program, which runs on the destination PC and receives the Syslog sent out by Bytton LTE device: Figure 5-155: Kiwi Syslog Daemon showing the remote System Log for Bytton LTE. ByttonLTE(full)_genericUsermanual_sw306FAS_revN.1.docx Page: 218 / 290 TOPEX Bytton (HSPA+ / LTE) 5.5.3 Update It allows you to perform an update or upgrade of the firmware running on Bytton LTE. Figure 5-156: Update feature in the System webpage of Bytton LTE. The update (firmware image) must be on your PC. The image files have the extension “trx”. You may download the image files from the ROHDE & SCHWARZ TOPEX S.A. website. Enter the name of the update file or click the button “Browse” to search your system for it. Figure 5-157: Search for the image file to update into Bytton LTE. ByttonLTE(full)_genericUsermanual_sw306FAS_revN.1.docx Page: 219 / 290 TOPEX Bytton (HSPA+ / LTE) The update (firmware image) files are called “company.-1.2.3--x.y.z-S.trx”, where 1.2.3. is the version number, for instance 2.7.5 or 3.0.6, xyz refers to the mobile data network and equipping of Bytton LTE, or detail th hardware model, such as : topex-3.0.5-FA-S, vodafone-3.0.4-FA-V or MobileCarrierB-3.0.7FA-O . Figure 5-158: Listing of a directory holding several firmware image files. For instance, the firmware image files as shown above may be located in the folder “Updates” located on the C: partition of the hard drive of the PC: Figure 5-159: Location of the “Updates” folder, holding the firmware image files. Select the file you want. Figure 5-160: Selecting the software image to be uploaded. In this case “topex-3.0.6-FA-S.trx” and press Open: Note: Each firmware file has an associated Control Sum. The control sum is a string of hexadecimal figures, such as “f2209c63972be34f55d4e69d90042d93” and it is stored in a text file (with .txt extension), with the same name as the firmware image. Using a control sum prevents you from loading a corrupted image. The Control Sum is located in a txt with the same name as the firmware. ByttonLTE(full)_genericUsermanual_sw306FAS_revN.1.docx Page: 220 / 290 TOPEX Bytton (HSPA+ / LTE) This associated text file may be viewed (opened) for instance with the Notepad text editor of Windows: Figure 5-161: Opening in Notepad the associated file with Check Sum. Copy the value of Control Sum from this file and paste it in the Firmware update web-page in the field named “Control Sum”: Figure 5-162: “Firmware Update” window with the control sum filled-in. Now click the “Send” button to perform the update. A “Firmware Update” window shows up, you can see a progress indicator under the message “Firmware is updating, please wait!” Figure 5-163: The “Firmware Update” window with progress bar that shows uploading of a new firmware version for Bytton. Note that there are two distinct, successive phases of updating the firmware image: in the first one, while the message “Updating firmware” is blinking, the equipment just checks the program image to be loaded against its checksum. if the result is OK, the Bytton LTE device goes to the second phase, it really loads the new firmware into its Flash memory. In this phase, the progress indicator is colored in red and additional messages are show: #### Install Partition and the red indicator bar can be seen as it “grows” toward the right! ByttonLTE(full)_genericUsermanual_sw306FAS_revN.1.docx Page: 221 / 290 TOPEX Bytton (HSPA+ / LTE) Figure 5-164: Red progress bar indicating actual upload of firmware. Warning! Do not update the firmware unless you have problems with the Bytton LTE mobile router or the new firmware has a feature that you need. Remember to backup your current configuration first. Be careful when you load an update file. If you select a wrong file, or if for different reasons firmware upgrading fails, the equipment may no longer operate correctly. You will need to perform an update using the “kernel” mode. To avoid this, follow carefully the rules indicated here. don’t turn off the Bytton LTE equipment or the computer while the firmware is being overwritten Equipment does not work while firmware update is in progress. after successful updating, verify the upgraded firmware remember that updating the firmware on the Bytton LTE equipment could cause some or all of the configuration settings to be lost, depending on the degree of change in the firmware. Therefore it is highly recommended that you save your current configuration before updating, then you restore it. To backup your settings, perform a Save, update the firmware, and then Load the saved settings, after you have the equipment operating with the updated firmware. To compare, look at the information displayed in the System>Status page before the firmware update: Figure 5-165: System Status showing firmware version prior to the upload of firmware. ByttonLTE(full)_genericUsermanual_sw306FAS_revN.1.docx Page: 222 / 290 TOPEX Bytton (HSPA+ / LTE) And respectively after loading the latest firmware version: Figure 5-166: System Status showing firmware version following succesful firmware update. 5.5.4 Password Allows you to modify passwords for the log-in accounts. Figure 5-167: Password – changing the login password for Bytton. Type the new password, then enter it again on the second row to confirm it. “Save” saves the new password. You should replace as soon as possible the default, generic password (99admin11 for Admin) with one specific to you, which will be communicated only to authorized users. Please choose a password with minimum six characters. In order to effectively prevent unauthorized access, the password must be long enough and include both letters and numbers. Note that the password is case-sensitive. Remember that you should change both passwords, the one for the ordinary user “admin” and respectively the one for “superuser” (in the example above is shown the change of password for “admin”). ByttonLTE(full)_genericUsermanual_sw306FAS_revN.1.docx Page: 223 / 290 TOPEX Bytton (HSPA+ / LTE) 5.5.5 Defaults This option restores the system settings to factory defaults. When you select “Defaults”, a confirmation window shows up, asking you “Are you sure?”. Figure 5-168: Defaults – loading the factory default settings. If you want to proceed, click the YES button and the equipment will revert to the factory default settings. Following a reset, it will start operating with the factory default values for all parameters. During the process you will see on screen the blinking message “Updating settings, please wait!” and a red progress bar, as shown below: Figure 5-169: Loading Defaults – the progress bar “Updating Settings, please wait!”. Under the window “Load default settings” with its progress bar, the equipment displays messages showing detailed information concerning the progress of the operation (“Erasing 128 Kbyte Flash: 0%, 6% … 93% complete” and finally , “Remount”). Then Bytton ICRE reboots and start operation with the factory default settings. CAUTION! Use this option carefully. During the process, Bytton LTE will not be available for routing and connecting to the 3G network. For a few moments, the LAN icon in the status bar will be barred with a red “x” and the message “A network cable is unplugged” will show up, indicating that Bytton LTE is unavailable. ByttonLTE(full)_genericUsermanual_sw306FAS_revN.1.docx Page: 224 / 290 TOPEX Bytton (HSPA+ / LTE) 5.5.6 Hardware factory defaults This is not a menu item, but the function is the same as the software reset to factory defaults described above. If you want, you can also perform the “Return to Defaults” operation via hardware. This means you do not need to use the Web interface! As mentioned, the recessed button labeled “RST” is located on the front panel, near the PWR jack of Bytton LTE (see the illustration). But simply pressing the Reset button for a short time won’t work! You must follow the reset procedure described below: a. First, you must stop the equipment. Take out the plug from the PWR jack connector; b. Wait for at least five seconds to be sure that capacitors are discharged; c. Press the RST button and keep it pressed, then power up Bytton LTE (insert back the supply jack); d. The green PWR indicator lights up immediately, keep the button still depressed; e. Wait at least six seconds, until the two center green LEDs (labeled DATA and Wi-Fi) light up continuously (all theree indicator LEDs must be turned ON); f. Now you can quit pressing the RST button! g. Bytton will perform a hardware reset to factory defaults; it will shut down and then start again operation, with the factory default settings. This way of restoring the factory default settings is faster than using the Web interface, but you should exercise the same care. Note: the “Return to Defaults” option is quite useful when incorrect settings have been performed or when you have forgotten the IP of the Bytton ICR router. If you don’t know the IP address or if you have incorrect settings for iptables, you won’t be able to connect to the wireless router to administer it. So you should perform a hardware “factory defaults”, and Topex Bytton will revert to its original settings, including the IP address of 192.168.1.1 ByttonLTE(full)_genericUsermanual_sw306FAS_revN.1.docx Page: 225 / 290 TOPEX Bytton (HSPA+ / LTE) 5.5.7 Save CFG Makes a backup copy of the current configuration (all the settings you made) of the Bytton LTE equipment. The configuration file is called by default “bytton.sav”. You will see a message similar to the one shown in this image: Figure 5-170: The Save command – Saving the “bytton.sav” file. Or like this: Figure 5-171: Saving the configuration file with the option “Save As“. Instead of simply clicking “Save” , it is highly recommended to use “Save File” or “Save it to disk”. This way you may choose both the name of the configuration file to be saved and the location on the HDD (the folder “Saves” on disk drive C: in the above example), instead of the default setting of the Internet browser. When you manage not a single Bytton ICR, but many routers and you have to maintain different configurations, you can divide the “Saves” folder into several sub-folders for specific applications or machine. ByttonLTE(full)_genericUsermanual_sw306FAS_revN.1.docx Page: 226 / 290 TOPEX Bytton (HSPA+ / LTE) The simplest way is to keep a single folder, but to change the default name “bytton.sav” into a name meaningful for your actual configuration that you need to save. After the downloading of the configuration file has ended successfully, the operating system will show a confirmation message such as these: Or: Figure 5-172: Message that confirms the saving the configuration file for Bytton ICR. Note: It is highly recommended that you backup your configuration from time to time. This way you can always load the saved configuration, if there is need. For instance, when you perform a “Restore to factory defaults”, all previous settings are lost. If you have saved the configuration, you can load it back to perform changes. Also, you should perform a “Save” before using “Update” to load a new software image, since the new firmware could erase some of the settings. 5.5.8 Load CFG This option loads a configuration file that you have previously saved or restores a backup. Figure 5-173: The Load command – selecting the file with the settings previously saved. Use “Browse” to navigate to the location where you saved the configuration file. ByttonLTE(full)_genericUsermanual_sw306FAS_revN.1.docx Page: 227 / 290 TOPEX Bytton (HSPA+ / LTE) Figure 5-174: “Choose File to Upload” – navigating for the configuration file you want. Press Open, then click “Send” to send the file to the Bytton ICR equipment. Figure 5-175: Press Send to load the saved settings form the configuration file you have selected. A red progress bar will be displayed, and above it you will see the blinking message “Updating settings, please wait”: ByttonLTE(full)_genericUsermanual_sw306FAS_revN.1.docx Page: 228 / 290 TOPEX Bytton (HSPA+ / LTE) Figure 5-176: System Load – progress bar while loading a file holding the saved settings. Here also, beneath the “Load saved settings” window with its red progress bar, you will see detailed messages about the progress of the operation, from “ Erasing 128 Kbyte @0 --0% complete” up to “Erasing 128 Kbyte @1e0000 -- 93% complete”. While loading the saved configuration, the connection to Bytton ICR stop for a short time (voice calls are interruped, you see an error message): Figure 5-177: The Web interface is unavailable while Bytton ICR restarts with the new configuration. and after reboot, Bytton LTE begins operating with the set of parameters (Configuration) that you have loaded! Figure 5-178 Bytton LTE begins operation with the loaded configuration. ByttonLTE(full)_genericUsermanual_sw306FAS_revN.1.docx Page: 229 / 290 TOPEX Bytton (HSPA+ / LTE) 5.6 SERVICES Here you may configure settings for the “services” provided by Bytton LTE, such as VRRP, SNMP, Telnet, configuration and activation of serial ports, control via SMS, Dynamic DNS, Client for NTP, and finally the function of the RST button: Figure 5-179: SERVICES – configuration web page for “services”. Depending upon different factors, all of the “services” features may be available to you, or only the most basic ones, which are to be found in any software version, such as SNMP, DDNS, NTP and Reset. . Figure 5-180: Illustration of different menus for SERVICES. These “factors” include: - the actual firmware version or variant, which may contain a lower or higher number of features; - the hardware equipping of your Bytton device: SERIAL is available only if it is fitted with one or two serial interfaces, Webcam makes sense only when the device has an active USB slot, and so on. - the mode of login: a simple user, which logs in as “admin”, has less rights, so he sees only to the basic features, while the “superuser” may get access also to the advanced features, such as VRRP or Telnet! Typically, SNMP, SMS, DDNS, NTP and of course “Reset” are available in all versions, while the rest of the features depend upon the current hardware and firmware configuration of your particular Bytton LTE equipment. ByttonLTE(full)_genericUsermanual_sw306FAS_revN.1.docx Page: 230 / 290 TOPEX Bytton (HSPA+ / LTE) 5.6.1 VRRP Establishes how Virtual Router Redundancy Protocol works on Bytton LTE (by default it is Disabled): Figure 5-181: VRRP Services – setting the virtual router protocol. Virtual Router Redundancy Protocol (VRRP) is a simple, yet robust practice that can provide additional availability in your network. It provides gateway redundancy by allowing each router within the redundant router topology to share a virtual Ethernet MAC address and a virtual IP address. It shares a virtual IP address among two router, the one that has active Internet connection gets it. When the connection of the primary router fails, the virtual IP is given to the secondary (backup) router. When the virtual addresses are active on a particular router, the router is said to be the master. Routers without control of the virtual addresses are referred to as backups. This page lets you configure the ID, the interface to be used for VRRP and the corresponding IP address, the delay for switching routers and the priority, as shown below: Figure 5-182: Configuring VRRP – edit the setting for the virtual router. VRRP runs on top of the Internet as its own protocol (i.e., it does not use TCP or UDP) and sends its announcements to a multicast address for outer VRRP routers to listen. If a backup does not hear from the master after the established delay, then the backup will take over through an election process whereby the router with the highest priority within the VRRP routers. ByttonLTE(full)_genericUsermanual_sw306FAS_revN.1.docx Page: 231 / 290 TOPEX Bytton (HSPA+ / LTE) 5.6.2 SNMP Settings for the Simple Network Management Protocol. This is a set of protocols for managing complex networks and works by sending messages to different parts of a network. Figure 5-183: SERVICES SNMP – enable and configure the network management. By default, the SNMP service of Bytton LTE is disabled, and there are two empty entries, for public and respectively private. You may also enable or disable the SNMP feature on the remote (WAN) side of the Bytton router. By default, this one is disabled too. What about SNMP? This Simple Network Management Protocol (SNMP) is used as the transport protocol for network management. This “Network management” business generally consists of network management stations communicating with network elements such as hosts, routers, servers, or printers. The agent is the software on the Bytton LTE router that runs the network management software. Therefore when the word agent is used, it is referring to the network element. This agent store information in a management information base (MIB). The network manager can set the threshold of the monitored event that will trigger the sending of the trap message. Among other applications, SNMP enables monitoring the performance of the network, when used in conjunction with different performance monitoring programs. SNMP Communities are groups that devices and management stations running SNMP belong to. It helps define where information is sent. The community name is used to identify the group. A SNMP device or agent may belong to more than one SNMP community. It will not respond to requests from management stations that do not belong to one of its communities. ByttonLTE(full)_genericUsermanual_sw306FAS_revN.1.docx Page: 232 / 290 TOPEX Bytton (HSPA+ / LTE) SNMP default communities are either private (read/write) or public (read only), choose the adequate setting for each community you define. You can Edit the two predefined “communities” on Bytton LTE, then create define additional ones, by using the “Add Community” link, as shown below: Figure 5-184: Define and configure SNMP Communities. For each community, you must enter the IP address and the corresponding net mask. For each community, you must enter the IP address such as 193.74.245.106 for a public network or 10.0.58.7 for a local , nonroutable network, and then select the corresponding net mask from the drop list (values are 0, 8, 16, 24, 30 and respectively 32). Figure 5-185: Set up IP and netmask for a SNMP Community. For each entry in the table, use at first the individual Save button to the left to save it: And then the button Save located at the bottom of the page, which saves all the settings in this section. Figure 5-186: Using local and global “Save” buttons for the SNMP Communities created. ByttonLTE(full)_genericUsermanual_sw306FAS_revN.1.docx Page: 233 / 290 TOPEX Bytton (HSPA+ / LTE) 5.6.3 TELNET Enables the Telnet feature of Bytton LTE and sets the port over which it will operate: Figure 5-187: Enable and configure the Telnet service of Bytton LTE. 5.6.4 SERIAL This page shows up only in case of Bytton LTE devices fitted with one or two serial interfaces (RS232/RS485).The example below is for a Bytton equipment with a single serial port. Figure 5-188: Enable and Configure Serial ports of Bytton LTE. By means of this menu you may control the one or two serial interfaces (RS232) of Bytton LTE and their “remote port” (serial-over-IP) feature. For each of the one or two serial ports of the equipment, you can set the following parameters: Serial Service 1 or 2 – select Disabled to de-activate or Server to activate the respective RS-232 port. By default they are both disabled. ByttonLTE(full)_genericUsermanual_sw306FAS_revN.1.docx Page: 234 / 290 TOPEX Bytton (HSPA+ / LTE) Parameters for the serial connection Here you can set the usual parameters for a RS-232 serial connection, such as speed in bits per second (1200, 9600, 115200 etc), number of Data bits (8, 7, 5 etc) per byte , number of Stop bits, parity checking (Not used, Even or Odd), flow control (Not used, Xon-Xoff, Hardware). Current recommended settings are 9600 bps, 8-N-1. Figure 5-189: parameters for the serial connection(s). Different port configurations If your Bytton LTE has two RS-232 ports, they can be configured with different parameters, according to the requirements of the particular serial connection to the respective legacy equipment. Remote connection parameters In case of using the remote serial server, you must fill-in additional parameters for this feature Delay, the value, in milliseconds, of the buffers that stores the characters before sending them over the serial connection, Packet Size, in bytes (default value 500) and Server x Port, the number of the IP port used for the remote serial connection. See below a few examples of serial parameters configuration: Figure 5-190: Examples of remote connection parameter settings for the serial link. ByttonLTE(full)_genericUsermanual_sw306FAS_revN.1.docx Page: 235 / 290 TOPEX Bytton (HSPA+ / LTE) 5.6.5 SMS Depending upon the actual firmware version, your equipment may have or not this menu item. With SERVICES>SMS”, Bytton LTE implements a feature for remote administration and reporting via SMS: Figure 5-191: Settings for SMS services. Service SMS: select Enable to activate this feature. By default it is disabled. Phone No.: enter a full mobile telephone number such as 074199….. in the above example, or just a prefix, “0741” or “075”. Only text messages issued from this number or prefix will be taken into account! Figure 5-192: Establishing parameters for the SMS managemnt service. SMS text: enter here a word that will act as password. Time to read: time period, in seconds, for Bytton LTE to check for SMS messages. In the System>Log you will see the testing for received SMS messages upon corresponding intervals: Jul Jul Jul Jul 6 6 6 6 10:07:01 10:07:05 10:07:06 10:07:14 bytton bytton bytton bytton cron.err crond[3442]: USER root pid 5971 cmd net_moni user.info pbx: test AT OK/NOK user.info pbx: sms len=2401 user.info pbx: test AT OK/NOK ByttonLTE(full)_genericUsermanual_sw306FAS_revN.1.docx Page: 236 / 290 TOPEX Bytton (HSPA+ / LTE) Jul Jul Jul Jul Jul 6 6 6 6 6 10:07:15 10:07:21 10:07:22 10:07:29 10:07:29 bytton bytton bytton bytton bytton user.info user.info user.info user.info user.info pbx: pbx: pbx: pbx: pbx: sms len=2334 test AT OK/NOK sms len=2267 test AT OK/NOK sms len=2200 SAVE CONFIG: button located at the bottom of the screen that saves the current configuration of Bytton LTE in a special partition of the Flash memory of the equipment. This way, it can perform a sort of backup for all the settings. Or: Jul 6 10:14:01 Jul 6 10:14:14 Jul 6 10:14:20 Jul 6 10:14:21 Jul 6 10:14:28 addresses bytton bytton bytton bytton bytton cron.err crond[3442]: USER root pid 8871 cmd net_moni user.notice root: SAVE CONFIG DONE user.notice root: SAVE CONFIG DONE user.notice root: SAVE CONFIG DONE daemon.info dnsmasq[1203]: read /etc/hosts - 1 When the “SMS management” service is enabled, you can manage remotely by means of SMS messages some features of the Topex Bytton router. Load – if you send to the Bytton LTE, form the telephone number or prefix that you have previously entered, a short message with the text “load”, the equipment will load the backup configuration that was previously saved. Info – after you send to the SIM used in the Bytton LTE equipment, form the telephone number or prefix that you have previously entered, a short message with the text “info”, the equipment will answer back to you with a SMS which shows: - the current state of the data link, such as started, then stopped in this examples - the name and type (MobileCarrierB, 3G) of the mobile network where it is registered - the value of the signal level, such as” 85dBm” - the mobile cell where it is connected, like “2” or “2,1,"03F2". Figure 5-193: Examples of actual SMS received on a mobile phone, form the remote Bytton LTE equipment. Reset - if you send to the Bytton LTE, form the telephone number or prefix that you have previously entered, a short message with the text “SMS text”, the data connection will be switched. That means: if the connection was online, it will be stopped, and if it was stopped, it will be started. ByttonLTE(full)_genericUsermanual_sw306FAS_revN.1.docx Page: 237 / 290 TOPEX Bytton (HSPA+ / LTE) 5.6.6 DDNS Here are located the settings for the Dynamic DNS Server. Figure 5-194: Services: Settings for the Dynamic DNS. Dynamic DNS is a service that enables mapping of a dynamically assigned IP address to a static or permanent hostname. This allows the use of applications that require a static IP address, such as web-hosting, FTP, etc. Dynamic DNS Service: Enables or disables the DDNS service. By default it is disabled: Figure 5-195: Enabling the Dynamic DNS Server. ByttonLTE(full)_genericUsermanual_sw306FAS_revN.1.docx Page: 238 / 290 TOPEX Bytton (HSPA+ / LTE) This service allows you to export several hostnames by means of a Dynamic DNS provider. DDNS Type: Allows you to select the type of DDNS service. The drop-down list includes the major Dynamic DNS service providers. The default is gnudip. Figure 5-196: Drop list for selecting the name of Dynamic DNS Service. Username & Password: User name and password for authenticating to the DDNS. Server: Full name of the Dynamic DNS server used to store your host and domain name information. Domain: The domain name for DDNS. You must have membership to one of the DDNS services providers. Warning: These factory default settings may not work in your area, you should change the DDNS parameters according to the specifications of your Internet provider. 5.6.7 NTP The Network Time Protocol is used to update the real-time clock in a computer, over Internet. For this, it uses a dedicated Time server on the Internet that accurately synchronizes the system date and time. Figure 5-197 Enabling and choosing server for the NTP Client service. ByttonLTE(full)_genericUsermanual_sw306FAS_revN.1.docx Page: 239 / 290 TOPEX Bytton (HSPA+ / LTE) NTP Service: Enabled or Disabled. By default it is disabled: Server: enter the full name of the NTP server you want to use, such as “utcnist.colorado.edu” or “ro.pool.ntp.org”. Even if the time server has a static IP address, it is always recommended to use DNS to resolve the name “timp.mcti.ro” or “ntp.sv2.ro” and not to enter the IP address, like 80.96.120.251 or 81.180.122.154 ! The “Current time” indicator shows the current UTC time (Universal Coordinated Time) of the system, with millisecond precision. If NTP feature is not active (you have disabled it the selected server is not online, or you have no connection to the Internet) it will display the default UTC date/time, which is Jan 1, 2000 and 0:00. When it becomes active, it shows the current UTC time: Figure 5-198: Examples of current time display when NTP Service is enabled. Sync time: the time interval, in minutes, after which the NTP client running on Bytton ICR will connect to the remote time server in order to perform sychronization. The default value is 60 minutes (one hour) but you may set a smarller interval: This UTC time may be different from the local time of your computer! This is easily corrected by the TZ (Time Zone) field: The field TZ allows you to enter the Time Zone correction, in hours. For instance, a value of +2 adds two hours to the UTC time (thus allowing to display the Bucharest time instead of GMT). ByttonLTE(full)_genericUsermanual_sw306FAS_revN.1.docx Page: 240 / 290 TOPEX Bytton (HSPA+ / LTE) Finally, the link SYNC located at the bottom of the NTP page, above the “Save” button: Figure 5-199: The SYNC link located at the bottom of the NTP window. forces an immediate synchronization using NTP, even if the time interval previously set has not yet finished: Time events in System Log In the system logs of the Bytton device you can see the moment when the applications running on Bytton connects to the Internet and the time jumps from the default “Jan 1 2000” to the actual date/time supplied by the selected NTP server: Jan 1 00:00:46 bytton user.info kernel: usb 1-1: Sierra USB modem converter now attached to ttyUSB6 Jan 1 00:00:47 bytton user.info pbx: modem port opened Jan 1 00:00:56 bytton user.notice root: Selected SIM0 Jan 1 00:00:56 bytton user.info pbx: clips active Dec 12 16:03:03 bytton user.info kernel: PHY: mdio@e0102120:05 - Link is Up - 100/Full Dec 12 16:03:03 bytton daemon.info dnsmasq[1295]: DHCPREQUEST(br0) 172.168.1.13 00:06:4f:02:15:82 Dec 12 16:03:03 bytton daemon.info dnsmasq[1295]: DHCPACK(br0) 172.168.1.13 00:06:4f:02:15:82 VO000073 Dec 12 16:03:03 bytton daemon.warn dnsmasq[1295]: Ignoring domain topex.ro for DHCP host name VO000073 Dec 12 16:03:03 bytton cron.err crond[1648]: time disparity of 22588802 minutes detected Dec 12 16:03:12 bytton daemon.info dnsmasq[1295]: DHCPINFORM(br0) 172.168.1.13 00:06:4f:02:15:82 Dec 12 16:03:12 bytton daemon.info dnsmasq[1295]: DHCPACK(br0) 172.168.1.13 00:06:4f:02:15:82 VO000073 Dec 12 16:03:55 bytton daemon.notice pppd[2212]: pppd 2.4.4 started by root, uid 0 Dec 12 16:03:56 bytton user.notice root: DATA START Dec 12 16:03:56 bytton daemon.info pppd[2212]: Serial port initialized. Dec 12 16:03:56 bytton local2.info chat[2246]: timeout set to 20 seconds Dec 12 16:03:56 bytton local2.info chat[2246]: abort on (BUSY) Or: Jan 1 00:00:46 bytton attached to ttyUSB5 Jan 1 00:00:46 bytton detected Jan 1 00:00:46 bytton attached to ttyUSB6 Jan 1 00:00:47 bytton Jan 1 00:00:56 bytton Jan 1 00:00:56 bytton Dec 13 09:27:03 bytton detected Dec 13 09:27:31 bytton Dec 13 09:27:31 bytton Dec 13 09:27:31 bytton Dec 13 09:27:31 bytton Dec 13 09:27:31 bytton Dec 13 09:27:32 bytton Dec 13 09:27:51 bytton user.info kernel: usb 1-1: Sierra USB modem converter now user.info kernel: sierra 1-1:1.6: Sierra USB modem converter user.info kernel: usb 1-1: Sierra USB modem converter now user.info pbx: modem port opened user.notice root: Selected SIM0 user.info pbx: clips active cron.err crond[1651]: time disparity of 22589846 minutes daemon.info daemon.info daemon.info daemon.info daemon.info daemon.info daemon.info dnsmasq[1296]: dnsmasq[1296]: dnsmasq[1296]: dnsmasq[1296]: dnsmasq[1296]: dnsmasq[1296]: dnsmasq[1296]: ByttonLTE(full)_genericUsermanual_sw306FAS_revN.1.docx reading /etc/resolv.conf using nameserver 172.27.168.70#53 using nameserver 172.27.168.7#53 using nameserver 192.168.1.88#53 using nameserver 8.8.8.8#53 read /etc/hosts - 1 addresses DHCPDISCOVER(br0) 00:06:4f:02:15:82 Page: 241 / 290 TOPEX Bytton (HSPA+ / LTE) Dec 13 09:27:51 bytton daemon.info dnsmasq[1296]: 00:06:4f:02:15:82 Dec 13 09:27:53 bytton daemon.info dnsmasq[1296]: Dec 13 09:27:53 bytton daemon.info dnsmasq[1296]: 00:06:4f:02:15:82 Dec 13 09:27:53 bytton daemon.info dnsmasq[1296]: 00:06:4f:02:15:82 Dec 13 09:27:53 bytton daemon.info dnsmasq[1296]: 00:06:4f:02:15:82 VO000073 Dec 13 09:27:53 bytton daemon.warn dnsmasq[1296]: host name VO000073 Dec 13 09:28:01 bytton cron.err crond[1651]: USER Dec 13 09:28:20 bytton daemon.info dnsmasq[1296]: 00:06:4f:02:15:82 Dec 13 09:28:20 bytton daemon.info dnsmasq[1296]: 00:06:4f:02:15:82 VO000073 Dec 13 09:29:01 bytton cron.err crond[1651]: USER DHCPOFFER(br0) 172.168.1.13 DHCPDISCOVER(br0) 00:06:4f:02:15:82 DHCPOFFER(br0) 172.168.1.13 DHCPREQUEST(br0) 172.168.1.13 DHCPACK(br0) 172.168.1.13 Ignoring domain topex.ro for DHCP root pid 2050 cmd net_moni DHCPINFORM(br0) 172.168.1.13 DHCPACK(br0) 172.168.1.13 root pid 2269 cmd net_moni Figure 5-200: Time jumps when NTP service become active, as seen in the system logs. 5.6.8 E-mail to SMS This page alows you to set up the conversion from e-mail messages to SMS sent out via mobile module: Figure 5-201: Configuration page for the E-mail to SMS feature of Bytton. By default, it is disabled. The fields under it are gray, indicating that they are not editable – the feature is not available. First, enable it to be able to use this service: ByttonLTE(full)_genericUsermanual_sw306FAS_revN.1.docx Page: 242 / 290 TOPEX Bytton (HSPA+ / LTE) How it works: The mail server (using SMTP) sends an e-mail to the IP of the Bytton equipment. Bytton sends out a SMS with the respective content, via mobile module, using the telephone number provided with the e-mail message. The total length of the Subject + Body must be at most equal to the maximum text length for the respective mobile carrier. Typically, this is 160 ASCII characters, but it dorps to 70 when you need to send non-ASCII characters (such as şţî’âă or €©™∞µα). Also, the limit may depend upon the region of the world, country, and mobile carrier (operator) used by the SIM card in your Bytton equipment. SMTP Simple Mail Transfer Protocol is a protocol widely used across the Internet for sending e-mail messages between servers. SMTP is generally used to send messages from a mail client to a mail server. You must specify the port number to be used for SMTP. Also, you must “tell” to the Bytton equipment if the destination telephone number is to be found in the “Subject” field or in the “To” field of the e-mail message. Figure 5-202: Configure the E-mail to SMS feature of Bytton. To be able to use email2sms, you must create on your computer special mail account, dedicated for this feature. In this example, the e-mail account is called “Test”, ad uses a fake address [email protected] Figure 5-203: Preparing a dedicated Email account to be used with the SMS feature of Bytton. ByttonLTE(full)_genericUsermanual_sw306FAS_revN.1.docx Page: 243 / 290 TOPEX Bytton (HSPA+ / LTE) The outgoing mail server (SMTP) must have as IP address the WAN address of the Bytton equipment, in this case 192.168.144.72 No password is used, the field is empty, but it must be completed, for compatibility Finally, the number of the server port for outgoing mail must be set to the same value as the one used by Byttpn, in this case “100001” Figure 5-204: Configure the E-mail to SMS feature of Bytton. Use the respective e-mail accont ([email protected]) to create the message that you want to be relayed by Bytton, as shown in the example below: The “To:” field must contain the destination telephone number, such as 0732056277 in this example. For compatibility, the entry in “To” must be structured like a correct e-maill address, that is [email protected] ByttonLTE(full)_genericUsermanual_sw306FAS_revN.1.docx Page: 244 / 290 TOPEX Bytton (HSPA+ / LTE) Remember that the total length (of Subject + Body) must respect the length limit for SMS message of the respective Mobile carrier Format – choose plain text. Also, the formatting of the message must be set to “plain text”. Be careful, currently may e-mail cliendt use by default Rich text or HTML formatting, you must set it instead to “Plain text”. See below an extract from the System Log, showing how Bytton receives (at 15:04:33) the e-mail message and sens out ot the destination phone number a corresponding SMS: Dec Dec Dec Dec Dec Dec 12 12 12 12 12 12 15:04:01 15:04:33 15:04:36 15:04:36 15:04:36 15:05:01 bytton bytton bytton bytton bytton bytton cron.err crond[1649]: USER root pid 3685 cmd net_moni user.notice root: EMail to SMS > 0732056277 user.info pbx: test AT OK/NOK user.info pbx: return AT NOK user.info pbx: modem err timeout cron.err crond[1649]: USER root pid 3972 cmd net_moni ByttonLTE(full)_genericUsermanual_sw306FAS_revN.1.docx Page: 245 / 290 TOPEX Bytton (HSPA+ / LTE) 5.6.9 Reset Here you can change the assignment of the “Reset” button located on the front panel: Figure 5-205: Settings for Reset button. Reset Button Settings – you choose the option you want. The function of the Reset (RST) button, located on the back panel among the connectors, can be changed according to your needs. Do nothing – yes, this “do nothing” action may quite be useful. It may happen that the Reset button is touched by accident when you plug a cable into Topex Bytton LTE, so that Bytton equipment reboots and reverts to the factory default values, loosing your particular settings. When you want to avoid this incident, select “Do nothing”. Now, even if you accidentally press Reset, nothing happens. If you want, you can still perform Reset via software! Note: Even when the Reset button is disabled form software, you can still perform a hardware “Reset to factory defaults”, by following the prescribed procedure upon power-up. Reboot – it performs a full reboot (restart) of Bytton LTE. Reset Data Connection – only the data connection is resetted, the equipment does not stop operating. Reset to Factory Defaults – after full reboot, Bytton LTE settings are restored to factory defaults. Periodic reset data connection: after the specified number of seconds, the data connection will reset. Figure 5-206: Entering time value for Periodical reset of the data connection. The default value is 0 (zero), which means that the connection will never be restarted. ByttonLTE(full)_genericUsermanual_sw306FAS_revN.1.docx Page: 246 / 290 TOPEX Bytton (HSPA+ / LTE) 5.7 SIM Here are the configuration pages related not only to the SIM card but also to the mobile module of the equipment. You can see the current state and change the parameters: Figure 5-207: General web page for the SIM Services. Also, from here you may send or receive SMS messages from your PC, using the mobile module of Bytton LTE. 5.7.1 SIM Status This page shows you the current state of the active SIM card and of the GSM/GPRS/EDGE, UMTS or HSPA+ module of Bytton LTE: Figure 5-208: Example of SIM Status display for Bytton LTE in HSPA mode. ByttonLTE(full)_genericUsermanual_sw306FAS_revN.1.docx Page: 247 / 290 TOPEX Bytton (HSPA+ / LTE) Other actual SIM Status examples follow: Security: unlocked Modem Version: K2_0_7_43AP IMSI: 226050001213062 IMEI: 355060025698866 Signal Level: 16/30 RSCP: -84 dBm Signal Ec/Io: Tot Ec/Io: -3.5 dB Network: 0,0,"RO Digi.Mobil",3 – 3G CELL: 2,1,"02BC","02BC7912",2 Registration: online Figure 5-209: SIM Status examples (for different Romanian carriers). The examples above refers to SIM cards from different carriers, with the level of RF signal is lower or higher, having access to both 2G and 3G technologies. One Sim card has a higher signal level, but is not properly registered – it provides just “limited service”, thus it is “offline”. Security: unlocked Modem Version: K2_0_7_43AP IMSI: 226102100414755 IMEI: 355060025698866 Signal Level: no signal Signal Ec/Io: Network: 0 - error CELL: 2,0 Registration: offline Security: unlocked Modem Version: K2_0_7_43AP IMSI: 226102100414755 IMEI: 355060025698866 Signal Level: 14/30 RSCP: -85 dBm Signal Ec/Io: Tot Ec/Io: -4.0 dB Network: 0,0,"RO MOBILECARRIERB",2 - error CELL: 2,1,"03F2","00102CE3",2 Registration: online Security: unlocked Modem Version: K2_0_7_43AP IMSI: 226102100414755 IMEI: 355060025698866 Signal Level: 14/30 RSCP: -84 dBm Signal Ec/Io: Tot Ec/Io: -4.5 dB Network: 0,0,"RO MobileCarrierB",2 1,UMTS,HSDPA/HSUPA CELL: 2,1,"03F2","00102CE3",2 Registration: online Figure 5-210: Several examples of SIM Status for the “Mobile Carrier B” provider. In the series of three examples above, the same Bytton equipment, fitted with the same 3G module and with the same mobile data subscription from the “MobileCarrierB” wireless voice/data operator, is shown in three situations, from left to the right: no signal at all (external Mobile antenna not connected) thus online and no signal or cell indication, with good signal and registration, but data net in error, and finally with data connection active (it show not just the network, but the 3G technologies actually available) The status of the Sim card and mobile module is automatically read every five seconds. The following information items are displayed: - Security: “Unlocked” or “OK” means the SIM is active. “Locked by PIN” means the SIM card is asking the PIN code to perform unlock. As an additional security measure, the SIM card is also provided with a PUK code, requested after three wrong PIN codes. - Modem Version: it is read from the 3G+ module, displays a string such as . or K2_0_7_35AP, which is very useful as information for debugging or when you need to replace the equipment. - IMSI (International Mobile Subscriber Identity), subscriber's identity (SIM card identity). This is a unique 15 digits code number that identifies a mobile subscriber to the network. When the Topex Bytton LTE's mobile module detects an active SIM card, it will query (and display) the IMSI code. Since the IMSI code is related to the SIM, when you change the SIM card, or when a dual-SIM equipment selects the second SIM, you will have another IMSI code. IMSI: 226102410043179 IMEI: 355060025698866 Figure 5-211: Actual examples of “SIM Status” page showing IMSI and respectively IMEI codes. ByttonLTE(full)_genericUsermanual_sw306FAS_revN.1.docx Page: 248 / 290 TOPEX Bytton (HSPA+ / LTE) - IMEI (International Mobile Equipment Identifier). 15-digit number that uniquely identifies an individual mobile terminal device. While IMSI is specific to the subscriber (SIM card), IMEI in specific to the wireless equipment (the modem of Bytton LTE in our case). When the SIM card is missing, the SIM Status window will show “error” in the Security, IMSI, Signal Level, Network and Registration fields. But you will still see the version of the 3G modem and the IMEI code, since they are equipment-dependent, and not related to the SIM card. - Signal Level, displayed as two groups of two figures such as “15/30”. The two digits indicate the level of the RF signal for the Mobile network on a scale from zero up to 30. When the SIM card is missing or isn't registered, its status will be: “no signal”. - Network: the name of the mobile network which the equipment is registered to, as transmitted by the mobile carrier. It may also indicate the network type: 2G or 3G. - Registration status: indicates whether the SIM card is registered to the mobile network or not. Normally, it should display “Registration: online” Warning! When the mobile module is in a call, or while it is transmitting or receiving SMS, it cannot be interrogated about its state. “error” messages Thus if you click “SIM Status” while in a voice call, you will get an error message (ERR). This does not mean something is wrong, simply try again (click “Reload”) later, when you have finished the voice call or the transmission of SMS messages. Figure 5-22: SIM Status with “error” messages, when the SIM card or module is busy. Cell: when the mobile voice /data provider supports this feature, information is shown about the current cell where the Sim of the Bytton equipment is registered: 2,1,"03F2","00102CE3",2 or Figure 5-213: Cell information in the SIM Status page. ByttonLTE(full)_genericUsermanual_sw306FAS_revN.1.docx Page: 249 / 290 TOPEX Bytton (HSPA+ / LTE) 5.7.2 SIM Settings In this section you may perform several settings related to the mobile module and to the SIM card(s). Figure 5-214: SIM Settings for the dual-SIM Bytton ICR. Respectively: Figure 5-215: Sim Settings for the single SIM Bytton equipment. SIM Settings for the Dual-SIM Bytton LTE In case of equipments that have dual-SIM capability, the first two fields (PIN and SCN) will be doubled, since one is needed for each SIM. Thus you will have two pairs. PIN SIM0 / SCN0 and respectively PIN SIM1 / SCN1, as shown! ByttonLTE(full)_genericUsermanual_sw306FAS_revN.1.docx Page: 250 / 290 TOPEX Bytton (HSPA+ / LTE) PIN SIM0: enter PIN code for the first SIM card. Service Center Number: full telephone number for the first SIM. In order for the SMS facility to operate, you must set the correct number. This is the SMS center of the first GSM operator. Enter here the full phone number of the GSM carrier between quotes, like “+40744946000” in this example: Figure 5-216: PIN for first SIM card and corresponding SC Number. PIN SIM1: enter PIN code for the respective SIM card. “1234” is the default value, which does NOT mean that the code is really 1234, instead it means “no PIN is required”. Thus , when the SIM has set a Pin code of “0000”, you must use this value in the PIN SIM field, otherwise the SIM card will be locked! Service Center Number Sim1: full telephone number for the second carrier. In order for the SMS facility to operate, you must set the correct number. This is the SMS center of the respective mobile operator. Enter the full phone number of the GSM carrier between quotes, like “+407402004000” or “+40744946000” in these examples. SIM Settings for the Single-SIM Bytton LTE In case of equipments that a single slot for SIM cards, there is just one PIN and SCN entry, as shown. Audio Settings The settings at the bottom are valid only for Bytton equipments with voice capabilities (the current model does not have an FXS port). Volume level: for setting the volume (sound) level. Of course, this setting has meaning only in case of Bytton LTE equipments with voice capabilities (that feature FXS interface) Valid settings for the audio level are from 0 to 4, where 0 means “mute”. Depending of the type of modem module used, you may have a single Audio setting, or independent settings for transmission (Tx) and respectively reception (Rx). Figure 5-217: Audio Settings for TX and RX. ByttonLTE(full)_genericUsermanual_sw306FAS_revN.1.docx Page: 251 / 290 TOPEX Bytton (HSPA+ / LTE) Mobile Network selection These two parameters allow you to establish the type of mobile network used and the order of searching for mobile networks. Network Mode lets you choose mobile networks using 2G network or 3G technologies and different frequency bands. The default setting is “All bands” (no restictions) , but you can select to connect only to networks with certain technologies or frequencies. You may choose Europe 2G, 3G or all, North America all or 2G only, all networks but only with GSM technology, or the reverese - all countries but only using WCDMA ! Figure 5-218: SIM Settings for Network Mode. Mobile Network Order is for choosing the order in which Bytton will look for mobile networks. The default is Automatic search, but you may select either 2G (GSM) only, orUMTS 3G only, or GSM and UMTS Only. Figure 1-219: SIM Settings for the order of Mobile Network selection. The "SMS" options that follow let you send or receive SMS messages from your computer to any GSM or 3G mobile terminal user, through the GSM/HSPA or LTE module of the Bytton LTE equipment. ByttonLTE(full)_genericUsermanual_sw306FAS_revN.1.docx Page: 252 / 290 TOPEX Bytton (HSPA+ / LTE) 5.7.3 SMS Read Displays a list of received text messages. Figure 5-220: SIM – “SMS Read” window, empty. This list for displaying received SMS messages has the following columns: h. ID : reference number: 1, 2, and so on up to 14; i. STATUS: REC(Received), READ or UNREAD; j. FROM: sender's phone number, such as “+40741664986”; k. DATE: date and time when the message was received (after the “+” sign the tenths of seconds); l. TEXT: the actual content of the message. Figure 5-221 List of received text messages displayed in “SMS Read”. ByttonLTE(full)_genericUsermanual_sw306FAS_revN.1.docx Page: 253 / 290 TOPEX Bytton (HSPA+ / LTE) Deleting SMSs You may delete one or several messages by typing the index number in the box at the bottom and clicking “Go” Figure 5-222: Deleting one of the messages in the list “SMS Read”. Why delete? Because after the maximum storage capacity (for instance, of 15 messages) is reached the BYTTON equipment won’t be able to receive newer SMS. If you want to continue receiving messages, you must delete some of the older SMS. After deletion, click “SMS Read” to collect your new messages from the server. The new message will be displayed, at first at the bottom of the list, with the status “UNREAD”: 17 "REC READ" 18 "REC READ" 19 "REC READ" 20 "REC READ" 22 "REC READ" 30 "REC READ" 31 "REC READ" 32 "REC READ" 21 "REC UNREAD" "+40754043064" "+40754043064" "+40753779863" "+40754043064" "+40753779863" "+40754043064" "+40754043064" "+40754043064" "+40732056277" "12/07/18,11:41:09+12" "12/07/18,18:11:52+12" "12/07/06,12:33:43+12" "12/07/18,18:12:09+12" "12/07/06,12:48:01+12" "12/07/06,13:05:01+12" "12/07/06,13:05:26+12" "12/07/06,13:05:35+12" "12/07/18,18:49:24+12" AT+CREG? rx note is: 490380483039148901234890 Info AT+CGSN Load AT+CREG? AT+CREG? AT+CGSN Dajt jge, mjh m Delete message with index Figure 5-223: Displaying a new message at the bottom of the list “SMS Read” and following the next “Read” command it will be sorted upon the “ID” field and placed in its proper (chronological) position. Also, its status is now “RECeived and READ” Figure 5-224: Updated list of sorted messages following a new “Read” command. ByttonLTE(full)_genericUsermanual_sw306FAS_revN.1.docx Page: 254 / 290 TOPEX Bytton (HSPA+ / LTE) 5.7.4 SMS Send This option allows you to send out a SMS message through the mobile network. Figure 5-225: SIM pages - SMS Send. Just type in the destination phone number in the field “To” and the text you want to transmit in the “Message” field , then click the Send button. Wait about 40 seconds for the mobile network to perform the sending operation. If the SMS cannot be send (network busy, congestion or other problems), an error messages will appear on top of the screen. Note: if the phone number for the SMS destination is in the same mobile network, you may enter it in short form, as “0740999999” or “0754043064”. But if it is in a different mobile network, you must type it in full format: country code, area code, number, for example “+40732056277”. ByttonLTE(full)_genericUsermanual_sw306FAS_revN.1.docx Page: 255 / 290 TOPEX Bytton (HSPA+ / LTE) 5.8 Stuff The “Stuff” element of menu holds miscellaneous features that are reserved for advanced users. Depending upon the actual firmware revision, this configuration Web page may be available or not on your equipment, an can include more or less elements: Figure 5-226: Section “Stuff” of the configuration Web pages for Superuser. These “miscellaneous” stuff pages may include email reporting, remote self-configuration and bandwidth testing. ByttonLTE(full)_genericUsermanual_sw306FAS_revN.1.docx Page: 256 / 290 TOPEX Bytton (HSPA+ / LTE) 5.8.1 E-mail Here are the settings allowing Bytton ICR to send out report information via E-mail. Figure 5-227: Status reporting via E-mail By default, this feature is Disabled. When disabled, all the fields that follow are colored in gray, indicating that they are not active (you cannot edit them) After setting the E-mail feature to Enabled, the fields become editable, you must configure the parameters. Figure 5-228: Enabling and configuring the SMTP service for reporting e-mail. ByttonLTE(full)_genericUsermanual_sw306FAS_revN.1.docx Page: 257 / 290 TOPEX Bytton (HSPA+ / LTE) SMTP server address: the name or address of the SMTP port used for mail. Enter here the mail server that will be used to handle outgoing messages. Simple Mail Transfer Protocol is, as its name indicates, a … simple Internet standard for electronic mail, defined first in 1982 and last updated by RFC 5321. “name or address” means that you can type either the human-form name of the server, such as “Mail4.topex.eu” or “smtp.gmail.com” , or the machine-form, that is the IP address of the respective servers, such as 77.238.184.86 or 213.165.64.42 Smtp server port: By default, SMTP uses TCP port 25, or port 587 for submission, but other ports (465) may also be used. You can enable or disable the “ICMP redirect” feature for receiving and / or respectively sending out data packets over the local network. Figure 5-229: Enable or disable and configure the Authentication feature. You can leave it to None, meaning no authentication at all is required, or choose either User/Pass, when ordinary authentication is requested, by means of an Username and corresponding Password. The most secure option is STARTTLS, advanced ESMTP authentication feature (ESMTP over secure TLS/SSL connection).This is standardized in RFC3207, “SMTP Service Extension for Secure SMTP over Transport Layer Security”. It is used to increase the security of mail server transactions. A few examples of names (IP addresses) of mail servers, and ports used by these: - Mail.adelphia.net or 75.180.132.91 - pop3.live.com or pop.juno.com - the well-known Gmail service uses for POP the port number 995, and the connection must be secure (TLS/SSL required). Yahoo uses Incoming Mail (POP3) Server: pop.mail.yahoo.com (needs SSL, port: 995) and Outgoing Mail (SMTP) Server: smtp.mail.yahoo.com (also use SSL, port: 465, need authentication) Standard ports for mail are: POP3 - port 110, SMTP - port 25, Secure SMTP (SSMTP) - port 465, Secure POP3 (SSL-POP) - port 995. Many ISPs do block the standard port for outgoing email, port 25, so you may have to change the smtp ports to 587 or 26! The meaning or usage of other fields is quite obvious: Figure 5-230: Configure the other parameters for E-mail reporting of Bytton. “To” is the real destination e-mail address, while “From” is a dummy field, you must complete it so the recipient does know that the message comes from Bytton LTE, but it is not a real e-mail address, it cannot be used for receiving messages! The Subject field, set by default to “Bytton report”, can also be changed to the words or phrase that you want to use. Finally, “Schedule (in hours)”, as its name suggests, is the time interval following which the status report will be sent out. With the default settings, the Bytton report shall be sent by e-mail every 24 hours. ByttonLTE(full)_genericUsermanual_sw306FAS_revN.1.docx Page: 258 / 290 TOPEX Bytton (HSPA+ / LTE) 5.8.2 Auto-configuration The “Auto provisioning” section may contain settings to several means by which Bytton imports by itself the configuration file required to operate. Figure 5-231: Autoprovisioning – settings for automatic retrieval of configuration file. First of all, to use it, you must Enable the Autoprovisioning feature – by default it is disabled so all fields below it are colored in gray, showing they are not editable. When you Enable the Auto-provisioning feature, the following fields “light up”: Figure 5-232: Aspect of the fields of “Autoprovisioning” when the feature is Disabled and respectively Enabled. ByttonLTE(full)_genericUsermanual_sw306FAS_revN.1.docx Page: 259 / 290 TOPEX Bytton (HSPA+ / LTE) Then you have to choose (by enabling it) one of the means of retrieving the configuration file, which is stored remotely: Figure 5-233: Aspect of the fields of “Autoprovisioning” when the feature is Disabled and respectively Enabled. The name of the respective configuration file must be the IMEI of the Bytton equipment, acting as a unique identifier: 355060025698866, , 352099001761481, , 4901542032375, etc.. You can choose as means of retrieval HTTP, FTP or TFTP. HTTP: When you choose the http method, the standard port is used, no authentication is required. You must only complete the address where the configuration file is to be found, as shown: Figure 5-234: Aspect of the fields of “Autoprovisioning” when the feature is Disabled and respectively Enabled. FTP: The standard File Transfer Protocol, very much used, with a large array of features and options. FTP also observes the client/server model, in this case a client runs on Bytton and connects to a remote FTP server. FTP itself uses the TCP transport protocol exclusively, it never uses UDP for its transport needs. . Also, FTP uses two ports to accomplish its task, by default port 21 is used for control (to listen to commands) while port 20 is employed for the actual data transfers. An interactive FTP session uses two operating modes , respectively active and passive mode. These two modes are initiated by the FTP client, and then acted upon by the FTP server. But in this case you do not have to bother with modes! Figure 5-235: Retrieving the Auto-configuration file by using FTP. After enabling the configuration download via FTP, you must fill-in the address of the FTP server, the path towards the location where the configuration file is stored, the user name and password for authentication (by default, it tries anonymous log-in) and the port used for commands. Figure 5-237: Fill-in the required fields for FTP transfer of the “Autoprovisioning” information.. ByttonLTE(full)_genericUsermanual_sw306FAS_revN.1.docx Page: 260 / 290 TOPEX Bytton (HSPA+ / LTE) TFTP: As its name says, Trivial File Transfer Protocol is a very simple protocol for transferring files, derived from the full FTP. Generally used exactly for this kind of tasks, automated transfer of configuration or boot files between machines in a local environment. This is because it has no security, it does not even, provide authentication. Its advantages are simplicity of design and very low usage of memory, it has been implemented on top of the UDP using port number 69, it does not require TCP! This makes it is ideal for simple machines such as routers with limited data storage! TFTP is currently defined by RFC 1350. It is seldom used interactively, like the FTP, by human users, instead it is excellent for machines simpler than a computer, networked devices that do not have the capabilities of “true” computers, but still need to be able to do file transfers. Due to the lack of security, it is dangerous to use it over the Internet. Thus, TFTP is generally only used on private, local networks. After enabling the TFTP section, you simply enter the address where the configuration file is stored, then the full path, and finally the port number to be used. By default, the standard port for TFTP is used, number 69: Figure 5-238: Configuring the TFTP client of Bytton to get the Auto.cfg file . ByttonLTE(full)_genericUsermanual_sw306FAS_revN.1.docx Page: 261 / 290 TOPEX Bytton (HSPA+ / LTE) 5.8.3 BW test Performs Bandwidth tests over the Bytton equipment: Figure 5-239: Bandwidth Testing – data speed tests performed over Bytton LTE.. First, Enable this feature (by default it is disabled). Figure 5-240: Enable Bandwidth Testing. Then, choose the method to be used: either FTP or IPERF. In both cases, the basic principle is simple, a large file of known length is uploaded to a destination, then downloaded, and the time necessary for the operation is measured, thus computing the bandwidth (Megabits per second). ByttonLTE(full)_genericUsermanual_sw306FAS_revN.1.docx Page: 262 / 290 TOPEX Bytton (HSPA+ / LTE) FTP In the BW test web page, first enable “BW test” then Enable the FTP option, as shown: Configure the FTP settings: Complete the address of the FTP server to be used the path towards the file to be used for testing, and the port. Authentication parameters (user name and password) may also be filled-in Figure 5-241: Bandwidth Testing using FTP. Now click the link BW Status located to the left, at the bottom of the page, to start the bandwidth measurement: Figure 5-242: Start the Bandwidth Test using FTP. A new window pops up, showing the phases and results of the test: “Client connecting to server, TCP port used, time interval required for transfer, computed bandwidth: Figure 5-243: Actual result of BW Testing – transfer speed measurement using Bytton as router. ByttonLTE(full)_genericUsermanual_sw306FAS_revN.1.docx Page: 263 / 290 TOPEX Bytton (HSPA+ / LTE) Another test, for large file sizes (130 and respectively 248 M bytes) show a measured speed that is now of 14,3 M bits per second: Here are several different results of BW tests: Figure 5-244: Several BW Tests that were performed for Bytton using the FTP option. ByttonLTE(full)_genericUsermanual_sw306FAS_revN.1.docx Page: 264 / 290 TOPEX Bytton (HSPA+ / LTE) IPERF In the BW test web page, first enable BW test, then Disable the FTP option and go to IPERF to choose “Client”: Figure 5-245: Using IPERF for BW Tests of the Topex wireless router. What it is? Generally, “Iperf” is an industry standard tool to measure the bandwidth and the quality of a network link. The network link under test is delimited by two hosts running Iperf. This tool is accurate and provides clear metrics to understand and use the performance metrics it produces. As you notice, the Iperf feature on Bytton LTE may operate either as a Client or as a Server. For extensive BW tests over a link, one host must be set as client, the other one as server. The quality of a link can be tested as follows: - Latency (response time or RTT): can be measured with the PING command available in “Test Net“ link that shows up in the “Interface Status” pages. - Jitter (latency variation): can be measured with an Iperf UDP test. - Datagram loss: can be measured with an Iperf UDP test. The “iperf” running on Bytton LTE is a simplified application, it just measures the bandwidth. The bandwidth is measured through TCP tests. The main difference between TCP (Transmission Control Protocol) and UDP (User Datagram Protocol) is precisely that TCP use processes to check that the packets were correctly received at the destination, while with UDP the packets are sent without any checks but with the advantage of being quicker than TCP. The “Iperf” utility uses the different capacities of TCP and UDP to provide statistics about network links. Iperf has a both a client and server functionality, and can measure the throughput between the two ends, either unidirectionally or bi-directionally. A typical Iperf output contains a time stamped report of the amount of data transferred and the throughput measured. ByttonLTE(full)_genericUsermanual_sw306FAS_revN.1.docx Page: 265 / 290 TOPEX Bytton (HSPA+ / LTE) To configure IPERF on Bytton, in the field IPERF, choose Client instead of the default Disabled. Complete the correct IP address in the filed “Test Server”. Specify the scheduling time interval, in minutes, in the field “Schedule” – the default value is one minute. Figure 5-246: Configuring IPERF for BW testing over Bytton. 5.8.4 Actual Speed Test Results The values determined by means of the “BW Test” web page are more accurate, but you may also use different freely available “Internet Speed Test” sites. The results from some of these sites are shown here: “My 3G speed”, download and upload: Figure 5-247: Download and Upload speed tests on “My 3G speed” site. ByttonLTE(full)_genericUsermanual_sw306FAS_revN.1.docx Page: 266 / 290 TOPEX Bytton (HSPA+ / LTE) Internet speed test using a different file size, 3MB. The computed speed isnow double compared to “fast 3G” but lower than 4G: Figure 5-248: Speed test for large files, using Mobile Speed test.com site. Another set of comparative Internet speed tests, for this Bytton LTE equipment: Firmware version: topex-3.0.3-a-FA-S Ethernet link up PPP link online, IP=93.122.148.36 PPPOE link offline System uptime: 12:51:12 up 37 min, load average: 0.00, 0.00, 0.00 DHCP Leases: 1342745334 d8:9e:3f:06:25:99 191.168.1.11 radus 01:d8:9e:3f:06:25:99 1342743331 00:13:02:6d:73:da 191.168.1.12 Irina-Dell 01:00:13:02:6d:73:da 1342743261 00:06:4f:02:15:82 191.168.1.13 VO000073 01:00:06:4f:02:15:82 - first, when using the Ethernet port for connection, as indicated by the routing Table and the Interface Status displays: Kernel IP routing table Destination Gateway Genmask Flags Metric Ref Use Iface 10.64.64.65 0.0.0.0 255.255.255.255 UH 0 0 0 ppp1 191.168.1.0 0.0.0.0 255.255.255.0 U 0 0 0 br0 192.168.0.0 0.0.0.0 255.255.0.0 U 0 0 0 wan 0.0.0.0 10.64.64.65 0.0.0.0 UG 0 0 0 ppp1 Ifaces: br0 Link encap:Ethernet HWaddr 00:19:70:49:F3:D7 inet addr:191.168.1.1 Bcast:191.168.1.255 Mask:255.255.255.0 UP BROADCAST RUNNING MULTICAST MTU:1500 Metric:1 RX packets:12652 errors:0 dropped:0 overruns:0 frame:0 ByttonLTE(full)_genericUsermanual_sw306FAS_revN.1.docx Page: 267 / 290 TOPEX Bytton (HSPA+ / LTE) TX packets:15194 errors:0 dropped:0 overruns:0 carrier:0 collisions:0 txqueuelen:0 RX bytes:2761304 (2.6 MiB) TX bytes:13951601 (13.3 MiB) lan Link encap:Ethernet HWaddr 00:50:C2:F5:23:2A UP BROADCAST RUNNING MULTICAST MTU:1500 Metric:1 RX packets:11281 errors:4 dropped:0 overruns:0 frame:0 TX packets:15471 errors:1 dropped:0 overruns:0 carrier:0 collisions:0 txqueuelen:1000 RX bytes:2823991 (2.6 MiB) TX bytes:13901997 (13.2 MiB) Base address:0x2200 ppp1 Link encap:Point-to-Point Protocol inet addr:93.122.148.36 P-t-P:10.64.64.65 Mask:255.255.255.255 UP POINTOPOINT RUNNING NOARP MULTICAST MTU:1500 Metric:1 RX packets:13467 errors:0 dropped:0 overruns:0 frame:0 TX packets:10297 errors:0 dropped:0 overruns:0 carrier:0 collisions:0 txqueuelen:3 RX bytes:13045215 (12.4 MiB) TX bytes:2485850 (2.3 MiB) wan Link encap:Ethernet HWaddr 00:50:C2:F5:23:29 inet addr:192.168.1.148 Bcast:192.168.255.255 Mask:255.255.0.0 UP BROADCAST RUNNING MULTICAST MTU:1500 Metric:1 RX packets:111710 errors:32 dropped:0 overruns:0 frame:0 TX packets:394 errors:0 dropped:0 overruns:0 carrier:0 collisions:0 txqueuelen:1000 RX bytes:6938268 (6.6 MiB) TX bytes:51456 (50.2 KiB) Base address:0x3000 Figure 5-249: Speed test when the Ethernet port is used for WAN. - Now, connection to Internet over the 3G wireless data link: PPP link online, IP=93.122.148.36 Kernel IP routing table Destination Gateway 10.64.64.65 0.0.0.0 191.168.1.0 0.0.0.0 192.168.0.0 0.0.0.0 0.0.0.0 10.64.64.65 br0 Genmask 255.255.255.255 255.255.255.0 255.255.0.0 0.0.0.0 Flags UH U U UG Metric 0 0 0 0 Ref 0 0 0 0 Use 0 0 0 0 Iface ppp1 br0 wan ppp1 Link encap:Ethernet HWaddr 00:19:70:49:F3:D7 inet addr:191.168.1.1 Bcast:191.168.1.255 Mask:255.255.255.0 UP BROADCAST RUNNING MULTICAST MTU:1500 Metric:1 RX packets:250209 errors:0 dropped:0 overruns:0 frame:0 TX packets:412636 errors:0 dropped:0 overruns:0 carrier:0 collisions:0 txqueuelen:0 RX bytes:24925941 (23.7 MiB) TX bytes:554504957 (528.8 MiB) ByttonLTE(full)_genericUsermanual_sw306FAS_revN.1.docx Page: 268 / 290 TOPEX Bytton (HSPA+ / LTE) ppp1 Link encap:Point-to-Point Protocol inet addr:93.122.148.36 P-t-P:10.64.64.65 Mask:255.255.255.255 UP POINTOPOINT RUNNING NOARP MULTICAST MTU:1500 Metric:1 RX packets:415307 errors:0 dropped:0 overruns:0 frame:0 TX packets:251562 errors:0 dropped:0 overruns:0 carrier:0 collisions:0 txqueuelen:3 RX bytes:549364190 (523.9 MiB) TX bytes:24488482 (23.3 MiB) See below actual speed test results for the wireless connection: Figure 5-250: Speed test when the 3G wireless module is used for WAN. Broadband Speed Test Results Test run on 19/07/2012 @ 10:55 PM Mirror: Internode Data: 3 MB Test Time: 28.94 secs Your line speed is 846 kbps (0.85 Mbps). Your download speed is 106 KB/s (0.1 MB/s). Figure 5-251: Detailed speed tests for the same Bytton while PPP1 wireless link is used for WAN. ByttonLTE(full)_genericUsermanual_sw306FAS_revN.1.docx Page: 269 / 290 TOPEX Bytton (HSPA+ / LTE) 5.9 Status Page The Bytton LTE router features a status page, accessible for any user without need for administrative password. You can select it form the first connection screen of Bytton LTE: Figure 5-252: Accessing the “Status page” link. Or you can enter in your browser directly the URL for the page: ““https://192.168.1.1/status” or https://192.168.1.1/status/index.html Or: Status Modem connection: stopped PPPOE connection: offline Firmware Version: topex-3.0.3-c-FA-S Modem Version: K2_0_7_43AP Security: unlocked IMSI: 226102410043179 IMEI: 355060025698866 Signal Level: 14/30 Network: 0,0,"RO Provider A",3 Registration: online Reload Figure 5-253: Status page example – access and aspects for “connection stopped”. ByttonLTE(full)_genericUsermanual_sw306FAS_revN.1.docx Page: 270 / 290 TOPEX Bytton (HSPA+ / LTE) Figure 5-254: Other status page example – no registration, error indication. While the configuration web pages shown previously are for configuring the Bytton ICR equipment, and are accessible only with log-in (you have access if you enter the correct user name and password), the Status Page can be accesses by any user (it does not request a password for log-in!). The Status Page shows you the essential parameters of the Rohde & Schwarz Topex S.A. Bytton ICR wireless router, that are available in the web page “SIM Status” and “System Status” described previously. Modem (Data) connection: it may be offline, online or stopped. When it is online, it also shows the current IP on the WAN side, such as “172.20.36.180” or “93.122.148.36” in these examples. You may have, as in this example, a SIM registered online, the mobile network is available for voice calls, but the modem connection is offline, you cannot connect to Internet via HSPA modem. You can see also info about the Ethernet link or PPP link (“PPPOE connection – offline”). Modem connection: PPPOE connection: Firmware Version: Modem Version: Security: IMSI: IMEI: Signal Level: Network: Registration: online, IP=93.122.148.36 offline topex-3.0.1-FA-S K2_0_7_43AP unlocked 226102100414755 355060025698866 12/30 0,0,"RO MOBILECARRIERB",2 online Status Modem connection: starting PPPOE connection: offline Firmware Version: topex-3.0.3-c-FA-S Modem Version: K2_0_7_43AP Security: unlocked IMSI: 226102410043179 IMEI: 355060025698866 Signal Level: 13/30 Network: 0,0,"MobileCarrierA",3 Registration: online Figure 5-255: Another two examples of Status page for Bytton ICR. ByttonLTE(full)_genericUsermanual_sw306FAS_revN.1.docx Page: 271 / 290 TOPEX Bytton (HSPA+ / LTE) PPPoE connection: information about the data link using PPP over Ethernet. In the above example, the status for the PPPoE connection is not yet available, so you see this error message. Firmware version: version of the firmware running on BYTTON: you may see “topex-3.0.1”-FA-S” or “MobileCarrierB-3.0.0.–FA-O-b” in the above examplse, and so on. The three digits following the name of the company show the version of the application program running, such as 2.7.2 or 3.0.1, while the final letters such as “FA-S” detail the platform, the modem type and the version (standard, dedicated for a certain carrier, with hard disk drive, etc). Finally, the last letter may indicate the type of the case, P for plastic or M for metal in the case of the industrial router; Modem Version: a code, such as “SWI9200X_03.00.08.02AP“ or “ K2_0_7_43AP”, describing the version of the embedded firmware of the mobile modem of the Bytton LTE equipment; it is very useful for debugging. Security: the state of the SIM card. Normally it should be “unlocked”, if it is “Locked by PIN” it means you must enter the correct PIN code in order to unlock it. - IMSI (International Mobile Subscriber Identity), identity of the subscriber , respectively of the SIM card used. - IMEI (International Mobile Equipment Identifier). 15-digit number that uniquely identifies an individual mobile terminal wireless device such as the 3G/4G modem of Bytton LTE. - Signal Level, displayed with four figures separated by a bar. The two digits indicate the level of the RF signal for the GSM/GPRS/EDGE/UMTS/HSPA network on a scale from zero to 30. The higher the value, the better signal you have, 17/30 is better than 14/30! Network: the name of the mobile network where the equipment is registered, as transmitted by the mobile carrier (may be a name, such as RO MobileCarrierA, Provider B, of just a code like “22601”. Registration status: shows if the SIM card of the equipment is registered to the mobile network (online) or not. Of course, if the SIM is not present, not activated or the signal level is much too low, the network-related information cannot be displayed. But the information related to the equipment (firmware version, version of the GSM or HSPA modem, IMEI code) will still be shown on the screen If the SIM is active and the signal is above zero, it will show IMSI and network information, even if not properly registered with the mobile carrier (you cannot make voice or data calls). ByttonLTE(full)_genericUsermanual_sw306FAS_revN.1.docx Page: 272 / 290 TOPEX Bytton (HSPA+ / LTE) 6 TECHNICAL SPECIFICATIONS Title Cellular networks supported Frequency bands Supported protocols Features Wired Network interfaces High speed wireless modem Description Depending upon actual type of mobile module used It can be GSM/GPRS/EDGE and respectively UMTS/HSDPA/HSPA+ or LTE GSM/GPRS/EDGE: quad band 850/900/1800/1900 MHz HSPA+/UMTS(WCDMA): tri-band or quad-band, 850/900/1900/2100MHz: LTE: multi-band 800/900/1800/2100/2600 MHz or LTE 700 TCP/IP, PPP, CHAP, PAP, ARP, UDP, FTP, TFTP, OSPF, RIP, BGP, NTP and others Full Firewall (SPI); Router Auto-negotiation, Auto-crossover, fully configurable 3+1 switch DHCP Server Remote configuration via Web page Multiple IPs over each interface, bridges, VLAN Fine tuning of each ETH port Masquerade and MTU adjustable for each interface Virtual Routing Tables QOS by means of packet marking and classifying (802.1p, 802.1 q) and various packet scheduling algorithms GRE, IPSEC, PTTTP and Open VPN for IP tunneling Quagga with RIP, BGP or OSPF for dynamic routing ETH Integrated four- port Router that includes a three LAN port Switch with Management and Layer2 for Ethernet 10/100 base-T. QoS according to 802.1p, 802.1q. Supports both static and dynamic IP address One dedicated WAN port. All ports are fully configurable via Web interface (assignement, IP address and netmask, speed, mode of operation) Connector type: female RJ45. Serial One or Two SER port for RS-232 / RS-485 serial links, over RJ-45 connectors; Selection between RS-232 and 485 is done at the factory, by mounting different hardware, according to the customer’s order. RS-232 interface is type 5-wire (RX, TX, GND, RTS, CTS) RS-485 interface is full duplex (two wire pairs, one for TX and one for RX) SPECIAL Optional one USB 2.0 Slot (on request) Optional one FXS telephone interface (on request) Depending upon the type of module selected for equipping Data service based on packet switched (PS) mode; Supporting SMS service based on GSM, GPRS, EDGE or UMTS, supporting group transmission of messages GPRS: Multi-slot Class 12 EDGE: Multislot class 12, Link Adaptation and Incremental Redundancy WCDMA 3GPP Release 5. MC7710 modules available for LTE (up to 100 Mbps download) featuring antenna diversity (MIMO support – two antennas may be used). Packet access One-phase and two-phase access for GPRS and EDGE Max. transmitter power GSM 850/900MHz: 2W DCS1800: 1W UMTS/HSPA 900/2100MHz: 0.25W Depending upon the type of mobile module selected for equipping LTE: In MIMO configuration (antenna diversity), peak downlink speeds up to 100 Mbps and peak uplink speeds up to 50Mbps with MC7710 HSPA+: Max 42 Mbps download and 5.76 Mbps upload with Sierra Wireless MC7710 HSPA+: Max 21 Mbps download and 5.76 Mbps upload with Sierra Wireless MC8705. Data services ByttonLTE(full)_genericUsermanual_sw306FAS_revN.1.docx Page: 273 / 290 TOPEX Bytton (HSPA+ / LTE) SMS VPN & Security GRE PPTP OpenVPN IPSEC Encryption protocols Identity authentication of peers Authentication algorithms Security of keys Network features Routing Firewall DHCP DNS PPP PPPoE VRRP NTP HSDPA/HSUPA: Max 7.2 Mbps download and 5.76 Mbps upload with Sierra Wireless MC8792V/8795V HSDPA : Max 3.6 Mbps download and 384 Kbps upload with Simcom 5216 EDGE – max 236.8Kbps download, max 118Kbps upload GPRS – max 85.6Kbps download, max 42.8Kbps upload CSD – GSM data rate 14.4 Kbps The choice of radio module also affects the maximum temperature range for functioning and storage!. Note: the values specified by the manufacturer are the uppermost limits of the respective 3G+ technology under laboratory conditions, you may not reach these speeds on your premises. Supporting SMS based on CS domain of GSM or UMTS Supporting SMS based on PS domain of UMTS Client; Several GRE tunnels may be defined. Client Client, TUN or TAP, UDP or TCP Host to host, network to network or Road Warrior IPSec Termination of two or more IPSec tunnels Up to 20 IPSec tunnels DES, 3DES, AES Symmetrical PSK – Pre Share Key Non symmetrical Public RSA key MD5, SHA1 PFS – Perfect Forward Secrecy Diffie Hellman algorithm IKE mechanism Static Dynamic, Unix – based Quagga software RIPv1, RIPv2, OSPF , BGP. NAT, PAT IP Tables MAC Address Filtering for all interfaces ACL – Access Control List SPI – Stateful Packet Inspection DHCP server, with forwarding option DNS Server, forwarding DNS requests Dynamic DNS Dual SIM capability (not synchronuosly) AT Commands Authentication: PAP, CHAP Verification of data link and failover Pont to Point Protocol over Ethernet Virtual Router Redundancy Protocol Client for NTP, up to version 4.0 ByttonLTE(full)_genericUsermanual_sw306FAS_revN.1.docx Page: 274 / 290 TOPEX Bytton (HSPA+ / LTE) WiFi Access Point Supported standards Operation Modes Connection Modes Wireless security Mobile antenna GPS antenna WiFi antenna Supply voltage Supply adapter Status indicators Temp. range IP Classification IEEE 802.11 b/g. Optionally also wireless N (802.11n) available, with support for dual antennas. Configurable as Access Point, Station or Bridge Infrastructure, Ad-Hoc WEP – 64 or 128 bits WPA, WPA2 – PSK or PSK 2 crypto MAC Filtering TKIP, AES External multi-band antenna with magnetic base and cable Two different types are shipped; one for GSM/3G and another for LTE (4G) modules in varioaus frequency. In care of 4G modules, which feature antenna diversity (MIMO), two LTE antennas may be used. For GPS-enabled modem modules, a GPS antenn is available. Stick antenna with 90o bending N-type has MIMO support (connectors for two wireless antennas) thus two WiFi antennas are required. 12 VD.C. (+ center wire, - external conductor) Standard - special switching mode power adapter for 230V AC mains Output : 12 V D.C. / 2.1 A Input: from 100 to 240 V A.C. / 0,3 A / 50 Hz Optional car kit adapter, for powering from the car battery Optional wide voltage range supply, form 9 up to 48 V DC input (by factory order) LEDs, for POWER, DATA, WiFi and SGN (level of signal), plus two LED per each LAN or WAN port. Operating: Standard 00 ... +700 C Optional Industrial: -25oC … +75oC (Sierra Wireless modules) Optional Industrial: -30oC … +80oC (SIMCOM modules) Storage: up to -400..+850 C for no more than 96 hours Humidity: 0 to 95%, non-condensing Ingress Protection Rating: IP 20 Chassis Material Dimensions (L x W x H) Installation Weight Ruggedized metallic case 210 x 130 x 30 (mm) except protrusions Horizontal mounting, on a flat surface DIN Rail mounting possible by means of a mechanical adapter Tipically 0,400 Kg, Maximum 0.800 Kg (equipment box only) Tipically 1 Kg – whole package ByttonLTE(full)_genericUsermanual_sw306FAS_revN.1.docx Page: 275 / 290 TOPEX Bytton (HSPA+ / LTE) 7. OPERATING ENVIRONMENT Bytton LTE was designed for indoor use only, so you should NOT operate it outdoors unles it is placed into weatherproof enclosures. You must install the Bytton LTE equipment in closed rooms or enclosures, where the environment conditions should be: operating temperature range: from 0 to 75 oC in case of units with components in the commercial temperature range, and respectively from -25 up to +80 oC in case of units built using h components in the industrial temperature range relative humidity: from 5 to 95 %, non-condensing. The extended temperature range version can operate form -30oC up to +80oC ambient temperature, but the case is not waterproof – the IP rating is just 20. For outdoors usage, you must ensure its protection against rain, spay, or saline mist! You should avoid dust and prolonged exposure to sun radiation. In addition, Bytton LTE must NOT be used in a flammable or explosive environment, or in locations where toxic or flammable gases may accumulate. The equipment must be handled with care, to avoid mechanical shocks and blows. Bytton LTE should not be used in an environment with high level of EMI (electromagnetic interferences) that is in close proximity to high power equipment such as electric motors or heaters. In addition, it should not be placed near copiers, PC monitors, TV sets or other audio-video appliances. In order to ensure adequate working temperature, the Bytton LTE interface must not be used too near heat sources or in direct sunshine. Also, it must not be overcrowded: you must leave free space around, below and above the Bytton LTE router. This is needed both for connecting phones / data / antennas cables, and also for ventilation (natural air cooling to dissipate the heat generated during operation). Remember, when allowed operating temperature is exceeded this may not have an immediate, visible effect on the BYTTON unit, but it can result in unreliable operation, accelerated ageing and hence diminishing of lifetime. When selecting the location for installing Bytton LTE and its external antennas you must remember the recommendations described in the chapter about mounting the equipment. Bytton LTE equipment does not include materials or components that are harmful to the environment. When the life cycle of this equipment is finished and it cannot be repaired or re-used anymore, you should dispose of it in accordance with laws and legal regulations that are valid in your area. ByttonLTE(full)_genericUsermanual_sw306FAS_revN.1.docx Page: 276 / 290 TOPEX Bytton (HSPA+ / LTE) 8 APPLICATIONS 8.1 Wireless gateway/firewall/router using the 3G+ networks The Bytton family was designed primary for wireless use, where it connects several computer, one or more cabled and/on wireless local networks or peripheral devices by means of its embedded 3G+ modem. The radio modem can connect to a wide range of LTE, UMTS/HSPA or GSM/GPRS mobile voice and data networks. Bytton ICR acts as a powerful residential gateway, being a compact, all in one box (NAT, PAT, router, firewall), connected to Internet via mobile broadband HSPA+ or LTE technology. You may connect to the Bytton ICR equipment several wireless and wired (Ethernet) clients, that is notebooks, desktop computers, tablets, Smartphones and various peripherals or measurement or commercial devices, at the same time. Figure 8-1: Wired and wirelss local clients connected to the Bytton wireless router. The access to data traffic does no longer require additional investments on equipment or software (router, switch , software, wiring operations). Bytton ICR broadband router allows connection to the local network (LAN) via three Fast Ethernet (10/100 Mbps) ports . Figure 8-2: Ilustration of SOHO applications for Bytton ICR. ByttonLTE(full)_genericUsermanual_sw306FAS_revN.1.docx Page: 277 / 290 TOPEX Bytton (HSPA+ / LTE) These kinds of applications are especially suited for both home and small or medium business network environment, where land connections are not readily available, and also for field applications, taken advanced of the industrial-grade built of Bytton LTE and its optional extended temperature range features. In addition, temporary events (festivals, sporting competitions, trade fairs and exhibitions) may benefit from the use of a wireless broadband router for data and voice. Even if the temporary event is located in the heart of the city, getting a wired broadband connection for only two-three days makes no economic sense. 8.2 M2M Field Applications Bytton ICR is an industrial grade broadband cellular router, so its applications are not limited to home and office, as described previously. The extended temperature range version, when fitted with serial interfaces, is becomes a machine-to-machine device that provides high data transfer rates to remote equipments located out in the filed, over 3G+ mobile networks. n addition to the advanced VPN and secured software features of the SOHO version, Bytton LTE provides industrial grade characteristics such as rugged metal case, extended temperature range for operation and storage and DIN Rail mounting for installation in an equipment rack. This rugged, compact-size wireless router is a suitable solution for field-specific applications, such as telemetry or back-up data transfers, since it includes a wide range of communication interfaces and protocols, supervised by advanced mechanisms such as backward capability including cross 3G+ networks coverage, WAN, WiFi and USB connections. Using this features, it can “talk” to several machines or measuring instruments out in the field, not just PC’s but also POS or ATM from filling stations and shops, telemetry equipments located at remote oil wells or pumping stations, etc. All these remote machines may be connected, via VIPN tunnels, over the high speed HSPA+ networks, to remote offices and to the headquarters of a big company with distributed presence, as illustrated below: Figure 8-3: Illustration of distributed and field applications for Bytton ICR. ByttonLTE(full)_genericUsermanual_sw306FAS_revN.1.docx Page: 278 / 290 TOPEX Bytton (HSPA+ / LTE) The availability of serial ports means that older “legacy” equipments (measurement and control units, meters, POS, card readers, ATMs), which feature only serial ports (RS-232 or RS-485 ), may also be connected to the Bytton ICR mobile router by means of its one or two SER ports, as shown in the illustration: Figure 8-4: Bytton ICR used for serial connection to legacy equipments. Domains of applications for the industrial grade cellular router may include Oil & Gas Industries, Processing Plants, Property / Estate Agencies, Logistics, Recruitment, Travel & Hospitality, Healthcare, Media & Broadcasting , Insurance & Finance. ByttonLTE(full)_genericUsermanual_sw306FAS_revN.1.docx Page: 279 / 290 TOPEX Bytton (HSPA+ / LTE) 9 Glossary 3G – “Third generation” mobile networks, specially designed for high speed data services. The classic definition of wireless networks that following the 2G systems (GSM) and they offer high speed data services in addition to the basic voice capability. These 3G mobile communications systems provide an enhanced range of multimedia services (high speed Internet access, video streaming, etc.). The high data transfer speed specific to the third generation communications network leads to an increased efficiency of information transmission, while the real time access to data and information means important savings of time and money. UMTS is the best known (but not the only one!) of the 3G networks, while HSPA+ is considered to be 3,5 G or 3G+. 4G - “Fourth-generation wireless”, the next stage of broadband mobile communications. According to the ITU,specifications es a 4G network requires a mobile device to be able to exchange data at 100 Mbit/sec. A 3G network, on the other hand, can offer data speeds as slow as 3.84 Mbit/sec. Several technolgies are used for 4G data networks, such as using Long Term Evolution (LTE) or Worldwide Interoperability for Microwave Access WiMAX. Generally OFDM is used -a type of digital modulation in which a signal is split into several narrowband channels at different frequencies. This is more efficient than TDMA employed in 2G, which divides channels into time slots and has multiple users take turns transmitting bursts or WCDMA, uesd by 3G, which simultaneously transmits multiple signals on the same channel. 4G does not mean only higher data rates, but also other enhancements - simultaneous connections to multiple high-speed networks that provide seamless handoffs throughout a geographical area, and better coverage using femtocells and picocells. As its name suggests, Bytton LTE may be equipped with a LTE mobile modules, to achieve data rates of up to 100 Mbit/sec. Broadband - A type of data transmission in which a single medium (radio, cable or fiber optics) carries several channels of data at once. Broadband is also associated with high transfer speed (at least 300 Kbps). UMTS technology qualifies for mobile broadband connection, and HSPA+ or LTE are even better! Device name - Also known as DHCP client ID or network name. Some ISP provide the customers with such device names, when using DHCP to assign addresses. DHCP (Dynamic Host Configuration Protocol) - This protocol allows a computer (or many computers on your network) to be automatically assigned a single IP address from a DHCP server. DHCP is available on Bytton LTE both for LAN (cabled or wireless) and WAN. DNS – Acronym for Domain Name System (or Service), an Internet service that translates domain names into IP addresses. This allows the Internet hosts to use both addresses type domain name (such as topex.ro or linux.org), and addresses type IP numbers (for instance 192.17.3.4). The domain name addresses are intended for human users and are automatically converted into IP (numeric) addresses. Because domain names are alphabetic, they are much easier to remember. The Internet however, is really based on IP addresses. Every time you use a domain name, therefore, a DNS service must translate the name into the corresponding IP address. DNS Server – computer able to answer to the interrogations in a DNS system. The DNS server maintains a database that includes the host computers with their domain names and the corresponding IP addresses. For instance, if you ask the DNS server for the domain name apex.com, it will return the IP address of the hypothetical company called Apex. DNS servers are linked in their network, so if one DNS server doesn't know how to translate a particular domain name, it asks another one, and so on, until the correct IP address is found. When a user enters a domain name into the Internet browser, the user is sent by the DNS Server to the proper IP address. The DNS server address used by the computers on your home network is the location of the DNS. DNS Server Address (Domain Name System) - DNS allows Internet host computers to have a domain name and one or more IP addresses. A DNS server keeps a database of host computers and their respective domain names and IP addresses, so that server your ISP has assigned. Dynamic DNS - service that allows clients connecting to the Internet with a dynamic IP address to be able to use applications that require a static IP address. The Internet Service Provider changes the IP address of the users, but there are applications that work only with static (fixed) IP addresses. Dynamic DNS makes it possible for sites on the Internet to establish connections to you computer without need for tracking the IP address themselves. DDNS is useful both for wired or wireless (such as UMTS) dialup ByttonLTE(full)_genericUsermanual_sw306FAS_revN.1.docx Page: 280 / 290 TOPEX Bytton (HSPA+ / LTE) connection where at each connection a new address is assigned, and for DSL services where the address is changed occasionally by the ISP. Bytton LTE allows usage of Dynamic DNS. Domain Name Resolution - The resolving of a domain name. Internet applications don’t communicate with domain names such as google.com or topex.ro, instead they use IP addresses (for example 193.226.61.95 or 216.239.39.99). Domain Name Resolution is the process (transparent for the user) of converting domain names into corresponding IP addresses. Every operating system has routines that deal with resolution of domain names. Encryption - This provides wireless data transmissions with a level of security. Bytton provides various degrees of encryption for data sent out via its embedded Wi-Fi access point. Ethernet - Standard for wired computer networks. Ethernet networks are connected by cables and hubs, and move data around. For wired connections, Bytton LTE provides Ethernet 10/100 ports, three for the local LAN and one for WAN. The ports are fully configurable, from the Web interface you may join the three LAN ports in the same switch or not, assign the different Ips, set them to operate duplex or halfduplex, select data speeds of 10 or 100 Mps, enable or disable auto-negotiation, and so on. Firewall - System designed to prevent unauthorized access to or from a private network. The firewall determines which information passes in and out of and prevents anyone outside of your network from accessing your computer without authorization and possibly damaging or viewing your files. Any company with an intranet that allows its workers access to the wider Internet must use a software or hardware firewall to prevent outsiders from accessing its own private data resources and for controlling what outside resources its own users have access to. Here the firewall is software a set of related programs (residing on the gateway server) that protect the resources of the local (internal) network. Gateway - A network point that manages all the data traffic of your network, as well as to the Internet and connects one network to another. Bytton LTE is also gateway, since it interfaces between the local networks (wired or wireless) and the HSPA mobile network or another broadband connection. GRE – Acronym for Generic Routing Encapsulation. GRE is used as a tunneling protocol, which can encapsulate a wide variety of protocol packet types inside IP tunnels. IP tunneling using GRE protocol allows easy creation and expansion of a Virtual Private Network using the 3G+ mobile network. The Bytton LTE router from Rohde & Schwarz Topex S.A. allows you to use several different GRE tunnels. HSDPA (High-Speed Downlink Packet Access) is an enhanced 3G (third generation) mobile telephony communications protocol in the High-Speed Packet Access (HSPA) family, also refered as 3.5G, 3G+ or turbo 3G. HSPDA allows mobile networks based on UMTS to have higher data transfer speeds and capacity. Current HSDPA deployments support down-link speeds of up to 42 Mbit/s. Further speed increases are available with HSPA+, which provides speeds of up to 337 Mbit/s with Release 11 of the 3GPP standards. HSPA+, also called "I-HSPA" (for Internet-HSPA) or Evolved High-Speed Packet Access, is a wireless broadband standard defined in 3GPP release 7 and above. By its name you can see that HSPA+ is an enhanced version of the previous 3G+ High Speed Packet Access system, a further increase of the speeds of the basic 3G system, and another step towards 4G (data rates up to 42Mbps currently and 100 Mbps in the LTE networks)! IP Address – Short from Internet Protocol address. The numerical address of a network device or resource as expressed in the format specified in the Internet Protocol (IP). In the current addressing format, IP version 4, the IP address is a 32-bit (4 bytes) sequence divided into four groups of decimal numbers separated by periods ("dots"). Each number can be zero to 255. These four groups of numbers look like “127.0.0.1” or „213.154.120.170”. The four numbers in an IP address are used in different ways to identify a particular network and a host on that network. IP – Acronym for Internet Protocol. It is the protocol from TCP/IP that directs the way data is sent from one computer to another on the Internet. The messages are divided into data packets, routed from the sender network to the receiver network and there re-assembled in the right order to re-create the original message. Because a message is divided into a number of packets, each packet can, if necessary, be sent by a different route across the Internet. These data packets can arrive in a different order than the order they were sent in. The Internet Protocol just delivers them. It's up to TCP protocol (Transmission Control Protocol ) to put the packets back in the right order. ByttonLTE(full)_genericUsermanual_sw306FAS_revN.1.docx Page: 281 / 290 TOPEX Bytton (HSPA+ / LTE) IP Tunneling - a tunneling protocol encapsulates a packet of the same or lower protocol, while in a regular protocol, the lower layer protocol encapsulates the higher level protocol. In order to achieve a Virtual Private Network (corporate network) you must ensure the port forwarding (tunneling), that is the transmission of private data through a public network such as 3G. The routing nodes in the respective public network must not be aware that the transmission is part of a private network. Tunneling means the encapsulation of the data and protocol information of the private network within the transmission units of the public network. Widely used tunneling methods are the Point-to-Point Tunneling Protocol (PPTP) developed by Microsoft and generic routing encapsulation (GRE), developed by Cisco Systems. All Bytton LTE equipments support the GRE protocol. Depending upon actual firmwarte revison sunning on it, Bytton LTE supports several types of secure IP tunnels, including GRE, IPSEC, OVPN and PPTP. ISP (Internet Service Provider) - An ISP is a business that allows individuals or businesses to connect to the Internet. Users log on to the Internet using an account with an ISP or Internet Service Provider. ISPs can serve IP addresses dynamically, or assign static (fixed) IP addresses to individual computers. In this case, the Internet provider is the operator of the 2G/3G or LTE mobile network. LAN - Acronym for local area network (computer network that spans a relatively small area). A group of computers, workstations and associated devices that share a common communications line or wireless link and are located in a relatively limited area, typically inside the same office building. The communications link that interconnects these computers allows any device of the network to interact with any other from the same network. The devices that compose a local network (workstations, personal computers and peripherals) are called nodes and typically share the resources of a single processor or server. This server has resources (applications, processing and data storage capabilities) that are shared in common by multiple computer users. The LAN can be connected to other local networks over any distance via phone lines, wireless links or other connections, and the system of LANs connected in this way is called a wide-area network (WAN). The LAN may also be connected to the Internet through a gateway. The Bytton LTE equipment performs as a gateway since it interfaces between local Ethernet and/or Wi-Fi networks and the 3G, CDMA or LTE wireless data network. LTE - Acronym for long-term evolution, alos calleds 4G LTE, a standard for wireless communication of high-speed data for mobile phones and data terminals. It is based on the GSM/EDGE and UMTS/HSPA network technologies, increasing the capacity and speed using a different radio interface together with core network improvements. The standard is developed by the 3GPP (3rd Generation Partnership Project) and is specified in its Release 8 document series, with minor enhancements described in Release 9. MAC (Media Access Control) Address - A MAC address is the hardware (physical) address of a ETH device connected to a network. In the Open Systems Interconnection model of communication, the MAC layer is one of two sub-layers of the Data Link Control layer and is concerned with sharing the physical connection. All network interface controllers must have a hard-coded and unique MAC address. The MAC address is applied at the factory and uniquely identifies network hardware, such as a Ethernet cards, modems or wireless adaptors on a LAN or WAN. The first part of the address is unique to the company that produced the device, and beyond that it is a sequence of digits unique to a single device manufactured by a company. The IEEE 802.x protocol (for instance, 802.3 is Ethernet) specifies that the MAC sub-layer must supply a 48-bit (6 byte) address. The MAC is most frequently represented as 12 hexadecimal digits. When looking at this hex representation of the MAC address, the first six hexadecimal digits identify the vendor while the last six hex digits identify the specific network interface card. Different companies like to show MAC addresses different ways, Bytton LTE makes use of the Unix-type MAC formatting, where there are six groups of two hex figure and the separator is “:” instead of the “-“ used by Microsoft. See below a few examples of MAC addresses encountered by the Bytton equipment. MAC address filtering - Since the MAC number is a unique number, a router may be programmed to accept (or reject) only certain MAC addresses from the local Ethernet network or Wi-Fi access points. When an unknown MAC address tries to connect, the Bytton router will not let it. MAC filtering can be used to prevent unauthorized access into small corporate networks. Without MAC address filtering, any wireless client can join (authenticate with) a Wi-Fi network provided they know the network name (ESSID) and maybe a few other security parameters like passwords or encryption keys. When MAC address filtering is enabled, however, the router performs an additional verification over the physical address. When this feature is enabled in Bytton LTE, when the embedded wireless access point receives a request to join with the WLAN, it compares the MAC address of that client against the Accept list. Clients on the list authenticate as normal, while clients not on the list are denied any access to the WLAN. The option ByttonLTE(full)_genericUsermanual_sw306FAS_revN.1.docx Page: 282 / 290 TOPEX Bytton (HSPA+ / LTE) Denny acts in reverse, the clients with specified MACs will be rejected, while all others are allowed access. This is useful when you know that some computers may have viruses and want to prevent the infection from spreading! Of course, some wireless clients allow their MAC address to be "impersonated" or "spoofed" in software. It's certainly possible for a hacker to break into your WLAN by configuring their client to spoof one of your allowed MAC addresses. Thus a determined attacker could capture details about MAC addresses from your network and pretend to be that device to connect to VLAN via Bytton. Although MAC address filtering isn't bulletproof, still it remains a helpful additional layer of defense that improves overall Wi-Fi network security against casual hackers or curious snoopers. MIMO (Multiple-input, multiple-output) technique has been established for mobile data communications as early as 1996. In the beginning the MIMO applications were targeted towards useage with WiFi and WiMAX local networks, since it was much easier to integrate MIMO into emerging devices, than into the 3G market where the standards were already established. But in the meantime the expanding standard 3G LTE (long-term evolution) has adopted MIMO and is on the rise. This is why MIMO or dual-antenna technique can be used both on the WLAN and WWAN sides of Bytton LTE! MTU - Acronym for Maximum Transmission Unit. Generally, the size of the largest datagram that can be passed by a layer of a communications protocol (that can be transmitted or received through a logical interface). All messages larger than the MTU will be divided into smaller packets before being sent. In our case MTU is the largest physical packet size, measured in bytes that a network can transmit. The size includes the IP header but does not include the size of any Link Layer headers or framing. Thus, when encapsulation and additional headers are used, you must take into account the additional length generated. Different networks have different values for MTU, which is set by the network administrator. Most networking technologies have a default MTU size: this is 576 for many PPP connections, 1500 for Ethernet networks, 65K for HYPER channel, etc. This is why the Web interface of Bytton LTE lets you to configure specific MTU values for each interface. NAT - Network Address Translation. NAT is an Internet standard that enables a local-area network (LAN) to use one set of IP addresses for internal traffic and another set of addresses for external traffic. On the gateway, NAT software performs all necessary translations of the IP addresses. There are several purposes for NAT usage: it provides a type of natural firewall by hiding all the internal IP addresses from the Internet. Only the single IP assigned to the router is visible from the Internet. Several computers on the local network to use one IP address, enabling access to the Internet from any computer network without the need to get more IP addresses from the ISP. Also, local computers are not directly reachable from the Internet, making them more secure. With NAT, the company can use several internal IP addresses. Since they're used only internally, there is no possibility of conflict with IP addresses used by other companies or organizations. Bytton allows you to selectively enable NAT or Masquerading for each of its interfaces! NTP - Acronym for Network Time Protocol. Internet standard protocol used to update the real-time clock in a computer. It assures accurate synchronization to the millisecond of computer clock times in a network of computers. NTP is very useful in packet-switched, variable-latency data networks. In case of Bytton LTE, when you want to measure the performances of the network, you need accurate, universal time-stamps for the data packets. NTP runs as a continuous background client program on a computer and it sends periodic time requests to servers, obtaining server time stamps and using them to adjust the client's clock. NTP uses UDP port 123 as its transport layer. It is designed particularly to resist the effects of variable latency. There are numerous primary and secondary servers in the Internet that are synchronized to the Coordinated Universal Time (UTC) via radio, satellite or modem. For more information, visit www.ntp.org. PPP - Acronym for Point-to-Point Protocol. Network protocol widely used to connect computers to the Internet. Works on the data link layer of the OSI model. PPP sends the TCP/IP packets of the gateway to a server that puts them onto the Internet. It is more stable than the older SLIP protocol and provides errorchecking features. PPP is the Internet standard for dial-up modem connections, no matter if they are phone line modems of high-speed UMTS wireless devices such as the embedded HSPA or LTE modem of Bytton LTE. PPPoE - Acronym for Point-to-Point Protocol over Ethernet. A method of secure data transmission, PPPoE using Ethernet to connect to an ISP. The PPP traffic is sent over Ethernet to the Internet through a common broadband medium. The users have the appearance of "dialing" the Internet, but their computers are in fact always connected. ByttonLTE(full)_genericUsermanual_sw306FAS_revN.1.docx Page: 283 / 290 TOPEX Bytton (HSPA+ / LTE) PPPoE supports a broad range of existing applications and services, from authentication, accounting and secure access to configuration management. Bytton LTE supports on the WAN side either PPP or PPPoE connection. RIP - Acronym for Routing Information Protocol. RIP for IP is a distance-vector routing protocol, which is the main dynamic routing protocol used in small or medium-sized IP internetworks. For dynamic routing, Bytton LTE supports protocols RIP v2 and OSPF. Routing -The process of determining and prescribing the path or method to be used for establishing connections and forwarding data packets. In a network, a 'routing switch' is a device that combines the functions of a switch, which forwards data by looking at a physical device address, and a router, which forwards packets by locating a next hop address. Each host with a router in the network uses the routing table information to determine the next host to route a packet to for a specified destination. Bytton LTE performs as a router for the wired or wireless local network where it is connected. It can perform both static routing (with fixed, pre-defined routes) and dynamic routing. Dynamic routing is more complex than static routing, but it provides several benefits. It ensures scalability and adaptability. The routes are dynamic, interactive, permanently updated. Routers learn about the network topology by communicating with other routers so it may select a better route, optimized for each time period. The Bytton equipment supports static and dynamic routing, featuring different protocols for dynamic routing, such as RIP v 2 for distance vector routing and OSPF for link state routing. S-HTTP - Acronym for SECURE HYPERTEXT TRANSFER PROTOCOL. A secure way of transferring information over the Web, by using an application-level encryption scheme. S-HTTP is an extension of the normal HTTP with security enhancements for WWW-based commerce. Web pages that use S-HTTP have a URL starting with https://. Typically HTTP data is sent over TCP/IP port 80, but HTTPS data is sent over port 443. The standard was developed for secure transactions, and uses 40-bit encryption ("weak" encryption) or 128-bit ("strong" encryption). The HTTPS standard supports certificates and allows encryption, digital signatures, authentication, or any combination of these. The S-HTTP type of transaction security is more secure than a user ID and password, thus it is mostly used by financial institutions (for example for credit-card purchases over the Web). Since Bytton LTE provides ensures S-HTTP, this means a higher degree of security for you. SMS - Acronym for Short Message Service; means the transmission of short text messages to and from cellular phones. The messages must be text only (no images or graphics) and not longer than 160 alphanumeric characters. Operators of Mobile Phone Networks use a spare data channel to send SMS messages. You may send SMS messages to another mobile subscriber, the mobile operator can send you phone settings over-the-air or commercial companies may send dedicated content to your mobile terminal. The embedded firmware allows Bytton LTE equipment to send and receive SMS (via mobile network) from the computer connected to it. Static packet filter - One of the simplest and least expensive forms of firewall protection is known as static packet filtering. With static packet filtering, each packet entering or leaving the network is checked and either passed or rejected depending on a set of user-defined rules. Dealing with each individual packet, the firewall applies its rule set to determine which packet to allow or disallow. The static packet filtering firewall examines each packet based on the following criteria: * Source IP address * Destination IP address * TCP/UDP source port * TCP/UDP destination port Static packet filtering is easy to implement and configure and does not use a lot of resources, but its efficiency is limited. Basic packet filtering firewalls are susceptible to IP spoofing, where an intruder tries to gain unauthorized access to computers by sending messages to a computer with an IP address indicating that the message is coming from a trusted host. Another shortcoming is that this form of firewall rarely provides sufficient logging or reporting capabilities. SPI - Acronym for Stateful packet inspection. The embedded Bytton LTE firewall also performs stateful packet inspection. This approach examines the contents of packets rather than just filtering them. It takes into account not only the addresses of the data packets but also the contents and the state of the connection. Stateful means they take into account the state of the connections they handle so that, for example, a legitimate incoming packet can be matched with the outbound request for that packet and allowed in. In addition, an incoming packet masquerading as a response can be blocked if the firewall knows that the outbound request is in fact nonexistent. Rather than controlling the individual data packets. ByttonLTE(full)_genericUsermanual_sw306FAS_revN.1.docx Page: 284 / 290 TOPEX Bytton (HSPA+ / LTE) SPI uses smart rules, thus enhancing the filtering process and controlling the network session. Static packet filtering cannot stop DOS attacks. But SPI closes ports until legitimate users request them opened so it prevents certain kinds of Denial of Service attacks. Since SPI firewalls compare packets to previous packets, the packets that violate the rules can be dropped. TCP/IP – Acronym for Transmission Control Protocol / Internet Protocol. It was established by the Defense Department of the USA for communications between computers. It has been at first incorporated in Unix operating system but has become the de facto standard for data transmission via networks, including for Internet. TCP – Acronym for Transmission Control Protocol. In TCP/IP, the TCP part is the one that takes care of keeping track of the individual units of data (packets) that a message was divided into for efficient routing through the Internet. TCP is known as a connection-oriented protocol, which means that a connection is established and maintained until the message or messages to be exchanged by the application programs at each end have been exchanged. TCP is responsible for ensuring that a message is divided into the packets that IP manages and for reassembling the packets back into the complete message at the other end. At the destination, TCP reassembles the individual packets and waits until they have all arrived to forward them to you as a single file. It also checks the received packets. TCP acts at the transport level (level 4) of the ISO/OSI model. See also ISO/OSI model, packet, TCP/IP. UDP – Acronym for User Datagram Protocol. It is a simpler protocol than TCP/IP that corresponds to the transport layer of the ISO/OSI model. UDP converts the messages generated by the application into data packets to be sent through IP, but does not check if the messages have been transmitted correctly or not. UDP allows individual packets to be dropped (with no retries) and UDP packets to be received in a different order than they were sent. Consequently UDP is more efficient but less reliable than TCP and is used to different purposes - primarily for broadcasting messages over a network. With UDP, reliability is wholly in charge of the application that generates the message. UDP is used often in applications such as videoconferencing or games where optimal performance is preferred over guaranteed message delivery. WAN - Acronym for Wide Area Network. A system of LANs, connected together. A Wan is a network that connects computers located in separate areas, (i.e., different buildings, cities, countries). The Internet is a wide area network. Bytton LTE features a dedicated WAN port and a configurable LAN/WAN ports, allowing versatile connection to another network or to alternate broadband service providers via Ethernet cable. WWAN – Acronym fo wireless wide area network. Also named "broadband wireless," WWAN refers to wireless high-speed data networks covering a large geographic area. This broad category can include 2.5G, 3G, 4G, and other types of technology where each base station (tower) is designed to reach an area measured inmany kilometers. The term WWAN is used primarily to distinguish this group of diverse technologies from WLANs (Wireless Local Area Networks,) which typically cover a much smaller area, just 300 m from the base station. WLAN includes technology like Wi-Fi. Wi-Fi type N – Besides the usual 802.11 b/g WiFi modules, Bytton LTE may be fitted with N-type Wireless Access Point using dual antennas. 802.11n is the third-generation Wi-Fi standard for wireless home networking. 802.11n equipment is backward compatible with older 802.11g or 802.11b gear, and it supports much faster wireless connections over longer distances. It uses several radio modules and antennas (MIMO) together with channel bonding techniques, which utilizes two adjacent Wi-Fi channels simultaneously to double the bandwidth of the wireless link compared to 802.11b/g. The 802.11n standard specifies 300 Mbps theoretical bandwidth is available when using channel bonding. Without it, about 50% of this bandwidth is lost (actually slightly more due to protocol overhead considerations), and 802.11n equipment will generally report connections in the 130-150 Mbps rated range in those cases. As a drawback, channel bonding substantially increases the risk of interfering with nearby Wi-Fi networks due to the increased spectrum and power it consumes. ByttonLTE(full)_genericUsermanual_sw306FAS_revN.1.docx Page: 285 / 290 TOPEX Bytton (HSPA+ / LTE) The manufacturer reserves the right to modify the product and manual for the purpose of technical improvement without prior notice. The manufacturer guarantees the good functioning of the product provided that it has been correctly installed and the directives for storage and usage have been respected. The warranty implies exclusively repairing or replacing the defective unit. The warranty does not include any indirect losses or loss of profit. The manufacturer is not liable for any damage, whether direct, indirect, special, incidental, or consequential, as a result of using Rohde & Schwarz Topex S.A. “Bytton LTE” equipment. No part of this manual may be reproduced, stored in a retrieval system, or transmitted, in any form or by any means, electronic, mechanical, recording, or otherwise, without the prior written permission of the company ROHDE & SCHWARZ TOPEX S.A. It is certified hereby that the Rohde & Schwarz Topex S.A. Bytton LTE unit is manufactured in concordance with the legal provisions concerning responsibility towards the quality of delivered products, fulfills the quality parameters specified in its “User’s manual” and is fit for the purpose for which it has been designed. It also warrants that the equipment will perform substantially in accordance with the accompanying documentation. Any comments, suggestions and proposals of yours concerning our products are welcome and we are gladly waiting for your feedback: Rohde & Schwarz TOPEX S.A. Feleacu street, no. 10, sector 1 Bucharest 014186 ROMANIA Tel: +4021 408.39.00 Fax: +4021 408.39.09 E-mail: topex@ topex.ro Web: www.topex.rohde-schwarz.com ByttonLTE(full)_genericUsermanual_sw306FAS_revN.1.docx Page: 286 / 290 TOPEX Bytton (HSPA+ / LTE) 10 Annex 1 – Antennas for ByttonICR Different types and numbers of Mobile antennas are supplied in the package for wireless Bytton LTE router. Mainly there are two standard (Omni directional) types, according to the technology and frequency bands of the mobile module: either for GSM/3G or for 4G (LTE). Small stick antenna for 2G/3G up to 3G+ (HSPA+ networks) Figure 11-1: Drawing of the Mobile Antenna for 2G/3G, with magnetic base and connection cable. The embedded multiband modem of 3G Bytton units covers almost all of the frequency bands of the world (dual band for UMTS/HSPA+ and tri-band or quad band for GSM/GPRS/EDGE). Thus, the corresponding Mobile antenna must be compatible with all these frequency rages! The standard stick antenna for GSM/3G is small (only 7 cm height), compact, rugged, suited for indoors or outdoors usage. It is fitted with a with magnetic base and has a 2,5m long cable. Figure 11-2: Photo of the Mobile Antenna for 2G/3G, with magnetic base and connection cable. The table below shows the main characteristics of the multi-band stick antenna (currently supplied with the Bytton LTE package for 3G variants). Frequency bands Gain Polarization Height Base Cable End Connector GSM 890-960 MHz PCN 1710-1880 MHz PCS 1850-1990 MHz UMTS/HSDPA 1920-2170 MHz 2 dBi Vertical Total 73 mm Active stick 43 mm Magnetic, bottom heavy Diameter 2,8 cm Type RG174, length 2,5 m Nipple, male ByttonLTE(full)_genericUsermanual_sw306FAS_revN.1.docx Page: 287 / 290 TOPEX Bytton (HSPA+ / LTE) Yagi GSM Antennas In case of locations with a low level of RF, you cannot use the full potential of 3G or HSPA+ networks. For such cases, you must use Yagi antennas (high gain, directive) for the respective GSM / HSPA frequency bands, instead of the usual stick antenna. The high gain antenna must be installed in a place with good reception (on the roof of the building). Figure 11-3: High Gain Yagi Antennas and Cables for GSM/HSPA. Such directive antennas feature from 5 up to 14 elements, provide 10-12 dBi gain and come with a connection cable that is 10-15 m long, to allow installation of the antenna on a mast or atop the building, where it gets a better level of 3G signal. The cable is a special one, large diameter, which assures low siggnal attenuation in spite of the additional length. Such Yagi GSM/3G antennas are available from manufacturer upon request. ByttonLTE(full)_genericUsermanual_sw306FAS_revN.1.docx Page: 288 / 290 TOPEX Bytton (HSPA+ / LTE) 4G (LTE) For the LTE 2600 MHz band, the “ SM03” magnetic base antenna is shipped in the package. This is a thin rod, dual coil, weather proof antenna, specially designed for the 2.6GHz frequency band used for LTE in Europe. Figure 11-4: General image of the Mobile Antenna for 4G, with magnetic base and connection cable The GSM03 antenna is for frequency ranges 890-960/1710-2150 and respectively 2600 MHz for LTE. The connection cable is thin, type RG178, and standard cable length is 3 meters, which allows more flexible placing of the antenna. Besides the SMA connector that matches the Bytton “mobile” connectors, other types are available (SMB, FME, TNC). In the 2600MHz frequency band, gain is 5dBi for the standard model with 3 m long cable and 7dBi for the variant with shorter cable (only 1 m long), which has a smaller signal loss. The LTE antenna is omnidirectional, rated for both outdoor and indoor usage. The following table shows the main characteristics of the multi-band LTE antenna with magnetic base, supplied with the Bytton LTE package for 4G (LTE) variants. “GSM03” multi-band LTE Antenna Name / description Electrical specifications Frequency bands Gain VSWR Input Impedance Directivity Polarization Maximum Power Mechanical specifications Height Base Mounting Cable End Connector Temperature range IP protection GSM 890-960 MHz PCN 1710-1880 MHz PCS 1850-1990 MHz UMTS/HSPA 1920-2150 MHz LTE 2500– 2690 MHz 5 dBi / 7 dBi (1m variant) <1.5 50 Ohm Omnipolar Vertical 60 W / 30 W Total 270 mm Active rod (wire+coil) 246 mm Diameter 45 mm Height 32 mm Magnetic Bottom heavy, stable Adhesive sticker Type RG178, standard length 3 m Nipple, SMA male Storage: -45oC to +75oC Operating -30oC to +75oC Fit for outdoors usage ByttonLTE(full)_genericUsermanual_sw306FAS_revN.1.docx Page: 289 / 290 TOPEX Bytton (HSPA+ / LTE) In case of locations with a low level of 4G signal, Yagi (high gain, directive) antennas are also available for the LTE frequency band. They may be apparent or enclosed in a “Radome”, single ori paired (LTE technology typically employs antenna diversity, thus two antennas are used). Typicall Yagi gains range for 9dBi up to 14dBi in the 2500-2700MHz frequency bands, and the UV-stable, UL flame rated radome assures all-weather operation. Warning! Don’t use excessive force when threading the antennas. Make sure the antennas are securely screwed into the respective RF connectors, but do NOT use a spanner or screw key, which could damage the antenna connector! Tighten the flange lightly, by hand. The stick antennas has vertical polarization, they should be placed in vertical or horizontal position, depending of the local RF field condition for the respective frequencies bands. In case of antenna diversity (MIMO) versions, the antennas shall be connected in the same way, only there are two of them: Figure 11-5: Photo of diversity-enabled Bytton, with two stick antennas for WiFI and two connectors for the 4G Mobile antennas. Warning! For the multiple-antenna variants of the equipment, the indications “MAIN” and “AUX” must be always observed, even when you use two identical antennas. This holds true both for the Mobile and WiFi antennas, as shown: Figure 11-6: Schematic drawing of the “AUX and MAIN” markings of antenna connectors, both for Mobile (LTE network) and for Wi-Fi (type N). This rule means that, when you connect a single antenna to a diversity-enabled equipment, always use the MAIN connector. With just one antenna, it will not be able to operate in diversity mode, still it will work correctly. But if you connect just a single antenna, to the AUX connector instead of MAIN, then it won’t be able to work properly! Notice: The Bytton LTE unit and its antennas should be placed such as to be as far as possible from appliances or office equipment that is sensitive to radio interference (microwave ovens, copiers, TV sets, PC displays, and multimedia systems). For best results, try to find for the single or dual WiFi and HSPA or LTE antennas a place of maximum signal reception. In addition, the antenna must NOT be located near heavy-duty equipment that may generate electromagnetic interferences, such as electric motors or heaters. ByttonLTE(full)_genericUsermanual_sw306FAS_revN.1.docx Page: 290 / 290