1
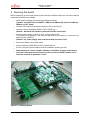
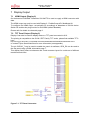
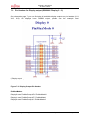
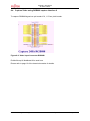
Fujitsu Semiconductor Europe
User Manual
FSEUGCC-UM_MB86R11_Rev1.4
EMERALD-L
EVALUATION BASE BOARD
SK-86R11-BASE
USERGUIDE
Emerald-L Base Board
SK-86R11-BASE
Revision History
Date
12 Oct 2010
04 Nov 2010
26 Nov 2010
04 Mar 2011
Issue
V1.0 Herbert Hönig
First draft
V1.1 Herbert Hönig
Added pictures, changed SAP item number
V1.2 Herbert Hönig
Added Settings for external PHY
V1.4 Herbert Hönig (V1.3 overleaped)
Added Reset Information , new controller on Board V1.4
This document contains 25 pages.
FSEUGCC-UM_MB86R11_Rev1.4
-2-
© Fujitsu Semiconductor Europe GmbH
Emerald-L Base Board
SK-86R11-BASE
Warranty and Disclaimer
To the maximum extent permitted by applicable law, Fujitsu Semiconductor Europe GmbH restricts its
warranties and its liability for all products delivered free of charge (eg. software include or header
files, application examples, target boards, evaluation boards, engineering samples of IC’s etc.), its
performance and any consequential damages, on the use of the Product in accordance with (i) the
terms of the License Agreement and the Sale and Purchase Agreement under which agreements the
Product has been delivered, (ii) the technical descriptions and (iii) all accompanying written materials.
In addition, to the maximum extent permitted by applicable law, Fujitsu Semiconductor Europe GmbH
disclaims all warranties and liabilities for the performance of the Product and any consequential
damages in cases of unauthorised decompiling and/or reverse engineering and/or disassembling.
Note, all these products are intended and must only be used in an evaluation laboratory
environment.
1.
Fujitsu Semiconductor Europe GmbH warrants that the Product will perform substantially in
accordance with the accompanying written materials for a period of 90 days form the date of
receipt by the customer. Concerning the hardware components of the Product, Fujitsu
Semiconductor Europe GmbH warrants that the Product will be free from defects in material
and workmanship under use and service as specified in the accompanying written materials
for a duration of 1 year from the date of receipt by the customer.
2.
Should a Product turn out to be defect, Fujitsu Semiconductor Europe GmbH´s entire liability
and the customer´s exclusive remedy shall be, at Fujitsu Semiconductor Europe GmbH´s sole
discretion, either return of the purchase price and the license fee, or replacement of the
Product or parts thereof, if the Product is returned to Fujitsu Semiconductor Europe GmbH in
original packing and without further defects resulting from the customer´s use or the transport.
However, this warranty is excluded if the defect has resulted from an accident not attributable
to Fujitsu Semiconductor Europe GmbH, or abuse or misapplication attributable to the
customer or any other third party not relating to Fujitsu Semiconductor Europe GmbH.
3.
To the maximum extent permitted by applicable law Fujitsu Semiconductor Europe GmbH
disclaims all other warranties, whether expressed or implied, in particular, but not limited to,
warranties of merchantability and fitness for a particular purpose for which the Product is not
designated.
4.
To the maximum extent permitted by applicable law, Fujitsu Semiconductor Europe GmbH´s
and its suppliers´ liability is restricted to intention and gross negligence.
NO LIABILITY FOR CONSEQUENTIAL DAMAGES
To the maximum extent permitted by applicable law, in no event shall Fujitsu
Semiconductor Europe GmbH and its suppliers be liable for any damages whatsoever
(including but without limitation, consequential and/or indirect damages for personal
injury, assets of substantial value, loss of profits, interruption of business operation,
loss of information, or any other monetary or pecuniary loss) arising from the use of
the Product.
Should one of the above stipulations be or become invalid and/or unenforceable, the remaining
stipulations shall stay in full effect
FSEUGCC-UM_MB86R11_Rev1.4
-3-
© Fujitsu Semiconductor Europe GmbH
Emerald-L Base Board
SK-86R11-BASE
Contents
Revision History.................................................................................................................. 2
Warranty and Disclaimer .................................................................................................... 3
Contents .............................................................................................................................. 4
0
Introduction / Features ................................................................................................ 6
1
System Overview ......................................................................................................... 7
2
Board Layout ................................................................................................................ 8
3
Running the board ....................................................................................................... 9
4
Power Supply ............................................................................................................. 10
5
Board Control Switches ............................................................................................ 11
6
CPU Connectors ........................................................................................................ 12
7
Display Output ........................................................................................................... 13
8
7.1
HDMI Output (Display 0) ....................................................................................... 13
7.2
TFT Panel Output (Display 0) ............................................................................... 13
7.3
Pin Headers for Display output (RGB888 / Display 0 – 2) ..................................... 14
7.4
APIX (Display 0 ) 3GBit Link ................................................................................. 15
7.5
APIX (Display 1 ) 1GBit Link ................................................................................. 15
7.6
APIX (Display 2 ) 1GBit Link ................................................................................. 15
Capture Functionality ................................................................................................ 16
8.1
Capture via APIX RX (RGB666) 3GBit Link .......................................................... 16
8.1.1 Capturing Display Data (RGB666 + LVDS666).................................................. 16
8.1.2 Capturing Ethernet data (using INAP as external PHY) ..................................... 16
9
8.2
Capture Video using Capture interfaces 1 and 2 (ITU656) .................................... 17
8.3
Capture Video using Capture interfaces 0 and 3 (ITU656) .................................... 17
8.4
Capture Video using RGB888 capture interface 0 ................................................. 18
Interfaces .................................................................................................................... 19
9.1
RS232 – UARTs ................................................................................................... 19
9.2
SPI/I2C – Aardvark Interface ............................................................................... 19
9.3
CAN Bus ............................................................................................................... 19
9.4
Media LB .............................................................................................................. 19
9.5
AIC / IPC (to ATLAS) ............................................................................................ 20
9.6
Ethernet (external bus), 100MBit........................................................................... 21
9.7
Ethernet (internal MAC, external PHY) 1GBit ........................................................ 21
9.8
SD Card ................................................................................................................ 21
9.9
Sound ................................................................................................................... 22
9.10
GPIOs ................................................................................................................... 22
FSEUGCC-UM_MB86R11_Rev1.4
-4-
© Fujitsu Semiconductor Europe GmbH
Emerald-L Base Board
SK-86R11-BASE
9.11
10
ADC ...................................................................................................................... 22
Flash........................................................................................................................ 23
10.1
QUAD SPI Flash ................................................................................................... 23
10.2
NAND Flash .......................................................................................................... 23
11
Appendix ................................................................................................................. 24
11.1
Used literature ...................................................................................................... 24
11.2
Figures.................................................................................................................. 25
FSEUGCC-UM_MB86R11_Rev1.4
-5-
© Fujitsu Semiconductor Europe GmbH
Emerald-L Base Board
SK-86R11-BASE
0 Introduction / Features
Here you will find a short summary and overview of the features that the SK-86R11-BASE
Evaluation Board offers.
It provides
Power supplies for the CPU module
2x RS232 interfaces (1x D-SUB9, 1x pin header)
HOST SPI/I2C interface via Totalphase Aardvark
CAN interface
Media LB interface
AIC / IPC interface (designed to work with ATLAS MCU)
Nand Flash 16-Bit length (2GBit) on board
Quad SPI Flash (16M-Bit) on board
Ethernet (external Bus) 100Mb (MII)
Ethernet (internal MAC of Emerald used, external PHY) 1Gb
SD Card interface
2x APIX TX devices (1Gb)
1x APIX TX and 1x APIX RX device (3Gb)
Sound Input/Ouput
Most of the interfaces can be accessed separately via control-switches on the board. This
enables the possibility to use all multiplex modes that Emerald-L provides.
Mechanical dimensions:
-
only PCB : 220 x 170 mm
-
with mounted connectors: 220 x 195 mm
-
Height (without CPU module) 25 mm
For details refer to the Emerald-L Hardware Manual (see appendix).
FSEUGCC-UM_MB86R11_Rev1.4
-6-
© Fujitsu Semiconductor Europe GmbH
Emerald-L Base Board
SK-86R11-BASE
1 System Overview
The Emerald-L system consists of three modules:
CPU module (Emerald-L chip, USB connectors)
Base board (supplies interfaces and power)
Addon board (from Jade-L system), provides 2x DVI output and 2x CVBS input
Figure 1-1: System Overview
FSEUGCC-UM_MB86R11_Rev1.4
-7-
© Fujitsu Semiconductor Europe GmbH
Emerald-L Base Board
SK-86R11-BASE
2 Board Layout
Figure 2-1: Board Layout
FSEUGCC-UM_MB86R11_Rev1.4
-8-
© Fujitsu Semiconductor Europe GmbH
Emerald-L Base Board
SK-86R11-BASE
3 Running the board
Before powering up the board, please ensure that all multiplex modes are set correct and all
interfaces connected accordingly.
check board switches and select appropriate interfaces
( Default: use HOST SPI and UART4 : SW6-3 and SW6-6 ON, others in SW6 and
SW8 are in OFF state)
connect CPU board on the base connectors CN_A and CN_B
connect external interfaces (HDMI, JTAG, RS232 etc.)
(Default : Aardvark SPI Interface connected, RS232 connected)
connect power supply on X34 (9-18V), recommended 12V
The polarity of the supply is : the inner pin has to be set to Positive (+), the outer ring
has to be set to GND (-)
(Default: use power supply that is delivered with the board, 12V)
start up the board using switch SW5
power indicating LEDS (D9,D10,D11) should light up
at 12V a current of around 600 mA will be needed in power up mode
Reset behaviour: due to software limitation sometimes it will be necessary to
reset the board three times. Please be aware: press the RESET button for at
least two seconds to generate a reset !
Figure 3-1: Running Board
FSEUGCC-UM_MB86R11_Rev1.4
-9-
© Fujitsu Semiconductor Europe GmbH
Emerald-L Base Board
SK-86R11-BASE
4 Power Supply
The Emerald-L baseboard is supplied via an external DC power adapter, the input voltage
must be in the range from 9V – 18V.
The generated supplies (5V, 3V3 and 1V8) are used to power the CPU module and the
interface devices on the baseboard.
The external power is fused and secured to avoid damaging the board in case of reverse
polarity.
The possibility of start-up via an external control pin is available.
Pin 25 on connector X28 provides this functionality. A HIGH level is used for power-up,
please see also section 8.5 of this document.
Figure 4-1: External Start-up (ATLAS Connector)
Please check page 19 of the board schematic.
FSEUGCC-UM_MB86R11_Rev1.4
- 10 -
© Fujitsu Semiconductor Europe GmbH
Emerald-L Base Board
SK-86R11-BASE
5 Board Control Switches
Switch:
(set to ON to enable function)
Function:
Schematic page:
SW8 / 1
Use MII PHY of APIX INAP375
12
SW8 / 2
Enable SPI communication to APIX 12
INAP375R
SW8 / 3
Enable I2S interface to APIX INAP375R 12
SW8 / 4
Enables capture interface from LVDS 12
converter (RGB666)
SW8 / 5
Enables sideband communication to 10
APIX INAP125TX 1 (Display 1)
SW8 / 6
Enables sideband communication to 8
APIX INAP125TX 2 (Display 2)
SW8 / 7
Feedback APIX INAP375R data directly 9
to INAP125TX
SW8 / 8
Enables DISP2
INAP125TX
SW6 / 1
Enables
SPI
INAP375TX
communication
to 11
SW6 / 2
Enables
I2S
INAP375TX
communication
to 11
SW6 / 3
Enables HOST SPI interface
14
SW6 / 4
Enables SD Card interface
15
SW6 / 5
Enables external PHY
21
SW6 / 6
Enables UART4
14
SW6 / 7
Enables I2S0 interface to soundchip
16
SW6 / 8
Enable QUAD SPI Flash
20
SW7 / A
Enables Capture 1 (ITU656)
18
SW7 / B
Enables Capture 2 (ITU656)
18
output
on
APIX 9
Figure 5-1: Overview Switches
FSEUGCC-UM_MB86R11_Rev1.4
- 11 -
© Fujitsu Semiconductor Europe GmbH
Emerald-L Base Board
SK-86R11-BASE
6 CPU Connectors
Please find here an overview of the signals connected to the CPU baseboard connectors.
MOLEX 52837-1679 connectors are used on the baseboard.
For connecting, on CPU module MOLEX 53647-1674 connectors needs to be used.
Figure 6-1: CPU Connectors
FSEUGCC-UM_MB86R11_Rev1.4
- 12 -
© Fujitsu Semiconductor Europe GmbH
Emerald-L Base Board
SK-86R11-BASE
7 Display Output
7.1
HDMI Output (Display 0)
On the board a DVI/HDMI Transmitter SIL164CTG is used to supply a HDMI connector with
data.
The HDMI output can only be used with Display 0, PinMuxGroup #D / MuxMode #0.
To configure the HDMI output set switches S1 accordingly to datasheet of SIL164 device.
Switch S2 enables hot plug function for DVI/HDMI (default disabled).
Please refer for details in schematic page 6.
7.2
TFT Panel Output (Display 0)
Display 0 can also be used to display data on a TFT panel connected to X10.
The pinning is compatible to the GLYN / EDT Familiy TFT series, please find available TFTs
here:
http://www.glyn.de/content_xl.asp?wdid=2214&sid=000000267A5E51505D5241605359415347
or contact Fujitsu Semiconductors for more information (see appendix).
The pin CAP2VI_7 can be used to enable the panel via software, SPI0_D0 can be used to
dim the panel using a PWM, schematics page 7.
This display family offers touchscreen and fixed connector layout for a wide set of different
resolutions and sizes.
Figure 7-1: TFT Panel Connector
FSEUGCC-UM_MB86R11_Rev1.4
- 13 -
© Fujitsu Semiconductor Europe GmbH
Emerald-L Base Board
SK-86R11-BASE
7.3
Pin Headers for Display output (RGB888 / Display 0 – 2)
On schematics page 7 you can find also all available display outputs on pin headers (X11,
X12, X13). All displays have RGB88 output, please see the example here:
( Display ouput 0).
Figure 7-2: Display Output Pin Header
PinMuxModes :
Display0 uses PinMuxGroup #D / PinMuxMode0
Display1 uses PinMuxGroup #F / PinMuxMode1
Display2 uses PinMuxGroup #I / PinMuxMode3
FSEUGCC-UM_MB86R11_Rev1.4
- 14 -
© Fujitsu Semiconductor Europe GmbH
Emerald-L Base Board
SK-86R11-BASE
7.4
APIX (Display 0 ) 3GBit Link
Display 0 can also be transmitted via APIX 3GBit link.
For this an external INAP375T is used on the board. This device is always on.
It can be configured via SPI1 interface, for this switch SW6/1 (Enable_SPI_TO_TX) needs
to be enabled.
Using I2S1 bus with this device needs to have SW6/2 enabled (Enable_I2S_TO_TX).
For details refer to page 11 of the board schematic.
For details of programming the INAP device, please refer to datasheet of Inova
semiconductors (INAP375T, see appendix).
7.5
APIX (Display 1 ) 1GBit Link
Display 1 can be transmitted via APIX 1GBit link.
For this an external INAP125T24 is used on the board. This device is always on.
It can be configured via EEPROM that needs to be programmed. For details refer to
datasheet of Inova semiconductors (INAP125T24, see appendix)
When using sideband data (GPIOs) bus switch U12 needs to be enabled via SW8/5
(ENABLE_SB_TX1). Also the ATLAS interface can be connected here, schematic page 10
shows connectivity.
The board offers the possibility to use either CAT5 or Rosenberger connectors for the APIX
link. Only one of them can be mounted.
7.6
APIX (Display 2 ) 1GBit Link
Display 2 can be transmitted via APIX 1GBit Link.
For this an external INAP125T24 is used on the board. This device is always on.
There are two different use cases that can be enabled here.
using Display2 output (RGB888) of Emerald: set SW8/ (ENABLE_TX_DISPLAY2)
PinMuxGroup #I / MuxMode #3 is used here.
using as loop through from APIX RX(RGB666) to TX: set SW8/ (EN_RX_TO_TX)
Here the RGB666 data stream from the external INAP375R device will be fed to this
TX device
It can be configured via EEPROM that needs to be programmed. For details refer to
datasheet of Inova semiconductors (INAP125T24, see appendix)
When using sideband data (GPIOs) bus switch U10 needs to be enabled via SW8/5
(ENABLE_SB_TX2). Also the ATLAS interface can be connected here, schematic page 8+9
shows connectivity.
The board offers the possibility to use either CAT5 or Rosenberger connectors for the APIX
link. Only one of them can be mounted.
FSEUGCC-UM_MB86R11_Rev1.4
- 15 -
© Fujitsu Semiconductor Europe GmbH
Emerald-L Base Board
SK-86R11-BASE
8 Capture Functionality
8.1
Capture via APIX RX (RGB666) 3GBit Link
This mode enables capturing data from APIX Link (3GBit) via an external INAP375R device.
8.1.1 Capturing Display Data (RGB666 + LVDS666)
The captured data needs be fed into the device in a special way: APIX2 Mode enabled
(3GBit), Configuration is set to receive 18-Bit RGB and 18-Bit LVDS.
From external two video streams are fed in, stream 1 (RGB666) will be transferred directly to
APIX device TX2 ( see section 6.6.), stream 2 will be received in LVDS 666 mode, this
stream will be decoded using U22 (page 12) into RGB666 and fed into Emerald L capture
unit RGB666 (PinMuxGroups #I+H, MuxMode #1).
The LVDS capture mode needs to be enabled using SW8/4 (CAP_LVDS_RGB666)
The INAP device needs to be configured via SPI0 interface, set SW8/2 to ON
(ENABLE_SPI_TO_RX), PinMuxGroups #B+G, MuxModes #3+5
The I2S0 interface can also be used, set SW8/3 to ON (ENABLE_I2S_TO_RX),
PinMuxGroups #G, MuxModes #3
Please refer to page 6 of the board schematics and to the INAP datasheet (see appendix)
8.1.2 Capturing Ethernet data (using INAP as external PHY)
This mode enables the the INAP375R to work as an external ethernet device in MII mode.
For this SW8/1 needs to be set ON (ENABLE_PHY_TO_RX).
Please refer here to page 6 of the board schematics and the INAP datasheet for details (see
appendix).
FSEUGCC-UM_MB86R11_Rev1.4
- 16 -
© Fujitsu Semiconductor Europe GmbH
Emerald-L Base Board
SK-86R11-BASE
8.2
Capture Video using Capture interfaces 1 and 2 (ITU656)
The board offers the possibility to capture two video streams via 2x S-Video ports (X18 and
X19), both streams are converted to ITU656 using an external converter SAA7113H.
PinMuxGroups #H+I, MuxMode #0
Both can be used independently,
selecting switch SW7A for capture interface1 (ENABLE_CAPTURE_1),
selecting switch SW7B for capture interface2 (ENABLE_CAPTURE_2),
additionally this ports are also accessible via pinheader X20
The SAA7113H can be programmed via I2C, please look at the datasheet for details (see
appendix).
Please refer to page 18 of the board schematics for details.
8.3
Capture Video using Capture interfaces 0 and 3 (ITU656)
The board has a 1.27mm pin header that can be used to capture signals through capture
interfaces 0 and 3 in ITU-656 format.
The pin header is designed to work with an Add-on-Board (from Jade-L Series) that provides
2x CBVS inputs for capturing video.
PinMuxGroup #I, MuxMode #1 is needed for CAP0, PinMuxGroup #H, MuxMode #0 is
needed for CAP3.
The figure shows the connection table for this connector X21:
Figure 8-1: Video Input Connector ITU656
Please refer to page 19 of the board schematics for details.
FSEUGCC-UM_MB86R11_Rev1.4
- 17 -
© Fujitsu Semiconductor Europe GmbH
Emerald-L Base Board
SK-86R11-BASE
8.4
Capture Video using RGB888 capture interface 0
To capture RGB888 signal use pin header X31, 1.27mm pitch header.
Figure 8-2: Video Input Connector RGB888
PinMuxGroup #I, MuxMode #0 is used here.
Please refer to page 19 of the board schematics for details.
FSEUGCC-UM_MB86R11_Rev1.4
- 18 -
© Fujitsu Semiconductor Europe GmbH
Emerald-L Base Board
SK-86R11-BASE
9 Interfaces
9.1
RS232 – UARTs
The Emerald-L board provides two RS232 interfaces.
UART0 is set by default and hardwired to a standard D-SUB connector (X35).
A second one (UART4) is wired through a MAX3387 device to be used as an external
RS232 port. This lines were wired to a 2.54mm pin header, an additional adapter (like the
Jade-L RS232 adapter) can be used here.
Please refer to page 14 of the board schematics for details.
9.2
SPI/I2C – Aardvark Interface
The Emerald-L supports a HOST-SPI interface to control chip and registers, the Aardvark
tool from Totalphase is recommended.
http://www.totalphase.com/products/aardvark_i2cspi/
The connector X6 is designed for use with Aardvark, also I2C control is possible here.
Especially benefit could be reached when using Fujitsu's GDC Studio, a great tool for
manipulating processor registers online.
http://www.fujitsu.com/emea/services/microelectronics/gdc/swtools/gdc-studio.html
To enable the HOST SPI Interface, switch SW6/3 (ENABLE_SPI_HOST) needs to be set to
“ON”.
Please refer to page 14 of the board schematics for details.
9.3
CAN Bus
The board is equipped with an external connector to the CAN bus, X24.
The RS232 adapter from Jade-L system can be used here to connect to a D-SUB9
connector.
Please refer to page 17 of the board schematics for details.
9.4
Media LB
Also a Media LB connector is on-board, X26.
Please refer to page 17 of the board schematics for details.
FSEUGCC-UM_MB86R11_Rev1.4
- 19 -
© Fujitsu Semiconductor Europe GmbH
Emerald-L Base Board
SK-86R11-BASE
9.5
AIC / IPC (to ATLAS)
The board is designed to work with the ATLAS chip, a MCU device from Fujitsu
Semiconductor. The AIC/IPC (Automotive Inter Connect / Inter Process Connect) Interface is
identical to the one on the ATLAS board, however it can be used also with other MCUs.
Pleas find below the pin out of the connector X28:
Figure 9-1: AIC/IPC Connector
Short pin description:
AICxx_TDxx : serial bus, transmit direction
AICxx_RDxx : serial bus, receive direction
AICxx_CLK : serial bus, clock
GPIO_to_Interruptxx : ATLAS can use GPIOs to trigger interrupts on Emerald
Emerald_GPIO_xx: two GPIOs from Emerald that can be used outside
SPI0_xxxxx : SPI0 interface from ATLAS
SPI1_xxxxx : SPI1 interface from ATLAS
Power_Control_Emerald: softstart for Emerald board (also see section 3),
HIGH starts up the board
Please refer to page 19 of the board schematics for details.
FSEUGCC-UM_MB86R11_Rev1.4
- 20 -
© Fujitsu Semiconductor Europe GmbH
Emerald-L Base Board
SK-86R11-BASE
9.6
Ethernet (external bus), 100MBit
The board contains an ethernet interface, MII (100MBit) mode can be used here.
The device is connected to the external bus of Emerald-L, 8-address lines and 16data lines
were used. Chip Select CS2 activates this device, interrupt A0 is used for that.
Please look at the datasheet (LAN9218) for details (see appendix).
Please refer to page 19 of the board schematics for details.
9.7
Ethernet (internal MAC, external PHY) 1GBit
Emerald-L provides an internal MAC, to make use of this function an external PHY needs to
be connected. The maximum speed is 1GBit, the PHY is configured to achieve this speed.
Please set jumpers JP2- JP11 accordingly to spec of the DP83865DVH device (see
appendix) to define your needs.
A recommendation is as followed:
-
Autonegotiation is ON
-
Modes enabled: 1000BASE-T, 100BASE-TX, 10BASE-T
-
Duplex Mode enabled
-
Jumpers to be set:
JP2 set to 2-3 , JP7 set to 1-2 ( Speed0 Strap = 0 = all Modes enabled )
JP3 set to 2-3 , JP8 set to 1-2 ( Speed1 Strap = 0 = all Modes enabled )
JP4 set to 1-2, JP9 set to 2-3 ( Duplex Mode enabled=1 )
JP5 set to 1-2, JP10 set to 2-3 ( Auto Negotiation enabled=1 )
JP6 set to 1-2, JP11 set to 2-3 (PHY Address set to 0001 )
Please note: As this device has no Power-ON-Reset an external reset needs to be done
after power up the board
To activate the external PHY, switch SW6/5 (ENABLE_EXT_PHY) needs to be set to “ON”
Interrupt A1 is used for the PHY. PinMuxGroup #I, MuxMode #1 or 2 needs to be set.
Please refer to page 22 of the board schematics for details.
9.8
SD Card
The Emerald-L Board provides a fully usable SD-Card interface with card reader (X14) on
board.
Using this switch SW6/4 (ENABLE_SD_CARD) needs to be set to “ON”
PinMuxGroup #F, MuxMode #0 is used here.
Please refer to page 22 of the board schematics for details.
FSEUGCC-UM_MB86R11_Rev1.4
- 21 -
© Fujitsu Semiconductor Europe GmbH
Emerald-L Base Board
SK-86R11-BASE
9.9
Sound
An external sound codec (WM8976) is integrated on the board.
It is internally connected to the I2S0 interface (using PinMuxGroup #F, MuxMode #0 or 4).
Connectors are X15 for a LINE_OUT and X16 for LINE_INPUT (both stereo)
The Codec can be programmed via I2C, please look at the datasheet for details (see
appendix).
To activate the sound codec, switch SW6/7 (ENABLE_I2S0_SOUND) needs to be set to
“ON”
Please refer to page 16 on the board schematics for details.
9.10 GPIOs
On the Emerald-L board some GPIOs can be used for special input and output.
When using PinMuxGroup #E, MuxMode #5, GPIOs 61, 64 and 65 can be used as LED
output. GPIOs 60, 62 and 63 are connected to a button that can be read.
Please refer to page 15 on the board schematics for details.
9.11 ADC
The ADC of Emerald-L is prepared to work with a voltage of 3.3V on the baseboard.
The rails are predefined to be near 3.3V (VRH) and GND (VRL), the inputs can be used via
connector X25.
Figure 9-2: ADC Input Connector
Please refer to page 17 of the board schematics for details.
FSEUGCC-UM_MB86R11_Rev1.4
- 22 -
© Fujitsu Semiconductor Europe GmbH
Emerald-L Base Board
SK-86R11-BASE
10 Flash
10.1 QUAD SPI Flash
On the Emerald-L baseboard a QUAD SPI flash is included, the Winbond device
W25Q16BVSSIG (16 Mbit) is used here.
To activate the bus, switch SW6/8 (ENABLE_QUAD_SPI_FLASH) needs to be set to “ON”.
PinMuxGroup #B, MuxMode #2 is used here.
For programming this device please refer to the datasheet of this device (see appendix).
Please refer to page 20 on the board schematics for details.
10.2 NAND Flash
Also on the board a 2GBit NAND Flash (here with 1-Bit ECC) is used. The device has 16Bit
data lines and can be selected via chip select XCS0 or XCS1, jumper JP1 needs to be set to
define this.
Fujitsu suggests to use MICRON devices for use with Emerald-L as most of the parts are
available according to automotive spec as well.
MICRON MT29F2G16AADWP-ET is used here.
For programming this device please refer to the datasheet of this device (see appendix).
Please refer to page 20 of the board schematics for details.
FSEUGCC-UM_MB86R11_Rev1.4
- 23 -
© Fujitsu Semiconductor Europe GmbH
Emerald-L Base Board
SK-86R11-BASE
11 Appendix
11.1 Used literature
Emerald-L Hardware Manual:
Emerald-L_MB86R11_Specifications_rev03_en.pdf
Emerald-L Base Board Schematics:
Emerald-L FSEUGCC Baseboard Schematics 1v4.pdf
Datasheet INAP125T24:
http://www.inova-semiconductors.de/en/datasheets/Q_PP_APIX.pdf
Datasheet INAP375R:
DS_APIX_INAP375R_0_4.pdf
Datasheet INAP375T:
DS_APIX_INAP375T_0_4.pdf
Datasheet Video Processor SAA7113H:
http://www.nxp.com/pip/SAA7113H.html
Datasheet Wolfson WM8976 Sound Codec:
http://www.wolfsonmicro.com/products/codecs/WM8976/
Datasheet SIL164CTG DVI Transmitter:
http://www.siliconimage.com/docs/SiI_164_Product_Brief.pdf
Datasheet LAN9218 LAN Controller:
http://www.smsc.com/index.php?pid=123&tid=145
Datasheet External PHY DP83865DVH:
http://www.national.com/pf/DP/DP83865.html
Datasheet Winbond QUAD SPI Flash W25Q16BVSSIG:
http://www.winbond.com.tw/NR/rdonlyres/7EB3B29C-1B35-421C-AA24F430B51C776A/0/W25Q16BV.pdf
Datasheet NAND Flash Micron MT29F2G16AADWP-ET:
http://download.micron.com/pdf/datasheets/flash/nand/2gb_nand_m29b.pdf
Fujitsu GDC Studio – a great tool for manipulating registers on the fly:
http://www.fujitsu.com/emea/services/microelectronics/gdc/swtools/gdc-studio.html
Totalphase Aardvark SPI Adapter:
http://www.totalphase.com/products/aardvark_i2cspi/
FSEUGCC-UM_MB86R11_Rev1.4
- 24 -
© Fujitsu Semiconductor Europe GmbH
Emerald-L Base Board
SK-86R11-BASE
11.2 Figures
Figure 1-1: System Overview ................................................................................................ 7
Figure 2-1: Board Layout ...................................................................................................... 8
Figure 3-1: Running Board .................................................................................................... 9
Figure 4-1: External Start-up (ATLAS Connector) ............................................................... 10
Figure 5-1: Overview Switches ............................................................................................ 11
Figure 6-1: CPU Connectors ............................................................................................... 12
Figure 7-1: TFT Panel Connector ........................................................................................ 13
Figure 7-2: Display Output Pin Header ................................................................................ 14
Figure 8-1: Video Input Connector ITU656 .......................................................................... 17
Figure 8-2: Video Input Connector RGB888 ........................................................................ 18
Figure 9-1: AIC/IPC Connector ........................................................................................... 20
Figure 9-2: ADC Input Connector ........................................................................................ 22
FSEUGCC-UM_MB86R11_Rev1.4
- 25 -
© Fujitsu Semiconductor Europe GmbH