1
Fujitsu Semiconductor Europe GmbH
SOFTWARE DEVELOPMENT PLATFORM
USER MANUAL
ID
Revision
Date
03-00012-001
01.06
2011-10-31
Status
Released
Approver Robert Sertic
Author
Stephan Dörr
The information in this document is subject to change without notice.
Published by
Fujitsu Semiconductor Europe GmbH (FSEU)
Pittlerstrasse 47
63225 Langen
GERMANY
Copyright © 2011 Fujitsu Semiconductor Europe GmbH
Attention please!
The information herein is given to describe certain components or functionalities and shall not be considered
as warranted characteristics.
Terms of delivery and rights to technical change reserved. We hereby disclaim any all warranties, including
but not limited to warranties of non-infringement, regarding circuits, descriptions and charts stated herein.
Revision History
Revision
Date
Changes (incl. section)
Author
(Department)
01.00
2011-01-04
Initial version
Stephan Doerr
(GCC SW)
01.01A
2011-02-14
Added chapter to describe system startup. Added chapter to describe U-Boot
environment variables & Linux Kernel
parameter
Stephan Doerr
(GCC SW)
01.01
2011-02-25
Added application installation procedure
Stephan Doerr
Approver
(Department)
(GCC SW)
01.02A
2011-03-30
Minor Changes due to release BSP1
Stephan Doerr
(GCC SW)
01.02B
2011-03-30
Review
Robert Sertic
01.02
2011-03-30
Release
01.03A
2011-06-10
Update linux kernel description
Sonja
Hoerndl
(GCC SW)
Stephan Doerr
(GCC SW)
01.03
01.04
01.05
01.05
2011-06-10
2011-08-12
2011-09-30
2011-10-31
ID 03-00012-001
Release
Update to BSP2.1 Release
Update to BSP_v3.0.0
Update to BSP_v3.0.1
1 / 28
Stephan Doerr
Robert Sertic
(GCC SW)
(GCC SW)
Stephan Doerr
Robert Sertic
(GCC SW)
(GCC SW)
Stephan Doerr
Robert Sertic
(GCC SW)
(GCC SW)
Stephan Doerr
Robert Sertic
(GCC SW)
(GCC SW)
Revision 01.06, 2011-10-31
ID 03-00012-001
2 / 28
Revision 01.06, 2011-10-31
Table of Contents
1
1.1
1.2
1.3
1.4
System Overview ........................................................................................................................... 5
General ............................................................................................................................................ 5
Network connection configuration ................................................................................................... 6
Serial connection configuration ....................................................................................................... 6
Remarks on this document .............................................................................................................. 7
2
2.1
2.1.1
2.1.2
2.1.3
Development Platform .................................................................................................................. 8
Host configuration ............................................................................................................................ 8
Toolchain installation ................................................................................................................... 8
File system installation ................................................................................................................. 9
Linux Kernel ................................................................................................................................. 9
3
3.1
3.2
3.3
3.4
3.5
3.6
Emerald HW/SW configuration................................................................................................... 10
MB86R11 ....................................................................................................................................... 10
MB86R12 ....................................................................................................................................... 10
U-Boot configuration ...................................................................................................................... 10
Emerald specific U-Boot environment variables............................................................................ 11
U-Boot Linux Kernel parameter ..................................................................................................... 12
Target Linux distribution ................................................................................................................ 13
4
4.1
4.1.1
4.1.2
4.2
4.3
4.4
4.4.1
4.4.2
4.4.3
4.4.4
4.4.5
4.4.6
4.4.7
Application/Linux Kernel development ..................................................................................... 15
Build Preparation ........................................................................................................................... 15
Build Procedure Linux Kernel .................................................................................................... 15
Build Procedure Application ....................................................................................................... 17
Application installation (NFS-File system) ..................................................................................... 17
Application installation (NAND flash / USB memory device) ......................................................... 17
System start-up ............................................................................................................................. 18
Root Filesystem preparation ...................................................................................................... 18
New System behavior after Emerald-L BSP2.1 installation ....................................................... 21
System behavior for Emerald-P BSP_v3.0.0 ............................................................................. 21
Start-up using an USB-memory device ..................................................................................... 22
Sample Application start-up shell script on USB-memory device.............................................. 23
Development start-up shell script on USB-memory device ....................................................... 23
Root Filesystem creation ........................................................................................................... 24
5
5.1
5.1.1
5.1.2
5.1.2.1
5.1.2.2
5.2
5.2.1
NOR-/NAND-Flash usage ............................................................................................................ 25
NOR-Flash ..................................................................................................................................... 25
Partitions .................................................................................................................................... 25
Installation .................................................................................................................................. 25
U-Boot update........................................................................................................................ 25
Linux Kernel update ............................................................................................................... 26
NAND-Flash................................................................................................................................... 27
Partitions .................................................................................................................................... 27
ID 03-00012-001
3 / 28
Revision 01.06, 2011-10-31
5.2.2
5.2.2.1
5.2.2.2
Installation .................................................................................................................................. 28
Root filesystem update .......................................................................................................... 28
Linux Kernel modules update ................................................................................................ 28
ID 03-00012-001
4 / 28
Revision 01.06, 2011-10-31
1
System Overview
This chapter should help the user to understand the basic concepts to develop software for an Emerald
Linux system.
1.1
General
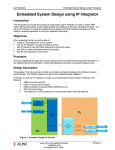
The Development Platform is based on a PC (development host) with a Linux OS, either installed native or
within a virtual machine. Typically the development host contains the server infrastructure like nfs- and tftpserver to act as resource for the target‟s file system and Linux kernel provider. The development host
features a GCC toolchain. This is used to generate the content of a file system for the target
(MB86R11/MB86R12).
The delivered system will execute the Linux kernel from NOR flash after the system is initialised by the
Bootloader. A sample file system is located in the NAND flash. This is mounted by the kernel. An init-process
will be called from the Linux kernel as last step of the kernel initialisation sequence. The process is part of
the file system. The picture below shows the HW/SW-architecture of the Emerald Linux System.
Emerald SoC
MB86R11/MB86R12
Developement
Platform
Network Connection
Serial Connection
Linux PC
TFTP-Server
NFS-Server
NOR/NAND Flash
(boot device)
GCC Toolchain
contains
Bootloader (U-Boot)
Linux Kernel
File System
generates
Hardware
Service
Software
ID 03-00012-001
5 / 28
Revision 01.06, 2011-10-31
1.2
Network connection configuration
The development system and the emerald evaluation board are connected within a private network. The
network is built upon tcp-ip.
For application development it is necessary to mount the file system over an nfs connection. To achieve this,
the development host should carry a separate network card dedicated to this network with the following
configuration:
IP-Address
169.254.148.045
Network Mask 255.255.000.000
The target is configured with the following setup:
IP-Address
169.254.148.043
Network Mask 255.255.000.000
Server IP
169.254.148.045
Gateway IP
1.3
169.254.148.045
Serial connection configuration
The development system and the emerald prototype should be connected via a serial line to display boot
messages and be able to enter configuration commands. You can use a common terminal program (for
example Tera Term http://www.ayera.com/teraterm/). A configuration for Tera Term is shown in the picture
below and can be reached via the menu „Setup->Serial port‟
ID 03-00012-001
6 / 28
Revision 01.06, 2011-10-31
1.4
Remarks on this document
For installation and configuration purpose some content is formatted to be used as an example. Most of the
installation/configuration is based on terminal usage, so almost all commands will be entered in a terminal
program. Two different prompts exist:
The first one is U-Boot (Bootloader) prompt formatted like:
The second one is the Linux terminal prompt formatted like:
emerald>
$>
On the development host a user named “linux”, password “user” is used as an example configuration.
ID 03-00012-001
7 / 28
Revision 01.06, 2011-10-31
2
Development Platform
2.1
Host configuration
Fujitsu is using a virtual machine as a development host. It‟s configured with Ubuntu Linux version 10.04 LTS
(http://www.ubuntu.com/getubuntu/download). The user manual mentioned in section 1.4 can help with
further configuration and is a good starting point to prepare the development host and understand the
requirements.
Ensure that an nfs and tftp server is running on your host machine. The tftp-server acts as a kernel source
for booting the target and for file transfers to the target as used in all update procedures (please check
chapter 0 for details).
Normally you can use any Linux distribution you prefer, as long as all requirements above are met.
2.1.1
Toolchain installation
The toolchain contains a GCC 4.3.3 C/C++ compiler with glibc 2.9. Please install the toolchain with the
commands below. You need to be user “root” to do this. In these instructions we assume a user named
“linux” should operate the toolchain after installation.
$> sudo mkdir /opt/pb-a8
$> sudo chown linux /opt/pb-a8
$> sudo chgrp linux /opt/pb-a8
Now user “linux” can install the toolchain to directory /opt/pb-a8. '{src}' is the directory where the archive is
located.
$>
$>
$>
$>
$>
cd /opt/pb-a8
tar xvjf {src}/arm-angstrom-linux-gnueabi-gcc.4.3.3.tar.bz2
mkdir staging
cd staging
tar xvjf {src}/armv7a-angstrom-linux-gnueabi.tar.bz2
ID 03-00012-001
8 / 28
Revision 01.06, 2011-10-31
2.1.2
File system installation
The file system is build with OpenEmbedded (http://www.openembedded.org).
Please check Emeralds BSP download section for updates.
http://www.fujitsu.com/emea/services/microelectronics/gdc/swtools/gdc-software-index.html
Please install the file system with the commands below and export the directory /opt/emerald/nfsroot with
your nfs-server. If you use BSP2.1 or later this step is not necessary as the target will boot the filesystem
from a flash device.
$>
$>
$>
$>
$>
2.1.3
mkdir /opt/emerald
cd /opt/emerald
sudo tar xvjf {path to}/emerald.rootfs.{release}.{version}.tar.bz2
cd /opt/emerald/nfsroot/lib
sudo tar xvjf {path to}/emerald.modules.{release}.{version}.tar.bz2
Linux Kernel
A Linux Kernel version 3.0.3 is used on the target. The kernel source can be downloaded from the Internet
http://www.kernel.org/pub/linux/kernel/v3.0/linux-3.0.3.tar.bz2.
It is modified to meet Emerald‟s HW specification. The source modification can be obtained from Fujitsu
Semiconductors GmbH. Please check the Emerald BSP download section.
http://www.fujitsu.com/emea/services/microelectronics/gdc/swtools/gdc-software-index.html
If drivers should be compiled, or the kernel itself should be modified, the kernel source tree must be installed.
You can extract the archive to your preferred location {destination directory}. Note that some driver makefiles
must be changed, when they reference the kernel source tree.
$> cd {destination directory}
$> tar xvjf {path to}/linux-3.0.3.tar.bz2
The kernel source code modification is distributed in the same structure as the kernel source itself. Please
extract the archive as below.
$> tar xvjf {path to}/emerald-{release}-{version}-linux-3.0.3.tar.bz2
ID 03-00012-001
9 / 28
Revision 01.06, 2011-10-31
3
Emerald HW/SW configuration
3.1
MB86R11
CPU:
ARM CortexA9 @400 MHz
Memory:
DDR2 Ram, 256 MB
3.2
MB86R12
CPU:
ARM CortexA9 @400 MHz
Memory:
DDR3 Ram, 512 MB
3.3
U-Boot configuration
U-Boot is used to boot the Linux operating system. It can automatically boot Linux, when a boot command is
present in the environment. U-Boot supports at least three different configurations.
1. A Configuration to boot the file system from NAND Flash.
The bootloader boots the kernel from NOR-flash, file system location is NAND-flash
emerald> setenv bootcmd ‘run nandboot’
emerald> saveenv
2. Configuration to boot the file system from network.
The bootloader boots the kernel from NOR, file system location is nfs
emerald> setenv bootcmd ‘run nfsboot’
emerald> saveenv
3. Configuration to boot the kernel and the file system from network.
Configuration 2 is typical to develop an application, as long as the kernel shouldn‟t be modified. For stand
alone applications & demonstrations use configuration 1.
ID 03-00012-001
10 / 28
Revision 01.06, 2011-10-31
The U-Boot environment is the place, where these configurations are saved. Typically there are two
configurations present, when you receive the evaluation board. Below you can find the commands to modify
or setup the configurations.
emerald> setenv ipaddr 169.254.148.43
emerald> setenv serverip 169.254.148.45
emerald> setenv gatewayip 169.254.148.45
emerald> setenv netmask 255.255.0.0
emerald> setenv ipconfig ‘’
emerald> setenv cpumem ‘mem=64M’
emerald> setenv gpumem ‘gpumem=192M’
emerald> setenv console ‘console=ttyS0,115200n8 earlyprintk=ttyS0,115200’
emerald> setenv bootargs_nand ‘root=/dev/mtdblock4 rw rootfstype=jffs2
lpj=3997696’
emerald> setenv bootargs_nfs ‘root=/dev/nfs rw nfsroot=169.254.148.45:/opt/
emerald/nfsroot/ rw lpj=3997696’
emerald> setenv nandboot ‘setenv bootargs ${bootargs_nand} ${cpumem} ${gpumem}
${console} ip=${ipaddr}:${serverip}:${gatewayip}:${netmask}:::off;bootm
e0100000’
emerald> setenv nfsboot ‘setenv bootargs ${bootargs_nfs} ${cpumem} ${gpumem}
${console} ip=${ipaddr}:${serverip}:${gatewayip}:${netmask}:::off;bootm
e0100000’
3.4
Emerald specific U-Boot environment variables
Some Emerald specific environment variables are defined, to give the user easy access to control the
system behavior. The system is configured with these settings, before the user can gain access via a shell
prompt.
„tcon_pinctrl‟: Can be used to setup the driver strength of the TCON-output-pad cells. (Default: 90)
„pinmux‟: Defines Emerald Peripheral settings (Default: 80000000). Please check the hardware-manual for
register description.
„MCR_63‟: Set DDR access priority for AXI0 (XXXXWWRR) - CAP/DISP
„MCR_64‟: Set DDR access priority for AXI1 (WWRRXXXX) - CAP/DISP
„MCR_65‟: Set DDR access priority for AXI2 (RRXXXXXX) - PIXENG/ARGES
„MCR_66‟: Set DDR access priority for AXI2 (XXXXXXWW) - PIXENG/ARGES
„MCR_67‟: Set DDR access priority for AXI3 (XXXXWWRR) - PIXENG/ARGES
„MCR_68‟: Set DDR access priority for AXI4 (WWRRXXXX) - CPU
A recommended setting is to keep the default (=lowest) priority 2 for PIXENG/ARGES, but change to priority
1 for the rest. Please check the hardware-manual for complete register description.
emerald> setenv MCR_63 00000101;setenv MCR_64 0101FFFF;setenv MCR_68 0101FFFF
ID 03-00012-001
11 / 28
Revision 01.06, 2011-10-31
3.5
U-Boot Linux Kernel parameter
This chapter is an introduction how to pass parameters to the Linux kernel in U-Boot. In addition you will find
an overview of the parameters used in an Emerald Linux system.
In U-Boot all parameters passed to the Linux kernel are collected in an environment variable named
„bootargs‟. If you like to have only one boot configuration, the easiest way is to set this variable directly.
Normally you like to have two configurations as mentioned in the previous chapter. For this reason the
environment variable „bootargs‟ can be constructed at runtime. Linux Kernel parameters are always passed
in the format „name=value‟. The Linux kernel requires several parameters to operate:
„root‟: A location from where it can mount the root file-system (mandatory)
Example: root=/dev/mtdblock4 rw
Example: root=/dev/nfs rw
„nfsroot‟: The IP-address of an nfs-server followed by the exported directory (mandatory if root=/dev/nfs)
Example: nfsroot=${serverip}:${nfs_path}
„rootfstype‟: The filesystem type of the partition (mandatory if root=/dev/mtdblock?)
Example: rootfstype=jffs2
„console‟: The device-name and configuration, where the initial console can be opened (mandatory)
Example: console=ttyS0,115200n8
„ip‟: The IP configuration of the target device (mandatory if root=/dev/nfs or an ssh-server should run on the
target)
Example: ip=${ipaddr}:${serverip}:${gatewayip}:${netmask}:::off
ID 03-00012-001
12 / 28
Revision 01.06, 2011-10-31
„init‟: An initial process to start, after the root-file-system is mounted. (Optional)
This can be used to minimize the start-up time by running your application as initial process. The example
below will boot the kernel and just run a shell.
Example: init=/bin/sh
„earlyprintk‟: A UART-device, where debug output can be redirected, before the console-driver is started
(optional)
Example: earlyprintk=ttyS0,115200
„mem‟: The amount of memory the Linux kernel will use (mandatory if you want to use the Emerald Graphic
Driver)
Example: mem=64m -> will map the first 64 megabytes of memory.
„gpumem‟: The amount of memory to be reserved for Emeralds GPU (mandatory if you want to use the
Emerald Graphic Driver)
Example: gpumem=64m -> will map 64 megabytes of memory.
Note: „mem‟ and „gpumem‟ share the memory on the CPU-Board. Currently 256 MB (512MB on Emerald-P
boards) are assembled. During boot up, Linux will start mapping the amount of memory supplied with „mem‟
or all available memory if „mem‟ isn‟t present. When the memory mappings overlap (mem + gpumem >
assembled Memory), the graphic driver can‟t be loaded.
3.6
Target Linux distribution
The BSP features an Ångström distribution on top of Linux kernel 3.0.3 as operating system. For more
information about this distribution please check
http://www.angstrom-distribution.org
The root filesystem, which is mounted by the kernel, features a serial console login as well as an ssh-login. A
user named „root‟ can login to the system, a password isn‟t required. All drivers, which aren‟t needed at boot
time, are compiled as modules. Typically they are present in the root filesystem, from where they can be
loaded.
As mentioned before, the content of the root filesystem is generated with the OpenEmbedded build
framework. Fujitsu choose to deliver a minimal filesystem and a SDK. Using this, you can evaluate the
ID 03-00012-001
13 / 28
Revision 01.06, 2011-10-31
platform. When you miss some libraries or applications, these can be added by using the complete build
framework. This is based on git-repository with cross-compiling information. Instructions how to setup the
build framework can be obtained from the OpenEmbedded website www.openembedded.org. Please
check the documentation on the website for system requirements.
In addition Fujitsu maintains some modifications for Emerald. These modifications can be used as a local
overlay to the git-repository.
ID 03-00012-001
14 / 28
Revision 01.06, 2011-10-31
4
Application/Linux Kernel development
4.1
Build Preparation
The current root filesystem distributed within the BSP includes a set of shell commands. Complex application
are not included, but can be evaluated by the using the graphics driver package. As we are using crosscompilation to build the kernel or any application, the environment must be modified.
$> export PATH=$PATH:/opt/pb-a8/cross/armv7a/bin/
$> export ARCH=arm
$> export CROSS_COMPILE=arm-angstrom-linux-gnueabi-
4.1.1
Build Procedure Linux Kernel
The source distribution contains some Linux Kernel configurations. These should be used to configure and
build a Linux Kernel for Emerald. You can start a graphical kernel configuration by using the command below.
$> make xconfig
Once the application is started, choose File->Load to select a kernel configuration file:
The configuration files are located in the folder „arch/arm/configs‟. All valid configurations are prefixed with
ID 03-00012-001
15 / 28
Revision 01.06, 2011-10-31
„emerald‟. We advise you to use the configuration ‘emerald_p_fseu_defconfig’. This config can also be used
to build a kernel for MB86R11, when the Board is delivered with BSP_v3.0.0 or later.
Now choose „File->Save‟ and „File->Quit‟ to make the new configuration active.
To build drivers as modules, the kernel source tree needs to be prepared:
$> make modules_prepare
Now the Kernel can be build:
Default configuration
$> make uImage
The Kernel-image can be found in „arch/arm/boot‟. It‟s named „uImage‟.
Please check the chapter NOR-/NAND-Flash usage for installation instructions.
To build all driver modules type:
$> make modules
ID 03-00012-001
16 / 28
Revision 01.06, 2011-10-31
To install all driver modules type:
$> sudo make ARCH=arm INSTALL_MOD_PATH={path_to_nfsroot} modules_install
4.1.2
Build Procedure Application
Please check the graphic driver package for details about the build procedure.
4.2
Application installation (NFS-File system)
Demo applications and all related files are installed in the NFS-File system for verification purpose. Normally
you will copy the application to the directory home/root
$> sudo cp {path_to_application}/* /opt/emerald/nfsroot/home/root/
It is useful to prepare a script, which will load additional drivers and start your application. This script can be
reused later to start your demo automatically.
4.3
Application installation (NAND flash / USB memory device)
To run the application on a target without a network-connection, the application and corresponding files need
to be transferred to Emerald flash memory. One method is to modify the root filesystem itself, another
possibility is to install just the application on an USB memory device.
ID 03-00012-001
17 / 28
Revision 01.06, 2011-10-31
4.4
System start-up
4.4.1
Root Filesystem preparation
The root filesystem is configured to run a default application after system setup. The behaviour can be
controlled by the file „etc/inittab‟ included in the root filesystem.
Normally a login shell is started by default. In a standalone or demo configuration it‟s more reasonable to
start an initialisation script, which will load additional drivers and start the application. To do this, enable the
last line in „etc/inittab‟ and let it point to a script you prepared to start your application. If you don‟t like to have
a serial login, disable any line which will start a „getty‟-process on a serial line. An example „/etc/inittab‟ file is
listed below. The „/etc/inittab‟ will start a serial console on UART0. This enables the user to login to the
system and start application debugging. This is the default configuration before BSP 2.1 release.
# /etc/inittab: init(8) configuration.
# $Id: inittab,v 1.91 2002/01/25 13:35:21 miquels Exp $
# The default runlevel.
id:3:initdefault:
# Boot-time system configuration/initialization script.
# This is run first except when booting in emergency (-b) mode.
si::sysinit:/etc/init.d/rcS
# What to do in single-user mode.
~~:S:wait:/sbin/sulogin
#
#
#
#
#
#
#
/etc/init.d executes the S and K scripts upon change
of runlevel.
Runlevel 0 is
Runlevel 1 is
Runlevels 2-5
Runlevel 6 is
halt.
single-user.
are multi-user.
reboot.
l0:0:wait:/etc/init.d/rc 0
l1:1:wait:/etc/init.d/rc 1
l2:2:wait:/etc/init.d/rc 2
l3:3:wait:/etc/init.d/rc 3
l4:4:wait:/etc/init.d/rc 4
l5:5:wait:/etc/init.d/rc 5
l6:6:wait:/etc/init.d/rc 6
# Normally not reached, but fallthrough in case of emergency.
z6:6:respawn:/sbin/sulogin
#disable the line below to not start a serial login
S0:2345:respawn:/sbin/getty 115200 ttyS0
ID 03-00012-001
18 / 28
Revision 01.06, 2011-10-31
# /sbin/getty invocations for the runlevels.
#
# The "id" field MUST be the same as the last
# characters of the device (after "tty").
#
# Format:
# <id>:<runlevels>:<action>:<process>
#
# enable the line below to run /home/root/startup.sh
#2:2345:once:/home/root/startup.sh
ID 03-00012-001
19 / 28
Revision 01.06, 2011-10-31
To automatically start the application after system boot, change „/etc/inittab‟ as below. This is the default
configuration since BSP 2.1 release.
# /etc/inittab: init(8) configuration.
# $Id: inittab,v 1.91 2002/01/25 13:35:21 miquels Exp $
# The default runlevel.
id:3:initdefault:
# Boot-time system configuration/initialization script.
# This is run first except when booting in emergency (-b) mode.
si::sysinit:/etc/init.d/rcS
# What to do in single-user mode.
~~:S:wait:/sbin/sulogin
#
#
#
#
#
#
#
/etc/init.d executes the S and K scripts upon change
of runlevel.
Runlevel 0 is
Runlevel 1 is
Runlevels 2-5
Runlevel 6 is
halt.
single-user.
are multi-user.
reboot.
l0:0:wait:/etc/init.d/rc 0
l1:1:wait:/etc/init.d/rc 1
l2:2:wait:/etc/init.d/rc 2
l3:3:wait:/etc/init.d/rc 3
l4:4:wait:/etc/init.d/rc 4
l5:5:wait:/etc/init.d/rc 5
l6:6:wait:/etc/init.d/rc 6
# Normally not reached, but fallthrough in case of emergency.
z6:6:respawn:/sbin/sulogin
# enable the line below to start a serial login
#S0:2345:respawn:/sbin/getty 115200 ttyS0
# /sbin/getty invocations for the runlevels.
#
# The "id" field MUST be the same as the last
# characters of the device (after "tty").
#
# Format:
# <id>:<runlevels>:<action>:<process>
#
# disable the line below to not run /home/root/startup.sh
2:2345:once:/home/root/startup.sh
ID 03-00012-001
20 / 28
Revision 01.06, 2011-10-31
In the example above the „/etc/inittab‟ will start the shell-script „startup.sh‟ located in „/home/root‟.This shellscript can prepare the system to start your demo-application.
4.4.2
New System behavior after Emerald-L BSP2.1 installation and later
From this release on the system behavior is controlled with an attached USB-memory device. Either a
development- or a demonstration-mode can be selected. The idea is that the target remains in one
configuration, regardless what the user likes to do. To switch between different operations, a removable
media should be used.
4.4.3
System behavior for Emerald-P BSP_v3.0.0, BSP_v3.0.1
As there is a problem with the external USB-Controller, mass storage devices don‟t work to control the
startup behavior. Due to this, the startup can be controlled by the file „/home/root/startup.sh‟. The file is
stored in the NAND-flash. You can edit this file by connecting to the system via a console. The demo
application can be stopped by pressing “Enter”. After this the system tries to connect to a NFS-server, which
can be configured. Setting „demo_mode‟ to zero will not start the demo application. Setting „timeout‟ to zero
will skip the detection of an USB-memory device to be mounted. Due to the USB mass storage problem, this
is currently the default.
#/home/root/startup.sh
#configure demo-mode on (1) or off (0)
demo_mode=1
#configure NFS server IP
server_ip="169.254.148.45"
#configure exported nfs directory
nfs_dir="/opt/emerald/nfsroot"
#configure target home directory (will be created)
home_dir="/home/dev"
#set timemout to zero to skip usb-sequence
timeout=0
#configure device to be mounted on usb-stick
device="/dev/sda1"
if [ "$demo_mode" = 1 ]
then
modprobe emerald_display
./home/root/demo/dashboard/dashboard -r 800
let timeout=0
fi
emerald_p=`/home/root/tools/emerald_probe -chipversion`
if [ $timeout -ne 0 ]
then
ID 03-00012-001
21 / 28
Revision 01.06, 2011-10-31
if [ $emerald_p == "Emerald-P" ]
then
modprobe isp1760
else
modprobe ehci-hcd
modprobe ohci-hcd
fi
modprobe usb-storage
fi
echo " "
until [[ -b "$device" || "$timeout" = 0 ]]; do
echo -e "\rTrying to mount an usb-memory device for $timeout seconds \c"
sleep 1
let timeout-=1
done
if [ "$timeout" = 0 ]
then
echo -e "\rUnable to mount an usb-memory device
echo -e "Try to mount $home_dir over NFS\n"
mkdir -p $home_dir
mount -t nfs $server_ip:$nfs_dir $home_dir -o nolock
while [ true ]; do
getty -L 115200 ttyS0 vt100
done;
else
mount $device
if [ -f /media/usb/startup.sh ]; then
cd /media/usb
chmod 777 /media/usb/startup.sh
/media/usb/startup.sh
else
echo -e "\rUnable to execute /media/usb/startup.sh\n"
while [ true ]; do
getty -L 115200 ttyS0 vt100
done;
fi
fi
4.4.4
\n"
Start-up using an USB-memory device
This example shows how to operate an USB-memory device and start a shell script from the attached media,
which will enable the user to configure the target for development or demonstration. It will initially load drivers
for USB-host controllers and USB-storage. Afterwards it will try to mount a partition on the USB-memory
device and start a shell script named „startup.sh‟. If no USB-memory device is attached, it will stop after 10
seconds and run a login shell. The file should be named „startup.sh‟ and be placed in „/home/root‟ from your
root filesystem to correspond with the content of „/etc/inittab‟:
modprobe ehci-hcd
modprobe ohci-hcd
modprobe usb-storage
device0="/dev/sda"
c=10
ID 03-00012-001
# /
(root directory)
22 / 28
Revision 01.06, 2011-10-31
echo " "
until [[ -b "$device0" || "$c" =
echo -e "\rTrying to mount a usb
sleep 1
let c-=1
done
if [ "$c" = 0 ]
then
echo -e "\rUnable to mount a usb
while [ true ]; do
/sbin/getty 115200 ttyS0
done;
else
mount /dev/sda1
if [ -f /media/usb/startup.sh ];
cd /media/usb
/media/usb/startup.sh
else
mount /dev/sda
cd /media/usb
/media/usb/startup.sh
fi
fi
4.4.5
0 ]]; do
memory device for $c seconds \c"
memory device
\n"
then
Sample Application start-up shell script on USB-memory device
The shell script, your demo application and all related files should be present on the USB-memory device. In
this example the shell-script will load the graphic-driver kernel module and start the application. The script
needs to be in the root-directory of the device. The filename must be „startup.sh‟.
modprobe emerald_display
chmod +x multisample
./multisample
4.4.6
Development start-up shell script on USB-memory device
The shell script should be present on the USB-memory device. In this example the shell-script will create a
directory to mount an nfs-share from the nfs-server with IP 169.254.148.45. The directory exported is
„/opt/emerald/sources‟ on the machine running the nfs-server. Afterwards a login shell is started
mkdir /home/root/sources
mount –t nfs 169.254.148.45:/opt/emerald/sources /home/root/sources –o
nolock
while [ true ]; do
/sbin/getty –L 115200 ttyS0 vt100
done;
ID 03-00012-001
23 / 28
Revision 01.06, 2011-10-31
4.4.7
Root Filesystem creation
A root filesystem for the emerald target can be created with the mtd-tools package (revision 1.50).
256mb Nand Flash
> sudo mkfs.jffs2 --root=nfsroot -l -v -n -e 128 -o temp.jffs2
> sudo sumtool -l -v -n -e 128 -p -i temp.jffs2 -o emerald.rootfs.nand.jffs2
64mb Nor Flash:
> sudo mkfs.jffs2 --root=nfsroot -l -v -e 128 -c 12 –o
emerald.rootfs.nor64.jffs2"
128mb Nor Flash:
> sudo mkfs.jffs2 --root=nfsroot -l -v -e 256 -c 12 -o
emerald.rootfs.nor128.jffs2
Note: Filesystem compression can be turned off with adding '-x zlib -x rtime‟
Note: If you get a segmentation fault during filesystem creation, make sure that all files belong to user „root‟.
> sudo chown root –R nfsroot
> sudo chgrp root –R nfsroot
ID 03-00012-001
24 / 28
Revision 01.06, 2011-10-31
5
NOR-/NAND-Flash usage
5.1
NOR-Flash
5.1.1
Partitions
The NOR-Flash contains four partitions as shown in the image below.
Linux device name
/dev/mtd0
/dev/mtd1
/dev/mtd2
/dev/mtd3
Physical address
U-Boot Bootloader
768 Kb
U-Boot Environment
256 Kb
Linux Kernel
0xE0000000 –
0xE00BFFFF
0xE00C00000xE00FFFFF
4096 Kb
0xE01000000xE04FFFFF
Not available when using
xipuImage
60328 Kb
0xE0500000 –
0xE3FFFFFF
5.1.2
Installation
This topic describes how to update the emerald target with new versions of bootloader, linux kernel or root
filesystem.
5.1.2.1
U-Boot update
First download the updated Bootloader-image to the target system:
emerald> tftp 80000000 u-boot.emerald.{release}.{version}.bin
ID 03-00012-001
25 / 28
Revision 01.06, 2011-10-31
Now delete the flash:
emerald> erase e0000000 e00bffff
Update the flash by copying the downloaded image, the variable „filesize‟ is updated by the tftp command:
emerald> cp.b 80000000 e0000000 ${filesize}
5.1.2.2
Linux Kernel update
First download the updated Kernel-image to the target system:
emerald> tftp 80000000 uImage.emerald.{release}.{version}
Now delete the flash:
emerald> erase e0100000 e04fffff
Update the flash by copying the downloaded image, the variable „filesize‟ is updated by the tftp command:
emerald> cp.b 80000000 e0100000 ${filesize}
ID 03-00012-001
26 / 28
Revision 01.06, 2011-10-31
5.2
NAND-Flash
5.2.1
Partitions
The NAND-Flash contains two partitions as shown in the image below.
Linux device name
/dev/mtd4
/dev/mtd5
ID 03-00012-001
Rootfilesystem
252 MB
Linux modules
4MB
27 / 28
Revision 01.06, 2011-10-31
5.2.2
Installation
5.2.2.1
Root filesystem update
First download the updated root filesystem image to the target system:
emerald> tftp 80000000 emerald.rootfs.nand.{release}.{version}.jffs2
Now delete the flash:
emerald> nand erase clean 0 fc00000
Update the flash by copying the downloaded image, the variable „filesize‟ is updated by the tftp command:
emerald> nand write 80000000 0 ${filesize}
5.2.2.2
Linux Kernel modules update
First download the updated kernel-modules-image to the target system:
emerald> tftp 80000000 emerald.modules.nand.{release}.{version}.jffs2
Now delete the flash:
emerald> nand erase clean fc00000
Update the flash by copying the downloaded image, the variable „filesize‟ is updated by the tftp command:
emerald> nand write 80000000 fc00000 ${filesize}
ID 03-00012-001
28 / 28
Revision 01.06, 2011-10-31