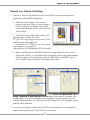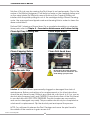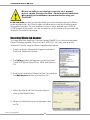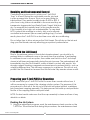
1
User’s Manual
JULY, 2008
VERSION 1.1
Tempe, Arizona USA
Basic Safety Instructions
Please read
d this
this entire
entire Manual
Manual before
before a
attempting
ttempting tto
oP
Print.
rint.
• Make sure
e to ffol
follow
ollo
low
w all
all wa
warn
warnings
rnin
ings
gs o
on
n th
the
e prin
pr
printer.
inte
ter.
r.
• Use the proper power source type iindicated
di
d on the
h printer’s
i
’ llabel.
b l
• Connect all equipment to grounded outlets. Do not use the same outlet for
any other system, such as a copy machine or an air conditioning unit
that turns ON and OFF.
• Place the printer where the power outlet is easily seen.
• Do not allow the power cord to be damaged.
• If you are using an extension cord, make sure the extension cord’s power
ampere rate does not exceed that of the printer’s cord.
• Keep electromagnetic devices and other potential sources of magnetic
fields away from your printer.
• Do not use the printer in locations that have high humidity, shocks,
vibrations, debris or dust.
• Leave enough space around the printer for proper ventilation.
• Do not leave the printer near heat sources such as radiators or heat vents.
• Do not leave the printer in direct sunlight.
• Place the printer on a stable surface that extends beyond the length
and width of the printer supports. The printer will not work properly if it is
tilted or leaning.
• When packing and moving the printer, do not set the printer on its side or
upside down. This may cause the ink to spill.
• Turn the printer OFF before cleaning. Clean with a damp cloth and avoid
spilling any liquid on the printer.
Caution:
• Do not unplug the printer to turn it OFF. Use the power button instead.
• Do not unplug the printer until the Main Power Switch has been turned
OFF.
• Do not block any of the printer’s vents or insert foreign object into its
slots.
• Do not attempt to service the printer yourself beyond the troubleshooting
techniques covered in this Manual.
• Keep the machine on a level surface.
vii
T-Jet3 PLUS User’s Manual
Safety Instructions for Ink Cartridges:
• Always keep ink cartridges out of the reach of children.
• While handling ink, be careful not to spill it on your skin. If ink does get on
your skin, wash thoroughly with soap and water. If ink gets in your eyes,
flush them immediately with water.
• Do not put your hand in the printer or touch the cartridges while printer is
in operation.
• Do not move the Print Head by hand- doing so may damage the
printer.
• Store ink cartridges in a cool dark place.
• Allow ink cartridges to warm to room temperature before using them after
storage.
• Do not dismantle the ink cartridge.
• Do not touch the IC chip on the ink cartridges. This will adversely effect
normal printing operations.
• If you remove the ink cartridges, make sure to place them in individual
bags and keep them away from dust, dirt and debris.
Legend of Symbols
Throughout this Manual you will see three symbols used to notify you of
important facts or procedures.
This icon is used to denote important points that may affect the
proper operation of your machine or the viability of its output. Think
of this as more than just a helpful hint.
This icon indicates recommendations from XV based on
research and development or years of experience within the
Garment Decorating business. Following these helpful Hints, Tips or
Reminders will make printing with your Fast T-Jet more enjoyable.
Where you see this icon, you should take note of the warnings.
Failure to follow any of the listed procedures could result in severe
damage to your machine, large amounts of downtime and/or
costly repairs or the possibility of severe bodily injury or death.
Version 1.1 Revised July, 2008
viii
Table of Contents
v
Basic Safety
ety Instructions
Instructions
vii
vii
Cautions
Safety Instructions for Ink Cartridges:
Legend of Symbols
vii
vii
vii
Chapter 1 - Introduction
1
T-Jet3 PLUS Important Points
The Basics
Maintenance
Poor Artwork
Important Support Information
Support Hours
About the Garment Decorating Business and
Where to Learn More
The Book
Computer Graphics DVDs
Business and Marketing DVD’s
Internet
Trade Shows and Trade Magazines
Our Advice
1
1
2
2
3
3
3
3
4
4
4
4
5
5
Chapter 2 - Unpacking and Setup
7
Unpacking Your T-Jet3 PLUS
Main Box Contents
Box 2
Industrial Bulk Ink System Parts
Waste Bottle
Exhaust Fan
Lifting Your T-Jet3 PLUS Unit From the Box
Preparations
Remove Hold Down Clamps
Install the Maximum Height Bar
Check the Adjustable Shirtboard Height
Removing the Packing Tape
Environmental Controls and Humidity
7
8
8
8
9
9
9
9
9
10
10
11
11
ix
T-Jet3 PLUS User’s Manual
Plug Unit into AC Power
Connecting Your T-Jet3 PLUS to a Computer
Installing the Bulk Ink System
Mounting the Adjustable Ink Shelf
Waste Bottle Installation with Shelf Bracket
Filling the Ink Bottles
Changing Ink Brands
Installing the Bulk Ink Cartridges
Connecting Ink Lines to the Ink Bottles
Resetting the Bulk Ink Cartridges
Load and Eject Positions
Graphics and RIP Software
12
13
14
14
14
15
16
16
18
19
20
21
Chapter 3- Software Overview
21
FastARTIST and FastRIP
FastRIP
Using Computer Graphics Software
Image Types
Vector
Pixel Based Bitmap
Summary
Editing Bitmap Artwork in FastARTIST/Photoshop
File Types and Resolutions
Check File Mode
Check File Size and Resolution
Check File Saturation
Sharpening Images
Using the Tone Curve
Bitmap Editing in FastARTIST
Selecting Areas
Channels and Layers
Setting Transparent Images in FastARTIST
Removing Backgrounds with Photoshop
Making Your Selection a New Layer
Fixing Bad Line-Art in Photoshop and FastARTIST
Artwork for Light and Dark Garments
Epson Driver Installation
Disabling the Status Monitor
22
22
23
24
24
24
24
25
26
27
27
28
29
30
30
31
31
32
32
33
34
34
35
38
Version 1.1 Revised July, 2008
x
- Table of Contents
Chapter 4 - Printing Basics
39
Control Panel Overview
Power Button
Passes
Ink Button
Load Button/Load Light
Eject Button
Error Button
Low Ink Indicator lights
Power Light
Load Light
All Ink Lights Flashing + Ink Button and Error Light
Ink Light and Error Light (synchronous) Flashing
Ink Light and Error Light (alternating) Flashing Fast
Basic Steps for Printing a Shirt
Loading a Garment onto the Shirtboard
Check Garment Height Clearance
Key Points for Printing
Prepare Your Artwork for Printing
A Word about Resolutions, Speed and Quality
Print Modes and FastRIP
CMYK Cartoon and Photo Print Modes
8 Color Print Modes
Underbase Print Modes
Windows Underbase
When a Print Job is Finished
Curing Your Garments
How to Use the Print Pass Counter
Printing From Various Graphic Programs
Printing from Adobe Photoshop
Printing from CorelDRAW
Printing from Illustrator
Quick Printing Tips
Production Rates and Ink Cost Chart
39
39
40
40
40
40
41
41
41
41
41
42
42
42
43
44
44
45
46
46
46
47
47
47
48
48
50
50
50
51
52
53
55
Chapter 5- Advanced Printing with White Ink
57
White Ink Warnings and Care
Pretreatment Basics
Applying Pretreatment
Printing White Ink
Washing Directions
White Ink Troubleshooting
57
58
58
61
63
63
xi
T-Jet3 PLUS User’s Manual
Chapter 6 - Printing on Other Items
Printing on General Items
Location and Placement
Adjusting the Bed Height
Printing Baseball Caps
Non-Textile Printing
Required Items and Overview
Getting Started
Fast T-Jet Non-Textile Primer
Fast T-Jet Non-Textile Pretreatment
Setting up an Image for Print
Printing to FastRIP Using Adobe Photoshop
Printing to FastRIP – CorelDRAW
Printing Multiple Items on the Print Bed
Setting up FastRIP
Printing Golf Balls
Golf Ball Holder Placement
Additional Instructions for Printing Non-Textiles using a T-Jet3 PLUS
Loading Golf Ball Template (FastARTIST Only)
Finish with Fast T-Jet Non-Textile Post-Treatment
Post Treatment Warnings and Safety Information
65
65
65
67
67
69
69
69
70
71
72
73
73
73
75
76
76
77
77
78
79
Chapter 7 - Maintenance Utilities to Improve Print Quality 81
Epson Adjustment Program
Head Angular Adjustment
Auto Bi-Directional Adjustment
PF Roller and Eject Roller Adjustments
Head Cleaning Utilities
Check the Spit Tray on a Regular Basis
Emptying the External Waste Bottle
Resetting Waste Ink Counter
Print Head Replacement
Support Hours
81
82
83
83
84
85
85
86
88
88
Chapter- 8 Preventative Maintenance/Problem Solving
89
Keep Your Encoder Strip Clean
Clean the Encoder Strip DAILY
Clean Capping Station and Wiper Daily
Cleaning the Wiper
Check the Spit Tray on a Regular Basis
Turn Your T-Jet 3 OFF at Night
Cautions About Ink Levels
Humidity and Environment Control
89
90
90
91
91
91
91
92
Version 1.1 Revised July, 2008
xii
- Table of Contents
Print With the Lid Closed
Preparing your T-Jet 3 for Downtime
Flushing the Ink System
Eliminating Ink Drops on Shirts
Clean Bulk System Chip Blocks
Have A Lot of RAM for Your Computer
When in Doubt – Unplug Everything
Clean Drive Belt and Roller
Shake Shirts or Preheat to Minimize Lint
Keep Excess Ink from the Ribbon Cable
Five Minute Daily Maintenance
Weekly or Monthly Maintenance
RS232 Cable
Auto Head Cleaning (Optional from FastRIP)
Daily and Weekly Maintenance Schedule Checklist
92
92
92
95
95
95
95
96
96
96
97
98
98
99
100
Chapter 9 - Troubleshooting
101
Chapter 10- Transporting the Printer
117
Flush the System
Secure the Print Bed and Ink System
Pack the Printer in its Original Box
Shipping Procedures
Shipment Checklist
Important Shipping Requirements
Other Warranty and Packing Issues
Request for Return Authorization
117
119
120
120
121
122
122
123
Chapter 11 - Product Support
127
Support Policy
Support Information and Hours
Phone Support
24 Hour Emergency Support
Support on the Web
Create an Account
127
127
127
128
128
128
Appendix A- Requirements and Notices
131
Windows OS System Requirements for T-Jet3 PLUS Operation
FCC Compliance
Declaration of Conformity
European Union Declaration of Conformity - CE
Limited Warranty
131
132
132
133
133
xiii
T-Jet3 PLUS User’s Manual
Version 1.1 Revised July, 2008
xiv
Chapter 1
Introduction
The T-Jet3 PLUS
LUS
LU
S is
is an inkjet
iink
nkje
jett printer
prin
printe
terr that
that h
has
as b
bee
been
een
n mo
modi
modifi
difified to
to pr
prin
print
intt on a
alm
almost
lmos
ostt
any type of fabric
fabr
fa
bric
ic material
mat
m
ater
eria
iall as well
wel
welll as non-textiles,
non
non-t
-tex
exti
tile
les,
s, such
ssuc
uch
h as golf
gol
g
olff balls,
balllls,
ba
s, keyboards,
key
keybo
boar
ards
ds,,
tennis balls, etc.
etc. (The
((Th
The
e ink
ink will
will not
not work
wor
w
ork
k on waterproof
wat
water
erpr
proo
ooff ny
nylo
nylon
lon
n an
and
d most
most ssyn
synthetic
ynth
thet
etic
ic
th past,
t this
thi type
t
i ti
diffi
ifficult,
lt if nott impossible
i
ibl to
t do
d
materials.) In the
off printing
was diffi
because there were no inks available that would work on both 100% cotton and
50/50 cotton/polyester blends AND withstand the rigors of washing.
That all changed with the introduction of FastINK Textile Ink. Designed
specifically for these materials, FastINK requires only a post-treatment of heat
to cure when printed on lighter shirts. It’s even possible to print with White ink
on dark shirts with the application of a Pretreatment. This ink is so versatile it
can even be used for printing on non-textiles by applying Fast T-Jet Non-Textile
Pretreatment to the item before printing and Fast T-Jet Non-Textile Series PostTreatment to the item after printing.
Since the T-Jet3 PLUS is based on standard inkjet technology, with the Epson
1800 being the heart of the system, you can print from any graphics application
like Adobe Illustrator, Adobe Photoshop, Adobe InDesign, CorelDRAW,
Macromedia Freehand or QuarkXPress. Another very good graphics application
you can use is FastARTIST, which is included as part of your kit.
Besides being reliable and versatile, the T-Jet3 PLUS is fast, printing a standard,
T-Shirt sized image in under two minutes. Whether it’s a shirt, a towel, mouse
pads, tote bags, bibs or baseball caps, the possibilities are endless.
T-Jet3 PLUS Important Points
The Basics
You probably can’t wait to get started and we share your enthusiasm for the
garment decoration process. However, before you print that first shirt, there are
a few basics that need to be covered.
WARNING
Please read this entire manual first before attempting to Print on
any garment.
1
T-Jet3 PLUS User’s Manual
The T-Jet3 PLUS prints best on 100% cotton. Printing on dark colored 50%
cotton/50% polyester blends with White ink is NOT recommended. You will notice
a discoloration of your image. Red garments will turn your Whites Pink and even
Yellow shirts will tint your image. Print only on pastels or White garments when
using White ink and blended fabrics. Images without White will not be affected.
In addition, when printing on 100% polyester or other synthetic materials, you
may not achieve the same print brightness.
The printer is ONLY compatible a Windows XP, 2000 or Vistas based Operating
System and the latest versions of both FastARTIST and FastRIP are included as
part of your kit. FastARTIST is a Windows based graphics application that will
make preparing an image for print as simple as a click of the mouse. With a oneclick Underbase Wizard and simple clipping features, FastARTIST can help ease
the transition into graphics design if you are not familiar with other applications.
For avid users of Photoshop, CorelDRAW, Illustrator etc., you may choose to work
within the application of choice and still set up the image properly for printing.
Macintosh Users can still create an image in their favorite graphics applicationthey will just have to transfer it to a PC for printing.
Every image must print to FastRIP for final output. FastRIP works as the Queue
and Print Manager, allowing you to not only select different Print Modes and
other attributes, but also archive print jobs for future reprints.
Maintenance
Although the T-Jet3 PLUS is “simply” an inkjet printer, the number one Technical
Support issue is a lack of maintenance of the machine. Printing on T-shirts is
not the same as printing on paper. A shirt gives off much more lint and the
amount of ink deposited on fabrics is far greater than on paper. Additionally,
when printing on dark shirts, you must apply a Pretreatment to the shirt. This
Pretreatment can get inside the printer and cause numerous problems, so we
recommend you pretreat shirts as far away as possible (i.e. in another room). If
you adhere to the required maintenance schedule, printing with the T-Jet3 PLUS
will be a joy.
Poor Artwork
With so many graphics programs readily available, everyone is an artist. Poor
quality artwork will be one of your biggest concerns because there is no magic
to transform a low resolution, low quality piece of artwork into a great looking
print for a shirt. Therefore, it is important you spend some time learning as much
as you can about graphic art programs and some of the simple methods that
can be used to improve the quality of customer supplied artwork.
Version 1.1 Revised July, 2008
2
Chapter 1 - Introduction
Support Hours
Technical Support
+1 7R3ODFHDQ2UGHU
+1 Fax
+1 E-mail:
support@HTXLSPHQW]RQH.com
Internet:
KWWSVXSSRUWHTXLSPHQW]RQHFRP
Extended Support hours: :00am to :00pm(67 Monday through Friday
About the Garment Decorating Business and
Where to Learn More
You are entering a fantastic business, one where you can make a lot of money
in a short period of time. But, like any business, there will be ups and downs. You
will need to learn about the industry such as trade standards, copyright and
trademark laws, how to price your work, how to deal with customers and much
more. Learning the business and marketing side is often harder than the actual
printing of shirts.
There are many valuable resources which can help you, including websites,
3
T-Jet3 PLUS User’s Manual
trade magazines, books, videos and trade shows.
The Book
One of the most valuable books on the industry is How To Print
T-Shirts for Fun and Profit. Written by Scott and Pat Fresener, it
is the “Bible” of the industry. Even though this book is geared
toward learning the screen printing process, it also contains
excellent sections on the business aspects of garment
decoration, including marketing and selling your creations,
the law, creating graphics, and best of all, a comprehensive
Suppliers Directory.
Computer Graphics DVDs
One of the hardest things to learn for
the computer novice is computer
graphics. There are a number of
excellent DVDs explaining computer
graphics and how to use Adobe
Photoshop , CorelDRAW or Adobe
Illustrator. These DVDs focus mainly
on the Screen Printing process,
however they also feature excellent
sections on how to create designs,
how to deal with poor quality artwork
and more.
Business and Marketing DVD’s
Since the business and marketing side is often
complex and sometimes frustrating, there is an
excellent DVD called Business and Marketing
that covers all aspects of running a successful
garment decorating enterprise. There is also
a good set of DVDs on marketing and selling,
called the Marketing Toolbox.
Internet
The number one website for the industry is www.screenprinters.net. There you will
find a wealth of articles, industry links, a Buyer’s Guide and open Forums.
Version 1.1 Revised July, 2008
4
Chapter 1 - Introduction
Our Advice
When starting a business, it is often easy to think nothing will go wrong. You need
to be positive about your venture, but in the beginning, expect the worse. If you
take orders for printed shirts before you have even received your machine, you
might find that deadlines are hard to meet because of the learning curve and
unexpected problems.
The garment business is one of deadlines such as event shirts, shirts for special
occasions and shirts with “dates” on them. You must always give yourself room
for error. Shirt suppliers might not ship on time. You might not have checked your
ink inventory and end up running out of a color. And, yes, you will ruin a few
shirts! Accept this as a fact of life in the garment decorating industry. To have
the most success, allow extra time to fill orders and don’t make commitments
that might be hard to make.
There is nothing more rewarding than seeing someone wearing one of your
creations, but nothing more disturbing than working all night to meet a deadline.
Anyone who has been in this industry has experienced the joy and sorrow of
both. Plan ahead and always have a cushion to make sure you meet deadlines.
5
T-Jet3 PLUS User’s Manual
Version 1.1 Revised July, 2008
6
Chapter 2
Unpacking and Setup
Please read all of the unpacking and setup instructions FIRST before attempting
to setup or use your printer. DO NOT plug your T-Jet3 PLUS into AC Power until
you are told to do so in this Manual.
Unpacking Your Fast T-Jet3 PLUS
If the instructions on the outside of the box were followed, you have already
checked the outside of the box for any shipping damage. If you see obvious
damage, please contact the freight carrier immediately so you can schedule a
freight inspection.
7
T-Jet3 PLUS User’s Manual
Save the box and all of the packing material!
Please
Please
Plea
se rretain
et
etai
ain
n al
alll sh
ship
shipping
ippi
ping
ng m
materials,
ater
at
eria
ials
ls ba
bags
bags,
gs bo
boxe
boxes,
xess a
and
nd d
directions.
irec
ir
ecti
tion
onss
You will need these items should you ever have to return the unit
for repair or for transportation. DO NOT return or ship a T-Jet3 PLUS
without using the original shipping carton or you may void your
warranty.
Main
M
ain B
Box
ox C
Contents
ontents
• SSoftware/Training
ft
/T i i
• Manual
• Waste Ink Pads
• Power Cable
• USB Cable
• Maintenance Kit
• Adjustable Shelf Bracket
• Low Profile Access Lid
• Height Adjustment Bar
Box 2
• FastARTIST Package
• Adjustable Shirtboards
• Industrial Bulk Ink System
• Cleaning System
• Inks
• Pretreatment
• Sprayer
• Parchment Paper
Industrial Bulk Ink System Parts
• 5 - Easy-fill bottles. Four 8oz.bottles for CMYK and one large bottle for
White ink
• 8 – Ink Cartridges
Version 1.1 Revised July, 2008
8
Chapter 2 - Unpacking and Setup
• 2 – Chip Blocks / 2 Chip Block Supports
• 1 – Cartridge Removal Tool
• 8 – Ink Cartridge Caps (for cartridge storage)
• 16 – Ink Line Caps
• 1 – Syringe
• 1 - Latex gloves
Waste Ink Bottle
• Waste Ink Bottle
• Secure Nut and Ink Line Fitting
• Waste Bottle Shelf Bracket
Exhaust Fan
• 1 - Split power cord
Lifting Your T-Jet3 PLUS Unit From the Box
WARNING! DO NOT lift alone. Lift with your legs, not your back!
Lift from SIDES ONLY
With an assistant, lift your T-Jet3 PLUS from
the box and place it on a firm, level surface
that supports the entire printer base
including the Print Bed. If any part of the
T-Jet3 PLUS base is hanging over the edge
or not supported in this manner, stress will
be placed on the Print Bed causing poor
functionality. For best results place the unit
on a table with extra room for a computer,
replacement ink and a Workspace.
Preparations
Remove Hold Down Clamps
With a Phillips head screwdriver, loosen the four Bed Holder
Brackets located toward the bottom of each side of the
Print Bed. You must remove these, but replace the screws to
9
T-Jet3 PLUS User’s Manual
maintain machine integrity. Move the Print Bed back and forth to ensure smooth
movement and then return the Print Bed to its Eject position.
The Maximum Height Bar
You have received a metal bar with a magnetic strip attached to one side.
Place this bar under the chrome T-Jet logo on the front of the printer. This bar
will act as a simple head strike warning device. At NO time should a garment or
other item to be imprinted sit high enough on the Shirtboard to make contact
with this bar. If a garment would brush against this bar, there is an imminent
danger of a collision with the Print Head. A head strike could permanently
damage the Print Head, resulting in down time and costly repairs.
Use this Bar as a reference for loaded garments, adjusting the
Shirtboards etc., but remove before printing.
Check the Adjustable Shirtboard Height
Place an adjustable Shirtboard within the Print Bed and use the adjustment knob
to raise or lower its surface to the proper height.
WARNING: Use the Maximum Height Bar as your guide to prevent
Print Head strikes. The adjustable
Shirtboard should be raised to a
level where the printable surface of
the garment is as close to the Bar
as possible, but DOES NOT make
contact with the Bar at any point. The Shirtboard
MUST NOT be raised beyond this point!
:HDUH not responsible for any damage
caused by disregarding Maximum Height
warnings. Replacement of Print Heads is NOT
covered by your warranty.
Version 1.1 Revised July, 2008
10
Chapter 2 - Unpacking and Setup
Removing the Packing Tape
Remove the packing tape that is currently holding the low profile access lid
down and open it. DO NOT try to move the print carriage off of the capping
station as the T-Jet3 PLUS locks the print carriage onto the capping station.
Forcing the print carriage to move will damage the printer.
Note: You may find a small amount of ink on the Waste Pad and/or Capping
Station during setup. This is normal and there is no need to be alarmed. Each
T-Jet3 PLUS is run through a series of print cycles before shipping to ensure it is
operating properly.
Environmental Controls and Humidity
This is a Hi-Tech inkjet printer that does NOT like being in a hot or cold shop or
garage without proper environmental controls.
Your T-Jet3 PLUS should not be in an area with direct airflow across the machine
(this will dry out and clog the Print Head), dust, a strong magnetic force or in
areas of excessively high humidity. The printer must be in an environmentally
controlled room with humidity levels between 40% and 80% (non-condensing).
Since you will be handling wet ink to refill the bulk system ink bottles, you should
protect any carpet or floor covering with mats.
Place the T-Jet3 PLUS close to a Heat Press or small
conveyor dryer to cure the ink. If you have two or more
printers at a production work station, place them around or
near the heat source. At night, and when the printer is not in
use, cover it to keep it protected.
Ensure the entire T-Jet3 PLUS is sitting level on a stable worktable or other hard
surface. All rubber support feet must be safely supported by the same structure.
Important Point!
When using White ink, you must apply a Pretreatment to the
shirts before printing. DO NOT spray this Pretreatment near
your T-Jet3 PLUS. Pretreat shirts in a different room, if possible
but at a minimum, make a cardboard enclosure for use
during applications. The Pretreatment is sticky and can ruin
the Print Head as well as damage the Encoder Strip. The
11
T-Jet3 PLUS User’s Manual
Encoder Strip is a thin piece of clear plastic with data that is read by the Print
Head as the unit operates. The Encoder Strip tells the Print Head exactly where
to print an image. If the Encoder Strip becomes dirty or damaged, the printer will
get confused, resulting in the printing of multiple images, strips of solid ink and
other irregular printing patterns.
Plug
P
lug Unit
Unit iinto
nto A
AC
CP
Power
ower
Plug the T-Jet3 PLUS into its own power source.
DO NOT TURN THE PRINTER ON YET! YOU MUST FIRST INSTALL THE BULK INK SYSTEM.
Insert the AC cord in unit and plug into a power strip with surge protection.
Avoid plugging multiple items into the power strip. The T-Jet3 PLUS has a dual
voltage power converter and will work on 50 or 60 cycle current that ranges
from 110 volts to 220 volt.
To prevent power surges from damaging your unit and/or
ruining shirts during a production run, plug the unit into a UPS
(Uninterruptible Power Supply).
DO NOT plug other high power use items into the same circuit, such
as a Heat Press - The Press will cycle on and off causing power
fluctuations and, potentially ruining shirts.
NEVER shut off your T-Jet3 PLUS at the
power strip; use the Power button then Main Power
Switch on the actual unit (located by the AC cord).
During Power Off of any inkjet printer, the printer
goes through a shut down cycle that seats the head
so you won’t get head clogs. If you shut the unit off
at a power strip it does not go through a normal shut
down.
Connecting Your T-Jet3 PLUS to a Computer
You can connect the T-Jet3 PLUS to a computer with
a normal parallel cable, USB cable or an IEEE 1394
FireWire cable. Use the included gold tip USB cable
for best results. In any situation take care not to use
a cable that is excessively long and do not use a
Version 1.1 Revised July, 2008
12
Chapter 2 - Unpacking and Setup
switch box (which can often cause communication
problems). Including your printer, mouse and
Dongle, you will need 3 free USB ports.
Your computer must use a Windows based
Operating System if you will be printing with White ink. For best results you should
use a computer with at least 512 MB of RAM. RAM is inexpensive and, if you can
put 1 GB or more on your computer, it will prevent problems when printing large
files. (Users of the Windows Vista OS should have a minimum of 2 GB onboard
RAM.)
The Universal Serial Bus – USB – method of
communication is standard on all newer computers,
but what is not commonly known is that there is only a
certain amount of power supplied to the entire “bus.”
This means that if you have a number of items plugged
into different USB ports on your computer, it might cause
communication issues with the T-Jet3 PLUS.
Use a dedicated computer to control your printer and do not plug anything else
into the extra USB ports when printing.
Failure to adhere to the recommended environmental, power,
maintenance and operating conditions you can void the warranty
of your T-Jet3 PLUS. The printer does NOT like to be in a hot, dry
shop with excess dust, as well as being plugged into outlets with
a lot of other items. Please read and understand the operating
conditions and maintenance requirements for your money making
investment.
Installing the Bulk Ink System
Mounting the Adjustable Ink Shelf
The Adjustable Ink Shelf hangs off the right side (opposite the Control Panel) of
your T-Jet3 PLUS. The wing nut in the center of the shelf and two guides allow the
shelf to be raised and lowered to compensate for the effects of gravity on the
ink.
▪
Turning the wing nut to the Left (Counter-Clockwise), loosens the
Adjustable Shelf.
▪
Turning the wing nut to the Right (Clockwise), secures the Adjustable Shelf
in place.
13
T-Jet3 PLUS User’s Manual
Important Note: When first installing the Adjustable Shelf, secure it at its lowest
position. (Make sure you remove the White protective tape covering the shelf)
All T-Jet’s utilize the effects of gravity to pull ink
through the Print Head. The level at which the bulk
system sits has a direct correlation to how well the
ink flows. In extreme cases ink can flow back into
the bulk system if the shelf is not adjusted properly.
It is important to understand that as you increase
elevation there is a decrease in gravity. That is why if
you are living at a higher elevation (beyond a couple
thousand feet of Sea Level), raising the Adjustable
Shelf will be necessary to help gravity do its job.
During operation, the following three conditions may occur, requiring
adjustment of the shelf.
• When the Print Head is not receiving enough ink (Ink Starvation)
• When Ink migrates completely back into the bottles
• When ink levels drop below 1/4 of the bottle, print quality is starts to
diminish.
Solution - Raise the Adjustable Shelf slightly and continue to raise the shelf as the
ink level drops from use. You can raise the Adjustable Shelf as far as possible as
long as ink doesn’t start dripping from the Print Head.
Waste Bottle Installation with Shelf Bracket
The Waste Bottle Shelf Bracket must be installed to hold
the Waste Ink Bottle. The Shelf Bracket is positioned
behind the T-Jet3 PLUS where the Ink Line Tubes exit.
To install the Shelf Bracket, remove the two screws from
the side of the Print Bed as identified on the right.
Using a Phillips head screwdriver and the shelf screws
(supplied); fasten the Shelf Bracket to the side of the
Print Bed.
The Waste Ink Bottle has 2 ink line tube inserts located
on the cap. Loosen the nut of the insert by turning it to
the left (counter-clockwise), allowing the ink line tube
to be inserted. Turn the nut to the right (clockwise) to
tighten upon the tube.
Version 1.1 Revised July, 2008
14
Chapter 2 - Unpacking and Setup
Filling the Ink Bottles
When initially setting up your T-Jet3 PLUS, we
recommend filling the CMYK ink bottles to
approximately the ¾ mark (the Full line being
100%) and the White ink bottle approximately
½ full.
This is due to the different effects that
elevation has on ink flow. Certain elevations
may necessitate the level of ink staying below
the bottles’ full line. This is only a suggested, starting point. It will be up to you to
determine the best ink level for your elevation through testing and use.
As you perform initial test prints, ink can be added as needed
to correct for ink starvation. DO NOT OVERFILL- Once the ink
has reached the Full Line STOP. Do not fill ink past this mark. If ink
starvation continues, raise the Adjustable Shelf as needed.
Changing
C
hanging Ink
Ink Brands
Brands
Your T-Jet3 PLUS is shipped with FastINK Textile Ink. With a normal inkjet printer,
it is a very common practice to change from the manufacturer’s brand of ink
to third party inks. However, this can result in serious issues when using specially
formulated textile inks. All textile inks are NOT created equal and they must not
be mixed. Should you decide to try another brand of textile ink in your printer,
before doing so you MUST flush out the entire Bulk Ink System using a special
flushing solution.
Failure to perform this process can result in a mixture of the two brands, creating
a chunky mess that might be called severe “cholesterol” in the ink tubes. In fact,
this mixture will permanently clog the Print Head. :HDUH not responsible
for any damage to your printer or replacement of the Print Head should you
use another manufacturer’s ink. If you do experience problems with another
manufacturer’s ink you must contact THAT manufacturer for any available
remedies.
15
T-Jet3 PLUS User’s Manual
Installing the Bulk Ink Cartridges
1. With the cleaning cartridges installed, power ON your
T-Jet3 PLUS using both the Main Power Switch and
the Power button. The printer will cycle through the
initialization process (Load light will flash), then the Print
Carriage will dock with the Capping Station. The Load
light will become solid. DO NOT press any buttons on the
control panel until the Load light is solid.
2. When the initialization cycle is complete, press the Ink
button once. This action will automatically unlock the Print
Carriage from the docking station and move the Print
Carriage up and to the left, making the following steps
easier.
3. Remove all the cleaning cartridges, taking care
not to allow any of the ink lines to come out of the
ink line guide.
4. Unpack your Bulk Ink System cartridges, including the two Chip Blocks and
two Chip Block Supports.
The two Chip Blocks are color coded for placement- one has a Yellow sticker
on the top left, and the other has a Black sticker. Place the Chip Block with
the Yellow sticker into the Print Carriage as shown on below. Using the sticker
as a guide, determine the proper orientation- it should be visible and align
with the Yellow cartridge position.
Version 1.1 Revised July, 2008
16
Chapter 2 - Unpacking and Setup
5. After the Chip Block is in place, use a Chip Block Support to secure it.
The Chip Block Support has arrows in the center bar, pointing upward. Use
these arrows for orientation and place the single end of the Chip Block
Support into the Chip Block. Press the back end into the Print Carriage. Note
the rear placement of the block support.
6. Locate the Chip Block with the black sticker and place
this into the Print Carriage as well, adjacent to the
previously installed Chip Block.
7. Secure this Chip Block into the Print Carriage with the
second Chip Block Support.
8. Located on the bottom of the Print Carriage is an Ink Line Guide that
currently holds 8 ink lines. DO NOT remove any of the 8 lines from the guide
until you are ready to connect the bulk ink cartridges.
9. Before proceeding to the next step, ensure all of the ink bottles are filled in
accordance with earlier instructions and none of the Ink Line Clamps are
engaged. DO NOT not connect any of the Ink Lines to the Ink Bottle at this
time.
Engaged
Disengaged
17
T-Jet3 PLUS User’s Manual
10. Attach the Yellow Ink Cartridge (indicated by the sticker) to the far left
(Yellow
Yellow) Ink Line as shown below. This is accomplished by removing the far
left Ink Line from the Ink Line Guide and twisting the two connectors together.
Connecting Ink Lines to the Ink Bottles
11. Connect the Yellow Ink Line to the Yellow Ink Bottle.
Connectors are color coded to match the Ink Bottle
and Ink Lines easily attached to Ink Bottles by a
basic twist-to-connect system. Please note: that the
White ink bottle uses four connectors.
12. Once the Ink Line is connected, you must
prime the Ink Cartridge. Locate the syringe
included with your Fast T-Jet Kit and insert it
into the bottom of the cartridge. Slowly draw
the ink from the bottle through the tube and
into the cartridge.
During priming, we recommend you unscrew the top of the Ink
Bottle slightly to dissipate any vacuum that may form during this
process. Ensure you draw ink through the cartridge and into the
syringe to eliminate the possibility of air being trapped in the
cartridge.
13. Remove the syringe and place the newly filled cartridge into its appropriate
position within the Print Carriage. Each cartridge must be inserted into
its proper position. Use the guide located above the Print Carriage as a
reference.
Version 1.1 Revised July, 2008
18
Chapter 2 - Unpacking and Setup
14. Repeat steps 10 through 13 for each of the
remaining seven cartridges.
15. With all of the Ink Lines connected, ensure
that Bulk Ink Bottles’ tops and the Ink Lines
are secure, including the Waste Ink Tube
running into the Waste Ink Bottle. Press the
Ink button on the Control Panel to allow
the Print Carriage to dock back onto the
capping station.
16. Ensure all the Ink Lines are secured within the Print Carriage guides and
perform 3-4 Head Cleanings.
To initiate a Head Cleaning cycle, hold down the Ink button on the Control
Panel for three seconds.
Only the initial setup procedures consume a large volume of ink.
Check the levels of your Bulk System Bottles- you will probably
need to add more ink after this process is complete. Don’t be
alarmed, normal printing does not use as much.
Resetting the Bulk Ink Cartridges
Each Chip Block contains smart chips that are designed to count the number of
ink drops dispensed. After a certain amount of ink has been used, a typical inkjet
cartridge chip tells the printer it is out of ink. However, this system is impractical
for a continuous-flow Bulk Ink System.
We have equipped each chip block with a new set of smart chips that are
designed to always read Full, but if you print all day long, the chip may still
believe the cartridge is low on ink when in reality it is not. Should this occur, the
T-Jet3 PLUS Low Ink Indicator lights will warn you that you are low on ink by either
flashing or remaining solid.
1
19
T-Jet3 PLUS User’s Manual
When an Ink light (or multiple lights) start flashing, press the Ink button once to
raise the Print Head from the Capping Station. Then press the Ink button again to
lower the Print Head. The flashing Ink light(s) should stop.
If the Ink lights still indicate an error condition:
1. Press the Ink button once (do not hold in).
The print carriage will move a few inches to the left.
2. When the print carriage stops, press the ink button once more.
The print carriage will move back to the capping station and dock back to
it’s original position.
When the ink button light stops flashing, the reset is complete.
Load and Eject Positions
Throughout this Manual, and in the various Technical Updates we publish, you
will notice references to the Load and Eject positions of your T-Jet3 PLUS. The
images below illustrate these positions.
The T-Jet3 PLUS in Eject position
The T-Jet3 PLUS in Load position
Version 1.1 Revised July, 2008
20
Chapter 3
Software Overview
The T-Jet3 PLUS
LUS
LU
S is
is a high
high performance
per
p
erfo
form
rman
ance
ce iink
inkjet
nkje
jett pr
prin
printer.
inte
ter.
r. G
Gra
Graphic
raph
phic
ic filles
es can
can be
be large
larg
large
e
and the data
a ssen
sent
entt fr
from
om FFas
FastRIP
astR
tRIP
IP tto
o the
the prin
pr
printer
inte
terr is ssen
sent
entt at a ver
v
very
ery
y high
high sspe
speed
peed
ed ((hi
(high
high
gh
data rate). In
no
ord
order
rder
er tto
o ge
gett the
the fa
fast
fastest
stes
estt sp
spee
speed
eed
d and
and have
have ffew
fewer
ewer
er com
c
communication
ommu
muni
nica
cati
tion
on
th the
th printer,
i t
d a ffastt computer.
t
Y
t d d
problems with
you need
You can use a standard
desktop computer or even a laptop your printer, but for the best performance,
the computer should have at least 1MB of RAM (2 GB of RAM is better).
If you want to continue working and creating artwork while the printer is printing,
having a higher amount of RAM on board your computer is essential. Ideally you
should have a dedicated computer for use with the T-Jet3 PLUS.
While sending data to the printer using a USB cable, do not plug in any other
USB devices other than a mouse. USB busses do not have a lot of power and the
more devices plugged in, the more power drain that will occur. In order to run
FastARTIST, you MUST use a Windows based Operating System. MAC users can
create their artwork in their favorite program and simply network or copy the
files over to the PC “workstation.”
Graphics and RIP Software
Your T-Jet3 PLUS includes the latest versions of both
FastARTIST and FastRIP. FastARTIST is a Windows based
graphics application that will make preparing an image
for print as easy as a click or two of the mouse. With
“one-click wonder” Underbasing and simple clipping
features, FastARTIST can help ease the transition if you
are not familiar with graphic applications. For avid users
of Photoshop, CorelDRAW, Illustrator, etc., you may
choose to work within your graphics application of
choice and still set up the image properly for printing.
There is also the option of importing an image into
FastARTIST from other graphics applications in order to take advantage
off the
d
h
one-click Underbase Wizard.
Once a graphic file is ready to print, it needs to be sent to special software
called a RIP (Raster Image Processor.) This software tells the machine what
image resolution to use, how many passes of each color to make, when and
21
T-Jet3 PLUS User’s Manual
how to print the Underbase and Highlight and how much ink to lay down. To
do all of this for you, we have included with your printer package our own very
special RIP program called FastRIP.
For best results, turn OFF all Screen Savers when printing to your T-Jet3 PLUS.
Note: For information about installing and using FastARTIST and FastRIP, consult
the FastARTIST User’s Manual.
FastARTIST and FastRIP
What makes the T-Jet3 PLUS so unique
is not only the printer and ink, but also
the software that drives it. As mentioned
earlier, your printer comes with two very
powerful programs – FastARTIST and
FastRIP. FastARTIST is a complete graphics
program much like CorelDRAW and
Adobe Photoshop. You can use it for all
of your graphic image creation or you
can create images in CorelDRAW or
Adobe Photoshop and import them into
FastARTIST to take advantage of the oneclick Underbase Wizard or simple clipping options.
FastRIP
FastRIP is a driver specifically designed
for Inkjet-to-Garment printers like your
T-Jet3 PLUS. A RIP converts the data from
a graphics program to computer code
called Postscript. This powerful language
allows much more control over a printer,
making the following possible:
• Previewing printable images
• Control over the amount of ink used
• Faster print speeds compared to a
standard printer driver
FastRIP is extremely easy to use and is almost transparent when working with the
T-Jet3 PLUS.
Version 1.1 Revised July, 2008
22
Chapter 3 - Software Overview
Note: It is important to have a basic knowledge of both
FastARTIST and FastRIP. Although the manuals may seem
very large, don’t be concerned by the size. You do not
need to know everything to get started.
Using Computer Graphics Software
In order to print a good looking image on a shirt, you need
a good piece of artwork. The customer typically has no idea about the type
or quality of artwork needed so you are often stuck with inferior designs. If you
don’t have computer graphics experience, you might print this bad artwork and
then blame your T-Jet3 PLUS for the poor quality image.
There are a number of great computer graphics programs designed for creating
and manipulating images. If you have never used computer graphics programs
before, you might be inclined to use applications such as Microsoft Word or
other word processing programs that are designed for text and are NOT strong
graphic programs.
Recommended graphic programs for this purpose are FastARTIST (included
you’re your T-Jet3 PLUS), CorelDRAW (any version), Adobe Photoshop (version
7.0 or higher), Adobe Illustrator (version 7.0 or higher) and Macromedia
Freehand (any version). Contrary to popular opinion, great images can be
created and manipulated on a Windows based PC as well as the Mac platform.
FastARTIST, the graphics application that is shipped with your printer, is designed
for Windows based PC ’s only. Mac users wishing to take advantage of the
FastARTIST Underbase Wizard and other convenient setup options will need to
transfer their files onto the PC loaded with FastARTIST by Importing the image.
We often hear from first time users that they did not think they would need to
know about graphics software. However, getting a great image on a garment
is not the same as taking your digital camera’s memory card to the drug store
and getting pictures made. Yes, it would seem that simple and it CAN be, but in
the world of T-Shirt printing there are many variables.
The first variable is that the customer will often bring you artwork that is
substandard, such as an image their web designer gave them. Web graphics
are commonly very low resolution (not sharp) and may need to be enlarged
for a full-size T-Shirt image. When you have an image that is of low resolution at
a small size, enlarging the image will only blur the image more. To compensate
for this, you will need to learn how to make the file the correct size plus how to
improve the quality of the file.
23
T-Jet3 PLUS User’s Manual
Image Types
Vector
Currently there are two types of graphics
programs – Vector and Bitmap. FastARTIST,
CorelDRAW, Adobe Illustrator and Macromedia
Freehand are called vector programs. Vector
programs create images based on shapes
somewhat like a coloring book. They typically
have hundreds or even thousands of typefaces
and many have extensive “coloring book” type
stock clip art that you can use to create artwork.
Vector programs are generally used for images
with a hard edge like race designs, school mascots, corporate logos, etc.
Pixel Based Bitmap
Programs like FastARTIST and Adobe
Photoshop are called pixel, or raster based programs, and work great for
photographic images. Bitmap applications
can lighten, darken, sharpen and even
create images. Photoshop is a common
graphics program used by many for
manipulating images, but FastARTIST also
contains similar editing tools. Images with
lots of gradations or that are photorealistic
are generally created and manipulated in
programs such as FastARTIST and
Photoshop.
Note: FastARTIST is both a bitmap and vector graphic program!
Summary
If you intend to create your own artwork, then you will need both a vector and
bitmap program. The vector program will be used for working with shapes, text
and edges, while the bitmap program will be used for any photographic or
detailed images. If you don’t have two applications, or don’t wish to spend the
money to purchase one of both needed programs, FastARTIST is the perfect
solution because it will work with both types of images.
FastARTIST can be used to create the entire image if needed. With similar tools to
Version 1.1 Revised July, 2008
24
Chapter 3 - Software Overview
CorelDRAW and Photoshop, those already familiar with other graphics programs
can quickly master FastARTIST.
Editing Bitmap Artwork in FastARTIST/Photoshop
The following sections gives Tips and suggestions for creating artwork suitable for
printing on your T-Jet3 PLUS. Remember, if you are proficient in a
graphics program other than the new FastARTIST- create the images where you
are most comfortable. For advanced users of programs such as Photoshop and
CorelDRAW, the entire image can be set up to print and then Imported into
FastARTIST for printing a White Underbase or Highlight White.
(Please note: Underbase and Highlight White options are not available when
printing from a graphics application other than FastARTIST.)
Besides the ability to work with vector based images such as hard edge
graphics, clipart and font manipulation, FastARTIST will do a lot of basic pixel
editing functions necessary when the customer gives you a pixel/bitmap file
such as: JPEG, GIF, TIFF or PSD.
Generally, a short run of photorealistic images is not profitable when Screen
Printing. However, should a customer want a picture of the entire team on a
shirt - no problem! One of the T-Jet3 PLUS’s major strengths is the ability to print
short runs of photorealistic images.
A common problem in the T-Shirt business is that customers need high resolution
images, yet often all they have is artwork that is small and low resolution. It is
MANDATORY that you learn how to make ANY artwork the correct size and
resolution, besides knowing how to make the image brighter (most images are
dull) with good color saturation. In reality, this may be the ONLY time you utilize
the FastARTIST or Photoshop image editing tools.
A Quick Note about Photoshop
As you begin to work with different kinds of images in different formats and
resolutions, it is very important to have the proper tools necessary to clean up
and make images “print ready.” Even though FastARTIST is a very powerful
graphics program, there may be times when a program such as Photoshop is
required for specific editing functions. Don’t worry, Photoshop works hand-inhand with FastARTIST, making it a very complimentary program to have when
working with bitmap images.
The goal here is to cover the basics of image editing, so that you can print the
best looking images possible. When first
25
T-Jet3 PLUS User’s Manual
learning graphics programs, the process
may seem a bit overwhelming, but don’t
get frustrated. Just keep in mind the 80/30
rule: You use 30% of the program 80% of
the time. But, in this case, it’s actually more
like a 90/10 rule.
So, you might be asking why you need
Photoshop at all if you have FastARTIST? In
a nutshell, you can do almost everything
you need with FastARTIST, but Photoshop
is much more powerful when creating an
image with lots of photographic components. Pl
Plus, Ph
Photoshop
t h
iis much
h more
powerful when fixing and cleaning up poor quality artwork.
Where to Get Photoshop
Photoshop is the flagship product of Adobe Systems at www.adobe.com.
The program retails for around $650 and, as of this writing, version 9.0 CS3 is the
most current version. It is always nice to have the latest and greatest version,
but frankly, you can do everything mentioned here with version 5.5 or higher.
If you are a student, teacher or work for a school, you may be eligible for an
“Educator Version” from places like www.academicsuperstore.com.
File Types and Resolutions
FastARTIST and Photoshop will let you
“Open” a wide variety of files including,
TIFF, JPEG, GIF, EPS, PSD, AI and others. If
you open a file that is vector based like
one from Adobe Illustrator, Photoshop will
convert the file from mathematical vectors
to small pixels. This is called Rasterizing a file.
The important point here is to keep the file
resolution high enough for the image to
remain sharp. It is generally taught that a
file needs to be at 300 DPI at the final size in
order for it to remain crisp.
In T-Shirt printing, you can get away with file
resolutions of 150 to 300 DPI at the final size.
The default setting for opening vector files in Photoshop is 72 DPI. The picture at
Version 1.1 Revised July, 2008
26
Chapter 3 - Software Overview
the right shows a magnified view of a file that is 300 DPI (bottom) and one that is
72 DPI (top). Obviously, the 72 DPI file will be softer.
Check File Mode
This is step that most new users will over look when opening a file. It is very
important to note the file attributes when first opening a file as well as
determining the file mode. Note whether it is CMYK or RGB and make changes
if necessary. Files must be in RGB because the T-Jet3 PLUS does not print spot
color.
If the file is CMYK from another application, FastARTIST will Open/
Import it as RGB. However, FastARTIST will open the file at a larger
resolution than normal, drastically increasing the file size. For best
results, convert the file to RGB (if you can) before importing it into
FastARTIST.
Yes, Photoshop will do process color separations called CMYK, but for file
manipulation and adjustment you should work in RGB mode. To check the
Mode of the file in Photoshop, go to Image > Mode. If CMYK is checked, click on
RGB.
Check File Size and Resolution
You must know the actual resolution and size of
the image. Otherwise you could be working on
a very small file and not know it. In FastARTIST,
Import a photorealistic file and click on the
Bitmap > Image Size. You will see the actual size
of the image. If the resolution is too small, change
the size and click Apply. Remember that an
appropriate image size should be 150 to 300 DPI.
If the images physical size is too small, resize the
image before changing the resolution. After the
image size is adjusted, click on the Bitmap and
then Image Size. Change the resolution and
select Bicubic. Click Apply.
In Photoshop, go to Image > Image Size. If it says pixels per CM, change this to
inches and then enter the image’s intended final print size. Re-adjust the
resolution and make sure that Bicubic is selected. The physical size should be the
final print size.
27
T-Jet3 PLUS User’s Manual
If you have an image that is very low resolution, y
your only
y real choice is to
change the image size and resolution. This is
often referred to as “Upsampling.” Photoshop
upsamples the image, but in doing so, it
must make calculations where to place the
extra pixels and what color to make the
pixels. Images may have softer edges when
upsampled, but they will also be less pixilated!
If you can get a higher resolution file from the
client, do so.
CorelDRAW and Adobe Illustrator have similar
Image Size functions.
IImportant
mportant Point
Point
If the original file is low resolution and not the final size, you need to upsample
the file to the final print size and 150 to
300 DPI (150 is OK for photos and images
without hard edges. 300 to 350 is better
where there is lettering or sharp edges).
Now, you can work on the file and add
type or other elements. It is important to
upsample the image first so any additional
elements you add will be at the higher
resolution. If you aren’t sure if the image is
sharp enough, simply zoom in on the file. It
might look great zoomed out but very soft
or jagged when you zoom in. It will print the
way you see it when zoomed in.
Check File Saturation
Quite often customers’ images will be flat and in need of a color boost. Always
check the file to see if it needs a saturation boost by going to Bitmap > CMYK
Version 1.1 Revised July, 2008
28
Chapter 3 - Software Overview
Color Adjustments > Hue Saturation (FastARTIST) or Image > Adjustments > Hue
Saturation (Photoshop).
Sharpening Images
Typically, an image can be made sharper. Even if the file came from an agency
or large licensed job, don’t assume that their artist knew your needs. Images
that are printed not only get darker, but also get softer. You must make them as
sharp as possible.
Go to Bitmap > Filters > Sharpen > Unsharp Mask (FastARTIST) or Filter > Sharpen
> Unsharp Masking (Photoshop). Don’t let the term “Unsharp” fool you. This term
comes from the process camera days and means it only sharpens areas of high
contrast. The reality is, it sharpens the image but keeps it less apparent that you
have sharpened the image.
Move the Amount slider to 150%. Set the Pixel Radius to 1 and the Threshold to
8. How does the image look? To compare the original to the sharpened version,
uncheck the Preview check box (Photoshop). Click it on and off and compare
the results. If you can’t see much difference, move the Amount slider higher. Go
all the way to 500% if you need to but don’t make the image too grainy.
29
T-Jet3 PLUS User’s Manual
Using Tone Curves
Whether you are Screen Printing, heat transfer printing or Inkjet-to-Garment
printing, a common dilemma is that images tend to get a little “muddy.” If you
have a file with lots of detail in the shadow areas, this will probably be lost when
printed so you need to adjust the “density levels” of the image. In FastARTIST,
go to the Bitmap dropdown menu, and then select CMYK Color Adjustments >
Curves. In Photoshop, go to Image > Adjustments > Curves.
The Tone Curve is a very powerful tool that allows you to adjust specific tonal
areas from the lightest “Highlights” to the
darkest
“Shadows.” By placing your cursor in the
middle of the “Midtones” curve and dragging
the mouse up or down, you can
lighten/darken the medium, or Midtones, in
an image.
By clicking on the very top corner and
dragging the mouse in, you can make the highlights
lighter
(Photoshop). Play around with the Tone Curve and
see what happens. A good curve for flat images is a
slight “S”, where you lighten the highlight area (35%)
and darken the shadow area (75%).
In later versions of Photoshop (CS through CS3),
similar adjustments can be made using the Shadow/
Highlight dialogue under Image > Adjustments. Make
sure you click the “Show More Options” check box for
additional settings.
Bitmap Editing in FastARTIST
Photoshop is always in bitmap mode
because it is a pixel-based editing program.
FastARTIST (along with CorelDRAW and
Adobe Illustrator) defaults to vector mode
when you launch the program, so you will
need to find the bitmap editing tools in
these programs. In FastARTIST, double-click
on the image. That changes the top
Toolbar icons to standard bitmap editing
mode (very similar icons to Photoshop).
Version 1.1 Revised July, 2008
30
Chapter 3 - Software Overview
Selecting Areas
In FastARTIST, if you want to apply a Tone Curve
adjustment or Unsharp Masking to specific
areas, you must double-click on the object to
make the bitmap tools available. You then click
on the Lasso tool (Hint: It looks like a lasso) and
hold down the mouse button while drawing
around the area you wish to modify. When you
release the mouse, you will have a yellow outline
identifying the selected area. Now, anything you
do ONLY happens to this area.
In Photoshop, you can choose an area with one
of the Selection Tools on the Toolbar. Click on the tool that looks like a Lasso
and draw around the object while holding down the left mouse button. When
the mouse button is released the selected area will be identified by what is
called “Marching Ants” – small moving lines around the selected area. While
the area is selected, any changes made will only apply to this area. To remove
the marching ants, go to the Select > De-Select (You can also use the keyboard
shortcut of [Ctrl] + D). If you want to select square or round areas, use the
Marquee Tool (top left tool) and use this the same way you would use the Lasso
tool.
Channels and Layers
What really separates Photoshop from FastARTIST
and CorelDRAW is the ability to work in Layers to
build images. Therefore, whenever you are using
Photoshop, you should have both the Channels
Palette and Layers Palette open.
People often get these confused so here are the
rules: The Channels Palette is used to
create output- Channels print. The Layers Palette
is used to create or build the image. You use the
Layers Palette to put various components
together including adding Type to an image.
Layers don’t print.
You will also notice that your Channels Palette shows ffour channels:
RGB,
h
l R
GB
Red, Green and Blue. Your test file probably only shows one Layer, called
Background.
For more details on using the Layers Palette in Photoshop, consult the Adobe
User’s Manual or In Program Help sections.
31
T-Jet3 PLUS User’s Manual
Setting Transparent Images in FastARTIST
To set transparent backgrounds in FastARTIST,
double-click on the image to enter the
bitmap edit state.
Using the Eyedropper tool, click on the Red
background and then click on the Add Color
button in the Color Selection dialog box. This
will make the selected Red the current color.
The background color can be any solid
color, not just red. For example it can be
White, Black, Yellow
Yellow, Green, etc. However, it
is important to note FastARTIST
will only remove ONE color. If
your image has a multi-color or
gradient background, it will be
necessary to use Photoshop to
make the image print ready.
To make the Red transparent, click on the
Eye icon next to the selected color. This acts
like a toggle switch, so selecting it again will
deactive any transparent color.
Removing Backgrounds with Photoshop
In order to make removing backgrounds as easy as possible, try to maintain a
consistent/neutral background if possible. For example, if photographing the
motorcycle shown below, park in front of a wall or a background that contains
a much lighter color than the bike. This will help Photoshop determine the
difference between the selected background and the object (such as the
motorcycle) you intend to keep.
Using the Magic Wand – Click and Delete
With the Magic Wand you, click on the unwanted areas around the image and
then delete them. It’s a pretty simple process IF the background color is different
(contrasting) from any of the edges of your image.
Click an area in the background and the Magic Wand will make a selection
around the image. If the “marching ants” selection goes into the main design,
Version 1.1 Revised July, 2008
32
Chapter 3 - Software Overview
change the Tolerance on the Property Bar.
The default is 32.
Depending upon the variations and
gradients in the background, it may
require some trial and error with Tolerance
settings and several selections before the
background is completely removed.
If the first click of the Magic Wand does not
get all the unwanted areas, you can add to
the selection by holding down the [Shift] key
and clicking another area. You can subtract
from the selection by holding down the [Alt] key and clicking on a
area.
Photoshop and FastARTIST both have Magic Wand tools (it looks
like a wand with a sparkler on the end.)
Using the Extract Filter
Photoshop also has a Filter called
Extract. This will allow you to draw
around an image and fill the center with
color. Photoshop then removes all the
areas around the image, leaving you
with a transparent background. Extract
does a decent job, but the Magic Wand
is the preferred method.
Keep in mind, the Magic Wand and Extract filters perform best
when the background is a solid color and not a gradient.
Making Your Selection a New Layer
The goal behind all this is to get your main image on a layer with a transparent
background. (This will show as gray and white checks all around the image).
With a transparent background, you can add additional elements to the image
including text, drop shadows, glows and more.
33
T-Jet3 PLUS User’s Manual
Fixing Bad Line-Art in Photoshop
and FastARTIST
You may also use a bitmap editing program
to improve the quality of line-art. Earlier we
covered file resolution, noting how a low
resolution file will have very jagged edges.
By simply upsampling a file to a much higher
resolution you will have less of a jagged
effect, but a softer edge. For Black and
White images, you will want to upsample
and then apply a Tone Curve to make edges
Black and White without any “gray” areas. This process
proc
pr
oces
esss is available
ava
vaililab
able
le in
in FastARTIST,
Fast
Fa
stAR
ARTI
TIST
ST
Photoshop, CorelDRAW and Adobe Illustrator.
IImportant
mportant Point
Point
You must take ownership of fixing bad artwork. If the file is provided
in a pixel based format like TIFF, PSD, JPG, GIF, etc., you can’t assume it is bright,
sharp, of high resolution and ready to print. You must check the resolution and
upsample the file if necessary. Make adjustments if it needs sharpness or boost
color saturation if the file is dull. Lighten the file if it seems too dark because the
image may print even darker!
Artwork
A
rtwork for
for Light
Light and
and Dark
Dark Garments
Garments
To set up artwork properly, it is imperative to know first onto what color garment
the image is to be printed. This will then determine if the image background
needs to be transparent, White, Black, or in some cases both Black and White.
For Light colored garments, the T-Jet3 PLUS will print the image just as it appears,
but it does not print the White. Printing in color without an Underbase is the
easiest form of garment printing.
If you require White in the image, it will be necessary to Underbase the image.
Therefore, Dark colored garments will always require an Underbase that allows
the colors to “stand off” the garment.
Please keep in mind, this section is intended only as a brief Overview and
Version 1.1 Revised July, 2008
34
Chapter 3 - Software Overview
Introduction into the world of software and graphics applications. Chapters 6,
8 and 9 of your FastARTIST User’s Manual covers the file setup process in-depth,
including how to prepare files for printing onto both Light and Dark shirts. For
step-by-step instructions and additional Hints and Tips, please refer to the
FastARTIST User’s Manual.
Epson Driver Installation
In addition to a graphics application to create and modify artwork and a RIP to
process the art and turn it into an image on a garment, you will need a Printer
Driver. A Printer Driver is the basic software needed to make any printer function.
For your T-Jet3 PLUS to operate properly, you will need to download the most
current version for the Epson Stylus Pro 1800 available at www.epson.com.
Follow the links under the Drivers & Support section and you will be able to select
a driver compatible with your Operating System.
Windows Vista Users MUST have Administrator authority to
download and install any drivers. Additionally, you MUST
download the applicable 32 bit OR 64 bit driver based on your
Operating System, NOT your processor. These drivers are NOT
interchangeable.
The T-Jet3 PLUS is a highly modified version of the Epson 1800 with hundreds of
additional parts not provided by Epson. As a result, the T-Jet3 PLUS and any
driver software is NOT supported by Epson. All support for the Epson driver and
internal Epson components will come from XV.
If you have any concerns installing the driver, contact our Support Department
and they will gladly walk you through the process.
Printer Driver Installation Steps
1. Like any inkjet printer driver installation, you first need to
extract the file. Double click on the zipped exe file.
35
T-Jet3 PLUS User’s Manual
2. A security warning screen will open. Press
Run.
3. Click OK for
the Self
Extractor
Window
4. Another Self Extractor Window opens. Where
field named, “Unzip to Folder” should default
to your “C” drive or Local disk and unzip in a
folder named Epson. Do not change
anything here unless it defaults to a different
location. If it reads a different location, press
browse and make a folder named “Epson” on
your local disk. Click Unzip.
5. This window confirms that the
files were unzipped
successfully.
Click OK
6. When the Epson Printer Utility Setup
window opens, click OK.
Version 1.1 Revised July, 2008
36
T-Jet3 PLUS User’s Manual
7. Click Accept to accept the
License Agreement.
8. The Utility Setup will
begin and will start
copying the
necessary files.
9. A Software Installation warning screen will
appear. Click Continue Anyway.
10. The last screen is a screen that will auto-detect
your printer. Make sure that your T-Jet is
connected to the printer using the USB cord.
• Power on the printer and the Epson Printer Utility
will auto detect it and finalize the installation
process.
• Click the start menu, then click Settings>Printers
and Faxes. From here you can manage your
printers etc.
Version 1.1 Revised July, 2008
37
T-Jet3 PLUS User’s Manual
The T-Jet3 PLUS is a highly modified versions of the Epson R1800 with hundreds
of additional parts not provided by Epson. As a result, your T-Jet and any driver
software is NOT supported by Epson. All support for the Epson driver and internal
Epson components will come from XV.
If you have any concerns installing the driver, contact our Support Department
and they will gladly walk you through the process.
Disabling the Status Monitor
For optimal Fast T-Jet3 performance you will need to ensure no Epson monitoring
services are running. To turn this service off, please perform the following
procedures after installing the Epson R1800 printer drivers and connecting the
USB cable to the PC.
1. Locate y
your task bar and or a small p
printer icon.
2. Right-click on the printer icon and select
Monitoring Preferences. In the dialogue
box that appears, uncheck everything in
this window.
3. You will now no longer see the printer icon
within the taskbar. The Status Monitor has
been disabled.
Version 1.1 Revised July, 2008
38
Chapter 4
Printing Basics
Your TT-J
Your
T-Jet3
-Jet
et3
3 PLUS
PLUS iiss ve
very
ry
easy
ea
sy to
to use.
use. Simply
Sim
Simpl
ply
y create
crea
cr
eate
te
an iima
image
mage
ge iin
n yo
your
ur ffav
favorite
avor
orit
ite
e
grap
gr
aphi
hics
cs p
rogr
ro
gram
am lo
load
ad a
graphics
program,
shirt on the printer, choose
the appropriate Print Mode
(printer resolution, number
of passes and how much
White ink to deposit), and
press the Print button. Voila!
Instant shirt! By now you
know many of the basic
parts of the printer. The
following section contains
more in-depth information
on the T-Jet3 PLUS.
Control Panel Overview
Power Button
The Power button turns the printer on and off only when
the main power switch is turned on. The main power switch
is located next to the AC cord.
39
T-Jet3 PLUS User’s Manual
Passes
TThe Passes button selects the number of Underbase print passes
or double passes of color that are to be made. The desired
o
number (1-7) may be selected by repeatedly pressing the button
n
until the required setting is reached. The appropriate number will
u
be
displayed
then
th
en b
e di
disp
spla
laye
ye by the LED just to the left of the Passes button. When a Job is
complete, the Passes Counter resets to “1.”
Ink Button
TThe Ink button is used for two different functions. The first function is
used
u
to unseat the Print Carriage from the Capping Station. This allows
you
to remove or reset the Bulk Ink Cartridges’ smart chips, clean the
y
Encoder
or Capping Station or install cleaning cartridges. Press the Ink
Enco
En
code
derr Strip
S
button once and the Print Carriage will unseat from the Capping Station and
move slightly to the left. Pressing the button again will cause the Print Carriage
to move back onto the Capping Station and lock in place. DO NOT hold down
the Ink button to perform this function.
The second function of the Ink button is to initiate Head Cleanings. If you depress
the Ink button for more than 3 seconds, the T-Jet3 PLUS will initiate a Head
Cleaning cycle.
Load Button/Load Light
TThe Load button moves the Print Bed to the ready position in
preparation for printing.
p
Eject Button
TThe Eject button moves the Print Bed into two different positions: Eject 1
and Eject 2
a
• Eject 1 (Press the Eject button once)
Is the first step in unloading a garment that has been
printed.
Warning: DO NOT load or unload garments from the
Eject 1 position. This could damage the printer and void
the manufacture’s warranty.
• Eject 2 (Press the Eject button a second time while in the
Eject 1 position)
Version 1.1 Revised July, 2008
40
Chapter 4 - Printing Basics
This completes the process of clearing the Print Bed from the printer. Only
in this position is it safe to Load or Unload a garment from the Shirtboard.
Error Button
TThis button is for Technical Support use only.
Low Ink Indicator lights
The Low Ink Indicator lights identify the status of corresponding ink cartridges.
The three Status modes are:
▪
▪
▪
Off – Cartridge is operating normally
Flashing – Cartridge needs to be reset by pressing the Ink button.
Solid – Cartridges will need to be to be reset within the Print Carriage. If
you have any SOLID ink lights, you must remove all the Bulk Ink Cartridges,
including the Chip Blocks, to reset the smart chips.
Power Light
The Power light remains solid when printer is on.
Load Light
The Load Light indicates the status of the printer either by flashing or remaining
solid.
▪
▪
Flashing – Printer is currently in use or processing an image for print.
Solid – Printer is ready and awaiting a print task.
Note: The Load Light will remain ON except when processing an image or
printing.
When
the Load light is flashing DO NOT send a job to the printer.
W
The
printer will get confused and require you to turn it OFF and then
T
back
ON in order to clear the error. Always wait until the Load light
b
is solid red before executing a print command.
All Ink Lights Flashing + Ink Button and Error Light
A fatal printer error has occurred. The printer must be completely shut OFF,
including the Main Power Switch. Manually move the Print Bed inward, centering
within the Printer Assembly, and turn the printer power ON.
41
T-Jet3 PLUS User’s Manual
Ink Light and Error Light (alternating) Flashing Fast
The printer thinks the Waste Tank is Full. This will only happen after the printer
reaches approximately 15,000 prints. Open FastRIP and go to Printers > Printer
Properties, or click on the last icon in the toolbar that says Print status and
settings. Click on the Reset Ink Pad Counter button and the error should clear in
approximately 10 seconds.
Support Hours
Toll Free
Technical Support
Corp. Office
Fax
Email:
Internet:
Support hours:
+1 888-MYTJETS (698-5387)
+1 480-929-2937
+1 480-929-0640
+1 480-929-0766
[email protected]
www.screenprinters.net Click on the Support tab.
7:00am to 6:00pm Monday through Friday
9:00am to 3:00pm Saturday
(Mountain Standard Time) USA
Note: Arizona does not observe “Daylight Savings Time.”
Basic Steps for Printing a Shirt
OK, the time has come. You have installed the Bulk Ink System, you have
created a image in your favorite graphics program and now you are ready
to ruin a few shirts. Yes, we did say ruin a few shirts. Be warned, there is a slight
learning curve to printing a shirt and you must get over the fact some will get
ruined.
When printing an image, you must be aware of print placement- This includes
reconciling what you see in your graphics application Page with where the
image will sit on the shirt. Your printer will also need to be “broken in” a little.
When you first install the Bulk System, there is a chance not all the inks are
flowing yet. You won’t really know this until you have done a print or two, or a
Nozzle Check. Therefore, you should start off by using clean rag shirts, or just
accept the fact that you will ruin a few new shirts and buy some extras. Your first
print may NOT be a winner, but after you have printed a few shirts you will feel
like an old pro.
Just remember, it is ONLY a shirt. Even when you HAVE become a seasoned pro,
ruined shirts are a fact of life in the garment decorating industry.
Version 1.1 Revised July, 2008
42
Chapter 4 - Printing Basics
• Power ON your T-Jet3 PLUS. The Print Bed should be fully extended (Eject 2).
DO NOT move the Print Bed by hand. (Refer to Chapter 2 for images of the
Eject and Load positions)
• Shirts can be full of lint and some shirts have more lint than others. Lint is NOT
your friend. It can get on key components inside the T-Jet3 PLUS, affecting
print quality and printer operation. For best results grab a blank shirt by the
shoulder seams and give it a little shake before you lay it on the Shirtboard.
This will actually help remove wrinkles as well.
Loading a Garment onto the Shirtboard
The T-Jet3 PLUS Shirtboard consists of an adjustable
aluminum base and a non-slip padded surface.
Lay the shirt over the Shirtboard as shown on the
right. Again, please check to make sure that
the collar of the garment is at the top of the
Shirtboard.
Smooth out the garment over the printing surface a
and
remaining
nd ffold
ol
old
d th
the
e re
rema
main
inin
ing
g
garment under the Shirtboard. Ensure any excess garment is folded under the
Shirtboard.
43
T-Jet3 PLUS User’s Manual
Check Garment Height Clearance
Use the Maximum Height Adjustment Bar as a guide to ensure your garments
do not exceed the minimum Print Head clearance. Adjust the Shirtboard height
as necessary to prevent a head strike. Use this Bar as a reference, but remove
before printing.
Key Points for Printing
K
¾ A
As a TT-Jet3
J t3 PLUS operator, one of the most important aspects of the printing
process is to check, re-check and re-check again the clearance of the
garments in relation to the Print Head. The number 1 reason Print Heads are
damaged is because this step is not taken seriously until the Print Head needs
to be replaced. Should the Print Head brush against, or strike, a garment
while printing, this will render the Print Head unusable. Pretreatment from
the garment will permanently clog the Nozzles and a collision between the
Print Head and the garment may not only damage the Print Head but the
Print Carriage as well.
:H DUH not responsible for any damage caused in this manner.
¾ The desired clearance is 1/8” or 3mm but no less than that. Proper clearance
must be maintained so that the garment and Print Head do not touch.
¾ The Load Light must be solid before sending a Print command. If a Print
command is sent while the Load light is blinking, the machine will need to be
powered OFF to reset.
¾ When creating graphics in your graphics program using a standard Page
Setup, the upper left corner of the image is the “zero” point in relation to the
Shirtboard. You should always create artwork using the same Page Size as
the Shirtboard. The standard Shirtboard is 13” x 18” (33 x 56cm).
¾ The T-Jet3 PLUS has a sensor that will stop the machine if its beam is broken by
a garment or Shirtboard. If the Load button is flashing, there is something
in the way. Remove the obstruction and completely power OFF the machine,
including the main power switch. Clear the print job from the Queue and
then power the machine back ON.
¾ The sensor light turns from Amber and Green to solid Green when there is an
obstruction.
Version 1.1 Revised July, 2008
44
Chapter 4 - Printing Basics
Prepare Your Artwork for Printing
1. Create or choose the artwork to print from within your favorite graphics
application (FastARTIST preferred).
• Make sure the image is the correct
physical size and that you have placed
it in your graphics program on a Page
that is the same size as the Shirtboard you
will be using.
• The easiest way to get the correct print
placement is to work on a 13” x
18” (33 x 45.7cm) Page as your layout. If you
need to print an image that
is wider than 13” (33cm), you can rotate
the image in your graphics
program and load the shirt
sideways onto the Shirtboard (90º clockwise).
• When working within FastARTIST, select the Page Size from the Layout >
Page Size window. You will also use this template when importing images.
You must also set the Page Size within FastRIP. Within FastARTIST, go to
File > FastRIP Setup and select the applicable value.
2.
Select
appropriate
Print
2
Sele
Se
lect
ct tthe
he a
ppro
pp
ropr
pria
iate
te P
rint
ri
nt
Mode.
There
variety
off Pr
Print
Modes in the FastRIP software. Print
Mode
Mo
de Th
Ther
ere
e ar
are
e a wi
wide
de v
ar
arie
iety
ty o
Prin
intt M
Modes give you the advantage of printing higher quality images (slower
speed) when needed or to print low quality simple Spot Color images (faster
speed) when needed.
3. You are now ready to print! Select the Print command from your graphics
application and choose T-Jet3 PLUS as your printer.
45
T-Jet3 PLUS User’s Manual
A Word about Resolutions, Speed and Quality
The resolution you choose will not only determine print quality, but print speed as
well. If you use a lower resolution Print Mode, you will achieve a much faster print
speed, but may not get the quality needed for photo images. Lower resolutions
apply fewer ink dots per inch, which allows the Print Head to move much faster.
If you use higher resolution Print Modes, you will notice a decrease in print speed
but an improvement in image quality. A higher DPI increases print quality by
increasing the density of the dots per inch. Therefore, we recommend a lower
resolution for cartoon images, but a higher resolution for photo type images.
Print Modes and FastRIP
Listed below are a list of print modes available with T-Jet printers and
FastRIP, but with the T-Jet3 PLUS all this is not necessary. We have
simplified using the T-jet3 with the PLUS model to a simple 1440 print
mode.
CMYK Cartoon and Photo Print Modes
The T-Jet3 PLUS has three basic modes for printing – Cartoon, Photo, and
Underbase. The Cartoon and Photo Print Modes will print the image in color
when printing from FastARTIST or any other graphics program. These two modes
were created to adjust print characteristics based on the image to be printed. If
you are printing vector graphics with spot color, use the Cartoon Print Modes. If
you are printing photo-type bitmap images, use the Photo Print Modes.
Cartoon Print Modes are designed to:
• Lay down more ink with good color saturation
• be used for non-critical images
• allow a lower DPI to be selected
Photo Print Modes are designed to:
• Lay down less ink with highly accurate colors
• reproduce an extremely detailed image
• utilize a higher DPI to ensure good print quality
Version 1.1 Revised July, 2008
46
Chapter 4 - Printing Basics
Eight Color Print Modes
The T-Jet3 PLUS also supports Eight Color Print Modes that utilize the additional
colors of Red, Green, Blue and Orange in place of the four White ink. This
configuration of inks cannot be used to print on dark garments, however when
printed on light garments, the additional colors create vibrant hues that add an
exciting dimensionality to your final output.
The Eight Color Bulk Ink System is an optional configuration. If your
printer is not equipped with the necessary inks and supplies, you
may purchase these accessories from XV
Refer to Chapter 7 of your FastARTIST User’s Manual for
details on Ink Line placement.
Underbase Print Modes
These Underbase Print Modes may only be selected from within FastARTIST. With
Cartoon and Photo Print Modes available in three different resolutions, you have
the ability to select the proper mode to match your graphic image. For dark
shirts try using the 1440 DPI Print Mode to achieve a stronger, more consistent
Underbase. This is due to the fact that the higher resolution will dispense more ink
at a slower speed, creating an extremely even coverage. If you are printing on
lighter colored shirts, it may not be necessary to print such a strong Underbase720 DPI may work better.
Windows Underbase
Windows Underbase Print Modes are used when printing from graphics programs
such as Adobe Photoshop, CorelDRAW, or Adobe Illustrator. There are four Print
Mode options and each is available in different resolutions. Bi-directional is also
offered for each Print Mode as well.
Select the Image modes when printing a bitmap, raster or gradient image. This
also applies when printing a gradient image in a Vector program. Anytime you
have a gradient in any image, Image modes must be used.
Vector modes should be selected when printing solid vector images. You will
also be able to print White areas as a “Highlight White” on the color pass only if
you use Named Spot Colors and apply the Named Color White.
Heavy/Normal Underbase changes the intensity of the Underbase. The Heavy
Underbase modes use a preset that applies more ink in dark and light areas
then the Normal Underbase modes. Because Underbasing is such a crucial part
of image quality, we recommend trying out the different print modes to get a
general understanding of the difference between each one.
47
T-Jet3 PLUS User’s Manual
Because Underbasing is such a crucial part of image quality, we recommend
you familiarize yourself with the different Print Modes to get better understanding
of the uses for each one.
For a complete list of the various CMYK, Eight Color and Underbase Print Modes
available, please refer to Chapter 7 of your FastARTIST User’s Manual.
When A Printing Job is Finished
1. After your T-Jet3 PLUS finishes printing,
the Print Bed will eject from the unit
(ensure the Bed is in the Eject 2 position
by pressing the Eject button again).
For brighter prints, double print the
image by pressing the Load button
and printing from the application a
second time. For higher production,
set the number of Pages to print to a
high quantity or choose a 2-pass Print
Mode.
Keep in mind, if you tell the application to print dozens of copies, FastRIP
might build a very large print file that will slow down your computer.
2. Carefully remove the shirt from the Shirtboard for curing.
3. Finished prints must be heat cured to fully set the ink. Use a conveyor dryer or
a Heat Press.
Curing
C
uring Y
Your
our G
Garments
arments
Finish
Finished
Fini
shed
ed prints
pri
rint
ntss mu
must
st b
be
e he
heat
at c
cured
ured
ur
ed tto
o fu
full
fully
lly
y se
sett th
the
e in
ink
ink.
k U
Use
se a c
conveyor
onve
on
veyo
yorr dr
drye
dryer
yerr or a
Heat Press with the following settings:
Light Garments
(With or without using FastBRIGHT)
Cure Time: Approximately 60-90 seconds
with medium to heavy pressure.
Cure Temp: 330°F (166°C)
Version 1.1 Revised July, 2008
48
Chapter 4 - Printing Basics
Dark Garments
(Using FastINK Pretreatment solution)
Cure Time: Approximately 180-240 seconds
with medium to heavy pressure.
Cure Temp: 330°F (166°C)
For areas of greater humidity or where shirts are very
damp after printing, try increasing the curing temperature to 350°F and curing
time to 120 seconds.
Important Point
All curing times and temperatures ARE RECOMMENDED STARTING
POINTS.
Shirts may scorch if cured too long. A Heat Press will provide a
more even cure and, when printing with White ink, you will see less
shirt fibers through the ink.
Before doing your first production run, it is important that you do a
test washing for proper cure. Variables such as climate (humidity)
and the amount of ink used on a shirt can extend cure times.
Certain garment fabrics may also require more time. You will have
to find the cure time that works best for your location and Print
Mode preferences.
You should ALWAYS do periodic wash tests as well as test the temperature of
your dryer or Heat Press using an infrared heat gun or Temperature Test Strips.
If using a conveyor dryer, use a very slow belt and make sure the garment lies
flat. If using a Heat Press, set the pressure to 70 or 80% of maximum (60 PSI). You
should clamp the heating element down directly onto the print with a piece of
paper or a Teflon pad over the print. You can also use a baking pan liner for this
purpose.
You will probably scorch a shirt or two doing temperature tests, but this is normal
in the garment decorating business.
Some shirts might show a slight discoloration if you use a Heat Press to cure
the print. (This is most often seen in Red and medium to dark colors other than
Black.) This discoloration will usually go away when the shirt cools or when the
shirt is washed.
49
T-Jet3 PLUS User’s Manual
How to Use the Print Pass Counter
The Print Pass Counter makes it easier to make multiple passes of
the Top Colors when printing on dark shirts. Without the Counter
you would need to stay by the machine and press the Load
button each time a print pass is completed. With the Counter, you
can set it for the number of passes and prepare the next shirt for printing. When
printing light garments, you must use a two pass Print Mode in combination with
the print passes counter.
Press the Passes button until it indicates the desired number of passes, then
press the Load button to load the garment. If you are doing a quantity of shirts
with the same design, set the number of copies you will need in FastRIP. After
the shirt loads (the Load light will stop blinking), send the Print command from
FastRIP. When the shirt is completed, press the Eject button 2x to fully eject the
Print Bed. Remove the first shirt and load the next shirt. Reset the Passes button
to the desired number of passes and press the Load button again. Continue this
process until your run is finished.
Remember, the Print Pass Counter will default to 1 with the completion of each
garment.
Printing From Various Graphic Programs
Printing from Adobe Photoshop
When printing a design from Photoshop, FastRIP will determine which
components of the image are pure White and configure the output so that
those areas do not receive an Underbase (RGB 255,255,255 or CMYK 0,0,0,0).
If you wish to override these settings, set these areas to a slight tint of off-White
(RGB 254,254,254 or CMYK 1,1,1,1).
In this first example, arrows identify that
the “N” in California has been set to
RGB 254,254,254, meaning that it will
print White.
Version 1.1 Revised July, 2008
50
Chapter 4 - Printing Basics
The arrows in this second example show
that the background is set to RGB
255,255,255, making the background
transparent when printing with FastRIP.
Color Management must be turned OFF
before sending the image to print. Color
Management is found in the Print with
Preview window. Go to File > Print with
Preview. For more information and
instructions on how to Print from
Photoshop, refer to Chapter 9 of your
FastARTIST User’s Manual.
Printing from CorelDRAW – Design Setup
When designing in CorelDRAW, set areas where no Underbase is desired as pure
White (RGB 255,255,255 or CMYK 0,0,0,0). To print an area as White, set the area
to a slight tint of off-White (RGB 254,254,254 or CMYK 1,1,1,1).
In this first example, the selected area
is set to CMYK 1,1,1,1, which is
recognized as White and will receive
an Underbase when printed through
FastRIP.
When working with vector images, if you use Named Spot Colors, use the Spot
Color White and FastRIP will create a Highlight White when it prints the Top Color
51
T-Jet3 PLUS User’s Manual
pass. This means an Underbase will be
applied and then Highlight White will
printed in conjunction with the Top
Colors. In this example, the arrow is
identifying the use of spot White.
Printing from Adobe Illustrator
When designing in Adobe Illustrator, set areas where no Underbase is desired as
pure White (RGB 255,255,255 or CMYK 0,0,0,0). To print an area as White, set the
(For best resu
area to a slight tint of off-White (RGB 254,254,254 or CMYK 1,1,1,1).
assembly sho
clean and fre
dried ink or d
In this example, the selected area is
not a pure White (RGB 254,254,254),
meaning that the image will print
White.
When working with vector images, if you use Named Spot Colors, use the Spot
Color White and FastRIP will create a Highlight White when it prints the Top Color
pass.
This means an Underbase will be
applied and then Highlight White will
be printed in conjunction with the Top
Colors. In this example, the arrow is
identifying the use of spot White.
Version 1.1 Revised July, 2008
52
ults the cap
ould be
ee of any
ebris).
Chapter 4 - Printing Basics
For more information on designing and printing vector or bitmap
images, Spot Colors and gradients, consult your FastARTIST User’s
Manual and the Help sections of your graphics application.
Quick Printing Tips
• You should perform a Head Cleaning if you experience one of the following
conditions:
▪
▪
▪
▪
If streaks appear in the print
If small drops of ink appear on
the garment outside of the
printed image
If the unit has been sitting for a
few days
If the Print Head strikes a
garrment.
Press the Ink button for three seconds to initiate a Head Cleaning cycle. You
may do this in the middle of a print job if necessary. If you experience severe
head clogs you can do a number of Head Cleanings back-to-back using the
Epson utility.
• If you have been printing a lot of shirts, you may have to manually wipe
the bottom of the head to remove cotton lint.
• The best way to check print quality is to do a Nozzle Check from the Epson
Adjustment Utilities Program. Refer to Chapter 7 for more information.
• Spots or ink stains must be removed BEFORE the print is cured by using a
standard Spot Removal gun. Make sure to NOT spray the wet print. Once the
ink is cured it is almost impossible to remove spots or smudges.
• Prints can be laundered as normal. If possible, give the customer washing
instructions of: Turn print inside out before washing or drying. Use Cold Water
Only and a Medium Dryer Temperature.
• You can expect a little fading with the first washing. This is normal and very
similar to what you would get from a screen printed shirt. If you experience
a lot of fading, make sure to check your dryer temperature. If the shirts are
damp from excess humidity, you should put them under the heat press for a
few seconds to dry out before printing.
53
T-Jet3 PLUS User’s Manual
Version 1.1 Revised July, 2008
54
Chapter 4 - Printing Basics
Production Rates and Ink Costs
The chart on the following page shows the average production rates and ink
costs you can expect when using your T-Jet3 PLUS. Each image is different and
the Print Mode and resolution you choose will also have an effect on these
figures. Ink costs might vary from this chart. The ink prices are based on the
current prices the summer of 2006 and are in US Dollars.
The following chart is also available online at www.screenprinters.net > Support >
T-Jet3 > Downloads.
55
T-Jet3 PLUS User’s Manual
Version 1.1 Revised July, 2008
56
Chapter 5
Advanced Printing with White Ink
This Chapterr o
off th
the
e Manu
Ma
Manual
nual
al iiss desi
de
designed
sign
gned
ed to
to pr
prov
provide
ovid
ide
e a brie
br
brief
ieff
Overview of th
the
e proc
pr
process
oces
esss fo
forr prin
pr
printing
inti
ting
ng W
Whi
White
hite
te iink
nk
onto a T-Shirtt o
other
garment.
orr ot
othe
herr ga
garm
rmen
ent.
t. Please
Plea
Pl
ease
se consult
con
c
onsu
sult
lt
your FastARTIST
User’s
Manual
detailed
TIS
ISTT Us
User
er’s
’s M
anua
an
uall fo
forr mo
more
re d
etai
et
aile
led
d
instructions and specific Hints and Tips.
Please DO NOT attempt to print ANY image until you
have read and familiarized yourself with FastARTIST and
FastRIP, including their uses and capabilities.
The process of printing White ink onto a Dark garment
was not an easy one to develop. Because the
openings in Print Heads are so small, one can’t use
thick ink like standard Screen Print Plastisol. Printing White
ink on a Fast T-Jet3 PLUS was made possible by a combination of:
• Very special ink that took over a year to develop
• A software print driver called FastRIP that allows the printer to dispense more
ink than originally designed
• A software package called FastARTIST that creates special Underbase and
highlight White files
• A revolutionary Pretreatment that allows the ink to set on top of the garment
and remain White.
White Ink Warnings and Care
Your Fast T-Jet3 PLUS is shipped with the latest innovation in textile
ink- FastINK Bright White. This ink is the best in the industry at
producing bright Whites and brilliant Highlights.
We recommend that as part of your daily routine you agitate the
White Bulk Ink Bottle in the beginning and ending of each day. Do
this regularly and you will have no settling concerns.
As a weekly practice, vigorously shake the ink you may have on
the shelf for about a minute. This will help keep the pigment of the
white in suspended and will give you great white prints. The white
ink has a shelf life of 6 months.
57
T-Jet3 PLUS User’s Manual
Pretreatment Basics
The Pretreatment solution is a milky colored, odorless and nontoxic liquid. A
chemical reaction between the Pretreatment and the White ink causes the
ink’s pigments to stay on top of the garment and not be absorbed by the
textile fibers. Because of these reactive chemicals, it is CRITICAL the Print Head
does not touch a pretreated garment - even one that has been dried! You
should also have good ventilation in the area where you are applying the
Pretreatment. If possible, pretreat garments in another room entirely.
You MUST NOT spray Pretreatment near the printer. In fact, you
should pretreat shirts in a separate room entirely to prevent any
overspray from getting inside the Fast T-Jet3 PLUS . If using another
room is not possible, a large cardboard box enclosure is a good
substitute for applying Pretreatment.
IImportant
mportant Point
Point
Your printer has a smart chip for each ink cartridge. These chips count the
number of drops of ink dispensed in order to warn you when the cartridge is
empty. Normally, you should never run out of ink before the chip “thinks” you are
out, since turning the printer ON or OFF resets the chip to read “Full.” However,
when printing with White ink, it does not take much ink usage before the chip
tells the printer it is “Out.” If this happens DURING a printing pass, the printer may
stop printing and the red lights on one, or all three, of the white colors will be ON.
If you turn the printer off during this process you will lose the job and ruin a shirt.
Reset the chip(s) by using the process described in Chapter 2 (pages 19-20).
Another option is to turn the printer OFF and back ON again between jobs so that
the chips will always read as “Full.”
Applying
A
pplying P
Pretreatment
retreatment
It iiss es
esse
essential
sent
ntia
iall the
the Pretreatment
Pret
Pretre
reat
atme
ment
nt solution
ssol
olut
utio
ion
n be app
a
applied
pplilied
ed eve
e
evenly
venl
nly
y to e
ens
ensure
nsur
ure
e a gr
grea
great
eatt
looking print (free from light and dark spots) on a Black garment. You can use
manual spray pumps, weed sprayers or any other method you feel comfortable
with to apply a uniform coating of FastINK Pretreatment. However, we strongly
suggest the use of a Control Spray Gun (commonly used to paint a porch deck
or furniture et al). Your Fast T-Jet3 PLUS kit includes a Wagner Control Spray
Gun. (If you purchased your printer outside of the USA, your machine may NOT
Version 1.1 Revised July, 2008
58
Chapter 5 - Advanced Printing with White Ink
include the control sprayer. These guns are fairly
inexpensive ($70 USD at home improvement stores.)
However, these are not designed for high volume
work, therefore you should keep an extra gun handy
as backup.
Cleaning the gun is simple and should be done on a
regular basis to extend the life of your sprayer. Just fill
up the storage bottle with water and run it through
the gun as you would normally dispense any other
solution.
Types of Pretreatment
Currently we offer three types of Pretreatment-FastINK Textile Pretreatment,
FastBRIGHT Textile Pretreatment and FastCOLOR Textile Pretreatment:
• FastINK Pretreatment #1 is specifically designed for use on Dark
colored garments, allowing for extremely bright Whites and vibrant
colors. FastINK Pretreatment should only be used with medium to
dark colored garments due to possible discoloration of light shirts
when exposed to direct sunlight.
• FastBRIGHT Pretreatment works extremely well with light colored
garments and images that have an Underbase. Using FastBRIGHT
creates vibrant images with rich, deep Blacks and Reds that will
not discolor when exposed to direct sunlight.
• FastCOLOR reduces cure times while GREATLY increasing the color
brilliance and washability of your print. This pretreatment is designed
for use with images on light colored shirts and containing NO White
ink.
WARNING
DO NOT mix any of the Pretreatments together or the result will be
ruined shirts.
Proper Pretreatment Application
All of our Pretreatments are specially formulated
liquids that prevent ink pigments from being
absorbed by the fabric of a garment. When
applying a Pretreatment solution, do not saturate
the garment!
59
T-Jet3 PLUS User’s Manual
You don’t want the shirt to be soaking wet. Move
the spray gun from side to side in even strokes. Light
shirts only require a misting back and forth, but Black
and other dark colors will need a slightly heavier
application. Don’t worry, the proper amount of
Pretreatment needed is something that you will get the
hang of with repetition. Please note, if you miss a spot
or apply the Pretreatment in an uneven spray, it will be
noticeable in the final print.
Dry the Pretreatment using a hair dryer, Heat Press
or conveyor dryer. When using a Heat Press, use a
non-silicone Pretreatment paper (available from XV
) to protect the garment. If you use a silicone
based paper, it will seal the Pretreatment on the shirt
surface and the White ink may not stick well enough.
You may use a Quillon treated baking pan liner to
dry the Pretreatment. However, if the paper sticks to the Pretreatment after you
are done pretreating the shirt, you may have applied too much Pretreatment
or the heat press is set for too much pressure! Standard “butcher paper” or
“brown Kraft paper” can also be used as a heat press protector when drying the
Pretreatment. Clamp the press down with medium pressure for 8 to 10 seconds
when drying Pretreatment at 330°F.
Some users have reported slightly better wash durability if you spray the shirt with
water BEFORE spraying it with Pretreatment.
IMPORTANT POINT Too much Pretreatment may cause poor wash durability.
When printing, ink will tend to cling to any loose fibers sticking
up from the shirt. When using a White Underbase, it is possible for
these fibers to become saturated and show through any color
that has been applied. This is why we
recommend the use of a Heat Press with
light pressure before the print to flatten to
fibers properly. A conveyor dryer or similar
method of drying the Pretreatment will not flatten the
fibers and may result in a lower quality print.
We recommend taking a look at the
AutoTREAT Express and PRO Pretreatment Centers.
These machines make pretreating a garment very easy
and apply a perfect application every time.
Version 1.1 Revised July, 2008
60
Chapter 5 - Advanced Printing with White Ink
Printing White Ink
Reminder: If the printer has been unused for a few days, perform two or three
regular Head Cleaning cycles to get the White ink flowing properly.
1. When printing with White ink, it is very important you set up the file correctly in
FastARTIST. When Underbasing solid, Spot Color images, generally you’ll print
solid White ink and then follow that print with the colors. Underbasing Spot
Color vector images is as simple as one click of the mouse in FastARTIST. If the
image has White as part of the design, a second pass of White is made at the
same time as the other colors. This second pass of White is called a Highlight
and it boosts the brightness of the White.
2. When printing photorealistic images, you will need to run a special routine
called the Underbase Wizard. This feature of FastARTIST will create a separate
piece of artwork that FastRIP will use to print an Underbase of White ink. When
printing a photorealistic image, the Underbase is NOT solid White but instead
it is Grayscale. Grayscale consists of light and dark areas that give the image
dimensionality. This is the art to printing bright and soft prints on Dark garment.
3. You must tell FastRIP what Print Modes to use for both the White ink and Top
Colors. Once you have made these selections, they can be used again for
other jobs. For Dark shirts you can get very good “Screen Print” quality White
if you select a 1440 DPI Print Mode for the Underbase. For the top colors of
Cyan, Magenta, Yellow
Yellow, Black and the Highlight White, choose a 720 DPI Print
Mode.
4. For medium colored shirts, use a 720 DPI Print Mode (faster than 1440 DPI)
for the White ink Underbase. In some cases, very light colored shirts may not
even need a White Underbase. These images can be printed using just CMYK
and Highlight White to save time.
We recommend you DO NOT mix Print Modes. You will notice that
certain Print Modes contain a ‘HS” or “HS (Bi-Directional)” while the
standard Print Modes contain neither. DO NOT use standard Print
Modes in conjunction with HS Print Modes. The result may lead to
registration issues and ruined prints. Please note that this warning is
not referring to print resolution, i.e. 720 or 1440 DPI. Print resolutions
can be mixed and matched as needed. If you are not sure how
different Print Modes work together, do a test print before doing
a production run. For more information on Print Modes, refer to
Chapter 4 of this Manual
5. Cure the print. Carefully remove the shirt from the Shirtboard and cure the
print. Keep in mind, White ink will need to be cured longer than standard
colors. Cure in a conveyor dryer or Heat Press. (See page 59- Curing Your
61
T-Jet3 PLUS User’s Manual
Garments for specific details)
If using a Heat Press, place a silicone treated
piece of parchment paper (a common
baking pan liner) over the print and close the
press. When you open the press, peel the
paper immediately. The paper can be used a
number of times before it becomes too
wrinkled to use.
• You will only use the silicone treated paper for curing after the entire print
has been completed. You risk ruining a shirt if you use silicone paper in the
Pretreatment phase.
• If you want a glossy print, use a standard Teflon pad rather than silicone
treated parchment when curing the print in a Heat Press. Teflon pads are
available from most Heat Press manufacturers.
IImportant
mportant Point
Point
When p
When
printing
rint
ri
ntin
ing
g gr
grad
gradient
adie
ient
nt iimages
mage
ma
gess wi
with
th W
White
hite
hi
te iink,
nk,, yo
nk
you
u sh
shou
should
ould
ld h
have
ave
av
e tw
two
o
versions of the artwork. One version will have a White background
and the other will have a Black background. These two files can
be created in Photoshop, Adobe Illustrator, CorelDRAW or even in
FastARTIST. If you use another program, simply save or export the
files as a JPEG file at 250 DPI resolution for the final print size and
Import these files into FastARTIST.
There is an excellent video tutorial on Underbasing with Two Versions of the
Artwork on the T-Jet Support page.
Version 1.1 Revised
Revis
Re
vised
ed July,
July, 2008
2008
62
Chapter 5 - Advanced Printing with White Ink
Washing Directions
For the longest lasting print, the shirt should be turned inside out, washed in
COLD water and dried on delicate. If possible, include washing directions with
the finished print.
When you apply the Pretreatment correctly and choose the proper Print Modes,
you will get very detailed bright prints like these!
White Ink Troubleshooting
ing & M
Maintenance
aintenance
Concern: White prints seem dull
Solution 1: You may not be applying enough Pr
Pret
Pretreatment
etre
reat
atme
ment
nt o
orr not
not us
usin
using
ing
g a 1440
1440
DPI print mode.
Solution 2: The Print Head may be clogged. If you had bright White prints before
and they now seem dull, you probably have clogged nozzles. Due to the nature
of the White pigment, you may experience more head clogs than normal. These
can easily be cleared by doing two or three Head Cleaning Cycles. Perform a
Nozzle Check to be certain nozzles are firing properly. Always follow Chapter
12 - Daily, Weekly and Montly Maintenance. Do not skip a day.
Solution 3: The Highlight White settings in FastARTIST are wrong. You may actually
be printing White ink ON TOP of the CMYK colors. Reload the image into
FastARTIST and run the Underbase/Highlight Wizard again. Try not applying a
Highlight or toning down the Highlight.
63
T-Jet3 PLUS User’s Manual
Solution 4: Dry ink may be causing the Print Head to not seal properly. Due to the
nature of the White ink pigment, it will build up faster on the capping station and
on the wiper blade. Dry White ink around the rim of the Capping Station will
interfere with the printer pulling ink out of the cartridge during a Head Cleaning
cycle. Use a sponge foam tipped swab and cleaning fluid or water to clean the
areas noted below.
Perform DAILY cleaning of these items. For a complete description on cleaning
these parts, refer to Chapter 8 - Preventative Maintenance and Problem Solving.
Clean Spit Tray/Flushing Box
Clean Wiper Blade
Clean Capping Station
Clean Print Head Area
Clean Encoder Strip
Do NOT touch the middle part of the
print head where the nozzles are. This
could damage your print head.
Solution 5: The Print Head is permanently clogged or damaged from lack of
maintenance. Before contacting us for a replacement or for other instructions,
check the print head to see if there is any visible ink or lint stuck to it. If so, use an
alcohol wipe (isopropyl only) and CAREFULLY wipe the bottom of the Print Head
in one direction with VERY LITTLE PRESSURE. The print nozzles are very sensitive
and can be damaged very easily. This procedure should only be completed as
a last resort to replacement. Flip the alcohol pad and repeat the process.
NOTE: You will need to release the Print Carriage and move the print head to
the middle of the machine to gain access to it.
Version 1.1 Revised July, 2008
64
Chapter 6
Printing on Other Items
nG
eneral IItems
tems
Printing on
General
LUSS can
LU
can pr
prin
intt
The T-Jet3 PLUS
print
on almost any
ny fa
fabr
fabric
bric
ic
or material and usually
you don’t even need a
clamping device. FastINK
for your T-Jet3 PLUS is a
water-based textile ink
designed to work not only
on natural fabric materials,
but also on non-textile items
such as unfinished wood,
mouse pads, golf balls,
keyboards, light switch
covers and much more. With the help of Fast T-Jet Non-Textile Series Pre and
Post Treatments, FastINK will adhere to almost any type of surface.
If you’re printing on smaller items such as hats, golf balls or mouse pads, these
can be placed on smaller Garment Holders available as accessories for your
T-Jet3 PLUS or you can make your own. Spray adhesive or sticky Table Tack
can be placed on these special holders to keep the items from moving. Just
remember to ALWAYS check the Print Head clearance.
Shirtboards (available options)
Standard
Youth / Infant
Sleeve
Location and Placement
Quad
The hardest part of printing on odd size items is determining their print location.
If you are facing your T-Jet3 PLUS, the outer right edge is “zero” in your graphics
65
T-Jet3 PLUS User’s Manual
program. You can make a Template or Custom Page Size to match the size of
your Shirtboard.
FastARTIST
you to
Size
tAR
ARTI
TIST
ST allows
ll
t adjust
dj t the
th Page
P
Si to match
atc
tch
h your
your items
ite
tems
ms in
in the
the Page
Page
Setup window. You must also set the correct page size in FastRIP Setup.
• FastARTIST Page Size – Go to Layout > Page Size
• FastRIP Setup – Go to File > FastRIP Setup
Version 1.1 Revised July, 2008
66
Chapter 6 - Printing on Other Items
Adjusting the Bed Height
When printing on non-textiles that require a special holder, you may need to
purchase the Non-Textile Height Adjustment Board in order to raise the specialty
holder closer to the Print Head. For the best prints, the printing surface should set
to 1/8inch (3mm) below the Print Head. If the item has a seam or excess fabric,
these areas should be lower than the main printing surface.
Ensure
the garment or non-textile item does not sit closer to the
E
Print
Head than the preferred of 1/8” (3mm).
P
Use Spray Glue, Table Tack or Double-Sided Tape to Hold Items in
Place
It may be necessary to design a special cutout from foam or other thin material
that is the same size as the printing area. You can simply spray glue this to your
normal Garment Holder or use spreadable Table Tack (available from XV
) to hold the item in place. Table Tack stays sticky for dozens, and even
hundreds of prints, and it can be “renewed” by wiping it down with a wet rag.
Special double-sided tape is also available from XV for this purpose.
Printing Baseball Caps
It’s easy to apply graphics to baseball caps, both with and without seams. When
using the optional Baseball Cap Holder, pull the sweatband out of the way,
push the cap against the spring guides and use your finger to press the point in
the crown down around the point on the cap holder. Stuff the excess cap under
the holder, lower the clamp and make a print. It’s worth noting, some caps will
require a little more practice to load than others. In Addition, always make sure
to check and double check the Print Head clearance. This will minimize Print
Head replacement as well as ensure better images.
67
T-Jet3 PLUS User’s Manual
Since a cap may not fit in a Conveyor Dryer or Heat Press for curing, a hair dryer
or industrial heat gun will also work to cure the final print. You may also remove
the holder with the cap still in place and lay both under a standard Heat Press.
If you choose the latter method, DO NOT clamp down on the cap and be
extremely cautious when removing the METAL holder, it could be very HOT!
Version 1.1 Revised July, 2008
68
Chapter 6 - Printing on Other Items
Non-Textile Printing
Required Items and Overview
You must have the following to
successfully print on Non-Textile items:
1. Non-Textile Pretreatment
2. Non-Textile Post-Treatment
3. (2) Fine Bristle Brushes
Optional materials may be required:
1. Non-Textile Primer
2. A Holder for object(s) (i.e. Golf Ball Holder)
3. Non-Textile Print Modes and Templates (You can utilize the latest Non-Textile
Print Modes by downloading the most recent Printer Package for your T-Jet3
PLUS from www.screenprinters.net)
CAUTION:
WEAR GLOVES WHEN APPLYING AND USE WITH
C
ADEQUATE
VENTILATION. HANDLE WITH CARE AND PROTECT
A
EYES
WITH SAFETY GLASSES WHEN APPLYING AS A SPRAY. BEFORE
E
USE,
CONSULT THE MATERIAL DATA SAFETY SHEET (MSDS) THAT IS
U
INCLUDED
WITH THESE PRODUCTS
IN
KEEP OUT OF REACH OF CHILDREN
Getting Started
It is necessary to determine if the surface intended for printing will allow the
Pretreatment to stick. Certain surfaces will accept the direct application of
the Non-Textile Pretreatment, while others will require first require a coat of
Non-Textile Primer. Generally, smooth surfaces such as light switches, keyboards,
lighters and gloss tiles will require an application of Non-Textile Primer before the
Non-Textile Pretreatment.
To Test: Apply a very small thin amount of Non-Textile Pretreatment to the
intended printing surface. If the Pretreatment runs off, it will be necessary to use
the Non-Textile Primer.
If this is your first time using a Non-Textile Pretreatment, it is
recommended
you pretreat small quantities at first to familiarize
re
yourself
with the process.
y
69
T-Jet3 PLUS User’s Manual
Fast T-Jet Non-Textile Primer
Fast T-Jet Non-Textile Primer is designed to be used on high gloss,
non-porous surfaces as a primer coat prior to the application of our
standard Fast T-Jet Non-Textile Pretreatment.
DO NOT print directly onto this product.
Protect your work surfaces with newspaper.
DIRECTIONS:
• Dip a fine bristle brush into the Primer, wiping off any
excess on the side of the bottle. Gently brush Primer
over the surface of the non-textile item, making sure
there are no uneven areas.
• The Primer must be applied in a thin even layer to ensure optimal
ti
l print
i t
quality.
• After the application is complete, clean the brush thoroughly with hot water
to remove all Primer residue.
This
T product can be sprayed on, but the application may not be as
smooth
as necessary for good print reproduction. If applying with
s
an
a airbrush, spray bottle or paint sprayer, you may need to dilute
the
th solution with water. If you dilute the Primer, two coats may be
necessary.
n
• Clean up spills and brushes with soap and water immediately after use.
• Allow the Primer to dry thoroughly before applying the Non-Textile
Pretreatment. Dry time will vary but can take up to one hour or more. To
speed up the drying process, you may use a hair dryer, heat lamp or a heat
gun set on a low temperature setting.
• A Heat Press may also be used by setting the non-textile item under the
heating element. However, DO NOT allow the heating element to touch the
non-textile item.
Version 1.1 Revised July, 2008
70
Chapter 6 - Printing on Other Items
Fast T-Jet Non-Textile Pretreatment
Fast T-Jet Non-Textile Pretreatment is designed for use as an inkjet ink
receptive base coat when printing directly onto non-textile materials
such as plastic, metal and wood. For increased durability of the final
print use our Fast T-Jet Post-Treatment on top of the final print. When
using a Fast T-Jet Inkjet-to-Garment Printer and FastINK Textile ink, you
WILL NOT need to change inks when using this product.
DIRECTIONS:
• Dip a fine bristle brush in the Pretreatment, wiping
off any excess on the side of the bottle. Gently brush
Pretreatment over the surface of the non-textile item,
making sure there are no uneven areas. If Primer was
applied, then the entire Primer treated surface must
be covered with Pretreatment.
• The Pretreatment must be applied in a thin even
layer to ensure optimal print
quality.
Use
U a second brush to apply Pretreatment. After the application is
complete,
clean the brush thoroughly with hot water to remove all
c
residual
Pretreatment.
re
This
T product may be sprayed on, but the application may not be
as
a smooth as necessary for good print reproduction. If applying
with
w an airbrush, spray bottle or paint sprayer, you may need to
dilute
the solution with water. If you dilute the Pretreatment, two
d
coats
may be necessary.
c
• Clean up spills and brushes with soap and water immediately after use.
• Allow the Pretreatment to dry thoroughly before applying the Non-Textile
Pretreatment. Dry time will vary but can take up to one hour or more. To
speed up the drying process, you may use a hair dryer, heat lamp or a heat
gun set on a low temperature setting.
• A Heat Press may also be used by setting the non-textile item under the
heating element. However, DO NOT allow the heating element to touch the
non-textile item.
71
T-Jet3 PLUS User’s Manual
SSince the pretreatment process can take some time to dry, we
recommend you pretreat as much of the production run as
re
possible to avoid delays due to drying time (Do this only after
p
becoming proficient with the Non-Textile Primer/Pretreatment).
b
Setting up an Image for Print
To setup an image for print, you must use a graphic application such as
FastARTIST, Photoshop, or CorelDRAW. Any these applications are capable of
printing to FastRIP, but for this Reference Guide we will setup the image using
FastARTIST. The steps required for printing with other graphic applications will be
very similar- please consult your application’s Owner’s Manual if needed.
1. Setup the printing area in which you will be printing on. To do this you will
need a measuring tape and will need to measure the width and height of
the Non-Textile item. From within FastARTIST select File > FastRIP Setup.
2. From the Setup window, select Page Setup. In
the Page Setup window, select Custom under
the Page option. Enter the Height and Width of
the Non-textile item you have measured. After
entering the values, click OK to return to the
workspace.
3. Select Layout > Page Size. For the Page Size,
enter the Height and Width of the Non-textile
item you have measured. After entering the
values, click OK to return to the workspace.
The non-textile item dimensions will now be
represented by a black box located within the
workspace. If this is not displayed, click View >
Show Page Size to view the black box.
Version 1.1 Revised July, 2008
72
Chapter 6 - Printing on Other Items
4. Import your image for printing and position the image as you would like it to
print on the non-textile item. For further details, please refer to your FastARTIST
User’s Manual.
5. Select File > Print to FastRIP > Position the image and click on the printer icon
located in the Printer Toolbox. This will send the image to FastRIP.
Printing to FastRIP Using Adobe Photoshop
Select File > Print with Preview and click on Page Setup. Click on Printer. In
the Page Setup menu, select your Fast T-Jet printer. Click Properties. Click
Advanced. Set the Page Size. Go to the Printer Features section and select the
Print Mode menu. Scroll down and select the Color Print Mode. Drop down the
Underbase Mode menu to select the Underbase Print Mode. Set the number
of ink passes for the Underbase and Top Colors and click OK. In Document
Properties, set to Landscape or Portrait for Orientation and click OK. Click Print.
Printing to FastRIP – CorelDRAW
Go to File > Print. From the General tab, select your Fast T-Jet printer. Click
Properties. Click Advanced and set the Page Size. Go to Printer Features. Drop
down the Print Mode menu to select the Color Print Mode. Drop down the
Underbase Mode menu to select the Underbase Print Mode. Set the number
of ink passes for the Underbase and Top Colors and click OK. In Document
Properties, set to Landscape or Portrait for Orientation and click OK. Click Print.
Printing Multiple Items on the Print Bed
When printing multiple items simultaneously, you must configure FastARTIST or
another graphics application so that each individual image is applied in the
proper location.
1. The total print area of all items must be determined measuring the total
length and height of all the items.
73
T-Jet3 PLUS User’s Manual
2. Within FastARTIST select File > FastRIP
Setup. From the Setup window, select
Page Setup. In the Page Setup window,
select Custom under the Page option.
Enter the Height and Width of the Nontextile item you have measured. After
entering the values, click OK to return to
the workspace.
3. Select Layout > Page Size. For the Page Size,
enter the Height and Width of the Non-textile
item you have measured. After entering the
values, click OK to return to the workspace.
The non-textile item dimensions will now be
represented by a black box located within the
workspace. If this is not displayed, click View >
Show Page Size to view the black box.
Upper Left-h
Upper
Lef
Left-hand
t-hand
and
Corner
Cor
ner is 0,
0,0
0
Version 1.1 Revised July, 2008
74
Chapter 6 - Printing on Other Items
Now that the total print area has been set, you must now determine the location
for each individual image that will be printed.
4. Using the first non-textile item that is closest
to the upper left hand corner of the print
bed, measure from the left side of the print
bed to the center point where the image is
to be located (X axis). Fractions of an inch
matter, so be precise.
Logo
For reference:
1/4 = .25
5/8 = .63
3/8 = .38
3/4 = .75
5. Using the same item, measure from the top
of the print bed down to the bottom point
where the image should stop on the non-textile
item (Y axis). The red dotted line identifies the
measurement taken for the bottom of the logo.
Upper
Upp
er Left-h
Lef
Left-hand
t-hand
and Co
Corne
Corner
rnerr
Logo
1/8 = .13
1/2 = .50
7/8 = .88
6. Steps 4 and 5 will give you the location in which to
rstt image.
o position
posit
ositio
ion
n the
the fifirs
imag
im
age
e
Using the rulers framing the FastARTIST workspace, place the image in the
proper location. You may also type in the desired location in the X/Y boxes
with the image selected.
Repeat steps 4, 5 and 6 for each of the remaining items. We recommend
measuring items starting in the upper left hand corner and moving left to right
and from top to bottom.
Setting up FastRIP
Once the Print command is given, FastRIP will open and proceed to spool the
print job.
75
T-Jet3 PLUS User’s Manual
1. Double-click on the file in the Queue
window.
2. This will bring up the Job Ticket Properties
window. Within the General tab, select
Max Ink. Check the Overwrite Print Mode
Max Ink Data box and change the Max Ink
Level from 400 to 300. Click OK.
Printing to Golf Balls
For printing golf balls you will need to use the optionall G
Golf
lf B
Ballll H
Holder,
ld
FFastt TT-Jet
J t
Non-Textile Pretreatment, and Fast T-Jet Non-Textile Post-Treatment. Fast T-Jet
Non-Textile Primer is not necessary.
1. Load the Golf Balls into the Holder and place the Overspray Shield on top of
the balls. The Shield will protect areas not intended to be printed upon from
Pretreatment and overspray.
2. Dip a fine bristle brush in the Pretreatment, wiping
off any excess on the side of the bottle. Gently
apply the Pretreatment to the exposed golf ball
surface, making sure there are no uneven areas.
3. Allow the Pretreatment to dry thoroughly before
printing. Dry time will vary, but it may take up to one hour or more. To speed
up the drying process use a hair dryer, heat lamp or heat gun set on a low
temperature setting.
Golf Ball Holder Placement
Align the four holes in the base of the Golf
Ball Holder with the four pins of the Adjustable
Shirtboard base and then place into the Print Bed
without a Shirtboard. Place several golf balls within
the Holder and use the Maximum Height Bar to
make sure they maintain the proper clearance
from the Print Head when loaded. Use this Bar as
a reference, but remove before printing. (Refer to
Chapter 2 of this Manual for more details).
Version 1.1 Revised July, 2008
76
Chapter 6 - Printing on Other Items
Additional Instructions for Printing Non-Textiles using a T-Jet3 PLUS
The FastARTIST Golf Ball
Template for the T-Jet3 PLUS is
designed to print 1” offset from
the top and bottom of the Golf
Ball Holder. Do not place golf
balls in the first and last row of
the Holder, they will not receive
an image.
Do not place golf balls in these rows
Loading Golf Ball Template (FastARTIST Only)
1. Go to File > Open and double-click on the Golf Ball Holder Template to open.
2. Import the images or text you wish to print and place them inside of the grid
lines.
3. Choose a Non-Textile Print Mode. (For a list of available Non-Textile Print
Modes refer to Chapter 7 of your FastARTIST User’s Manual.)
4. Print to FastRIP.
77
T-Jet3 PLUS User’s Manual
Finish with Fast T-Jet Non-Textile Post-Treatment
Fast T-Jet Non-Textile Post-Treatment is a protective coating used for prints on
non-textile surfaces. This post treatment will prevent fading of ink colors, extend
the life of the image as well as waterproofing and acting as a UV protectant.
DIRECTIONS:
Shake the can before each use and apply to nontextile, printed surfaces only after all ink has dried
thoroughly. Apply a thin coat, holding the can 4 to
8 inches from surface and using a swift motion to
prevent overspray and unwanted build-up. If buildup does occur, use a lacquer thinner to remove. A
second coat may be applied after approximately
two minutes of drying time. Allow treated surfaces
to dry for 30 minutes to one hour in a clean, dust
free area before handling. Allow 24 hours cure time
prior to placing coated articles into service.
Clean the valve after use by turning the can upside down and spraying a
short burst until cleared. If the nozzle is clogged or sprays irregularly, check for
clogging within the opening. Scrape off excess coating with a soft object and
twist the valve one half turn to close.
Non-Textile Printing Tips
o When brushing on any of the treatments, make sure they are applied in
smooth, even and thin layers.
o Having two brushes can make the pretreatment and priming processes
easier. Use one for Non-Textile Primer and one for Non-Textile Pretreatment.
o Cleaning the brushes when done with hot water and letting dry will prevent
them from drying out and ruining the brushes.
o When printing on Non-Textile items, use a piece of film that covers the whole
item and print a test print to see if it is aligned with the desired printing area.
o The maximum printable area of a T-Jet3 PLUS is 13” x 22”. To maximize
production, you can position multiple items next to each other to print more
then one item at a time.
o If you have a Heat Press, you may dry items faster by placing them under
the element, but you MUST avoid contact between the item and the heated
surface.
Version 1.1 Revised July, 2008
78
Chapter 6 - Printing on Other Items
Post-Treatment Warnings and Safety Information
Use Fast T-Jet Non-Textile Post-Treatment only in a well ventilated area.
Fast T-Jet Non-Textile Post-Treatment VAPOR is HARMFUL and MAY AFFECT THE
BRAIN OR central NERVOUS SYSTEM, CAUSING DIZZINESS, HEADACHE OR NAUSEA.
It may CAUSE NOSE, THROAT IRRITATION and LUNG IRRITATION. OVEREXPOSURE
MAY CAUSE LIVER, KIDNEY OR BLOOD DAMAGE. It may CAUSE EYE or SKIN
IRRITATION. Fast T-Jet Non-Textile Post-Treatment is HARMFUL IF SWALLOWED.
Reports have associated repeated and prolonged occupational exposure to
solvents with permanent brain and nervous system damage. Intentional misuse
by deliberately concentrating and inhaling the contents may be harmful or
fatal.
CAUTION: Do not puncture or incinerate (burn) container. Exposure to heat or
prolonged exposure to sun may cause bursting. Do not expose to heat or store
at temperatures above 120°F. Vapors may ignite explosively. Keep away from
heat, sparks and flame.
VAPORS MAY CAUSE FLASH FIRE. Do not smoke while using this product.
Extinguish all flames and pilot lights and turn off stoves, heaters, electric
motors and other sources of ignition during use and until all vapors are gone.
Prevent buildup of vapors by opening all windows and doors to achieve cross
ventilation. Use only with adequate ventilation. Do not breathe dust, vapors or
spray mist. Ensure fresh air entry during application and drying. If you experience
eye watering, headache or dizziness or if air monitoring demonstrates that
vapor/mist levels are above applicable limits, wear an appropriate, properly
filled respirator (NIOSH/MSHA approved) during and after application. Follow
respirator manufacturer’s directions for respirator use. Avoid contact with eyes,
skin and clothing. Wash thoroughly after handling.
KEEP OUT OF REACH OF CHILDREN
First Aid: in case of contact, immediately flush eyes or skin with plenty of water
for at least 15 minutes. Remove contaminated clothing and shoes. Get medical
attention. Wash clothing before reuse. If swallowed, get medical attention
immediately. If you experience difficulty in breathing, leave the area to
obtain fresh air. If continued difficulty is experienced, get medical assistance
immediately. If spilled, contain spilled material and remove with inert absorbent.
Dispose of contaminated absorbent, container and unused contents in
accordance with local, state and federal regulations.
The Manufacturer shall not be liable for loss or damages whether direct, indirect,
incidental or consequential, regardless of the legal theory asserted, including
negligence and strict liability. Read Material Safety Data Sheet before use.
79
T-Jet3 PLUS User’s Manual
Version 1.1 Revised July, 2008
80
Chapter 7
Utilities to Improve Print Quality
“Banding” iss a common
com
c
ommo
mon
n is
issu
issue
sue
e that
that a
ari
arises
rise
sess duri
du
during
ring
ng p
pri
printing
rint
ntin
ing
g an
and
d tw
two
o of tthe
he m
mos
most
ostt
common causes
Banding
clogged
Print
ause
au
sess of Ba
Band
ndin
ing
g are
are a dirty
d
dir
irty
ty or
or clog
cl
ogge
ged
d Pr
Prin
intt He
Head
ad o
orr one
one that
that iiss
misaligned. If your prints
bottles
i t are unexpectedly
t dl lilight
ht or should
h ld one off tthe
h iink
kb
ttl
in the Bulk Ink System run dry, one or more Head Cleanings may be necessary.
In addition, if your printer has not been used for several days a Cleaning may
be required to unclog the nozzles so they can deliver ink properly.
Although Head Cleanings can use a lot of ink, we recommend
you do at least one regular cleaning each day. To initiate a this
cleaning cycle, hold down the Ink button on the T-Jet3 PLUS
Control Panel for three seconds.
When your T-Jet3 PLUS is not in use, make sure that the power is OFF so that
the Print Head remains docked with the Capping Station. This will help prevent
the ink within the Nozzles from drying up and clogging. When the printer is
powered ON, it will proceed with its normal start up cycle.
Epson Adjustment Program
There are four Utilities that may be run to calibrate Print Head Alignment and
ensure your Fast T-Jet3 PLUS will print the best quality images possible. In fact,
should you have banding or registration issues, these utilities may solve the
problem without the need for a strong Head Cleaning. Try these first!
These Utilities are accessed through
the Epson Adjustment Program
software that is available for download
from the Support section of www.
mytjet.com. To run these maintenance
procedures, you must install the
application on the computer to which
your Fast T-Jet3 PLUS is connected.
81
T-Jet3 PLUS User’s Manual
Once the application is installed, run the program
and select the Particular Adjustment Mode. A popup window (Setting) will ask you to select the Port
to which your printer is connected. Scroll through
the list and select Epson Stylus Photo 1800. This is
your Fast T-Jet3 PLUS.
You will then be taken to the Main Selection
Screen. From here you will select the first Utility to
run- Head Angular Adjustment.
Head Angular Adjustment
You will need to place a standard 8.5” x 11”
sheet of paper on a Shirtboard to perform this
procedure. Once the paper is loaded, press Print
and the Fast T-Jet3 PLUS will print two groups of
parallel lines labeled Band Pass Incline 0 > > 80
and Band Pass Incline 0 < < 80. These groups of
lines will be assigned numbers from -6 to 6. The lines
to either side of the numbered lines are marked
NG and these are not used for calibration. A
third printout labeled Head Incline will print at the
bottom of the page and will consist of seven boxes
broken into horizontal line segments. The five boxes
of concern will be numbered 70 to – 70.
Examine the first group parallel lines labeled Band Pass Incline 0 > > 80 and note
which set contains the straightest segment. If you look closely, you will see most
of the lines are slightly offset in the middle. Note the number of the one with NO
offset and enter this in the applicable data field by placing a checkmark in the
Band box and entering the line segment number in the box next to the correct
group name. Next, examine the second group of lines and select the straightest
segment from that group. Enter that line’s number in the next data field.
Place a check in the Raster Offset box and examine the set of boxes under
the heading Head Incline. Select the set of interlocking lines that interlock but
that DO NOT overlap any line above or below it. Enter this number into the
applicable data field.
Click on Input and the application will do some calculations before placing its
own data in the fields. Once the calculations are complete, click on Finish and
you will be taken back to the main selection screen.
Version 1.1 Revised July, 2008
82
Chapter 7 - Utilities to Improve Print Quality
Once you have entered data on this screen you must click on the
O
Input button FIRST and then click on Finish. If you do not follow this
In
ssequence, or you click on any other buttons in between Input and
FFinish, your data will not be stored properly and you must rerun this
calibration process.
c
Auto Bi-Directional Adjustment
You will need to place a standard 8.5” x 11” sheet of paper on a Shirtboard
to perform this procedure. Once the paper is loaded, from the main selection
screen of the Adjustment Program, select the Auto Bi-D Adjustment routine.
On the next screen, select Perform and the routine will print automatically and
make the necessary calibrations. You will not need to input any data manually.
When the Auto Bi-Directional Adjustment procedure is complete, you MUST click
on Finish for the data to be properly stored. You will then be taken back to the
main selection screen.
PF Roller and Eject Roller Adjustments (PF Adjustment Utility)
You will need to place a standard 8.5” x 11” sheet
of paper on a Shirtboard to perform each of
these procedures and both are run from the PF
Adjustment Utility.
Select the PF Roller Utility and press Print. A group
offset boxes will printout along with 7 colored
boxes at the bottom of the page. The offset boxes
will be numbered from -3 to -13 and these are
what is used to calibrate the PF Roller.
Carefully examine the offset boxes and note the
group with NO GAP between the upper and lower one. P
Place
a checkmark
l
h k
k
next to PF in the Input & Read section and enter the number that corresponds
with the two boxes you have selected.
To calibrate the Eject Roller, you will need to place a clean sheet of standard
8.5” x 11” paper on the Shirtboard and select Eject Roller and Letter for paper
size. Press the Print button.
About halfway down the sheet of paper, a thick line will print with a series of
small blocks below it. These blocks will be numbered -15 to -2. Carefully examine
the blocks and select the one that TOUCHES the long bar above it, with NO GAP
or OVERLAP between them. Place a check mark next to Eject in the Input &
83
T-Jet3 PLUS User’s Manual
Read section and input the box you just selected into the data field.
Click on Input and then click on Finish.
You have now completed the necessary initialization procedures for your
Fast T-Jet3 PLUS and you may close the Adjustment Program. Close the main
selection screen and select Quit from the program screen.
Head Cleaning Utilities
If a Head Alignment Procedure does not fix your printing
g issues, y
you will have
to initiate a Head Cleaning. Additionally, if your
printer has been idle for several days, or you
believe you have a clog, a Head Cleaning may
be the solution.
To execute a Head Cleaning, make sure your
printer is ON, but not printing, and all of the Red
Ink lights are off.
Load the Epson Adjustment Program and select
Particular Adjustment mode. From the main selection screen choose Head
Cleaning. From the Head Cleaning window press Cleaning and follow the onscreen instructions. A Head Cleaning will take about 45 seconds, during which
time the printer makes noise and the Power light and the red Ink lights will flash.
You
should never turn OFF the printer while the Power light is
Y
flashing! This may damage the printer. A Head Cleaning cycle also
wipes
the bottom of the head, therefore it is recommended you
w
initiate
a Head Cleaning if you start to see drops of ink on garments
in
or
o if the Print Head comes in contact with a garment
Perform a Nozzle Check
When both the Power light and the Ink lights
stop flashing, perform a Nozzle Check. You
will need a few sheets of letter size paper OR
clear inkjet film for this purpose. It is hard to
see White ink on White paper when doing a
Nozzle Check, so the film is a better choice.
Lay the paper or film on top of the Garment
Holder, butting up against the zero point of
the bed. Next, click on Print from the Nozzle
Check section of the Head Cleaning Utilities
Version 1.1 Revised July, 2008
84
Chapter 7 - Utilities to Improve Print Quality
Screen. Follow the on-screen prompts. After the Nozzle Check Pattern has
printed, check to see if the lines have any gaps or bands in them. If the Nozzle
Check Pattern has no gaps or bands, click on Finish.
If the Nozzle Check Pattern has gaps or bands, click on the Cleaning button to
clean the Print Head again.
For
F serious clogs you may have to run this routine several times.
Doing
this will use a lot of ink but will generally clear even badly
D
clogged
heads.
c
We
W recommend you schedule Automatic Head Cleanings every 12
hours
using FastRIP. This will help prevent Print Head and Capping
h
Station
issues caused by dried ink. This is especially important if the
S
printer
will be idle longer than ONE day (24 hrs). Refer to Chapter 7
p
of
o your FastARTIST User’s Manual for further details.
Check the Spit Tray on a Regular Basis
The spit tray (shown to the right) may become very
full depending on the amount of Head Cleanings
that are performed. For replacement pads contact
Technical Support.
Emptying the External Waste Bottle
As your T-Jet3 PLUS goes through head cleaning
cycles, it forces ink through the Print Head. This excess
ink goes into the External Waste Bottle located at the
back of the T-Jet3 PLUS on the control panel side.
To empty the waste bottle simply unscrew the top of
the bottle and remove, carefully placing the waste
bottle top with waste ink line attached on a rag or old t-shirt.
Empty
waste
bottle
-sh
shir
irtt E
mpty
mp
ty w
aste
as
te b
ottl
ot
tle
e
and replace waste bottle top. The ink is biodegradable and non-toxic so it can
be washed down a regular sink or basin drain.
85
T-Jet3 PLUS User’s Manual
:HDUH not liable for any damage caused by ink to property
U
ssuch as carpets, flooring or furniture . Please read and understand
all operating and maintenance procedures before using your
a
TT-Jet3 PLUS.
instance
that your printer thinks you have used enough ink to fill the
In tthe
he rrare
ar
are
e in
inst
sta
a
entire Waste Bottle, all of the ink lights will blink and you will be unable to reset
the regular counters. This can happen once you have printed from 10,000 to
15,000 pages. At this point, you are not able to run the printer until you reset the
Waste Ink Counter in the printer.
Resetting Waste Ink Counter
You may reset the Waste Ink Counter through FastRIP if you have downloaded
Printer Package Update 4.5 for the Fast T-Jet3 PLUS. You may also reset the
Waste Ink Counter using the Epson Adjustment program.
1. Open the Epson Adjustment Program and select
Particular Adjustment Mode.
2. The Setting window will appear. Locate your Fast
T-Jet3 PLUS (Epson Stylus Photo 1800) and click on
OK.
3. Scroll down and select Waste Ink Pad Counter from
the Maintenance section and click on OK.
4. Within the Waste Ink Pad Counter window,
click on the Read button.
5. When the Information pop-up appears, click
on OK.
Version 1.1 Revised July, 2008
86
Chapter 7 - Utilities to Improve Print Quality
6. The Waste Ink Pad Counter window will still
be present. Click on the Initialization button
as shown on the right.
7. Another Information pop-up will appear, indicating that the Waste Ink
Counter has initialized properly. Click on OK.
8. Click on the Read button once more to record the initial value of 1777.
9. When the Information pop-up appears, click on OK.
10. Select Finish from the bottom of the Waste Ink Pad Counter window and exit
the Adjustment program.
11. Turn OFF your Fast T-Jet3 PLUS by using the Power button and
Power switch, located on the rear of your printer adjacent the
power cord.
12. Manually center the Print Bed by applying a light pressure against it with your
hand.
13. The final step is a Manual Reset of your printer. This will complete the Waste
Tank Reset process.
▪
▪
▪
While holding down the Power button, flip the Power switch.
The Print Bed will begin to move back and forth. Don’t interfere with its
movement, this is part of the reset process.
Allow the Print Bed to move back and forth at least 2 times, then turn OFF
the printer using the Power switch.
87
T-Jet3 PLUS User’s Manual
14. Turn ON your printer, using the Power switch, but this time DO NOT hold down
the Power button.
15. Press the Power button and allow the printer to go through its start-up cycle.
Print Head Replacement
In the event that you damage the
Print Head by means of a head strike,
the Head will probably need to be
replaced. If you can’t get the Head
to print in alignment after numerous
alignment routines, it is most likely
permanently damaged and will have
to be replaced.
By design, replacing the head is fairly
straightforward and should take less
than 30 minutes. Replacement Print
Heads are available from XV
and come with complete written instructions.
If you are dependent on your T-Jet3 PLUS and cannot afford to be down for a
few days while awaiting a shipped replacement, we recommend keeping a
back-up head in stock.
If you need further assistance, contact Technical Support.
Version 1.1 Revised July, 2008
88
Chapter 8
Preventative Maintenance
and Problem Solving
Your T-Jet3 PL
PLUS
US sho
sshould
houl
uld
d wo
work
rk ttro
trouble
roub
uble
le ffre
free
ree
e if y
you
ou ttak
take
ake
e the
the time
time tto
o un
unde
understand
ders
rsta
tand
nd a
and
nd
perform the ne
nece
necessary
cess
ssar
ary
y ma
mach
machine
chin
ine
e main
ma
maintenance.
inte
tena
nanc
nce.
e. 9
95%
5% o
off ou
ourr te
tech
technical
chni
nica
call su
supp
support
ppor
ortt
calls come from
rom
ro
m pe
peop
people
ople
le who
who hav
h
have
ave
e no
nott ma
main
maintained
inta
tain
ined
ed the
ttheir
heir
ir m
mac
machines
achi
hine
ness pr
prop
properly.
oper
erly
ly..
Jet
et3
3 PL
PLUS
US m
ay a
ppea
pp
earr to b
e ju
just
st a
n in
inkj
kjet
et p
rint
ri
nter
er it iiss a VE
VERY
RY
While your T-Jet3
may
appear
be
an
inkjet
printer,
SPECIAL inkjet printer. When printing on garments, the printer must print A LOT
more ink than when printing on paper. This can, and will, cause excess ink to
coat internal parts if the machine is not maintained on a regular basis.
When printing dark shirts with white ink, the use of a pretreatment is necessary.
This pretreatment is sticky and, if it’s sprayed near a machine, it can get on
the internal working parts of the printer. Also, inkjet printers in general do not
like hot dry room conditions or a dusty, dirty shop. Be aware of the climate
and conditions in which you use and store your machine. You have made a
substantial investment in your business when you purchased your T-Jet3 PLUS. In
order to get the most out of it, please take the time to learn the simple steps that
will keep your T-Jet3 PLUS happy and making you money.
Keep Your Encoder Strip Clean
A main concern of many who call our
support department is when the printer gets
“confused” on how to print an image. The
way an inkjet printer tells the Print Head what
and where to print is a thin strip called the
Encoder Strip. A dirty Encoder Strip can cause
everything from images printing in the wrong
location and large blocks of ink spraying on
the shirt to double-images, dark bands across
the print, thin horizontal lines and much more.
The printer head continually receives data
through this strip while in motion. If the strip getss di
dirty
orr in
dirt
rty
y wi
with
th llint
intt fr
in
from
om sshirts,
hi
hirt
rts,
s, o
ink
k
from overspray, it can confuse the printer. To avoid this situation, do daily and
weekly maintenance on the unit as suggested in this section.
89
T-Jet3 PLUS User’s Manual
Clean the Encoder Strip DAILY
Press the Ink button to move the Print Carriage
off of the Capping Station. Manually move the
carriage to the center of the print bed. This will
allow you to clean the Capping Station side of
the Encoder Strip.
You can use foam-tipped swabs, water,
glass cleaner or cleaning fluid, but for best
results use Isopropyl Alcohol Pads. Do NOT use
Rubbing Alcohol pads. Wrap the Alcohol Pad
around both sides of the Encoder strip and move
both
directions.
e th
the
e Pa
Pad
d in b
oth
ot
h di
dire
rect
ctio
ions
ns If
the pad becomes black then use a new pad and clean the Encoder strip
again. Press the Ink button again to move the Print Carriage back to the
Capping Station. Clean the rest of the Encoder Strip.
Allow the Encoder strip to AIR DRY.
The
Encoder Strip is actually CLEAR with small marks on it. Be
T
careful
to NOT scratch it or the sensor will not read it correctly.
c
Only
use FOAM TIP cleaning swabs or Isopropyl Alcohol Pads when
O
doing
any maintenance or cleaning inside your T-Jet3 PLUS.
d
Clean Capping Station and Wiper Daily
The Capping Station seals the Print Head when it is not in use. Ink residue around
the edge of the Capping Station may keep the head from seating and sealing
properly. This will cause Print Head clogs. Be aware that white ink will build up
faster and thicker than regular colors.
The Capping Station is the rectangular piece onto which the Print Head seats.
Make sure that the outer rubber seal is free from dried ink and garment fibers as
well as the outer edge of the Print Head. Use a foam swab, water, glass cleaner,
cleaning fluid or Isopropyl Alcohol to keep this clean.
Version 1.1 Revised July, 2008
90
Chapter 8 - Preventative Maintenance and Problem Solving
Note: When cleaning the Capping Station, be careful to NOT dislodge it out of
position or the Print Head will not seat properly. If you push down on it too hard it
will move off of the mount.
Cleaning the Wiper
The Wiper is concealed within the Capping Station and is designed to clean
the bottom of the Print Head during a Head Cleaning. It is very important that
the wiper is cleaned daily, along with the Capping Station. In order access
the Wiper, Press and Hold down the Ink button for 3 seconds to initiate a Head
Cleaning. After you see the Print Head move up and to the left, immediately
switch OFF the power at the Main Power Switch.
You may now move the Print Carriage further to the left, exposing the Wiper. The
Wiper will remain in its UP position until the power is turned back ON. When you
have finished cleaning the Wiper, turn the Main Power Switch ON and press the
Power button. The printer will resume and complete the halted Head Cleaning
process. The Print Carriage will then dock with the Capping Station when
finished.
Check the Spit Tray on a Regular Basis
The spit tray may become very full depending on the amount of Head
Cleanings that are performed. For replacement pads contact Technical
Support.
Turn Your T-Jet3 PLUS OFF at Night
Turn OFF the machine at night using the Power Button. Wait for the printer to
completely power down (Print Carriage will dock onto the Capping Station),
then turn off the main Power Switch located next to the AC cord. DO NOT use a
power strip to turn off your printer.
Cautions About Ink Levels
When refilling the bulk ink bottles, STOP at the FULL LINE marked on the side of
the bottle. DO NOT overfill the Bulk Ink Bottles or this will cause excess pressure,
which can lead to ink dripping out from the bottom of the Print Head.
Your White Ink levels MUST always be higher than the CMYK ink levels or crosscontamination will occur
91
T-Jet3 PLUS User’s Manual
Humidity and Environmental Control
Controlling the environment in which your T-Jet3 PLUS
“lives” is a must! During the cold winter months, dry heat
is often pumped into a room. This is not a good thing for
inkjet printers. They prefer humidity levels of 40% to 60%. If
your room is dry, place a humidifier in the room and buy an
inexpensive hygrometer from Radio Shack, Target, Wal Mart
etc. to measure the humidity level. In the summer months,
if the humidity is too high, use a dehumidifier. Try very hard
NOT to place this machine in a dusty, dirty or non-climate
controlled environment (like a screen printing shop). For best
results, place the T-Jet3 PLUS in a dust free room with air-conditioning.
Do not allow fans to blow air across the Print Heads. This will dry up the ink and
clog your Print Heads, seriously effecting your printer’s performance.
Print With the Lid Closed
Due to the airborne nature of the white ink pretreatment, you should try to
pretreat shirts in a different room or far away from the machine. If pretreating
in a different room is not an option, then make sure the lid on the T-Jet is kept
closed at all times and especially during the print process. The pretreatment will
immediately clog the Print Heads if comes in direct contact with any ink. We
strongly suggest creating a separate enclosed area to pretreat shirts in, such as
a large cardboard box. This will keep overspray to a minimum. This will not only
protect the Print Heads but ensures that the Encoder Strip remains clean as well.
Preparing your T-Jet3 PLUS for Downtime
In the event that your T-Jet3 PLUS will sit for more than a week without use, it
will be necessary to connect the cleaning solution system. The purpose of this
procedure is to flush all of the ink out of the bulk ink system ink lines, cartridges,
print head and capping assembly. This helps prevent ink build up and promotes
the life of the capping station and print head.
NOTE: For best results make sure that the cap assembly is clean and free of any
dried ink or debris.
Flushing the Ink System
1. Using the adjustment program, reset the maintenance tank counter on the
T-JET3 Plus. This will insure that during this procedure, the maintenance tank
Version 1.1 Revised July, 2008
92
Chapter 8 - Preventative Maintenance and Problem Solving
will not read as full. Refer to Chapter 7 - Maintenance Utilities to Improve Print
Quality - Resetting the Waste Ink Counter for instructions.
2. Press the ink button. This will release the carriage off of the capping
assembly. Refer to Chapter 4 - Printing Basics for more information on
the control panel buttons.
3. Turn the power off using the power switch located on
the back of the machine near the power cord. Move the
head off the capping assembly to gain access to the bulk
system ink cartridges.
4. Using a pair of pliers or a nut driver,
carefully loosen (do not fully remove) the
nut that attaches the black chain to the
metal carriage bracket. Do not place too
much force on the carriage bracket. The
print carriage is delicate and if not careful,
you can cause damage to it.
5. Gently lift the black chain off of the
carriage bracket. This will allow more room
to get to the ink lines.
6. Release an ink line from the cartridge by
using the quick release finger screw.
7. Next, hold the released ink line upwards
to allow the ink to flow back into the bulk ink
bottle.
Tip: A syringe can be used to force excess
ink in the lines back into the bottles by
releasing the line from the bottle and pulling
the ink through from the bottle end of the
hose.
8. Reattach the ink line to the cartridge. Do not overtighten.
9. Repeat steps 6 - 8 for all of the ink lines.
10. Next, reattach the black chain to the carriage bracket. Tighten the screws so
that the chain does not fall off.
93
T-Jet3 PLUS User’s Manual
11. Fill two 500 ml bottles (supplied) with HD cleaning solution.
12. Loosen one of the ink lines attached to the bulk ink
system bottles and connect it to one of the fittings on the
cleaning solution bottle.
HINT: Completing this one ink line at a time will reduce
spillage from any left over ink still in the ink lines.
13. Repeat step 12 for all of the ink lines so that
each line is connected to one of the
cleaning solution bottles (CMYK for one and
white for the other).
NOTE: Take care not to let the lines tangle
up. It’s important to make sure there are no
kinks or creases in the ink lines.
14. Remove one of the waste ink lines from the
waste ink bottle.
Insert the tip of a plastic syringe (included) into the
waste ink line and pull back on the plunger until
the syringe is full of liquid.
Dump the excess ink from the syringe into the
waste ink bottle or other container.
15. Repeat step 14 for the remaining waste ink line.
16. Go back to the adjustment program on your computer.
Run multiple power cleanings until the solution that comes from the waste ink
bottle is clear.
Version 1.1 Revised July, 2008
94
Chapter 8 - Preventative Maintenance and Problem Solving
Eliminating Ink Drops on Shirts
When you perform a Head Cleaning, the Head itself is cleaned and wiped by
the printer. On occasion, this may not clean away small pieces of shirt lint that
can collect around the bottom. This excess lint can allow ink to accumulate
under the Print Head, and then drip on the garment. The easiest way to clean
the Print Head is to have the Print Bed in the Load position. This will provide the
needed clearance to clean the Print Head properly. Using a foam tip swab,
water, glass cleaner, or cleaning fluid, clean any lint and ink residue off the
edges of the Print Head.
BE CAREFUL not to touch the bottom of the Print Head. This is where the actual
nozzles are located and they can be easily damaged.
Clean Bulk System Chip Blocks
The bulk cartridges chip blocks can sometimes get dirty and not make good
contact. If you get erratic red lights on certain colors, clean the chips with a
foam-tipped swab and Isopropyl Alcohol. A pencil eraser also works well for this
task.
Have A Lot of RAM for Your Computer
RAM is the temporary memory that your computer uses when processing
complex data. RAM is NOT expensive. Most computers ship with 512mb of RAM.
This is not enough, especially when using FastARTIST and FastRIP. Your computer
should have 1 to 2 GB of RAM.
If using or upgrading to Windows Vista, you will need 2GB of RAM for proper
operation of your printer and software.
When in Doubt – Unplug Everything
Sometimes inkjet printers just get “confused,” especially if you stop them in the
middle of a run. If the T-Jet3 PLUS is suddenly acting abnormally, turn everything
off AND unplug the power. Make sure to unplug the USB cable between
your T-Jet3 PLUS and the computer to end data transmission that still may be
occurring. Leave everything unplugged for a few minutes and then plug it all
back in and start over.
You MUST cancel all print jobs for this to be effective or they may start back up
when you turn the computer and T-Jet back on.
95
T-Jet3 PLUS User’s Manual
Clean Drive Roller and Belt
During normal operating conditions, lint that is coated with pretreatment can
get caught in the Print Head Belt Gear located in the right rear inside of the
machine. This lint will start to clog the belt gears and the belt will slip, causing
the bed to jerk and not complete print jobs. Periodically check this gear and if
necessary, clean
it with a brush
or computer
vacuum. Make
sure to avoid any
contact with the
Encoder Strip. It is
fragile and could
be damaged!
Shake Shirts or Preheat to Minimize Lint
T-Shirts generate a lot of lint and it is important to minimize the amount of lint
inside your machine. Get in the habit of shaking a shirt before loading it. If you
feel the shirts you are using generate excess lint, use a Pet Hair Pickup Roller on
the shirt after it is on the shirtboard. You may also preheat them in a heat transfer
press for just a few seconds to flatten down the fibers.
Keep Excess Ink from the Ribbon Cable
If excess ink leaks or spills onto the ribbon cable, it may short out the
motherboard. When changing cartridges, you should ALWAYS wipe excess ink
from the bottom of the Carriage and around the
Print Head with the foam tipped swab.
You must never touch or push in the ribbon cable
clip as this will cause the ribbon cable and the
Encoder Strip to rub together.
Version 1.1 Revised July, 2008
96
Chapter 8 - Preventative Maintenance and Problem Solving
Five Minute Daily Maintenance
Since the introduction of white ink for dark shirts and the spraying
of pretreatment around the shop, daily maintenance has become
a very critical part of your printer’s performance. By not following
the required daily maintenance described below you will void your
T-Jet3 PLUS warranty as well as damage the machine.
Many of these items have been covered earlier in this manual, but the following
list will help you prioritize what key maintenance items should be done on a
regular basis.
¾ Turn the machine off at night
Turning OFF the machine at night makes sure the Print Head is capped
properly on the Capping Station.
¾ Perform Head Cleanings Every Morning and at the End of Shift
After turning on the machine at the start of the day, perform 3 to 4 Head
Cleanings. A shortcut is to press and hold the Ink button for three seconds to
initiate this process. The preferred method is to use the Epson Cleaning Utility
in the Epson driver. Perform Head Cleanings at the end of a shirt run and
definitely at the end of each day.
¾ Clean Capping Station and Wiper
The Capping Station is the rectangular piece into which the inkjet printer
head seats. Make sure that the outer rubber seal is free from dried ink
and garment fibers. Use a foam swab and distilled water, cleaning fluid or
Isopropyl Alcohol to keep this clean.
¾ Clean the Belt and Drive Gear
Clean the carriage motor drive gear and belt with a small computer vacuum
or small brush. Shirt fibers can accumulate in the drive gear, causing the belt
to skip. Make sure to avoid any contact with the Encoder Strip. It is fragile
and may get damaged. Care also needs to be taken not to contaminate
the Encoder Strip.
¾ Clean the Print Head
Clean any accumulated ink or garment fibers from around the sides and on
the bottom of the Print Head with a foam tip swab, water, glass cleaner, or
cleaning fluid.
¾ Clean the Encoder Strip
During printing and Head Cleanings, the clear plastic Encoder Strip through
which the head receives printing data can get dirty. The Encoder Strip is
essentially the “brains” of the printer and if the Print Head can’t properly
97
T-Jet3 PLUS User’s Manual
receive the data through the strip, it will get “confused” and print in the
wrong location, dumping ink where it should not be. Clean the Encoder Strip
with a swab and glass cleaner or Isopropyl Alcohol pad.
¾ Check ink levels
Visually check the ink levels of the bulk ink bottles for the following conditions:
• Ink levels that are past the full line - ink might start to drip from the Print
Head
• Ink levels are too low - the ink tubes will run dry.
Weekly or Monthly Maintenance (depending on amount of production)
¾ Clean Print Head guide rails
The long, round guide rails on which the printing carriage moves can get dirty
and dry. Wipe this weekly and use the machine oil supplied with your printer
(sewing machine oil). Give it a few drops every other week.
¾ Clean Belt and Drive Gear
Remove drive belt and clean with clean cloth and glass cleaner or Isopropyl
Alcohol. You may have to use a sharp object such as a needle or small wire
brush to “Pick” the garment fibers from the drive gear.
¾ Reset the Waste Ink Counter
Always check the Waste Ink Bottle prior to resetting the counter to determine
if it requires emptying. Refer to Chapter 7 for instructions on Resetting the
Waste Ink Counter.
Do Not Clean the Plastic Cover with Windex
The Low Profile Plastic Cover of the T-Jet3 PLUS should be cleaned with soap
and water only. The red Plexiglas that protects the metal T-Jet exterior from rust
and corrosion will crack severely if cleaned with Windex or Isopropyl Alcohol. To
prevent any damage use a mild detergent soap and water mix.
RS232 Cable
There is a RS232 cable hidden inside the right metal printer housing for firmware
updates only. Do not try to connect this cable to your computer unless
instructed by a VXSSRUW Technician.
Version 1.1 Revised July, 2008
98
Chapter 8 - Preventative Maintenance and Problem Solving
Auto Head Cleaning (Optional from FastRIP)
A new feature of FastRIP 9.0 is the ability to schedule an Auto Head Cleaning
session. One of the most common problems with printing white ink is the ink’s
tendency to clog the Print Heads. The ink must also be stirred on a regular basis
to keep its pigments from settling within the bottle. The Auto Head Cleaning
function tells the printer to perform a Head Cleaning during the night, helping to
prevent ink settling and head clogging- leaving your T-Jet3 PLUS ready to print
first thing in the morning.
To utilize the Auto Head Cleaning function, you must set it up within the FastRIP
interface on your computer. For the scheduled session to take place, DO NOT
turn OFF your printer when you have completed your day.
DO NOT LUBRICATE DRIVE SCREW
The T-Jet3 PLUS Drive Screw
MUST NEVER be lubricated or
wiped off with a chemical
solvent. A special coating has
already been placed on the
Drive Screw to prevent dust buildup that
could potentially hinder the movement of
the Print Bed. Treating the Drive Screw will
result in dust buildup and contaminate the
drive mechanism.
Drive Screw
99
T-Jet3 PLUS User’s Manual
Daily and Weekly Maintenance Schedule Checklist
The following checklist can be used as a guide to ensure critical maintenance
is performed on a regular basis. The check lists can be downloaded from www.
screenprinters.net – Click on Support > T-Jet3 PLUS > Downloads.
Version 1.1 Revised July, 2008
100
Chapter 9
Troubleshooting
Problem:
After
Afte
Af
terr pr
prin
printing
inti
ting
ng a
an
n im
imag
image,
age,
e, the
the c
col
color
olor
or lloo
looks
ooks
ks g
gre
great,
reat
at,, bu
butt afte
af
after
terr cu
curi
curing,
ring
ng,, th
the
e pr
prin
print
intt lo
look
looks
okss
dull.
dull
du
ll..
Causes:
▪ The temperature is set too high on the Heat Press
Test the temperature using a “touch-less” infrared thermometer or heat
testing strips. If the temperature is too hot, it could scorch the shirts and
ink.
▪ There is too much pressure being applied to the shirt during curing
When curing your shirts, make sure you do not apply too much
pressure. You should apply a medium to heavy amount of pressure.
▪ The wrong type of paper was used
Make sure the paper that is used for curing is either a Teflon pad or
silicone treated paper.
Prevention:
Get to know your Heat Press or dryer- every make and model has its own
“personality.” Frequently test the output temperature to ensure it actually
matches your desired settings. (Refer to Chapter 4 for curing times and details.)
Problem:
Print
leaking,
dripping
garments.
The
Th
e Pr
Prin
intt He
Head
ad iiss le
leak
akin
ing,
ing
g,
g d
dri
ripp
rippin
ing
g in
ink
k on g
gar
arme
arment
nts.
ntss.
s
Causes:
C
▪ The Print Head may have been damaged a collision
Order a replacement Print Head.
▪ The Print Head is dripping ink
Thoroughly clean the Capping Station. The Capping Station can become
dirty with garment lint or fibers as well as dried ink. This will prevent it from
adequately cleaning the Print Head.
▪ Debris or shirt fibers have collected on the Print Head as well as the Print
101
T-Jet3 PLUS User’s Manual
▪
▪
▪
▪
Head carriage
Gently clean the bottom of the Print Head to remove any debris, dried ink
and fibers. Also check the Capping Station to ensure it is clean and free of
debris and lint.
The ink is not feeding properly to the Print Head
Your Adjustable Ink Shelf may be at an incorrect height. If the Bulk Ink
System sitting too high, too much ink will be drawn through the Print Head.
If the Bulk Ink System is too low, gravity will pull the ink back into the
bottles, starving the Print Head.
Too much ink is coming through the Print Head
If you filled the Bulk Ink Bottles past the Full Line, there could be too much
pressure in the Bulk System Ink Lines, forcing ink out of the Print Head.
Altitude can have an effect
The Bulk Ink System requires the proper vacuum pressure to siphon the ink
into the Print Head. If you are having an unusual amount of problems and
are at a higher altitude, don’t fill the ink bottles as full and adjust the
height of the shelf bracket. (Refer to Chapter 2)
Faulty bulk system
Call Technical Support.
Prevention:
▪ Always check the Platen to Print Head Clearance prior to printing.
▪ Clean the Capping Station on a regular basis.
▪ Clean debris from the Print Head daily.
▪ Do not overfill the Bulk Ink Cartridges.
Problem:
printed
image
wiping
washing
out,
fading
badly
bleeding.
The
Th
e pr
prin
inte
ted
d im
imag
age
e is w
wip
ipin
iping
g of
off,
offf,
f w
was
ashi
ashing
ng o
out
ut,
ut, fa
fadi
ding
ng b
bad
adly
adly o
orr bl
blee
eedi
ding
ng.
ng.
Causes:
▪ The garment was improperly cured
Garment ink requires a temperature of 330 degrees F. to cure properly.
Apply this heat for at least 60-90 seconds for Light garments and for
at least 180-240 seconds for Dark garments
▪ Too much or too little pressure was applied when Heat Pressing
When pressing the garment, the Heat Press should rest on the silicone or
Teflon paper with medium to heavy pressure. This allows the moisture
within the inks to escape and properly cure without scorching the shirt.
▪ The temperature of Heat Press was not correct
Make sure the Heat Press is heating up evenly and reaching the
correct temperature of 330 degrees F. You can test this with a
touch-less infrared thermometer or heat testing strips.
Version 1.1 Revised July, 2008
102
Chapter 9 - Troubleshooting
▪
▪
▪
▪
Too much Pretreatment was applied
Avoid soaking the garment with Pretreatment. Do not print on shirts
where the Pretreatment may still be wet. You can use a Heat Press to dry
the Pretreatment prior to printing.
An insufficient amount of Pretreatment may have been applied
Apply more Pretreatment on successive shirts and cure again.
An incorrect type of fabric was used for printing
For best results print onto 100% cotton. On 100% cotton, colors will look
their best. For 50/50 blends of cotton and polyester, the ink needs to be
cured quickly to reduce possible bleeding. FastINK will NOT work on most
synthetic materials such as waterproof Nylon.
The garment was washed improperly
Wash in cold water and dry on a delicate dryer setting.
Prevention:
▪ Make sure your Heat Press is heating up evenly and reaching the
correct temperature.
▪ Pretreat evenly and away from printer.
▪ Cure Pretreat properly.
NOTE: Cure times WILL vary based on the amount of ink used, humidity etc.
These recommendations are general guides. You may have to extend your cure
times depending upon your location and print mode preferences. (Refer to
Chapter 4 for details.)
Problem:
Printed
colors
appear
different
what
computer
monitor
prior
Prin
Pr
inte
ted
d co
colo
lors
rs a
app
ppea
ppearr di
diff
ffer
eren
entt fr
from
om w
wha
hat
hat yo
you
u se
see
e on tthe
he c
com
ompu
ompute
terr mo
moni
nito
torr pr
prio
iorr
printing.
to p
pri
rint
ntin
ing.
g.
Causes:
▪ Your nozzles could be clogged.
o Run a Nozzle Check on a piece of clear film
o Clean the Capping Station
o Run a Head Cleaning and a Nozzle Check in succession
o Flush out the ink system. Refer to Chapter 8 - Preventative Maintenance
and Problem Solving. with cleaning cartridges.
▪ The image has an attached ICC Profile.
FastARTIST uses its own ICC Profile- make sure you do not apply one from
your preferred graphics program. Refer to your graphics
application’s User’s Manual on ICC profiles.
103
T-Jet3 PLUS User’s Manual
▪
▪
You have an ICC profile checked in CorelDRAW.
Go to File > Print and select the Misc. Tab. Uncheck Apply ICC Profile.
The Capping Station is not working properly.
Clean the Capping Station.
Prevention:
Usually when a color prints with an incorrect hue, it is because a Nozzle is
clogged. If you are trying to print an Orange image but it appears more Yellow
Yellow,
that means the Magenta is clogged and the pigments can’t mix to produce
Orange.
The most important part of your Fast T-Jet3 PLUS is the Capping Station. Make
sure this ALWAYS stays clean. The Print Head “docks” here when not in use to
ensure it does not dry out. The Capping Station is also used during Head
Cleanings. If the Capping Station is dirty, the printer can’t do a proper Head
Cleaning and fix a clogged nozzle.
Note: When building any image inside any software program, make sure you
always use RGB color mode because this is how your monitor displays colors.
Never apply an ICC profile.
Problem:
Prints
gaps
print.
Prin
Pr
ints
ts are
are out
out of
of alignment
alig
al
ignm
nmen
entt or there
tthe
here
re are
are large
lar
large
ge g
gap
apss in tthe
he p
pri
rint
nt..
Causes:
▪ Different Print Modes are being used
Double-check settings in the FastRIP Setup screen and make sure all Print
Modes are of the same type. If using an HS Print Mode for the
color then the same Mode must be used for the Underbase (i.e. Photo 720
Standard HS Print Mode and 1440 DPI Image Normal Underbase HS).
▪ Encoder strip is dirty and needs to be cleaned
Clean the Encoder Strip.
▪ If using an Underbase and/or Underbase wizard, the Black and White
versions of images may be different sizes.
Double check the images’ Heights and Widths to make sure they are
identical.
▪ Print Carriage is jumping around and causing a misread of the Encoder
Strip.
Clean the Drive Belt Gear.
▪ There is a communication error between your printer and your
computer.
Make sure you don’t have any jobs in the FastRIP Queue or Windows Print
Version 1.1 Revised July, 2008
104
Chapter 9 - Troubleshooting
Manager. If you do, delete them. Power down your printer, unplug
the power cord and leave it unplugged for about 30 seconds. Power
back ON and try again.
Make sure you are using the correct port. Open FastRIP and select
Printers/Manage Printers. Make sure the Epson Stylus port Control Panel
box has a check mark in it.
You may also be using insufficient or incorrect cables. We highly
recommend using a USB cable for the best connection. DO NOT use a
long cable, switch boxes, hubs or even wireless USB connections.
Prevention:
▪ Always double check settings in FastRIP prior to sending a Print command
▪ Clean the Encoder Strip daily
▪ Always make sure images are the same size when using the Underbase
Wizard in FastARTIST.
▪ Test the communication between the computer and printer.
Problem:
Fonts
printing
correctly
garment.
Font
Fo
ntss are
are no
nott pr
p
prin
inti
ting
ng
gc
cor
orre
rect
ctly
ly
yo
on
n th
the
e ga
garm
g
rmen
ent.
t.
Causes:
Sometimes fonts, especially script fonts, may not print correctly or print at all.
This tends to happen when using Vector Programs. The printer driver may not
download or recognize the font. To fix this, change the font to a graphic image.
Depending on the graphics program, it may be called Convert to Curves or
Create Outlines. You may also need to do this if you are printing vector fonts
along with a bitmap image.
Try importing or printing a different file to see if the problem remains.
Problem:
printer
stops
middle
print
routine
stops
communicating
with
The
Th
e pr
p
prin
inte
terr st
stop
ops
ps in tthe
he mid
m
iddl
dle
e of a p
pri
rint
nt rrou
outi
tine
ne a
and
nd ssto
tops
p
ps c
com
ommu
muni
nica
cati
ting
ng
gw
wit
ith
h
computer.
the
th
e co
comp
mput
uter
er..
Causes:
▪ Print drivers may need to be re-installed
Print drivers are prone to occasionally stop communicating with the
105
T-Jet3 PLUS User’s Manual
▪
▪
▪
Windows XP operating system. The only solution is to re-install the driver.
Too many items may be connected to your USB port
If you have any additional items connected to your USB ports, unplug
everything but the mouse and the Fast T-Jet3 PLUS. The USB bus on your
computer only has only a limited amount of power.
The image file may be corrupt
The file being printed may be corrupt. Try another file.
USB cable may be too long
Your USB cable should not be MORE than six feet in length.
Prevention:
▪ Keep it simple. Do not overload the printer port.
▪ When in doubt first try turning everything off and unplugging things such
as the USB cable from the computer to the printer.
Problem:
printing
White
prints
there
Underbase
settings
When
Wh
en p
pri
rint
rintin
ing
g Wh
Whit
ite
e in
ink,
k, n
no
o in
ink
k pr
prin
ints
ts o
orr th
ther
ere
e ar
are
e no U
Und
nder
nderba
base
se sset
etti
etting
ngss
available.
avai
av
aila
labl
ble.
e.
Causes and Solutions:
You do not have the correct printer selected in FastRIP.
Open FastRIP and navigate to Printers/Manage Printers and make sure your
printer is setup as a Fast T-Jet3 PLUS. If it is NOT setup as a 3, FastRIP doesn’t know
that it needs to use the White ink.
Problem:
When
send
print
printer
nothing
happens.
When y
you
ou ssen
end
end a pr
prin
intt jo
job
b to tthe
he p
pri
rint
rinter
er n
not
othi
othing
ng h
hap
appe
appens
ns..
Cause:
Ca se:
▪ The computer is not communicating with the printer.
Check the port settings in FastRIP. In the FastRIP window go to Printers/
Manage Printers. The port should be set to Epson stylus pro 4800_usb00*.
Check the Control Panel box on the right. Make sure there are no
other jobs already in the print queue.
▪ The printer is not ready to print the job.
Check to see if any of the ink cartridges are showing empty.
Version 1.1 Revised
Revis
Re
vised
ed July,
July, 2008
2008
1066
10
Chapter 9 - Troubleshooting
Problem:
shirt
showing
through
Underbase.
The
Th
e color
colo
co
lorr of tthe
he sshi
hirt
rt iiss show
sh
owin
ing
g th
thro
roug
ugh
h th
the
e Un
Unde
derb
rbas
ase.
e.
Causes:
▪ There was not enough Pretreatment applied to the shirt.
○
Use a good spray gun such
as the Wagner Control
Sprayer to lay down
an even coat of Pretreatment.
○
Press the shirt in a Heat Press
prior to pretreating. This will
flatten the garment fibers,
allowing the Pretreatment
to stick to the shirt better.
○
Be sure to cover the entire
printable area.
○
Use 100% Pretreatment. Try not diluting it with water to see if prints
improve.
▪ The White Nozzles are clogged.
○
Run a Nozzle Check on a piece of clear film to see how the
Nozzles are performing.
○
Clean the Capping Station.
○
Run a Head Cleaning and a Nozzle Check in succession.
○
Flush out the ink system. Refer to Chapter 8 - Preventative
Maintenance and Problem Solving.
▪ The Underbase settings in FastARTIST are not strong enough or not set up
correctly.
Check your Underbase settings and compare them to the default settings
listed in Chapter 9 of the FastARTIST Manual. (Keep in mind, every image
will vary- this is just a starting point).
T-Jet Blazer
Prevention:
▪ Practice is the only way to master the art of pretreating a shirt.
Eventually you will develop your own style for to applying Pretreatment.
▪ Try pressing your shirts before applying Pretreatment. This will flatten loose
fibers, allowing the Pretreatment stick to the shirt and not the fibers.
▪ Perform regular machine maintenance. Keeping your machine clean
is the key to having great prints on a Dark garment. Frequently run Head
Cleanings and Nozzle Checks to keep your nozzles flowing properly.
Take the time to get to know your machine and your software. Make sure
you start off using the default Underbase settings provided in Chapter 9 of
the FastARTIST Manual.
1077
10
T-Jet3 PLUS User’s Manual
Problem:
There
horizontal
banding
across
print
colors).
Ther
Th
ere
e is h
hor
oriz
izon
onta
tall ba
band
ndin
ing
g ac
acro
ross
ss p
pri
rint
nt ((in
in o
one
ne o
orr al
alll co
colo
lors
rs).
).
Causes:
• Ink in the Nozzle has dried out
o Do Head Cleanings and Nozzle Checks until the problem is resolved.
o Use a cleaning cartridge and run Head Cleanings until the problem
is resolved.
o A serious or permanent clog may require replacing the Print Head.
• The Capping Station is not cleaning the Print Head
If the Capping Station is dirty, it will just add more debris to the Print
Head, causing it to become clogged. Thoroughly clean the Capping
Station. It can be cleaned with swabs included in the maintenance
kit and a glass cleaner like Windex. Be sure to clean the rubber seal
around the Capping Station as well as the rubber wiper blade.
• Air bubbles in bulk system tubing are causing small amounts of ink to
dry inside Print Head/Nozzles.
Run Head Cleanings and print Nozzle Checks until a satisfactory test
print is achieved.
• You are using a High Speed (HS) Print Mode.
Try using a 2 Pass or standard Print Mode. HS, or Bi-directional Print
Modes require the Nozzles to be in perfect alignment. Additionally,
when using HS Print Modes, head clogs tend to appear as banding.
Prevention:
• Clean Capping Station daily.
• Run Head Cleanings before printing in the morning as well as printing
a Nozzle Check to gauge the status of the Print Head prior to printing
onto garments.
• Make sure the Bulk Ink System tubes don’t have any air in them prior to
printing.
Problem:
Files
print.
File
Fi
less take
take a long
llon
ong
g time
time tto
o prin
pr
int.
t.
Causes and Solutions:
• Printing from CorelDRAW is causing large spool files.
Printing from any version of CorelDRAW can create extremely large
spool files. This happens when one or more copies of a file are sent to
the printer while you are trying to print a number of images that require
a second pass. It can also happen if bitmap images are placed in the
document. If the spool files are larger than your physical memory, the
Version 1.1 Revised July, 2008
108
Chapter 9 - Troubleshooting
file may not print or may take a long time processing. Ways to reduce
this include exporting the file in a JPEG format, then bringing the file
back into CorelDRAW using the Import function. If the bitmap was
created with a high resolution, try lowering the resolution to around 200
DPI. Save this file and Import it back into CorelDRAW. Try to print from
a different program like Adobe Photoshop or Adobe Illustrator. These
graphic programs do not create such large spool files.
• File resolution is too high.
A resolution of 150 to 300 DPI (at the final print size) is all that is
necessary for direct printing to garments. If you receive larger file
resolutions, resample them to a lower resolution to speed up ripping
and printing times.
Prevention:
Keep file sizes small, if possible, and don’t send a lot of print commands at the
same time.
Problem:
The
printing
large
bands
color,
vertical
colored
printing
partial
The printer
prin
pr
inte
terr is p
pri
rint
ntin
ing
g la
larg
rge
e band
ba
ndss of c
col
olor
or,, ve
vert
rtic
ical
al c
col
olor
ored
ed lin
llines
ines
es o
orr pr
prin
inti
ting
ng p
par
arti
tial
al
images.
imag
iim
ages
es..
Causes:
▪ You have a dirty Encoder Strip or Encoder Sensor
The Encoder Strip is the heart of the machine and behind the Print Head
lies an Encoder Strip Sensor. The Encoder Strip has information on it that
the Encoder Strip Sensor reads as the Print Head moves back and forth. If
there is ANY contamination, Pretreatment, dirt, ink or debris on the
Encoder Strip or on the Encoder Strip Sensor, the printer will be VERY
CONFUSED. This is the #1 cause of abnormal printing problems.
Clean the Encoder Strip with Glass Cleaner.
▪ The Gear for the Print Carriage Drive Belt may be filled with lint and
slipping.
Clean the Gear and Roller.
Prevention:
▪ Keep the printing area clean, the machine lid closed and pretreat shirts
away from the printer.
▪ Shake shirts before you print onto them to remove excess lint that may get
on the Encoder Strip.
▪ When printing a large volume run, clean the Encoder Strip often to
prevent communication errors from ruining shirts during a printing cycle.
1099
10
T-Jet3 PLUS User’s Manual
Problem:
print
White
Underbase
White
over
entire
image.
When
Wh
en y
you
ou p
pri
rint
nt a W
Whi
hite
te Und
U
nder
erba
base
se y
you
ou g
get
et a Whi
W
hite
te b
box
ox o
ove
verr th
the
e enti
en
tire
re iima
mage
ge..
Causes:
• Check your Underbase setup within FastARTIST.
Within FastARTIST go to File > FastRIP Setup > Underbase Setup tab.
Make sure the top checkbox that says Underbase All Items with this
Underbase Color is checked. Make sure the bottom check box that
says Highlight All Objects with This Color is NOT checked.
Make sure to view the image in FastRIP’s View Raw Data window to
see if it looks correct BEFORE
printing.
Please note: If you choose a 1440 DPI White Print Mode you will not have the
View Raw Data option.
Problem:
Pr
P
obl
blem:
quality
printed
output
unacceptable
printing
The
Th
e qu
qual
alit
ity
y of tthe
he p
pri
rint
nted
ed out
o
utpu
putt is u
una
nacc
ccep
epta
tabl
ble
e wh
when
en p
pri
rint
ntin
ing
g bitmap
bitm
bitmap
ap images.
iima
mage
ges.
s.
images
seem
clean
sharp.
The
Th
e im
imag
ages
es ssee
eem
eem so
soft
ft a
and
nd a
are
re n
not
ot c
cle
lean
lean a
and
nd ssha
harp
harp.
rp.
The resolution at final size is 72 DPI.
Causes:
The resolution of the image is too low.
Resolution at 72 DPI is for viewing the image on a computer monitor only.
Images intended for printing need to be between 150 and 225 DPI to maintain
a clean and sharp image. You can try upsampling the image to a larger
resolution, but the image still will be “soft” when printed.
Problem:
sending
print
command
T-Jet3
PLUS,
Print
moves
When
Wh
en ssen
endi
ending
ng a p
pri
rint
rint c
com
omma
ommand
nd tto
o th
the
e Fa
Fast
st TT-J
-Jet
Jet3
et3 PL
PLUS
US,
US, th
the
e Pr
Prin
intt He
Head
ad m
mov
oves
oves
printing
dispensed.
lilike
ke iitt is p
pri
rint
ntin
ing
g bu
butt no iink
nk iiss di
disp
spen
ense
sed.
d.
Causes:
• Ink is not flowing from the Bulk System.
Ensure the breather hole in the cap of each ink cartridge has not
Version 1.1 Revised July, 2008
110
Chapter 9 - Troubleshooting
become clogged or closed. The cartridges need to breathe as ink
flows through the lines.
• Ribbon cable to the Print Head is
damaged.
If you accidentally splash/drip ink or
cleaning fluid on the gray Ribbon
cable that connects to the Print
Head, it can short out. Check for
burn marks on the Ribbon cable
connectors. Check to make sure it
hasn’t been crimped or pinched.
• Motherboard is bad.
There is a chance the motherboard
is bad. The board could have a
defect or some fluid may have
been spilled on it. If ink or cleaning
fluid runs down the Ribbon cable
and drips into the bed it can short
out the motherboard.
• Capping Station Clogged.
The Capping Station may need cleaning. If the Print Head did not seat
properly, ALL of the nozzles could be clogged.
Problem:
image
printing
outside
shirtboard
wrong
The
Th
e iim
imag
age
e iis p
pri
rint
intin
tiing
g ou
outs
tsid
t ide
ide off tthe
he
h sshi
hirt
hirtbo
tboar
b ard
d or iin
n th
the
e wr
wron
ong
g lo
loca
llocation.
cati
tion
tion..
Causes:
You have a mismatch in the software settings.
Make sure your working Page Size matches the final print page size. A common
error is working on one Page Size in a graphics program but printing to a
different Page Size in FastRIP.
Problem:
printer
weekends
times
when
heads
I on
only
ly u
use
se m
my
y pr
prin
inte
terr on w
wee
eeke
ee
kend
ndss an
and
d ma
many
ny ttim
imes
im
es w
whe
hen
hen I go tto
o us
use
e it
it,, th
the
e he
head
adss
clogged.
are
ar
e clog
cl
ogge
ged.
d.
Causes:
Ink is drying within the Print Head due to lack of use.
If you are NOT using your printer on a regular basis, the ink may partially dry
111
T-Jet3 PLUS User’s Manual
within the Print Head, causing a clog.
We have found the best solution to this issue is to turn your printer ON everyday,
even if you don’t intend to print anything. When the printer is turned ON, it
primes the Print Head during startup. This process is
sufficient to prevent head clogs if done regularly. You DO NOT have to do a
Head Cleaning unless you want to.
After your printer has gone through its startup procedures, turn it OFF to ensure
the Print Head seats within the Capping Station.
NOTE: Always make sure you observe the proper procedures for powering ON
and OFF your printer to avoid damaging the Print Head.
Problem:
printing
vector
graphics,
printed
colors
match
previews
When
Wh
en p
pri
rint
rintin
ing
g ve
vect
ctor
or g
gra
raph
raphic
ics,
icss,
s tthe
he p
pri
rint
rinted
ed c
col
olor
olorss do n
not
ot m
mat
atch
atch tthe
he p
pre
revi
review
ewss in
graphics
application.
my g
gra
raph
phic
icss appl
ap
plic
icat
atio
ion.
n.
Causes:
FastRIP is a bitmap based image processor.
When rasterizing a vector image, FastRIP must convert a vector graphic into
a bitmapped graphic. Sometimes the translation of color profiles is not exact,
resulting in a difference in output.
For consistent color reproduction, save your image as a high quality JPEG and
send this image to the RIP for printing.
Problem:
P obl
Pr
blem:
Individual
ashing.
Indi
In
divi
vidu
dual
al ink
ink lights
llig
ight
htss are
are flas
ashi
hing
ng..
Causes:
The printer thinks you are out of a specifi
color.
cific c
olor
ol
or..
The ink cartridges have auto reset chips
them,
have
been
printing
ps o
on
n th
them
em
m, bu
butt iff y
you
ou
uh
ave
av
e be
bee
en p
en
pri
rin
n
ntin
ing
g
a lot of shirts the chips will not have had
the
chance
reset.
d th
e ch
chan
han
nce tto
o re
rese
se
et
You can turn the printer off for 30 seconds and then back on, BUT if you are in
the middle of a job, you will lose a shirt.
You can also press the Ink button once (wait until printer moves the Print
Carriage off of the Capping Station and parks), press the Ink button again and
the carriage will return to home position. The lights should go out and the printer
Version 1.1 Revised July, 2008
112
Chapter 9 - Troubleshooting
will start to print again.
Prevention:
Get in the habit of turning the printer ON and OFF between print jobs that use a
lot of ink or need a large number of prints.
Problem:
ashing
solid
printer
print.
Ink
In
k llights
ight
ig
htss ar
are
e flflas
ashi
as
hing
ng or
or so
soli
lid
d an
and
d th
the
e pr
prin
inte
terr wi
willll n
not
ot p
pri
rint
rint.
nt.
Causes:
C
▪ The Maintenance Tank Counter may need to be reset.
If the printer thinks that you have done about 10,000 to 15, 000 “pages”
you will need to reset the Maintenance Tank Counter. There is an
excellent software program that will automatically reset the
printer without you having to take off a cover or get inside of the
machine. Refer to Chapter 7 for details.
▪ If ink light is solid, ink cartridges may not be seated all the way or they
could have a bad chip.
A chip on an ink cartridge is not connecting properly to the prong
inside the Print Carriage. Press the Ink button on the printer. This
slides the Print Carriage over. Remove all the ink cartridges and then snap
each one back into place. Press the Ink button again. You can also clean
the contacts on the chip with a pencil eraser. Replace chips if errors still
exist.
▪ Ink cartridge holder has bent prongs that do not make good contact with
the chip.
When you insert an ink cartridge, the small chip on the back makes
contact with gold prongs. These prongs can be pulled out of place if the
chip is not installed correctly on the cartridge (sticking out of the slot) or if
the prong hangs on the cartridge as it is being removed.
WARNING: NEVER insert a cartridge without a chip or you will pull the prongs
loose when you remove the cartridge.
Prevention:
There are a number of reasons the printer may have Red lights flashing or solid.
Keep the Encoder Strip clean. Ensure the Print Head docks properly with the
Capping Station. Check cartridges for bad chips or poor chip connections.
1133
11
T-Jet3 PLUS User’s Manual
Probl
Problem:
P
blem:
printed
output
The
Th
e quality
qual
qu
alit
ity
y of tthe
he p
pri
rint
nted
ed out
o
utpu
putt is unacceptable
una
u
nacc
ccep
epta
tabl
ble
e when
when printing
pri
p
rint
ntin
ing
g bitmap
bitm
bitmap
ap images.
iima
mage
ges.
s.
images
seem
clean
sharp.
The
Th
e im
imag
ages
es ssee
eem
m so
soft
ft a
and
nd a
are
re n
not
ot cle
c
lean
an a
and
nd ssha
harp
rp..
Cause:
The resolution of the image is too low.
Resolution at 72 DPI is for viewing the image on a computer monitor only.
Images intended for printing need to be between 150 and 225 DPI to maintain
a clean and sharp image. You can try upsampling the image to a larger
resolution, but the image still will be “soft” when printed.
Problem:
sending
command
T-Jet3
PLUS
printer,
Print
Head
moves
When
Wh
en ssen
endi
ding
ng
g a Print
Prin
Pr
intt c
omma
om
mand
nd tto
o th
the
e TT-Je
Jet3
t3 P
PLU
LUSS pr
p
prin
inte
ter,
r,, tthe
he P
Pri
rint
nt H
Hea
ead
d move
mo
vess
dispensed.
lilike
ke it
it is printing
pri
p
rint
ntin
ing
g but
but no iink
nk iiss di
disp
spen
ense
sed.
d.
Causes:
▪ Ink is not flowing from the Bulk System.
Unscrew the top of each bottle then reseal.
▪ The Ribbon Cable to the Print Head is burnt or not connected.
If you accidentally splash/drip ink or cleaning fluid on the gray Ribbon
Cable that connects to the Print Head, it can short out. Check for
burn marks on the Ribbon cable connectors. Ensure that the cable is
connected properly. This is a common error that occurs after replacing a
Print Head.
▪ Motherboard is bad.
There is a chance the motherboard is bad. The board could have a
defect or some fluid may have been spilled on it. If ink or cleaning fluid
runs down the Ribbon Cable and drips into the bed it can short out
the motherboard.
▪ Capping Station Clogged.
The Capping Station may need cleaning. If the Print Head did not seat
properly, ALL of the Print Heads could be clogged as well as the hose with
the Green stripe that drains the excess ink into the Waste Bottle. This would
prevent the Capping Station from draining properly.
Problem:
Lights
ashing
Control
Panel
Ligh
Li
g ts a
ghts
are
re fla
ash
shin
ing
g on the
the C
Con
ontr
trol
ol P
Pan
anel
el
Version 1.1 Revised July, 2008
114
Chapter 9 - Troubleshooting
Causes:
The Load Light indicates the status of the printer either by flashing of remaining
solid.
○ Flashing – Printer is currently in use or processing an image for print.
○ Solid – Printer is ready and awaiting a print task
Note: The Load Light will remain on except when processing an image or
printing.
All Ink Lights Flashing as well as Ink Button and Error Light
A fatal printer error has occurred. The printer must be completely shutoff,
including the main power switch. Manually move the print bed inward,
centering it under the printer then power back on the printer.
Ink Light and Error Light (alternating) Flashing Fast
The printer thinks the waste tank is full. This will only happen after the printer
reaches approximately 15,000 prints. Open FastRIP and go to Printers > Printer
Properties or click on the last icon in the toolbar that says Print status and
settings. Click on the Reset Ink Pad Counter button and the error should clear in
about 10 seconds.
Problem:
The
image
printing
outside
Shirtboard
wrong
location.
The im
imag
age
e is p
pri
rint
ntin
ing
g ou
outs
tsid
ide
e of tthe
he SShi
hirt
rtbo
boar
ard
d or iin
n th
the
e wr
wron
ong
g lo
loca
cati
tion
on..
Causes and Problems:
You have a mismatch in the software settings.
Make sure your working “Page Size” matches the final print Page Size. A
common error is working on one Page Size in a graphics program but printing to
a different Page Size in FastRIP.
Problem:
I only
Print
only use
use my
my printer
prin
pr
inte
terr on weekends
wee
w
eeke
kend
ndss and
and many
many times
tim
times
es when
whe
w
hen
n I go tto
o use
use it
it,, th
the
e Pr
Prin
intt
Head
Head is
is clogged.
clog
cl
ogge
ged.
d.
Causes and Solutions:
• Ink is drying within the Print Head due to lack of use.
If you are NOT using your printer on a regular basis, the ink may partially
dry within the Print Head, causing a clog.
We have found the best solution to this issue is to turn your printer ON
115
T-Jet3 PLUS User’s Manual
everyday, even if you don’t intend to print anything. When the printer
is turned on, it primes the Print Head during startup. This process is
sufficient to prevent head clogs if done regularly. You DO NOT have
to do a Head Cleaning unless you want to.
After your printer has gone through its startup procedures, turn it OFF
to ensure the Print Head seats within the Capping Station.
NOTE: Always make sure you observe the proper procedures for powering ON
and OFF your printer to avoid damaging the Print Head.
FOR EXTENDED DOWN TIME: Flush out the ink system. Refer to Chapter 8 Preventative Maintenance and Problem Solving.
Problem:
When
printing
vector
graphics,
printed
colors
match
previews
When p
pri
rint
rintin
ing
g vect
ve
ect
ctor
or g
gra
raph
ra
phic
ics
ics,
ss, tthe
he p
pri
rint
rinted
ed c
col
olor
ol
orss do n
not
ot m
mat
atch
atch tthe
he p
pre
revi
review
ie
ewss in
my graphics
gra
g
raph
phic
icss application.
ap
appl
plic
icat
atio
ion.
n.
Causes and Solutions:
• FastRIP is a bitmap based image processor.
When rasterizing a vector image, FastRIP must convert a vector
graphic into a bitmapped graphic. Sometimes the translation of color
profiles is not exact, resulting in a difference in output.
For consistent color reproduction, save your image as a high quality
JPEG and send this image to the RIP for printing.
Version 1.1 Revised July, 2008
116
Chapter 10
Transporting the Printer
If your T-Jet3
3P
PLU
PLUS
LUSS wi
willll b
be
e expe
ex
experiencing
peri
rien
enci
cing
ng a
an
n ex
exte
extended
tend
nded
ed per
p
period
erio
iod
d of d
dow
downtime
ownt
ntim
ime
e (2 or
or
more days), if you will be transporting your printer from one location to another,
or if you will be shipping it to XV for repair, you
nsta
ns
tallll tthe
he C
lean
leanin
ing
g Ca
Cart
rtri
ridg
dges
es
will need to iinstall
Cleaning
Cartridges.
Every T-Jet3 PLUS is shipped with HD Cleaning
Solution, 2 Bulk Cleaning System Bottles and a
syringe flush the system. It is important for you to
follow the steps outlined in this Chapter. Failure
to do so could not only cause serious damage to
your printer, but may also void your warranty.
The preparation process should only take about 10 minutes. If you have any
questions, please contact the Technical Support Department.
Flush the Ink System
The purpose of this procedure is to flush all of the ink out of the bulk ink system ink
lines, cartridges, print head and capping assembly. This helps prevent ink build
up and promotes the life of the capping station and print head. This procedure
is also necessary for preparing the T-JET3 PLUS for down time.
NOTE: For best results make sure that the cap assembly is clean and free of any
dried ink or debris.
1. Using the adjustment program, reset the maintenance tank counter on the
T-JET3 Plus. This will insure that during this procedure, the maintenance tank
will not read as full. Refer to Chapter 7 - Maintenance Utilities to Improve Print
Quality - Resetting the Waste Ink Counter for instructions.
2. Press the ink button. This will release the carriage off of the capping
assembly. Refer to Chapter 4 - Printing Basics for more information on
the control panel buttons.
3. Turn the power off using the power switch located on
the back of the machine near the power cord. Move the
head off the capping assembly to gain access to the bulk
system ink cartridges.
117
T-Jet3 PLUS User’s Manual
4. Using a pair of pliers or a nut driver,
carefully loosen (do not fully remove) the
nut that attaches the black chain to the
metal carriage bracket. Do not place too
much force on the carriage bracket. The
print carriage is delicate and if not careful,
you can cause damage to it.
5. Gently lift the black chain off of the
carriage bracket. This will allow more room
to get to the ink lines.
6. Release an ink line from the cartridge by
using the quick release finger screw.
7. Next, hold the released ink line upwards
to allow the ink to flow back into the bulk
ink bottle.
Tip: A syringe can be used to force excess
ink in the lines back into the bottles by
releasing the line from the bottle and
pulling the ink through from the bottle end
of the hose.
8. Reattach the ink line to the cartridge. Do not overtighten.
9. Repeat steps 6 - 8 for all of the ink lines.
10. Next, reattach the black chain to the carriage bracket. Tighten the screws so
that the chain does not fall off.
11. Fill two 500 ml bottles (supplied) with HD cleaning solution.
12. Loosen one of the ink lines attached to the bulk ink
system bottles and connect it to one of the fittings on the
cleaning solution bottle.
HINT: Completing this one ink line at a time will reduce
spillage from any left over ink still in the ink lines.
Version 1.1 Revised July, 2008
118
Chapter 10 - Transporting the Printer
13. Repeat step 12 for all of the ink lines so that
each line is connected to one of the
cleaning solution bottles (CMYK for one and
white for the other).
NOTE: Take care not to let the lines tangle
up. It’s important to make sure there are no
kinks or creases in the ink lines.
14. Remove one of the waste ink lines from the waste
ink bottle.
Insert the tip of a plastic syringe (included) into the
waste ink line and pull back on the plunger until
the syringe is full of liquid.
Dump the excess ink from the syringe into the
waste ink bottle or other container.
15. Repeat step 14 for the remaining waste ink line.
16. Go back to the adjustment program on your computer.
Run multiple power cleanings until the solution that comes from the waste ink
bottle is clear.
Secure the Print Bed and Ink System
1. Move the Print Bed to the middle of its track.
Using a Phillips head screwdriver, install the
bed brackets. Position a bracket so that its
metal flange sits flush against the Print Bed
and tighten the screw. Do this for all four
corners.
2. Place the Waste Ink Bottle in an upright position within the Print Bed and
secure it to the T-Jet3 PLUS with a piece of adhesive packing tape.
119
T-Jet3 PLUS User’s Manual
3. Place a piece of tape across the bulk ink bottles
(having the cleaning solution in them) and adjustable
shelf bracket to secure in place. In the example to the
right, the red dotted line identifies proper tape
placement.
4. Place a small piece of tape over the breather holes on
the ink bottles.
If you will be shipping the printer via a freight carrier, you must
completely disconnect and remove all Bulk Ink System Bottles and
the Waste Ink Bottle. You WILL NOT ship these items.
Pack the Printer in its Original Box
Failure to do so will void your
warranty.
The T-Jet3 PLUS requires 2 people
to lift. Make sure you observe the
following holding points.
DO NOT lift your T-Jet3 PLUS by the Print Bed. Lift
from underneath the side panels. Lifting by the
Print Bed may cause serious damage.
Shipping Procedures
If you are shipping your printer to another location, or returning it to U.S. for
Warranty or Non-Warranty repair:
Pack only the Printer in the original box
DO NOT include:
▪
▪
▪
▪
▪
Bulk Ink System
Bottles of FastINK
Shirtboards
T-Jet Manual
T-Jet Software/Drivers
Version 1.1 Revised July, 2008
120
Chapter 10 - Transporting the Printer
▪
▪
▪
Syringes
Gloves
USB printer cable
Proper Packing – Please note, the example
to the right does not contain any loose items
that could damage the printer during
shipping.
Improper Packing –Major damage to the printer can be a result of loose items
and/or missing side supports as pictured below.
Shipment Checklist
When shipping your T-Jet for repair work, whether Warranty or
Non-Warranty, the following procedures MUST be followed.
Prior to receiving a Return Authorization, BOTH pages of the Shipping Procedures
Acknowledgement must be signed by the Original Purchaser or party
responsible for billing. In addition, all packing procedures as outlined previously
in this Chapter must be followed.
The Shipping Procedures Acknowledgement MUST be faxed to our Support
Department. Within 2 business days you will receive a Return Authorization
number and/or a follow-up call from our Support Department, so please ensure
your contact information is correct.
Failure to obtain a Return Authorization can result in your shipment being refused
and additional return shipment charges being incurred. Failure to follow the
121
T-Jet3 PLUS User’s Manual
procedures described herein for the preparation and packing of your T-Jet may
result in additional charges for cleaning and/or maintenance being incurred.
EVEN if the repair is authorized under warranty, YOU will
be responsible for any charges that are a result of a
failure to follow packing and shipping procedures.
Important Shipping Requirements:
•
Your T-Jet must be insured for full retail value (:H will do this if we are
scheduling the shipping).
• Your T-Jet is covered by a Depot Warranty. This means that the customer is
responsible for shipping costs. Please refer to the Limited Warranty section of
this Manual for further details.
• Shipping must be done by Freight Line with the printer strapped onto a
palette. A T-Jet WILL NOT BE ACCEPTED when shipped via FedEx or UPS.
•
:H can contact a freight company and schedule a pickup for your
printer. Round trip shipping costs are approximately $500-$1000, dependant
upon product.
•
If scheduling shipping through XV, shipping fees must be paid prior to
pickup.
•
Your T-Jet must be shipped to XV in the original T-Jet boxes AND with
the proper box inserts.
Other Warranty and Packing Issues
Should you have any questions or concerns, please contact our Technical
Support Department for assistance.
Version 1.1 Revised July, 2008
122
Appendix A
Requirements and Notices
Windows O
OS
SS
System
ystem R
Requirements
equirements ffor
or TT-Jet3
-Jet3 P
PLUS
LUS O
Operation
peration
Minimum System
yst
stem
em R
Req
Requirements
equi
uire
reme
ment
ntss
• PC with a Pentium 4 - 1.8 GHz and Windows XP, 2000 or Vista Operating
System (Windows ME is not supported)
• A minimum of 512MB of RAM. If using Windows Vista OS 2GB is
recommended
• A minimum of 10 GB of free disk space on your hard disk. You will also need
at least an additional 50 GB for saved files.
• A display monitor with high resolution. (1280 x 1024)
• CD-ROM or DVD drives for installing the software
• One of the following printer to computer connections:
▪ A USB port that complies with Windows
▪ An IEEE-1284 parallel port connection with D-SUB, 21-pins, (computer
end) and a 36-pin Printer connection
▪ OHCI- compliant IEEE-1394 (Firewire) Connection port and interface
card along with an IEEE-1394 cable
• Connection of a mouse and Dongle will require additional free USB ports
Recommended System Requirements
• PC with a Dual Core Processor (Intel Core 2 Duo or AMD Athalon X2) and
Windows XP, 2000 or Vista Operating System (Windows ME is not supported)
• 3 GB of RAM and a dedicated graphics card with 512 MB of onboard
memory
• A minimum of 10 GB of free disk space on your hard disk for program
installation and 100 GB for saved files.
• A display monitor with high resolution. (1280 x 1024)
• CD R/W or DVD R/W drive(s) for installing software and burning back-up
copies
• A dedicated USB port (2.0)
• The connection of a mouse and Dongle will require additional free USB
ports.
131
T-Jet3 PLUS User’s Manual
FCC Compliance
This equipment has been tested and found to comply with the limits for a Class B
digital device, pursuant to Part 15 of the FCC Rules. These limits are designed to
provide reasonable protection against harmful interference in a residential installation.
This equipment generates, uses and can radiate radio frequency energy, and if not
installed and used in accordance with the instructions, may cause harmful interference
to radio communications. However, there is no guarantee that interference will not
occur in a particular installation. If this equipment does cause harmful interference to
radio or television reception, which can be determined by turning the equipment off
and on, the user is
encouraged to try to correct the interference by one or more of the following
measures:
•
•
•
Reorient or relocate the receiving antenna.
Increase the separation between the equipment and receiver.
Connect the equipment into an outlet on a circuit different from that to
which the receiver is connected.
Consult the dealer or an experienced radio/TV technician for help.
WARNING: The connection of a non-shielded equipment interface cable to this
equipment will invalidate the FCC Certification of this device and may cause
interference levels, which exceed the limits established by the FCC for this equipment.
It is the responsibility of the user to obtain and use a shielded equipment interface
cable with this device. If this equipment has more than one interface connector, do not
leave cables connected to unused interfaces. Changes or modifications not expressly
approved by the manufacturer could void the authority to operate the equipment.
For Canadian Users
This Class B digital apparatus complies with Canadian ICES-003.
Declaration of Conformity
According to 47CFR, Part 15 for Class B Personal Computers and Peripherals; and or
CPU Boards and Power Supplies used with Class B Personal Computers:
We: U.S. Screen Print & Inkjet Technology a division of U.S. Graphic Arts, Inc.
Located at: 1901 East 5th Street Tempe, AZ 85043 Telephone: (480) 929-2937
Declare under sole responsibility that the product identified herein, complies with 47CFR
Part 2 and 15 of the FCC rules as a Class B digital device. Each product marketed
is identical to the representative Unit tested and found to be compliant with the
standards. Records maintained continue to reflect the equipment being produced
can be expected to be within the variation accepted, due to quantity production
and testing on a statistical basis as required by 47CFR 2.909. Operation is subject to the
following two conditions: (1) this device may not cause harmful interference, and (2)
this device must accept any interference received, including interference that may
cause undesired operation.
Version 1.1 Revised July, 2008
132
Appendix A - Requirements and Notices
Type of Product:
Factory Refurbished Inkjet Printer
Model:
T-Jet3 PLUS
European Union Declaration of Conformity - CE
A sample of this equipment has been tested against the Essential
Health and Safety Requirements of the Machinery Directive. Based
on conformity with the Machinery Directive, the Equipment Under
Test - T-Jet3 PLUS from U.S. Graphic Arts, Inc., dba U.S. Screen Print &
Inkjet Technology in Tempe, Arizona USA is deemed in compliance with the Machinery
Directive (98/37/EC) and the Council Directives amending the Machinery Directive
(91/368/EEC) and 93/44/EEC). In addition, the Equipment Under Test complies with the
requirements of the Low Voltage Directive (73/23/EEC) and the EMC Directive (89/336/
EEC)
133