1
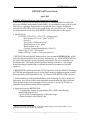
RETROCAM User’s Guide
RETROCAM User’s Guide
April 2005
RETROCAM Specifications and Operational Guidance:
1. RETROCAM is a science-quality optical CCD camera installed on the 2.4m
telescope Multiple Instrument System (MIS). It is available for use with all of the
observatory’s primary instruments except the 8K direct imager. A detailed
description of RETROCAM can be found in the Astronomical Journal.1 Citations
for observational work done with RETROCAM should refer to this paper.
2. Specifications:
CCD: E2V CCD 55-20 – 1152 x 770 – 22.5µm pixels
Dark Current: 2.5 e- sec-1 pixel-1 at -20°C
Gain: 3.0
Pixel Scale: 0.259 arcsec pixel-1
Readout noise: 13.4 e- pixel-1
Readout time: 6 sec
Cooling: 3 stage thermoelectric (-20±1°C)
Field of View: 4.97 x 3.32 arcmin
Filters: SDSS g, r, i and z. One open position
3. RETROCAM uses the MIS finder mirror (now renamed RETROCAM), which
obscures the science field of the primary instrument. So, while RETROCAM can
be used within minutes of most primary instruments, the two cannot be used
simultaneously. The finder mirror has been resized such that a ~100 arcmin2
horseshoe-shaped guide field is available around the perimeter of the MIS
aperture.
4. RETROCAM is parfocal with the CCDS. Operation with the Mark III, Modspec
or TIFKAM spectrographs or any of the direct imaging cameras requires a small
telescope focus offset (see table in the “To Observe with RETROCAM” section).
5. Under conditions of bright illumination, such as during sky flat or dome flat
exposures, you will encounter non-negligible internal reflected light problems.
These problems are severe enough to ruin your sky or dome flat. We plan to
eliminate this problem during future upgrades.
6. Suggested uses for RETROCAM:
- An imager for targets of opportunity (SNe, GRBs, microlensing,
monitoring projects, etc.)
- Spectroscopy and photometry of the same target
- Finder Camera for the MDM 2.4m
1
Morgan, et al. 2005, “RETROCAM: A Versatile Optical Imager for Synoptic Studies”, AJ, in
press (preprints available at astro-ph/0502274)
________________________________________________________________________
1
RETROCAM User’s Guide
RETROCAM Startup
1. Login to retrocam (the dedicated linux machine which runs RETROCAM) as
‘visitor’. On chichon, retrocam can be accessed from the desktop menu by
selecting “Data Acquisition”, then “RETROCAM”. On agung, select
“RETROCAM” on the desktop menu. Password is set to the current visitor
password.
2. Verify that the RETROCAM GUI is not running on any other console.
Note: The simplest way to do this is to enter the command “ps –x” in a
retrocam xterm. Look for “retrocam” and/or “ds9” in the process id table.
3. Start the RETROCAM control GUI by typing ‘retrocam’
- Multiple windows will open during system startup.
- System startup is complete when the ds9 window, RETROCAM control
panel and a diagnostic xterm are the only open windows.
- The diagnostic xterm may be iconified.
To Observe with RETROCAM:
1. Using the xmis control panel on chichon, move RETROCAM to the
‘In’ position.
2. Select the focus offset appropriate for the primary instrument in use:
Instrument
Telescope Focus Offset (Secondary
Mirror Encoder Units)
CCDS
0
TIFKAM
+50
MODSPEC
+128
Mark III
+171
Direct Imagers (Templeton, Echelle)
-15*
*This value was measured using the RETROCAM ‘r’ filter and the Johnson-Cousins ‘R’
filter with Echelle. Focus offsets with other filters have not yet been measured and are
likely to be different.
Set the telescope focus to the RETROCAM position using the xtcs control.
Example: If Mark III is in use and the current focus is 3174:
3174+171=3345
Set telescope focus to 3345 using the xtcs control.
3. Fill in the Object, RA, Dec, Image Type, Filename, Observer and Rotator PA
(Instrument Rotator Angle) fields in the RETROCAM GUI. Verify settings in the
‘Data Directory’ field.
4. Set the desired ExpTime and #Images in the GUI.
5. Move the guide probe away from the center of the field until guide stars come
into view. Note that the guider may need to be focused if a telescope focus offset
was inserted in step 2.
- Note: When using RETROCAM for C. Morgan and C. Kochanek’s lensed
QSO monitoring project, pre-selected guide probe positions are available
using the ‘retrocam_gs’ program on chichon. See the “Lensed QSO
Observing Procedure” for details.
________________________________________________________________________
2
RETROCAM User’s Guide
6. If you are using the ‘Seitzer Guider’ (also known as ‘TVGUIDER’) or the ‘DTI
Guider’ (also known as ‘PCGUIDER’) in the direct mode, select a guide star and
commence guiding.
7. If you are using the ‘DTI Guider’ (‘PCGUIDER’) in the downward-looking
mode, such as during use with the MODSPEC or Mark III spectrographs:
a) On the Guider PC, press the ‘p’ key to enter the parameter settings
b) Set the ‘Flip E/W’ parameter to ‘0’.
c) Set the ‘Guider Angle’ parameter to (90 + TCS Rotator Angle)
d) Exit the parameter settings, select a guide star and commence guiding
8. Select the desired filter by clicking on its button.
9. Click ‘GO’ in the RETROCAM GUI.
10. Once CCD readout is complete, the image will be displayed in the open ds9
window.
11. To resume observing with the primary instrument after using RETROCAM:
a) Using xmis, move RETROCAM to the ‘Out’ position
b) Restore the telescope focus to its original setting using xtcs
c) If using the ‘DTI Guider’ in downward-looking mode:
- Move the guide probe to the ‘slit’ position
- Set the ‘Flip E/W’ parameter to ‘1’
- Set the ‘Guider Angle’ parameter to (270 - TCS Rotator Angle)
d) Restore the guider focus to its initial setting
RETROCAM Control Panel: (See the GUI screenshot on the following page)
Warning: The ‘ABORT’ button is currently malfunctioning. Use of the abort
button will cause RETROCAM to lock up, requiring system restart.
1. The following parameters are set using the RETROCAM GUI:
- Exposure Time
- Number of Images to acquire in a sequence
- Image Type (Object, Dark, etc.)
- Filename (see additional guidance under “Filename” below)
- File sequence number (automatically resets to ‘1’ with each new
filename)
- Data directory (usually /home/retrocam/data)
2. Filters are selected by clicking on the appropriate filter button using the
mouse. The button will appear yellow during filter wheel motion and will
appear green when the selected filter is in place.
3. The following FITS header information can be updated in the GUI:
- Object Name
________________________________________________________________________
3
RETROCAM User’s Guide
- Object RA and Dec (Note: This feature is informational and does not
change telescope RA&Dec. Future versions of this program will retrieve this
information from xtcs automatically.)
- Observer Name(s)
- Instrument Rotator Position Angle (PA)
4. The lower right corner of the GUI displays the following information:
- CCD Temperature
- Telescope Focus: (not yet implemented)
- Instrument rotator position angle (PA)
- Finder Mirror Position (not yet implemented)
- Guide Probe Position (not yet implemented)
5. The thermoelectric cooler (TEC) controls can be found in the ‘Temperature’
menu. The TEC is automatically set to maintain -20±1°C upon startup.
Additional adjustments should not be necessary.
Filenames:
1. RETROCAM uses a ‘C-like’ filename convention that is demonstrated in the
RETROCAM GUI screenshot above. The ‘%4.4d’ suffix implies that filenames
will be appended with a four-digit number equal to the sequence number that is
displayed. For example, in the case shown above, the first filename would be:
r040917.0001.fits. The ‘SeqNo’ will automatically index with each exposure, so
the next exposure would be: r040917.0002.fits. Changing the filename suffix to
‘%3.3d’ would reduce the number of digits in the filename to three.
________________________________________________________________________
4
RETROCAM User’s Guide
2. The ‘SeqNo’ is automatically reset to ‘1’ when the filename is changed, but it
can then be manually set to any number.
RETROCAM Shutdown:
1. Under the ‘Session’ menu in the RETROCAM control panel, select ‘Exit’.
Troubleshooting Guide:
1. The CCD temperature is too high.
- The TEC ‘ON/OFF’ indication is located on the ‘CCD Temp:’ line in the
lower right hand corner of the GUI. Verify that ‘ON’ is displayed. If not,
turn on the TEC by selecting ‘Cooler ON’ in the ‘Temperature’ menu.
2. No stars appear in the image following CCD readout.
- Verify that RETROCAM is in the ‘In’ position on the xmis control panel.
3. Images are out of focus.
- Ensure that you have entered the appropriate focus offset for the
primary instrument in use. See section 2 of ‘To Observe with
RETROCAM’ for details.
4. Iraf is reporting some inscrutable errors when I am attempting to display
images in a ds9 or ximtool window.
- The RETROCAM ds9 window will cause conflicts with Iraf ds9 or
ximtool windows. Discontinue using Iraf on retrocam, and perform data
analysis using another computer. A restart of the RETROCAM software
may be necessary.
5. I can’t find any guide stars.
- The RETROCAM mirror occults the central region of the guide field.
Approximately 100 arcmin2 of unvignetted guide field is available in an
annular region around the center. The guide probe may be in the shadow
of the finder mirror.
- Attempt to focus the guider. Inserting a telescope focus offset will put
the guider out of focus, and refocusing may be necessary to resolve guide
stars on the TV screen.
- If you are using the ‘DTI Guider’, the combination of integration time,
gain and the settings of the ‘White’ and ‘Black’ knobs may be preventing
you from seeing the star on the screen. Follow the steps in the ‘DTI
Guider’ section of the 2.4m Telescope User’s Manual to adjust these
settings properly.
6. RETROCAM is completely locked up, I can’t operate the GUI at all.
- Close the RETROCAM and ds9 windows.
- Open the diagnostic xterm – a prompt should be available.
- Restart RETROCAM
________________________________________________________________________
5