1
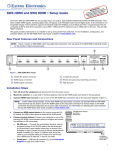
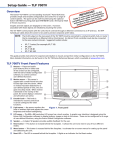
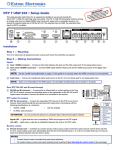
Wireless Light Control
Quick Start Guide
This guide describes how to get started using components of dresden elektronik Wireless Light
Control solution to run a demo application of a wireless light control network.
For example, you already have the StarterKit Wireless Light Control
you bought the necessary components separately.
1
or the RaspBee Gateway
Components
StarterKit Wireless
Light Control
RaspBee
Gateway
Raspberry Pi Model B
√
√
RaspBee premium
√
√
√
√
√
√
Commercial WiFi-Router
-
-
Ethernet cable
√
-
Wireless electronic ballast(s) (FLS)
2x FLS-PP lp
-
2x Test-LED-Strip RGB
-
-
-
-
-
Power supply unit with Micro-USB plug
3
SD Card with Raspbian Linux Distribution
appropriate illuminant(s)
4
5
Power supply unit(s) for FLS
6
Control device (PC/ Smartphone/ Tablet) with
browser
2
or
Note: Raspberry Pi Modell B+ and Raspberry Pi 2 Modell B 7 can also be used.
Setup gateway
SD-Card
Power
Supply
1. Attach RaspBee on Raspberry Pi (attach on
extension header at the outer edge, do not
attach displaced!).
2. Insert SD card.
3. Connect to router via Ethernet cable.
4. Establish power supply (use micro-USB
connector beside SD card slot).
5. Initially the LEDs on the RaspBee blink green
for a short time and then turn continuously
red. Wait for the booting routine (takes
approx. 1 minute).
If you separately purchased the components Raspberry Pi and/or RaspBee basic, you have to install
8
the gateway software deCONZ manually. Please follow the RaspBee User Manual in this case.
1
See https://www.dresden-elektronik.de/funktechnik/solutions/wireless-light-control/starterkit/
See https://www.dresden-elektronik.de/funktechnik/solutions/wireless-light-control/raspbee-gateway/
Smartphone charger, PC or the like. only limited suitable, power supply 5 V, 1.2 A required
4
Download from www.raspbian.org
5
Compatibility matrix : http://www.dresden-elektronik.de/funktechnik/solutions/wireless-light-control/wireless-ballasts/
6
See https://www.dresden-elektronik.de/funktechnik/solutions/wireless-light-control/wireless-ballasts/fls-pp-lp/
7
Micro SD card necessary
8
https://www.dresden-elektronik.de/funktechnik/service/downloads/documentation/?eID=dam_frontend_push&docID=2145
2
3
dresden elektronik ingenieurtechnik gmbh
10-2015
Page 1 of 15
Wireless Light Control
Quick Start Guide
Hardware setup – wireless electronic ballasts FLS-PP lp
Attention: This hardware setup is based on the example of the FLS-PP lp, it could vary between other
wireless electronic ballasts from dresden elektronik. Please look at the respective product flyer to
connect your acquired FLS correctly.
To wire the FLS-PP lp use conductor with crosssection of 0.2–0.75 mm² (AWG24–18). Dismantle the
cable 6–7 mm.
Attention: Insert/remove fine-stranded conductors by
lightly pressing on push-button with a small
screwdriver or pen. Don’t use ferrules or tinned wires.
1. Connect FLS-PP lp with LED strip.
2. Connect LED Power Supply to both FLS-PP
lp. Initially the illuminants shine
monochromatic white.
FLS-PP lp
4
3
2
1
+
+
-
W
B
G
R
COM+
COM+
GND
+
-
R
G
B
W
12/24V DC
The combination of FLS-PP lp and illuminant will be referred to as ‘light’ below.
Setup web application
1. Open a web browser on the control unit (PC, tablet;
needs access to the local network).
2. Open the following address (Internet connection
necessary): http://www.dresden-elektronik.de/discover.
9
Click the gateway link there.
3. Log in with
User:
Password:
9
delight
delight
Create bookmark of gateway-link for ease of use.
dresden elektronik ingenieurtechnik gmbh
10-2015
Page 2 of 15
Wireless Light Control
Quick Start Guide
Add lights to wireless network
The ZigBee wireless network is closed by default and has to be opened during setup temporarily so
that new lights can join the network.
1. Select menu Settings in the upper right
corner.
2. Click on button Open Network. The network
will remain open for 1 minute.
3. Click on button Done to get back to main
screen.
4. Wait until the devices join the network
(colored illuminants then shine green,
monochromatic illuminants don’t have a
special indicator).
5. The network will close automatically after one
minute.
Note: Do not use backward and forward buttons of your web
browser. Use the buttons of the WebApp instead.
6. The new light will be displayed. Press button
Group+ to assign the light to a new group.
7. Choose a group which the light should be
assigned to.
8. If the group does not exist press button
Create Group.
9. Press Apply to complete the action.
10. The light appears in the chosen group.
dresden elektronik ingenieurtechnik gmbh
10-2015
Page 3 of 15
Wireless Light Control
Quick Start Guide
Grouping lights
The lights can be combined to groups within a ZigBee network. One light can be a part of several
groups.
Lights can be added or removed from an existing
group in the menu Groups.
Press Create Group to create a group of lights.
Press Edit Members to define the lights of an
existing group.
Press button Edit Members to get back to group
configuration.
Activate the lights in the chosen group by setting
the check box.
Deactivate the lights in the chosen group by
unchecking the box.
Grayed lights are actually not available, because
of interrupted power supply or they are not a part
of the network. Inactive lights will dissappear from
the group configuration after gateway restart.
Press Apply to complete the process.
dresden elektronik ingenieurtechnik gmbh
10-2015
Page 4 of 15
Wireless Light Control
Quick Start Guide
Controlling lights
Configure color / brightness /
saturation of the group
Switch on/off
lights separately
per bulb symbol
Configure color / brightness /
saturation of individual lights
Switch on/off
complete group
per button
Call up scene
editor
Set up color and brightness
The RGB color setup will be supported by the FLS-PP lp with connected RGB(W) illuminant. The
white channel W can be controlled separately.
Smartphone view
Name of
the light
(changeable)
Desktop / Tablet view
Saturation
Actual setup
Farbe
Saturation
Color
Brightness
White channel
dresden elektronik ingenieurtechnik gmbh
10-2015
Page 5 of 15
Wireless Light Control
Quick Start Guide
Set up color temperature
The CW/WW color temperature will be supported by the FLS-H lp with connected cold white / warm
white illuminant.
Smartphone view
Desktop / Tablet view
Name of
the light
(changeable)
Actual setup
Color
temperature
Color temperature
Brightness
Create scenes
By means of scenes complex light settings can be stored and simply be recalled later on at touch of a
button.
1. Set up lights within the group as desired by
clicking on the ’ ... ’ sign.
2. Press button ’ ... ’ in the group view.
1.
2.
3. Press button Create Scene.
4. Assign a name.
5. Press button Create to save the actual
settings the scene.
dresden elektronik ingenieurtechnik gmbh
10-2015
Page 6 of 15
Wireless Light Control
Quick Start Guide
6. Get back to the main screen by pressing
button Done.
7. The scene will be displayed next to the button
on / off and can be called on click.
Modify and delete scenes
Stored scene settings can also be modified or deleted.
1. Set up lights within the group as desired by
clicking on the ’ ... ’ sign.
2. Press button ’ ... ’ in the group view to get to
the scene editor.
1.
2.
3. Click button Store next to the desired scene.
Using Delete the scenes can be deleted.
dresden elektronik ingenieurtechnik gmbh
10-2015
Page 7 of 15
Wireless Light Control
Quick Start Guide
Create time-based events
Creating, editing and activating of time-based events can be performed in the menu Schedules. It is
possible to create a timer or an alarm-based event.
Note: time-based events will be supported from gateway version 2.00.00.
1. Open the menu Schedules.
2. Press the button Create Schedule.
Note: All created events are based on the system time of the
gateway. The time of the user device like tablet or
smartphone is not relevant. The gateway system time can be
changed in the system settings.
Set up the alarm event
The alarm-based event defines a time, on which the lights will perform a defined action.
This example describes the activation of an
alarm-based event.
1.
1. Assign a name for the event.
2. Select the alarm-based event by button
Alarm.
3. Setting the alarm time in hours and
minutes.
4. The alarm should activate a defined
scene. Therefore select the button Scene
On.
5. Choose the scene by button ‘ … ‘.
2.
3.
4.
5.
dresden elektronik ingenieurtechnik gmbh
10-2015
Page 8 of 15
Wireless Light Control
Quick Start Guide
6. Choose the scene Relax of the group
Living Room and confirm with Apply.
7. The event takes place on the defined
time at defined weekdays. Select the
days by clicking the buttons Mo, Tu, We,
Th, Fr, Sa, and So.
8. The alarm event is activated after
creation per default and can be
deactivated by pressing the button
Disable.
9. Confirm all changes by pressing Apply.
7.
8.
10. Now, the created alarm event is visible in
the schedules menu.
dresden elektronik ingenieurtechnik gmbh
10-2015
Page 9 of 15
Wireless Light Control
Quick Start Guide
Set up the timer event
The timer event defines a period of time, after which the lights will perform a defined action.
This example describes the
activation of all lights of a group.
timer-based
1.
1. Assign a name for the event.
2. Select the timer event by pressing the
button Timer.
3. Define the period of time in hours and
minutes.
4. The timer should activate all lights of a
selected group. Therefore press button
Group On.
5. Choose the group by ‘ … ‘.
6. The lights of the selected group should
not dim on rapidly. Instead they should
dim on with a defined fading time. The
duration can be configured in minutes
and seconds by pressing the button ‘ … ‘.
7. The lights of the selected group should
not exceed a defined brightness level.
The Level can be configured between
10% and 100% by pressing the button
‘ … ‘.
8. The timer event is activated after creation
per default and can be deactivated by
pressing the button Disable.
9. Confirm all changes by pressing Apply.
2.
3.
4.
5.
6.
7.
8.
10. Now, the created timer event is visible in
the schedules menu. The selected period
of time will be displayed and decrease
every minute.
dresden elektronik ingenieurtechnik gmbh
10-2015
Page 10 of 15
Wireless Light Control
Quick Start Guide
Adding a ZigBee switch
The WebApp supports the adding and configuring of one or more ZigBee switches like the „Philips
Hue Tap“.
Note: Philips Hue Tap will be supported since gateway version 2.02.05.
1. Press the button Connect a new Device
in the menu Devices.
2. Follow the instructions and press the
button Search now.
3. Press the displayed Tap button for at
least 10 seconds and then release it.
4. Now the WebApp is seacrhing for the
ZigBee switch.
5. A short status report will appear when the
ZigBee switch is connected successfully
to the network.
6. The connected ZigBee switch appears in
the Devices menu and can be configured
by pressing the button ‘ … ‘.
dresden elektronik ingenieurtechnik gmbh
10-2015
Page 11 of 15
Wireless Light Control
Quick Start Guide
Configuring a ZigBee switch
Every tap button of the connected Philips Hue
Tap can be assigned with the following
functions:
-
All lights on
All lights off
Group on
Group off
Call scene
Confirm the settings with Apply.
System settings
The available system settings are displayed in default mode as well as in advanced mode.
Several system settings can be configured:
- Display the version number of the gateway
(deCONZ)
- Modify the gateway name
- Choose the time format between 24h and 12h
(AM/PM)
- Change the WebApp login user name and
password. Default name is delight and
password delight.
rd
- Press Unlock Gateway to allow 3 party apps
to register themself to the gateway.
The advanced system settings allow further
control:
- Detailed specification for time and date
- Group Delay defines the time between two
group commands. Small values could
overload the network.
- Internet Service allows the gateway to
register on the dresden elektronik discovery
10
webpage and check for updates.
10
See http://www.dresden-elektronik.de/discover
dresden elektronik ingenieurtechnik gmbh
10-2015
Page 12 of 15
Wireless Light Control
Quick Start Guide
Network settings
The button Open Network opens the ZigBee
network for new devices. The network closes
itself automatically after 1 minute.
The advanced system settings allow further
settings:
- The Duration defines the network open time,
which is selectable between 1 minute and 4
minutes.
- The OTAU Server activates automatic
firmware updates of all network devices by
dresden elektronik.
- The Channel defines the actual ZigBee
channel selectable by 11, 15, 20 and 25.
Changing of the channel can take up to 10
seconds.
Software Updates
To benefit from the ongoing development of the dresden elektronik Wireless Light Control application,
the gateway will automatically check for updates. If there is a new gateway update available, a
corresponding message in the WebApp will appear. The installation of a gateway update runs only
after an explicit acceptance. The update procedure may last some minutes depending on the Internet
connection and size of the update.
Note: Do not interrupt the gateway from power supply during the update process. The SD card
software image can be damaged and make the gateway unusable.
If the option OTAU Server is activated all lights will be automatically updated. This takes place in the
background, while controlling the system is still possible. The actual state will be displayed in the
WebApp main menu. When the update transfer is completed the firmware is installed automatically.
During this process the light will not react on control commands for about one minute. After the
automatic restart the light is available as usual. All settings like color, brightness and scenes will be
maintained.
Note: If the update process of the lights will be interrupted by a power cut the update process will be
started again automatically from beginning after power-on. If several update processes will fail next to
another the light takes the internal working delivery firmware automatically.
dresden elektronik ingenieurtechnik gmbh
10-2015
Page 13 of 15
Wireless Light Control StarterKit
Quick Start Guide
Reset the light to factory settings
Resetting the light is not necessary during normal operation. A reset is required if lights shall join a
new network. The reset can be done in two different ways described below.
Reset via Touchlink
If light and gateway can be moved within a
range of less than 50 cm of each other, a
Touchlink Reset can be performed.
-
-
-
-
Go to the menu Settings in the category
Reset Devices via Touchlink and click the
button Scan for Devices.
A progress bar indicates the process. After
the scan procedure has been completed, a
list of available devices within the range gets
displayed.
Each light should be identified by clicking
the blink button first before resetting it.
Observe the status of each operation at the
bottom of the page. If the target light is not
listed, try scanning again.
Click the button Reset to set back the light to
factory settings.
1.
3.
4.
Reset via power cycle sequence
If gateway and lights are installed fixed the distance between them might be greater than 50 cm. In
this case the Touchlink Reset will not work. Proceed with a power cycle sequence as follows:
1.
2.
3.
4.
Power cycle 4 times within 2 to 20 seconds on time.
When switching on for the fourth time: illuminant blinks for 10 seconds.
Wait until illuminant stops blinking.
Switch on and off again 2 times, after approximate 2 seconds the device begins to restore the
factory settings (duration approximate 60 seconds, in this time the light is off). Afterwards the
light is operative again and can be added to a network.
dresden elektronik ingenieurtechnik gmbh
10-2015
Page 14 of 15
Wireless Light Control
Quick Start Guide
Notes
1. Each light can be a member of up to 10 groups.
2. In the user interface any number of groups can be created with each up to 16 scenes.
3. A scene always describes the status of the complete group, i.e. changing the scene affects all
lights.
4. If a light is powered off and on again, its last settings are restored. If settings per user interface
have been changed meanwhile they are ineffective after switching on again.
5. Not existing lights are displayed grayed out / semi-transparent in the user interface.
6. Lights can only belong to one network but to several groups; they rejoin it automatically after
switching on again. If a light shall be assigned to a new network it must be reset to factory settings
first.
7. For optimum accessibility of your lights we recommend that the gateway is powered on
permanently. After reboot the website may have to be loaded again. (Please see section: Reset
FLS to Factory Settings.)
Please also note the Frequently Asked Questions which can be found on our website:
http://www.dresden-elektronik.de/funktechnik/service/support/faq/wireless-light-control/?L=1
© 2015 dresden elektronik ingenieurtechnik gmbh . All rights reserved. Other registered trademarks or terms and product
names are the property of their respective owners. All information contained herein is subject to change without notice. No
liability can be accepted or guarantee made for the information provided being up to date, correct and complete.
dresden elektronik ingenieurtechnik gmbh
Enno-Heidebroek-Str. 12
01237 Dresden | Germany
dresden elektronik ingenieurtechnik gmbh
Phone: +49 351 31850-0 Fax: -10
[email protected]
www.dresden-elektronik.de
10-2015
Contact
Page 15 of 15