1
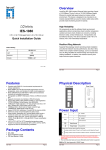
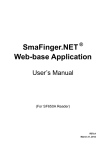
®
Mifare Configurable
Sector Reader
User’s Manual
REV.C
July 9, 2007
MF7xx
PROMAG
REV.C
Mifare® Configurable Sector Reader
Overview:
MF7xx is a user configurable mifare® sector data reader. It can be configured to read mifare® card with
MAD1/MAD2 standard in a mifare® application open system, or can be configured to read the user-defined
sector data (Non-MAD) in a user defined closed system.
Output interface can be configured as an RS232 output or Wiegand output. Wiegand output is selectable from
26 bits to 128 bits.
MF7xx can also be set with a Reader ID number for multi-unit communication.
Features:
1. Support MAD1/MAD2 standard, and support customer MAD-AID setting.
2. Support Non-MAD format with user-defined sector number.
3. Support Anti-Collision (Two cards together can be read at the same time).
4. Support used card with data offset and length.
5. Support Multi Sectors.
6. Support Mifare® Standard 4K or Mifare® Standard 1K card.
7. Each Reader with Reader ID for multi-link application.
8. Output interface: Wiegand (Default), ABA-TK2 and RS232.
9. Wiegand output selectable from 26 bits to 128 bits.
10. RS232 output packet can be set with Header, Reader ID and Trailer.
Application:
1. Access Control.
2. Time Attendance.
3. Guest Registration System.
4. Academic Services.
5. Info Services.
2
MF7xx
PROMAG
REV.C
Mifare® Application Directory (MAD) Support:
MF7XX support the MAD format card, the MAD (mifare® application directory) standard proposes the
introduction of common data structures for card application directory entries. MF7XX reader should take
advantage of this feature using those sector pointers instead of physical sector number.
Auto Mode
The MF700 will search the AID from mifare® application
directory (MAD) , then got a correct sector number from
MAD. If the card is not a MAD card, the MF700 will use
Request
Anticollision
the Non-MAD Sector# (Setting by MF700 Utility).
No Tag
About MAD please see the web pages:
http://www.mifare.net
Card On Reader
http://www.semiconductors.philips.com/ac
Is MAD
Card
robat/other/identification/M001824.pdf
No
Yes
AID Match
No
Yes
Get
Using MF700
Application Sector#
Non-MAD Sector#
APP KEY
Authenticate
NG
PASS
Read Sector Data
Un-know
Output Data
3
MF7xx
PROMAG
REV.C
User-Data Format
MF7XX will send out the data following the format as below, the user data length defined by the Data-Info. At
wiegand output format, the data output length is fixed (defined by Number Of Bits), so the user data would be
cut if longer than Number of Bits, or the user data would be appended with zero “0” if shorter than Number of
Bits.
Byte 0
Block 0
Application
Block 1
Sector #
Block 2
Byte 15
Data-Info
USER DATA (Max 128 Bytes)
Block 3
Data-Info
bit7
bit6
bit5
Data Type (11b)
bit0
Data Length
Data Type is fixed with 11b which meets “any other data” type of “Card Holder information” as MAD standard.
And data length is including the data with ending zero “0”, so the number of data byte sent by MF7XX is equal
to data length with one less for RS232 output.
Example: Data Length is 16, MF7XX only send out 15 bytes for RS232 output.
4
MF7xx
PROMAG
REV.C
Wires Assignment
Color
Symbol
I/O
Description
Red
VCC
IN
Power Input : DC 7.5V~12V
Black
GND
IN
Power Ground
White
DATA 1
OUT
Wiegand Data 1 Signal / ABA TK2 Clock (Strobe)
Green
DATA 0
OUT
Wiegand Data 0 Signal / ABA TK2 Data
Yellow
TXD
OUT
RS232 TXD (To Host RXD)
Blue
RXD
IN
RS232 RXD (To Host TXD)
Orange
CP
OUT
ABA TK2 Card Present (for MF7XX REV.D and later)
Brown
LED/BUZEER
IN
External LED/BUZZER Control
Connect To MF7XXKIT before configure the MF7XX Reader.
To configure the MF7XX reader you need connect the reader to the MF7XXKIT first as below:
MF700
MF700KIT
ORANGE
BLACK
CP
GND
D1
D0
RX
TX
VCC
WHITE
RED
WAS-T0029
YELLOW
BLUE
GREEN
BROWN
" "
" "
The above housing is for reference only
9VDC
Remark:
2004/10/29: New Brown wire is for External LED/Buzzer Control, and Blue wire is keep in RS232 RX
signal for communication only.
Note:
MF7XXKIT is a test connection kit for MF7XX configuration use. It is an optional item for purchasing.
5
MF7xx
PROMAG
REV.C
Mifare Reader Utility
1. Mifare Settings:
MAD-AID: (Default=4703)
MAD Application Identifier number is authorized and assigned by Mifare.net upon the customer’s request
for registered Application Identifier in a mifare® application open system (AID: 0000h~FFFFh).
Or it is also possible for the user to define the AID himself for the application in user defined closed
system without registering into MAD group. According to the AID, MF7XX can find and read the
corresponding sector on the MAD card.
Non-MAD Sector: (Default =0)
When the card is Non-MAD format, MF7XX will only read the “Non-MAD Sector”.
(1K Card Sector: 0~15, 4K Card Sector:0~39). For the Non-MAD application, user can freely define the
Sector.
App Key (KEY_A): (Default=FFFFFFFFFFFF)
App Key must be the same as the KEY_A of the card issued. This means MF7XX only can read the sector
data on the card with the same KEY_A.
Encrypt: (Default=None)
Fraud prevention, Select Encrypt Mode (None, Encrypt 1, Encrypt 2, Encrypt 3, Encrypt 4, Encrypt 5) to
protected your card data. (Remark: Encrypt mode must to work together with the same encrypt mode of
“Mifare Card Issuer” software.)
6
MF7xx
PROMAG
REV.C
Used Card (Not issued by “Mifare Card Issuer”)
You have to indicate the data position in the card, when the card is not issued by “Mifare Card Issuer”
software. And you must set the “Offset” (Max 255, and base from zero) form the beginning of sector and
set your data “Length” (Max 128).
Example:
If your card data in the grey grid of sector, you have to set the “Offset” = 17, and set the “Length”= 20.
AID Sector (or Non-MAD Sector)
Block 0
0
1
2
3
4
5
6
7
8
9
10
11
12
13
14
15
Block 1
16
17
18
19
20
21
22
23
24
25
26
27
28
29
30
31
Block 2
32
33
34
35
36
37
38
39
40
41
42
43
44
45
46
47
7
MF7xx
PROMAG
REV.C
2. Reader Settings
Reader ID : (Default=0)
MF7XX Reader ID for multi link application. (ID: 0~99).
Interface : (Default=Wiegand)
MF7XX can be set as Wiegand , RS232 or ABA-TK2 output.
Read Mode: (Default=Card Data Only)
a. Card Data Only: Read card sector data only; If any error (ex. mifare key error), reader will show “Card
Invalid” status.
b. Card Data or CSN (Card Serial Number): Read card sector data, If any error (ex. mifare key error),
reader will send the CSN to host.
c.
CSN Only: CSN read only.
Output Mode: (Default=Once)
a. Once: Send data (or CSN) to host once.
b. Continue: Keeping sending data (or CSN) to host till card remove.
8
MF7xx
PROMAG
REV.C
3. LED / Buzzer Settings
New MF7XX support the LED/Alarm Configuration. Setting the LED/Buzzer to indicate the system status
for end-user.
Enable RS232 Command Set Control: (For 19200,n,8,1 Only)
RS232 LED/Buzzer command set frame as below:
STX
02h
J
4Ah
NUMBER (0~9)
30h~39h
CR
0Dh
Command Table:
NUMBER
0 (30h)
1 (31h)
2 (32h)
3 (33h)
4 (34h)
5 (35h)
6 (36h)
7 (37h)
8 (38h)
9 (39h)
Descriptions
All LED Off, Buzzer Off
Green LED ON
Green LED OFF
Red LED ON
Red LED OFF
Buzzer Beep 1 Time
Buzzer Beep 3 Time
Green LED ON with Beep 1 Time
Red LED ON with Beep 3 Time
All LED ON (Orange)
Remark: If Enable the RS232 Command Set Control (for LED/Buzzer), the external LED/Buzzer
control with high/low level control will be disable.
Read Idle: Show LED color after power on or idle state.
Brown wire = PULSE (or Card is valid): Show LED color and beeps to indicate the end-user when
brown wire = PULSE, or card was passed by MF7XX reader.
9
MF7xx
PROMAG
REV.C
Brown wire = Inactive ( or Card Is invalid): Show LED color and beeps to indicate the end-user when
brown wire = Inactive, or card was failed by MF7XX reader.
Brown wire = Active: Show LED color and beeps to indicate the end-user that brown wire = Active signal
from Host.
Brown wire Active level: Set Brown wire Active level condition with Host status.
Disable: Always disable the Brown wire. (Default), LED/Buzzer control by reader self.
High: Active High / Normal keep in Low.
Low: Active Low / Normal keep in High.
Remark:
If set Active Low, you may have to connect brown wire to a pull-up resistor (1K~10K) with 5VDC).
Control Brown wire:
After Data Output: The brown wire will be enabling after finished output the card data or CSN. (Default)
Any Time: The brown wire enabled in any time.
Note: See Annex E, the LED/Buzzer also can be controlled externally with High/Low
level control.
10
MF7xx
PROMAG
REV.C
4. Wiegand Setting:
Number of Bits is to set the Wiegand output type you want to meet your Host (or Terminal). It can be 26
to 128 (Default=26).
Include Reader ID1 is to set the Wiegand output data to include Reader ID when it is enabled.
(Default=Disable).
Bit Sequence is to set the Wiegand output data sequence, it can be standard data sequence (MSB first)
or Reverse data sequence (LSB first). (Default=Standard).
11
MF7xx
PROMAG
REV.C
5. ABA-TK2 Settings
Number Of Digital: Set number of digital codes for TK2 output. (Default=10)
Add Reader ID: Add Reader ID into TK2 data. (Default=Disable)
Sequence: Set the TK2 data sequence. (Default=MSB First)
Data Conversion: Select card data format to convert ,
a. BIN to DEC (Default, card issue by Mifare Card Issuer Utility)
b. Decimal String (ex. “123456”)
c. BCD
d. Direct (Memory Map)
e. Bytes to DEC
12
MF7xx
PROMAG
REV.C
6. RS232 Setting:
Baudrate can be set 2400bps~57600bps (Default=19200bps)
Data Sequence can be set “LSB” first (Default) and “MSB” first.
Package2 is to set the output data packet to include Header, Reader ID, Data Length, CR, LF and Trailer.
(Header:00h~FFh, Trailer : 00h~FFh). (Default = None included)
Output Format can be “Binary” or “Hex String” for output format.
Note:
(1).Wiegand output data packet with Reader ID:
Standard
Parity(Even)
Reader ID
(MSB)
Data Bits
(LSB)
Parity(Odd)
Reverse
Parity(Odd)
Reader ID
(LSB)
Data Bits
(MSB)
Parity(Even)
(2).RS232 output data packet with Header, Reader ID and Trailer:
Header
Reader ID
(LSB)
Data Bytes
(MSB)
Trailer
(3).ABA-TK2 with Reader ID:
MSB First
SS
Reader ID
(MSB)
Digital Code
(LSB)
ES
LRC
LSB First
SS
Reader ID
(LSB)
Digital Code
(MSB)
ES
LRC
Remark:
MF7XX all configuration items are write only, so any users can not read the configuration items from MF7XX
to get the App Key, that is very important to protect your App Key and all configuration items.
13
MF7xx
PROMAG
REV.C
Test MF7XX Reader after configuration
After MF7XX configuration is completed you may use MF7XX Utility “Test” function to test the MF7XX to see if
the configuration is done correctly.
1. After the configuration on the MF7XX Utility software is made, you should click [Update Reader] to
download the current configuration to the MF7XX Reader.
2. After MF7XX configuration is completed, you may click [Test] to test MF7XX Reader.
3. Get an issued mifare® card to put on MF7XX reader to be read and see the output data on the window of
“MF7XX Output Test”.
Wiegand 34 bits output data with standard bit sequence, example as below:
14
MF7xx
PROMAG
REV.C
ANNEX A. Hardware Specification
MF7XX
Major Feature
Mifare® Application Directory Reader
Access Control & Security
Card Type
ISO14443A, Mifare Class1
(Mifare® 1K, Mifare® 4K for MAD1/MAD2)
RF Frequence
13.56MHz
RF Distance2
50mm (Using the MFA01 Mifare® card of GIGA-TMS INC.)
DC Power
7.5VDC~12VDC (Min [email protected], 150mA@12V)
Interface
Wiegand 26~128 bits (Standard / Reverse)
RS232 2400bps~57600bps
ABA-TK2 40IPS
Dimension
H82.5mm x W46.5mm x D15.0mm
Weight
120g
Note:
1. Mifare Class: Mifare Standard 1K/4K/Pro (without Mifare Ultra-Light).
2. MF7XX RF distance can reach up to 50mm with MFA01 (Mifare® Standard 1K Card) of
GIGA-TMS INC.
15
MF7xx
PROMAG
REV.C
ANNEX B. Wiegand Interface
The Data 1 and Data 0 signals are held at a logic high level unit, the reader is ready to send a data stream.
The reader places data as asynchronous low-going pulses on the Data 1 or Data 0 lines to transmit the data
stream to Host. The Data 1 and Data 0 pulses will allowable pulse width times and pulse interval times for the
MF7XX reader.
Data 1 Signal
Data 0 Signal
`
Tpw
Tpi
Tpw
Tpi
Pulse Times
Symbol
Description
Typical Time
Tpw
Pulse Width Time
100us +/- 3%
Tpi
Pulse Interval Time
1.9ms +/- 3%
Wiegand Packet (Without Reader ID)
Standard (Default)
Parity(Even)
(MSB)
Data Bits
(LSB)
Parity(Odd)
Reverse (Option)
Parity(Odd)
(LSB)
Data Bits
(MSB)
Parity(Even)
Connect the Wiegand wires, example as below: (The pull high resister must >= 10K Ohm)
HOST/Terminal
5VDC
Pull high resistor
9~12VD
MF700
(Red)
10K
10K
ohm
ohm
Data 1 (White)
Data 0 (Green)
(Black)
GND
GND
Optional: External LED/Buzzer Control (Brown)
16
>=10K Ohm
MF7xx
PROMAG
REV.C
ANNEX C. ABA TK2 Interface
The timing for Card Present, Clock (Strobe) and Data , example as below:
/CARD PRESENT
Leading Zero
Data
Trailing Zero
/DATA
/STROBE
(CLOCK)
0
0
0 . . . 0
1
1
0
1
0
0
1
.
.
.
0
0
0
STROBE Width Approximately 25~50% Of Bit Time
Bit Time 40IPS (min:280us, typ:330us, max:480us)
DATA
The data signal is valid while the clock is low. If the Data signal is high, the bit
is a zero. If the Data signal is low, the bit is a one.
CLOCK (STROBE)
The Clock signal indicates when Data is valid. It is recommended that Data be loaded
by the user with the leading edge (negative) of the Strobe.
CARD PRESENT
Card Present will go low after flux reversals from the Reader. Card Present will return
high after the last flux reversal.
Connect the ABA TK2 wires, example as below:
HOST/Terminal
9~12VD
(Red)
MF700
Card Present (Orange)
Clock (White)
Data (Green)
(Black)
GND
GND
Optional: External LED/Buzzer Control (Brown)
17
MF7xx
PROMAG
REV.C
ANNEX D. RS232 Interface
Connect the RS232 wires, example as below:
HOST/Terminal
9~12VD
(Red)
MF700
TXD (Yellow)
GND (Black)
GND
GND
Optional: External LED/Buzzer Control (Brown)
18
MF7xx
PROMAG
REV.C
ANNEX E. External LED/Buzzer Control
MF7XX supports the external LED/Buzzer control for Terminal (or Host) to prompt end-user the card data is
invalid or valid. Use Brown wire to control the LED/Buzzer of MF7XX
Examples as below: (Active High)
(1) Show External Invalid Status
Data Output
Alarm Control (Brown)
Min 100ms
(2) Show Card Valid Status
Data Output
Alarm Control (Brown)
Min 100ms
Note:
1. Send one pulse to show the “Extern Invalid” LED/Buzzer Status.
2. Send three or more pulse to show the “Card Valid” LED/Buzzer status.
3. You can configure the LED/Buzzer status by MF7XX utility.
19
MF7xx
PROMAG
REV.C
ANNEX F. Order Information
Part Number
MF700SK-10
Include
Description
MF700-10
MF7XX Configurable Reader (Encrypt Version)
MF70KIT
MF7XX Configure Kit
WAS-T0029
MF7XX Configure Cable
PCR310U
Card Issue Programmer
DISK5257
Card Issue and Utility Software
Power Adaptor
DC Power Adaptor 9VDC for MF7XXKIT
MFA01 (3PCS)
Mifare Standard 1K Card
MF700-10
MF700-10
MF700 Configurable Reader (Encrypt Version)
MF700KIT-10
MF700KIT
Reader Kit
WAS-T0029
MF7XX Configure Cable
DISK5238
Card Issue and Utility Software
Power Adaptor
DC Power Adaptor 9VDC for MF7XXKIT
PCR310U
Card Issue Programmer
DISK5238
Card Issue and Utility Software
MFA01
MFA01
Mifare® Standard 1K Card
MFA04
MFA04
Mifare® Standard 4K Card
PCR310U-30
20
MF7xx
PROMAG
REV.C
ANNEX G. WebISP - Firmware Upgrade Utility
MF7XX also supports the ISP (In-System Program) function to upgrade the reader’s
firmware.
Install the WebISP (include in CD-ROM) in your Windows System first (It may need to
reboot your system) and follow the steps as below: (First of all, you need to connect
the reader or programmer to PC, and make sure they were power-on)
Step 1: Input your account
(UserName and Password)
Note:
Contact us to get your account
when needed.
Step 2: Click [Start Check] to
automatically check the
firmware version from our FTP
server.
Show the update
Note:
history.
1. The WebISP will auto scan
all Comm ports to search
the reader or programmer.
2. The WebISP will show the
[Update Information] and
list the update history.
Step 3: If your reader’s or
programmer’s firmware out of
date, then WebISP will prompt
you to update the firmware.
Click [Yes] to begin Updating
the firmware.
21
MF7xx
PROMAG
REV.C
Step 4: Wait for the updating
to finish. And repeat step 2
to update other readers or
programmers.
Update finished
Step 5: Check “Upgrade &
Update Files” list to download
the new and related software
or utility to meet the updated
firmware.
Note:
Click the new software or
utility at “Upgrade & Update
Files” to start downloading.
22
MF7xx
PROMAG
REV.C
ANNEX H. Configured Card
MF7XX supports updating the reader by reading Configured Card.
Step 1:
Only connect PCR310 to
PC without any MF7XX
Reader.
Click "Auto Scan",
then found the PCR310.
Select the "MF700
Series" option and
Click "OK".
Step 2:
Click "Configure Card"
to using current
settings to creating a
"Configured Card".
Step 3:
Put a new Mifare Card on
PCR310 and Click
"Create" to Create the
"Configured Card"
23
MF7xx
PROMAG
REV.C
ANNEX G. History
Rev A: February 20, 2006
Initial MF700 Configurable Sector Reader.
Rev B: May 30, 2006
Add “Direct (Memory Map)” option item for Data Conversion of ABA-TK2.
Firmware Version (PGM-T0724 V1.0R4).
DISK 5238 REV.C (Mifare Reader Utility V1.0R1).
Rev C: July 9, 2007
Add "Configured Card" function for Update Reader via reading Configured Card
Firmware Version (PGM-T0724 V1.1R0).
DISK 5238 REV.H (Mifare Reader Utility V1.0R10).
24
MF7xx
PROMAG
REV.C
PROMAG
®
GIGA-TMS INC.
http://www.gigatms.com.tw
mailto:[email protected]
TEL : +886-2-26954214
FAX : +886-2-26954213
Office: 8F, No. 31,Lane 169, Kang-Ning St.,Hsi-Chih, Taipei, Taiwan
25