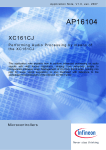
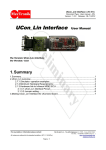
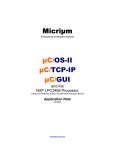
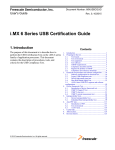
1
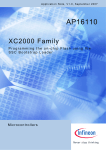
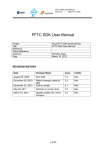
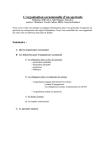
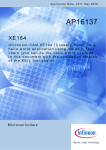
Application Note, V2.0, July 2006 AP16102 XC164CM XC164CM "Cookery-Book" for a "Hello world" application Microcontrollers Edition 2008-07-16 Published by Infineon Technologies AG 81726 München, Germany © Infineon Technologies AG 2008. All Rights Reserved. LEGAL DISCLAIMER THE INFORMATION GIVEN IN THIS APPLICATION NOTE IS GIVEN AS A HINT FOR THE IMPLEMENTATION OF THE INFINEON TECHNOLOGIES COMPONENT ONLY AND SHALL NOT BE REGARDED AS ANY DESCRIPTION OR WARRANTY OF A CERTAIN FUNCTIONALITY, CONDITION OR QUALITY OF THE INFINEON TECHNOLOGIES COMPONENT. THE RECIPIENT OF THIS APPLICATION NOTE MUST VERIFY ANY FUNCTION DESCRIBED HEREIN IN THE REAL APPLICATION. INFINEON TECHNOLOGIES HEREBY DISCLAIMS ANY AND ALL WARRANTIES AND LIABILITIES OF ANY KIND (INCLUDING WITHOUT LIMITATION WARRANTIES OF NON-INFRINGEMENT OF INTELLECTUAL PROPERTY RIGHTS OF ANY THIRD PARTY) WITH RESPECT TO ANY AND ALL INFORMATION GIVEN IN THIS APPLICATION NOTE. Information For further information on technology, delivery terms and conditions and prices please contact your nearest Infineon Technologies Office (www.infineon.com). Warnings Due to technical requirements components may contain dangerous substances. For information on the types in question please contact your nearest Infineon Technologies Office. Infineon Technologies Components may only be used in life-support devices or systems with the express written approval of Infineon Technologies, if a failure of such components can reasonably be expected to cause the failure of that life-support device or system, or to affect the safety or effectiveness of that device or system. Life support devices or systems are intended to be implanted in the human body, or to support and/or maintain and sustain and/or protect human life. If they fail, it is reasonable to assume that the health of the user or other persons may be endangered. AP16102 XC164CM "Cookery-Book" AP1610210 Revision History: 2006-07 Previous Version: none Page Subjects (major changes since last revision) V2.0 We Listen to Your Comments Any information within this document that you feel is wrong, unclear or missing at all? Your feedback will help us to continuously improve the quality of this document. Please send your proposal (including a reference to this document) to: [email protected] Application Note 3 V2.0, 2006-07 AP16102 XC164CM "Cookery-Book" Note: Table of Contents see page 6. Introduction: This “Appnote” is an Infineon Hands-On-Training. It will help inexperienced users to get an XC164CM Evaluation-Board / Starter-Kit-Board up and running. With this Hands-On-Training / Cookery-Book / step-by-step-book you should be able to get your first useful program in less than 2 hours. The purpose of this document is to gain know-how of the microcontroller and the tool-chain. Additionally, the "hello-world-example" can easily be expanded to your needs. You can connect either a part of - or your entire application to the Starter-Kit-Board. You are also able to benchmark any of your algorithms to find out if the selected microcontroller fulfils all the required functions within the time frame needed. Note: The style used in this document focuses on working through this material as fast and easily as possible. That means there are full screenshots instead of dialog-window-screenshots; extensive use of colours and page breaks; and listed source-code is not formatted to ease copy & paste. Have fun and enjoy the XC164CM! Application Note 4 V2.0, 2006-07 AP16102 XC164CM "Cookery-Book" XC164CM Block Diagram Application Note 5 V2.0, 2006-07 AP16102 XC164CM "Cookery-Book" “Cookery-book“ For your first programming example for the XC164CM Starter-Kit-Board: Your program: Chapter/ Step: 1.) *** Recipes *** XC164CM Starter Kit Board Power Supply, Jumper Setting, Serial cable to the notebook 2.) DAvE program generator DAvE installation (mothersystem) + DAvE Update (XC164CM.DIP) for XC164CM 3.) Using DAvE Microcontroller initialization for your programming example 4.) Using the KEIL Development Tools (C/EC++ Compiler) Programming of your application (XC164CM) with KEIL tool chain (µVision3) Compiler V6.04a + first steps with the Simulator Application Note 6 V2.0, 2006-07 AP16102 XC164CM "Cookery-Book" Additional exercises 5.) OnChipFlash-Programming with Bootstrap Loader Mode (ASC0) + MEMTOOL 6.) OnChipFlash-Programming and OCDS via Keil-ULINK or USB-JTAG-Wiggler-Box 7.) Merging DAvE with µVision3 Application Note 7 V2.0, 2006-07 AP16102 XC164CM "Cookery-Book" k_40 k_50 ADC CAPCOM6: PWM generation (asymmetrical/edge-aligned, single-shot, modulated) – playing music Feedback 8.) Feedback Application Note 8 V2.0, 2006-07 AP16102 XC164CM "Cookery-Book" 1.) XC164CM Easy Kit: Ordering information: Starter Kit - Type SK-XC164CM Title XC164CM Easy Kit Ordering No. B158-H8647-X-0-7600 Comment Distribution Worldwide: http://www.infineon.com/cgi-bin/ifx/portal/ep/channelView.do?channelId=66982&pageTypeId=17224 Application Note 9 V2.0, 2006-07 AP16102 XC164CM "Cookery-Book" You need a Power Supply: The XC164CM Board requires an external power supply. A regulated DC power supply with 9 Volts, 400 mA can be connected to the power connector. You need a RS-232 Serial Cable ( 1:1; 9-pin Sub-D plug – 9-pin Sub-D connector ) For further information, please refer to the XC164CM Board Manual, V0.3, April 2004 . For further information, please refer to the XC164CM Board Manual, V0.9, Aug. 2005 . For further information, please refer to the XC164CM Board Manual, V1.0, Jan. 2006 . For further information, please refer to the XC164CM Board Manual, V2.0, Jan. 2007 . Note: Since Board Manual V2.0 the Easy Kit combines the powerful Debug Support, a serial communication and Power Supply over one USB cable. Application Note 10 V2.0, 2006-07 AP16102 XC164CM "Cookery-Book" Layout Overview: Application Note 11 V2.0, 2006-07 AP16102 XC164CM "Cookery-Book" DIP switch 102 Jumper Settings: Standard Internal Start Standard Internal Start Switch S102: Startup configuration: Standard start from internal Flash Application Note 12 V2.0, 2006-07 AP16102 XC164CM "Cookery-Book" 2.) DAvE – Installation for XC164CM microcontrollers: Install DAvE (mothersystem): Download @ http://www.infineon.com/DAvE the DAvE-mothersystem setup.exe and execute setup.exe to install DAvE . Application Note 13 V2.0, 2006-07 AP16102 XC164CM "Cookery-Book" Install the XC164CM microcontroller Update: 1.) Download @ http://www.infineon.com/DAvE the DAvE-update-file (.DIP) for the required microcontroller Unzip the zip-file “XC164CM_v0.3.zip” and save “ XC164CM.DIP “ @ e.g. D:\DAvE\XC164CM-2006-07-20. Application Note 14 V2.0, 2006-07 AP16102 XC164CM "Cookery-Book" 2.) Start DAvE - ( click ) 3.) View Setup Wizard Default: • Installation Forward> Select: • I want to install products from the DAvE’s web site Forward> Select: D:\DAvE\XC164CM-2006-07-20 Forward> Select: Available Products click D XC164CM Forward> Install End 4.) DAvE is now ready to generate code for the XC164CM microcontroller. Application Note 15 V2.0, 2006-07 AP16102 XC164CM "Cookery-Book" 3.) DAvE - Microcontroller Initialization after Power-On: Start the program generator DAvE and select the XC164CM microcontroller: File; New; 16-Bit Microcontrollers; XC164CM; Create: Application Note 16 V2.0, 2006-07 AP16102 XC164CM "Cookery-Book" Choose the Project Settings as you can see in the Screenshots: General: Controller Type: Type: select XC164CM-8F40 General: For the KEIL Compiler choose ~ Keil in the Compiler Settings: Application Note 17 V2.0, 2006-07 AP16102 XC164CM "Cookery-Book" System Clock: CPU Clock will be 20 MHz – Application Note 18 ( do nothing ) V2.0, 2006-07 AP16102 XC164CM "Cookery-Book" See also Core-Register PLLCON: View – Register Explorer: PLLCON=0x7814 fPLL= fOSC * ( PLLMUL+1 ) / ( ( PLLDIV+1 ) * ( PLLODIV+1 ) ) fPLL= 8 * ( 24+1 ) / ( ( 1 + 1 ) * ( 4 + 1 ) ) = 20 MHz PLLCON=0x7814 Application Note 19 V2.0, 2006-07 AP16102 XC164CM "Cookery-Book" Global Settings: do not change configuration Application Note 20 V2.0, 2006-07 AP16102 XC164CM "Cookery-Book" CPUCON1/VECSEG: Vector Segment Pointer: click/check ~ Start from internal program memory Application Note 21 V2.0, 2006-07 AP16102 XC164CM "Cookery-Book" Notes: If you wish, you can insert your comments here. Exit this dialog now by clicking Application Note the close button: 22 V2.0, 2006-07 AP16102 XC164CM "Cookery-Book" Configuration of the ASC0: The configuration window can be opened by clicking the specific block/module. Application Note 23 V2.0, 2006-07 AP16102 XC164CM "Cookery-Book" Module Clock: (do nothing) Application Note 24 V2.0, 2006-07 AP16102 XC164CM "Cookery-Book" Pin Selection: Alternate Pin Selection: click 9 Use pin Tx, click 9 Use pin Rx Autobaud: (do nothing) Application Note 25 V2.0, 2006-07 AP16102 XC164CM "Cookery-Book" Control: Receiver Enable: click 9 Enable receiver FIFO: (do nothing) Application Note 26 V2.0, 2006-07 AP16102 XC164CM "Cookery-Book" Baud Rate: Baud Rate: Required baud rate [kbaud] input 9,600 <ENTER> Baud Rate: Baud Rate Selection Bit: additionally – if you want: click 9 Use fractional divider as prescaler ... Note: Validate each alpha numeric entry by pressing ENTER. IrDA: (do nothing) Interrupts: (do nothing) Int. Extension: (do nothing) PEC: (do nothing) Application Note 27 V2.0, 2006-07 AP16102 XC164CM "Cookery-Book" Functions: Initialization Function: click 9 ASC0_vInit Parameters: (do nothing) Notes: If you wish, you can insert your comments here. Exit this dialog now by clicking Application Note the close button: 28 V2.0, 2006-07 AP16102 XC164CM "Cookery-Book" Configure Timer T7 in CAPCOM 2: The configuration window can be opened by clicking the specific block/module. Application Note 29 V2.0, 2006-07 AP16102 XC164CM "Cookery-Book" Module Clock: CAPCOM2 Disable Flag: click ~ Enable module Application Note 30 V2.0, 2006-07 AP16102 XC164CM "Cookery-Book" Control: Port Lock Control: click ~ The contents of the port register is not changed by the CAPCOM2 unit Application Note 31 V2.0, 2006-07 AP16102 XC164CM "Cookery-Book" Timer 7/8: Timer 7 Start Control: click 9 Start T7 after initialization (T7R) Timer 7/8: Interrupt Control click 9 Enable T7 interrupt (IE) Timer 7/8: Timer 7 Input Selection (T7I): Prescaler: choose Module Clock/1024 Timer 7/8: Timer 7 Registers: Timer 7 reload register: input 0xB3B5 <ENTER> for 1 second Channels: (do nothing) Application Note 32 V2.0, 2006-07 AP16102 XC164CM "Cookery-Book" Interrupts: drag and drop the CC2 Timer 7 INT to Interrupt Level 7, Group 0 Int. Extension: (do nothing) PEC: (do nothing) Application Note 33 V2.0, 2006-07 AP16102 XC164CM "Cookery-Book" Functions: Initialization Function: click 9 CC2_vInit Interrupt of Timer 7 is enabled Parameters: (do nothing) Notes: If you wish, you can insert your comments here. Exit this dialog now by clicking Application Note the close button: 34 V2.0, 2006-07 AP16102 XC164CM "Cookery-Book" Configure Port 1L Pin 1,3,5,7 to Output : The configuration window can be opened by clicking the specific block/module. Application Note 35 V2.0, 2006-07 AP16102 XC164CM "Cookery-Book" Ports: click Configure Port 1L Application Note 36 V2.0, 2006-07 AP16102 XC164CM "Cookery-Book" Port 1L: Functionality: click 9 Use P1L.1 as general IO Port 1L: Functionality: click 9 Use P1L.3 as general IO Port 1L: Functionality: click 9 Use P1L.5 as general IO Port 1L: Functionality: click 9 Use P1L.7 as general IO - Direction: click ~ Out Direction: click ~ Out Direction: click ~ Out Direction: click ~ Out Output Characteristic: (do nothing) Parameters: (do nothing) Notes: If you wish, you can insert your comments here. Exit this dialog now by clicking Application Note the close button: 37 V2.0, 2006-07 AP16102 XC164CM "Cookery-Book" Functions: Initialization Functions: click 9 IO_vInit Parameters: (do nothing) Notes: If you wish, you can insert your comments here. Exit this dialog now by clicking Application Note the close button: 38 V2.0, 2006-07 AP16102 XC164CM "Cookery-Book" Save the project: File Save Save project: Save in: C:\XC164CM (create directory) File name: XC164CM Save Application Note 39 V2.0, 2006-07 AP16102 XC164CM "Cookery-Book" Generate Code: File Generate Code or click DAvE will show you all the files he has generated (File Viewer opens automatically). File Exit Save changes? Click Yes Application Note 40 V2.0, 2006-07 AP16102 XC164CM "Cookery-Book" 4.) Using of the KEIL - µVision 3 Development Tools: Install the Tool chain - here you can download the Keil Development Tools: http://www.keil.com/demo/eval/c166.htm Application Note 41 V2.0, 2006-07 AP16102 XC164CM "Cookery-Book" Click Submit Execute C166V604a.EXE (- or higher) and choose e.g. C:\Keil_D16bit_V604a for the installation path Application Note 42 V2.0, 2006-07 AP16102 XC164CM "Cookery-Book" Start Keil µVision3 and open the DAvE Project: Double-click Application Note 43 V2.0, 2006-07 AP16102 XC164CM "Cookery-Book" If you see an open project – close it: Project - Close Project Project - Open Project Look in: C:\XC164CM choose: File of type: Dave Project Files File name: XC164CM.dpt Open Application Note 44 V2.0, 2006-07 AP16102 XC164CM "Cookery-Book" Generate „make“-File: Project – Rebuild all target files Application Note or click 45 V2.0, 2006-07 AP16102 XC164CM "Cookery-Book" Configure Compiler, Assembler, Linker, Locater, Hex-Converter and Build – Control: mouse position: (Project Workspace, Files): Target1 click right mouse button Options for Target ´Target1‘ Application Note or click 46 V2.0, 2006-07 AP16102 XC164CM "Cookery-Book" Device: check XC164CM-8F Application Note 47 V2.0, 2006-07 AP16102 XC164CM "Cookery-Book" Target: insert/check Clock (MHz): 8 Target: click/check 9 Use On-chip ROM (64KB) Target: click/check 9 Use On-chip XRAM Application Note 48 V2.0, 2006-07 AP16102 XC164CM "Cookery-Book" Output: click 9 Create HEX File Listing (do nothing) C166 (do nothing) EC++ (do nothing) A166 (do nothing) L166 Locate (do nothing) Application Note 49 V2.0, 2006-07 AP16102 XC164CM "Cookery-Book" L166 Misc: Interrupt Vector Table Address: insert 0x0C00000 Debug (do nothing) Utilities (do nothing) OK Application Note 50 V2.0, 2006-07 AP16102 XC164CM "Cookery-Book" Insert your application specific program: Note: DAvE doesn’t change code which is inserted between ‘// USER CODE BEGIN’ and ‘// USER CODE END’. Therefore, whenever adding code to DAvE’s generated code, write it between ‘// USER CODE BEGIN’ and ‘// USER CODE END’. If you wish to change DAvE´s generated code or add code outside these ‘USER CODE’ sections you will have to insert/modify your changes each time after letting DAvE regenerate code! Application Note 51 V2.0, 2006-07 AP16102 XC164CM "Cookery-Book" Double click MAIN.C and insert Global Variables: char menu[] = "\r\n\n\n\n" "1 ... LEDs P1L.1+P1L.3+P1L.5+P1L.7 ON\r\n" "2 ... LEDs P1L.1+P1L.3+P1L.5+P1L.7 OFF\r\n" "3 ... LEDs P1L.1+P1L.3+P1L.5+P1L.7 blinking\r\n" " \r\n"; char question[] = "your choice: "; char message1[] = "\n\r*** LEDs ON ***\r\n"; char message2[] = "\n\r*** LEDs OFF ***\r\n"; char message3[] = "\n\r*** LEDs BLINKING ***\r\n"; volatile int RS232_wait=2; bit blinking=ON; char select=' '; Application Note 52 V2.0, 2006-07 AP16102 XC164CM "Cookery-Book" Application Note 53 V2.0, 2006-07 AP16102 XC164CM "Cookery-Book" Double click MAIN.C and insert the function input() char input (void) { char in=' '; do { printf(question); while (!ASC0_RIC_IR); ASC0_RIC_IR=0; in = (char)ASC0_RBUF; }while (in!='1' && in!= '2' && in != '3'); return in; } Application Note 54 V2.0, 2006-07 AP16102 XC164CM "Cookery-Book" Double click MAIN.C and insert the following code into the main function: while(RS232_wait); while (1) { printf(menu); select=input(); switch (select) { case '1': blinking=OFF; P1L=LED_ON, printf(message1); break; case '2': blinking=OFF; P1L=LED_OFF, printf(message2); break; case '3': blinking=ON, printf(message3); break; } } Application Note 55 V2.0, 2006-07 AP16102 XC164CM "Cookery-Book" Double click Main.h and insert the following Defines: #define OFF 0 #define ON 1 #define LED_ON 0x0000 #define LED_OFF 0xFFFF Application Note 56 V2.0, 2006-07 AP16102 XC164CM "Cookery-Book" Double click Main.h and insert extern-declaration “Global Variables” extern bit blinking; extern volatile int RS232_wait; Application Note 57 V2.0, 2006-07 AP16102 XC164CM "Cookery-Book" Double click Main.h and insert Includes (for printf() ): #include <stdio.h> #include <ctype.h> Application Note 58 V2.0, 2006-07 AP16102 XC164CM "Cookery-Book" Double click ASC0.C and insert code into the ASC0_vInit() function: (to start printf() ): ASC0_TIC_IR=1; Application Note 59 V2.0, 2006-07 AP16102 XC164CM "Cookery-Book" Double click CC2.C and insert code for T7 interrupt service routine: if(RS232_wait) RS232_wait--; if(blinking) P1L=P1L^0xFFFF; Application Note 60 V2.0, 2006-07 AP16102 XC164CM "Cookery-Book" Generate your application program: Project – Rebuild all target files or click Now you can close your project and µVision 3: Project Close Project File - Exit Application Note 61 V2.0, 2006-07 AP16102 XC164CM "Cookery-Book" Note: From now on you can simply open your µVision-Project with: Start Keil µVision and open the Keil Project If you see an open project – close it: Project - Close Project Project - Open Project choose: C:\XC164CM choose: File type: Project Files (*.uv2) choose: XC164CM.Uv2 Open Note: You could program now the hex output file XC164CM.H86 with Memtool (http://www.pls-mc.com/) or Minimon (www.perschl.at) or XCFLASHER (Open-Source by www.perschl.at ) or FLASHIT ( http://www.hse-electronic.com ) or Flash-on-the-Fly into the OnChipFlash (Program Memory) of the XC164CM microcontroller. Additionally, you can use the µVision3 for OnChipFlash-Programming (using the JTAG interface) of course - you can also use a Debugger for this task. Application Note 62 V2.0, 2006-07 AP16102 XC164CM "Cookery-Book" Using the simulator (first we will test our program inside the Keil Simulator without hardware): The uVision3 simulator has a couple of VTREG's that allow you the configuration of the reset behaviour. These pins of the Infineon XC16x are reflected by the following VTREGs: EA is the EA pin (0:= code fetch from external ROM ; 1:= code fetch from on-chip ROM) ALE is the ALE pin RD is the RD pin WR is the WR pin RSTCFGP are the levels on the configuration PINs NMIPIN is the NMI pin By default, the value of the EA pin is set to 0 to simulate the off-chip ROM. When this VTREG is 1 at CPU reset, the uVision3 simulates on-chip ROM and the RESET vector and interrupt vectors are at address 0xC00000. Additionally, see the XC16x Derivatives System Units User’s Manual: It is badly needed to start the µVision simulator with program start in on-chip ROM (Flash)! Application Note 63 V2.0, 2006-07 AP16102 XC164CM "Cookery-Book" Start the µVision simulator with program start in on-chip ROM (Flash): You can enable the on-chip-ROM-behavior (Standard Internal Start) as described below: mouse position: (Project Workspace, Files): Target1 click right mouse button Options for Target ´Target1‘ or click Debug click Settings Application Note 64 V2.0, 2006-07 AP16102 XC164CM "Cookery-Book" Simulator Setup Startup Configuration SMOD choose Configuration from Program Memory click 9 EA# = 1 click 9 RD# = 1 click ALE# = 0 click WR# = 0 OK OK Application Note 65 V2.0, 2006-07 AP16102 XC164CM "Cookery-Book" Debug – Start/Stop Debug Session or click OK Application Note 66 V2.0, 2006-07 AP16102 XC164CM "Cookery-Book" Debug – Run View - Serial Window #1 Peripherals - I/O-Ports – Port1 Peripherals – Capcom2 (T7,T8) – T7 Note: By activating (click) the “Serial Window #1” you can type 1, 2 or 3 and you can watch the result in the “Parallel Port 1” window. Now (if you want) you can close your simulator session: Debug Stop Running Debug Start/Stop Debug Session Now (if you want) you can close your project and µVision 3: Project Close Project File - Exit Application Note 67 V2.0, 2006-07 AP16102 XC164CM "Cookery-Book" Using real hardware: 5.) Using Bootstrap loader (ASC0) + MEMTOOL): Layout Overview: Application Note 68 V2.0, 2006-07 AP16102 XC164CM "Cookery-Book" DIP switch 102 Jumper Settings: Bootstrap Loader ASC ⇔ Standard Internal Start Bootstrap Loader ASC ⇔ Standard Internal Start Switch S102: ⇔ Startup configuration: Bootstrap loader ASC Application Note Startup configuration: Standard start from internal Flash 69 V2.0, 2006-07 AP16102 XC164CM "Cookery-Book" MEMTOOL Installation: The following procedure will install/prepare Memtool for the programming of the XC164CM: Download MemToolv4.0.2.exe (or higher version) @ http://www.infineon.com/cgi-bin/ifx/portal/ep/channelView.do?channelId=75076&channelPage=%2Fep%2Fchannel%2FinformationPage.jsp&pageTypeId=17099 Application Note 70 V2.0, 2006-07 AP16102 XC164CM "Cookery-Book" Application Note 71 V2.0, 2006-07 AP16102 XC164CM "Cookery-Book" Execute file MT4.exe ( - or higher version) Application Note 72 V2.0, 2006-07 AP16102 XC164CM "Cookery-Book" And choose Destination Location (default directory) C:\Program Files\Infineon\Memtool4: Application Note 73 V2.0, 2006-07 AP16102 XC164CM "Cookery-Book" Start Memtool: Browse: Select Easy Kit with XC164CM-8F Series: OK Application Note 74 V2.0, 2006-07 AP16102 XC164CM "Cookery-Book" MEMTOOL is now ready to program the OnChipFlash of the XC164CM microcontroller. Application Note 75 V2.0, 2006-07 AP16102 XC164CM "Cookery-Book" Using MEMTOOL: Programming XC164CM.h86 into the OnChipFlash in the XC164CM: Assign Power to your target board. Set Dip Switch S102 to Bootstrap Loader ASC: Application Note 76 V2.0, 2006-07 AP16102 XC164CM "Cookery-Book" Press Reset Key Application Note 77 V2.0, 2006-07 AP16102 XC164CM "Cookery-Book" Erase the ONChipFlash: Connect Erase Start Application Note 78 V2.0, 2006-07 AP16102 XC164CM "Cookery-Book" Exit Load HEX File: Open File Dateityp (Files of type): select H86-Files (*.h86) Look in: C:\XC164CM Select XC164CM.H86 Open Application Note 79 V2.0, 2006-07 AP16102 XC164CM "Cookery-Book" Program selected hex-file into the OnChipFlash: Select All Add Sel >> Application Note 80 V2.0, 2006-07 AP16102 XC164CM "Cookery-Book" Program Exit Exit MEMTOOL: Disconnect Exit Application Note 81 V2.0, 2006-07 AP16102 XC164CM "Cookery-Book" Start your program: Set Dip Switch 102 to Standard internal start: Press Reset Key Your application is running! Application Note 82 V2.0, 2006-07 AP16102 XC164CM "Cookery-Book" 6.) OnChipFlash-Programming, OCDS-Debugging via Keil-ULINK-JTAG-Interface or USB-JTAG-Wiggler-Box Board Configuration For further information, please refer to the XC164CM Board Manual, V0.3, April 2004 . For further information, please refer to the XC164CM Board Manual, V0.9, Aug. 2005 . For further information, please refer to the XC164CM Board Manual, V1.0, Jan. 2006 . OCDS-Interface Application Note 83 V2.0, 2006-07 AP16102 XC164CM "Cookery-Book" Keil-ULINK-JTAG-Interface Application Note 84 V2.0, 2006-07 AP16102 XC164CM "Cookery-Book" OnChipFlash-Programming via KEIL-ULINK Start Keil µVision 3 and open the KEIL Project XC164CM.Uv2 If you see an open project – close it: Project - Close Project Project - Open Project choose: C:\XC164CM choose: File type: Project Files (*.uv2) choose: XC164CM.uv2 Öffnen/Open (Do you want to migrate the changes? click JA/Yes) Application Note 85 V2.0, 2006-07 AP16102 XC164CM "Cookery-Book" mouse position: (Project Window, Files): Target 1: click right mouse button click Options for Target ’Target 1’ or: click Options for Target Options for Target ’Target 1’: Utilities Application Note 86 V2.0, 2006-07 AP16102 XC164CM "Cookery-Book" Options for Target ’Target 1’: Utilities Configure Flash Menu Command: Use Target Driver for Flash Programming: Select ULINK Driver for XC16x Application Note 87 V2.0, 2006-07 AP16102 XC164CM "Cookery-Book" Options for Target ’Target 1’: Utilities Configure Flash Menu Command: Use Target Driver for Flash Programming: Click Settings Click Add Application Note 88 V2.0, 2006-07 AP16102 XC164CM "Cookery-Book" Add Programming Algorithm: select XC16x-8F on-chip Flash click Add Application Note 89 V2.0, 2006-07 AP16102 XC164CM "Cookery-Book" OK OK Application Note 90 V2.0, 2006-07 AP16102 XC164CM "Cookery-Book" And see the result: Application Note 91 V2.0, 2006-07 AP16102 XC164CM "Cookery-Book" Application Note 92 V2.0, 2006-07 AP16102 XC164CM "Cookery-Book" OCDS-Debugging via KEIL-ULINK-JTAG-Interface mouse position: (Project Window, Files): Target 1: click right mouse button click Options for Target ’Target 1’ or: click Options for Target Options for Target ’Target 1’: Debug Application Note 93 V2.0, 2006-07 AP16102 XC164CM "Cookery-Book" Options for Target ’Target 1’: Debug Click ~ Use : Select ULINK Driver for XC16x Application Note 94 V2.0, 2006-07 AP16102 XC164CM "Cookery-Book" click 9 Run to main(): OK Application Note 95 V2.0, 2006-07 AP16102 XC164CM "Cookery-Book" Now, you can debug with OCDS via KEIL-ULINK-JTAG-Interface: Debug – Start/Stop Debug Session or click OK Application Note 96 V2.0, 2006-07 AP16102 XC164CM "Cookery-Book" Application Note 97 V2.0, 2006-07 AP16102 XC164CM "Cookery-Book" Debug – Run Application Note 98 V2.0, 2006-07 AP16102 XC164CM "Cookery-Book" USB-JTAG-Wiggler-Box Application Note 99 V2.0, 2006-07 AP16102 XC164CM "Cookery-Book" OnChipFlash-Programming via USB-JTAG-Wiggler-Box Easy Kit XC164 CD click start.htm Application Note 100 V2.0, 2006-07 AP16102 XC164CM "Cookery-Book" Click Getting Started Application Note 101 V2.0, 2006-07 AP16102 XC164CM "Cookery-Book" Application Note 102 V2.0, 2006-07 AP16102 XC164CM "Cookery-Book" Install (click) DAS-Software Application Note 103 V2.0, 2006-07 AP16102 XC164CM "Cookery-Book" Start Keil µVision 3 and open the KEIL Project XC164CM.Uv2 If you see an open project – close it: Project - Close Project Project - Open Project choose: C:\XC164CM choose: File type: Project Files (*.uv2) choose: XC164CM.uv2 Öffnen/Open (Do you want to migrate the changes? Click JA/Yes) Application Note 104 V2.0, 2006-07 AP16102 XC164CM "Cookery-Book" mouse position: (Project Window, Files): Target 1: click right mouse button click Options for Target ’Target 1’ or: click Options for Target Options for Target ’Target 1’: Utilities Application Note 105 V2.0, 2006-07 AP16102 XC164CM "Cookery-Book" Options for Target ’Target 1’: Utilities Configure Flash Menu Command: Use Target Driver for Flash Programming: Select Infineon DAS Client for XC16x Application Note 106 V2.0, 2006-07 AP16102 XC164CM "Cookery-Book" Options for Target ’Target 1’: Utilities Configure Flash Menu Command: Use Target Driver for Flash Programming: Click Settings Click Add Application Note 107 V2.0, 2006-07 AP16102 XC164CM "Cookery-Book" Add Programming Algorithm: select XC16x-8F On-chip Flash click Add Application Note 108 V2.0, 2006-07 AP16102 XC164CM "Cookery-Book" OK OK Application Note 109 V2.0, 2006-07 AP16102 XC164CM "Cookery-Book" And see the result: Application Note 110 V2.0, 2006-07 AP16102 XC164CM "Cookery-Book" Application Note 111 V2.0, 2006-07 AP16102 XC164CM "Cookery-Book" OCDS-Debugging via USB-JTAG-Wiggler-Box mouse position: (Project Window, Files): Target 1: click right mouse button click Options for Target ’Target 1’ or: click Options for Target Options for Target ’Target 1’: Debug Application Note 112 V2.0, 2006-07 AP16102 XC164CM "Cookery-Book" Options for Target ’Target 1’: Debug click ~ Use : select Infineon DAS Client for XC16x OK Application Note 113 V2.0, 2006-07 AP16102 XC164CM "Cookery-Book" Now, you can debug with OCDS via USB-JTAG-Wiggler-Box: Debug – Start/Stop Debug Session or click OK Application Note 114 V2.0, 2006-07 AP16102 XC164CM "Cookery-Book" Application Note 115 V2.0, 2006-07 AP16102 XC164CM "Cookery-Book" Debug – Run Application Note 116 V2.0, 2006-07 AP16102 XC164CM "Cookery-Book" 7.) Merging DAvE + µVision3 Merging tools: DAvE + µVision3 http://www.infineon.com/DAvE open your current DAvE project: Tools Customize Tools Menu … Application Note 117 V2.0, 2006-07 AP16102 XC164CM "Cookery-Book" Menu Content: click New (Insert) insert Start DAvE with current Project '@P' Command: insert: C:\Program Files\DAvE\dave.exe Arguments: insert: [email protected] Note: &P … current directory (path) @P … project name without Extension and without path OK Application Note 118 V2.0, 2006-07 AP16102 XC164CM "Cookery-Book" And see the result: Application Note 119 V2.0, 2006-07 AP16102 XC164CM "Cookery-Book" k10.2.) open DAvE without project: Tools Customize Tools Menu … Menu Content: click New (Insert) insert Start DAvE without Project Command: insert: C:\Program Files\DAvE\dave.exe Application Note 120 V2.0, 2006-07 AP16102 XC164CM "Cookery-Book" OK Application Note 121 V2.0, 2006-07 AP16102 XC164CM "Cookery-Book" And see the result: Application Note 122 V2.0, 2006-07 AP16102 XC164CM "Cookery-Book" Application Note 123 V2.0, 2006-07 AP16102 XC164CM "Cookery-Book" 8.) Feedback (XC164CM): Your opinion, suggestions and/or criticisms Contact Details (this section may remain empty should you wish to offer feedback anonymously): ______________________________________________________ ______________________________________________________ ______________________________________________________ If you have any suggestions please send this sheet back to: email: [email protected] FAX: +43 (0) 4242 3020 5783 Your suggestions: ______________________________________________________ ______________________________________________________ ______________________________________________________ ______________________________________________________ ______________________________________________________ ______________________________________________________ ______________________________________________________ ______________________________________________________ Application Note 124 V2.0, 2006-07 http://www.infineon.com Published by Infineon Technologies AG