1
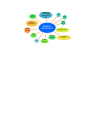
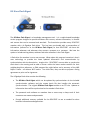
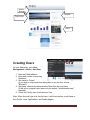
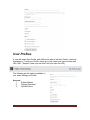
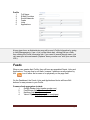
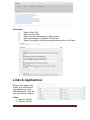
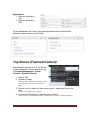
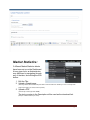
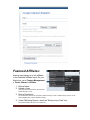
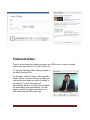
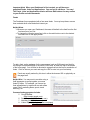
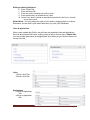
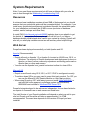
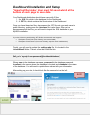
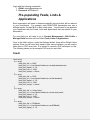
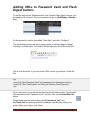
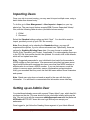
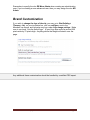
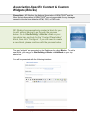
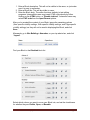
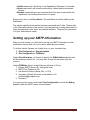
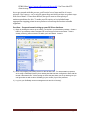
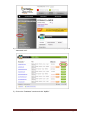
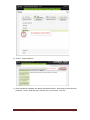
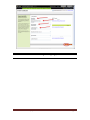
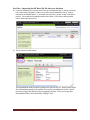
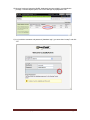
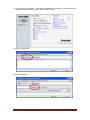
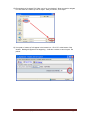
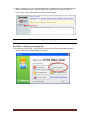
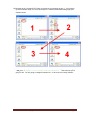
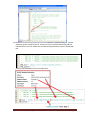
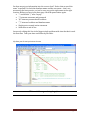
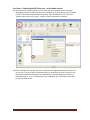
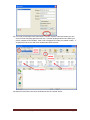
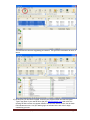
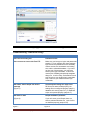
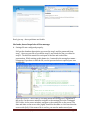
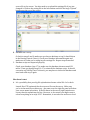
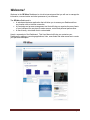
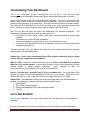
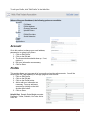
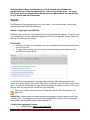
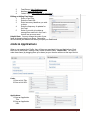
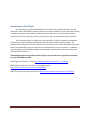
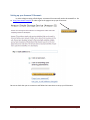
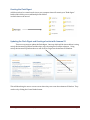
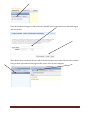
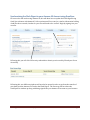
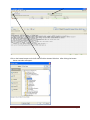
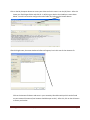
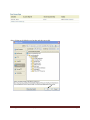
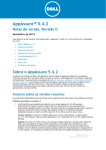
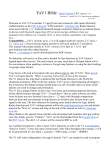
A Project of the West Volusia Association of REALTORS® Orange City, Florida With Funding Provided by the National Association of REALTORS® Consulting by Jeremy Conaway, RECON Intelligence Services Introduction The project includes the RE-Worx Dashboard and RE-Worx Flash Digest. Implementation of this project in our Association has forced many of our members to take a new look at technology and how it can benefit their business. It has proved to them that change is not as painful as they anticipated. Members are impressed at the level of tech support and the mindset of our Association, especially when compared with neighboring, and much larger, associations. The RE-Worx® Dashboard is a virtual instrument panel that REALTORS® use to manage the information and processes of their business. Members login to their Dashboard to access all websites, transaction software, email, social media, news feeds, market statistics, computer software and any other information sources, applications or processes that they need to successfully conduct their business. The RE-Worx Dashboard is a web-based, custom business application that allows the REALTOR® to access their dashboard from any location with an Internet connection. It is a knowledge and process management tool that organizes the many facets of their business into one place for easier access, control and personal performance. It is a user-friendly, virtual desk that is customizable. Users can add or remove applications, add personal links and resources or re-arrange most of the components. This program is a direct member professional support tool from the Association. The RE-Worx Dashboard will be a positive return on the investment REALTORS® make in your Association. RE-Worx Digest - knowledge management tool social media dashboard FAR NAR News feeds Finance Committee RE-Worx Dashboard training videos email Transacti on Desk MLS Forms Online password vault customizable links Association Value Jeff De Cagna, in “Embracing the Revolution” says, “Busy, tired and stressed out people need simpler forms of technology-supported engagement along with clear and meaningful incentives to sustain their intrinsic motivation over time. In the 21st century, the act of paying dues simply isn’t enough to make someone a member anymore.” The RE-Worx Dashboard provides a tangible value to their membership and a clear incentive to keep that membership so they can continue using the service. Innovation is an expectation for both Gen X and Gen Y. The innovative RE-Worx Dashboard will help attract and retain younger REALTORS®. This service will engage membership and make the Association more relevant to each member. This program shows that the Association is actively working on helping the REALTOR® make the real estate buying and selling process more responsive to the consumer. The RE-Worx Dashboard is an excellent tool for staff to manage their information and processes. Association staff always has 5 to 8 windows and applications open in order to efficiently provide member service and perform their jobs. The Dashboard has been a welcome application for all staff. The RE-Worx Dashboard is: • • • • A resource and workspace that will be a critical business asset for our members. A valuable tool/nerve center for their real estate business operations, marketing and overall performance. Allows our members to be a successful conductor of information and transaction manager for consumers. A critical channel for Association communication to our members. The key communication areas include the headline, the top news stories (up to 5 “billboards” that can include links to more information), the featured video and the Association calendar. The online RE-Worx Dashboard allows increased access to information and resources, more efficient communication to prospects and customers, streamlined way to conduct business and access to immediate information and news from the Association. RE-Worx Flash Digest The RE-Worx Flash Digest is a knowledge management tool. It is a sophisticated knowledge service program designed to provide members with current, relevant information, in formats and venues that can be accessed and searched. The Association provides every REALTOR® member with a 4 Gigabyte flash drive. This has been pre-loaded with a compendium of information (referred to as the RE-Worx Flash Digest) so that REALTORS® can have this information whenever and wherever they contact a prospect or a customer. We have the option to include training videos, webinars and other resources in the Flash Digest. A flash drive for members is not a new concept. What makes this program innovative is that it uses technology to provide the latest updated information and communication by synchronization with the Association. Imagine this… REALTORS® are now able to synchronize their data in the morning and be able to show a seller the latest market statistics for their neighborhood that afternoon, a CMA prepared the night before and a summary of the NAR Buyers’ Profile – all without Wi-Fi access. Two clicks later, they are able to prepare a listing agreement to print out for signatures. The 4 Gigabyte flash drive contains the following: • The RE-Worx Flash Digest which can be updated by synchronization via the included synchronization software and the custom batch file that handles the automatic synchronization. The original RE-Worx Flash Digest resides on an FTP site. Updates to information there will be synchronized to the member’s flash drive. • The password vault software so members have a secure way to keep track of their numerous user names and passwords • Enough additional memory available for the REALTOR® to use as needed for other business information and applications. Getting Started We have included manuals for both the RE-Worx Dashboard and RE-Worx Flash Digest projects. Each of these will help associations and users alike to understand how to use, implement, and customize their Dashboard. Also available are sample marketing materials and training videos you can use, copy or adapt. Dashboard User Manual: The user manual is a great way for members to learn how to use the Dashboard and on their own. Associations can pass this out electronically or in print to assist members with the customization of their own unique Dashboard. It can also be used as a troubleshooting tool to be posted on an Associations website or similar means of communication. Dashboard Administrative Manual: The administrative manual will assist Associations in the process of implementing the Dashboard to their members. It can be used as a troubleshooting device for Association staff to figure out quick fixes to problems. This manual can be customized and improved upon by Associations according to their specific needs and wants. This Administrative Manual will show you how to handle the administrative functions to keep the Dashboard up-to-date. Dashboard Deployment Procedures The deployment procedures will assist technical staff on the implementation processes. It will walk them through the necessary steps of making the Dashboard public for members of the Association. It addresses technical procedures relevant to implementation. Flash Digest User Manual and Admin/Deployment Manual This contains all implementation and user information for the Flash Digest. Comments on Implementation The West Volusia Association of REALTORS® has included all of the information and materials you will need to implement the RE-Worx Dashboard and RE-Worx Flash Digest at your Association. Please note that customization or special adaptations to the programs presented here will incur additional costs for your Association. We would like to provide specific information (company name and contact person) regarding the vendors we have used for the RE-Worx Dashboard and RE-Worx Flash Digest. These vendors would include our “partners” who are providing key elements of our projects, such as market statistics, flash drives, flash drive software (sync and password) and our dashboard design company. In addition, our dashboard is designed to integrate with our vendors for our website and our association management system. This vendor information would help other Associations save time, money and frustration to implement these features. We have been very pleased with all of the vendors who helped make these projects possible. However, as these are ongoing relationships that may change with the passage of time, we think you are best served by contacting us directly for the latest information. Please contact us: [email protected] or Pam MacConnell, CEO [email protected] West Volusia Association of REALTORS® 425 S. Volusia Avenue Orange City, FL 32763 386-774-6433 Administrative Manual Index: Pg. 2 Pg. 3 Pg. 4 Pg. 5 Pg. 6 Pg. 7 Pg. 8 Pg. 9 Pg. 10 Pg. 12 Pg. 13 Pg. 14 Welcome! Creating Users User Profiles Feeds Links & Applications Top Stories Market Statistics Featured Affiliates Featured Video Administrative Message Event Calendar Appendix A RE-Worx Dashboard Administrative Manual Page 1 Welcome! Welcome to the RE-Worx Dashboard, a virtual instrument panel that your members and staff will use to manage the information, communication and other processes of their business. This Administrative Manual will show you how to handle the administrative functions to keep the Dashboard up-to-date. The RE-Worx Dashboard is: • A web-based, custom business application that will allow users to access their Dashboard from any location with an Internet connection. • A knowledge and process management tool that will help users organize the many facets of their business into one place for easier access, control and personal performance. • A user-friendly, virtual desk that is customizable. • A communication tool with 4 key areas that organizations can use to channel information to their constituents: 1. Administrative message 2. Top Stories (up to 5) 3. Featured video 4. Event Calendar Note: These four blocks cannot be moved or minimized by the user, as they are key communication channels for the administrator. Here’s a screenshot of the entire Dashboard. RE-Worx Dashboard Administrative Manual Page 2 Admin Message Top Stories Calendar Video Creating Users On your Admin bar, go to User Management > Users > Add User 1. Enter an E-Mail address 2. Enter and confirm a temporary Password 3. Set status to "Active" (If you wish to stop a user from being able to use the site, choose "Blocked") 4. Optionally, choose any administrative Roles this user may have. (If this is just a regular user, leave only the default, "authenticated user", checked) 5. Check the "Notify user of new account" box Note: When the user logs in for the first time, it will force him/her to add items to their Profile, Links, Applications, and Feeds widgets. RE-Worx Dashboard Administrative Manual Page 3 User Profiles A user will create their Profile, and will then be able to edit their Feeds, Links and Applications. To edit your Profile, simply go to http://www.your-site.com/user and click "Edit". (Replace "www.your-site.com" with your own site URL) The following are the options available to you, when editing your Profile: Account: 1 E-Mail Address 2 Change Password 3 Upload Picture RE-Worx Dashboard Administrative Manual Page 4 Profile: 1 2 3 4 5 6 Full Name E-Mail Providers Social Networks Feeds Links Applications At any given time, an Administrator may edit a user's Profile Information by going to User Management > User > List (on the Admin bar), clicking Edit on a User, then clicking the Profile Information tab. If you need to search through users, just visit www.your-site.com/search (Replace "www.your-site.com" with your own site URL). Feeds When a user creates their Profile, they will have pre-populated Feeds, Links and Applications. They are free to edit them, however. feeds are usually marked by this icon in either the browser url or physically on the page itself. On the Dashboard, the Feeds, Links and Applications blocks will have Edit buttons for easy access to your Profile. Common feed aggregators include: 1 Google Reader (http://reader.google.com) 2 Feed Burner (http://feedburner.com) 3 Netvibes (http://netvibes.com) 4 Yahoo! Pipes (http://pipes.yahoo.com/pipes) RE-Worx Dashboard Administrative Manual Page 5 Feed Items: 1 2 3 4 5 Enter a Feed Title Enter the Feed URL Enter how many Headlines you wish to show Enter the frequency of updates, for the Feed Select if you wish to include an excerpt from each link in the Feed Links & Applications When a user creates their Profile, they will have prepopulated Feeds, Links and Applications. They are free to edit them, however. Links: 1. Enter a Link Title 2. Enter a Link URL RE-Worx Dashboard Administrative Manual Page 6 Applications: 1. Enter an Application Title 2. Enter an Application URL On the Dashboard, the Feeds, Links and Applications blocks will have Edit buttons for easy access to your Profile. Top Stories (Featured Content): Administrators may set up to 5 Top Stories on the Dashboard. On your Admin bar, go to Content Management > Create Content > Featured Content: 1. Enter a Title 2. Upload an Image (This image will be cropped and resized down to 600 x 250. Please keep that in mind when uploading an image) 3. Enter a Link, for where you want users to go to, when they click on the story. (You may leave this field empty, if you wish) 4. Enter a brief Description of what the story is about. (This text will be cut off at around 260 characters. Please keep this in mind when entering a description) RE-Worx Dashboard Administrative Manual Page 7 Market Statistics: 3 different Market Statistics blocks have been set up on the Dashboard. At any given time, an Administrator may edit them by navigating through any of the tabs, and clicking the Edit button: 1. Edit the Title 2. Upload a Graph image (This image will be downscaled to 640 pixels wide in order to fit the block. Please try to have a correctly-sized image. If the image is too small, it will not upscale) 3. Upload a PDF (This file may not be larger than 128MB) The text you enter in the Description will be used as the download link. (Example: "Download this report, now!") RE-Worx Dashboard Administrative Manual Page 8 Featured Affiliates: Admins may display up to two affiliates in the Featured Affiliates block. On your Admin bar, go to Content Management > Create Content > Affiliate: 1. Enter a Name 2. Upload a Logo (This image will be downscaled to 100 pixels wide. Please keep that in mind) 3. Enter a Description (On the Dashboard, this text will be stripped of HTML formatting, in order to maintain styling. However, on the View All Affiliates page, it will be displayed normally) 4. Under Publishing Options, check the "Sticky at top of lists" box. (Only Stickied Affiliates will show on the Dashboard) RE-Worx Dashboard Administrative Manual Page 9 Featured Video: There is a block where an Admin may enter any HTML code, in order to embed videos from sites such as YouTube, Vimeo, etc. To edit your Featured Video, simply navigate to the block, and click Edit. On the editor, click the “Insert / edit embedded media” button. A window will pop-up where you can specify what media you want to embed. In the case of YouTube, the plugin will automatically detect a YouTube link and adjust the embedding code, automatically. You will need to specify the video’s dimensions to fit 300 pixels wide and 255 pixels high. RE-Worx Dashboard Administrative Manual Page 10 RE-Worx Dashboard Administrative Manual Page 11 Administrative Message: Administrators may set a message that may be visible to users. On your Admin bar, go to Content Management > Create Content > Admin message: 1. Enter a Title 2. Enter a Message 3. Under Message Visibility, make sure that "Show message (sticky)" is checked, and if you want all new users to see this message, you may check "Always show this message to new users" RE-Worx Dashboard Administrative Manual Page 12 Event Calendar: At any given time, an Administrator may enter Events on the Event Calendar. On your Admin bar, go to Content Management > Create Content > Event: 1. 2. 3. 4. Enter a Title Enter a Date Enter an Address (if applicable) Enter a brief Description of the Event Events will show up on the Event Calendar block. Users may highlight a day to see that day's events, and click on an event title, to see more information. RE-Worx Dashboard Administrative Manual Page 13 Appendix A: User Instructions for Editing Profile, Feeds, Links and Applications To edit your Profile, simply go to http://www.your-site.com/user, login and click "Edit Profile" in the Hello Box. (Administrators - Replace "www.your-site.com" with your own Dashboard site URL) When editing your Dashboard, the following options are available: Account: 4 Full Name 5 E-Mail Address 6 Change Password 7 Upload Picture Profile: 7 E-Mail Providers 8 Social Networks Feeds Links Applications Account Go to this section to change your email address, password or to upload your picture. 1. Click on Edit Profile. 2. Click on the Edit tab. 3. The Account button should show up. If not, click on it. 4. Edit your information as necessary. 5. Click on Save. Profile This section allows you to access all of your email and social media accounts. You will be entering the URL (web address) of the login page for each account. 1. Click on Edit Profile. 2. Click on the Edit tab. 3. Click on the Profile button. 4. Add or edit your information as necessary. You may add more accounts by clicking on the Add Another Item button. 5. Click on Save. Helpful Hint: Sample Social Media accounts: Facebook, Twitter, LinkedIn, YouTube, Active Rain, etc. RE-Worx Dashboard Administrative Manual Page 14 Important Note! When your Dashboard is first created, you will have prepopulated Feeds, Links and Applications. You are free to edit them. It’s easy! The Feeds, Links and Applications blocks will have Edit buttons for easy access to your Profile and edit commands. Feeds The Dashboard is pre-populated with a few news feeds. You may keep these, remove them and add other news feeds that interest you. Helpful Hints: • Whenever you open your Dashboard, the news will default to the feed from the first feed source on your list. • To change the incoming news feed, click on the radio button next to the desired feed and click on the Apply button. To add a feed, go the webpage for the news source (such as CNN news) and look for the orange icon (shown below) or the words “RSS Feed” at either the top or the bottom of the home page. You will then be directed to a page that lists the feed or a selection of feeds. Click on the one you want and copy the URL to enter into your feed setup. Feeds are usually marked by this icon in either the browser URL or physically on the page itself. Helpful Hint: You may want to consider using a feed aggregator to group together your news feeds by topics. For example, you can set up feed aggregations by topics such as real estate news, news, marketing ideas, sports, trend watching, etc. Common feed aggregators include: 5 Google Reader (http://reader.google.com) 6 Feed Burner (http://feedburner.com) 7 Netvibes (http://netvibes.com) 8 Yahoo! Pipes (http://pipes.yahoo.com/pipes) RE-Worx Dashboard Administrative Manual Page 15 Editing or Adding Feed Items: 6 Enter a Feed Title. 7 Enter the Feed URL. 8 Enter how many Headlines you wish to show. 9 Enter the frequency of updates for the Feed. 10 Select if you wish to include an excerpt from each link in the Feed – that will use up more room! Helpful Hints: You may change the order of your feeds by dragging them up or down. Remember, the first feed is your default feed when you open your Dashboard. Links & Applications When a user creates their Profile, they will have pre-populated Links and Applications. Each bb block has an Edit button, making it easy to add or remove items. Helpful Hint: You can re-order these items (by dragging them up or down) so your favorite ones are at the top of the list. Links: 3. Enter a Link Title. 4. Enter a Link URL. Applications: 3. Enter an Application Title. 4. Enter an Application URL. RE-Worx Dashboard Administrative Manual Page 16 Deployment Procedures Index: Page 2 Page 3-6 Page 7 Page 8-10 Page 10 Page 11 Page 12 Page 13-15 Page 15 Page 16 Pre-implementation System Requirements Dashboard Installation & Setup Pre-populating Feeds, Links and Applications Adding URLs to Password Vault and Flash Digest buttons Importing Users & Setting up an Admin user Brand Customization Association-Specific Content & Custom Widgets (Blocks) Setting up your SMTP information Appendix (Provided by Ron LaMee, Vice President of Information Services, Arizona Association of REALTORS NFi Studios, the National Association of REALTORS® and the West Volusia Association of REALTORS® are not responsible for any damages caused to the site from defective HTML, CSS, or PHP code. RE-Worx Dashboard Deployment Manual Page 1 Pre-Implementation • • • • • • • Vendor specifications and selection • Dashboard host • FTP provider – for Flash Digest • Synchronization software • Password Vault software • Flash drive vendor Prepare detailed budget, include: • Hosting for Dashboard and FTP site for flash digest • Flash drives • Marketing and training expenses • Staff expense Determine and develop content for Flash Digest Determine implementation schedule Determine marketing plan Determine training schedule Determine Dashboard pre-populated feeds, links and applications specific to association RE-Worx Dashboard Deployment Manual Page 2 System Requirements Note: if you meet these requirements but still have problems with your site, be sure to read through the Webhosting Troubleshooting FAQ. Resources A minimum base installation requires at least 3MB of disk space but you should assume that your actual disk space will be somewhat higher. For example, if you install many contributed modules and contributed themes, the actual disk space for your installation could easily be 40 MB or more (exclusive of database content, media, backups and other files). A useful FAQ (http://drupal.org/node/59680) explains how to use phpinfo to get the details of your system. For example, phpinfo will tell you if you have a database already installed and what version your system is running. Phpinfo will also tell you what php variables are set as well as many other helpful things. Web Server Drupal has been deployed successfully on both Apache and IIS. Apache (Recommended) • Drupal will work on Apache 1.3 or Apache 2.x hosted on UNIX/Linux, OS X, or Windows. The majority of Drupal development and deployment is done on Apache, so there is more community experience and testing performed on Apache than on other web servers. • You can use the Apache 'mod_rewrite' extension to allow for clean URLs. Microsoft IIS • Drupal core will work using IIS 5, IIS 6, or IIS 7 if PHP is configured correctly. • To achieve clean URLs you may need to use a third party product. For IIS7 you can use the Microsoft URL Rewrite Module or a third party solution. • When using Drupal on IIS 7 with fastcgi you must install Hotfix kb954946, or wait until the hotfix appears in a package update (recommended). KB954946 was included in Windows 2008 Server SP2 Drupal is being developed to be web server independent, but we have limited or no reports of successful use on web servers not listed here. The total file size of your Drupal installation will depend on what you add to your site, but Drupal core files alone will take up approximately 2 to 3 MB uncompressed. The exact size depends on the version of Drupal you have installed. RE-Worx Dashboard Deployment Manual Page 3 Database server Recommended: MySQL 4.1 or MySQL 5.0 • Drupal 5.x and earlier supports MySQL 3.23.17 or higher. MySQL 4.1 or higher is strongly recommended. • Drupal 6 supports MySQL 4.1 or higher. • Drupal 7 will only support MySQL 5.0.15 or higher, and requires the PDO database extension for PHP (see PHP section below). • NOTE: Drupal makes use of some features not available on some inexpensive hosting plans so please check that your host allows database accounts with the following rights: SELECT, INSERT, UPDATE, DELETE, CREATE, DROP, INDEX, ALTER. These rights are sufficient to run Drupal core 6.x. Some contributed modules, and also Drupal core 5.x (but not Drupal core 6.x), additionally require the following rights: CREATE TEMPORARY TABLES, LOCK TABLES. • Note: If your system/host is running MySQL 4.1 or newer and you receive the error "Client does not support authentication protocol requested by server", address the problem by following the instructions provided by MySQL AB. There is a minor OS issue with some MySQL 5+ installations primarily on Windows but affecting some versions of Unix/Linux as well. • Note: When using Drupal 5.x or later, particularly with contributed modules, it may be necessary to set the system variable max_allowed_packet to at least 16M. Some inexpensive hosting plans set this value too low (the MySQL default is only 1M). In that case, you may need to choose a better hosting plan. A value of 1M may be sufficient for 5.x. • Note: Drupal supports MyISAM and InnoDB table types. NDB tables (MySQL Cluster) are not supported. Note that if your web hosting account is set up with a graphic control panel such as Plesk or CPanel, it is very likely that you do not need to worry about installing a driver for MySQL -- it is probably already installed on your server. You might wish to simply create your database and proceed with installing Drupal, and then refer back to Drupal documentation for specific troubleshooting help if you run into problems. PostgreSQL 7.4 or higher • Note: Some contributed modules are not as abstracted from MySQL-specific code as everyone would like. If you are familiar with PostgreSQL please file issues with those contributed modules as you find them. • Drupal 7 will only support PostgreSQL 8.3 or higher • PHP 5.2.6 for Windows has a bug in its pgsql extension. You will need to replace it with the php_pgsql.dll from version 5.2.5. SQLite 3.x - Drupal 7 only • Note: Some contributed modules are not as abstracted from MySQL-specific RE-Worx Dashboard Deployment Manual Page 4 code as everyone would like. If you are familiar with SQLite please file issues with those contributed modules as you find them. Currently other databases, such as Microsoft SQL Server, Oracle, and MongoDB are not supported in Drupal core, but various efforts are underway to supply support. Please see discussions in the Enterprise Group, or projects http://drupal.org/project/oracle, http://drupal.org/project/sqlsrv, and http://drupal.org/project/mongodb_dbtng if you are interested in working on database support. PHP Recommended: PHP 5.2.x Required: PHP version 4.4.0 or higher (Contributed modules may not support this version of PHP) • PHP 5.3 is not yet supported by Drupal 5.x, but is supported by Drupal 6.14 core and higher (see the release notes for 6.14) and also by Drupal 7.x. Note that some contributed modules may not be compatible with PHP 5.3, and that some PHP 5.3 configurations still show warnings with Drupal 6.14; work is ongoing to resolve the latter in #360605: PHP 5.3 Compatibility. • PHP 5.2 or higher will be a requirement for Drupal 7. • PHP memory requirements can vary significantly depending on your use of modules. While 16 MB may be sufficient for a default Drupal 6 installation and 30 MB may be sufficient for a default Drupal 7 installation, a production site with a number of commonly used modules enabled (CCK, Views etc.) could require 64 MB or more. Some installations may require much more, especially with media-rich implementations. If you are using a hosting service it is important to verify that your host can provide sufficient memory for the set of modules you are deploying or may deploy in the future. (See the Increase PHP memory limit page in the Troubleshooting FAQ for additional information on modifying the PHP memory limit.) • The PHP extension for connecting to your chosen database must be installed and enabled. Drupal's currently supported database connectors are: mysql (the original MySQL extension), mysqli (an improved connector for newer MySQL installations), and pgsql (for PostgreSQL). Note: PHP 5.x no longer enables the mysql extension by default. Please read the links above for installing and enabling your chosen connector. Additionally, Drupal 6.x does not provide the option to select the mysql connector if mysqli is enabled in your PHP configuration. • PHP XML extension (for Blog API, Drupal, and Ping modules). This extension is enabled by default in a standard PHP installation; the Windows version of PHP has built-in support for this extension. • An image library for PHP such as the GD library is needed for image manipulation (resizing user pictures, image and imagecache modules). GD is included with PHP 4.3 and higher and enabled by default. ImageMagick is also supported for basic image manipulations in Drupal core but there is much less support from contributed modules. • PHP needs the following configuration directives for Drupal to work (only RE-Worx Dashboard Deployment Manual Page 5 directives that differ from the default php.ini-dist / php.ini-recommended): ◦ register_globals: off; this is the default value, but some hosts have it enabled ◦ error_reporting set to E_ALL & ~E_NOTICE. Work is ongoing to change this to E_ALL for Drupal 6 and Drupal 7. ◦ safe_mode: off. Safe mode may interfere with file and image uploads. ◦ Php Data Objects (PDO) must be activated for Drupal 7 to install and run correctly. Look in your php.ini. Uncomment (remove the leading semicolin) at line extension=php_pdo.dll, extension=php_pdo_mysql.dll. If these lines are not there, you will need to add them. You can also use pecl install pdo to install pdo, and then pecl install pdo_mysql (for instance), to install the PDO database driver. More information can be found on the What is PDO page. ◦ In addition, we recommend the following setting: session.cache_limiter: nocache • Some of these settings are contained in the default .htaccess file that ships with Drupal, so you shouldn't need to set them explicitly. Note, however, that setting PHP configuration options from .htaccess only works under the following conditions: ◦ With Apache (or a compatible web server) ◦ If the .htaccess file is actually read, i.e. AllowOverride is not None ◦ If PHP is installed as an Apache module • See the PHP manual for how to change configuration settings for other interfaces to PHP. • Drupal 7 may require the time parameter to be at least 30 seconds. • In some shared hosting environments, access to these settings is restricted. If you cannot make these changes yourself, please ask your hosting provider to adjust them for you. RE-Worx Dashboard Deployment Manual Page 6 Dashboard Installation and Setup *Important Reminder: User must hit save/submit at the bottom of each page to save data. Your Dashboard distribution should have come with 2 files: 1. An .SQL file, which is the database for the Dashboard 2. A .ZIP file, which contains the file structure of the Dashboard Once you have these two files, decompress the .ZIP file onto your web server’s public directory, making sure the .htaccess file is also there. After you’ve decompressed all the files, you will need to import the .SQL database to your MySQL installation. If you don’t have any web hosting, NFi Studios recommends and supports: • Rackspace Cloud Sites (User friendly, less customizable) • Rackspace Cloud Servers (Less user-friendly, requires server maintenance) Finally, you will need to update the settings.php file. It is located in the /sites/default/ folder. There’s a line that looks like this: $db_url = 'mysql://user:password@localhost/database'; Where user is the database username, password is the database password, localhost is the server where the database is located, and database is the name of the database. You will need to update these values with your information. After setting up your site, it should look like the screenshot on the left: BAD! GOOD! RE-Worx Dashboard Deployment Manual Page 7 Login with the following credentials: 1. E-Mail: [email protected] 2. Password: NFiStudios10 Pre-populating Feeds, Links & Applications Each organization will need to determine specific resources that will be relevant to your constituents. For example, each REALTOR® Association may use a different vendor for their MLS or their online forms. You will need to pre-populate your Dashboard with the Feeds, Links and Applications that are specific to your Association. For each field you will need to go to Content Management > Edit Profile > Manage Fields and then click on either Feeds, Links or Applications. Once in the field’s options, under the Settings fieldset, there will be Default Value options. Since you will most likely need to enter various defaults, you will need to enter them in PHP array form. It is advised to consult a PHP developer for this. The following shows you an example PHP array for each field. Feeds return array( 0 => array( 'feed_field_title' => 'NAR', 'feed_field_url' => 'http://feeds.feedburner.com/dailyrealestatenews', 'feed_field_display' => '10', 'feed_field_freq' => '1800', 'feed_field_excerpt' => 'blank ), 1 => array( 'feed_field_title' => 'FAR', 'feed_field_url' => 'http://feeds.feedburner.com/floridarealtors', 'feed_field_display' => '10', 'feed_field_freq' => '1800', 'feed_field_excerpt' => 'blank' ), 2 => array( 'feed_field_title' => 'Inman News', 'feed_field_url' => 'http://feeds.feedburner.com/reindustrynews', 'feed_field_display' => '10', 'feed_field_freq' => '1800', 'feed_field_excerpt' => 'blank' ), 3 => array( 'feed_field_title' => 'RISMedia', 'feed_field_url' => 'http://feeds.feedburner.com/RISMedia', 'feed_field_display' => '10', RE-Worx Dashboard Deployment Manual Page 8 'feed_field_freq' => '1800', 'feed_field_excerpt' => 'blank' ), ); Links return array( 0 => array( 'url' => 'http://www.realtor.org', 'title' => 'NAR', 'attributes' => 'checked' ), 1 => array( 'url' => 'http://blog.narrpr.com', 'title' => 'RPR', 'attributes' => 'checked' ), 2 => array( 'url' => 'http://www.houselogic.com', 'title' => 'Houselogic', 'attributes' => 'checked' ), 3 => array( 'url' => 'http://www.floridarealtors.org', 'title' => 'Florida Realtors', 'attributes' => 'checked' ), 4 => array( 'url' => 'http://webserver.vcgov.org/index.html', 'title' => 'Volusia County Property Appraiser', 'attributes' => 'checked' ), Applications return array( 0 => array( 'url' => 'http://mfr.mlxchange.com', 'title' => 'MLXchange', 'attributes' => 'checked ), 1 => array( 'url' => 'https://www.floridarealtors.org/member_signin.cfm?target=/ToolsAndSupport/Transactio nDesk/TransactionDeskAutoLogin.cfm', 'title' => 'Transaction Desk', 'attributes' => 'checked' ), RE-Worx Dashboard Deployment Manual Page 9 2 => array( 'url' => 'https://supraweb.suprakim.com', 'title' => 'SupraWeb', 'attributes' => 'checked' ), ); RE-Worx Dashboard Deployment Manual Page 10 Adding URLs to Password Vault and Flash Digest buttons To edit the links on the “Password Vault” and “Access Flash Digest” buttons, you will need to edit its’ block. On your top admin bar, go to Site Building > Blocks > List. On the blocks list, look for one called “Flash Sync” and click “Configure”. The block editing screen will show a page similar to editing a page in Drupal, including a rich-text editor. In the editor will be both links, and will look like this: This is as it should be. If you look at the HTML source, you will see it looks like this: <p> <a href="#" title="Password Vault" id="password_link">Password Vault</a> <a href="#" title="Flash Digest" id="flash_link">Access Flash Digest</a> </p> All you will need to do is edit the link that has already been created. For example, click anywhere inside “Password Vault”, and then click on the Insert/Edit Link button. Please make sure that after editing, the id=”password_link” and id=”flash_link” are placed just like the example, otherwise the styling may break. When you’re done, click “Save”. RE-Worx Dashboard Deployment Manual Page 11 Importing Users Once your site is up and running, you may want to import multiple users, using a batch rather than manual entry. To do this, go to User Management > User Imports > Import, on your top admin bar. The user import feature accepts CSV (Comma Separated Values) files, with the following table structure (and table column names): 1. E-Mail 2. Password Select the Standard settings option and click “Next.” You should be ready to import, provided you set up your CSV file correctly. Note: Even though you’re selecting the Standard settings, you may still experiment the options, if you’re a more advanced user. Specifically, there are options for Updating Existing Users data. You may choose to update their Profile, Role, Password, and Contact, if applicable. If no data regarding these are in the CSV file, their profile shouldn’t be updated. If in doubt, stick to the defaults, which will not update user data. Note: Suggested passwords for your initial batch load could be the member’s NRDS number or their last name. We recommend using their last name as we have had difficulties with members who have more than one NRDS number or affiliates who do not have a NRDS number. If you use last names, scrub the column to remove upper case letter, spaces, hyphenation and apostrophes. Notify your members that they must use their last name without those characters and spaces. Note: Batch user entry does not send an email to the user with their login information. You will need to communicate this information some other way. Setting up an Admin User Your dashboard already comes with a preset “Super Admin” user, which has ALL privileges on the site. This user should only be used while initially setting up the site. You can log in with the username [email protected] and the password NFiStudios10. DO NOT share this user login with anyone except your webmaster. Once logged in, just follow the Creating Users segment of your Admin Manual. RE-Worx Dashboard Deployment Manual Page 12 Remember to specify the role RE-Worx Admin when creating an administrative user. If you’re creating a more advanced user, then you may assign the role NFi Admin. Brand Customization If you wish to change the logo of the site, you may go to Site Building > Themes > List, on your top admin bar, click on configure, next to the MemberFuse theme, and upload a new logo under Logo image settings. Make sure to un-check “Use the default logo”. A good logo size would be around 220 pixels wide by 70 pixels high. Anything above that height will stretch over the page. Any additional theme customization should be handled by a certified CSS expert. RE-Worx Dashboard Deployment Manual Page 13 Association-Specific Content & Custom Widgets (Blocks) Please Note: NFi Studios, the National Association of REALTORS® and the West Volusia Association of REALTORS® are not responsible for any damages caused to the site from defective HTML, CSS, or PHP code. NFi Studios has preemptively created a block for you to edit, without having to go through the process below. Go to Site Building > Blocks > List on your top admin bar, and look for the “Content Placeholder” block, then click “Configure”. If you still need to create a new block, please continue with the process below. The way “widgets” are presented on the Dashboard is called Blocks. To add a new Block, you may go to Site Building > Blocks > Add Block on your top admin bar. You will be presented with the following interface: RE-Worx Dashboard Deployment Manual Page 14 1. Enter a Block description. This will not be visible to the users, so just make sure it is easy to remember. 2. Enter a Block title. This will be visible to users. 3. Enter the Block body. The editor functions similarly to text editing programs. Intermediate users may insert HTML code directly by either clicking on the HTML button, or “Disable rich-test”. Advanced users may select PHP code from the Input Format options. After you’ve created the content of your Block, ignore the remaining options (User specific visibility settings, Role specific visibility settings, and Page specific visibility settings), as they will not be used in displaying this Block, and click Save. Afterwards, go to Site Building > Homebox, on your top admin bar, and click “Layout”. Find your Block in the Disabled block list. Select which column you want to move your Block into, and set the checkboxes for whether they are Visible, Open, or Movable. RE-Worx Dashboard Deployment Manual Page 15 • Visible means that it will show on the Dashboard. Otherwise, it’s invisible. • Open means that it will show the entire block, rather than the minimized version. • Movable means that you can move the block from area to area within the dashboard. Un-checking this will lock it in place. When you’re done, click Save blocks. The new Block should be visible on the Dashboard. The market statistics block section has been preloaded with 3 tabs. Please refer to the information above in this section if you are planning on using these tabs for other purposes than local, state, and national statistics. They can be customized to fit your Association’s needs. Setting up your SMTP information After your site is setup, you will need to set up your SMTP information so that notifications can be sent out to your users, when they are created. To do this, there’s 2 places you’ll need to go, on your top admin bar: 1. Site Configuration > Site Information 2. Site Configuration > PHPMailer Under Site Information, you’ll need to specify the E-Mail Address that the site will be sending e-mails from. (You may also change the site name from this screen.) Under PHPMailer, there’s a few fields you will have to fill out: 1. Primary SMTP Server (Ex. smtp.gmail.com) 2. SMTP Port (Defaults to 25) 3. Use Secure Protocol (None, SSL, or TLS) 4. Username (Usually the entire e-mail address. Ex. [email protected]) 5. Password You may send out a test e-mail under Test Configuration, and set the Debug Level to check the SMTP server communication. RE-Worx Dashboard Deployment Manual Page 16 Appendix (Provided by Ron LaMee, Vice President of Information Services, Arizona Association of REALTORS® after a test deployment) RE-Worx Setup Step-By-Step If you have in-house web servers, you probably have techies you can dump this project on. These setup instructions are based on the assumption that you do not have your own servers/techies and that you intend to host your RE-Worx site through an outside service like Rackspace or GoDaddy. With a bit of web knowledge you can work your way through instructions. Hopefully, you already have a domain name picked out and purchased for your RE-Worx site. If you don’t, go do it and come back. Preliminaries – Before you begin To complete this process you will need: a) A place for RE-Worx to live. RE-Worx is built on a Drupal software platform and works best in a Linux/Apache/MySQL/php (LAMP) environment. It will work in other environments, but we’ll assume you have arranged for a LAMP server environment. As mentioned, you can purchase hosting service from RackSpace (http://www.rackspacecloud.com/), GoDaddy (http://www.godaddy.com/hosting/web-hosting.aspx) or any number of other services. All you need is a minimal Rackspace Linux “Cloud site” or GoDaddy’s Linux “Economy Plan.” You must have this hosting site all set up under your domain name before you continue with these instructions. If you need help with setting up hosting, call your hosting vendor. As you set this stuff up, be sure to note down your hosting site username and password… you’ll need it again in step 24. b) An HTML editor like Dreamweaver or Coda to edit your REWorx settings file. If you have Windows and need a free one, download and install Coffee Cup Free HTML Editor http://www.coffeecup.com/freestuff/. You’ll use this HTML editor in step 18. c) An FTP client like SmartFTP or FileZilla to move files from your computer to a remote hosting site. Commercial HTML editors like Dreamweaver have FTP capabilities built in. However, if you are running Windows and need free FTP software, download and install Free FTP from the same place with Free RE-Worx Dashboard Deployment Manual Page 17 HTML Editor http://www.coffeecup.com/freestuff/. You’ll use this FTP client in step 23. As we get started with this process, you’ll notice lots of steps and lot of screen pictures. Don’t worry – we’ve tried to parse these activities out into very short steps with lots of detail. It’s not that difficult, but you’ll want to allow plenty of uninterrupted time for this. To make your life easier, we’ve included some appropriate stopping points in case you have to break up the fun into tolerable segments. Part One – Preparation and setting up your RE-Worx database 1) Begin by locating the reworx.zip or reworx_new.zip file in your distribution package. Create a folder on your desktop called “Unzipped File” and unzip your files into the folder. If this is already confusing, then turn back now while you’re still ahead. I mean it. 2) Next, we’ll prepare your hosting service for the RE-Worx site. For demonstration purposes, we’re using a GoDaddy Economy Linux hosting site that has been configured to work with the domain “aarnetwork.com.” We’re leaving out some the part where you set up hosting, but you can figure that out with a call to GoDaddy (or your vendor) if you have problems. 3) Log in to your GoDaddy account management site and click “Hosting”. RE-Worx Dashboard Deployment Manual Page 18 4) Locate the host site and launch the Control Center. Remember, our example site is “aarnetwork.com’. 5) Click on the “Databases” section and click “MySQL.” RE-Worx Dashboard Deployment Manual Page 19 6) Click on “Create Database.” 7) Enter Description, Database User Name and Password fields. Write down the username and password – mark it “database login” and keep it in a secure place. Click OK. RE-Worx Dashboard Deployment Manual Page 20 This could be a good stopping place RE-Worx Dashboard Deployment Manual Page 21 Part Two – Importing the RE-Worx SQL file into your database 8) It can take GoDaddy up to several hours to set up your database (step 7), though it could be just a few minutes. Be patient. When you do return and the database is set up, it will be indicated in your MySQL panel – if you forgot how to get here, go back to step 3 and follow the trail. You should see something like the screen below. Click on the edit/view details button, which looks like a pencil. 9) This is critical, so watch closely… The information in the red box is going to be used in step 21. Either write down this information exactly as it appears or copy the text and paste it into a word processor page (like Word) so you can paste it in later. Once you’ve got that information down, click on the blue “MySQL” link. RE-Worx Dashboard Deployment Manual Page 22 10) Next we’re going to import the MySQL database that was provided in your distribution package. From the MySQL panel, click on the “Manage via phpMyAdmin” link. 11) Log in with the username and password (“database login’) you wrote down in step 7 and click “Go”. RE-Worx Dashboard Deployment Manual Page 23 12) You should see this window… Note that your database (our example is “reworxdb”) has zero tables; ignore “information_schema” Click the “SQL” button. 13) Click on “Import files”. 14) Click on “Browse”. RE-Worx Dashboard Deployment Manual Page 24 15) Remember that “Unzipped File” folder you left on your desktop? Now you need to navigate to it and select the “reworx.sql” file for import. After you select it, click “Open”. 16) Your path to “reworx.sql” will appear in the browse box. Click “Go” at the bottom of the window. Nothing will appear to be happening – it will take a minute or two to import. Be patient. RE-Worx Dashboard Deployment Manual Page 25 17) When it’s finished, you’ll see yellow message and our database will show something like 121 tables, indicating it is ready. Click the green “Exit” button next to the “Home” button. To finish. Close out any other MySQL or Control Center windows. This could be a good stopping place Part Three – Editing your settings file 18) Launch your HTML editor. These screens are using Free HTML, but the steps should be similar. Click on the “Open Existing Files” button. RE-Worx Dashboard Deployment Manual Page 26 19) Navigate to the “Unzipped File” folder you placed on your desktop in step 1. You’ll need to go several folders deep, so here is the sequence: ReWorx/sites/default/settings.php (see diagram below). 20) The file will open up in the code editor. Scroll down to line 92 (or so); look for something like “$db_url = 'mysql://root:root@localhost/reworx';” This is the line you’re going to edit. You are going to change this whole line – it will soon look entirely different. RE-Worx Dashboard Deployment Manual Page 27 21) Remember the information you copied down in step 9? Now you need it again. Line 88 shows the generic format for line 92. Place your cursor in line 92 and edit it by filling in information from your site. Make sure you keep all the punctuation in place! Starting with this: insert your information, so it becomes this: RE-Worx Dashboard Deployment Manual Page 28 See how we put our information into the correct slots? Notice that we used the same “reworxdb” for both the database name and the user name – that’s not necessarily the best practice, so just be sure you get the right name in the right location. Before you save in the next step, check the punctuation again: • “:” and double “/” after “mysql” • “:” between username and password • “@” between password and localhost • “”/” between localhost and databasename • Single quotes around entire statement • Semicolon at end of line Incorrectly editing this line is the biggest single problem with sites that don’t work the first time. Take your time and recheck your edits. 22) Save your file and you’re done for now. This could be a good stopping place RE-Worx Dashboard Deployment Manual Page 29 Part Four – Uploading the RE-Worx site – on the home stretch 23) There are lots of ways to transfer (or “FTP”) files from your computer to the hosting site. Although the steps are similar with other FTP programs, we’re going assume you’ve installed Free FTP, which was mentioned at the beginning. After launching Free FTP, click on the “Servers” button, then click on the “+” button to create a new server connection. 24) Enter a nickname for your site, the server, username, and original password you used to set up your site. The server will be the domain name you selected for your site. Be sure to use the original username and password you used when you set up hosting and mentioned in preliminary step a). If you’ve forgotten your login credentials, you can always retrieve them from your hosting service. RE-Worx Dashboard Deployment Manual Page 30 25) You’ll find yourself back at the main screen; click the “Servers” button and select your new server from the list (there should be only one). Click the left drop down box and select your source (navigate to the “REWorx” folder in the “Unzipped File” folder you created in step 1. If all goes well, both source and server windows should fill with files. 26) Select all of the files in the source window and click the “Upload” button: RE-Worx Dashboard Deployment Manual Page 31 You should see the files beginning to transfer. The process could take an hour or more. 27) At this point, you should be finished! Close all your programs down and start a browser. Type in the name of your new RE-Worx site (like www.aarnetwork.com) and voila! This opening RE-Worx screen may appear different from the final release version, but the basic look indicates success. Use your starting login as indicated in the red circle to begin customizing your site. RE-Worx Dashboard Deployment Manual Page 32 This is a terrific stopping place – celebrate with beverage of choice. Troubleshooting – What went wrong? Problem Cause/solution Can’t access hosting site Password issues Can’t connect to server with Free FTP Make sure you keep your logins and passwords straight. For our example site, there separate login names and passwords for the GoDaddy master account, the aarnetwork.com hosting site, and the reworxdb database. If you can’t get into one of these areas, you may have mixed up the login credentials. A call to the vendor (like GoDaddy) should help straighten things out. Just for clarity, Preliminaries A and step 24 refer to your hosting login credentials; step 3 refers to your master account login credentials. Site loads, shows Drupal site off-line message Check Drupal message for mysql error (Figure 1) RE-Worx files were loaded properly, but settings file not configured properly (step 21), database isn’t set up (steps 4-7), or database script not imported properly (steps 8-17). Site doesn’t start Drupal installation problems (Figure 2) If you can’t even get to Drupal, there are serious problems with the site. Look for files not installed properly (steps 25-27). Figure 1 RE-Worx Dashboard Deployment Manual Figure 2 Page 33 Don’t give up – these problems are fixable. Site loads, shows Drupal site off-line message A. Settings file not configured properly. Pull out the database description you saved in step 9 and the password from step 7. Open up your file as you did in step 19 and check the line you edited in step 21. Recheck the entries for each part of the line and recheck the punctuation. While setting up this demo site, I entered in the wrong host name – it happens. If you have to edit the file, use the process below to upload your new settings file. Open up Free FTP. We’ll start by checking when the settings file is uploaded to the server. In the source window, navigate to the settings file in the “Unzipped File” folder; in the server window, navigate to the setting file on the server. The date and time on the server side (right) should be the same or a bit later than the source side (left). If the source file is earlier, you need to make resend your RE-Worx Dashboard Deployment Manual Page 34 source file to the server. You also need to re-upload the settings file if you just changed it. Click on the setting file in the left window and click the large “Upload” button near the top of the screen. B. Database isn’t set up Go back to steps 8 and 9; make sure you have a database set up (it should show in the Hosting Control Center). Check your Database Information again and make sure it’s what you’re using in your settings file. Repeat steps as needed. C. Database script not imported properly Check your database (step 17) to make sure the database shows around 121 tables. If not, go through steps 10-17 to reinstall the database script. It should overwrite any old files, but if it doesn’t, you may have to delete the database and start back with step 5 again. Site doesn’t start A. It’s a possibility that your big file upload missed some critical file. Let’s check. Launch Free FTP again and check out source files on the server. Make sure you’re in the main server directory – the name over the right file panel will show your server name in brackets. If the file dates in the server (right) window are recent, then the upload may be fine. However, to be certain, you might want to reload everything as in steps 25-27. Remember, it can take over an hour to load. RE-Worx Dashboard Deployment Manual Page 35 . RE-Worx Dashboard Deployment Manual Page 36 User Manual Index: Page 2 Page 3 Page 4 Page 5 Page 6 Introduction Customizing Your Dashboard User Account and Profile Feeds Links & Applications RE-Worx Dashboard User Manual Page 1 Welcome! Welcome to the RE-Worx Dashboard, a virtual instrument panel that you will use to manage the information, communication and other processes of your business. The RE-Worx Dashboard is: • A web-based business application that will allow you to access your Dashboard from any location with an Internet connection. • A knowledge and process management tool that will help you organize the many facets of your business into one place for easier access, control and personal performance. • A user-friendly, virtual desk that is customizable. Here’s a screenshot of the Dashboard. This User Manual will help you customize your Dashboard by adding or removing applications, links, news feeds and other resources to create your personal workspace. RE-Worx Dashboard User Manual Page 2 Customizing Your Dashboard This is your virtual desk, so get it arranged the way you like it! And, like most desk arrangements, you will probably change some things around after sitting there for a while! Some of the content blocks can be moved and/or minimized. There are some blocks that cannot, such as the Top Stories, Featured Video and Calendar! You can move a block if your hovering cursor shows up as a 4-way arrow. Just click and drag the block to another location. The block can be minimized if you see the minus sign in the upper right hand corner of the block. Just click to minimize and then click on the plus sign to open up the block. Now you can add the items that make this Dashboard your personal workspace. The Dashboard is designed to be the central “processing point” for: • Information In: news stories, videos, news feeds, incoming email and social media updates) • Information Out: email and other applications • Information Resources, such as links to all of your information sources • Processes: MLS, applications for forms, transactions, customer records and relationship management and more! The next sections of the User Manual will show you how to remove and add your personal News Feeds, Links and Applications. Helpful Hint: Here’s some information about URLs (internet addresses) that you might need to help you customize your Dashboard… What is a URL? Stands for "Uniform Resource Locator." A URL is the address of a specific Web site or file on the Internet. It cannot have spaces or certain other characters and uses forward slashes to denote different directories. Some examples of URLs are http://www.cnet.com/, http://web.mit.edu/, and ftp://info.apple.com/. How do I find the one I need and copy it to my command box? Go to the page of the website you want. Go up to the address bar at the top of your screen. Right click on the address and click on “Copy.” Then go to the link box, right click and click on “Paste.” Helpful Hint: The Dashboard should be set as the home page when your internet browser is opened. For example, for Internet Explorer users this can be done by 1. Clicking tools 2. Then Clicking internet options 3. Placing the Dashboard URL in the homepage window 4. Click Ok Let’s Get Started! Log in to your Dashboard. Go to http://reworx.nfidev.com/ and login with your user name and password. Now you can update your Account and then edit your Profile, Feeds, Links and Applications. RE-Worx Dashboard User Manual Page 3 To edit your Profile, click "Edit Profile" in the Hello Box. When editing your Dashboard, the following options are available: Account: 1 Full Name 2 E-Mail Address 3 Change Password 4 Upload Picture Profile: 1 E-Mail Providers 2 Social Networks Feeds Links Applications Account Go to this section to change your email address, password or to upload your picture. 1. Click on Edit Profile. 2. Click on the Edit tab. 3. The Account button should show up. If not, click on it. 4. Edit your information as necessary. 5. Click on Save. Profile This section allows you to access all of your email and social media accounts. You will be entering the URL (web address) of the login page for each account. 1. Click on Edit Profile. 2. Click on the Edit tab. 3. Click on the Profile button. 4. Add or edit your information as necessary. You may add more accounts by clicking on the Add Another Item button. 5. Click on Save. Helpful Hint: Sample Social Media accounts: Facebook, Twitter, LinkedIn, YouTube, Active Rain, etc. RE-Worx Dashboard User Manual Page 4 Important Note! When your Dashboard is first created, you will have prepopulated Feeds, Links and Applications. You are free to edit them. It’s easy! The Feeds, Links and Applications blocks will have Edit buttons for easy access to your Profile and edit commands. Feeds The Dashboard is pre-populated with a few news feeds. You may keep these, remove them and add other news feeds that interest you. What is an Aggregator and RSS Feed: RSS feeds are a spam-free, quick and efficient way to read news and weblogs. To get the most out of newsfeeds, you need a powerful aggregator, which lets you organize, search, categorize and use news items just like emails. Helpful Hints: • Whenever you open your Dashboard, the news will default to the feed from the first feed source on your list. • To change the incoming news feed, click on the radio button next to the desired feed and click on the Apply button. To add a feed, go the webpage for the news source (such as CNN news) and look for the orange icon (shown below) or the words “RSS Feed” at either the top or the bottom of the home page. You will then be directed to a page that lists the feed or a selection of feeds. Click on the one you want and copy the URL to enter into your feed setup. Feeds are usually marked by this icon in either the browser URL or physically on the page itself. Helpful Hint: You may want to consider using a feed aggregator to group together your news feeds by topics. For example, you can set up feed aggregations by topics such as real estate news, news, marketing ideas, sports, trend watching, etc. Common feed aggregators include: 1 Google Reader (http://reader.google.com) RE-Worx Dashboard User Manual Page 5 2 3 4 Feed Burner (http://feedburner.com) Netvibes (http://netvibes.com) Yahoo! Pipes (http://pipes.yahoo.com/pipes) Editing or Adding Feed Items: 1 Enter a Feed Title. 2 Enter the Feed URL. 3 Enter how many Headlines you wish to show. 4 Enter the frequency of updates for the Feed. 5 Select if you wish to include an excerpt from each link in the Feed – that will use up more room! Helpful Hints: You may change the order of your feeds by dragging them up or down. Remember, the first feed is your default feed when you open your Dashboard. Links & Applications When a user creates their Profile, they will have pre-populated Links and Applications. Each block has an Edit button, making it easy to add or remove items. Helpful Hint: You can reorder these items (by dragging them up or down) so your favorite ones are at the top of the list. Links: 1. Enter a Link Title. 2. Enter a Link URL. Applications: 1. Enter an Application Title. 2. Enter an Application URL. RE-Worx Dashboard User Manual Page 6 Access Flash Digest: This button will open up a window that will display the Association Flash Digest – a set of folders and files containing everything from member and committee forms, past issues of newsletters and member communications, market statistics reports and more. Password Vault This button will open up a window to the log in page for the online version of your Password vault software. Helpful Hint: An iPhone app icon can be created for mobile access. • Go to the Dashboard in Safari o Tap the + button and then tap Add to Home Screen A screenshot of the current view becomes your icon. • Tapping this icon takes you right to your Dashboard. RE-Worx Dashboard User Manual Page 7 Flash Digest Administrative and Deployment Manual Index: Contents Introduction to Flash Digest ............................................................................................................................................... 2 Setting up your Amazon S3 Account: .............................................................................................................................. 3 Creating the Flash Digest...................................................................................................................................................... 4 Updating the Flash Digest and Creating a bucket with Amazon S3 .................................................................... 4 Synchronizing the Flash Digest to your Amazon S3 Account using GoodSync .............................................. 6 Flash Digest Administrative and Deployment Manual Page 1 Introduction to Flash Digest The Flash Digest is a way for REALTORS® to access all of the up to date information from the Association. When a REALTORs® plugs their flash drive into their computer, all of the information placed on the Flash Digest by the Association is updated onto their flash drive. This information could be market statistics, forms, and other various communication tools and resources from the Association. The Flash Digest will be a valuable asset to any REALTOR® in today’s competitive marketplace. Flash drives have been preloaded with GoodSync2Go and Roboform2Go software packages. The GoodSync2Go software performs the automatic synchronization process of up to date files to take place every time the REALTOR® plugs the flash drive into a computer with internet connection. In addition, a top rated password vault software program also preloaded on the flash drive, will store all usernames and passwords for the user. These helpful step by step video tutorials will give you an interactive approach to learning how the Flash Digest works: Flash Digest for Windows 7 Users: http://www.youtube.com/watch?v=Ti-3ovPOie0 Flash Digest tutorial video for all other operating systems: http://www.youtube.com/watch?v=wPiLESxSsYM Roboform (password vault) tutorial video: http://www.youtube.com/watch?v=1jqnY8vizeg Flash Digest Administrative and Deployment Manual Page 2 Setting up your Amazon S3 Account: In order to begin creating a Flash Digest, an Amazon S3 account will need to be created first. Go to http://aws.amazon.com/s3/ in order to get to the page to set up your S3 account Be sure to check that you are a new user and follow the instructions to set-up your S3 Account. Flash Digest Administrative and Deployment Manual Page 3 Creating the Flash Digest A folder needs to be created on a drive on your computer that will contain your “flash digest.” Inside of this folder you can add multiple sub-folders in which data can be stored. Updating the Flash Digest and Creating a bucket with Amazon S3 There are two ways to update the flash digest. One way which will be shown below is using strictly the Amazon S3 platform and the other way is by using the GoodSync software. Using strictly the Amazon S3 platform the user will click Go to sign into the Amazon S3 Platform. This will then bring the user to a new screen where they can create there Amazon S3 bucket. They can do so by clicking the Create Bucket button. Flash Digest Administrative and Deployment Manual Page 4 Then this window will appear in which the user will add in their custom name for the Flash Digest and click Create. After this has been completed, the user will click on the bucket name on the left side of the window. They can then upload their Flash Digest folder from a drive on their computer. Flash Digest Administrative and Deployment Manual Page 5 Synchronizing the Flash Digest to your Amazon S3 Account using GoodSync For users who will not be using Amazon S3, this will show how to update the Flash Digest using Good Sync software with AmazonS3. After an Amazon S3 account (or a similar information holding cloud) has been created, a bucket for your files will need to be created. Begin by signing into your account. Following this you will click on Security credentials to obtain your Access Key ID and your Secret Access Key Following this, two different windows will need to be opened in order to perform the transfer of your data from the Amazon S3 Cloud to the Flash Digest. The first step will be to have the GoodSync2Go window up along with being signed into your Amazon S3 account on your browser. Flash Digest Administrative and Deployment Manual Page 6 Click on the browse buttons on the left side to find the Amazon S3 bucket. After clicking the browse button a window will appear. Flash Digest Administrative and Deployment Manual Page 7 Click on the My Computer button to access your drives and in this case it is on the (R:) Drive. After this locate your Flash Digest folder and click Ok. It will bring you back to the GoodSync screen shown below. You will now need to configure the other folder by clicking on the browse button. After clicking browse, the same window as before will appear, but in this case click on Amazon S3. Click on the Amazon S3 Button and enter in your AccessKey ID and Secret Key which can be found on your Amazon S3 account (Your browser should be open to this). After this, click on the Go button to access your bucket. Flash Digest Administrative and Deployment Manual Page 8 After clicking go, highlight your bucket and then press Ok. Flash Digest Administrative and Deployment Manual Page 9 You will then be brought back to the Good Sync window. With these credentials in place click on the analyze button on the left side of the window. After this has been completed, click on the Sync button. Your AmazonS3 account has now been updated for members to obtain the most recent Flash Digest. Flash Digest Administrative and Deployment Manual Page 10 Flash Digest User Manual Index: Contents Introduction:.............................................................................................................................................................................. 2 GoodSync2Go and Roboform2Go Software Start Up ................................................................................................ 2 RoboForm Advanced Set up ................................................................................................................................................ 3 RoboForm Online Backup .................................................................................................................................................... 3 GoodSync2Go and Roboform2Go Tutorial Videos ..................................................................................................... 5 Support ........................................................................................................................................................................................ 5 Flash Digest Manual Page 1 Introduction: The Flash Digest is a way for REALTORS® to access all of the up to date information from the Association. When a REALTORs® plugs their flash drive into their computer, all of the information placed on the Flash Digest by the Association is updated onto their flash drive. This information includes market statistics, forms, and other various tools and resources from the Association. The Flash Digest will be a valuable asset to any REALTOR® in today’s competitive marketplace. Flash drives have been preloaded with GoodSync2Go and Roboform2Go software packages. The GoodSync2Go software performs the automatic synchronization of files every time the REALTOR® plugs the flash drive into a computer with internet connection. In addition, RoboForm2Go (a top rated password vault software program also preloaded on the flash drive) will store all usernames and passwords for the user. GoodSync2Go and Roboform2Go Software Start Up The GoodSync2Go software on this flash drive will automatically update your Flash Digest with the latest information. 1. Insert flash drive into USB port. 2. A window will appear with: Launch Flash Digest highlighted. 3. Press Ok. 4. An auto-synchronization will run giving you the most up to date files. 5. When this is complete click on the start button in the bottom left of your desktop. 6. Click on MyComputer then click on FlashDigest to view/access the files. 7. To view the flash digest double click on the Flash Digest folder. 8. Click on the Portable Roboform Folder to activate the Roboform (Windows 7 users). (Windows 7: disregard steps 2-4 and begin with 5) You will also need to open the GoodSync folder and click on the GoodSync2go icon to run the auto synchronization.) Flash Digest Manual Page 2 If you have any questions email [email protected] RoboForm Advanced Set up Roboform will automatically start on all operating systems other than Windows 7. Follow the directions above to launch Roboform. Once Roboform has launched, the most basic way of using it is to use your computer as you normally would. Upon the entry of a username and password and clicking login, the Roboform will automatically pop-up a window. Choose a passcard name. For example, RE-Worx Dashboard. By checking the password protect button, this window will appear. This is important to do for accounts that have very sensitive information like bank accounts and emails. A master password will be needed to access all of your logins and passwords upon the start-up of your computer. This master password will be your one password to remember in order to access all of your passwords. Technical support cannot help you retrieve this password RoboForm Online Backup- How to Set Up Online Back-up Account If you do not have your flash drive you will still be able to access your password vault via the online password vault. First, begin by clicking on the password vault icon on the dashboard or going to https://online.roboform.com/login. Flash Digest Manual Page 3 After this has been done a screen will appear asking you to login with your master password. If you have not created on online account yet you must do so. After the creation of your online RoboForm Account you will be able to access your logins and passwords without your flash drive. It is important to keep both up to date and in order to do so click the Sync button in the toolbar section of your desktop. Following the steps below will allow users to keep their passcards synchronized between Roboform2Go and RoboForm Pro. 1. Sign up for a RoboForm Online account (https://online.roboform.com/signup) 2. When RoboForm2Go is running: a. Right Click the RoboForm icon and go to Tools -> Sync RoboForm Data b. Enter your newly created RoboForm Online account credentials 3. When RoboForm is running without RoboForm2Go inserted: a. Right click the RoboForm icon and go to Tools -> Sync RoboForm Data b. Enter your newly created RoboForm Online account credentials 4. Enjoy having access to your passcards everywhere! Flash Digest Manual Page 4 GoodSync2Go and Roboform2Go Tutorial Videos These helpful step by step video tutorials will give you an interactive approach to learning how to use your flash drive: Flash Digest for Windows 7 Users: http://www.youtube.com/watch?v=Ti-3ovPOie0 Flash Digest tutorial video for all other operating systems: http://www.youtube.com/watch?v=wPiLESxSsYM Roboform (password vault) tutorial video: http://www.youtube.com/watch?v=1jqnY8vizeg Support For all other questions email [email protected] or call 386-774-6433. Online tutorials and troubleshooting can be found here http://www.roboform.com/support/overview Flash Digest Manual Page 5