1
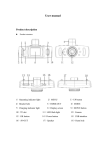
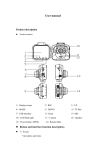
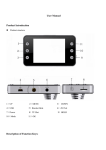
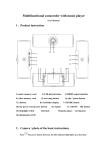
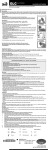
Button and interface function description:
6048 HD User manual
l
1) UP button - Short press on this button to move up within menu commands
Choose up function in MENU item
l
2)MENU button- Short Press to access all function settings such as Resolution,
Loop recording etc or press menu again to enter Date/Time, Formatting etc
l
3)DOWN button - Short press on
this button to move down within menu
commands. Choose down function in MENU item
l
4)USB data interface - Connect PC for Data transfer
Connect external power to charge battery or provide working power.
l
5)Camera lens - 160° wide-angle Lens;
l
6)Speaker - Video playback, voice monitor, operating sound warning
l
7)OK button - Confirmation button for video recording and taking photo;
In recording mode, press this mode to start video recording, re
-press to
stop;
In photo mode, short press to take photo. In menu mode means Confirmation
button.
1)UP button
4)USB interface
7)OK button t
10)Display screen
13)Bracket hole
2)MENU
5)Camera
8)MODE
11)TF slot
14)Reset hole
3)DOWN button
l
Playback
6)Speaker
9)Power button
12)LED flash light
8) MODE - Short press on this button to shift modes between Video, Camera and
l
10)Screen - 3.5cm LCD window
l
11)TF slot - Slot for memory card . NB. Insert SD c ard with text facing front of
15)MIC
camera. Do not force in case you have attempted to insert back to front. Once in,
the card can easily be removed by pressing finger nail onto top o f card and spring
loaded insert then releases. Cover this slot with hand in case SD card ejects too
NB. If your LCD screen appears scratched or dirty, your camera
has a thin protective film protecting your LCD screen and
sometimes a lens cover. You can peel back either via tabs or use
fingernail in corner of screen and peel back.
quickly.
l
12)LED light - Night vision
l
13)Bracket hole - Install vehicle bracket hole
l
14)Reset slot - Use this to restart when crash
l
15)MIC
Special function description
Long press on “power on/off” button to start, Indicator
l
power on
MENU button
light will shine when
Once you have pressed the Mode button and entered into say Video mode, then Short
Then long press again on “power on/off” button to shutdown and the indicator
press on Menu button to show function setting s. Within this setting you can now
light go out
update the default settings and adjust Resolution, Loop Record times, whether Motion
Notice: video instrument will automatically power off after waning of low battery
Detection is on or Off, whether you want G -Sensor setting to be high or low etc etc.
Press menu again to enter the next window
l
Short press on “M” button shift to REC mode, REC icon is on the top left corner
– Status window shows shape of a
Short press on “OK” mode to start recording, flashing red dot on REC icon
‘Spanner’. Within this window, you can now set Date/Time, Format, Languages etc.
indicate the recording is on the way
If you pressed Mode a couple times, you may have a camera icon top left. To adjust
these settings, follow above instructions but only if you haven’t already adjusted all
REC mode
l
Photo mode
Short press on “M” button shift to photo mode, an photo icon is on the top left
the settings whilst in the Video mode menu.
corner
Then short press on “OK” button to take a photo, screen flash one time means
Within this section, its important once your SD card has been inserted into TF slot that
photo completed
you Format your camera. Follow step above and within Spanner settings, move cursor
l
Video/photo playback
down until Format option appears. Click Yes to format. This takes a couple seconds.
Short press on “M” button, shift to playback
Now your camera is Ok to begin recording,or taking photographs
mode, playback icon is on the top
left corner
Short press on up key to choose files
l
G-sensor function
Short press on down key to choose files
When gravitational acceleration reach 6g(1g=9.80m/s), machine will save
Short press on “OK” button to play the selected video files
present video as undeletable files
playback mode aqnd watching a video, should you wish to erase, press the Menu
Automatic power on/off function
l
Support recording Start and shutdown synchronization with Auto and save the
video files After connect to the car power supply
l
Seamless loop recording, don’t leak second
l
SOS
Short press "M" to lock current video whilst recording or photograph
. Once you are in
key and a delete or save option will appear. Move up or down button an
d then
push Ok.
l
Menu setting
Short press on “menu” mode, enter video set status, and now the background icon
top left is yellow in “video icon” column; then press “M” button again shift to set
status, the “set icon” column background is yellow.
In the setting items, press on up or down keys to shift up and down in sub items ,
REC/photo operation specifications
l
Power on/off
then press “OK” button to set sub items.
Short press on “MENU” or “MODE” button can exit the setting status
l
Time settings
Short press “MENU” button to enter “setting status”, here sh ort press on ‘m enu”
button to set menu. Scroll up or down within menu settings to choose date time
items, short press “OK” to enter, short press on “
l
automatically off when charging completed.
1. Use USB power adapter to charge via 240 volt (not supplied)
OK” button can make shifts
among y/m/d/h/m/s. Press “OK” button to confirm modification.
Camera settings
Short press “Mode” button to enter Camera mode. Within this setting, if you haven’t
already set some of your camera functions, press Menu and
adjust any
scroll up and down and
of the default settings such as: Capture mode,
resolution, quality,
2. Use PC-USB cable to charge (supplied)
3. Use car power to charge (supplied)
Notice: Video instrument can only use 5V car power supply, or it may cause device
sharpness, ISO, Anti shaking, Quick review etc etc . As you adjust each setting, then
damage.
press the Ok button to confirm and move to next menu option.
This products Car charger can only be used in 12V/14V
USB mode
Remark: If involved in a crash or perhaps you drop camera and screen becomes static
Separate USB cable and computer, press “power on” button, car DVR will automatically
or malfunctioning, simply insert a paper clip into Reset hole on top of camera. Switch
camera on and off. This usually fixes
show USB menu, two mode areavailable:
any issues unless camera broke on impact
internally or externally Warranty would not apply.
1:USB-Disk
In this mode we can access video files and photo files
l Products specifications
2:PC-Camera
In this mode USB video equipment are shown, can take photo or make video chat
Features
HD camera, HD video recording
G-sensor
Built-in (car accident case of emergency save, will not be
deleted)
Battery instruction
l
LCD screen size
Battery indication image:
camera
1.5LTPS
160 A + grade high-resolution ultra wide-angle len
Russian, Japanese、French, Italian, German, spanish, English,
Language
Full battery
slightly low battery
low battery
Chinese (simplified), Chinese (Traditional), Korean, etc…
battery empty
There are three methods to charge, the red indicator light up when charging, the entire
charging time is about 180 minutes, and the red indicator light
Files format
AVI
Resolution
Max 1080P
Recording video format
M-JPEG
Continuous loop video
seamless loop recording, don’t le
ak second
Automatically power
Support auto ignition boot, turn off shutdown
on/off
Motion Detection
Time synchronization
Carrier media
Unclear video
Checks if there are any dirt or fingerprint; and use lens paper to clear
the camera Len.
l
Black image when recording sky or water scene
Scenes with big contrast will influence the automatic exposure
function of camera; you can adjust “EV in setting mode to correct.
l
Color is not perfect in cloudy day and outdoor light
Set the “white balance” function to automatic
l
cross stripe interference in image
Because of wrong “light frequency”, please set it to 50Hz or 60Hz
according to the local power supply frequency
l
Crash
Support (Y/M/D/H/M)
Built-in memory ( total:64MB)
5million
Photo format
JPEG
Memory card
TF (max 32GB)
MIC
Support
Built-in stereo
Support
Infrared night vision
Support
Video output
AV-OUT/HDMI
Video format
PAL/NTSC
Current frequency
50HZ/60HZ
1:USB-Disk
USB function
2:PC-Camera
Battery
l
supported
Photo mode
Power interface
function to format your TF card
5V 800ma
Built-in 800mAh
Trouble shooting:
Ø
For problems in normal operating situation ,please try these methods
below:
l
Can’t take photo and recording
Check the if the TF card has enough space or locked
l
Automatically stop when recording
Use the compatible high -speed TF card with SDHC bec ause of big HD video
data, the high-speed TF card have identifying of C4 and C6
l
Appear “files error” when replay photo or video
Uncompleted files because of TF card storage error, please use formatting
function to format your TF card
Restart by pressing shortly on” RESET” button after crash