1
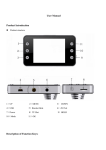
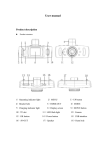
Produce Features
Gs8000 HD User manual
l
l
l
l
l
l
l
l
l
140 degree Ultra High-definition wide angle lens
1920 x 1080P FULL HD resolution
4 x digital zoom, Range 12cm to infinity distance
6.5cm LCD screen
Support night vision with 4 LED lights
Support HDMI full HD video transmission
Video can switch 3 kinds of resolution
30 to 60 frames per second
G-sensor function saves current video
l
l
Automatic recording when car start
Automatically loop recording, recording time can
be set for each file.
Time and date display, re-boot without re-setting
Charge through the USB port
Support watching while shooting and one-key
play back function.
The maximum support 32GB TF high-capacity
storage devices.
l
l
l
LENS (140* WIDE ANGLE)
UP
POWER
l
TF CARD
SLOT
Button and interface function description:
l UP button - Short press on this button to move up within menu commands
Choose up function in MENU item
l MENU button- Short Press to access all function settings such as Resolution,
Loop recording etc or press menu again to enter Date/Time, Formatting etc
l DOWN button - Short press on this button to move down within menu
commands. Choose down function in MENU item
l USB data interface - Connect PC for Data transfer, car charger DC port or
connect external USB power adapter to charge battery
l Camera lens - 140° wide-angle Lens;
l Record button – (bottom right) Confirmation button for video recording, taking
photos and general confirmation button whilst in Menu settings.
l MODE - Short press on this button to shift modes between Video, Camera and
Playback
l Screen - 6.5cm LCD window
l TF slot - Slot for memory card. NB. Insert SD card with text facing back of
RECORD
MODE
DOWN
camera. Do not force in case you have attempted to insert back to front. Once in,
SPEAKER
l There are three methods to charge, the red indicator
the card can easily be removed by pressing finger nail onto top of card and spring
l light up when charging, the entire charging time is
loaded insert then releases. Cover this slot with hand in case SD card ejects too
RESET
l about 180 minutes, and the red indicator light
NB. If your LCD screen looks scratched or dirty, your camera
l automatically off when charging completed.
has a thin protective film protecting your LCD screen
and sometimes a lens cover. You can peel back either via tabs
1. Use USB power adapter to charge via 240 volt
or use fingernail in corner of screen and peel back.
(not supplied)
Product Description
This product is developed with the latest science and technology
to design a high-definition camcorder. It is not only to be used as
a regular HD camera, but also a professional HD Car DVR. It
can both record 1920 x 1080P high-definition video and take up
to 12 mega pixels photos. TF card is used as its storage
device. This DVR is compact, power-saving and portable.
By comparing with traditional Camcorder record high-definition
and video file can be transferred by HDMI to a high definition
LCD TV
quickly.
l LED light - Night vision
l Bracket hole - Install vehicle bracket hole
l Reset slot - Use this to restart when crash
l MIC
2. Use PC-USB cable to charge (supplied)
3. Use car power to charge (supplied)
Special function description
l
l
Support recording Start and shutdown synchronization with Auto and save the
video files After connect to the car power supply
l
Seamless loop recording, don’t leak second
l
SOS
MENU button
Once you have pressed the Mode button and entered into say Video mode, then Short
press on Menu button to show function settings. Within this setting when you push the
Short press "Mode" to lock current video whilst recording or photograph
up or down buttons you can now alter settings within Resolution , Loop Record times,
whether Motion Detection is on or Off, whether you want G-Sensor setting to be high
or low etc etc. Once you have determined which setting best suits you, press the
REC/photo operation specifications
Record button to confirm that setting. Press menu again to enter the next window –
l
Power on/off
Status window shows shape of a ‘Spanner’. Within this window, you can now set
Long press on “power on/off” button to start, Indicator light will shine when
Date/Time, Format, Languages etc by following above process.
power on
Then long press again on “power on/off” button to shutdown and the indicator
If you pressed Mode a couple times, you may have a camera icon top left. To adjust
light go out
these settings, follow above instructions but only if you haven’t already adjusted all
Notice: video instrument will automatically power off after waning of low battery
the settings whilst in the Video mode menu.
l
REC mode
Short press on “Mode” button to shift mode options - Video, Camera or Playback
Within this section, before you begin any recording, its important once your SD card
mode and press Record to activate any of these modes. Push the Record button
has been inserted into TF slot that you Format your camera. Follow step above and
within Spanner settings, move cursor down until Format option appears. Click Yes to
again to end Video or to take Photos.
l
Video/photo playback
format. This takes a couple seconds. Now your camera is Ok to begin recording,or
Short press on “Mode” button, shift to playback mode, playback icon is on the
taking photographs
top left corner
Short press on up or down keys to choose files
l
Short press on “Record” button to play the selected video files. Once you are in
G-sensor function
playback mode and watching a video, should you wish to erase, press the Menu
When gravitational acceleration reach 6g(1g=9.80m/s), machine will save
key in which a delete or save option will appear. Move up or down button and
pres ent video as undeletable files. You can select with level of G Sensor
then push Record to confirm deletion or save.
suits you
Automatic power on/off function
l
Menu setting
Short press on “MENU” or “MODE” button can exit the setting status.
Operation Instructions:
Product Parameter
l Built-in 3.7V/300MAh high capacity battery
l 12V/24V car charger
Connect the device with car charger, so that when the car starts, this DVR will
automatically start recording; when car is turned off, it will automatically stop
recording and save the recorded files.
Tips: Please charge this device with standard car charger (as provided) , otherwise, it
may cause damage to the device.
l Use of storage card
1. Make sure the TF card insertion direction. If the direction of insertion is incorrect,
it may damage the device and TF card;
2. Please use high-speed TF card with SDHC specifications. There will be the sign of
C4 or C6 on high-speed TF card but brand name Class 10 SD cards recommended.
3. The initial use of the memory card in the device: please operate formatting in the
device first.
Reset the system: used to set the system parameter to be original value. Insert paper
clip into hole to reset, then switch off and on again.
Automatic shutdown: used to set the automatic shutdown when stop recording.
Frequency: used to select the frequency of the power line, if you choose the wrong
light frequency, the image will appear horizontal stripes interference.
Automatic off-screen: set the time of automatically off-screen, press any key to wake
up the LCD screen
Acceleration sensor: For monitoring vehicle exercise of collision, if there is a
collision, then automatically trigger a mandatory save function and a lock symbol
appears at the lower left corner. The file is saved and will not be removed by loop
recording. G-sensor sensitivity settings have cancel/1/2/3/4/5/6/7/8 of nine options,
when setting is set to be cancel, automatically trigger file protection function cancels.
Impact strength 1 is the lowest and 8 is the maximum (To avoid card size influence
video recording, the total size of locking document limit 1G)
File Protection function: during the recording process, press the mode button to
manually force protection function; in the protected state, press the mode button to
cancel mandatory save function; if in the playback state, short press open key to force
protection or lifting force protection currently selected document.
Zoom
4 time digital zoom
Screen
2.7 inch TFT LCD
AV(CVBS) composite television signal output
Video output
NTSC/PAL, TV HDMI output, Max1920*1080P
Audio
Built-in MIC
Memory
Support max 32GB TF card
Photo
JPG; Max 12 M pixels
Shutter
Electronic shutter
Fill light
Electronic infrared fill light
Battery
300mAh, 3.7v, lithium ion polymer battery
Solution for Problems:
Under normal operating conditions, if there is problem with the device, please refer to
the following methods to solve:
1. Photograph and shooting: check if TF card has sufficient space.
2. Automatically stop when recording video: due to huge amount of data of highdefinition video, please use SDHC compatible high-speed TF card. There will be a
sign of C4 or C6 on high-speed TF card. Format the TF card on the device before you
use it.
3. No image displayed on high-definition television: confirm if AV, HDMI cable plug
is connected with television correctly; check if the TV signal is in the state for AV and
HDMI connection.
4. Image blur : please check if there is stain, fingerprints on the lens; clean the lens
before recording.
5. Horizontal stripes interference: it is due to set the wrong light frequency, please set
according to the local power supply frequency: 60HZ or 50HZ