1
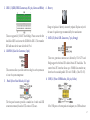
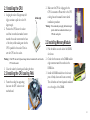
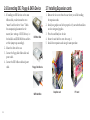
2.1 Installing the CPU
1. Angling the rod to 65-degree may feel
tight, continue to pull the rod to 90degree angle.
2. Position the CPU above the socket
such that its notched or marked corner
matches the socket corner near the base
of the lever, while making sure that the
CPU is parallel to the socket. Then insert the CPU into the socket.
Actual angle
Warning: If the CPU does not fit, please change the insert orientation. Do not force the
CPU into the socket.
3. Close the socket by lowering and locking the lever.
2.2 Installing the CPU cooling FAN
1. Fasten the cooling fan supporting
base onto the CPU socket on the
motherboard.
2. Make sure the CPU fan is plugged to the
CPU fan connector. Please refer to the CPU
cooling fan user’s manual for more detail
installation procedure.
Warning: We recommend you to apply the thermal tape to
provide better heat conduction between your
CPU and cooling fan.
2.3 Installing Memory Module
1. Push the latches on each side of the DIMM
slot down.
2. Check that the cutouts on the DIMM module
edge connector match the notches in the
DIMM slot.
3. Install the DIMM module into the slot and
press it firmly down until it seats correctly.
The slot latches are levered upwards and latch
on to the edges of the DIMM.
2-1


![600A01-manual-V1[1]](http://vs1.manualzilla.com/store/data/005768384_1-b36f8a87433f2b6e700f051b34ad2f22-150x150.png)