1
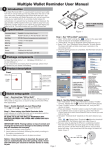
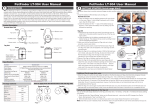
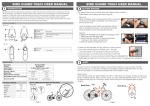
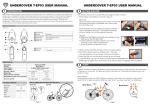
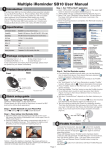
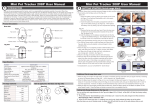
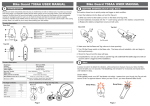
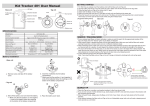
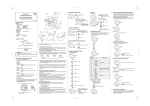
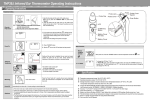
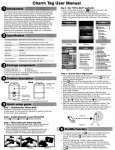
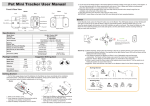
VoyagerBlue24 USER MANUAL SPECIFICATION OVERVIEW VoyagerBlue24 USER MANUAL GETTING STARTED VoyagerBlue24 is a digital wireless device with proximity alarm and e-Pickpocket shielding capabilities. It has been specifically designed to HELP PREVENT the theft of your personal identity from contactless technology documents or the loss of your essential documents such as: Passports, ePassports, credit and ID cards.There are three "Alarm / sensitivity modes" each can be individually selected as: High, Medium, or Low from the base unit. Once the tag is out of range, the base unit will trigger an alarm at 95db OVERVIEW 1. Insert batteries in to base and the tag unit in accordance with the battery installation Instructions illustrated. BE SURE TO SLIDE TAG UNIT BATTERY BETWEEN THE UPPER AND LOWER BATTERY CONTACTS. IMPORTANT NOTE: Placing battery on top of contact and closing the lid will cause damage to the battery terminal and will invalidate the warranty. - Base unit The Base Unit - Tag unit side facing upwards Back Front Key Chain Speaker Status LED Setting button 5 Power switch 6 Battery cover 1 2 3 4 2 3 4 6 Sound output Shows the signal status and range setting condition Set desired alert range (Default is set to Near range) Power ON/OFF 1 5 Front Back 1 2 Show the signal synchronous status between Base and Tag unit 1 Status LED 2 Power switch 3 Battery cover Power ON/OFF 2 2 3 CR2016 1 2 3 The 3 Tag Unit 1 1 CR2032 Slide out the battery cover. Insert batteries (included) following the polarity markings in the battery compartment. Close the battery cover back to its place as shown. side facing upwards 2. Switch the power button of the base unit and the tag unit to the "ON" position. Connection between both units may take up to 16 seconds. Once connected the device is ready for use and is set to sensitive mode. 3. Press the setting button to set the desired alert range. The default setting is: High sensitivity RED LED - Medium Sensitivity ORANGE LED – Low Sensitivity GREEN LED. To select the sensitivity mode: hold setting button for 3 seconds. The status LED will change colour from Red (High sensitivity ) to orange (medium sensitivity) to Green (low sensitivity) to Red (high sensitivity ). Simply release the button when the desired alert sesnsitivity colour is illuminated. 3 SPECIFICATION VoyagerBlue24 Model Name Function High(Red LED) Alarm Sensitivity Devices Battery Type Battery Life Time with Standby Beep Sound (at 10cm/3.9inch) Dimension (L/W/H) Alert : 5±2m/16±6ft Medium(Orange LED) : 10±3m/32±10ft Low(Green LED) : 20±6m/64±20ft Tag(S09) Base(M08) CR2032x1 CR2016x1 60 days ( with 8 hours/day) 95db±3(db) No Sound 61.5x36x11.6mm 50x30x3mm 2.42x1.42x0.46inch 1.96x1.18x0.12inch When most sensitive mode is selected care must be taken to avoid signal blocking by the human body. It will help to set the transmitter tag and alarm base unit on the same side of the body. 4. For more detailed information on "How to tips" and where we recommend setting the shield and proximity alarm device see separate page on reverse of VoyagerBlue24 Picture Manual.Or visit www.voyagerblue.co.uk. ALWAYS REMOVE BEFORE INSPECTION BY AN AUTHORIZED PERSON. If storing inside a wallet or purse ensure the shielding device is on the outside of the credit / ID card to be protected with the non protected side closest to your person. Attach the base unit to a garment or article of clothing which you are not going to take off whilst the device is in use. RANGE ALERT If the Base unit makes a high frequency beeping tone, it means the distance between the Base unit and the Tag unit is over the selected sensitivity range. SUGGESTED SETTING PLACE Base Unit Tag Unit Important Notes: 1. When stored inside the wallet as illustrated. THE WALLET MUST NOT BE STORED IN BACK POCKET AS THIS COULD RESULT IN DAMAGE TO THE TAG UNIT INVALIDATING THE WARRANTY. 2. When placing the Tag unit into a wallet and then inserting into a front pocket always locate Base unit on to the same side of your person selecting the sensitivity which best suits the environment and your needs. Page 1 Alarm from Base unit Once both units come back in to range the alarm beep will stop sounding. Over the selected sensitivity range an audible 95dB alarm will sound Page 2 VoyagerBlue24 USER MANUAL WAKE UP / SLEEP MODE VoyagerBlue24 USER MANUAL CARE AND MAINTENANCE a.) Switch on the tag and then base units to start the wake up and connection process. While the base unit establishes contact with the tag, the status lights will blink This can take from 6-16 seconds, assuming the tag is in range and the signal not blocked. b.) When the tag and base unit are synchronized, the device is ready for use. If the base unit fails to establish a connection with the tag within 20 seconds (for example, due to the tag being out of range or blocked), the base unit will emit a single beep and enter “sleep mode” indicating a lost signal. To exit the sleep mode, the user should switch off both units, and restart the wake-up process. c.) After successfully synchronizing (connecting) the Tag unit LED blinks once every two seconds whilst the base unit blinks twice every two seconds Important Note: In order to conserve battery life, the Base & Tag unit should be switched off when the proximity alarm function is not required. OUT OF RANGE / LOST SIGNAL a.) The base unit beeps and the signal LED blinks for 20 seconds when out of range or an item becomes lost. After this 20 second period the base unit will automatically enter a temporary sleep mode. b.) The base unit beeps for a period of 20 seconds every two minutes when in the Out Of Range / Lost Signal (Sleep) mode. This is a reminder for the user to switch the unit off in order to conserve base unit power and battery life. c.) Once you are aware of a lost or out of range status ensure you switch the base unit off to conserve battery power.Once the signal range as been resumed or the lost item recovered, re-arm the base and tag unit by following the power on procedure described in this manual. If preferred, the base unit can be left switched on when an alarm status is sounded as the base unit will stop sounding when the Tag unit is back within range, however, continuous periods of alarm sounding will significantly reduce battery life. LOW BATTERY When either the base or Tag unit are under low battery power status the Base unit sounds : • One beep every two minutes indicating a Base unit low power status. • Two beeps every two minutes indicating a Tag unit low power status. Important: Under low battery conditions the base unit may emit abnormal / false alarms. FREQUENT ASKED QUESTIONS Q. What conditions can cause false alarms? A. False alarms are caused by following reasons: 1. Low battery power will cause unpredictable behavior. 2. Unit has been blocked by human body, or Other obstruction. a). VoyagerBlue is an AID to the prevention of identity theft or loss of personal items. In the event that either takes place we can not be held responsible for, or have claims made against us for such loss. b). Alert range depend on the terrain and environment. c). If the beeping sound is not loud enough, the batteries may be low. Change with new batteries for louder alarm sound. d). Using any radio frequency transmitting device is forbidden in-flight. We therefore, recommend you comply with all flight safety rules and regulations. e). We reserve the right to change the specification of the hardware and software at any time and without prior notice. Information in this document is subject to change without notice. f). This product operational temperature is between 14℉ ~140℉(-10˚C~60˚C). Storage Temperature is between -4℉~185℉(-20˚C~85˚C) . Recycle: The Batteries provided in this product should be recycled to protect the local environment. Please contact you local environmental / local recycling authority for full details. Warning: Do not put the batteries into the fire or heat sources. It may cause danger or even explosion. FCC CERTIFICATIONS Federal Communication Commission Interference Statement This equipment has been tested and approved to comply with the limits of a Class B digital device, pursuant to Part 15 of the FCC Rules. These limits are designed to provide reasonable protection against harmful interference in a residential installation. This FCC Certified piece of equipment generates, uses and can radiate radio frequency energy, if installed and not used in accordance with the instructions, It may cause harmful interference to radio communications. However, there is no guarantee that interference will not occur in a particular installation. If this equipment does cause harmful interference to radio or television reception, which can be determinedly turning the equipment off and on, the user is encouraged to try to correct the interference by one of the following measures: ■ Reorient or relocate the receiving antenna. ■ Increase the separation between the equipment and receiver. ■ Connect the equipment into an outlet on a circuit different from that to which the receiver is connected. ■ Consult the dealer or an experienced radio/TV technician for help. This device complies with Part 15 of the FCC Rules. Operation is subject to the following two conditions: (1) This device may not cause harmful interference, and (2) this device must accept an interference received, including interference that may cause undesired operation. FCC Caution: Any changes or modifications that are not expressly approved by the party responsible for compliance could void the user's authority to operate this equipment. Q. Why is the range alarm distance not consistent? A. Because radio signal strength and signal refection are affected by the environment. Users may need to adjust range to compensate for environment factors. Page 3 Page 4