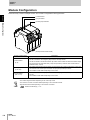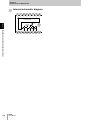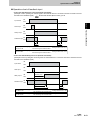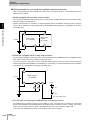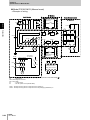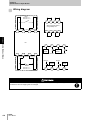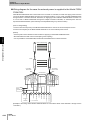
1
User's Manual Safety Controller J224I-E-01 Original instructions Introduction Thank you for purchasing the F3SX Series Safety Controller (hereinafter referred to as the “F3SX”). This is the instruction Manual describing the use of F3SX. Always heed the following points when using the F3SX: • Be sure to have F3SX be handled by a "Responsible Person" who is well aware of and familiar with the machine to be installed. • The term "Responsible Person" used in this Instruction Manual means the person qualified, authorized and responsible to secure "safety" in each process of the design, installation, operation, maintenance services and disposition of the machine. • It is assumed that F3SX will be used properly according to the installation environment, performance and function of the machine. Responsible Person should conduct risk assessment on the machine and determine the suitability of this product before installation. • Read this Manual thoroughly to understand and make good use of the descriptions before installing and operating the product. • Keep this Manual at the place where the operator can refer to whenever necessary. (Be sure to read it thoroughly.) Introduction ÇÕǹÇ?Ç… Introduction Precautions in using the Product Chapter ëÊ 1 èÕ1 Chapter 1 Outline Chapter 2 Specifications of Main Module Chapter ëÊ 2 èÕ2 Chapter 3 Specifications of Output Module Chapter ëÊ 3 èÕ3 Chapter 4 Specifications of Input Module Chapter ëÊ 4 èÕ4 Chapter 5 Installation and Wiring Chapter 5 Chapter 6 Appendix Chapter 6 User’s Manual Safety Controller Model F3SX Series Introduction Introduction Precautions in using the Product Precautions in using the Product Legislation and Standards • In Japan, "Type Test" requirements are provided in Article 44 of the Industrial Safety and Health Law. These requirements apply to complete systems, and can not be applied to a controller by itself. Accordingly, in order to use the F3SX controller in Japan as a "Safety device for press machine or shearing tool" pursuant to Article 42 of the above-mentioned law, it is necessary to apply for testing of the entire system. • In Europe, the F3SX controller is subject to the European Union (EU) Machinery Directive Annex V, Item 2 and 4. • We have obtained the following certificate of TÜV-SÜD for F3SX. 1) EC Declaration of Conformity OMRON declares that F3SX is in conformity with the requirements of the following EC Directives: - Machinery Directive 2006/42/EC - Low Voltage Directive 2006/95/EC - EMC Directive 2004/108/EC 2) European standards EN61508 (SIL1-3), EN ISO13849-1:2008 (Cat.4 PL e), EN61496-1 (Type4 ESPE), EN50178, EN55011, EN60204-1, EN61000-6-2, EN61000-6-4, EN1760-1, EN574 (Type IIIC), EN1088 3) International standards IEC61508 (SIL1-3), IEC61496-1 (Type4 ESPE), IEC60204-1 • We have obtained the following certificate of UL for F3SX. -Listing certificate for the safety standards of USA and Canada. UL508, UL1998, UL61496-1 (type4 ESPE), CSA C22.2 No.14, CSA C22.2 No.0.8 2 F3SX User’s Manual Introduction Please read and understand this manual before using the products. Please consult your OMRON representative if you have any questions or comments. WARRANTY OMRON's exclusive warranty is that the products are free from defects in materials and workmanship for a period of one year (or other period if specified) from date of sale by OMRON. OMRON MAKES NO WARRANTY OR REPRESENTATION, EXPRESS OR IMPLIED, REGARDING NONINFRINGEMENT, MERCHANTABILITY, OR FITNESS FOR PARTICULAR PURPOSE OF THE PRODUCTS. ANY BUYER OR USER ACKNOWLEDGES THAT THE BUYER OR USER ALONE HAS DETERMINED THAT THE PRODUCTS WILL SUITABLY MEET THE REQUIREMENTS OF THEIR INTENDED USE. OMRON DISCLAIMS ALL OTHER WARRANTIES, EXPRESS OR IMPLIED. Introduction Precautions in using the Product READ AND UNDERSTAND THIS MANUAL LIMITATIONS OF LIABILITY OMRON SHALL NOT BE RESPONSIBLE FOR SPECIAL, INDIRECT, OR CONSEQUENTIAL DAMAGES, LOSS OF PROFITS OR COMMERCIAL LOSS IN ANY WAY CONNECTED WITH THE PRODUCTS, WHETHER SUCH CLAIM IS BASED ON CONTRACT, WARRANTY, NEGLIGENCE, OR STRICT LIABILITY. In no event shall responsibility of OMRON for any act exceed the individual price of the product on which liability is asserted. IN NO EVENT SHALL OMRON BE RESPONSIBLE FOR WARRANTY, REPAIR, OR OTHER CLAIMS REGARDING THE PRODUCTS UNLESS OMRON'S ANALYSIS CONFIRMS THAT THE PRODUCTS WERE PROPERLY HANDLED, STORED, INSTALLED, AND MAINTAINED AND NOT SUBJECT TO CONTAMINATION, ABUSE, MISUSE, OR INAPPROPRIATE MODIFICATION OR REPAIR. F3SX User’s Manual 3 Introduction Introduction Precautions in using the Product SUITABILITY FOR USE OMRON shall not be responsible for conformity with any standards, codes, or regulations that apply to the combination of products in the customer's application or use of the product. At the customer's request, OMRON will provide applicable third party certification documents identifying ratings and limitations of use that apply to the products. This information by itself is not sufficient for a complete determination of the suitability of the products in combination with the end product, machine, system, or other application or use. The following are some examples of applications for which particular attention must be given. This is not intended to be an exhaustive list of all possible uses of the products, nor is it intended to imply that the uses listed may be suitable for the products: • Outdoor use, uses involving potential chemical contamination or electrical interference, or conditions or uses not described in this document. • Nuclear energy control systems, combustion systems, railroad systems, aviation systems, medical equipment, amusement machines, vehicles, safety equipment, and installations subject to separate industry or government regulations. • Systems, machines, and equipment that could present a risk to life or property. Please know and observe all prohibitions of use applicable to the products. NEVER USE THE PRODUCTS FOR AN APPLICATION INVOLVING SERIOUS RISK TO LIFE OR PROPERTY WITHOUT ENSURING THAT THE SYSTEM AS A WHOLE HAS BEEN DESIGNED TO ADDRESS THE RISKS, AND THAT THE OMRON PRODUCT IS PROPERLY RATED AND INSTALLED FOR THE INTENDED USE WITHIN THE OVERALL EQUIPMENT OR SYSTEM. CHANGE IN SPECIFICATIONS Product specifications and accessories may be changed at any time based on improvements and other reasons. Consult with your OMRON representative at any time to confirm actual specifications of purchased product. 4 F3SX User’s Manual Introduction Dimensions and weights are nominal and are not to be used for manufacturing purposes, even when tolerances are shown. ERRORS AND OMISSIONS The information in this document has been carefully checked and is believed to be accurate; however, no responsibility is assumed for clerical, typographical, or proofreading errors, or omissions. Introduction Precautions in using the Product DIMENSIONS AND WEIGHTS COPYRIGHT AND COPY PERMISSION This document shall not be copied for sales or promotions without permission. This document is protected by copyright and is intended solely for use in conjunction with the product. Please notify us before copying or reproducing this document in any manner, for any other purpose. If copying or transmitting this document to another, please copy or transmit it in its entirety. F3SX User’s Manual 5 Introduction Introduction Precautions in using the Product Precautions for Safe Use Regarding the alert symbols and meanings used for the safe uses In order for our customers to use F3SX in safety, precautions are indicated in this manual with the alert symbols and statements such as the followings. Those safety precautions relate to the important descriptions that must be obeyed for the safe uses and operations. Be sure to obey the precautions. The following indications and symbols are used for the descriptions. Indicates a potentially hazardous situation which, if not avoided, will result in minor or moderate injury, or may result in serious injury or death. Additionally there may be significant property damage. Indicates a potentially hazardous situation which, if not avoided, may result in minor or moderate injury or in property damage. Meanings of Alert Symbols Indicates prohibited actions. Indicates mandatory actions. Alert Statements in this Manual Do not disassemble, modify, or attempt to repair the F3SX controller. Doing so may damage the original safety functions. Do not operate the F3SX controller in a hazardous environment, such as an environment that contains flammable or explosive gas. Doing so may cause fire or explosion by electric arc generated in the internal relays or externally connected electromagnetic switches. Do not connect the F3SX power input with a DC power supply or AC power supply exceeding the rated voltage. Also do not make reverse connection for the polarity of power supply. Doing either of these may cause breakdown of device and/or danger such as an electric shock. Do not use the F3SX's communication functions for the purpose of configuring a safety related system. Doing so may cause serious danger if any trouble occurs with the wiring or programming of the host computer. 6 F3SX User’s Manual Introduction Introduction Precautions in using the Product Do not use the auxiliary input terminals (start command input) for connection with a safety input device for the purpose of configuring a safety related system. Doing so may cause serious injury to humans when a trouble occurs with F3SX or the peripheral devices. Apply neither of a voltage exceeding the rated nor an AC power supply across the auxiliary input terminals (start command inputs). Doing either of these may cause breakdown of device and/or danger such as an electric shock. The auxiliary solid-state output (at the AS1,AS2 and AS3 terminals) is not a safety output. Do not use it for the purpose of configuring a safety related system. Doing so may cause serious injury to humans when a trouble occurs with F3SX or the peripheral devices. The external indicator output is not a safety output. Do not use it for the purpose other than indication. DC solid-state safety output; Do not short-circuit the output lines to the 24V DC line. Doing so will make the output always ON and dangerous. Also, ground the 0V line of the power source so that the output does not become ON when the output line is grounded. Never use with a load in excess of the trip capacity (contact voltage, contact current). Doing so may damage the output circuit and cutoff may not be possible. When transferring a F3SX product to another user, be sure to attach this User's Manual. When this product is used in a safety related system, a "Responsible Person" must strictly conform to the standards, legislations and regulations of the country and the local government under which the system is operated. A "Responsible Person" who is well aware of and familiar with the machine must implement the installation of the F3SX and confirmation thereafter. And the users must have thorough understanding about the relevant installation requirements, safe distances, control devices and the functions before starting operation. For the inspection and/or maintenance of the F3SX, a "Responsible Person" must confirm that the work has been properly performed. Maintenance Services and Inspection p.6-30 In order to prevent hazardous situation, a "Responsible Person" must implement the inspections according to this User's Manual at least once for every six months. Failure to do so may leads to an accident including a serious injury to humans. Whenever the F3SX does not operate properly, the user shall stop the machine immediately and report it to the "Responsible Person". F3SX User’s Manual 7 Introduction Introduction Precautions in using the Product In order for F3SX to satisfy EN60204-1, IEC61496-1 and UL508, have the DC power unit comply with all of the following requirements. • Voltage within the rated (24V DC ± 10%). • Do not share the power source with other devices or machines. When the power source is shared by multiple devices, consider margins for the total rated current. • Compliant with the EMC Directive, for Industrial environments. • Double or reinforced insulation between the primary and secondary circuits. • Automatic recovery of over-current protection characteristics (voltage drop). • 20ms or over of the output hold time. • Satisfies the output characteristics requirements of a class 2 circuit or equivalent limited energy circuit, as stipulated in UL508. • Compliant with the laws and standards in relation to EMC and other electric device safety in the country or area where this unit is used. (Example: EMC Directive and Low Voltage Directive in EU.) When using a commercialized switching regulator, be sure to ground FG (frame ground terminal). (If not grounded, it may cause erroneous operations due to the switching noises.) Use appropriate control devices to materialize the safety functions. Failure to do so may cause deterioration in the safety performances. Wiring must be done while the power is turned OFF either for F3SX or the devices connected with it. Doing it with the power ON may cause an electric shock. And external devices in connection with this product may behave in an unexpected way. Ensure that the connections are made properly at the input and output terminals. Failure to ensure this may cause an electric shock or damage the safety functions. Ensure that sufficient attention is given so that shared causes of faults do not cause the redundant safety circuit to become ineffective. Set up a protective structure around the applicable machines so that nobody can reach the hazardous area of the machines without passing through the detection zone. If any works should be carried out in such hazardous area, set the sensors that always detect whole or a part of human bodies. Failure to do so causes the detection errors of human body and will lead to a serious injury. Measure the maximum stop time with the actual machine configurations and periodically confirm that the stop time remains unchanged. Never fail to secure the safety distances to the hazardous areas around the machine. The reset switch must be installed in a place where the entire dangerous zone can be viewed, and in a way that the switch cannot be operated from the dangerous zone. In order to maintain the safety functions, put the product in the state of output-OFF (the emergency-stop state) once every 24 hours. 8 F3SX User’s Manual Introduction Introduction Precautions in using the Product Do not use F3SX for the machines that cannot be stopped immediately by the electric control at an emergency. Such machines cannot stop before the human body reaches the hazardous area and will cause a serious injury. With regard to the relay output, install a fuse in serial with the output contacts. Contacts protection for safety relay outputs p.14 Be sure to align the devices so as to prevent mutual interference when using multiple safety light curtains or multi-beam safety sensors. Failure to do so may cause non-detectable conditions and a serious injury to humans. Regarding setting to F3SX by using the function set-up software for model F3SX (Model F3SXCD, sold separately), keep the set contents in the history. After changing any settings to F3SX by using the function set-up software for model F3SX (Model F3SXCD, sold separately), be sure to carry out the "Function test" and keep the test results in the history. Function test p.6-30 DC solid-state safety output; Be sure to configure the safety related system by using two channels. Only with one channel to be used, the safety functions of the system will be degraded. It may cause serious injury to humans when a trouble occurs. DC solid-state safety output; Connect a load across the output terminal and the 0V line (PNP output). If it is connected between the output terminal and the 24V DC line by mistake, the output may turn ON when an emergency-stop occurs and cause a dangerous situation. (Correct) (Wrong) Load (E module) Load (E module) F3SX User’s Manual 9 Introduction Introduction Precautions in using the Product The safety category is determined by the entire safety control system. Design and use it in accordance with all the related standards. Consultation with an independent certification organization is recommended. The life duration of the relays varies depending on the switching conditions or loads, etc. Use the relays within an appropriate switching times, after confirming the limit of switching times with the actual devices under the actual conditions. If the DIN rail is too short for the width of F3SX, the product may drop out of the rail by vibration. Use end plate (Model PFP-M, sold separately), to fix F3SX on the DIN rail where necessary. Use F3SX in an enclosure rated at least IP54 (IEC60529). For ventilation, allow for 5mm or more on both sides of the F3SX and 50mm or more above and beneath. Stranded wire should be processed with insulation-covered bar terminal (DIN46228-4 standard compatible type) at its ends before using for connection. Conforming wire (when using recommended bar terminals): 0.34 to 1.5mm2 AWG22 to 16 Be careful not to catch a finger in the connector when installing it. Connect firmly at the time of main body mounting and connect the cable connectors. Allow some leeway for the wires and do not tighten the wires when wiring connection cables to F3SX, and confirm that any cable may not block the movements of workers or objects. For the external indicator, use a filament-type lamp for the externally connected indicator. With an LEDtype indicator, the perfect detection of a trouble is not available. Mat must be installed on a flat floor. 10 F3SX User’s Manual Introduction Please observe the following precautions for safe use of the products. (1) (2) (3) Read this manual thoroughly to understand before using the product. Loads must satisfy all the conditions below: •Are not short-circuited. •Are not provided with the voltage higher than the rating. •Are not used with current higher than the rating. Provide the control circuit (24V DC circuit) of F3SX with double or reinforced insulation for protection from an electric shock. ( Conforming to Standards p.13) (4) F3SX belongs to the over-voltage category II. Connect F3SX to the power distribution system of the over-voltage category II. ( Conforming to Standards p.13) (5) (6) (7) (8) Ground the minus terminal of 24V DC for the D-class earthing (through the earthing resistance of 100 max.). Put the product in the state of output-OFF (the emergency-stop state) once every 24 hours. Do not disassemble, repair or modify F3SX. Be sure to dispose of the F3SX as industrial waste. F3SX User’s Manual Introduction Precautions in using the Product Precautions for Safe Use 11 Introduction Introduction Precautions in using the Product Precautions for Correct Use Please observe the following precautions to prevent operation failure, malfunctions, or undesirable effects on product performance. (1) (2) (3) (4) (5) 12 Installation environment: -Do not use F3SX at altitudes over 1,000 meters. -Do not install the F3SX in the following environments: •Areas with high-humidity where condensation is likely to occur; •In the atmosphere with smoke or microparticles which may cause quality deterioration; •In the atmosphere of corrosive, inflammable or explosive gases; •Areas exposed to vibration or shock levels higher than specification provisions; •Areas where the product may come in direct contact with water, oil, chemicals; •Areas subject to oscillation or impact larger than rated value; -Do not use radio equipment, such as cellular phones, walkie-talkies or transceivers which generate radio waves, near the F3SX. -Protect the output circuit with a surge absorber when an inductive load is connected to the output. -For ventilation and wiring, allow for 5mm on both sides of the F3SX, and 50mm or more above and beneath. Wiring and mounting -Do not operate the control system until 5 seconds or more after turning ON the power of the F3SX. -Do not have the input/output lines, such as that for sensor, share the same conduit with the high voltage or power electric lines. -When replacing the metal connectors with other types such as resin connectors, use ones in the structure with the protection grade IP54 or higher. -Wire correctly after confirming the signal names of all the terminals. -Perform wiring between the input and output with a wiring length of 100m or less. When regulations specify that the wiring of a connected device must be 100m or less, perform wiring according to those regulations. Maintenance -When cleaning, avoid using thinner, benzene or acetone. Standards -The safety category is determined by the entire safety control system. Design and use it in accordance with all the related standards. Consultation with an independent certification organization is recommended. -The customer is requested to make compliant with the applicable standards for the entire system. This is a class A product. In residential areas it may cause radio interference, in which case the Responsible Person may be required to take adequate measures to reduce interference. F3SX User’s Manual Introduction Introduction Precautions in using the Product Conforming to Standards Regarding Over-voltage Category Over-voltage category IV Nominal voltage of power supply 400V Impulse dielectric strength 6kV III II I 400V/230V 230V 100V 4kV 2.5kV 500V (1.2/50us) Isolating transformer Fig.1 Example of over-voltage category (1). Over-voltage category is the classification which categorizes the power distribution system by the required impulse withstand level caused by such as a lightning. Categories are defined from IV to I in order of impulse voltage level as shown in Fig.1. F3SX is designed for over-voltage category II based on EN50178. Therefore, do not connect F3SX directly to the power distribution system whose over-voltage category is III or over. In general, over-voltage category II is the power distribution system that is insulated and stepped down voltage level with more than two isolating transformers from the public power distribution system. See IEC60664-1, EN50178 for details of the over-voltage category. F3SX User’s Manual 13 Introduction Introduction Isolating transformers The isolating transformer that is used to isolate between over-voltage category III and II such as TR1 of Fig.2 should conform to IEC60742, and the insulation between first input and secondary output should satisfy at least basic insulation of over-voltage category III. One side of a secondary output of the isolating transformer should be grounded for the protection in a case a short-circuit failure occurs between input and output of the isolating transformer. Insert fuses to protect the isolating transformer and to prevent personnel from an electrical shock according to the specification of the transformer, i.e. at the points of F1, F2, F3 of Fig.2. Contacts protection for electro-magnetic contactors For the use of safety category 4 (EN ISO13849-1:2008), insert fuses at F6, F7, and F8 of Fig.2 whose current rating is less than 60% of the current rating of electromagnetic contactors to protect contacts from welding according to prEN50156. But if the prospective short-circuit current is less than the current rating of electromagnetic contactors, this may not be required. If contacts are welded, it may cause an opening failure of outputs. For the details, see chapter prEN50156-1of 10.4.3.4. Contacts protection for safety relay outputs For the use of safety category 4 (EN ISO13849-1:2008), insert fuses at F4 and F5 of Fig.2 whose current rating is less than 3.15A to protect safety relay output contacts from welding according to prEN50156. If fuses with current rating of more than 3.15A are used, fault exclusion of contact welding becomes impossible. If the application is intended for use under safety category 3 (EN ISO13849-1:2008), insert fuses at F4 and F5 of Fig.2 whose current rating is less than 5A, and safety relay outputs are possible to be applied with 5A max. (resistive load). But in this case, output relay contacts are not protected from welding. If the safety relay contacts are welded, it may cause an opening failure of outputs. For the details, see chapter prEN50156-1of 10.4.3.4. If surge absorbers are used, they must be installed across the load as illustrated at SA1 and SA2 of Fig.2. If it was installed directly across the output, it may cause a failure to open output circuits. 400V AC / 230V AC L1 L2 F1...F8 Fuses MA MB Electromagnetic switches TR1 Insulated transformer SA1, SA2 Surge absorbers L3 F1 F3 TR1 ...230V AC F4 F5 F2 F6 F7 F8 Power supply R1 F3SX R2 MA MB SA1 Load III Over-voltage category II Fig.2 Example of over-voltage category (2). 14 F3SX User’s Manual MA MB SA2 Introduction Introduction How to Read This Manual How to Read This Manual Meaning of marks Indicates descriptions of essential points regarding the performance such as an advice for use. Indicates the page number for the relevant contents. F3SX User’s Manual 15 Introduction Introduction How to Read This Manual F3SX User’s Manual 16 Introduction Precautions in using the Product 1-2 How to Read This Manual 1-15 Contents 1-17 Chapter 1 Outline 1-1 Features of F3SX 1-2 Module Configuration 1-4 Product Lineup 1-5 Meanings of model type 1-5 Rating / Characteristic 1-6 Dimensional Drawings 1-13 Chapter 2 Specifications of Main Module Main Module with External Indicator Output 2-1 2-2 Each name and functions 2-2 Internal schematic diagram 2-4 Main Module with DC solid-state Safety Output 2-5 Each name and functions 2-5 DC solid-state safety outputs (SS1 and SS2 terminals) 2-7 Internal schematic diagram 2-7 Functions of Main Module 2-8 Diagnosing and monitoring functions 2-8 External indicator outputs (EL1 and EL2 terminals; N module) 2-9 DC solid-state safety outputs (SS1 and SS2 terminals; E module) 2-9 Reset mode 2-10 Feedback input (FB terminal) 2-12 Start command input (SSC terminal) 2-20 Auxiliary solid-state outputs (AS1, AS2, AS3 terminals) 2-21 Communication functions (COM terminal) 2-26 Connection Introduction Contents Contents 2-28 Wiring for reset inputs 2-28 Wiring for emergency-stop input 2-29 Example of wiring and operation chart 2-30 F3SX User’s Manual 17 Introduction Introduction Contents Chapter 3 Specifications of Output Module Specifications of Relay Output Module 3-2 Each name and functions 3-2 Internal schematic diagram 3-2 Specifications of Relay Output Module (ON-delay output) 3-3 Each name and functions 3-3 Internal schematic diagram 3-3 Specifications of Relay Output Module (OFF-delay output) 3-4 Each name and functions 3-4 Internal schematic diagram 3-4 Operation chart 3-5 Chapter 4 Specifications of Input Module Safety Mat Input Module 4-1 4-2 Each name and functions 4-2 Wiring diagram 4-4 Light Curtain Input Module 4-6 Each name and functions 4-6 Wiring diagram 4-8 Safety Door Switch Input Module 4-11 Each name and functions 4-11 Wiring diagram 4-12 Connection of Input Devices Chapter 5 Installation and Wiring Installation 4-13 5-1 5-2 Placing into control board 5-4 Placing to DIN rail 5-5 Wiring 5-6 Connection between main body and terminal block 5-6 Processing of wire end 5-7 Connecting bar terminal to terminal block connector 5-9 Chapter 6 18 3-1 F3SX User’s Manual Appendix 6-1 Introduction 6-2 Safety light curtain connection cable 6-2 Accessories for function set-up software for model F3SX 6-3 Recommended materials and tools 6-4 Communication Reference 6-5 Outline of communication functions 6-5 Communication procedure of CompoWay/F 6-6 Command reference 6-9 Troubleshooting 6-25 Error code and measures to be taken 6-25 Error indications and measures to be taken 6-27 Check List for Installation and Wiring 6-29 Maintenance Services and Inspection 6-30 Precautions concerning trial operation after changing function setup 6-30 Routine inspection 6-33 Biannual inspection 6-33 Quoted Standards Introduction Contents Accessories (sold separately) 6-34 F3SX User’s Manual 19 Introduction Introduction Contents 20 F3SX User’s Manual Chapter 1 Chapter 1 Outline Outline Features of F3SX 1-2 Module Configuration 1-4 Product Lineup 1-5 Meanings of model type Rating / Characteristic 1-5 1-6 Dimensional Drawings 1-13 F3SX User’s Manual 1-1 Chapter 1 Outline Features of F3SX Chapter 1 F3SX is an electronic safety controller. Applicable to the performance level (PL) a, b, c, d, or e, and stop category 0, 1. It is composed by modules. Features of F3SX Main Module ..... controls the entire part of controller. (Two kinds) Input Module ..... to be connected with the input devices such as safety light curtains, safety mat, etc. (Three kinds) functions as the safety outputs. (Three kinds) Relay Output Module ..... Multiple input devices can be connected to a single unit of controller. The products can be chosen in compatibility with the applications. By using the function set-up software for model F3SX (Model F3SX-CD, sold separately), changes in various kinds of parameters and input/output terminal monitoring of F3SX can be performed. Safety light curtain Safety door switch Emergency-stop switch Safety mat Contactor 1-2 F3SX User’s Manual Chapter 1 Outline Control Devices to Be Connected Chapter 1 In order to maintain the correct operation of all safety functions, use appropriate devices for connection with the product. Failure to do so may cause degradation of the safety functions. Requirements Emergency-stop switch Door interlock switch Use the switch of positive opening operation complying with IEC/EN60947-51. Also, use the parts having been approved by the certification body. Use the door interlock switch satisfying the required safety category. Use the switch compatible with the load of small current (24V DC, 5mA). Safety mat Use Miller Edge Model ME151-4/ME151Y-4 manufactured. Safety light curtain Use OMRON Model F3SN/F3SH/F3SJ series manufactured. Relay Electromagnetic breaker Use those with forcibly guided (linked) contacts or those conforming to EN50205. If connecting the NC contact of an electromagnetic breaker without the forcibly guided (linked) contacts to the feedback/reset input line, inability in declinator contact of such electromagnetic breaker cannot be found out. Use those having been approved by the certification body. The feedback contacts should be compatible with the load of small current (24V DC, 5mA). Other control devices Use upon confirming that each of those satisfies the required safety category. F3SX User’s Manual Features of F3SX Control device 1-3 Chapter 1 Outline Module Configuration F3SX main body consists of multiple module. The module is categorized in three types below. Chapter 1 (1) Main Module (3) Input Module (2) Relay Output Module Module Configuration R M1 N (Example: Model F3SX-N-M1R) Number / Module name Description • One module is installed in a product for entire controlling on the controller. • Can be connected to an emergency-stop switch for the input device. (1) Main Module (E, N) • Can be connected to an external indicator. (N module : Main module with external indicator output) • Two channels of DC solid-state safety output are provided. (E module : Main module with DC solid-state safety output) (2) Relay Output Module (R, R1, R2) (3) Input Module (M1, L2, D1) • The safety output functions are provided. Two channels of NO contact (conductive to output) and one channel of NC contact (non-conductive to ouput) are provided per module. • The installed number differs depending on the model. • To be connected to the safety input devices such as safety light curtain, safety door switch, safety mat, etc. • The installed number differs depending on the model. •The module alignment differs depending on the main body model. •The maximum number of modules differs depending on the combined modules. •External dimensions differ depending on the number of modules. Dimensional Drawings p.1-13 1-4 F3SX User’s Manual Chapter 1 Outline Product Lineup F3SX is categorized as follows. Chapter 1 Meanings of model type Product Lineup Model F3SX- (1) Number Symbol Meanings (1) EM1 Emergency-stop / controller for safety mat input (DC solid-state safety output) Model F3SX-- (2) (1) Number (1) (2) Symbol Meanings N Main module with external indicator output E Main module with DC solid-state safety output M1 Module for safety mat input L2 Module for light curtain input D1 Module for door switch input R Relay output module (DPST-NO, SPST-NC) NON-delay output (Instant breaking) (delay time unable to be set) R1 Relay output module (DPST-NO, SPST-NC) ON-delay output R2 Relay output module (DPST-NO, SPST-NC) OFF-delay output F3SX User’s Manual 1-5 Chapter 1 Outline Rating / Characteristic General specifications Chapter 1 Items Category, Performance Level (PL) (EN ISO13849-1:2008) Rating / Characteristic Performance Level (PL) d, category 3. Rating / Characteristic Safety integrity level (IEC61508) SIL3 (Note 1) Rated supply voltage 24V DC ± 10% (ripple p-p 10% max.) Startup time 5 seconds max. Protection for control circuit Output short-circuiting protection, and power supply reverse polarity protection. (Note 2) Over-voltage category (IEC60664-1) II Insulation resistance Between all lead wires and outer case : 100M or more (by 500V DC megger) Dielectric strength Between all lead wires and outer case : 2200V AC, 50/60Hz for 1 min. Ambient temperature Operating : -10 to +50°C (no freezing or condensation) Storage : -30 to +70°C (no freezing or condensation) Ambient humidity Operating and storage : 35 to 85%RH each (no freezing or condensation) Vibration resistance 10 to 55Hz double amplitude of 0.7mm each in X, Y and Z direction, 20 sweeps (with power on) Shock resistance 100m/s2 each in X, Y and Z direction, 1,000 times (with power on) Case materials Glass fiber reinforced polyamide 66 (PA-66-FR) Degree of protection Terminal block : IP20, Main body : IP40 (IEC60529) (Note 1) This is the SIL value, but not a value of the entire system. (Note 2) When this protection function operates, recover by turning the main power ON again. 1-6 F3SX User’s Manual Chapter 1 Outline Rated current, response time, mass, external dimension [F3SX-EM1] Emergency-stop input Feedback input ON : 15 to 24V DC ± 10% OFF : Open or 0 to 5V DC Internal impedance : Approximately 5k Chapter 1 Reset input Input Auxiliary input Safety output Auxiliary solid-state output PNP transistor output Load current : 25mA max., Residual voltage : 2V max. (Note 2) Category, Performance Level (PL) (EN ISO13849-1:2008) Performance Level (PL) d, category 3. Safety integrity level (IEC61508) SIL3 Rated current 300mA or less (except current consumption for the connected input/output devices) Response time Rating / Characteristic DC solid-state output PNP transistor output Load current 300mA max. (resistive load/inductive load) (Note 1) Residual voltage (for ON) : 2V max. (Note 2) Residual voltage (for OFF) : 0.1V max. Leakage current (for OFF) : 0.1mA max. Permissible capacity load : 1 F max. Allowable wiring resistance between output terminal and load : 4 max. DC solid-state safety output (SS1, SS2 terminal) ONOFF : 25 ms or less Safety output monitor OFFON : 105 ms or less (AS1 terminal) Weight Approximately 0.3kg (main body only) External shape 2 slots : 45(W) x 111(H) x 113(D) Connectable input devices Emergency-stop switch (common to Ch.1 and Ch.2) Safety mat 2 connection area (Note 3) (Note 1) Insert a surge absorber such as diode in parallel to the inductive load. (Note 2) Not including voltage drops in the extended wire. (Note 3) To connect more than 1 mat to 1 connection area: (1) Total capacity of mats and connection cable must be maximum capacity of controller inputs or less. (2) Mat connection cable length must be 100m or less. (3) Capacity for reference • Mat capacity: 1nF per square foot • Mat connection cable (AWG16): 50pF per foot • Maximum capacity of controller inputs: 0.09F F3SX User’s Manual 1-7 Chapter 1 Outline [F3SX-E-M1M1] Emergency-stop input Reset input Input Chapter 1 Feedback input ON : 15 to 24V DC ± 10% OFF : Open or 0 to 5V DC Internal impedance : Approximately 5k Auxiliary input Rating / Characteristic DC solidstate output Safety output PNP transistor output Load current 300mA max. (resistive load/inductive load) (Note 1) Residual voltage (for ON) : 2V max. (Note 2) Residual voltage (for OFF) : 0.1V max. Leakage current (for OFF) : 0.1mA max. Permissible capacity load : 1 F max. Allowable wiring resistance between output terminal and load : 4 max. Auxiliary solid-state output PNP transistor output Load current : 25mA max., Residual voltage : 2V max. (Note 2) Category, Performance Level (PL) (EN ISO13849-1:2008) Performance Level (PL) d, category 3. Safety integrity level (IEC61508) SIL3 Rated current 450mA or less (except current consumption for the connected input/output devices) Response time DC solid-state safety output (SS1, SS2 terminal) Safety output monitor (AS1 terminal) Weight ONOFF : 25 ms or less OFFON : 105 ms or less Approximately 0.4kg (main body only) External shape 3 slots : 67.5(W) x 111(H) x 113(D) Connectable input devices Emergency-stop switch (common to Ch.1 and Ch.2) Safety mat 4 connection area (Note 3) (Note 1) Insert a surge absorber such as diode in parallel to the inductive load. (Note 2) Not including voltage drops in the extended wire. (Note 3) To connect more than 1 mat to 1 connection area: (1) Total capacity of mats and connection cable must be maximum capacity of controller inputs or less. (2) Mat connection cable length must be 100m or less. (3) Capacity for reference • Mat capacity: 1nF per square foot • Mat connection cable (AWG16): 50pF per foot • Maximum capacity of controller inputs: 0.09F 1-8 F3SX User’s Manual Chapter 1 Outline [F3SX-E-L2M1] Emergency-stop input Reset input Input Auxiliary input Safety output Auxiliary solid-state output PNP transistor output Load current : 25mA max., Residual voltage : 2V max. (Note 2) Category, Performance Level (PL) (EN ISO13849-1:2008) Performance Level (PL) d, category 3. Safety integrity level (IEC61508) SIL3 Rated current 450mA or less (except current consumption for the connected input/output devices) Response time DC solid-state safety output (SS1, SS2 terminal) Safety output monitor (AS1 terminal) Rating / Characteristic DC solidstate output PNP transistor output Load current 300mA max. (resistive load/inductive load) (Note 1) Residual voltage (for ON) : 2V max. (Note 2) Residual voltage (for OFF) : 0.1V max. Leakage current (for OFF) : 0.1mA max. Permissible capacity load : 1 F max. Allowable wiring resistance between output terminal and load : 4 max. Chapter 1 Feedback input ON : 15 to 24V DC ± 10% OFF : Open or 0 to 5V DC Internal impedance : Approximately 5k ONOFF : 25 ms or less OFFON : 105 ms or less Weight Approximately 0.4kg (main body only) External shape 3 slots : 67.5(W) x 111(H) x 113(D) Connectable input devices Emergency-stop switch (common to Ch.1 and Ch.2) Safety mat 2 connection area (Note 3) Safety light curtain 2 set (Note 1) Insert a surge absorber such as diode in parallel to the inductive load. (Note 2) Not including voltage drops in the extended wire. (Note 3) To connect more than 1 mat to 1 connection area: (1) Total capacity of mats and connection cable must be maximum capacity of controller inputs or less. (2) Mat connection cable length must be 100m or less. (3) Capacity for reference • Mat capacity: 1nF per square foot • Mat connection cable (AWG16): 50pF per foot • Maximum capacity of controller inputs: 0.09F F3SX User’s Manual 1-9 Chapter 1 Outline [F3SX-E-M1D1] Emergency-stop input Reset input Input Chapter 1 Feedback input ON : 15 to 24V DC ± 10% OFF : Open or 0 to 5V DC Internal impedance : Approximately 5k Auxiliary input Rating / Characteristic DC solidstate output Safety output PNP transistor output Load current 300mA max. (resistive load/inductive load) (Note 1) Residual voltage (for ON) : 2V max. (Note 2) Residual voltage (for OFF) : 0.1V max. Leakage current (for OFF) : 0.1mA max. Permissible capacity load : 1 F max. Allowable wiring resistance between output terminal and load : 4 max. Auxiliary solid-state output PNP transistor output Load current : 25mA max., Residual voltage : 2V max. (Note 2) Category, Performance Level (PL) (EN ISO13849-1:2008) Performance Level (PL) d, category 3. Safety integrity level (IEC61508) SIL3 Rated current 450mA or less (except current consumption for the connected input/output devices) Response time DC solid-state safety output (SS1, SS2 terminal) Safety output monitor (AS1 terminal) ONOFF : 25 ms or less OFFON : 105 ms or less Weight Approximately 0.4kg (main body only) External shape 3 slots : 67.5(W) x 111(H) x 113(D) Connectable input devices Emergency-stop switch (common to Ch.1 and Ch.2) Safety mat 2 connection area (Note 3) Safety door switch (common to Ch.1 and Ch.2) 2sets (Note 1) Insert a surge absorber such as diode in parallel to the inductive load. (Note 2) Not including voltage drops in the extended wire. (Note 3) To connect more than 1 mat to 1 connection area: (1) Total capacity of mats and connection cable must be maximum capacity of controller inputs or less. (2) Mat connection cable length must be 100m or less. (3) Capacity for reference • Mat capacity: 1nF per square foot • Mat connection cable (AWG16): 50pF per foot • Maximum capacity of controller inputs: 0.09F 1-10 F3SX User’s Manual Chapter 1 Outline [F3SX-E-M1R] Emergency-stop input Feedback input Auxiliary input Relay contact output Safety output Auxiliary solid-state output PNP transistor output Load current : 25mA max., Residual voltage : 2V max. (Note 2) Number of main contacts (safety outputs) DPST-NO Number of auxiliary contacts SPST-NC Rated load Resistive load 11/12 terminal 250V AC 50/60Hz 30V DC 5A (Auxiliary contact ) 23/24 terminal 33/34 terminal (Main contact ) Inductive load 250V AC 50/60Hz 30V DC 3.15A (5A) (Note 3) AC-15 : 240V AC/2A cos=0.3 DC-13 : 24V DC/1A L/R=48ms Minimum applicable load (Note 4) 24V DC/5mA (reference value) (Note 5) Electrical endurance (Note 4) 100,000 times or more (open/close frequency of 1,800 times/h) Mechanical endurance (Note 4) 10,000,000 times or more (open/close frequency of 36,000 times/h) Category, Performance Level (PL) (EN ISO13849-1:2008) Performance Level (PL) d, category 3. Safety integrity level (IEC61508) SIL3 Rated current 400mA or less (except current consumption for the connected input/output devices) Response time Rating / Characteristic DC solidstate output PNP transistor output Load current 300mA max. (resistive load/inductive load) (Note 1) Residual voltage (for ON) : 2V max. (Note 2) Residual voltage (for OFF) : 0.1V max. Leakage current (for OFF) : 0.1mA max. Permissible capacity load : 1 F max. Allowable wiring resistance between output terminal and load : 4 max. Chapter 1 ON : 15 to 24V DC ± 10% OFF : Open or 0 to 5V DC Internal impedance : Approximately 5k Reset input Input Instant breaking auxiliary output (AS1 terminal) ONOFF : 25 ms or less OFFON : 105 ms or less Safety relay output (23/24 terminal, 33/34 terminal) Auxiliary relay output (11/12 terminal) Response time : 35 ms or less Operating time : 135 ms or less Weight Approximately 0.5kg (main body only) External shape 4 slots : 90(W) x 111(H) x 113(D) Connectable input devices Emergency-stop switch (common to Ch.1 and Ch.2) Safety mat 2 connection area (Note 6) (Note 1) Insert a surge absorber such as diode in parallel to the inductive load. (Note 2) Not including voltage drops in the extended wire. (Note 3) An external fuse must be inserted into the safety relay output. The fuse rating depends on the safety category. Use under the Safety category 3 (EN ISO13849-1:2008) The external fuse rating is 5A or less than 5A. The current that can be applied to the safety relay contacts is limited by the fuse rating and it is 5A or less than 5A (resistive load). However, in this case, the safety relay output cannot be protected from welding. For the details, see the section 10.4.3.4 of prEN50156-1. (Note 4) Performance of the built-in relay itself. * The values for endurance are those at ambient temperatures between +15 and +35C and ambient humidities between 25 to 75%RH. (Note 5) Reference value. Use with less value is not appropriate. Note that, if loaded once with a higher value, the contacts may become unable to open/close for a small load. (Note 6) To connect more than 1 mat to 1 connection area: (1) Total capacity of mats and connection cable must be maximum capacity of controller inputs or less. (2) Mat connection cable length must be 100m or less. (3) Capacity for reference • Mat capacity: 1nF per square foot • Mat connection cable (AWG16): 50pF per foot • Maximum capacity of controller inputs: 0.09F F3SX User’s Manual 1-11 Chapter 1 Outline [F3SX-N-M1R] Emergency-stop input Chapter 1 ON : 15 to 24V DC ± 10% OFF : Open or 0 to 5V DC Internal impedance : Approximately 5k Reset input Input Feedback input Auxiliary input Rating / Characteristic DC solidstate output Relay contact output External indicator output (Note 1) External indicator which can be connected Filament type indicator DC24V, 3 to 7W Auxiliary solid-state output PNP transistor output Load current : 25mA or under, Residual voltage : 2V or under (Note 2) Number of main contacts (safety outputs) DPST-NO Number of auxiliary contacts SPST-NC Rated load Resistive load 11/12 terminal 250V AC 50/60Hz 30V DC 5A (Auxiliary contact ) 23/24 terminal 33/34 terminal (Main contact ) Inductive load 250V AC 50/60Hz 30V DC 3.15A (5A) (Note 3) AC-15 : 240V AC/2A cos=0.3 DC-13 : 24V DC/1A L/R=48ms Minimum applicable load (Note 4) 24V DC/5mA (reference value) (Note 5) Electrical endurance (Note 4) 100,000 times or more (open/close frequency of 1,800 times/h) Mechanical endurance (Note 4) 10,000,000 times or more (open/close frequency of 36,000 times/h) Category, Performance Level (PL) (EN ISO13849-1:2008) Performance Level (PL) d, category 3 Safety integrity level (IEC61508) SIL3 Rated current 400mA or less (except current consumption for the connected input/output devices) Response time Instant breaking auxiliary output (AS1 terminal) ONOFF : 25 ms or less OFFON : 105 ms or less Safety relay output (23/24 terminal, 33/34 terminal) Auxiliary relay output (11/12 terminal) Response time : 35 ms or less Operating time : 135 ms or less Weight Approximately 0.5kg (main body only) External shape 4 slots : 90(W) x 111(H) x 113(D) Connectable input devices Emergency-stop switch (common to Ch.1 and Ch.2) Safety mat 2 connection area (Note 6) (Note 1) If no external indicator is connected, connect a resistor (4.7k, 1/4W) between the EL1 and EL2 terminals. The resistor with lead wires (non-polar) shown in the right figure is attached to this product. (Note 2) Not including voltage drops in the extended wire. (Note 3) An external fuse must be inserted into the safety relay output. The fuse rating depends on the safety category. Use under the Safety Category 3 (EN ISO13849-1:2008) The external fuse rating is 5A or less than 5A. The current that can be applied to the safety relay contacts is limited by the fuse rating and it is 5A or less than 5A (resistive load). However, in this case, the safety relay output cannot be protected from welding. For the details, see the section 10.4.3.4 of prEN50156-1. (Note 4) Performance of the built-in relay itself. * The values for endurance are those at ambient temperatures between +15 and +35C and ambient humidities between 25 to 75%RH. (Note 5) Reference value. Use with less value is not appropriate. Note that, if loaded once with a higher value, the contacts may become unable to open/close for a small load. (Note 6) To connect more than 1 mat to 1 connection area: (1) Total capacity of mats and connection cable must be maximum capacity of controller inputs or less. (2) Mat connection cable length must be 100m or less. (3) Capacity for reference • Mat capacity: 1nF per square foot • Mat connection cable (AWG16): 50pF per foot • Maximum capacity of controller inputs: 0.09F 1-12 F3SX User’s Manual Chapter 1 Outline Dimensional Drawings Model F3SX Chapter 1 Width Width(mm) EM1 45 E-M1M1, M1D1, L2M1 67.5 E-M1R, N-M1R 90 Dimensional Drawings Model (Unit : mm) The number of slots indicates the width occupied by each module. • Main module (N, E) • Input module ( L2, M1, D1) • Relay output module (R, R1, R2) : 1 slot : 1 slot : 2 slots F3SX User’s Manual 1-13 Chapter 1 Outline MEMO Chapter 1 Dimensional Drawings 1-14 F3SX User’s Manual Chapter 2 Specifications of Main Module Chapter 2 2-2 Each name and functions Internal schematic diagram Main Module with DC solid-state Safety Output 2-2 2-4 2-5 Each name and functions DC solid-state safety outputs (SS1 and SS2 terminals) Internal schematic diagram Functions of Main Module 2-5 2-7 2-7 2-8 Specifications of Main Module Main Module with External Indicator Output Diagnosing and monitoring functions 2-8 External indicator outputs (EL1 and EL2 terminals; N module) 2-9 DC solid-state safety outputs (SS1 and SS2 terminals; E module) 2-9 Reset mode 2-10 Feedback input (FB terminal) 2-12 Start command input (SSC terminal) 2-20 Auxiliary solid-state outputs (AS1, AS2, AS3 terminals) 2-21 Communication functions (COM terminal) 2-26 Connection 2-28 Wiring for reset inputs Wiring for emergency-stop input Example of wiring and operation chart 2-28 2-29 2-30 F3SX User’s Manual 2-1 Chapter 2 Specifications of Main Module Main Module with External Indicator Output This module (N module) is the main module with external indicator output. Each name and functions Chapter 2 Input/output terminal Main Module with External Indicator Output LED Input/output terminal Input/output terminal LED indicator Indication PW 2-2 Color Green Name Functions Power indicator Lights up while power is ON. ER Red Error indicator Lights up or flashes when an error occurs. Lighting up : No synchronization between emergency-stop inputs. 1-time flashing : Short-circuiting or mis-wiring between emergency-stop inputs. 2-time flashing : Trouble or mis-wiring around emergency-stop input circuit. 3-time flashing : Mis-wiring or break around Y1, Y2 or Y3 terminal. 4-time flashing : Trouble in external indicator or around the circuit for indicator output. 5-time flashing : Trouble or welding around safety relay output circuit. 6-time flashing : Error in feedback signals from an external devices. Continuously flashing : Affected by noises or trouble around the internal circuit of F3SX. RS Green Reset input indicator Lights up at the time of: Auto resetting : Y3 terminal input is ON. Manual resetting: Y2 terminal input is ON. LK Yellow Interlock indicator Lights up in interlock states. T1 Green T12 input indicator Lights up when input is ON at T12 terminal. T2 Green T22 input indicator Lights up when input is ON at T22 terminal. EL Green External indicator output ON indicator Lights up when external indicator output is ON. If you use the function set-up software for model F3SX (Model F3SX-CD, sold separately) to set the parameter to enable the blinking function of the external indicator lamp, the indicator lamp will either stay illuminated or blink according to its output operation. FB Green Feedback input indicator Lights up when feedback input terminal is ON. F3SX User’s Manual Chapter 2 Specifications of Main Module Input/output terminal Terminal No. Power input A1 24V DC input A2 GND (0V) input T11 T12 T21 T22 Emergency-stop switch input Chapter 2 Emergency-stop input (Note 1) Functions Emergency-stop switch input Y1 Y2 Reset input, selection between auto reset / manual reset, system reset Y3 Feedback input (Note 2) FB Monitoring feedback time AS1 Instant breaking auxiliary output (Standard Setup:Outputs the signals indicating whether the state is safe or not.) AS2 Information trigger (Standard Setup:Turns ON when error data, excessive frequency data of output switching and excessive energizing time data are available) AS3 Standby output (Standard Setup:When F3SX CPU has been initialized and the input and output have turned into normally controllable state, the output is turning ON) Auxiliary input (Note 4) SSC Start command input External indicator output (Note 5) EL1 Indicator output with diagnosis function (+ : source) EL2 Indicator output with diagnosis function (- : sink) RS-232C port COM Port for communication cable connection (RS-232C) Auxiliary solid-state output (Note 3) (Note 1) In the case that the emergency-stop switch is not used, directly connect T11 terminal with T12 terminal, and the T21 Main Module with External Indicator Output Reset input terminal with the T22 terminal, respectively. (Note 2) In the case that the feedback input is not used, refer to "Feedback input (FB terminal)". Feedback input (FB terminal) p.2-12 (Note 3) By using the function set-up software for model F3SX (Model F3SX-CD, sold separately), the function settings of auxiliary solid-state output (at the AS1, AS2 and AS3 terminals) and external indicator output can be changed. For the details, confirm with HELP of Model F3SX-CD. (Note 4) In the case that the start command input is not used, connect SSC terminal with the 24V DC input terminal (A1 terminal) directly. (Note 5) In the case that the external indicator is not used, connect a resistor (1/4W, 4.7k) between the EL1 terminal and the EL2 terminal. The auxiliary solid-state output (at the AS1, AS2 and AS3 terminals) is not a safety output. Do not use it for the purpose of configuring a safety related system. Doing so may cause serious injury to humans when a trouble occurs with F3SX or the peripheral devices. F3SX User’s Manual 2-3 Chapter 2 Specifications of Main Module Internal schematic diagram Control circuit Chapter 2 Main Module with External Indicator Output 2-4 F3SX User’s Manual Chapter 2 Specifications of Main Module Main Module with DC solid-state Safety Output This module (E module) is the main module with DC solid-state safety output. Each name and functions Chapter 2 Main Module with DC solid-state Safety Output Input/output terminal LED Input/output terminal Input/output terminal LED indicator Indication PW Color Green Name Functions Power indicator Lights up while power is ON. ER Red Error indicator Lights up or flashes when an error occurs. Lighting up: No synchronization between emergency-stop inputs. 1-time flashing: Short-circuiting or mis-wiring between emergency-stop inputs. 2-time flashing: Trouble or mis-wiring around emergency-stop input circuit. 3-time flashing: Mis-wiring or break around Y1, Y2 or Y3 terminal. 4-time flashing: Short-circuiting or mis-wiring around the DC solid-state safety out puts. Trouble in the DC solid-state safety output circuits. 5-time flashing: Trouble or welding around safety relay output circuit. 6-time flashing: Error in feedback signals from an external devices. Continuously flashing: Affected by noises or trouble around the internal circuit of F3SX. RS Green Reset input indicator Lights up at the time of: Auto resetting : Y3 terminal input is ON. Manual resetting: Y2 terminal input is ON. LK Yellow Interlock indicator Lights up in interlock states. T1 Green T12 input indicator Lights up when input is ON at T12 terminal. T2 Green T22 input indicator Lights up when input is ON at T22 terminal. F3SX User’s Manual 2-5 Chapter 2 Specifications of Main Module Indication Color Name Functions Green DC solid-state safety output ON indicator Lights up when DC solid-state safety output is ON. Red DC solid-state safety output OFF indicator Lights up when DC solid-state safety output is OFF. EN Chapter 2 Input/output terminal Main Module with DC solid-state Safety Output Terminal No. Power input A1 24V DC input A2 GND (0V) input T11 Emergency-stop input (Note 1) Functions T12 T21 T22 Emergency-stop switch input Emergency-stop switch input Y1 Reset input Y2 Reset input, selection between auto reset / manual reset, system reset Y3 Feedback input (Note 2) Auxiliary solid-state output (Note 3) FB Monitoring feedback time AS1 Safety output monitor (Standard Setup:Outputs signal that is synchronous and in the same logics as those of the safety output) AS2 Ready output (Standard Setup:When F3SX CPU has been initialized and the input and output have turned into normally controllable state, the output is turning ON. ) AS3 Standby output (Standard Setup:When F3SX CPU has been initialized and the input and output have turned into normally controllable state,the output is turning ON) Auxiliary input (Note 4) SSC Start command input DC solid-state safety output SS1 DC solid-state safety output 1 SS2 DC solid-state safety output 2 RS-232C port COM Port for communication cable connection (RS-232C) (Note 1) In the case that the emergency-stop switch is not used, directly connect T11 terminal with T12 terminal, and the T21 terminal with the T22 terminal, respectively. (Note 2) In the case that the feedback input is not used, refer to “Feedback input (FB terminal)”. Feedback input (FB terminal) p.2-12 (Note 3) By using the function set-up software for model F3SX (Model F3SX-CD, sold separately), the function settings of auxiliary solid-state output (at the AS1, AS2 and AS3 terminals) can be changed. For the details, confirm with HELP of Model F3SX-CD. (Note 4) In the case that the start command input is not used, connect SSC terminal with the 24V DC input terminal (A1 terminal) directly. The auxiliary solid-state output (at the AS1, AS2 and AS3 terminals) is not a safety output. Do not use it for the purpose of configuring a safety related system. Doing so may cause serious injury to humans when a trouble occurs with F3SX or the peripheral devices. 2-6 F3SX User’s Manual Chapter 2 Specifications of Main Module DC solid-state safety outputs (SS1 and SS2 terminals) Waveform of DC solid-state safety output Response time (ONOFF) Main Module with DC solid-state Safety Output ON DC solid-state safety output OFF Approx. 200seconds OFF signal •The response time differs depending on the type. Rated current, response time, mass, external dimension p.1-7 DC solid-state safety output; Connect a load across the output terminal and the 0V line (PNP output). If it is connected between the output terminal and the 24V DC line by mistake, the output may turn reversed when an emergency-stop occurs and cause a dangerous situation. (Correct) Chapter 2 In order for F3SX to confirm that the output holds its shutoff function, it turns the outputs OFF cyclically for a short time period. When the output signal turns OFF at this time, the output circuits is judged to be normal. However, if it does not turn OFF, the output circuit or the wiring is judged to be abnormal and the controller becomes in the lockout state. Watch the input response time of the devices connected to the SS1 and SS2 terminal to be sure that an erroneous operation does not occur with the connecting devices due to OFF pulse signals. (Wrong) Load Load (E module) (E module) Internal schematic diagram Control circuit F3SX User’s Manual 2-7 Chapter 2 Specifications of Main Module Functions of Main Module Diagnosing and monitoring functions Chapter 2 F3SX diagnoses or monitors the input devices and the external indicator, etc., as to whether an error occurs or not with any of those devices. Cross channel synchronization monitoring function Functions of Main Module It monitors the input channels (Ch 1 - Ch 2) to find any differences in rising time between the input signals through those channels to the effect that any nullification of the safety related system function is prevented. •The threshold value of the cross channel synchronization monitoring is set to 500ms at the factory shipment. •By using the function set-up software for F3SX (Model F3SX-CD, sold separately), the threshold value can be changed within the range from 100ms to 1000ms. For the details, confirm with HELP of Model F3SX-CD. Cross channel short-circuiting detection function It will detect short-circuiting which may occur between the input channels (Ch 1 - Ch 2) and find a disorder of the safety related system. If short-circuiting should occur, it puts F3SX into the lock-out to secure the OFF state. (No fuse replacing is required.) The following table shows the diagnosing or monitoring contents as well as the erroneous states. Diagnosis When an abnormal state is detected: Cross-channel short-circuiting Feedback time monitoring Error in internal circuit Becomes in lock-out state, and outputs an error signal on error indicator. After the power is re-turned ON or the system reset is made, and then the state has returned to normal, the error is released. Error in external devices Error in indicator (short-circuiting or wire break) Becomes in lock-out state, and outputs an error signal on error indicator. After system reset is made and the state has returned to normal, the error is released. Cross-channel synchronous monitoring If the difference of cross-channel timing exceeds the regulated range, safety output turns OFF and outputs an error signal on error indicator. The error will be released when the inputs are returned to OFF for the both channels. •When F3SX detects an error, the error indicator (ER) lights up or flashes to indicate details of the error. Error indications and measures to be taken p.6-27 2-8 F3SX User’s Manual Chapter 2 Specifications of Main Module External indicator outputs (EL1 and EL2 terminals; N module) An external indicator can be connected. With the diagnosis functions built in, short-circuiting or wire break of the connected external indicator can be detected. When abnormality of the external indicator is detected, the lock-out will be activated. The indicator operates as follows depending on the F3SX states. Indicator Lighting up At safety output OFF Lighting out Interlock state (Note 1) Lighting out In lock-out state Lighting out (Note 1) The interlock state is that the input devices are ON (safety states) and in the standby state in the manual reset mode. Wire break detection The diagnosis begins at the time when the external indicator turns in the lighting up state. When detecting a wire break, F3SX becomes in a lock-out state. The external indicator has been set at the factory shipment so that it may light up when the safety output is ON. •When not used, insert a resistor (1/4W, 4.7k) between EL1 and EL2 terminals. Functions of Main Module At safety output ON Chapter 2 State of F3SX Model F3SX-N-M1R (Manual reset) p.2-38 •By using the function set-up software for model F3SX (Model F3SX-CD, sold separately), the lighting operations of external indicators can be changed. NON delay (instant breaking) . . . . . . . . . . . . . . . Lighting operation pattern can be chosen (lighting up for ON / lighting out for OFF, or lighting out for ON / lighting up for OFF) Delay set . . . . . . . . . . . . . . . . . . . . . . . . . . . . . . . Lighting up or lighting out in synchronous timing with output states of the module which is set for delay. Flashing for stand-by, lighting up for Ready . . . Flashing : When the main body is in the normal operation and safety input of the main module is ON. Lighting up: When all the safety inputs are ON. For the details, confirm with HELP of Model F3SX-CD. The external indicator output is not a safety output. Do not use it for the purpose other than indication. For the external indicator, use a filament-type lamp for the externally connected indicator. With an LED-type indicator, the perfect detection of a trouble is not available. DC solid-state safety outputs (SS1 and SS2 terminals; E module) They are the safety outputs provided by solid-state element circuits. The short-circuiting in DC solid-state safety output can be detected by the diagnosing functions. • By using the function set-up software for F3SX (Model F3SX-CD, sold separately), ON-delay or OFF-delay can be set for the DC solid-state safety outputs within the setting range from 0 to 600 seconds (10 minutes). For the details, confirm with HELP of Model F3SX-CD. F3SX User’s Manual 2-9 Chapter 2 Specifications of Main Module Reset mode Auto reset mode and manual reset mode Chapter 2 The auto reset mode or manual reset mode is set by wiring around the Y1, Y2 and Y3 terminals. • Connect the NC-type switch for the auto reset mode. • Connect the NO-type switch for the manual reset mode. Wiring for reset inputs p.2-28 Auto reset Functions of Main Module The safety output turns ON automatically when its conditions are satisfied for turning the safety output ON. (When ON-delay is set, the safety output turns ON after the ON-delay time elapsed.) Manual reset Even the conditions are satisfied for turning the safety output ON, the interlock state prevails and the safety output does not turn ON. In order to turn the safety output ON, it is necessary to execute the manual reset (interlock reset). (When ON-delay is set, the safety output turns ON after the manual reset is executed and the ON-delay time elapsed.) •"Interlock state" is the state awaiting a reset input while the input device is ON (safe state) in the manual reset mode. •As it gets in the interlock state, the interlock indicator (LK) of the main module lights up. • The reset contents and conditions differ depending whether it is auto reset mode or manual reset mode. Reset mode Auto reset Manual reset 2-10 F3SX User’s Manual State of F3SX Time duration of reset input (while reset switch is pressed) 50ms input time < 3s 3s input time Safety output OFF state - System reset Safety output ON state - - At lock-out - System reset Safety output OFF state (At the interlock state) Reset of interlock System reset Safety output ON state - - At lock-out - System reset Chapter 2 Specifications of Main Module At the time of auto reset Press for 3 seconds or longer before releasing the reset button. ON Y3 output OFF ON Standby output ON When all of the safety inputs are ON, the safety output turns ON with the reset input ON. (At the time when the reset button is released, the safety output turns ON.) OFF OFF Standby output turns ON when diagnosis results in OK at turning power ON. Functions of Main Module Approx. 5 seconds 3 seconds The process goes on at turning power ON. It turns OFF if F3SX is in the lock-out state. Chapter 2 Safety output F3SX re-starts. (State that power is ON.) At the time of manual reset Press for 3 seconds or longer before releasing the reset button. Y2 output ON Interlock reset OFF Safety output ON Standby output ON When all of the safety inputs are ON, the safety output turns ON with the reset input ON. (At the time when the reset button is released, the safety output turns ON.) OFF OFF Approx. 5 seconds Standby output turns ON when diagnosis results in OK at turning power ON. 3 seconds The process goes on at turning power ON. It turns OFF if F3SX is in the lock-out state. F3SX re-starts. (State that power is ON.) System reset The system reset is executed by pressing down the reset switch for three seconds or longer. The system reset makes the power turned OFF and ON again. When the safety output is ON, the system reset is not acceptable during the execution in which the power is being turned ON again. • While the system reset is executed, all the indicators turn OFF except for the power indicator (PW). •The reset state can be confirmed with the Standby output. F3SX User’s Manual 2-11 Chapter 2 Specifications of Main Module Feedback input (FB terminal) It is the function to monitor the external device states. It inputs the monitoring signal received from the external devices (such as NC contact of a relay) to the feedback input terminal to check if the signal synchronizes in reverse with the F3SX safety output. If the monitoring signal is not input by the feedback time monitoring functions within the monitoring time period, F3SX is determined to be in the feedback error state and put into the lock-out state. Chapter 2 Examples of uses Functions of Main Module • Mal-functioning such as welding can be detected by inputting contactor's NC contact signal as the feedback signal to F3SX. • Stop operation can be confirmed on the external device such as a motor which does not come into stop state instantly due to its inertia at the moment that the power turns OFF. (Only when the feedback signal input is given to detect the stop operation) • Monitoring output time of feedback signal can forecast worn brake, etc., of the external device. • The history of feedback signals can be used for trend control of time before stop (= verification on the reasonable safety distance). •The monitoring process for output time of feedback signal begins automatically at the time when power is turned ON. Sixteen historical measurements in feedback monitoring time are retained but will be cleared at the time when power is turned OFF or the system is reset. If you want to save the history, read and save it on the host computer or other means. Communication Reference p.6-5 Wiring example of feedback input In the case of detecting contactor welding by inputting NC contact signal of the external device in connection with the relay output module to the FB terminal for the feedback signal. Relay output module (R, R1, R2 module) Fuse A1 Main module (N, E module) 11 24V DC 23 33 K1 AC K2 A2 FB 12 24 34 KM1 KM2 24V DC KM1 KM2 M 2-12 F3SX User’s Manual KM1,KM2 : Magnetic contactor M : Motor Chapter 2 Specifications of Main Module Operation chart of feedback input • In the case that delay time is not set (manual reset mode) (Example of uses: Inputting NC contact signal of the external device in connection with the R module to the FB terminal for the feedback signal.) Model F3SX-N-M1R (Manual reset) p.2-38 ON Input device OFF Chapter 2 ON Reset input OFF Functions of Main Module ON Safety output OFF ON Feedback input OFF T1m T2m T1s T2s Safety output when changing from OFF to ON T1m: Feedback time T1s: Monitoring time threshold value Locking out when T1m > T1s Safety output when changing from ON to OFF T2m: Feedback time T2s: Monitoring time threshold value Locking out when T2m > T2s • In the case that ON-delay time is set (manual reset mode) (Example of uses: Inputting NC contact signal of the external device in connection with the R1 module to the FB terminal for the feedback signal.) ON Input device OFF ON Reset input OFF ON Safety output ON-delay time OFF ON Feedback input OFF T3m T3s T4m T4s Safety output when changing from OFF to ON T3m: Feedback time Locking out when T3m > T3s T3s: Monitoring time threshold value Safety output when changing from ON to OFF T4m: Feedback time Locking out when T4m > T4s T4s: Monitoring time threshold value F3SX User’s Manual 2-13 Chapter 2 Specifications of Main Module • In the case that OFF-delay time is set (manual reset mode) (Example of uses: Inputting NC contact signal of the external device in connection with the R2 module to the FB terminal for the feedback signal.) ON Input device OFF Chapter 2 ON Reset input OFF ON OFF-delay time Functions of Main Module Safety output OFF ON Feedback input OFF T5m T5s T6m T6s Safety output when changing from OFF to ON T5m: Feedback time Locking out when T5m > T5s T5s: Monitoring time threshold value Safety output when changing from ON to OFF T6m: Feedback time Locking out when T6m > T6s T6s: Monitoring time threshold value • Input the signal, which satisfies the feedback input operation time chart, for the feedback signal. •The threshold value of feedback monitoring time is set to 500ms at the factory shipment. By using the function setup software for model F3SX (Model F3SX-CD , sold separately), the monitoring time can be changed. For the details, confirm with HELP of Model F3SX-CD . •The threshold value of feedback monitoring time for the -T type is set to 500ms at the factory shipment, and cannot be changed by using the function set-up software for model F3SX (Model F3SX-CD , sold separately). 2-14 F3SX User’s Manual Chapter 2 Specifications of Main Module Operation chart of feedback input when OFF-delay time is set for DC solidstate safety output ON-delay time or OFF-delay time setting is enabled for the DC solid-state safety outputs (SS1 and SS2 terminals) of the E module by using the function set-up software for F3SX (Model F3SX-CD, sold separately). When delay time is set for the DC solid-state safety outputs in the F3SX-E-R1 or F3SX-E-R2 configuration, the history read out by the function set-up software for F3SX will be as follows depending on the set time length and feedback input route. (The product is set to "non-delay" at the factory shipment.) •Example: OFF-delay time of DC solid-state safety output < R2 module OFF-delay time ON Input device OFF Safety output (SS1,SS2) Safety output (R2 module) Functions of Main Module • When the DC solid-state safety output is activated earlier than the R1 (R2) module, the feedback history will show the time from when the DC solid-state safety output was activated until the monitoring signal is input to the FB terminal. Chapter 2 In the case of inputting monitoring signal received from external device in connection with FB terminal to R1 (R2) module ON OFF OFF-delay time ON OFF-delay time OFF ON Feedback input OFF History Threshold value • When the DC solid-state safety output is activated later than the R1 (R2) module, the feedback history will show the time from when the R1 (R2) module was activated until the monitoring signal is input to the FB terminal. •Example: OFF-delay time of DC solid-state safety output > R2 module OFF-delay time ON Input device OFF Safety output (SS1,SS2) ON Safety output (R2 module) ON OFF-delay time OFF OFF OFF-delay time ON Feedback input OFF History Threshold value F3SX User’s Manual 2-15 Chapter 2 Specifications of Main Module In the case of inputting monitoring signal received from external device in connection with the DC solid-state safety output to the FB terminal Model F3SX-EM1 (Manual reset) p.2-30 • The feedback history will show the time from when the DC solid-state safety output is activated until the monitoring signal is input to the FB terminal. Chapter 2 •Example: OFF-delay time of DC solid-state safety output < R2 module OFF-delay time ON Input device OFF Functions of Main Module Safety output (SS1,SS2) ON Safety output (R2 module) ON Feedback input OFF OFF-delay time OFF-delay time OFF ON OFF History Threshold value • Example: The type which is not equipped with a relay output module (F3SX-E-). OFF-delay time should be set to the DC solid-state safety output. ON Input device OFF Safety output (SS1,SS2) Feedback input ON OFF OFF-delay time ON OFF History Threshold value 2-16 F3SX User’s Manual Chapter 2 Specifications of Main Module Example of changing feedback monitoring threshold value F3SX-N-D1RR2 (In case the OFF-delay time is set to 3 seconds.) (Model No. for reference) D1 module S 3 (NO contact) S2 11 21 12 22 Relay output module (R module) 23 Relay output module (R2 module) Chapter 2 Close Main module Safety Guard 24 11 S1 T11 T12 T21 T22 Y1 Y2 Y3 Fuse 5 6 Input circuit Control circuit 7 Input circuit 24V DC 24V DC 8 24V DC 11 23 33 K1 11 23 33 K3 DC24V AC COM E1 DC24V 24V DC 24V DC Input circuit Input circuit K2 K4 0V A2 SSC AS3 AS2 AS1 EL1 EL2 FB 9 E1 S6 (NC contact) 24V DC 10 11 12 12 24 34 12 24 34 KM1 KM2 Functions of Main Module E1 A1 12 S4 (NC contact) 24V DC 11 External indicator E1 Motor controller Safety Guard 24V DC Close 12 (Operation commands) KM1 24 23 S 5 (NO contact) KM2 M1 M S1 : Emergency-stop switch (positive opening mechanism) (Model A165E, Model A22E) S2 : Reset switch S3, S5 : Limit switch S4, S6 : Safety limit switch (positive opening mechanism) (Model D4N, Model D4B) KM1, KM2: Magnetic contactor M : 3-phase motor E1 : 24V DC power source (Model S82K) External indicator: Filament type indicator (When any external indicator is not used, connect a resistor (1/4W, 4.7k).) In the case of using NC contacts of the external devices (KM1 and KM2 in the above wiring example) in connection with the R2 module for the feedback signal, it is necessary to change threshold value of the feedback monitoring time (when safety output changes from ON to OFF) after having changed the OFF-delay time. R2 module response time 40ms (Refer to the response time table.) R2 module delay time 3000ms (Delay time: 3 seconds) Response time of external device 10ms (10ms as assumed in this example) +(margin) 450ms (450ms as assumed in this example) Total (set value) 3500ms (Note) Threshold value of the feedback monitoring time is set to 500ms at the factory shipment. Therefore, if only the OFF-delay time is changed without changing the threshold value of the feedback monitoring time, a feedback error occurs with F3SX and will put it in the lock-out state because the monitoring signal is not input from the external device within the monitoring time period. Rated current, response time, mass, external dimension p.1-7 F3SX User’s Manual 2-17 Chapter 2 Specifications of Main Module Wiring example for not using the feedback monitoring function Wire as mentioned below when external device states are not monitored. However, contact welding cannot be detected for the contactor. Model equipped with the relay output module; Chapter 2 For not using the feedback monitoring function of a model which is equipped with the relay output module, make wiring according to the Figure below. With the R1/R2 module, it is necessary to change threshold value of the feedback monitoring time by using the function set-up software for model F3SX (Model F3SX-CD, sold separately) in consideration for the delay time setting value. Functions of Main Module A1 11 Relay output module (R, R1, R2) Main module (E, N module) 24V DC A2 FB 12 Model not equipped with the relay output module; For not using the feedback monitoring function of a model (Model F3SX-E-)which is not equipped with the relay output module, make wiring according to the Figure below. In case of having set a delay time to the DC solid-state safety output by using the function set-up software for model F3SX (Model F3SX-CD, sold separately), it is necessary to change threshold value of the feedback monitoring time in consideration for the delay time setting value. A1 Main module (E module) 24V DC A2 SS1 SS2 R Y1 R Y2 FB 24V DC RY1 RY2 RY1, RY2: Safety relay For the case of nullifying the feedback time monitoring function; The feedback time monitoring function can be nullified by using the function set-up software for model F3SX (Model F3SX-CD, sold separately).When the feedback time monitoring function is nullified, the function does not work at the time when the safety output switches either from OFF to ON or from ON to OFF. In this case, the "feedback input monitor" of the auxiliary output does not function. 2-18 F3SX User’s Manual Chapter 2 Specifications of Main Module Wiring example for the case that the feedback time monitoring function cannot be used; Although the R1/R2 module delay time is 600sec (10 minutes) at maximum, the feedback time monitoring threshold value, which can be set by using the function set-up software for model F3SX (Model F3SX-CD sold separately), ranges from 10ms to 59990ms (approximately 1 minute). Therefore, if the delay time exceeds the threshold time, make the settings and wiring in the following procedures. Chapter 2 1. Nullify the feedback time monitoring function by using the function set-up software for model F3SX . 2. Make wiring referring to the wiring example below. (Model No. for reference) Functions of Main Module Feedback loop Relay output module (R, R1, R2 module) S1 KM1 KM2 A1 Y1 Fuse 24V DC Y2 Y3 11 23 33 Manual reset mode KM1 K1 24V DC Main module (N, E module) AC KM2 K2 M A2 FB 12 24 34 KM 1 KM 2 S1 : Reset switch (NO type) KM1, KM2 : Magnet contactor M : Motor Wire the auto reset mode as follows. Feedback loop S2 KM1 24V DC Y1 Y2 KM2 Y3 S2 : Reset switch (NC type) F3SX User’s Manual 2-19 Chapter 2 Specifications of Main Module Start command input (SSC terminal) The start command input (SSC terminal) is a start permission input for those other than safety input. The safety output does not turn ON unless the SSC input turns ON. For an example, it can be used for a start command input received from the programmable controller (PLC). Auto reset mode Chapter 2 When the start command input is ON while all the input devices are in the ON states, F3SX safety output turns ON. As the SSC terminal is made OFF while the safety output is ON, the safety output turns OFF. Functions of Main Module ON Input device OFF ON SSC input OFF ON Safety output OFF Manual reset mode When the start command input is ON while all the input devices are in the ON states, F3SX safety output turns ON after the interlock reset is input. As the SSC terminal is made OFF while the safety output is ON, the safety output turns OFF. ON Input device OFF ON SSC input OFF 3 seconds or shorter ON 3 seconds or shorter Reset input OFF ON Safety output OFF •External device conditions can be monitored by inputting the standby signal from the AS3 terminal to the SSC terminal through the PLC RUN contact, etc. •If not used, directly connect SSC terminal with 24V DC input terminal (A1 terminal). Model F3SX-N-M1R (Manual reset) p.2-38 Do not use the auxiliary input terminals (start command input) for connection with a safety input device for the purpose of configuring a safety related system. Doing so may cause serious injury to humans when a trouble occurs with F3SX or the peripheral devices. Apply neither of a voltage exceeding the rated nor an AC power supply across the auxiliary input terminals (start command inputs). Doing either of these may cause breakdown of device and/or danger such as an electric shock. 2-20 F3SX User’s Manual Chapter 2 Specifications of Main Module Auxiliary solid-state outputs (AS1, AS2, AS3 terminals) By using the auxiliary solid-state outputs, monitoring from the external controller is enabled. Each of the auxiliary solid-state outputs is allocated to the functions shown in the following table at the time of factory shipment. Type AS1 terminal AS2 terminal AS3 terminal Instant breaking auxiliary output (synchronous) Information trigger Standby output E module Safety output monitor (synchronous) Standby output Ready output Type Instant breaking auxiliary output Functions Outputs the signals indicating whether the state is safe or not. The output state can be chosen (synchronous/reverse). Choice is available only for N module. Instant breaking auxiliary output (AS1 terminal; N module) p.2-22 Safety output monitor Monitors the main module (except N module) and safety output of output module. Choice between monitored module and output states is available (synchronous/reverse). Safety output monitor (AS1 terminal; E module) p.2-22 Information trigger Functions of Main Module • The functions of auxiliary solid-state output terminals can be changed by using the function set-up software for F3SX (Model F3SX-CD, sold separately). For the details, confirm with HELP of Model F3SX-CD. Chapter 2 N module Output turns ON when the main body is in either of the following states: (1) Lock-out state; (2) Time-out in either cross input channel synchronization monitoring time; (3) Switching frequency of safety output exceeds the alarm value; (4) Accumulated power-on time exceeds predetermined value (approx. 3 years). Information trigger (AS2 terminal ; N module) p.2-23 Ready output Output is ON when the main body is in the Ready state (all the safety inputs of main module and input module are ON). Ready output (AS2 terminal ; E module) p.2-24 Standby output Output is ON when safety input of the main module is ON while the main body is in the normally operating state. Standby output (AS3 terminal) p.2-25 Lock-out output Output is ON when the main body is in the lock-out state. Output switching frequency alarm Output is ON when switching frequency of safety output (as counted by the times of turning from ON to OFF) exceeds the alarm value. The alarm value can be set within the range from 1 to 1 million. Accumulated power-on time alarm Output is ON when accumulated power-on time exceeds the predetermined value (approx. 3 years). The alarm value cannot be changed. Feedback input monitor Output is ON when the feedback input terminal turns ON. It does not function when the feedback time monitoring function is nullified. The auxiliary solid-state output (at the AS1, AS2 and AS3 terminals) is not a safety output. Do not use it for the purpose of configuring a safety related system. Doing so may cause serious injury to humans when a trouble occurs with F3SX or the peripheral devices. F3SX User’s Manual 2-21 Chapter 2 Specifications of Main Module Instant breaking auxiliary output (AS1 terminal; N module) It outputs the signal indicating whether the state is safe or not. The output state can be chosen (synchronous/ reverse). Choice is available only for the N module. • Operation chart (manual reset mode) ON Input device OFF Chapter 2 Reset input ON 3 seconds or shorter 3 seconds or shorter OFF Functions of Main Module Instant breaking auxiliary output ON OFF The instant breaking auxiliary output is not a safety output. Do not use it for the purpose of configuring a safety related system. Doing so may cause serious injury to humans when a trouble occurs with F3SX or the peripheral devices. Safety output monitor (AS1 terminal; E module) Monitors the DC solid-state safety output or safety output of the relay output module. •By using the function set-up software for model F3SX (Model F3SX-CD, sold separately), it can be made synchronous/reverse to the following outputs. For the details, confirm with HELP of Model F3SX-CD. (1) DC solid-state safety output of E module (2) R module (3) R1 module (ON-delay) (4) R2 module (OFF-delay) Operation chart Safety output Safety output monitor Safety output monitor is not the safety output. Do not use it for the purpose of configuring a safety related system. Doing so may cause serious injury to humans when a trouble occurs with F3SX or the peripheral devices. 2-22 F3SX User’s Manual Chapter 2 Specifications of Main Module Information trigger (AS2 terminal ; N module) The output turns ON when the main body is in either of the following states. This trigger signal can be used for the command request towards the host side such as the programmable controller (PLC), the personal computer (PC), etc. Communication Reference p.6-5 Information Description Excess switching frequency of output It is the information to be output when the ON/OFF switching frequency of the safety output exceeds the pre-set switching frequency. The frequency can be set to a value within the range from one to one million times. Excess energizing time It is the information to be output when the accumulated power-ON time of F3SX exceeds more or less 30,000 hours. The hour value for alarming the accumulated power-ON time cannot be changed. The information trigger is not the safety output. Do not use it for the purpose of configuring a safety related system. Doing so may cause serious injury to humans when a trouble occurs with F3SX or the peripheral devices. F3SX User’s Manual Functions of Main Module Information to be output when either of the following error occurs: • Lock-out Chapter 2 Error information 2-23 Chapter 2 Specifications of Main Module Ready output (AS2 terminal ; E module) The output turns ON when F3SX CPU has been initialized and the input and output have turned into the normally controllable state. When F3SX is in either of the following states, the Ready output turns OFF. State Ready output Chapter 2 In lock-out state OFF Emergency-stop switch connected to the main module is pressed. OFF When either of the input devices are OFF. OFF Functions of Main Module The Ready output is not the safety output. Do not use it for the purpose of configuring a safety related system. Doing so may cause serious injury to humans when a trouble occurs with F3SX or the peripheral devices. Operation chart (The following diagnosis timing is an example.) ON Po wer OFF Fee db ack input signal Normal Error Normal In pu t d ia gn osis (Inp ut de vice ) Error ON Inp ut de vice OFF Emerge ncy-stop switch Rea dy o ut put ON OFF ON OFF 5 seconds max. Condition (1) Condition (2) Condition (3) Condition (4) Condition (1) : The CPU of F3SX is initialized after the power is turned ON, and if both of the feedback input signal and input diagnosis results are normal, the Ready output turns ON. Condition (2) : When the input device turns OFF, the Ready output turns OFF. Condition (3) : When the emergency-stop switch is pressed (OFF state), the Ready output turns OFF. Condition (4) : When F3SX becomes in the lock-out state, the Ready output becomes OFF. The above operation chart shows an example in which the lock-out state has been caused by a feedback input signal error. (The lock-out may occur likewise by an input diagnosis error.) 2-24 F3SX User’s Manual Chapter 2 Specifications of Main Module Standby output (AS3 terminal) When F3SX CPU has been initialized and the input and output have turned into normally controllable state, the Standby signal is output. It is irrelevant to the ON/OFF state of the input device connected to the input module. It can be used for a part of the preparation signal to the entire system operation. When F3SX is in either of the following states, Standby output turns OFF. State Standby output OFF Emergency-stop switch connected to the main module is pressed. OFF Chapter 2 In lock-out state Functions of Main Module The Standby output is not the safety output. Do not use it for the purpose of configuring a safety related system. Doing so may cause serious injury to humans when a trouble occurs with F3SX or the peripheral devices. Operation chart (The following diagnosis timing is an example.) ON Power OFF Feedback input signal Normal Error Normal Input diagnosis (Input device) Error ON Input device OFF Emergency-stop switch Standby output ON OFF ON OFF 5 seconds max. Condition (1) Condition (2) Condition (3) Condition (4) Condition (1) : The CPU of F3SX is initialized after the power is turned ON, and if both of the feedback input signal and input diagnosis results are normal, the Standby output turns ON. (It is irrelevant to ON/OFF of the input devices at this time.) Condition (2) : The Standby output turns ON irrelevantly to ON/OFF of the input devices. Condition (3) : When the emergency-stop switch is pressed (OFF state), the Standby output turns OFF. Condition (4) : When F3SX becomes in the lock-out state, the Standby output becomes OFF. The above operation chart shows an example in which the lock-out state has been caused by a feedback input signal error. (The lock-out may occur likewise by an input diagnosis error.) F3SX User’s Manual 2-25 Chapter 2 Specifications of Main Module Example of use U V W KM5 KM1 Chapter 2 KM2 System Functions of Main Module Driver unit PLC In-operation output F3SX Standby output Safety relay output KM1 KM2 System The driver unit performs control according to the F3SX safety outputs. M AC KM5 PLC In-operation output F3SX Standby output KM5 Contact System F3SX Safety relay output KM1, KM2 NO contact Driver unit Communication functions (COM terminal) Program can be created on the host side such as on the programmable controller (PLC), personal computer (PC), etc., and the input/output information of the F3SX control signal can be read out. The followings are the information to be read out: Communication Reference p.6-5 2-26 F3SX User’s Manual Chapter 2 Specifications of Main Module Status of F3SX All of the ON/OFF states of the F3SX input and output terminals can be read. When an error occurs, the error massage can be read as to which module is erroneous. Measured value of feedback monitoring time Accumulated energizing time Functions of Main Module The accumulated time length in which F3SX power is ON can be read out. The value is monitored and stored every 15 minutes. Chapter 2 • The time duration from when the safety output turns OFF till the feedback input turns ON. • The time duration from when the safety output turns ON till the feedback input turns OFF. Each of these can be read out for the measured value of feedback monitoring time. Also, the each measured value as many as 16 times before the latest can be read likewise. Note) While the power is OFF, it is not stored in F3SX. Save it in the host side where it is necessary. Switching frequency of output The accumulated switching times can be read out regarding the safety output of F3SX. The value is monitored and stored every 15 minutes. Error code When F3SX is locked-out, the error code can be read out for the error details. See the "Troubleshooting" of the manual for the error codes and the correspondences. Troubleshooting p.6-25 Error log An error code and the error log can be read out for the accumulated energizing time at the time of occurring the error. The error logs as many as 10 times before the latest can be read. The error logs are stored in F3SX even when the power is OFF. Echo back Echo back is read for testing purposes on the communication functions. The arbitrary data is sent back when it is transmitted from the host side. Cross-channel synchronous monitoring time With regard to the emergency-stop input section and the safety input section of the input module of F3SX, the time differences from when one side turns ON until the other turns ON is logged. Each measured value as many as 16 times before the latest can be read out. Note) While the power is OFF, it is not stored in F3SX. Save it in the host side where it is necessary. Example of use (1) The system has been locked-out before recognizing. The time and reason should be known. By reading out the error log, · at which device an error occurs or improperly wired and · when had it occurred, are determined. Example of use (2) It should be known how long the safety relay of F3SX might remain normally operable. The accumulated relay switching frequencies are known when the output switching frequencies are read out. On the basis of this frequency, the residual allowance in the life duration can be estimated. • When communication cable is always connected, fix the cable with a clamp, so as to make it unstressed and prevent from dropout. Do not use the F3SX's communication functions with a host computer for the purpose of configuring a safety related system. Doing so may cause serious danger if any trouble occurs with the wiring or programming of the host computer. F3SX User’s Manual 2-27 Chapter 2 Specifications of Main Module Connection Chapter 2 Wiring must be done while the power is turned OFF either for F3SX or the devices connected with it. Doing it with the power ON may cause an electric shock, and external devices in connection with this product may behave in an unexpected way. Connection Ensure that the connections are made properly at the input and output terminals. Failure to ensure this may cause an electric shock or damage the safety functions. The reset switch must be installed in a place where the entire dangerous zone can be viewed, and in a way that the switch cannot be operated from the dangerous zone. The safety category is determined by the entire safety control system. Design and use it in accordance with all the related standards. Consultation with an independent certification organization is recommended. Wiring for reset inputs Interlock functions are set by the reset inputs wiring. Reset mode Terminal Connection Y2 Connect to 24V DC Y1/Y3 Connect as shown in the right figure Auto reset Schematic diagram System reset switch (If an NC type switch is not connected, system reset cannot be activated. In such a case, turn the power ON again after turning it OFF to reset the system. ) Interlock / lock-out reset switch Y3 Connect to 24V DC Y1/Y2 Connect as shown in the right figure Manual reset Note) In the auto reset mode, the detection function is made unavailable for the cases of trouble such as reset switch contact welding and short-circuiting between Y1-Y3. 2-28 F3SX User’s Manual Chapter 2 Specifications of Main Module Wiring for emergency-stop input Cross-channel short-circuit monitoring functions are set by connecting the emergency-stop switches. Cross-channel short-circuit monitoring Safety category Connection Schematic diagram Chapter 2 2 Connection Emergencystop switch Connect the switches between 24V DC and T12, T22. None Emergencystop switch 3 Connect the switches between 24V DC and T12, T22. Emergencystop switch Available 4 Connect the switches between T11 and T12, and T21 and T22, respectively. F3SX User’s Manual 2-29 Chapter 2 Specifications of Main Module Example of wiring and operation chart Model F3SX-EM1 (Manual reset) Example of wiring Note: F3SX-E-M1M1R incorporates 2 sets of M1 module. M1 Module Main Module Chapter 2 Mat 1 Model ME151-4/ ME151Y-4 S2 11 21 12 22 S1 Connection 24V DC E1 A1 T11 T12 T21 T22 Y1 Y2 Y3 5 6 7 Input circuit Control circuit Input circuit 24V DC 24V DC 8 24V DC 24V DC COM E1 24V DC 24V DC 24V DC Input circuit Input circuit 0V A2 SSC AS3 AS2 AS1 SS1 SS2 FB 9 10 11 12 E1 RY1 RY2 24V DC Mat 2 Model ME151-4/ ME151Y-4 24V DC E1 Fuses KM1 RY1 5 AC KM2 S1 : S2 : KM1, KM2 : RY1, RY2 : M : E1 : 7 9 10 11 F3SX User’s Manual 12 M Emergency-stop switch (positive opening contacts) (Model A165E,Model A22E) Reset switch Magnetic contactor Relay 3 phase motor 24V DC power source (Model S82K) Note 1 :Example of wiring above corresponds to the Category 3. Note 2 :Example of wiring above corresponds to the Stop Category (EN60204-1) 0. 2-30 8 Example with neither safety Mat connected. RY2 KM1 KM2 6 Chapter 2 Specifications of Main Module Operation chart ON Po wer OFF Chapter 2 ON Emerge ncy-stop switch OFF ON Reset input OFF Connection ON Safety mat 1 OFF ON Safety mat 2 OFF DC solid-state safety output SS1, SS2 ON OFF F3SX User’s Manual 2-31 Chapter 2 Specifications of Main Module Model F3SX-E-L2M1 (Manual reset) Example of wiring L2 Module SLC1 Model F3SN-A/ F3SH/F3SJ Emitter 2 8 6 1 3 4 5 Receiver 7 Example without safety light curtain Model F3SN/F3SH/F3SJ connected. Chapter 2 15 9 11 16 14 13 12 10 Model F39-JC A- L emitter cable Model F39-JC A- D receiver cable 0V (blue) Shielded Control output 2 (white) Control output 1 (green) 24V DC (brown) 12 External relay monitor input (red) (Note2) Auxiliary output (yellow) (Note 2) 11 RS- 485(B)(pink) 24V DC (brown) 10 Interlock selection Open input (white) 9 Shielded Example with neither safety Mat connected. Reset input (yellow) 8 0V (blue) 7 Open (red) Connection 6 Test input (green) RS-485(A)(gray) 5 M1 Module Mo Main Module Modu Mat 1 Model ME151-4/ ME151Y-4 S2 11 21 12 22 S1 24V DC Y2 Y3 2 RS-485(B) Control output 1 Control output 2 5 Input circuit RS-485(A) 7 24V DC 5 Test input 4 Reset input 3 Reset input 1 Test input 6 0V 8 Control output 2 Y1 Control output 1 T22 RS-485(B) T21 RS-485(A) T12 0V T11 24V DC E1 A1 15 9 11 16 14 13 12 10 Control circuit 6 7 8 Input circuit 24V DC 24V DC 24V DC 24V DC COM E1 24V DC 0V A2 SSC AS3 AS2 AS1 SS1 SS2 FB 24V DC 24V DC Input circuit 9 10 Input circuit 11 12 E1 RY1 RY2 24V DC Mat 2 Model ME151-4/ ME151Y-4 24V DC E1 Model F39-JC A- L emitter cable Note 1 : Example of wiring above corresponds to t he Category 3. Note 2 : Example when t he auxiliary output is of standard setting (ON when light n i terrupted). For other than standard setting, refer to the Catalog or User's Manual of F3SN/F3SH/ F3SJ. Note 3 : Example of wiring above corresponds to t he Stop Category (EN60204-1) 0. F3SX User’s Manual Emitter SLC2 Model F3SN-A/ F3SH/F3SJ Receiver 24V DC (brown) Reset input (yellow) Interlock selection Open input (white) Test SW Test input (green) Shielded Shielded 0V (blue) Control output 2 (white) Model F39-JC A- D receiver cable S1 : Emergency-stop switch (positive opening contacts) (Model A165E , ModelA22E) S2 : Reset switch KM1,KM2 : Magnetic contactor RY1,RY2 : Relay : 3 phase motor M E1 : 24V DC power source (Model S82K) 2-32 Control output 1(green) External relay monit or input (red) (Note 2) Auxiliary output (yellow) (Note 2) RS- 485(B) (pink) RS-485(A) (gray) 0V (blue) M Wiring diagram for inspection of the light curtain functions. Open (red) KM1 KM2 24V DC (brown) RY2 24V DC (brown) 0V (blue) KM2 Interlock selection Open input (white) AC Reset input (yellow) RY1 Test input (green) KM1 Open (red) Shielded Fuses Chapter 2 Specifications of Main Module Operation chart Power ON OFF Emergency-stop switch OFF Chapter 2 Reset input ON ON OFF Connection ON Safety mat 1 OFF ON Safety mat 2 OFF Model F3SN-A/F3SH/ ON F3SJ-A SLC1 OFF Model F3SN-A/F3SH/ ON F3SJ SLC2 OFF DC solid-state safety ON output SS1, SS2 OFF F3SX User’s Manual 2-33 Chapter 2 Specifications of Main Module Model F3SX-E-M1D1 (Manual reset) Example of wiring D1 Module S 3 (NO contact ) 24 21 12 22 Safety Guard Chapter 2 Mat 1 Model ME151-4/ ME151Y-4 S2 11 Close M1 Module Main Module 23 11 S1 Connection E1 A1 T11 T12 T21 T22 Y1 Y2 Y3 5 6 7 Input circuit Control circuit 12 S4 (NC contact) 24V DC 5 8 6 Input circuit Input circuit 8 Input circuit 24V DC 24V DC 24V DC 24V DC 7 24V DC 24V DC COM E1 24V DC Input circuit 24V DC 24V DC 24V DC 24V DC Input circuit Input circuit Input circuit 0V SSC AS3 AS2 AS1 SS1 SS2 FB 9 10 11 9 12 E1 RY1 24V DC 10 S6 (NC contact) RY2 11 12 11 12 Close Mat 2 Model ME151-4/ ME151Y-4 24V DC Safety Guard A2 24 E1 Fuses 23 S 5 (NO contact) KM1 RY1 5 AC 6 7 8 KM2 RY2 KM1 KM2 Example with neither safety Mat connected. M 9 10 11 12 5 9 S1 : S2 : S3, S5 : S4, S6 : KM1, KM2: RY1, RY2: M : E1 : Emergency-stop switch (positive opening contacts) (Model A165E, Model A22E) Reset switch Limit switch Safety limit switch (positive opening contacts) (Model D4N, Model D4B) Magnetic contactor Relay 3 phase motor 24V DC power sourc e (Model S82K) Note 1 :Example of wiring abo ve corresponds to the Category . 3 Note 2 :Example of wiring above cor responds to the Stop Category (EN60204-1) 0. 2-34 F3SX User’s Manual 6 7 8 Example with neither safety limit switch nor safety door switch connected. 10 11 12 Chapter 2 Specifications of Main Module Operation chart Po wer ON OFF ON OFF Chapter 2 Emerge ncy-stop switch S1 ON Reset switch S2 Connection OFF ON Safety mat 1 OFF Safety mat 2 ON OFF ON Limit switch S3 OFF 0.5 seconds or shorter (Note 1) ON Limit switch S4 Limit switch S5 OFF ON OFF 0.5 seconds or shorter (Note 1) Limit switch S6 ON OFF DC solid-state ON safety output SS1, SS2 OFF (Note 1) Operates at the next reset switch input only if input time difference is within 0.5 seconds. F3SX User’s Manual 2-35 Chapter 2 Specifications of Main Module Model F3SX-E-M1R (Manual reset) Example of wiring M1 Module Main Mo dule Relay Output Module Mat 1 Model ME151-4/ ME151Y-4 S2 11 21 12 22 (R Module) Chapter 2 S1 Fuses 24V DC E1 A1 T11 T12 T21 T22 Y1 Y2 Y3 5 6 7 Connection Input circuit Control circuit Input circuit 24V DC 24V DC 24V DC 8 11 23 33 K1 24V DC AC COM E1 24V DC 24V DC 24V DC Input circuit Input circuit K2 0V A2 SSC AS3 AS2 AS1 SS1 SS2 FB 9 10 11 12 12 24 34 KM1 KM2 E1 24V DC 24V DC E1 Motor controller RY1 RY2 Mat 2 Model ME151-4/ ME151Y-4 (Instructions of operation) RY1 KM1 5 6 7 8 RY2 Example with neither safety Mat connected. KM2 9 10 11 12 M S1 : Emergency-stop switch (positive opening contacts) (Model A165E, Model A22E) S2 : Reset switch KM1, KM2:Magnetic contactor RY1, RY2: Relay M : 3 phase motor E1 : 24V DC power source (Model S82K) Note 1 :Example of wiring above corresponds to the Category 3. Note 2 :Example of wiring above corresponds to the Stop Category (EN60204-1) 0. 2-36 F3SX User’s Manual Chapter 2 Specifications of Main Module Operation chart ON Po wer OFF Emerge ncy-stop switch ON Chapter 2 OFF ON Reset input OFF Connection ON Safety mat 1 OFF ON Safety mat 2 OFF DC solid-state safety ON output SS1, SS2 OFF ON KM1, KM2 NC contact OFF KM1, KM2 NO contact ON OFF F3SX User’s Manual 2-37 Chapter 2 Specifications of Main Module Model F3SX-N-M1R (Manual reset) Example of wiring M1 Module Main Module Relay Output Module Mat 1 Model ME151-4/ ME151Y-4 S2 11 21 12 22 (R Module) S1 Chapter 2 Fuses 24V DC E1 A1 T11 T12 T21 T22 Y1 Y2 Y3 5 6 Connection Input circuit Control circuit 7 8 Input circuit 24V DC 24V DC 11 23 33 K1 24V DC 24V DC AC COM E1 24V DC 24V DC 24V DC Input circuit Input circuit K2 0V A2 SSC AS3 AS2 AS1 EL1 EL2 FB 9 10 11 12 12 24 34 KM1 KM2 E1 24V DC External indicator Mat 2 Model ME151-4/ ME151Y-4 24V DC E1 KM1 5 KM2 Example with neither safety Mat connected. 9 6 10 7 11 8 12 M1 M S1 : Emergency-stop switch (positive opening contacts) (Model A165E, Model A22E) S2 : Reset switch KM1, KM2: Magnetic contactor M : 3 phase motor E1 : 24V DC power source (Model S82K) External indicator: Filament type indicator When any external indicat or is not used, connect a resistor (1/4W, 4.7k ) Note 1 :Example of wiring above corresponds to the Category 3. Note 2 :Example of wiring above corresponds to the Stop Category (EN60204-1) 0. 2-38 F3SX User’s Manual Chapter 2 Specifications of Main Module Operation chart ON Po wer OFF Emerge ncy-stop switch ON Chapter 2 OFF ON Reset input OFF Connection ON Safety mat 1 OFF ON Safety mat 2 OFF Lighting up External indicator Lighting out ON KM1, KM2 NC contact OFF ON KM1, KM2 NO contact OFF F3SX User’s Manual 2-39 Chapter 2 Specifications of Main Module MEMO Chapter 2 Connection 2-40 F3SX User’s Manual Chapter 3 Specifications of Output Module Each name and functions Internal schematic diagram Specifications of Relay Output Module (ON-delay output) 3-2 3-2 3-3 Each name and functions Internal schematic diagram Specifications of Relay Output Module (OFF-delay output) 3-3 3-3 3-4 Each name and functions Internal schematic diagram Operation chart Specifications of Output Module 3-2 Chapter 3 Specifications of Relay Output Module 3-4 3-4 3-5 F3SX User’s Manual 3-1 Chapter 3 Specifications of Output Module Specifications of Relay Output Module This module (R module) is the relay output module with NON-delay output (Instant breaking). Each name and functions Output terminal Chapter 3 LED Specifications of Relay Output Module Output terminal LED Indication Color Name Functions EN1 Green Safety relay output ON indicator Lights up when safety relay output is ON. EN1 Red Safety relay output OFF indicator Lights up when safety relay output is OFF. Output terminal Terminal No. 11, 12 Functions Auxiliary relay output (NC) Relay output 23, 24 Safety relay output (NO) 33, 34 Safety relay output (NO) Internal schematic diagram 11 23 33 12 24 34 K1 K2 3-2 F3SX User’s Manual Chapter 3 Specifications of Output Module Specifications of Relay Output Module (ON-delay output) This module (R1 module) is the relay output module (with ON-delay output). Each name and functions Output terminal Chapter 3 LED Output terminal LED Indication Color Name Safety relay output ON Green indicator EN2 EN2 Safety relay output OFF indicator Red Functions Lights up when safety relay output is ON. Lights up when safety relay output is OFF. During the ON-delay operation, it flashes in the cycles shown below. Residual ON-delay time is 20 seconds or more : 1Hz cycle Residual ON-delay time is 10 seconds or more : 2Hz cycle Residual ON-delay time is 5 seconds or more : 3Hz cycle Residual ON-delay time is less than 5 seconds : 4Hz cycle Specifications of Relay Output Module (ON-delay output) Use this area to write the data for the delay time set by the function set-up software for model F3SX (Model F3SX-CD, sold separately). Output terminal Terminal No. 11, 12 Functions Auxiliary relay output (NC) (ON-delay output) Relay output 23, 24 Safety relay output (NO) (ON-delay output) 33, 34 Safety relay output (NO) (ON-delay output) Internal schematic diagram 11 23 33 12 24 34 K1 K2 F3SX User’s Manual 3-3 Chapter 3 Specifications of Output Module Specifications of Relay Output Module (OFF-delay output) This module (R2 module) is the relay output module (with OFF-delay output). Each name and functions Output terminal Chapter 3 LED Specifications of Relay Output Module (OFF-delay output) Use this area to write the data for the delay time set by the function set-up software for model F3SX (Model F3SX-CD, sold separately). Output terminal LED Indication Color Name Functions EN3 Green Safety relay output ON indicator Lights up when safety relay output is ON. During the OFF-delay operation, it flashes in the cycles shown below. Residual OFF-delay time is 20 seconds or more: 1Hz cycle Residual OFF-delay time is 10 seconds or more: 2Hz cycle Residual OFF-delay time is 5 seconds or more : 3Hz cycle Residual OFF-delay time is less than 5 seconds: 4Hz cycle EN3 Red Safety relay output OFF indicator Lights up when safety relay output is OFF. Output terminal Terminal No. 11, 12 Functions Auxiliary relay output (NC) (OFF-delay output) Relay output 23, 24 Safety relay output (NO) (OFF-delay output) 33, 34 Safety relay output (NO) (OFF-delay output) Internal schematic diagram 11 23 33 12 24 34 K1 K2 3-4 F3SX User’s Manual Chapter 3 Specifications of Output Module Operation chart With R module ON Input device OFF 3 seconds or shorter ON Reset input OFF Chapter 3 ON Safety output OFF Specifications of Relay Output Module (OFF-delay output) In the manual reset mode; The safety output turns OFF immediately after the input device turns OFF. And, with all the input devices in the ON state, the safety output turns ON immediately after the interlock reset is input. With ON-delay set out in R1 module (Note 1) ON Input device OFF 3 seconds or shorter ON Reset input OFF ON Safety output OFF ON-delay In the manual reset mode; With all the input devices in the ON state, the safety output turns ON when the ON-delay time elapsed after the interlock reset is input. With OFF-delay set out in R2 module (Note 2) ON Input device OFF 3 seconds or shorter ON Reset input OFF ON Safety output OFF OFF-delay In the manual reset mode; The safety output turns OFF when the OFF-delay time elapsed after the input device turns OFF. F3SX User’s Manual 3-5 Chapter 3 Specifications of Output Module (Note 1)The ON-delay time can be set to the R1 module (23/24 terminals, 33/34 terminals). The ON-delay time can be set to the time in the range from 0.1 to 600 seconds with the function set-up software for model F3SX (Model F3SX-CD, sold separately). For the details, confirm with HELP of Model F3SX-CD. The ON-delay time is set to “0 seconds” at the factory shipment. (Note 2)The OFF-delay time can be set to the R2 module (23/24 terminals, 33/34 terminals). The OFF-delay time can be set to the time in the range from 0.1 to 600 seconds with the function set-up software for model F3SX (Model F3SX-CD, sold separately). For the details, confirm with HELP of Model F3SX-CD. The OFF-delay time is set to “0 seconds” (NON-delay (Instant breaking)) at the factory shipment. Chapter 3 Never use with a load in excess of the trip capacity (contact voltage, contact current). Doing so may damage the output circuit and cutoff may not be possible. Specifications of Relay Output Module (OFF-delay output) 3-6 With regard to the relay output, install a fuse in series with the output contacts. Contacts protection for safety relay outputs p.14 The life duration of the relays varies depending on the switching conditions or loads, etc. Use the relays within the specified switching frequency limits for the actual devices under actual conditions. F3SX User’s Manual Chapter 4 Specifications of Input Module 4-2 Each name and functions Wiring diagram Light Curtain Input Module 4-2 4-4 4-6 4-6 4-8 4-11 Each name and functions Wiring diagram Connection of Input Devices 4-11 4-12 4-13 Specifications of Input Module Each name and functions Wiring diagram Safety Door Switch Input Module Chapter 4 Safety Mat Input Module F3SX User's Manual 4-1 Chapter 4 Specifications of Input Module Safety Mat Input Module This module (M1 module) is the input module for safety mat. Each name and functions Safety mat Input/output terminal 1 2 3 4 5 6 7 8 Chapter 4 M1 Safety Mat Input Module ER1 ER2 D1 D2 D3 D4 LED M1 9 10 13 14 11 15 12 16 Input/output terminal Safety mat LED indicator 4-2 Indication Color ER1 Red Error indicator Flashes when Terminal 5 or Terminal 7 input error occurs. 1 flash : Breaking of wire. 2 flashes : Failure or mis-wiring of input circuit. ER2 Red Error indicator Flashes when Terminal 6 or Terminal 8 input error occurs. 1 flash : Breaking of wire. 2 flashes : Failure or mis-wiring of input circuit. D1 Green Terminal 5 input indicator Lights up for Terminal 5 input. D2 Green Terminal 6 input indicator Lights up for Terminal 6 input. D3 Green Terminal 7 input indicator Lights up for Terminal 7 input. D4 Green Terminal 8 input indicator Lights up for Terminal 8 input. F3SX User's Manual Name Functions Chapter 4 Specifications of Input Module Input/output terminal Terminal No. Connection 1 2 3 Not used. 4 5 6 7 Safety mat Miller Edge Model ME151-4 Model ME151Y-4 First connection area Safety mat Miller Edge Model ME151-4 Model ME151Y-4 Second connection area 8 9 10 11 12 Chapter 4 13 14 15 Not used. Safety Mat Input Module 16 (Note 1) Connect terminals 5 and 6, and 7 and 8 directly if a safety mat (1st set) is not connected. (Note 2) Connect terminals 9 and 10, and 11 and 12 directly if a safety mat (2nd set) is not connected. F3SX User's Manual 4-3 Chapter 4 Specifications of Input Module Wiring diagram Mat 1 Model ME151-4 Model ME151Y-4 5 6 7 8 Wiring example without using a safety mat 5 6 7 8 9 10 11 12 Chapter 4 M1 Safety Mat Input Module 5 6 Input Circuit 9 10 11 7 Input Circuit DC 24V 12 8 DC 24V DC 24V DC 24V Input Circuit Input Circuit Mat 2 Model ME151-4 Model ME151Y-4 9 10 11 12 Measure the machine's maximum time for stopping on the actual system. Also, periodically check that the machine's time for stopping has not changed. 4-4 F3SX User's Manual Chapter 4 Specifications of Input Module Calculation of Safety Distance EN999 describes an expression for safety mat to be installed on a floor as; S = (1600 x T) + 1200mm S is configured as minimum safety distance (unit: mm), coefficient 1600 is configured at 1600mm/s as the standard approach speed, T is time for stopping the whole machine, 1200mm is a length with consideration of a step and arm length of a man Time for stopping the whole machine can be calculated by: T = t1 + t2 t1 : Maximum time from start up of a detection device to turning OFF of control device's output t2 : Response time of a machine. That is, required time to stop a machine or remove a hazard after receiving safety mat system's output. Response time for calculation must be one fro the worst case. Some machines may have different response times for operation mode, type of workpiece, or stopping start point during a cycle. If wear of brake may affect the response time, it also should be taken into consideration. Chapter 4 Safety Mat Input Module <Calculation example> In this example, a safety mat is used for a machine with measured maximum response time of 0.485 seconds. Here, t1 is assumed as 25ms. From the expression above, T = t1 + t2 = 25ms + 485ms = 510ms = 0.510s S = (1600 x 0.510) + 1200mm = 816 + 1200mm = 2016mm Thus safety mat must be installed up to 2016mm from a source of danger. Note 1 : Design and installation of safety mat system with safety distance must comply to the product's specification. Note 2 : Take undetectable areas of a safety mat into consideration such as external frame and corners. Number of connections • To connect more than 1 mat to 1 connection area, total capacity of mats and connection cable must be maximum capacity of controller inputs or less. • Mat connection cable length must be 100m or less. <Capacity for reference> • Mat capacity: 1nF per square foot • Mat connection cable (AWG16): 50pF per foot • Maximum capacity of controller inputs: 0.09F Mat must be installed on a flat floor. F3SX User's Manual 4-5 Chapter 4 Specifications of Input Module Light Curtain Input Module This module (L2 module) is the input module for safety light curtain. •The F3SX can supply electric power to a maximum of 4 sets of model F3SN/F3SH/F3SJ. If more than the above limitation is to be connected, power should be supplied externally from outside the F3SX. In such case, make it so the 24V DC and 0V lines of the external power supply for the F3SN/F3SH/F3SJ share the same line with the F3SX power supply. •For using Model F3SN/F3SH/F3SJ in serial connection, external power supply is required. Wiring diagram for the case the external power is supplied to the Model F3SN/F3SH/F3SJ p.4-10 Each name and functions Chapter 4 Safety light curtain Light Curtain Input Module Input/output terminal 1 2 3 4 5 6 7 8 L2 ER1 ER2 D1 D2 D3 D4 LED L2 Safety light curtain 9 10 13 14 11 15 12 16 Input/output terminal 4-6 F3SX User's Manual Chapter 4 Specifications of Input Module LED Indication Color Name Functions ER1 Red Error indicator Lights up or flashes when Terminal 5 or Terminal 7 input error occurs. Light-up : Not synchronized between two terminal inputs 1 flash : Short-circuit or mis-wiring between two terminal inputs 2 flashes : Failure or mis-wiring of input circuit ER2 Red Error indicator Lights up or flashes when Terminal 12 or Terminal 10 input error occurs. Light-up : Not synchronized between two terminal inputs 1 flash : Short-circuit or mis-wiring between two terminal inputs 2 flashes : Failure or mis-wiring of input circuit D1 Green Terminal 5 input indicator Lights up for Terminal 5 input. D2 Green Terminal 7 input indicator Lights up for Terminal 7 input. D3 Green Terminal 12 input indicator Lights up for Terminal 12 input. D4 Green Terminal 10 input indicator Lights up for Terminal 10 input. Terminal No. Chapter 4 Input/output terminal Connection 24V DC 2 0V 3 RS-485(A) 4 RS-485(B) 5 Control output 1 6 Reset input 7 Control output 2 8 Test input 9 Test input 10 Control output 2 11 Reset input 12 Control output 1 13 RS-485(B) 14 RS-485(A) 15 0V 16 24V DC Safety light curtain (Set #1) OMRON Model F3SN-A series (Type 4) Model F3SN-B series (Type 2) Model F3SJ-A series (Type 4) or, multi-beam safety sensor ; OMRON Model F3SH series (Type 4) Light Curtain Input Module 1 Safety light curtain (Set #2) OMRON Model F3SN-A series (Type 4) Model F3SN-B series (Type 2) Model F3SJ-A series (Type 4) or, multi-beam safety sensor ; OMRON Model F3SH series (Type 4) (Note 1) If the safety light curtain (Set #1) is not connected, connect terminal 5 and terminal 7 directly with terminal 1. (Note 2) If the safety light curtain (Set #2) is not connected, connect terminal 10 and terminal 12 directly with terminal 16. • If the terminal 1 is short-circuited with the terminal 2, or otherwise, the terminal 15 is short-circuited with the terminal 16, the protection circuits discontinue the power supply through the terminals 1 and 16 automatically. Remove the causes of short-circuiting and recover by turning the main power ON again. • When the Model F3SN/F3SH/F3SJ is brought into the lockout state, the release may be effective only by turning the power OFF and ON again. Recover those by doing so. Never fail to secure the safety distances to the hazardous areas around the machine. Be sure to align the devices so as to prevent mutual interference when using multiple safety light curtains, multi-beam safety sensors or single-beam safety sensors. Failure to do so may cause nondetectable conditions and a serious injury to humans. Note 1: Example when the auxiliary output is of standard setting (ON when light interrupted). For other than standard setting, refer to the Catalog or User's Manual of F3SN/F3SH/F3SJ. F3SX User's Manual 4-7 Chapter 4 Specifications of Input Module Wiring diagram Shielded 0V (blue) Control output 1 (green) Control output 2 (white) External relay monitor input (red) (Note 1) 0V (blue) Shielded Control output 1 (green) Control output 2 (white) 24V DC (brown) Opened Interlock selection input (white) Test input (green) Reset input (yellow) Opened (red) 0V (blue) Shielded Auxiliary output (yellow) (Note 1) External relay monitor input (red) (Note 1) 24V DC (brown) Reset input (yellow) 24V DC (brown) Opened Interlock selection input (white) Test input (green) Opened (red) 0V (blue) RS-485 (A) (gray) Wiring diagram for inspection of Model F3SN/F3SH/F3SJ functions Shielded Model F39-JCA-D Receiver cable Model F39-JCA-L Emitter cable Receiver SLC2 Model F3SN/F3SH/ F3SJ Emitter 24V DC (brown) 24V DC (brown) Opened Interlock selection input (white) Reset input (yellow) Test input (green) Opened (red) Wiring example without Model F3SN/ F3SH/F3SJ connected. Light Curtain Input Module User's Manual 0V (blue) Shielded Chapter 4 F3SX 4-8 Model F39-JCA-D Receiver cable Model F39-JCA-L Emitter cable Test switch RS-485 (B) (pink) Auxiliary output (yellow) (Note 1) RS-485 (B) (pink) Receiver SLC1 Model F3SN/F3SH/ F3SJ Emitter RS-485 (A) (gray) Chapter 4 Specifications of Input Module Using a branch connector Connector connection is possible using a branch connector for safety light curtains. Emitter Safety light curtain or multi-beam safety sensor (Model F3SN/F3SH/F3SJ) Receiver Chapter 4 Light Curtain Input Module Branch connector for safety light curtains Model F39-CN5 Gray Double-end connector cable Model F39-JCB-L (Gray) Black Double-end connector cable Model F39-JCB-D (Black) Double-end connector cable for branch connector Model F39-JCT For the details of each model, refer to Chapter 6 Accessories. Accessories (sold separately) p.6-2 F3SX User's Manual 4-9 Chapter 4 Specifications of Input Module Wiring diagram for the case the external power is supplied to the Model F3SN/ F3SH/F3SJ When Model F3SN/F3SH/F3SJ is connected to the L1 module or L2 module, an F3SX can supply power source to one set of Model F3SN/F3SH/F3SJ through one connection terminal, or up to 4 sets of Model F3SN/F3SH/F3SJ through all of the connection terminals. Therefore, for supplying to sets of Model F3SN/F3SH/F3SJ in series or to 5 or more sets of Model F3SN/F3SX through the multiple connection terminals, an external power source is required as illustrated below. (Nonconformity to the stipulated wiring may cause a trouble.) (How to change wiring) 1.Connect 24V DC line (brown) of the Model F3SN/F3SH/F3SJ to 24V DC of the external power source. 2.Connect 0V line (blue) of the Model F3SN/F3SH/F3SJ to 0V of the external power source. Chapter 4 (Notice) * Use the power source identical to that of F3SX for supplying to the Model F3SN/F3SH/F3SJ. * Be careful about the total current consumption (power capacity). * It is not possible to use Model F3SN, Model F3SH and Model F3SJ in serial connection. Model F3SN/F3SH/F3SJ Light Curtain Input Module Receiver Emitter F39-JCA-L Emitter cable F39-JCA-D Receiver cable RS-485(A) (Grey) RS-485(B) (Pink) Shielding 0V (Blue) Control output 2 (White) Control output 1 (Green) Auxiliary output (Yellow) External relay monitor input (Red) 24V DC (Brown) 24V DC (Brown) Open Interlock selection input (White) Reset input (Yellow) Open (Red) Test input (Green) 0V (Blue) Shielding Power GND source 24V DC GND 24V DC A2 A1 2 8 6 1 3 4 5 7 0V 24V DC 0V Test input Reset input 24V DC RS-485(A) RS-485(B) Control output (1) Control output (2) E module or N module L1 or L2 module (Example of the wiring, where Model F3SN/F3SH/F3SJ is connected to either of the terminals 1 through 8 of the L2 module.) 4-10 F3SX User's Manual Chapter 4 Specifications of Input Module Safety Door Switch Input Module This module (D1 module) is the contact-type input device input module for use with safety door switch, etc. Each name and functions Safety door switch, etc. Safety door switch, etc. Input/output terminal 1 2 3 4 5 6 7 8 ER1 ER2 D1 D2 D3 D4 10 14 11 15 D1 Safety Door Switch Input Module 9 13 LED Chapter 4 D1 12 16 Input/output terminal Safety door switch, etc. Safety door switch, etc. •Connect with safety door switch, safety limit switch or the like of contact type. LED Indication ER1 Color Red Name Functions Error indicator Lights up or flashes when Terminal 5 or Terminal 7 input error occurs. Light-up : Not synchronized between two terminal inputs 1 flash : Short-circuit or mis-wiring between two terminal inputs 2 flashes : Failure or mis-wiring of input circuit Error indicator Lights up or flashes when Terminal 12 or Terminal 10 input error occurs. Light-up : Not synchronized between two terminal inputs 1 flash : Short-circuit or mis-wiring between two terminal inputs 2 flashes : Failure or mis-wiring of input circuit ER2 Red D1 Green Terminal 5 input indicator Lights up for Terminal 5 input. D2 Green Terminal 7 input indicator Lights up for Terminal 7 input. D3 Green Terminal 12 input indicator Lights up for Terminal 12 input. D4 Green Terminal 10 input indicator Lights up for Terminal 10 input. F3SX User's Manual 4-11 Chapter 4 Specifications of Input Module Input/output terminal Terminal No. Connection 1 2 Not used. 3 4 5 Contacts such as safety limit switch or safety door switch. 6 Set #1 7 Contacts such as safety limit switch or safety door switch. 8 9 Contacts such as safety limit switch or safety door switch. 10 Set #2 11 Contacts such as safety limit switch or safety door switch. 12 Chapter 4 13 Safety Door Switch Input Module 16 14 Not used. 15 (Note 1) When any terminal is not connected with a (safety) limit switch or a door switch, it should be directly connected in the following combination. Terminals 5 and 6, terminals 7 and 8, terminals 9 and 10, and terminals 11 and 12. Wiring diagram (NO contact) S1 24 Close Safety Guard S1, S3 : Limit switch S2, S4 : Safety limit switch (positive opening mechanism) (Model D4N, Model D4B) 23 11 5 12 S2 (NC contact) 5 6 7 6 7 8 Example with neither safety limit switch nor safety door switch connected. 8 9 10 11 12 D1 9 S4 (NC contact) 10 11 12 11 5 12 Input circuit Safety Guard Close F3SX User's Manual 7 24 24V DC 24V DC 24V DC Input circuit S3 (NO contact) 9 8 Input circuit 24V DC 23 4-12 6 10 Input circuit 11 12 Chapter 4 Specifications of Input Module Connection of Input Devices Connector for Set #2 connection Connector for Set #3 connection Connector for Set #4 connection Connector for Set #1 connection Chapter 4 Connection of Input Devices Figure as viewed from the main module side. Connecting section Connector for Set #1 connection Connector for Set #2 connection Connector for Set #3 connection Connector for Set #4 connection L2 module D1 module M1 module Model F3SN/ F3SH/F3SJ (Set #1) - - Safety door switch (Set #1) Safety mat (First connection area) Safety door switch (Set #2) Safety mat (Second connection area) - - Model F3SN/ F3SH/F3SJ (Set #2) •In order to secure the safety functions use appropriate input devices to configure the system. •Use the input device connectors in the order starting with Set #1. •For wiring in the case that a device or devices are not in use, refer to the wiring diagram of each module. •When wiring any devices, disconnect the power supply to F3SX and the devices to be connected. •Wire around the input and output terminals properly with care. F3SX User's Manual 4-13 Chapter 4 Specifications of Input Module MEMO Chapter 4 Connection of Input Devices 4-14 F3SX User's Manual Chapter 5 Installation and Wiring Installation 5-2 Placing into control board Placing to DIN rail Wiring 5-4 5-5 5-6 5-6 5-7 5-9 Chapter 5 Connection between main body and terminal block Processing of wire end Connecting bar terminal to terminal block connector Installation and Wiring F3SX User's Manual 5-1 Chapter 5 Installation and Wiring Installation Do not operate the F3SX controller in a hazardous environment, such as an environment that contains flammable or explosive gas. Doing so may cause fire or explosion by electric arc generated in the internal relays or externally connected electromagnetic switches. A "Responsible Person" who is well aware of and familiar with the machine must implement the installation of the F3SX and confirmation thereafter. And the users must have thorough understanding about the relevant installation requirements, safe distances, control devices and the functions before starting operation. For the inspection and/or maintenance of the F3SX, a “Responsible Person“ must confirm that the work has been properly performed. Maintenance Services and Inspection p.6-30 Chapter 5 Installation 5-2 Use F3SX in an enclosure rated at least IP54 (IEC60529). For ventilation, allow for 5mm or more on both sides of the F3SX and 50mm or more above and beneath. F3SX User's Manual Chapter 5 Installation and Wiring In order for F3SX to satisfy EN60204-1, IEC61496-1 and UL508, have the DC power unit comply with all of the following requirements. • Voltage within the rated (24V DC ± 10%). • Do not share the power source with other devices or machines. When the power source is shared by mulitiple devices, consider margins for the total rated current. • Compliant with the EMC Directive, for Industrial environments. • Double or reinforced insulation between the primary and secondary circuits. • Automatic recovery of over-current protection characteristics (voltage drop). • 20ms or over of the output hold time. • Satisfies the output characteristics requirements of a class 2 circuit or equivalent limited energy circuit, as stipulated in UL508. • Compliant with the laws and standards in relation to EMC and other electric device safety in the country or area where this unit is used. (Example: EMC Directive and Low Voltage Directive in EU.) When using a commercialized switching regulator, be sure to ground FG (frame ground terminal). (If not grounded, it may cause erroneous operations due to the switching noises.) With regard to the limited current and voltage circuit with power supplied by the isolated source such as the secondary winding of an isolating transformer: -the current is limited to 8A max. (including when short-circuited). Or, - a circuit protector to regulate the current such as a fuse is used and its rating should be 4.2A max. (at 24V DC power source) Installation (1) Chapter 5 [Remark] The power supply must conform to the following requirement (1) or (2) regarding a secondary circuit, in accordance with UL 508,to avoid a fire. Recommended power supply :Model S82K (50W, 90W type) manufactured by OMRON Corporation. This model is UL listing certified (UL508, Class 2), and is compliant with CE marking (EMC/Low Voltage Directive). (2) Circuits with a Class 2 power supply pursuant to UL1310 or with the power source supplied by a Class 2 transformer pursuant to UL1585. F3SX User's Manual 5-3 Chapter 5 Installation and Wiring Placing into control board If the DIN rail is too short for the width of F3SX, the product may drop out of the rail by vibration. Use end plate (Model PFP-M, sold separately), to fix F3SX on the DIN rail where necessary. • Use DIN rail (35mm-wide) for placing the main body into the control board. • Locate the wiring duct and main body on an appropriate position so that they cause no trouble to occur with placement/displacement of the unit, connection/disconnection of the connectors, or heat release of the unit. Use of the wiring duct of 60mm high or less is recommended. • Allow for 5mm or more on both sides of the module and 50mm or more above and beneath. Wiring duct Wiring duct 50mm or more 60mm max. Space in 5mm or more to the next module. Chapter 5 End plate (Model PFP-M) Installation Allow a space of 50mm or more both above and beneath. End plate (Model PFP-M) 50mm or more 35mm DIN rail End plate (Model PFP-M) Wiring duct Wiring duct 60mm max. (Unit:mm) • Use within the rated extent regarding the circumstances in the control panel. Items 5-4 Rating Ambient temperature Operating: -10 to +50C (no freezing or condensation) Ambient humidity 35 to 85%RH (no freezing or condensation) Vibration resistance 10 to 55Hz double amplitude of 0.7mm each in X, Y and Z direction, 20 sweeps (with power on) Shock resistance 100m/s2 each in X, Y and Z direction, 1000 times (with power on) F3SX User's Manual Chapter 5 Installation and Wiring Placing to DIN rail Placement 1. Hang the upper hook on the rail. 2. Push the main body until the lower hook is locked. 1 DIN rail 2 Chapter 5 Displacement Installation 1. Insert the edge of a flat-blade screw driver in the slot 4 of the hook. 2. Draw the hook downward. 3. Pull the main body forward to remove it from the rail. 4. Hold the main body upward. 3 2 1 F3SX User's Manual 5-5 Chapter 5 Installation and Wiring Wiring Wiring must be done while the power is turned OFF either for F3SX or the devices connected with it. Doing it with the power ON may cause an electric shock. And external devices in connection with this product may behave in an unexpected way. Connection between main body and terminal block Each part name and functions of terminal block (3) Chapter 5 (2) (1) Wiring Number Name Functions (1) Wire insertion slot Fix the wire within. (2) Wire release button Push this button to take out the wire. (3) Tester probe point Contact the tester probe at this position. Placement / displacement of terminal block connector The terminal block connector is mounted at the factory shipment. Displace the terminal block connector when making wiring. Displacement Main body Terminal block connector Placement Main body Terminal block connector Be careful not to catch a finger in the connector when installing it. 5-6 F3SX User's Manual Chapter 5 Installation and Wiring • The terminal block connector is provided with the protection key against erroneous wrong connectiion between the AC and the DC lines by mistake. (The “key” herein is the red board part attached to the entry of the terminal block connector. Two of the keys are attached to each terminal block connector. ) However, the insertion could be made if attempted forcefully or in a particular angle. The anti-erroneous insertion key is only a visual prevention mean but not of a structure to prevent an erroneous insertion. Ensure the wiring before inserting the connector. • Also, do not the terminal block connectors attached to the relay output module with any of other modules. Processing of wire end Wiring materials Select to use wiring materials conforming to the required standards. Recommended materials and tools p.6-4 Stranded wire should be processed with insulation-covered bar terminal (DIN46228-4 standard compatible type) at its ends before using for connection. Conforming wire (when using recommended bar terminals): 0.34 to 1.5mm2 AWG22 to 16 Chapter 5 Processing of wire end Wiring 1. Uncover the insulation of the wire. Length to uncover should meet the bar terminal to be used. 2. Insert the wire edge to the bar terminal. Use bar terminals compatible with the terminal block. 3. The wire end is to be inserted in the bar terminal. Confirm that the wire insulation is contained in the insulation cover of the bar terminal. 4. Crimp the metal part with the specialized tool. Use the crimping tool compatible with the bar terminal. Specialized tool Metal part to be crimped Processing is completed. F3SX User's Manual 5-7 Chapter 5 Installation and Wiring Proper example of processing wire end Proper example Insulation cover Improper example of processing wire end Improper example Description It may cause the wire to come out of the bar terminal. The removed part is too short. It may cause short-circuit or an electrical shock. The wire is uncovered at the insulation cover. Chapter 5 The wire end protrudes from the metal part of the bar terminal. It may cause improper connection with the terminal block. The protruding length must be less than 0.5mm. Wiring It may cause the wire to come out of the bar terminal. The crimped part is too short. It may cause short-circuit or an electrical shock. The insulation cover does not properly cover wire insulation. Two wire ends are crimped in a bar terminal. Avoid crimping two or more wire ends in a bar terminal. Doing so may cause a break of the wire, displacement of the cable or improper connection. For crimping two wires, use the 2-wire bar terminal. For such a case, ensure that the diameters are the same. It may cause short-circuit or an electrical shock. The insulation cover does not properly cover the wire. 5-8 F3SX User's Manual Chapter 5 Installation and Wiring Connecting bar terminal to terminal block connector Terminal block connector Wire with a bar terminal crimped at the end Wiring procedures 1. Insert the wire with bar terminal into the wire insertion slot. Chapter 5 Wiring 2. Insert to the end firmly. Improper example of wire connection Improper example The wire is not inserted to the end. The wire is not inserted straight. Description The wire may come out and cause short-circuit or an electric shock. It may not have been inserted to the depth of the connector. Disconnection 1. Push the lock release button with a screwdriver or Release button other tools. 2. Pull out the wire. F3SX User's Manual 5-9 Chapter 5 Installation and Wiring MEMO Chapter 5 Wiring 5-10 F3SX User's Manual Chapter 6 Appendix Accessories (sold separately) 6-2 Safety light curtain connection cable Accessories for function set-up software for model F3SX Recommended materials and tools Communication Reference 6-2 6-3 6-4 6-5 6-5 6-6 6-9 6-25 Error code and measures to be taken Error indications and measures to be taken Check List for Installation and Wiring 6-25 6-27 6-29 Maintenance Services and Inspection 6-30 Chapter 6 Outline of communication functions Communication procedure of CompoWay/F Command reference Troubleshooting Appendix Precautions concerning trial operation after changing function setup 6-30 Routine inspection 6-33 Biannual inspection 6-33 Quoted Standards 6-34 F3SX User’s Manual 6-1 Chapter 6 Appendix Accessories (sold separately) Safety light curtain connection cable Single-side connector cable for connection with safety light curtain • The attached at one side of the cable is the connector for Model F3SN/F3SH/F3SJ series. • Two different models are available for emitter and receiver. Set model Model F39-JC3A For emitter For receiver Model F39-JC3A-L Model F39-JC7A Model F39-JC7A-L Model F39-JC10A Model F39-JC10A-L Model F39-JC15A Model F39-JC15A-L Model F39-JC3A-D Gray cable Model F39-JC7A-D Model F39-JC10A-D Length (L, unit :mm) 3000 Black cable Model F39-JC15A-D 7000 10000 15000 Double-side connector cable for connection with safety light curtain • The attached at the both sides of the cable is the connector for Model F3SN/F3SH/F3SJ series. • Two different models are available for emitter and receiver. • The cable length should be limited by number of devices in serial connection. For the details, refer to Model F3SN/F3SH/F3SJ Instruction Manual. • Maximum cable length to be used for serial connection is 3m. Set model name For emitter For receiver Chapter 6 Model F39-JCR2B Model F39-JC3B Model F39-JC3B-L Model F39-JC3B-D Accessories (sold separately) Model F39-JC5B (Note) Model F39-JC5B-L Model F39-JC5B-D Model F39-JCR2B-D 200 Model F39-JCR5B Model F39-JCR5B-L Model F39-JCR5B-D 500 3000 Grey cable Model F39-JC7B-D Black cable 5000 Model F39-JC7B (Note) Model F39-JC7B-L Model F39-JC10B (Note) Model F39-JC10B-L Model F39-JC10B-D 10000 Model F39-JC15B (Note) Model F39-JC15B-L Model F39-JC15B-D 15000 Model F39-JC20B (Note) Model F39-JC20B-L Model F39-JC20B-D 20000 (Note): Not for use in serial connection. Branch connector for safety light curtains Model Connecting device Model F3SN/F3SH/F3SJ Model F3SX series Model F39-CN5 Double-end connector cable Model 6-2 Length (L, unit :mm) Model F39-JCR2B-L Cable length Model F39-JC1T 1m Model F39-JC3T 3m Model F39-JC5T 5m Model F39-JC10T 10 m F3SX User’s Manual Connecting device Model F39-CN5 Model F3SX series 7000 Chapter 6 Appendix Accessories for function set-up software for model F3SX Function set-up software for model F3SX Model name Model F3SX-CD Compatible OS Windows 98/2000/XP Communication cable • Cable to connect F3SX with a personal computer Model name Model F39-JC2X1 Shape D-SUB 9-pin socket Number of package 1 • Cable to connect F3SX with the programmable controller Model name Model F39-JC2X2 Shape D-SUB 9-pin plug Number of package 1 Chapter 6 Accessories (sold separately) F3SX User’s Manual 6-3 Chapter 6 Appendix Recommended materials and tools Bar terminal with plastic insulation collar Use the ferrule with insulation cover (bar terminal) conforming to DIN46228-4 standard. The ferrule with similar appearance but not conforming to the standard, may not match the terminal block of this product. (The dimensions regarding the wire are the rough standard. Confirm those beforehand.) Note: Use wire of the same diameter for the two-wire bar terminals if any are used Specifications for reference (Product specifications of Phoenix Contact Japan) Wire dimensions 8 0.8 2.0 14 8 1.1 2.5 AI 0.75-8GY 0.75 18 10 14 8 1.3 2.8 Accessories (sold separately) 1 For wire Chapter 6 AI 1.0-8RD 1.0 18 10 14 8 1.5 3.0 AI 1.5-8BK 1.5 16 10 14 8 1.8 3.4 AI-TWIN 2 x 0.5-8WH 2 x 0.5 - 10 15 8 1.5 2.5/4.7 AI-TWIN 2 x 0.75-8GY 2 x 0.75 - 10 15 8 1.8 2.8/5.0 AI-TWIN 2 x 1-8RD - 10 15 8 2.05 3.4/5.4 * 2 For 2 wires D2 L2 L2 Crimp tool specialized for bar terminal Manufacturer Phoenix Contact D2 Insulation cover L1 L1 D1 User’s Manual *1 *2 2x1 Insulation cover F3SX Dimensions 12.5 10 * 1 For 1 wire 6-4 Inner diameter of insulation cover D2 (mm) 10 20 Inner diameter of conductor D1 (mm) Entire length L1(mm) 22 0.5 AWG Length of metal part L2(mm) Removed length of insulation(mm) 0.34 AI 0.5-8WH Section area of conductor(mm2) AI 0.34-8TQ Model of bar terminal 2 For wire Bar terminal specifications Model CRIMPFOX UD6 D1 Chapter 6 Appendix Communication Reference Outline of communication functions The communication function is to monitor the input/output state, etc., of F3SX using the program created on the host computer such as a personal computer or a programmable controller. Accordingly, the descriptions are made here for the function from the viewpoint of the host computer. CompoWay/F is the unified communication procedures used in the OMRON versatile serial communication. Using CompoWay/F enables communication with the host computer to be simplified by the unified frame format and the set of commands conforming to the FINS*, of which validity has been proven in uses with the OMRON programmable controller or the similar products. *FINS (Factory Interface Network Service) : protocol to help message exchange among controllers on the OMRON FA Network. Communication specifications Connection of transmission channel RS-232C : Point-to-point RS-232C Synchronous fashion Asynchronous method Communication rate 9600bps Transmission code ASCII Chapter 6 Communication method Length of data bit 8 bit Length of stop bit 1 bit Error detection BCC (Block check character) None Interface RS-232C Re-try function None Communication buffer 149byte Transmission procedure The host computer transmits a command frame, and F3SX transmits a response frame back to the host computer. There, a command frame is responded by a response frame in correspondence. The operation of the command frame and response frame can be illustrated as follows. Host computer F3SX Command frame Communication Reference Flow control Command frame Response frame F3SX User’s Manual 6-5 Chapter 6 Appendix Wiring Example of wiring Model F39-JC2X1 PC/AT compatible F3SX Programmable controller Model F39-JC2X2 Communication procedure of CompoWay/F Hereinafter, with 0x attached before numeric figures, like (0x02), represents hexadecimal figures. With " " represent ASCII characters. Numeric figures under a segment of a frame represent a number in byte. Command frame FINS-mini command text Chapter 6 STX Node No. Sub-address SID 0x02 "00" "00" "0" 0x03 1 2 2 1 1 ETX BCC 1 Byte Communication Reference BCC Computation range STX Code to indicate the top of communication frame. Be sure to set this code for the top byte of (0x02). At the time of receiving STX again during reception, the reception will be re-tried from the received STX on. Node No. The machine number to specify the destination. By using the function set-up software for model F3SX (Model F3SX-CD, sold separately), the machine number can be specified. * The machine number is set to “00” at the factory shipment. Sub-address Be sure to specify "00". SID (service ID) Be sure to specify "0". FINS-mini command text Main body of command. ETX Code to indicate the end of text. (0x03) BCC Block check character. Stores BCC computation results raging from Node No. to ETX. BCC computation:BCC (Block check character) calculates exclusive-OR of the values for each 1byte from the node No. to ETX, and set the results at BCC. STX (0x02) Node No. "0" (0x30) "0" (0x30) Sub-address "00" (0x3030) SID "0" (0x30) FINS-mini command text "0601" (0x30363031) BCC = 0x30 0x30 0x30 0x30 0x30 0x30 0x36 0x30 0x31 0x03 = 0x34 indicates XOR (Exclusive-OR) computation. 6-6 F3SX User’s Manual ETX (0x03) BCC (0x34) Chapter 6 Appendix Response frame STX Node No. 0x02 "00" 1byte 2byte Sub-address End code FINS-mini response text MRS "00" 2byte ETX SRC BCC 0x03 1byte 2byte Data name 1byte Description STX Code to indicate the top of communication frame. This code is set for the top byte of (0x02). Node No. "00" is attached. *If you specified the machine number by using the function set-up software for model F3SX (Model F3SX-CD, sold separately), the specified number will be attached. Sub-address "00" is attached. End code Returns executed results against a command frame. FINS-mini response text Main body of response. ETX Code to indicate the end of text. (0x03) BCC Block check character. Stores BCC computation results raging from Node No. to ETX. End code of a response is as follows. End code Name Priority of error detection Error The case that command processing ends normally. None "0F" The case that specified FINS command cannot be executed. 6 "11" Framing error The case that stop bit of command frame character is [0]. 1 "12" Over-run error The case that new data transmission is attempted when already filled with received data. 2 "13" BCC error The case that received BCC is not identical to the computed BCC. 4 "14" Format error The case that the character in FINS-mini command text is other than "0" to "9", "A" to "F", " " (space). The case that SID and FINS-mini command text do not exist, or else 5 FINS-mini command text does not exist. The case that [MRC/SRC] of FINS-mini command text is missing. "18" Frame length error The case that received frame exceeds given number of bytes. • • • • Communication Reference Normal end FINS command error Chapter 6 "00" 3 End code is returned in response to one command frame receipt addressed to own Node. No response returns when frame is not completed up to ETX, BCC characters. No response returns when sub-address is other than "00". Priority of error detection indicates the order of errors when multiple errors have occurred. Note:It is affected by noises, etc., whether error response returns or no response returns. Ensure that re-try is made on the host computer side. F3SX User’s Manual 6-7 Chapter 6 Appendix Command text FINS-mini command text / FINS-mini response text is the main text of command / response. FINS-mini command text / FINS-mini response text is composed of the following data. Command MRC (Main request code) and SRC (Sub-request code), and the necessary data thereafter, are added. STX Node No. Sub-address SID "00" "0" 0x02 MRC SRC 2 2 FINS-mini Command text ETX BCC 0x03 Data Byte Example of end code When no command text is provided (i.e., the mahcine number is “00”) Chapter 6 Command STX 0x02 Node No. "0" "0" Sub-address "0" "0" ETX BCC 0x03 Communication Reference Response STX 0x02 Node No. "0" "0" Sub-address "0" "0" When node number is missing. Command STX ETX 0x02 0x03 BCC One character short for node number. Response No response is provided. 6-8 "0" SID F3SX User’s Manual End code "1" "4" ETX 0x03 BCC Chapter 6 Appendix Response After MRC/SRC, MRES (Main response code) and SRES (Sup-response code), and the necessary data thereafter, are added. Node No. STX FINS-mini Response text Sub-address 0x02 ETX 0x03 "00" MRC SRC 2 BCC MRES SRES 2 2 2 Data Byte Only MRC/SRC, MRES/SRES are the response for the case that the specified FINS-mini command could not be executed. Command reference Listing of FINS-mini commands MRC/SRC listing MRC SRC Error Chapter 6 Type of command "06" "01" Reads out F3SX operations (states of input/output, errors). Echo back test "08" "01" Executes echo back test. Readout of parameter area "02" "01" Reads out measurements in feedback monitoring time, energizing time, number of output switching frequency, error code, error logs and crosschannel synchronous monitoring time. Readout of F3SX status Fins-mini command text MRC SRC "06" "01" 2 2 Communication Reference Readout of F3SX status Fins-mini response text MRC SRC "06" "01" 2 2 Response code 4 Operating state State of F3SX 2 Response code Response code Error name "1001" Excess command length "0000" Normal end Description The command is too long. - Operating state Code Operating state "00" Normal operating "10" In lock-out state F3SX User’s Manual 6-9 Chapter 6 Appendix State of F3SX The data differs depending on the F3SX model. The data are arranged in order from the left to the right as viewed towards the F3SX front panel. R N M1 Right Left N (main module) data M1 (input module) data R (relay output module) data ... N (main module) data :2byte [2nd byte] Bit 0 Chapter 6 External indicator states 1 ON 0 OFF 1 (None) - (None) 2 AS1 output state ON OFF 3 AS2 output state ON OFF 4 AS3 output state ON OFF 5 000 :Normal 001 :Synchronization check error with emergency-stop input. Error messages 010 :Short-circuiting between emergency-stop inputs or error around internal (The bit alignment of error massage circuit. : bit 7, bit 6, bit 5) 100 :Mis-wiring or wire break around Y1 to Y3 terminals. 101 :Error in external indicator, error around circuit. 111 :Other error (including error in other modules). 6 Communication Reference 6-10 Contents of data 7 [1st byte] Bit F3SX User’s Manual Contents of data 1 0 0 T12 input states ON OFF 1 T22 input states ON OFF 2 Y2 input states ON OFF 3 Y3 input states ON OFF 4 FB input states ON OFF 5 In interlock state In interlock state Normal state 6 Initiation command input states ON OFF 7 (None) - (None) Chapter 6 Appendix E (main module) data: 2 byte [2nd byte] Bit Contents of data 1 0 0 SS1 output state ON OFF 1 SS2 output state ON OFF 2 AS1 output state ON OFF 3 AS2 output state ON OFF 4 AS3 output state ON OFF 5 000: Normal 001:Synchronization check error with emergency-stop input. Error messages 010 :Short-circuiting between emergency-stop inputs or error around internal (The bit alignment of error massage circuit. : bit 7, bit 6, bit 5) 011: Mis-wiring at SS1/SS2 terminal / error in the internal circuits 100 :Mis-wiring or wire break around Y1 to Y3 terminals. 111 :Other error (including error in other modules). 6 7 [1st byte] Bit Contents of data 1 0 0 T12 input states ON OFF 1 T22 input states ON OFF 2 Y2 input states ON OFF 3 Y3 input states ON OFF 4 FB input states ON OFF In interlock state In interlock state Normal state Initiation command input states ON OFF 7 (None) - (None) Chapter 6 5 6 Communication Reference R (relay output module) data :1byte Bit 0 Contents of data 23-24 output states 1 ON 0 OFF 1 33-34 output states ON OFF 2 (None) - (None) 3 (None) - (None) 4 (None) - (None) 5 6 7 Error messages 000 :Normal (The bit alignment of error massage 001 :Error around relay or internal circuit. : bit 7, bit 6, bit 5) 111 :Other error (including error in other modules). F3SX User’s Manual 6-11 Chapter 6 Appendix M1 (mat input module) :2byte [2nd byte] Bit Contents of data 1 0 0 T12 input states ON OFF 1 T22 input states ON OFF 2 (None) - (None) 3 (None) - (None) 4 T32 input states ON OFF 5 T42 input states ON OFF 6 (None) - (None) 7 (None) - (None) * For mats, data of T12/T22 or T32/T42 should be "0" if a mat switch is activated. [1st byte] Bit Contents of data 0 (None) - (None) 1 (None) - (None) 2 (None) - (None) 3 (None) - (None) 4 (None) - (None) Error messages 000 :Normal 010: Breakage or circuit failure between T1-T2 100: Breakage or circuit failure between T3-T4 111: Other error (including other module's failure) 5 Chapter 6 6 7 Communication Reference L2 (light curtain input module) data : 1byte Bit User’s Manual 1 0 Input states of control output 1 (terminals 1 to 8 side) ON OFF 1 Input states of control output 2 (terminals 1 to 8 side) ON OFF 2 Input states of control output 1 (terminals 9 to 16 side) ON OFF 3 Input states of control output 2 (terminals 9 to 16 side) ON OFF 4 (None) - (None) 5 000 :Normal 001 :Synchronization check error between control outputs (terminals 1 to 8 side). Error messages 010 :Error around input circuit of control output (terminals 1 to 8 side). (The bit alignment of error massage 011 :Synchronization check error between control outputs (terminals 9 to 16 : bit 7, bit 6, bit 5) side). 100 :Error around input circuit of control output (terminals 9 to 16 side). 111 :Other error (including error in other modules). 7 F3SX Contents of data 0 6 6-12 1 0 Chapter 6 Appendix D1 (door switch input module) data : 2 bytes [2nd byte] Bit Contents of data 1 0 0 Terminal 5 input states ON OFF 1 Terminal 7 input states ON OFF 2 (None) - (None) 3 (None) - (None) 4 Terminal 12 input states ON OFF 5 Terminal 10 input states ON OFF 6 (None) - (None) 7 (None) - (None) [1st byte] Bit Contents of data 1 0 (None) - (None) 1 (None) - (None) 2 (None) - (None) 3 (None) - (None) 4 (None) - (None) 5 000 :Normal 001 :Synchronization check error between terminals 5-7. Error messages 010 :Short-circuiting between terminals 5-7 or error around circuit. (The bit alignment of error massage 011 :Synchronization check error between terminals10-12. : bit 7, bit 6, bit 5) 100 :Short-circuiting between terminals10-12 or error around circuit. 111 :Other error (including error in other modules). 6 7 Chapter 6 0 Communication Reference F3SX User’s Manual 6-13 Chapter 6 Appendix Echo back test Fins-mini command text MRC SRC "08" "01" 2 2 Test data Fins-mini response text MRC SRC "08" "01" 2 2 Test data Response code 4 Test data Transmitted arbitrary test data will be sent back. Response code Response code Error name "1001" Excess command length "0000" Normal end Description The command is too long. - Chapter 6 Note:Maximum number of test data byte is 20byte. If a command with the test data in 21byte or more is sent, error will be responded. Note:ASCII characters to be used for test data are limited to " " (space), "0" to "9", and "A" to "F". If any ASCII characters other than these are used, the end code will become [14 : Format error]. Communication Reference Readout of parameter area Fins-mini command text MRC SRC "02" "01" Parameter type Readout start address Number of elements 2 2 4 4 4 Fins-mini response text MRC SRC "02" "01" Response code Parameter type Readout start address Number of elements 2 2 4 4 4 4 Data name Description Parameter type The data of readout parameter type is attached. Readout start address The read start address is attached. Number of elements The read number of elements is attached. Readout data 6-14 F3SX User’s Manual The data of readout parameter is attached. Access size of the data is byte. Readout data (requested) Chapter 6 Appendix Response code Response code Error name Description "1001" Excess command length The command is too long. "1002" Short of command length The command is too short. "1101" Area type error Wrong parameter type. "1104" Error outside of end address range The specified end address (Start address plus number of elements) exceeds processing range. "1100" Parameter error Wrong parameter setting (Type, address, number of elements). "2203" Operation error Designated operation is not executed. "0000" Normal end - Parameter type listing Parameter type code Command name Error Reading the time length from when safety output turns OFF until feedback input turns ON. "4005" Readout of feedback monitor time measurements (Safety output OFFON) Reading the time length from when safety output turns ON until feedback input turns OFF. "4006" Readout of energizing time Reading the accumulated time length that F3SX power has been ON. "4007" Readout of number of output switching frequency Reading accumulated number of frequency that safety output of F3SX has switched. "4008" Readout of error code Reading error code in lock-out state. "4009" Readout of error log Reading past error logs (Error code and the relevant energizing time at the time of occurrence). "4010" Readout of output-synchronized monitor time (main module) Regarding the emergency-stop input section of the main module, the time length from when one part turns ON till the other turns ON is read out. "4011"`"4014" Readout of input-synchronized monitor time (Input module: Terminals 1 to 8) Regarding the safety input section of input module, the time length from when one side turns ON till the other turns ON is read out. "4021"- "4024" Readout of input-synchronized monitor time (Input module: Terminals 9 to 16) Regarding the safety input section of input module, the time length from when one side turns ON till the other turns ON is read out. Readout of feedback monitor time measurements (Safety output ONOFF) Items Error Error Reading the time length from when safety output turns OFF until feedback input turns ON. Type code "4004" Number of data 2byte x 16 for each 1 data = Max. 32byte (Past 16 data can be read.) Readout start address Contents of data "0000" Latest feedback monitor time measurements. "0001" The feedback monitor time measurements 2 times before the latest. "0002" The feedback monitor time measurements 3 times before the latest. "000F" Communication Reference Readout of feedback monitor time measurements (Safety output ONOFF) Chapter 6 "4004" The feedback monitor time measurements 16 times before the latest. F3SX User’s Manual 6-15 Chapter 6 Appendix Example of command (1) Reading out the latest feedback monitor time measurements. Command STX 0x02 CompoWay/F MRC header SRC Type code Address Number of elements ETX "02" "01" "4004" "0000" "8002" 0x03 CompoWay/F MRC header SRC Response code Type code Address Number of elements Data ETX "01" "0000" "4004" "0000" "8002" "001A" 0x03 Data ETX "00000" BCC Response STX 0x02 "000000" "02" BCC The read data is “001A” = 26 (ms). (2) Reading out the last 3 feedback monitor time measurements. Command STX 0x02 SRC Type code Address Number of elements ETX "02" "01" "4004" "0000" "8006" 0x03 CompoWay/F MRC header SRC Response code Type code Address Number of elements "01" "0000" "4004" "0000" "8006" CompoWay/F MRC header "00000" BCC Response Chapter 6 STX 0x02 "000000" "02" BCC "001A00150 0x03 017" Communication Reference The read data is “001A00150017” = Latest measurements is 26 (ms), measurements 2 times before the latest is 21 (ms), and 3 measurements before the latest is 23 (ms). (3) Reading out the feedback monitor time measurement 7 times before the latest. Command STX 0x02 CompoWay/F MRC header SRC Type code Address Number of elements ETX "02" "01" "4004" "0006" "8002" 0x03 CompoWay/F MRC header SRC Response code Type code Address Number of elements Data ETX "01" "0000" "4004" "0006" "8002" "0105" 0x03 "00000" BCC Response STX 0x02 "000000" "02" BCC The read data is “0105” = 261 (ms). Note: Logs are held during the time when the power is ON. If the power is turned OFF or the system reset is activated, the prior data storage should be cleared of. Note:If the address is in the range other than "0000" to "000F", the response should be [Parameter error : 1100] Note: This command is accepted only when the safety output is OFF. The response when safety output is ON should be [Operating error : 2203]. 6-16 F3SX User’s Manual Chapter 6 Appendix Readout of feedback monitor time measurements (Safety output OFFON) Items Error Error Reading the time length from when safety output turns ON until feedback input turns OFF. Type code "4005" Number of data 2byte x 16 for each 1 data = Max. 32byte (Past 16 data can be read.) Readout start address Contents of data "0000" Latest feedback monitor time measurements. "0001" The feedback monitor time measurements 2 times before the latest. "0002" The feedback monitor time measurements 3 times before the latest. "000F" The feedback monitor time measurements 16 times before the latest. Example of command (1) Reading out the latest feedback monitor time measurements. Command STX 0x02 CompoWay/F MRC header SRC Types Code Address Number of elements ETX "02" "01" "4005" "0000" "8002" 0x03 CompoWay/F MRC header SRC Response code Type code Address Number of elements Data ETX "01" "0000" "4005" "0000" "8002" "001A" 0x03 "00000" BCC STX 0x02 "000000" "02" BCC Communication Reference The read data is “001A” = 26 (ms). (2) Reading out the last 3 feedback monitor time measurements. Command STX 0x02 SRC Type code Address Number of elements ETX "02" "01" "4005" "0000" "8006" 0x03 CompoWay/F MRC header SRC Response code Type code Address Number of elements Data ETX "01" "0000" "4005" "0000" "8006" "001A0015 0017" 0x03 CompoWay/F MRC header "00000" Chapter 6 Response BCC Response STX 0x02 "000000" "02" BCC The read data is “001A00150017” = Latest measurements is 26 (ms), measurements 2 times before the latest is 21 (ms), and 3 measurements before the latest is 23 (ms). (3) Reading out the feedback monitor time measurement 7 times before the latest. Command STX 0x02 CompoWay/F MRC header "00000" "02" SRC Type code Address Number of elements ETX "01" "4005" "0006" "8002" 0x03 BCC F3SX User’s Manual 6-17 Chapter 6 Appendix Response CompoWay/F MRC header STX 0x02 "000000" "02" SRC Response code Type code Address Number of elements Data ETX "01" "0000" "4005" "0006" "8002" "0105" 0x03 BCC The read data is “0105” = 261 (ms). Note:The history can be stored only during the power is ON. If the power is turned OFF, the prior data storage should be cleared of. Note:If the address is in the range other than "0000" to "000F", the response should be [Parameter error : 1100] Note:This command is accepted only when the safety output is OFF. The response when safety output is ON should be [Operating error : 2203]. Readout of energizing time Items Error Error Reading the accumulated time length that F3SX power has been ON. Type code "4006" Data volume 4byte Readout start address “0000” (fixed) Contents of data Accumulated time length that F3SX power has been ON. Chapter 6 Example of command Reading out the accumulated time length that the F3SX power has been ON. Command Communication Reference SRC Type code Address Number of elements ETX "02" "01" "4006" "0000" "8004" 0x03 CompoWay/F MRC header SRC Response code Type code Address Number of elements Data ETX "01" "0000" "4006" "0000" "8004" "001055FB" 0x03 CompoWay/F MRC header STX 0x02 "00000" BCC Response STX 0x02 "000000" "02" BCC The read data is “001055FB” = 1070587 (minnutes). Note:The data is stored in the F3SX’s EEPROM every 15 minutes. Accordingly, readout value after the power is re-turned ON may be less than that obtained before the re-turning. Note:If the address is other than “0000”, the response should be [Parameter error : 1100]. Readout of number of output switching frequency Items Error Reading the accumulated number of safety output switching frequency. Type code "4007" Data volume 4byte Readout start address “0000” (fixed) 6-18 Error F3SX User’s Manual Contents of data Accumulated number of F3SX output switching frequency. Chapter 6 Appendix Example of command Reading out the accumulated number of F3SX output switching frequency. Command SRC Type code Address Number of elements ETX "02" "01" "4007" "0000" "8004" 0x03 CompoWay/F MRC header SRC Response code Type code Address Number of elements Data ETX "01" "0000" "4007" "0000" "8004" "00012345" 0x03 CompoWay/F MRC header STX 0x02 "00000" BCC Response STX 0x02 "000000" "02" BCC The read data is “00012345” = 74565 (times). Note:The data is stored in the F3SX’s EEPROM every 15 minutes. Accordingly, readout value after the power is re-turned ON may be less than that obtained before the re-turning. Note:If the address is other than “0000”, the response should be [Parameter error : 1100]. Readout of error code Items Error Reading the error code of F3SX. Type code "4008" Data volume 2byte Readout start address Contents of data Error code of F3SX Communication Reference “0000” (fixed) Chapter 6 Error Example of command Reading out the error code of F3SX. Command STX 0x02 CompoWay/F MRC header SRC Type code Address Number of elements ETX "02" "01" "4008" "0000" "8002" 0x03 CompoWay/F MRC header SRC Response code Type code Address Number of elements Data ETX "01" "0000" "4008" "0000" "8002" "2001" 0x03 "00000" BCC Response STX 0x02 "000000" "02" BCC The read data is “2001”: Wiring error in the reset input. Note:If the F3SX transmits this command during normal operation, the response data should be "0000". Note:If the address is other than “0000”, the response should be [Parameter error : 1100]. Note: For the correspondence of error code with error contents, see “Troubleshooting”. Troubleshooting p.6-25 F3SX User’s Manual 6-19 Chapter 6 Appendix Readout of error log Items Error Error Reading the error code of F3SX. The past 10 of data can be read including the latest. Type code "4009" Contents of data Error code (2byte) + energizing time at error occurring (4byte) = 6byte in total (= 8006 elements) Data volume 6byte per 1 data x 10 (able to read out data for the last 10 logs) = Max. 60 byte. Readout start address Contents of data "0000" The latest error log. "0001" The error logs 2 time before the latest. "0002" The error logs 3 time before the latest. "0009" The error logs 10 time before the latest. Example of command (1) Reading out the latest error log. Command STX 0x02 CompoWay/F MRC header Chapter 6 SRC Type code Address Number of elements ETX "02" "01" "4009" "0000" "8006" 0x03 CompoWay/F MRC header SRC Response code Type code Address Number of elements Data ETX "01" "0000" "4009" "0000" "8006" "230100105A 3B" 0x03 "00000" BCC Response STX Communication Reference 0x02 "000000" "02" BCC The read data is “230100105A3B” = Error code 2301 : Short-circuiting or mis-wiring around emergency-stop input, the energizing time is 1071675 minutes. (2) Reading out the 2 last error log data. Command STX 0x02 SRC Type code Address Number of elements ETX "02" "01" "4009" "0000" "800C" 0x03 CompoWay/F MRC header SRC Response code Type code Address Number of elements Data ETX "01" "0000" "4009" "0000" "800C" "2301000105 06390300009 2A3" 0x03 CompoWay/F MRC header "00000" BCC Response STX 0x02 "000000" "02" BCC the read data is “2301000105063903000092A3” = The latest error code 2301 : Short-circuiting or mis-wiring around emergency-stop input, the energizing time is 66822 minutes. 2 error codes before the latest 3903 : Wire break or error in external indicator, the energizing time is 37539 minutes. 6-20 F3SX User’s Manual Chapter 6 Appendix (3) Reading out the error log data 7 times before the latest. Command SRC Type code Address Number of elements ETX "02" "01" "4009" "0006" "8006" 0x03 CompoWay/F MRC header SRC Response code Type code Address Number of elements "01" "0000" "4009" "0006" "8006" CompoWay/F MRC header STX 0x02 "00000" BCC Response STX 0x02 "000000" "02" Data ETX BCC "2701005503 0x03 61" The read data is “270100550361” = Error code 2701 : Error around the circuit in F3SX, the energizing time is 5571425 minutes. Note:If the address is in the range other than "0000" to "0009", the response should be [Parameter error : 1100]. Note: For the correspondence of error code with error contents, see “Troubleshooting”. Troubleshooting p.6-25 Note:This command is accepted only when safety output is OFF. The response when safety output is ON should be [Operating error : 2203]. Items Error Type code "4010" Data volume 2byte x 16 for each 1 data = Max. 32byte (Past 16 data can be read.) Readout start address Contents of data "0000" The latest measurements of cross-channel synchronous monitor time at the emergency-stop input "0001" Measurements two times before the last of cross-channel synchronous monitor time at the emergencystop input "0002" Measurements three times before the last of cross-channel synchronous monitor time at the emergency-stop input Communication Reference Error Regarding the emergency-stop input section of the main module, the time length from when one side turns ON till the other turns ON (time difference between T12 and T22 turn ON) is read out. Chapter 6 Readout of cross-channel synchronous monitor time (Main Module) Measurements 16 times before the last of cross-channel synchronous monitor time at the emergencystop input "000F" Example of command (1) Reading the latest cross-channel synchronous monitor time at the emergency-stop input. Command STX 0x02 CompoWay/F MRC header "00000" "02" SRC Type code Address Number of elements ETX "01" "4010" "0000" "8002" 0x03 BCC Read the latest cross-channel synchronous monitor time at the emergency-stop input. F3SX User’s Manual 6-21 Chapter 6 Appendix Response STX 0x02 CompoWay/F MRC header "000000" "02" SRC Response code Type code Address Number of elements Data ETX "01" "0000" "4010" "0000" "8002" "0014" 0x03 BCC The read data is 0014 = 20(ms). (2) Reading the data 3 times before the latest of cross-channel synchronous monitor time at the emergency-stop input. Command STX 0x02 CompoWay/F MRC header "00000" "02" SRC Type code Address Number of elements ETX "01" "4010" "0000" "8006" 0x03 BCC Read the past three cross-channel synchronous time measurements at the emergency-stop input. Response STX 0x02 CompoWay/F MRC header "000000" "02" SRC Response code Type code Address Number of elements Data ETX "01" "0000" "4010" "0000" "8006" "0014" "001A" "0017" 0x03 BCC Chapter 6 The read data is 0014001A0017 = the latest is 20(ms), two times before the latest is 26(ms), and three times before the latest is 23(ms). (3) Reading the data 7 times before the latest of cross-channel synchronous monitor time at the emergency-stop input. Communication Reference Command STX 0x02 CompoWay/F MRC header "00000" "02" SRC Type code Address Number of elements ETX "01" "4010" "0006" "8002" 0x03 BCC Read seven times before the last cross-channel synchronous monitor time at the emergency-stop input. Response STX 0x02 CompoWay/F MRC header "000000" "02" SRC Response code Type code Address Number of elements Data ETX "01" "0000" "4010" "0006" "8002" "00C8" 0x03 BCC The read data is 00C8 = 200(ms). Note: The history is stored only during the power is ON. If the power is turned OFF or the system reset is activated, the prior data storage should be cleared. Note: If the address is other than 0000 to 000F, the response should be [Parameter error : 1100]. Note: This command is accepted only when the safety output is OFF. The response when safety output is ON should be [Operating error : 2203]. Note: The maximum measurement time for the time difference is 59990ms. 6-22 F3SX User’s Manual Chapter 6 Appendix Readout of cross-channel synchronous monitor time (Input Module) <Terminals 1 to 8> Items Error Error Regarding the safety input section of the input module (terminals 1 to 8), the time length from when one side turns ON till the other turns ON is read out. Type code "4011"-"4014" Data volume 2byte x 16 for each 1 data = Max. 32byte (Past 16 data can be read.) <Terminals 9 to 16> Items Error Error Regarding the safety input section of the input module (terminals 9 to 16), the time length from when one side turns ON till the other turns ON is read out. Type code "4021"`"4024" Data volume 2byte x 16 for each 1 data = Max. 32byte (Past 16 data can be read.) Readout start address Contents of data "0000" The latest measurements of cross-channel synchronous monitor time at the safety input "0001" The data of measurements two times before the latest cross-channel synchronous monitor time at the safety input "0002" The data of measurements three times before the latest cross-channel synchronous monitor time at the safety input "000F" The data of measurements 16 times before the latest cross-channel synchronous monitor time at the safety input [4], four to the right of the main module The second to the least significant digit: Communication Reference Regarding type code Specify the safety switch (safety input section) to read out cross-channel synchronous monitor time by the type code. The least significant digit: Module position [1], to the right of the main module [2], two to the right of the main module Chapter 6 [1] terminals 1 to 8 side [2] terminals 9 to 16 side F3SX-N-M1D1 4010 4012 4011 T12 T11 T22 T21 1 2 3 4 1 2 3 4 5 6 7 8 5 6 7 8 N M1 9 10 11 12 9 D1 10 11 12 13 14 15 16 13 14 15 16 4021 4022 F3SX User’s Manual 6-23 Chapter 6 Appendix Example of command (for the case of abovementioned F3SX-N-M1D1) (1) Reading out cross-channel synchronous monitor time at the M1 module terminals 1 to 8 (Safety mat). Command STX 0x02 CompoWay/F MRC header "00000" "02" SRC Type code Address Number of elements ETX "01" "4011" "0000" "8002" 0x03 BCC Read the latest cross-channel synchronous monitor time at the emergency-stop input. Response STX 0x02 CompoWay/F MRC header "000000" "02" SRC Response code Type code Address Number of elements Data ETX "01" "0000" "4011" "0000" "8002" "001A" 0x03 BCC The read data is 007D = 125(ms). (2) Reading the last three data of cross-channel synchronous monitor time at the D1 module terminals 9 to 16 side (ex. limit switch). Command STX 0x02 CompoWay/F MRC header "00000" "02" SRC Type code Address Number of elements ETX "01" "4022" "0000" "8006" 0x03 BCC Read three times before the latst cross-channel synchronous monitor time at the emergency-stop input. Chapter 6 Response STX Communication Reference 0x02 CompoWay/F MRC header "000000" "02" SRC Response code Type code Address Number of elements Data ETX "01" "0000" "4022" "0000" "8006" "0014" "001A" "0017" 0x03 BCC The read data is 0014001A0017 = the latest is 20(ms), two times before the latest is 26(ms), and three times before the latest is 23(ms). (3) Reading the data 7 times before the latest cross-channel synchronous monitor time at the D1 module terminals 1 to 8 side (ex. Limit switch). Command STX 0x02 CompoWay/F MRC header "00000" "02" SRC Type code Address Number of elements ETX "01" "4012" "0006" "8002" 0x03 BCC Read seven times before the last cross-channel synchronous monitor time at the emergency-stop input. Response STX 0x02 CompoWay/F MRC header "000000" "02" SRC Response code Type code Address Number of elements Data ETX "01" "0000" "4012" "0006" "8002" "00C8" 0x03 BCC The read data is 00C8 = 200(ms). Note: The history is stored only during the power is ON. If the power is turned OFF or the system reset is activated, the prior data storage should be cleared. Note: If the address is other than 0000 to 000F, the response should be [Parameter error : 1100]. Note: This command is accepted only when the safety output is OFF. The response when safety output is ON should be [Operating error : 2203]. Note: When read out for the output module, the response should be [Parameter error: 1100]. 6-24 F3SX User’s Manual Chapter 6 Appendix Troubleshooting Error code and measures to be taken Every time when F3SX enters into lock-out state, the error code is recorded. The error codes can be read out through communication. Take appropriate measures according to the table below. (For the details of communication commands, see “Communication Reference”.) Communication Reference p.6-5 Code 0000 Error In operation with no error. 01XX to Error around F3SX internal 0CXX circuit. Assumed causes Example of measures - - Affected by noises excess level. Confirm noise environment surrounding F3SX. Replace F3SX. 2001 Improper wiring with reset input terminal. Confirm that wiring is suitable for auto reset or manual reset. 2002 Wiring error around reset input terminal. Wire break or short-circuit around reset input terminal. Confirm that wiring is suitable for auto reset or manual reset. Affected by noises excess level. Confirm noise environment surrounding F3SX. Trouble with internal circuit related to reset input terminal. Replace F3SX. Error around F3SX internal circuit. Affected by noises excess level. Confirm noise environment surrounding F3SX. Trouble with F3SX internal circuit. Replace F3SX. 22xx Error around F3SX internal circuit. Affected by noises excess level. Confirm noise environment surrounding F3SX. Trouble with F3SX internal circuit. Replace F3SX. 2301 Short-circuit among inputs of emergency-stop switch. Short-circuiting around emergency-stop switch wiring. Confirm wiring of emergency-stop switches. 240X Short-circuit or wiring error around safety input (terminals 1 to 8 side). Short-circuiting in wiring of input device connected to input module. Confirm wiring of input device connected to input module. 242X Short-circuit or wiring error around safety input (terminals 9 to 16 side). Short-circuiting in wiring of input device connected to input module. Confirm wiring of input device connected to input module. Affected by noises excess level. Confirm noise environment surrounding F3SX. Trouble with F3SX internal circuit. Replace F3SX. 2003 21xx Error around reset input circuit. 2901 2B01 2B02 2D01 Short-circuiting between SS1 and SS2 terminals or mis-wiring of SS1 or SS2 Trouble with DC solid-state safety terminal. output (E module only) Trouble with SS1 or SS2 terminal internal circuit. 2AXX 2CXX Error around F3SX internal 2EXX circuit. to 36XX 3801 Initial wiring error around feedback input. Check the wiring between SS1 and SS2 terminals. Replace F3SX. Affected by noises excess level. Confirm noise environment surrounding F3SX. Trouble with F3SX internal circuit. Replace F3SX. Improper wiring with external device such as contactor. Troubleshooting 25XX to Error around F3SX internal 28XX circuit. Chapter 6 Trouble with F3SX internal circuit. Initial wiring error around reset input terminal. Confirm wiring with external device such as contactor. Wiring for reset inputs p.2-28 F3SX User’s Manual 6-25 Chapter 6 Appendix Code 3802 Time-out in feedback input monitoring. 3803 Wiring error around feedback input. 3901 Error around external indicator output circuit (EL2). 3902 3903 Chapter 6 Error around external indicator output circuit (EL1). Wiring error around external indicator output, or error in external indicator. 3AXX Error in F3SX internal circuits 4001 4002 4003 Errors in log data. 5001 Error around F3SX internal circuit. Assumed causes Trouble occurs with any of the external devices such as contactor. Example of measures Replace the external device. Short-circuiting or wire break around Confirm the wiring with relay contacts relay contacts or feedback input terminal. or feedback input terminal. Short-circuiting or wire break around Confirm the wiring with relay contacts relay contacts or feedback input terminal. or feedback input terminal. Affected by noises excess level. Confirm noise environment surrounding F3SX. Trouble with internal circuit in of external indicator output terminal. Replace F3SX. Affected by noises excess level. Confirm noise environment surrounding F3SX. Trouble with internal circuit in of external indicator output terminal. Replace F3SX. Wire break in connection with external indicator. Confirm wiring with external indicator. The external indicator is defective. Replace external indicator. Affected by excess level of noises Check noise circumstances. Troubles in F3SX internal circuits Replace F3SX. History data of energizing time and output switching frequency and error log have been initialized by noises, etc. (It means that the history has been initialized. The F3SX performance is not affected.) Affected by noises excess level. Confirm noise environment surrounding F3SX. Trouble with F3SX internal circuit. Replace F3SX. Note: The least significant digit of the error code 240X / 242X / 270X denotes the module position. The input module positions are denoted in the manner 1, 2, ... in the order from the main module side. Troubleshooting 6-26 Error F3SX User’s Manual Chapter 6 Appendix Error indications and measures to be taken When F3SX detects an error, indicator of ER lights up, or flashes to notify the error contents. Take appropriate measures according to the table below. Main module ER indication Error Lighting up 1 1-time flashing 1 2-time flashing 1 2 Short-circuiting or wiring error among emergency- stop switch inputs. Short-circuiting around emergency-stop switch wiring. Confirm wiring with emergencystop switch. Trouble with emergency-stop switch input circuit. Replace F3SX. Affected by noises of excess level. Confirm noise environment surrounding F3SX. Improper wiring with reset input terminal. Confirm wiring with reset input terminal. 3 Error around reset Short-circuiting or wire break input terminal. around reset input terminal. 3 4 4-time flashing: 1 2 3 Error around the DC solid-state safety output terminals (E module). 4 5 2 3 4 5 6 Error around feedback input terminal. 6-time flashing Continuously flashing Replace F3SX. Trouble with external indicator. Replace external indicator. Improper wiring with external indicator. Confirm wiring with external indicator. Error around output circuit of external indicator. Replace F3SX. Trouble with the load (external devices). Replace the external device. Improper wiring with external device such as contactor. Confirm wiring with external device such as contactor. Trouble with DC solid-state safety output circuit Replace F3SX. Trouble with relay output. Replace F3SX. Error around relay Affected by noises of excess output terminal. level. 5-time flashing (Note 1) 1 Trouble with reset input terminal circuit. Disturbance by noises or trouble with F3SX. Troubleshooting 2 Error around the external indicator output terminals (N module). Confirm wiring with reset input terminal. Chapter 6 3-time flashing 1 Measures to be taken Defects in emergency-stop switch contacts. Confirm emergency-stop switch Or improper wiring with or its wiring. emergency-stop switch. Error around circuit of emergency-stop switch terminal. 2 Assumed causes Synchronization error of emergency-stop switch inputs. Confirm noise environment surrounding F3SX. Improper wiring with external device such as contactor. Confirm wiring with external device such as contactor. Trouble with external device such as contactor. Replace the external device such as contactor. Affected by noises of excess level. Confirm noise environment surrounding F3SX. Trouble with F3SX internal circuit. Replace F3SX. (Note 1)The product without assembled relay output module does not suffer from this kind of error. F3SX User’s Manual 6-27 Chapter 6 Appendix M1 / L2 / D1 module ER1 indication represents error occurring in the Ch.1, while ER2 indication represents error occurring in the Ch.2 side. ER1/ER2 indication Lighting up 1 1-time flashing 1 2 2-time flashing Chapter 6 Troubleshooting 6-28 F3SX User’s Manual Error Assumed causes Measures to be taken Synchronization error around inputs of input device. Defects in input device contacts. Or improper wiring with input device. Confirm input device or its wiring. Short-circuiting or wiring error among input device. Short-circuiting around input device. Confirm wiring with input device. Affected by noises of excess Error around input level. terminal circuit of Trouble with input circuit of input input device. device. Confirm noise environment surrounding F3SX. Replace F3SX. Chapter 6 Appendix Check List for Installation and Wiring (1) Confirm the followings after installation and wiring are finished. Items to be confirmed for installation conditions Confirmed The machine is not in such a structure that bothers the safety functions such as enforced stop. The interlock reset switch is installed at the location where the entire danger area is viewed and an access cannot be made for an operation from the danger area. The response time of this F3SX matches that of the safety related system of the application system. Has been installed in the enclosure with degree of protection IP54. Has been fixed on the DIN rail with the fixture to prevent dropout of the main body. Spaces of 50mm each are given above and beneath the module, and 5mm or more each of the right and left. Placing into control board p.5-4 (2) Confirm the followings before turning power ON. Items to be confirmed for installation conditions Confirmed The power supply unit is used exclusively for F3SX and the safety devices of the light curtain, etc., to be connected with F3SX. In case that a power supply unit is connected to multiple devices, an allowance is given to the capacity for the total current value. There is no reverse connection with regard to the power supply. The power supply unit is for the 24V DC power complying with the EMC Directive, Low Voltage Directive and the output conservation specifications. In case that stranded wire is used, the processing of the wire end has been made by using a proper bar terminal complying with DIN46228-4 standard and the matching crimping tool. Chapter 6 Double or reinforced insulation is provided between the 24V DC circuit of input/output and the output, and other parts on which the dangerous voltage should be applied. Wiring is separated between the safety channels and other channels. Output line is not short-circuited to 24V DC. Check List for Installation and Wiring No load is short-circuited to 24V DC. F3SX User’s Manual 6-29 Chapter 6 Appendix Maintenance Services and Inspection The following describes maintenance services and inspection. For the inspection and/or maintenance of the F3SX, a “Responsible Person“ must confirm that the work has been properly performed. In order to maintain the safety functions, put the product in the state of output-off (the emergency-stop state) once every 24 hours. • As a safety measure, enter and keep the inspection results in the records. • The person who is familiar with F3SX and the application system should perform an inspection. • When the system is used and operated by persons different from those who designed and installed it, ensure that the users and operators are provided with thorough training regarding the maintenance services and inspection. • Confirm at the daily inspection that the emergency-stop switch operates normally and effectively. • Confirm at the daily inspection that the input devices operate normally and effectively. • Give an inspection every six months to prevent short-circuiting or wire break that might be caused by loosened connectors or wiring. Chapter 6 Precautions concerning trial operation after changing function setup Maintenance Services and Inspection The following describes the precautions to be noted when using the function setup software for model F3SX (Model F3SX-CD, sold separately) to change the set-up of the safety-related functions of F3SX. For the details, confirm with HELP of Model F3SX-CD. Access rights You will be prompted to enter a valid password before being able to begin changing the function setup. (Note) *The password set at the factory is “F3SX.” *The “Responsible Person” must take the utmost care so that the password will not be known to those other than the “Responsible Person”. *The password shall be entered required when making any modification, regardless of the safety functions to be modified. (Recommendations) It is strongly recommended that you change the password “F3SX” to a new one. To change the password, select “File (F)” in the menu bar and then “Set Password (P).” Function test 6-30 F3SX User’s Manual Chapter 6 Appendix After setup change by using the function set-up software for model F3SX, a “Responsible Person” must confirm the proper function operations to approve the change. The functions that require operation check after changing their settings are as follows. (Example of test procedure) Functions Setting What to check Date/name of personnel Approval Does the output go on after the elapse of the specified time? XXXX/YY/ZZ XXXX/YY/ZZ ms OFF-delay time Module: Time: ms Does the output go off after the elapse of the time you specified? XXXX/YY/ZZ XXXX/YY/ZZ Module Time: (1) Does F3SX determine that the input is on if the cross-channel input is turned on within the time you specified? (ex. The ER indicator lights off, and the D1/D2 indicator lights on.) (2) Does F3SX determine that the input is off if the time that elapses from when the input of one side of the cross-channel goes on until when the input of the other side of the cross-channel goes on is more than the time you specified? (ex. Both the ER indicator and the D1/D2 indicator light on.) XXXX/YY/ZZ XXXX/YY/ZZ XXXX/YY/ZZ XXXX/YY/ZZ XXXX/YY/ZZ XXXX/YY/ZZ XXXX/YY/ZZ XXXX/YY/ZZ XXXX/YY/ZZ XXXX/YY/ZZ Cross-channel synchronous monitoring time Feedback time monitoring (at safety output ONOFF) Feedback time monitoring (at safety output OFFON) ms (1) Does F3SX operates normally if the time that elapses from when the safety output is turned ONOFF until when the feedback input is turned OFFON is less than the time you specified? (2) Does F3SX enters the lockout state if the time that elapses from when the safety output is turned ONOFF until when the feedback input is turned OFFON is less than the time you specified? ms (1) Does F3SX operates normally if the time that elapses from when the safety output is turned OFFON until the feedback input is turned ONOFF is less than the time you specified? (2) Does F3SX enters the lockout state if the time that elapses from when the safety output is turned OFFON until when the feedback input is turned ONOFF is less than the time you specified? Does the external indicator light on, flash or light off correctly according to the settings? Settings for external indicator output Settings for auxiliary solid-state output ms AS1: AS2: AS3: After completing the setup and when connecting to the function setup supporting software for F3SX again, are the settings shown for the output of the auxiliary solid-state identical to those you actually set? Maintenance Services and Inspection Module Time: Chapter 6 ON-delay time (Cautions) *When you changed the delay time, you need to re-calculate the safety distance and verify the installation state. *Log and store the new settings and test results. (The function set-up software for model F3SX can store the data of settings you made. Also, when transferring F3SX, pass the successor the data and contents set in the product. (Print the setup data entry sheet in the next page for use.) F3SX User’s Manual 6-31 Chapter 6 Appendix Setup data entry sheet Chapter 6 Maintenance Services and Inspection 6-32 F3SX User’s Manual Chapter 6 Appendix Routine inspection Confirm the followings once every 24 hours at the beginning of daily work. Items to be confirmed Confirmed Power of the control system is OFF. No person exists in the protection area when operator turns the power ON. No external flaws or dents exist on each input device and wires. Output is OFF when making each input device into the stop state (OFF-state of output) one after another. The routine inspection items specified in the Instruction Manual regarding the safety light curtains and multi-beam safety sensor in use, are satisfied. No person can reach the hazardous area without passing through the detection zone. The devices are positioned so that they can always detect whole or a part of a human body of a person who works around the hazardous areas. The distance to the hazardous areas is more than the minimum safety distance calculated by the given formula. (Cautions) * If any malfunctioning occurs, inspect all the functions of the F3SX and all of input devices. * Do not re-start the control system until the inspection is completed. Biannual inspection Items to be confirmed Confirmed Maintenance Services and Inspection The machine is in such a structure that may bother the safety functions such as enforced stop. Chapter 6 Confirm the followings every six months or when setting of the machine has been changed. No modification or connection change has been made that affects the control system of the machine badly. The output of the input device and the machine are connected by proper wiring. Actual response time of the entire machine is normal and shorter than the designed value. Accumulated number of switching frequency with each control relay and contact is significantly small compared with those of the life duration. No loosened screw exists for fix the brackets. No looseness in connector or wiring exists. F3SX User’s Manual 6-33 Chapter 6 Appendix Quoted Standards International standards IEC615081,2,3,4,5,6,7 Functional safety of electrical/electronic/programmable electronic safety-related systems- Part 1 to 7. IEC61496-1 Safety of machinery-Electro-sensitive protective equipment-Part 1: General requirements and tests IEC60664-1 Insulation coordination for equipment within low-voltage systems - Part 1: Principles, requirements and tests IEC60742 Isolating transformers and safety isolating transformers. Requirements European standards EN 954-1 Safety of machinery-Safety related parts of control systems-Part 1: General principles for design EN ISO13849-1:2008 Safety of machinery-Safety related parts of control systems-Part 1: General principles for design EN 50178 Electronic equipment for use in power installations EN60204-1 Safety of machinery-Electrical equipment of machines-Part 1: General requirements EN61496-1 Safety of machinery-Electro-sensitive protective equipment-Part 1: General requirements and tests EN574 Safety of machinery-Two-hand control devices-Functional aspects - Principles for design EN1760-1 Safety of machinery. Pressure sensitive protective devices. General principles for the design and testing of pressure sensitive mats and pressure sensitive floors EN1088 Safety of machinery - Interloking devices associated with guards - Principles for design and selection prEN50156-1 Electrical equipment for furnaces and ancillary equipment - Part 1: Requirements for application design and installation Chapter 6 American standards Quoted Standards UL508 Industrial Control Equipment UL1998 Software in Programmable Components UL61496-1 Safety of machinery-Electro-sensitive protective equipment-Part1: General requirements and tests Glossary IEC61508: 1998 (EN61508:2001) The standard that specifies the detailed procedures (for designing, evaluation methods, etc.) to be taken in the safety life cycle including designing, installation, maintenance servicing, disposition of the systems or devices in relation to the safety functions which are realized by the electrical/electronic/electronically programmable systems. SIL: Safety Integrity Level The Safety integrity level of a safety system as represented by a numeric figure likewise the safety category B, 1, 2, 3 or 4 of the conventional EN954-1. The level is set forth by calculated probability of occurrence of hazardous troubles according to the frequency of usage. The F3SX SIL is classified on the safety level same as the safety category 4 of EN954-1. Performance Level: PL This is an index that showed the performance of the safety control system that can share by the risk assessment and the mechanical design. It is evaluated from "a" by five stages of "e". The demanded performance level is specially called PLr from the standpoint where the risk assessment is executed. The performance level PL of the safety control system from which the decrease of the risk is attempted should be a level more than the equal to PLr. 6-34 F3SX User’s Manual Revision History The revision symbols of the manual are attached to the catalog number in the lower part of the front cover and back cover. Catalog number Z220-E1-01 A Revision No. Revision symbol Revision date A February 2005 B July, 2009 C December, 2009 D February, 2010 Revisions First edition Added descriptions about safety light curtain Model F3SJ, compliance with EMC Directive, etc. Correspondence from EN954-1 to EN ISO13849-1, compliance with Machinery Directive, etc. Correspondence to EN ISO13849-1:2008, compliance with Machinery Directive, etc. Americas Edition Catalog number J224I-E-01 Revision No. Revision symbol Revision date 1 February 2005 Revisions Content same as Z220D-E1-01A, Americas contact information F3SX User’s Manual Terms and Conditions of Sale 1. Offer; Acceptance. These terms and conditions (these "Terms") are deemed part of all quotes, agreements, purchase orders, acknowledgments, price lists, catalogs, manuals, brochures and other documents, whether electronic or in writing, relating to the sale of products or services (collectively, the "Products") by Omron Electronics LLC and its subsidiary companies (“Omron”). Omron objects to any terms or conditions proposed in Buyer’s purchase order or other documents which are inconsistent with, or in addition to, these Terms. 2. Prices; Payment Terms. All prices stated are current, subject to change without notice by Omron. Omron reserves the right to increase or decrease prices on any unshipped portions of outstanding orders. Payments for Products are due net 30 days unless otherwise stated in the invoice. 3. Discounts. Cash discounts, if any, will apply only on the net amount of invoices sent to Buyer after deducting transportation charges, taxes and duties, and will be allowed only if (i) the invoice is paid according to Omron’s payment terms and (ii) Buyer has no past due amounts. 4. Interest. Omron, at its option, may charge Buyer 1-1/2% interest per month or the maximum legal rate, whichever is less, on any balance not paid within the stated terms. 5. Orders. Omron will accept no order less than $200 net billing. 6. Governmental Approvals. Buyer shall be responsible for, and shall bear all costs involved in, obtaining any government approvals required for the importation or sale of the Products. 7. Taxes. All taxes, duties and other governmental charges (other than general real property and income taxes), including any interest or penalties thereon, imposed directly or indirectly on Omron or required to be collected directly or indirectly by Omron for the manufacture, production, sale, delivery, importation, consumption or use of the Products sold hereunder (including customs duties and sales, excise, use, turnover and license taxes) shall be charged to and remitted by Buyer to Omron. 8. Financial. If the financial position of Buyer at any time becomes unsatisfactory to Omron, Omron reserves the right to stop shipments or require satisfactory security or payment in advance. If Buyer fails to make payment or otherwise comply with these Terms or any related agreement, Omron may (without liability and in addition to other remedies) cancel any unshipped portion of Products sold hereunder and stop any Products in transit until Buyer pays all amounts, including amounts payable hereunder, whether or not then due, which are owing to it by Buyer. Buyer shall in any event remain liable for all unpaid accounts. 9. Cancellation; Etc. Orders are not subject to rescheduling or cancellation unless Buyer indemnifies Omron against all related costs or expenses. 10. Force Majeure. Omron shall not be liable for any delay or failure in delivery resulting from causes beyond its control, including earthquakes, fires, floods, strikes or other labor disputes, shortage of labor or materials, accidents to machinery, acts of sabotage, riots, delay in or lack of transportation or the requirements of any government authority. 11. Shipping; Delivery. Unless otherwise expressly agreed in writing by Omron: a. Shipments shall be by a carrier selected by Omron; Omron will not drop ship except in “break down” situations. b. Such carrier shall act as the agent of Buyer and delivery to such carrier shall constitute delivery to Buyer; c. All sales and shipments of Products shall be FOB shipping point (unless otherwise stated in writing by Omron), at which point title and risk of loss shall pass from Omron to Buyer; provided that Omron shall retain a security interest in the Products until the full purchase price is paid; d. Delivery and shipping dates are estimates only; and e. Omron will package Products as it deems proper for protection against normal handling and extra charges apply to special conditions. 12. Claims. Any claim by Buyer against Omron for shortage or damage to the Products occurring before delivery to the carrier must be presented in writing to Omron within 30 days of receipt of shipment and include the original transportation bill signed by the carrier noting that the carrier received the Products from Omron in the condition claimed. 13. Warranties. (a) Exclusive Warranty. Omron’s exclusive warranty is that the Products will be free from defects in materials and workmanship for a period of twelve months from the date of sale by Omron (or such other period expressed in writing by Omron). Omron disclaims all other warranties, express or implied. (b) Limitations. OMRON MAKES NO WARRANTY OR REPRESENTATION, EXPRESS OR IMPLIED, ABOUT NON-INFRINGEMENT, MERCHANTABIL- 14. 15. 16. 17. 18. ITY OR FITNESS FOR A PARTICULAR PURPOSE OF THE PRODUCTS. BUYER ACKNOWLEDGES THAT IT ALONE HAS DETERMINED THAT THE PRODUCTS WILL SUITABLY MEET THE REQUIREMENTS OF THEIR INTENDED USE. Omron further disclaims all warranties and responsibility of any type for claims or expenses based on infringement by the Products or otherwise of any intellectual property right. (c) Buyer Remedy. Omron’s sole obligation hereunder shall be, at Omron’s election, to (i) replace (in the form originally shipped with Buyer responsible for labor charges for removal or replacement thereof) the non-complying Product, (ii) repair the non-complying Product, or (iii) repay or credit Buyer an amount equal to the purchase price of the non-complying Product; provided that in no event shall Omron be responsible for warranty, repair, indemnity or any other claims or expenses regarding the Products unless Omron’s analysis confirms that the Products were properly handled, stored, installed and maintained and not subject to contamination, abuse, misuse or inappropriate modification. Return of any Products by Buyer must be approved in writing by Omron before shipment. Omron Companies shall not be liable for the suitability or unsuitability or the results from the use of Products in combination with any electrical or electronic components, circuits, system assemblies or any other materials or substances or environments. Any advice, recommendations or information given orally or in writing, are not to be construed as an amendment or addition to the above warranty. See http://www.omron247.com or contact your Omron representative for published information. Limitation on Liability; Etc. OMRON COMPANIES SHALL NOT BE LIABLE FOR SPECIAL, INDIRECT, INCIDENTAL, OR CONSEQUENTIAL DAMAGES, LOSS OF PROFITS OR PRODUCTION OR COMMERCIAL LOSS IN ANY WAY CONNECTED WITH THE PRODUCTS, WHETHER SUCH CLAIM IS BASED IN CONTRACT, WARRANTY, NEGLIGENCE OR STRICT LIABILITY. Further, in no event shall liability of Omron Companies exceed the individual price of the Product on which liability is asserted. Indemnities. Buyer shall indemnify and hold harmless Omron Companies and their employees from and against all liabilities, losses, claims, costs and expenses (including attorney's fees and expenses) related to any claim, investigation, litigation or proceeding (whether or not Omron is a party) which arises or is alleged to arise from Buyer's acts or omissions under these Terms or in any way with respect to the Products. Without limiting the foregoing, Buyer (at its own expense) shall indemnify and hold harmless Omron and defend or settle any action brought against such Companies to the extent based on a claim that any Product made to Buyer specifications infringed intellectual property rights of another party. Property; Confidentiality. Any intellectual property in the Products is the exclusive property of Omron Companies and Buyer shall not attempt to duplicate it in any way without the written permission of Omron. Notwithstanding any charges to Buyer for engineering or tooling, all engineering and tooling shall remain the exclusive property of Omron. All information and materials supplied by Omron to Buyer relating to the Products are confidential and proprietary, and Buyer shall limit distribution thereof to its trusted employees and strictly prevent disclosure to any third party. Export Controls. Buyer shall comply with all applicable laws, regulations and licenses regarding (i) export of products or information; (iii) sale of products to “forbidden” or other proscribed persons; and (ii) disclosure to non-citizens of regulated technology or information. Miscellaneous. (a) Waiver. No failure or delay by Omron in exercising any right and no course of dealing between Buyer and Omron shall operate as a waiver of rights by Omron. (b) Assignment. Buyer may not assign its rights hereunder without Omron's written consent. (c) Law. These Terms are governed by the law of the jurisdiction of the home office of the Omron company from which Buyer is purchasing the Products (without regard to conflict of law principles). (d) Amendment. These Terms constitute the entire agreement between Buyer and Omron relating to the Products, and no provision may be changed or waived unless in writing signed by the parties. (e) Severability. If any provision hereof is rendered ineffective or invalid, such provision shall not invalidate any other provision. (f) Setoff. Buyer shall have no right to set off any amounts against the amount owing in respect of this invoice. (g) Definitions. As used herein, “including” means “including without limitation”; and “Omron Companies” (or similar words) mean Omron Corporation and any direct or indirect subsidiary or affiliate thereof. Certain Precautions on Specifications and Use 1. Suitability of Use. Omron Companies shall not be responsible for conformity with any standards, codes or regulations which apply to the combination of the Product in the Buyer’s application or use of the Product. At Buyer’s request, Omron will provide applicable third party certification documents identifying ratings and limitations of use which apply to the Product. This information by itself is not sufficient for a complete determination of the suitability of the Product in combination with the end product, machine, system, or other application or use. Buyer shall be solely responsible for determining appropriateness of the particular Product with respect to Buyer’s application, product or system. Buyer shall take application responsibility in all cases but the following is a non-exhaustive list of applications for which particular attention must be given: (i) Outdoor use, uses involving potential chemical contamination or electrical interference, or conditions or uses not described in this document. (ii) Use in consumer products or any use in significant quantities. (iii) Energy control systems, combustion systems, railroad systems, aviation systems, medical equipment, amusement machines, vehicles, safety equipment, and installations subject to separate industry or government regulations. (iv) Systems, machines and equipment that could present a risk to life or property. Please know and observe all prohibitions of use applicable to this Product. NEVER USE THE PRODUCT FOR AN APPLICATION INVOLVING SERIOUS RISK TO LIFE OR PROPERTY OR IN LARGE QUANTITIES WITHOUT ENSURING THAT THE SYSTEM AS A WHOLE HAS BEEN DESIGNED TO 2. 3. 4. 5. ADDRESS THE RISKS, AND THAT THE OMRON’S PRODUCT IS PROPERLY RATED AND INSTALLED FOR THE INTENDED USE WITHIN THE OVERALL EQUIPMENT OR SYSTEM. Programmable Products. Omron Companies shall not be responsible for the user’s programming of a programmable Product, or any consequence thereof. Performance Data. Data presented in Omron Company websites, catalogs and other materials is provided as a guide for the user in determining suitability and does not constitute a warranty. It may represent the result of Omron’s test conditions, and the user must correlate it to actual application requirements. Actual performance is subject to the Omron’s Warranty and Limitations of Liability. Change in Specifications. Product specifications and accessories may be changed at any time based on improvements and other reasons. It is our practice to change part numbers when published ratings or features are changed, or when significant construction changes are made. However, some specifications of the Product may be changed without any notice. When in doubt, special part numbers may be assigned to fix or establish key specifications for your application. Please consult with your Omron’s representative at any time to confirm actual specifications of purchased Product. Errors and Omissions. Information presented by Omron Companies has been checked and is believed to be accurate; however, no responsibility is assumed for clerical, typographical or proofreading errors or omissions. OMRON AUTOMATION AND SAFETY • THE AMERICAS HEADQUARTERS • Chicago, IL USA • 847.843.7900 • 800.556.6766 • www.omron247.com OMRON CANADA, INC. • HEAD OFFICE Toronto, ON, Canada • 416.286.6465 • 866.986.6766 • www.omron247.com OMRON ARGENTINA • SALES OFFICE Cono Sur • 54.11.4783.5300 OMRON ELECTRONICS DE MEXICO • HEAD OFFICE México DF • 52.55.59.01.43.00 • 01-800-226-6766 • [email protected] OMRON CHILE • SALES OFFICE Santiago • 56.9.9917.3920 OMRON ELECTRONICS DE MEXICO • SALES OFFICE Apodaca, N.L. • 52.81.11.56.99.20 • 01-800-226-6766 • [email protected] OTHER OMRON LATIN AMERICA SALES 54.11.4783.5300 OMRON ELETRÔNICA DO BRASIL LTDA • HEAD OFFICE São Paulo, SP, Brasil • 55.11.2101.6300 • www.omron.com.br OMRON EUROPE B.V. • Wegalaan 67-69, NL-2132 JD, Hoofddorp, The Netherlands. • +31 (0) 23 568 13 00 • www.industrial.omron.eu Authorized Distributor: Automation Control Systems • Machine Automation Controllers (MAC) • Programmable Controllers (PLC) • Operator interfaces (HMI) • Distributed I/O • Software Drives & Motion Controls • Servo & AC Drives • Motion Controllers & Encoders Temperature & Process Controllers • Single and Multi-loop Controllers Sensors & Vision • Proximity Sensors • Photoelectric Sensors • Fiber-Optic Sensors • Amplified Photomicrosensors • Measurement Sensors • Ultrasonic Sensors • Vision Sensors Industrial Components • RFID/Code Readers • Relays • Pushbuttons & Indicators • Limit and Basic Switches • Timers • Counters • Metering Devices • Power Supplies Safety • Laser Scanners • Safety Mats • Edges and Bumpers • Programmable Safety Controllers • Light Curtains • Safety Relays • Safety Interlock Switches J224I-E-01 07/15 Note: Specifications are subject to change. Printed on recycled paper. © 2015 Omron Electronics LLC Printed in U.S.A.