1
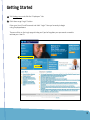
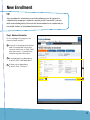
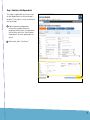
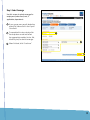
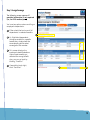
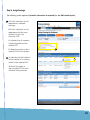
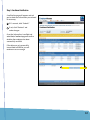
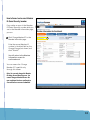
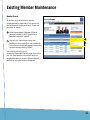
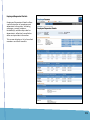
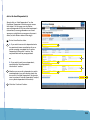
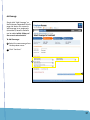
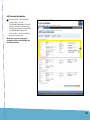
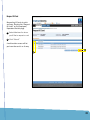
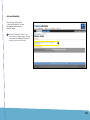
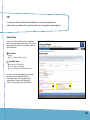
EmployerAccess
Online User Manual
Table of Contents
Introduction to EmployerAccess
page 2
New Enrollment
page 5
Entering a Probationary Period
Add Dependents
Select Coverage
Assign Coverage
Other Coverage
Enrollment Verification
Incorrect Member ID
page 6
page 7
page 8
page 9
page 11
page 12
page 13
Existing Member Maintenance
page 14
Add Dependents
Add Coverage
Change Coverage
Cancel Coverage
Re-enrollment
Reinstate
Edit Personal Information
Request ID Card
Life and Disability
page 16
page 17
page 18
page 20
page 21
page 22
page 23
page 24
page 25
Group Function
page 27
Pending Activity
page 28
Group Billing
Open Invoices
Invoice Details
Pay Online
page 29
page 29
page 30
page 32
Frequently Asked Questions
page 33
1
Introduction
EmployerAccess at bcbsga.com - your one-stop health management Web tool.
Blue Cross and Blue Shield of Georgia (BCBSGa) is making it easier for you to do business with us. In
addition to the helpful resources already available on bcbsga.com, our online transaction
service, EmployerAccess, has been updated to provide:
Enhanced Content
Improved availability
Faster response times
And a clean new look!
We’ve added Life and Disability management, which allows you to manage more at your convenience.
The new EmployerAccess offers you even more control over employee information, claim
information and accuracy. Error messages signal missing or incomplete information, and
electronic prompts guide you from one step to the next.
This manual offers step-by-step instructions on how to effectively use EmployerAccess.
If you have specific questions, refer to the Table of Contents or the FAQs page in the back of the manual.
2
Getting Started
1 Visit bcbsga.com and click the “Employers” tab.
2 Click the orange “Login” button.
Enter your User ID and Password and click “Login.” Now you’re ready to begin
using EmployerAccess.
There are links on the Login page to help you if you’ve forgotten your password or need to
retrieve your User ID.
1
2
3
TIP:
You can navigate EmployerAccess using tabs or “breadcrumbs.” What are breadcrumbs? Hansel and Gretel used
the real thing to mark their trail. EmployerAccess marks your trail electronically. Below the tabs are the titles of
pages you’ve visited, which appear as links. These are called breadcrumbs and they show you where you’ve been.
If you want to get back to any one of them, just click the link.
The Membership main page is called
EmployerAccess Overview. Think of it as homebase.
Here you can start the enrollment process for new employees
(subscribers), access pending activity, perform a search for
a current subscriber or navigate easily using the tabs at
the top.
1 Tabs to Employer Details, Billing, Forms,
Reports and Profile are embedded at the top.
They give you quick access to any of these screens.
EmployerAccess Overview displays all your pending
activity. To access your pending activity, click “View
All” on the right.
3 Resume or delete pending activity using the hyperlinks
to the right of the specific activity. All incomplete work
is automatically saved in Pending Activity.
Note: You can also access Pending Activity from the “Reports”
tab. Any pending activity that was started in a previous
version of EmployerAccess will not be shown or available.
To access benefit information or make changes to a current employee’s benefits, enter the
Member ID number (typically the Social Security Number) in the blank box under “View/Change
Member Information,” then click “Submit.” You can also reach the information by entering the last
and first name, then clicking “Submit.”
To add a new employee, enter the Member ID number (typically the Social Security Number) in
the blank box under “Add New Subscriber,” then click “Submit.”
The first page in the new enrollment process, “Member Information,” will appear.
4
New Enrollment
TIP:
Steps are numbered to tell you where you are in the enrollment process. All steps must be
completed before an employee is enrolled. If at any time you click “Save and Exit,” your work
will be saved in Pending Activity. Please note that the new enrollment is not complete until you
have clicked “Confirm” on the Enrollment Verification Screen.
Step 1. Member Information
This is the beginning page to start
the enrollment process.
To enroll an employee (subscriber),
enter the requested information
into each blank box, or field. Fields
with red arrows (>>) beside them
indicate required information.
If the employee has dependents
to enroll, click “Add Dependent.”
If there are no dependents
to enroll, click “Continue.”
5
TIP:
If you did not complete all required information, an error message will appear
telling you which field needs to be completed. You won’t be able to continue to
the next screen until completing the required fields.
Member Information
(Entering a Probationary Period)
If you have only one probationary period, the
effective date of coverage is calculated based
on the date entered in the “Hire Date” field.
If you have multiple probationary periods (i.e.,
an exempt employee is eligible for coverage
on the first day of the month following the
date of hire and a non-exempt employee is
eligible for coverage on the first day of the
month following the date of three months
of continuous employment - see note
below), click the drop down box for
“Probation Type” and select the appropriate
type. The employee’s effective date of
coverage will be calculated based on the
“Hire Date” and the “Probation Type.”
3 If the Employee has dependents to enroll,
click “Add Dependent.”
If the Employee does not have dependents
to enroll, click “Continue.”
Note: Employees must meet eligibility
requirements and satisfy their “waiting”
period (referred to as probationary period)
as defined in your Group Master Application.
6
Step 1. Members (Add Dependents)
This step is applicable only if you want
to add dependents to the employee’s
benefits. This option is only available for
new enrollees.
Fields requesting dependent
information appear below the
employee information. Complete the
information and click “Add Another
Dependent” for each dependent to
enroll.
Otherwise, click “Continue.”
7
Step 2. Select Coverage
Use this screen to select coverage for
employees (subscribers) and, if
applicable, dependents.
If your group uses payroll deduction,
enter that information in the Payroll
Class field.
To complete this step, simply click
the drop-down arrow and select
the appropriate medical, vision, life,
disability and/or dental coverage.
When finished, click “Continue.”
8
Step 3. Assign Coverage
The following screen appears if
provider information is not required
(i.e., for PPO medical plan).
You have two options when enrolling an
employee’s dependents:
Either check the box to enroll all
dependents in selected benefits.
Or, if individual dependents
should be enrolled in a specific
benefit plan, simply check the
corresponding box to select
coverage for that member.
This screen displays the
employee’s benefit selections.
If you missed something or
selected the wrong benefit
plan, you can go back by
clicking “Previous.”
If everything looks right,
click “Continue.”
9
Step 3a. Assign Coverage
The following screen appears if provider information is required (i.e., for HMO medical plan).
1 A. Enrolls subscriber and all
dependents in selected
coverage.
B. Enrolls subscriber and all
dependents with the same
medical Primary Care
Physician (PCP).
C. Indicates that all members
are existing patients of the
medical PCP.
D. Allows the system to pick a
medical PCP for all members.
A. Indicates that the individual
family member is an existing
patient of the selected PCP.
B. Allows the system to
pick a medical PCP for each
individual family member.
10
Step 4. Other Coverage
This is the final screen in the new enrollment
process.
1 Indicate “Yes” or “No” by clicking the
corresponding circle.
Clicking “No” to this question will automatically
activate “No” in the corresponding check
boxes below. Clicking “Yes” to this question
prompts you to complete the necessary
information below, which is used to populate the
pre-existing field.
Enter the appropriate begin and end date for
each member who had prior coverage. If no prior
coverage information is provided, enter the hire
date as the prior coverage begin date and leave
the end date blank. This does not apply if you are
processing in the Open Enrollment mode or if the
employee has chosen an HMO plan.
If you enter begin and end dates, then
check “Show Total Months,” EmployerAccess
automatically calculates and displays the total
number of months.
Note: Pre-existing data cannot be changed in
EmployerAccess after a member has been added.
This is the last step in the enrollment process.
Click “Continue” to complete the new enrollment.
11
Step 5. Enrollment Verification
A verification page will appear and ask
you to check the information you entered
for accuracy.
1 If it’s correct, click “Submit.”
If not, click “Previous” and
make changes.
Once the information is verified and
submitted, a feedback page will confirm
whether the employee has been
successfully enrolled.
If the data was not successfully
transmitted to BCBSGa, you will
receive an error message.
12
How to Correct an Incorrect Member
ID (Social Security) number:
If you notice an error in the Member
ID (Social Security) number while you
are on the Member Information page,
you can:
Click “Change Member ID” on the
Member Information page.
Enter the correct Member ID
number in the blank field on the
Change ID page (not shown) and
click “Submit.”
You will return to the Member
Information screen for
continued work.
You can access the “Change
Member ID” hyperlink only
through this screen.
Note: You can only change the Member
ID during the enrollment process. You
cannot change a Member ID once the
new enrollment has been confirmed on
the verification screen and submitted.
13
Existing Member Maintenance
Member Search
To perform maintenance on a specific
employee and/or dependent, first search for
the employee in EmployerAccess. There are
two ways to search:
1 Enter the employee’s Member ID (Social
Security Number) or HCID (Health Card
Identifier) and click “Submit.”
You can also search by entering the
employee’s last name (first name optional).
A list of search results will appear. Choose the
correct name by clicking “Select.”
1
Your search will bring up an
Employee/Dependent Details page from which
you can view specific information about an
employee and easily access different benefit
options by using the buttons displayed.
14
Employee/Dependent Details
Employee/Dependent Details offers
a quick overview of employee and
dependent information, including
coverage, name(s), address,
birthdate(s), relationship code for
dependents, effective/cancellation
dates and provider information.
This screen displays a list of enrolled
members and their benefits.
15
Add or Re-Enroll Dependent(s)
Simply click on “Add Dependents” on the
Employee/Dependent Details page to access
this screen. On this page you can add or
re-enroll dependents to an enrolled employee’s
(subscriber’s) coverage. Newborns and new
spouses are eligible for coverage on the event
date (i.e., birth date or date of marriage).
1 Enter the effective date.
A. If you wish to re-enroll a dependent who
has previously been cancelled and has no
active coverage, complete the “Inactive
Dependent Information” section. The
required fields will be pre-populated.
or
B. If you wish to add a new dependent,
complete the “New Dependent
Information” section.
Whether you re-enroll a dependent or add a
new dependent, you will need to check the
box next to “Include Dependent” (and make
sure to uncheck “Include Dependent” box(es)
on any blank dependent information).
Click the “Continue” button.
16
Add Coverage
Simply click “Add Coverage” on
the Employee/Dependent Details
page and access this screen to
add coverage to an employee’s
(subscriber’s) benefits. Benefits
can be added within 90 days of
the current calendar date.
To Add Coverage:
1 Select the new coverage from
the drop-down menu.
2 Click “Continue.”
17
Change Coverage
Simply click the “Change
Coverage” button on the
Employee/Dependent Details
page to add or change payroll
classes or make changes to
existing benefit coverage.
Here you can:
1 Enter the effective date
of change.
A. Select a new subgroup.
or
B. Add or change a
payroll class.
If you selected a new subgroup
(2A), you will proceed to “Select
Coverage” by clicking “Continue.”
Note: Benefit coverage cannot be
cancelled through this option.
If you added or changed a payroll class (2B), click “Submit” (not shown) and your transaction
is complete.
Note: The payroll class must be the same for all active products.
18
Change Coverage (Change Subgroup)
1 Select new coverage.
Click “Continue.”
19
Cancel Coverage
On the Employee/Dependent Details
page, click “Cancel Coverage.” The
Cancel Coverage page will appear.
1 Key in the cancellation effective date.
Under “Cancellation Reason,”
select a reason from the
drop-down menu.
3 Be sure you check the box next to
all affected benefits.
Note: If a cancellation date
is on the first of the month,
coverage will terminate at
midnight on the previous day (i.e.
cancel date 9/1/06; coverage
ends at midnight 8/31/06). A
cancellation date other than the
first of the month will terminate at
midnight on the date entered (i.e.
cancel date 9/15/06; coverage
ends at midnight on 9/15/06).
20
Re-Enrollment
To re-enroll a member who’s
coverage has been cancelled,
select “Re-Enroll” from the
Employee/Dependent Details
page. (Re-enrollment follows
the same process as new
enrollment.)
To re-enroll an employee
(subscriber), enter the
requested information into
each blank box, or field.
Fields with red arrows
(>>) beside them indicate
required information.
If the employee has
dependents to re-enroll,
check the box next to
“Include Dependent.”
If the employee has
more dependents
to enroll, click
“Add Dependent.”
4 Click “Continue.”
The remaining steps of
the re-enrollment process
mirror the steps in the new
enrollment process (outlined
on pages 8-12).
21
Reinstate
To reinstate a member
with no lapse in coverage,
select “Reinstate” from
the Employee/Dependent
Details page.
To reinstate an employee
and any dependents,
check the box marked
“Reinstate Member.”
Be sure to check all
applicable benefit boxes.
Click “Submit.”
Note: No dependents can
be reinstated on cancelled
contracts unless the employee
(subscriber) is reinstated. Only
dependents with the same cancel
date as the employee can be
reinstated on cancelled contracts.
22
Edit Personal Information
1 Simply click “Edit Personal
Information” on the
Employee/Dependent Details
page to access the option to
change employee (subscriber)
and dependent personal
information, such as address,
phone number, etc.
Note: Be sure to verify your
changes before submitting the
new information.
23
Request ID Card
Requesting ID Cards is quick
and easy. Simply click “Request
ID Cards” on the Employee/
Dependent Details page.
1 Select Members for whom
you’d like to request a card.
2 Click “Submit.”
A confirmation screen will let
you know the card is on its way.
24
Life and Disability
To initiate a claim, click
“Life and Disability” on the
Employee/Department
Details page.
1 Click “Initiate a Claim” on
the Claims Tools page. There
are several different kinds of
claims you can initiate.
Future Deliverable
25
TIP:
For all claims other than Short Term Disability, once you have completed your
online entries, you will be able to print the claims form for signature and completion.
Submit Claim
You can initiate a life and/or disability
claim for your employees here. Fill in the
required information and select a claim
at the bottom.
1 Life Claims
Life
Life – Waiver of Premium
Disability Claims
Long Term Disability
Short Term Disability
Loss of Sight/Dismemberment
Once you have completed your online
entries, you will be able to print
the claims form for signature and
completion. Short-term disability
claims are handled over the phone.
26
Group Function
Employer Details
Review preferences and general
group information here.
1 Billing
This tab allows you to view
summary information for all
open invoices. Additionally,
this functionality provides
details on monthly activity,
invoice number and total
amount due.
Reports
You can use this tab to
view Employee Rosters,
generate Activity Reports
and help employees find
physicians using our online
Provider Directory.
Profile
Use this tab to change your
e-mail address, password
and/or your secret question.
27
Pending Activity
This example shows how your
Pending Activity folder might look.
1 Clicking “Delete” on this screen
only removes the action from
Pending Activity; it does not
cancel the subscriber’s coverage. Cancel Coverage can be
accessed from the Employee/
Dependent Details page.
Note: Subscriber information cannot
be accessed if that subscriber has
work pending in Pending Activity.
To ensure full access to all subscriber
information, please keep Pending
Activity up to date and to a minimum.
28
Group Billing
TIP:
Billing Entities also provides access to invoices and their details.
Group Billing Transaction Selection
Select the group number from the Billing
Entities page (Billing home page) to access
a number of transactions on the Open
Invoices page.
Invoices
Click on an invoice number to view details.
3 Using the links on the left side of the screen,
you can pay your bills online, schedule
payments, view past invoices and more.
You can also access some of the above
functions using the buttons on the screen.
29
Invoice Details
After selecting an invoice number
to review, several options are
available. This screen displays your
current invoices and the total amount
due. All the information on this page
appears on your statement.
30
Invoice/Membership Details
Here you can view each
employee within your group.
To view any billed
adjustments for your
group, click “Adjustments.”
31
TIP:
You have the option to pay online from almost any screen in the Billing
section. Look for the “Pay Online Now” button.
Pay Online
EmployerAccess offers you the
convenience and flexibility of paying
your monthly bill(s) online. You have
the option to pay multiple invoices
at one time.
1 Check the box marked “Pay”
for each invoice you choose.
Choose to pay using a single
account or multiple accounts.
3 Click “Continue.”
Note: You are still required to pay all invoices
in a timely manner in accordance with the
terms of your group contract.
32
Frequently Asked Questions
Can there be more than one administrator in a group who can process eligibility
on EmployerAccess?
Yes. Each administrator requesting access to EmployerAccess needs to complete the Username Policy
and Usage Agreement. All administrators will receive their own User ID and PIN allowing them to use
EmployerAccess.
Can a group’s third-party administrator process the eligibility?
Yes. We require a written request from the group if they use the services of a third party on
their behalf. BCBSGa will need to approve the use of this third-party administrator. The Internet
Eligibility Agreement and the Third-Party Agreement will need to be signed by the group and
the administrator.
If the group has multiple subgroups, can the administrator process eligibility
for all subgroups?
Yes. BCBSGa’s system is designed to use the subgroup number to determine what groups will be
viewable to the group.
What is the turnaround time once a group administrator has processed activity through EmployerAccess?
Once the group administrator receives the message that the requested action was “successfully
completed,” the information is in the BCBSGa system within 24 hours.
Are groups required to submit membership forms (i.e., enrollment, change, etc.) once activities are processed
through EmployerAccess?
No. The group is responsible for maintaining the eligibility documentation. This is noted in the
Internet Eligibility Agreement, under Section IV, Part A – Establishment and Retention of
Membership Information.
33
Does BCBSGa have a minimum browser requirement?
Yes, Internet Explorer 6.0 or higher.
Does BCBSGa use passwords?
Yes. A User ID and PIN are assigned for all customers as they register to use the Web site.
What is your encryption process?
BCBSGa uses 128-bit encryption starting at the login page. This means that no usernames or
passwords pass across the Internet in clear text.
Do you use Secure Socket Layer (SSL)?
Yes. 128-bit SSL certificates are installed on the server supporting the Web site, ensuring an
encrypted channel is established between a customer’s browser and our Web site. The vendor
we use is VeriSign.
Life and disability products are underwritten by Greater Georgia Life Insurance Company.
Blue Cross and Blue Shield of Georgia, Inc. and Greater Georgia Life Insurance Company are independent licensees of the Blue Cross and Blue Shield
Association. The Blue Cross and Blue Shield names and symbols are registered marks of the Blue Cross and Blue Shield Association.
34