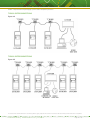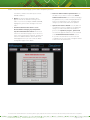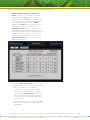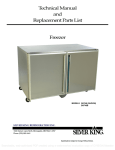
1
INSTALLATION AND
OPERATING GUIDE
Datalarm™ Temperature Monitoring/Datalogging System
Installation and Operating Instructions
Save the instructions
for future reference.
24/7 Toll-Free Technical Support
1-800-243-9271
www.KitchenBrains.com
(from the U.S., Canada and the Caribbean)
This document contains confidential information. The dissemination, publication, copying, or duplication of this document or the software described herein without prior written authorization is strictly prohibited.
PDF compression, OCR, web optimization using a watermarked evaluation copy of CVISION PDFCompressor
Kitchen Brains © 2013 | www.KitchenBrains.com | 229-40081 A
Page 1 of 36
Datalarm™ Temperature Monitoring/Datalogging System Installation and Operating Instructions
TABLE OF CONTENTS
General Description.................................................................................................................................................................. 3
Section 1 – Datalarm................................................................................................................................................................ 4
A. Controls, Indicators & their Functions............................................................................................................................. 4
B. Datalarm Operation......................................................................................................................................................... 5
C. Datalarm Installation....................................................................................................................................................... 6
D. Datalarm Programming................................................................................................................................................... 9
Section 2 – Datahub................................................................................................................................................................ 11
A. Connections, Controls, Indicators & their Functions...................................................................................................... 11
B. Datahub Installation.......................................................................................................................................................12
C. Setting up communication between the Datahub and the computer or computer network........................................ 15
Section 3 – Datalarm Software.............................................................................................................................................. 18
1. Set System Clock........................................................................................................................................................... 19
2. System Functions.......................................................................................................................................................... 20
3. Assign Addresses to the Alarms................................................................................................................................... 22
4. Configure the Individual Alarms.................................................................................................................................... 24
5. Alarm Status Center...................................................................................................................................................... 27
Downloading Data.................................................................................................................................................................. 28
Download From All Alarms................................................................................................................................................ 28
Generating a Graph........................................................................................................................................................... 29
Generating a List............................................................................................................................................................... 30
Generating an Individual CSV (Comma delimited) File. “Download From This Alarm”...................................................... 31
Technical Support................................................................................................................................................................... 31
This document contains confidential information. The dissemination, publication, copying, or duplication of this document or the software described herein without prior written authorization is strictly prohibited.
PDF compression, OCR, web optimization using a watermarked evaluation copy of CVISION PDFCompressor
Kitchen Brains © 2013 | www.KitchenBrains.com | 229-40081 A
Page 2 of 36
Datalarm™ Temperature Monitoring/Datalogging System Installation and Operating Instructions
DATALARM MONITORING/ DATALOGGING
SYSTEM INSTALLATION INSTRUCTIONS
GENERAL DESCRIPTION:
The Datalarm Monitoring System consists of two primary
components, described as follows:
1. Datalarm – The Datalarm is offered in two versions,
the Datalarm 1 for single compartment monitoring
and the Datalarm 2 for two compartment monitoring.
Both versions provide readout of monitored
temperature, visual indicators to show compartment
status, audible alarm, and dry contact output as well
as pulse output for remote notification. In addition
to monitoring temperature, the Datalarm also
monitors AC power as well as providing a means for
integrating a panic (entrapment) alarm and a door
ajar alarm into the system. When so configured,
the Datalarm constantly monitors compartment
temperature, AC power and door status, and provides
audible and visual alarms with remote notification
capability whenever refrigeration failure, power
failure or a “check door alarm” (panic or door ajar)
occurs. The Datalarm also contains internal memory
(Datalogging) for storing a history of monitored
conditions and alarm events. (Datahub and computer
or computer network required for data access.)
2. Datahub – The Datahub is a proprietary server.
Combined with the Datalarm, the Datahub offers the
following capabilities: (Computer with web browser
required for access to data and real time alarm
conditions.)
• Dataware software for remote alarm access
(for viewing real time alarm conditions and for
extracting data from the Datalarm(s)) is preinstalled into the Datahub. (Dataware is accessed
with a web browser.)
™
• Web Enabled. Ethernet port provides access
for viewing Real Time Alarm Status and for
Logging Data from a single computer, from any
computer on a LAN (Local Area Network) or, via
the Internet, from any computer anywhere in
the world. (Broadband connection at monitored
location required for Internet access.)
• Password protected, with two levels of password
security. (Administrator and User)
• Datalarms are completely programmable from a
computer via the Datahub. (Or manually on the
alarm front panel.)
• Historical Data is presented in graph format, in
list format or in CSV (comma delimited) format.
CSV format is downloadable into Microsoft Excel,
Microsoft Access or any other CSV-compatible
application for archiving and data manipulation.
• Time and date stamping of data is generated in
the Datahub in 12 or 24 hour format.
• Email Capable. Datahub can generate email when
an alarm occurs and notify up to four addresses
of the location and type of alarm condition.
(Broadband access required for email notification.)
• Up to 100 Datalarms may be connected to a
Datahub.
• Battery backup with built-in recharging circuitry to
keep Datahub operational in a power failure. (24
hours minimum of operation on battery.)
• Datalarm and Datahub firmware may be upgraded
locally or remotely.
This document contains confidential information. The dissemination, publication, copying, or duplication of this document or the software described herein without prior written authorization is strictly prohibited.
PDF compression, OCR, web optimization using a watermarked evaluation copy of CVISION PDFCompressor
Kitchen Brains © 2013 | www.KitchenBrains.com | 229-40081 A
Page 3 of 36
Datalarm™ Temperature Monitoring/Datalogging System Installation and Operating Instructions
SECTION 1 – DATALARM:
(The Datalarm may be used without the Datahub as a
stand alone alarm or with the Datahub and a computer or
computer network to offer full product capabilities.)
A. CONTROLS, INDICATORS & THEIR FUNCTIONS:
(Refer to Figure 1.)
FIGURE 1
and internal test functions are performed). In
Program mode, press Test to increase or change a
selected parameter value.
3. Program button – (To minimize the possibility
of tampering, this button is not indicated on
the faceplate. This button can also be disabled
completely from the Datahub.) In Run mode, press
Program to enter Program mode, which allows
for changes to be made to alarm parameters. The
program button is also used to advance through the
parameters in the program menu and to complete
the programming process.
4. LO & HI Indicator Lights – Bi-colored LED’s to
indicate compartment status. Monitored conditions
shown are:
Constant blue = Safe temp.
Blinking red (HI or LO) = Abnormal temp.
Constant red (HI or LO) = Temp. alarm. (Temp.
abnormal for longer than time delay.)
The Datalarm 1 has only “temp 1” indicator
lights, which are always lit, and the digital readout
constantly displays the single compartment
temperature. The Datalarm 2 has “temp 1” and
“temp 2” indicator lights which alternately display at
4 second intervals. The digital readout also alternates
with “temp 1” and “temp 2” indicator lights to show
respective compartment temperatures.)
5. CHECK DOOR Indicator Lights – Red LED’s to
indicate one of two “Check Door” conditions,
depending on the additional optional equipment
installed. Options and conditions are:
a. IP-1 Illuminated Pushbutton – When installed
inside of the walk-in and connected to the
Datalarm, the IP-1 provides a Panic (entrapment)
Alarm function.
The following are user accessible with the
faceplate installed:
1. Silence button – In Run mode, (Normal operation)
press Silence to acknowledge an alarm condition and
silence the audible alarm. In Program mode, press
Silence to decrease or change a selected parameter
value. (Example: set point, time delay, C or F scale, etc.)
2. Test button – In Run mode, press Test to initiate a
built-in Test routine. (Alarm parameters are displayed
b. DAC-55 Door Monitor – When installed on the
walk-in and connected to the Datalarm, the DAC55 provides a Door Ajar Alarm function. (The IP-1
may also be connected to the DAC-55 to combine
Door Ajar and Panic Alarm Function.)
6. AC FAIL Indicator Light – Blinks on and off when
there is no AC power.
7. LO BATT Indicator Light – Blinks on and off when
the battery is getting weak.
The following are installer accessible with the
faceplate removed:
8. 120VAC CONN. – Line voltage for powering the
Datalarm is connected to these wires. (Current draw
This document contains confidential information. The dissemination, publication, copying, or duplication of this document or the software described herein without prior written authorization is strictly prohibited.
PDF compression, OCR, web optimization using a watermarked evaluation copy of CVISION PDFCompressor
Kitchen Brains © 2013 | www.KitchenBrains.com | 229-40081 A
Page 4 of 36
Datalarm™ Temperature Monitoring/Datalogging System Installation and Operating Instructions
is less than 50ma.) Green wire must be connected
to earth ground for proper operation.
9. REMOTE NOTIF. CONN. – These wires provide
a means for connecting the Datalarm to remote
notification devices (Strobe lights, security systems,
etc.) Outputs include normally open and normally
closed dry contacts, and a pulse voltage output for
activation of an automatic telephone dialer. (Wire
color code is adjacent to Figure 1.)
10.CHECK DOOR CONN. (Check Door Connection) –
Used to connect the IP-1(s) or the DAC-55(s) to
the Datalarm. (Optional devices for “Check Door”
function.) See #5 on previous page and also see
connection diagrams (Fig. 2A & 2B on page 8.)
11.PROBE CONN. (Probe Connection) – Used to
connect the provided temperature sensor(s). Connect
in accordance with Figure 1. Note: Probes do not
have polarity.
12.DATA PORT – Used to interconnect the Datalarm(s)
to the Datahub. Connection is made with the “J”
board and the connecting cable that comes with
the “J” board. IMPORTANT! The Data Port on the
Datalarm is not an Ethernet port. It should not be
connected directly to a computer or a router. It
should only be connected to a “J” board or to the
“From Alarms” connection on the Datahub.
13.DEF. ADD. (Default Address Button) – This button is
used to restore the address of the Datalarm to the
factory default address. (Factory default address
is A254.) This button is seldom used, and only has
application if the alarms will be connected to a
Datahub.
14.DEF. SET. (Default Setpoint Button) – The Datalarm
contains pre-programmed default values for
changeable parameters such as temperature set
points, alarm time delay, scale, etc. Press this button
if you wish to restore these default values.
15.BAT. SLP. (Battery Sleep) – Patent Pending. The
Datalarm contains a 6 volt rechargeable battery to
keep the alarm operational during a power failure.
When the alarm is shipped, the battery is physically
connected to the Datalarm. Providing AC power
to the alarm causes the battery to automatically
connect electrically. With subsequent power
outages, the battery will remain electrically
connected so as to provide standby power. If desired,
press this button with AC power removed to return
the battery to the sleep condition. Two significant
applications for this feature are:
A. Bench Testing – If the alarm is tested before it
is installed or shipped, this feature provides a
means for returning the battery to the sleep state
for transporting or shipping.
B. New Construction Installations – It often happens
that alarms are installed, sometimes for months,
before line voltage is provided. This feature
insures that the battery will be connected once
line voltage is supplied.
B. DATALARM OPERATION:
1. Temperature Monitoring – If temp is between
setpoints, HI & LO alarm lights are both blue.
Abnormal high or low temp activates the alarm delay
and causes the respective alarm light to blink red.
Abnormal temp that persists for longer than the
time delay causes an alarm annunciation: Respective
alarm light goes to solid red and the horn sounds.
Press Silence to stop the horn from sounding.
The light remains red until temp returns to normal.
Normal temp automatically resets the alarm and the
light returns to blue.
2. Check Door Alarm – The Check Door Function can
be used to generate a Panic (Entrapment) Alarm,
a door ajar alarm or annunciation of both of these
conditions. (See “Check Door Indicator lights, page 4,
for optional equipment required.) If there is no check
door alarm, the check door light is off. In a check
door alarm the check door light glows red and the
horn sounds. Press the Silence button to stop the
horn from sounding and to extinguish the check door
light. (Note: If the check door alarm is generated by
a DAC-55 door monitor, the alarm condition must be
cleared on the DAC-55 before it can be cleared on
the Datalarm.)
3. AC FAIL – The decimal point on the display above
“AC FAIL” is used to visually annunciate a power
failure. If AC power is on, the AC Fail light is off.
The AC Fail light will begin to blink whenever power
is interrupted. Power interruptions of less than 1
minute will not generate an AC Fail alarm. In power
interruptions of less than 1 minute, the AC light will
turn off and the alarm will automatically reset when
power is restored. Power interruptions of 1 minute
or longer will generate an AC Fail alarm: The horn
begins to beep on and off with the blinking AC Fail
light, and all other lights, including the display, will
turn off so as to conserve battery power. Press the
Silence button to stop the horn from sounding.
Anytime the Silence button is pressed during an
AC Fail alarm, the alarm will briefly display the
This document contains confidential information. The dissemination, publication, copying, or duplication of this document or the software described herein without prior written authorization is strictly prohibited.
PDF compression, OCR, web optimization using a watermarked evaluation copy of CVISION PDFCompressor
Kitchen Brains © 2013 | www.KitchenBrains.com | 229-40081 A
Page 5 of 36
Datalarm™ Temperature Monitoring/Datalogging System Installation and Operating Instructions
monitored temperature and briefly activate the
alarm lights to show compartment temperature
and status.
4. LO BATT – The decimal point on the display above
“LO BATT” is used to visually annunciate a Low
Battery condition. The battery in the Datalarm is
rechargeable and the Datalarm contains recharging
circuitry. If the battery is sufficiently charged, the LO
BATT light is off. The LO BATT light will begin to blink
whenever the battery is getting weak and the horn
will beep once every six minutes to draw attention
to the low battery condition. The Silence button does
not affect a low battery condition. For reliability as a
backup power source, it is recommended that the
battery be replaced every 3-5 years.
5. Dry Contacts – The dry contacts will operate for
alarm conditions 1, 2 and 3 on previous page, as
described on page 10, item # 7, “Alarm Relay”. There
is no relay activation for a low battery condition. Dry
contact wire color code is: Blue = N/O, Purple =
common, Yellow = N/C.
the alarm address (Example: 254). Alarm address
is used to identify a particular alarm on a network
and is only relevant when the alarm is connected
to the Datahub.
e. Display reads “AUtO” (Autoset) and then displays
“On” (enabled) or “OFF” (disabled).
f. Display reads “SCLE” (Scale) and then displays
“F” (Fahrenheit) or “C” (Centigrade).
g. Display reads “HiAL” (High Alarm Setpoint)
and then displays selected setpoint value. The
respective HiAL light is red when this setting
displays.
h. Display reads “LoAL” (Low Alarm Setpoint)
and then displays selected setpoint value. The
respective LoAL light is red when this
setting displays.
i. Display reads “dLAy” (Alarm Delay) and then
displays selected alarm time delay value in
minutes. The respective HI and LO alarm lights
blink on and off when this setting displays.
6. Pulse Output – A pulse output (6 VDC for 1 second)
is provided for the purpose of activating an automatic
telephone dialer, (Modularm Automatic Telephone
Dialer). Pulse output wire color code is: Grey =
ground “-“, Red = 6 VDC “+”. A pulse output is
generated for alarm conditions 1, 2 and 3 above:
j. NOTE: On the Datalarm 1, single compartment
alarm, the display goes to “k”, below, after
“i”, above, is completed. On the Datalarm 2,
two compartment alarm, “g thru i”, above,
are repeated to show the settings for the
second probe.
a. One minute after alarm annunciation occurs if the
Silence button has not been pressed before the
minute passes.
k. Display reads “rbAC” (ringback) and then displays
selected ringback time delay value in minutes.
(See page 10, #6 for Ringback description.)
b. Every 30 minutes after alarm annunciation
occurs to repeatedly re-activate the dialer. This
continues until the alarm has been acknowledged
by pressing the Silence button or until the alarm
condition returns to normal.
l. Display reads “rLAY” (relay configuration)
and then displays “OFF”, “UnLA” or “LACH”,
depending on the selected mode. (See page 10,
item #7, Alarm Relay, for a description of relay
operation.)
7. Test Mode – Test mode is provided to display alarm
parameters and to allow the Datalarm to perform
certain testing functions. Press the Test switch to
enter Test Mode. The display reads “Test” and the
alarm does the following, automatically:
a. Sequentially illuminates all display segments
and LEDs.
b. Display reads “ArEv” (alarm revision) and then
displays the alarm software version number.
(Example: 1.12)
c. Display reads “LrEV” (bootloader revision) and
then displays the bootloader software version
number. (Example: 0.02) (Bootloader is used for
firmware upgrades.)
m.Display lights all segments, all alarm lights turn
on and buzzer sounds. Press Silence to turn
off the buzzer and put the alarm back into run
mode. NOTE: If Silence isn’t pressed within 30
seconds the buzzer will turn off and the alarm
will return to run mode automatically.
C. DATALARM INSTALLATION:
1. Remove the 3 faceplate screws and remove
the faceplate.
2. It is easier to mount the external enclosure if the
alarm and the battery are temporarily removed. To
remove, grab the alarm/backplate assembly, slide
up and then lift out. Reverse to re-install after the
enclosure has been mounted.
d. Display reads “Addr” (Address) and then displays
This document contains confidential information. The dissemination, publication, copying, or duplication of this document or the software described herein without prior written authorization is strictly prohibited.
PDF compression, OCR, web optimization using a watermarked evaluation copy of CVISION PDFCompressor
Kitchen Brains © 2013 | www.KitchenBrains.com | 229-40081 A
Page 6 of 36
Datalarm™ Temperature Monitoring/Datalogging System Installation and Operating Instructions
3. Mount the enclosure in a suitable location:
A. Surface Mount - Use the 4 mounting holes on the
back wall of the enclosure.
B. Flush Mount - Make a cutout in the mounting
surface, 9 3/8” high by 4 3/8” wide. Use the
4 mounting holes on the front flange of the
enclosure.
C. Re-install the alarm into the enclosure.
4. The top of the enclosure has two knockouts for ½”
conduit. The left conduit is used to provide power to
the alarm. The right conduit is used for connecting
the cable from the “J” board to the Datalarm. It
may also be used for other low voltage applications
such as sensor line routing, connecting to a door
monitor, etc.
5. Temperature sensors (1 sensor for the Datalarm
1 and 2 sensors for the Datalarm 2) are not preattached to the alarm. Mount the sensor in a location
which will typify the average ambient temperature.
Recommended location is in front of the evaporator
on the ceiling in the center of the room. Make sure
that the sensor and sensor wire are positioned so
that they will not be damaged by any products or
items in the monitored area. Fasten the sensor
with the provided ¼” clamp. If desired, sensor wire
may be extended up to 200 feet without affecting
accuracy of the displayed temperature. Shielded wire
(two conductors inside of the shield) must be used
if the sensor line is extended. The sensor line may
be shortened as well. When extended, connect the
sensor to the two conductors inside of the shield.
No connection is made to the shield at the sensor
end of the extending wire. If a splice is made inside
of the monitored compartment, seal the splice with
silicone to prevent moisture from causing erroneous
temperature readings. Connect the sensor wire to
the terminal block as shown on Figure 1. Probes
do not have polarity. If the sensor wire has been
extended, connect the shield of the extending
wire to the leftmost position of the Check Door
Connection terminal block. (Labeled GRD, Figure
2A & 2B, page 8. Also see #10 on Figure 1.) The
shield may also be connected to the grey Remote
Notification wire. (Labeled GRD, see #9, Figure
1.) If the probe wire enters the alarm enclosure
directly from the monitored compartment, seal the
opening to prevent moisture from entering the alarm.
Important! Do not run sensor line in conduit with
line voltage. “Bouncing” or erroneous readings
will result. Do not connect shield to chassis
ground. Equipment damage may result.
6. Bring 120VAC through the left conduit to the top
chamber of the alarm enclosure and connect to the
black and white #18 wires. The green #18 wire must
be connected to earth ground for proper operation.
7. If the Datalarm is to be connected to other
Datalarms or to the Datahub, connect the cable of
the “J” Board through the right conduit to the Data
Port on the Datalarm. IMPORTANT! If you are using
the right conduit to make other low voltage
connections, make the data cable connection
first! It will be difficult to impossible to slide the
“J” board cable through if there are other wires
in the conduit.
8. If the DAC-55 Door Monitor is to be installed and tied
in with the Datalarm, connect according to Figure
2A, using the right conduit as a means for making
interconnections. 18-22 gauge wire is adequate. (See
DAC-55 instructions for complete information on
installing this piece of equipment.)
9. If the IP-1 Panic Button is to be installed and tied
in with the Datalarm, mount the IP-1 inside of the
monitored compartment and connect according to
Figure 2B, using the right conduit as a means for
making connections. (The IP-1 comes with preconnected interconnecting wire.)
IMPORTANT!! AFTER WIRING HAS BEEN INSTALLED,
SEAL CONDUIT OPENINGS AND OTHER OPENINGS
(SENSOR INTO COMPARTMENT) WITH SILICONE TO
PREVENT MOISTURE FROM ENTERING THE ALARM
ENCLOSURE OR DAMAGE MAY RESULT.
This document contains confidential information. The dissemination, publication, copying, or duplication of this document or the software described herein without prior written authorization is strictly prohibited.
PDF compression, OCR, web optimization using a watermarked evaluation copy of CVISION PDFCompressor
Kitchen Brains © 2013 | www.KitchenBrains.com | 229-40081 A
Page 7 of 36
Datalarm™ Temperature Monitoring/Datalogging System Installation and Operating Instructions
INSTALLATION
GENERAL SAFETY MEASURES AND PRODUCT LIMITATIONS
• This product (“Product”) must be installed by a licensed electrician experienced in working in the types of environments
for which this Product is intended to be utilized; specifically, commercial walk-in coolers and freezers (“Equipment”).
• Personnel installing the Product must carefully and completely read the Operating and Installation Instructions
(“Instructions”), and instructions and specifications of the Equipment manufacturers, before attempting to operate and
install the Product. Failure to comply with the Instructions, and the instructions and specifications of the Equipment
manufacturers, may result in personal injury and/or property damage and may void the warranty of the Product. Retain the
Instructions for future reference.
• The Product shall only be used for the purposes described in the Instructions.
• During installation of the Product, all applicable laws, regulations and industry rules, including local electrical and safety
codes, the National Electric Code (NEC) and the Occupational Safety and Health Act (OSHA), must be strictly followed.
Consistent therewith, follow applicable electrical codes regarding running of low voltage wiring and high voltage wiring
in separate conduits and use appropriately rated wire (insulation type, voltage rating and wire gauge) for all connections.
Supply connection wiring must be rated at least 90°C. Use copper conductors only.
• The enclosure used for mounting the Product must be properly grounded according to electrical code.
• Confirm that the power source conforms to the requirements of the Product before connecting.
• Do not exceed the rated limits of the Product. Refer to the Product specifications for suitability of the Product to the
application.
• The Product is not suitable for use in wet locations. Do not expose the Product to water, moisture or condensation. In no
event should the Product be exposed to environments where sudden temperature changes with high humidity may result
in the formation of condensation.
• Any openings in the walls, ceiling or floor of the Equipment for wiring or other reason must be sealed (made
airtight and watertight) with appropriate materials (e.g., silicone, caulk or foam), both on the outside and inside
of the Equipment, to prevent moisture or condensation from entering the compartment of the Equipment and
forming and accumulating on the interior walls of the compartment and the contents of the compartment,
including the Product. Failure to properly seal such openings may (i) result in damage to the Equipment and
contents of the compartment (ii) pose a safety hazard and (iii) void the warranty of the Product.
• To prevent moisture or condensation from entering or forming in the enclosure used for the Product, any openings
in this enclosure (for wiring access or other purpose) must be appropriately sealed with materials such as silicone,
caulk or foam.
• Installation of the Product should be inspected and the Product tested by qualified personnel to ensure the Product
performs safely and in accordance with the Product specifications. Periodic testing of the Product should be performed on
an ongoing basis (at least quarterly) to ensure the Product continues to perform properly.
• All personnel operating, maintaining, repairing or interfacing with the Product must be instructed in the use of the Product
and provided with the Instructions. The Instructions must be kept in an accessible location for easy reference.
• WARNING: Hazard of electric shock! Power sources must be turned off or otherwise disconnected prior to installation or
servicing of the Product. Lock and tag power disconnects to prevent an unexpected application of power.
This document contains confidential information. The dissemination, publication, copying, or duplication of this document or the software described herein without prior written authorization is strictly prohibited.
PDF compression, OCR, web optimization using a watermarked evaluation copy of CVISION PDFCompressor
Kitchen Brains © 2013 | www.KitchenBrains.com | 229-40081 A
Page 8 of 36
Datalarm™ Temperature Monitoring/Datalogging System Installation and Operating Instructions
WIRING DIAGRAM-CONNECTING DAC-55(‘S) TO THE DATALARM
Figure 2A
WIRING DIAGRAM-CONNECTING IP-1P TO THE DATALARM
Figure 2B
This document contains confidential information. The dissemination, publication, copying, or duplication of this document or the software described herein without prior written authorization is strictly prohibited.
PDF compression, OCR, web optimization using a watermarked evaluation copy of CVISION PDFCompressor
Kitchen Brains © 2013 | www.KitchenBrains.com | 229-40081 A
Page 9 of 36
Datalarm™ Temperature Monitoring/Datalogging System Installation and Operating Instructions
D. DATALARM PROGRAMMING: (The Datalarm may
be programmed either manually on the alarm itself
or remotely by computer. Remote programming
requires the Datahub. Programming via the Datahub
is preferable when so connected. This section covers
manual programming only.)
IMPORTANT!! It is recommended that you do not enter
Program Mode until you have read this section and
understand the parameter choices and their intent.
The Datalarm contains Autoset™, a patent pending
technology which allows the Datalarm to automatically
program itself for certain common applications.
Entering Program Mode and changing temperature
setpoints will disable Autoset.
Programming Sequence and Description of Parameters:
The program menu contains seven variable parameters. All
seven parameters have pre-programmed factory default
values. The seven parameters and their factory default
values are:
Parameter
Default Value
Autoset
ON
Scale
°F
High Alarm Temperature Setpoint
45°F
Low Alarm Temperature Setpoint
30°F
Alarm Delay
60 Minutes
Ringback Delay
0 Minutes
Alarm Relay
Off
Press the hidden Program button (Page 4, Figure 1, #3)
to enter Program Mode. When in Program Mode, the
“Silence“ and “Test“ buttons become means for selecting
new parameter values. When a new value has been
selected using the Silence or Test buttons, press Program
again to move to the next variable parameter. NOTE: Once
Program Mode is entered, the Program process must
be completed for any changes made to be stored as
new operating parameters. There is no provision for
moving backwards through the program process and there
is no provision for manually exiting without completing the
programming process.
When the Program button is pressed, the display reads
“PrOG”, and then goes to the first parameter:
1. Autoset™ (Patent Pending) Display reads “AUTO”
and then reads the selected choice. Choices are
On or OFF. Default is ON. Autoset gives the
Datalarm the ability to automatically select from
pre-loaded alarm temperature setpoints by sensing
the temperature of the monitored compartment,
determining if it is a cooler or a freezer, and adjusting
itself accordingly. Pre-loaded default setpoints for
a cooler are, HI: 45F, LO: 30F. Pre-loaded default
set points for a freezer are, HI: 10F, LO: -20F. All
Datalarms are shipped with pre-loaded cooler
setpoints selected. If the monitored compartment
is a freezer, the setpoints will automatically change
to the freezer defaults when the compartment
temperature drops to the default high freezer
setpoint. Once changed, the setpoints will not revert
back to the cooler setpoints regardless of how warm
the compartment gets. In the programming menu,
changing the Autoset default setting to OFF disables
the Autoset feature and allows manual adjustment of
HI and LO alarm temperature setpoints. The Autoset
function only affects alarm temperature setpoints.
All variable parameters other than alarm temperature
setpoints may still be changed (Scale, Alarm Delay,
etc.), without affecting the Autoset function.
Select ON or OFF using Silence or Test Buttons and
press Program Button to move to next parameter.
Important Note: If Autoset has been turned OFF
and Program has been pressed to move to the
next parameter, there is no provision in program
mode for manually turning Autoset back ON.
(Remember, you can’t move backwards through the
programming process and you can’t manually exit
without completing the programming process.) If
this situation has been created and the selection
of OFF is not the desired choice, there are two
ways to correct it: 1) Stop programming and wait
for two minutes. The Datalarm is designed so that
if programming is interrupted for this period of time
it will automatically abort the programming process
and return to Run mode, operating at the parameters
that existed before programming began. 2) Press
the DEF. SET. Button. (Page 4, Fig. 1, #14) This will
restore all default values, including “Autoset ON”.
2. Scale – Display reads “SCLE” and then the selected
scale. Choices are F (Fahrenheit) and C (Centigrade).
Default is F. After selecting F or C using Silence or
Test buttons, press Program button to move to next
variable parameter.
3. High Alarm Temperature Setpoint – (NOTE: If
Autoset is ON, this parameter selection or any other
Alarm Temperature setpoint parameter selections
will not display, as setpoints cannot be changed
when Autoset is enabled. These parameters
only display when Autoset is OFF.) If Autoset is
OFF, display reads “HiAL” and then the selected
setpoint. Setpoint value is changed using “Silence”
and “Test” buttons. On the Alarm Status Indicator
This document contains confidential information. The dissemination, publication, copying, or duplication of this document or the software described herein without prior written authorization is strictly prohibited.
PDF compression, OCR, web optimization using a watermarked evaluation copy of CVISION PDFCompressor
Kitchen Brains © 2013 | www.KitchenBrains.com | 229-40081 A
Page 10 of 36
Datalarm™ Temperature Monitoring/Datalogging System Installation and Operating Instructions
Lights, the HI alarm light will glow red to indicate
that it is the parameter that has been selected for
adjustment. On Datalarms with 2 probe capability,
(for 2 compartment monitoring), the HI alarm light
for the selected probe will glow red to indicate the
parameter and probe that has been selected for
adjustment. (Range is -40F (-40C) to 125F (52C).
Select setpoint value & press Program button to
move to next variable parameter.
4. Low Alarm Temperature Setpoint – Display reads
“LoAL” and then the selected setpoint. Operation is
the same as #3 above, except LO alarm light glows
red instead of HI alarm light. Select & press Program
button to move to next variable parameter.
5. Alarm Delay – Display reads “dLay” and then
the selected delay time. Default is 60 minutes. HI
and LO alarm lights blink on and off to indicate the
parameter and probe that has been selected for
adjustment. On the Datalarm 2, independent delay
time may be selected for each probe. The time delay
is provided to override normal rises in compartment
temperature caused by defrost cycles or doors being
opened. Change using Silence and Test buttons.
Range is 000 (no delay) to 150 minutes. Press
Program button to move to next variable parameter.
6. Ringback – Display reads “rbAC” and then the
selected ringback time. Default is 000 (no Ringback).
The Ringback feature makes the audible alarm
re-activate at regular intervals during an alarm
condition so as to remind personnel that an alarm
condition is ongoing. Change using Silence and Test
buttons. Range is 000 (no Ringback) to 150 minutes.
Press Program button to move to next variable
parameter.
provides normally open and normally closed dry
contacts for remote notification purposes. There are
3 selectable relay modes:
a. Off – Display reads “OFF”. Choose this mode
when the relay is not being used so as to
conserve standby battery life in a power failure.
b. Unlatched – Display reads “UnLA”. Relay activates
when an alarm occurs and deactivates when
Silence is pressed. Use this mode when the relay
is being used to activate a secondary annunciation
device such as a horn or a strobe light.
c. Latched – Display reads “LACH”. Relay activates
when an alarm occurs and de-activates when the
alarm condition clears. Use this mode when the
relay is being used to send a signal to a building
management system, where it is desired that an
alarm condition continues to be indicated until a
condition has been corrected.
Press the Program button again after the desired
relay mode has been selected to complete the
programming process. The display reads “doNE”
(Done) and the alarm returns to the Run Mode
(normal operation) and begins to perform its
monitoring functions. NOTE: If the above described
programming process is begun and is then
interrupted for 2 or more minutes, the Datalarm
will automatically abort the Programming mode
and will return to Run mode, operating at the
parameters that existed before programming
began. The programming process must be
completed for selected changes to become new
stored values.
7. Alarm Relay – Display reads “rLAY” and then the
selected choice. Default is OFF. The alarm relay
This document contains confidential information. The dissemination, publication, copying, or duplication of this document or the software described herein without prior written authorization is strictly prohibited.
PDF compression, OCR, web optimization using a watermarked evaluation copy of CVISION PDFCompressor
Kitchen Brains © 2013 | www.KitchenBrains.com | 229-40081 A
Page 11 of 36
Datalarm™ Temperature Monitoring/Datalogging System Installation and Operating Instructions
SECTION 2 – DATAHUB
The Datahub is a proprietary server to the Datalarms and
it is utilized to connect and access up to 100 Datalarms
from a computer, a computer network or the Internet.
Computer access is through an ordinary web browser.
Internet Explorer is recommended. (Internet Explorer is a
trademark of Microsoft Corporation.) With the Datahub and
a computer or computer network it is possible to configure
the alarms remotely from a computer, to view real time
monitored conditions and to extract historical data regarding
compartment temperatures and alarm conditions. See page
1, General Description, for a full list of Datahub features.
A. CONNECTIONS, CONTROLS, INDICATORS &
THEIR FUNCTIONS: (Refer to Figure 3.)
FIGURE 3
1. 16 VAC Transformer – Provides line voltage to the
Datahub. Connect input of transformer to 120VAC
and connect 16VAC output to terminal strip on
Datahub in accordance with Figure 3. (NOTE:
12VDC and Auto Dialer connections on the terminal
strip are for powering and connecting an optional,
factory installed automatic telephone dialer. These
connections are not normally utilized for a typical
installation.)
2. Black & Red Flying Leads – Provided for connection
to the rechargeable battery. The battery provided
with the Datahub is 12VDC @ 4 ampere hours. The
Datahub contains recharging circuitry. Connect as
shown on Figure 3.
3. From Alarms – Provided for connecting alarm(s) to
the Datahub. Datalarms are “daisy chained” together
as shown on Figures 4A & 4B, utilizing “J” boards
as shown on Figure 5.
4. System Active Lights – When the Datahub is
powered and functioning, the red 3V light is on and
the four amber lights are sequentially scanning from
left to right.
5. Ethernet – To Network Jack – Provided for
connection to a computer or computer network.
6. Option Switches – Used for manual configuration
of certain Datahub settings. Options switches are
examined ONCE at power up time or whenever the
Reset Switch (See #10 on the next page) is pressed.
Press in the top of a selected option switch to close
the switch. Switches 1-4 should be re-opened by
pressing the bottom of the switch after the desired
effect takes place. Switches 5-8 should be left in
the desired position once selected. Option Switch
assignments and functions are:
Switch 1 – Select to restore Datahub defaults.
Passwords, alarm names and other Datahub settings
are reset to default values. IP address and Alarm
settings are not changed.
This document contains confidential information. The dissemination, publication, copying, or duplication of this document or the software described herein without prior written authorization is strictly prohibited.
PDF compression, OCR, web optimization using a watermarked evaluation copy of CVISION PDFCompressor
Kitchen Brains © 2013 | www.KitchenBrains.com | 229-40081 A
Page 12 of 36
Datalarm™ Temperature Monitoring/Datalogging System Installation and Operating Instructions
Switch 2 – Resets passwords to “Admin” and
“User”. Nothing else is changed.
Switches 3 & 4 –
Close 3 to set IP address to 192.168.0.240.
Close 4 to set IP address to 192.168.1.240.
Close 3 & 4 to set IP address to 192.168.2.240.
Note: There is an IPSet Utility contained on the
provided UTILITIES CD which offers another means
of setting the IP Address of the Datahub. If this utility
is used, Switches 3 & 4 are generally unneeded.
Switch 5 – Enables Diagnostic mode. Typically
activated in tech support situations. Normal position
is off.
Switch 6 – Enables Datahub debugging via serial
port. Typically activated in tech support situations.
Normal position is off.
Switch 7 – Unused.
Switch 8 – Built-in Datahub line termination resistor.
7. Dry Contact Connections – Provided as a means for
connecting the relay in the Datahub to other external
devices. Normally open and normally closed dry
contacts may be used to activate security systems,
building management systems, external horns,
strobe lights or other remote notification equipment.
B. DATAHUB INSTALLATION: (This section also
includes information for connecting Datalarms to the
Datahub.) See Figure 4A, Figure 4B and Figure 5.
TERMINATION RESISTORS – Two 120 ohm
resistors are taped to the top of the Datahub for line
termination of the cable that is used to interconnect
Datalarms and the Datahub. A third line termination
resistor is built into the Datahub itself. Use these
resistors as follows:
If your installation is like Figure 4A, put a line
termination resistor onto the “J” Board at the end
of the cable. (The alarm furthest away from the
Datahub.) The resistor is connected across terminals
A & B of either of the green terminal blocks on
the “J” Board. (See Figure 5 on page 14.) This
terminates the alarm end of the cable. Select switch
8 on the Datahub (press in on top) to terminate the
Hub end of the cable. When so configured, the other
loose resistor is unused.
If your installation is like Figure 4B, put line
termination resistors onto the “J” Boards at each
end of the cable. (The alarm at each end of the
cable furthest away from the Datahub.) Resistors
are connected as described for Figure 4A. This
terminates both ends of the cable. Do Not select
switch 8 on the Datahub when so configured.
8. Autodialer – For connection of phone line to the
optional Autodialer.
9. RST – Reset button. Usually used in conjunction with
options switch. Press reset button to implement
function changes that are selected on options
switch.
This document contains confidential information. The dissemination, publication, copying, or duplication of this document or the software described herein without prior written authorization is strictly prohibited.
PDF compression, OCR, web optimization using a watermarked evaluation copy of CVISION PDFCompressor
Kitchen Brains © 2013 | www.KitchenBrains.com | 229-40081 A
Page 13 of 36
Datalarm™ Temperature Monitoring/Datalogging System Installation and Operating Instructions
TYPICAL INTERCONNECTIONS
Figure 4A
TYPICAL INTERCONNECTIONS
Figure 4B
This document contains confidential information. The dissemination, publication, copying, or duplication of this document or the software described herein without prior written authorization is strictly prohibited.
PDF compression, OCR, web optimization using a watermarked evaluation copy of CVISION PDFCompressor
Kitchen Brains © 2013 | www.KitchenBrains.com | 229-40081 A
Page 14 of 36
Datalarm™ Temperature Monitoring/Datalogging System Installation and Operating Instructions
The Datahub is mounted inside of a hinged, 12” x 12” x 3”
steel enclosure, which will also contain the rechargeable
backup battery, and, if so ordered, an optional Autodialer.
Figure 5
1. Select a suitable location for mounting the Datahub
enclosure. Considerations for a suitable location are:
a. Easy physical access to the Datahub.
b. Access to line voltage for powering the Datahub.
(120VAC)
c. Access for connecting the Datalarms to the
Datahub.
d. Access for connecting the Datahub to a computer
or a computer network. (Ethernet connection)
e. Access for connection to a phone line. (For
Autodialer, if required.)
2. Mount the Datahub using the mounting holes in the
back wall of the Datahub enclosure.
3. Interconnect the Datalarm(s) to the Datahub in
accordance with Figure 4A and 4B, using the
“J” Boards (Figure 5) as a means for providing
interconnection. Note that all Datalarms and the
Datahub must be “daisy chained” together on
a single cable for proper operation. The Datahub
can be installed at one end of the single cable as
shown in Figure 4A or it can be installed anywhere
in between Datalarms on the cable as shown on
Figure 4B. The proper location for the Datahub
on the cable will depend on the physical layout of
the monitored compartments, relative to where
the Datahub is to be installed. Do not attempt to
connect the Datalarms to the Datahub in a “star”
configuration (multiple cables running from one or
more Datalarms to the Datahub) as this will cause
the system to operate improperly. The cable coming
from the Datalarm (as described in #7 on page 6)
is plugged into the jack labeled “ALARM” on the
“J” board (Figure 5). The actual interface between
the Datalarms and the Datahub consists of three
wires, two of which carry data while the third wire
is ground. CAT 5 wire (normally used for Ethernet
connections) contains 4 twisted pairs of conductors
(8 wires total). Because CAT 5 wire is so widely
available and because it is comparatively inexpensive,
it is recommended as the interconnecting wire
of choice, despite having more conductors than
necessary. The “J” boards (Figure 5) provide two
different means for interconnecting Datalarms to
each other and to the Datahub:
The first means consists of two Ethernet jacks,
labeled “NETWORK”. If these jacks are used, the
interconnecting wiring must be terminated with
RJ45 jacks, which are then plugged into the “J”
boards. Wire assignment in all plugs must be
identical in order to insure network continuity.
Pre-assembled Ethernet cables of appropriate length
may also be used. Connection on the Datahub is
made to the “FROM ALARMS” jack on the Datahub.
The second means consists of two terminal blocks,
also labeled “NETWORK”. These blocks are provided
for cut wire connection to the “J” boards. Note the
terminal block connection assignment on Figure 5.
For data communication, terminals G, A & B only
are required. For Cat 5 wire, assign a twisted pair
to terminals A and B (data) and use one or two of
the other connectors in the cable to terminal G
(ground). Wire assignment must be identical for
all connections to insure network continuity.
Connection on the Datahub is made to the “FROM
ALARMS” terminal block on the Datahub.
4. Connect the output of the transformer (provided)
to the 16VAC terminals in the Datahub and connect
transformer input to 120VAC. Once powered up,
the “System Active Lights” (#4, page 11) will activate.
5. Connect an Ethernet cable to the jack labeled
“ETHERNET – TO NETWORK” on the Datahub and
connect the other end of the Ethernet cable as
follows:
a. If you are connecting the Datahub directly
to a single computer, you may need to use a
crossover adaptor in order to achieve successful
communication between the Datahub and the
computer. Connect the cable to the adaptor and
connect the jack to the Ethernet port on the
computer.
This document contains confidential information. The dissemination, publication, copying, or duplication of this document or the software described herein without prior written authorization is strictly prohibited.
PDF compression, OCR, web optimization using a watermarked evaluation copy of CVISION PDFCompressor
Kitchen Brains © 2013 | www.KitchenBrains.com | 229-40081 A
Page 15 of 36
Datalarm™ Temperature Monitoring/Datalogging System Installation and Operating Instructions
b. If you are connecting the Datahub to a network,
(router or switch) a crossover adaptor would not
be used. Connect the cable directly to the router
or switch.
Important! There are two small LEDs built into the
“ETHERNET – TO NETWORK” jack on the Datahub.
These LEDs will be lit when the cable is plugged in on
both ends if the connections are correct. If the LED’s are
not lit, you will not be able to communicate with the
Datahub! Note: On a 10MB connection, only the right
LED will be lit. On a 100MB connection, both LEDs will
be lit.
C. SETTING UP COMMUNICATION BETWEEN THE
DATAHUB & THE COMPUTER OR COMPUTER
NETWORK. IMPORTANT!!! If you have IT personnel
employed at your facility, allow them to set up this
communication.
For IT Personnel: The Datahub is designed to use a
static IP address. The default address for the Datahub
is 192.168.1.240 and the default subnet mask is
255.255.255.0. The default port is 80. In addition to a
copy of the instruction manual, the Utilities CD provided
with the Datahub contains 2 files: a copy of Java (Java is
a trademark of Oracle) which is required for utilizing the
graphing capability of the Datahub, and a utility called
“Datalarm IP Set” which is utilized as a means of viewing
and changing the IP address of the Datahub. Instructions for
using the Datalarm IP Set utility are on page 16 under the
heading “Connecting the Datahub to a router”. You may also
temporarily connect your computer directly to the Datahub
as described below (Connecting the Datahub to a single
computer). Once you have logged into the system, click on
“System Functions” from the Alarm Administration Center
screen. Follow the instructions under “System Functions”
on pages 21-22 for changing the IP address, port, etc.
For Non-IT Personnel: Since the Datahub is actually
a computer, it shares a characteristic with other more
traditional computers in that it has an address, called an
“IP Address”, as a means of identifying the Datahub to
another computer or on a LAN (Local Area Network). The
default IP address for the Datahub is 192.168.1.240 and the
default subnet mask is 255.255.255.0. The procedure for
connecting the Datahub to your computer or network will
vary, depending on what it is connected to.
Find the section below that relates to your particular
application and connect accordingly.
1. Connecting the Datahub to a single computer –
Use this approach if your computer is a stand
alone machine and it is not part of a network. Your
computer requires an Ethernet port for connection
to the Datahub. To connect and to assign the IP
address, proceed as follows:
a. Connect an Ethernet cable from the “Ethernet –
To Network” jack on the Datahub to the Ethernet
port on your computer, using the provided
crossover adaptor as previously described.
The crossover adaptor may be placed on either
end of the cable. The LED’s on the “Ethernet –
To Network” jack on the Datahub will be lit if
connections are correct.
b. To assign the IP address, proceed as follows:
Note: This procedure may vary slightly, depending
on your operating system (Windows XP, Windows
98, etc.).
1. Click on the “Start” menu.
2. Click on “Control Panel”. (If you do not see
“Control Panel”, click on “Settings” and then
click on “Control Panel”.
3. Double click on “Network Connections”.
(Depending on your operating system, the
icon may just say “Network”.)
4. Double click on the “Local Area Connection”
icon under “LAN or high speed internet”.
5. A “Local Area Connection Properties” screen
will appear with a small scrollable window.
Scroll down to “Internet Protocol, (TCP/IP) and
double click on it.
6. The box shown below will appear. Select
“Use the following IP Address” and enter
the address 192.168.1.241 as shown. If the
subnet mask 255.255.255.0 does not appear
automatically, enter it manually as shown.
When completed, click “OK”.
This document contains confidential information. The dissemination, publication, copying, or duplication of this document or the software described herein without prior written authorization is strictly prohibited.
PDF compression, OCR, web optimization using a watermarked evaluation copy of CVISION PDFCompressor
Kitchen Brains © 2013 | www.KitchenBrains.com | 229-40081 A
Page 16 of 36
Datalarm™ Temperature Monitoring/Datalogging System Installation and Operating Instructions
Once you have obtained the router IP address,
open your web browser, and in the address bar,
type “http://” followed by the router IP address you
obtained (example: http://192.168.0.1) and hit enter.
This will bring you to the router login page which
normally requires you to enter a user name and a
password. Consult the Router user manual for this
information. (The default user name and password
may be “admin”). You must have the proper user
name and password or you will not be able to gain
access to the router. Please Note: Each router
is different. You may need to refer to your router
manual for DHCP information and configuration.
7. Open your web browser and enter the
following address in the address bar:
http://192.168.1.240. Hit enter and you will
be taken to the Datalarm Log In screen. See
page 18 for Dataware software instructions.
2. Connecting the Datahub to a Router – In order
to connect to a router and assign an appropriate IP
address to the Datahub, you will need your router’s
IP address and you will also need the Datalarm IP
Setup utility which is contained on the provided CDRom. The router IP address will be provided in the
documentation that came with it when purchased,
or in all likelihood it can also be obtained from the
router manufacturer’s website. The router IP address
can also be obtained directly from your computer
as follows:
For Windows XP, Windows 2000, & Windows 7:
Click on Start.
Click on Run.
Type cmd and press Enter.
In the black window, type ipconfig/all and press Enter
(If Run does not appear, use Search and type “run”).
A list will pop up showing the IP address, the Subnet
Mask and the Default Gateway. The number after
the Default Gateway (example- 192.168.0.1) is the
Router IP address. Write this address down. NOTE:
Addresses labeled “DNS Addresses” will also show
on this screen. Write these down as well as you will
need them if you are going to use the email feature.
Once you have gained access to the router, find
the tab or button labeled DHCP (Dynamic Host
Configuration Protocol) and click on it. This will
provide you with an address range that the router
uses to automatically assign addresses to various
machines that are on your LAN (local area network).
It is important, when assigning a static IP address
to the Datahub, that you pick an address which
is outside of this designated range or conflicts
may result. For example, if your router has an
address range of 192.168.1.100 to 192.168.1.150
(50 addresses) which is reserved for automatically
assigning addresses, you must choose an address
for the Datahub which is outside of this range.
A suitable address in this instance would be
192.168.1.151. Note that the first three numbers
of the Datahub IP address you choose must be
identical to the first three numbers of the router
IP address. In this instance, the first three identical
numbers are 192, 168 and 1. The last number, in this
instance 151, is the unique address for the Datahub.
Also note that 151 is outside of the range of 100-150.
With this information in mind, to assign a new IP
address to the Datahub, proceed as follows:
a. Connect an Ethernet cable from the “Ethernet –
To Network” jack on the Datahub to an available
port on the router. The crossover adaptor is not
required. The green LED’s on the “Ethernet –
To Network” jack on the Datahub will be lit if
connections are correct.
b. Obtain the IP address of the router as described
above, and from the DHCP page in the router,
determine the address range that you should not
use, and then determine the IP address you want
to assign to the Datahub.
c. Put the Datalarm Utilities CD into your computer
and open the DATALARM IP SET program. The
following screen will appear:
This document contains confidential information. The dissemination, publication, copying, or duplication of this document or the software described herein without prior written authorization is strictly prohibited.
PDF compression, OCR, web optimization using a watermarked evaluation copy of CVISION PDFCompressor
Kitchen Brains © 2013 | www.KitchenBrains.com | 229-40081 A
Page 17 of 36
Datalarm™ Temperature Monitoring/Datalogging System Installation and Operating Instructions
The blue highlighted listing in the righthand
“Select a Hub” window shows the present
address of the Datahub. Note: If you have more
than one Datahub installed in a given location,
there will be more than one Datahub listed
when the Datalarm IP Set window opens. Each
Datahub has a unique Mac Address which
is labeled on the cover of the Datahub itself.
Reference this Mac Address to the one shown on
the screen so you know which one is which. (The
same result can also be obtained by temporarily
disconnecting a Datahub from the network,
pressing “Search Again” on the IP Set screen and
identifying the unit that is missing.)
d. In the Hub Settings window on the left side of the
IP Set screen, enter the new Datahub IP Address
into the IP window and enter the router IP
Address into the Gateway window. The Network
mask can typically be left at 255.255.255.0.
e. Press “Set” in the middle of the IP Set screen.
The address of the highlighted Datahub in the
“Select a Hub” window will change to the new
address. Verify that the address of the highlighted
Datahub has changed and then press “Close” to
close the IP Set utility.
f. To access the Datahub, open your web browser
and in the address bar, type “http://” followed
by the new Datahub IP address you assigned
(example: http://192.168.1.242) and hit enter.
This will bring you to the Datalarm login screen
as shown on next page:
This document contains confidential information. The dissemination, publication, copying, or duplication of this document or the software described herein without prior written authorization is strictly prohibited.
PDF compression, OCR, web optimization using a watermarked evaluation copy of CVISION PDFCompressor
Kitchen Brains © 2013 | www.KitchenBrains.com | 229-40081 A
Page 18 of 36
Datalarm™ Temperature Monitoring/Datalogging System Installation and Operating Instructions
DATALARM LOGIN SCREEN
SECTION 3 – DATAWARE SOFTWARE
NOTE: The Dataware software for accessing the individual
Datalarms is built into the Datahub itself so it does not
need to be installed. However, the Dataware software
uses Java software, (Java is a trademark of Oracle), to
provide graphing capability and Java must be installed onto
any computer used to generate graphs. A copy of Java is
contained on the Datalarm Utilities CD or it is available as a
free download from www.java.com. Once installed, the
Dataware software (or any other application you may have
which uses Java) will automatically access Java when required.
Once you have reached the Datalarm Login page as shown
above, enter the default administrator password , admin,
(not case sensitive), and click on the “Submit” button or
hit Enter. You will be taken to the Alarm Administration
Center screen as shown on the next page: Note: The
administrator password provides access to all system
functions and settings. The second default password is
user, and the user password only accesses alarm conditions
and allows the user to generate reports. The user password
does not provide access to any system settings. The
default Administrator (admin) and User (user) passwords
are changeable by the Administrator from inside of the
Dataware software.
This document contains confidential information. The dissemination, publication, copying, or duplication of this document or the software described herein without prior written authorization is strictly prohibited.
PDF compression, OCR, web optimization using a watermarked evaluation copy of CVISION PDFCompressor
Kitchen Brains © 2013 | www.KitchenBrains.com | 229-40081 A
Page 19 of 36
Datalarm™ Temperature Monitoring/Datalogging System Installation and Operating Instructions
ALARM ADMINISTRATION CENTER SCREEN
The five buttons across the top direct you to other functions
of the software. The box that says “No alarms connected”
is where the alarms will be listed once addresses have
been assigned. To set up the system, proceed as follows:
1. SET SYSTEM CLOCK: While this step does not have
to be performed first, it is recommended because
the System Clock provides time and date stamping
for all data and it must be set properly to generate
accurate reports. Press Set System Clock and the
following screen appears:
Use the pull down boxes to set the correct date and
time. When complete, press Update and Return to
Admin. NOTE 1: If you are at this screen and you are
not changing the settings, press Return to Admin
without update. NOTE 2: The Datahub incorporates
battery backup which keeps the Datahub operational
for up to 24 hours during a power failure. The System
Clock incorporates a separate power supply which
keeps the clock powered in a power failure for up
to 1 week. Power failures exceeding 1 week may
require resetting the System Clock.
This document contains confidential information. The dissemination, publication, copying, or duplication of this document or the software described herein without prior written authorization is strictly prohibited.
PDF compression, OCR, web optimization using a watermarked evaluation copy of CVISION PDFCompressor
Kitchen Brains © 2013 | www.KitchenBrains.com | 229-40081 A
Page 20 of 36
Datalarm™ Temperature Monitoring/Datalogging System Installation and Operating Instructions
SYSTEM FUNCTIONS: As the name suggests, this
screen contains functions which effect entire system
operation. Some or all of the functions on this
screen may or may not be used for your application.
To review settings contained here, press SYSTEM
FUNCTIONS and the following screen appears:
Please note the Return to Admin without update
and Update and return to admin buttons on the
bottom of the screen. Any changes made on this
screen must be followed by pressing Update and
return to admin for the changes to take effect. If
you do not wish to make changes, press Return
to admin without update to exit the SYSTEM
FUNCTIONS screen. Pressing the [ENTER] key will
result in no changes saved.
This document contains confidential information. The dissemination, publication, copying, or duplication of this document or the software described herein without prior written authorization is strictly prohibited.
PDF compression, OCR, web optimization using a watermarked evaluation copy of CVISION PDFCompressor
Kitchen Brains © 2013 | www.KitchenBrains.com | 229-40081 A
Page 21 of 36
Datalarm™ Temperature Monitoring/Datalogging System Installation and Operating Instructions
Functions on the SYSTEM FUNCTIONS screen are:
1. Set User and Administrator Passwords – This
is where the default passwords Admin and User
may be changed to passwords of your choice.
Enter the old and new passwords as shown in
the respective boxes.
2. Set User Screen Refresh – This setting affects
how quickly the system updates when looking
at alarm conditions on the ALARM STATUS
CENTER screen. The default is 5 seconds which
is satisfactory for most applications. Use the
pulldown menu to change from the default
setting.
3. Set Auto Logout – The system is designed to
automatically log off after a period of time if
there is no user activity. (This feature prevents
someone from locking others out of the system
if they have not logged off properly.) The default
is 30 minutes. Use the pulldown menu to change
from the default setting.
4. Configure Email Notification – The system can
be configured to send email to a maximum of 4
addresses regarding alarm conditions. To set it
up, fill in the form as follows:
a. Mail Server – You will need to obtain the
mail server name from your Internet Service
Provider (ISP). (Example – mail.optonline.net)
Enter your mail server name into the mail
server window.
the system) TO IDENTIFY THE LOCATION
YOU ARE LOOKING AT.
f. Send Mail – Select from the pulldown menu
how frequently you want email to be sent in
an alarm condition.
g. Dest #1 – 4 – (Destination) Enter the addresses
where you would like email to be sent.
Once email has been configured, you can check
the “test email box” to generate a test message.
(The message will be sent when you leave
the SYSTEM FUNCTIONS screen by pressing
the Update and return to administration
button.) NOTE: Once you re-enter the SYSTEM
FUNCTIONS page the “test email box” will
default to unchecked.
5. Network Configuration – IMPORTANT – Note
the red caution statement in this section:
“Changing these settings may disconnect
session.” Use this section to view or change the
system address configuration to your computer
or network. Fields in this section indicate the
following:
a. IP Address – This is the fixed IP address of the
Datahub. The default address is 192.168.1.240.
If it has been changed with the IPSet utility,
the changed address will appear in this field.
You may also change the address manually
in this field by highlighting the address and
entering a new one.
b. Primary DNS Server, Secondary DNS
Server – (Windows for entering these
addresses are at the bottom of the next
box on the screen, labeled, Network
Configuration.) These addresses may also be
obtained from your ISP or from the Run, cmd,
ipconfig/all sequence as described on page
16.
b. Gateway – This is typically the same as your
router address.
c. Mail User Name – This optional field may be
required and may be provided by some ISP’s.
If not, leave it blank.
d. Subnet Mask – The default is 255.255.255.0.
If your system is connected directly to a
broadband connection, your ISP will advise
you what the subnet mask should be. If your
system is connected to a router, or if you are
unsure, leave the subnet mask at the default.
d. Return address – Enter the address where
you want notification to be sent if mail does
not go through. (Most likely you will enter
your own email address here.)
e. Site Name – Enter the address of the entire
system. (Example: Monmouth Hospital
Main Kitchen, Store #256, etc. ). NOTE: THE
NAME THAT IS ENTERED HERE WILL ALSO
APPEAR ON THE DATALARM LOG-IN PAGE
(The first screen you see when accessing
c. Primary and Secondary DNS Server – If you
have configured email, these addresses have
already been filled in. These addresses may
also be obtained from your ISP or from the
Run, cmd, ipconfig/all sequence as described
on page 16.
e. HTTP port – The default is 80. The HTTP port
is a web server port and is only of concern if
you plan on accessing your system over the
Internet. If necessary (for example, if port 80
is blocked or not supported by your ISP) the
port may be changed to a new port in this
field. NOTE: If the port is changed from the
This document contains confidential information. The dissemination, publication, copying, or duplication of this document or the software described herein without prior written authorization is strictly prohibited.
PDF compression, OCR, web optimization using a watermarked evaluation copy of CVISION PDFCompressor
Kitchen Brains © 2013 | www.KitchenBrains.com | 229-40081 A
Page 22 of 36
Datalarm™ Temperature Monitoring/Datalogging System Installation and Operating Instructions
default, it may be necessary to change settings
in your router (sometimes referred to as
forwarding) to make the new port available via
the Internet. See your router manual for details.
situations.
3. ASSIGN ADDRESSES TO THE ALARMS: The
Datalarm System design is based on a “Multi-Drop”
configuration, where all of the alarms are “daisy
chained” to the same cable (Bus). In order for the
system to identify the alarms on the bus, each
alarm must be assigned a unique address. To
assign addresses, proceed as follows: (Read this
section before you begin so as to proceed in the
proper manner.)
6. Dynamic DNS Setup – Use this function only if:
• You have a broadband Internet connection
and you will be accessing your system over
the Internet.
• You have a dynamic IP address. (As opposed
to a static IP address. See below for a brief
description of the difference, and contact your
ISP if you are unsure.)
a. Use the provided Datalarm Alarm Address
Worksheet to organize your desired address
assignment. Organizing addresses is important
because it will affect how the alarms are grouped
and displayed for review when you wish to check
compartment status from your computer. The
worksheet has room for listing 20 compartments.
Make additional copies if you are monitoring
more than 20. The Alarm Address column should
contain a numeric listing of the number of alarms
that you have. Allow 2 lines on the form for 2
probe alarms (Datalarm 2). The Probe # column is
used to identify individual probe assignments for
each alarm. The Monitored Compartment Name
column is where your compartments are listed.
• You are not already performing this function
by some other means such as through
your router.
IP addresses provided by ISP’s can be either
static (unchanging) or dynamic (changing). If your
address is static, this function is unnecessary
because your IP address always remains the
same. If your address is dynamic, dynamic
DNS provides a method of keeping a domain
name linked to a changing IP address. NOTE:
Some ISP’s that normally provide dynamic IP
addresses are able to provide a static IP address
for a nominal charge. Contact your ISP for more
information in this regard.
7. Other System Functions – Other operational
and diagnostic settings consist of the following:
• Login Always – If this box is checked, someone
logging in while someone else is using the
system will “bump off” the first user.
• 24 Hour Clock – If this box is checked, reports
will be generated in military time instead of
AM-PM format.
• Daylight Time Adj. – Check this box if you
want the system to automatically adjust for
Standard and Daylight Saving Time.
• Reset System – Duplicates the function of the
Reset button on the Datahub. (#10, page 12)
• Upgrade Alarm Firmware and Upgrade Hub
Firmware – These functions provide access to
the Bootloader that is built into the Datalarms
and the Datahub. The Bootloader provides a
means for upgrading or otherwise revising
the operating code installed in these devices.
Modularm will provide this code as required in
the appropriate format.
• View Event Log – Used for troubleshooting
or other diagnostic purposes in tech support
The following diagram shows a piece of this form
and how it might look when filled out:
DATALARM ALARM ADDRESS WORKSHEET
ALARM
ADDRESS
PROBE MONITORED COMPARTMENT NAME
#
1
1
MAIN KITCHEN COOLER
”
2
MAIN KITCHEN FREEZER
2
1
BAKERY COOLER
”
2
BAKERY FREEZER
3
1
MEAT COOLER
”
2
SEAFOOD COOLER
4
1
DELI COOLER
”
2
PRODUCE COOLER
5
1
DAIRY COOLER
Note that addresses 1 through 4 are for two probe
alarms and address 5 is for a one probe alarm.
Once the address assignment has been
established, go to the Alarm Administration
Center screen and press Install New Alarms.
The following screen appears:
Next, go to the alarm that you want to be Address
#1. This alarm, and all alarms that have not been
addressed, will have the letters “Addr” on the
display. Press the Silence button on the alarm.
This document contains confidential information. The dissemination, publication, copying, or duplication of this document or the software described herein without prior written authorization is strictly prohibited.
PDF compression, OCR, web optimization using a watermarked evaluation copy of CVISION PDFCompressor
Kitchen Brains © 2013 | www.KitchenBrains.com | 229-40081 A
Page 23 of 36
Datalarm™ Temperature Monitoring/Datalogging System Installation and Operating Instructions
The display will briefly change to “A001” (Address
#1) and then the alarm will return to Run mode.
(The alarm displays a compartment temperature
and begins normal operation.) Address #1 has
now been assigned to this alarm. Repeat this
procedure with the remaining alarms (addresses
will be “A002”, “A003”, etc.) until all alarms have
been addressed. When complete, return to the
computer and press End Alarm Installation And
Return To Administration. This returns you to the
Alarm Administration Center screen which will
now appear similar to the screen as shown on
the following page:
NOTE #1: If for any reason the addressing
procedure is interrupted for 10 minutes or more,
the entire system will automatically return to Run
mode. Alarms that have already been addressed
will maintain the new addresses. The addressing
procedure must be restarted to address the
remaining alarms. (Alarms that have already been
addressed will not revert to the Address mode
when the procedure is restarted.)
NOTE #2: To check the alarm address at any time,
press the Test button on the Datalarm. The alarm
address will be the third parameter to display.
(The letters “Addr” will display, followed by the
alarm address.) See Test Mode, 7d on page 6.
This document contains confidential information. The dissemination, publication, copying, or duplication of this document or the software described herein without prior written authorization is strictly prohibited.
PDF compression, OCR, web optimization using a watermarked evaluation copy of CVISION PDFCompressor
Kitchen Brains © 2013 | www.KitchenBrains.com | 229-40081 A
Page 24 of 36
Datalarm™ Temperature Monitoring/Datalogging System Installation and Operating Instructions
The screen now shows the alarm addresses,
generic names for the alarms and “App Ver”
(application version), which is the software
version presently running in your alarms. (This
example shows five alarms. For your specific
application, this screen will show all of the alarms
that you have installed.)
NOTE: The Refresh Alarms List button is used
in specific situations such as when alarms
are removed from the system or when alarm
software is upgraded. Pressing this button will
upgrade the list of alarms displayed to those
which are currently installed and responding on
the system.
4. CONFIGURE THE INDIVIDUAL ALARMS: This
feature allows you to custom configure alarms
according to your specific requirements. (Assign
names to alarms or change alarm operating
parameters.) Note the red message “Click on
the address of the alarm you wish to configure”.
Clicking on an address will take you to the Alarm
Configuration screen for the address you selected,
as shown on the following page: NOTE: All
parameters are changed by highlighting and changing
to the desired values or by using the drop down menus.
This document contains confidential information. The dissemination, publication, copying, or duplication of this document or the software described herein without prior written authorization is strictly prohibited.
PDF compression, OCR, web optimization using a watermarked evaluation copy of CVISION PDFCompressor
Kitchen Brains © 2013 | www.KitchenBrains.com | 229-40081 A
Page 25 of 36
Datalarm™ Temperature Monitoring/Datalogging System Installation and Operating Instructions
All of the settings shown above represent the
default settings for the Datalarms. Most of the
parameters shown are explained under D) Datalarm
Programming on page 9. NOTE: On Datalarm 1
single probe alarms, the “Probe 2” box does not
appear. The other parameter selections not covered
under the aforementioned section are:
a. Set time per sample, etc.: This is the time
period at which the alarm will record a sample
of the monitored temperature. As shown, the
default is every 6 minutes. The range this can be
set to is 10 seconds (00:10) to 40 minutes (40:00)
in 10 second increments.The memory capacity in
days will update automatically.
b. Permit remote silencing of alarm: This allows
you to acknowledge and silence an activated
alarm remotely from the computer. As shown,
the default is YES. If you want to disable remote
silencing, change YES to NO. (When changed to
NO, an alarm can only be silenced by pressing
the Silence button on the alarm itself.)
c. Permit local configuration from the alarm
panel: This allows manual programming of alarm
parameters on the individual alarms. As shown,
the default is YES. Changing to NO disables
the hidden manual programming button on the
respective Datalarm. (When changed to NO,
alarm parameters can only be programmed from
the computer.)
Other functions shown on this screen are:
a. Remove this alarm from system completely
button: This button does as the name implies.
Use this function if you want to assign a different
address to an alarm or if you are replacing an
alarm. NOTE: Whenever alarms are addressed,
the Datahub will always assign the lowest
available address to the alarm you are addressing.
Example: If you have 5 alarms, you wish to
replace alarm 3, and you want the replacement
alarm to have address 3, you must first use this
remove function to remove alarm 3 from the list.
If you don’t and you assign an address to the
This document contains confidential information. The dissemination, publication, copying, or duplication of this document or the software described herein without prior written authorization is strictly prohibited.
PDF compression, OCR, web optimization using a watermarked evaluation copy of CVISION PDFCompressor
Kitchen Brains © 2013 | www.KitchenBrains.com | 229-40081 A
Page 26 of 36
Datalarm™ Temperature Monitoring/Datalogging System Installation and Operating Instructions
new alarm, it will become alarm 6, (the lowest
available address.)
b. Name: The generic alarm and probe name
appears here as the default. To change it to a
name of your choice (example: DAIRY COOLER),
highlight the generic name and type in the new
name.
c. Caution Statement: This alarm is set to
Autoset Mode. Changing any temperature
setpoint will disable this feature: The Autoset
function is described on page 9. If you choose to
enter custom temperature setpoints, the Autoset
function is disabled and the caution statement
will disappear when you next look at the Alarm
Configuration page for this alarm.
d. Return to Admin without update button: Use
this button if you wish to return to the Alarm
Administration Center screen without changing
any parameters. If you have changed parameters
and you use this button to exit, the parameter
changes you have made will not be updated.
e. Update and return to Admin: Use this button if
you want the system to update to the parameter
changes you have made. When this button is
pressed, the Update in progress, please wait
screen briefly appears and then you are returned
to the Alarm Administration Center screen.
If you have entered names for the monitored
compartments the screen will now appear similar
to the screen as shown below:
This document contains confidential information. The dissemination, publication, copying, or duplication of this document or the software described herein without prior written authorization is strictly prohibited.
PDF compression, OCR, web optimization using a watermarked evaluation copy of CVISION PDFCompressor
Kitchen Brains © 2013 | www.KitchenBrains.com | 229-40081 A
Page 27 of 36
Datalarm™ Temperature Monitoring/Datalogging System Installation and Operating Instructions
5. ALARM STATUS CENTER: The Alarm Status
Center is the point of entrance into the Dataware
software when the User password is utilized to
access the system. (The User does not have access
to any of the parameter settings already described
when accessing the system with the Admin
password. The Admin password provides access
to all system functions and settings.) From the
Alarm Status Center screen you are able to view
all existing monitored conditions and you are also
able to generate historical reports of past monitored
conditions in graph format, in list format or in CSV
(comma delimited) format. When you click on the
Alarm Status Center button, the following screen
appears, as shown below:
Much on the Alarm Status Center screen is selfexplanatory. However, the following should be noted:
• When looking at this screen, a periodic
“flickering” will occur in accordance with the
chosen “Set User Screen Refresh” setting as
selected on the System Functions screen. (See
page 21, #2.) This flickering is the result of this
screen updating the information shown and it is
normal operation.
• The “AC OK – Batt = 13. 1” message in the upper
left corner is the status of the power supply for
the Datahub.
This document contains confidential information. The dissemination, publication, copying, or duplication of this document or the software described herein without prior written authorization is strictly prohibited.
PDF compression, OCR, web optimization using a watermarked evaluation copy of CVISION PDFCompressor
Kitchen Brains © 2013 | www.KitchenBrains.com | 229-40081 A
Page 28 of 36
Datalarm™ Temperature Monitoring/Datalogging System Installation and Operating Instructions
DOWNLOAD FROM ALL ALARMS:
• Each screen will show a maximum of 5 alarms
(addresses) as shown. If your application utilizes
more than 5 alarms, a means for moving through
the additional screens is automatically generated
directly above the aforementioned power supply
message.
• The “Download From All Alarms” button at the
bottom of the screen may be used to generate a
.CSV (comma-delimited) file which may be read
by Excel, Access or any other CSV-compatible
application. The file contains sequentially listed
data for all alarms for a selected time period.
Clicking on this button will take you to the
Download From All Alarms screen. Select
a start date and time from which you wish to
retrieve data, click on the “Download From All
Alarms” button on this screen and follow the
instructions for saving the selected data to a
location of your choice.
• The “Showing All Units” and the “Show Alerting
Units” messages in the upper right corner are
used to select what is displayed on the screen.
“Showing all Units” is presently selected on the
screen above. Clicking on the “Show Alerting
Units” message will display a list of only those
alarms that are in an alarm condition. This feature
is useful in helping to easily identify an alarm
displaying an alarm condition in installations with
a large number of alarms.
• The “Low Alarm”, “High Alarm” and “Check
Door” indicators duplicate the alarm lights on the
individual alarms.
• “Power” indicates AC power status to the
individual alarms. OK = AC Power. FAIL = AC
Failure in progress. FAILED = AC Failure had
occurred that was not acknowledged.
• The ACK buttons under the “Clear” heading are
used to acknowledge and Silence an activated
alarm remotely from the computer. (This will only
function if “Permit Remote Silencing of Alarm”
on the respective Alarm Configuration screen has
been set to “YES”. See 4b, bottom of page 25.)
An unacknowledged Clear button will be red to
identify the activated alarm and will return to gray
when you click on it.
Note the following:
1. There are no headings shown on the listed
data. The headings for the columns are:
A
B
C
D
E
F
G
H
SAMPLE ALARM
ALARM TIME DATE TEMP. TEMP.
CHECK
ADDRESS PROBE
STATUS DOOR
I
AC
POWER
2. Microsoft Excel has a limit of slightly over
65,000 entries (samples). If you exceed this
limit, you cannot open the entire file with
Excel. (Example: 10 alarms and 30 days worth
of data at the 6 minute default sample rate
will exceed this limit.) You must use Microsoft
Access or another CSV compatible database
to open the file.
• The “Click On Alarm Name To View Details”
message directly below the Alarm Status Center
heading identifies the procedure for generating
reports on individual monitored compartments.
To proceed, click on an alarm name (not the
address) for which you wish to generate a report.
You will be taken to the Status Detail screen as
shown on the following page:
This document contains confidential information. The dissemination, publication, copying, or duplication of this document or the software described herein without prior written authorization is strictly prohibited.
PDF compression, OCR, web optimization using a watermarked evaluation copy of CVISION PDFCompressor
Kitchen Brains © 2013 | www.KitchenBrains.com | 229-40081 A
Page 29 of 36
Datalarm™ Temperature Monitoring/Datalogging System Installation and Operating Instructions
• The Status Detail screen provides boxes for
selecting a beginning time from when you wish
to retrieve data. The beginning time can be
selected as a specific date and time from the
pulldown boxes or it can be defined in days,
hours and minutes. The screen also contains an
“Alarm Configuration Summary” which contains
setpoint and alarm time delay settings for the
respective alarm you are viewing. Click on
“Display Graph” to generate a graphical report,
click on “Display List” to generate a listed text
report or click on “Download From This Alarm” to
generate a CSV (comma delimited) file.
GENERATING A GRAPH:
If “Display Graph” is selected, a graph similar to
the following screen will be generated: Remember
that Java must be loaded onto the computer for
graphing to work.
NOTE: The first time that a graph is generated
in a given session will take a bit longer because
Java is loading. Subsequent graphing in a given
session will be faster. (A 30 day graph at the 6
minute default sample rate will take about 25
seconds to generate.)
This document contains confidential information. The dissemination, publication, copying, or duplication of this document or the software described herein without prior written authorization is strictly prohibited.
PDF compression, OCR, web optimization using a watermarked evaluation copy of CVISION PDFCompressor
Kitchen Brains © 2013 | www.KitchenBrains.com | 229-40081 A
Page 30 of 36
Datalarm™ Temperature Monitoring/Datalogging System Installation and Operating Instructions
Regarding the Status Detail-Graph screen, the
following is noted:
• The temperature generates a multi-colored trace
for easier identification of monitored conditions.
Blue = Safe, Yellow = Abnormal Temp (alarm time
delay is timing out), and Red = Alarm.
• In accordance with the message “Move mouse
over graph to view details” in the lower left
hand corner, moving the mouse as described
will provide a continuous numerical update of
the time and temperature corresponding to the
location of the mouse on the graph.
• Click and drag the mouse over a section of the
graph that you wish to zoom in on. A new graph
will be generated representing the highlighted area.
• If the original graph has been changed by
zooming in or other button functions, the “Zoom
Orig” button will return you to the graph originally
displayed.
• The “Zoom Out” button will allow you to view a
larger graph than originally designated in terms of
time displayed.
• The “Pan” buttons allow you to move backwards
and forwards in time on the graph.
• If a Check Door or an AC Fail alarm occurs,
a wider trace will be superimposed over the
temperature trace for the duration of the
respective alarm condition. A message will also
appear in the lower left corner of the screen
which states “Events have been logged! Move
mouse over graph to view details.” Moving the
mouse as described will provide more information
regarding the respective alarm condition.
• The “Print” button allows you to print a copy of
the graph you are viewing. Click on it and follow
the instructions to print.
GENERATING A LIST:
If “ Display List” is selected, a text list similar to the
following on the next page will appear: (Java is not
required to generate a list.)
This document contains confidential information. The dissemination, publication, copying, or duplication of this document or the software described herein without prior written authorization is strictly prohibited.
PDF compression, OCR, web optimization using a watermarked evaluation copy of CVISION PDFCompressor
Kitchen Brains © 2013 | www.KitchenBrains.com | 229-40081 A
Page 31 of 36
Datalarm™ Temperature Monitoring/Datalogging System Installation and Operating Instructions
Regarding the Status Detail – List screen, the
following is noted:
• The scroll bar on the right will allow you to move
through the entire list.
• Abnormal and alarm conditions for temperature,
check door and AC power will list under the
respective headings when they occur.
• The “New List” Box lets you select a new
beginning time for generating a new list report.
• The “Display as Graph” button lets you display
the selected list in graph format.
GENERATING AN INDIVIDUAL CSV
(COMMA DELIMITED) FILE. “DOWNLOAD
FROM THIS ALARM”:
All is identical to the information presented on
page 28 for “Download From All Alarms” with
the difference being that the data collected in
this manner will be specific to the alarm you are
downloading from.
TECHNICAL SUPPORT: 24/7 from the U.S., Canada, and
Caribbean: 1-800-243-9271
• The “Display as a Printable Page” button changes
the generated list into a printable format.
• The printable format can be saved as a file, by
using your browser’s menu bar. Select “File,” click
“Save as”, then select a location and name for the
file.
This document contains confidential information. The dissemination, publication, copying, or duplication of this document or the software described herein without prior written authorization is strictly prohibited.
PDF compression, OCR, web optimization using a watermarked evaluation copy of CVISION PDFCompressor
Kitchen Brains © 2013 | www.KitchenBrains.com | 229-40081 A
Page 32 of 36
Datalarm™ Temperature Monitoring/Datalogging System Installation and Operating Instructions
WORKSHEET
DATALARM ALARM ADDRESS WORKSHEET
ALARM ADDRESS
PROBE #
MONITORED COMPARTMENT NAME
This document contains confidential information. The dissemination, publication, copying, or duplication of this document or the software described herein without prior written authorization is strictly prohibited.
PDF compression, OCR, web optimization using a watermarked evaluation copy of CVISION PDFCompressor
Kitchen Brains © 2013 | www.KitchenBrains.com | 229-40081 A
Page 33 of 36
Datalarm™ Temperature Monitoring/Datalogging System Installation and Operating Instructions
NOTES
This document contains confidential information. The dissemination, publication, copying, or duplication of this document or the software described herein without prior written authorization is strictly prohibited.
PDF compression, OCR, web optimization using a watermarked evaluation copy of CVISION PDFCompressor
Kitchen Brains © 2013 | www.KitchenBrains.com | 229-40081 A
Page 34 of 36
Datalarm™ Temperature Monitoring/Datalogging System Installation and Operating Instructions
NOTES
This document contains confidential information. The dissemination, publication, copying, or duplication of this document or the software described herein without prior written authorization is strictly prohibited.
PDF compression, OCR, web optimization using a watermarked evaluation copy of CVISION PDFCompressor
Kitchen Brains © 2013 | www.KitchenBrains.com | 229-40081 A
Page 35 of 36
Datalarm™ Temperature Monitoring/Datalogging System Installation and Operating Instructions
WARRANTY
Kitchen Brains warrants that its products shall not fail
to function in accordance with their specifications
because of defects in material or workmanship, for the
following warranty periods:
i. New Products: New Products consisting of
microprocessor based controllers, timers, data-loggers
or remote monitoring devices for 1 year from date of
purchase.
International offices are located in the
United Kingdom, China and Singapore:
Food Automation - Service Techniques, Inc.
905 Honeyspot Road, Stratford, CT 06615-7147 USA
Phone: +1-203-377-4414
Sales: 1-800-327-8766
Fax: +1-203-377-8187
International Callers: +1-203-378-6860
www.KitchenBrains.com
Toll-free technical support 24/7 from the U.S.,
Canada, and Caribbean: 1-800-243-9271
Europe, Middle East, Africa
31 Saffron Court Southfields Business Park
Basildon, Essex SS15 6SS ENGLAND
Phone: +44 0 1268544000
China
1803, 18F, No 922 Hengshan Rd
Shanghai 200030, CHINA
Phone: +8613916 854 613
Asia Pacific
13A MacKenzie Road
228676
Singapore
Phone: +65 983159273
ii. Sensors and Accessories: Sensors and
accessories (consisting of probes, wireless sensors,
hoses, relays, switches, mounting hardware or
accessories) for 90 days from date of purchase.
For complete details consult www.kitchenbrains.com/
warranty
PATENTS
The products manufactured by Kitchen Brains
are protected under one or more of the following
U.S. Patents:
5,331,5755,539,671
5,726,4245,875,430
6,401,466 6,401,467
7,145,4637,650,833
5,711,6065,723,846
6,142,6666,339,930
6,581,3917,015,433
7,877,2918,060,408
Plus foreign patents and patents pending. Plus licensed
patent 5,973,297
This document contains confidential information. The dissemination, publication, copying, or duplication of this document or the software described herein without prior written authorization is strictly prohibited.
PDF compression, OCR, web optimization using a watermarked evaluation copy of CVISION PDFCompressor
Kitchen Brains © 2013 | www.KitchenBrains.com | 229-40081 A
Page 36 of 36