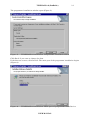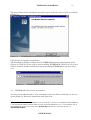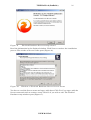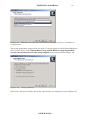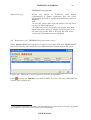
1
TELEHANSA 8 (PanBaltic) 1 Telehansa 8 (PanBaltic) – Swedbank Electronic Banking Programme for business clients User Manual USER MANUAL TELEHANSA 8 (PanBaltic) 2 CONTENTS 1 Security measures of TELEHANSA .........................................................................4 1.1 Security measures by the client .......................................................................4 1.2 Security of documents sent to the bank ..........................................................5 1.2.1 Confirmation of orders with digital confirmations generated in the TELEHANSA programme (PGP)..........................................................................................5 1.2.2 Signing orders with ID card.....................................................................................8 2 3 4 1.3 Security measures in the bank .........................................................................9 1.4 Additional security recommendations...........................................................10 Installation of the TELEHANSA programme.......................................................12 2.1 Technical requirements for computers..........................................................12 2.2 Installation of the TELEHANSA programme..............................................12 2.3 INTERBASE (Firebird) installation ..............................................................15 2.4 Removing INTERBASE from the Windows operation system ..................19 2.5 Preparing the programme for use ..................................................................20 Registration of TELEHANSA contract data in the programme. Other settings 24 3.1 Description of account(s) in the programme.................................................24 3.2 Registration of TELEHANSA programme users.........................................26 3.3 Setting connection parameters .......................................................................28 3.4 Additional TELEHANSA settings .................................................................31 Programme menu, buttons, windows and keyboard............................................32 4.1 Main TELEHANSA menu ...............................................................................32 4.2 Icons ....................................................................................................................34 4.3 Windows .............................................................................................................35 4.4 Keyboard ............................................................................................................35 5 Work with the TELEHANSA programme .............................................................36 6 Creation of payment orders......................................................................................38 6.1 Importing payment orders to the TELEHANSA programme .................................39 6.2 Creation of domestic payment orders ............................................................39 6.3 Creation of foreign payment orders ...............................................................41 6.4 Confirmation of payment orders ....................................................................46 6.5 Amendment of payment orders ......................................................................47 6.6 Deletion of payment orders .............................................................................47 6.7 Sending payment orders to the bank.............................................................47 USER MANUAL TELEHANSA 8 (PanBaltic) 3 6.8 Payment orders returned by the bank ..........................................................48 6.9 Archiving payment orders ...............................................................................48 6.10 Printing payment orders..................................................................................48 6.11 Starting a new payment order on the basis of an old payment order ......48 7 Currency conversion..................................................................................................49 7.1. Preparation of conversion orders....................................................................49 7.1. Confirmation of a conversion order................................................................50 7.2. Conversion orders sent to the bank ...............................................................50 7.3. Conversion orders rejected by the bank ........................................................50 7.4. Archiving conversion orders............................................................................50 8. Creation and confirmation of messages (free text)..........................................51 9. Masspayments.......................................................................................................52 9.1. Creation of masspayments ..............................................................................52 9.2. Confirmation of masspayments......................................................................54 9.3. Masspayments sent to bank............................................................................54 9.4. Masspayments rejected by the bank..............................................................54 9.5. Archiving masspayments ................................................................................54 10. Searching for documents corresponding do specific criteria. Filter .............55 11. Reports received from the bank..........................................................................56 12. Establishing a connection with the bank’s system..........................................57 12.1. Data exchanged with the bank ...................................................................60 12.2. Processing requests in the bank .................................................................61 13 Additional options of TELEHANSA ..................................................................63 13.1 Import and export settings of the TELEHANSA programme. Importing and exporting files........................................................................................................63 13.2 Document numbers...........................................................................................64 13.3 Document colours (according to document status) ......................................65 USER MANUAL TELEHANSA 8 (PanBaltic) 1 4 Security measures of TELEHANSA Security is the main requirement for banking software. This chapter discusses the security measures of TELEHANSA and gives advice to users. The security measures of TELEHANSA can be divided into three groups. They are measures that guarantee: security at the client’s workplace; 1.1 security of the documents sent in the programme; security in the bank. Security measures by the client Database security The data of the programme are stored in a local database. The database is protected by the password generated at the time the programme is installed. The system administrator uses this password when maintaining the service database. System of user rights The purpose of the system of user rights is to distinguish between different users of the programme. Use of the programme can be regulated by granting different rights to various users in the organisation. TELEHANSA clients themselves are responsible for developing a system of user rights inside the TELEHANSA programme. The bank does not have any data about such rights. The system administrator (user name SYSDBA) has more rights than anyone else in the user hierarchy. The administrator of the TELEHANSA programme monitors the programme, registers new users, grants them rights and amends the rights of existing users. The administrator has the right to change the passwords of users, view or change the database password and access all data. The options of each TELEHANSA programme user are defined with user rights, which are different for different accounts and documents. The following rights can be granted to programme users. 1 The right to enter documents. This right allows users to create and amend certain types of documents, but the documents created by such users are not sent to the bank without the confirmation of a user who has the right to sign documents. 2 The right to sign documents. Users who have this right can sign (accept) certain types of documents in respect of specific accounts. Confirmation of a document is the final permission to send the document to the bank. 3 The right to empty the archive. Users who have this right can delete archive data. 4 The right to view information. Users who have this right can view selected account statements and account balances. USER MANUAL TELEHANSA 8 (PanBaltic) 5 5 Connection right. This right allows users to establish connections with the bank’s system. However, accessing this window is not sufficient for a full connection. A login password (connection password), which has not been saved in the TELEHANSA system, is also required in order to establish a connection with the bank. The login password is the main means of authentication used by the bank to identify the client. Login passwords may not be disclosed to third parties! 1.2 Security of documents sent to the bank Confirmation of orders in the TELEHANSA programme – PGP or ID card How does it work? 1) The accountholder must enter into a Contract for Use of TELEHANSA Digital Security Element with the bank in which the accountholder defines their intention and requires the bank to apply the relevant method to check the authenticity of payments in the future. The accountholder has to decide whether they will start using a digital confirmation generated in the TELEHANSA programme (PGP) or an ID card to confirm their orders. NB! The digital confirmation requirement is established for an account. Each person who conforms orders must confirm the orders made from such an account using the same type of confirmation (either PGP or ID card). If the orders require two digital confirmations, then both persons who confirm the order must use the same type of digital confirmation (PGP) or digital signature (ID card). If one of the persons who confirms the order has an ID card, but the other one does not, then select TELEHANSA generated digital confirmation (PGP) as the means (type) used to confirm orders. 3) The following must be done for the user(s) who confirm(s) orders in the TELEHANSA programme: a) personal digital confirmations (PGPs) must be generated in the TELEHANSA programme and the public key must be sent to the bank, or b) if ID card is selected as the type of digital confirmation, the person(s) who confirm(s) orders have to inform the bank of this decision (by submitting an application). 1.2.1 Confirmation of orders with digital confirmations generated in the TELEHANSA programme (PGP). Working principle of digital confirmation The so-called public key principle is observed in the creation of digital confirmations. This means that a separate key is registered for each person with confirmation rights, which consists of two parts – a secret key and a public key. The secret part of the key is only known to the person with confirmation rights (the owner of the PGP) and the public part of the key is sent to the other party – the bank. The creation of such a key and the confirmation of data are based on mathematical methods according to which the data that have been encoded with the secret key can only be deciphered with the public key. The same data cannot be obtained if the data are encoded with the public key. If the owner of the key uses the secret part of the key to encode data, the bank can decipher USER MANUAL TELEHANSA 8 (PanBaltic) 6 the data with the specific person’s public key and by doing so guarantees that the person with confirmation rights is the actual owner of the given key. The bank is granted access to the public key only, which is why the bank cannot create the signature, but can check that the signature is authentic. The secret key for confirming payments (signature) is stored on a magnetic medium. Each employee who has the right to sign documents is given a personal data medium (disk, CD, memory stick, etc,) that cannot be used by any other person. How does the bank verify that the digital confirmation (PGP) is correct? When a payment order is accepted, the bank’s system checks that the key is really registered in the bank’s system; the user who confirmed the payment document in the TELEHANSA programme has the right to give instructions to the bank; the data of the payment have not changed after confirmation. The system checks that the received digital confirmations comply with the parameters set for confirmation in respect of the relevant account. If the checked data are correct, the payment document will be sent for processing and if the data are incorrect, the payment document will be returned to the client and it is not analysed any more. An error message is displayed in the Archiving reference field when a payment document is rejected. How is a PGP key generated? The key is generated in the TELEHANSA programme provided by the bank. The following actions are required for the creation of a key: Enter the programme with administrator rights and select Administration/Users from . the menu or click the icon The user administration window will open. Double click the name of the user for whom you want to create a digital signature. The user’s data are displayed on the screen. Check the data entered about the user or enter new data. USER MANUAL TELEHANSA 8 (PanBaltic) 7 Figure 1. Definition of user rights. Creation of digital confirmation (PGP) The digital confirmation (PGP) of the user is created in the PGP signature block. The location of the generated PGP (NB! The key may not be stored on the server or the C disk!) must be defined in the field Key reading directory. (Create digital signature). The programme asks you to insert the data Click medium (disk, CD, memory stick, etc.) in the computer. This opens the window with the data of the digital confirmation (PGP) (Figure 2). Figure 2. Data of the digital confirmation (PGP) USER MANUAL TELEHANSA 8 (PanBaltic) 8 Enter the user’s first name, surname, personal identification code and the password to protect the generated key (PGP). NB! The digital confirmation is personal, which means that the password must be entered and re-entered by the person with the user right himself or herself! The key password must consist of at least six characters. Use both letters and digits when creating the password. The programme generates the digital key (PGP). The key will be valid for one year from the day of generation! The validity period of the key is displayed every time it is used. The TELEHANSA programme generates a total of 6 files: pubring.pgp, secring.pgp, keyexp_EE.asc; keyexp_LV.asc; keyexp_LT.asc, keyexp_ENG.asc. The key is saved in two separate files – pubring.pgp (the file for the public key) and secring.pgp (the file for the secret key). The secret key must be kept particularly safe and its confidentiality must be guaranteed, because it might be used to create your signature if it becomes known to someone else. The files keyexp_EE.asc; keyexp_LV.asc; keyexp_LT.asc, keyexp_ENG.asc created by the programme contain the key encoded in a special format. The programme displays the number of the key in the Key ID field. The programme ‘forgets’ the key after all the windows used to confirm documents are closed. The following is required to take the public key of the digital confirmation to the bank: 1) Print the file keyexp_EE.asc, sign it and take it to the nearest Swedbank branch. NB! Digital confirmation PGP is personal, which means that the signed document (file printout) must be taken to the bank by the person to whom this digital confirmation (PGP) belongs. 2) E-mail the file keyexp_EE.asc to [email protected]. The user must change the secret key and the public key regularly and notify the bank thereof. The user may define the changing period himself or herself whilst keeping in mind that the secret and public key of the digital confirmation must be changed at least once a year. Users who confirm orders made from Swedbank Estonia, Swedbank Latvia and Swedbank Lithuania accounts in the TELEHANSA programme can use the same PGP key in all three countries. For this purpose, they need to deliver the file keyexp_LV.asc to Swedbank Latvia and the keyexp_LV.asc to Swedbank Lithuania. 1.2.2 Signing orders with ID card All persons who confirm operations in TELEHANSA (who own ID cards) must send a relevant application to the bank in order to confirm orders with their ID cards. The application may be sent to the bank either with a free TELEHANSA message (if the PGP used to confirm the free message was already in use in TELEHANSA5) or by e-mail to [email protected]. USER MANUAL TELEHANSA 8 (PanBaltic) 9 NB! The file contained in the e-mail must be signed with the ID card (using Digidoc software). _________________________________________________________________________________ Example: Application I (first name, surname, personal identification code), wish to use my ID card to sign orders in the TELEHANSA programme from ……………… Date _________________________________________________________________________________ 1.3 Security measures in the bank Establishment of user rights for accounts in the bank The client can freely select the operations that can be performed in their account with the TELEHANSA programme. It is defined in the TELEHANSA service contract. The bank assigns a TELEHANSA user ID to the client when the TELEHANSA service contract is entered into. The bank may assign several different TELEHANSA user IDs to one client. If requested by the client, the bank defines the accounts that the client has the right to manage for each TELEHANSA user ID. Additional confirmation of documents that exceed established limits The client can select a limit for each different type of payment document. It is defined in the TELEHANSA service contract. If the amount of a payment document exceeds the limit specified in the TELEHANSA service contract, the bank will request a confirmation: the bank employee calls the client and asks for confirmation of the amount given in the payment document. The login passwords used to access the bank system or session passwords must be protected. The login passwords (a password sheet with 200 passwords or a password from the PIN calculator) are used by the bank to identify you as a client. If the passwords are known to a person who can access the programme without the relevant authorisation, such a person will be able to act on your behalf. Keep the passwords in the safe or in any other safe place and do not take them out unless you need to log in for a session. If you suspect that your passwords have become known to third parties, contact the bank immediately and ask for such passwords to be cancelled and for new ones to be generated for you. NB! The new functionality of TELEHANSA: definition of personal connecting users, where the users (specific persons) who can establish a connection with the bank in TELEHANSA8 using means of authentication tied to their personal user ID (used by the person when, for example, visiting Hansa Net Bank as a private person), such as PIN calculator or ID card, have been specified in the TELEHANSA contract and in the TELEHANSA programme. USER MANUAL TELEHANSA 8 (PanBaltic) 1.4 10 Additional security recommendations The security measures set out below are recommendations only and it may be possible that not all of them can be fully implemented. It must be kept in mind that the client can use its bank account with the help of the TELEHANSA programme. Therefore, there must be as many security measures as possible in order to guarantee the security of the bank and the client. Unauthorised entry into the TELEHANSA programme (by decoding a secret key, etc.) is less likely than attempts by a person who has the right to use the programme to perform operations that are not permitted. Other persons to whom a programme user has disclosed his or her passwords may also be such persons. 1. Install the program in a place that is physically well protected. If you have rooms that are guarded or otherwise well protected, you should keep the computer on which the programme database is installed in such a room. 2. Regulate access to the computer on which the programme and database are installed. There are several software tools that can be used to regulate password use and user rights when working on a computer. Such functions are generally already included in newer operation systems, which means that there is no need for additional software. A logbook for registration of relevant information should be kept where possible. Network security measures must be introduced and the number of users who have access to the data should be reduced if the data are meant for common use in the network. 3. The number of people who use the programme must be as small as possible. Granting user rights for the programme must be well considered. If an employee only needs reports, then these can be obtained from a colleague who is already a user of the programme. This means that adding another user can be avoided. If this is not possible, the user’s access rights should be restricted to reports only. 4. The person who is appointed the administrator must be completely trustworthy. The administrator has the right to access the passwords of both users and the database. The administrator can technically make all kinds of changes in the database (except for a session with the bank). Even though a session with the bank is impossible without knowing the login password, the administrator can still read, enter and change the data in the database. The duties performed by the administrator are more technical in their nature (creating new users, changing the database password). These operations do not need to be performed constantly and this means that the administrator’s duties are often performed by a person who is in a high position in the organisation. 5. Remove unnecessary users from the system. If an employee stops using the programme for a certain period, then such a user should be removed from the programme or his or her rights should be fully restricted. 6. Try to obtain information about new versions of the programme and refresh the programme regularly. Errors in earlier versions are corrected every time a new version is developed and it is possible that new security functions and other options are added to the programme. 7. Make backup copies of your data. The purpose of this security measure is to avoid technical problems rather than protect against intentional or unauthorised activities. Data may be lost as a result of various USER MANUAL TELEHANSA 8 (PanBaltic) 11 computer failures. Even though permanent copies of documents can be found, we advise regularly making copies of the database in order to reduce the threat that your documents may be lost to the minimum. The easiest way is to copy the database onto some other data medium. Backup copies must be kept as securely as the main copies. USER MANUAL TELEHANSA 8 (PanBaltic) 2 12 Installation of the TELEHANSA programme 2.1 Technical requirements for computers Check that your computer meets the following minimal technical requirements before you install the programme: WINDOWS is the operation system, TCP/IP protocol have been installed; processor – 300 MHz; random access memory (RAM) – 32 MB; hard disk drive (HDD) – 70 MB; the computer has a floppy disk device, CD device or the option to use a memory stick; separation – 800 x 600 points, 16-bit colours; the computer has a CD device or Internet connection (only required for installation); the computer has Internet connection or a modem that guarantees a connection when the telephone number is dialled; the computer displays the actual date and time. 2.2 Installation of the TELEHANSA programme The copyright of the programme is protected by laws and the Telehansa Contract made between the bank and the client. Amendment, updating, improvement, translation or any other adaptation of the programme at one’s own discretion is prohibited. It is advisable to close all other active programmes before installing the TELEHANSA programme. Save the .exe file found on the bank’s website www.swedbank.ee on the disk and then open it in order to install the TELEHANSA programme. Use the following buttons to install the programme: Next – to continue the installation procedure, to move into the next installation window; Back – to return to the previous installation window of the programme; Cancel – to cancel the installation procedure; Browse – to access the directory tree and select the place where the programme will be installed on the disk; I Agree – to agree with the selected installation conditions. The installation window with several recommendations and warnings is displayed on the screen after you have launched the .exe file (Figure 3). USER MANUAL TELEHANSA 8 (PanBaltic) Figure 3. 13 TELEHANSA installation. General information Click Next. The directory data window opens (Figure 4). Figure 4. TELEHANSA installation. Directory data Specify the directory where you want to install the TELEHANSA programme. The default directory is C:\Program Files\Telehansa PanBaltic. If you want to select a different directory, then click Change. Click Next after selecting the place where you want to install the programme. USER MANUAL TELEHANSA 8 (PanBaltic) 14 The programme installation window opens (Figure 5). Figure 5. TELEHANSA installation. Programme installation data Click Back if you want to change the data. If the data are correct, click Install. The main part of the programme installation begins (Figure 6). Figure 6. TELEHANSA installation. Main part of programme installation USER MANUAL TELEHANSA 8 (PanBaltic) 15 The last window of the installation procedure opens if the files were copied successfully (Figure 7). Figure 7. TELEHANSA installation. End of installation Click Finish to complete installation. The installation dialogue window of the INTERBASE database administrator opens (Figure 8). Click Yes if you wish to start installing INTERBASE. Click No if you do not wish to install it (further information about installing INTERBASE is given in clause 2.3). Figure 8. 2.3 INTERBASE installation dialogue window INTERBASE (Firebird) installation Activate the installation order1. The installation wizard of Firebird Database Server opens (Figure 9). Read the instructions and click Next. 1 There are several versions of INTERBASE. You can install any version that is compatible with INTERBASE 6. The TELEHANSA PB programme offers the setup of Firebird Database Server 1.0. The installation file of this INTERBASE version can be found in the Firebird Setup sub-directory of the main directory of TELEHANSA PanBaltic. USER MANUAL TELEHANSA 8 (PanBaltic) Figure 9. 16 Firebird Database Server setup wizard Read the information in the displayed window. Click Next to continue the installation process. The window of license terms opens (Figure 10). Figure 10. Window of Firebird Database Server license terms You have to read the license terms and agree with them. Click Yes if you agree with the license terms and wish to continue setup. Click No if you wish to exit. The Firebird Database setup window opens (Figure 11). USER MANUAL TELEHANSA 8 (PanBaltic) Figure 11. 17 Firebird Database setup window Read the displayed information and click Next. The window for selection of the destination directory opens (Figure 12). Specify the directory where Firebird Database Server will be installed. This directory must be on the hard disk of the computer. The programme must not be installed on the network disk. We advise you not to change the directory offered for installation of the programme. Figure 12. Window for selection of the destination directory Click Next. The window for selection of the installation components of Firebird Database Server opens (Figure 13). Select Full installation of server and development tools. Click Next. USER MANUAL TELEHANSA 8 (PanBaltic) 18 Figure 13. Window for selection of Firebird Database Server installation components The setup programme suggests the creation of a menu group for the Firebird Database Server. Click Next. Tick Create a Menu Group, Install IBServer using the guardian service, Start Firebird service when setup complete in the setup window (Figure 14). Figure 14. Setup window Click Next. The last window, where the selected data are displayed, opens (Figure 15). USER MANUAL TELEHANSA 8 (PanBaltic) Figure 15. 19 Last window with selected data Click Next. The last window of the setup procedure opens (Figure 16). Figure 16. Last window of the setup procedure If you wish to complete the launch process, click Finish. Click Back if you want to move back. 2.4 Removing INTERBASE from the Windows operation system Use the Control Panel/Add or Remove Programs application to remove INTERBASE. Select INTERBASE and click Add/Remove. InterBase Server, Guardian and InterServer processes must not be running during the removal of an InterBase client or server. These processes can be stopped as follows. Right-click on the icon of the relevant application on the taskbar and select Shutdown (if the operation system is Windows 9X), then select the InterBase USER MANUAL TELEHANSA 8 (PanBaltic) 20 Manager icon from the Control Panel programme group and click Stop (if the operation system us Windows NT). Enter the operation system as a Windows administrator in order to install or remove INTERBASE. The files isc4.gbd, interbase.log, host.evn, host.lck are not automatically removed in the course of removal. The ODBC administrator must be manually removed. It cannot be removed from the Windows programme group Control Panel. 2.5 Preparing the programme for use If you wish to launch the programme, click the TELEHANSA PanBaltic icon in the Start/Programs menu of WINDOWS or the icon computer. on the desktop of your The database configuration window of the programme opens (Figure 17). Figure 17. Database configuration Enter masterkey, which is the primary password of the TELEHANSA programme administrator, in the Password SYSDBA field. You must change this password later. Server name – the network name or IP address of the computer where the application database is located. Do not change the contents of this field if the database is on the same computer. Protocol – the manner in which data is sent between the programme and the database. Local – the database is on the same computer. USER MANUAL TELEHANSA 8 (PanBaltic) 21 NetBEUI – identification of the computer that contains the database (if the network is very small). TCP_IP – identification of the IP address or network name of the computer that contains the database. Database directory – location of the database on the hard disk of the file server. The default directory is C:\Program Files\Telehansa PanBaltic\data. The location of the server disk must be specified as the location if the database is kept on the server. (Example: If the database directory is on the server E:\databases\Telehansa PanBaltic\data, then the same path E:\databases\Telehansa PanBaltic\data must also be specified in the database directory field.) Click Create database. Database successfully created is displayed on the screen if creation was successful: Figure 18. Click OK. Click Test connection to test the connection. Click OK if it was successful. Figure 19. Click OK when all parameters have been set as required. The programme then asks you to change the administrator password (Figure 20). USER MANUAL TELEHANSA 8 (PanBaltic) Figure 20. 22 Changing the administrator password Enter the primary administrator password masterkey in the Old password field. Create a new password (may consists of up to seven characters) and enter in the two fields New password and Confirm password. NB! DO NOT FORGET the new administrator password! Once you have changed the password, a window opens and confirms that the password has been successfully changed (Figure 21). Figure 21. Password has been changed Click OK. A dialogue window opens (Figure 22) and asks if you wish to import the data held in the previous version of TELEHANSA to TELEHANSA8 PanBaltic. . Figure 22. Click Yes to import data from previous versions of TELEHANSA. Click No if you do not wish to import data. USER MANUAL TELEHANSA 8 (PanBaltic) 23 You can also start the database conversion procedure later: find the Convert.exe file from the Telehansa PanBaltic directory and launch it. The below window opens (Figure 23). The Telehansa database conversion window opens when you click Yes (Figure 23). Figure 23. TELEHANSA database conversion Specify the directory where the previous version of TELEHANSA is located. NB! Not the database directory. Enter the ADMIN (the administrator of the previous version of TELEHANSA) password and click Connect. Enter the SYSDBA (the administrator of the TELEHANSA8 PanBaltic version) password and click Connect. Old data will be imported to the new TELEHANSA version when you click Convert. Click Save to save the conversion report. Then close the window. The main window of the programme, which is meant to be used by the administrator (SYSDBA), opens (Figure 24). Figure 24. TELEHANSA. Administrator’s desktop USER MANUAL TELEHANSA 8 (PanBaltic) 3 24 Registration of TELEHANSA contract data in the programme. Other settings 3.1 Description of account(s) in the programme All TELEHANSA service contracts confirmed in the bank must be registered in the programme before you can start using TELEHANSA (and if the terms and conditions of any contracts are amended or if new contracts are entered into, the TELEHANSA programme administrator must amend the relevant provisions). Select Options/Accounts from the menu in order to register a TELEHANSA service contract. Click or press the TAB key if you wish to add a new account. Click entry. Click Click if you do not wish to save the entry. if you wish to delete an existing row. Then click Close. Figure 24. Administration of accounts Enter the following data in the account description window (Figure 25): USER MANUAL to save the TELEHANSA 8 (PanBaltic) Figure 25. 25 Description of accounts in the TELEHANSA programme Address Official name of the accountholder (name of the legal entity or private person). This name will be used on your payment orders. You can describe the purpose of each account in this field if you administer several accounts with TELEHANSA. The company’s address Customer TELEHANSA user ID (TH…. according to the contract). Installation Enter the abbreviated name that defines the installation of the specific computer that performs operations or the installation of Telehansa. One client may have the Telehansa programme installed in different places in which case the IDs must be different. The bank distinguishes the different Telehansa users of the client on the basis of the user ID. The company’s registration number or the person’s identification code according to the contract. Account number (according to the contract). The bank that manages the account, i.e. Swedbank. Default – 767. The currency used for transactions by default – EURK. The signature requirement used to confirm/sign the payments made to the account defined in the Name Description Reg. no. Account Bank Currency Signatures USER MANUAL TELEHANSA 8 (PanBaltic) 26 TELEHANSA programme. Signature type 3.2 Orders are signed in Telehansa with digital confirmations or digital signatures. You can select confirmation by PGP or signing with an ID card (only in Estonia!). NB! *A user (the person who signs the orders) can only have one type of digital signature. * If orders have to be accepted by two people, then both digital signatures given to confirm the order must be of the same type (either PGP or ID card). See also clause 1.2 Security of documents sent to the bank Registration of TELEHANSA programme users Select Options/Users from the menu to register users who work with TELEHANSA2. Enter the following data when the user administration window (Figure 26) opens. Figure 26. Window of users registered in the programme or press the TAB key if you wish to add a new user. The user administration Click window opens (Figure 27). 2 The programme administrator (SYSDBA) is the TELEHANSA user whose rights are restricted to programme setup. Payments are processed by users generated with TELEHANSA. USER MANUAL TELEHANSA 8 (PanBaltic) Figure 27. 27 Window for administration of TELEHANSA user rights Specify the account(s) with which the registered user is allowed to work. Fill in the following fields: First name Last name Username Password Signature level Key ID Create Authorise First name of the user (according to passport). Surname of the user (according to passport). The agreed login name of the TELEHANSA user. The agreed login password of the TELEHANSA user (must be entered in two fields). Each TELEHANSA user can change this password later as necessary. Signature level A is defined for the user. The signature level defined for users who do not have the right to sign according to the Telehansa contract is none. The signature level of other users is defined on the basis of the Telehansa contract registered in the bank. (create a digital confirmation (PGP)) Clicking starts creating a signature that is on the level designated to the user (see 1.2.1. Confirmation of orders with digital confirmations generated in the TELEHANSA PROGRAMME (PGP)). The user is allowed to create new documents. The user is allowed to sign documents. USER MANUAL TELEHANSA 8 (PanBaltic) Purge archive View reports Open session User ID 28 The user is allowed to delete archived documents. The user is allowed to view, save and print reports received from the bank. The user is allowed to establish connections with the bank’s system. The field must be filled only if personalised contacts with the bank are used. NB! Only specific persons who have been granted the right to contact the bank may contact the bank through Telehansa8 after the (personal) user IDs of personal users/persons who contact the bank have been added to the Telehansa contract and the relevant changes have been made in the Telehansa programme and they have to use the means of authentication tied to their personal (private person’s) user ID: PINcalculator or ID card. The administrator must do the following in the Telehansa programme: 1) add the user ID under the rights of the Telehansa programme user, which is the personal teleservices user ID of the user (the user ID the person uses in Hansa Net Bank as a private person); 2) tick the relevant Telehansa user ID (TH00…) row in the connection setup of the programme (Administration/Setup/Connection-> Personalised users). See also clause 3.3. Connection setup by administrator (Figure 28). Use to save the entry. Click if you do not wish to save the created entry. Use to delete the row. Use to define the rights required by the user for account management. Then click Close. 3.3 Setting connection parameters Connection parameters are required for configuration of the computer’s connection sessions with the bank. We recommend setting and amending the connection parameters during the first installation of the programme and in the case of later changes concerning connection. Select Options/Configuration/Connection (Figures 28 and 29) from the menu in order to change the provisions of the connection created with the bank’s system (to set connection parameters). USER MANUAL TELEHANSA 8 (PanBaltic) 29 Figure 28. Connection setup window for TELEHANSA programme administrator (SYSDBA). Figure 29 Connection setup window for Telehansa programme users TELEHANSA uses the TCP/IP protocol for connection. USER MANUAL TELEHANSA 8 (PanBaltic) 30 This is a convenient way of creating a connection if you have online Internet connection. Ask your Internet service provider about the options to establish connections through the TCP/IP protocol. You have to specify the following provisions if you use the TCP/IP network protocol: Server – the address with which connection is established (th.hansa.ee). Port – the port with which connection is established (4000). Dialup connection Select the name of the dial-up connection created in your computer if you do not have online Internet connection. Click New to create a new dialup connection. Click Change to change the data of an existing connection. User – the user name required for Internet connection. Password – the password required for Internet connection. NB! Do not confuse it with the Telehansa password! User names and passwords stored in Windows are not used. Select a name for the connection, click Next, add the telephone number (either 8003636 or 6 131 363 with the necessary area codes), click Next and then Finish. Then select the name of the created connection from the list of Dialup connections, click Change and only tick Enable software compression and the TCP/IP protocol under Server Type. Click OK to finish. Enter thansa in both the User field and in the Password field in the window of connection parameters. If you use a telephone connection, select Dial-Up Connection as the value for Name. If you do not have a connection yet, click New and enter the necessary connection data3. The Internet connection provider is selected with the telephone number of the connection or with the direct connection to the bank. Enter the user name and password of the connection in the fields User and Password. Tick the field Use dialup. If you do not have Internet connection, you can create the connection through the dial-up server of the bank. The telephone number is +372 6131 363, user – thansa, password – thansa. See clause 12 Establishing a connection (communication) with the bank’s system for further information. 3 Check that your modem has been correctly installed before creating the connection. Also check the connections of your telephone leads. USER MANUAL TELEHANSA 8 (PanBaltic) 3.4 31 Additional TELEHANSA settings Figure 30. Folders and database. Options/Folders and database allows you to determine the work directories of temporary files, messages and update files. Click if you wish to replace the existing directory with another one. Select a new directory from the directory tree. You can also view and define the connection type created with the database in the directory window. Click OK after selecting the necessary settings. The TELEHANSA programme administrator can also process lists of banks, payees, foreign banks and payees of foreign payments and select the provisions of documents and reports. The administrator is allowed to view the session reports of connections with the bank system. Click Send/Session report (see 12.2 Processing requests in the bank). USER MANUAL TELEHANSA 8 (PanBaltic) 4 32 Programme menu, buttons, windows and keyboard 4.1 Main TELEHANSA menu File Open archive Change password Change contract Change user Language Exit Document Domestic payments Foreign payments Conversions Messages Masspayments Declaration of international payments Limits and interest Reports Text files (responses to requests) Opens the archive base (only for viewing) Changing the password of the TELEHANSA user The option to select a contract registered in the TELEHANSA programme. The option to select a user registered in the TELEHANSA programme. The languages the user can select. Exit the programme Creation and confirmation of payment orders. Working with sent, rejected or archived payment orders. Creation and confirmation of foreign payment orders (payments in foreign currencies); working with send, rejected or archived foreign payment orders. Creation and confirmation of the documents of conversion transactions. Working with sent, rejected or archived conversion documents. Creation and confirmation of messages sent to the bank. Creation and confirmation of masspayment orders (e.g. salary payments). Working with sent, returned or archived mass payment orders. Declaration means that in addition to outgoing payments, the payment balance code and country must also be added to incoming foreign payments that exceed 50,000 EUR or an equivalent in a foreign currency. Changing the limits and interest of group accounts. Viewing or printing files received from the bank. USER MANUAL TELEHANSA 8 (PanBaltic) Balances Send Options Statement history Today’s statements Swedbank exchange rates Official exchange rates Incoming foreign payments Standard statements Group account statements Open session Session report Folders and database Foreign banks Correspondent s Foreign correspondents Configuration Maintenance Masspayment groups Mass payment lists Group members Digital 33 Viewing and printing the account balance requested from the bank. Filtering, viewing, printing and saving archived account operations. Viewing and printing the account operations of the same day requested from the bank. Viewing and printing Swedbank exchange rates. Viewing and printing Eesti Pank exchange rates. Viewing and printing the foreign payments requested from the bank. Saving, viewing and printing the standard statement file requested from the bank. Saving, viewing and printing the group account statements requested from the bank. Starting a session with the bank. Notices about the course of sessions with the bank system. List of foreign banks. Details of the defined domestic payees created by the user (‘correspondents’ in the previous version of Telehansa). Details of the defined foreign payees created by the user (‘foreign correspondents’ in the previous version of Telehansa). *Import/Export – setting the rules of data import/export. *Document – setting the rules for numbering documents. *Status colours – changing the colours of documents. The default colours of documents are: during preparation – black; confirmed – green; pending second signature – olive; rejected – red; ready for sending – blue; archived – teal. *Connection – shows connection type and settings (whether dial-up or online connection). *Printing. Different types of mass payments. Details of mass payment payees. Entry, amendment and deletion of the account details of the group's subsidiaries. Generating a new digital confirmation (PGP) for USER MANUAL TELEHANSA 8 (PanBaltic) signature Statement maintenance Telehansa help About Help 34 the user. Help texts. Programme version and contact details. If any of the menu options is inactive, it means that the user does not have the right to perform certain functions in TELEHANSA. Only the TELEHANSA programme administrator (SYSDBA) can grant the rights required for performance of the additional functions. 4.2 Icons Accounts Users First row Previous row Next row Last row Add new row Delete row Save change Cancel change Refresh table Domestic payment order Foreign payment order Conversion Messages Mass payments Declaration of foreign receipts Limits and interest Connection Sign envelope Remove signature from envelope Tear envelope Show envelope contents Envelope sent to bank Refresh/update Prepared (orders) USER MANUAL TELEHANSA 8 (PanBaltic) 35 Returned (orders) Sent (orders sent to bank) Archived (orders) Crate new order on the basis of selected document Import documents Export documents Check documents Gather documents in envelope Gather documents in envelope and sign it Print (selected) documents Print list of documents Show statistics Document filter/Define report filter Empty filter Print filtered report Print entire report Export filtered data to ASCII file Export filtered data to Excel file Export filtered data to XML file Empty filter Help information Session report 4.3 Windows TELEHANSA data are displayed in windows. The window displayed on the screen can be opened or closed, its size can be changed and it can be moved to a different place on the screen. Several windows can be closed at the same time, but only one window of all opened windows (active or working window) is active at any one time. All orders are entered only in the active window. The name of each window is displayed on the top of the window. Usual orders in windows: OK Saving the data and closing the window. Cancel Closing the window without saving the data. 4.4 Keyboard Move to the start of field (list). USER MANUAL TELEHANSA 8 (PanBaltic) 36 Move to the end of field (list). Change the regime for adding text (insert/overwrite). Submission of new documents. Deletion of the character to the left of the cursor (this key may be marked with a long arrow pointing left; it is usually located on the main part of the keyboard to the right of the row of numbers). Deletion of the character to the right of the cursor. , , , , – , Taking the cursor to another field or another place in the same field. Moving up or down by a page in the text window. Moving to the next (or previous) field. If the permitted length of the text entered in the field is longer than the length of the displayed text, then the field content is automatically scrolled upwards. A scroll bar will be displayed, which helps to view the text. or any other key meant for entering If you enter a field that is not empty and press text, then you either empty the field or the sign on this key will appear. If you only wish to change the existing content of a field, press field content is not marked. 5 to make sure that the Work with the TELEHANSA programme This programme is designed for working in the WINDOWS operation system. Click Start/Programs/TELEHANSA PanBaltic to launch the programme. Select the TELEHANSA icon or the TELEHANSA PanBaltic icon displayed on the desktop of your computer. The username and password created by the programme administrator must be entered before work with the system can start (Figure 31). USER MANUAL TELEHANSA 8 (PanBaltic) Figure 31. 37 Entering the programme The TELEHANSA contract window is the first to open if the TELEHANSA programme is used to administer the accounts of several companies (Figure 32). Figure 32. TELEHANSA contract window Select the company whose account you wish to manage. The main TELEHANSA window opens if the entered username and password were correct (Figure 33). Figure 33. Main TELEHANSA window You have now entered the TELEHANSA programme and can work within the limits of the user rights assigned to you. USER MANUAL TELEHANSA 8 (PanBaltic) 38 6 Creation of payment orders The window of payment orders (table) opens when you select Domestic payments (icon ) under Document in the menu. The window of foreign payment orders (table) opens when you select Foreign payments (icon ) from the same menu. Figure 34. Window of domestic payment orders (table) Document statuses Documents are divided into different statuses in TELEHANSA depending on the level to which they have been processed. Clicking the button that corresponds to the status of the document displays payment orders with different statuses in a table: Created Rejected Sent to bank Archived Fewer documents are displayed if selection criteria (document filters) have also been defined. Click the icon . Enter the required criterion for selection of the payment orders. Click OK. Proceed from Search. The details of a payment order – Content – are displayed in a separate window if you double click on an entry in the window of payment orders. The status of the payment orders is displayed in the right-hand part of the window (Figure 35). USER MANUAL TELEHANSA 8 (PanBaltic) Figure 35. 39 Content of the document Documents in this part may have the following status: Created by – surname of the person who prepared the payment order. A Signature, B Signature – surname or surnames of the person or persons who confirmed the payment order. Status – status of the payment order. Bank reference – archiving reference of the payment order in the bank or a note. (Add row) if you wish to create a new payment order. Click A window with a blank payment order is displayed on the screen (Figure 35). 6.1 Importing payment orders to the TELEHANSA programme Click to import payment orders to the TELEHANSA programme. See also 13.1. "Import and export settings of the TELEHANSA programme. Importing and exporting files”. If you used an earlier version of TELEHANSA before, then review the instructions Instruction for transfer from the Telehansa 5 version to the Telehansa 8 (PanBaltic) version on the bank’s website www.swedbank.ee. to export archived payment orders. Click 6.2 Creation of domestic payment orders The following fields must be filled on the domestic payment order form (Figure 35): Account Account number. Select the correct account number from the USER MANUAL TELEHANSA 8 (PanBaltic) Doc. no. 40 dropdown menu. Document number. It is possible to let the programme allocate a document number and payment order reference automatically, see 13.2. “Document numbers”. Doc. date Date when the document was created. The current date is automatically entered in the field. It can be changed if necessary. You can also use the date selection button (located next to the field). Op. date The date when the operation was performed in the bank. If you leave this field blank, the date when the payment order was sent to the bank is automatically entered in the field. Type Urgent payment as the type of the payment order (the programme always gives normal payment as the payment type by default). Urgent payments can only be made to other Estonian banks (making intra-bank urgent payments is not possible). An urgent payment is sent to the payee’s bank within 30 minutes between 8 am and 4 pm on banking days. The bank accepts the payment from the client after 4 pm on banking days, on weekends and public holidays, but sends it to the payee’s bank in the morning of the next banking day. Pursuant to the directive of Eesti Pank, normal domestic payments amounting to or exceeding 15 million EEK are considered urgent payments. NB! Urgent domestic payments cannot be cancelled! Payee’s details Name Name of the payee of the payment order (legal entity or natural person). The payees to whom payments are frequently made can be added to the list of defined payees. The list of defined payees (‘correspondents’ in the earlier version of TELEHANSA) created by you is displayed when you click the button to the right of the Name field (Figure 36). Figure 36. Defined payees (correspondents) USER MANUAL TELEHANSA 8 (PanBaltic) 41 Select the requested payee from the field and click OK. You can view and amend the data of the defined payee if you double click on the selected name. Account Payee’s account number in the payee’s bank. It is more important than the payee’s name, i.e. money is received on the account in the payee’s bank on the basis of the account number. The payee’s name is added for the purpose of additional verification of the account number. Bank Name and code of the payee’s bank. Amount The transferred amount. Domestic payments that cannot be made due to lack of funds on your account are sent back from the bank with an error message. Currency The currency in which the payment is made. NB! Domestic payments can be made in foreign currencies only inside Swedbank. A separate conversion transaction must be performed in advance if the amount of the relevant currency held on the account is insufficient for the payment. Details Details of the purpose of the payment. It is recommended to at least enter the number of the invoice on the basis of which the payment is made in this field. Reference number Entering a reference number is mandatory only if the payee has indicated it on the payment claim. Reference numbers are used in the information system of the payee and failure to enter the reference number shown on the payment claim may cause delays in processing the payer's payment by the payee. The details entered in a document that is under creation may be incomplete. However, all required fields must be completed for acceptance of the document. The details entered in a payment order must be saved with the button changes). This will take the payment order to the ‘created’ status. 6.3 (Save Creation of foreign payment orders Select Foreign payments under the menu option Document (icon foreign payments window (Figure 37). Click (Add row). A blank foreign payment order form is displayed on the screen. USER MANUAL ) and open the TELEHANSA 8 (PanBaltic) Figure 37. 42 Completion of foreign payment orders The text fields in foreign payment orders must be completed using the Latin alphabet! The following fields must be filled in: Doc. no. Document number. It is possible to let the programme allocate a document number and payment order reference automatically, see 13.2. “Document numbers”. Doc. date Date when the document was created. The field is automatically filled out with the current date which can be changed if necessary. Op. date The date the operation was performed in the bank. If you leave the field blank, the date when the foreign payment was sent to the bank is automatically entered in the field. NB! Urgent and express payments must be sent to the bank before 12.00. Type Express payments can be made in the following currencies: USD, EUR. Charges (costs) Normal Urgent Express The person who pays the costs of the international payment order must be determined. USER MANUAL TELEHANSA 8 (PanBaltic) 43 Remitter – the payer pays the service charges of both Swedbank and the foreign banks and the payment is sent to the payee as a full amount. Additional service charges may later be debited from the payer’s account if the service charges paid by the payer to Swedbank do not cover the service charges demanded by the payee’s bank or the correspondent bank. Beneficiary– the payee pays all the costs of the banks engaged in the transfer of the payment. The service charges of Swedbank are subtracted from the amount of the payment in the International Settlements Division and the payment amount reduced by the amount of service charges is sent out by the bank. The correspondent bank/banks and payee’s bank also reduce the amount of the payment by their service charges and the amount received on the payee’s account has been reduced by all service charges. Shared – the payer pays the service charges of Swedbank and the payee pays the service charges of all other banks, i.e. each party pays its own costs. Details of the beneficiary: Name The payees to whom payments are frequently made can be added to the list of defined foreign payees. The details of partners may be entered in the database of foreign payees in order to avoid repeated entries in the future. If a payee is selected from the list of correspondents, the details of such a payee are automatically entered in the payment order. The list of defined foreign payees (‘foreign correspondents’ in the earlier version of TELEHANSA) created by you is displayed when you click to the right of the Name field (Figure 38). USER MANUAL TELEHANSA 8 (PanBaltic) 44 Address Figure 38. List of defined foreign payees (foreign correspondents) Select the requested payee from the field and click OK. You can view and amend the data of the defined payee if you double click the selected name. The beneficiary’s address. Country The beneficiary’s country or residency. Beneficiary bank: Bank Name and address of the payee’s bank. Enter at least the city and name country if you do not know the address. Bank code (SWIFT/ BIC) SWIFT or BIC of the beneficiary’s bank/correspondent bank/intermediate bank (if known). A BIC, which is also known as the SWIFT code, is an 8 or 11-digit combination of letters (or letters and numbers), which allows for identification of the payee’s bank when foreign payments are processed. The SWIFT code must be entered without blanks. It must consist of 8 or 11 characters. Account The beneficiary’s account number. Correspondent bank4 The bank where the beneficiary’s bank keeps its correspondent account for the relevant currency. USER MANUAL TELEHANSA 8 (PanBaltic) 45 Entering the data of the correspondent bank and the intermediary bank is not mandatory, but it is necessary if the payer has information about the banks through which the payee wishes to receive the payment. If the payer does not have the relevant data, then Swedbank selects the route for sending the payment according to its own preferences. Account/IBAN Bank name Bank code Data of the correspondent bank are necessary if the foreign payment is sent to the payee’s country in a currency other than the currency of the payee’s country. Data of the correspondent bank are also required if the payee’s bank is a department or branch of another bank. In such a case the data of the main bank are noted as the data of the correspondent bank. The number of the correspondent account/IBAN of the payee’s bank in the correspondent bank. Name of the correspondent bank. SWIFT/BIC of the payee’s correspondent bank, if known. Intermediary bank: Account/IBAN Bank name Bank code (SWIFT/ BIC) Number of the payee’s account in the intermediary bank. Name of the payee’s intermediary bank. SWIFT or BIC of the payee’s intermediary bank. Amount Currency The transferred amount. The currency code of the foreign payment order. The code may be entered either manually or selected from the list of currencies (Figure 36). The code of the currency that must be debited from the account if the defined payment currency does not exist in the account. If you wish to use more than one debit currency for conversion into the payment currency, you have to perform a conversion transaction – select Conversions under menu option Document (see 7, Currency conversion). If the amount of the payment currency on the account is sufficient, then enter the same currency code in the fields Currency and Debit currency. Note. If the amount of the payment currency held in the account is sufficient, then the debit currency conversion transaction is not performed regardless of the defined debit currency. Information about the content of the payment – the account or contract on the basis of which the payment is made: number, date (enter no more than 140 characters, the recommended number of characters is 16). Debit currency Details USER MANUAL TELEHANSA 8 (PanBaltic) 46 The goods or service reference, contract number and code must be entered if the money transfer of an international payment order must be made in Russian roubles (RUR), Ukrainian hryvnias (UAH) or Belarusian roubles (BYR). Information about the content of the payment is not translated into a foreign language. Use a language that is understandable for the payee and the payee’s bank. Balance code The code that identifies the contents of the payment according to the qualification of Eesti Pank. Further information about foreign payment orders is available on the bank’s homepage: www.swedbank.ee. (Save The details entered in a foreign payment order must be saved – click changes). This will take the foreign payment order to the ‘created’ status. 6.4 Confirmation of payment orders The PGP generated in the Telehansa programme or the ID card is used to confirm payments in TELEHANSA 8. The right of signature of the user who has been granted the right to sign payment documents must correspond to the signature card held in the bank (excl. exceptional cases). In order to confirm payment documents: 1. select created documents only; 2. mark the documents you wish to confirm. You can mark one or several documents. Move the cursor on one of the entries if you wish to select several documents. Press the Shift or Ctrl key when clicking entries as this allows you to select several entries: the Shift key selects all entries at once, the Ctrl key can be used to add entries one by one. All selected payment orders will be marked if you press Ctrl and A at the same time. Confirm document (Gather documents in an envelope and sign it). 3. Click A floppy disk or CD on which the digital confirmation PGP is held must be inserted in the computer for the time documents are confirmed. A window opens and requests that you enter the digital confirmation password. The floppy disk or CD must be removed from the computer after the password has been entered. If you sign the ‘payment envelope’ with you ID card, enter your PIN2 in the window that opens on the screen. The details of the documents pending confirmation are displayed on the screen. Click Sign if everything is in order. Confirmed/signed payment documents move from the table of payment orders to the main window of Telehansa (the opening page of the user). See Figure 33. USER MANUAL TELEHANSA 8 (PanBaltic) 47 If you confirmed the wrong payment order, you can remove the signature given to the ‘envelope’ in the main window of Telehansa. Mark the relevant ‘envelope’ and click Remove confirmation (Remove signature from the envelope). Show envelope contents and enter the ID number of the specific payment Click order in the ‘Document ID’ field at the bottom of the page in order to remove a payment order from the envelope. If you wish to remove several payment orders from the envelope, enter the ID numbers of these payment orders separated with semi-colons. Click Delete. The payment orders that have been removed from the envelope move back into the table of payment orders and their status goes back to created payment order. Note. Confirmation of a large number of payment documents requires use of the computer’s resources, which means that confirmation may take a while. Wait until the payment documents you have marked for confirmation have been confirmed and continue working with the programme only after this has happened. 6.5 Amendment of payment orders Only created payment orders can be amended. The programme does now allow users to amend confirmed/signed payment orders that are already in the ‘envelope’. In order to amend a confirmed payment order, you must move the relevant payment order from the main Telehansa window/’envelope’ back to the list of created payment orders. Click Show envelope contents and enter the ID number of the specific payment order in the ‘Document ID’ field at the bottom of the page in order to remove a payment order from the envelope. If you wish to remove several payment orders from the envelope, enter the ID numbers of these payment orders separated with semi-colons. Click Delete. The payment orders that have been removed from the envelope move back into the table of payment orders and their status goes back to created payment order. If you need to amend payment documents, select the relevant payment order in the table of payment orders and double click on it. The form of the payment document together with the data entered previously is displayed on the screen. Make the relevant changes, save them and confirm the document again. 6.6 Deletion of payment orders Only created documents can be deleted either one by one or as groups of documents. In order to delete a payment order, mark the relevant payment documents and click (Delete row). The programme displays the question Do you want to delete the selected document(s)? If your answer is Yes, the selected documents will be deleted. 6.7 Sending payment orders to the bank You need to connect to the bank’s system through Connect/Establish connection. See 12. Establishing a connection (communication) with the bank’s system. USER MANUAL TELEHANSA 8 (PanBaltic) 48 The Send accepted orders field has already been ticked in the session window and this means that all ‘envelopes’ that have been appropriately accepted/signed will be sent to the bank. NB! If you do not wish to send the accepted ‘envelopes’ (with payment orders) to the bank with your session, then untick the field Send accepted orders. 'Envelopes' with payment orders sent to the bank remain on the opening page of Telehansa until they have been acknowledged by the bank. Payment orders are sent to the archive after the bank's acknowledgement is received in the session. in the table of orders if you wish to view archived payment orders. Click Note. Amendment or deletion of payment orders sent to the bank is prohibited. 6.8 Payment orders returned by the bank The bank rejects payment orders in the following cases: the funds (or relevant payment currency) are insufficient for performance of the payment order; the specific type of transaction is not permitted for the relevant account; in the event of intra-bank payment orders: if the payee's account number and name do not match; if the payment details are missing. (Returned All payments rejected by the bank can be viewed by clicking documents). Rejected documents can be amended. Amended rejected documents are automatically included among created payment orders. 6.9 Archiving payment orders The programme automatically sends all completed payment orders to the archive. The archiving reference of the bank is noted on every payment document received from the bank, which can be viewed in the field Archiving reference. (Archived If you wish to view and print archived payment documents, click documents). You will see the payment documents on your screen in the order in which they were entered in the archive. The table can be sorted. 6.10 Printing payment orders You do not need to print payment documents and take them to the bank when you work with the TELEHANSA programme. Users can print payment documents for their own reference. In order to do this, mark the relevant payment order and click (Print documents). If you wish to print a list of selected documents, then click document list). (Print 6.11 Starting a new payment order on the basis of an old payment order If you wish to prepare a payment document quickly on the basis of an earlier document, then click (Create new order on the basis of selected document). All the data USER MANUAL TELEHANSA 8 (PanBaltic) 49 associated with the payment are populated in the newly created document. The new status of the document will be ‘created’. 7 Currency conversion If you wish to convert one currency into another, select Document/Conversion or click (Conversion) on the programme toolbar. NOTE. Conversion and foreign payment orders do not depend on each other. You have to submit the conversion order first, i.e. convert the necessary amount of currency in your account. Payment orders are submitted in the course of the next session with the bank’s system. NOTE. If the conversion order is sent with the payment order, then it is not fully guaranteed that the conversion will be done before the performance of the payment order. 7.1. Preparation of conversion orders The purpose of conversion is to obtain certain currencies for the account. If you wish to convert the funds held in your account into several currencies, you must complete a separate conversion order for each currency. The conversion form consists of the following fields. Data of the document Account Number of the account in which the conversion order is performed. Doc. no. Document number. Doc. date Date of the conversion order. To currency (the currency you wish to obtain) Currency Code of the currency to be obtained. Amount The amount to be obtained. Actual Actually obtained amount. Filled in by the Bank. amount Rate Currency exchange rate. Filled in by the Bank. Bank ref. Archive code of the bank. Filled in by the Bank. From currency (the currency you wish to convert) Currency Code of the currency from which you wish to convert. Amount Amount. Actual amount Rate Bank ref. Actual amount. Filled in by the Bank. Exchange rate. Filled in by the Bank. Archive reference of the bank. Filled in by the Bank. Every currency is displayed in a separate row in the table. Click key if you wish to start a new row. Click wish to save the entry. Click to save the entry. Click to delete the row. USER MANUAL or press the TAB if you do not TELEHANSA 8 (PanBaltic) Figure 39. 50 Completion of a currency conversion order The order shown in the conversion order must be observed when several currencies are converted. Note. If you are converting from one currency to another, then you must define the amount to be purchased or sold. The WHOLE amount of the currency to be sold is converted into the purchased currency if the amount of the currency to be purchased and sold is not defined. 7.1. Confirmation of a conversion order A conversion order must be confirmed before it is sent to the bank. The order is confirmed in the same manner as a payment document (see 6.4. Confirmation of payment orders). 7.2. Conversion orders sent to the bank If you wish to view the conversion orders sent to the bank, select Document/Conversion and click (Sent). 7.3. Conversion orders rejected by the bank Conversion orders are rejected in the following cases: the funds (or funds in the defined currency) held in the account are insufficient for the transaction; the account is blocked; the conversion order has expired. 7.4. Archiving conversion orders After a conversion order has been successfully completed in the bank, you can view it under the menu option Document/Conversion (the icon must be clicked). Double click the entry of the relevant conversion order if you wish to view the details of the conversion order completed by the bank. The amounts and exchange rates of completed transactions are shown in separate columns. USER MANUAL TELEHANSA 8 (PanBaltic) 51 8. Creation and confirmation of messages (free text) The programme can be used to send messages (free text) to the bank. All messages must bear an address. The text may be written in the programme or attached as a text file. Select the menu option Messages if you wish to write a message to the bank. to write a new message. This opens the window where the message can be Click written (Figure 40). Figure 40. Creation of messages Doc. no. Document number. The programme may automatically generate document numbers and the letters added before and after the number (see 13.3 Document numbers). Doc. date Form Date when the document was created. The current date is automatically entered in this field. A different date can be entered in the document date field ‘Doc. date’ or it can be selected using the date selection button (located next to the field). In this window, you can select a pre-populated form that allows you to create ordinary messages (cancellation of a payment order, faxing payment documents bearing the seal of the bank, application for making a payment from a loan account, etc.) more quickly. Select the correct form, click Complete and fill in the form. To Subject The agreed name. Title of the message that briefly describes its content. USER MANUAL TELEHANSA 8 (PanBaltic) 52 You have to mark the previously created file in order to send it. File Click . This opens a dialogue window where you can select the required file. Enter the required directory, select the file and click Open. The file name automatically appears in the field Text. Text of the message. Text Confirmation of messages The message must be confirmed first and then sent to the bank. The order is confirmed in the same manner as a payment document (see 6.4. Confirmation of payment orders). 9. Masspayments Mass payments cover normal payment orders that have the same purpose, such as salary payments to employees. Mass payments can only be made to accounts opened in the territory of the Republic of Estonia. You have to do the following in order to make a mass payment: create the mass payment; sign the mass payment as a single document; send the mass payment to the bank. All successfully made mass payments are returned to the payer and archived as one mass payment. Any mass payments that contain errors are returned as one mass payment. A rejected mass payment must be amended, confirmed and resent to the bank. Note. The payments contained in one masspayment are debited from the indicated account in random order. 9.1. Creation of masspayments Select the menu option Document/Masspayments or the icon masspayment window as show below opens (Figure 41). Figure 41. Creation of masspayments USER MANUAL and click . The TELEHANSA 8 (PanBaltic) 53 The masspayment form consists of the following parts: document details; payment details; payees. The document and payment order details are the same in the case of all payment orders prepared according to payees. The following fields must be completed for masspayments: Document details: Masspayment document number. The programme may generate the letters written before the document number or the characters written after the document number (see 13.2 Document numbers). Doc. no. Doc. date Date when the document was created. The current date is automatically entered in the field. Any other date can also be entered in the Doc. date field. You can also use the date selection button (located next to the field). Posting date (Op. date) The date when the operation was performed in the bank. If you leave this field blank, the date when the payment order (debit order) was received in the bank is automatically entered in the field in the bank. Code of the payment currency. All single payments in the group must be made in the same currency – litas. Only payment orders can be filled in for the purpose of mass payments. Currency Details of the mass payment. The content of this field is used for all single payments in the mass payment. Details Beneficiaries details: Number of the payment order. If this field is left blank, the programme automatically allocates a document number (if applicable, see 13.2 Document numbers). Doc. no. Name, Surname Amount Account Reference number Company’s name or the first name and surname of a natural person. The transferred amount. Number of the payee’s account. The code allocated to the payee. Not mandatory, but if entered, it must correspond to the standard provided by the payee. Bank ref. Archive code or note of the payment order. The following buttons can be used in creating mass payments: – Saving the entered details. USER MANUAL TELEHANSA 8 (PanBaltic) 54 – Creation of a new group on the basis of an existing list. A new payment group can be generated on the basis of the list of payees when this button is clicked. – Importing the list of payees. – Importing a group. If you select Group import, the masspayment order will be automatically populated with the details of the payees in the relevant group. In order to delete the details in a field, select the relevant entry and press the Ctrl and Del keys at the same time. Deletion of a payee from a mass payment order does not delete the payee from the previously created group. 9.2. Confirmation of masspayments Masspayments must be confirmed before they are sent to the bank. The order is confirmed in the same manner as a payment document (see 6.4. Confirmation of payment orders). 9.3. Masspayments sent to bank Sent if you wish to Select the menu option Document/Masspayments and click view the mass payments sent to bank. Double click the relevant mass payment entry in order to view its content. 9.4. Masspayments rejected by the bank All rejected masspayments are returned as a single payment if errors are found in them. Payment orders are rejected in the following cases: the funds (or funds in the defined currency) held in the account are insufficient; the account is blocked; the specific type of transaction is not permitted for the relevant account; the payee’s name noted on the payment order does not match the payee’s account number (only checked in the case of intra-bank payments); required details are missing from the payment order. The error is indicated next to each mass payment row in the bank’s reference field. Click Rejected to view rejected/incorrect masspayments. Rejected mass payments can be amended. Rejected mass payment orders that correct payments with errors can be amended, confirmed and resent to the bank. 9.5. Archiving masspayments All masspayments successfully processed in the bank are returned as one masspayment and automatically archived. Select the menu option Document/Masspayments and click in order to view archived masspayments. The bank adds its reference to each successfully processed payment order. Incorrect payment orders are archived with the reference that the payment order contained errors. USER MANUAL TELEHANSA 8 (PanBaltic) 55 10. Searching for documents corresponding do specific criteria. Filter You can search for the necessary entry from among payment orders, foreign payments, conversion transactions, messages and mass payments. Clicking on the relevant document status button allows you to select created, confirmed, rejected or archived documents (see 6 Creation of payment orders – Document statuses). You can click several buttons at the same time. This includes all documents with the selected statuses in the classification. The document search window, where all fields are blue, opens after you have selected the Document filter. Enter the parameters document type and status and clicked according to which you wish to select the document in the data search field. Selection criteria can be established for one or more details of the document. Click OK if you want to save the entered parameters. A list of documents that correspond to the established criteria is then displayed on the screen. Do not forget to delete the established selection criteria after you have found the required document. You can do this by clicking Empty filter. Document filter and then USER MANUAL TELEHANSA 8 (PanBaltic) 56 11. Reports received from the bank You have to establish a connection with the bank in order to receive reports from the bank. Select the menu option Send/Open session. This opens the report request window where you have to determine the details of requests for reports. You can display reports on your screen or print them at any time if creation of a connection with the bank was successful. You have to select the menu option Reports for this purpose. The following reports are displayed under this option: files; bank messages; account balance reports; statement archive (statements until the end of the previous day); today's statements (statements from 0.00 until the end of the same day); Swedbank exchange rates; exchange rates; foreign receipts; standard statements. The filter is displayed on the screen first of all when you select Statement history under the menu option Reports (Figure 42). Select the period of time for which you wish a statement to be displayed on your screen or select any other parameter in the filter that you wish to use to find an operation on a statement. Figure 42. USER MANUAL TELEHANSA 8 (PanBaltic) 57 A filtered statement is displayed on the screen (in the form of a table) (Figure 43). Figure 43. Filtered statement table Click Print filtered statement in order to view/print the statement. Exporting reports received from the bank The details of reports can be exported to accounting software in the TELEHANSA programme. The programme can also automatically generate a statement file. Click the following buttons in order to export the selected details to a file: – Export to an ASCII text file. – Export to an Excel file. – Export to an XML file. Information about the formats used the in TELEHANSA programme can be found on the bank’s homepage: www.swedbank.ee. See also 13.1. Import and export settings of the TELEHANSA programme. Importing and exporting files. 12. Establishing a connection with the bank’s system Select the menu option Send/Open session or the icon Open session. The request window opens (Figure 45). Define the details you wish to request from the bank or send to the bank. Connecting to the bank for the first time When you are about to connect to the bank for the first time (create a session with the bank), the programme opens a window where you wish to enter the earliest/latest date from which you wish to create a new statement database/archive in Telehansa8. (For example: The company has been operating for 5 years, but it only needs an overview of one year’s operations in its everyday work. This means that the date you enter in the window is one year earlier than today’s date). USER MANUAL TELEHANSA 8 (PanBaltic) 58 Figure 44. Setting the starting dates of the statement archive NB! If the statements history option has been ticked in the connection window, it means that Telehansa 8 updates the statement table itself (the programme automatically requests information from the bank about the operations performed on the dates missing from the statement table). Figure 45. Session window Data exchanged with the bank. Session window: Submit accepted documents Sending confirmed orders (payment orders, foreign payment orders, mass payments, conversion orders, USER MANUAL TELEHANSA 8 (PanBaltic) Balance Today’s statements 59 messages) to the bank. Account balance request. Account statement request about operations performed on the same day. Account statement request for the selected period. Statement history Incoming foreign payments Request about the international payment orders received in the selected period. International incoming Foreign receipts subject to declaration by demand payments to declare of Eesti Pank. Official statement Source document for accounting. Exch. rates Request about Swedbank exchange rates in cash and on account during the selected period. Central Bank’s exch. rates Request about the official exchange rates of Eesti Pank during the selected period. Common data update (banks, currencies, balance codes…) Automatic updates of the tables of currencies, payment balance codes, Estonian banks. Click OK after marking the required fields. This opens the window where you can enter the password that allows you to log into the bank system (Figures 46 and 47). Figure 46. The window for entering the password to log into the bank’s system if the session password is obtained from a password sheet or PIN calculator Connecting the bank with an ID card The window for entering the PIN1 opens if the user who has the right to contact the bank through the TELEHANSA programme uses his or her ID card for authentication. USER MANUAL TELEHANSA 8 (PanBaltic) 60 Figure 47. The window for entering the password to log into the bank system if the bank is contacted with an ID card Enter the password required to log into the bank’s system or the PIN1 if an ID card is used and determine whether you wish to terminate previous requests. The connection window opens (Figure 48). Figure 48. Connection report 12.1. Data exchanged with the bank The bank sends the data of the following documents: Processed (accepted) payment and conversion orders with the archive code (reference number) allocated by the bank. Processed (accepted) payment and conversion orders are archived. Rejected (cancelled) payment and conversion orders with the bank’s note that they contain errors. Reports that have been requested during the current and/or previous session. A note about whether the session was successful is displayed after the end of the session. Select menu option Reports if you wish to view the reports received from the bank (see 11 Reports received from the bank). A connection with the bank’s system must be established in order to receive a response to completed payment documents and conversion orders. Requests must not be defined in this case. USER MANUAL TELEHANSA 8 (PanBaltic) 61 12.2. Processing requests in the bank Received data are processed in the bank pursuant to the following procedure: the digital signatures are verified; the amounts of converted currencies in the account are checked; the amount indicated in the payment order is debited from the client’s account; the bank’s archive codes are allocated to all payment orders; the service charges are calculated. A relevant error message is displayed on the screen if the session is interrupted during login into the bank’s system or if an error is found. If this happens, select the relevant reasons from among the most frequent ones. Internet connection has been disconnected. Check the connection. Contact your Internet service provider (ISP) if necessary. If you use a dial-up connection to create an Internet connection, check that it is working properly. The number of the internal telephone exchange required for contacting an external line for local calls has changed. Make the relevant changes in the modem setup of your computer. Check the dialling regime – is it tone or impulse dialling? Check that the modem is properly installed. Try switching the modem on and off and rebooting your computer. Are the other programmes that use the modem connection working? If not, reinstall the modem. Install the correct modem drives. You receive the message: Unauthorized access. Error in login. This means that you have been blocked. Contact the specialist who manages your account in the bank. You receive the message: Unauthorized access. Wrong password. This means that you entered the wrong password. Contact the specialist who manages your account in the bank. The TELEHANSA service can be used from 8 am to 11 pm on business days. You have to select Send/Session report in order to obtain information about your session with the bank. A session report about your sessions with the bank opens (Figure 49). USER MANUAL TELEHANSA 8 (PanBaltic) Figure 49. 62 Log of sessions with the bank’s system Select the date and double click it. A session report about your sessions with the bank opens. Abbreviations used in TELEHANSA statements AS Opening balance LS Closing balance K2 Account turnover in the specified period K1 Daily turnover MK Payment order DP Debit orders CTX Payments made through an ATM SMS Payment made by text message (mobile bank) MV International payment orders S Cash transaction X Currency conversion K Card transactions TS Transactions with the bank, traveller’s cheques M Interest, manual debit and credit transactions I Interest, loan interest, surplus amounts IM Payments AI Accrued interest USER MANUAL TELEHANSA 8 (PanBaltic) 63 TT-TT_10 Charges T2 Total charges G Total charges PT Charge for normal payment order S1 Balance 13 Additional options of TELEHANSA Programme setup Selecting the Options/Configuration menu option open the windows where the following programme parameters can be set: import and export; document numbers; document status colours; connection setup; printing. 13.1 Import and export settings of the TELEHANSA programme. Importing and exporting files. Select the menu option Import/Export to open the import and export setup window (Figure 50). Figure 50. Import and export settings of the TELEHANSA programme USER MANUAL TELEHANSA 8 (PanBaltic) Payments: Import Export Format DOS import/export Delete files after import Reports: Export Format (format of reports) Automatic statement export 64 In this field, you can define the location of the directory from where the TELEHANSA programme takes ALL import files of payment orders by default. In this field, you can define the location of the directory where the TELEHANSA programme stores ALL exported data files. In this field, you can select the format in which the TELEHANSA programme imports and exports the details of payment documents. If you do not know the format, ask the employee who uses your accounting software. Tick this field if your accounting software works in the DOS environment. Tick this field if you want to delete the files that have been imported to the TELEHANSA programme from the import directory. In this field, you can define the directory where exported report files are stored by default. In this field, you can select the format in which the TELEHANSA programme imports and exports the details of reports. Tick this field if you wish to export the statements received from the bank automatically into a file in the specified format and store them in the directory designated for exported report. Telehansa 8 (PanBaltic) supports the following payment formats: 1) Import/export formats of payment orders: Telehansa 4.13; Telehansa 5.114; SEB format. 2) Operation export (report) formats (ASCII): Telehansa 4.13; Telehansa 5.11; excel, xml, SWIFT MT940. If you used an earlier version of TELEHANSA before, then review the instructions Instruction for transfer from the Telehansa 5 version to the Telehansa 8 (PanBaltic) version on the bank’s website www.swedbank.ee. 13.2 Document numbers. Selecting the menu option Configuration/Document opens the document number setup window (Figure 51) where you can enter additional settings that do not affect the functioning of the programme, but help you improve the work and the manner in which data are sent. The numeration offered by the programme to new documents can also be defined in this window. USER MANUAL TELEHANSA 8 (PanBaltic) Figure 51. Document numbers Automatic numeration of new documents Common numeration for all documents Format Prefix Suffix 65 If this option has been ticked, then a new number is automatically offered for the document when a new document is opened (the next number in the order). If this option has been ticked, then all document types will receive defined general numbers. If this field has not been ticked, then documents of different types are numbered individually regardless of each other. Relevant combinations of letters that help to identify the type of the payment document can be entered before and after the document number. The letter(s) that denote the first part of the document number can be entered in this field. The letter(s) that denote the second part of the document number can be entered in this field. 13.3 Document colours (according to document status) Payment documents with different statuses are displayed in different colours in the programme. You can select suitable colours for the documents by selecting the menu option Configuration/Status colours (Figure 52). USER MANUAL TELEHANSA 8 (PanBaltic) Figure 52. 66 Document colours The following colours are used by default: prepared – black; accepted – green; waiting for 2. signature – olive; rejected – red; sent – blue; archived – teal. Corporate Client Helpline 613 2222, e-mail: [email protected] USER MANUAL