1
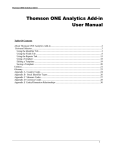
User Manual CPUII Revision 3.01 11/01/2013 Software #V13_xx o Code-Jet Inc. Production and Development: 2100 Greenwood Dr., STE 400 Southlake, TX 76092 817-788-9171 Corporate: 175 South Street, Suite 1210 Salt Lake City, UT 84111 USA 877- 263-3538 ▪ Toll Free 1(877) CODEJET 2 C+260 KEYPAD DISPLAY Print Key Gives a manual print go Main Power PRINTHEAD COVER ON/OFF Indicates the status of print head cover on/off (High voltage on/off) (Deflector plates) INK LOW LEVEL INDICATOR TOP UP LEVEL INDICATOR Indicates an ink low condition (replace ink bottle) Indicates a top-up low condition (replace top up bottle) 3 Pause Key Disables the print FAULT INDICATOR Indicates a fault condition and is accompanied by a diagnosis on main screen of LCD MAIN SCREEN FUNCTIONS STARTING THE JET Ensure that the coder is plugged into a power source and is switched On. Push the main isolator switch on the left hand side of the coder to the On position. The following screen indicates that jet-starting procedure may proceed: The pump will start, followed by the opening of the feed valve, the jet can be observed initially as a clear line from the nozzle to the gutter, the jet will turn black as all flushing solution is replaced by ink, a clicking sound will be heard as any air is purged out of the system, the start up procedure lasts approximately 30 seconds. The following screen indicates a successful start up: When the Print head cover is in place the screen will display the message being printed Coding may now begin. Press V to enlarge message being printed 4 STOPPING THE JET When stopping the jet for any reason, the Printer should always be shut down NEVER TURN OFF THE PRINTER AT THE MAIN SWITCH OR MAIN PLUG WHILE THE JET IS RUNNING. The shutdown procedure is very important and should always be adhered to in order to avoid problems when restarting at the beginning of the next shift. This procedure takes approximately 5 minutes. STOP THE JET A clean stop (Auto Shut Down) the jet will stop the printer will flush the lines and clear the gutter line in preparation for the next start, Wash Solvent can be applied to both the nozzle jewel plate and the gutter to aid the process this is also a good time to give the print head a general clean. Wait for printer to display JET NOT RUNNING before turning power off. ADJUSTING THE LCD CONTRAST Either or keys until the display looks sharp. Do not hold down the key too long. Auto repeat will change speeds and change the contrast too quickly to be noticeable. 5 ENTERING AND EDITING MESSAGES The Printer can print up to four lines of text in the following formats: Fonts Printed Dots 4 Lines of Text: 5 High 7 High 3 Lines of Text: 5 & 7 Plus 9 High 2 Lines of Text: 5, 7 & 9 Plus 11 High 1 Line of Text: 5, 7, 9 & 11 Plus 15 High, 17 High, 24 High, 32 High To edit an existing or enter a new message from the Main Screen: or Screen displays: 6 or A message name can be entered or use UP and DOWN arrow to select an existing message. Or press F1 to enter a new name 7 Message Names Messages are stored using names up to 16 characters in length this can be made up of Alpha Numeric characters these can be selected by direct name entry or via the up and down arrow keys to the right of the screen. Enter the message name E.g. Product 1567 To backspace and retype the name. The editor will permit changing the specific parameters for this message. Or to change the value. Or to move between parameters. Will skip both parameters pages and start editing the message. Printed Dots is the maximum number of dots to use while printing the message. NOTE: Using more dots than necessary will degrade the print speed of the Printer. Expires in Days is the expiration to apply within this message. Shaft Encoder Rate this sets the width of print. It is the divisor to apply with a shaft encoder. This value is directly affected by Printed Dots. Product Delay is the amount of time or encoder pulses to wait before printing the message. Print Height is the amount of high voltage used to deflect a drop of ink. Print Orientation is whether to print the message right side up (NORMAL) or up side down (INVERTED). 8 Print Direction is whether to print the message left to right (NORMAL) or right to left (REVERSE). Raster Repeat Factor is a bolderization to be applied across the entire message. Inter Character Gap is the number of dots to place between each printed character. The Message Editor is WYSIWYG. Once the parameters have been filled, the display will show this screen. If there is currently a message already programmed into the selected message number or name, the Screen will display that message. WYSIWYG Flashing Cursor Viewing Area Mode: Add or Edit Field Contents Message Name Font Height, Barcode Name, or Picture Number 9 To delete any letter from the text, position the cursor over the chosen character via the then use of the and For example: One on the key would erase the letter R from third line; this could be replaced with the new required letter, then to store the message. (1) To erase an entire field: Position the cursor on the first letter, and hold . The field would then be erased, the new code could be programmed in, and the key pressed to store the changed message. (2) To program in a complete new message with expiration date: From the main screen, Type PRODUCT 1567, then twice to accept the current parameters Type BEST BEFORE END, then and hold Type 1959012 LP45 ZX7R, then twice to accept the current parameters. Type E, CAPS, type e, SPACE, type F, type f, SPACE, type 20G, , type g. 10 Until y has been erased, as indicated in the field contents. And hold The to refresh the screen with translated time fields. key to Store the message. 11 PRINTING SPECIAL FONTS The message editor permits dot addressable field positioning. The following key combinations can be used to move the cursor around the print area. Right Arrow moves the cursor one dot to the right. Left Arrow moves the cursor one dot to the left. Up Arrow moves the cursor one dot up. Down Arrow moves the cursor one dot down. Ctrl Right Arrow moves the cursor eight dots to the right. Ctrl Left Arrow moves the cursor eight dots to the left. Ctrl Up Arrow moves the cursor eight dots up. Ctrl Down Arrow moves the cursor eight dots down. Alt Right Arrow moves the cursor to the end of the message. Alt Left Arrow moves the cursor home (top left of message). Enter move the cursor to the next line based on the font height and the left position of the field above. Font key is used to select a font. The font selection is rotary where the choices are by fit capability. Create a new message and name it LESSON1. The Key sequences are: , L, E, S, S, O, N, 1, Move the Cursor to the right by eight dots and hold Select the 24 High font by pressing the five times. 12 Type the numbers 0, 1, 2, 3, 4, 5, 6, 7, 8, 9, 0. Did you notice the screen scroll to show the last number that was typed? One time. The cursor will be blinking on the last zero (0). And hold . The text field became a UPC Barcode. Note the font name changed to UPC/EAN. And hold ., you can scroll through all of the barcodes that are in the Printer. The twice to move past the barcode. The key to select 5 High. Type 'THIS IS A'. the The key to select 7 High. Type 'UPC BARCODE'. The key to select 9 High. Type 'PRINTING'. the key. the key. key. Notice that the cursor moved to the top line. Press the key. The text doubles in width. The bolderization will increase up to a magnification of 5 then roll back to 1. Press the key. Notice the text field inverts and prints upside down. Press the key. Notice the characters in the text field reverses and prints back to front. 13 The key to Store the message. NOTE: Bolding or double dotting a character, word or message will increase the overall appearance and visibility, but will also increase the message in length, making it more difficult to fit into small target areas on the product to be coded. 5 DOT HIGH SINGLE DOT 5 DO T H IGH DOUB L E DO T 7 DOT HIGH SINGLE DOT 7 DO T H IGH DO UB LE DO T 12 DOT HIGH SINGLE DOT 12 DOT HIGH DO UBLE DO T 16 DOT HIGH SINGLE DOT 16 DOT HIGH DOUBLE DOT 24 DOT HIGH SINGLE DOT 24 DOT HIGH DOUBLE DOT 14 PRINTING REAL TIME CLOCK INFORMATION All date, time, Julian, and expiration utilize the real time clock in the Printer. The information is retrieved using the key. When editing Time, Date, or Julian fields and hold to refresh the screen with the actual translated values. Create a new message and name it LESSON2. The Key sequences are: L, E, S, S, O, N, 2, Notice that the current time is automatically entered as Hour, Minutes, and Seconds. Notice the field contents are Hh:Mm:Ss. Here are all of the translated characters for a time field. TIME H – Tens of hours h – Unit of hours (CAPS + H) M – Tens of minutes m – Units of minutes (CAPS + M) S – Tens of seconds s – Units of seconds (CAPS + S) Z - Shift Code character E.G Hh:Mm = 09:30 Characters, which do not appear in this list, will be printed as entered. 15 to advance down one line. and hold Notice that Month, Day, and Year are entered automatically. Mm/Dd/Yy Notice the field contents are Mm/Dd/Yy. Here are all of the translated characters for a date field. CURRENT DATE M- Tens Digit of month m – Units Digit of month D – Tens Digit of day of month d – Units Digit of day of month Y – Tens Digit of year number y – Units Digit of year number A - 1st character of alpha month B - 2nd character of alpha month C - 3rd character of alpha month W,w – Day of week (Sun= 1) Z - Shift Code character Examples Mm/Dd/Yy = 11/05/13 or Dd ABC 20Yy = 05 NOV 2013 EXPIRATION DATE F - Tens Digit of month of Expiration* f - Units Digit of month of Expiration* E - Ten Digit of day of Expiration* e - Units Digit of day of Expiration* G - Tens Digit of year of Expiration* g - Units Digit of year of Expiration* a - 1st character of Expiration alpha month* b - 2nd character of Expiration alpha month* c - 3rd character of Expiration alpha month* Examples Ff/Ee/Gg = 11/27/13 or Ee abc 20Gg = 27 NOV 2013 * NOTE See Message Parameters Screen 1, Expires in Days. Characters, which do not appear in this list, will be printed as entered. 16 to advance down one line. and hold notice that Expiry date Julian Day of Year is entered automatically edit this and replace Ff/Ee/Gg with xyz. Notice the field contents are xyz. Here are all of the translated characters for a Julian field. JULIAN DATE W - Tens of week number w - Units of week number x - Hundreds of Julian day of year y - Tens of Julian day of year z – Units of Julian day of year E - Tens of European Julian week, The first full week of the year is '01'. e - Units of European Julian week I - Tens of ISO Julian week, the first day of the year is '01' until Sunday, then it is week '02'. i - Units of ISO Julian week N - Tens of Non-Standard Julian week, every seven days is a week. n - Units of Non-Standard Julian week Z - Shift Code character Examples xyz = 365 or xyzZ = 2651 for day of year and shift-code Characters, which do not appear in this list, will be printed as entered. the key to Store the message. 17 PRINTING BARCODES Most barcodes can support data from multiple field types. The following walk through will guide you into the complex means of printing multiple data type in a single barcode. Barcodes in the editor work a little strange to the previous method. When you take a closer look, the criteria are exactly the same. The barcodes which are available: UPC or EAN barcodes. 12 or 13 Interleaved 2 of 5 2:1 aspect ratio. Interleaved 2 of 5 3:1 aspect ratio. Interleaved 2 of 5 5:2 aspect ratio. Code39 2:1 aspect ratio. Code39 3:1 aspect ratio. Code128 Self Compression. Code128 subset B. Code128 subset C. QR Data Matrix Create a new message and name it LESSON3. The Key sequences are: , L, E, S, S, O, N, 2, Press the key five times to select 24 High. Selecting a font size does not create a field. Some information must be typed before the new font becomes our desired barcode height. Type '1234', then press a barcode. and hold the cursor must be on a character in the field to convert it into key twice. I2of5 2:1 will be selected. 18 to begin appending the barcode with the variable fields. key to add the current time. until the ':' (colon) is highlighted, then . three times. until the next ':' (colon) is highlighted, once to append another variable field. and hold notice that the incrementing number has been initialized to '0001'. It will start counting at one and add one on every print. six times to append one more field. and hold . until the first '/' (slash) is highlighted, until the next '/' (slash) is highlighted, until the last 'D' is highlighted, type a 'Z'. . . Now you have an I2of5 barcode with a constant '1234', Hour, Minute, Incrementing number, Month, Day, Year, and Shift Code. and hold information. the now the barcode contains the current time and variable key to Store the message. 19 PRINTING INCREMENTING & DECREMENTING NUMBERS Incrementing Numbers and hold (+) key. A typical Incrementing code would be shown on the editor screen as: 0001 The Printer would print an incrementing number for ex: 0001 and on subsequent prints 0002 0003 Decrementing Numbers and hold (-) key. A typical Decrementing code would be shown on the editor screen as: 9999 The Printer would print an decrementing number for ex: 9999 and on subsequent prints 9998 9997 The view inside of the WYSIWYG editor: 20 SERIAL BUFFER Serial buffers are for variable data that comes from a computer. There are ten buffers of thirty-four characters in length. In referencing a serial buffer, the format must indicate which buffer to use and how many characters. In order to be able to print using the RS232 serial Buffer uses the following procedure. and hold Notice the field content has the two digit buffer number, followed by text, which does not appear in the WYSIWYG. Serial Buffer number 1 does not contain any characters. Delete the text characters to suit length of Serial string to required Transmit ^SB01TEXT STRING (cr) LOGOS and PICTURES Logos must be downloaded via the serial port as described in the Programming Manual. Once downloaded, the logo can be printed in a message. and hold 21 The editor automatically creates a picture field, selecting Logo number 1 (01). Logos and Pictures are numbered 01 to 99. In this example we have downloaded a picture to Number 10. This makes it easy to edit by typing a 1. The editor has located and displayed Picture #10. As you notice, the extra "1" is displayed after the logo. once then to eliminate the extra digit. To select the Picture field . Notice that the Font type displays PICT 10, indicating that the Field is Picture number 10. 22 MAIN SCREEN FUNCTIONS CONTINUED COPY AND PASTE MESSAGE The CodeJet C+260 can copy and paste a message. and hold Select the source message using the Function keys, Arrows keys, or typing the name. Select the destination message by typing the new name. The message will now be copied including the message parameters If the Source and Destination are the same, the printer will display this message 23 SELECTING A MESSAGE TO PRINT The Printer has the ability to store a minimum of 63 different messages of 4000 characters per message as standard. The maximum depends upon the actual number of characters in each message. From the Main Screen: To select the required message: the screen will display the following information: The new message can be selected by the use of directly typing the name. or to scroll through the list of messages.. When the required message name is displayed, to select the message, or to abandon the selection. The main screen will show the new message number as selected. 24 DELETING A MESSAGE The message storage area can become filled to capacity. To remove an old message, and hold The main screen will ask for which message to delete by displaying the current selected message. If the current selected message is deleted, DEFAULT is automatically selected. If DEFAULT does not exist, Print is disabled until a valid message is selected and Printing is manually re-enabled. The message can be selected by the use of directly typing the name. or to scroll through the list of messages.. If the message to delete does not exist, the following error message is displayed. 25 ENABLE OR DISABLE PRINTING ENABLE PRINTING DISABLE PRINTING Enable Disable Menu and hold When changing messages during the traversing of products before the Printer it may become necessary to disable printing. To disable or enable printing, to disable or to enable, Or use and hold use or to toggle When printing is disabled, the key MUST BE PRESSED before it will be disabled. Printing is enabled immediately when is pressed. INDUCE A MANUAL PRINT TRIGGER A manual print trigger can be induced if the print is enabled, When the Jet is running, the product counter will increment for each induction. If latched repeat print is enabled, it will start continuous printing. 26 TEMPORARILY ADJUSTING MESSAGE HEIGHT The height of the print can be adjusted and affects the vertical distance between printed dots. From the Main Screen: The screen will display the current height setting; this can be adjusted up and down with direct number entry or the use of or via the or to the right of the screen. The range is one (1) to ten (10). When the required setting is obtained key to set. Note: The printed character height can also be altered by moving the printhead closer to the substrate to reduce the height or further away to increase the height. Minimum distance 5mm – maximum 15mm (Optimum distance 10mm). To save the changes permanently, reselect the same message. 27 then TEMPORARILY ADJUSTING THE PRINT WIDTH The length of a message depends on the width of the characters. The larger the number of the width setting, the wider the gap between the columns of every character. From the Main Screen: The screen will display the current width setting, this can be adjusted up or down with direct number entry or the use of or via the or to the right of the screen. The faster the speed of the product to be coded, the lower the required width setting. The range is one (1) to two hundred fifty five (255). When the required setting is obtained key to set. Note: To save the changes permanently, reselect the same message. 28 then TEMPORARILY ADJUSTING PRODUCT DELAY A message may be delayed so that printing starts at a fixed interval after the product sensor has been triggered in order to hit a specific target area of the product. From the main screen: The screen will show the current delay setting, this can be adjusted up and down with direct number entry or the use of the or via the or to the right of the screen. Minimum setting being 10, maximum being 10,000. When the required setting is obtained key to set. Note: The printed character Delay can also be altered by moving the product detector closer, further away from, before of after printhead. To save the changes permanently, reselect the same message. 29 then TEMPORARILY REVERSING THE MESSAGE The printed characters can be reversed to suit a product traveling left to right or vise versa. From the main screen: The screen will display the current orientation; this is altered to the other state via the keys When the desired state is displayed, press key to set Note: A change in reverse mode can invariably affect the invert status resulting in the need to change the invert to its other state The reversal of the printed characters can also be attained by spinning the printhead 180 degrees. To save the changes permanently, reselect the same message. 30 then . TEMPORARILY INVERTING THE MESSAGE The printed characters can be inverted (turned upside down), to suit a product traveling left to right or vice versa. From the main screen: The screen will display the current orientation; this is altered to the opposite state via the keys When the desired state is displayed, key to set. Note: A change in invert mode can invariably affect the reverse status resulting in the need to change the reverse to its other state. Spinning the printhead 180 degrees can also attain the inverting of the printed characters. To save the changes permanently, reselect the same message. 31 then TEMPORARY INTERCHARACTER GAP There is a standard 1-column gap between characters, which may be increased up to 9 columns. From the Main Screen: and hold The screen will now show the following: The inter character gap can be adjusted via direct number entry or the F2 and F3 keys or via the up or down arrow keys to the right of the screen. When the required gap setting is displayed, key to set. Note: To save the changes permanently, reselect the same message. 32 then TEMPORARY BOLDERIZATION The Bolderization of the entire message can be changed temporarily The bolderization can be adjusted via direct number entry, the or to the right of the screen. When the required bolderization is displayed, or via the key to set. Note: To save the changes permanently, reselect the same message. then . TEMPORARY EXPIRATION The Expiration (in days) of the current message can be changed temporarily by holding and hold on the Main Screen. The expiration can be adjusted via direct number entry, the or via the or to the right of the screen. When the required expiration is displayed, key to set. Note: To save the changes permanently, reselect the same message. 33 then . ZEROING THE PRODUCT COUNT The product count on the Main screen can be reset to Zero and hold the count is reset without a dialog or question. SELECTING AN ALTERNATE LANGUAGE The language for the prompts and date can be selected by and hold The current languages at the time of this manual are English and Spanish. to select English or for Spanish. for French for future languages CHANGE CURRENT DATE AND TIME The current date and time are changed by key. Type the current hour (hh), minute (mm), day of month (DD), month (MM), year (YY), and day of week (d). Day of week is 1 for Sunday to 7 is Saturday. to accept the changed time or 34 to abandon. SHIFT PERIODS AND CODES From the main screen, and hold the following screen will display Four periods are displayed, sorted by time. As shown above, the periods have not been defined. The default is 06:00 with a letter of 'A' and 15:00 with a letter of 'B' (two shifts). To define the first shift at 7:59, type 0, 7, type 5, 9. To define the letter for the shift as 1; press type the number one (1). With only one shift defined, the Printer will always print a one. to move the second shift. Type 1, 9, , 5, 9, C. to define the second shift at 19:59 with a letter of C. Between 07:59:00 and 19:58:59 the Printer will print the letter 1. Between 19:59:00 and 07:58:59 the Printer will print the letter C. When defining shift codes the key will save and sort the shifts. The key will abandon any changes. A SPACE in the shift letter will remove the shift and ignore the time for start of shift. To Enter Shift Code into the message Editor refer to Julian Date Code Page 17 35 Example Of a 12-hr 2-shift pattern starting at 8am Printing A & B with shift change over at 8pm Example Of a 8-hr 3-shift pattern starting at 6am Printing A , B & C with shift change over’s at 2pm & 10pm Example Of a 8-hr 3-shift pattern starting at 07:59am Printing 1 , 2 & 3 with shift change over’s at 3:59pm & 11:59pm Example Of a 6-hr 4-shift pattern starting at 6am Printing A, B, C, & D with shift change over’s at 12pm 6pm & Midnight Example Of a 6-hr 4-shift pattern starting at 6am Printing 1, 2, 3, & 4 with shift change over’s at 12pm 6pm & Midnight 36 Example Of a 12-hr 2-shift pattern starting at 12am Printing A & P with shift change over at 12pm Example Of a 6-hr 4-shift pattern starting at 6am Printing M, A, E, & N with shift change over’s at 12pm 6pm & Midnight SHAFT ENCODER SOURCE The Printer has two sources for the shaft encoder. To change the source, and hold to select the internal shaft encoder (timer) or external shaft encoder and wheel. 37 to select the OPERATING IN CONTINUOUS PRINT MODE This feature is for applications where the Printer is required to print onto a continuous substrate or extrusion. When configured to operate in this mode the Printer prints automatically and at regular intervals, the duration of which is programmable. The duration of the interval between prints can be set in two ways, either as a measure of time (Timed) or as a measure of distance (Encoder). From the main screen: and hold The screen will display the current status; this can be altered via the When the required mode is selected KEY MODE key to set. FUNCTIONALITY OFF The photocell must be triggered for each print. LATCHED the photocell must be triggered once to continuous print. Uses Repeat Print Delay. the photocell must be blocked for continuous print. uses the full product delay. the photocell must be blocked for continuous print. uses 1/10th of the product delay. TIMED ENCODER 38 keys. REPEAT PRINT DELAY Repeat print delay is used in the Latched repeat print mode. When the photocell is triggered, the Product delay is used, and then each subsequent print uses Repeat Print Delay. To alter the spacing between each reprint, and hold The repeat print delay can be adjusted via direct number entry, or keys, or the or keys to the right of the screen. When the repeat print delay is displayed, key to set. 39 Start / Stop Commands F1 Start the Jet ALT PRINT System-Warm up Mode Ink pump runs 3.1.Bar systems monitors Viscosity and ink Levels no ink jetted through nozzle. F1 Shutdown Jet is stopped no solvent is added during shutdown sequence. F2 Jet Not Running Nozzle Maintenance Nozzle Maintenance gives four options for cleaning the nozzle 40 F1 Nozzle Flush Pump runs 3.1 Bar return valve opened and back pressure on nozzle jewel plate used to clear partial blockages on the nozzle jewel plate solvent is applied to front of nozzle whilst in flushing mode. F2 Purge Pump runs 3.1 Bar return & feed valve opened ink pulled from mixer tank via Venturi cleans the inside of the nozzle body and back pressure on nozzle used to clear partial blockages on the nozzle jewel plate solvent is applied to front of nozzle whilst in purging mode F3 Clean Pump runs 3.1 solvent pulled from top-up bottle to nozzle then used to clean nozzle repeated us of this command will lower ink viscosity F4 Stabilize Pump runs 3.1 Bar return & feed valve opened ink pulled from mixer tank via Venturi cleans the inside of the nozzle body and back pressure on nozzle used to clear partial blockages Jet then starts no modulation the return valve pulsed to remove air may also help restore a sticking valve repeated until aborted Press F1 to Abort Nozzle Maintenance functions Remove Print Head Cover 41 F2 Jet Running Nozzle Maintenance and Print Head Cover Removed Jet Running Nozzle Maintenance gives four options for cleaning the nozzle with jet in run mode F1 Nozzle Flush Pump is at 3.1 Bar return valve opened and back pressure on nozzle jewel plate used to clear partial blockages on the nozzle jewel plate solvent is applied to front of nozzle whilst in flushing mode. Press F1 to abort and to re-start the Jet F2 Stop Jet Pump runs 3.1 Feed valves close allowing print head to be cleaned and dried if dirty when ready F1 to Re-Start Jet F3 Shutdown will quickly stop the printer without flushing nozzle not recommended for any shutdown of more than an hour F4 Stabilize Pump runs 3.1 Bar return & feed valve opened ink pulled from mixer tank via Venturi cleans the inside of the nozzle body and back pressure on nozzle used to clear partial blockages Jet then starts no modulation the return valve pulsed to remove air may also help restore a sticking valve repeated until aborted Press F1 to abort and to re-start the Jet 42 Press Escape Abort Nozzle Maintenance functions and put the printer back into run mode allow approx. 15 seconds to stabilize before replacing print head cover The Charge error and Gutter fault will bring up the running nozzle maint screen if a key is pressed within 5 minutes of the error after that the printer will shut down to a full stop Charge Error Gutter Fault Ensure print head cover is off & Press any key to bring up running nozzle maintenance Menu Clean and dry the nozzle then start the jet 43 EXTENDED FONTS IN CHARACTER GENERATORS ALT + 3 DIGIT 128 129 130 131 132 133 134 135 136 CHARACTER ¡ ¿ « » ¶ ¢ £ ¤ ¥ NAMED Inverted ! Inverted ? Spanish Left Quote mark Spanish Right Quote mark Pilcrow Cent Pound Currency Yen 137 Euro-Currency 138 139 140 COLON CRUZEIRO FRENCH FRANC 141 142 143 144 145 146 147 148 149 150 151 152 153 154 ₣ ₤ ₪ ₫ € À Á  à Lira NAIRA Philippine PESO India RUPEE Korea WON Isreal SHEQEL Vietnam DONG EURO Spain PESETA Russian RUBEL A with Grave A with Acute A with Circumflex A with Tilde 44 ALT + 3 DIGIT 155 156 157 158 159 160 161 162 163 164 165 166 167 168 169 170 171 172 173 174 175 176 177 178 179 180 181 182 183 CHARACTER Ä Å Æ Ç È É Ê Ë Ì Í Î Ï Ð Ñ Ò Ó Ô Õ Ö Ø Œ Ù Ú Û Ü Ý Þ ß à NAMED A with Diaeresis A with Ring Latin AE C with Cedilla E with Grave E with Acute E with Circumflex E with Diaeresis I with Grave I with Acute I with Circumflex I with Diaeresis Capital Eth, D with Stroke N with Tilde O with Grave O with Acute O with Circumflex O with Tilde O with Diaeresis O with Stroke Latin OE U with Grave U with ACUTE U with Circumflex U with Diaeresis Y with Acute Captial Thorn Sharp S (B) a with Grave 45 ALT + 3 DIGIT 184 185 186 187 188 189 190 191 192 193 194 195 196 197 198 199 200 201 202 203 204 205 206 207 208 209 210 211 212 CHARACTER á â ã ä å æ ç è é ê ë ì í î ï ð ñ ò ó ô õ ö ø œ ù ú û ü ý NAMED a with Acute a with Circumflex a with Tilde a with Diaeresis a with Ring Latin ae c with Cedilla e with Grave e with Acute e with Circumflex e with Diaeresis i with Grave i with Acute i with Circumflex i with Diaeresis Small Eth n with Tilde o with Grave o with Acute o with Circumflex o with Tilde o with Diaeresis o with Stroke Latin oe u with Grave u with Acute u with Circumflex u with Diaeresis y with Acute 46 ALT + 3 DIGIT 213 214 215 216 217 218 219 220 221 222 223 224 225 226 227 228 229 230 231 232 233 234 235 236 237 238 239 240 241 CHARACTER þ ÿ Č Ć Š Ž Ő Ű č ć đ š ž ő ű Ą Ę Ł Ż Ğ Ş ą ę ł ż ğ ş Ẁ Ŵ NAMED Small Thorn y with Diaeresis C with Caron C with Acute S with Caron Z with Caron O with Double Acute U with Double Acute c with Caron c with Acute d with Stroke s with Caron z with Caron o with Double Acute u with Double Acute A with Ogonek E with Ogonek L with Stroke Z with Dot G with Caron S with Cedilla a with Ogolek e with Ogolek l with Stroke z with Dot g with Caron s with Cedilla W with Grave W with Circumflex 47 ALT + 3 DIGIT 242 243 244 245 246 247 248 249 250 CHARACTER Ẅ Ỳ Ŷ Ÿ ẁ ŵ ẅ ỳ ŷ NAMED W with Diaeresis Y with Grave Y with Circumflex Y with Diaeresis w with Grave w with Circumflex w with Diaeresis y with Grave y with Circumflex 48 EDIT MODE FUNCTIONS KEY FUNCTION CATEGORY ESC Abandon, Do not Save User SAVE Save & Exit User DEL Delete Character under Cursor User Delete to text to end of field User ALT DEL CTRL DEL Delete Field User BOLD Make Text Bolder User INVERT Invert Field(s) User REVERSE Reverse Field(s) User FONTS Select Font User Select Barcode User Time Field User ALT CLOCK Date Field User CTRL CLOCK Expiration or Julian Field User ALT L (+) Incrementing Field User ALT M (-) Decrementing Field User ALT P Logo or Picture Field User ALT S Serial Buffer Field User ALT V Refresh WYSIWYG User User ALT FONTS CLOCK 49 KEY FUNCTION CATEGORY Left Arrow Move Cursor left one dot User Right Arrow Move Cursor right one dot User Up Arrow Move Cursor up one dot User Down Arrow Move Cursor down one dot User CTRL Right Arrow Move Cursor left eight dots User CTRL Left Arrow Move Cursor right eight dots User CTRL Up Arrow Move Cursor up eight dots User CTRL Down Arrow Move Cursor down eight dots User ALT Right Arrow Move Cursor to home User ALT Left Arrow Move Cursor to the end of Message User ENTER Move Cursor to next Line User 50 MAIN SCREEN FUNCTIONS KEY FUNCTION CATEGORY PRINT Start Jet User PAUSE Quickly Stop Jet User Cleanly Stop Jet User MSG Select message to Print User LEFT Arrow Contrast Adjustment User RIGHT Arrow Contrast Adjustment User EDIT Message Editor User ALT MSG Copy Message User ALT DEL Delete Message User CTRL D Disable Printing User CTRL P Induce a manual print trigger User CTRL S Set Shift periods and Codes User CTRL WIDTH Shaft Encoder Source User ALT WIDTH Repeat Print Mode User ALT DELAY Repeat Print Delay User CLOCK Set the current Date and Time User HEIGHT Temporary EHT Level User INVERT Temporary Message Inversion User ALT STOP 51 KEY FUNCTION CATEGORY REVERSE Temporary Message Reversal User CTRL E Temporary Expiration in Days User WIDTH Temporary Shaft Encoder Divisor User BOLD Temporary Raster Repeat Count User DELAY Temporary Print Delay User ALT G Temporary Inter Character Gap User CTRL Z Zero Product Counter User ALT L Select Language User 52 KEY FUNCTION CATEGORY ALT D Diagnostic Mode Service/User ALT PRINT System-Warm Up Mode Service/User CTRL START Nozzle Flush Service/User CTRL PAUSE Umbilical Purge Service/User ALT HEIGHT EHT Trip Level Set Service ALT P Default Pump Pressure Service CTRL M Modulation Level Service ALT Q Phase Voltage Level Service ALT C Phase Control Disable/Enable Service CTRL C Charge Error Shutdown Disable/Enable Service/User ALT E Photocell Edge Select Service CTRL V Viscosity Set point Service ALT V Viscosity Warm Up Time Service CTRL DEL Delete All Messages Service Alt D Alt F1 Calibration Menu Service 53