1
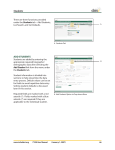
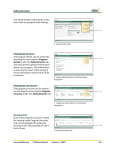
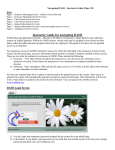
Instructors
Instructors are added to the system
under the Instructors tab. This area is
also where lists of instructors can be
viewed and instructor information can
be edited.
add instructors
To add an instructor to the system,
select Add Instructor from the
Instructors tab. The instructor
information screen is divided into the
following five sections:
Biographic/Demographic
Enter as much information as is
available about the instructor. The
fields preceded by a red asterisk (*)
are required fields. Some fields require
text entry and some (such as gender
and ethnicity) provide a drop-down
list to select from. Enter the required
information in the Biographic/
Demographic section. The system will
automatically check for duplicates and
prompt the user at the top of the page
if any are identified. Once an instructor
has been added to the system the
sub-menu will be available. These are
discussed later in the document under
the List/Search function.
Note: When a drop-down list is
present, you can either select the item
with your mouse from the drop-down
list or type the first letter of the item
into the box, and the appropriate item
will be inserted.
www.iccbdaisi.org
FY08 User Manual
A
B
C
A. Add Instructor Option in Drop-down Navigation
B. Instructors Sub-Menu
C. Indicates Required Field
(January 1, 2007)
21
Instructors
Note: If an instructor is working for
multiple programs, the instructor
must have a separate record for each
program. Within one program, the system
compares SSN, Last Name, and Birth
Date for possible duplicate accounts. If
any suspected duplicates are found a
message is displayed.
D
Note: Fields that have formatted data
such as Social Security Number (000-000000) do not require you to enter the
separators. Key in only the numbers. To
erase the data and make a change to
an entry, highlight the existing data and
then press the delete key.
D. Duplicate Message
Contact Information
Enter the address information as
available. The default value for the state
is Illinois. Other fields can have default
values set for your individual program
(instructor defaults will be described later
in this document).
E
E. Contact Information
www.iccbdaisi.org
FY08 User Manual
(January 1, 2007)
22
Instructors
Education/Employment
Enter the appropriate information paying
close attention to the required fields.
1. Employee Status: Employment
status (full or part-time) as an
instructor in your program.
2. Employment Date: Date first
employed by your program.
3. Years Experience at Date of Hire:
Years of experience in the field of
adult education at time initially
employed by your program.
4. Primary Teaching Area: Type of
instruction teacher spends the
majority of time providing.
5. Secondary Teaching Area: Type
of instruction teacher spends the
minority of time providing. May be
left blank of marked Not Applicable
if teacher provides only one type of
instruction.
F
F. Education/Employment
Custom Fields
If custom fields have been defined
they will appear on the screen just
below the education/employment
section. An explanation of how to setup
the custom fields will be provided
in the Administration section of this
document.
G
G. Custom Fields
www.iccbdaisi.org
FY08 User Manual
(January 1, 2007)
23
Instructors
Site Access
Select the appropriate status and
issue site access as needed. The level
of site access granted will control how
much the instructor can edit/change
information within the site.
• No Access: prevents instructors from
having an account within the DAISI
system for the program.
• Instructor Enter Attendance:
allows the instructor to view student
data for his/her classes and to enter
student attendance information.
If this option is selected a unique
email address will be required before
the instructor’s information can be
saved.
• Instructor View Only: grants the
instructor an account with view-only
access to his/her class data, including
roster and attendance views. If this
option is selected a unique email
address will be required before
the instructor’s information can be
saved.
H
H. Status
Check Send Email to send the instructor
an email with login and password
information. An email will only be sent
if an email address is available. If no
email address is provided or if the Send
Email box is not checked, the login and
password information will be displayed
on the screen once the instructor’s
information is successfully saved.
You will need to print the information
and give it to the instructor.
Click SUBMIT to save the information.
www.iccbdaisi.org
FY08 User Manual
(January 1, 2007)
24
Instructors
Submission Errors
Note: If the information entered for an
instructor is not valid or is incomplete,
an error message will be displayed in
red type near the top of the screen.
Any error messages displayed must
be resolved before the instructor’s
information can be saved successfully.
I
I. Error Message
List/Search Instructors
Instructor information can be edited
and reviewed under the Instructors
tab by selecting the List/Search option
from the menu.
Note: There is a sub-menu available on
this screen under the heading. Hover
over the option to display the link.
J
K
L
List All – displays all instructors without
regard for search criteria.
Add New – brings up a new instructor
entry screen. This is the same screen
displayed under the Add New function
previously discussed.
www.iccbdaisi.org
FY08 User Manual
J. List/Search Option in Drop-down Navigation
K. Add New Link
L. List All Link
(January 1, 2007)
25
Instructors
Search – allows you to enter specific
data to use in a search. Click on the box
in front of the search criteria to include
the field in the search and enter the
data to use in the text field, or select a
value from a drop down menu. A partial
search can be done on last name or first
name by entering the first letter(s) of
the name.
For example, checking the first name
box and typing the letter “T” then
clicking on SEARCH will display all
instructors with a first name beginning
with “T”.
M
M. Search
It is important to note that searches
are inclusive. Selecting last name and a
birth date range requires the instructor
match on last name AND on the birth
date range to be listed in the search
results.
Once the results are displayed, links to
any instructors that meet the criteria are
provided.
N
N. Search Results
www.iccbdaisi.org
FY08 User Manual
(January 1, 2007)
26
Instructors
edit instructors
Add/Edit Details
Click the link on the instructor’s name to
display the Add/Edit Details screen.
O
Please note the instructor sub-menu
is available from the Add/Edit Details
page.
The information displayed for the
instructor is the same information that
was entered for the Add New Instructor
screen. It allows editing of each
section entered for the new instructor
-- Biographic/Demographic, Contact,
Education/Employment, Custom Fields,
and Status.
O . Instructor Sub-Menu
Changes can be made to any of these
areas. Required fields must still be
completed. Duplicates are not allowed
and will be checked automatically by
the system.
Note: Once changes are entered be
sure to click on SUBMIT to save them.
Changes will not be saved unless the
SUBMIT button is used.
www.iccbdaisi.org
FY08 User Manual
(January 1, 2007)
27
Instructors
If there are errors in the entry of data
a red message will be displayed at
the top of the screen. If the data has
been updated successfully a green
confirmation message will display at
the top of the screen.
P
Q
R
Click on the Search Results button to
return to the List/Search screen, select
one of the options from the sub-menu
or choose another function from the
navigation bar.
Professional Development
The professional development screen
accessed from the instructors submenu displays hours by activity that
an instructor has spent on professional
development for the specified fiscal
year. Note that this link is displayed
after an instructor is selected from the
list of instructors that matched your
search.
P. Search Results Button
Q. Instructors: Add/Edit Details Sub-Menu
R. Successful Update Message
Policy at the ICCB now requires:
1. All Instructional staff must receive
at least 6 hours of professional
development training each fiscal
year.
2. All New Adult Education Instructors
must complete a New Teacher
Orientation within six months of his
or her hire date.
3. Please see section 9.2 of the AEFL
Provider Manual for additional
professional development
requirements.
S
S. Prof. Development Link
www.iccbdaisi.org
FY08 User Manual
(January 1, 2007)
28
Instructors
Clicking on the Prof. Development
link from the Instructor submenu will
display the screen on the right.
T
Each of the professional development
activities available are listed for review.
The total hours for each activity are
listed along with an overall total. If the
instructor is a teacher who has met
the six hour requirement, the YES radio
button near the bottom of the screen
will be automatically marked by the
system.
To add additional hours for an
instructor, click on the ADD HOURS
button and the entry screen will be
displayed.
U
V
W
T. Add Hours Button
U. Total Hours for Each Activity
V. Total Hours Attended
W. 6 Hr. Requirement Radio Button
Add Hours
Activity date, activity type, and hours
attended are required pieces of
information. Activities can be selected
by highlighting a selection on the droplist or by entering the first letter of the
text description.
For example, if you type the letter “S” the
first activity that begins with the letter
will be highlighted. Type it again and
the second activity that begins with the
letter will be highlighted. In this case,
typing the letter “S” twice will highlight
“Special Project Institutes/Retreats”.
Up to five activities can be entered from
this screen. If you need to enter more
than five, click on the SUBMIT button
to save the changes and then select the
ADD HOURS button to add, enter, and
submit additional entries.
www.iccbdaisi.org
FY08 User Manual
(January 1, 2007)
29
Instructors
After the data has been submitted
and updated you will be returned to
the Professional Development screen
where you can review the changes.
Detailed information about each
category can be displayed by clicking
on the link provided in the Total Hoursto-date column.
To return to the Prof. Development
summary, click the Prof. Development
link in the upper right.
X
X. Prof. Development Link
View Classes
You can view the classes that an
instructor is assigned to from either of
two places.
You can click on the folder icon in
the View Classes column next to the
instructor’s name on the List/Search
screen.
Y
Y. View Classes Icon
www.iccbdaisi.org
FY08 User Manual
(January 1, 2007)
30
Instructors
Or, once an instructor has been selected
from the search list, the list of classes
assigned to him/her can be reviewed by
clicking on the View Classes link in the
sub-menu.
Z
Z. View Classes Link
All classes the instructor is assigned to
in the current fiscal year will be listed
first. Classes in previous fiscal years will
be listed below the current list.
AA
While the default is to display all of the
classes, clicking on the List Current link
will display only the current classes for
the instructor.
BB
AA. List Current Link
BB. Click to View Class Details
If you click the link on the class/section
no., the details of the class/section will
be displayed and can be edited. More
will be discussed about this in the
Classes section of the document.
www.iccbdaisi.org
FY08 User Manual
(January 1, 2007)
31
Instructors
Set Defaults
Default values can be set for any of the
instructor entry fields by selecting Set
Defaults from the Instructors tab.
CC
Default values are data values that will
display in the fields each time a new
instructor is added. They are designed
to aid in data entry so that values used
most often are completed without
having to enter them each time.
Once the default values are entered,
click on SUBMIT to save them. The
default values will display when a new
instructor is entered. To change values
during data entry, just highlight and
delete the default value and enter the
appropriate information.
www.iccbdaisi.org
FY08 User Manual
CC. Set Defaults Option in Drop-down Navigation
(January 1, 2007)
32
Courses
Courses are instructional offerings
beneath which there may be several
classes. For example, one course may
be taught to two separate classes, one
meeting Monday and Wednesday and
another meeting at a different location
on Tuesday and Thursday. All new
courses and all course changes must
be approved by the ICCB prior to data
entry. Please see Sections 1.3 and 5.2
of the AEFL Provider Manual for further
information.
Courses can be set up after funding
has been entered into the system.
The Courses tab is selected when new
courses are to be added or changes
need to be made to existing courses.
A
A. Courses Tab
Add Courses
To access the Add Course page, select
the Add Course menu option under the
Courses tab in the navigation at the top
of the page.
B
B. Add Course Option in Drop-down Navigation
www.iccbdaisi.org
FY08 User Manual
(January 1, 2007)
33
Courses
When adding a new course, the
required pieces of information must
be entered and should be identical to
the information approved by the ICCB.
You will need to enter the course code,
name, and description. Community
Colleges are also required to enter the
appropriate PCS, CIP, ID Code for the
course. The Instructional Categories
selected when funding was set up will
be displayed. Checkmarks should be
entered for Instructional Categories and
any Misc. items that might apply.
Note: As Misc. items are selected,
instructional categories may become
unavailable for selection. For example,
selecting Job Skills will not allow VOC to
be selected.
The system defaults the minimum
units of instruction to .5 (7.5 hours), but
the maximum must be entered. The
maximum should equal the largest
number of instructional units one
student might receive in one fiscal year
through any combination of classes
assigned to this course code. Please see
the Attendance section for additional
information on units of instruction.
C
Click on the SUBMIT button to save.
The system will validate the data that is
entered and will display error messages
as necessary for correction.
www.iccbdaisi.org
FY08 User Manual
C. Error Message
(January 1, 2007)
34
Courses
These errors will need to be corrected
before a course can be saved
successfully. Once a course has been
saved, a green success message will
display at the top of the screen.
D
To add another course to the system,
please select the ADD COURSE option
from the navigation menu and repeat
the steps listed previously.
D. Success Message
List/Search Courses
The List/Search feature under the
Courses tab is used to look up a course
and select it for editing or to add a new
course.
To view the List/Search Courses page,
select the List/Search option under the
Courses tab in the navigation at the top
of the page.
E
E. List/Search Option in Drop-down Navigation
To display all of the courses available for
review and edit, select List All from the
sub-menu.
F
F. List All Link
www.iccbdaisi.org
FY08 User Manual
(January 1, 2007)
35
Courses
Searches can also be limited by
selecting the specific fields to search
and match on. Check the boxes for
course status, course code, course
name, fiscal year, and/or instructional
categories and specify any qualifiers for
the search.
For course code, course name, and fiscal
year enter the text to include in the
search in the field provided. For status
and instructional categories check the
appropriate boxes to modify the search
criteria.
Submit the search and the results will
be displayed.
G
H
Results will be listed with links to
additional course detail provided.
Clicking on either link, the course code
or the course name, will forward you
to the Add/Edit Details screen to allow
changes to be made.
Click on the folder icon in the view
all classes connected to the selected
course.
www.iccbdaisi.org
FY08 User Manual
I
G. Course Code Link
H. Course Name Link-links you to View Course Details
I. Link to View Classes Mapped to this Course Code
(January 1, 2007)
36
Courses
edit courses
Add/Edit Details
When the search is completed a list of
courses that meet the search criteria
will be displayed. If the desired course is
not listed, it can be added by clicking on
the Add New link.
Clicking on the link provided for an
existing course code or course name
will display the information that has
been entered for the course.
J
K
J. Add New Link
K. Edit Course Link
Once the Add/Edit Details screen
is displayed, the course details
information can be changed.
Before classes are assigned to a course,
the course detail information can be
changed as needed. Once classes are
assigned to a course, the miscellaneous
section (which presents Job Skills,
Citizenship, Foreign Language GED, and
Math Only status) cannot be changed.
Instructional categories can be added
if the program funding will allow it. In
the example listed to the right, ESL is
available to select but HSCR and VOC
are not, because the program does
not receive funding to support these
types of instruction. If courses have
been assigned to classes with enrolled
students, the instructional categories
cannot be removed from the course.
www.iccbdaisi.org
FY08 User Manual
L
M
L. Misc. Section
M. Instructional Categories Section
(January 1, 2007)
37
Courses
View Classes
Hovering over the View Classes link on
the Add/Edit Details screen will provide
a link to the classes that have been
assigned to the course.
N
Click on the link to display a list of the
classes that are assigned to the course.
N. View Classes Link
Classes that are assigned to the course
during the current fiscal year will be
displayed first and classes that were
from previous years will be displayed
below. You can use the List Current or
List All links that are provided to refine
the list of classes that are displayed on
the screen.
O
P
Q
O. List Current and List All Links
P. List of Classes
Q. Link to Class Details
Once the list of classes is displayed,
clicking on the link on the class/section
number will display general information
about the class and transfer you to
the Classes section of the system.
Information about classes will be
covered in the next section of this
document.
www.iccbdaisi.org
FY08 User Manual
(January 1, 2007)
38
Classes
All classes are assigned to an approved
course within the system. One course
can have several classes, but each class
is attached to only one course.
A
A. Classes Tab
Add Classes
Classes are added by entering the
appropriate data after selecting Add
Class from the menu under the Classes
tab.
B
Required information is identified with
a red asterisk (*).
B. Add Class Option in Drop-down Navigation
General Information
Enter the start and end dates for the
class. If the start and end dates cross a
fiscal year, (such as a summer class) you
will be prompted to select the fiscal
year the class should be assigned to.
C
The class/section number may include
alpha characters, numbers, and/or
punctuation. The class/section number
must be a name unique to your
program data.
C. General Information
www.iccbdaisi.org
FY08 User Manual
(January 1, 2007)
39
Classes
Each class must be assigned to an
existing course. Either type the course
code into the area provided (the system
will verify that it is an existing course) or
use the search option to select it.
D
To search for a course, click on the
SEARCH button next to the Course
Code field.
D. Course Code and Search Button
A pop-window will display the available
courses with a radio button next to
each one.
E
Click on the appropriate radio button
and then click on ASSIGN TO CLASS.
F
The pop-up window will close and the
value selected will populate the course
code field.
E. Radio Button Selection
F. Assign to Class Button
www.iccbdaisi.org
FY08 User Manual
(January 1, 2007)
40
Classes
Once a class has been assigned a course
code, the Instructional Type section
will list the instructional categories
that were assigned to course when
it was set up. These are displayed for
informational purposes only – they can
not be changed.
Once the course code has been entered,
enter the building name by typing
it into the area provided or select
the building from the list provided
using the SEARCH feature. If a default
building was selected when setting up
the building list, then it will auto-fill in
the building field when adding a new
class. Users have the ability to override
the default building by selecting an
alternative.
G
H
G. Building Field
H. Instructional Categories
To search for a building, click on the
SEARCH button next to the Building
field.
A pop-window will display the available
buildings with a radio button next to
each one.
Click on the appropriate radio button
and then click on ASSIGN TO CLASS.
The pop-up window will close and
the value selected will populate the
building field.
www.iccbdaisi.org
FY08 User Manual
(January 1, 2007)
41
Classes
Default funding can be established
to simplify the process of assigning
students to funding sources during
class placement. For example, selecting
4800 – Federal Basic funds here will
allow only that funding source to be
presented as an option when assigning
students to this class. More than one
funding source can be set up as a
default for a class, if multiple funding
sources are used to support instruction.
Selecting Assign at Student Placement
here will cause all allowable funding
sources to be presented as options
when assigning students to the class,
and you must choose the appropriate
funding source from the list for every
student.
I
I. Default Funding Source
The default funding sources available
for a class are determined by:
1. The type of funding received by
the program. For example, if your
program does not receive 4805
– Federal EL/Civics funds, it will not
be available for selection.
2. The type of instruction provided
within the course to which the class
is assigned. For example, if a class is
assigned to a course approved only
for VOC, then 4800 – Federal Basic
and 4805 – Federal EL/Civics funds
will not be available for selection,
because federal funds cannot
be used to support vocational
instruction.
If the funding sources are grayed out,
they cannot be selected.
www.iccbdaisi.org
FY08 User Manual
(January 1, 2007)
42
Classes
Note: If a student receives public
assistance, that funding source will
automatically be added as a funding
option for that particular student
when enrolling in a class. 3410 – Public
Assistance funds do not need to be
set up as a default funding source for
the class in order to have that funding
source made available for students
receiving public assistance.
Note: It is important to carefully follow
your program’s Cost Allocation Plan
when establishing default funding and
when assigning students to funding
sources during class placement.
Funding assignments made within
DAISI should be reflective of financial
and other claims within your institution.
Note for Community College
providers: One class section may
be claimed in either institutional/
unrestricted or restricted funds but
not both. The 51% or greater rule will
determine where it is claimed. Please
see the FAQ for Community College
System and Adult Education Funding
Issues on the ICCB web-site for further
information.
For further information on class
funding, please see Section 5.5 of the
AEFL Provider Manual and the Cost
Allocation Presentation currently
available through the ICCB web-site.
www.iccbdaisi.org
FY08 User Manual
(January 1, 2007)
43
Classes
Select yes/no in response to the GED IL
question – this information is used for
tracking purposes when a class uses
the GED Illinois online program. Classes
may use GED IL either 100% of the time
or as a component within an existing
class.
J
Attendance hours must be tracked
differently depending on the type of
GED IL class. If you click No on this
option no other entries are required.
J. GED IL No Radio Button
Clicking on Yes displays other selection
boxes that must be completed. There
are three choices for type – at a
distance, supplemental, and hybrid.
• At a distance: class time using GED
IL must be 100%. The enrollment
type for this class should be
Individualized Enrollment. When
entering attendance, 1 hour
should be entered for each lesson
completed with 70% or greater
accuracy.
• Supplemental: class time using
GED IL may be less than 100% as
it is simply a piece of an existing
GED class. The enrollment type
can be either open or fixed entry.
Attendance will be entered exactly
as a regularly scheduled class.
www.iccbdaisi.org
FY08 User Manual
K
K. GED IL Yes Radio Button
(January 1, 2007)
44
Classes
• Hybrid: class time using GED IL may
be less than 100%. The enrollment
type can be either open or fixed
entry. Two options for attendance
will be present if a hybrid class is
selected. Since the class meets on
a regular schedule, attendance will
be required for each meeting day.
In addition, an area will be available
to enter at a distance hours spent
outside of regular class meeting
schedule.
Enrollment
There are three types of enrollment to
select from: open entry, fixed entry, and
individualized enrollment.
Open Entry
For open entry classes students can
enroll, drop and re-enroll any time
during a semester or fiscal year. All of
the attendance hours, enrollment hours,
contact, and units roll up into one total
for the class. Students must be dropped
after five consecutive absences.
www.iccbdaisi.org
FY08 User Manual
L
L. Enrollment Type Drop-down Menu
(January 1, 2007)
45
Classes
Fixed Entry
In fixed entry classes students must
enroll in the class by the 3rd scheduled
day of the class. A mid-term date is
established for a fixed entry class
during class set-up based on the start
and end dates of the class. If a student
drops prior to the mid-term he/she
will not be considered enrolled and no
enrollment hours will be calculated or
reported. If a student is still enrolled at
mid-term the enrollment hours for the
entire term or semester will be credited
when attendance for the mid-term
date is entered. As with open entry,
five consecutive absences require a
student be dropped from the class. If a
student remains enrolled at mid-term
and drops the class after the mid-term
date, he/she may re-enroll later in the
term. However, if a student accumulates
5 consecutive absences and drops from
the class prior to the mid-term date,
he/she is not permitted to re-enroll into
that same class.
Individualized Enrollment
As within open entry classes, students
can enroll at any time. However, there is
no established meeting schedule. Each
time a student completes a lesson with
70% or greater accuracy, the actual date
and number of lessons/hours is entered.
Attendance and enrollment hours
will be identical to one another, and
absences, Unscheduled, and Given Days
do not apply. Students can be dropped
at any point in time.
www.iccbdaisi.org
FY08 User Manual
(January 1, 2007)
46
Classes
Select the enrollment type from the
drop-down list provided. Both fixed and
open entry enrollments require a class
schedule or meeting times.
Both hours and minutes for the start
and end times must be entered as
double digits. For example, use a 0
(zero) in front of numbers 1-9 when
entering hours – and enter two
numbers for the minutes. The colon will
be inserted by the system.
M
Use the drop-down list to select AM/PM.
The hours of instruction will be
calculated for you when you tab off the
end time field.
M. Enrollment
Also, for fixed entry classes, the system
will calculate the mid-term date and
display it on the view/edit class display
screen.
N
N. Mid-term Date
www.iccbdaisi.org
FY08 User Manual
(January 1, 2007)
47
Classes
Sometimes it is necessary to add
additional days to a schedule. Click
on ADD OTHER DATE and a pop-up
window will open to allow additional
days to be added to the class schedule.
O
O. Add Other Date Button
Scheduled Date = a date class plans to
meet but is not currently included in
the normal weekly class schedule.
Unscheduled Date = a date included in
the normal class schedule but class will
not meet (ex. Campus closure, spring
break, etc).
Selecting a scheduled date requires the
entry of start and end times. Click on
SUBMIT to save the changes.
www.iccbdaisi.org
FY08 User Manual
(January 1, 2007)
48
Classes
The newly scheduled date will be
displayed on the class screen.
P
P. Irregular Scheduled Days
If an unscheduled day needs to be
added it is also added through the popup window provided.
www.iccbdaisi.org
FY08 User Manual
(January 1, 2007)
49
Classes
Once submitted and saved the
additional date will be displayed on the
class detail screen.
When attendance is entered, the
scheduled days will display as
dates that require data entry. The
unscheduled days will be indicated
with an alternative color in the cell
header. Please enter a ‘U’ attendance
code in this cell. If attendance has been
generated, the ‘U’ code will be inserted
automatically for the student.
Q
When individualized enrollment is
selected as the enrollment type no
calendar or scheduled class times are
entered.
Q. Unscheduled Days
Assign Instructor
An instructor must be assigned to a
class in order to have the attendance
and enrollment hours from it included
in reporting. However, the system will
allow you to establish the class without
an instructor initially, so long as you
return and assign an instructor prior to
running reports.
R
R. Instructors Name Field
www.iccbdaisi.org
FY08 User Manual
(January 1, 2007)
50
Classes
There are two methods for assigning
instructors.
You can type the name of the instructor
into the space provided. Typing the first
letter of the last name will provide a list
you can select from. The other option
is to click on ASSIGN INSTRUCTOR and
a pop-up window will be presented to
allow you to search for an instructor.
S
S. Instructor Names Drop-down Menu
You can select List All to display all
instructors, type characters in the
name field and click on SEARCH to
display matches, or click on one of the
links provided on the letters of the
alphabet. The results of the search will
be displayed.
Click on the check box next to the
instructor to be selected. If the
Instructor is assigned start and end
dates other than those listed, please
modify the dates. Click ASSIGN
TEACHER to assign the instructor to the
class.
Repeat the process to add additional
instructors to a class.
www.iccbdaisi.org
FY08 User Manual
(January 1, 2007)
51
Classes
If multiple instructors are added
throughout the duration of a class,
users can track the instructor dates by
entering/modifying the start and end
date of each instructor on the Class Edit
page.
Click SUBMIT to save the new class to
the system. Any errors will appear in red
at the top of the screen and must be
resolved for the class to be saved.
List/Search
To view the List/Search Classes page,
select the List/Search option under the
Classes tab in the navigation at the top
of the page.
T
The List/Search menu for Classes allows
you to look for a specific class to edit
information or review data.
T. List/Search Option in Drop-down Navigation
Searches can be done by specifying
the search criteria or by listing all of the
classes.
Searches can be refined by typing
selection text into fields when
available, by selecting check boxes, or
by selecting values from drop down
lists. Remember that searching is an
inclusive process. Each item checked
must be found in the class data in order
for it to be listed in the search results.
www.iccbdaisi.org
FY08 User Manual
U
V
W
U. List All Link
V. Criteria Selection Checkbox
W. Criteria Value
(January 1, 2007)
52
Classes
Select the search criteria and enter
the search values. When finished, click
the SEARCH button to view the list of
classes matching the search criteria.
Each class is listed with summary
information and quick links to areas of
the existing class.
A link on the class/section number is
provided for each class that is listed
in the results. Clicking on the link
will display the details for the class
and allow the data to be changed or
modified.
Also note there are icons for roster,
attendance, and Student Generation
Report displayed for each class. Clicking
on any of the icons will take you to the
area that displays the information it
references.
X
Y
Z
AA
X. Class/Section No. Link
Y. Roster Icon
Z. Stud. Gen. Report Icon
AA. Attendance Icon
Edit Classes
Add/Edit Details
Clicking on a link to a class will take you
to the Add/Edit Details screen. Classes
can be edited after originally entered,
with several exceptions.
After default funding has been
established, additional funding sources
may still be added, if they are available
for use by the class (given limitations
described earlier in this section).
However, default funding sources
cannot be removed if students have
been enrolled and funding has been
assigned to these students.
www.iccbdaisi.org
FY08 User Manual
(January 1, 2007)
53
Classes
If additional funding sources are
desired, check the default funding
source on the Edit Class screen and
submit changes. The newly selected
funding source will appear in the
available fund source options for
student enrollment. To update an
enrolled student fund source, go to the
individual student enrollment record
and update the funding source for the
selected student.
Class schedule changes are allowed
on a limited basis. Start and end date
modifications are allowed for open
entry classes only. Fixed entry classes
are not allowed to modify start and end
dates for classes. Class meeting day and
meeting time adjustments are allowed
for either enrollment type.
BB
CC
BB. Default Funding Source
CC. Update Class Schedule
NOTE: Any changes to the class
schedule will result in attendance
record recalculation for all students.
To change the class schedule, click
on UPDATE in the Class Schedule
section of the screen. The Update Class
Schedule screen will be displayed. Class
dates can be changed here as needed.
Note: Attendance should be checked
for invalid flags if schedules are
changed.
www.iccbdaisi.org
FY08 User Manual
(January 1, 2007)
54
Classes
Additional Instructors for the class can
be assigned by clicking the ASSIGN
INSTRUCTOR button. The process to
assign an additional instructor is the
same as assigning an instructor when
adding a new class.
In some cases, Instructors may not
be instructing for the duration of the
class schedule. It is possible to update
the start and end dates from the Class
Add/Edit Details screen by clicking
the Update link next to the selected
instructor. Enter the revised start and/
or end date and click SUBMIT to return
to the Class Details page.
To remove an instructor from the class,
click the Delete link.
DD
EE
FF
DD. Assign Instructor Button
EE. Delete Link
FF. Update Link
NOTE: The delete is non-recoverable so
use with caution.
In addition to the class details being
available, links are provided to other
Class administration features such
as roster, attendance, and student
generation report.
GG
GG. Classes Sub-Menu
www.iccbdaisi.org
FY08 User Manual
(January 1, 2007)
55
Classes
Roster
Once students are enrolled in a class a
roster can be displayed.
HH
HH. Roster Link
Student List
Students actively enrolled in the
class will be displayed first. The list of
students can be changed by selecting a
different list option. There are three lists
available:
• Active – lists only students actively
enrolled in the class.
• Exits – lists students exited from the
class.
• All – lists all students, both active
and exited.
II
II. List Selection
Clicking the link provided on the
student name will leave the Class
Roster and show the detailed bio/
demo information for the student.
This information is located under the
Students tab and is discussed in more
detail in that section of the manual.
JJ
KK
JJ. Update Link
KK. Student Bio/Demo Link
Clicking the Update link for a specific
student presents the option to update
the funding for the student, enter
mid-term or final scores, and/or view
the class exit date and modify the exit
reason.
www.iccbdaisi.org
FY08 User Manual
(January 1, 2007)
56
Classes
The last option on the roster list is to
delete a student from a class. Clicking
on DELETE will delete all student
activity within this class, including any
attendance entered. This delete is not
recoverable, and requires acceptance
of a confirmation message prior to
deleting. At the confirmation page, to
continue with deleting the student,
click DELETE. To cancel and return to
the roster page, click CANCEL.
LL
LL. Delete Link
Enrolling Students
Students can also be enrolled in the
selected class from this screen. Click on
ENROLL STUDENT to add a student to
the class.
MM
MM. Enroll Student Button
Students can be added by typing the
first few letters of the last name and
then highlighting and selecting the
appropriate name from the list that is
displayed.
Students can also be added by clicking
on the SEARCH link and then using
the pop-up window to search for the
student by social security number,
student ID, last name, first name, date of
birth, or by clicking on one of the links
provided on the letters.
NN
NN. Search Button
www.iccbdaisi.org
FY08 User Manual
(January 1, 2007)
57
Classes
To search with criteria, select a criteria
type by checking the box next to the
criteria you wish to use. Next, enter
the criteria value in the area provided.
When finished, click SEARCH to view
results.
To search by first letter of last name,
click the corresponding letter. All
students whose last names begin with
the selected letter will be displayed.
OO
PP
OO. Search Criteria
PP. Search by First Letter of Last Name
Once the list of students is displayed,
click on ENROLL for the selected
student to enter the remainder of the
enrollment information for the student.
QQ
QQ. Enroll Button
If the class involves only one
instructional category, the category will
be automatically filled in. If the class
serves more than one instructional
category, such as ABE/ASE, the
system will automatically insert the
instructional category if the student
has a valid pre-test entered at the time
of class enrollment. Otherwise, you will
need to manually select ABE or ASE
from the drop-down menu. In addition,
the funding source will be the default
funding source that was set up for the
class. If other options are available they
will be listed in the drop-down list for
selection.
www.iccbdaisi.org
FY08 User Manual
(January 1, 2007)
58
Classes
The Student Start Date will default to
the start date of the class. The student
start date can be changed manually
or the system will automatically
update it to the enrollment date when
attendance is entered for the student.
Click on ENROLL to save the
information that has been entered to
complete enrollment for the student.
Once a student has been enrolled, you
will see ‘Student enrolled successfully!’
in green text at the top of the page.
To enroll another student, repeat the
process. To return to the class roster,
click the link at the top of the display.
RR
RR. Student Enrolled Successfully Message
Attendance
Attendance can be entered from
two points in the system. One is the
Attendance link on the Classes–Add/
Edit Details submenu. The other is
on the Student-Class Info screen.
The following example is of an open
entry enrollment class type (a fixed
entry enrollment displays the same
attendance entry format).
SS
SS. Attendance Link
The first time attendance is entered
for a class, the dates displayed begin
with the start date of the class. After
attendance has been entered, the
first date displayed is the last date of
attendance that was entered.
www.iccbdaisi.org
FY08 User Manual
(January 1, 2007)
59
Classes
Links are provided (Previous Month/
Next Month) next to the class name and
current date to allow you to move from
month to month to review attendance
information. To the right of those links is
a help link for displaying the legend for
entering attendance. Rolling over the
HELP icon will display the codes used
to enter attendance.
Note: This is referred to as contextsensitive help. Moving the mouse
pointer over the icon will display the
help and moving off of the icon will
close the help window.
Legend
Note: Please see the Appendix for
Attendance Legend definitions.
TT
UU
VV
TT. Attendance Entry Legend Help
UU. Previous Month and Next Month Buttons
VV. Class Name and Month Display
AAbsent
CComplete
DDrop
EEnroll
RRe-enroll
P
Present
TTest
U
Unscheduled
G
Given Day
E - Emergency
H - Holiday
S - Staff Development
www.iccbdaisi.org
FY08 User Manual
(January 1, 2007)
60
Classes
Display/Entry Modes
There are several display options
available which allow the attendance
data to be viewed and entered in
different formats. Attendance can
be viewed by the month or by the
semester. Select the view by clicking on
the radio button next to Month View or
All Semester.
WW
WW. Month view and All Semester Radio Buttons
Select the entry mode by clicking on
the radio button next to either Meeting
Days or Calendar Days. Meeting Days
mode will display only the days on
which the class actually meets, whereas,
Calendar Days mode will display all of
the days of the month with the days
when the class does not meet grayed
out.
XX
XX. Meeting Days and Calendar Days Radio Buttons
Use the Refresh button to update the
screen display based on the options
selected.
The Entry vs. Correct selection for data
entry determines whether validation
is done during entry. Select Entry Mode
when entering attendance normally.
Validation is performed in this mode
and it should be the default method
chosen. Select Correct Mode to turn off
attendance validation. This will allow
you to go back and correct invalid
attendance entries. Toggle back to
Entry Mode when the corrections are
completed and click the Recalculate
button to validate attendance
adjustments.
www.iccbdaisi.org
FY08 User Manual
YY
YY. Entry Mode and Correct Mode Radio Buttons
(January 1, 2007)
61
Classes
Generating Attendance
Users have the option to generate
attendance for a selected student or
the entire class at one time. Generating
attendance allows the user to select a
range of dates and generate Present
(P) codes for all meeting days for
the selected students. This method
of attendance entry is an option in
addition to regular attendance entry
which is illustrated later in this section.
ZZ
ZZ. Generating Attendance Section
Note: When using attendance
generation, you must update
attendance for all days in which the
student should not have a Present code
(ex. absences, etc).
Entering a start date and end date and
clicking on Generate will populate
each of the scheduled meeting dates
between those listed. If All Students
is selected, then attendance will be
generated for all students enrolled in
the class. If Checked Only is selected,
then attendance will be generated for
the students that have been selected
with checks in the selection boxes next
to their names.
Attendance is generated using the
following rules:
• If students are not yet enrolled an
E will be inserted on the Start Date
specified.
• If the End Date specified is equal
to the end of the class, the final
attendance code will be a C for
complete.
• Given or Unscheduled day codes
will be inserted as defined in the
administration area.
• All other dates will be P for present.
www.iccbdaisi.org
FY08 User Manual
(January 1, 2007)
62
Classes
Attendance Grid Overview
The attendance grid displays columns of
information for each student in the class:
• Select box: allows students to be
selected by placing a check in the
box. This is used with the generate
attendance feature.
• Student: the name of the enrolled
student. Last name, first name, and
the last four digits of the social
security number (if available) are
displayed. Students are sorted
alphabetically by last name.
NOTE: If the student name turns
red, this indicates the units of
instruction accrued by the student
exceed the maximum units of
instruction for the course to which
the selected class is connected.
• Valid: Status of the attendance data
for the student – it will display one
of three icons.
- Valid indicates that the entries
for the student pass the test for
validity.
- Valid no calculation means that
attendance has been updated
but the SUBMIT button has not
yet been clicked to validate the
entries and update the totals.
- Invalid means that the changes
made did not pass validation
and must be corrected. Rolling
over the icon will display a pop
up window detailing the reason
why attendance is marked as
invalid. It may be necessary
to switch to Correct Mode to
update attendance and correct
the invalid entry.
www.iccbdaisi.org
FY08 User Manual
AAA
AAA. Attendance Grid Overview
BBB
CCC
BBB. Status Icons
CCC. Valid Column
(January 1, 2007)
63
Classes
• AH – Attendance Hours: number
of calculated attendance hours in
the selected class.
• EH – Enrollment Hours: number
of calculated enrollment hours for
a class. For fixed entry classes, if
before midterm, enrollment hours =
zero. For fixed entry classes, if after
mid-term, enrollment hours = total
scheduled hours for the class.
• UI – Units of Instruction: the
number of calculated enrollment
hours divided by 15.
DDD
DDD. AH, EH and UI Columns
Attendance Entry
To begin entering attendance for
a student, users must use the ‘E’
(enroll) code. Enter an ‘E’ in the
cell representing the student’s first
attendance date. Next, continue to
enter appropriate attendance codes
for each student listed. When finished,
click the SUBMIT button to validate
attendance and calculate attendance
hours, enrollment hours, and units of
instruction for each student.
If attendance is Invalid, it will require
correction otherwise the student will
not be included on required reports
submitted to the ICCB. To correct
attendance, please change to Correct
mode and click Recalculate. Adjust
the attendance codes and toggle back
to Entry mode and click Recalculate
again to re-validate the attendance
information. Positioning the mouse
pointer directly over the Invalid icon
will reveal the reason for the invalid
attendance.
www.iccbdaisi.org
FY08 User Manual
EEE
FFF
GGG
EEE. Valid No Calculation Icon
FFF. E (enroll) Code
GGG. Submit Button
HHH
HHH. Invalid Icon
(January 1, 2007)
64
Classes
Individualized Enrollment Entry
For individualized enrollment classes,
attendance is tracked by hours attended.
Enter the hours attended each day
by the student and click the SUBMIT
button at the bottom of the screen to
calculate totals for the student.
Student Generation Report
This report is not yet available.
III
III. Student Generation Report Link
www.iccbdaisi.org
FY08 User Manual
(January 1, 2007)
65