1
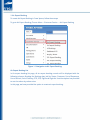
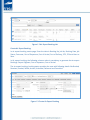
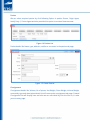
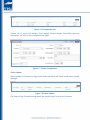
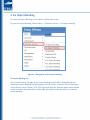
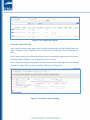
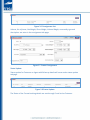
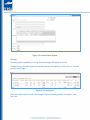
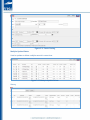
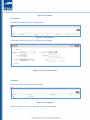
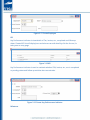
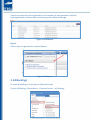
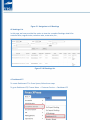
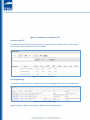
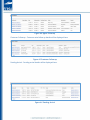
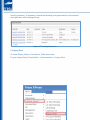
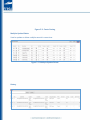
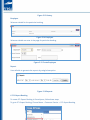
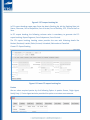
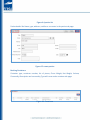
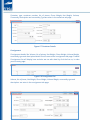
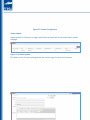
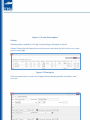
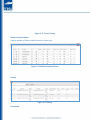
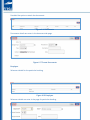
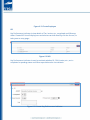
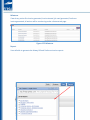
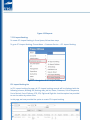
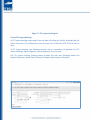
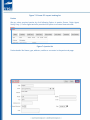
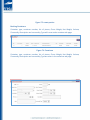
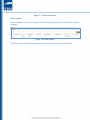
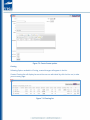
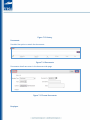
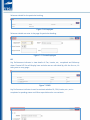
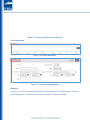
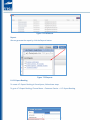
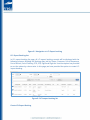
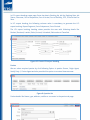
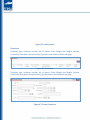
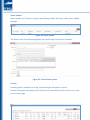
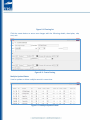
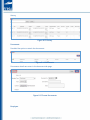
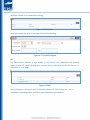
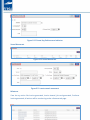
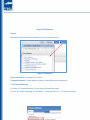
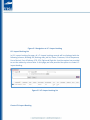
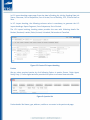
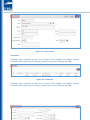
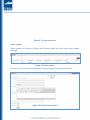
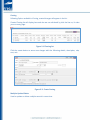
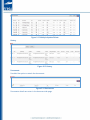
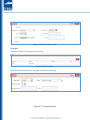
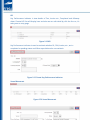
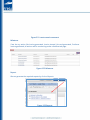
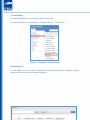
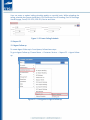
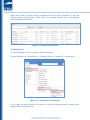
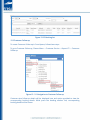
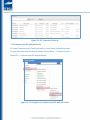
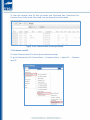
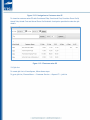
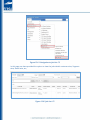
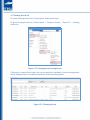
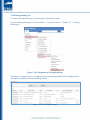
Fresa Technologies
Neutral IT Solution Provider
Disclaimer
The following is intended to outline our general product direction. It is intended for information purposes only, and may not be incorporated into any
contract. It is not a commitment to deliver any material, code, or functionality, and should not be relied upon in making purchasing decision. The
development, release, and timing of any features or functionality described for Fresa Technologies products remains at the sole discretion of Fresa
Technologies.
Fresa XPress Customer Service
Release Version 1.1
Customer Service
Table of Content
1. Fresa XPress
Introduction
Where to find Help
2. Fresa Documentation
Introduction
3. List of Bookings
3.1 Air Export Booking
3.2 Air Import Booking
3.3 All Booking
3.4 Dashboard -CS
3.5 Enquiry Sheet
3.6 FCL Export Booking
3.7 FCL Import Booking
3.8 LCL Export Booking
3.9 LCL Import Booking
3.10 Note Master
3.11 Sailing Schedule
4. Reports –CS
1. Fresa XPress
Introduction:
Welcome to the Fresa XPress
Fresa XPress is comprehensive and fully integrated freight management software, capable
of handling every aspect of the freight forwarding, shipping, logistics and transportation
industries, from initial sales lead, customer service, documentation through operations, to
cash receipts and management reporting. Fresa XPress is highly scalable and bundled with
modules, enabling it to be easily configured to meet the specific needs of customer allowing customers to drive the software in a way that most suits their own requirements.
Fresa XPress is web based online software.
Where to find Help:
For Help and Support, You can contact Fresa Technologies:
Phone: 044 6900 0430
Email: [email protected]
The Fresa XPress User Manual is available to view or Download from the Fresa
Technologies website: www.fresatechnologies.com
2. Fresa Customer Service
Introduction:
Sales coordinator and Customer Service professionals can create the bookings,
nominations and send various status updates to customers, agents and to other stake
holders of the shipment. They capture the entire life cycle of the shipment and manage the
exceptions which are displayed on their dashboard that is unique to each person. The
information captured are then used to send the daily status report to the Customers and
Agents.
How this Manual is organized:
This Manual is designed to be task oriented. You can skip to any topic you need and get
step by step procedures in Fresa XPress. You can also click on any word in the index to go
to that topic.
This Manual is organized into the following Topics:
1. An Overview of the Customer Service
2. How to enter the Booking
3. How to Generate the Reports
1. Air Export Booking
To create Air Export Booking in Fresa Xpress, follow these steps
To go to Air Export Booking, Choose Menu →Customer Service → Air Export Booking
Figure 1.1 Navigation to Air Export Booking
Air Export Booking List
In Air export booking list page, all air export booking records will be displayed with the
following columns, Booking No, Booking date, Job No, Status, Customer, Port of Departure,
Port of Arrival, Port of Delivery, ETD, ETA, Flight and Flight No. And also option has provided
to sort the values by column wise.
In this page, we have provided the option to create air export booking.
Figure 1.2 Air Export Booking List
Create Air Export Booking
In air export booking create page, Enter the data in Booking No, Job No, Booking Date, Job
Status, Customer, Port of Departure, Port of Arrival, Port of Delivery, ETD, ETA and then to
Save.
In Air export booking, the following columns value is mandatory to generate the air export
Bookings. Report Segment, Port of departure, Port of Arrival.
The air export booking, booking status provides the user with following details like Booked,
Received, Loaded, Sailed, Arrived, Unloaded, Delivered and Cancelled.
Figure 1.3 Create Air Export Booking
Parties
We can select required parties by click following Option in parties Screen, Origin Agent,
Notify Party 1, Carrier Agent and also provided the option to create a New customer.
Figure 1.4 Parties List
Parties details like Name, type, address, mobile no. are enter in the parties tab page.
Figure 1.5 Create Parties
Consignment
Consignment details like Volume, No of pieces, Net Weight, Gross Weight, Volume Weight,
commodity type and description details list will come under consignment tab page. Created
Consignment list will display here and also we can edit detail by click the line no, it's take
yours to entry page.
Figure 1.6 Consignment List
Volume, No of pieces, Net Weight, Gross Weight, Volume Weight, commodity type and
description are enter in the consignment tab page.
Figure 1.7 Create Consignment
Status Update
Status update for Customer or Agent with follow up details will come under status update
tab page.
Figure 1.8 Status Update
The Status of the Current booking details are sent through E-mail to the Customer
Figure 1.9 Create Status Update
Costing
Following Option available in Costing, created charges will appear in the list.
Created Costing list will display here and also we can edit detail by click the line no, it’s take
yours to entry page.
Figure 1.10 Costing List
Click the create button to enter new charges with the following details, description, sale,
cost, unit.
Figure 1.11 Create Costing
Multiple Update/Delete
Used to update or delete multiple records in same time.
Figure 1.12 Multiple Update/Delete
Figure 1.13 History
Documents
Provided the option to attach the documents
Figure 1.14 Documents
Documents details are enter in the document tab page.
Figure 1.15 Create Documents
Employee
Salesman details for the particular booking.
Figure 1.16 Employee
Salesman details are enter in the page for particular booking.
Figure 1.17 Create Employee
KPI
Key Performance Indicator is view details of Can, Invoice, etc., completed and follow up
dates. Created KPI list will display here and also we can edit detail by click the line no, it's
take yours to entry page.
Figure 1.18 KPI
Key Performance Indicator is used to maintain whether BL, CAN, Invoice, etc., are in
completed or pending status and follow up activities also can maintain.
Figure 1.19 Create Key Performance Indicator
Milestone
If we do any action like Invoice generated, Invoice viewed, job card generated, Proforma
Invoice generated, all actions will be monitoring under milestone tab page.
Figure 1.20 Milestone
Report:
We can generate required reports by click on reports.
Figure 1.27 Reports
2. Air Import Booking
To create Air Import Booking in Fresa Xpress, follow these steps
To go to Air Import Booking, Choose Menu → Customer Service → Air Import Booking
Figure 2.1 Navigation to Air Import Booking
Air Import Booking List
In Air import booking list page, all air import booking records will be displayed with the
following columns, Booking No, Booking date, Job No, Status, Customer, Port of Departure,
Port of Arrival, Port of Delivery, ETD, ETA, Flight and Flight No. And also option has provided
to sort the values by column wise. In this page, we have provided the option to create air
import booking.
Figure 2.2 Air import booking list
Create Air Import Booking
In air import booking create page, Enter the data in Booking No, Job No, Booking Date, Job
Status, Customer, Port of Departure, Port of Arrival, Port of Delivery, ETD, ETA and then to
Save.
In Air import booking, the following columns value is mandatory to generate the air import
bookings. Report Segment, Port of departure, Port of Arrival.
The air import booking, booking status provides the user with following details like Booked,
Received, Loaded, Sailed, Arrived, Unloaded, Delivered and Cancelled.
Figure 2.3 Create Air import booking
Parties
We can select required parties by click following Option in parties Screen, Origin Agent,
Notify Party 1, Carrier Agent and also provided the option to create a New customer.
Figure 2.4 Parties List
Parties details like Name, type, address, mobile no. are enter in the parties tab page.
Figure 2.5 Create Parties
Consignment
Consignment details like Volume, No of pieces, Net Weight, Gross Weight, Volume Weight,
commodity type and description details list will come under consignment tab page. Created
Consignment list will display here and also we can edit detail by click the line no, it's take
yours to entry page.
Figure 2.6 Consignment List
Volume, No of pieces, Net Weight, Gross Weight, Volume Weight, commodity type and
description are enter in the consignment tab page.
Figure 2.7 Create Consignment
Status Update
Status update for Customer or Agent with follow up details will come under status update
tab page.
Figure 2.8 Status Update
The Status of the Current booking details are sent through E-mail to the Customer.
Figure 2.9 Create Status Update
Costing
Following Option available in Costing, created charges will appear in the list.
Created Costing list will display here and also we can edit detail by click the line no, it's take
yours to entry page.
Figure 2.10 Costing List
Click the create button to enter new charges with the following details, description, sale,
cost, unit.
Figure 2.11 Create Costing
Multiple Update/Delete
Used to update or delete multiple records in same time.
Figure 2.12 Multiple Update/Delete
History
Figure 2.13 History
Documents
Provided the option to attach the documents
Figure 2.14 Documents
Documents details are enter in the document tab page.
Figure 2.15 Create Documents
Employee
Salesman details for the particular booking.
Figure 2.16 Employee
Salesman details are enter in the page for particular booking.
Figure 2.17 Create Employee
KPI
Key Performance Indicator is view details of Can, Invoice, etc., completed and follow up
dates. Created KPI list will display here and also we can edit detail by click the line no, it's
take yours to entry page.
Figure 2.18 KPI
Key Performance Indicator is used to maintain whether CAN, Invoice, etc., are in completed
or pending status and follow up activities also can maintain.
Figure 2.19 Create Key Performance Indicator
Milestone
If we do any action like Invoice generated, Invoice viewed, job card generated, Proforma
Invoice generated, all actions will be monitoring under milestone tab page.
Figure 2.20 Milestone
Report:
Click on report to generate the required Reports.
Figure 2.21 Reports
3. All Bookings
To create all bookings in Fresa Xpress, follow these steps
To go to All Bookings, Choose Menu →Customer Service → All Bookings
Figure 3.1 Navigation to All Bookings
All bookings List
In this page, we have provided the option to view the complete Bookings details like
customer wise, segment wise, salesman wise, status wise, etc.,
Figure 3.2 All Bookings list
4. Dashboard-CS
To create Dashboard-CS in Fresa Xpress, follow these steps
To go to Dashboard-CS, Choose Menu → Customer Service → Dashboard-CS
Figure 4.1 Navigation to Dashboard-CS
Customer wise GP
To view the customer wise Provisional Sale, Provisional Cost, Provision Gross Profit, Actual
Sale, Actual Cost and Actual Gross Profit details.
Figure 4.2 Customer wise GP
Pending Bookings
If booking is created but job is not generated, those booking details will be displayed here.
Figure 4.3 Pending Bookings
Agent Follow up - Agent wise follow up details will be displayed here.
Figure 4.4 Agent Follow up
Customer Follow up - Customer wise follow up details will be displayed here.
Figure 4.5 Customer Follow up
Pending Arrival - Pending arrival details will be displayed here.
Figure 4.6 Pending Arrival
Pending Quotation - If quotation is created but booking is not generated for that quotation,
those quotation will be displayed here.
Figure 4.7 Pending Quotation
5. Enquiry Sheet
To create Enquiry Sheet in Fresa Xpress, follow these steps
To go to Enquiry Sheet, Choose Menu →Documentation→ Enquiry Sheet
Figure 5.1 Navigation to Enquiry Sheet
Enquiry Sheet List
In Enquiry Sheet list page, all Enquiry Sheet records will be displayed with the following
columns, Enquiry No, Date, Status, Customer, Port of Receipt, Place of Delivery, Valid From,
Valid To, Approved By And also option has provided to sort the values by column wise. In
this page, we have provided the option to create Enquiry Sheet.
Figure 5.4 Customer Details
Consignment Details
Consignment details like Volume, No of pieces, Net Weight, Gross Weight, Volume Weight,
commodity type and description details list will come under consignment tab page. Created
Consignment list will display here and also we can edit detail by click the line no, it's take
yours to entry page…
Figure 5.5 Consignment list
Volume, No of pieces, Net Weight, Gross Weight, Volume Weight, commodity type and
description are enter in the consignment tab page.
Figure 5.6 Create Consignment
Mail Details
Figure 5.7 Mail details
Status Update
Status update for Customer or Agent with follow up details will come under status update
tab page.
Figure 5.8 Status update
The Status of the Current booking details are sent through E-mail to the Customer
Figure 5.9 Create Status update
Costing
Following Option available in Costing, created charges will appear in the list.
Created Costing list will display here and also we can edit detail by click the line no, its take
yours to entry page…
Figure 5.10 Costing list
Click the create button to enter new charges with the following details, description, sale,
cost, unit.
Figure 5.11 Create Costing
Multiple Update/Delete
Used to update or delete multiple records in same time.
Figure 5.12 Multiple Update/Delete
History
Figure 5.13 History
Employee
Salesman details for the particular booking.
Figure 5.14 Employee
Salesman details are enter in the page for particular booking.
Figure 5.15 Create Employee
Report:
User will able to generate the reports by using below option.
Figure 5.16 Reports
6. FCL Export Booking
To create FCL Export Booking in Fresa Xpress, follow these steps
To go to FCL Export Booking, Choose Menu →Customer Service → FCL Export Booking
Figure 6.1 Navigation to FCL export booking
FCL Export Booking List
In FCL export booking list page, all FCL export booking records will be displayed with the
following columns, Booking No, Booking date, Job No, Status, Customer, Port of Departure,
Port of Arrival, Port of Delivery, ETD, ETA, Flight and Flight No. And also option has provided
to sort the values by column wise.
In this page, we have provided the option to create FCL export booking.
Figure 6.2 FCL export booking list
In FCL export booking create page, Enter the data in Booking No, Job No, Booking Date, Job
Status, Customer, Port of Departure, Port of Arrival, Port of Delivery, ETD, ETA and then to
Save.
In FCL export booking, the following columns value is mandatory to generate the FCL
export booking. Report Segment, Port of departure, Port of Arrival.
The FCL export booking, booking status provides the user with following details like
Booked, Received, Loaded, Sailed, Arrived, Unloaded, Delivered and Cancelled.
Create FCL Export Booking
Figure 6.3 Create FCL export booking list
Parties
We can select required parties by click following Option in parties Screen, Origin Agent,
Notify Party 1, Carrier Agent and also provided the option to create a new customer.
Figure 6.4 parties list
Parties details like Name, type, address, mobile no. are enter in the parties tab page.
Figure 6.5 create parties
Booking Containers
Container type, container number, No of pieces, Gross Weight, Net Weight, Volume,
Commodity Description and commodity Type will come under container tab page.
Figure 6.6 Containers
Container type, container number, No of pieces, Gross Weight, Net Weight, Volume,
Commodity Description and commodity Type are enter in the container tab page.
Figure 6.7 Container Details
Consignment
Consignment details like Volume, No of pieces, Net Weight, Gross Weight, Volume Weight,
commodity type and description details list will come under consignment tab page. Created
Consignment list will display here and also we can edit detail by click the line no, its take
yours to entry page..
Figure 6.8 Consignment list
Volume, No of pieces, Net Weight, Gross Weight, Volume Weight, commodity type and
description are enter in the consignment tab page.
Figure 6.9 Create Consignment
Status Update
Status update for Customer or Agent with follow up details will come under status update
tab page.
Figure 6.10 Status update
The Status of the Current booking details are sent through E-mail to the Customer.
Figure 6.11 Create Status update
Costing
Following Option available in Costing, created charges will appear in the list.
Created Costing list will display here and also we can edit detail by click the line no, its take
yours to entry page.
Figure 6.12 Costing list
Click the create button to enter new charges with the following details, description, sale,
cost, unit.
Figure 6.13 Create Costing
Multiple Update/Delete
Used to update or delete multiple records in same time.
Figure 6.14 Multiple Update/Delete
History
Figure 6.15 History
Documents
Provided the option to attach the documents
Figure 6.16 Documents
Documents details are enter in the document tab page.
Figure 6.17 Create Documents
Employee
Salesman details for the particular booking.
Figure 6.18 Employee
Salesman details are enter in the page for particular booking.
Figure 6.19 Create Employee
KPI
Key Performance Indicator is view details of Can, Invoice, etc., completed and follow up
dates. Created KPI list will display here and also we can edit detail by click the line no, it's
take yours to entry page…
Figure 6.20 KPI
Key Performance Indicator is used to maintain whether BL, CAN, Invoice, etc., are in
completed or pending status and follow up activities also can maintain.
Figure 6.21 Create Key Performance Indicator
Milestone
If we do any action like Invoice generated, Invoice viewed, job card generated, Proforma
Invoice generated, all actions will be monitoring under milestone tab page.
Figure 6.22 Milestone
Report:
User will able to generate the Airway Bill and Proforma invoice reports.
Figure 6.23 Reports
7. FCL Import Booking
To create FCL Import Booking in Fresa Xpress, follow these steps
To go to FCL Import Booking, Choose Menu →Customer Service → FCL Import Booking
Figure 7.1 Navigation to FCL import booking
FCL Import Booking List
In FCL import booking list page, all FCL import booking records will be displayed with the
following columns, Booking No, Booking date, Job No, Status, Customer, Port of Departure,
Port of Arrival, Port of Delivery, ETD, ETA, Flight and Flight No. And also option has provided
to sort the values by column wise.
In this page, we have provided the option to create FCL import booking.
Figure 7.2 FCL import booking list
Create FCL Import Booking
In FCL import booking create page, Enter the data in Booking No, Job No, Booking Date, Job
Status, Customer, Port of Departure, Port of Arrival, Port of Delivery, ETD, ETA and then to
Save.
In FCL import booking, the following columns value is mandatory to generate the FCL
import bookings. Report Segment, Port of departure, Port of Arrival.
The FCL import booking, booking status provides the user with following details like
Booked, Received, Loaded, Sailed, Arrived, Unloaded, Delivered and Cancelled.
Figure 7.3 Create FCL import booking list
Parties
We can select required parties by click following Option in parties Screen, Origin Agent,
Notify Party 1, Carrier Agent and also provided the option to create a New customer.
Figure 7.4 parties list
Parties details like Name, type, address, mobile no. are enter in the parties tab page.
Figure 7.5 create parties
Booking Containers
Container type, container number, No of pieces, Gross Weight, Net Weight, Volume,
Commodity Description and commodity Type will come under container tab page.
Figure 7.6 Containers
Container type, container number, No of pieces, Gross Weight, Net Weight, Volume,
Commodity Description and commodity Type are enter in the container tab page.
Figure 7.7 Create Containers
Status Update
Status update for Customer or Agent with follow up details will come under status update
tab page.
Figure 7.8 Status update
The Status of the Current booking details are sent through E-mail to the Customer.
Figure 7.9 Create Status update
Costing
Following Option available in Costing, created charges will appear in the list.
Created Costing list will display here and also we can edit detail by click the line no, its take
yours to entry page..
Figure 7.10 Costing list
Click the create button to enter new charges with the following details, description, sale,
cost, unit.
Figure 7.11 Create Costing
Multiple Update/Delete
Used to update or delete multiple records in same time.
Figure 7.12 Multiple Update/Delete
History
Figure 7.13 History
Documents
Provided the option to attach the documents
Figure 7.14 Documents
Documents details are enter in the document tab page.
Figure 7.15 Create Documents
Employee
Salesman details for the particular booking.
Figure 7.16 Employee
Salesman details are enter in the page for particular booking.
Figure 7.17 Create Employee
KPI
Key Performance Indicator is view details of Can, Invoice, etc., completed and follow-up
dates. Created KPI list will display here and also we can edit detail by click the line no, it’s
take yours to entry page…
Figure 7.18 KPI
Key Performance Indicator is used to maintain whether BL, CAN, Invoice, etc., are in
completed or pending status and follow up activities also can maintain.
Figure 7.19 Create Key Performance Indicator
Vessel Movement
Figure 7.20 Vessel Movement
Figure 7.21 create vessel movement
Milestone
If we do any action like Invoice generated, Invoice viewed, job card generated, Proforma
Invoice generated, all actions will be monitoring under milestone tab page.
Figure 7.22 Milestone
Report:
We can generate the report by click the Reports button
Figure 7.23 Reports
8. LCL Export Booking
To create LCL Export Booking in Fresa Xpress, follow these steps
To go to LCL Export Booking, Choose Menu →Customer Service → LCL Export Booking
Figure 8.1 Navigation to LCL Export booking
LCL Export Booking List
In LCL export booking list page, all LCL export booking records will be displayed with the
following columns, Booking No, Booking date, Job No, Status, Customer, Port of Departure,
Port of Arrival, Port of Delivery, ETD, ETA, Flight and Flight No. And also option has provided
to sort the values by column wise. In this page, we have provided the option to create LCL
import booking.
Figure 8.2 LCL export booking list
Create LCL Export Booking
In LCL export booking create page, Enter the data in Booking No, Job No, Booking Date, Job
Status, Customer, Port of Departure, Port of Arrival, Port of Delivery, ETD, ETA and then to
Save.
In LCL export booking, the following columns value is mandatory to generate the LCL
export booking. Report Segment, Port of departure, Port of Arrival.
The LCL export booking, booking status provides the user with following details like
Booked, Received, Loaded, Sailed, Arrived, Unloaded, Delivered and Cancelled.
Figure 8.3 Create LCL export booking
Parties
We can select required parties by click following Option in parties Screen, Origin Agent,
Notify Party 1, Carrier Agent and also provided the option to create a New customer.
Figure 8.4 parties list
Parties details like Name, type, address, mobile no. are enter in the parties tab page
Figure 8.5 create parties
Containers
Container type, container number, No of pieces, Gross Weight, Net Weight, Volume,
Commodity Description and commodity Type will come under container tab page.
Figure 8.6 Containers
Container type, container number, No of pieces, Gross Weight, Net Weight, Volume,
Commodity Description and commodity Type are enter in the container tab page.
Figure 8.7 Create Containers
Status Update
Status update for Customer or Agent with followup details will come under status update
tab page.
Figure 8.8 Status update
The Status of the Current booking details are sent through E-mail to the Customer.
Figure 8.9 Create Status update
Costing
Following Option available in Costing, created charges will appear in the list.
Created Costing list will display here and also we can edit detail by click the line no, its take
yours to entry page.
Figure 8.10 Costing list
Click the create button to enter new charges with the following details, description, sale,
cost, unit.
Figure 8.11 Create Costing
Multiple Update/Delete
Used to update or delete multiple records in same time.
Figure 8.12 Multiple Update/Delete
History
Figure 8.13 History
Documents
Provided the option to attach the documents
Figure 8.14 Documents
Documents details are enter in the document tab page.
Figure 8.15 Create Documents
Employee
Salesman details for the particular booking.
Figure 8.16 Employee
Salesman details are enter in the page for particular booking.
Figure 8.17 Create Employee
KPI
Key Performance Indicator is view details of Can, Invoice, etc., completed and followup
dates. Created KPI list will display here and also we can edit detail by click the line no, it’s
take yours to entry page.
Figure 8.18 KPI
Key Performance Indicator is used to maintain whether BL, CAN, Invoice, etc., are in
completed or pending status and follow up activities also can maintain.
Figure 8.19 Create Key Performance Indicator
Vessel Movement
Figure 8.20 Vessel Movement
Figure 8.21 create vessel movement
Milestone
If we do any action like Invoice generated, Invoice viewed, job card generated, Proforma
Invoice generated, all actions will be monitoring under milestone tab page.
Figure 8.22 Milestone
Report:
We can generate the required reports by click on Reports button.
Figure 8.23 Reports
Proforma Invoice: Pre-stage of the Invoice
Transport Request: To view details of parties, commodity and consignment
9. LCL Import Booking
To create LCL Import Booking in Fresa Xpress, follow these steps
To go to LCL Import Booking, Choose Menu →Customer Service → LCL Import Booking
Figure 9.1 Navigation to LCL import booking
LCL Import Booking List
In LCL import booking list page, all LCL import booking records will be displayed with the
following columns, Booking No, Booking date, Job No, Status, Customer, Port of Departure,
Port of Arrival, Port of Delivery, ETD, ETA, Flight and Flight No. And also option has provided
to sort the values by column wise. In this page, we have provided the option to create LCL
import booking.
Figure 9.2 LCL import booking list
Create LCL Import Booking
In LCL import booking create page, Enter the data in Booking No, Job No, Booking Date, Job
Status, Customer, Port of Departure, Port of Arrival, Port of Delivery, ETD, ETA and then to
Save.
In LCL import booking, the following columns value is mandatory to generate the LCL
import bookings. Report Segment, Port of departure, Port of Arrival.
The LCL import booking, booking status provides the user with following details like
Booked, Received, Loaded, Sailed, Arrived, Unloaded, Delivered and Cancelled.
Figure 9.3 Create LCL import booking
Parties
We can select required parties by click following Option in parties Screen, Origin Agent,
Notify Party 1, Carrier Agent and also provided the option to create a New customer.
Figure 9.4 parties list
Parties details like Name, type, address, mobile no. are enter in the parties tab page.
Figure 9.5 create parties
Containers
Container type, container number, No of pieces, Gross Weight, Net Weight, Volume,
Commodity Description and commodity Type will come under container tab page.
Figure 9.6 Containers
Container type, container number, No of pieces, Gross Weight, Net Weight, Volume,
Commodity Description and commodity Type are enter in the container tab page.
Figure 9.7 create containers
Status Update
Status update for Customer or Agent with followup details will come under status update
tab page.
Figure 9.8 Status update
The Status of the Current booking details are sent through E-mail to the Customer
Figure 9.9 Create Status update
Costing
Following Option available in Costing, created charges will appear in the list.
Created Costing list will display here and also we can edit detail by click the line no, it’s take
yours to entry page.
Figure 9.10 Costing list
Click the create button to enter new charges with the following details, description, sale,
cost, unit.
Figure 9.11 Create Costing
Multiple Update/Delete
Used to update or delete multiple records in same time.
Figure 9.12 Multiple Update/Delete
History
Figure 9.13 History
Documents
Provided the option to attach the documents
Figure 9.14 Documents
Documents details are enter in the document tab page.
Figure 9.15 Create Documents
Employee
Salesman details for the particular booking.
Figure 9.16 Employee
Salesman details are enter in the page for particular booking.
Figure 9.17 Create Employee
KPI
Key Performance Indicator is view details of Can, Invoice etc., Completed and followup
dates. Created KPI list will display here and also we can edit detail by click the line no, it’s
take yours to entry page.
Figure 9.18 KPI
Key Performance Indicator is used to maintain whether BL, CAN, Invoice, etc., are in
completed or pending status and follow up activities also can maintain.
Figure 9.19 Create Key Performance Indicator
Vessel Movement
Figure 9.20 Vessel Movement
Figure 9.21 create vessel movement
Milestone
If we do any action like Invoice generated, Invoice viewed, job card generated, Proforma
Invoice generated, all actions will be monitoring under milestone tab page.
Figure 9.22 Milestone
Report:
We can generate the required reports by click on Reports
Figure 9.23 Reports
10. Note Master
To create Note Master in Fresa Xpress, follow these steps
To go to Note Master, Choose Menu →Customer Service → Note Master
Figure 10.1 Navigation to Note Master
Note Master List
In note Master user can create meaningful sentences briefly where frequently used in
order to communicate with Customer or Agents.
Figure 10.2 Note Master List
Create Note Master
Figure 10.3 Create Note Master
11. Sailing Schedule
To create Sailing Schedule in Fresa Xpress, follow these steps
To go to Sailing Schedule, Choose Menu →Customer Service → Sailing Schedule
Figure 11.1 Navigation to Sailing Schedule
Sailing Schedule List
In sailing schedule list page, all sailing schedule records will be displayed with the following
columns, Service, POL, CFS Cutoff, POL ETD, POD, POD ETA, Vessel, Voyage, Carrier and
Note.
In this page, we have provided the option to create and upload the sailing schedule.
Figure 11.2 Sailing Schedule List
Create Sailing Schedule
User can enter or upload sailing schedule weekly or monthly basis. While uploading the
sailing schedule the format should be in CSV file format. Port of Loading, Port of Discharge,
Vessel/Voyage, Cutoff, POL ETD, POD ETA, Carrier and Note.
Figure 11.3 Create Sailing Schedule
12. Report-CS
12.1 Agent Follow up
To create Agent Follow up in Fresa Xpress, follow these steps
To go to Agent Follow up, Choose Menu → Customer Service → Report-CS → Agent Follow
up
Figure 12.1.1 Navigation to Agent Follow up
Agent wise follow up details will be displayed here and option provided to view the
corresponding booking details. While press the booking number link, corresponding
booking details will be shown.
Figure 12.1.2 Agent Follow up list
12.2 Booking List
To create Booking List in Fresa Xpress, follow these steps
To go to Booking List, Choose Menu → Customer Service → Report-CS → Booking List
Figure 12.2.1 Navigation to booking list
In this page, we have provided the option to view the Booking details customer wise,
Segment wise, Status wise, etc.,
Figure 12.2.2 Booking list
12.3 Customer Follow up
To create Customer Follow up in Fresa Xpress, follow these steps
To go to Customer Follow up, Choose Menu → Customer Service → Report-CS → Customer
Follow up
Figure 12...3.1 Navigation to Customer Follow up
Customer wise follow up details will be displayed here and option provided to view the
corresponding booking details. While press the booking number link, corresponding
booking details will be shown.
Figure 12...3.2 Customer Follow up
12.4 Customer wise GP with Job Details
To create Customer wise GP with Job Details in Fresa Xpress, follow these steps
To go to Customer wise GP with Job Details, Choose Menu → Customer Service →
Report-CS → Customer wise GP with Job Details
Figure 12.4.1 Navigation to Customer wise GP with Job Details
To view the customer wise GP with job details and Provisional Sale, Provisional Cost,
Provision Gross Profit, Actual Sale, Actual Cost and Actual Gross Profit details.
Figure 12.4.2 Customer wise GP with Job Details
12.5 Customer wise GP
To create Customer wise GP in Fresa Xpress, follow these steps
To go to Customer wise GP, Choose Menu → Customer Service → Report-CS → Customer
wise GP
Figure 12.5.1 Navigation to Customer wise GP
To view the customer wise GP with Provisional Sale, Provisional Cost, Provision Gross Profit,
Actual Sale, Actual Cost and Actual Gross Profit details. And option provided to view the job
details.
Figure 11.5.2 Customer wise GP
12.6 Job List
To create Job List in Fresa Xpress, follow these steps
To go to Job List, Choose Menu → Customer Service → Report-CS → Job List
Figure 12.6.1 Navigation to Job List- CS
In this page, we have provided the option to view the jobs details customer wise, Segment
wise, Status wise, etc.,
Figure 12.6.2 Job List- CS
12.7 Pending Arrival List
To create Pending Arrival List in Fresa Xpress, follow these steps
To go to Pending Arrival List, Choose Menu → Customer Service → Report-CS → Pending
Arrival List
Figure 12.7.1 Navigation to Pending Arrival
If Shipment is started from origin, but not yet reached in destination, those booking details
will be displayed here. And option provided to view the booking details.
Figure 12.7.2 Pending Arrival
12.8 Pending Booking List
To create Pending Booking List in Fresa Xpress, follow these steps
To go to Pending Booking List, Choose Menu → Customer Service → Report-CS → Pending
Booking List
Figure 12.8.1 Navigation to Pending Bookings
If booking is created but job is not generated, those booking details will be displayed here.
And option provided to view the booking details.
Figure 12.8.2 Pending Bookings
Contacts
Fresa Technologies FZE
Fresa Technologies Pvt Ltd
SM Office, E1-2806 H
473A - Sai Shahi, Kamakotti Nagar
Ajman Free Zone
Pallikaranai, Chennai - 600 100
United Arab Emirates
Tamil Nadu, India
Mobile : +971 50 1393035
Mobile : +91 98408 45684
Our Products
Fresa XPress
Fresa Web
Fresa Gold Neutral IT Solution Provider
Fresa Mail
Fresa Lite
Shipsoft