1
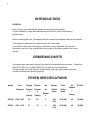
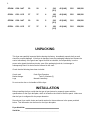
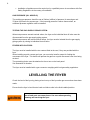
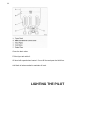
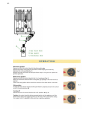
1
BANKS
banks
FOODSVILLE
GF40L GF40N
GF50L GF50N
Intertek
2
(PLEASE RETAIN THIS MANUAL FOR FUTURE
REFERENCE)
Post in a prominent location. Instructions to be followed in the events of the user smelling gas.
Model
Dimensions (mm)
GF30L
GF40N
394x769x1196
GF40L
GF40N
394x769x1196
GF50L
GF50N
530x769x1196
TABLE OF CONTENTS
IMPORTANT FOR YOUR SAFETY........................................................................................................3
INTRODUCTION.................................................................................................................................4
ORDERING PARTS..............................................................................................................................4
FRYER SPECIFICATIONS.....................................................................................................................4
UNPACKING.......................................................................................................................................5
INSTALLATION...................................................................................................................................5
CLEARANCE........................................................................................................................................5
LOCATION..........................................................................................................................................6
CODES AND STANDARDS...................................................................................................................6
ASSEMBLY.........................................................................................................................................6
GAS CONNECTION AND SUPPLY........................................................................................................7
GAS PRESSURE..................................................................................................................................7
TEST GAS SUPPLY..............................................................................................................................7
FRYERS WITH CASTORS....................................................................................................................8
LEVELLING THE FRYER......................................................................................................................8
OVER-TEMPERATURE SHUTDOWN..................................................................................................8
BEFORE FIRST USE............................................................................................................................9
FILLING TANK WITH OIL....................................................................................................................10
LIGHTING THE PILOT.........................................................................................................................11
FRYER OPERATION...........................................................................................................................12
TURNING OFF THE FRYER.................................................................................................................12
EXTENDED SHUTDOWN....................................................................................................................12
BASIC FRYING INSTRUCTIONS..........................................................................................................12
FRY BASKET GUIDELINES..................................................................................................................13
EXTENDED OIL LIFE............................................................................................................................13
DRAINING THE TANK.........................................................................................................................14
DAILY FILTERING - ALL MODELS.........................................................................................................14
CLEANING...........................................................................................................................................15
BOIL OUT PROCEDURE.......................................................................................................................16
MAINTENANCE...................................................................................................................................16
3
FLUE VENT INSPECTION......................................................................................................................17
TROUBLESHOOTING CHART...............................................................................................................17
GUARANTEE........................................................................................................................................18
IMPORTANT FOR YOUR SAFETY
THIS MANUAL HAS BEEN PREPARED FOR PERSONNEL QUALIFIED TO INSTAL GAS
EQUIPMENT IN THE COUNTRY OF INSTALLATION. THIS PERSON SHOULD PERFORM
THE INITIAL COMMISSIONING AND ADJUSTMENTS OF THE EQUIPMENT COVERED BY
THIS MANUAL.
POST IN A PROMINENT LOCATION. PLEASE FOLLOW THESE INSTRUCTIONS IN THE
EVENT OF A GAS LEAK. THIS INFORMATION CAN BE OBTAINED FROM THE LOCAL
GAS SUPPLIER.
IMPORTANT
IF A GAS ODOUR IS DETECTED, SHUT DOWN ALL GAS UNITS AT THE MAIN SHUT OFF VALVE
AND CONTACT THE LOCAL GAS COMPANY OR GAS SUPPLIER FOR IMMEDIATE SERVICE.
FOR YOUR SAFETY
DO NOT STORE OR USE PETROL OR OTHER FLAMMABLE VAPOURS OR LIQUIDS IN
THE VICINITY OF THIS OR ANY OTHER GAS APPLIANCE.
Improper installation, adjustment, alteration, service or maintenance will invalidate
warranty and may cause property damage, injury or death.
Read the installation, operating and maintenance instructions thoroughly before
installing or servicing this equipment.
4
INTRODUCTION
GENERAL
Banks Fryers are produced with quality workmanship and materials.
Proper installation, usage and maintenance will result in years of satisfactory
performance.
Before installing the fryer, thoroughly read this manual and carefully follow all instructions.
This manual is applicable to models listed on the cover page.
Procedures in this manual will apply to all models unless specified. Pictures and
illustrations can be of any model unless the picture or illustration needs to be model
specific.
ORDERING PARTS
Customers may order parts directly from their local authorised service centre. Please call
0845 872 5000 (UK) or 1890 602000 (IRL) to find your local distributor.
Please provide the model number, serial number, gas type, part needed, item part
number (if known) and quantity required.
FRYER SPECIFICATIONS
Model
Gas
Category
Supply
Burner
No
Burner
Pliot
Pressur Pressur
e
e
of
Orifice
(mm)
Orifice
(mm)
(mbar)
(mbar)
Burner
s
Oil
Capacit
y
BTU/hr
(litres)
GF30N
G20 - NAT
20
20
3
210
(2.1)
45 (0.45)
18
82,000
GF30L
G31 - LPG
37
37
3
150
(1.5)
40 (0.40)
18
82,000
5
GF40N
G20 - NAT
20
20
4
210
(2.1)
45 (0.45)
22.5
109,200
GF40L
G31 - LPG
37
37
4
150
(1.5)
40 (0.40)
22.5
109,200
GF50N
G20 - NAT
20
20
5
210
(2.1)
45 (0.45)
31.5
136,500
GF50L
G31 - LPG
37
37
5
150
(1.5)
40 (0.40)
31.5
136,500
UNPACKING
This fryer was carefully inspected before leaving the factory. Immediately unpack the fryer and
check for possible damage. If the fryer is damaged, save the packaging material and contact the
carrier immediately. If the goods are signed for and not checked, the responsibility is on the
person who signed the delivery docket, even if the packaging looks ok, but damage is
subsequently found. No claim can be followed in this case.
Check that the following have been included:
Crumb rack
Basket Hanger
Legs
Drain Pipe Extension
Twin Fry Baskets (2)
Manual & warranty.
Do not use the door or its handle to lift the fryer.
INSTALLATION
Before installing the fryer, verify that the type of gas (natural or propane) agrees with the
specifications on the fryer data plate, which is located on the inside of the door panel. Make sure
that the fryer is configured for the proper elevation.
Record your fryer model, device and serial number for future reference in the space provided
below. This information can be found on the fryer data plate.
Fryer Model No: _____________________________________
Serial No:___________________________________________
6
Clearances
Minimum clearance from combustible construction:
6” (15cm) from the sides of the fryer
6” (15cm) from the back of the fryer
The fryer must not be installed on combustible floors.
Minimum clearance from non combustible construction:
6” (15cm) from the sides of the fryer
6” (15cm) from the back of the fryer
Between the fryer & open-top flame units:
16” (41cm)
Allow space for servicing and operation.
Location
• Install fryer in an area with sufficient air supply for gas combustion at fryer burners –
24mm3/hr minimum
• Do not obstruct the flow of combustion or ventilation air
• Provide adequate clearance for air openings into the combustion chamber
• Do not permit fans to blow directly onto fryer
• Avoid wall-type fans, which create cross-currents within a room
• Avoid open windows next to the sides or back of the fryer
• Do not obstruct or block the appliance flue
• Do not connect the extraction system directly to the appliance flue
CODES AND STANDARDS
Installation of appliance shall comply with local Gas, Health and Safety requirements, in the
country of installation.
o Gas Safety (Installation & Use) Regulations
o Local & National Building Regulations
o Health & Safety at Work Act
o Institution of Gas Engineers Publications IGE/IPI, IGE/UP/2, IGE/UP/4
o Fire Safety Act
o BS5440: Extraction, air supply for gas appliance
o BS6175 / BS5440-2
o Ireland – IS820 – Non Domestic Gas Installations
ASSEMBLY
The fryer must be restrained to prevent tipping and the splashing of hot liquid. The means of
restraint may be the manner of installation, installing the fryer in an alcove or by separate means
such as adequate ties.
7
NOTE: The gas supply pressure at the gas inlet to the appliance should be equal to the
rating on the fryer data plate.
Locate the fryer under a hood with adequate connection to an exhaust duct.
The hood must extend 6” (15cm) beyond the fryer on both sides.
Clearance above the fryer should be adequate for combustion of by products to be removed
efficiently.
An 18” (46cm) minimum clearance should be maintained between the flue vent and the filters of
the hood ventilation system.
Never make flue extract connections directly onto the fryer flue.
Do not obstruct the flow of the gasses from the appliance.
Proper air balance should be maintained in the room.
GAS CONNECTION AND SUPPLY
The appliance must be installed, tested and commissioned by a qualified gas technician to the
gas safety regulations in the country of installation.
All gas supply connections and any pipe joint compound must be resistant to the action of
propane gasses.
• Check that gas supply corresponds to that specified on the data plate of the
appliance
• Connection is at the back of the unit via 1/2” BSPT male tread
• Suitable quick release commercial gas hose to be used. Domestic hoses are not
suitable
• Isolating valve must be fitted close to the unit for emergency shut down and
servicing
• Pressure test the appliance (soundness test) before connecting the gas supply
• Test for leaks
Make sure the pipes are clean and free from obstructions, dirt and piping compound.
Prior to lighting, check all joints in the gas supply line for leaks.
Use soap and water solution or other gas leak detection equipment
After piping has been checked for leaks, fully purge gas pipes to remove air.
WARNINGS
•
•
Do not use a naked flame to check for gas leaks
Make sure the fryer tank is filled with oil before lighting the burners, otherwise the tank will
be damaged & invalidate warranty
8
•
Installation of appliance must be carried out by a qualified person in accordance with Gas
Safety Regulations in the country of installation.
GAS PRESSURE (ALL MODELS):
The working gas pressure should be set at 20mbar (millibar) of pressure for natural gas and
37mbar of pressure for propane gas. If the incoming pressure is above these values, an
additional pressure regulator must be installed.
TESTING THE GAS SUPPLY PIPING SYSTEM:
When test pressures exceed nominal values, the fryer and its individual shut off valve must be
disconnected from the gas supply piping system.
When test pressures are below nominal values, the fryer must be isolated from the gas supply
piping system by closing its individual shut off valve.
FRYERS WITH CASTORS:
The fryer must be installed with the two castors fitted at the rear, if they are provided with the
fryer.
When installing a quick connect gas hose, you must also install a means for limiting the
movement of the fryer. This device will prevent the gas line or quick disconnect hose from being
strained.
The restraining device must be attached to the cut out on the back panel.
See illustration for location.
The fryer must be installed with a gas connector complying with local gas safety regulations.
LEVELLING THE FRYER
Check the level of the fryer by placing a level on top of the fryer after gas connections have been
made.
Ensure that the fryer is level front-to-back and side-to-side in the final installed position.
Hot oil and parts can cause burns. Use care when operating,
cleaning and servicing the fryer.
9
Spilling hot frying compound can cause severe burns. Do not
move fryer without draining all frying compound from the tank.
OVER-TERMPERATURE SHUTDOWN
If the oil becomes over heated, a high-temperature shutoff device will turn the gas off to the
burners and extinguish the pilot.
If the fryer shuts down due to overheating, DO NOT re-light the pilot until the oil temperature is
below 300°F (149°C).
If an overheating situation persists, contact your local Banks authorised service agent.
BEFORE FIRST USE
Cleaning
New units are wiped down at the factory to remove any visible signs of dirt, oil, grease etc.,
remaining from the manufacturing process.
Before any food preparation, thoroughly wipe protective oil from all surface parts and the tank
interior with hot soapy water to remove any film residue and dust or debris.
Do not use chlorine or sulphate/sulphide cleaners.
Wash any accessories shipped with unit.
Rinse fryer and accessories thoroughly and drain the fryer.
Wipe tank completely dry with a soft, clean cloth.
10
FILLING THE TANK WITH OIL
Solid shortening should NOT be used with fryers.
Melting solid shortening will damage the tank and void the warranty.
11
Close the drain valve.
Fill the fryer tank with oil.
Oil level will expand when heated. Do not fill the tank past the MAX line.
Add fresh oil when needed to maintain oil level.
LIGHTING THE PILOT
12
13
When the fryer is lit, proceed with all the relevant gas regulation checks, including; gas leak
tests, correct operation of the gas valve, correct operation of the thermocouple, correct
temperature of the oil when compared with the temperature knob setting. If the oil temperature
does not equal the temperature knob setting, calibrate the thermostat until the correct value is
reached.
FRYER OPERATION
Set the temperature knob to the desired frying temperature.
After the set temperature has been reached, the thermostat shuts off the gas flow to the burners.
The pilot remains lit. The burners will cycle on and off, maintaining the set temperature.
TURNING OFF THE FRYER
1. Turn the thermostat OFF
2. To keep pilot lit, turn the gas valve to the Pilot position.
3. To shut off all gas to the system, including the pilot, turn the gas valve knob to the OFF
position.
EXTENDED SHUTDOWN
1.
2.
3.
4.
5.
Turn the thermostat knob to OFF
Push in the pilot knob and turn to OFF
Thoroughly drain the fryer. Refer to DRAINING THE FRYER
Clean the fryer. Refer to CLEANING
Turn off the main gas shutoff valve.
BASIC FRYING INSTRUCTION
Set the desired temperature and allow the oil to heat up to that temperature before adding
produce.
Fry items that are about the same size together, to have the same cooking time.
Drain or wipe dry, raw or wet foods to minimize splatter when lowering into hot oil.
Add fresh oil as needed.
14
FRY BASKET GUIDELINES
Do not overfull baskets (see table for recommended basket capacities below)
Carefully lower basket into oil.
When frying doughnuts and fritters, turn the product once during frying.
When cooking French fries or onion rings, shake the basket several times in a way that does not
splatter
the oil.
Batter covered foods should be dropped carefully, one by one, into the oil or basket, away from
the operator.
If you use the basket, first dip the basket into the oil to reduce batter build up on basket surfaces.
When frying is completed, remove basket or product.
Hang basket on the rear hanger.
Fry Basket Capacity:
GF30, GF40, GF50 recommend pounds per basket are 1.5lbs (0.7 kgs)
EXTENDING OIL LIFE
Oil life can be extended by the following guidelines:
Do not salt foods over the fryer.
Use good quality oil.
Filter oil daily (at a minimum)
Replace oil if it becomes poorly flavoured.
Keep equipment and oil clean.
Set the temperature thermostat correctly.
15
Remove excess moisture and particles from food products before placing into the fryer.
DRAINING THE TANK
1.
2.
3.
4.
Turn the thermostat to OFF.
To keep the pilot lit, turn gas valve to PILOT.
Direct the drain spout into the container that you want to drain oil into.
Open the drain valve. The oil will drain into the container. When the container is full or the
fryer tank is empty, close the drain valve. Repeat this step until the fryer is empty.
5. If desired, perform the weekly clean-out as described under CLEANING.
6. Once tank is completely empty, add new oil and set thermostat to desired temperature.
DAILY FILTERING
Hot oil and hot parts can cause burns. Use care when
operating, cleaning and servicing the fryer.
Filter the oil at least once a day. Refer to the instructions provided with your filtering equipment.
A cold fryer will not drain properly.
Always filter hot oil between 93°C and 120°C.
The oil in the cold zone area will remain hard if the heat is only on for a few minutes.
If necessary, use the clean-out rod to carefully stir the hard oil to an area above the cold zone
where it will melt.
16
CLEANING
Hot oil and hot parts can cause burns. Use care when
operating, cleaning and servicing the fryer.
Daily
Clean you fryer regularly with a damp cloth and polish with a soft, dry cloth. If regular cleaning is
neglected, grease will be burned onto the fryer and discolorations may form.
Fingerprints are sometimes a problem with highly polished surfaces of stainless steel. They can
be minimized by applying a cleaner that will leave a thin oil or wax film.
Clean all exterior surfaces at least once daily.
Use a damp cloth with warm water and a mild soap or detergent.
Do not use chlorine or sulphate/sulfide cleaners
Rinse thoroughly and then polish with a soft dry cloth.
17
Keep the fryer exterior clean and free of accumulated grease to prevent stubborn stains from
forming. This can lead to creating a fire hazard.
Remove discolorations by washing with any detergent or soap and water.
Use a self-soaping, non-metallic scouring pad for particularly stubborn discolorations.
Always rub with the grain of the stainless steel.
Do not use a metallic scouring pad or harsh cleaners.
BOIL OUT PROCEDURE
Weekly or as required:
1. Drain the tank as described under the section DRAINING THE TANK
2. Once the oil has been drained, flush out scraps and sediment with a small amount of
warm oil. Allow the tank to drain thoroughly.
3. Close the drain valve and fill tank with non corrosive, grease dissolving commercial
cleaner. Follow the manufacturer’s instructions.
Do not use chlorine or sulphate/sulphide cleaners.
4. Add commercial boil-out solution.
Solution level must be between the MIN and MAX levels on the fryer tank.
5. Set thermostat to the temperature recommended for the solution being used. Allow to
simmer for about 15 to 20 minutes.
6. Drain the cleaning solution from the tank.
7. Close the drain valve and refill the tank with water.
Add 1 cup (1/4 L) of vinegar to neutralise alkaline left by the cleaner.
Solution level must be between the MIN and MAX level on the fryer tank.
8. Bring solution to a simmer only, turn the thermostat off.
Allow to stand for a few minutes.
9. Drain the tank according to DRAIN THE TANK.
Rinse thoroughly with clear, hot water.
All traces of cleaner must be removed. Dry the tank thoroughly.
10. Close the drain valve and add oil.
18
Follow the FILLING THE TANK WITH OIL procedure in this manual.
The fryer is now ready for use.
MAINTENANCE
Hot oil and hot parts can cause burns.
The operator must be careful when operating, cleaning and servicing the fryer.
Spilling hot fryer oil can cause severe burns.
Do not move fryer without draining all frying oil from the tank.
The fryer should be restrained to prevent tipping when installed in order to avoid
the splashing of hot liquid.
FLUE VENT INSPECTION
When the fryer is cool, inspect manually. Check the flue and clear any obstructions.
SERVICE IN THE UK & IRELAND
Contact your local Banks Service Office or call 0845 872 5000 (UK) or 1890 206000
(Ireland) for details of your local Banks Agent.
Troubleshooting Chart:
Problem:
No heat
Possible Cause:
Thermostat dial not turned on.
Pilot not lit.
Gas supply not turned on.
Wire connections loose (call service)
Wire connections need cleaning (call service)
Thermopile (call service)
Insufficient or too
much heat
Thermostat dial not set to desired temperature
High limit tripped (call service)
Temperature probe (call service)
Tank will not drain
Oil too cold
Drain pipe clogged with debris
GUARANTEE
The appliance is covered by a 12 month warranty. The warranty is subject to the appliance being used
in accordance with the instructions supplied. The guarantee does not cover damage resulting from
19
misuse, accident or alteration to unit. The guarantee does not cover accidental breakage or damage, or
wear and tear from normal use or neglect.
Proof of purchase, model number and serial number will be required in any communication with supplier
or manufacturer. Incorrect installation, maintenance or unauthorised service work will invalidate
warranty.
This guarantee does not affect your statutory rights.
Authorised Service Agents:
We recommend that all servicing be carried out by Authorised Service Agents and we cannot accept
responsibility for work carried out to by other persons.
Warranty work will only be undertaken during normal working hours 8.30am to 5.30pm Monday to Friday