1
Operation & Troubleshooting
Uno
One Step Disc Repair Machine
TM
Repair a scratched disc to like new
with the push of a button.
Ver 1.1
08-11-2012
© 2012 Azuradisc . All rights reserved. Printed in the U.S.A.
SAFETY
When using the Azuradisc Uno disc repair machine, the following basic safety precautions should always be followed
to reduce the risk of fire, electric shock, or injury to persons:
•
Read this manual before assembling or using the machine.
•
Use this machine only for its intended use as described in this manual.
•
Use only with Azuradisc-recommended accessories and repair materials. (The use of repair materials
not approved by Azuradisc may damage discs permanently or cause injuries.)
•
Pay close attention when the machine is used near children. The machine is not intended for use by
children or infirm persons.
•
Do not operate the machine if the cord or plug is damaged, is not working properly, has been damaged,
or immersed in water. If these conditions are present, return the machine to Azuradisc for examination,
repair, or adjustment.
•
Do not drop or insert objects into any openings.
•
To disconnect, turn off the machine, then remove plug from the electrical outlet.
•
Use a grounded plug when using an extension cord.
•
Keep fingers and all body parts away from moving parts and openings.
•
Disconnect electrical supply before cleaning.
© 2010 Azuradisc All rights reserved. Printed in the U.S.A.
R
This manual may not be copied, in whole or in part, without written consent of Azuradisc. Use of the Azuradisc logo
without the prior written consent of Azuradisc may constitute trademark infringement and unfair competition in violation of federal and state laws.
Every effort has been made to ensure that the information in this manual is accurate. Azuradisc is not responsible
for printing or clerical errors.
Azuradisc Inc.
7307 South 89th Place
Mesa, Arizona 85212
480.827.8786
www.azuradisc.com
Azuradisc Inc. is not responsible or liable for damage, of any type, to discs inserted into an Azuradisc machine. If
you believe that an Azuradisc machine is malfunctioning, discontinue use and contact Azuradisc or an authorized
representative.
2
Ver 1.1
08-11-2012
TABLE OF CONTENTS
SAFETY . . . . . . . . . . . . . . . . . . . . . . . . . . . . . . . . . . . . . . . . . . . . . . . . . . . . . . . . . . . . . . . . . . . .2
OUT OF THE BOX . . . . . . . . . . . . . . . . . . . . . . . . . . . . . . . . . . . . . . . . . . . . . . . . . . . . . . . . . . . .4
PART IDENTIFICATION . . . . . . . . . . . . . . . . . . . . . . . . . . . . . . . . . . . . . . . . . . . . . . . . . . . . . . . .4
IMPORTANT INFORMATION . . . . . . . . . . . . . . . . . . ........ . . . . . . . . . . . . . . . . . . . . . . . . . . . . . . .5
SET UP . . . . . . . . . . . . . . . . . . . . . . . . . . . . . . . . . . . . . . . . . . . . . . . . . . . . . . . . . . . . . . . . . . . .6
BASIC OPERATION . . . . . . . . . . . . . . . . . . . . . . . . . . . . . . . . . . . . . . . . . . . . . . . . . . . . . . . . . . .7
WALKTHROUGH . . . .
SELECT TO START . .
ABOUT REPAIR . . . . .
POLICOOL LOW & LID
.....
.....
.....
OPEN
........
........
........
SCREEN:
.
.
.
.
.
.
.
.
.
.
.
.
.
.
.
.
.
.
.
.
.
.
.
.
.
.
.
.
.
.
.
.
.
.
.
.
.
.
.
.
.
.
.
.
.
.
.
.
.
.
.
.
.
.
.
.
.
.
.
.
.
.
.
.
.
.
.
.
.
.
.
.
.
.
.
.
.
.
.
.
.
.
.
.
.
.
.
.
.
.
.
.
.
.
.
.
.
.
.
.
.
.
.
.
.
.
.
.
.
.
.
.
.
.
.
.
.
.
.
.
.
.
.
.
.
.
.
.
.
.
.
.
.
.
.
.
.
.
.
.
.
.
.
.
.
.
.
.
.
.
.
.
.
.
.
.
.
.
.
.
.
.
.
.
.
.
.
.
.
.
.
.
.
.
.
.
.
.
.
.
.
.
.
.
.
.
.
.
.
.
.
.
.
.
.
.
.7
.7
.7
.7
INFO MENU . . . . . . . . . . . . . . . . . . . . . . . . . . . . . . . . . . . . . . . . . . . . . . . . . . . . . . . . . . . . . . . . .9
TROUBLE SHOOTING. . . . . . . . . . . . . . . . . . . . . . . . . . . . . . . . . . . . . . . . . . . . . . . . . . . . . . . . . 15
MAINTENANCE. . . . . . . . . . . . . . . . . . . . . . . ........ . . . . . . . . . . . . . . . . . . . . . . . . . . . . . . . . . . .16
EDUCATION . . . . . . . . . . . . . . . . . . . . . . . . . . . . . . . . . . . . . . . . . . . . . . . . . . . . . . . . . . . . . . . .19
HOW DISCS ARE MADE . . . . . . . . . . . . . . . . . .
HOW A DVD IS MADE . . . . . . . . . . . . . . . . . . . .
Single Layer DVDs . . . . . . . . . . . . . . . .
Double Layered DVDs . . . . . . . . . . . . . .
Double Sided DVDs . . . . . . . . . . . . . . . .
Double Sided/Double Layered DVDs . . . .
IDENTIFYING SCRATCHES . . . . . . . . . . . . . . . .
Reading Side Scratches - CDs, CD-ROMs
Top Side Scratches . . . . . . . . . . . . . . . .
Top Side Foil Dents . . . . . . . . . . . . . . . .
.......
.......
.......
.......
.......
.......
.......
& DVDs
.......
.......
.
.
.
.
.
.
.
.
.
.
.
.
.
.
.
.
.
.
.
.
.
.
.
.
.
.
.
.
.
.
.
.
.
.
.
.
.
.
.
.
.
.
.
.
.
.
.
.
.
.
.
.
.
.
.
.
.
.
.
.
.
.
.
.
.
.
.
.
.
.
.
.
.
.
.
.
.
.
.
.
.
.
.
.
.
.
.
.
.
.
.
.
.
.
.
.
.
.
.
.
.
.
.
.
.
.
.
.
.
.
.
.
.
.
.
.
.
.
.
.
.
.
.
.
.
.
.
.
.
.
.
.
.
.
.
.
.
.
.
.
.
.
.
.
.
.
.
.
.
.
.
.
.
.
.
.
.
.
.
.
.
.
.
.
.
.
.
.
.
.
.
.
.
.
.
.
.
.
.
.
.
.
.
.
.
.
.
.
.
.
.
.
.
.
.
.
.
.
.
.
.
.
.
.
.
.
.
.
.
.
.
.
.
.
.
.
.
.
.
.
.
.
.
.
.
.
.
.
.
.
.
.
.
.
.
.
.
.
.
.
.
.
.
.
.
.
.
.
.
.
.
.
.
.
.
.
.
.
.
.
.
.
.
.
.
.
.
.
.
.
.
.
.
.
.
.
.
.
.
.
.
.
.
.
.
.
.
.
.
.
.
.
.
.
.
.
.
.
.
.
.
.
.
.
.
.
.
.
.
.
.
.
.
.
.
.
.
.
.
.
.
.
.
.
.
.
.
.
.
.
.
.
.
.
.
.
.
.
.
.
.19
.19
.19
.19
.19
.19
.20
.20
.21
.21
AZURADISC ONE-YEAR/100,000 DISC LIMITED WARRANTY . . . . . . . . . . . . . . . . . . . . . . . . . . .22
EXCLUSIONS AND LIMITATIONS . . . . . . . . . . . . . . . . . . . . . . . . . . . . . . . . . . . . . . . . . . . . . . . . . . . . . .22
OBTAINING WARRANTY SERVICE . . . . . . . . . . . . . . . . . . . . . . . . . . . . . . . . . . . . . . . . . . . . . . . . . . . .22
WARRANTY COVERAGE . . . . . . . . . . . . . . . . . . . . . . . . . . . . . . . . . . . . . . . . . . . . . . . . . . . . . . . . . . . .23
3
Ver 1.1
08-11-2012
OUT OF THE BOX
After unpacking the Uno, verify the following items, in the quantities shown, are included. Contact Azuradisc, or
the local representative if any items are missing. Place the machine on sturdy surface. Ensure there are no obstructions
of air circulation around the bottom and rear of the machine. Make sure that new cartridges are not stored within 2 feet of the
Uno.
TM
1 ea. - PoliCool
v4.0 Cartridge Kit
TM
Includes 32oz of PoliCool , and 1 Pads.
Item # uno_02889_0 (Sold as a Kit)
(Combo Item)
1 ea. - Micro-Fiber Wiping Cloths 6x6 - Hand washable and reusable super soft
material to clean optical surfaces.
1 ea. - Optical SprayCleaner 2oz.- Laser clear anti-static formula spray cleaner.
Item # CK 00262 3
1 ea. - Power Cord
1 ea. Scratch Removal Poster
Item # adv_00222_7
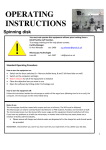
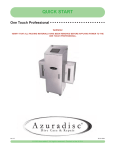
PART IDENTIFICATION
A Access Door:
• PolicoolTM Cartridge
• Easy access to PoliCoolTM pump
• Easy access to PoliCoolTM Mixer
F
B Safety Lid:
• Automatic shut-off when open
C
CAUTION!
Make sure there is adequate room
for air flow around and
underneath the machine
AT ALL TIMES!
C Aluminum Casing
• Will not conduct electricity
• Waterproof
• Easy to clean
A
B
D Side mounted cooling fans
B
E AC Electric input recepticle
E
• Industrial Strength
• Fused
• On/Off Switch
F
D
C
F Electronic Controller and User Interface
D
4
Ver 1.1
08-11-2012
Important Information
About PoliCool & Smart Tag Technology
TM
What is PoliCoolTM ?
PoliCoolTM is an advanced formula of micro-abrasives particles, along with a cooling solution and other
proprietary ingredients mixed together in a single liquid to provide maximum scratch removal and polishing properties.
Performance
PoliCoolTM outperforms polish compounds in cut rate & finish. PoliCoolTM lasts longer than most fixed abrasives. One of the greatest benefits of PoliCoolTM is that it can be recycled over and over (with filtering)
until it has reached the end of its useable life. This creates the benefits of cooling a disc during repair
without creating wastewater, or having a complex recirculation system. There is no need to add water,
or clean up messy polish compound splatter or dust from the machine similar to those used in "water
based" or "dry process" machines. PoliCoolTM is automatically recycled back into the cartridge at the end
of the cycle.
Usable Life
The performance and life of this product is measured in seconds run time. Different size containers and
mixtures contain a smart tag (computer chip) with the information containing the maximum "seconds of
run time" per cartridge. If PoliCoolTM were used beyond this life, poor performance would result, and disc
damage could occur. Since product life is critical to performance, PolicoolTM is only sold in containers
called cartridges that contains a smart tag.
About the Smart Tag IMPORTANT MUST READ INFORMATION
Each PoliCoolTM cartridge is outfitted with a smart Tag that carries the information about the maximum
useable life (run time) of each individual cartridge. Azuradisc disc repair machines that use PoliCoolTM
technology are outfitted with a smart Tag reader that reads and transfers the "run time" information
from the cartridge to the disc repair machine. Once transferred, the runtime information cannot be
transferred back to the PoliCoolTM cartridge, nor can it be transferred to a different machine. To get maximum life out of each PoliCoolTM cartridge, it must be completely used before replacement. Once a cartridge has been mated with a machine, only that machine (not the cartridge) keeps track of the credits
of repair seconds and assumes that the same cartridge stays in place to be used until that repair time is
used-up. The cartridge itself is no longer able to identify itself or to provide left-over credits to this or
any other machine.
While it is possible to remove a partially used cartridge from the machine (for transportation or to shake
and mix the liquid) it is important that the same cartridge is reinserted in the same machine to be able
to use-up the remaining credits.
PLEASE NOTE:
- Inserting a new cartridge in a machine that still has credits left from a previous cartridge will
ignore the new tag and continue to use the original credits left from the previous cartridge. To properly
load a new bottle and its values, you must enter the system set up and manually delete any time remaining from the machine before you can load the credits from a new bottle.
- Inserting a partially used cartridge in another machine will not transfer any credit.
Azuradisc does not provide refunds or credits for losses due to premature replacement of PoliCoolTM cartridges or the improper exchange of cartridges between machines.
5
Ver 1.1
08-11-2012
SET UP - SUPPLIES - CARTRIDGE & PAD INSTALLATION
To be performed initially and each time you replace the consumables.
IMPORTANT! Always change the abrasive & (optional) finishing pad when installing a new cartridge.
1
Power the machine on. Allow the machine to fully Boot Up, the
display will show PolicoolTM Time in Seconds Left. The machine
will stop operating when policool time reads 0 (zero). Policool
Time must read 0 (Zero) in order to load a new
Bottle.
(see erase function to intentionally delete time)
2
The Fused Switch is
located on the back.
Remove Previously Depleted
(used) Bottle, and set Mixer
outside of machine.
Insert a new “Unopened”
bottle of PoliCool as
shown
Smart Tag located here under label.
ON / OFF
Fuse Access
Drawer
This Side out Label
3
4
Open the Bottle, Remove Seal and insert Mixer assembly
into machine be sure to place under drain spout.
Note: The power cord and tubing will spin the mixer top as
it is inserted, this is normal.
Press the enter Key to “load” a New Bottle.
Within 5 seconds or less, Policool time will be
transfered from the bottle to the Machine.
Upon successful transfer, the
display will show time such
as: 6600 Seconds.
5
Mix /Prime Verify Liquid Flow
6
Prime Function will operate the mixer for 5 seconds, then mixer
& pump for 10 seconds more. Repeat until liquid is mixed &
flowing. Verify no air bubbles are present, and flow is not
blocked in any way. It may take more than one prime cycle.
Installing New Polishing Pads
The Abrasive & Finishing Pads must be replaced each time a new
bottle of PolicoolTM is installed. They are attached using velcro, to
remove gently peel off pad from base, to install new ones align
and press down firmly. The Smaller Finishing Pad is optional and
not required for use.
Press the
button, use the
buttons to scroll to the prime screen. Press the
enter button begins Prime function. Press
to stop prematurely and return to
main screen.
Scroll Forward
Pump Prime
f : Start Sec: 00
Information
Enter
Scroll Back
6
Ver 1.1
08-11-2012
BASIC OPERATION
(Figure 2.1)
For proper operation the lid must be both
closed and locked by compression.
Place a Disc on the spindle
as shown (repairable side will
contact pad when lid is closed)
To lock, Turn the latch clockwise until the lid
is pulled down and the latch is compressed as
shown in Figure 2.1
Open and unlocked
Lid will open and close easily.
Not Compressed, Not Locked
Lid will not close if in this position,
if lid is closed, it is not locked
Closed and locked
To lock, turn knob clockwise until
it compresses lid and locks
Select Repair Cycle
Time Remaining
Sec: 59 AD:On
Number = Length of time in seconds
After pressing your selected time cycle, the machine will
start automatically and the screen will show the cycle
time as it counts down to zero, the machine
shuts off automatically. A Dry Cycle Timer will countdown
after the repair cycle. Dry time is not deducted* from
policool time (*versions 6.3 and higher).
After repair cycle is finished remove
Disc from spindle.
7
Ver 1.1
08-11-2012
INFORMATION SCREENS
Please Load Policool
NO PoliCool Time Remaining
Policool Time Display
PoliCool Time Remaining
Time Left: 0
Load New Policool
PoliCool Time
Sec: 6600 DryOn
Displays remaining PoliCool time
in seconds.
To load a new cartridge, insert new
cartridge, and press enter button.
You should see 6600 seconds appear
within 5 seconds or less.
Lid Open Screen
PoliCool Low Screen
Machine Will Not Operate With Lid Open
PoliCool Low !
f :Reset Warning
Lid Open
Please Close
At 1500 seconds the screen will indicate a warning. Once
it reaches 0 seconds, the machine will no longer start.
The machine will not operate once it has reached zero.
You must “load” a New Policool cartridge once you have
reached 0 (Zero).
You cannot load a new bottle if there is time remaining.
(See Erase function to inentionally erase time)
8
Ver 1.1
08-11-2012
INFO MENU
Forward Scroll Button
Info
Button
Enter
Button
Reverse Scroll Button
• Prime System (mix & pump)
Press the
button, use the
buttons to
scroll to the prime system screen.
Pressing the
button to enter function.
Press again to prime
button will stop the
prime and pressing again will exit the screen.
<Prime System>
• Total Runtime Meter
Press the
button, use the
buttons to scroll to the Runtime
Meter screen to see the total
amount of cycle run time displayed in
hours.
Total Runtime
Hours: 001.10
• Load Policool
Press the
button, use the arrow
buttons to scroll to the load policool screen.
Pressing the
button to enter function.
Press it again to transfer credits to machine
Press
to return to main screen.
Press f Key Load
Policool Sec: 6600
• System Set Up
• System Statistics
Press the
button, use the
buttons to
scroll to the System Statistics screen
to see the number of cartridges used and
time cycle counts.
PoliCool Loads
Total:
9
• Auto Dry Timer
Press the
button, use the arrow
buttons to scroll to the load policool screen.
Pressing the
button to enter the function.
Press it again to transfer credits to machine
Press
to return to main screen.
Press the
button, use the arrow
buttons to scroll to the Auto Dry Timer screen.
Pressing the
button to enter the function.
use the arrow buttons to set the dry time
Press
to return to main screen.
<System Setup>
<Auto Dry Timer>
9
Ver 1.1
08-11-2012
INFO MENU
DRY TIME SETUP
Forward Scroll Button
<Auto Dry Timer>
Info
Button
Enter
Button
Reverse Scroll Button
• Auto Dry On/Off
Press the
button, use the
buttons
to scroll to the auto dry screen.
Pressing the
button enters the function.
Auto Dry 5 sec.
Press fto Change
Use the arrow keys to select value
•Zero turns the timer off: 10 seconds is max
•Press Enter: Confirm change
•Press >: Increase timer selection by 1
•Press <: Decrease the timer selection by 1
•Press i: Cancel and do not load new selection. Takes back to Auto Dry timer Main
Dry Timer: 5 Sec
Use Arrow Keys
Dry Timer Facts:
-Drying Time is no longer included in
policool time in software version 6.3
and higher.
-Dry time will not deduct from policool
timer.
-Dry Cycle feature works by stopping
the liquid pump, and allowing friction
to dry the pad and disc.
-Dry Times may Vary- Depending on
the pad pressure against the disc, you
may want to increase or decrease the
dry timer to “fine tune” how dry your
discs come out.
Dry Timer Fine tuning:
Dry Timer & Disc Finish:
When to Change Dry timer:
-Dry but not Hot is the goal when selecting
a proper dry cycle. You want the machine to
stop at the moment the pad and disc are
dry but not a moment longer.
-When the dry cycle is set accuractely, your
discs will come out shiny & ready to go into
the case.
-If your discs are coming out HOT, you may
want to reduce your dry time.
-If your discs are coming out Wet, you may
want to increase dry time.
-if your discs have a light whispy repair
marks, try reducing your dry time.
-If your pads are not lasting the full bottle,
reducing dry times may help reduce this. If
pad pressures are too high, reducing dry
timer by a few seconds may not impact this,
and you may need to adjust your pad pressure.
-If discs have a light powder- try increasing
by 1 or 2 seconds.
-If you operating at high temperatures, you
may need to reduce your dry times.
-Overdrying, causes excessiv heat, which
may prematurely wear your pads out, or
cause premature pad failure, or potentionally over heat a disc causing damage.
-Overdrying can leave whispy repair marks.
If the pad becomes too dry, light rescratching will begin to occur, this means you are
over drying, and should either reduce the
dry time or the disc/pad pressure.
If your discs come out dry but have a light
dry powder on them, the dry time may need
to be adjusted by 1 or 2 seconds up or
down to perfect it. A light powder residue
that wipes off without scratching is considered normal to average.
Some Discs will vary- Some discs are
thicker or thinner than others and may
come out damp, or drier than others due to
the variance from disc to disc. Things like a
scratch guard, can affect your finish. The
dry timer is adjustable to fit keep your repair
experience similar from disc to disc.
10
Ver 1.1
08-11-2012
INFO MENU
SYSTEM SETUP
Forward Scroll Button
Info
Button
Enter
Button
Reverse Scroll Button
• Mixer Menu (Turn On / Off)
• Mixer Test
• Pump Test
Press the
button, use the arrow
buttons to scroll to the Mixer Menu screen.
Pressing the
button to enter the function.
press the enter button again to set turn off
or on Press
to return to main screen.
Press the
button, use the arrow
buttons to scroll to the Mixer Test screen.
Pressing the
button to enter the function.
press the enter button again and hold to
Test Press
to return to main screen.
Press the
button, use the arrow
buttons to scroll to the Pump Test screen.
Pressing the
button to enter the function.
press the enter button again and hold to
Test, Press
to return to main screen.
<Mixer Menu>
Hold f To
Test Mixer
Hold f To
Test Pump
• Pump Tube Timer Reset
Press the
button, use the arrow
buttons to scroll to the Pump Tube timer Reset
screen. Press
button to enter the function.
press and hold again and hold to reset the
timer Press
to return to main screen.
Hold f To Erase
Tube: 000001.0h
• Tag Test (Read Only)
Press the
button, use the arrow
buttons to scroll to the Tag Test screen.
Press the
button to enter the function.
press the enter button again to Test,
Press
to return to main screen.
<Tag Test>
• Erase Policool
Press the
button, use the arrow
buttons to scroll to the Erase Policool screen.
Pressing the
button to enter the function.
Follow instructions to Erase Currently
Loaded Policcol Time. Press
to return
to main screen.
<Erase Policool>
11
Ver 1.1
08-11-2012
INFO MENU
System Statistics Menu
Leads to all Statistical values
the machine tracks during
operation such as total
runtime, PoliCool Loads,
Recipe counts, etc.
SYSTEM STATISTIC SCREENS
Forward Scroll
Button
<System Statistics>
Info
Button
Enter
Button
Press “i” from the main
screen to get to main info
shown at right.
Reverse Scroll
Button
Press “i” at any time to return to the main screen
• Total Policool Loads
Press the
button, use the
buttons to scroll to the count screen. Displays the
total number of bottles of policool you have
loaded..
<Total Policool>
Loads: 3
• Total Recipe Count
• Total Runtime
Press the
button, use the
Press the
button, use the
buttons to scroll to the count screen. Displays the buttons to scroll to the count screen. Displays
recipe tracking.
machines total runtime.
<Total Runtime>
Hours: 25.7
<Recipe Count>
Total:
859
• Pump Runtime
• 30,60,90,120,180 Second Cycle Count
Press the
button, use the
the count screen. Displays recipe tracking.
Press the
button, use the
buttons to
scroll to the count screen. Displays each recipe tracking.
buttons to scroll to
<Pump Runtime>
Hours :
25.7
60 Second Cycle
Count:
224
12
Ver 1.1
08-11-2012
INFO MENU
Press
from the
main screen to get to
main info shown at
right.
ERASING POLICOOL TIME
Forward Scroll
Button
<Clear Policool>
Info
Button
Enter
Button
Press
at any
time to return to the
main screen
Reverse Scroll
Button
Description
Actions
•Asks user to confirm clear of PoliCool timer
•Press Enter: NA
•Press >: NA
•Press <: NA
•Press i: Take to Clear PoliCool Menu.
Or if Clear PoliCool is called from the Load
PoliCool screen, returns you to Load PoliCool
Main
•Displays amount of PoliCool time left on the system
•Press 180: Clear PoliCool Timer and return
to Clear PoliCool Menu
• Clear PoliCool Time WARNING!
Procedure Permanently Erases PoliCool Credits!
Press the
button, use the
buttons to scroll to the PoliCoolTM Time
Clear screen. Press
to proceed to confirmation screen.
•
Confirm Policool Erase?
Hold the 180 button down to erase or “zero” out any
button to exit.
unwanted PoliCoolTM credits. Use the
Confirm Clr?
Press 180: 0005 sec
<Clear Policool>
13
Ver 1.1
08-11-2012
TAG TEST FEATURE
Step 1: To enter testing, press the
button. (Figure 3.1 ) This will take you
to the testing screen. To return to the
main screen press the
button.
( Figure 3.2 )
When you are at the testing screen
you will either see a time value or the
word depleted if the time has been
transfered previously (used).
(PREVIOUSLY KNOWN AS SMART CHIP TEST)
<
Tag Test
>
Time Left:
Depleted or Secs
( Figure 3.1 )
Step 2:
Remove the
Mixer and set
aside to test
several bottles
in a row
( Figure 4.1 )
( Figure 3.2 )
Step 3:
If the PoliCool Tag is
valid you will see the
amount of Time left in
seconds. The timer will
reset automatically
after 3 seconds.
TM
( Figure 4.1 )
Step 4: If the PoliCool Tag Test
displays the word “depleted” when run,
this means there is no credit left on this
bottle, and you must load a new bottle
that has credit on it. ( Figure 6.1 )
TM
Press the enter button
to retest.
( Figure 5.1 )
Press f Key
Time: 6600 Sec
( Figure 5.1 )
Step 5: If the PoliCool Chip is not Reckogized
you will remain on the Test Screen and nothing will
occur. The timer will not count down and the Seconds will continue to display zero.
( Figure 7.1 ) If you need to return to the Main Test
Screen you can do this by pushing the
button.
TM
Press fKey
Time:
0
Tag Depleted
( Figure 6.1 )
sec
( Figure 7.1 )
14
Ver 1.1
08-11-2012
SCREEN MAP
SCREEN FLOW CHART
15
Ver 1.1
08-11-2012
TROUBLESHOOTING
No power
• Verify the power cord is properly inserted in a working outlet; test the outlet with another device.
• Check the fuse (by the power connector) on the machine. 110 -230V machines: 15A (1 spare fuse can be found in the AC outlet)
• Check On/Off switch is in the “On” position.
Caution: To avoid electrical shock, ensure the outlet is properly equipped
Fuse Removal
with a ground connection.
Little or No water flow
• Is the hose inserted into the PoliCoolTM container?
• Are there any kinks in the hose(s)?
• Is the pump turning? (try priming pump)
• Check and clean filter if needed.
Machine overheating
• Verify the machine is on a flat sturdy surface. A carpeted surface may block the air outlet on
the bottom of the machine.
• Leave space around the machine to allow air flow for the cooling fans.
• PoliCoolTM liquid is not flowing correctly. Verify proper flow of liquid with no air bubbles by using
the pump prime feature. Look for constant flow under the lid during the priming process.
Cartridge not reading
• Remove cartridge and reinstall it behind the access door making sure to position cartridge label
side in. (step 2)
• Make sure that the cartridge is new and that it has not already been inserted in this or another
machine and has already transferred its credits.
• Test cartridge in test mode (Refer to smart chip test mode)
Not responding to Con- • Power machine down. Turn machine back on and check for display on the front control panel.
trol Panel
• Wait for the screen to be on.
Has power but will not
run
• Make sure there are no obstructions under the lid and reclose.
• Make sure the prime pump sequence has completed, and press the start button again.
• Check for indicators on the screen. A new PoliCoolTM cartridge may be required.
• Make sure controller is displaying main screen.
Preamature wear on
the pad
• Never run the machine without a disc. If this happens, the rubber pad from the handle will damage the polish pad which will then have to be replaced. The PoliCoolTM will still be useable, but the
pad must be replaced with a new one. The handle pad may also need to be replaced if it has been
damaged.
16
Ver 1.1
08-11-2012
TROUBLESHOOTING
“HOW TO PREVENT PADS FROM PREMATURE FAILURE”
Problem:
The primary cause of any premature pad failure is typically due to excess HEAT. Heat will break
down the fiber top layer on the pad in the following ways: fabric fraying, fabric has hole in it, exPads are not lasting for posing the rubber layers below, pad has glazing over appearing to have lighted melted and fused
the normal life
together.
expectancy of 6,600
Maximum Rated Temperature range is 120 degrees fareinheight. Temperatures above this range
seconds
are known to cause pad breakdown.
Possible Cause(s):
• Lack of or Insufficient Liquid Coolant
• Pad Pressure is too high
• Pad thickness increases due to liquid absorbstion.
• Clogged or Damaged Radiator.
Insufficient Liquid
Coolant
Lack of Liquid Coolant- Verify that you have sufficient Policool flowing out of the nozzles. A reduced flow is a known cause of premature pad failure.
Insufficient Liquid Coolant- Azuradisc uses Policool to keep the pads cool which contains abrasive materials as well as cooling agents. Although this formula is water soluble, adding water to
the formula can drastically change the chemistry of the Policool, causing the cooling agents to
become ineffective. The can happen if an tap water is added to “replenish” what appears to be
water loss due to evaporation, spilling or liquid that is trapped in the radiator or lines. If Tap water
for instance is added, the ratios are changed and the formula can become diluted or “watered
down” reducing the cooling properties. Tap water also contains hard minerals which will affect
the chemistry and can mechanically cause light “wispy scratching marks” on the surface of the
disc. If the Policool has been compromised, the system must be washed clean and wiped down.
Preferably using Warm Distilled Water no hotter than 90 degrees in temperature. Distilled water
does not contain minerals, and will help absorb minerals.
Pad Pressure too High Pressure too high- each pad is rated for a light compression equating to .6 mm or 10% of the
thickness of the material. Compressing the pad with a greater amount of pressure will SQUEEZE
the liquid content out of the upper layer of the surface, essentially causing the surface to become
.
dry which will instantly increase friction levels to a point of pad failure due to excess heat.
Pad thickness increases due to liquid
absorbtion
Pad thickness increases due to Liquid absorption- Each pad will absorb briefly retain a small
amount of liquid which will cause the cell foam structure to swell up. If the pad pressure is set at
time when the pad is dry, it is possible for excess pressure to be created due to liquid absorption
swelling. If the pad swells causing overpressure, the pressure will become too high and the surface will overeat causing premature pad failure.
Clogged or Damaged
Radiator
A radiator has been used in conjunction with Policool to help prevent the liquid from exceeding
120 degrees F. On average a small radiator can reduce the temperatures between 10-20 degrees. Overtime Policool can build up inside of the radiator reducing its ability to affectively cool
the liquid. A reduced capacity radiator appears to function, as the liquid is still able to flow freely
through the radiator even though the lower have of the radiator has sediment built up in it preventing the liquid from flowing through the entire radiator. This problem can be prevented by applying preventative maintenance techniques such as flushing the radiator out thoroughly and
often. Bypassing the radiator all together can be a great solution; as long as you have another
means of keeping the operating temperatures below 120 F. Storing the Policool in the refrigerator
at 55 F is preferred and can yield significantly better results if this temperature is maintained.
Azuradisc currently is testing Chiller technology to hold this temperature down at 55 degrees F
even during continuous operation and recirculation. Liquid temperatures can also be reduced
with the usage of mixers which can aerate the liquid reducing the temperature enough to preventing a temperature rise above 120 degrees F.
Hyper Extended Life-
Pads lasting well beyond 12,000 seconds has been recorded repeatedly in Azuradisc laboratory
experiments when applying the correct pressure to the pad and maintaining liquid Policool temperature of a steady 55 Degrees F. The Policool was also continuously mixed for consistency in
distribution of the cooling agents throughout the entire experiments while recirculating the same
Policool in a closed loop environment. It is well known and documented that the primary reason
for pad failure is one or more of the above mentioned problems, all of them leading to excess
heat, which yields repeatable failures when the temperature exceeds 120 degrees. All of the
above problems have been identified as preventable.
17
Ver 1.1
08-11-2012
MAINTENANCE
CHANGE PUMP TUBE
Step 1:
Step 2:
Step 3:
Turn pump assembly
counter clockwise to remove outer cover.
Remove and replace hose.
Align pins and turn pump
clockwise to replace outer
cover.
CLEANING YOUR UNO PERMA FILTER
CLEANING YOUR UNO
Step 1:
Step 2:
Step 3:
Mist repair chamber with Using a soft cloth, remove
Azuradisc Spray Cleaner. PoliCool residue and Spray
Cleaner from all surfaces.
TM
Repeat as needed until
clean.
After every cartridge of PoliCool
remove the blue filter and run
water through it until clean.
(Place back on when clean)
TM
LUBE QUICK LOAD SLIDERS VERSION 2
Step 1:
Step 2:
Step 3:
Remove set screw by turning
counter clockwise.
Separate and lubricate rings
with 2-3 drops of Quick Load
Head Lubricant (tl_03044_2)
Spread on inner brass surface
with brush.
Assembly is reverse, HOLES MUST
ALIGN or damage will result.
Do NOT over tighten set screw or
damage will result.
18
Ver 1.1
08-11-2012
MAINTENANCE
FLUSH COOLING SYSTEM
Step 2:
Step 1:
Set an empty PoliCool container
under drain as a catch.
Place the supply line to the
pump into a container of
Warm distilled water.
Step 3:
Step 4:
Run “Prime Cycle” until
fluid runs clear.
As needed, remove and clean fittings
under warm water.
If clogged use paperclip to clear holes
TM
Scroll Forward
Information
Enter
Pump Prime
f : Start Sec: 00
Scroll Back
Step 5:
Step 6:
Remember to run Mixer
and “Prime Cycle” when a
new PoliCool is inserted.
(Also run if machine has
been left unused for any
period of time.)
Wipe the Machine Down
with a dry clean cloth. Do
not use any chemicals.
TM
Azuradisc Spray Cleaner is
safe to use to clean up the
machine.
Scroll Forward
Information
Enter
Pump Prime
f : Start Sec: 00
Scroll Back
19
Ver 1.1
08-11-2012
UNO QUICK-START/REFERENCE GUIDE
READ BEFORE OPERATING MACHINE
Loading PoliCool Credits (See page 6 in the User’s manual)
• Insert PoliCool into the Uno prior to powering up the machine.
• When prompted by the Uno, insert your PoliCool cartridge into the front
chamber. Make sure the label “THIS SIDE OUT” is facing out.
• Your Uno screen will indicate “PoliCool Loading” and begin its countdown.
DO NOT REMOVE during this process.
• When your machine reads “PoliCool Credits 6,600” your credit transfer is complete.
Routine Maintenance
Hourly:
• Keep your filter free of debris.
Daily
• Wipe down the surfaces and heads after each shift to prevent excessive PoliCool
build up. (See page 16 in the User’s manual)
• Exercise your Quick Load Assemblies at the beginning of each shift. Lubricate as
needed. (See page 16 in the User’s manual)
Weekly
• Flush your radiator with WARM distilled water using the “prime cycle.”
(See page 17 in the User’s manual)
Azuradisc, Inc
7307 South 89th Place
Mesa, AZ 85212
United States
www.azuradisc.com
20
Ver 1.1
08-11-2012
EDUCATION
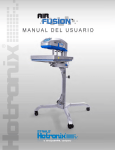
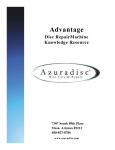
HOW DISCS ARE MADE
CDs consist of 99% clear polycarbonate plastic. The reflective layer, protective layer and screen print comprise the
remaining 1% of the disc.
1. A disc is created from molten polycarbonate and digital information
is stamped on the top of the disc, while it is still near melting point,
using a die with microscopic bumps. These bumps are known as “pits
and lands”.
4
3
2. After the information is molded into the polycarbonate, a reflective
foil layer is applied using a process called sputtering or wet silvering.
This layer reflects the laser back to the player, so it’s integrity is extremely important. The layer is usually silver, but can be made of gold
or platinum.
2
3. A clear lacquer coating is applied to seal the reflective layer and prevent oxidation. This layer is very thin and offers little protection from
top side scratches.
1
4. Finally the artwork is screen-printed on the top of the disc.
Pits and Lands are imprinted into the disc to indicate a one or a zero. A laser beam is sent from the player to the
disc and the reflective layer reflects it back to the reader and the ones and zeros are translated by the player.
Recordable discs have a photosensitive dye type layer instead of the stamped information layer. This layer, when
exposed to a certain light, will make an impression of a pit into the layer.
Re-recordable discs use a layer that allows the laser to polarize the photosensitive layer back and forth between a
visible pit to an invisible pit.
Label
Pit
Land
Reflective Layer
Laser
Polycarbonate
HOW A DVD IS MADE
DVDs are made in different ways depending on the amount of information that is recorded on the disc. DVDs may
be single or double layered and single or double layered double sided.
NOTE: DVDs cannot be repaired as many times as CDs because the read side polycarbonate layer is thinner.
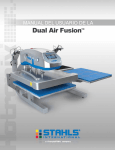
Single Layer DVDs ( DVD-5 - 4.7GB)
These DVDs are made the same way as a CD with one additional polycarbonate layer added between the label and
the pits and lands.
Thickness: 1.2mm
Label
0.6mm
Polycarbonate
0.6mm
Reflective Layer
Polycarbonate
Laser
21
Ver 1.1
08-11-2012
Double Layered DVDs ( DVD-9 - 8.5GB)
Double layered DVDs have a semi reflective layer and a reflective layer giving two layers to store information.
Thickness: 1.2mm
Label
Polycarbonate
0.6mm
Reflective Layer
Bonding Layer
Semi Reflective Layer
0.6mm
Polycarbonate
Laser
Double Sided DVDs ( DVD-10 - 9.4GB)
Double sided DVDs consist of two discs bonded back to back with the reflective layers in the middle and both sides
are repairable. Double sided DVDs require the use of smaller of micro-abrasive polishing papers to prevent the
manufacturer’s label area from being removed during the repair process.
Laser
Polycarbonate
Thickness: 1.2mm
0.6mm
Reflective Layer
Bonding Layer
Reflective Layer
0.6mm
Polycarbonate
Laser
Double Sided/Double Layered DVDs (DVD-18 - 17.1GB)
Double sided/double layered DVDs are simply two double layered discs bonded back to back.
Laser
Thickness: 1.2mm
Polycarbonate
Semi Reflective Layer
0.6mm
Reflective Layer
Bonding Layer
Reflective Layer
0.6mm
Semi Reflective Layer
Polycarbonate
Laser
IDENTIFYING SCRATCHES
The three basic types of scratches on CDs are: topside, reading side, and top side foil dents. DVDs are not subject
to top side scratches and foil dents as the manufacturing process is different from CDs.
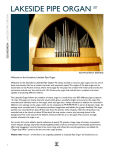
Reading Side Scratches - CDs, CD-ROMs & DVDs
Reading side scratches are the most common type, the easiest to identify, and the
only type of scratch that can be repaired.
Scratch
If the scratch has a double Image, as shown in the figure to the right, it is a reading
side scratch and can be repaired by using an Azuradisc scratch repair machine. The
double image is the result of the actual scratch and a reflection made by the reflective
foil layer.
Reflection
22
Ver 1.1
08-11-2012
Top Side Scratches
Note:
Light passes
through the disc.
The scratches shown below are not found on DVDs
Top side scratches are caused by a sharp object damaging the top or label side of a disc. In
this case, the information just below the printed label area is damaged and causes a skip.
Top side scratches cannot be repaired, however they can be prevented by using an Azuradisc Scratch Guard.
The easiest way to identify a top side scratch is to hold the suspected scratch up to a light
source and verify that light will pass through the disc in that area.
Note:
If light does not pass through, check the reading or bottom side of the disc for a scratch without a “double
image”. If a double image is not visible, it is a topside foil dent or a top side scratch that did not damage any
of the label.
Top Side Foil Dents
No double image
Top side foil dents are not scratches but look like a scratch on the reading side of the disc.
The dent is made by a large amount of pressure put on the label side of the disc, causing
the foil layer to dent. This dent will cause skips and cannot be repaired, however they can
be prevented using an Azuradisc Scratch Guard.
The easiest way to identify the top side foil dent is to see if there is a “double image” produced. There should not be a second image because the damage is to the inner foil layer.
There may not be any evidence on the label side of the disc because the pressure did not
cause any of the label to be removed.
ACCESSORIES
Game Cube Adapter.
Polishing Pad
Double Sided DVD
with velcro.
Game Cube Adapter Ring
Fits Dual Disc II and Uno
Replacement pad
(Do NOT install until old pad has
been removed)
Item # gca_02508_0
Item # st2_02959_0
Reinforced Plastic Spindles.
For handling and storage of
compact discs.
Item # spn_01677_4
23
Ver 1.1
08-11-2012
EXCLUSIONS AND LIMITATIONS
This Limited Warranty applies only to the Warranted Products. This Limited Warranty does not apply to any other products, whether or not packaged or sold with
the Warranted Products.
This Limited Warranty can be redeemed only by the original purchaser at the original location where Azuradisc shipped the Warranted Product. If you wish to
transfer this Limited Warranty, please contact Azuradisc for more information.
Any Software distributed by Azuradisc, whether or not incorporated into the Warranted Products, is not covered under this Limited Warranty. Refer to Azuradisc's
Software License Agreement, reviewable at www.azuradisc.com or by calling +1.480.827.8786 for more information.
This Limited Warranty does not apply to the following:
• Normal wear or deterioration (follow preventative maintenance schedules to minimize wear and tear on your machine);
•
•
Improper installation or maintenance including but not limited to failure to follow any preventative maintenance schedule;
•
Warranted Products that have been used with non-Azuradisc products;
•
Damage caused by service performed by anyone other than Azuradisc or an Azuradisc-certified service technician;
•
A Warranted Product that has been modified without the written permission of Azuradisc;
•
If any Azuradisc serial number, date stamp or other marking has been removed or defaced;
•
Any item concerning the Warranted Product's appearance that is not due to a defect in material or workmanship.
Damage caused by accident, abuse, misuse, misapplication, or failure to follow usage directions;
TO THE MAXIMUM EXTENT PERMITTED BY LAW, THIS LIMITED WARRANTY AND THE REMEDIES SET FORTH ABOVE ARE EXCLUSIVE AND IN LIEU OF
ALL OTHER WARRANTIES, REMEDIES AND CONDITIONS, WHETHER ORAL OR WRITTEN, EXPRESS OR IMPLIED. AZURADISC SPECIFICALLY DISCLAIMS ANY AND ALL IMPLIED WARRANTIES, INCLUDING, WITHOUT LIMITATION, WARRANTIES OF MERCHANTABILITY AND FITNESS FOR A PARTICULAR PURPOSE. IF AZURADISC CANNOT LAWFULLY DISCLAIM OR EXCLUDE IMPLIED WARRANTIES UNDER APPLICABLE LAW, THEN TO THE
EXTENT POSSIBLE ANY CLAIMS UNDER SUCH IMPLIED WARRANTIES SHALL EXPIRE ON EXPIRATION OF THE WARRANTY PERIOD. No Azuradisc reseller, agent, or employee is authorized to make any modification, extension, or addition to this warranty.
IN NO EVENT SHALL AZURADISC BE LIABLE, WHETHER IN CONTRACT, TORT (INCLUDING NEGLIGENCE), STRICT PRODUCT LIABILITY OR OTHERWISE, FOR DAMAGES IN EXCESS OF THE PURCHASE PRICE OF THE WARRANTED PRODUCT WITH RESPECT TO WHICH SUCH DAMAGES ARE ASSERTED, PLUS ANY FREIGHT CHARGES ACTUALLY PAID ATTRIBUTABLE TO SUCH WARRANTED PRODUCT, OR FOR ANY INDIRECT, SPECIAL,
INCIDENTAL , PUNITIVE OR CONSEQUENTIAL DAMAGES OF ANY KIND, INCLUDING LOSS OF PROFITS, LOSS OF USE, INTERRUPTION OF BUSINESS,
OR ANY COSTS OF RECOVERING OR REPRODUCING ANY PROGRAM OR DATA STORED IN AN OPTICAL DISC, ARISING OUT OF OR IN CONNECTION
WITH THE USE OF OR INABILITY TO USE THE WARRANTED PRODUCT OR AZURADISC'S PERFORMANCE OF ITS OBLIGATIONS HEREUNDER, TO THE
FULL EXTENT THESE DAMAGES MAY BE DISCLAIMED BY LAW.
This Limited Warranty gives you specific legal rights and you may also have other rights that vary from jurisdiction to jurisdiction.
OBTAINING WARRANTY SERVICE
If you have a problem with one of the Warranted Products, DO NOT SHIP THE PRODUCTS DIRECTLY TO AZURADISC. Instead, please contact our Technical
Support personnel at +1 (480) 827-8786 for a Return Materials Authorization (RMA) number and instructions.
For all warranty service, the Warranted Product must be returned to Azuradisc or an Azuradisc-designated repair center with all transportation and insurance
charges prepaid all the way to AZURADISC warehouse. RMA number, dated proof of purchase and whom it was purchased from, as well as an explanation of the
problem, must accompany the Warranted Product. You are responsible for any shipping costs, import/export duties, taxes and other such fees.
If Azuradisc determines that some of the necessary repairs are not covered under this Limited Warranty, you may request an estimate and the opportunity to confirm whether you agree to pay for these repairs. If you decline, Azuradisc obligations for that machine or product under this Limited Warranty end.
24
Ver 1.1
08-11-2012
WARRANTY COVERAGE
Azuradisc warranty obligations for its products are limited to the terms set forth below:
Azuradisc, Inc. ("Azuradisc") warrants its standard products (the "Warranted Products"), against defects in materials and workmanship for a period
("Warranty Period") defined as follows:
The Warranty Period for disc repair machines and disc testers is a period of one (1) year from the date of original purchase or until 100,000 repairs have been
processed using that Warranted Product, whichever comes first. Unless otherwise specified, the Warranty Period applicable to machines and disc testers pur
chased from Azuradisc as "factory refurbished" products is 6 months or 50,000 repairs, whichever comes first.
The Warranty Period applicable to supplies, normal wear items and replacement machines, assemblies, and parts provided under this Limited Warranty against
defects in materials and workmanship is ninety (90) days from their date of delivery by Azuradisc. Normal wear items include but are not limited to, Mixer Pump,
Latch Assembly, Radiator Cooling System, liquid hosing, rubber gripping mat and polish pads.
Replacement machines, assemblies, and parts, excluding supplies and normal wear items, are also covered for the remaining portion of the original machine's
warranty, if that provides longer coverage for you.
If a defect is discovered and a valid claim received by Azuradisc within the Warranty Period, at its option, Azuradisc will (1) repair the Warranted Product using
new or refurbished replacement parts, (2) exchange the Warranted Product with one that is new or that has been manufactured from new or serviceable used
parts and is at least functionally equivalent to the Warranted Product, or (3) refund the purchase price of the Warranted Product.
When a Warranted Product is exchanged or repaired, any replacement item becomes your property and the replaced item becomes Azuradisc's property. When
a refund is given, the Warranted Product becomes Azuradisc's property.
25
Ver 1.1
08-11-2012
7307 South 89th Place
Mesa, Arizona 85212
Phone (480) 827-8786 Fax (480) 827-1104
26
Ver 1.1
08-11-2012