1
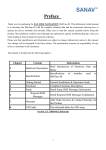
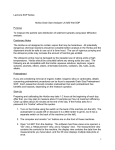
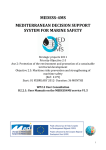
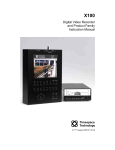
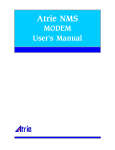
Instruction Manual GSM/GPRS MODEM CARD Model: DP-OPT-CARD-GPRS - Retrofit to (or supplied ® with) DIGICHEM Plus+ Controllers - For Remote Connection to www.digichemplus.com Please complete last page and submit to CWC for Web-Server Setup Supplied by: Convergent Water Controls Pty Ltd 2/4 Huntley St Alexandria NSW 2015 Tel: (02) 9698 3131 Fax: (02) 9698 3210 www.cwc.com.au [email protected] M1 ver 1.2 Manufacturer: Convergent Water Controls Pty Ltd, Sydney Australia. Note: On-going product development at Convergent Water Controls may lead to changes in the specifications of this product. Warranty: This product is guaranteed for a period of 12 months from installation date or 18 months from Invoice date (whichever occurs first). The warranty applies to manufacturing or component defects which may cause the unit to malfunction under specified conditions. The guarantee does not cover damage due to abuse, tampering or improper installation. Disclaimer: Convergent Water Controls will not be held liable for any consequential damage or loss arising resulting from product malfunction. Table of Contents 1. Introduction....................................................................................................................... 1 1.1 Features.................................................................................................................................. 1 2. Description of Operation ................................................................................................... 1 2.1 Webserver & DIGICHEM Plus+ Communication ......................................................................... 1 2.2 SIM Card Specifications ............................................................................................................ 2 3. 4. Installation & Wiring ......................................................................................................... 2 3.1 Installation of GSM/GPRS Modem & SIM Card ...................................................................... 3 3.2 Enable Remote Communications.......................................................................................... 5 Modem Activation .............................................................................................................. 6 4.1 Sending an SMS to Activate the Modem ............................................................................... 6 4.2 Modem Card Polling............................................................................................................ 9 5. Alarm SMS Messages ....................................................................................................... 10 6. DIGICHEM Plus+ Registration ........................................................................................ 11 1. Introduction The DP-OPT-CARD-GPRS modem card can be fitted to any CWC DIGICHEMPlus+ controller to communicate remotely with the CWC Webserver i.e. www.digichemplus.com All process variables, settings and logs are transmitted through this device, to and from the Webserver. 1.1 Features Easy retrofit to controllers installed in the field. Coloured LED to indicate operation Operates with any SIM card on the GSM/GPRS Network 2. Description of Operation The following explains the operation for the remote communications of the DIGICHEM Plus+ Controller, Webserver, and SIM Card specifications. 2.1 Webserver & DIGICHEM Plus+ Communication With the SIM Card installed, and the Modem communication operating (as per the sections 3 and 4), the following occurs when the modem connects to the Webserver www.digichemplus.com : The modem will connect to the Webserver at a default interval of every 15 minutes. This can only be altered on the Webserver, and cannot be altered in the controller itself. This is also known as the Default GSM Logon Cycle. If settings are changed on the Webserver, these changes will be downloaded to the DIGICHEM Plus+ Controller when the unit is connected to the Webserver. This will occur when the controller connects on the next GSM Logon Cycle. If settings are changed and saved in the DIGICHEM Plus+ Controller itself, and then the menu is exited to the main screen, the controller will immediately connect to the Webserver and upload the changes. If changes are made simultaneously on the Webserver and in the DIGICHEM Plus+ Controller within one GSM Logon Cycle, the Webserver’s changes will overwrite the settings changed in the Controller. The Controller will now have the Webserver’s changes only, and none of any settings changed initially in the Controller. 1 2.2 SIM Card Specifications Each service provider will have their own SIM Card to be installed in the Modem of the DIGICHEM Plus+ Controller. SIM Cards from the different providers have their own data and voice plans for their network. Depending on which service provider you choose, the SIM cards should have the following characteristics: The SIM Card should have the facilities for both DATA, and SMS communication. Some SIM Cards have two numbers for these, i.e. one DATA number and one SMS (or voice) number, which will be different numbers. Some SIM Cards only have one number, which facilitates both DATA and SMS communication. Billing of DATA transfer will be in incurred on the DATA number. The DIGICHEM Plus+ Controller will not SMS alarms directly from the SIM card. This is dealt with from the Webserver, and no SIM Card alarm SMS bills will be accumulated. The SMS’s will be forwarded by a 3rd party, that will be initialised by an alarm condition from the Webserver. Note: It is recommended, if possible to have outgoing voice calls barred on the SIM Card, whilst still being able to send and receive SMS. 3. Installation & Wiring The DP-OPT-CARD-GPRS includes a Velcro attachment, SIM card holder and ribbon cable to be attached to the DIGHCEM Plus+ Controller. The card is recognised by the DIGICHEM Plus+ Controller if the LED on the card illuminates when the Modem is switched on, which means it is connected to the Webserver. It will not operate after powering up the controller. A SIM card is required (Section 2.1), and the remote comms needs to be activated in the controller software (Section 2.2) for the LED to operate. To check the LED operation, open the enclosure – but do NOT touch anything inside due to risk of electrical shock, switch the Modem on in the TEST menu (Section 4.1 step 3) and observe the coloured LED on the Modem Card. Be careful to not remove the enclosure lid too far away from the base, in order to prevent damage to the interconnecting ribbon cable. Caution: This should only be performed by a qualified technician or electrician. 2 The controller may require a software upgrade if it does not recognise the Modem card. A software upgrade entails switching the controller on, with a Dongle plugged into the comms port, with the latest software version loaded. If you are unsure, please provide your supplier with the serial number of the controller to determine if a software upgrade is required. 3.1 Installation of GSM/GPRS Modem & SIM Card DIGICHEM Plus+ MOTHER BOARD WITH GSM/GPRS MODEM CARD INSTALLED Please see the diagram above, and follow the instructions below: 1. 2. 3. 4. 5. Ensure that the power is switched off and the controller is unplugged from mains power. Remove cover of enclosure. Before attaching the card onto the enclosure base, make sure the position of the card is on the left hand side of the square, grey transformer, with the SIM card holder towards the top, and Modem aerial on the right hand side. (The small white writing on the Modem circuit board should be upside down) The aerial can be adjusted up or forward, but this orientation should not matter. Peel the white adhesive tape off the Velcro attachment behind the Modem casing, and secure the device in position, as per the diagram above. 3 6. 7. 8. Push firmly on the Modem to ensure the adhesive tape adheres securely to the enclosure base. The device can now be removed if necessary, as the Velcro layers will detach. Plug the ribbon cable from the Modem into the black socket labelled GSM/GPRS Port, as shown on the diagram above. The connector can only plug in one way, with the tab towards the top of the enclosure. Push the connector in all the way. Now install the SIM CARD: Please see the diagrams below, and follow steps 9 to 12. Figure 1 9. 10. 11. 12. Figure 2 Figure 3 To insert the SIM Card into the holder, slide the silver clip to the left as per figure 1 (if already not done), and lift up the top flap. Slide the sim card into the top flap, between the silver clip, and sheath of the top flap as shown above in figures 2 & 3. Make sure the positional tab on the SIM Card is towards the top, left hand corner, as shown in figure 2. Slide the card in all the way – figure 3. Push the top flap down firmly, and slide the silver clip to the right, as shown below in figure 4. Figure 4 13. The SIM Card is now installed, and the top flap should be secure, and should not be able to be lifted. 4 Replace the Enclosure Cover of the DIGICHEM Plus+ Controller: 14. 15. 16. Replace cover of enclosure, ensuring that the seal is in place and no wires are trapped between the lid and the base. Screw the enclosure cover down securely. Plug into mains and switch on. 3.2 Enable Remote Communications The remote communications in the DIGICHEM Plus+ controller requires activation. Please follow the instructions below for this procedure. For a full explanation of how to operate through the menu structure, please consult the DIGICHEM Plus+ instruction manual. The default GSM Logon cycle time to the remote server is once every 15 minutes (See Section 2 above for further explanation). This time can only be altered via the web based software, and cannot be edited from the DIGICHEM Plus+ controller. It is however recommended to keep it at 15 minutes or to increase, rather than decrease this GSM Logon Cycle. Please follow the example below of how to implement this feature on the DIGICHEM Plus+ controller: Main Menu > SETUP MENU > ADVANCED SETUP > REMOTE COMS. Once logged on, the server is updated from the DIGICHEM Plus+ Controller. If alarm conditions exist, the various contact people set up in the web based 5 software are contacted via SMS, and/or e-mail depending on the software’s setup parameters. The card is recognised by the DIGICHEM Plus+ Controller if the LED on the card operates when the Modem is switched on, to connect to the Webserver. It will not operate after powering up the controller. A SIM card is required (Section 3.1), and the remote comms needs to be activated in the controller software for the LED to operate. To check the LED operation, open the enclosure – but do NOT touch anything inside due to risk of electrical shock, switch the Modem on in the TEST menu (Section 4.1 step 3) and observe the coloured LED on the Modem Card. Be careful to not remove the enclosure lid too far away from the base, in order to prevent damage the interconnecting ribbon cable. Caution: This should only be performed by a qualified technician or electrician. The controller may require a software upgrade if it does not recognise the Modem card. A software upgrade entails switching the controller on, with a Dongle plugged into the comms port, with the latest software version loaded. If you are unsure, please provide your supplier with the serial number of the controller to determine if a software upgrade is required. 4. Modem Activation The Modem Card will now require activation for the SIM Card Network. NOTE: If your DIGICHEM Plus+ Controller was originally purchased with the SIM Card installed, please refer directly to section 4.2. This is because the Modem Card would have already been activated prior to shipping. 4.1 Sending an SMS to Activate the Modem SIM Cards differ depending on different service providers. NOTE: SIM Cards used with the DIGICHEM Plus+ Controller are required to have both Data and SMS capabilities. These services are implemented by the service provider (See Section 2.2) Each service provider has an APN number, (Access Point Name), which is a unique number that identifies that service provider’s network. 6 Each DIGICHEM Plus+ Modem needs to know this APN number of the service provider. To send the APN number to the Modem, a text will be required to be sent via the Modem’s SIM Card from a mobile phone, while the modem is on and communicating. The text must be sent to the Voice number of the SIM card, if the SIM card has both Data and Voice numbers. Please follow the steps on the following page to activate the Modem Card: 1. Please select and enter the appropriate text message from the table below into a mobile phone, ready to send for the following service providers but do NOT send the text message yet, continue reading these instructions: NOTE: All text is CASE SENSITIVE, so please check The underscore ( _ ) represents a space character The text is to be sent to the Voice number of the SIM Card Service Provider: Vodaphone Text Message to be sent: AQUAGPRS,APN=vfinternet.au,_,_# 2. In the ‘Send to Number Menu’ of your mobile phone, enter the telephone number of the SIM Card into your mobile phone, but do NOT press the send button yet. 3. The Modem must be activated in order for the relevant text message to be received by the SIM Card. In order to activate the Modem, please enter the TEST Outputs menu of the DIGICHEM Plus+ controller, and test the modem as shown in the diagram below: (For a full explanation of how to operate through the menu structure, please consult the DIGICHEM Plus+ user manual.) 7 Main Menu > TEST OUTPUTS. 4. Once the Modem messages start appearing on the last line of the display, send the text message immediately. NOTE: If you take too long to send the message, or you see “Session Done” displayed on the last line of the screen, repeat this procedure. 5. It is recommended to repeat step 4, if the signal strength is too low (around 50%), as seen on the last line of the display when the modem connects. Make sure the Modem is still on, when re-sending this text. 6. The modem will finish the connection, and the DIGICHEM Plus+ controller will proceed with normal control. 7. To test if the Modem has received the relevant text message, perform the steps in section 4.2 below. NOTE: If the signal strength of the Modem is continually too low, (as displayed on the last line of the display when the Modem first switches on), then an optional external mounted aerial can be purchased. 8 4.2 Modem Card Polling To check whether the Modem contains the correct APN number: 1. Enter the following text into a mobile phone: AQUAGPRS,APN? NOTE: All text is CASE SENSITIVE, so please check This text is to be sent to the DATA number of your SIM card 2. In the ‘Send to Number’ Menu of your mobile phone, enter the Data number of the SIM Card into your mobile phone, but do NOT press the send button yet. 3. Do not send the text yet, and turn the modem on by following from Step 3 of Section 4.1 on the previous page. Complete all remaining steps in that section. 4. Within around 3 – 15 seconds, you should receive a text to the mobile phone that you sent the original message from. 5. This text should confirm the APN number that is in the Modem, as per the example below: Service Provider: APN Setting: Vodaphone APN Settings:vfinternet.au,_,_ NOTE: The underscore ( _ ) represents a space character 6. If you do not receive the correct message as per the above table, please see Section 3.1, and repeat this Section 4.2 for confirmation. 7. If you do not receive any text message, please repeat this section. 8. If all else fails, after double checking case sensitive texting and spacing, please contact your supplier. 9 5. Alarm SMS Messages The following will be sent via SMS from the Webserver if an alarm condition exists: 1. 2. 3. 4. 5. 6. 7. 8. 9. 10. 11. 12. 13. 14. 15. 16. 17. High Conductivity Alarm Low Conductivity Alarm Bleed Timer Alarm High ORP Alarm Low ORP Alarm ORP Dose Timer Alarm High pH Alarm Low pH Alarm pH Dose Timer Alarm No Flow Alarm Inhibitor Tank Level Low Bio A Tank Level Low Bio B/Chlorine Tank Level Low Bromine Tank Level Low pH Tank Level Low Dispersant Tank Level Low Communication Lost Note: The SMS charge will not be billed from the service provider of the SIM Card. For Alarm #17, Loss of Communication - this alarm will only be sent if the controller cannot log on to the Webserver after 15 sequentially failed GSM Logon Cycles. For example, if the Webserver Interval is 15 minutes, then the Communication Lost Alarm will only occur after 15 x 15 minutes = 3 hours, 45 minutes. 10 6. DIGICHEM Plus+ Registration Please print out and fax, or e-mail this page to CWC to register & activate your DIGICHEM Plus+ Controller on www.digichemplus.com. You will be contacted shortly thereafter. Company: ___________________________ Authorised person: ___________________________ Contact number: ___________________________ Date: ___________________________ Hold the Red button (View Settings) down for 3 seconds on the DIGICHEM Plus+ Controller to obtain the ID of the controller: DIGICHEM Plus+ ID: ___________________________ Service Provider: ___________________________ SIM Card Voice No: ___________________________ SIM Card Data No: (If applicable) ___________________________ Please check the silver label on the DIGICHEM Plus+ Controller, and enter the serial number of the unit below. (The serial number can also be found on other silver labels either on the PVC backboard or Cabinet if ordered) DP+ Serial Number: ___________________________ Site Name: (16 Characters max) __ __ __ __ __ __ __ __ __ __ __ __ __ __ __ __ Controller Name: (16 Characters max) __ __ __ __ __ __ __ __ __ __ __ __ __ __ __ __ Contact Details: e-mail: [email protected] Return Fax: (02) 9698 3210 Phone: (02) 9698 3131 11