1
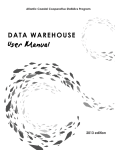
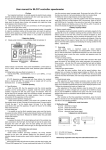
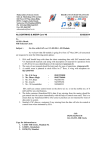
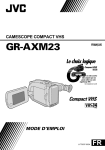
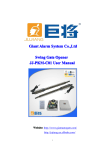
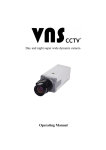
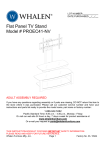
prpd.RG-OB-GE-StepsUSr11:Layout 1
1/14/11
2:44 PM
Page 1
SAVE THESE INSTRUCTIONS
DEALER/INSTALLER: GIVE TO HOMEOWNER
OCEAN BLUE
“GRAND ENTRANCE” POOL STEPS
ASSEMBLY AND INSTALLATION MANUAL
ABOVE GROUND FOUR TREAD MODEL
Part No. 400700
IN GROUND THREE TREAD MODEL
Part No. 400800
prpd.RG-OB-GE-StepsUSr11:Layout 1
1/14/11
2:44 PM
Page 2
OCEAN BLUE FOUR TREAD STEPS
For Above Ground Pools Model No. 400700 - Four Tread
ASSEMBLY INSTRUCTIONS - PLEASE READ BEFORE ATTEMPTING ASSEMBLY
Ballast
Back
Handrail
1.9” diameter
Post
1.9” diameter
Side
Extension
Panel
Stringer
Brace
Upper
Side
Panel
Back
Extension
Panel
Return
Panel
Upper
Back
Panel
Lower
Side
Panel
Side
Ballast
Round
Step
Pad
Leveler
Tube
Deck
Connector
1.9” diameter
Side
Stringer
Stringer
Stringer
Extension
QTY
111111111111124235111111-
PART
NUMBER
490709
490710
490712
490711
490704
490703
490707
490706
490705
490708
490713
490716
490717
490700
490701
490702
490714
490715
490725
490726
490727
490728
490729
490730
DESCRIPTION
QTY
1stringer
1stringer extension
1side stringer
1stringer brace
1lower back panel
29 upper back panel
4back extension panel
2lower side panel
2upper side panel
side extension panel
Second
return panel
Tread
side ballast
back ballast
Right Bottom
hand rail 1.9" diameter
Tread
post 1.9" diameter
deck connector 1.9" diameter
leveler tube
Left Bottom
round step pad
Tread
left bottom tread
center bottom tread
Center Bottom
right bottom tread
Tread
second tread
Flexible Third
third tread
Riser
fourth tread
Flexible Fourth
Riser
PART
NUMBER
490721
490722
490723
490724
490731
Lower Back
Panel
DESCRIPTION
flexible bottom riser
flexible second riser
flexible third riser
flexible fourth riser
step hardware/safety pack
#10 x 1-1/4" self tapping screws
white plugs
safety labels
tread plugs
Tools Needed for Assembly
Cordless drill with Phillips head
Rubber Mallet
Hack saw (for 3-tread only)
Plastic funnel
Liquid soad
70 LBS. SAND REQUIRED
Fourth
Tread
Third
Tread
Flexible Second
Riser
Flexible Bottom
Riser
prpd.RG-OB-GE-StepsUSr11:Layout 1
1/14/11
2:44 PM
Page 3
OCEAN BLUE THREE TREAD STEPS
For In Ground Pools Model No. 400800 - Three Tread
ASSEMBLY INSTRUCTIONS - PLEASE READ BEFORE ATTEMPTING ASSEMBLY
Back
Trim
Handrail
1.9”diameter
Post
1.9” diameter
Side
Extension
Panel
Stringer
Brace
Back
Trim
Extension
Back
Extension
Panel
Side
Trim
Back
Ballast
Return
Panel
Side
Ballast
Lower
Side
Panel
Round
Step
Pad
Leveler
Tube
Side
Stringer
Deck
Connector
1.9” diameter
Stringer
Stringer
Extension
QTY
111111111111112423511111-
QTY
PART DESCRIPTION
NUMBER
1490709 stringer
1490710 stringer extension
1490712 side stringer
1490711 stringer brace
29 490704 lower back panel
4490719 back trim
2490720 back trim extension
2490707 back extension panel
490706 lower side panel
490718 side trim
490708 side extension panel
Second
490713 return panel
Tread
490716 side ballast
490717 back ballast
Right Bottom
490700 hand rail 1.9" diameter
Tread
490701 post 1.9" diameter
490702 deck connector 1.9" diameter
490714 leveler tube
Left Bottom
490715 round step pad
Tread
490725 left bottom tread
Center Bottom
490726 center bottom tread
Tread
490727 right bottom tread
Flexible Third
490728 second tread
Riser
490729 third tread
Flexible Bottom
Riser
Lower Back
Panel
PART DESCRIPTION
NUMBER
490721 flexible bottom riser
490722 flexible second riser
490723 flexible third riser
490731 step hardware/safety pack
#10 x 1-1/4" self tapping screws
white plugs
safety labels
tread plugs
Tools Needed for Assembly
Cordless drill with Phillips head
Rubber Mallet
Hack saw (for 3-tread only)
Plastic funnel
Liquid soad
70 LBS. SAND REQUIRED
Third
Tread
Flexible Second
Riser
prpd.RG-OB-GE-StepsUSr11:Layout 1
STEP 1:
1/14/11
2:44 PM
Tools needed:
Parts needed:
Page 4
cordless drill with Phillips driver, rubber mallet
3-leveler tubes, 5-round step pads, back panel, side panel,
back extension, side extension, back extension return, stringer,
stringer extension, side stringer and stringer brace
(FOR ABOVE AND IN GROUND STEPS)
Flat Bottom - 2 threads exposed
Tapered Bottom -no threads exposed
#1: Using a rubber mallet install three
of the round step pads on to three of
the leveler tubes. A little liquid soap
on the leveler tubes will make
assembly easier. Set the three
assemblies and two round step
pads aside.
#2: Next install one of the leveler tube assemblies into the lower side panel
leaving two threads exposed for a flat bottom pool. If pool bottom is tapered
install leveler tube all the way up so there are no exposed threads. To install
the leveler tube place the long tab on side of tube into slot on panel and tap
down with rubber mallet.
3: To make assembly easier apply a
little liquid soap onto the four tabs
then insert tabs into the openings on
the lower back panel and push panels
together. Panels are designed to fit
together tight, it may require a rubber
mallet if panels won’t go together
by pushing.
#4: Install the second leveler tube
assembly into the side extension
panel. This leveler tube assembly is
fixed so there will be no adjustment in
the slot on panel.
#5: With the assembled panels from
step #3 standing up attach the side
extension using three #10 x 1-1/4” self
tapping screws.
Tapered Bottom
-no threads
exposed
Flat
Bottom 1 thread
exposed
#6: Attach the back extension panel
using three #10 x 1-1/4” self tapping
screws.
#7: Install the third leveler tube
assembly into the back extension
return leaving one thread exposed for
flat bottom pool. If pool bottom is
tapered install leveler tube all the way
up so there are no exposed threads.
#8: Install the
back extension
return on to the
back extension
panel. Push
down until seated.
prpd.RG-OB-GE-StepsUSr11:Layout 1
1/14/11
2:45 PM
Page 5
STEP 1: (Cont’d)
(FOR ABOVE AND IN GROUND STEPS)
#9: Turn the assembly over so the leveler legs are sitting on the ground.
#10: Using three #10 x 1-1/4” self
tapping screws one in every other
hole attach the stringer extension to
the stringer.
#11: Install one of the round step
pads over the round tab located on
the bottom of the stringer assembly.
A little liquid soap on the round tab
will make assembly easier.
#12: Insert the
stringer assembly
into the opening
on the back panel
and push down
until seated.
#13: Install the second round step
pad over the round tab located on the
bottom of the side stringer.
Again, a little liquid soap will make
assembly easier.
#14: Align the
tab on the side
stringer with
the groove on
the stringer
and push
down until seated.
#15: Align the two tabs on the
stringer brace with the groove on the
stringer and side stringer and push
down until seated.
prpd.RG-OB-GE-StepsUSr11:Layout 1
STEP 2:
1/14/11
2:46 PM
Tools needed:
Parts needed:
Page 6
cordless drill with Phillips driver, rubber mallet
left bottom tread, center bottom tread, right bottom tread, flexible
bottom riser, second tread, flexible second riser, third tread,
flexible third riser, back ballast, side ballast and 4-white plugs
(FOR ABOVE AND IN GROUND STEPS)
#1: Position the left bottom tread over
the side extension panel and over the
raised tab on the stringer. Push down
and inward until seated. Attach the
tread to the stringer using one of the
#10 x 1-1/4” self tapping screws in the
outer hole.
70 LBS. SAND REQUIRED required for Step 2
#2: Next, position the right bottom
tread over the back extension and
over the raised tab on the side
stringer. Push down and inward until
seated. Attach the tread to the side
stringer using one #10 x 1-1/4 self
tapping screw.
#3: Lay the center bottom tread over
the right and left bottom treads and
push down and inward. The center
tread will attach from underneath the
step. Lean the assembly back to
expose the bottom of the tread.
#5: With the step assembly still
leaning back install the flexible bottom
riser by placing over the tabs on the
stringers and into the groove on the
underside of the bottom tread. The
angled cut on the riser will match the
angle on the return panel.
#6: The flexible riser will only be
attached at both ends. Attach at the
angled end first by measuring up 2”
and over 2” then using a #10 x 1-1/4”
self tapping screw go through the face
of the riser and in to the return panel.
On opposite end measure up 2” and
over to the first groove in the riser and
angle the screw so it will thread into
the raised tab on the panel.
#8: Place the second flexible riser
into the groove on the bottom tread
into the slots on the side extension
and back extension. The four
ventilation slots in the riser should be
positioned on the right side and
aligned above the slots in the
first riser.
#9: Place the second tread over the
stringers and onto the side and back
extension panels. Align the tabs on
one side of the tread with the slots on
panel and push down until seated.
Only attach one side of the tread at
this time.
Self
tapping screws
#4: Attach the center tread using two
#10 x 1-1/4 self tapping screws, one
each in the outer holes located on the
underside of center step. Screws will
install at an angle.
Pour Sand into
the Stringer holes
#7: At this time pour 25 lbs. of sand
into the stringer and 25 lbs of sand
into the side stringer. Sand will be
added through the holes located at
the top of the stringers. As the stringer
fills tap the sides to settle sand to the
bottom. Plug the two fill holes with two
white plugs from the hardware bag
Sand is necessary to keep the
steps from floating.
prpd.RG-OB-GE-StepsUSr11:Layout 1
1/14/11
2:46 PM
Page 7
STEP 2: (Cont’d)
(FOR ABOVE AND IN GROUND STEPS)
#10: Next, push in and downward at
the center of tread to lock into the
stringers.
#11: Align the tabs on the other side
of the tread with the slots on the panel
and tap down until seated.
#12: Place the third flexible riser in to
the groove on the second step and in
to the slots on the side and back
extensions. The ventilation slots in
the riser should positioned on the
right side and aligned above the slots
in the first and second risers.
Fill these holes
with sand
#13: Place the third tread over the
side and back panels, align the tabs
on the tread with the slots on panels
and push down until seated.
#14: Fill the side and back ballast
with 10 lbs. of sand each and plug the
fill holes using the two white plugs
from the hardware bag.
#15: Install the side ballast by placing
over the side extension panel and
pushing down until seated, a mallet
may be necessary.
#16: Repeat procedure to install the
back ballast.
IF YOU HAVE ABOVE GROUND STEP, SKIP STEP 3 AND GO TO STEP 4
prpd.RG-OB-GE-StepsUSr11:Layout 1
1/14/11
2:47 PM
Page 8
Tools needed:
Parts needed:
STEP 3:
cordless drill with Phillips driver
4-posts, 2-handrails, 2-deck connectors
Side trim, back trim, back trim extension and
8 -#10 X 1-1/4” self tapping screws
(FOR IN GROUND #400800 STEP ONLY).
#1: Place the back trim over the
lower back panel and align the tabs
with the slots on panel and push
down until seated.
#2: Repeat procedure to install the
back trim extension and the side trim.
#3: Using a hack saw cut 14” off
from the bottom ends of two posts.
Insert cut posts into both holes
located on the second step and push
down until posts stop.
A little liquid soap on the posts will
make assembly easier.
#4: Insert the other posts into the two
#5: Slide a deck connector over
each of the top posts, again liquid
soap on the posts will make
this easier.
#6: Rotate posts to align the flat side
with the flat side on the handrail and
install both handrails by tapping down
with a rubber mallet.
holes on third tread and push down
until post stops. Using the two plugs
from hardware bag, plug the two
unused holes on the bottom tread.
#7: Attach the handrail to each post
using one #10 x 1-1/4 self tapping
screw, repeat for the second hand rail.
#8: Attach all four posts to the step
panels using one #10 x 1-1/4 self
tapping screw in each post.
prpd.RG-OB-GE-StepsUSr11:Layout 1
1/14/11
2:47 PM
Tools needed:
Parts needed:
STEP 4:
Page 9
cordless drill with Phillips driver, rubber mallet
flexible fourth riser, fourth tread, upper side panel,
upper back panel, 4 handrail posts, 2 handrails,
2 deck connectors and 10- #10 x 1-1/4 self tapping screws
(FOR ABOVE GROUND #400700 STEP ONLY).
#2: Position the upper back/side
panel assembly over the lower back
and side panel, align the tabs with the
slots on the panels and push down
until seated, mallet may be required.
#3: Attach the panel assembly by
using one #10 x 1-1/4 self tapping
screw in the back panel and one in
the side panel at the recesses.
#4: Place the fourth flexible riser on
top of the third tread with the ends of
the riser into the slots on the upper
side and back panels. The third tread
does not have groove for the riser to
set in to.
#5: Place the fourth tread over the
upper side and back panels. Slowly
push down making sure to align the
top of riser with the groove on the
underside of fourth tread.
#6: – insert the handrail posts into
both holes on the fourth tread and
push down until post stops.
A little liquid soap will make
assembly easier
#7: Insert the handrail posts into
both holes on the second tread and
push down until post stops. Using the
two plugs from hardware bag, plug the
two unused holes on the first tread.
#8: Slide a deck connector over each
of the top posts. A little liquid hand
soap on the posts will make
assembly easier.
#9: Rotate posts to align the flat side
with the flat side on the handrail and
install both handrails by tapping down
with a rubber mallet.
#1: Insert the two tabs on the upper
side panel in to the openings on the
upper back panel and push together.
A little liquid soap on the tabs will
make assembly easier.
prpd.RG-OB-GE-StepsUSr11:Layout 1
1/14/11
2:47 PM
Page 10
STEP 4: (Cont’d)
(FOR ABOVE GROUND #400700 STEP ONLY).
#10: Attach the
handrail to each post
using one #10 x 11/4” self tapping
screw, repeat for the
second handrail.
NOTES:
#11: Attach all four posts to
the step panels using one
#10 x 1-1/4” self tapping
screw in each post.
prpd.RG-OB-GE-StepsUSr11:Layout 1
1/14/11
STEP 5:
2:47 PM
Page 11
Tools needed: Cordless drill w/Phillips driver, rubber mallet
Parts needed: 6-1-1/4” self tapping screws, 2 safety label
(FOR ABOVE AND IN GROUND STEPS)
INSTALLING STEPS INTO SWIMMING POOL
IT WILL REQUIRE 2-3 PEOPLE TO PLACE STEP INTO POOL.
#1: Place pool step in the water, if
#2: Step will float until all the air is
#3: Position the step close to the pool
you have an above ground pool be
careful not to damage pool frame.
Hold the step away from swimming
pool wall while it is filling with water.
out of step components, this will take
several minutes. To remove the air, it
will be necessary to tilt the step backwards and to the left and right until
the air bubbles stop. Once the air
bubbles have stopped the step should
be sitting firmly on bottom of pool. If
not, air is still trapped in components
and step will have to be tilted again.
wall. Rotate the two deck connectors
to sit on to pool deck and attach using
two #10 x 1-1/4” self tapping screws
in each connector. If you have a concrete deck you will need to purchase
the proper fasteners for concrete.
#4: Attach the deck connectors to
#5: Apply the two safety labels on the
each handrail posts using one #10 x
1-1/4” self tapping screw.
upper handrail posts so they are visible when entering the swimming pool.
prpd.RG-OB-GE-StepsUSr11:Layout 1
1/14/11
2:47 PM
Page 12
SAFETY RULES
IMPORTANT
• One person on the step at a time
• DANGER: shallow water no jumping or
diving from step or pool deck
• ALWAYS have competent adult supervision
when pool is in use
• NEVER leave the pool unattended
• NO unauthorized entry into pool
• To prevent entrapment or drowning step must
be installed up to the inside of pool wall
• Weight limit 400 lbs
• Exceeding the recommended weight limit
may cause step to fail
FOR YOUR SAFETY
*
Consult your local building department before
installation of your pool and equipment.
*
Check the contents of the carton with the parts
list for this step.
*
DO NOT attempt to assemble or install this step
if there are ANY shortages of parts or hardware.
*
For proper assembly and installation follow all
instructions in the sequence shown.
*
Before using the product, after assembly and
installation, go over the instructions and procedures again to make sure nothing has been overlooked.
*
Be sure and safe. The manufacturer IS NOT
responsible for improper assembly or
installation.
DANGER: only use a cordless drill for assembly and installation. NEVER use a corded
electric drill in or around swimming pool.
WINTERIZING: Disconnect the step from pool deck or outside safety ladder and
carefully lift out of water. Once out of water, tip step on its back to drain water from
panels. After drained, tip step on its front to finish draining water. All the water must be
drained from step before putting in to storage.
NOTE: sand remains in step — do not remove sand.
OCEAN BLUE WATER PRODUCTS WARRANTY
Ocean Blue Water Products warrants their swimming pool steps to be free from defects in workmanship for one year
from date of purchase.
DO NOT RETURN DEFECTIVE PART TO DEALER
The defective part should be returned, postpaid, to:
Ocean Blue Water Products
4646 W. Lake Street
Chicago, IL 60644
Enclose proof-of-purchase (receipts, etc.) showing date purchased, your name, address, and daytime phone number. You
will be notified of cost to replace part.
This warranty gives you specific legal rights, and you may also have other rights which may vary from state to state.
Made in U.S.A.
Printed in U.S.A.
01/14/11