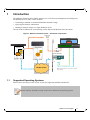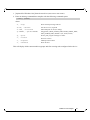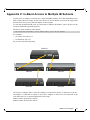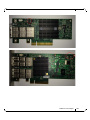
1
Mellanox Firmware Tools (MFT) User Manual Rev 2.4 www.mellanox.com Rev 2.4 NOTE: THIS HARDWARE, SOFTWARE OR TEST SUITE PRODUCT (“PRODUCT(S)”) AND ITS RELATED DOCUMENTATION ARE PROVIDED BY MELLANOX TECHNOLOGIES “AS-IS” WITH ALL FAULTS OF ANY KIND AND SOLELY FOR THE PURPOSE OF AIDING THE CUSTOMER IN TESTING APPLICATIONS THAT USE THE PRODUCTS IN DESIGNATED SOLUTIONS. THE CUSTOMER'S MANUFACTURING TEST ENVIRONMENT HAS NOT MET THE STANDARDS SET BY MELLANOX TECHNOLOGIES TO FULLY QUALIFY THE PRODUCT(S) AND/OR THE SYSTEM USING IT. THEREFORE, MELLANOX TECHNOLOGIES CANNOT AND DOES NOT GUARANTEE OR WARRANT THAT THE PRODUCTS WILL OPERATE WITH THE HIGHEST QUALITY. ANY EXPRESS OR IMPLIED WARRANTIES, INCLUDING, BUT NOT LIMITED TO, THE IMPLIED WARRANTIES OF MERCHANTABILITY, FITNESS FOR A PARTICULAR PURPOSE AND NONINFRINGEMENT ARE DISCLAIMED. IN NO EVENT SHALL MELLANOX BE LIABLE TO CUSTOMER OR ANY THIRD PARTIES FOR ANY DIRECT, INDIRECT, SPECIAL, EXEMPLARY, OR CONSEQUENTIAL DAMAGES OF ANY KIND (INCLUDING, BUT NOT LIMITED TO, PAYMENT FOR PROCUREMENT OF SUBSTITUTE GOODS OR SERVICES; LOSS OF USE, DATA, OR PROFITS; OR BUSINESS INTERRUPTION) HOWEVER CAUSED AND ON ANY THEORY OF LIABILITY, WHETHER IN CONTRACT, STRICT LIABILITY, OR TORT (INCLUDING NEGLIGENCE OR OTHERWISE) ARISING IN ANY WAY FROM THE USE OF THE PRODUCT(S) AND RELATED DOCUMENTATION EVEN IF ADVISED OF THE POSSIBILITY OF SUCH DAMAGE. Mellanox Technologies 350 Oakmead Parkway Suite 100 Sunnyvale, CA 94085 U.S.A. www.mellanox.com Tel: (408) 970-3400 Fax: (408) 970-3403 Mellanox Technologies, Ltd. Hakidma 26 Ofer Industrial Park Yokneam 2069200 Israel www.mellanox.com Tel: +972 (0)74 723 7200 Fax: +972 (0)4 959 3245 © Copyright 2015. Mellanox Technologies. All Rights Reserved. Mellanox®, Mellanox logo, BridgeX®, ConnectX®, Connect-IB®, CoolBox®, CORE-Direct®, GPUDirect®, InfiniBridge®, InfiniHost®, InfiniScale®, Kotura®, Kotura logo, MetroX®, MLNX-OS®, PhyX®, ScalableHPC®, SwitchX®, TestX®, UFM®, Virtual Protocol Interconnect®, Voltaire® and Voltaire logo are registered trademarks of Mellanox Technologies, Ltd. CyPU™, ExtendX™, FabricIT™, FPGADirect™, HPC-X™, Mellanox Care™, Mellanox CloudX™, Mellanox Open Ethernet™, Mellanox PeerDirect™, Mellanox Virtual Modular Switch™, MetroDX™, NVMeDirect™, StPU™, Switch-IB™, Unbreakable-Link™ are trademarks of Mellanox Technologies, Ltd. All other trademarks are property of their respective owners. 2 Mellanox Technologies Document Number: 2329 Rev 2.4 Table of Content Table of Content . . . . . . . . . . . . . . . . . . . . . . . . . . . . . . . . . . . . . . . . . . . . . . . . . . . . . . . . . . . 1 List of Tables . . . . . . . . . . . . . . . . . . . . . . . . . . . . . . . . . . . . . . . . . . . . . . . . . . . . . . . . . . . . . 4 List of Figures . . . . . . . . . . . . . . . . . . . . . . . . . . . . . . . . . . . . . . . . . . . . . . . . . . . . . . . . . . . . . 5 Chapter 1 Introduction . . . . . . . . . . . . . . . . . . . . . . . . . . . . . . . . . . . . . . . . . . . . . . . . . . . 11 1.1 1.2 Supported Operating Systems . . . . . . . . . . . . . . . . . . . . . . . . . . . . . . . . . . . . . . . 11 MFT Access to Hardware Devices . . . . . . . . . . . . . . . . . . . . . . . . . . . . . . . . . . . 12 Chapter 2 MFT Installation . . . . . . . . . . . . . . . . . . . . . . . . . . . . . . . . . . . . . . . . . . . . . . . 14 Chapter 3 Firmware Generation, Configuration, and Update Tools . . . . . . . . . . . . . . 16 3.1 Mellanox Software Tools (mst) Service . . . . . . . . . . . . . . . . . . . . . . . . . . . . . . . 16 3.1.1 3.1.2 3.1.3 3.1.4 3.2 Linux . . . . . . . . . . . . . . . . . . . . . . . . . . . . . . . . . . . . . . . . . . . . . . . . . . . . . . . . . . . Windows . . . . . . . . . . . . . . . . . . . . . . . . . . . . . . . . . . . . . . . . . . . . . . . . . . . . . . . . FreeBSD . . . . . . . . . . . . . . . . . . . . . . . . . . . . . . . . . . . . . . . . . . . . . . . . . . . . . . . . ESXi . . . . . . . . . . . . . . . . . . . . . . . . . . . . . . . . . . . . . . . . . . . . . . . . . . . . . . . . . . . 16 19 21 22 mlxfwmanager - Firmware Update and Query Tool . . . . . . . . . . . . . . . . . . . . . . 23 3.2.1 Querying the Device . . . . . . . . . . . . . . . . . . . . . . . . . . . . . . . . . . . . . . . . . . . . . . . 25 3.2.2 Updating the Device . . . . . . . . . . . . . . . . . . . . . . . . . . . . . . . . . . . . . . . . . . . . . . . 27 3.2.3 Updating the Device Online . . . . . . . . . . . . . . . . . . . . . . . . . . . . . . . . . . . . . . . . . 27 3.3 mlxconfig - Changing Device Configuration Tool . . . . . . . . . . . . . . . . . . . . . . . 31 3.3.1 Using mlxconifg with PCI Device in Bus Device Function (BDF) Format . . . . . 35 3.3.2 Using mlxconfig to Set VPI Parameters . . . . . . . . . . . . . . . . . . . . . . . . . . . . . . . . 35 3.4 flint – Firmware Burning Tool . . . . . . . . . . . . . . . . . . . . . . . . . . . . . . . . . . . . . . 36 3.4.1 3.4.2 3.4.3 3.4.4 3.4.5 3.4.6 3.5 Burning a Firmware Image . . . . . . . . . . . . . . . . . . . . . . . . . . . . . . . . . . . . . . . . . . Querying the Firmware Image . . . . . . . . . . . . . . . . . . . . . . . . . . . . . . . . . . . . . . . Verifying the Firmware Image . . . . . . . . . . . . . . . . . . . . . . . . . . . . . . . . . . . . . . . Managing an Expansion ROM Image. . . . . . . . . . . . . . . . . . . . . . . . . . . . . . . . . . Setting GUIDs and MACs . . . . . . . . . . . . . . . . . . . . . . . . . . . . . . . . . . . . . . . . . . Flint/mlxburn Limitations . . . . . . . . . . . . . . . . . . . . . . . . . . . . . . . . . . . . . . . . . . . 40 42 43 43 44 54 mlxburn - Firmware Image Generator and Burner . . . . . . . . . . . . . . . . . . . . . . . 55 3.5.1 Generating and Burning Firmware . . . . . . . . . . . . . . . . . . . . . . . . . . . . . . . . . . . . 55 3.5.2 Customizing Firmware . . . . . . . . . . . . . . . . . . . . . . . . . . . . . . . . . . . . . . . . . . . . . 55 3.6 mlxfwreset - Loading Firmware on 5th Generation Devices Tool . . . . . . . . . . . 63 3.6.1 mlxfwreset Limitations . . . . . . . . . . . . . . . . . . . . . . . . . . . . . . . . . . . . . . . . . . . . . 65 3.7 3.8 mlxphyburn – Burning Tool for Externally Managed PHY . . . . . . . . . . . . . . . . 66 mlx_fpga - Burning and Debugging Tool for Mellanox Devices with FPGA . . 68 Chapter 4 Debug Utilities . . . . . . . . . . . . . . . . . . . . . . . . . . . . . . . . . . . . . . . . . . . . . . . . . 71 4.1 fwtrace Utility . . . . . . . . . . . . . . . . . . . . . . . . . . . . . . . . . . . . . . . . . . . . . . . . . . . 71 4.1.1 fwtrace Usage . . . . . . . . . . . . . . . . . . . . . . . . . . . . . . . . . . . . . . . . . . . . . . . . . . . . 71 4.2 itrace Utility . . . . . . . . . . . . . . . . . . . . . . . . . . . . . . . . . . . . . . . . . . . . . . . . . . . . . 73 4.2.1 itrace Usage. . . . . . . . . . . . . . . . . . . . . . . . . . . . . . . . . . . . . . . . . . . . . . . . . . . . . . 73 4.3 mstdump Utility . . . . . . . . . . . . . . . . . . . . . . . . . . . . . . . . . . . . . . . . . . . . . . . . . . 75 4.3.1 mstdump Usage. . . . . . . . . . . . . . . . . . . . . . . . . . . . . . . . . . . . . . . . . . . . . . . . . . . 75 Mellanox Technologies 1 Rev 2.4 4.4 mlxi2c Utility. . . . . . . . . . . . . . . . . . . . . . . . . . . . . . . . . . . . . . . . . . . . . . . . . . . . 75 4.4.1 mlxi2c Usage. . . . . . . . . . . . . . . . . . . . . . . . . . . . . . . . . . . . . . . . . . . . . . . . . . . . . 75 4.5 i2c Utility . . . . . . . . . . . . . . . . . . . . . . . . . . . . . . . . . . . . . . . . . . . . . . . . . . . . . . . 76 4.5.1 i2c Usage . . . . . . . . . . . . . . . . . . . . . . . . . . . . . . . . . . . . . . . . . . . . . . . . . . . . . . . . 76 4.5.2 Exit Return Values . . . . . . . . . . . . . . . . . . . . . . . . . . . . . . . . . . . . . . . . . . . . . . . . 77 4.6 mget_temp Utility . . . . . . . . . . . . . . . . . . . . . . . . . . . . . . . . . . . . . . . . . . . . . . . . 77 4.6.1 mget_temp Usage . . . . . . . . . . . . . . . . . . . . . . . . . . . . . . . . . . . . . . . . . . . . . . . . . 77 4.7 mlxtrace Utility . . . . . . . . . . . . . . . . . . . . . . . . . . . . . . . . . . . . . . . . . . . . . . . . . . 78 4.7.1 mlxtrace Usage . . . . . . . . . . . . . . . . . . . . . . . . . . . . . . . . . . . . . . . . . . . . . . . . . . . 78 4.8 mlxdump Utility. . . . . . . . . . . . . . . . . . . . . . . . . . . . . . . . . . . . . . . . . . . . . . . . . . 80 4.8.1 mlxdump Usage . . . . . . . . . . . . . . . . . . . . . . . . . . . . . . . . . . . . . . . . . . . . . . . . . . 80 4.9 mlxmcg Utility. . . . . . . . . . . . . . . . . . . . . . . . . . . . . . . . . . . . . . . . . . . . . . . . . . . 80 4.9.1 mlxmcg Usage. . . . . . . . . . . . . . . . . . . . . . . . . . . . . . . . . . . . . . . . . . . . . . . . . . . . 80 4.10 pckt_drop Utility . . . . . . . . . . . . . . . . . . . . . . . . . . . . . . . . . . . . . . . . . . . . . . . . . 82 4.10.1 pckt_drop Usage . . . . . . . . . . . . . . . . . . . . . . . . . . . . . . . . . . . . . . . . . . . . . . . . . . 82 4.11 mlxuptime Utility. . . . . . . . . . . . . . . . . . . . . . . . . . . . . . . . . . . . . . . . . . . . . . . . . 83 4.11.1 mlxuptime Usage . . . . . . . . . . . . . . . . . . . . . . . . . . . . . . . . . . . . . . . . . . . . . . . . . 83 4.12 wqdump Utility . . . . . . . . . . . . . . . . . . . . . . . . . . . . . . . . . . . . . . . . . . . . . . . . . . 83 4.12.1 wqdump Usage . . . . . . . . . . . . . . . . . . . . . . . . . . . . . . . . . . . . . . . . . . . . . . . . . . . 84 4.13 mlxmdio Utility . . . . . . . . . . . . . . . . . . . . . . . . . . . . . . . . . . . . . . . . . . . . . . . . . . 86 4.13.1 mlxmdio Usage . . . . . . . . . . . . . . . . . . . . . . . . . . . . . . . . . . . . . . . . . . . . . . . . . . . 86 Chapter 5 Troubleshooting . . . . . . . . . . . . . . . . . . . . . . . . . . . . . . . . . . . . . . . . . . . . . . . . 87 5.1 5.2 5.3 General Related Issues. . . . . . . . . . . . . . . . . . . . . . . . . . . . . . . . . . . . . . . . . . . . . 87 Installation Related Issues . . . . . . . . . . . . . . . . . . . . . . . . . . . . . . . . . . . . . . . . . . 88 Firmware Burning Related Issues . . . . . . . . . . . . . . . . . . . . . . . . . . . . . . . . . . . . 88 Appendix A PSID Assignment . . . . . . . . . . . . . . . . . . . . . . . . . . . . . . . . . . . . . . . . . . . . . . . . . . . . . . 90 A.1 PSID Field Structure. . . . . . . . . . . . . . . . . . . . . . . . . . . . . . . . . . . . . . . . . . . . . . . . . . . . . . . . . . . . . . . 90 A.2 PSID Assignment and Integration Flow . . . . . . . . . . . . . . . . . . . . . . . . . . . . . . . . . . . . . . . . . . . . . . . . 90 Appendix B Flow Examples - mlxburn . . . . . . . . . . . . . . . . . . . . . . . . . . . . . . . . . . . . . . . . . . . . . . . 91 Appendix C In-Band Access to Multiple IB Subnets . . . . . . . . . . . . . . . . . . . . . . . . . . . . . . . . . . . . 93 Appendix D MTUSB-1 USB to I2C Adapter . . . . . . . . . . . . . . . . . . . . . . . . . . . . . . . . . . . . . . . . . . 95 D.1 Overview. . . . . . . . . . . . . . . . . . . . . . . . . . . . . . . . . . . . . . . . . . . . . . . . . . . . . . . . . . . . . . . . . . . . . . . . 95 0.0.1 Package Contents 95 0.0.2 System Requirements 96 0.0.3 Supported Platforms 96 D.2 Hardware Installation . . . . . . . . . . . . . . . . . . . . . . . . . . . . . . . . . . . . . . . . . . . . . . . . . . . . . . . . . . . . . . 96 D.3 Software Installation. . . . . . . . . . . . . . . . . . . . . . . . . . . . . . . . . . . . . . . . . . . . . . . . . . . . . . . . . . . . . . . 96 Appendix E Remote Access to Device by Sockets . . . . . . . . . . . . . . . . . . . . . . . . . . . . . . . . . . . . . . 97 E.1 Overview . . . . . . . . . . . . . . . . . . . . . . . . . . . . . . . . . . . . . . . . . . . . . . . . . . . . . . . . . . . . . . . . . . . . . . . . 97 Appendix F Accessing Remote InfiniBand Device by Direct Route MADs . . . . . . . . . . . . . . . . . . 99 Appendix G Update Package for Mellanox Firmware . . . . . . . . . . . . . . . . . . . . . . . . . . . . . . . . . 101 G.1 Overview. . . . . . . . . . . . . . . . . . . . . . . . . . . . . . . . . . . . . . . . . . . . . . . . . . . . . . . . . . . . . . . . . . . . . . . 101 0.0.4 Update Package for Mellanox Firmware Features 101 G.2 Update Package for Mellanox Firmware Generation Flow . . . . . . . . . . . . . . . . . . . . . . . . . . . . . . . . 101 0.0.5 mlx_fwsfx_gen Usage 101 2 Mellanox Technologies Rev 2.4 0.0.6 UPMF Generation Example 103 G.3 Updating Firmware Using an UPMF . . . . . . . . . . . . . . . . . . . . . . . . . . . . . . . . . . . . . . . . . . . . . . . . . 105 Appendix H Secure Host Feature . . . . . . . . . . . . . . . . . . . . . . . . . . . . . . . . . . . . . . . . . . . . . . . . . . 106 H.1 Using the Secure Host . . . . . . . . . . . . . . . . . . . . . . . . . . . . . . . . . . . . . . . . . 106 Appendix I Booting HCA Device in Livefish Mode . . . . . . . . . . . . . . . . . . . . . . . . . . . . . . . . . . . . 108 I.1 Booting Card in Livefish Mode . . . . . . . . . . . . . . . . . . . . . . . . . . . . . . . . . . . . . . . . . . . . . . . . . . . . . . 108 I.2 Booting Card in Normal Mode. . . . . . . . . . . . . . . . . . . . . . . . . . . . . . . . . . . . . . . . . . . . . . . . . . . . . . . 108 I.3 Common Locations of Flash Present Pins . . . . . . . . . . . . . . . . . . . . . . . . . . . . . . . . . . . . . . . . . . . . . . 108 Appendix J Burning a New Connect-IB® Device . . . . . . . . . . . . . . . . . . . . . . . . . . . . . . . . . . . . . 110 J.1 GUIDs and MACs . . . . . . . . . . . . . . . . . . . . . . . . . . . . . . . . . . . . . . . . . . . . . . . . . . . . . . . . . . . . . . . . 110 J.2 PCI Vital Product Data (VPD) . . . . . . . . . . . . . . . . . . . . . . . . . . . . . . . . . . . 110 J.3 Burning a New Connect-IB® Device . . . . . . . . . . . . . . . . . . . . . . . . . . . . . . . . . . . . . . . . . . . . . . . . . 110 Appendix K Burning a New Switch-IB™ Device . . . . . . . . . . . . . . . . . . . . . . . . . . . . . . . . . . . . . . 112 K.1 Burning the Switch-IB™ Device: . . . . . . . . . . . . . . . . . . . . . . . . . . . . . . . . . . . . . . . . . . . . . . . . . . . 112 Appendix L Burning a New ConnectX-4® Device . . . . . . . . . . . . . . . . . . . . . . . . . . . . . . . . . . . . . 114 L.1 Burning the ConnectX-4® Device:. . . . . . . . . . . . . . . . . . . . . . . . . . . . . . . . . . . . . . . . . . . . . . . . . . . 114 Mellanox Technologies 3 Rev 2.4 List of Tables Table 1: Table 2: Table 3: Table 4: Table 5: Table 6: 4 Revision History Table . . . . . . . . . . . . . . . . . . . . . . . . . . . . . . . . . . . . . . . . . . . . . . . . . . . . 6 Supported Mellanox Devices . . . . . . . . . . . . . . . . . . . . . . . . . . . . . . . . . . . . . . . . . . . . . . 12 mst start Supported OPCODES . . . . . . . . . . . . . . . . . . . . . . . . . . . . . . . . . . . . . . . . . . . . 17 Supported Configurations and their Parameters . . . . . . . . . . . . . . . . . . . . . . . . . . . . . . . . 32 PSID format . . . . . . . . . . . . . . . . . . . . . . . . . . . . . . . . . . . . . . . . . . . . . . . . . . . . . . . . . . . 90 MTUSB-1 Package Contents . . . . . . . . . . . . . . . . . . . . . . . . . . . . . . . . . . . . . . . . . . . . . . 95 Mellanox Technologies Rev 2.4 List of Figures Figure 1: Mellanox Firmware Tools – A Scheme of Operation . . . . . . . . . . . . . . . . . . . . . . . . . . . 11 Figure 2: FW Generation and Burning . . . . . . . . . . . . . . . . . . . . . . . . . . . . . . . . . . . . . . . . . . . . . . . 55 Figure 3: MTUSB-1 Device . . . . . . . . . . . . . . . . . . . . . . . . . . . . . . . . . . . . . . . . . . . . . . . . . . . . . . . 95 Figure 4: UPMF Package Generation Flow . . . . . . . . . . . . . . . . . . . . . . . . . . . . . . . . . . . . . . . . . . 102 Mellanox Technologies 5 Rev 2.4 Document Revision History Table 1 - Revision History Table (Sheet 1 of 3) Date June 2015 Revision 2.4 Description Added the following sections: • • Section 3.8, “mlx_fpga - Burning and Debugging Tool for Mellanox Devices with FPGA”, on page 68 Section L, “Burning a New ConnectX-4® Device”, on page 114 Updated the following sections: • • • • • • • • • • January 2015 2.3 Section 2, “MFT Installation”, on page 14 Section 3.1, “Mellanox Software Tools (mst) Service”, on page 16 Section 3.5, “mlxburn - Firmware Image Generator and Burner”, on page 55 Section 3.6, “mlxfwreset - Loading Firmware on 5th Generation Devices Tool”, on page 63 Section 3.6, “mlxfwreset - Loading Firmware on 5th Generation Devices Tool”, on page 63 Section 4.2, “itrace Utility”, on page 73 Section 4.7, “mlxtrace Utility”, on page 78 Section 4.12, “wqdump Utility”, on page 83 Section 5, “Troubleshooting”, on page 87 Section J.2, “PCI Vital Product Data (VPD)”, on page 110 Added the following sections: • • Section 3.7, “mlxphyburn – Burning Tool for Externally Managed PHY”, on page 66 Section K, “Burning a New Switch-IB™ Device”, on page 112 Updated the following sections: • • • • • August 2014 2.2 “Supported Configurations and their Parameters,” on page 32 “Examples of mlxconfig Usage,” on page 33 Section 4.1, “fwtrace Utility”, on page 71 Section 4.2.1, “itrace Usage”, on page 73 Section G.2.2, “UPMF Generation Example”, on page 103 Added the following sections: • • • Section 3.6, “mlxfwreset - Loading Firmware on 5th Generation Devices Tool”, on page 63 Section 3.1, “Mellanox Software Tools (mst) Service”, on page 16 Section I, “Booting HCA Device in Livefish Mode”, on page 108 Updated the following sections: • • • 6 Mellanox Technologies Section 3.6, “mlxfwreset - Loading Firmware on 5th Generation Devices Tool”, on page 63 Section G, “Update Package for Mellanox Firmware”, on page 101 Section , “flint Synopsis”, on page 36 Rev 2.4 Table 1 - Revision History Table (Sheet 2 of 3) Date May 2014 Revision 2.1 Description Added the following sections: • • Section 3.2, “mlxfwmanager - Firmware Update and Query Tool”, on page 23 Section H, “Secure Host Feature”, on page 106 Updated the following sections: • Section 3.6, “mlxfwreset - Loading Firmware on 5th Generation Devices Tool”, on page 63 Section , “Supported Configurations and their Parameters”, on page 32 • Section , “Burn Example:”, on page 66 • Section , “Example (VIBs installation):”, on page 14 • February 2014 2.0 Removed the sub-section “How to Run flint in VMware” Removed the sub-section “How to run mstdump in VMware” Updated the following sections: • Section , “Example (VIBs installation):”, on page 14 • • December 2013 1.90 Section , “”, on page 15 Section 4.12, “wqdump Utility”, on page 83 Removed the -qq flag from the document Removed sub-section “On Pre-ConnectX Devices” Added the following sections: • Section 4.12, “wqdump Utility”, on page 83 Updated the following sections: • • • • • • • • • • • • • • • • • October 2013 1.80 Section 2, “MFT Installation”, on page 14 Section 3.1, “Mellanox Software Tools (mst) Service”, on page 16 Section , “Example (VIBs installation):”, on page 14 Section , “mlxburn Synopsis”, on page 56 Section , “SwitchX® Switch Examples”, on page 60 Section , “InfiniScale IV Switch Examples”, on page 60 Section , “Command Parameters:”, on page 39 Section 3.4.5.5, “Disabling/Enabling Access to the Hardware”, on page 52 Section 3.4.6, “Flint/mlxburn Limitations”, on page 54 Section 3.6, “mlxfwreset - Loading Firmware on 5th Generation Devices Tool”, on page 63 Section 3.2.1, “Querying the Device”, on page 25 Section 3.2.2, “Updating the Device”, on page 27 Section 4.4, “mlxi2c Utility”, on page 75 Section 4.5.1, “i2c Usage”, on page 76 Section 4.7, “mlxtrace Utility”, on page 78 Section 4.12, “wqdump Utility”, on page 83 Section J.3, “Burning a New Connect-IB® Device”, on page 110 Updated section Section , “Command Parameters:”, on page 39 added a Connect-IB™ Expansion ROM command limitation note. Mellanox Technologies 7 Rev 2.4 Table 1 - Revision History Table (Sheet 3 of 3) Date July 2013 Revision 1.80 Description Reorganized the Firmware Tools and Utilities section. Added the following sections: • Section 3.6, “mlxfwreset - Loading Firmware on 5th Generation • • • • • April 2013 1.70 Devices Tool”, on page 63 Section 4.1, “fwtrace Utility”, on page 71 Section 4.11, “mlxuptime Utility”, on page 83 Appendix F: “Accessing Remote InfiniBand Device by Direct Route MADs,” on page 99 Appendix F: “Accessing Remote InfiniBand Device by Direct Route MADs,” on page 99 Appendix G: “Update Package for Mellanox Firmware,” on page 101 Added the following sections: • Section , “Mellanox Connect-IB®, Switch-IB™ and ConnectX-4® Initial Burning Options”, on page 59 • Section , “Connect-IB® Examples”, on page 61 • Section 4.2, “itrace Utility”, on page 73 • Section 4.8, “mlxdump Utility”, on page 80 • Section 4.7, “mlxtrace Utility”, on page 78 • Section 4.9, “mlxmcg Utility”, on page 80 • Section 4.10, “pckt_drop Utility”, on page 82 • Appendix E, “Remote Access to Device by Sockets” Removed the following sections: • Section 1.2, “Software Prerequisites” • Section 2.1.4, “Exit Return Values” Updated the following sections: • Section , “mlxburn Synopsis”, on page 56 • Section , “Examples of mlxburn Usage”, on page 59 • Section , “flint Synopsis”, on page 36 8 Mellanox Technologies Rev 2.4 About this Manual The document describes MFT Rev 2.4 features, tools content and configuration. Intended Audience This manual is intended for system administrators responsible for managing and debugging firmware for Mellanox devices. Common Abbreviations and Acronyms Term Description MFT Mellanox Firmware tools MST Mellanox Software tools and it's the name of the script that starts/stops the driver used by MFT tools mlx Extension of the text firmware file which contains all the firmware content ini Extension of the firmware configuration file which is in INI format and contains card specific configurations. bin Extension of the binary firmware file which is a combination of INI and mlx file MFA Extension of the a firmware file that contains several binary files of firmware for different cards/boards 4th Generation Family Contains the following devices: ConnectX®-3 Pro, Infniscale® IV, SwitchX®, SwitchX®-2 and BridgeX® ConnectX-3 5th Generation Family Contains the following device: Connect-IB® Switch-IB™ ConnectX®-4 Reference Documents and Downloads • To download firmware images and their release notes, see http://www.mellanox.com/ page/software_overview_ib • Mellanox OFED (for Linux) is a software stack that can be downloaded from http://www.mellanox.com > Products > Adapter IB/VPI Drivers > Linux SW/Driver. • Mellanox WinOF (for Windows) is a software stack that can be downloaded from http://www.mellanox.com > Products > Adapter IB/VPI Drivers > Windows SW/ Driver. • ibdiag tools – run ‘man ibdiagnet’ for details on a machine with OFED installed. • Mellanox OFED (for ESXi) is a software stack that can be downloaded from http://www.mellanox.com > Products > Adapter IB/VPI Drivers > VMware Driver. • Mellanox OFED (for FreeBSD) is a software stack that can be downloaded from http://www.mellanox.com > Products > Adapter IB/VPI Drivers > VMware Driver. Mellanox Technologies 9 Rev 2.4 MFT Web Page Please visit http://www.mellanox.com > Products > InfiniBand/VPI Drivers > Firmware Tools for downloads. 10 Mellanox Technologies Rev 2.4 1 Introduction The Mellanox Firmware Tools (MFT) package is a set of firmware management and debug tools for Mellanox devices. MFT can be used for: • Generating a standard or customized Mellanox firmware image • Querying for firmware information • Burning a firmware image to a single Mellanox device The list of the available tools in the package can be found in the Release Notes document. Figure 1: Mellanox Firmware Tools – A Scheme of Operation Mellanox USBTO- I²C Adapter MLXBURN FLINT MST Mellanox SwitchX Based Switch System OFED/WinVPI USB Mellanox SwitchX Switch Mellanox VPI Adapter IB PCI InfiniBand Fabric Note: In-Band capabilities are not supported by Mellanox Ethernet Adapters 1.1 Supported Operating Systems Please refer to the release notes of your version for supported platforms and kernels. Unless explicitly specified, the usage of the tools is identical for all operating systems. Mellanox Technologies 11 Rev 2.4 1.2 Introduction MFT Access to Hardware Devices Table 1 lists the Mellanox devices supported by MFT, the supporting tools, and the access methods to these devices. Table 1 - Supported Mellanox Devices HW Access Method Device Type Product Name PCI I2C In-Band HCA (InfiniBand) MT2760xA0 Connect-IB® V V V VPI Network Adapter MT27508 ConnectX®-3 V V V MT27528 ConnectX®-3 Pro V V V MT27708 ConnectX®-4 V V V MT25408 ConnectX® EN V V MT58100A0 SwitchX® V1 V V MT48436 InfiniScale® IV V2 V V Switch-IB™ V2 V V MT64102 BridgeX®1 V2 V V Ethernet Adapter (NIC) MT25408 ConnectX®-2 EN MT27508 ConnectX®-3 EN Switch Bridge 1. For managed switch products only. MFT tools access Mellanox devices via the PCI Express interface, via a USB to I2C adapter (Mellanox P/N: MTUSB-1), or via vendor-specific MADs over the InfiniBand fabric (In-Band). In-Band device access requires the local IB port to be in the ACTIVE state and connected to an IB fabric. All MFT tools address the target hardware device using an mst device name. This name is assigned by running the command ‘mst start’ (in Windows, it is not required to run the “mst start” command) for PCI and I2C access. In-Band devices can be assigned by running the 'mst ib add' command. To list the available mst device names on the local machine, run ‘mst status’. Local PCI devices may also be accessed using device aliases. Supported aliases are: 12 • PCI device “bus:dev.fn” , E.G.: 03:00.0 • OFED RDMA device, E.G.: mlx4_0 Mellanox Technologies Rev 2.4 • Network interface with “net-” prefix, E.G.: net-eth2 Run mst status -v to list the devices and their available aliases. The format of an mst device name is as follows: • Via PCI: # mt4099_pci_crX where: X is the index of the adapter on the machine. _crX devices access the adapter directly (recommended if possible) confX devices use configuration cycles to access the adapter For example: # mt25418_pci_cr0 • Via USB to I2C adapter: For example, mtusb-1. • Via Remote device: /dev/mst/mft:23108,@dev@mst@mt4103_pci_cr0 • Via ibdr device: For example, /dev/mst/CA_MT4113_server1_HCA-3_ibdr-0,mlx5_0,1 or ibdr-0,mlx5_0,1. • Via In-Band: <string>lid-<lid_number>. For example: /dev/mst/CA_MT4099_mft_HCA-1_lid-0x0002 or simply "lid-2"" The “mst ib add” command adds devices in the format: • for adapters and bridges: CA_<device id >_<ib node description>_lid-<lid number> • for switches: SW_<device id >_lid-<lid number> See Step 3 in Appendix B,“Flow Examples - mlxburn,” on page 91 for instructions on how to obtain the device LID • Via PCI user level: <bus:dev.fn> For example, if you run lspci -d 15b3: Mellanox devices and PCI Device IDs will be displayed. # /sbin/lspci -d 15b3: 02:00.0 Ethernet controller: Mellanox Technologies Unknown device 6368 (rev a0) Mellanox Technologies 13 Rev 2.4 2 MFT Installation MFT Installation OS Install 1. Download the Linux MFT package from the Mellanox Management Tools webpage: http://www.mellanox.com/products/management_tools.php 2. Untar the downloaded package 3. Allow packaging of bins to self executing file. 4. Run 'install.sh' For OEM only: 'install.sh --oem' 5. Start the mst driver by running: mst start Linux Uninstall Stop the mst driver by running: mft_uninstall.sh NOTE: It is possible to customize some installation parameters (such as the target installation path). Run 'install.sh --help' for details. Windows The installation is EXE based: 1. Download the Windows MFT package from the Mellanox Management Tools webpage: http://www.mellanox.com/products/management_tools.php. 2. Double click the EXE file and follow the instructions presented by the installation wizard. 1. Go to Add or remove programs. 2. Remove WinMFT64 depending on the platform type. FreeBSD 1. Download the FreeBSD MFT package from the Mellanox Management Tools webpage: http://www.mellanox.com/products/management_tools.php. 2. Untar the downloaded package. 3. Run “install.sh” Uninstall MFT on FreeBSD, run the following command: mft_uninstall.sh VMware 1. Download the MFT for VMware vib package from: http://www.mellanox.com/products/management_tools.php 2. Install the package. Run: # esxcli software vib install -v <MST Vib> # esxcli software vib install -v <MFT Vib> NOTE: For VIBs installation examples, please see below. 3. Reboot system. 4. Start the mst driver. Run: # /opt/mellanox/bin/mst start 1. Uninstall the package. Run: # esxcli software vib remove -n mft 2. Uninstall the mst: • VMKlinux: # esxcli software vib remove -n netmft • Native: # esxcli software vib remove -n nmst 3. Reboot system. Example (VIBs installation): • VMK: esxcli software vib install -v /tmp/net-mst_4.0.0.22-1OEM.600.0.0.2295424.vib esxcli software vib install -v /tmp/mft-4.0.0.22-10EM-600.0.0.2295424.x86_64.vib • Native: esxcli software vib install -v /tmp/nmst-4.0.0.22-1OEM.600.0.0.2295424.x86_64.vib esxcli software vib install -v /tmp/mft-4.0.0.22-10EM-600.0.0.2295424.x86_64.vib 14 Mellanox Technologies Rev 2.4 The MFT tools are not located in the default path. In order to run any MFT tool either: • Enter the full path. For example: /opt/mellanox/bin/flint OR • add MFT path to the default system path by running: export PATH=$PATH:/opt/mellanox/bin1 1. The path is temporary and will hold only until reboot Mellanox Technologies 15 Rev 2.4 Firmware Generation, Configuration, and Update Tools 3 Firmware Generation, Configuration, and Update Tools 3.1 Mellanox Software Tools (mst) Service 3.1.1 Linux This script is used to start mst service and to stop it. It is also used in other operations with Mellanox devices, such as in resetting or enabling remote access. mst Synopsis mst <command> [switches] Commands and Switches Description mst start [--with_msix] [--with_unknown][-with_i2cdev] [--with_lpcdev] Create special files that represent Mellanox devices in directory /dev/ mst. Load appropriate kernel modules and saves PCI configuration headers in directory /var/mst_pci. After successfully completion of this command the mst driver is ready to work and you can invoke other Mellanox tools like Infiniburn or tdevmon. You can configure the start command by edit the configuration file: /etc/mft/mst.conf, for example you can rename you devices. Options: • • • 16 --with_msix: Create the msix device. --with_unknown: Do not check if the device ID is supported. --with_i2cdev: Create Embedded I2C master mst stop Stop Mellanox mst driver service, remove all special files/directories and unload kernel modules. mst restart [--with_msix] [--with_unknown][-with_i2cdev] [--with_lpcdev] Just like "mst stop" followed by "mst start [--with_msix] [--with_unknown][--with_i2cdev] [--with_lpcdev]" mst server start [port] Start mst server to allow incoming connection. Default port is 23108 mst server stop Stop mst server. mst remote add <hostname>[:port] Establish connection with specified host on specified port (default port is 23108). Add devices on remote peer to local devices list. <hostname> may be host name as well as an IP address. mst remote del <hostname>[:port] Remove all remote devices on specified hostname. <hostname>[:port] should be specified exactly as in the "mst remote add" command. Mellanox Technologies Rev 2.4 mst ib add [OPTIONS] [local_hca_id] [local_hca_port] Add devices found in the IB fabric for inband access. Requires OFED installation and an active IB link. If local_hca_id and local_hca_port are given, the IB subnet connected to the given port is scanned. Otherwise, the default subnet is scanned. Options: • • • • --discover-tool <discover-tool>: The tool that is used to discover the fabric. Supported tools: ibnetdiscover, ibdiagnet. default: ibdiagnet --add-non-mlnx: Add non Mellanox nodes. --topo-file <topology-file>: A prepared topology file which describes the fabric. For ibnetdiscover: provide an output of the tool. For ibdiagnet: provide LST file that ibdiagnet generates. --use-ibdr: Access by direct route MADs. Available only when using ibnetdiscover tool, for SwitchX and ConnectIB devices. NOTE: if a topology file is specified, device are taken from it. Otherwise, a discover tool is run to discover the fabric. mst ib del Remove all inband devices. mst status Print current status of Mellanox devices Options: • -v run with high verbosity level (print more info on each device) mst save Save PCI configuration headers in directory /var/mst_pci. mst load Load PCI configuration headers from directory /var/mst_pci. mst version Print the version info Using mst.conf File in Linux Edit the /etc/mft/mst.conf configuration file to configure the start operation in Linux (only). The configuration file consists of lines of rules. Every line will be a rule for mst start. It must be valid, and the rules should be unique. There should also be no duplication of new names and/or serials. The rule general format is the following: $OPCODE $PARAMS Table 2 - mst start Supported OPCODES OPCODES RENAME Definition renames mst devices Description • • • Rule format: RENAME $TYPE $NEW_NAME $ID Supported types: # MTUSB (where $ID is the iSerial) Example: RENAME USB my 0x2A4C. • Effect: MTUSB with serial 0x2A4C will be renamed to /dev/mst/mymtusb-1 (always mtusb-1 will be concatenated to the new name). Mellanox Technologies 17 Rev 2.4 Firmware Generation, Configuration, and Update Tools Examples of mst Usage To start Mellanox mst driver service:. # mst start Starting MST (Mellanox Software Tools) driver set Loading MST PCI module - Success Loading MST PCI configuration module - Success Create devices MTUSB-1 USB to I2C Bridge - Success To stop the service: # mst stop Stopping MST (Mellanox Software Tools) driver set Unloading MST PCI module - Success To print the current status of Mellanox devices: # mst status MST modules: -----------MST PCI module loaded MST PCI configuration module loaded MST devices: -----------/dev/mst/mt4099_pciconf0 /dev/mst/mt4099_pci_cr0 /dev/mst/mtusb-1 - PCI configuration cycles access. domain:bus:dev.fn=0000:0b:00.0 addr.reg=88 data.reg=92 Chip revision is: 01 - PCI direct access. domain:bus:dev.fn=0000:0b:00.0 bar=0xd2600000 size=0x100000 Chip revision is: 01 - USB to I2C adapter as I2C master iSerial = 0x1683 To show the devices status with detailed information: # mst status -v PCI devices: DEVICE_TYPE MST PCI RDMA NET NUMA ConnectX4(rev:0) /dev/mst/mt4115_pciconf0 08:00.0 08:00.1 mlx5_0 mlx5_1 net-ib2 net-ib3 -1 -1 ConnectIB(rev:0) /dev/mst/mt4113_pciconf0 0b:00.0 mlx5_2 net-ib4, net-ib5 -1 ConnectX3(rev:1) /dev/mst/mt4099_pciconf0 ConnectX3(rev:1) /dev/mst/mt4099_pci_cr0 0e:00.0 mlx4_0 net-ib0, net-ib1 -1 I2C devices: ------------------- 18 MST Serial /dev/mst/mtusb-1 0x1B5C Mellanox Technologies Rev 2.4 In case the device has Function Per Port (FPP) enabled on it, the physical functions information will appear under the same mst device. Example: 3.1.2 DEVICE_TYPE MST PCI RDMA NET NUMA ConnectX4(rev:0) /dev/mst/mt4115_pciconf0 08:00.0 08:00.1 mlx5_0 mlx5_1 net-ib2 net-ib3 -1 -1 Windows mst Synopsis mst status [-v] | help | server <start|stop> | ib <add|del> | version | remote <add|del> <hostname> Commands and Switches Description There are no mst start or stop operations in Windows. mst server start [port] Start mst server to allow incoming connection. Default port is 23108 mst server stop Stop mst server. mst remote add <hostname>[:port] Establish connection with specified host on specified port (default port is 23108). Add devices on remote peer to local devices list. <hostname> may be host name as well as an IP address. mst remote del <hostname>[:port] Remove all remote devices on specified hostname. <hostname>[:port] should be specified exactly as in the "mst remote add" command. mst ib del Remove all inband devices. mst status Print current status of Mellanox devices mst version Print the version info Mellanox Technologies 19 Rev 2.4 Firmware Generation, Configuration, and Update Tools mst ib add [OPTIONS] [local_hca_id] [local_hca_port] [lst-file] Add devices found in the IB fabric for inband access. Requires MLNX_WinOF installation and an active IB link. If local_hca_id and local_hca_port are given, the IB subnet connected to the given port is scanned. Otherwise, the default subnet is scanned. If an lst-file is specified, devices are taken from this file.Otherwise, ibnetdiscover tool is run to discover the fabric. Options: • --discover-tool <discover-tool>: The tool used to discover the fabric. Supported tools: ibnetdiscover, ibdiagnet. default: ibnetdiscover NOTE: The discover tool argument is intended only for parsing purposes, thus you need to specify an lst-file with it. • • • • --add-non-mlnx: Add non Mellanox nodes. --use-ibdr: Access by direct route MADs. Available only when using ibnetdiscover tool, for SwitchX and ConnectIB devices. --no-format-check: Do not check the format of the given local_hca_id. The expected format of the local_hca_id is: ibv_device[0-9]+. --topo-file <topology-file>: A prepared topology file which describes the fabric. For ibnetdiscover: provide an output of the tool. For ibdiagnet: provide and lst-file that ibdiagnet generates. NOTE: If a topology file is specified, the devices are taken from it. Otherwise, a discover tool is run to discover the fabric. mst help Print this help information. Examples of mst Usage To print the current status of Mellanox devices: # mst status MST devices: -----------mt4099_pci_cr0 mt4099_pciconf0 mtusb-1 mtusb-2 To show the devices status with detailed information: # mst status -v MST devices: -----------mt4099_pci_cr0 mt4099_pciconf0 mtusb-1 mtusb-2 20 Mellanox Technologies bus:dev.fn=13:00.0 bus:dev.fn=13:00.0 iSerial=0x1ccc iSerial=0x1cd5 Rev 2.4 3.1.3 FreeBSD mst Synopsis mst <command> [switches] Commands and Switches Description There are no mst start or stop operations in FreeBSD. mst status Print current status of Mellanox devices. mst help Print this help information. mst version Print mst version information. mst server start [port] Start mst server to allow incoming connection. Default port is 23108. mst server stop Stop mst server. Examples of mst Usage To print the current status of Mellanox devices: MST devices: -----------pci0:3:0:0 - MT27500 Family [ConnectX-3] The mst status output is taken from parsing the `pciconf` output. Mellanox Technologies 21 Rev 2.4 3.1.4 Firmware Generation, Configuration, and Update Tools ESXi mst Synopsis mst <command> [switches] Commands and Switches Description mst start Create special files that represent Mellanox devices in directory/dev. Load appropriate modules. After successfully completing this command, the mst driver will be ready to work. mst stop Stop Mellanox mst driver service and unload the kernel modules. mst restart "mst stop" followed by "mst start" mst server start [-p|--port port] Start mst server to allow incoming connection. Default port is 23108. mst server stop Stop the mst server. mst status Print current status of Mellanox devices Options: -v run with a high verbosity level (print more info on each device) mst version Print the version info Examples of mst Usage To print the current status of Mellanox devices: Native # /opt/mellanox/bin/mst status MST devices: -----------mt4099_pciconf0 mt4099_pci_cr0 VMK Linux # /opt/mellanox/bin/mst status MST devices: /dev/mt4099_pciconf0 /dev/mt4099_pci_cr0 To show the devices status with detailed information: # /opt/mellanox/bin/mst status -v PCI devices: DEVICE_TYPE MST ConnectX3(rev:1) mt4099_pciconf0 ConnectX3(rev:1) mt4099_pci_cr0 PCI RDMA NET NUMA 0b:00.0 For further information on In-Band and Remote Access, please refer to Appendix C: “In-Band Access to Multiple IB Subnets,” on page 93, Appendix F: “Accessing Remote InfiniBand Device by Direct Route MADs,” on page 99 and Appendix E,“Remote Access to Device by Sockets,” on page 97 22 Mellanox Technologies Rev 2.4 3.2 mlxfwmanager - Firmware Update and Query Tool The mlxfwmanager is a Mellanox firmware update and query utility which scans the system for available Mellanox devices (only mst PCI devices) and performs the necessary firmware updates. mlxfwmanager utility has the following flavors: • mlxfwmanager – operates on mst devices and device aliases and requires MFT installation and running “mst start”. • mlxfwmanager_pci – operates on local Mellanox PCI devices and does not require MFT installation. mlxfwmanager_pci gets a PCI device (in format “bus:dev.fn”) as an input to the --device option. Other than the input device format, the mlxfwmanager and mlxfwmanager_pci tools share the same command line and functionality. For further information on firmware update, please refer to Appendix G: “Update Package for Mellanox Firmware,” on page 101. The examples throughout the document use pci “bus.dev.fn” format. However, all the examples are inter-changeable with the mlxfwmanager -d /dev/mst/<device> format. mlxfwmanager Synopsis # [-d|--dev DeviceName] [-h|--help] [-v|--version] [--query] [--query-format Format] [-u|-update] [-i|--image-file FileName][-D|--image-dir DirectoryName] [-f|--force] [-y|--yes] [--no] [-l|--list-content] [--archive-names] [--clear-semaphore]--exe-rel-path] [--log] [-L|--log-file LogFileName] [--no-progress] [-o|--outfile OutputFileName] [--nofs] [--ssl-certificate Certificate][--online] [--online-query PSIDs] [--key key] [--download DirectoryName] [--downloaddefault] [--download-device Device][--download-os OS] [--download-type Type] where: -d|--dev DeviceName Perform operation for specified mst device(s). Run 'mst status' command to list the available devices. Multiple devices can be specified/ delimited by semicolons. A device list containing semicolons must be quoted. -h|--help Show this message and exit -v|--version Show the executable version and exit --query Query device(s) info --query-format Format Query | Online query) output format, XML | Text - default Text -u|--update Update firmware image(s) on the device(s) -i|--image-file FileName Specified image file to use -D|--image-dir DirectoryName Specified directory instead of default to locate image files -f|--force Force image update -y|--yes Answer is yes in prompts --no Answer is no in prompts Mellanox Technologies 23 Rev 2.4 Firmware Generation, Configuration, and Update Tools -l|--list-content List file/Directory content, used with --image-dir and --image-file flags --archive-names Display archive names in listing --clear-semaphore Force clear of the flash semaphore on the device. No command is allowed when this flag is used. NOTE: May result in system instability or flash corruption if the device or another application is currently using the flash. Exercise caution. --exe-rel-path Use paths relative to the location of the executable --log Create a log file -L|--log-file LogFileName Use a specified log file --no-progress Do not show progress -o|--outfile OutputFileName Write to a specified output file --nofs Burn image in a non-failsafe manner --online Fetch required FW images online from Mellanox server --online-query-psid PSIDs Query FW info, PSID(s) are comma-separated --key key Key for custom download/update --download DirectoryName Download files from server to a specified directory --download-default Use Default values for download --download-device Device Options are: • • • • --download-os OS Options are (only for sfx): • • • • • • • • • • 24 ConnectX Connect-IB ConnectX-4 -default:All Linux_x64 Windows Windows_x64 Linux_PPC64 Linux_PPC64le FBSD10_64 FBSD10_32 FBSD10_1_64 FBSD11_64 -default:All --download-type Type MFA | self_extractor - default All --ssl-certificate Certificate SSL certificate For secure connection Mellanox Technologies Rev 2.4 3.2.1 Querying the Device • To query a specific device, use the following command line: # mlxfwmanager -d <device> --query • To query all the devices on the machine, use the following command line: # mlxfwmanager --query Examples: a. Query the device. mlxfwmanager -d 09:00.0 --query Querying Mellanox devices firmware ... Device #1: ---------Device Type: Part Number: Description: 40GigE; PCIe3.0 x8 PSID: PCI Device Name: Port1 GUID: Port2 MAC: Versions: FW ConnectX3 MCX354A-FCA_A2-A4 ConnectX-3 VPI adapter card; dual-port QSFP; FDR IB (56Gb/s) and 8GT/s; RoHS R6 MT_1020120019 0000:09:00.0 0002c9000100d051 0002c9000002 Current Available 2.31.5050 2.32.5000 Status: Update required --------Found 1 device(s) requiring firmware update. Please use -u flag to perform the update. b. Query all the devices. Querying Mellanox devices firmware ... Device #1: ---------Device Type: Part Number: Description: x16; RoHS R6 PSID: PCI Device Name: Port1 GUID: Port2 GUID: Versions: FW Status: ConnectIB MCB192A-FCA_A1 Connect-IB Host Channel Adapter; single-port QSFP; FDR 56Gb/s; PCIe2.0 MT_1220110030 /dev/mst/mt4113_pciconf0 0002c903002ef500 0002c903002ef501 Current Available 2.11.1258 10.10.4000 Update required Device #2: ---------- Mellanox Technologies 25 Rev 2.4 Firmware Generation, Configuration, and Update Tools Device Type: Part Number: Description: 40GigE; PCIe3.0 x8 PSID: PCI Device Name: Port1 GUID: Port2 MAC: Versions: FW Status: ConnectX3 MCX354A-FCA_A2-A4 ConnectX-3 VPI adapter card; dual-port QSFP; FDR IB (56Gb/s) and 8GT/s; RoHS R6 MT_1020120019 /dev/mst/mt4099_pci_cr0 0002c9000100d051 0002c9000002 Current Available 2.31.5050 2.32.5000 Update required --------Found 2 device(s) requiring firmware update. Please use -u flag to perform the update. c. Query XML mlxfwmanager --query --query-format XML <Devices> <Device pciName="/dev/mst/mt4099_pci_cr0" type="ConnectX3" psid="MT_1200111023" partNumber="MCX354A-FCA_A2-A4"> <Versions> <FW current="2.1.0065" available="2.32.5000"/> </Versions> <MACs port1="02c90abcdef0" port2="02c90abcdef1"/> <Status> update required </Status> <Description> ConnectX-3 VPI adapter card; dual-port QSFP; FDR IB (56Gb/s) and 40GigE; PCIe3.0 x8 8GT/s; RoHS R6 </Description> </Device> <Device pciName="/dev/mst/mt4113_pciconf0" type="ConnectIB" psid="MT_1220110030" partNumber="MCB192A-FCA_A1"> <Versions> <FW current="2.11.1258" available="10.10.4000"/> </Versions> <GUIDs port1="0002c903002ef500" /> <MACs port1="0002c903002ef501" /> <Status> update required </Status> <Description> Connect-IB Host Channel Adapter; single-port QSFP; FDR 56Gb/s; PCIe2.0 x16; RoHS R6 </Description> </Device> </Devices> 26 Mellanox Technologies Rev 2.4 3.2.2 Updating the Device • To update a device on the machine, use the following command line1: # mlxfwmanager -u -d <device> -i <FileName> Example: mlxfwmanager -u -d 0000:09:00.0 -i fw-ConnectX3-rel-2.32.5000.mfa Querying Mellanox devices firmware ... Device #1: ---------Device Type: ConnectX3 Part Number: MCX354A-FCA_A2-A4 Description: ConnectX-3 VPI adapter card; dual-port QSFP; FDR IB (56Gb/s) and 40GigE; PCIe3.0 x8 8GT/s; RoHS R6 PSID: MT_1020120019 PCI Device Name: 0000:09:00.0 Port1 GUID: 0002c9000100d051 Port2 MAC: 0002c9000002 Versions: Current Available FW 2.31.5050 2.32.5000 Status: Update required --------Found 1 device(s) requiring firmware update. 3.2.3 Updating the Device Online To update the device online on the machine from Mellanox site, use the following command line: mlxfwmanager --online -u -d <device> 1. If only PXE rom needs update, please add -f to the command line Mellanox Technologies 27 Rev 2.4 Firmware Generation, Configuration, and Update Tools Example: mlxfwmanager --online -u -d 0000:09:00.0 -y Querying Mellanox devices firmware ... Device #1: ---------Device Type: ConnectX3Pro Part Number: MCX354A-FCC_Ax Description: ConnectX-3 Pro VPI adapter card; dual-port QSFP; FDR IB (56Gb/ s) and 40GigE;PCIe3.0 x8 8GT/s;RoHS R6 PSID: MT_1090111019 PCI Device Name:0000:09:00.0 Port1 GUID: 0002c90300e955e1 Port2 GUID: 0002c90300e955e2 Versions: Current Available FW 2.32.5506 2.33.5000 PXE 3.4.0460 3.4.0460 Status: Update required --------Found 1 device(s) requiring firmware update... Device #1 Release notes: -----------------------Version 2.33.5000 contains the following features/bug fixes: 1- Virtual QoS support. 2- RX buffer optimizations for DSCP mode. 3- SMBUS ARP support. 4- RDMA Retransmission optimization. 5- NVCONFIG: UAR BAR change support. 6- Sideband connectivity improvements (IPMI,NCSI). For full list of features and bug fixes please see full release notes at: ConnectX3: http://www.mellanox.com/pdf/firmware/ConnectX3-FW-2_33_5000-release_notes.pdf ConnectX3Pro: http://www.mellanox.com/pdf/firmware/ConnectX3Pro-FW-2_33_5000release_notes.pdf -----------------------Please wait while downloading MFA(s) 100% Device #1: Updating FW ... Done Restart needed for updates to take effect. 28 Mellanox Technologies Rev 2.4 3.2.3.1 Downloading Firmware Images and Firmware Update Packages To download firmware images/firmware update packages, use the following command line: mlxfwmanager --download <DownloadDir> --download-device <DeviceType> --downloados <OS> --download-type <DownloadType> Example: a. Downloading Firmware Images/Firmware Update Packages mlxfwmanager --download /tmp/DownloadDir --download-device ConnectX --download-os All -download-type self_extractor ------ Files To Be Downloaded -----ConnectX : ---------<Files>: 0 - mlxfwmanager-linux-ConnectX3_X3Pro-20140811 1 - mlxfwmanager-windows-ConnectX3_X3Pro-20140811.exe 2 - mlxfwmanager-linux64-ConnectX3_X3Pro-20140811 3 - mlxfwmanager-windows64-ConnectX3_X3Pro-20140811.exe <Release Note>: Fixed Minor Issues. Perform Download? [y/N]: y Please wait while downloading Files to : '/tmp/DownloadDir' 0 - mlxfwmanager-linux-ConnectX3_X3Pro-20140811 : Done 1 - mlxfwmanager-windows-ConnectX3_X3Pro-20140811.exe : Done 2 - mlxfwmanager-linux64-ConnectX3_X3Pro-20140811 : Done 3 - mlxfwmanager-windows64-ConnectX3_X3Pro-20140811.exe : Done Downloading file(s) to : '/tmp/DownloadDir' is done successfully Mellanox Technologies 29 Rev 2.4 Firmware Generation, Configuration, and Update Tools b. Downloading firmware images/firmware update packages using custom key mlxfwmanager --download /tmp/DownloadDir --download-device ConnectX --download-os All -download-type All --key last_release ------ Files To Be Downloaded -----ConnectX : ---------<Files>: 0 - fw-ConnectX3_X3Pro-20140610.mfa 1 - mlxfwmanager-linux-ConnectX3_X3Pro-20140610 2 - mlxfwmanager-windows-ConnectX3_X3Pro-20140610.exe 3 - mlxfwmanager-linux64-ConnectX3_X3Pro-20140610 4 - mlxfwmanager-windows64-ConnectX3_X3Pro-20140610.exe <Release Note>: Fixed Minor Issues. Perform Download? [y/N]: y Please wait while downloading Files to : '/tmp/DownloadDir' 0 - fw-ConnectX3_X3Pro-20140610.mfa : Done 1 - mlxfwmanager-linux-ConnectX3_X3Pro-20140610 : Done 2 - mlxfwmanager-windows-ConnectX3_X3Pro-20140610.exe : Done 3 - mlxfwmanager-linux64-ConnectX3_X3Pro-20140610 : Done 4 - mlxfwmanager-windows64-ConnectX3_X3Pro-20140610.exe : Done Downloading file(s) to : '/tmp/DownloadDir' is done successfully 30 Mellanox Technologies Rev 2.4 3.3 mlxconfig - Changing Device Configuration Tool The mlxconfig tool allows the user to change some of the device configurations without burning the firmware once more. The configuration is also kept after reset. Tool Requirements • OFED/WinOF driver to be installed and enabled • Access to the device through the PCI interface (pciconf/pci_cr) • Firmware supporting changing device configurations feature: • Version 2.31.5000 or above for ConnectX-3/ConnectX-3 Pro. • Version 10.10.6000 or above for Connect-IB. • Supported devices: ConnectX®-3/ConnectX®-3 Pro, Connect-IB®, and ConnectX®-41 • Changing device configurations enabled. For changes after a successful configuration to take effect, reboot the system mlxconfig Synopsis # mlxconfig [-d <device> ] [-y] < set [parameters] | query | reset > where: -d|--dev <device> Performs operation for a specified mst device. -y|--yes Answers yes in prompt. -v|--version Displays version info. -h|--help Displays help message. q[uery]1 Queries current supported configurations. -force Enables the user to skip some advanced checks performed by the tool.2 s[et] Sets configurations to a specific device. r[eset] Resets configurations to their default value. 1. Query command will query a single device if a device is specified. Otherwise, it will query all devices on the machine 2. The use of the --force flag is not recommended and is intended for advanced users only. 1. For ConnectX-4, support is at beta level, and it only supports VPI settings. Mellanox Technologies 31 Rev 2.4 Firmware Generation, Configuration, and Update Tools Supported Configurations and their Parameters Table 3 - Supported Configurations and their Parameters Feature SR-IOV Description Sets the device virtualization parameters Parameter SRIOV_EN Enables or disables virtualization NUM_OF_VFS=<NUM> Sets the number of virtual functions to allocate Wake on LAN1 Enables/disables Wake on LAN feature WOL_MAGIC_EN_P1 Enables or disables Wake on magic packet for port 1 WOL_MAGIC_EN_P2 Enables or disables Wake on magic packet for port 2 BAR size VPI settings Sets the BAR size that the system allocates per physical and virtual function LOG_BAR_SIZE Configures the port's working mode VPI_SETTINGS_PORT1 Log (base 2) of the number of megabytes to be allocated per physical and virtual function Configures port 1 working mode VPI_SETTINGS_PORT2 Configures port 2 working mode Values 0: disable 1: enable 1 to 127 (maximal number of virtual function may be smaller as it depends on the PCI BAR size and available system resources) 0: disable 1:enable 0: disable 1:enable 0 to 9 (maximal size may be smaller as it depends on SRIOV settings) 1: InfiniBand 2: Ethernet 3: VPI (auto-sense), ConnectX-3/ConnectX-3 Pro only/ConnectX-4 1. For supported devices only listed in this section. The default value for the parameters listed in the table above is firmware dependent. Before setting the number of VFs in SR-IOV, please make sure your system can support that number of VFs. If your hardware and software cannot support that number, this may cause your system to cease working. Therefore, mlxconfig protects the user by making sure that when setting SR-IOV parameters, the value of NUM_OF_VFS*PCI_BAR_SIZE(1) must not exceed 512. Also, NUM_OF_VFS must not exceed the limit defined by the firmware (127 VFs upper bound). The same calculation applies to BAR size settings. 32 Mellanox Technologies Rev 2.4 (1) PCI_BAR_SIZE refers to the PCI BAR size per function, either physical or virtual . In case there was no server booting after enabling SRIOV, please refer to “Troubleshooting” on page 87 Examples of mlxconfig Usage Querying Current Device Configuration To query the current device configuration, use the following command line: # mlxconfig -d <device> query Example: # mlxconfig -d /dev/mst/mt4099_pciconf0 q Device type: ConnectX-3 PCI device: /dev/mst/ /dev/mst/mt4099_pciconf0 Device 1: ----------Configurations: SRIOV_EN NUM_OF_VFS WOL_MAGIC_EN_P1 WOL_MAGIC_EN_P2 Current 1 16 0 0 N/A means that the device default configuration is set Mellanox Technologies 33 Rev 2.4 Firmware Generation, Configuration, and Update Tools Setting Device Configuration To set the device configuration, use the following command line: # mlxconfig -d <device> set [Parameters....] Example: # mlxconfig -d /dev/mst/mt4099_pciconf0 set WOL_MAGIC_EN_P2=1 NUM_OF_VFS=24 Device type: ConnectX-3 PCI device: /dev/mst/mt4099_pcionf0 Configurations: Current SRIOV_EN 1 NUM_OF_VFS 16 WOL_MAGIC_EN_P1 0 WOL_MAGIC_EN_P2 0 New 1 24 0 1 Apply new Configuration?(y/n) [n]: y Applying... Done! -I- Please reboot the system to load new configurations. Resetting Device Configuration to Default To reset the device configuration to default, use the following command line: # mlxconfig -d <device> reset Example: # mlxconfig -d /dev/mst/mt4099_pciconf0 reset Reset configuration for device /dev/mst/mt4099_pciconf0? ? (y/n) [n] : y Applying... Done! -I- Please power-cycle device to load new configurations. >mlxconfig -d /dev/mst/mt4099_pciconf0 query Device 1: ---------Device type: PCI Device: ConnectX-3 /dev/mst/mt4099_pciconf0 Configurations: SRIOV_EN NUM_OF_VFS WOL_MAGIC_EN_P1 WOL_MAGIC_EN_P2 34 Mellanox Technologies Current 1 8 0 0 Rev 2.4 3.3.1 Using mlxconifg with PCI Device in Bus Device Function (BDF) Format In order to access device in BDF format via configuration cycles, use "pciconf-" as prefix to the device. Example: # mlxconfig -d pciconf-000:03:00.0 q Device 1: ---------Device type: PCI Device: ConnectX-3 pciconf-000:03:00.0 Configurations: SRIOV_EN NUM_OF_VFS WOL_MAGIC_EN_P1 WOL_MAGIC_EN_P2 3.3.2 Current 1 16 0 0 Using mlxconfig to Set VPI Parameters In order to set VPI parameters through mlxconfig, use the following command line: # mlxconfig -d <device> set [LINK_TYPE_P1=<link_type>] [LINK_TYPE_P2=<link_type>] Example: Configuring both ports as InfiniBand: # mlxconfig -d /dev/mst/mt4103_pci_cr0 set LINK_TYPE_P1=1 LINK_TYPE_P2=1 Device #1: ---------Device type: PCI device: ConnectX3Pro /dev/mst/mt4103_pci_cr0 Configurations: SRIOV_EN NUM_OF_VFS LINK_TYPE_P1 LINK_TYPE_P2 LOG_BAR_SIZE Current 1 8 N/A N/A 3 New 1 8 1 1 3 Apply new Configuration? ? (y/n) [n] : y Applying... Done! -I- Please reboot machine to load new configurations. Mellanox Technologies 35 Rev 2.4 3.4 Firmware Generation, Configuration, and Update Tools flint – Firmware Burning Tool The flint (Flash interface) utility performs the following functions: • Burns a binary firmware image to the Flash device attached to an adapter, bridge or switch device • Burns an Expansion ROM image to the Flash device attached to a ConnectX® family adapter devices • Queries for firmware attributes (version, GUIDs, UIDs, MACs, PSID, etc.) • Enables executing various operations on the Flash memory from the command line (for debug/production) • Disables/enables the access to the device’s hardware registers, and changes the key used for enabling. This feature is functional only if the burnt firmware supports it flint Synopsis flint [switches...] <command> [parameters...] Switches Options -allow_psid_change Allow burning a FW image with a different PSID (Parameter Set ID) than the one currently on flash. Note that changing a PSID may cause the device to malfunction. Use only if you know what you are doing -banks <banks> Set the number of attached flash devices (banks) -blank_guids Burn the image with blank GUIDs and MACs (where applicable). These values can be set later using the "sg" command (see details below). Commands affected: burn -clear_semaphore Force clear the flash semaphore on the device. No command is allowed when this flag is used. NOTE: May result in system instability or flash corruption if the device or another application is currently using the flash. Exercise caution. -d[evice] <device> Device flash is connected to. Commands affected: all -dual_image Make the burn process burn two images on flash (previously default algorithm). Current default failsafe burn process burns a single image (in alternating locations). Commands affected: burn -flash_params <type,log2size,num_of_flashes> Use the given parameters to access the flash instead of reading them from the flash. Supported parameters: • • • 36 Mellanox Technologies Type: The type of the flash, such as: M25PXxx, M25Pxx, SST25VFxx, W25QxxBV, W25Xxx, AT25DFxxx, S25FLXXXP log2size: The log2 of the flash size num_of_flashes: the number of the flashes connected to the device Rev 2.4 -guid <GUID> GUID base value. 4 GUIDs are automatically assigned to the following values: guid -> node GUID guid+1 -> port1 guid+2 -> port2 guid+3 -> system image GUID NOTE: port2 guid will be assigned even for a single port HCA - The HCA ignores this value. Commands affected: burn, sg -guids <GUIDs...> 4 GUIDs must be specified here. The specified GUIDs are assigned to the following fields, repectively: node, port1, port2 and system image GUID. NOTE: port2 guid must be specified even for a single port HCA. The HCA ignores this value. It can be set to 0x0. Commands affected: burn, sg -h[elp] Prints this message and exits -hh Prints extended command help -i[mage] <image> Binary image file. Commands affected: burn, verify -log <log_file> Prints the burning status to the specified log file -mac <MAC>1 MAC address base value. 2 MACs are automatically assigned to the following values: mac -> port1 mac+1 -> port2 Commands affected: burn, sg -macs <MACs...>1 2 MACs must be specified here. The specified MACs are assigned to port1, port2, repectively. Commands affected: burn, sg NOTE: -mac/-macs flags are applicable only for Mellanox Technologies ethernet products. -no Non interactive mode - assume answer "no" to all questions. Commands affected: all -no_flash_verify Do not verify each write on the flash. -nofs Burns image in a non failsafe manner. --allow_rom_change Allows burning/removing a ROM to/from Firmware image when product version is present. 1. The -mac and -macs options are applicable only to Mellanox Technologies Ethernet adapter and switch devices. Mellanox Technologies 37 Rev 2.4 Firmware Generation, Configuration, and Update Tools -override_cache_replacement1 Allow accessing the flash even if the cache replacement mode is enabled. NOTE: This flag is often referred to as -ocr NOTE: This flag is intended for advanced users only. Running in this mode may cause the firmware to hang. -s[ilent] Do not print burn progress flyer. Commands affected: burn -striped_image Use this flag to indicate that the given image file is in a "striped image" format. Commands affected: query verify -uid <UID> BridgeX/5th Generation devices only. Derive and set the device UIDs (GUIDs, MACs, WWNs).UIDs are derived from the given base UID according to Mellanox Methodologies Commands affected: burn, sg -uids <UIDs...> BridgeX only. 29 space separated UIDs must be specified here.The specified UIDs are assigned to the following fields, respectively: G0-MAC-PI0 G0-MAC-PI1 G0-MAC-PI2 G0-MAC-PE0 G0-MAC-PE1 G0-MAC-PE2 G0-MAC-PE3 G0-FC-WWPN-P0 G0-FC-WWPN-P1 G0-FCWWPN-P2 G0-FC-WWPN-P3 G0-IB-NODE-GUID G0-IB-PORT-GUID G0-FC-WWNN G1-MAC-PI0 G1-MAC-PI1 G1-MAC-PI2 G1-MAC-PE0 G1-MAC-PE1 G1-MAC-PE2 G1-MAC-PE3 G1-FC-WWPN-P0 G1-FC-WWPN-P1 G1-FC-WWPN-P2 G1-FC-WWPN-P3 G1-IB-NODE-GUID G1-IB-PORT-GUID G1-FC-WWNN IB-SYSTEM-GUID Commands affected: burn, sg -use_image_guids Burn (guids/uids/macs) as appears in the given image. Commands affected: burn -use_image_ps Burn vsd as appears in the given image - do not keep existing VSD on flash. Commands affected: burn -use_image_rom Do not save the ROM which exists in the device. Commands affected: burn --ignore_dev_data Do not attempt to take device data sections from device (sections will be taken from the image. FS3 Only). Commands affected: burn --ignore_dev_data Do not attempt to take device data sections from device(sections will be taken from the image. FS3 Only). Commands affected: burn -v Version info. -vsd 38 <string> Write this string, of up to 208 characters, to VSD when burn. -y[es] Non interactive mode - assume answer "yes" to all questions. Commands affected: all --use_fw Access to flash using FW (ConnectX3/ConnectX3Pro Device Only) Commands affected: all Mellanox Technologies Rev 2.4 1. When accessing SwitchX via I2C or PCI, the -override_cache_replacement flag must be set. Command Parameters: The flint utility commands are: Common FW Update and Query Burn flash b[urn] q[uery] [full] Query misc. flash/firmware characteristics, use "full" to get more information. v[erify] Verify entire flash swreset SW reset the target un-managed switch device. This command is supported only in the In-Band access method. Expansion ROM Update: brom <ROM-file> rrom Burn the specified ROM file on the flash. Remove the ROM section from the flash. drom <out-file> Read the ROM section from the flash. Query ROM in a given image. qrom Initial Burn, Production: bb Burn Block - Burns the given image as is. No checks are done. sg [guids_num=<num> step_size=<size>] | [nocrc] Set GUIDs. set_vpd Set read-only VPD (For FS3 image only). [vpd file] smg [guids_num=<num> step_size=<size>] Set manufacture GUIDs (For FS3 image only). sv Set the VSD. Misc FW Image operations: ri <out-file> Read the fw image on the flash. dc [out-file] Dump Configuration: print fw configuration file for the given image. dth [out-file] Dump Hash: print hash file for the given image. HW Access Key: set_key [key] Set/Update the HW access key which is used to enable/disable access to HW. The key can be provided in the command line or interactively typed after the command is given NOTE: The new key is activated only after the device is reset. Mellanox Technologies 39 Rev 2.4 Firmware Generation, Configuration, and Update Tools hw_access <enable|disable> [key] Enable/disable the access to the HW. The key can be provided in the command line or interactively typed after the command is given Low Level Flash Operations: Query HW info and flash attributes. hw query e[rase] Erase sector <addr> rw <addr> Read one dword from flash ww <addr> < data> Write one dword to flash wwne <addr> Write one dword to flash without sector erase wb <data-file> <addr> Write a data block to flash wbne <addr> <size> <data ...> Write a data block to flash without sector erase rb <addr> <size> [out-file] Read a data block from flash The following commands are non-failsafe when performed on a 5th generation device: sg, smg, sv and set_vpd. Manufacture GUIDs are similar to GUIDs. However, they are located in the protected area of the flash and set during production. By default, firmware will use GUIDs unless specified otherwise during production. 3.4.1 Burning a Firmware Image The FLINT utility enables you to burn the Flash from a binary image. To burn the entire Flash from a raw binary image, use the following command line: # flint -d <device> -i <fw-file> [-guid <GUID> | -guids <4 GUIDS> | -mac <MAC> | -macs <2 MACs>] burn where: 40 device Device on which the flash is burned. fw-file Binary firmware file. Mellanox Technologies Rev 2.4 GUID(s) Optional, for InfiniBand adapters and 4th generation switches. One or four GUIDs. • • • If 4 GUIDS are provided (-guids flag), they will be assigned as node, Port 1, Port 2 and system image GUIDs, respectively. If only one GUID is provided (-guid flag), it will be assigned as node GUID. Its values +1, +2 and +3 will be assigned as Port 1, Port 2 and system image GUID, respectively. If no -guid/-guids flag is provided, the current GUIDs will be preserved on the device. NOTE: For 4th generation, four GUIDs must be specified but Ports 1 and 2 GUIDs are ignored and should be set to 0. NOTE: A GUID is a 16-digit hexadecimal number. If less than 16 digits are provided, leading zeros will be inserted. MAC(s) Optional, for Ethernet and VPI adapters and switches. • • • If 2 MACs are provided (-macs flag), they will be assigned to Port 1 and Port 2, respectively. If only one MAC is provided (-mac flag), it will be assigned to Port 1; MAC+1 will be assigned to Port 2. If no -mac/-macs flag is provided, the current LIDs will be preserved on the device. NOTE: A MAC is a 12-digit hexadecimal number. If less than 12 digits are provided, leading zeros will be inserted. Mellanox Technologies 41 Rev 2.4 Firmware Generation, Configuration, and Update Tools To burn a firmware image: 1. Update the firmware on the device, keeping the current GUIDs and VSD. (Note: This is the common way to use flint.) # flint -d /dev/mst/mt4099_pci_cr0 -i fw-4099-2_31_5050-MCX354A-FCB_A2.bin burn 2. Update the firmware on the device, specifying the GUIDs to burn. # flint -d /dev/mst/mt4099_pci_cr0 -i fw-4099-2_31_5050-MCX354A-FCB_A2.bin -guid 1234567deadbeef burn 3. Update the firmware on the device, specifying the MACs to burn. # flint -d /dev/mst/mt4099_pci_cr0 -i fw-4099-2_31_5050-MCX354A-FCB_A2.bin -mac 1234567deadbeef burn 4. Burn the image on a blank Flash device. This means that no GUIDs are currently burnt on the device, therefore they must be supplied (with -guid/-guids) by the burning command. Moreover, the burn process cannot be failsafe when burning a blank Flash, therefore the -nofs flag must be specified. # flint -d /dev/mst/mt4099_pci_cr0 -i fw-4099-2_31_5050-MCX354A-FCB_A2.bin -nofs -guid 12345678 burn 5. Read FW from the device and save it as an image file. # flint -d /dev/mst/mt4099_pci_cr0 ri Flash_Image_Copy.bin 6. MT48436 InfiniScale IV switch: Burn the image on a blank Flash device. This means that no GUIDs are currently burnt on the device, therefore they must be supplied (with -guid/-guids) by the burning command. Moreover, the burn process cannot be failsafe when burning a blank Flash, therefore the -nofs flag must be specified. # flint -d /dev/mst/mtusb-1 -i /tmp/fw-is4.bin -nofs -guids 0002c9000100d060 0 0 0002c9000100d060 b 7. MT48436 InfiniScale IV switch inband firmware update: # flint -d lid-0x18 -i /tmp/fw-is4.bin b 8. MT58100 SwitchX switch: Burn the image on a blank Flash device. Meaning, no GUIDs/MACs are currently burnt on the device, therefore they must be supplied (with -guid/-guids and -mac/-macs) by the burning command. Moreover, the burn process cannot be failsafe when burning a blank Flash, therefore the -nofs flag must be specified. # flint -d /dev/mst/mtusb-1 -i /tmp/fw-sx.bin -nofs -guids 000002c900002100 0 0 000002c900002100 -macs 0002c9002100 0002c9002101 b 9. MT58100 SwitchX switch inband firmware update: # flint -d lid-0x18 -i /tmp/fw-sx.bin b 3.4.2 Querying the Firmware Image • To query the FW image on a device, use the following command line: # flint -d <device> q • To query the FW image in a file, use the following command line: # flint -i <image file> q 42 Mellanox Technologies Rev 2.4 where: device Device on which the query is run. image file Image file on which the query is run. Examples: a. Query the FW on the device. # flint -d /dev/mst/mt4099_pciconf0 query b. Query the FW image file. # flint -i 25408-2_30_5000-MCX354A-FCB_A2.bin query 3.4.3 Verifying the Firmware Image • To verify the FW image on the Flash, use the following command line: # flint -d <device> v • To verify the FW image in a file, use the following command line: # flint -i <image file> v where: device Flash device to verify. image file Image file to verify. Examples: # flint -d /dev/mst/mt4099_pci_cr0 v # flint -i ./image_file.bin v 3.4.4 Managing an Expansion ROM Image • To burn an Expansion ROM image, use the following command: # flint -d <mst device> brom <image name>.mrom The "brom" command installs the ROM image on the Flash device or replaces an already existing one. Example: # flint -d /dev/mst/mt4099_pci_cr0 brom example.mrom Current ROM info on flash: N/A New ROM info: type=PXE version=3.4.255 devid=4099 proto=VPI Burning ROM image - OK Restoring signature - OK # • To read an Expansion ROM image to a file, use the following command: # flint -d <mst device> rrom <image name>.rom Mellanox Technologies 43 Rev 2.4 Firmware Generation, Configuration, and Update Tools Example: # flint -d /dev/mst/mt4099_pci_cr0 rrom example.mrom # flint -d /dev/mst/mt4099_pci_cr0 q Image type: FS2 FW Version: 2.31.5050 FW Release Date: 4.5.2014 Rom Info: type=PXE version=3.4.225 devid=4099 proto=VPI Device ID: 4099 Description: Node Port1 Port2 Sys image GUIDs: f45214030001b8a0 f45214030001b8a1 f45214030001b8a2 f45214030001b8a3 MACs: f4521401b8a1 f4521401b8a2 VSD: PSID: MT_1090120019 # • To remove the Expansion ROM, use the following command: # flint -d <mst device> drom Example: # flint -d /dev/mst/mt4099_pci_cr0 drom Removing ROM image - OK Restoring signature - OK 3.4.5 Setting GUIDs and MACs To set GUIDs/MACs/UIDs for the given device, use the ‘sg’ (set guids) command with the guid(s) -uid(s) and/or -mac(s) flags. 3.4.5.1 4th Generation Devices On 4th generation devices, the “sg” command can operate on both the image file and the image on the flash. When running the “sg” command on an image on the flash, if the GUIDs/MACs/ UIDs in the image are non-blank, the flint will re-burn the current image using the given GUIDs/ MACs/UIDs. 1. Change the GUIDs/MACs on a device # flint -d /dev/mst/mt4099_pciconf0 q -W- Running quick query - Skipping full image integrity checks. Image type: FW Version: FW Release Date: Device ID: Description: GUIDs: MACs: VSD: PSID: FS2 2.31.5050 4.5.2014 4099 Node Port1 Port2 Sys image f45214030001b8a0 f45214030001b8a1 f45214030001b8a2 f45214030001b8a3 f4521401b8a1 f4521401b8a2 MT_1090120019 # flint -d /dev/mst/mt4099_pciconf0 -guid 0x452140300abadaba -mac 0x300abadaba sg 44 Mellanox Technologies Rev 2.4 -W- GUIDs are already set, re-burining image with the new GUIDs ... You are about to change the Guids/Macs/Uids on the device: New Values Current Values Node GUID: 452140300abadaba f45214030001b8a0 Port1 GUID: 452140300abadabb f45214030001b8a1 Port2 GUID: 452140300abadabc f45214030001b8a2 Sys.Image GUID: 452140300abadabd f45214030001b8a3 Port1 MAC: 00300abadaba f4521401b8a1 Port2 MAC: 00300abadabb f4521401b8a2 Do you want to continue ? (y/n) [n] : y Burning FS2 FW image without signatures - OK Restoring signature - OK # flint -d /dev/mst/mt4099_pciconf0 q Image type: FS2 FW Version: 2.31.5050 FW Release Date: 4.5.2014 Device ID: 4099 Description: Node Port1 Port2 Sys image GUIDs: 452140300abadaba 452140300abadabb 452140300abadabc 452140300abadabd MACs: 00300abadaba 00300abadabb VSD: PSID: MT_1090120019 2. Change the GUIDs/MACs on an image file: # flint -i /tmp/image.bin q Image type: fs2 FW Version: 2.31.5050 FW Release Date: 4.5.2014 Device ID: 4099 Description: Node Port1 Port2 Sys image GUIDs: f45214030001b8a0 f45214030001b8a1 f45214030001b8a2 f45214030001b8a3 MACs: 00300abadaba 00300abadabb VSD: PSID: MT_1090120019 # flint -i /tmp/image.bin -guid 0002c9000abcdef0 -mac 02c90abcdef0 sg You are about to change the Guids/Macs/Uids on the device: New Values Current Values Node GUID: 0002c9000abcdef0 f45214030001b8a0 Port1 GUID: 0002c9000abcdef1 f45214030001b8a1 Port2 GUID: 0002c9000abcdef2 f45214030001b8a2 Sys.Image GUID: 0002c9000abcdef3 f45214030001b8a3 Port1 MAC: 02c90abcdef0 00300abadaba Port2 MAC: 02c90abcdef1 00300abadabb Do you want to continue ? (y/n) [n] : y Restoring signature - OK Mellanox Technologies 45 Rev 2.4 Firmware Generation, Configuration, and Update Tools # flint -i /tmp/image.bin q Image type: FS2 FW Version: 2.31.5050 FW Release Date: 4.5.2014 Device ID: 4099 Description: Node Port1 Port2 Sys image GUIDs: 0002c9000abcdef0 0002c9000abcdef1 0002c9000abcdef2 0002c9000abcdef3 MACs: 02c90abcdef0 02c90abcdef1 VSD: PSID: MT_1090120019 46 Mellanox Technologies Rev 2.4 3.4.5.2 5th Generation Devices On 5th Generation devices, the “sg” command can operate on both the image file and the image on the flash. When running the “sg” command on an image on the flash, -uid flag must be specified. For ConnectX-4, -guid/-mac flags can be specified. By default, 8 GUIDs will be assigned for each port starting from base, base+1 up until base+7 for port 1 and base+8 up until base+15 for port 2. To change the step size and the number of GUIDs per port, specify guids_num=<num> step_size=<size> to the sg command. 1. Change GUIDs for device: # flint -d /dev/mst/mt4113_pciconf0 q Image type: FS3 FW Version: 10.10.3000 FW Release Date: 29.4.2014 Description: UID GuidsNumber Step Base GUID1: 0002c903002ef500 8 1 Base GUID2: 0002c903002ef508 8 1 Base MAC1: 00000002c92ef500 8 1 Base MAC2: 00000002c92ef508 8 1 Image VSD: Device VSD: VSD PSID: MT_1240110019 # flint -d /dev/mst/mt4113_pciconf0 -uid 0002c123456abcd -ocr sg -W- Firmware flash cache access is enabled. Running in this mode may cause the firmware to hang. Updating GUID section - OK Updating ITOC section - OK Restoring signature - OK # flint -d /dev/mst/mt4113_pciconf0 q Image type: FS3 FW Version: 10.10.3000 FW Release Date: 29.4.2014 Description: UID GuidsNumber Step Base GUID1: 00002c123456abcd 8 1 Orig Base GUID1: 0002c903002ef500 8 1 Base GUID2: 00002c123456abd5 8 1 Orig Base GUID2: 0002c903002ef508 8 1 Base MAC1: 000000002c56abcd 8 1 Orig Base MAC1: 00000002c92ef500 8 1 Base MAC2: 000000002c56abd5 8 1 Orig Base MAC2: 00000002c92ef508 8 1 Image VSD: Device VSD: VSD PSID: MT_1240110019 Mellanox Technologies 47 Rev 2.4 Firmware Generation, Configuration, and Update Tools Orig Base GUID/MAC refers to the GUIDs/MACs located in the MFG(manufacture guids) section of the flash/image. 2. Change GUIDS for device (specifying guids_num and step_size): # flint -d /dev/mst/mt4113_pciconf0 q Image type: FS3 FW Version: 10.10.3000 FW Release Date: 29.4.2014 Description: UID GuidsNumber Step Base GUID1: 0002c903002ef500 8 1 Base GUID2: 0002c903002ef508 8 1 Base MAC1: 00000002c92ef500 8 1 Base MAC2: 00000002c92ef508 8 1 Image VSD: Device VSD: VSD PSID: MT_1240110019 # flint -d /dev/mst/mt4113_pciconf0 -uid 0000000000000001 -ocr sg guids_num=2 step_size=1 -W- Firmware flash cache access is enabled. Running in this mode may cause the firmware to hang. Updating GUID section - OK Updating ITOC section - OK Restoring signature - OK # flint -d /dev/mst/mt4113_pciconf0 q Image type: FS3 FW Version: 10.10.3000 FW Release Date: 29.4.2014 Description: UID GuidsNumber Step Base GUID1: 0000000000000001 2 1 Orig Base GUID1: 0002c903002ef500 8 1 Base GUID2: 0000000000000003 2 1 Orig Base GUID2: 0002c903002ef508 8 1 Base MAC1: 0000000000000001 2 1 Orig Base MAC1: 00000002c92ef500 8 1 Base MAC2: 0000000000000003 2 1 Orig Base MAC2: 00000002c92ef508 8 1 Image VSD: Device VSD: VSD PSID: MT_1240110019 48 Mellanox Technologies Rev 2.4 3. Change GUIDs for image: # flint -i /tmp/connect-ib.bin q Image type: FS3 FW Version: 10.10.3000 FW Release Date: 29.4.2014 Description: UID Base GUID1: 0002c903002ef500 Base GUID2: 0002c903002ef508 Base MAC1: 00000002c92ef500 Base MAC2: 00000002c92ef508 Image VSD: Device VSD: VSD PSID: MT_1240110019 GuidsNumber Step 8 1 8 1 8 1 8 1 # flint -i /tmp/connect-ib.bin -uid 000123456abcd sg Updating GUID section - OK Updating ITOC section - OK Restoring signature - OK # flint -i /tmp/connect-ib.bin q Image type: FS3 FW Version: 10.10.3000 FW Release Date: 29.4.2014 Description: UID Base GUID1: 000000123456abcd Orig Base GUID1: 0002c903002ef500 Base GUID2: 000000123456abd5 Orig Base GUID2: 0002c903002ef508 Base MAC1: 000000000056abcd Orig Base MAC1: 00000002c92ef500 Base MAC2: 000000000056abd5 Orig Base MAC2: 00000002c92ef508 Image VSD: Device VSD: VSD PSID: MT_1240110019 GuidsNumber Step 8 1 8 1 8 1 8 1 8 1 8 1 8 1 8 1 4. 4. Change GUIDs and MACs for the ConnectX®-4 device: # flint -d /dev/mst/mt4115_pciconf0 -guid e41d2d0300570fc0 -mac 0000e41d2d570fc0 -ocr sg -W- Firmware flash cache access is enabled. Running in this mode may cause the firmware to hang. Updating GUID section - OK Updating ITOC section - OK Restoring signature - OK # flint -d /dev/mst/mt4115_pciconf0 q Image type: FS3 FW Version: 12.0100.5630 FW Release Date: 23.3.2015 Description: UID GuidsNumber Mellanox Technologies 49 Rev 2.4 Firmware Generation, Configuration, and Update Tools Base GUID: Base MAC: Image VSD: Device VSD: PSID: e41d2d0300570fc0 0000e41d2d570fc0 4 4 MT_2190110032 add note: GUIDs and MACs can be changed separately on ConnectX4 3.4.5.3 Preparing a Binary Firmware Image for Pre-assembly Burning In some cases, OEMs may prefer to pre-burn the flash before it is assembled on board. To generate an image for pre-burning for 4th generation devices (ConnectX® and newer), use the mlxburn "-striped_image" flag. The "striped image" file layout is identical to the image layout on the flash, hence making it suitable for burning verbatim. When pre-burning, the GUIDs/MACs inside the image should be unique per device. The following are two methods to pre-burn an image. You can choose the best method suitable for your needs. Method 1: Pre-burn an Image with Blank GUIDs/MACs: In this method, the image is generated with blank GUIDs and CRCs. The GUIDs are set after the device is assembled using the flint "sg" command. To set GUIDs take less than 1 second when running on an image with blank GUIDs (through a PCI device). A device that is burnt with blank GUIDs/MACs will not boot as a functional network device as long as the GUIDs/MACs are not set. To pre-burn an image with blank GUIDs/MACs: 1. Generate a striped image with blank GUIDs. # mlxburn -fw ./fw-ConnectX3-rel.mlx -./MCX354A-FCB_A2-A5.ini -wrimage./fw-ConnectX3-rel.bin -striped_image -blank_guids -I- Generating image ... -I- Image generation completed successfully. 2. Burn the image to a flash using an external burner. 3. (Optional) After assembly, query the image on flash to verify there are no GUIDs on the device. # flint -d /dev/mst/mt26428_pci_cr0 q Image type: FW Version: FW Release Date: Device ID: 4099 Description: 50 FS2 2.31.5050 4.5.2014 Node Mellanox Technologies Port1 Port2 Sys image Rev 2.4 GUIDs: MACs: VSD: PSID: ffffffffffffffff ffffffffffffffff ffffffffffffffff ffffffffffffffff ffffffffffffffff ffffffffffffffff n/a MT_1090120019 -W- GUIDs/MACs values and their CRC are not set. 4. Set the correct GUIDs. Since the image is with blank GUIDs, this operation takes less than 1 second # flint -d /dev/mst/mt4099_pci_cr0 -guid 0x0002c9030abcdef0 -mac 0x0002c9bcdef1 sg 5. Query the image on flash to verify that the GUIDs are set correctly. # flint -d /dev/mst/mt4099_pci_cr0 q Image type: FW Version: FW Release Date: Device ID: 4099 Description: GUIDs: MACs: VSD: PSID: FS2 2.31.5050 4.5.2014 Node Port1 Port2 Sys image 0002c9030abcdef0 0002c9030abcdef1 0002c9030abcdef2 0002c9030abcdef3 0002c9bcdef1 0002c9bcdef2 n/a MT_1090120019 Method 2: Pre-burn an Image with Specific GUIDs/MACs for Each Device: In this method, a "base" image is generated with arbitrary default GUIDs and then updated with the correct GUIDs for each device. To pre-burn an image with Specific GUIDs/MACs for Each Device: 1. Generate the base image with arbitrary default GUIDs # mlxburn -fw./fw-ConnectX3-rel.mlx -c ./MCX354A-FCB_A2-A5.ini -wrimage ./fw-ConnectX3rel.bin -striped_image 2. Per device, set the device specific GUIDs in the image. flint -i ./fw-ConnectX3-rel.bin -guid 0x0002c9030abcdef0 -mac 0x0002c9bcdef1 -striped_image sg 3. (Optional) Query the image to verify the GUIDs are set. The “-striped_image” flag must be specified when querying a striped image. # flint -i ./fw-ConnectX3-rel.bin -striped_image q Image type: FS2 FW Version: 2.31.5050 FW Release Date: 4.5.2014 Device ID: 4099 Description: Node Port1 Port2 Sys image GUIDs: 0002c9030abcdef0 0002c9030abcdef1 0002c9030abcdef2 0002c9030abcdef3 MACs: 0002c9bcdef1 0002c9bcdef2 VSD: n/a PSID: MT_1090120019 Mellanox Technologies 51 Rev 2.4 Firmware Generation, Configuration, and Update Tools Now the fw-ConnectX3-rel.bin image can be pre-burned to the flash. After the assembly, the device would be fully functional. 3.4.5.4 Setting the VSD To set the vsd for the given image/device (4th generation), use the sv command with -vsd flag. Example: # flint -d /dev/mst/mt4099_pci_cr0 -vsd "MELLANOX" sv Setting the VSD - OK Restoring signature - OK # flint -d /dev/mst/mt4099_pci_cr0 q Image type: FS2 FW Version: 2.31.5050 FW Release Date: 4.5.2014 Device ID: 4099 Description: Node Port1 Port2 Sys image GUIDs: f45214030001b8a0 f45214030001b8a1 f45214030001b8a2 f45214030001b8a3 MACs: 00300abadaba 00300abadabb VSD: MELLANOX PSID: MT_1090120019 3.4.5.5 Disabling/Enabling Access to the Hardware The secure host feature enables ConnectX® family devices to block access to its internal hardware registers. The hardware access in this mode is allowed only if a correct 64 bits key is provided. The secure host feature requires a MLNX_OFED driver installed on the machine. To disable/enable access to the hardware: 1. Set the key: # flint -d /dev/mst/mt4099_pci_cr0 set_key 22062011 Setting the HW Key - OK Restoring signature - OK A driver restart is required to activate the new key. 2. Access the HW while HW access is disabled: # fint -d /dev/mst/mt4099_pci_cr0 q E- Cannot open /dev/mst/mt4099_pci_cr0: HW access is disabled on the device. E- Run "flint -d /dev/mst/mt4099_pci_cr0 hw_access enable" in order to enable HW access. 52 Mellanox Technologies Rev 2.4 3. Enable HW access: # flint -d /dev/mst/mt4099_pci_cr0 hw_access enable Enter Key: ******** 4. Disable HW access: # flint -d /dev/mst/mt4099_pci_cr0 hw_access disable WARNING: 1. Once a hardware access key is set, the hardware can be accessed only after the correct key is provided. 2. If a key is lost, there is no way to recover it using the tool. The only way to recover from a lost key is to: • • • • Connect the flash-not-present jumper on the card Boot in "flash recovery" mode Re-burn FW Re-set the HW access key For further details, please refer to Appendix H,“Secure Host Feature,” on page 106 3.4.5.6 Reading a Word from Flash To read one dword from Flash memory, use the following command line:where: # flint -d <device> rw addr device The device the dword is read from addr The address of the word to read Example: # flint -d /dev/mst/mt4099_pci_cr0 rw 0x20 3.4.5.7 Writing a dword to Flash To write one dword to Flash memory, use the following command line: # flint -d <device> ww addr data where: device The device the dword is written to. addr The address of the word to write. data The value of the word. Example: # flint -d /dev/mst/mt4099_pci_conf01 ww 0x10008 0x5a445a44 3.4.5.8 Writing a dword to Flash Without Sector Erase To write one dword to Flash memory without sector erase , use the following command line: # flint -d <device> wwne addr data where: device The device the dword is written to. Mellanox Technologies 53 Rev 2.4 Firmware Generation, Configuration, and Update Tools addr The address of the word to write. data The value of the word. Example: # flint -d /dev/mst/mt4099_pci_cr0 wwne 0x10008 0x5a445a44 Note that the result may be dependent on the Flash type. Usually, bitwise and between the specified word and the previous Flash contents will be written to the specified address. 3.4.5.9 Erasing a Sector To erase a sector that contains a specified address, use the following command line: # flint -d <device> e addr where: device The device the sector is erased from. addr The address of a word in the sector that you want to erase. Example: # flint -d /dev/mst/mtusb-1 e 0x1000 3.4.6 Flint/mlxburn Limitations When running flint/mlxburn via an MTUSB-1 device, a burn/query command may take up to 45 minutes to complete. To accelerate the burn process add the flag -no_flash_verify to the command line which skips the flash verification step. This flag, however, does not verify if the image is burnt correctly. Burning an image to a ConnectX®-3 adapter in Flash recovery mode may fail on some server types (that use PCIe spread spectrum). The tool may not be able to recognize the device’s PCI CONF0 or the image burn may not complete successfully. To burn the device, use the MTUSB-1 connection. 54 Mellanox Technologies Rev 2.4 3.5 mlxburn - Firmware Image Generator and Burner mlxburn is a tool for firmware (FW) image generation and/or for burning a firmware image to the Flash/EEPROM attached to a Mellanox device. Both functions or a single function of mlxburn can be activated by means of command line options (see Section , “mlxburn Synopsis”). It can also query for firmware attributes (e.g., firmware version, GUIDs, etc.) and VPD info of adapter cards and switch systems. mlxburn allows for customization of standard Mellanox firmware for OEM specific needs (e.g., a specific adapter board type). See Section 3.5.2, “Customizing Firmware”, on page 55. 3.5.1 Generating and Burning Firmware The mlxburn firmware update flow is composed of two separate stages: image generation and image burning. In the image generation stage, a given Mellanox firmware release (in .mlx format for adapters, bridges and 4th generation switches (ConnectX® and newer), and in .BIN file format for InfiniScale® III switches) is processed together with a board-specific configuration (.ini) file to generate a ‘burnable’ firmware image. This image is burnt to the Flash/EERPROM attached to a Mellanox device in the second stage. The burning process retains device specific data such as GUIDs, UIDs, MACs, VSD, and BSN. Also, the burn process is failsafe by default. Figure 2: FW Generation and Burning mlxburn runs both stages by default, but it may perform only one by means of command options. If the ‘-wrimage’ is specified (see Section , “mlxburn Synopsis”), only image generation is performed. Specifying the ‘-image’ option skips the image generation stage and loads the provided image (generated in a previous run of mlxburn using the ‘-wrimage’ option). 3.5.2 Customizing Firmware A Mellanox firmware image can be customized (usually) to fit a specific board type. The customization is done by using a FW parameter-set file in the image generation stage. This file has a .ini Mellanox Technologies 55 Rev 2.4 Firmware Generation, Configuration, and Update Tools format. Each parameter-set file has a unique parameter-set ID (PSID), which is kept in the device Flash/EEPROM and allows retaining device configuration during future FW updates. During a device FW update, mlxburn reads the PSID from the device and uses the corresponding .ini file when generating the FW image. mlxburn searches for the files in the same directory of the FW release. When mlxburn is used to generate an image file, or when no corresponding parameter-set file is found, the user should explicitly specify which parameter-set file to use. To produce an image file the user needs to provide the option ‘-wrimage <target file>’. To actually burn the image to the Flash/EEPROM attached to a Mellanox adapter or switch device, the user needs to specify the option ‘-dev <mst device>’ (see the synopsis section below). If run in burning mode, mlxburn auto-detects the firmware parameter-set with which the device was previously burnt. It locates and uses this parameter-set file to generate the appropriate image for the device (by merging the FW release with the specific parameter-set required). To inhibit image generation, the ‘-image <pre-generated-image-file>’ should be used. It instructs mlxburn to use the given file for burning the device. mlxburn Synopsis #mlxburn [-h][-v] <-dev mst-device|-wrimage fw-image> <-fw mellanox-fw-file|-image fw-image|-img_dir img_direcory|-fw_dir fw_dir> [-conf fw-conf-file][-nofs][-nofs_img][-striped_image][-format BINARY|IMAGE][-dev_type device type] [-exp_rom <exp_rom_file>][-exp_rom_dir <exp_rom_dir>][-force][-conf_dir <conf_dir>] [-fwver]1[-vpd][-vpd_rw][-vpd_prog_rw <rw-keywords-file>][-vpd_set_keyword <keyword-assignment>] [-set_pxe_en <(port1|port2)=(enable|disable)>] [-prof_file <profiles file>] [-query] [-conf_dir_list <dir1,dir2,...,dirn>] 1. The “-fwver” flag is not supported in Connect-IB®, Switch-IB™, and ConnectX-4® devices. where: -dev_type <mellanox-devicenumber> mlxburn must know the device type in order to work properly Use this flag if device type auto-detection fails. Example: -dev_type 4099 Supported Mellanox device types: • HCAs/NICs: 25408, 25418, 26418, 26428 25448, 26448, 26468, 26478, 25458, 26458, 26438, 26488, 4097, 4098, 4099, 4100, 4101, 4102, 4103, 4104, 4105, 4106, 4107, 4108, 4109, 4110, 4111, 4112 • • 56 Switches: 43132, 48436, 48437, 48438, 51000 Bridges: 64102, 64122, 1016 -fw <mellanox-fw-file> Specify Mellanox FW released Firmware File to use (file extension is .mlx for HCA and BIN for an MT47396 switch) -conf <parameter-set-file> FW configuration file (.ini). Needed when generating image (not using -dev flag) or if configuration auto detection fails -conf_dir <dir> When specified, the auto detected configuration files will be looked for in the given directory, instead of in the firmware file directory. Applicable for burn operation -dev <mst-dev> Burn the image using the given mst device Mellanox Technologies Rev 2.4 -exp_rom <exp-rom-file> Integrate the given expansion rom file to the FW image. The given file may be in .img or bin/.rom (raw binary) format. • If the exp-rom-file is set to "AUTO", expansion rom file is auto detected from the files rom in the exp_rom_dir (see below). NOTE: Exp rom auto detection is done for devices that are already burned with an exp-rom image. • If "-exp_rom AUTO" is specified for a device with no exp-rom, it would be burnt with no exp rom. To add exp-rom to a device, manually supply the exp rom file to use -exp_rom_dir <exp_rom_dir> The directory in which to look for expansion rom file when "-exp_rom AUTO" is specified. By default, exp-rom files are searched in <fw file directory>/exp_rom/* -force None interactive mode. Assume "yes" for all user questions. -format <BINARY|IMAGE> Specify which image format to use. Can be specified only with the -wrimage flag. Default is BINARY. -fw_dir <dir> When specified, the auto detected fw files will be looked for in the given directory. Applicable for burn operation -conf_dir_list <dir1,dir2,...,dirn> When specified, the auto detected configuration files will be looked for in the given directories, instead of in the firmware file directory. Applicable for burn operation -fwver • • When a device is given: Display current loaded firmware version. When a FW file is given (-fw flag): Display the file FW version. Note: The “-fwver” flag is not supported in Connect-IB® devices. -h Display a short help text -image <fw-image-file> Do not generate image. Use the given fw image instead -img_dir <image directory> Do not generate image. Select the image to burn from the *.bin in the given directory -nofs When specified, burn process will not be failsafe. -nofs_img When specified, generated image will not be failsafe, and burn process will not be failsafe Mellanox Technologies 57 Rev 2.4 Firmware Generation, Configuration, and Update Tools -query Query the HCA/Switch device for firmware details, e.g. Firmware Version, GUIDs etc. In addition to the above flags, Mlxburn can also accept the following flags/options, which are passed to the underlying burning tool: -banks -use_image_ps -skip_is -mac(s) -guid(s) -sysguid -vsd -ndesc -bsn -pe_i2c -se_i2c -is3_i2c -no -uid(s) -log -blank_guids -flash_params -allow_psid_change -no_flash_verify -use_image_rom -override_cache_replacement -use_image_guids See the flint tool documentation for HCA/4th gen switches/ Bridge burning options. -v Print version info and exit -V <INFORM|WARNING|DEBUG> Set verbosity level. Default is WARNING -vpd1,2 Display the read only section of the PCI VPD (Vital Product Data) of the given device -vpd_prog_rw<rw-keywordsfile>1,2 (on Linux only): Program the VPD-W tag (the writable section of the VPD) with the data given in the rw-keywords-file. File lines format: "KEYWORD = VALUE". In order to set binary data to a keyword, add ":BIN" to the keyword name. in this case, the data is a hexadecimal string of even length. Example file: V1 = MY-ASCII-KEYWORD V2:BIN = 1234abcd White spaces before and after VALUE are trimmed -vpd_rw1,2 (on Linux only): Display also the read/write section of the PCI VPD of the given device. -vpd_set_keyword <keywordassignment>1,2 Add or change a keyword value in the VPD-W tag (the writable section of the VPD) with the data given in the keyword-assignment string. The string format is identical to a line in the rw-keywords-file described above. Other keywords in the VPD-W tag are not affected by this operation. -wrimage <fw-image-file> Write the image to the given file. 1. The VPD query may not be enabled on certain board types. Also, VPD operations are available only for devices with a PCI interface. 2. Running multiple VPD access commands in parallel on the same device, by mlxburn or any other VPD access tool, may cause the commands to fail. VPD access commands should be run one at a time. 58 Mellanox Technologies Rev 2.4 Mellanox Connect-IB®, Switch-IB™ and ConnectX-4® Initial Burning Options These options are applicable for Mellanox Connect-IB® HCA only. The following options are relevant when generating an image for initial burning. The image contains the VPD and the GUIDs that are in a read-only area on flash. [ -vpd_r_file <vpd_r_file>] [ -base_guid <GUID>] where: -vpd_r_file <vpd_r_file> Embed the given VPD Read-Only section in the generated image. The vpd_r_file should contain the vpd read only section and the first dword of the vpd write-able section. The file is in binary format, and its size must be a multiple of 4 bytes. Please refer to PCI base spec for VPD structure info. -base_guid <GUID> Set the given GUID as the image base GUID. The base GUID is used to derive GUIDs and MACs for the HCA ports. It is assumed that 16 GUIDs (base_guid to base_guid + 15) are reserved for the card. Note: On ConnectX-4, only GUIDs will be derived according to the HCA configuration. -base_mac <MAC> Set the given MAC as the image base MAC. The base MAC is used to derive MACs for the HCA ports according to the device configuration (ConnectX-4 only). Additional mlxburn Options The following is a list of additional options. Please see Chapter 3.2, “mlxfwmanager - Firmware Update and Query Tool” for the HCA options.1 [-use_image_ps] [-skip_is] [-mac(s)] [-guid(s)] [-sysguid] [-vsd] [-uid(s)] [-log] [blank_guids] [-flash_params] [-allow_psid_change] [-no_flash_verify] [-use_image_rom] [-ocr] [use_image_guids] [-bank] Examples of mlxburn Usage Host Channel Adapter Examples • To update firmware on an MT25408 ConnectX® adapter device with the configuration file (.ini) auto-detected, enter: # mlxburn -fw ./fw-ConnectX3-rel.mlx -dev /dev/mst/mt4099_pci_cr0 • To generate a failsafe image file for the same adapter above without burning, enter: # mlxburn -fw ./fw-ConnectX3-rel.mlx -conf ./MCX354A-FCB_A2-A5.ini -wrimage ./fw-4099.bin 1. The arguments of the -guids and -macs flags must be provided within quotation marks; for example, mlxburn -macs “0002c900001 0002c900002” Mellanox Technologies 59 Rev 2.4 • Firmware Generation, Configuration, and Update Tools To update firmware on the same adapter above with the configuration file (.ini) explicitly specified, enter: # mlxburn -fw ./fw-ConnectX3-rel.mlx -dev /dev/mst/mt4099_pci_cr0 -conf ./CX354A-FCB_A2A5.ini SwitchX® Switch Examples • Burn an MSX6025 switch system using the In-Band access method: # mlxburn -dev /dev/mst/SW_MT51000_000002c900002100_lid-0x000E -fw ./fw-sx.mlx • Generate an MT48436 image and perform an In-Band update of the device with LID 0x18: # mlxburn -dev lid-0x000E -fw ./fw-sx.mlx • Generate and burn a new MSX6025 via I2C: • Set the I2C network to access the InfiniScale IV switch. # mlxi2c -d /dev/mst/mtusb-1 p SX • Burn the new image (the flash is still blank) specifying the Node GUID, system GUID, base MAC and Switch MAC. Note that 4 guids (in quotes) should be specified as an argument to the -guids flag. The 2 middle GUIDs are ignored by SwitchX and should be set to 0. # mlxburn -d /dev/mst/mtusb-1 -fw ./fw-sx.mlx -conf MSX6025F_A1.ini -guids "000002c900002100 0 0 000002c900002100" -macs "0002c9002100 0002c9002101" -nofs InfiniScale IV Switch Examples • Burn an MTS3600 switch system via I2C: a. Set the I2C network to access the InfiniScale IV switch: # mlxi2c -d /dev/mst/mtusb-1 p IS4_PRIM b. Burn: # mlxburn -dev /dev/mst/mtusb-1 -fw ./fw-IS4.mlx • Burn an MTS3600 switch system using the In-Band access method: # mlxburn -dev /dev/mst/SW_MT48438_lid-0x0003 -fw ./fw-IS4.mlx • Generate and burn a new MTS3600 via I2C: a. Set the I2C network to access the InfiniScale IV switch. # mlxi2c -d /dev/mst/mtusb-1 p IS4_PRIM b. Burn the new image (the flash is still blank) specifying the Node and System GUIDs. Note that 4 GUIDs (in quotes) should be specified as an argument to the -guids flag. The 2 middle GUIDs are ignored by the InfiniScale IV and should be set to 0. # mlxburn -dev /dev/mst/mtusb-1 -fw ./fw-IS4.mlx -conf ./MTS3600Q-1UNC_A1.ini-guids "0002c9000100d060 0 0 0002c9000100d060" -nofs • Generate and Burn a new MT3600 switch system via I2C in 2 steps: a. Generate the image: # mlxburn -fw ./fw-IS4.mlx -conf ./MTS3600Q-1UNC_A1.ini -wrimage ./fw-is4.bin 60 Mellanox Technologies Rev 2.4 b. Burn using flint tool: # flint -d /dev/mst/mtusb-1 -i /tmp/fw-is4.bin -nofs -guids 0002c9000100d060 0 0 0002c9000100d060 b • To generate an MT48436 image and perform an In-Band update of the device with LID 0x18, enter: # mlxburn -fw ./fw-IS4.mlx -dev lid-0x18 BridgeX® Gateway Examples • To update firmware on BridgeX® device with the configuration file (.ini) auto-detected, enter: # mlxburn -d /dev/mst/mt64102_pci_cr1 -fw ./fw-BridgeX-rel.mlx • To generate a failsafe image file for the same BridgeX above without burning, enter: # mlxburn -fw ./fw-BridgeX-rel.mlx -conf ./MTB4020-PC0_A1.ini -wrimage ./fw-BridgeX.bin • To update firmware on the same BridgeX above with the configuration file (.ini) explicitly specified, enter: # mlxburn -fw ./fw-BridgeX-rel.mlx -dev /dev/mst/mt64102_pci_cr1-conf ./MTB4020-PC0_A1.ini • To burn a firmware binary file for a BridgeX device, enter: # mlxburn -image ./fw-BridgeX.bin -dev /dev/mst/mt64102_pci_cr1 Connect-IB® Examples • To generate a failsafe image file for Connect-IB® device without burning, enter: # mlxburn -fw FW/fw-ConnectIB.mlx -c FW/MCB194A-FCA_A1.ini -wrimage fw-ConnectIB-MCB194AFCA_A1.bin -base_guid 0x0002c903002ef500 • To update firmware on a Connect-IB® device, enter: # mlxburn –i fw-ConnectIB-MCB194A-FCA_A1.bin –d /dev/mst/mt4113_pciconf0 Switch-IB™ Examples • To generate a failsafe image file for a Switch-IB™ device without burning, enter: mlxburn -fw FW/fw-SwitchIB.mlx -c FW/MSB7700-E_Ax.ini -wrimage fw-SwitchIB-MSB7700-E_Ax.bin base_guid 0x0002c903002ef500 • To update firmware on a Switch-IB™ device, enter: mlxburn -i fw-SwitchIB-MSB7700-E_Ax.bin -d /dev/mst/SW_MT52000_000011111101a24c_lid0x0006,mlx4_0,1 ConnectX-4® Examples: • To generate a failsafe image file for ConnectX-4® device without burning, enter: # mlxburn -fw FW/fw-ConnectX-4.mlx -conf FW/MCX456A-ECA_Ax.ini -wrimage fw-ConnectX-4-MCX456A-ECA_Ax.bin -base_guid 0x0002c903002ef500 • To update firmware on a ConnectX-4® device, enter: # mlxburn –i fw-ConnectX-4-MCX456A-ECA_Ax.bin –d /dev/mst/mt4113_pciconf0 Mellanox Technologies 61 Rev 2.4 Firmware Generation, Configuration, and Update Tools Exit Return Values The following exit values are returned: 62 • 0 - successful completion • >0 - an error occurred Mellanox Technologies Rev 2.4 3.6 mlxfwreset - Loading Firmware on 5th Generation Devices Tool mlxfwreset (Mellanox firmware reset) tool enables the user to load updated firmware without having to reboot the machine. mlxfwreset supports 5th Generation HCAs with ISFU1 supported Firmware. It is supported only on Linux. Tool Requirements • OFED driver to be installed and enabled • Access to device through configuration cycles (pciconf) • Firmware supporting ISFU • Version 10.10.3000 or above for Connect-IB • Version 12.0100.0000 or above for ConnectX-4 • Device's firmware updated with latest MFT burning tools (Flint/Mlxburn/Mlxfwmanager) • Supported devices: Connect-IB and ConnectX-4 Exact reset level needed to load new firmware may differ, as it depends on the difference between the running firmware and the firmware we are upgrading to. mlxfwreset Synopsis # mlxfwreset -d <device> [--level <0..5>] [-y] <query | reset> where: -d|--device <device> Device to work with. -l|--level <0..5> Run reset with the specified reset level. -y|--yes Answer “yes” on prompt. -v|--version Print tool version. -h|--help Show help message and exit. query Query for reset level required to load new firmware reset Execute reset Level. Reset Levels Reset levels depends on the extent of the changes introduced when updating the device's firmware. The tool will display the supported reset levels that will ensure the loading of the new firmware Those reset levels are: 1. In Service Firmware Update (ISFU) allows for a smooth firmware upgrade. Mellanox Technologies 63 Rev 2.4 Firmware Generation, Configuration, and Update Tools • 0: Full ISFU. • 1: Driver restart (link/management will remain up). • 2: Driver restart (link/management will be down). • 3: Driver restart and PCI reset. • 4: Warm reboot. • 5: Cold reboot (performed by the user). Full ISFU means that the transaction to the new firmware will be seamless. When burning firmware with Flint/Mlxburn at the end of the burn the following message is displayed: -I- To load new FW run mlxfwreset or reboot machine. If this message is not displayed, a reboot is required to load a new firmware. Driver restart includes restart of the mst driver and OFED driver. Examples of mlxfwreset Usage 1. To query device reset level after firmware update use the following command line: # mlxfwreset -d /dev/mst/mt4113_pciconf0 query Supported reset levels for loading firmware on device, /dev/mst/mt4113_pciconf0: Example: 0: 1: 2: 3: 4: 5: Full ISFU Driver restart (link/management will remain up) Driver restart (link/management will be down) Driver restart and PCI reset Warm Reboot Cold Reboot Not supported Not supported Not supported Supported Supported Supported 2. To reset device in order to load new firmware, use the following command line: # mlxfwreset -d /dev/mst/mt4113_pciconf0 reset 64 Mellanox Technologies Rev 2.4 Example 3: Driver restart and PCI reset Continue with reset?[y/N] y -I- Stopping Driver -I- Sending Reset Command To Fw -I- Resetting PCI -I- Starting Driver -I- Restarting MST -I- FW was loaded successfully. -Done -Done -Done -Done -Done When running the reset command without specifying a reset level the minimal reset level will be performed. 3. To reset a device with a specific reset level to load new firmware, use the following command line: # mlxfwreset -d /dev/mst/mt4113_pciconf0 -l 4 reset Example: Requested reset level for device, /dev/mst/mt4113_pciconf0: 4: Warm Reboot Continue with reset?[y/N] y -I- Sending reboot command to machine - The system is going down for reboot NOW! 3.6.1 mlxfwreset Limitations The following are the limitations of mlxfwreset: • Executing a reset level that is lower than the minimal level (as shown in query command) will yield an error and a reboot will be required in order to load the new firmware. Attempting to run the tool again will return an error. • When updating the firmware of a device using flint/mlxburn/mlxfwmanager, it is required for the burning tool to update the new firmware in an ISFU manner in order to be able to run this tool. The user should make sure that the message: “-I- To load new FW run mlxfwreset or reboot machine” is present in the burning tool's output. • After a successful reset execution, attempting to query or reset again will yield an error as the load new firmware command was already sent to the firmware. Mellanox Technologies 65 Rev 2.4 3.7 Firmware Generation, Configuration, and Update Tools mlxphyburn – Burning Tool for Externally Managed PHY Mlxphyburn (Mellanox PHY burn) tool allows the user to burn firmware of an externally managed PHY. The tool burns and verifies a pre-compiled binary PHY firmware image on the PHY’s flash. It is supported only on Linux. Tool Requirements • ConnectX®-3/ConnectX®-3 Pro with an externally managed PHY • A device that has access to the PHY flash module • MLNX_OFED driver (if installed) should be down • Access to the device through the PCI interface (pciconf/pci_cr) • Firmware version that supports access to an externally managed PHY • Version 2_33_5000 and above mlxphyburn Synopsis # mlxphyburn [-d <device>] –i <phy_fw_image> b[urn]|q[uery] where: -d|--dev <device> Device which has access to the PHY. -i|--img <PHY_fw_image> PHY firmware image. -v|--version Display version info. --h|--help Display help message. b[urn] Burn given PHY image on the device's PHY. q[uery] Query PHY FW on device. If no device is specified, mlxphyburn will attempt to burn the PHY firmware image on all mst devices on the machine. Examples of mlxphyburn Usage Burn Example: # mlxphyburn -d /dev/mst/mt4099_pciconf0 -i Firmware_1.37.10_N32722.cld burn -I- attempting to burn PHY Fw on device: /dev/mst/mt4099_pciconf0 -I- Burning...(Process might take a few minutes) -I- Device burned and verified. 66 Mellanox Technologies Rev 2.4 Query Example: # mlxphyburn -d /dev/mst/mt4099_pciconf0 q -I- attempting to burn PHY Fw on device: /dev/mst/mt4099_pciconf0 Flash Type : Atmel AT25DF041A FW version : 1.37 Image ID : 1.37.10 InterfaceMasters N32722 Apr 14, 2014 12:21:00 Image ROM ID : 0 Mellanox Technologies 67 Rev 2.4 3.8 Firmware Generation, Configuration, and Update Tools mlx_fpga - Burning and Debugging Tool for Mellanox Devices with FPGA mlx_fpga tool allows the user to burn private code on Mellanox programmable adapter cards with an on-board FPGA. This tool burns a .rbf file onto the FPGA flash device. The .rbf file must be generated according to the instructions listed in the relevant programmable adapter card User Manual. The tool also enables the user to read/write individual registers in the QDR memory or read them all at once. Tool Requirements • A ConnectX®-3 Pro adapter card with an FPGA device • Starting the mst service with the fpga lookup flag (mst start --with_fpga) mlx_fpga Synopsis # mlx_fpga [-d <device> ] < read <addr> | write <addr> <value> | b <image path> > # mlx_fpga [-d <device> ] < read_reg <name> | write_reg <name> <value> | show_all | read_all > # mlx_fpga [-d <device> ] < clear_semaphore | reset > where: 68 -d|--device <device> FPGA mst device interface -v|--version Display version info -h|--help Display help message r |read <addr> Read debug register in address w |write <data> <addr> Write data to debug register in address rr|read_reg <name> Read debug register with name wr|write_reg <data> <name> Write data to debug register with name b |burn <.rbf file> Burn image on flash read_all Read all debug registers show_all Show all debug registers clear_semaphore Unlock flash controller semaphore reset Reset flash controller Mellanox Technologies Rev 2.4 Examples of mlx_fpga Usage Adding FPGA mst Device Interface apps-13:~ # mst start --with_fpga apps-13:~ # mst status MST modules: -----------MST PCI module is not loaded MST PCI configuration module is not loaded MST devices: -----------No MST devices were found nor MST modules were loaded. You may need to run 'mst start' to load MST modules. FPGA devices: ------------------/dev/mst/0000:82:00.0_fpga Burning the FPGA’s flash device using the mlnx_fpga burning tool mlnx_fpga tool burns a .rbf file onto the FPGA flash device. The .rbf file must be generated according to the instructions listed in the relevant programmable adapter card User Manual. Run the following command to burn the .rbf file: # mlx_fpga -d <device> burn image <filename>.rbf Debugging the Tool • Reading One Debug Register: # mlx_fpga -d <device> read 0x0 • Writing One Debug Register: # mlx_fpga -d <device> write 0x0 0x0 • Showing all debug registers apps-13:~ # mlx_fpga -d /dev/mst/0000:82:00.0_fpga show_all ethernet.ethernet_hca.ethernet_port_ips.mac.rx_mac_config.rx_transfer_control ethernet.ethernet_hca.ethernet_port_ips.mac.rx_mac_config.rx_transfer_status ethernet.ethernet_hca.ethernet_port_ips.mac.rx_mac_config.rx_padcrc_control ethernet.ethernet_hca.ethernet_port_ips.mac.rx_mac_config.rx_crccheck_control ethernet.ethernet_hca.ethernet_port_ips.mac.rx_mac_config.rx_overflow_truncated_packet_count_msb ethernet.ethernet_hca.ethernet_port_ips.mac.rx_mac_config.rx_overflow_truncated_packet_count_lsb ethernet.ethernet_hca.ethernet_port_ips.mac.rx_mac_config.rx_overflow_dropped_packet_count_msb ethernet.ethernet_hca.ethernet_port_ips.mac.rx_mac_config.rx_overflow_dropped_packet_count_lsb ethernet.ethernet_hca.ethernet_port_ips.mac.rx_mac_config.rx_custom_preamble_forward ethernet.ethernet_hca.ethernet_port_ips.mac.rx_mac_config.rx_timestamp_registers.rx_period_10g Mellanox Technologies 69 Rev 2.4 Firmware Generation, Configuration, and Update Tools ethernet.ethernet_hca.ethernet_port_ips.mac.rx_mac_config.rx_timestamp_registers.rx_fns_adjustment_10g ethernet.ethernet_hca.ethernet_port_ips.mac.rx_mac_config.rx_timestamp_registers.rx_ns_adjustment_10g ethernet.ethernet_hca.ethernet_port_ips.mac.rx_mac_config.rx_timestamp_registers.rx_period_mult_speed ethernet.ethernet_hca.ethernet_port_ips.mac.rx_mac_config.rx_timestamp_registers.rx_fns_adjustment_mult_speed 70 Mellanox Technologies Rev 2.4 4 Debug Utilities 4.1 fwtrace Utility The fwtrace utility extracts and prints trace messages generated by the firmware running on 5th generation devices (Connect-IB® and above) iRISC. These trace messages inform developers of software drivers about internal status, events, critical errors, etc. Trace messages generated by iRISCs are stored in the trace buffer. The trace buffer is located in host memory. The tool also supports mem free mode with which uses a device internal small buffer. By default, the firmware does not print trace messages. Please contact your FAE for more details on how to enable firmware tracing. Memory mode on Connect-IB® device is supported only by PCI mst devices. 4.1.1 fwtrace Usage 1. Start the mst driver (mst start or mst restart) 2. Enter the following command: # fwtrace [options...] where: -h|--help Print this help message and exit -d|--device mst device name -f|--fw_strings Fw strings db file containing the FW strings --tracer_mode Tracer mode [FIFO | MEM] --real_ts Print real timestamps in [hh:mm:ss:nsec] format -i|--irisc Irisc name (See below for full list of irisc names) -s|--stream Run in streaming mode -c|--cfg HW tracer events cfg file -S|--buf_size HW tracer MEM buffer size in [MB] --dump Dump file name -m|--mask Trace class mask, use "+" to enable multiple classes or use integer format, e.g: -m class1+class2+... or 0xff00ff00 -l|--level Trace level v|--version Print tool's version and exit Mellanox Technologies 71 Rev 2.4 Debug Utilities Device Specific Info: • Connect-IB® and ConnectX®-4: Irisc names: [i0, iron, i2, i3, i4, i5, i6, i7, all] • Trace classes: DEBUG_INIT, INIT, ICM, ICM_FREE_LIST, ICM_BLOCK_ALLOC, CMD_IF, PHY_IB, PHY_RX_ADAP, PHY_EYE_OPN, PHY_COMMON, PHY_MANAGER, PHY_PLL, BLOCK_ALLOC, ICM_ACCESS, MAD, RXT_CHECKS, I2C, TRANSPORT, FW_LL, RX_ERRORS, DEBUG_TRACER, PROFILING, MANAGEMENT, FLASH, STEERING Example: # fwtrace -d mlx5_0 -i all -s -I- Found FW string db cache file, going to use it mlxtrace -d mlx5_0 -m MEM -c /tmp/itrace_8153.cfg -S -ITracer Configuration: -I===================== -IMode : Collector -IActivation Mode : Memory Mode -IMemory Access Method : NA -IConfiguration File Path : /tmp/itrace_8153.cfg -IOutput file (Trace File) Path : mlxtrace.trc -IUser Buffer Size : NA[MBytes] -IUse Stream Mode : YES -IConfigure Only : NO -IOnly Snapshot (Skip Configuration Stage) : NO -IContinuous fill : NO -IPrint timestamp in [hh:mm:ss:nsec] format : NO -IOutput file for streaming : STDOUT -IDelay between samples : 0[usec] -I=============================================== -IDevice is: cib -IConfiguring Tracer... -IInvalidating kernel buffer... (Press ^C to skip) -IDone -ITracer was configured successfully Device frequency: 276MHz -IStarting event streaming... Reading new events... 774774193803 I2 Mad received on port 1 - QP 0 774774215444 I2 process set_get_pkey_table on port=1 set_get_=0 774775079296 I2 Mad received on port 1 - QP 0 774775120645 I2 port_state changed from INIT to ARM 774775166315 I2 process set_get_port_info on port 1 set_get_: 1 774775335890 I2 Mad received on port 1 - QP 0 774775367205 I2 port_state changed from ARM to ACTIVE 774775410880 I2 process set_get_port_info on port 1 set_get_: 1 774786733806 I3 process MAD_IFC on port 1 774786744859 I3 process set_get_port_info on port 1 set_get_: 0 . . . 72 Mellanox Technologies block=1 status:0x0 status:0x0 status:0x0 Rev 2.4 4.2 itrace Utility The itrace utility extracts and prints trace messages generated by the firmware of a ConnectX® family adapter devices. These trace messages inform developers of software drivers about internal status, events, critical errors, etc., for each iRISC. Trace messages generated by iRISCs are stored in the trace buffer. The trace buffer is located in host memory for MemFree adapter cards (i.e., without on-board memory), and in adapter memory for adapter cards with on-board memory. The utility is a command line application controlled by command line parameters. It prints trace messages in text format to the console. 4.2.1 itrace Usage In order to print the firmware traces, it is required to: • Debug firmware is burnt and loaded on the device • The driver is up, meaning: • For adapters with on-board memory: The SYS_ENABLE command has been executed • For adapters without on-board memory (MemFree): The RUN_FW command has been executed • The desired trace mask is set (see the -m flag below) The mst driver must be started prior to running itrace tool. To start itrace: 1. Start the mst driver (mst start1 or mst restart1). 2. Enter the following command: # itrace [options...] IRISC_NAME where: IRISC_NAME The iRISC for which traces are to be printed. This can be specified once anywhere in the command line as a special option without the leading hyphen. Run ‘itrace -h’ to get a list of iRISC names for each adapter device. -h, --help Displays help about itrace usage. -m --mask=TRACE_MASK Sets the Trace Mask. To enable generating trace messages for an iRISC, the trace_mask register must be set according to the specifications in the device’s Programmer’s Reference Manual. Setting or clearing bits of the trace_mask register enables or disables, respectively, the generation of specific types of trace messages. The TRACE_MASK parameter must be a hexadecimal or decimal number and its value will be written into the trace_mask register. Changing trace_mask will not change or remove messages previously stored in the trace buffer, so disabled types of messages can still be displayed by itrace if they were previously generated. -w, --wait Runs itrace in wait mode. itrace will exit only if you press <Ctrl-C>. This is not the default behavior of itrace. Without the -w option, itrace will exit if there have been no new traces in the last 0.5 seconds. 1. This step in not required in Windows. Mellanox Technologies 73 Rev 2.4 Debug Utilities -d, --d=DEVICE Specifies the name of the mst device driver for accessing the cr-space. The default value is:/dev/mst/mt4099_pci_cr0. To run itrace via the I2C interface, use this option to specify the following: --d=device, where the device is an I2C device (such as mtusb-1) --nomap Sets itrace not to directly access memory (via memory mapping) for reading the trace buffer, but to use the adapter memory access Gateway instead. By default, itrace accesses the memory directly. If the cr-space device specified by the -d parameter is one of the I2C devices, -nomap is switched on. --no-propel Sets itrace not to animate the propeller in wait mode (-w option). By default, animation is enabled. -v, --version Prints the MFT version and exits -c, --color Enables color in trace output -D, --dump Dumps the trace buffer and exits. This option is useful for debugging itrace; it dumps the contents of the trace buffer in row format. For Linux, device names should be listed with the /dev/mst prefix. For Windows, no prefix is required. Example: # itrace -d /dev/mst/mt4099_pci_cr0 sx1 itrace: read memory (174712 bytes), each dot denotes 2048 bytes: [.....................................................................................] IRISC Trace Viewer (Mellanox ConnectX), mft 4.0.0-20, built on Mar 17 2015, 16:18:04. Git SHA Hash: 161be23 FW Version: 2.33.9910 11/03/2015 16:44:34 (00000003 (00000004 (00000005 (00000006 (00000007 (00000008 (00000009 (0000000a (0000000b (0000000c (0000000d (00000029 (0000002b (0000002c (0000002d (0000002e (0000002f 74 c1b59e4e) dda895e4) dda89760) dda89868) dda97ccf) dda97e47) dda97f4f) dda9a8f6) dda9aa6e) dda9ab79) ddaaadc1) ddaee521) ddaee8ce) ddaee9f2) ddaef0d5) ddaef2d9) ddaef6aa) SCHD: exeqpc_valid2freed(0x0) vec_busy_valid=0x00000010 SCHD: SQP:0x000400 exes_super_scheduler:busy_done SCHD: writing QpState SQPSTATE_GOOD_IDLE!!!! SCHD: exeqpc_valid2freed(0x0) vec_busy_valid=0x00000010 SCHD: SQP:0x000400 exes_super_scheduler:busy_ SCHD: writing QpState SQPSTATE_GOOD_IDLE!!!! SCHD: exeqpc_valid2freed(0x0) vec_busy_valid=0x00000010 SCHD: SQP:0x000400 exes_super_scheduler:busy SCHD: writing QpState SQPSTATE_GOOD_IDLE!!!! SCHD: exeqpc_valid2freed(0x0) vec_busy_valid=0x00000010 SCHD: SQP:0x000400 exes_super_scheduler:busy_ INFO: IPCdata[00]=0x01abcd0a(0000002a ddaee60c) INFO: IPCdata[01]=0x00000014 MAD: exes_mad: QPN=0x000000, nda_nds=0x7c58d014 SCHD: SQP:0x000000 sqpc_access_db_algorithm: INC SCHD: exes_scheduler: try to insert SCHD: SQP:0x000000 exes_scheduler chosen SCHD: EXES_GO(0x0).. Mellanox Technologies Rev 2.4 4.3 mstdump Utility The mstdump utility dumps device internal configuration registers. The dump file is used by Mellanox Support for hardware troubleshooting purposes. It can be applied on all Mellanox adapter devices, BridgeX® device and 4th generation switch devices. 4.3.1 mstdump Usage The mst driver must be started prior to running mstdump tool. To start mstdump: 1. Start the mst driver (mst start1 or mst restart1). 2. Enter an mstdump command that complies with the following command syntax: # mstdump [-full] <mst device> > <dump file> where the -full flag dumps all internal registers. On BridgeX devices, using the -full flag may have undesired side-effects and requires resetting the device. Example: [root@mymach]# mstdump /dev/mst/mt4099_pci_cr0 > mt4099.dmp This dumps the internal configuration data of the device into the file mt25408.dmp. 4.4 mlxi2c Utility The mlxi2c utility provides a way to route the I2c bus to Mellanox 4th generation switches. 4.4.1 mlxi2c Usage The mst driver must be started prior to running mlxi2c. To start mlxi2c: 1. Start the mst driver (mst start1 or mst restart). 2. Run mlxi2c with the following command line syntax: # mlxi2c [switches...] <command> [parameters...] 1. This step in not required in Windows. Mellanox Technologies 75 Rev 2.4 Debug Utilities Switches Options -d <device> mst i2c device name default: "/dev/mst/mtusb-1" Affected commands: all -h Print this help information -v Print version and exit Commands p <i2c_component> Route the i2c path to the indicated i2c component scan Scan the i2c slave addresses Example: • Point to a SwitchX device: # mlxi2c -d /dev/mst/mtusb-1 p SX • Point to an InfiniScale IV device to enable accessing it directly by firmware utilities: # mlxi2c -d /dev/mst/mtusb-1 p IS4_PRIM • Display the addresses of all I2C-accessible devices: # mlxi2c -d /dev/mst/mtusb-1 scan 4.5 i2c Utility The i2c utility provides low level access to the I2C bus on any Mellanox switch platform, enabling the user to read or write data. 4.5.1 i2c Usage The mst driver must be started prior to running i2c tool. To start i2c: 1. Start the MST driver (mst start1 or mst restart1). 2. Run i2c with the following command line syntax: # i2c [OPTIONS] <device> <cmd> <i2c_addr> <addr> [<data>] where: -h Prints this message. -a <addr_width> Sets address width (in bytes) to the specified value. May be 0, 1, 2 or 4. Default: 1. -d <data_width> Sets data width (in bytes) to the specified value. May be 1, 2 or 4s. Default is 1. -x <data_len> Presents each byte of data as two hexadecimal digits (such as 013C20343B). Note that this option is mutually exclusive with the "-d" option. The remaining parameters are: <device> Valid mst device. 1. This step in not required in Windows. 76 Mellanox Technologies Rev 2.4 <cmd> Command. May be "r[ead]" or "w[rite]". <i2c_addr> I2C slave address. <addr> Address (of length addr_width) inside I2C target device to read/write operation. Note that the <addr> value is ignored if <addr_witdh> = 0. <data> Data (bytes of length data_width) to write to target device. All parameters are interpreted as hexadecimal values. Examples: 1. Read two bytes from address 0 of target I2C device at address 0x56: # i2c -a 2 -d 2 /dev/mst/mtusb-1 r 0x56 0x00 0000 2. Write two bytes to the address above then read them: # i2c -a 2 -d 2 /dev/mst/mtusb-1 w 0x56 0x00 0x1234 # i2c -a 2 -d 2 /dev/mst/mtusb-1 r 0x56 0x00 3412 3. Read (as separate) 16 bytes in hexadecimal format starting from address 0 of the target device above: # i2c -a 2 -x 16 /dev/mst/mtusb-1 r 0x56 0x00 12340000000000000000000000000000 4.5.2 Exit Return Values The following exit values are returned: 4.6 • 0 - successful completion • >0 - an error occurred mget_temp Utility The mget_temp utility reads the hardware temperature from Mellanox Technologies devices with temperature sensors (all Mellanox devices), and prints the reading in Celsius degrees. 4.6.1 mget_temp Usage The mst driver must be started prior to running mget_temp. To run mget_temp: 1. Start the mst driver (mst start1 or mst restart). 2. Run mget_temp with the following command line syntax: # mget_temp [OPTIONS] 1. This step in not required in Windows. Mellanox Technologies 77 Rev 2.4 Debug Utilities where: -h Print this message. -d <dev> mst device name --version Display version info Example on how to read a device temperature: # mget_temp -d dev/mst/SW_MT51000_0002c903007e76a0_lid-0x0002 4.7 mlxtrace Utility The mlxtrace utility is used to configure and extract HW events generated by different units in Mellanox devices.The utility generates a dump ".trc" file which contains HW events that assist us with debug, troubleshooting and performance analysis. Events can be stored in host memory if driver is up or in a small on-chip buffer (always available) depending on the utility running mode. In order to run the utility it's required to have a configuration file first, this file should be provided by Mellanox representative. A dump file "mlxtrace.trc" will be generated by end of run (file name can be controlled by "-o" flag), this file should be sent to Mellanox representative for further diagnostics/troubleshooting. Memory mode on Connect-IB® device is supported only by PCI mst devices. 4.7.1 mlxtrace Usage • The mst driver must be started prior to running the mlxtrace tool. • For MEM buffer mode driver must be "up" also. • Enter the following command: • mlxtrace [options] -h, --help Print help and exit -v, --version Print version (default=off) -p, --parse Move to parser mode (default=off) Mode: CollectMode 78 -d, --device=MstDev Mst device -m, --mode=Mode Activation mode: FIFO - HW BUFFER , MEM - KERNELB, UFFER (possible values="FIFO", "MEM") -a, --mem_access=MemMethod Memory access method: OB_GW, MEM, DMEM, FMEM, VMEM (possible values="OB_GW", "MEM", "DMEM", "FMEM", "VMEM") -c, --cfg=CfgFile Mlxtrace configuration file Mellanox Technologies Rev 2.4 -o, --trc_file=TrcPath Output TRC file path (default=`mlxtrace.trc') -C, --config_only Configure tracer and exit (default=off) -n, --snapshot Take events snapshot - this assumes previous run with --config_only (default=off) -s, --buf_size=BufSize User buffer size [MB] (default=`1') -S, --stream Don't save events to file parse it immediately (default=off) --ignore_old_events Ignore collecting old events (default=off) -g, --continuous_fill Do not stop recording (stopping only with ^C), keep filling user's buffer cyclicly (default=off) --sample_delay=Delay Delay between samples when polling new events in [usec] (default=`0') --keep_running Keep the HW tracer unit running after exit (default=off) Mode: ParseMode -i, --input=TrcFile Input file (default=`mlxtrace.trc') --csv_mode Enable csv output format (default=off) --print_ts Print timestamp events (default=off) -r, --real_ts Print real timestamps in [hh:mm:ss.nsec] format (default=off) --print_raw Print event bytes in each line header (default=off) --ts_format=format Choose printed TS format hex/dec (possible values="hex", "dec" default=`dec') --print_delta Enable printing delta between events (in cycles) (default=off) -f, --print_file=FilePath Print parsed event to the given file and not to stdout --enable_db_check Enable events DB checks (default=off) Examples: 1. To generate a configuration file, run the following command: # mlxtrace --create_cfg=/tmp 2. Choose the suitable .cfg file depending on the device you are using, and run the following command to generate a .trc file: # mlxtrace -d /dev/mst/mt4099_pci_cr0 -c /tmp/mlxtrace_cx3.cfg -m MEM -o connectx3.trc 3. To generate a .trc file with a maximal size of 100 MB, run the following command: # mlxtrace -d /dev/mst/mt4099_pci_cr0 -c /tmp/mlxtrace_cx3.cfg -m MEM -s 100 -o connectx3.trc Mellanox Technologies 79 Rev 2.4 4.8 Debug Utilities mlxdump Utility The mlxdump utility dumps device internal configuration data and other internal data (such as counters, state machines). The data can be used by for hardware troubleshooting. It can be applied to all Mellanox adapter devices, BridgeX device and 4th generation switch devices. The tool has 3 run modes: [fast | normal | full] while the default is "fast", the "full" mode dumps all available data but might run slower than normal and fast modes. 4.8.1 mlxdump Usage • The mst driver must be started prior to running mlxdump tool. > mlxdump -d <mst dev> snapshot [options] Where: -o, --file dump file name -m, --mode run mode [fast | normal | full] -h, --help Show help message Examples: To generate "mlxdump.udmp" while running in fast mode: # mlxdump -d /dev/mst/mt4099_pci_cr0 snapshot To generate "mlxdump.udmp" while running in full mode: # mlxdump -d /dev/mst/mt4099_pci_cr0 snapshot -m full To generate "mlxdump_13_1_2013.udmp" while running in normal mode: # mlxdump -d /dev/mst/mt4099_pci_cr0 snapshot -m normal -o mlxdump_13_1_2013.udmp 4.9 mlxmcg Utility The mlxmcg tool displays the current multicast groups and flow steering rules configured in the device. Target users: Developers of Flow Steering aware applications. This tool dumps the internal steering table which is used by the device to steer Ethernet packets and Multicast IB packets to the correct destination QPs. Each line in the table shows a single filter and a list of destination QPs. Packets that match the filter are steered to the list of destination QPs. mlxmcg is not supported against In-band device. 4.9.1 mlxmcg Usage The mst driver must be started prior to running mlxmcg tool. To start mlxmcg: 80 Mellanox Technologies Rev 2.4 1. [Optional for Windows OSs] Start the mst driver (mst start or mst restart). 2. Enter an mlxmcg command that complies with the following command syntax: # mlxmcg [OPTIONS] where: -h, --help Show this help message and exit -d DEV, --dev=DEV mst device to use, required -f FILE, --file=FILE MCG dump file to use (for debug) -p PARAMS, --params=PARAMS Mcg params, (MCG_ENTRY_SIZE, HASH_TABLE_SIZE, MCG_TABLE_SIZE), default is (64, 32768, 65536) -q, --quiet Do not print progress messages to stderr -v, --version Print tool version -c, --hopcount Add hopCount column -a, --advanced Show all rules This will display all the current multicast groups and flow steering rules configured in the device. Mellanox Technologies 81 Rev 2.4 Debug Utilities Example: Command : mlxmcg -d /dev/mst/mt4099_pci_cr0 MCG table size: 64 K entries, Hash size: 32 K entries, Entry size: 64 B Progress: HHHHHLLLL Bucket Index ID Prio Proto DQP Port VLAN MAC SIP DIP I-MAC I-VLAN VNI L4 SPort DPort Next QPs 0 0 0 0 all -2 --- -- -- -- --- ---1009c 11 af9 fee0 0 5000 IPv6 -- ff0e:0000:0000:0000:0000:0000:e000:0001 - -- -- -- -- -8012 SB e3f e3f 0 5000 L2 -2 -01:80:c2:00:00:0e -- -- - -- -- -- -- -- 8012 40048 1139 1139 0 5000 L2 -2 -01:00:5e:00:00:01 -- -- - -- -- -- -- -- 8014 40048 26fc 26fc 0 5000 L2 -2 -ff:ff:ff:ff:ff:ff -- -- - -- -- -- -- -- 8018 40048 2a3e 2a3e 0 5000 L2 -2 -33:33:00:00:00:01 -- -- -- -- -- -- -- -- 801a 40048 4000 4000 0 0 all -2 --- -- -- -- --- ---- 1009c 10 45d7 45d7 0 5000 L2 -1 -01:00:5e:00:00:fb -- -- -- -- -- -- -- -- 8000 4004a 4af9 fef8 0 5000 IPv6 -ff0e:0000:0000:0000:0000:0000:e000:0001 -- -- -- -- -- -- 8002 SB 4e3f 4e3f 0 5000 L2 -1 -01:80:c2:00:00:0e -- -- -- -- -- -- -- -- 8002 4004a 5139 5139 0 5000 L2 -1 -01:00:5e:00:00:01 -- -- -- -- -- -- -- -- 8004 4004a 66fc 66fc 0 5000 L2 -1 -ff:ff:ff:ff:ff:ff -- -- -- -- -- -- -- -- 8008 4004a 6a3e 6a3e 0 5000 L2 -1 -33:33:00:00:00:01 -- -- -- -- -- -- -- -- 800a 4004a 734b 734b 0 5000 L2 -1 -33:33:e0:00:00:01 -- -- -- -- -- -- -- -- 800c 4004a Duplicated MCGS: Count 1000 1000 0 5000 L2 -2 -- 00:02:c9:00:00:02 -- -- -- -- -- -- -- -- 8015 40048 2048 4002 4002 0 5000 L2 -1 -- 00:02:c9:00:00:01 -- -- -- -- -- -- -- -- 8001 4004a 2046 16 Unique rules, 4108 Total Index QPs ================================================================================================= ==================== fee0 40054 40055 40056 40057 40058 40059 4005a 4005b 4005c 4005d 4005e 4005f 40060 40061 40062 40063 40064 40065 40066 40067 40068 40069 4006a 4006b 4006c 4006d 4006e 4006f 40070 40071 40072 40073 40074 40075 40076 40077 40078 40079 4007a 4007b ================================================================================================= ==================== fef8 40054 40055 40056 40057 40058 40059 4005a 4005b 4005c 4005d 4005e 4005f 40060 40061 40062 40063 40064 40065 40066 40067 40068 40069 4006a 4006b 4006c 4006d 4006e 4006f 40070 40071 40072 40073 40074 40075 40076 40077 40078 40079 4007a 4007b ================================================================================================= ==================== 4.10 pckt_drop Utility The pckt_drop utility corrupts the next transmitted packet from a ConnectX® family adapter port. 4.10.1 pckt_drop Usage The mst driver must be started prior to running the pckt_drop utility. To start the pckt_drop utility: 1. Start the mst driver (mst start or mst restart). 82 Mellanox Technologies Rev 2.4 2. Run the pckt_drop with the following command line syntax: -d, --device Specify the mst device to configure. (Required.) -h, --help Print this help screen and exit. -m, --mode Specify operating mode. Supported modes are: EDP: Inserts error on next transmitted data packet. (Default: `EDP'.) -p, --port Select which port to configure. Use `1'/`2' for port1/port2, respectively, or `b' for both. (Default: `b'.) -v, --version Print the application version and exit. Example: # pckt_drop -d /dev/mst/mt4099_pci_cr0 -p 1 The example above shows how to use the pckt_drop to corrupt a packet from port 1. 4.11 mlxuptime Utility The mlxuptime is a Mellanox firmware which prints Mellanox devices' up time and measured/ configured frequency. 4.11.1 mlxuptime Usage mlxuptime [-d] [-s] [-h] [-v] where: -d Mst device name -s Sampling interval for measuring frequency (default: 1 [sec]) -h Print help and exit -v Print tool version and exit Example: • Print all info: # mlxuptime -d /dev/mst/mt4099_pci_cr0 Measured core frequency : 427.099818 MHz Device up time : 10:01:20.456344 [h:m:s.usec] • Print the uptime and configured frequency only: # mlxuptime -d /dev/mst/mt4099_pci_cr0 -m Configured core frequency : 427.083333 MHz Device up time : 53:31:00.162464 [h:m:s.usec] 4.12 wqdump Utility The wqdump utility dumps device internal work queues. A work queue is an object containing a Queue Pair Context (QPC) which contains control information required by the device to execute I/O operations on that QP, and a work queue buffer which is a virtually-contiguous memory buffer allocated when creating the QP. Mellanox Technologies 83 Rev 2.4 Debug Utilities The dumped data can be used for hardware troubleshooting. It can be applied on ConnectX® and Connect-IB® Mellanox adapter devices. wqdump on all ConnectX® devices, except for ConnectX®-4 devices, is not supported against in-band devices. 4.12.1 wqdump Usage The mst driver must be started prior to running the wqdump utility. To start the wqdump utility: 1. Start the mst driver (mst start or mst restart). 2. Run wqdump. WQDump # WQDump <-d|--device DeviceName> <--source ContextType> [--gvmi Gvmi] [--qp ContextNumber] <--dump DumpType> [--fi StartIndex] [--num NumberOfItems] [--format Format] [--address Address] [--size Size] [-v|--version] [-h|--help] [--clear_semaphore] [--gw_access] where: --d|--device DeviceName Device name --source ContextType Type of context to dump. Options are: Snd, Rcv, Cmp, Srq, Eqe, connect-X :MCG,connect-IB:MKC, SXDC, FullQp --gvmi Gvmi Guest VM ID (connect-IB only) --qp ContextNumber Context number to dump --dump DumpType Dump Type. Options are: WQ, QP, WQ_QP, ALL_QPC, ALL_VALID_QPNS, ICM --fi StartIndex Index of first element to dump, (Default:0) --num NumberOfItems Number of elements to dump from buffer, (Default: keep reading) --format Format Output format: options are : text, raw, dw, (Default: text) --address Address Memory Address --size Size Memory size in bytes -v|--version Show tool version and exit -h|--help Show usage --clear_semaphore Force clear semaphore --gw_access Force get QPC by GW access (Connect-X Family) Examples: • Print all valid qpns The example below will dump all valid qpns of type mcg context. # wqdump -d /dev/mst/mt4099_pci_cr0 --source mcg --dump ALL_VALID_QPNS • 84 Dump mcg qp Mellanox Technologies Rev 2.4 The example below will dump mcg context number 0x10. # wqdump -d /dev/mst/mt4099_pci_cr0 --source mcg --dump QP -qp 0x10 • Dump other qpns The example below will dump snd context number 0x10 in a raw format. # wqdump -d /dev/mst/mt4099_pci_cr0 --source snd --dump QP -qp 0x10 --format raw • Dump wq The example below will dump send work queue buffer number 0x42. # wqdump -d /dev/mst/mt4099_pci_cr0 --source snd --dump wq -qp 0x42 • Dump mcg qp by GW access The example below will dump mcg context number 0x10 by GW access. # wqdump -d /dev/mst/mt4103_pci_cr0 --source mcg --dump QP -qp 0x10 --gw_access Mellanox Technologies 85 Rev 2.4 4.13 Debug Utilities mlxmdio Utility The mlxmdio tool is used to read/write MDIO registers (Clause 45) on Boards with externally managed PHY. 4.13.1 mlxmdio Usage To run mlxmdio, use the following line: # mlxmdio <-d mst_dev> <-m phy_addr:dev_addr> <-a addr[:data]> [-g mdio_gw] where: -d <device> mst device -m <mdio_id> The mdio id of the target device in phy_addr:dev_addr format. -a <addr[:data]> Access a single MDIO reg. If data is specified, the reg is written, Otherwise, it is read. Addr and data should be in hex format. -g <mdio_gw> Select which mdio gw <0 or 1> to use. (Default is 0). -h Show usage. -v Show tool version. Methods for sending MDIO Transactions mlxmdio will attempt to send the MDIO transaction through a firmware interface if supported (on supported devices only) if the firmware interface is not supported by the device, the tool by default will attempt to send the transaction through the mdio gateway (default is 0). If -g <0|1> flag is specified, the tool will attempt to send the MDIO transaction through the specified gateway. Sending MDIO transactions via FW requires specification of the PCI device. Example: 1. To read mlxmdio register, run the following command: # mlxmdio -d /dev/mst/mt4099_pciconf0 -m 0x2:0x1 -a 0x0 4081 2. To write mlxmdio register, run the following command: # mlxmdio -d /dev/mst/mt4099_pciconf0 -m 0x2:0x1e -a 0x103:0x1 3. To read mlxmdio register through gateway, run the following command: # mlxmdio -d /dev/mst/mt4099_pciconf0 -m 0x0:0x1 -a 0x3 -g 0 688b 86 Mellanox Technologies Rev 2.4 5 Troubleshooting You may be able to easily resolve the issues described in this section. If a problem persists and you are unable to resolve it yourself please contact your Mellanox representative or Mellanox Support at [email protected]. 5.1 General Related Issues Issue Cause Solution Adapter is no longer identified by the operating system after firmware upgrade Happens due to burning the wrong firmware on the adapter, firmware corruption or adapter's hardware failure. Power cycle the server. If the issue persists, extract the adapter and contact Mellanox Support Server is booting in loop/not completing boot after performing adapter firmware upgrade Happens due to burning the wrong firmware on the adapter, firmware corruption or adapter's hardware failure. Extract the adapter and contact Mellanox Support Some of the 5th generation devices are represented with only one mst device (/dev/ mst/mt4113_pciconfx) in the output of mst status For 5th generation devices, there is only one method available for accessing the hardware. For example, Connect-IB device is represented by /dev/mst/ mt4113_pciconfx mst device When querying a 5th generation device, use the conf mst device (for example: dev/mst/ mt4113_pciconfx) Enabling hardware access after configuring new secure host key, fails The new configuration of the secure host key was not loaded by the driver Restart the driver before enabling the hardware access again Server not booting after enabling SRIOV with high number of VFs Setting number of VFs larger than what the Hardware and Software can support may cause the system to cease working To solve this issue: 1. 2. 3. 4. Disable SRIOV in bios Reboot server Change num of VFs Enable SRIOV in bios Mellanox Technologies 87 Rev 2.4 5.2 Troubleshooting Installation Related Issues Issue Unable to install MFT package on ESXi platform and the following message is printed on the screen: Cause Insufficient privileges 1. Copy the MFT package to /tmp/vmware and continue with the installation. If the issue persists, reboot the ESX server and try again 2. Use full file path of the MFT package Note: an additional reboot will be required after completing the installation Got no data from process 5.3 Solution Firmware Burning Related Issues Issue Cause The following message is printed on screen when trying to query/burn a ConnectIB device: Using an outdated firmware version with the Connect-IB adapter. 1. Unload MLNX_OFED driver: /etc/ init.d/openibd stop. 2. Add “-ocr” option to the 'flint' command. For example: flint -d /dev/mst/ mt4113_pciconf0 -ocr q Updating only the EXP_ROM (FlexBoot) for recent firmware images which requires adding the 'allow_rom_change' option. Allow “-allow_rom_change” option to the “flint” command. For example: flint -d <mst_device> Generating a firmware image file on Windows fails and the following message is printed on screen: Using a firmware configuration file (.ini) which was generated by PowerShell text redirection: flint -d Generate the firmware configuration file (.ini) using CMD edit and continue with generating the firmware image file. -E- File: C:/Users/ Administrator/ps.ini, Line: 1 - Invalid syntax -E- Image generation failed: child process exited abnormally <mst_device> dc > <fw_conf_file>.ini -E- Cannot open Device: /dev/mst/ mt4113_pciconf0. B14 Operation not permitted MFE_CMDIF_GO_BIT_BUSY The following message is reported on screen when trying to remove the expansion ROM using the 'drom' option: Solution -allow_rom_change drom -E- Remove ROM failed: The device FW contains common FW/ ROM Product Version The ROM cannot be removed separately.B9 88 Mellanox Technologies Rev 2.4 Issue Burning command fails and the following message is printed on screen: -E- Can not open 06:00.0: Can not obtain Flash semaphore (63). You can run "flint clear_semaphore -d <device>" to force semaphore unlock. See help for details. Burning tool fails with the following message: –E– Unsupported binary version (2.0) please update to latest MFT package. mlxburn tool fails to generate a firmware image and displays the following message: Cause Solution Semaphore can be locked due to: If no other process is taking place at the same time run the following command: • flint -d <device> --clear_semaphore • • Another process is burning the firmware at the same time Failure in the firmware boot Burning process was forcefully killed OR Reboot the machine. The binary version is incompatible with the burning tool. Update MFT to the latest package. The MLX file version is incompatible with the image generation tool (mlxburn). Update MFT to the latest package. The MLX file version is incompatible with the image generation tool (mlxburn). Update MFT to the latest package. –E– Unsupported MLX file version (2.0) please update to latest MFT package. mlxburn tool fails to generate a firmware image and displays the following message -E- Perl Error: Image generation tool uses mic (tool) version 1.5.0 that is not supported for creating a bin file for this FW version. FW requires mic version 2.0.0 or above. Please update MFT package. Mellanox Technologies 89 Rev 2.4 Troubleshooting Appendix A: PSID Assignment In some cases, OEMs or board manufacturers may wish to use a specific FW configuration not supplied by Mellanox. After setting the new FW parameters in an INI file, the user should assign a unique PSID (Parameter Set ID) to this new configuration. The PSID is kept as part of the FW image on the device NVMEM. The firmware burning tools use this field to retain FW settings while updating FW versions. This appendix explains how to assign a new PSID for a user customized FW, and how to indicate to the burning tools that a new PSID exists. Please change FW parameters with caution. A faulty setting of FW parameters may result in undefined behavior of the burnt device. A.1 PSID Field Structure The PSID field is a 16-ascii (byte) character string. If the assigned PSID length is less then 16 characters, the remaining characters are filled with binary 0s by the burning tool. Table 4 provides the format of a PSID. Table 4 - PSID format Vendor symbol Board Type Symbol Board Version Symbol Parameter Set Number Reserved 3 characters 3 characters 3 characters 4 characters 3 characters (filled with ‘\0’) Example: A PSID for Mellanox’s MHXL-CF128-T HCA board is MT_0030000001, where: A.2 MT_ Mellanox vendor symbol 003 MHXL-CF128-T board symbol 000 Board version symbol 0001 Parameter Set Number PSID Assignment and Integration Flow To assign and integrate the new PSID to produce the new FW 1. Write the new FW configuration file (in .INI format). 2. Assign it with a PSID in the format described above. Use your own vendor symbol to assure PSID uniqueness. If you do not know your vendor symbol, please contact your local Mellanox FAE. 3. Set the PSID parameter in the new FW configuration file. 90 Mellanox Technologies Rev 2.4 Appendix B: Flow Examples - mlxburn To update an MT48436 InfiniScale® IV switch device having a specific GUID (for example, 0002c90200415190) or LID, the following are the recommended steps to update the device firmware. For Linux device names should be listed with the /dev/mst prefix. For Windows, no prefix is required. 1. Make sure all subnet ports are in the active state. One way to check this is to run opensm, the Subnet Manager. [root@mymach]> /etc/init.d/opensmd start opensm start [ OK ] 2. Make sure the local ports are active by running ‘ibv_devinfo’. 3. Obtain the device LID. There are two ways to obtain it: a. Using the “mst ib add” command: The “mst ib add”runs the ibdiagnet/ibnetdiscover tool to discover the InfiniBand fabric and then lists the discovered IB nodes as an mst device. These devices can be used for access by other MFT tools. [root@mymach]> mst ib add -I- Discovering the fabric - Running: /opt/bin/ibdiagnet -skip all -I- Added 3 in-band devices To list the discovered mst inband devices run “mst status”. [root@mymach]> mst status MST modules: -----------MST PCI module loaded MST PCI configuration module loaded ... Inband devices: ------------------/dev/mst/CA_MT25418_sw005_HCA-1_lid-0x0001 /dev/mst/SW_MT47396_lid-0x0011 /dev/mst/SW_MT48438_lid-0x0003 [root@mymach]> Mellanox Technologies 91 Rev 2.4 Troubleshooting b. Using the ibnetdiscover tool, run: ibnetdiscover | grep 0002c90200415190 | grep -w Switch Switch 36 "S-0002c90200415190" # "Infiniscale-IV Mellanox Technologies" base port 0 lid 3 lmc 0 The resulting LID is given as a decimal number. 4. Run mlxburn with the LID retrieved in step #3 above to perform the In-Band burning operation. Burn the InfiniScale® IV switch: [root@mymach]> mlxburn -d /dev/mst/SW_MT48438_lid-0x0003 -fw ./fw-IS4.mlx -I- Querying device ... -I- Using auto detected configuration file: ./MTS3600Q-1UNC_A1.ini (PSID = MT_0C20110003) -I- Generating image ... *** WARNING *** Running quick query - Skipping full image integrity checks. Current FW version on flash: 7.0.135 New FW version: 7.0.138 Burning second FW image without signatures - OK Restoring second signature - OK -I- Image burn completed successfully. 92 Mellanox Technologies Rev 2.4 Appendix C: In-Band Access to Multiple IB Subnets In most cases, an adapter is connected to a single InfiniBand subnet. The LIDs (InfiniBand Local IDs) on this subnet are unique. In this state, the device access MADs are sent (to the target LID) from the first active port on the first adapter on the machine. In case that the different IB ports are connected to different IB subnets, source IB port on the local host should be specified explicitly. The device name would be in the format: <any-string>lid-<lid-number>[,source adapter name][,source IB port number] For example: • On Linux: lid-3,mlx4_0,1 • On Windows: lid-3,0,1 Say we have the following setup: Host H1 HCA mlx4_0 port 1 HCA mlx4_1 port 2 Switch1 Switch2 Host H2 Host H3 H1 host has 2 adapters. Port 1 of the first adapter is connected to Switch 1, and port 2 of the second adapter is connected to Switch 2. Since the 2 adapters on the H1 are not connected to the each other, there are 2 separate IB subnets in this setup. Subnet1 nodes: H1 Switch 1 and H2 Subnet2 nodes: H1 Switch 2 and H3 Mellanox Technologies 93 Rev 2.4 Troubleshooting Running "ibv_devinfo" command on H1 would list the 2 adapter names. For ConnectX® adapters, the names would be mlx4_0 and mlx4_1. Running "mst ib add" would add ib devices from the default port (first active port on the first adapter) - only Subnet1 nodes would be listed. To add the nodes of the second subnet, the source adapter and port should be specified to the "mst ib add" command in the following format: # mst ib add <hca_name> <hca_port> Example: 1. Add nodes of both subnets, Run: # mst ib add mlx4_0 1 # mst ib add mlx4_1 2 2. List the devices: # mst status ... /dev/mst/CA_MT25418_H1_HCA-1_lid-0x0001,mlx4_0,1 /dev/mst/CA_MT25418_H2_HCA-1_lid-0x0005,mlx4_0,1 /dev/mst/SW_MT51000_Switch1_lid-0x0003,mlx4_0,1 /dev/mst/CA_MT25418_H1_HCA-1_lid-0x0010,mlx4_1,2 /dev/mst/CA_MT25418_H3_HCA-1_lid-0x0012,mlx4_1,2 /dev/mst/SW_MT51000_Switch2_lid-0x0005,mlx4_1,2 You can use the above device names with the MFT tools. 94 Mellanox Technologies Rev 2.4 Appendix D: MTUSB-1 USB to I2C Adapter D.1 Overview The MTUSB-1 is a USB to I2C bus adapter. This chapter provides the user with hardware and software installation instructions on machines running Linux or Windows operating systems. Figure 3: MTUSB-1 Device D.1.1 Package Contents Please make sure that your package contains the items listed in Table 5 and that they are in good condition. Table 5 - MTUSB-1 Package Contents Item Quantity Description MTUSB-1 device 1 USB to I2C bus adapter USB cable 1 USB_A to USB_B (1.8m) I2C cable 1 9-pin male-to-male cable (1.5m) Converter cable 2 9-pin female to 3-pin (small/large) (0.3m) Mellanox Technologies 95 Rev 2.4 D.1.2 Troubleshooting System Requirements The MTUSB-1 is a USB device which may be connected to any Personal Computer with a USB Host Adapter (USB Standard 1.1 or later) and having at least one USB connection port. D.1.3 Supported Platforms MTUSB-1 supports the same platforms that are supported by the MFT tools package. D.2 Hardware Installation To install the MTUSB-1 hardware, please execute the following steps in the exact order: 1. Connect one end of the USB cable to the MTUSB-1 and the other end to the PC. 2. Connect one end of the I2C cable to the MTUSB-1 and the other end to the system/board you wish to control via the I2C interface. If the system/board uses a 3-pin connector instead of a 9-pin connector, connect the appropriate converter cable as an extension to the I2C cable on the 9-pin end, then connect its 3-pin end to the system/board. D.3 Software Installation The MTUSB-1 device requires that the Mellanox Firmware Tools (MFT) package be installed on the machine to which MTUSB-1 is connected – see Section 2,“MFT Installation,” on page 14 of this manual for installation instructions. For a Windows machine, it is also required to install the MTUSB-1 driver – visit http://www.diolan.com to download this driver. This driver is required for the first use of the MTUSB-1 device. Once you have the requirements installed, you may verify that your MTUSB-1 device is detected by MFT software as described below. 1. Start the mst1 driver. Enter: # mst start (or mst restart if mst start was run earlier) 2. To obtain the list of mst devices, enter: # mst status If MTUSB-1 has been correctly installed, “mst status” should include the following device in the device list it generates: • On Linux: /dev/mst/mtusb-1 • On Windows: mtusb-1 1. This step in not required in Windows. 96 Mellanox Technologies Rev 2.4 Appendix E: Remote Access to Device by Sockets E.1 Overview The mst device on a machine can be accessed (server side) remotely for debugging purposes using the minimum set of tools from another machine (client side) which may have more tools or faster machine. To do so: • The mst server should run on the 'server side machine. Run: 'mst server start' • The client side should add the mst 'server side'. Run: 'mst remote add <server side machine IP>' After remote devices are added to the mst list device in the 'client side', you can run any tool that accesses the mst devices of the 'server side' as seen in the example below Usage of relevant command: Command mst server start [port] Description Starts mst server to allow incoming connection. Default port is 23108 mst server stop Stops mst server. mst remote add <hostname>[:port] • mst remote del <hostname>[:port] Removes all remote devices on a specified hostname. <hostname>[:port] should be specified exactly as in the "mst remote add" command. • • Establishes connection with a specified host on a specified port (default port is 23108). Adds devices on remote peer to local the devices list. <hostname> may be host name as well as an IP address. Example: The example below shows how to query the firmware of a device in the server side (machine: mft) from the client side (machine: mft1): 1. Run mst status in the server side: [root@mft ~]# mst status MST modules: -----------MST PCI module loaded MST PCI configuration module loaded MST devices: -----------/dev/mst/mt26428_pciconf0 /dev/mst/mt26428_pci_cr0 /dev/mst/mtusb-1: - PCI configuration cycles access. domain:bus:dev.fn=0000:0b:00.0 addr.reg=88 data.reg=92 Chip revision is: B0 - PCI direct access. domain:bus:dev.fn=0000:0b:00.0 bar=0xd2600000 size=0x100000 Chip revision is: B0 - USB to I2C adapter as I2C master Mellanox Technologies 97 Rev 2.4 Troubleshooting 2. Start the mst server in the 'server side': [root@dev-l-vrt-059-005 ~]# mst server start 3. Add mst remote device in the client side: [root@dev-l-vrt-059-006 ~]# mst remote add dev-l-vrt-059-005 4. Show the mst device in the 'client side' which contains remote devices for the 'server side' machine: [root@mft1 ~]# mst status MST modules: -----------MST PCI module loaded MST PCI configuration module loaded MST devices: -----------/dev/mst/mt4099_pciconf0 /dev/mst/mt4099_pci_cr0 - PCI configuration cycles access. domain:bus:dev.fn=0000:0b:00.0 addr.reg=88 data.reg=92 Chip revision is: 01 - PCI direct access. domain:bus:dev.fn=0000:0b:00.0 bar=0xd2600000 size=0x100000 Chip revision is: 01 Remote MST devices: ------------------/dev/mst/mft:23108,@dev@mst@mt26428_pciconf0 Chip revision is: B0 /dev/mst/mft:23108,@dev@mst@mt26428_pci_cr0 Chip revision is: B0 /dev/mst/mft:23108,@dev@mst@mtusb-1 5. Access a remote mst device from the 'client side': [root@mft1 ~]# flint -d /dev/mst/mft:23108,@dev@mst@mt4099_pci_cr0 q Image type: FS2 FW Version: 2.32.1092 FW Release Date: 17.8.2014 Rom Info: type=PXE version=3.4.300 devid=4099 proto=VPI Device ID: 4099 Description: Node Port1 Port2 Sys image GUIDs: 0002c90300e6e4e0 0002c90300e6e4e1 0002c90300e6e4e2 0002c90300e6e4e3 MACs: 0002c9e6e4e1 0002c9e6e4e2 VSD: n/a PSID: MT_1090120019 98 Mellanox Technologies Rev 2.4 Appendix F: Accessing Remote InfiniBand Device by Direct Route MADs To access a SwitchX® switch or Connect-IB® device remotely by direct route MADs: 1. Make sure the local ports are connected to a node or more. # ibstat or # ibv_devinfo 2. Obtain the device direct route path. # mst ib add --use-ibdr --discover-tool ibnetdiscover mlx5_0 1 -I- Discovering the fabric - Running: ibnetdiscover -s -C mlx5_0 -P 1 -I- Added 2 in-band devices 3. List the discovered direct route device. # mst status MST modules: -----------MST PCI module loaded MST PCI configuration module loaded MST devices: -----------…. Inband devices: ------------------/dev/mst/CA_MT4113_server1_HCA-3_ibdr-0,mlx5_0,1 /dev/mst/SW_MT51000_switch1_ibdr-0.2,mlx5_0,1 4. Run any tool against the devices above. # flint -d /dev/mst/CA_MT4113_server1_HCA-3_ibdr-0,mlx5_0,2 v FS3 failsafe image /0x00000038-0x00000f4f (0x000f18)/ (BOOT2) - OK /0x00201000-0x0020101f (0x000020)/ (ITOC_Header) - OK /0x00203000-0x0020323f (0x000240)/ (FW_MAIN_CFG) - OK /0x00204000-0x0020437f (0x000380)/ (FW_BOOT_CFG) - OK /0x00205000-0x002057ff (0x000800)/ (HW_MAIN_CFG) - OK /0x00206000-0x002060ff (0x000100)/ (HW_BOOT_CFG) - OK /0x00207000-0x002195e3 (0x0125e4)/ (PCI_CODE) - OK /0x0021a000-0x0021e3a7 (0x0043a8)/ (IRON_PREP_CODE) - OK Mellanox Technologies 99 Rev 2.4 Troubleshooting /0x0021f000-0x00226bab (0x007bac)/ (PCIE_LINK_CODE) - OK /0x00227000-0x002a888f (0x081890)/ (MAIN_CODE) - OK /0x002a9000-0x002a95bf (0x0005c0)/ (POST_IRON_BOOT_CODE) - OK /0x002aa000-0x002aa3ff (0x000400)/ (IMAGE_INFO) - OK /0x002aa400-0x002b3e7b (0x009a7c)/ (FW_ADB) - OK /0x002b3e7c-0x002b4277 (0x0003fc)/ (DBG_LOG_MAP) - OK /0x002b4278-0x002b427f (0x000008)/ (DBG_FW_PARAMS) - OK /0x003fa000-0x003fbfff (0x002000)/ (NV_DATA) - OK /0x003fd000-0x003fd1ff (0x000200)/ (DEV_INFO) - OK /0x003ff000-0x003ff13f (0x000140)/ (MFG_INFO) - OK /0x003ff140-0x003ff13f (0x000000)/ (VPD_R0) - OK FW image verification succeeded. Image is bootable. 100 Mellanox Technologies Rev 2.4 Appendix G: Update Package for Mellanox Firmware G.1 Overview Update Package for Mellanox Firmware (UPMF) is a new method used to distribute firmware to end users. Instead of providing multiple binary files (one for each board type) and burning them using the flint tool, the UPMF method requires only a single standalone file. The UPMF is a self-extracting executable that contains a set of Mellanox firmware binary images, and the mlxfwmanager firmware update tool. When executed, the UPMF: • Extracts its content into a temporary location • Scans the locally installed Mellanox devices firmware versions • Performs firmware updates if needed • Cleans up temporary files The UPMF method and its related tools are released as Beta in MFT 3.1.0. The current firmware update method, updating firmware using flint and .bin file is still supported. G.1.1 G.2 Update Package for Mellanox Firmware Features • Single file per firmware release • Simple 'one click' firmware update • Compact size (achieved by efficient compression of the firmware images) • No installation required Update Package for Mellanox Firmware Generation Flow The mlx_fwsfx_gen tool is used for OEMs that wish to create their own UPMFs that contain their own customized firmware images. To install the mlx_fwsfx_gen tool, the installation script should be run with the "--oem" command line option. G.2.1 mlx_fwsfx_gen Usage This tool packs the firmware images provided in the input directory and the mlxfwmanager update tool into a single standalone self-extracting executable. The UPMF generation is supported on Linux and Windows. Being an executable file, the UPMF should be prepared for Linux and Windows separately. Usage: # mlx_fwsfx_gen --source-dir <FW images directory> --out-dir <output directory> [--sfx-name <sfx file name>] [--phy-support --phy-img <phy-img>] Mellanox Technologies 101 Rev 2.4 Troubleshooting where: --source-dir Directory containing Mellanox firmware images to be included in the package. This option may be used more than once to specify more than one source directory. --out-dir Specifies the output directory. --certificate SSL certificate. --phy-support Generate extractor with mlxphyburn support. --phy-img PHY firmware image. sfx-name The self-extracting executable filename. The default name is mlxfwmanager-YYYYMMDD-<build number>, where build number is the previous maximum build number existing in the output directory incremented by one. Figure 4: UPMF Package Generation Flow 102 Mellanox Technologies Rev 2.4 G.2.2 UPMF Generation Example The below example packs 3 firmware binaries (named fw-ConnectX-3-1.bin, fw-ConnectX-32.bin, fw-ConnectX-3-3.bin) located in the directory '/tmp/fw-ConnectX-3-dir/'into a Linux UPMF package named /tmp/mlxfwmanager-20141126-1. mlx_fwsfx_gen --source-dir /tmp/fw-ConnectX-3-dir --out-dir /tmp Package name: /tmp/mlxfwmanager-20141126-1 Contents: Source dirs: /tmp/fw-ConnectX-3-dir Adding file: /etc/mft/ca-bundle.crt sfx_stub file: /usr/bin/mlx_sfx_stub Creating intermediate MFA archive from binary files: fw-ConnectX-3-1.bin fw-ConnectX-3-2.bin fw-ConnectX-3-3.bin mfa tool: /usr/bin/mlx_mfa_gen mfa cmd: /usr/bin/mlx_mfa_gen -p /tmp/Pcgs82KTxr/srcs.mfa -s /tmp/fw-ConnectX-3-dir Adding bins from /tmp/fw-ConnectX-3-dir Files copied: 3 Querying images ... Files queried: 3 Compressing ... (this may take a minute) Archive: /tmp/Pcgs82KTxr/srcs.mfa Total time: 0m2s Adding file: /tmp/Pcgs82KTxr/srcs.mfa Adding file: /usr/bin/mlxfwmanager_pci Creating zip /tmp/Pcgs82KTxr/zippackage.zip adding: srcs.mfa (deflated 0%) adding: mlxfwmanager_pci (deflated 57%) adding: ca-bundle.crt (deflated 45%) sfx auto-run command: mlxfwmanager_pci -u --log-on-update --ssl-certificate %ca-bundle.crt% %current-dir% %argv% Log name: /tmp/mlxfwmanager-20141126-1.log Mellanox Technologies 103 Rev 2.4 G.2.3 Troubleshooting UPMF Generation with PHY Binary Example The below example packs 3 firmware binaries (named fw-ConnectX-3-1.bin, fw-ConnectX-32.bin, fw-ConnectX-3-3.bin) located in the directory '/tmp/fw-ConnectX-3-dir/' and a PHY image '/tmp/Firmware_1.37.10_N32722.cld' into a Linux UPMF package named /tmp/mlxfwmanager-20141126-2 mlx_fwsfx_gen --source-dir /tmp/fw-ConnectX-3-dir --out-dir /tmp --phy-support --phy-img /tmp/ Firmware_1.37.10_N32722.cld Creating /tmp/C04TldeQHr/phy_mfa direcotry Package name: /tmp/mlxfwmanager-20141126-2 Contents: Source dirs: /tmp/fw-ConnectX-3-dir Adding file: /etc/mft/ca-bundle.crt sfx_stub file: /usr/bin/mlx_sfx_stub Creating intermediate MFA archive from binary files: fw-ConnectX-3-1.bin fw-ConnectX-3-2.bin fw-ConnectX-3-3.bin mfa tool: /usr/bin/mlx_mfa_gen mfa cmd: /usr/bin/mlx_mfa_gen -p /tmp/YaH5BAoQ8q/srcs.mfa -s /tmp/fw-ConnectX-3-dir Adding bins from /tmp/fw-ConnectX-3-dir Files copied: 3 Querying images ... Files queried: 3 Compressing ... (this may take a minute) Archive: /tmp/YaH5BAoQ8q/srcs.mfa Total time: 0m1s Adding file: /tmp/YaH5BAoQ8q/srcs.mfa Adding file: /usr/bin/mlxfwmanager Copying /tmp/Firmware_1.37.10_N32722.cld to /tmp/C04TldeQHr/phy_mfa Adding file: /tmp/Firmware_1.37.10_N32722.cld Adding file: /usr/bin/mlxphyburn Creating zip /tmp/YaH5BAoQ8q/zippackage.zip adding: srcs.mfa (deflated 0%) adding: ca-bundle.crt (deflated 45%) adding: phy_mfa/ (stored 0%) adding: phy_mfa/Firmware_1.37.10_N32722.cld (deflated 44%) adding: mlxfwmanager (deflated 57%) adding: mlxphyburn (deflated 60%) sfx auto-run command: mlxfwmanager -u --log-on-update --ssl-certificate %ca-bundle.crt% %current-dir% %argv% mlxphyburn auto-run command: mlxphyburn %device% -i ./phy_mfa/Firmware_1.37.10_N32722.cld b Log name: /tmp/mlxfwmanager-20141126-2.log 104 Mellanox Technologies Rev 2.4 G.3 Updating Firmware Using an UPMF Updating the firmware is done by simply executing the UPMF. Most of the command line options of the mlxfwmanager tool apply also for the UPMF. For further detail, please refer to Section 3.6, “mlxfwreset - Loading Firmware on 5th Generation Devices Tool”, on page 63. Some of the most commonly used command line options are: --force Force firmware update even if the firmware in the UPMF is not newer than the one on the device. --yes Non-interactive mode - assume 'yes' to all questions. --list List the supported part numbers for which a firmware is available in the package.. In addition to the mlxfwmanager tool command line options, the UPMF has 2 additional options: Additional UPMF self extractor options: --sfx-extract-dir <dir> Use <dir> for temporary files during execution --sfx-extract-only Do not execute, only extract files to a location specified through the -sfx-extract-dir option --sfx-no-pause Do not wait for user keypress after completion. Note: This flag is used in Windows OSs. Extraction Example # mlxfwmanager-20130717-1 --sfx-extract-dir ./mydir --sfx-extract-only Extracting to mydir/mlxfwmanager-20130717-1 ... Done Run the firmware update command: # ./mydir/mlxfwmanager-20130717-1/mlxfwmanager -u Mellanox Technologies 105 Rev 2.4 Troubleshooting Appendix H: Secure Host Feature Secure host is the general term for the capability of a device to protect itself and the subnet from malicious software through mechanisms such as blocking access of untrusted entities to the device configuration registers, directly (through pci_cr or pci_conf) and indirectly (through MADs). WARNING: • • Once a hardware access key is set, the hardware can be accessed only after the correct key is provided. If a key is lost, please refer to Appendix H.1.5,“Recover Lost Key,” on page 107 The hardware access in this mode is allowed only if a correct 64 bits key is provided. The secure host feature requires a MLNX_OFED driver installed on the machine. H.1 Using the Secure Host H.1.1 Generating/Burning a Firmware supporting Secure Host Feature 1. Make sure you have INI and mlx files suitable for the device. Both files are available for download at: http://www.mellanox.com/page/custom_firmware_table a. Add cr_protection_en=true under [HCA] section in the INI file. b. Generate an image using mlxburn, for example run: # mlxburn -fw ./fw-4099-rel.mlx -conf ./secure_host.ini -wrimage fw-4099.secure.bin 2. Burn the image on the device using flint: # flint -d /dev/mst/mt4099_pci_cr0 -i fw-4099.secure.bin b 3. For changes to take effect, reboot is required. H.1.2 Setting the Secure Host Key To set the key, run: # flint -d /dev/mst/mt4099_pci_cr0 set_key 22062011 Setting the HW Key - OK 106 Mellanox Technologies Rev 2.4 Restoring signature - OK A driver restart is required to activate the new key. H.1.3 Disabling/Enabling Access to the Hardware 1. Access the hardware while hardware access is disabled: # flint -d /dev/mst/mt4099_pci_cr0 q E- Cannot open /dev/mst/mt4099_pci_cr0: HW access is disabled on the device. E- Run "flint -d /dev/mst/mt4099_pci_cr0 hw_access enable" in order to enable HW access. 2. Enable hardware access: # flint -d /dev/mst/mt4099_pci_cr0 hw_access enable Enter Key: ******** 3. Disable hardware access: # flint -d /dev/mst/mt4099_pci_cr0 hw_access disable H.1.4 Removing secure host feature To remove the secure host feature: Step 1. Make sure you have INI and MLX file suitable for the device. a. Remove cr_protection_en=true from the INI (if present) b. Generate the image using mlxburn, for example run: # mlxburn -fw ./fw-4099-rel.mlx -conf ./unsecure_host.ini -wrimage fw-4099.unsecure.bin Step 2. Burn the firmware on the device (make sure hardware access is enabled prior to burning) # flint -d /dev/mst/mt4099_pci_cr0 -i fw-4099.unsecure.bin b Step 3. Execute a driver restart in order to load the unsecure firmware.. # service openibd restart H.1.5 Recover Lost Key If a key is lost, there is no way to recover it using the tool. The only way to recover it is to: Step 1. Connect the flash-not-present jumper on the card. Step 2. Reboot the machine. Step 3. Re-burn firmware Step 4. Remove the flash-not-present jumper. Step 5. Reboot the machine Step 6. Re-set the hardware access key Mellanox Technologies 107 Rev 2.4 Troubleshooting Appendix I: Booting HCA Device in Livefish Mode In case a MLNX HCA fails to boot properly and is not being identified by the system due to a corrupt firmware, the user is able to boot the card in livefish mode in order to re-burn the card.1 To do so, a direct access to the card is needed. By connecting the two flash present pins using a jumper while the machine is powered off, the card will boot in Flash not present mode (the firmware will not be loaded from the flash) i.e livefish. I.1 Booting Card in Livefish Mode To boot the card in livefish mode: I.2 Step 1. Power off the machine. Step 2. Locate the Flash preset pins on the HCA. Step 3. Close the two pins using a jumper. Step 4. Power on the machine. Booting Card in Normal Mode To boot the card in normal mode: I.3 Step 1. Power off the machine. Step 2. Take off the jumper connected to the Flash Present pins on the HCA. Step 3. Power on the machine. Common Locations of Flash Present Pins The following photos show common locations of the Flash Present pins. Existence and location of Flash Present pins depends on the board manufacture 1. Supported boards only 108 Mellanox Technologies Rev 2.4 Mellanox Technologies 109 Rev 2.4 Troubleshooting Appendix J: Burning a New Connect-IB® Device When burning a flash for the first time, the initial image should contain the correct GUIDs and VPD for the device. Subsequent firmware updates will not change these initial setting flint for OEM is required for burning Connect-IB® for the first time. J.1 GUIDs and MACs The Connect-IB® image contains the Node, Port and System GUIDs and Port MACs to be used by the card. To simplify GUIDs assignment, the mlxburn tool can derive the MACs and GUIDs from a single base GUID according to Mellanox methodology: Description: Port1 GUID: Port2 GUID: Port1 MAC: Port2 MAC: UID Number base 8 base + 8 8 1 guid2mac (base) 8 guid2mac(base + 8) 8 Step 1 1 1 1 1. guid2mac(guid) is (((guid >> 16) & 0xffffff000000) | (guid & 0xffffff) ). Meaning, remove the 2 middle bytes of an 8 bytes GUID to generate a 6 bytes MAC. J.2 PCI Vital Product Data (VPD) The VPD information is returned by the firmware upon VPD access from the PCI configuration header. J.3 • The vpd_ro file last 3 bytes are the vpd_rw tag-id and length • The size of the vpd_r file (including the above 3 bytes) should be a multiple of 4 Burning a New Connect-IB® Device The VPD and GUIDs are stored in the last sector on flash that can be set as Write protected after the initial firmware burn. J.3.1 To burn the Connect-IB® device: Method 1: Generating Firmware With Specific GUIDs and Burning on the Flash 1. Generate the initial image with the correct GUIDs and VPD for the specific device, using the mlxburn tool. The generated image occupies full flash size. # mlxburn -fw FW/fw-ConnectIB.mlx -c FW/MCB194A-FCA_A1.ini -wrimage fw-ConnectIB-MCB194AFCA_A1.bin -base_guid 0x0002c903002ef500 -vpd_r_file ./vpd_r_data.bin 2. Disable the Write protection. # flint -d /dev/mst/mt511_pciconf0 -ocr hw set Flash0.WriteProtected=Disabled 110 Mellanox Technologies Rev 2.4 3. Burn the entire flash, using the flint tool. # flint -d /dev/mst/mt511_pciconf0 -i ./fw-ConnectIB-MCB194A-FCA_A1.bin ocr -ignore_dev_data -allow_psid_change -nofs --yes burn 4. Set Write protection on the last sector, using the flint: For devices using Winbond flash:. # flint -d /dev/mst/mt511_pciconf0 -ocr hw set Flash0.WriteProtected=Top,1-SubSectors 5. Enable flash quad SPI IO operations. # flint -d /dev/mst/mt511_pciconf0 -ocr hw set QuadEn=1 Method 2: Generating Firmware Image With Blank GUIDs, Burning and Setting GUIDs on the Flash 1. Generate the initial image with VPD for the specific device, using the mlxburn tool. The generated image occupies full flash size. # mlxburn -fw FW/fw-ConnectIB.mlx -c FW/MCB194A-FCA_A1.ini -wrimage fw-ConnectIB-MCB194AFCA_A1.bin -vpd_r_file ./vpd_r_data.bin 2. Disable the Write protection. # flint -d /dev/mst/mt511_pciconf0 -ocr hw set Flash0.WriteProtected=Disabled 3. Burn the entire flash, using the flint tool. # flint -d /dev/mst/mt5111_pciconf0 -i ./fw-ConnectIB-MCB194A-FCA_A1.bin -ocr -ignore_dev_data -allow_psid_change -nofs --yes burn 4. Set device manufacture GUIDs, run: # flint -d /dev/mst/mt511_pciconf0 -ocr -uid 0x0002c903002ef500 smg 5. Set device GUIDs, run: # flint -d /dev/mst/mt511_pciconf0 -ocr -uid 0x0002c903002ef500 sg 6. Set Write Protection on the last sector, using the flint tool. For devices using Winbond flash:. # flint -d /dev/mst/mt511_pciconf0 -ocr hw set Flash0.WriteProtected=Top,1-SubSectors 7. Enable flash quad SPI IO operations. # flint -d /dev/mst/mt511_pciconf0 -ocr hw set QuadEn=1 To view flash settings, run: # flint -d /dev/mst/mt511_pciconf0 -ocr hw query To view assigned GUIDs, run: # flint -d /dev/mst/mt511_pciconf0 -ocr q To change a GUID after the initial burn, run: # flint -d /dev/mst/mt4113_pciconf0 -ocr -uid 0x0002c903002ef500 sg Mellanox Technologies 111 Rev 2.4 Troubleshooting Appendix K: Burning a New Switch-IB™ Device Upon first time flash burning, the GUIDs and VPD of the device are required to be set on the flash. The sections below demonstrate two methods of burning a new Switch-IB™ device in order to set these initial settings. Subsequent firmware updates will not change these settings. flint for OEM is required for burning Switch-IB™ for the first time. For information regarding GUIDs, MACs and VPD, please refer to Appendix F: “Accessing Remote InfiniBand Device by Direct Route MADs,” on page 99. K.1 Burning the Switch-IB™ Device: The examples below are for managed switches. For unmanaged switches, connect an MTUSB adapter (Appendix D: “MTUSB-1 USB to I2C Adapter,” on page 95) to the device and use the appropriate mst device (/dev/mst/mtusb…). Method 1: Generating Firmware with Specific GUIDs and Burning it on the Flash In order to burn a new Switch-IB™ device, follow the steps below: 1. Generate the initial image with the correct GUIDs and VPD for the specific device using the mlxburn tool. The generated image occupies full flash size. # mlxburn -fw FW/fw-SwitchIB.mlx -c FW/MSB7700-E_Ax.ini -wrimage fw-SwitchIB-MSB7700-E_Ax.bin -base_guid 0x0002c903002ef500 -vpd_r_file ./vpd_r_data.bin 2. Disable the Write protection. # flint -d /dev/mst/mt583_pciconf0 -ocr hw set Flash0.WriteProtected=Disabled # flint -d /dev/mst/mt583_pciconf0 -ocr hw set Flash1.WriteProtected=Disabled 3. Burn the entire flash using the flint tool. # flint -d /dev/mst/mt583_pciconf0 -i ./ fw-SwitchIB-MSB7700-E_Ax.bin ocr -ignore_dev_data -allow_psid_change -nofs --yes burn 4. Set Write protection # flint -d /dev/mst/mt583_pciconf0 -ocr hw set Flash0.WriteProtected=Top,2-SubSectors 5. Enable flash quad SPI IO operations. # flint -d /dev/mst/mt583_pciconf0 -ocr hw set QuadEn=1 112 Mellanox Technologies Rev 2.4 Method 2: Generating Firmware Image with Blank GUIDs, Burning and Setting GUIDs on the Flash In order to burn a new Switch-IB™ device, follow the steps below: 1. Generate the initial image VPD for the specific device using the mlxburn tool. The generated image occupies full flash size. # mlxburn -fw FW/fw-SwitchIB.mlx -c FW/MSB7700-E_Ax.ini -wrimage fw-SwitchIB-MSB7700-E_Ax.bin -vpd_r_file ./vpd_r_data.bin 2. Disable the Write protection. # flint -d /dev/mst/mt583_pciconf0 -ocr hw set Flash0.WritePro-tected=Disabled # flint -d /dev/mst/mt583_pciconf0 -ocr hw set Flash1.WritePro-tected=Disabled 3. Burn the entire flash using the flint tool. # flint -d /dev/mst/mt583_pciconf0 -i ./ fw-SwitchIB-MSB7700-E_Ax.bin ocr -ignore_dev_data -allow_psid_change -nofs --yes burn 4. Set device manufacture GUIDs. # flint -d /dev/mst/mt583_pciconf0 -ocr -uid 0x0002c903002ef500 smg 5. Set device GUIDs. # flint -d /dev/mst/mt583_pciconf0 -ocr -uid 0x0002c903002ef500 sg 6. Set Write protection. # flint -d /dev/mst/mt583_pciconf0 -ocr hw set Flash0.WriteProtected=Top,2-SubSectors # flint -d /dev/mst/mt583_pciconf0 -ocr hw set Flash1.WriteProtected=Top,1-SubSectors 7. Enable flash quad SPI IO operations. # flint -d /dev/mst/mt583_pciconf0 -ocr hw set QuadEn=1 To view flash settings: # flint -d /dev/mst/mt583_pciconf0 -ocr hw query To view assigned GUIDs: # flint -d /dev/mst/mt583_pciconf0 -ocr q To change a GUID after the initial burn: # flint -d /dev/mst/m52000_pciconf0 -ocr -uid 0x0002c903002ef500 sg Mellanox Technologies 113 Rev 2.4 Troubleshooting Appendix L: Burning a New ConnectX-4® Device Upon first time device burning, the GUIDs, MACs and VPD of the device are required to be set on the flash. The sections below demonstrate two methods of burning a new ConnectX-4® device in order to set these initial settings. Subsequent firmware updates will not change these settings. flint for OEM is required for burning ConnectX-4® for the first time. For information regarding GUIDs, MACs and VPD, please refer to Appendix F: “Accessing Remote InfiniBand Device by Direct Route MADs,” on page 99. L.1 Burning the ConnectX-4® Device: Method 1: Generating Firmware with Specific GUIDs and Burning it on the Device In order to burn a new ConnectX-4® device, follow the steps below: 1. Generate the initial image with the correct GUIDs and VPD for the specific device using the mlxburn tool. The generated image occupies full flash size. # mlxburn -fw FW/fw-ConnextX4.mlx -c FW/ MCX454_Ax.ini -wrimage fw-ConnectX4- MCX454_Ax.bin base_guid 0xe41d2d0300570fc0-base_mac 0x0000e41d2d570fc0 -vpd_r_file ./vpd_r_data.bin 2. Disable the Write protection. # flint -d /dev/mst/mt521_pciconf0 -ocr hw set Flash0.WriteProtected=Disabled 3. Burn the entire flash using the flint tool. # flint -d /dev/mst/mt521_pciconf0 -i ./ fw-ConnectX4- MCX454_Ax.bin -ocr -ignore_dev_data allow_psid_change -nofs --yes burn 4. Set Write protection # flint -d /dev/mst/mt521_pciconf0 -ocr hw set Flash0.WriteProtected=Top,8-SubSectors 5. Enable flash quad SPI IO operations. # flint -d /dev/mst/mt521_pciconf0 -ocr hw set QuadEn=1 114 Mellanox Technologies Rev 2.4 Method 2: Generating Firmware Image with Blank GUIDs, Burning and Setting GUIDs on the Device In order to burn a new Switch-IB™ device, follow the steps below: 1. Generate the initial image VPD for the specific device using the mlxburn tool. The generated image occupies full flash size. # mlxburn -fw FW/fw-ConnextX4.mlx -c FW/MCX454_Ax.ini -wrimage fw-ConnectX4- MCX454_Ax.bin vpd_r_file ./vpd_r_data.bin 2. Disable the Write protection. # flint -d /dev/mst/mt521_pciconf0 -ocr hw set Flash0.WriteProtected=Disabled 3. Burn the entire flash using the flint tool. # flint -d /dev/mst/mt521_pciconf0 -i ./ fw- ConnectX4- MCX454_Ax.bin -ocr -ignore_dev_data allow_psid_change -nofs --yes burn 4. Set device manufacture GUIDs and MACs., run: # flint -d /dev/mst/mt521_pciconf0 -ocr -guid 0xe41d2d0300570fc0 -mac 0x0000e41d2d570fc0 smg 5. Set device GUIDs and MACs, run: # flint -d /dev/mst/mt521_pciconf0 -ocr -guid 0xe41d2d0300570fc0 -mac 0x0000e41d2d570fc0 sg 6. Set Write protection on the last sector using flint: # flint -d /dev/mst/mt521_pciconf0 -ocr hw set Flash0.WriteProtected=Top,8-SubSectors 7. Enable flash quad SPI IO operations. # flint -d /dev/mst/mt521_pciconf0 -ocr hw set QuadEn=1 To view flash settings: # flint -d /dev/mst/mt521_pciconf0 -ocr hw query To view assigned GUIDs: # flint -d /dev/mst/mt521_pciconf0 -ocr q To change a GUID after the initial burn: # flint -d /dev/mst/m4115_pciconf0 -ocr -guid 0xe41d2d0300570fc0 sg To change a MAC after the initial burn: # flint -d /dev/mst/m4115_pciconf0 -ocr -mac 0x0000e41d2d570fc0 sg To change a GUID and derive MAC from it after the initial burn, run: # flint -d /dev/mst/m4115_pciconf0 -ocr -uid 0xe41d2d0300570fc0 sg MACs will be derived from the GUID according to guid2mac(guid) formula described in section J.1 Mellanox Technologies 115