1
FlightPrep™
Software Applications
Version 6
User Manual
Includes
ChartCase Pro™ Pro
K
ChartKey™
Golden Eagle Plus™ G+
Golden Eagle FlightPrep™
For the latest technical tips, techniques and frequently asked
questions (and their answers) please visit www.flightprep.com
and select customer service on the home page.
GE
2
FlightPrep
User Manual
GE
G+
K
Pro
Table of Contents
Software End User License Agreement ................................................................................ 8
Product Features.................................................................................................................10
Computer Hardware Minimum Requirements: .................................................................13
Installation for all FlightPrep Software Products ..................................................................13
Product Activation ...............................................................................................................17
Flight Planning ....................................................................................................................19
Program Features ............................................................................................................19
Opening Screen...............................................................................................................19
Screen Layout .................................................................................................................20
Menu Items: .................................................................................................................20
Tab Items: ....................................................................................................................20
Tool Bar Items: .............................................................................................................20
Route Planner..................................................................................................................21
Airports ........................................................................................................................22
Flight Properties ...........................................................................................................22
Route Planner Tabs .........................................................................................................23
Route ...........................................................................................................................23
Map Layers ......................................................................................................................27
Appearance..................................................................................................................27
DUATS .........................................................................................................................28
XM Weather Layers .....................................................................................................29
GPS .................................................................................................................................30
NRST...............................................................................................................................30
Menus .................................................................................................................................31
[File] ................................................................................................................................31
[New] ............................................................................................................................31
[Open] ..........................................................................................................................31
[Save] ...........................................................................................................................31
[Save As…] ..................................................................................................................31
[Print] ...........................................................................................................................31
[Exit] .............................................................................................................................31
[Edit] ................................................................................................................................32
3
FlightPrep
User Manual
GE
G+
K
Pro
[Delete] ........................................................................................................................32
[Select All] ....................................................................................................................32
[User Waypoints] ..........................................................................................................32
[Aircraft…] .......................................................................................................................32
Editing or Adding a New Aircraft – ................................................................................33
Moment Arm Data Entry. ..............................................................................................35
CG Envelope ................................................................................................................36
[Pilots…] ..........................................................................................................................38
General Tab – ..............................................................................................................40
Navigation Tab – ..........................................................................................................50
Airspace Tab – .............................................................................................................53
Aircraft Tab – ...............................................................................................................54
Pilots Tab – ..................................................................................................................54
Product Keys – .............................................................................................................55
Application Data Folders – ...........................................................................................56
GPS – ..........................................................................................................................57
Traffic – ........................................................................................................................58
Nearest Filter–..............................................................................................................62
Emergency Filter – .......................................................................................................62
Inflight Tab – ................................................................................................................63
[Chart]..............................................................................................................................66
[Search]........................................................................................................................66
[Show Route] ...............................................................................................................67
[Route List] ...................................................................................................................67
[Show Nexrad]..............................................................................................................69
[Select Wind Altitude] ...................................................................................................69
[Update TFRs] ..............................................................................................................70
[TFR List…] ..................................................................................................................70
[Route] .............................................................................................................................71
[Route Wizard] .............................................................................................................71
[Compare Altitudes] ......................................................................................................73
[Reverse Route] ...........................................................................................................73
[Weight & Balance] .......................................................................................................73
4
FlightPrep
User Manual
GE
G+
K
Pro
[Use Winds]..................................................................................................................73
[Edit Route List…] ........................................................................................................74
[Plain Language Router] ..................................................................................................76
Routing options ............................................................................................................76
[Weather] .........................................................................................................................81
[DUATS] .......................................................................................................................81
[XM WXWorx]...............................................................................................................83
[GPS] ...............................................................................................................................84
[Connect/Start] .............................................................................................................84
[GPS Configure] ...........................................................................................................84
[Show Satellite View] ....................................................................................................85
[Show Raw Data View] .................................................................................................85
[Traffic] ............................................................................................................................86
[Connect]......................................................................................................................86
[Traffic Configure…] .....................................................................................................86
[View]...............................................................................................................................87
[Latitude/Longitude] ......................................................................................................87
[Route Information] .......................................................................................................87
[DUATS Status] ............................................................................................................87
[Check Lists] ................................................................................................................88
[Launch] .......................................................................................................................88
[Tab Bar] ......................................................................................................................89
[Select Tabs] ................................................................................................................89
[Status Bar] ..................................................................................................................90
[Start In-Flight]..............................................................................................................90
[Help] ...............................................................................................................................90
[Account Info] ...............................................................................................................90
[Help Manual] ...............................................................................................................90
[View License Agreement] ............................................................................................91
[Change History] ..........................................................................................................91
Tabs ....................................................................................................................................92
Chart Tab - ......................................................................................................................92
DUATS Tab - ...................................................................................................................93
Online Flight Planner .......................................................................................................94
5
FlightPrep
User Manual
GE
G+
K
Pro
Encode/Decode ...............................................................................................................95
Preferred Routes .............................................................................................................96
File Flight Plan .................................................................................................................96
File ICAO Flight Plan .......................................................................................................97
When to use the DOMESTIC ICAO Form....................................................................97
Domestic ICAO Flight Plan Help ..................................................................................98
File Flight Plan ...............................................................................................................106
Cancel Flight Plan..........................................................................................................106
Close Flight Plan ...........................................................................................................106
Weather Charts .............................................................................................................121
Approaches Tab - ..........................................................................................................124
Flight Guide Tab - ..........................................................................................................126
Reports Tab -.................................................................................................................128
Updater Tab –................................................................................................................129
Downloading Charts ...................................................................................................130
Purchasing Charts......................................................................................................133
WebInfo – ......................................................................................................................134
Tools .................................................................................................................................135
Search Tool................................................................................................................136
Chart Preferences Tool ..............................................................................................136
Hand Tool ..................................................................................................................136
Router Mode Tool ......................................................................................................136
Ruler Tool ..................................................................................................................136
Zoom-In Tool ..............................................................................................................136
Zoom-Out Tool ...........................................................................................................136
View Route Tool .........................................................................................................136
Toggle Nexrad Tool ....................................................................................................136
Toggle Profile View ....................................................................................................136
Emergency Land Tool ................................................................................................137
Start In-Flight Tool......................................................................................................137
Tutorial - Flight Planning ...................................................................................................138
Using the Router Mode Tool ..........................................................................................141
Weather Graphics ..........................................................................................................143
In-Flight .............................................................................................................................147
6
FlightPrep
User Manual
GE
G+
K
Pro
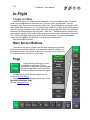
Toggle and Max .........................................................................................................147
Main Screen Buttons .....................................................................................................147
Page ..............................................................................................................................147
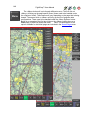
NRST Find .....................................................................................................................150
Drct To...........................................................................................................................154
Charts ............................................................................................................................155
IP ...................................................................................................................................156
One-click Airport Selection .........................................................................................158
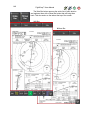
Airport Diagrams ........................................................................................................160
Not Geo-Referenced ..................................................................................................160
Menu - Menu .................................................................................................................161
Load Flight Plan .........................................................................................................161
Save Flight Plan .........................................................................................................161
Set Desired Altitude ...................................................................................................162
GPS Status ................................................................................................................162
XM Status ..................................................................................................................162
Traffic Status ..............................................................................................................163
Configure Page ..........................................................................................................167
Preferences................................................................................................................167
Exit Inflight .................................................................................................................168
Close Menu ................................................................................................................168
In Out .........................................................................................................................168
Screen Pages ................................................................................................................169
Route List / Vector Chart ...........................................................................................169
Vector Chart ...............................................................................................................170
Details ........................................................................................................................173
XM Layers ..................................................................................................................175
Radar .........................................................................................................................175
Radar Coverage .........................................................................................................175
SCIT...........................................................................................................................176
METAR ......................................................................................................................176
TAF ............................................................................................................................176
Lightning ....................................................................................................................177
AIRMETS ...................................................................................................................177
7
FlightPrep
User Manual
GE
G+
K
Pro
SIGMETS ...................................................................................................................177
TFRs ..........................................................................................................................177
PIREPS ......................................................................................................................179
AIREPS ......................................................................................................................179
Winds .........................................................................................................................180
Surface Analysis ........................................................................................................181
Satellite Visible ...........................................................................................................182
Map Scale ..................................................................................................................183
Other XM Weather .....................................................................................................184
1-Click METAR...........................................................................................................185
TAWS - Profile ...........................................................................................................186
Profile .........................................................................................................................187
Chart – Track Up / North Up Options..........................................................................188
Track Up Options .......................................................................................................189
Check List ..................................................................................................................190
HITS...........................................................................................................................191
Landsat ......................................................................................................................192
Appendices ....................................................................................................................193
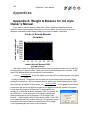
Appendix A: Weight & Balance for old style Owner’s Manual .........................................193
Appendix B: USB GPS Device Installation .....................................................................195
Appendix C: Bluetooth GPS Device Installation .............................................................199
Toshiba Bluetooth Stack Installation – Motion; Fujitsu ................................................200
Fujitsu Bluetooth Installation –....................................................................................201
Appendix D: XM Receiver Installation with Toshiba Bluetooth Drivers ...........................205
Appendix E: XM Receiver Installation with Widcomm Bluetooth Drivers ........................208
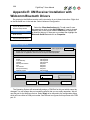
Appendix F: XM Receiver Installation with Microsoft Bluetooth Drivers ..........................214
Appendix F: USB XM Receiver Installation ....................................................................218
XM Link Settings ........................................................................................................218
Appendix G: XMWX Deactivation Indicator ....................................................................221
Troubleshooting XMWX .............................................................................................222
Appendix H: Configure ChartCase (one-time only) ........................................................223
Appendix I: Windows® 7 Bluetooth Setup......................................................................224
Appendix J: Multiple Computers ....................................................................................229
8
FlightPrep
User Manual
GE
G+
K
Pro
Software End User License Agreement
IMPORTANT: THIS SOFTWARE END USER LICENSE AGREEMENT ("EULA") IS A LEGAL AGREEMENT BETWEEN YOU
(EITHER AN INDIVIDUAL OR, IF PURCHASED OR OTHERWISE ACQUIRED BY OR FOR AN ENTITY, AN ENTITY) AND
STENBOCK & EVERSON INC... READ IT CAREFULLY BEFORE COMPLETING THE INSTALLATION. IF YOU DO NOT AGREE
TO BE BOUND BY THESE TERMS, THEN DO NOT INSTALL OR USE THE SOFTWARE.
License Grants
You may install and use the Software on a single desktop or laptop computer that runs an Authorized Operating System. A
license for the Software may not be shared, installed or used concurrently on different computers. You agree that Stenbock &
Everson Inc. may audit your use of the Software for compliance with these terms at any time, upon reasonable notice. In the event
that such audit reveals any use of the Software by you other than in full compliance with the terms of this Agreement, you shall
reimburse Stenbock & Everson Inc. for all reasonable expenses related to such audit in addition to any other liabilities you may incur
as a result of such non-compliance. Certain rights are not granted under this Agreement, but may be available under a separate
agreement.
You may not make or distribute copies of the Software, or electronically transfer the Software from one computer to another or
over a network. You may not alter, merge, modify, adapt or translate the Software, or decompile, reverse engineer, disassemble, or
otherwise reduce the Software to a human-perceivable form. You may not sell, rent, lease, or sublicense the Software. You may not
modify the Software or create derivative works based upon the Software. You may not export the Software into any country
prohibited by the United States Export Administration Act and the regulations thereunder. In the event that you fail to comply with
this EULA, Stenbock & Everson Inc. may terminate the license and you must destroy all copies of the Software (with all other rights
of both parties and all other provisions of this EULA surviving any such termination). You shall not use the Software to develop any
software or other technology having the same primary function as the Software, including but not limited to using the Software in any
development or test procedure that seeks to develop like software or other technology, or to determine if such software or other
technology performs in a similar manner as the Software.
Ownership
The foregoing license gives you limited license to use the Software. Stenbock & Everson Inc. and its suppliers retain all right,
title and interest, including all copyright and intellectual property rights, in and to, the Software and all copies thereof. All rights not
specifically granted in this EULA, including Federal and International Copyrights, are reserved by Stenbock & Everson Inc. and its
suppliers.
WARRANTY DISCLAIMER
STENBOCK & EVERSON INC. AND ITS SUPPLIERS DISCLAIM ALL WARRANTIES AND REPRESENTATIONS,
WHETHER EXPRESS, IMPLIED, OR OTHERWISE, INCLUDING THE WARRANTIES OF MERCHANTABILITY OR FITNESS FOR
A PARTICULAR PURPOSE. STENBOCK & EVERSON INC. DOES NOT WARRANT THAT THE SOFTWARE IS ERROR-FREE
OR WILL OPERATE WITHOUT INTERRUPTION. IF APPLICABLE LAW REQUIRES ANY WARRANTIES WITH RESPECT TO
THE SOFTWARE, ALL SUCH WARRANTIES ARE LIMITED IN DURATION TO NINETY (90) DAYS FROM THE DATE OF
DELIVERY SOME STATES DO NOT ALLOW THE EXCLUSION OF IMPLIED WARRANTIES, SO THE ABOVE EXCLUSION MAY
NOT APPLY TO YOU. THIS WARRANTY GIVES YOU SPECIFIC LEGAL RIGHTS AND YOU MAY ALSO HAVE OTHER LEGAL
RIGHTS THAT VARY FROM STATE TO STATE.
LIMITATION OF LIABILITY
NEITHER STENBOCK & EVERSON INC. NOR ITS SUPPLIERS SHALL BE LIABLE TO YOU OR ANY THIRD PARTY FOR
ANY INDIRECT, SPECIAL, INCIDENTAL, PUNITIVE, COVER OR CONSEQUENTIAL DAMAGES (INCLUDING, BUT NOT
LIMITED TO, DAMAGES FOR THE INABILITY TO USE EQUIPMENT OR ACCESS DATA, LOSS OF BUSINESS, LOSS OF
PROFITS, BUSINESS INTERRUPTION OR THE LIKE), ARISING OUT OF THE USE OF, OR INABILITY TO USE, THE
SOFTWARE AND BASED ON ANY THEORY OF LIABILITY INCLUDING BREACH OF CONTRACT, BREACH OF WARRANTY,
TORT (INCLUDING NEGLIGENCE), PRODUCT LIABILITY OR OTHERWISE, EVEN IF STENBOCK & EVERSON INC. OR ITS
REPRESENTATIVES HAVE BEEN ADVISED OF THE POSSIBILITY OF SUCH DAMAGES AND EVEN IF A REMEDY SET
FORTH HEREIN IS FOUND TO HAVE FAILED OF ITS ESSENTIAL PURPOSE. STENBOCK & EVERSON INC.'S TOTAL
LIABILITY TO YOU FOR ACTUAL DAMAGES FOR ANY CAUSE WHATSOEVER WILL BE LIMITED TO THE GREATER OF $10
OR THE AMOUNT PAID BY YOU FOR THE SOFTWARE THAT CAUSED SUCH DAMAGE. (USA only) SOME STATES DO NOT
ALLOW THE LIMITATION OR EXCLUSION OF LIABILITY FOR INCIDENTAL OF CONSEQUENTIAL DAMAGES, SO THE ABOVE
LIMITATION OR EXCLUSION MAY NOT APPLY TO YOU AND YOU MAY ALSO HAVE OTHER LEGAL RIGHTS THAT VARY
FROM STATE TO STATE. THE FOREGOING LIMITATIONS ON LIABILITY ARE INTENDED TO APPLY TO ALL ASPECTS OF
THIS EULA.
This EULA shall be governed by the internal laws of the State of Oregon, without giving effect to principles of conflict of laws.
This EULA contains the complete agreement between the parties with respect to the subject matter hereof, and supersedes all prior
or contemporaneous agreements or understandings, whether oral or written. You agree that any varying or additional terms
contained in any purchase order or other written notification or document issued by you in relation to the Software licensed
hereunder shall be of no effect. The failure or delay of Stenbock & Everson Inc. to exercise any of its rights under this EULA or upon
any breach of this EULA shall not be deemed a waiver of those rights or of the breach. Stenbock & Everson Inc. and other
trademarks contained in the Software are trademarks or registered trademarks of Stenbock & Everson Inc. Systems Incorporated in
the United States and/or other countries. Third party trademarks, trade names, product names and logos may be the trademarks or
registered trademarks of their respective owners. You may not remove or alter any trademark, trade names, product names, logo,
copyright or other proprietary notices, legends, symbols or labels in the Software. This EULA does not authorize you to use
Stenbock & Everson Inc.'s or its licensors' names or any of their respective trademarks.
9
FlightPrep
User Manual
GE
G+
K
ChartCase Development Team
Software Code: Kyle Everson, Travis Cannon
Requirement Design: John Bouyea
GUI Graphics Design: Roger Stenbock
Evaluation & Testing: John Bouyea, Roger Stenbock, Ross Neher
Data Compilation: Audrie Crane
User Manual & documentation: Curt Anderson, Ross Neher
Tutorial Video: Stenbock Communications Inc
Manual Version 6.0.0 April 2010
Special thanks to all our Beta Testers and especially to Bill, David, & George!
Pro
10
FlightPrep
User Manual
GE
G+
K
Pro
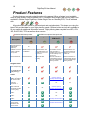
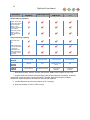
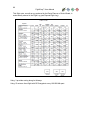
Product Features
Product features are color-coded throughout the manual. When a feature is not available
within a given product it will be marked out; i.e. LandSat Photo-Imagery with moving map is not
available in Golden Eagle FlightPrep, Golden Eagle Plus nor ChartKey EFB, This is indicated
with:
Pro
GE G+
K
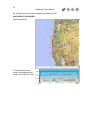
All products include access to current airport and navigation data. This keeps you using the
latest FAA provided data for your flight planning needs. Optional online services are available to
fill your needs for additional information access. Flight planning data compiled from NFD, ATA100, DUATS WX, TFRs as well as other sources.
Included with base product
Golden Eagle
FlightPrep
Description
available as optional data purchase
Golden Eagle Plus
ChartKey
EFB Device
GE
Enhanced Version of
Golden Eagle
FlightPrep
G+
K
ChartCase Pro
v. 6
Pro
n/a
Installation Type and
number of allowed
PC's per user
Installed software, no limit Installed software, user
on installations
may install software and
updates on up to 3 PC's
for their use
No installation, product
exists completely on
ChartKey device, user may
use the ChartKey in any
PC they use
Installed software, user
may install software and
updates on up to 3 PC's
for their use
Recommended Use
VFR Flight Planning
Electronic Flight Bag, InCockpit Weather, Moving
Map, and VFR/IFR Flight
Planning Interface
Electronic Flight Bag, InCockpit Weather, Moving
Map, and VFR/IFR Flight
Planning Interface
VFR & IFR Flight
Planning
Navigation Data
BASIC: (Required for
basic route planning) *
SUPPLEMENTAL:
(For comprehensive
flight planning) **
n/a
Charts
Vector & Topo Relief
charts. User defined
with Terrain Profile.
Included in Optional
ChartKey Data Subscription
FAA NACO
Instrument
Procedures. ***
Geo-Referenced FAA
NACO Instrument
Procedures (required
for moving map).
n/a
n/a
n/a
Included in Optional
ChartKey Data Subscription
Bit mapped TAC
Charts.
n/a
Bit mapped WAC
Charts.
n/a
Bit mapped Sectional
Charts.
Included in Optional
ChartKey Data Subscription
Bit mapped Low
Enroute Charts.
Included in Optional
ChartKey Data Subscription
Bit mapped High
Enroute Charts.
n/a
n/a
11
FlightPrep
Description
Golden Eagle
FlightPrep
User Manual
Golden Eagle Plus
GE
ChartKey
EFB Device
K
G+
ChartCase Pro
v. 5
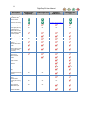
Flight Planning
Bit mapped High
Enroute Charts.
n/a
Flight Guide Airport
Data and Fuel Pricing.
Included in Optional
ChartKey Data Subscription
Flight Planning Wizard
100% Web based
online flight planning
at flightprep.com.
n/a
n/a
n/a
n/a
Off-line planning with
online weather, TFRs
and data updates.
Fuel Stop Planning
n/a
Multiple Altitudes per
trip
n/a
Graphic weight and
balance.
Aircraft performance
profile
Automatic flight
planning (Direct, GPS,
Low & High Airway
and VOR),
Point & click rubber
band routing.
Plain Language
Router
n/a
EFB Optimized InFlight Interface
n/a
n/a
In-Cockpit XM/WX
Weather
n/a
n/a
In-flight Traffic overlay
n/a
n/a
HITS (Highway in the
Sky)
n/a
n/a
TAWS (Terrain
Awareness & Warning
system)
n/a
n/a
Virtual Instrument
Panel
n/a
n/a
LandSat PhotoImagery with moving
map
n/a
n/a
Moving Map - external
GPS, Garmin &
NMEA 0183 Input
n/a
n/a
Pilot / Operator
defined Checklists
n/a
n/a
#
n/a
#
Pro
12
FlightPrep
Description
Golden Eagle
FlightPrep
User Manual
GE
G+
K
Golden Eagle Plus
ChartKey
EFB Device
ChartCase Pro
v. 5
Weather Planning Capability
NEXRAD Weather
Overlay, DUATS text
briefings and graphics.
Plan view premium
weather - Color
METARs, Pilot defined
flight conditions.
Profile view premium
weather - Cloud
bases, Winds barbs,
Airspace,
Reports & Printing Capability
Online/offline Flight
log and flight plan
form.
Online/offline IFR/VFR
TripKit: Raster Chart,
Instrument procedures
in PDF format.
Online/offline VFR
TripKit Vector charts
and weather charts in
PDF format.
Delivery
Medium
Internet Download
Internet Download
Internet Download
Internet Download
Optional
Delivery
Medium
CD ROM
DVD
ChartKey Exchange
Service
DVD
Product
Support
By CSC DUATS
By FlightPrep Standard
By FlightPrep
Premium
By FlightPrep
Premium
* Basic Data Includes: Airports, Airways, Intersections, NDBs, VORs, Graphic & Text TFRs.
** Supplemental Data Includes: Extended airport data (airport diagrams, businesses, elevations,
frequencies, runway elevation, runway information), Terminal, Special Use Airspace updates,
Geopolitical, Navaid frequencies & elevations, SID & STAR waypoints.
*** Includes Departure and Arrival procedures (U.S. Coverage).
# Requires purchase of Zaon™ traffic receiver.
Pro
13
FlightPrep
User Manual
GE
K
G+
Pro
Computer Hardware Minimum Requirements:
Windows XP Tablet/Pro/Home/Media Service Pack 2, Windows Vista Compliant, and
Windows 7. More Information on running ChartCase in Vista
900 MHz Processor
1 GB RAM
12 GB disk space (software requires from 300Mb up to 15GB depending upon how
much data is installed).
Installation for all FlightPrep
Software Products
GE
G+
K
Pro
This guide is effective for all FlightPrep software products. This document may be
superseded by information that may have arrived in paper format with your Disk Updates or
from a new software download.
Reminder: ChartKey EFB Device is not installed on any computer. It runs directly from the
“key”. No installation needed – simply plug it in!
Disk Based Installation:
A. YOU MUST INSTALL ALL DISKS in your package!
Please install the disk in the following order to ensure proper setup:
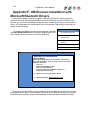
1.) Application & Navigation DVD. Disk 2 is Enroutes and Supplemental
a. If a warning about active content pops up, click Yes or Allow.
b. A window will pop up in your internet browser that will ask you to select the program
that you would like to install (choose either Golden Eagle or ChartCase)
c. Once you click the program name a box will pop up asking if you would like to save
or run this File. Please click Run
d. If a Security Warning pops up, please choose Run and continue.
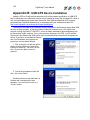
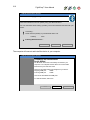
e. Install Shield will then start up and after a few moments will say “Welcome to the
Install Shield Wizard for FlightPrep (Product) please choose Next and continue.
f. Select “Complete installation”
g. Once the program completes Setup, it will offer you two options
i. To view the Read Me file (Please review it for last minute tips)
ii. To Launch the Program
h. Install disk 2
i. Please launch the program and if successful proceed to step 3.), if not, proceed with
step 2.)
2.) If the program fails to launch please do the following:
a. Close the web browser that has opened with the software choices
b. Open My Computer (or Vista equivalent) through the start menu or the desktop and
then “right click” the disk drive that contains the FlightPrep Application & Navigation
DVD and select Open.
14
FlightPrep™ User Manual
GE
G+
K
Pro
c. Once you are viewing the contents of the disk, select (Double Click) the appropriate
product folder (All ChartCase Software Types select ChartCase, All Golden Eagle
Software types select Golden Eagle)
d. Once you are inside the Software folder, double click on the Golden Eagle or
ChartCase Program Setup Launcher Application and follow the Installation shield
instructions.
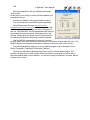
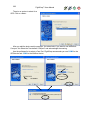
3.) Once the Program is open, the first screen you see asks you to input your email address
and password. Please ensure that your PC/Tablet is on the Internet for the system to verify the
information
a. If you do not know the password, please insert your email address and click
Forgot Password
b. If you have no idea which email or password FlightPrep may have on file for you
please call our office or select Skip Account setup and you will have to manually
enter the product keys that are on your disk sleeves or with your invoice
c. If you skip the account setup, the program will initially start as Golden Eagle,
(even if you installed ChartCase.)
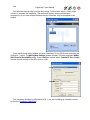
d. When the program starts, please select Route Planner from the pop up window.
e. Next, select The Updater tab that is found in between the Reports and Internet
Tabs
f. Once you have selected the Updater Tab, please select the Product Keys button
on the bottom left. If you skipped entering and verifying your account
information, insert your product keys manually.
** ENSURE THAT YOU USE THE HYPHENS IN THE PRODUCT KEY**
g. The installed product list should now match the program you own. You may close
the Product Keys window
h. Close the program. Start the software by using the icon on the desktop or by
opening the start menu, All Programs, FlightPrep, and the Program version
i. Your program will now open completely.
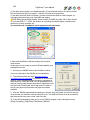
j. When the software opens, please go back to the Updater tab after selecting
Route planner.
k. Selecting Internet Update will initiate the program auto download all of your
selected data sets (Full US Data Set downloads may take a significant amount of
time depending on your internet connection speed).When the download is
complete, your selected data set will be current and available upon your next
restart of the software.
15
FlightPrep™ User Manual
GE
G+
K
Pro
In the event that the installation fails to start when you insert the Application & Navigation
DVD, you may force the installation to begin by browsing to your computers DVD drive into the
Golden Eagle or ChartCase folder and double clicking on Setup.exe to start the installation.
If you are an existing customer moving forward to the new product line we have sent you
two initial installation disks. These disks will be updated according to your subscription
service.
If you subscribed to a Download Only service, these disks will not be updated.
If you subscribed to a Disk Media service (or you have remaining updates in a preexisting plan) the Enroutes and Supplemental DVD is updated on a 56 day data cycle
and, Application & Navigation DVD is updated on a 28 day cycle.
NOTE: All users should retain their new "Supplemental Data DVD"; replacement disks
are available for a $9.95 replacement fee.
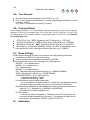
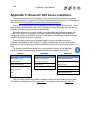
B. During software installation, an Account Setup screen is presented. Your system will
not operate correctly without completing Account Setup. Your account information permits
the system to download your software permissions and data subscriptions.
Enter your email address and account password at this time. (If you do not recall your
password, enter your email address and click the [Forgot Password] button. The system will
email your password to you.) After the system installation is completed, the system sends you
an Activation Email. Be sure to reply to this email to confirm proper system operation.
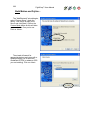
In the event you choose not to complete Account Setup (or, if you are not connected to the
Internet during installation) enter all your 25 digit Product Keys to enable chart, data, Instrument
Plate access and other features in your software. Enter the Product Keys provided in this
shipment using the [Updater] tab with the [Product Keys] function at the bottom of the left side
frame. Please include the hyphens between each group of 5 characters.
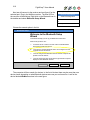
C. When the program warns about Expired Navigation data, click on [Update from Internet].
This will automatically connect you to flightprep.com and begins the process.
D. After verifying normal operation of the new version, you may uninstall the
previous version to save disk space. If you have limited hard drive space, you may need to
uninstall the prior version prior to installing the new ChartCase. If uninstalling the prior program
first, use the [Add/Remove Programs] selection in Windows Control Panel to uninstall
ChartCase Professional and then the ChartCase Supplemental program (leave the remaining
structure intact until the data import and migration tool in finished).
The new software is designed to pull forward the aircraft and pilot data that you completed
using [Edit], [Aircraft…] and [Edit], [Pilots…]. In the event your aircraft or pilot data import fails,
you will need to copy two data files (lclacft.dat & pilots.dat) from your prior installation to the new
program folders
• The old ChartCase location was C:\Program Files\FlightPrep\ChartCase\Local
• The old Golden Eagle location was C:\Program Files\FlightPrep\GoldenEagle\Local
• The new location depends on your operating system.
For XP users, Pilots data will be located in C:\Documents and Settings\All
Users\Application Data\FlightPrep\Local.
16
FlightPrep™ User Manual
GE
G+
K
Pro
Aircraft data will be located in C:\Documents and Settings\Administrator\My
Documents\FlightPrep\Aircraft.
For Vista and Windows 7 users, Pilots data will be located in C:\Program
Data\FlightPrep\Local.
Aircraft data will be located in C:\Users\ (Your user name)\Documents\FlightPrep\Aircraft.
If you cannot view your aircraft icon on the Moving Map screens AND the map is panning
automatically, you may need to reset the map icon found in the [Edit], [Preferences], [General],
[Moving Map] menu option or [Menu], [Menu], [Preferences], [General], [Moving Map] in the inflight mode and reset transparency to more than 0%. The <Reset> on each Preferences page
resets to the defaults for that page only. It is not a global reset button.
17
FlightPrep™ User Manual
GE
G+
K
Pro
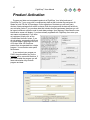
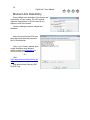
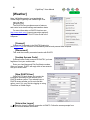
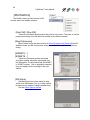
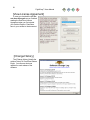
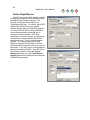
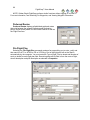
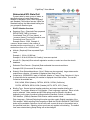
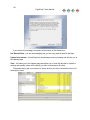
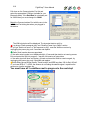
Product Activation
Program and data are two separate products at FlightPrep. Your initial purchase of
ChartCase Pro™ may come with a complimentary data set that includes the contiguous 48
States for both IFR and VFR packages. At the expiration of that data you will have many
choices of data packages from which to choose. Both the program and the data will have their
own activation codes. If you purchase data that includes several types/areas/ durations you will
be issued a different activation code for each data package. Upon startup of ChartCase the user
identification screen will display. If you have already registered with FlightPrep, then enter your
user name and password. If you have
not registered, simply click on the
<Create New Account> button. If you
do not register, your product will revert
to Golden Eagle FlightPrep at the end
of 30 days. Note: All ChartCase
products are incorporated into a single
program. Your activation code opens
the features.
If you received your program on
DVDs, the authorization key for the
program will be come with the discs. If
you downloaded the program you will
need authorization keys for both
program and data.
18
FlightPrep™ User Manual
GE
G+
K
Pro
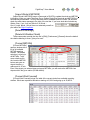
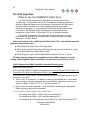
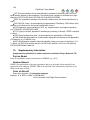
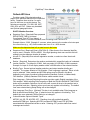
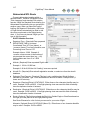
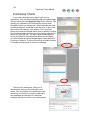
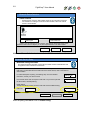
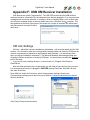
The easiest way to activate is to be connected to the internet when starting the program. If
you already have an account, click on the Updater tab at the top of the screen. In the lower-left
corner of the screen you will find control buttons. Click on the <Account Info> button.
This will bring up the account information box (see previous page). Enter your e-mail address
and password and click on the <Use Existing Account> button. This will bring up your
information that is on record at FlightPrep. Click on the <Close> button. You can verify that your
account is active and the product codes are installed by clicking on the <Product Keys> button.
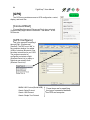
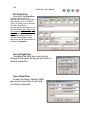
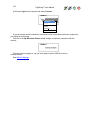
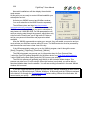
If entering the authorization keys manually, use the “Manually Add Keys” selection under the
Product Keys Tab (keys are included with the DVD discs). Note: If an error is made entering the
key code you will receive and error message. Re-enter your code and click the “Add Key”
button. Continue adding any additional products keys then click the “OK” button.
Enter the
key in the box
near the
bottom of the
window. Click
on the <Add
Key> button
and it will move up to the main
window. Continue adding keys as
needed.
NOTE: Activating the program
needs to be completed within 30 days
of loading the program. If you do not
wish to activate during any particular
session simply click on the close
button in the upper-right corner. This
will put you directly into the program.
At some point within the 30 days
activation must be completed for the
program to function – without
activation, the program will revert to
Golden Eagle FlightPrep at the end of
the 30 days.
If your EFB computer is not able to connect to the internet directly, simply connect to
flightprep.com using a secondary computer that has internet service. Download the
authorization keys and enter when convenient.
If you do not have internet access, you can obtain your activation key(s) by calling
FlightPrep at 503.678.4360.
The <Refresh Subs> button connects to FlightPrep and refreshes all Subscription
information.
Product keys can also be accessed through Preferences / Product Keys.
19
FlightPrep™ User Manual
GE
G+
K
Pro
Flight Planning
Program Features
This guide will take you through key features of FlightPrep software. This includes Golden
Eagle FlightPrep, Golden Eagle Plus, and ChartCase Pro. Look at the right side of the page to
see if that section is applicable to your software. If you see features that are not available in
your Golden Eagle Plus and would like to upgrade to ChartCase Professional, give our sales
staff a call at 503.678.4360 or email us at [email protected].
From this point on the manual assumes that the software is installed and running with a
connection to the Internet at the ready for its machine. To verify that you have an active internet
connection and see if there are any manual updates or errata are published, please visit us at:
http://www.flightprep.com/rootpage.php?page=techtips.
This manual is divided into two main parts - Flight Planning and In-Flight. The descriptions of
the Flight Planning feature will be divided into four parts – Route Planner, Menu items, Tab
items and Tool bar items.
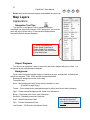
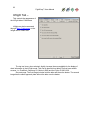
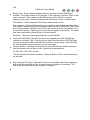
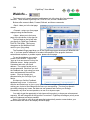
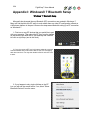
Opening Screen
When you first start ChartCase you will be greeted (after the copyright agreement) by the
Launch selection window. This allows you to go directly to a) the Route Wizard, b) the Route
Planner, c) the Plain Language Router, or d) the InFlight mode. If you would like the choice to
be your default selection, click on the “Make selection default startup page” before making your
selection. The Launch window will not be displayed after making a default selection.
ChartKey and ChartCase Pro
Golden Eagle FlightPrep and
Golden Eagle Plus
If you need to change the default setting go to [View], [Launch…] and this window will come
up allowing you to change the setting.
20
FlightPrep™ User Manual
GE
G+
K
Pro
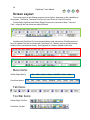
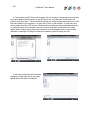
Screen Layout
The screen layout for the different programs varies slightly, depending on the capabilities of
the program. The Menus, Tabs and Tools give the user access to a host of functions.
Golden Eagle FlightPrep and Golden Eagle Plus have the same set of Menu, Tabs and
Tools – although the sub-menus are slightly different.
ChartKey and ChartCase Pro have the same Menus (and sub-menus). ChartKey does not
have the Updater Tab that is included with ChartCase Pro. ChartKey may be updated through
software that is included with the Key. See Appendix for ChartKey Updater information.
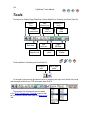
Menu Items:
Golden Eagle Menus:
ChartCase Menus:
File
Tab Items:
Tool Bar Items:
Golden Eagle Tool Bar:
ChartCase Tool Bar:
File
Edit
Edit
Chart
Chart
Route
Route
DUATS
Weather
GPS
View
Traffic
Help
View
Help
21
FlightPrep™ User Manual
GE
G+
K
Pro
When running ChartCase on a tablet PC, scroll arrow may appear to allow scrolling for
viewing off-screen Tab or Tool Bar items.
.
Explanation of Manual Conventions:
Menu and submenu name will be in brackets; i.e. [Edit].
Buttons will be enclosed in the less than, greater than symbols; i.e. <Next>.
Icon titles, tool names and choice options are in bold; i.e. Weather Charts.
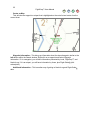
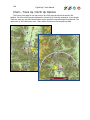
Route Planner
The Route Planner is for manually planning, altering and monitoring flight plans. Route
Wizard displays program help for assistance in planning a flight. If you have selected any other
screen, clicking on the Chart tab will return you to the Route Planner.
Golden Eagle Flight Prep
Golden Eagle Plus
ChartKey
ChartCase Pro
As both of the Golden Eagle products are not designed for in-flight use, they do not include the
GPS nor NRST (nearest) tabs within the planner.
22
FlightPrep™ User Manual
GE
G+
K
Pro
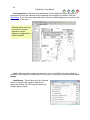
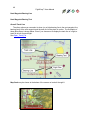
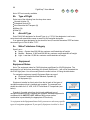
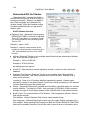
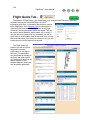
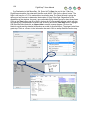
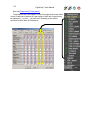
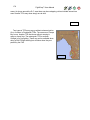
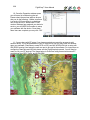
Airports
Entering Departure and Destination airports in the Route
Planner can be done by entering the airport identifier, the
airport name, or the city associated with the airport. If you
enter the airport name (or city) the program will provide a list
of possible matches for the name entered. For example, if
Aurora is entered (and press <Tab>), the list of possible
matches is shown at the right. Some of the matches may
seem obvious – Buckley AFB is located at Aurora, Colorado.
To verify a selected airport, click on the <Info> button. This
will open an information window with an airport diagram as
well as location, runway length and frequencies.
After the departure and destination airports have been
entered, you select the type of routing for the flight – Direct,
VOR to VOR, GPS/Loran, Low or High Airways.
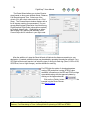
Flight Properties
After the <Plan It> button is
selected, the route will be listed in
the Route of Flight column. Next,
click on the <Properties> button.
This is where the pilot and plane
are selected. In addition, the
departure time, alternate
destination airport(s), altitude of
flight and fuel for the flight are
listed. When the <OK> button is
selected the flight profile may be viewed. If it does not appear below the plan view of the flight,
click on the Profile View Tool.
23
FlightPrep™ User Manual
GE
G+
K
Pro
Route Planner Tabs
Regardless of how the flight was planned (manually or using the Wizard), the appropriate
blanks in the Route Planning window (upper left) for the Departure and Destination airports will
be filled in. Below the <Plan It> and the <Properties> buttons are a series of up to five tabs in
two rows – Route, Map Layers, GPS, and NRST. Golden Eagle FlightPrep and Golden Eagle
Plus will only have Route and Map Layers tabs.
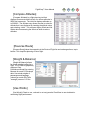
Route
The Route tab will display the route of flight including waypoints (if any). The insertion arrow will
start below the destination airport. Right-clicking on a waypoint will bring up a list of options. The
list of options will vary slightly, depending on what is clicked – waypoint or airport (departure or
destination airport, or an intermediate airport).
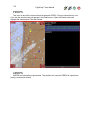
Waypoints
Dept. & Dest. Airports
Interm. Airports
Set Insert Before and Set Insert After provide a break ( ) in the route list so a new
waypoint may be inserted. Clicking on the blank provided in the route list will bring up a Search
window to retrieve a waypoint from the aviation waypoint
database. Keying in an identifier or location name will bring
up a list of possible matches. To help identify the correct
waypoint, <Info>, <Locate>, <Raster Chart>, and
<Approaches> (if appropriate) are available to provide
added information about the selection. Once the waypoint
has been chosen, it can be added to the route and the
route map will be updated automatically (duplicating the
effect of using the rubber band routing feature).
The <Info> button in the Search window will bring up
viewing options for the highlighted item (airport or
waypoint).
24
FlightPrep™ User Manual
GE
G+
K
Pro
The options for Info on the Search window include (from the top) Local, NavInfo.org, AFD,
FlightPrep™ and Flight Guide (with subscription). See also [Chart], [Search…].
25
FlightPrep™ User Manual
GE
G+
K
Pro
Center on Map
This will take the waypoint or airport that is highlighted on the route list and center it on the
current chart.
Waypoint Information – This brings up information about the airport/waypoint similar to the
Info button within the Search window. Right-click on a waypoint and select Waypoint
Information. If it is a waypoint, you will have information presented by Local, FlightPrep™, and
NavInfo.org. If it is an airport, you will have information by those, plus Flight Guide (with
subscription).
Additional Information – This is another way of getting to NavInfo.org and Flight Guide
data.
26
FlightPrep™ User Manual
GE
G+
K
Pro
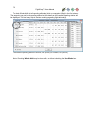
View Approaches – Selecting View Approaches from the Right-Click menu will open the
Approaches Tab and will sequence the first approach for that airport (if available). See also
Approaches. If you click on an airport that does not have a published approach, you will see “No
Approaches” in the menu.
Selected airport and list of
its minimums, arrivals,
departures, airport
diagrams and approaches
(where available).
Land - When an airport is used as a waypoint in your route of flight, this option allows for
selection of that airport as a landing airport. If you click on a waypoint this option becomes Land
Nearby.
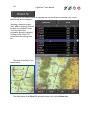
Land Nearby – This will bring up a list of airports
within the vicinity of the waypoint. Selecting an
airport and clicking <OK> will insert the airport into
the flight plan as a stop.
27
FlightPrep™ User Manual
GE
G+
K
Pro
Delete removes the selected waypoint and updates the route map.
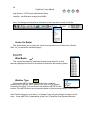
Map Layers
Appearance
Navigation Tool Tips
Turn this too on and place it over a navigation indicator
(controlled and special use airspace, VOR, intersection, etc.) and the
name will pop up at the tool tip. If the controlled airspace has a
floor/ceiling that will also be displayed
XM is not available on
Golden Eagle FlightPrep or
Golden Eagle Plus, therefore
these functions are not included
in their Map Layers.
Airport Diagrams
Turn this tool on and place it over an airport and the airport diagram will pop up. Note – not
all airports have a published airport diagram.
Background
Vector chart information includes airports, low and jet airways, intersections, controlled and
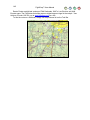
special use airspace, TFRs, VORs and well as state boundaries.
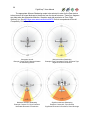
Selecting the background choice for the map.
The options are:
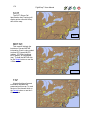
None – Black background with Vector charts information in color.
(Excellent for night flying).
Terrain – Color-coded terrain (metropolitan areas in yellow) with Vector chart information.
Light – Cream colored background with Vector chart information.
Brown – Dark brown with Vector chart information.
Sectional – Standard government Sectional
WAC – World Aeronautical Chart
TAC – Terminal Aeronautical Chart
Low Enroute – IFR Enroute Low Altitude Charts
Note: Map Layer setting
may also be accessed
using [Edit], [Preferences],
[General].
28
FlightPrep™ User Manual
GE
G+
K
Pro
High Enroute – IFR Enroute High Altitude Charts
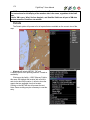
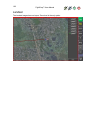
LandSat – LandSat photo imagery from NASA
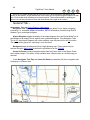
Note: The Background may also be controlled via the drop-down list on the Tool Bar.
Vector On Raster
This option allows you to overlay the Vector chart information on a Raster chart (Section,
WAC, etc.) as well as the LandSat imagery.
DUATS
Wind Barbs
This controls the display of wind barbs through a drop down list. If wind
barbs are displayed the choice is the altitude of winds from the recording station.
Weather Type
WX
Selecting the METAR option will present a color-coded box
indicating a VFR (green), MVFR (yellow), IFR (red), or LIFR (purple).
Positioning the Router Tool over the box will reveal the METAR for that
location. If the METAR box is tan the reporting station is either missing ceiling or visibility data.
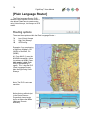
Note: Double-clicking on a sub-menu (i.e. Weather Type) will cycle through the options on the
menu. None METAR Temperatures Dew Point Temp/Dew Point Spread None etc.
29
FlightPrep™ User Manual
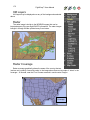
XM Weather Layers
The XM Weather Layers will display which features are turned
on or off. Show XM Data is a master switch. If this is turned off,
none of the graphics will be displayed, even if they are individually
On. See also [Edit], [Preferences], [General] and [Weather], [XM
WxWorx], [XM Status].
GE
G+
K
Pro
30
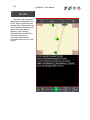
FlightPrep™ User Manual
GPS
The GPS tab will open a display that will show location, track and
speed of the aircraft, time and distance to the next waypoint and time
and distance to the destination. The [GPS] [Connect] feature enables
this data display.
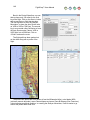
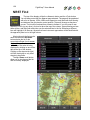
NRST
The NRST tab will give distance and heading to the nearest a)
airport, b) VOR, and c) NDB. These will be constantly updated
throughout the flight. The <Info> button opens a window and present
options for viewing Local, NavInfo.org, AFD, FlightPrep, or Flight Guide
information. In the case of the VORs and the NDBs, only Local and
NavInfo.org are presented.
The <Filter> button takes you to the Preferences window that allows
you to establish criterion for airports to be selected within the vicinity –
minimum length of runway; control towers; services; include (or
exclude) private airports.
See also [Edit], [Preferences], _[Nearest_Filter]
GE
G+
K
Pro
31
FlightPrep™ User Manual
GE
G+
K
Pro
Menus
File
Edit
Chart
Route
Weather
GPS
Traffic
View
Help
These menu items are only available on
ChartKey and ChartCase Pro.
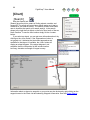
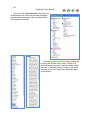
[File]
[New]
[New] allows the user to clear any existing flight plans and
prepare for a new plan.
[Open]
[Open] allows access to saved flight plans.
[Save]
[Save] records the current flight plan on the computer’s hard drive (or storage device).
[Save As…]
[Save As…] is the same as the [Save] command but allows the user to change the location
of the file, the name of the file, or both.
[Print]
[Print] will make a PDF file of the current vector map, weather briefing, or weather chart that
is being viewed. This command is not available for printing raster charts (i.e. Sectional, LowEnroute, etc.). To print raster charts see Reports.
[Exit]
[Exit] exits and closes the program.
Note: ChartKey EFB has two addition [File] submenu items; Backup and Restore. [Backup]
saves all data used within the Preferences submenu that includes pilot and aircraft data. These
can be recovered into ChartKey by selecting [Restore].
32
FlightPrep™ User Manual
GE
G+
K
Pro
[Edit]
[Delete]
[Select All]
The [Delete] and [Select All] functions are used when editing a
Route of Flight or a list of Waypoints.
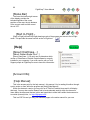
[User Waypoints]
Selecting [User Waypoints…] will allow you to list and
select the currently defined user waypoints. See Router Mode
tool. If you would like to manually enter a new waypoint, select
[Add]. Within the list of waypoints you can [Edit] or [Delete] –
after selecting - or [Delete All].
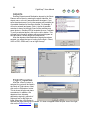
[Aircraft…]
Selecting [Edit] [Aircraft] presents a
list of generic aircraft. When a generic
aircraft is selected you are presented
with five tabbed pages on which to enter
aircraft information: General,
Performance, Moment Arms, CG
Envelope and Check List. You will find
some of the information on the General
and Performance pages already provide
for you. Check this information carefully
to ensure it is in agreement with your
Pilot’s Operating Handbook (POH).
Change any information that is not in
agreement with the POH. The Moment
Arms and CG Envelope allows you to
enter weight and balance information
from you POH. On the Check List tab
page you can enter aircraft checklists for
possible use during Pre- and In-Flight
Mode operation.
If a generic aircraft is not displayed that describes your aircraft or if you want to manually
enter your aircraft information , select <Add> from the menu on the right side of the page, enter
a filename for the aircraft, and enter the required data. If you are qualified on several aircraft
models, you can set up multiple aircraft profiles and then select the specific aircraft to be flown
during the flight planning phase. Applicable aircraft data entered here will be imported into the
Flight Plan Form automatically.
33
FlightPrep™ User Manual
GE
G+
K
Pro
Editing or Adding a New Aircraft –
The first window will be to
give the plane’s description a
filename. This is how the plane
will be sorted within the list of
planes. If you do not want to view
or scroll through the list of
planes, simply delete the planes
you do not want in the list. Even if
you start with an empty list you
can add your plane and have a
“list” of one plane.
After entering the filename
you will start with the plane’s
description. The only difference
from this point on between
editing and adding a new aircraft
is that if you select an aircraft to
edit some of the items will be filled out. They may not be correct for your aircraft so check the
figures carefully. They will be a reasonable starting point. Doing a complete job in defining your
plane is the best way to fully utilize many of the functions of ChartCase.
The general description of the plane is
done in the first window. This and the pilot
information will be in the flight plan form
34
FlightPrep™ User Manual
GE
G+
K
Pro
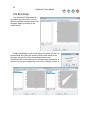
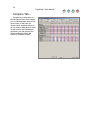
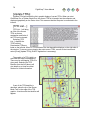
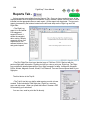
The data needed to complete the [Performance], [Moment Arms] and [CG Envelope]
sections will be found in the Pilot’s Operation Handbook (POH). Calculating a plane’s weight &
balance requires two sets of data to be entered. The example below is using data from a
Cessna 177RG. First, click on the [Moment Arm] tab, then [Add]. Enter the description of the
weight’s position in the aircraft, weight, and arm (distance from the plane’s datum, or reference
point). The POH will have descriptors for items such as empty weight (use your plane’s actual
weight from your plane’s current weight & balance calculations, not the sample weight.)
35
FlightPrep™ User Manual
Moment Arm Data Entry.
Empty Weight is the descriptor of the location we
are entering. It is not a value. The 1831 pounds
represent a weight that is 103.33 inches aft of a
reference point in the aircraft.
Continue adding the names, weights and
distances.
When all items from the POH have
been listed (and checked) proceed to
the CG Envelope tab.
Note: If your Owner’s Manual gives
weight & balance using Moment
(pound-inches), see Appendix A on
how to convert to Arm data.
- Or Goto:
http://www.duats.com/flyers/duats_flye
r.cgi
and download the February 2007
DUATS Flyer.
GE
G+
K
Pro
36
FlightPrep™ User Manual
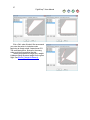
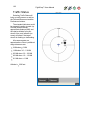
CG Envelope
You will build a CG Envelope for
your plane using your POH. You will
define the location of each corner of the
envelope. Begin by clicking on the
<Add> button.
Weight is displayed on the vertical axis of the graph; CG arm on
the horizontal axis. Enter the values to identify each corner of the
envelope. As you click <OK> after entering the amounts,
ChartCase will connect the points in the order they are entered. At
first you will only see a single point, then a line, a triangle, and so on.
GE
G+
K
Pro
37
FlightPrep™ User Manual
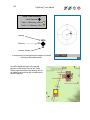
Click <OK> when finished. We recommend
you enter the points in clockwise order
beginning at empty weight, forward-most CG.
The same data points, entered in the wrong
order could yield something like this…
When you prepare for a flight, do a weight
& balance using the actual weight for the given
flight. See [Route], [Weight & Balance].
GE
G+
K
Pro
38
FlightPrep™ User Manual
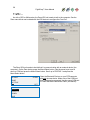
[Pilots…]
Begin by clicking the <Add>
button at the bottom. That will
bring up the Pilot Information
window. This is used to describe
the pilot for use in filling in the
flight plan and for logging on to
DUATS. The DUATS Access Code
MUST be completed to use their
weather and flight planning and
flight filing services. It is also
necessary to select the pilot from
the list under Properties while
building a flight plan. Also
accessed from Preferences /
Pilots.
GE
G+
K
Pro
39
FlightPrep™ User Manual
GE
G+
K
Pro
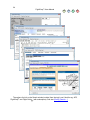
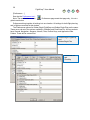
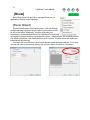
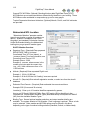
[Preferences…]
See also the Preferences tool Note: The reset button on each
global reset button
Preferences page resets that page only, it is not a
Preferences bring together all settings into one location. All settings for both flight planning
and in-flight are recorded in this window.
The Preferences options for Golden Eagle FlightPrep and Golden Eagle Plus are the same.
These are a sub-set of the options available in ChartKey and ChartCase Pro. All four products
have General, Navigation, Airspace, Aircraft, Pilots, Product Keys, and Application Data
Folders. These will be covered first.
Golden Eagle FlightPrep
and
Golden Eagle Plus
ChartCase Pro
and
ChartKey
40
FlightPrep™ User Manual
GE
G+
K
Pro
Note: As you select (single-click) an item in the list a brief description will appear at the
bottom of the window. As you double-click on the item you will cycle through the options for that
item. Each double-click will advance to the next option. The normal method to selecting an
option is to use the pull-down list from the down-arrow at the right of the column.
General Tab –
Appearance See also: Route Planner – Map Layers
Navigation Tool Tips toggles the ability for the Router Mode Tool to display navigation
information, i.e. controlled airspace information, METAR information (if shown using DUATS
Weather Type), and airport diagrams.
Airport Diagrams toggles the display of the airport diagram when the Router Mode Tool is
positioned over an airport. Not all airports have a published diagram. If the Navigation Tools
Tips is Off, then Airport Diagrams will not be available, even they were left in the On position.
The option will be grayed out, indicating it is not functional.
Background sets the background for the flight planning map. These options may be
selected using the Map Layers as well as the pull-down list on the Tool Bar.
Vector On Raster overlays navigational data from the Vector chart on the Raster Charts
and LandSat images. This option is only available when a Raster chart (or LandSat image) is
selected.
If both Navigation Tool Tips and Vector On Raster are selected (On) then navigation data
will pop up on a Raster chart.
41
FlightPrep™ User Manual
GE
G+
K
Pro
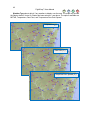
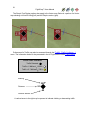
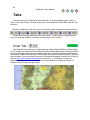
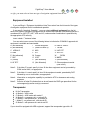
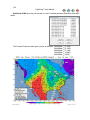
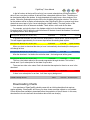
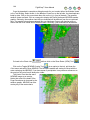
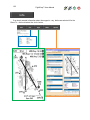
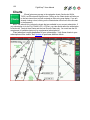
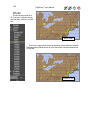
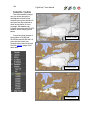
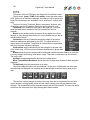
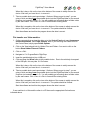
DUATS Weather Overlays
Wind Barbs selects the altitude for display of wind information from DUATS. It may also
turn off the images by selecting None. Below is an image of Wind Barbs and METAR displayed
on a Sectional using Vector On Raster, Wind Barbs, and Weather Type (METAR).
42
FlightPrep™ User Manual
GE
G+
K
Pro
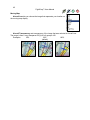
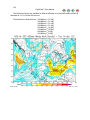
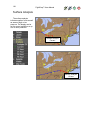
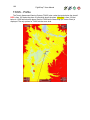
Weather Type selects which, if any weather to display over the map. The maps may include
the Raster charts if Vector On Raster has been selected – see above. The options available are
METAR, Temperature, Dew Point, and Temperature Dew Point Spread
Temperature ( F)
Dew Point ( F)
Temp/Dew Point Spread ( C)
43
FlightPrep™ User Manual
GE
G+
K
Pro
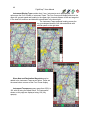
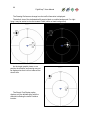
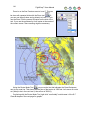
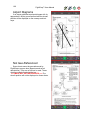
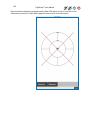
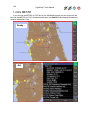
METAR Minimums
METARS will be color-coded: Green = VFR; Yellow = MVFR; Red = IFR; Purple = LIFR
(Low IFR conditions); Tan = Station is missing either ceiling and/or visibility.
The METAR Minimums allows the pilot to determine the levels for IFR (red), MVFR (yellow),
LIFR (purple), and VFR (green) when the METAR box is checked. When METARs, under
Weather Types are selected for display, the color-coded symbol will appear at reporting sights.
Positioning the Router Mode tool over a METAR symbol will display the information from that
reporting station.
The default values for the minimums are:
Low Instrument Flight Rules (LIFR)
1 mile visibility
500 foot ceiling
Instrument Flight Rules (IFR)
3 miles visibility
1000 foot ceiling
Marginal visual Flight Rules (MVFR)
5 miles visibility
3000 foot ceiling.
GE
G+
K
Pro
XM Weather Layers
These options are the same options available in the Route Planner area under the Map
Layers tab.
Show XM Data
Radar
METAR
TAF
Lightning
AIRMET
SIGMET
TFR
Winds
Surface Analysis
Cloud Tops
XM Configuration
X01 needs to be turned on if you are using XM Weather within ChartCase. When you turn
X01 on you will be greeted by a window that tells you that your XMLink program must be
stopped and restarted for it work.
X02 needs to be left off unless you are using the WxWorx on Wings software.
XMLink Data Folder’s default location is C:\Program Files\Common Files\XMLink\Data\. Do
not confuse this data location with destination for the navigation data and the files generated by
the application, i.e. aircraft and pilot data, flight plans and track files. See [Preferences],
[Application Data Folders].
44
FlightPrep™ User Manual
GE
G+
K
Pro
DUATS Setup
The DUATS setup consists of how you are going to connect to DUATS to receive
information from and to file flight plans with DUATS. The top three items are how direct
connection would be made over the internet. If you have a dial-up connection, a modem would
normally be detected and the phone number activated.
Change the Time Zone to match your location.
Toward the bottom you select how long to keep briefings and weather maps. It is possible to
override these to immediately delete by using [Weather]. [DUATS], [Delete All Briefings] and/or
[Delete All Weather Charts].
The Direct Connect connects and downloads each briefing or weather chart as it is selected.
For example: I you selected to view the Contiguous 48 Sat\NEXRAD weather images and
selected the Florida region. As soon as the <OK> button was clicked, the connected would be
made, followed by the downloading of the image and then disconnect from DUATS.
If you normally make several selections, i.e. Standard WX: Route and Contiguous
48/NEXRAD images for you route and some Additional 48 WX images, you would select Direct
Connect to be Off
45
FlightPrep™ User Manual
GE
G+
K
Pro
Moving Map
Aircraft Icon lets you choose the image that represents your location on
the moving map display.
Aircraft Transparency sets transparency of the image that was selected in Aircraft Icon.
The range is from a very transparent 25(%) to fully opaque 100.
Examples:
25%
66%
100%
(default)
46
FlightPrep™ User Manual
GE
G+
K
Pro
Instrument Display Type controls what, if any, instruments are to be displayed. The
options are the Four Corners or Instrument Tapes. The Four Corners will display altitude in the
upper left, ground speed and heading in the upper right, time and distance to the next waypoint
in the lower left, and time and distance to destination in the lower right.
The Instrument Tapes presents heading across the
top, groundspeed down the left side and altitude with
vertical speed on the right side.
Show Next and Destination Waypoints may be
added to the Instrument Tapes as an option. These are
the same bottom corners as the Four Corner display.
Instrument Transparency may range from 25(%) to
100, with 66 being the default value. The instruments
shown on this page are displayed using 100 (fully
opaque).
47
FlightPrep™ User Manual
GE
G+
K
Pro
Compass Arc may be displayed when in Track Up orientation. It will be centered on the aircraft
position (see below).
Aircraft Screen Position moves the aircraft icon from near the bottom of the screen (0) to the
center of the screen (100).
Aircraft positioned near bottom with
compass arc.
Option – Aircraft still near bottom
without compass arc.
48
FlightPrep™ User Manual
GE
G+
K
Pro
Map Orientation is either North Up or Track Up. When in Track Up on a Vector chart the chart
text is re-oriented so that it may be easily read. When using Track Up on Raster charts the text
will not change for ease of reading as these are scanned images.
49
FlightPrep™ User Manual
GE
G+
K
Pro
Next Waypoint Bearing Line
Next Waypoint Bearing Text
Aircraft Track Line
The other options you can select to show (or not) the bearing line to the next waypoint; the
bearing (text) to the next waypoint and the track line of the plane in motion. The illustration of
these three items is shown below. Even if you choose not to display the track line of a flight, a
track file is built for each flight.
See Open_Track_File
Map Scale may be shown at the bottom of the screen on levels 4 through 8.
50
FlightPrep™ User Manual
Navigation Tab –
This allows you to customize
the vector charts within ChartCase.
You can turn on (or off) features at
each level of zoom. If, after
changing these preferences, you
would like to come back to the
original setting, simply click on the
<Reset To Defaults> button.
On the Navigation tab the two
checkboxes at the top control the
pop-ups when using the Router
Mode tool.
<Show Navigation Data Tool
Tips> Checking this box (default
selected) will give a pop-up on the
Vector Chart providing information
concerning...
Airport name (rather than 3-4
character identifiers)
Airways
Controlled airspaces
VOR information
Special Use Airspace
Prohibited
Restricted
Alert
Warning
Military Operation Area
TFRs
The description – in this case of an MOA
– will pop up when the tip of the Router Mode
tool is over the border of the area.
Uncheck the box to turn this feature off.
See also Tool_Router_Mode
GE
G+
K
Pro
51
FlightPrep™ User Manual
GE
G+
K
Pro
The checkbox for <Show Airport
Diagrams> will provide a pop-up whenever
the Router Mode tool is over an airport. This
function is only active when <Show Navigation
Data Tool Tips> is also selected. Some lowuse airports are not included in the airport
diagram data base.
Turning off <Show Airport Diagrams> will
not affect Show Navigation Data Tool Tips.
But, turning off <Show Navigation Data Tool
Tips> will also turn off <Show Airport
Diagrams>.
The main body of the Navigation window of the Chart Preferences screen is devoted to the
appearance of the levels within the vector chart. Each level (1-8) is presented in its own column.
Within each column the red “X” indicates that that item will be displayed at that level of zoom.
The Airports portion of
Preferences lets you select when
airports are depicted on the vector
chart (default is all levels), whether
or not the airport label will be shown, whether or not only public use airports will be displayed,
and the minimum runway length airport that will be displayed at that level.
The Lat/Long Lines selects at
what levels you want the lat/long
lines displayed on the vector chart.
TFRs can be displayed at all
levels (default). The TFR label is
used to display information about a
TFR and can be displayed at each
level.
52
FlightPrep™ User Manual
GE
G+
K
Pro
VORs and their labels can be
displayed at all levels. The default
setting displays information at
levels 4 and above. Displayed VOR
information can be filtered using the
Altitude drop-down menu. The
available selections are All, High
Low, or Terminal.
NDBs and their labels can be
displayed at all levels. The default
setting is to display the icon starting
at level 4 and the labels only at
levels 7 and 8.
Intersections are usually
displayed only at the higher levels.
You may choose to display them at
any level. The type of intersection
to be displayed at any level is
selected from the pull-down list.
Obstructions are only
displayed at the top two levels
because of the amount of clutter
they would produce on the lower
levels. The labels for obstruction are
not selected in the default setting.
Airways are displayed at level 4
and above by default. The labels
are displayed starting at level 6.
Altitude refers to Low-Enroute
airways, High-Enroute airways, or
both displayed. The altitude dropdown menu allows for selection of
Low Enroute Airway, High Enroute
Airways or both to be displayed.
Note: If you choose not to display an item (TFR, VOR, NDB, etc.) label for that item will not
be displayed. The label may remain checked, but it will not appear without the lead item being
displayed.
53
FlightPrep™ User Manual
Airspace Tab –
Airspace is a continuation of
the Navigation Tab in that it allows
you to customize each level of the
vector chart. In this case you
choose which airspaces show (or
do not show) at each level of zoom.
As with most of the Preferences
selections, you can return to the
default setting by clicking the
<Reset to Defaults> button.
GE
G+
K
Pro
54
FlightPrep™ User Manual
Aircraft Tab –
This allows the pilot to describe
the plane, the plane’s performance,
loading data and check lists. If an
existing generic plane in the list
matches (or closely matches) the
actually plane being used, then
select it and possibly modify it to
match. If a generic plane does not
match or the plane is not on the list
simply select [Add] to go to a blank
form.
Go to [Edit], [Aircraft…] for the
description on how to complete this
process.
Pilots Tab –
This is the Preferences entry to
editing the Pilot description – also
shown under [Edit], [Pilots…]
GE
G+
K
Pro
55
FlightPrep™ User Manual
Product Keys –
You may manually enter
Product Keys in this window.
Product Keys may also be
downloaded from FlightPrep.com
through the Updater Tab.
See also Product Activation.
GE
G+
K
Pro
56
FlightPrep™ User Manual
GE
G+
K
Pro
Application Data Folders –
This allows the user to override
the default location of documents
(aircraft descriptions, flight plans,
flight tracks, weather briefings and
reports) and data (raster charts,
background data, LandSat images,
and vector chart data). If you have
different storage locations you wish
to use, you may identify them for
the software.
Note: The file locations in this
example are from Windows Vista
and Windows 7 data structure. For
Windows XP the document folder
would be in C:\Documents and
Setting\Administrator\My
documents\FlightPrep\. The data
files would be in C:\Documents and
Settings\All Users\Application
Data\FlightPrep\.
This concludes the narrative on the Preferences Tabs that are included in the four products
that include flight planning – Golden Eagle FlightPrep, Golden Eagle Plus, ChartKey EFB, and
ChartCase Pro. The remaining tabs are applicable to the in-flight mode only and are only
available in ChartKey EFB and ChartCase Pro.
57
FlightPrep™ User Manual
GE
G+
K
Pro
The following Preferences Tabs appear only in ChartKey EFB and ChartCase Pro:
GPS, Traffic, Nearest Filter, Emergency Filter, and Inflight.
GPS –
The GPS must “talk” to the computer whether it is cabled (USB) or wireless (Bluetooth). See
the setup instructions for your GPS. The program can also be configured to simulate a flight
(Simulate Route List) or replay a flight that was actually flown (Simulate Track List).
Reminder: Our suggest COM port settings is COM5 for the GPS, COM8 for the XM receiver and
the Zaon traffic receiver will makes its own selection from the available ports.
58
FlightPrep™ User Manual
GE
G+
K
Pro
Traffic –
As with a GPS or XM receiver, the Zaon XRX unit needs to talk to the computer. See the
Zaon manual that was included with the XRX device to configure the Com Port.
The Zaon XRX unit needs to be told that it is communicating with an external device (the
computer). On the Zaon device press the Menu/Select button. Use the arrow keys to scroll
down to COM and press the Menu/Select button. Scroll up to PROFILE 1 and press the
Menu/Select button
AIRCRAFT
RANGE
ALTITUDE
COM
PROFILE 1
PROFILE 2
GARMIN
NONE
SCREEN
EXIT
Open the Bluetooth Devices on your EFB computer
and add the new device. Make note of the COM port
that is assigned or requested. Use the same COM port
in ChartCase Edit/Preferences/Traffic (see above).
59
FlightPrep™ User Manual
GE
G+
K
Pro
The appropriate Airframe Shadowing needs to be selected in order for the Zaon device
to best account for signal blockage to the device from the aircraft structure. These four diagrams
may help make the appropriate selection. Graphics used with permission of Zaon Flight
Systems, Inc. See http://www.zaon.aero/content/view/50/79/ for their comprehensive Aircraft
Compatibility Guide from Zaon.
Composite Aircraft
Example: Cirrus SR-22, Diamond Katana
No Shadowing Effects
Minimal Airframe Shadowing
Example: Piper Tomahawk (PA-38, Grumman Tiger
Slight Decrease in Resolution
Moderate Airframe Shadowing
Example: Cessna 172, Piper Cherokee
Noticeable Decrease in Resolution
Significant Airframe Shadowing
Example: Cessna 421, Piper Seneca
Significant Decrease in Resolution, Some Blockage
60
FlightPrep™ User Manual
GE
G+
K
The Drawing Preferences change how the traffic information is displayed.
The default view of the dedicated traffic page is black on a white background. For night
flying it may be easier to view the Inverse Colors (white on black background).
As the target graphic closes on our
position the distance and bearing may not
be displayed so that it will not obscure the
aircraft icon
The Simple Text Display option
displays only the altitude along with the
diamond indicating the traffic’s relative
location.
Pro
61
FlightPrep™ User Manual
GE
G+
K
Pro
The Simple Text Display options also apply to the Vector map. Below is a portion of a Vector
map showing a full traffic listing (left) and the Simple version (right).
Preferences for Traffic may also be accessed through the [Traffic], [Traffic Configure…]
menu. The information below is also presented in the In-Flight section under Traffic Status.
Visual Traffic Indicators
Traffic Detected:
Traffic < 2 NM and
Traffic < 0.7 NM and
1000 ft:
700 ft:
Bearing
250
Distance
2.5
-05
Relative Altitude
A vertical arrow to the right may be present to indicate climbing or descending traffic.
62
FlightPrep™ User Manual
Nearest Filter–
This tab allows the pilot to
establish criterion for airports to be
selected within the vicinity –
minimum length of runway; control
towers; services; include (or
exclude) private airports.
See also Route Planner Tabs
Emergency Filter –
This has the same filtering
criteria as Nearest Filter (above).
These setting are used with the
Emergency Land tool.
See also Emergency Land Tool
or GPS Emergency Land
GE
G+
K
Pro
63
FlightPrep™ User Manual
GE
G+
K
Pro
Inflight Tab –
This controls the appearance of
the InFlight side of ChartCase.
Inflight can also be accessed
through Menu, Preferences on the
Inflight side of ChartCase.
The top two items, when selected, slightly increase the area available for the display of
chart information in the InFlight mode. This can be beneficial on tablet PCs that have smaller
screens; i.e. ChartBook, Samsung Q1, Motion LS800 and the Fujitsu P1620-1630.
See next page. The first image includes both the tabs and the active border. The second
image has the same approach plate without the tabs or active border.
64
FlightPrep™ User Manual
GE
G+
K
Note: To have the maximum viewing area you may also hide the tabs and the menu bar.
See also Hide Bar.
tabs
active border
Pro
65
FlightPrep™ User Manual
GE
G+
K
Pro
The GPS warning message comes on when the status of the GPS signal changes. The
messages are:
The bottom three (No GPS Connected, GPS Simulation Mode and Invalid GPS Fix) will remain
on the screen unless you elect to not show the GPS warning message. The first two messages
(Valid 3D GPS Fix and 2D Only) will display for a few moments and then clear themselves.
Note: If you do not have an XM or Traffic receiver with you should de-activate (uncheck) the
Connect XM/WX when entering Inflight and/or Auto connect traffic receiver when entering
Inflight options.
66
FlightPrep™ User Manual
GE
G+
K
5
[Chart]
[Search]
See also Search tool [Search] gives the pilot a means of finding airports, navaids, and
waypoints. The search will return items whose name are in-part or
contained in your search word(s). The search will also return items
near to locations that match your search word(s). In the search
shown to the right the first airport on the list is found north of Aurora,
North Carolina. To see the item location simply hit the <Locate>
button.
If you select an airport, you can get more information about it by
clicking on the <Info> button. If the <Approaches> button is
not grayed out, it indicates that instrument approaches are
available for that airport. If available, the <Info> button will
display an airport diagram. If the airport diagram in not
available, then the information list will include location
Lat/Long, elevation and length of longest runway.
Information about an airport or waypoint on your route can also be done by right-clicking on the
waypoint name in the Route List and selecting Waypoint Information. See also Route Planner.
67
FlightPrep™ User Manual
GE
G+
K
5
[Show Route]
[Show Route] returns the display scale to show the entire route of the flight being planned.
This is useful when route is off screen due to scrolling, panning or zooming in or out to look at
other areas of the map.
[Route List]
[Route List] pulls down an additional menu
for editing a route. If a route is not in the
planning stages, most of the sub-menu items
will be dimmed (unavailable). For a flight in the
planning stage, this menu will allow the editing
at any waypoint on the route. The same
functions can be accessed by right-clicking on
the waypoint in the Route of Flight list.
[Insert Before]
[Insert Before] position the cursor in a blank area before the selected waypoint. This
allows a new waypoint to be inserted at that point. The new waypoint can be selected by
clicking on the chart with the Router Mode tool, or using [Chart] [Search]. Clicking on the
new blank in the route list will also bring up the Search menu.
[Information]
[Information] will open the Waypoint Information dialog box for the selected waypoint.
68
FlightPrep™ User Manual
GE
G+
K
5
[NavInfo.org]
This opens a link to the internet site NavInfo.org and brings a host of information about an
airport (less information about a VOR and nothing about and intersection).
[Locate on Map]
In order to find a waypoint/airport that is on your current route list and located beyond your
current map scale, first select the fix and then select [Locate on Map]. Your display will center
on the selected item.
[Delete]
[Delete] will remove the selected waypoint from the route list. Ctrl+Delete will delete a
waypoint after selecting, without going through the menu.
[Insert After]
[Land After] provides the same function as [Insert Before] with the change in insertion point
in the list.
69
FlightPrep™ User Manual
GE
G+
K
5
[Show Nexrad]
[Show Nexrad] will overlay the NEXRad weather image over the vector map. NEXRAD
images must first be loaded into the computer via the DUATS tab. You will need to select the
NEXRad files from the list of available downloads. If the list is empty, go to the Weather Charts
tab to download.
See DUATS tab and Tool_Toggle_Nexrad
[Select Wind Altitude]
Before the Select Wind Altitude may function, the wind barbs must be
displayed via either the Route Planner, Map Layers (DUATS Weather
Overlays) or [Preferences], [General], (DUATS Weather Overlays). Once
any altitude, other than None is selected the Select Wind Altitude slide-bar
will make the change. It’s an easy way to compare the winds at different
altitudes along you route.
70
FlightPrep™ User Manual
GE
G+
K
5
[Update TFRs]
[Update TFRs] will refresh the list in graphic display of current TFRs. When you start
ChartCase Pro or Golden Eagle Plus, the current TFR list is brought into the computer and
displayed graphically on the vector chart. This assumes that the computer is connected to the
internet.
[TFR List…]
[TFR List…] will bring
up a list of the current
TFRs so that an
explanation and limits of
the TFR can be viewed.
Selecting [TFR
List…] displays the
TFRS window.
Downloaded TFRs are
listed on the left side. When a TFR is selected, the text description displays on the right side of
the window. To ensure you are viewing the most current TFRs: connect to the internet and
select [Chart] [Update TFRs] (DUATS registration is necessary).
The graphic of a TFR (right) is a
red circle with edge cross-hatching.
There may be overlapping TFRs in a
given area. Selecting the TFR
identifier from the list (above) will
give details or, at least a contact
number for further information.
If part of the TFR identifier is
obscured, place the tip of the Router
Mode Tool on the edge of the TFR
graphic. A text box with the identifier will
appear.
71
FlightPrep™ User Manual
GE
G+
K
5
[Route]
Note: Show Route List and Plain Language Router are not
applicable to Golden Eagle FlightPrep.
[Route Wizard]
[Route Wizard] makes route planning easy. It will step through
the flight planning sequence using the plane’s performance profile
as well as the winds. Additionally, using the climb data, fuel
consumption, wind speed and altitude, the ChartCase Route Wizard
will suggest fuel stops based on user selectable criteria – distance flown, fuel remaining or time.
The Wizard will present a list of airports that meet the criteria. The pilot selects the airport and
proceeds with the planning.
You begin the Route Wizard by entering the departure and destination airports. If you know
of a stop you want to make along the way you can enter that in and click on <Add Stop>.
72
FlightPrep™ User Manual
GE
G+
K
5
The Route Wizard allows you to plan Enroute
stops based on three user defined criteria: Distance,
Fuel Remaining and Time. Select one of the
criteria, fill in the criteria value and click on <Find
Stop>. The Choose Airport window displays with a
list of airports meeting your parameters. You can
access helpful airport information from NavInfo.org,
FlightPrep and Flight Guide (subscription required)
by clicking <Airport Info>. Highlighting an airport
and clicking <OK> places your selection in the
Current Stops list for inclusion in your flight route.
After the addition of a stop the Route Wizard will indicate the distance remaining to your
destination. If needed, additional stops may be added by repeating the selection process. For a
VFR flight all that would remain is to select the type of routing for each leg (Direct, VOR to VOR,
GPS Direct, Low or High Airways), and the altitude for each leg.
For IFR flights the option of choosing departure
routing (SID) and arrival routing (STAR) is also
available. Information on the SID and STAR routings
are available along with the approach plates by
clicking on the Approaches tab.
Click on the <Finish> button and the flight will be
inserted into the Route Planner.
See Route Planner.
The route Wizard within Golden Eagle Flight Prep does not do stop planning based on
Distance, Fuel Remaining or Time. It does provide for planning of SIDS and STARS.
73
FlightPrep™ User Manual
GE
G+
K
5
[Compare Altitudes]
[Compare Altitudes] is a flight planning tool that
displays time enroute and fuel burn for various altitudes in
2000 foot increments. The initial list displays altitudes up
to 22000 ft. The Altitude entry allows the user to select an
altitude that is not displayed by inserting the altitude value
and selecting <Add>. Two columns display Winds and No
Winds data for assessing the effects of wind at various
altitudes.
[Reverse Route]
[Reverse Route] takes the waypoints in the Route of Flight list and exchanges them, top to
bottom. This simplifies planning a return flight.
[Weight & Balance]
[Weight & Balance] allows
for actual weights loading for a
flight. The CG will be graphically
displayed. See
Preferences/Aircraft for entering
Moment Arm and CG Envelope
data. Use actual weights of
passengers and baggage
(unless you match the FAA’s
“average” person of 170 lbs.
[Use Winds]
[Use Winds] (Check to use, uncheck to not use) permits ChartCase to use wind data in
calculating flight performance.
74
FlightPrep™ User Manual
GE
G+
K
5
[Edit Route List…]
[Edit Route List…] displays the information similar to a flight log.
The column headings (in full) are: Winds (dir @ kts); Mag Var; Crossing (MSL); ETA
(hh:mm); Airway; MEA (MSL); GS (kts); Hdg (true); Dst (nm); Time (hh:mm); Fuel (gals)
Note: You may temporarily spread a column’s width by clicking
on the right border of the column title and adjusting it to the right
(or left). When the cursor is in the correct location it will turn into a
double arrow. Any changes made will be reset to default with the
next time [Show Route List] is opened.
Also, positioning the cursor over the column title will display the full title.
Click on the Use Winds box and Ground Speed (GS) calculations will take winds into account.
75
FlightPrep™ User Manual
GE
G+
K
5
To check Winds Aloft (at all reporting altitudes) click on a waypoint (Wpt) in the first column.
The waypoint may not be a reporting station but the data from the nearest reporting station will
be displayed. This tool may help in decision making regarding flight altitude(s).
The nearest reporting station to Aurora, OR (KUAO) is Portland, OR (KPDX).
Note: Checking Winds Aloft may be done with, or without checking the Use Winds box.
76
FlightPrep™ User Manual
[Plain Language Router]
The Plain Language Router (PLR)
allows the pilot to enter a known route. It
also allows ChartCase to create routes
using Victor Airways, Jet Airways or GPS
routes.
Routing options
There are three options within the Plain Language Router –
*V
*J
*G
Low (Victor) Airways
High (Jet) Airways
GPS routing
Examples: You are planning
a flight from Hillsboro, OR
(KHIO) to Red Bluff, CA
(KRBL)
#1 From KHIO, fly over the
NOONS intersection, follow
low airways to KRBL. Enter:
khio noons *v krbl. Each
entry is separated by a
space. The *v has the PLR
(Plain Language Router)
plan the flight using Victor
Airways.
Note: The PLR is not case
sensitive.
Notice that our altitude (set
in the Route Planner –
Properties) clears terrain
but is not above the MEAs
(Minimum Enroute
Altitudes).
GE
G+
K
5
77
FlightPrep™ User Manual
GE
G+
K
5
#2 The PLR can plan the flight using the MEAs for the route. After the *v, enter a dash (-)
followed by your desired altitude in feet…
KHIO NOONS *V-7000 KRBL
The -7000 tells the PLR to plan the flight so that all MEAs are at, or below 7,000’
The results:
The flight path DOES clear
all MEAs along the route
but the route is much longer
than the more direct route.
You can go back the PLR and make changes in the previous routing.
78
FlightPrep™ User Manual
#3 Editing the previous route to change the altitude to 9,000’…
KHIO NOONS *V-9000 KRBL
yields the following:
To fly the shortest route
using Victor Airways would
require an altitude of 11,000’
GE
G+
K
5
79
FlightPrep™ User Manual
KHIO NOONS *V-11000 KRBL
GE
G+
K
5
80
FlightPrep™ User Manual
GE
G+
K
This flight route, as well as any produced by the Route Planner or Route Wizard, is
automatically entered in the Flight Log (see Reports/Flight Log).
Using *J provides routing along Jet Airways.
Using *G routes a direct flight with GPS waypoints every 100-200 NM apart.
5
81
FlightPrep™ User Manual
GE
G+
K
[Weather]
Note: XM WxWorx portion is not applicable to
Golden Eagle FlightPrep and Golden Eagle Plus.
[DUATS]
The DUATS menu provides access to features
and control over stored briefings and weather charts.
For more information on DUATS functions see
http://www.duats.com/ (internet connection required).
Log in and go to the CSC DUATS User Guide in the
Help area.
[Connect]
If there are Commands in the DUATS Pending list
(see DUATS Tab), the Connect will immediately connect and process those requests.
[Disconnect]
This ends the currently connected session with DUATS.
[Lookup Access Code]
[Lookup Access Code] connects to DUATS if you have
forgotten or lost your access code.
Enter your Last Name and Pilot Certificate numbers.
After you connect, DUATS will reply within a few seconds
with your access code.
[New DUATS User]
[New DUATS User] allows you to enter the
information necessary to gain access to the
DUATS weather system. If you already have a
DUATS access number you do not need this
option, even if it is your first time logging on using
ChartCase or Golden Eagle.
[Interactive Logon]
[Interactive Logon] is a direct connection to DUATS. Follow the screen prompts from
DUATS to access weather information.
5
82
FlightPrep™ User Manual
GE
G+
K
5
[Import Winds & METARS]
[Import Winds & METARS] issues a command to DUATS to update the winds and METAR
information. When you start ChartCase Pro or Golden Eagle Plus the winds and METARS are
automatically downloaded. To verify that wind data is available select the Chart Tab and then
check the wind status message to the right of the tool bar. If you have wind data it should say
Winds: Okay. If not, it will say Winds: 0 or Winds: Hint: If it says Winds: 164 you have not selected yourself as
pilot within the Flight Properties.
[Delete All Briefings]
[Delete All Weather Charts]
These commands override the time set in [Edit], [Preferences], [General] where the default
time before deleting is three (3) days for each.
[Current METARs]
[Current METARs]
opens a window with a
list of all available
METAR reporting
stations. The default
selection is to bring in
all METARs. To be
more selective click
the Location METAR
button and enter an
airport identifier, a
radius and hit <Find>.
Even if the airport you selected does not report METARs, you will receive the METARs from
airports within the given radius (25 NM default).
[Current Wind Forecast]
[Current Wind Forecast] brings in a table of the current winds from available reporting
stations. Winds are reported at elevations starting at 3,000 ft and going up to 39,000 ft.
83
FlightPrep™ User Manual
GE
G+
K
5
[XM WxWorx]
The WxWorx menu provides access to XM
controls, status and weather displays.
[Start XM] / [Stop XM]
These two commands will alternate at the position in the menu. They start or halt the
program processing of the XM data files created by the XMLink software.
[Map Preferences]
[Map Preferences] is the same function as [Chart] [Preferences] [General].Both XM
Weather Layers and XM Configuration setting are available through these preference
setting.
[AIRMETS…]
[SIGMETS…]
These two commands provide text-based
short-term weather advisories downloaded from
the XM satellite. The left window lists the AIRMET
or SIGMET number. Click to highlight the desired
entry and display the text message in the right
window
[XM Status]
[XM Status] provides a time stamp for data
stream from XM weather. This is an easy method
to determine the validity of satellite weather data.
See also Route Planner XM tab.
84
FlightPrep™ User Manual
GE
G+
[GPS]
The GPS menu provides access to GPS configuration, control,
display, and track files.
[Connect/Start]
[Connect/Start] becomes [Disconnect/Stop] when selected.
[Connect/Start] begins either a simulation – see below – or the
GPS device.
[GPS Configure]
This is the same as accessing it
through [Edit\, [Preferences]
[General]. The GPS must “talk” to
the computer whether it is cabled
(USB) or wireless (Bluetooth). See
the setup instructions for your GPS.
The program can also be
configured to simulate a flight
(Simulate Route List) or replay a
flight that was actually flown
(Simulate Track List).
NMEA 0183 Protocol(Serial/USB)
Garmin Serial Protocol
Garmin USB Protocol
Garmin Simple Text Protocol
These items are for specifying
the type of connection between
the GPS and computer.
K
5
85
FlightPrep™ User Manual
GE
G+
K
5
[Open Track File]
[Close Track File]
[Open Track File] selects track files to be used for Simulated Track List. To replay a flight,
select the track from the list. The filename indicates the year, month, day and time of flight), i.e.
a filename of 20080305151435.trk would represent the flight started on March 5, 2008 at 3:14 in
the afternoon (local). Select <Simulate Track List> within the [GPS], [Configure] menu and
finally [Connect/Start] the GPS.
Not available when connected to a GPS device or during simulation.
[Moving]…
Aircraft
The map background remains stationery while the aircraft moves. The program will
reposition the chart before the icon of the plane “flies” off the edge.
Map
The aircraft remains in a fixed position – at the center of the screen in the case of North up
orientation or somewhere along the centerline of the screen between half-way down and the
bottom of the screen. The chart moves under the aircraft.
[Show Satellite View]
This feature allows you to see the
relative signal strength of the available GPS
satellites and a sky map of their locations.
The map displays all of the available
satellites and their status.
[Show Raw Data View]
This view shows the raw data
being received from the GPS
receiver. If the data is not
displayed, the GPS receiver is not
getting current data and the
position shown on the chart is not
valid-or- the selected GPS
Configuration setup is invalid. This can result from a bad data cable or a disconnected Bluetooth
device configuration
86
FlightPrep™ User Manual
GE
G+
[Traffic]
The Traffic Menu provides access to Traffic control and
configuration.
[Connect]
Connects/Disconnects the Zaon Traffic device to the ChartCase program
[Traffic Configure…]
Details for Traffic Configure are done on [Edit], [Preferences], [Traffic] (pg 58).
K
5
87
FlightPrep™ User Manual
GE
G+
K
5
[View]
[View] allows the user to display various flight data or change the
current display to the in-flight view.
[Latitude/Longitude]
Selecting this menu item will present a floating window that will give the
latitude/longitude of the cursor position on the map. The Latitude/Longitude
is also displayed at the bottom-right of the screen along with the trip distance
and current UTC if the Status Bar has been selected.
This will work with any of these tools:
See also Tools.
[Route Information]
[Route Information] will present a floating window that gives overall information about the
route without having to go to Reports for the flight log.
[DUATS Status]
See also Briefing and Weather Charts under tabs.
[DUATS Status] will present a floating window that shows the current status of the DUATS
download (text briefing, graphical weather charts, or both).
88
FlightPrep™ User Manual
GE
G+
K
[Check Lists]
Checklists are made in [Edit] [Aircraft…] or
[Edit], [Preferences], [Aircraft]. They are
available to be used before, during, and after
flight; i.e. preflight, run-up, takeoff, cruise,
emergency, and landing. Each checklist can be
accessed through the pull-down menu and each
item checked with a click of the mouse or pen.
Hitting the <Clear All> button readies the list for
the next flight.
[Launch]
See also Opening Screen.
This allows the same settings as presented at the startup of the program. It is needed if a
default selection has been made and needs to be changed.
ChartKey
ChartCase Pro
Golden Eagle FlightPrep
Golden Eagle Plus
5
89
FlightPrep™ User Manual
GE
G+
K
5
[Tab Bar]
This is a toggle for displaying (or not displaying the Tab Bar. When it is selected (checked) the
Tabs are shown (default). If you are short on screen space, you might turn them off.
See: Select Tabs
With Tab Bar
Without Tab Bar
[Select Tabs]
If you have selected to turn off the Tab Bar
(see above), this is how those tabs can be
selected.
90
FlightPrep™ User Manual
GE
G+
K
5
GE
G+
K
5
[Status Bar]
The line at the bottom-right corner
of the display provides the
latitude/longitude of the cursor
position on the map, the trip distance
of the current route and the current
time in UTC.
[Start In-Flight] –
[Start In-Flight] will leave the flight planning mode of the program and move to the InFlight
mode. This provides the same function as the In-Flight tool.
[Help]
[About ChartCase…]
[About Golden Eagle Plus…]
[About ChartCase…] is a quick way to determine which
version of ChartCase or Golden Eagle software is currently
installed in your computer. If you ever need to call our Tech
Support people at FlightPrep be sure to have this information.
[Account Info]
[Help Manual]
This is the access point for the help manual – this manual. You’re reading this either through
a print version or from within the program and [Help] [Help Manual].
Within the electronic version you may click on a Table of Contents items and it will display
that topic. You may also use the Search tool to locate selected word(s) within the document.
Items within the document that are in blue are hyperlinks to either items within the document or
to outside (internet) links; i.e. http://flightprep.com/.
This is a PDF file and you may print selected pages or the entire manual for your use.
91
FlightPrep™ User Manual
[View License Agreement]
In case you checked the box Do
not show this again as you finished
reading the End-User License
Agreement when you first started
your Golden Eagle or ChartCase,
here is your access to the document.
[Change History]
The [Change History] details the
revision history of ChartCase/Golden
Eagle. You can see what was
updated in each release of the
software.
GE
G+
K
5
92
FlightPrep™ User Manual
GE
G+
K
Pro
Tabs
The main functions of FlightPrep’s Route Planner can be accessed through a series of
Tabs, on the Tabs Tool Bar, located on the main screen between the Main Menu and the Tool
Bar items.
Selecting a tabbed topic will take you to an information page dealing with the selected item.
We will begin our flight planning on the Chart screen. This should be the opening screen
when you open the software. Across the top of the map is the Tool Bar.
Chart Tab The Chart tab is the home for your flight planning. Golden Eagle FlightPrep, Golden Eagle
Plus, ChartKey and ChartCase Professional charts are created electronically, using the latest in
advanced and patent pending vector mapping techniques. FlightPrep charts are automatically
de-cluttered. Unlike a fixed Sectional or WAC chart, the closer the chart is zoomed in, the more
detail is shown. You can choose the amount of information presented on each level of zoom by
going to [Edit], [Preferences], [Navigation] and clicking on – or clicking off – data to be
presented on each level. You can always revert to the defaults by clicking the <Reset To
Defaults> button in the lower right corner.
93
FlightPrep™ User Manual
DUATS Tab The DUATS tab provides access to text- and graphic based
briefings. In the upper left corner of the window is the listing of your
weather briefings within the last three days sorted in reverse order;
the most recent briefing is at the top of the list. Briefings are
automatically deleted after three days (or time specified by the user
in the Preferences).
Weather briefings are brought in over the internet from DUATS.
You must have a DUATS account. Go to DUATS.com if you need to
establish an account. If you already have an account you can look
up your access code through Weather/DUATS/Lookup Access
Code.
The sequence to retrieve weather information:
Select a weather briefing from the list.
Enter the required information in the window.
Clicking <OK> puts the briefing in the Pending Command
area*.
Enter additional (if desired) briefings – or add Weather
Charts to the Pending Commands area. See also Weather
Charts.
Click on <Connect>.
The briefing(s) will be downloaded to the computer.
*Note – The default is for Direct Connect to be On. This means
that as you click on <OK> the connection is made and the
information (briefing or weather graphic) is downloaded. If you want
to select multiple briefing and/or weather graphics to be downloaded
in a single session then Direct Connect needs to be turned Off. See
[Edit], [Preferences], [General], DUATS Setup.
These are legal briefings in accordance with the FARs. You are
responsible for the information contained in them.
GE
G+
K
Pro
94
FlightPrep™ User Manual
Online Flight Planner
DUATS has an online flight planner available
to registered users and can be accessed using
the Online Flight Planner command. The
DUATS routing logic differs slightly from
FlightPrep routing logic. As a result, the DUATS
Online Flight Planner may return slightly
different routings than your FlightPrep program.
You may find the DUATS routing preferable in
some instances and we encourage you to
experiment with this feature. Note: After
selecting the <Connect> button, your previously
entered route is cleared pending the DUATS
downloaded route. This is a normal program
function. If you wish to save your routing
PRIOR to using the DUATS planner, use the
[File] [Save As] command to store your route for
later recall. If you want to use a routing different
than that returned by DUATS: From the Online
Flight Planner window, select the Type of
Routing pull-down menu then User Defined
Routing and enter the desired route in the User
Defined Routing window.
GE
G+
K
Pro
95
FlightPrep™ User Manual
GE
G+
K
Pro
Encode/Decode
The Encode/Decode feature under the DUATS tab
offers the following selections: Encode, Decode, or
Extended Decode.
Encode Using proper names for airport, navaids and
weather reporting facilities, DUATS returns the location
identifiers associated with these facilities.
In the Dialog Box with Encode selected, Enter a proper
name for the airport, navaids or weather reporting
facility. If a state is entered the name and the state ID
must be separated by a comma…
Example: Boston, MA.
The dialog box will accept a minimum of the first 3 characters of the name, up to a maximum
of 42 characters including the state ID.
Example: BOS will return all the identifiers associated with facilities whose proper names
start with BOS.
NOTE - The more definitive (e.g. Boston, MA) the shorter the list of identifiers. i.e. BOS may
produce several pages of information.
Decode: Using 3-5 character identifiers, DUATS returns the proper name of the airport,
navaid, Victor airways, Jet airways, or weather reporting facility associated with the identifier
In the Dialog Box with Decode selected, enter as many characters as possible (min 3 to max
of 5) for desired airport, navaid, Victor airways, Jet airways, or Wx locations. Up to 10 IDs
may be specified at a time. ID, must be separated by a SPACE (e.g., SEA DFO LAX SAN
PHX SSLC BOI DCA IAD BOS).
Example - J1 will provide all route elements that make up J1.
Extended Decode: Entering 3-5 character of an airport identifier, DUATS returns basic
information on the requested airport. This information includes Lat/long, elevation, magnetic
variation, Unicom Frequency, Common Traffic Advisory Frequency (CTAF), and types of
weather reported, including NOTAM reporting. (The location identifier for weather and
NOTAMs is provided if different from the airport ID).
Information Applicable to Extended Decode
Aircraft ID: Required. Enter your aircraft registration number, or select from your aircraft
database.
Input: Required. Enter names or identifiers, depending on whether you are encoding or
decoding.
Enter 3 to 5 character IDs for desired airport, navaid or wx locations. Up to ten IDs may be
specified at a time. Separated with SPACES (e.g., SEA SFO LAX SAN PHX SLC BOI DCA IAD
BOS)
Enter 3 to 42 characters and optional 2 character state ID for desired airport, navaid, wx
location or city information. If a state ID is specified, it must be preceded by a comma.
For example: pittsburgh, pa
96
FlightPrep™ User Manual
GE
G+
K
Pro
NOTE: Golden Eagle FlightPrep performs similar functions without logging on to DUATS.
For more information, see Searching For Waypoints, and Viewing Waypoint Information.
Preferred Routes
Preferred Routes displays all published preferred routes
that exist between the entered Departure and Destination
points. Route will be placed in to the Route Planner as well as
the Flight Plan form.
File Flight Plan
Selecting the File Flight Plan command creates a form permitting you to enter, verify and
then send it to ATC or AFSS for IFR or VFR filing. Part of the flight plan will not be filled in
automatically by the computer. You must enter the Type of flight, Fuel on board and Number of
souls on board for each flight plan filed. Remaining data will be filled in from the route of flight,
aircraft description and pilot description as selected in Properties.
97
FlightPrep™ User Manual
GE
G+
K
Pro
File ICAO Flight Plan
When to use the DOMESTIC ICAO Form
The CSC DUATS Domestic ICAO flight plan form may be used for any
domestic flight. The Domestic ICAO form will accept and validate inputs that are
allowed for domestic flights but are not allowed in international ICAO flight plans.
A domestic flight is defined as one which departs and lands wholly within
domestic U.S. airspace (i.e., the conterminous 48 states, Alaska, Hawaii and/or
Puerto Rico). The Domestic ICAO flight plan must be used for automatic
assignment of RNAV SIDs, STARs and/or PTP in U.S. domestic airspace.
The DUATS non-domestic ICAO flight plan form must be used to file flight
plans where the destination is a foreign country or when overflying any foreign
airspace, i.e. Canada, Mexico.
Pilots can Continue to file a NAS Flight Plan/FAA Form 7233-1 (the standard domestic
flight plan form) in these cases:
Pilots filing Visual Flight Rules (VFR) flight plans.
Pilots filing Instrument Flight Rules (IFR) flight plans who are not qualified for, or who
do not want departure or arrival RNAV routes.
Pilots filing point to point (GPS/LORAN/RNAV direct) and “Q” and “T” routes.
IFR flight plans for pilots who are qualified and desire RNAV departure or arrival
routing, (including RNAV (SIDs) and (STARs) are required to use FAA Form 7233-4.
ICAO Equipment and RNAV Capability Information Requirements
RNAV Information required If you are RNAV1/RNAV 2 capable in accordance with Advisory Circular (AC) 90-100A, U.S.
Terminal and En Route Area Navigation (RNAV) Operations,
If you are RNAV 1 and/or RNAV 2 capable and want to file RNAV Departure and or Arrival
procedures, you must:
1. Enter in Item 10, Equipment – In addition to identifying all available and serviceable
communication, navigation, approach aid and surveillance equipment carried on your
aircraft, for RNAV 1 insert “R”, “G”, or “I” and the character “Z”.
2. Enter in Item 18, Other Information – Insert “NAV/RNV” followed by the appropriate
RNAV accuracy value(s) per the following:
If you are RNAV1/RNAV2 capable IAW AC900-100A
o
To be assigned an RNAV 1 STAR, insert the characters “A1”.
o
To be assigned an RNAV 1 SID, insert the characters “D1”.
o
To be assigned en route extensions and/or RNAV PTP, insert the characters “E2”.
Examples: NAV/RNVD1
NAV/RNVA1
98
FlightPrep™ User Manual
GE
G+
K
Pro
NAV/RNVE2
NAV/RNVD1A1
If you are RNAV PTP capable but not RNAV 1 and/or RNAV 2 capable, you must:
1. Enter in Item 10, Equipment – In addition to identifying all available and serviceable
communication, navigation, approach aid and surveillance equipment carried on your
aircraft, For basic RNAV “D” and/or “C” are appropriate plus insert the character “Z”.
2. Enter in Item 18, Other Information – Insert “RMK/PTP” and “NAV/RNVE99”
Example: RMK/PTP NAV/RNVE99
Domestic ICAO Flight Plan Help
The numbers below refer to the box number in the Domestic ICAO Flight Plan form.
7.
Aircraft Identification
The aircraft identification can consist of no more than 7 characters where the first character
is alphabetic followed by up to 6 alphanumeric characters. The ID can be registration markings,
call signs, or aircraft operating agency designators followed by the flight identification. (e.g.
N12345A, OOTEK, KLM111)
8a.
Flight Rules
Specify IFR or VFR only. DVFR is not an option.
99
FlightPrep™ User Manual
GE
G+
K
Pro
Note: VFR not currently available.
8b.
Type of Flight
Select one of the following from the drop-down menu
General Aviation (G)
Scheduled Service (S)
Non-Scheduled Air Transport (N)
Military (M)
Other (X)
9.
Aircraft Type
Enter FAA/ICAO designator for Aircraft Type, (e.g. C172) If the designator is not known
enter the aircraft manufacture name to search for the assigned designator.
If no approved type designator for the aircraft is found, insert the characters ZZZZ and enter
the aircraft type in Field 18 after "TYP/".
9c.
Wake Turbulence Category
Specify one Heavy – Greater than 300,000 lbs. maximum certificated take-off weight
Medium – Between 15,000 and 300,000 lbs. maximum certificated take-off weight
Light – Less than 15,000 lbs. maximum certificated take-off weight
10.
Equipment
Equipment Status
Note: The equipment codes for FAA flight plans are different for ICAO flight plans. The
equipment list you built when describing your aircraft (Edit/Aircraft…) will not be forwarded into
the ICAO flight plans. You will manually enter the codes into box 10 using the table below.
For navigation equipment, specify Equipment Status as one of:
Equipment installed as listed Standard, Operable (S)
No equipment (N)
Equipment installed as listed, select from the list each of the types of
navigation equipment that is installed and operable. The example here
shows the codes for ILS, VOR, VHF RTF and Mode C Transponder (see
below).
Standard, Operable select from the list each additional type of
navigation equipment that is installed and operable. Standard equipment is
considered to be VHF RTF, ADF, VOR and ILS, unless another
combination is prescribed by the appropriate ATS authority.
No equipment in the Equipment Status field, you must not select any specific
types of navigation equipment. If you specify Equipment installed as listed
100
FlightPrep™ User Manual
GE
G+
K
Pro
at right, you must select at least one type of navigation equipment from the list.
Equipment Installed
If you are filling in “Equipment installed as listed” then select from the list each of the types
of navigation equipment that is installed and operable.
If you specify “standard, Operable “, you may select additional equipment from the list
each of the types of navigation equipment that is installed and operable. Standard equipment is
considered to be VHF RTF, ADF, VOR and ILS, unless another combination is prescribed by
the appropriate ATS authority.
Insert a slash “/” between letters
You can select one or more of the following letters to indicate the COM/NAV/ approach aid
equipment is available and serviceable:
A (Not allocated)
I Inertial Navigation
R RNP10 –Note 5
B (Not allocated)
J (Data Link-Note 3)
T TACAN
C LORAN C
K MLS
U UHF RTF
D DME
L ILS
V VHF RTF
E (Not allocated)
M Omega
W
RVSM
F ADF
O VOR
X MNPS
G (GNSS)
P (Not Allocated)
Y (Not Allocated)
H HF RTF
Q (Not Allocated)
Z Other equipment carried
(See note 2)
Note 2: If the letter Z is used, specify in Item 18 the other equipment carried, preceded by
COM/ and/or NAV/, as appropriate.
Note 3: If the letter J is used, specify in Item 18 the equipment carried, preceded by DAT/
followed by one or more letters, as appropriate.
Note 4: Information on navigation capability is provided to ATC for clearance and routing
purposes.
Note 5: Inclusion of letter R indicates that an aircraft meets the RNP type prescribed for the
route segment(s) and/or route(s) concerned.
Transponder
N: No Transponder
A: Mode A - 4096 codes
C: Mode A - 4096 codes with mode C
X: Mode S - no pressure alt., no aircraft ID
P: Mode S - with pressure alt., no aircraft ID
I: Mode S - no pressure alt., with aircraft ID
S: Mode S - with pressure alt. and aircraft ID
If your aircraft is equipped with ADS equipment, append the transponder type with a D.
101
FlightPrep™ User Manual
13.
GE
G+
K
Pro
Departure Point and Destination
Departure and Destination airports are filled in by Golden Eagle/ChartCase. The departure
point, destination point, and alternate airport given for an ICAO flight plan must be four letter
ICAO international airport identifiers.
For airports in the continental United States, prefix the three-letter identifier with a 'K' - for
example, SFO must be entered as KSFO. Airports in Alaska and Hawaii should utilize the
appropriate international identifier - for example, ANC must be entered as PANC and PHKO
instead of KOA. ICAO airport identifiers for US airports may be recognized as follows:
Continental US - Kxxx (e.g., use KSFO for SFO)
Alaska - PAxx, POxx, PPxx (e.g., use PANC for ANC)
Hawaii - PHxx (e.g., use PHKO for KOA))
Puerto Rico - TJxx (e.g., use TJVQ for VQS, TJFA for X95)
US Virgin Islands - TIxx (use TIST for STT, TISX for STX)
For US airports with identifiers that contain one or more digits such as 1C9 or 5CA3, or an
airport in Alaska, Puerto Rico, or Hawaii that does not have a designated international identifier,
you must enter ZZZZ as your departure point. Then, in the Remarks section, Block 18 enter the
airport identifier of the airport you're actually departing by entering DEP/arpt – where “arpt” is
the actual departure
DEP/arpt - departure airport
EXAMPLE: DEP/1C9
Proposed Departure Time
Enter estimated time of departure (UTC)
Enter HHMM, where HH is hour and MM is minute (e.g., 2130) and select a time zone
option.
Enter MMMM, where MMMM is the number of minutes past the current time (e.g., 45)
and select "Minutes from now" option. Valid numbers are from 0 to 1439 minutes. Please
note the lower limit is 10 minutes. For example, if you enter 3, your departure time is
calculated to be 10 minutes.
NOTE: All flight plans filed, amended or canceled must be submitted sufficiently far in
advance of the proposed departure time to allow for processing. Flight plans will NOT be
accepted if it is too close to flight departure time (e.g., less than 30 minutes before
departure.
NOTE: If departure time is less than current time, DUATS will file the flight plan for
the following day (e.g., if the time is 9/19/90 2200 UTC, then plans submitted for 1800
UTC will be sent for 9/20/90)
NOTE: Flight plans filed between 60 and 30 minutes before departure are transmitted
immediately.
102
FlightPrep™ User Manual
GE
G+
K
Pro
15a. True Airspeed
Enter an airspeed in knots between 09 and 1000 (e.g., 115)
Enter a mach speed as a M followed by a number, representing hundredths of a mach,
between 1 and 500
(e.g., M75 is 75 hundredths of a mach (.75 mach))
15b. Cruising Altitude
Enter cruising altitude as a 2 or 3 digit number representing hundreds of feet, with a minimum
altitude of 1,000 feet. For example, enter 10 for 1,000 feet, 120 for 12,000 feet, 390 for FL390.
The following non-ICAO altitude formats are permissible entries for field 15b in the Domestic
ICAO flight plan only:
- OTP(VFR on Top) - "OTP/" followed by the OTP altitude (e.g., "OTP/120")
- VFR(Visual Flight Rules) - "VFR/" followed by the VFR altitude (e.g., "VFR/085)
- ABV(Above an Altitude) - "ABV/" followed by the ABV altitude (e.g., "ABV/330)
- Block Altitude - in the format "dddBddd" where the 1st "ddd" is lower altitude of the
block and the 2nd "ddd" is the higher altitude of the block (e.g.,"210B290")
15c. Route of Flight
Golden Eagle/ChartCase will insert your route from your flight planning information.
Leave blank or DIRECT for great circle routing.
Enter a sequence of route elements separated by SPACES.
Route elements can consist of the following in any valid sequence:
AIRPORT - 2 to 4 alphanumerics
NAVAID - 2 to 3 alphanumerics
FIX - 5 alphanumerics
AIRWAY - 2 to 4 alphanumerics
SID - (Standard Instrument Departure Route) (e.g., SUMMA2 SUMMA)
STAR - (Standard Arrival Route (e.g., IRONS IRONS2)
PUBLISHED RADIAL - (6 to 7 alphanumerics)
- 3 characters followed by 3 digits
- 4 characters followed by 3 digits
fix radial distance (eight to eleven characters)
- two to five character navigational aid I.D., followed by 3 digit degrees magnetic
and 3 digit distance in nautical miles with no spaces between characters
latitude/longitude (ddNdddW or ddmmNdddmmW). Insert zeroes when necessary to
make up 7 or 11 characters, e.g. 46N078W, 4620N07805W
North latitudes and West longitudes only
En Route Delays
- consists of an element separator (/), followed by the letter D, followed by the
hours and minutes separated by a plus sign (+). For example: a fifteen minute
enroute delay at Nottingham VORTAC is typed OTT/D0+15.
16.
Destination
103
FlightPrep™ User Manual
GE
G+
K
Pro
The departure point and destination point are filled in by Golden Eagle/ChartCase. The
Alternate Airports must use the four letter ICAO international airport identifiers. See instruction
13, above.
IFR Alternate Airport Requirements
Refer to 13. Departure Point and Destination for procedures on entering
Alternate(s) airports.
Alternate airports are not required for VFR or DVFR flight plans.
IFR Alternate Is Required If Destination ...
1 hour before to
ceiling below
1 hour after
2,000 feet
scheduled arrival
or
visibility below
3 statute miles
Alternate Minimums
Precision Approach Non-precision Approach No Approaches (VFR)
ceiling 600 feet
visibility 2 miles
or better
ceiling 800 feet
visibility 2 miles
or better
descent from MEA
and landing
under basic VFR
This is a summary of 14CFR 91.169 - see the regulation for full details.
Est. Time Enroute
Enter estimated time enroute as 'HHMM' (e.g., 0215). This will be entered by Golden
Eagle/ChartCase.
18.
Other Information Remark
Leave it blank if no other information,
OR, any other desired/necessary information in the preferred sequence grouped 1, 2, and
3. Use the form of the appropriate indicator followed by an oblique stroke and the
information to be recorded:
Note: Use only alpha, numeric & "/" when entering information
GROUP 1
NAV/ Significant data related to navigation equipment as required by the appropriate ATS
authority, e.g. NAV/INS, NAV/RNV
If you are RNAV 1 and/or RNAV 2 capable and want to file RNAV Departure and
or Arrival procedures, you must:
104
FlightPrep™ User Manual
GE
G+
K
Pro
1. Enter in Item 10, Equipment – In addition to identifying all available and
serviceable communication, navigation, approach aid and surveillance equipment
carried on your aircraft, insert the character “Z”.
2. Enter in Item 18, Other Information – Insert “NAV/RNV” followed by the
appropriate RNAV accuracy value(s) per the following:
3.
o To be assigned an RNAV 1 STAR, insert the characters “A1”.
o To be assigned an RNAV 1 SID, insert the characters “D1”.
o To be assigned en route extensions and/or RNAV PTP, insert the
characters “E2”.
Examples: NAV/RNVD1
NAV/RNVA1
NAV/RNVE2
NAV/RNVD1A1
If you are RNAV PTP capable but not RNAV 1 and/or RNAV 2 capable, you must:
1. Enter in Item 10, Equipment – In addition to identifying all available and serviceable
communication, navigation, approach aid and surveillance equipment carried on your
aircraft, insert the character “Z”.
2. Enter in Item 18, Other Information – Insert “RMK/PTP” and “NAV/RNVE99”
Example: RMK/PTP NAV/RNVE99
RMK/ Any other plain language remarks when required by the appropriate ATS authority
or deemed necessary.
GROUP 2
DEP/ Name of departure aerodrome, if ZZZZ is inserted in Item 13, or the ICAO four-letter
location indicator of the location of the ATS unit from which supplementary flight plan data can
be obtained, if AFIL is inserted in Item 13.
DEST/ Name of destination aerodrome, if ZZZZ is inserted in Item 16.
ALTN/ Name of destination alternate aerodrome(s), if ZZZZ is inserted in Item 16.
RALT/ Name of en route alternate aerodrome(s).
GROUP 3
EET/ Significant points or FIR boundary designators and accumulated estimated elapsed
times to such points or FIR boundaries, when so prescribed on the basis of regional air
navigation agreements, or by the appropriate ATS authority. Examples: EET/CAP 0745
XYZ0830
105
FlightPrep™ User Manual
GE
G+
K
Pro
RIF/ The route details to the revised destination aerodrome, followed by the ICAO fourletter location indicator of the aerodrome. The revised route is subject to re-clearance in flight.
Examples: RIF/DTA HEC KLAX RIF/ESP G94 CLA APPH RIF/LEMD
REG/ The registration markings of the aircraft, if different from the aircraft identification in
Item 7.
SEL/ SELCAL Code, if so prescribed by the appropriate ATS authority. OPR/ Name of the
operator, if not obvious from the aircraft identification in Item 7.
STS/ Reason for special handling by ATS, e.g. hospital aircraft, one engine inoperative,
e.g. STS/HOSP, STS/ONE ENG INOP.
TYP/ Type(s) of aircraft, preceded if necessary by number(s) of aircraft, if ZZZZ is inserted
in Item 9.
PER/ Aircraft performance data, if so prescribed by the appropriate ATS authority.
COM/ Significant data related to communication equipment as required by the appropriate
ATS authority, e.g. COM/UHF only.
DAT/ Significant data related to data link capability, using one or more of the letters, S, H,
V, and M, e.g. DAT/S for satellite data link, DAT/H for HF data link, DAT/V for VHF data link,
DAT/M for SSR Mode S data link.
19.
Supplementary Information
Supplementary information is neither required nor desired in filing a Domestic FPL.
Fuel on Board
Enter fuel endurance in hours and minutes as 'HHMM' (e.g., 0215)
Number Aboard
INSERT the total number of persons (passengers and crew) on board, when required by the
appropriate ATS authority. INSERT TBN (to be notified) if the total number of persons is not
known at the time of filing
Color of Aircraft
Enter color of aircraft - 12 characters maximum.
Example: 'R' or 'RED' or 'R/BK' or 'RED/BLACK'
- End of Domestic ICAO Flight Plan information.
106
FlightPrep™ User Manual
File Flight Plan
Selecting the File Flight Plan
command creates a form
permitting you to enter, verify and
then send it to ATC or AFSS for
IFR or VFR filing. Part of the flight
plan will not be filled in
automatically by thecomputer. You
must enter the Type of flight, Fuel
on board and Number of souls on
board for each plan filed.
Remaining data will be filled in
from the route of flight, aircraft
description and pilot description as
selected in Properties.
Cancel Flight Plan
Cancelling the flight plan may be done
through the program as long as you have an
internet connection.
Close Flight Plan
As with cancelling, closing a flight
plan may be done here if you have
an internet connection
GE
G+
K
Pro
107
FlightPrep™ User Manual
GE
G+
K
Pro
Standard WX: Route
Automatically provides all available weather
types within a defined corridor for a route of
flight and a defined radius around a selected
location. When you select this type of briefing,
the Departure, Destination, and Route of Flight
field will automatically be filled in with the route
you planned on the planning chart (see Chart
Tab Overview). If you have not planned a flight
you can type in the information.
Departure Time: (Required) Enter proposed
DEPARTURE TIME in Universal
Coordinated Time (UTC) as (hhmm), or
(+mmmm) format. For more information, see
Converting Local Time to UTC.
Example: hhmm - 2200. Example 2:
+mmmm, where mmmm is the number of minutes past the current time (e.g., +45). Valid
numbers are from +0 to +1439 minutes.
Altitude: (Required) Enter requested Flight Level.
Example 1: 120 for 12,000 feet.
Example 2: 80 for 8,000 feet. No "leading" zeros are required.
Aircraft ID: (Required) Enter aircraft registration number, or select one from the aircraft
database.
Estimated Time Enroute: (Required) This box is only available when Winds Aloft are
selected as a Weather Type. Enter estimated time enroute as hhmm. Example 0230 (2
hours and 30 minutes)
Departure: (Required) Enter LOCATION ID. Either three or four character identifier may be
used. Example: BOS or KBOS. If the flight planning chart was used this field will already
have the departure location id entered.
Destination: (Required) Enter LOCATION ID. Either three or four character identifier may be
used. Example: BOS or KBOS. If the flight planning chart was used this field will already
have the destination location id entered.
Route: (Optional) This field may already be filled in by Golden Eagle FlightPrep based on
the flight you have planned on the flight planning chart.
See Route Elements for a list of what you can use for your route of flight.
Alternate: (Optional) Enter LOCATION ID (Max of 5). Either three or four character identifier
may be used. Example: BOS or KBOS.
Weather Corridor Width: (Required) Determines the weather provided within a specified
corridor along the requested route of flight. The default is 50 NM. User may select 10-100
NM in 5 NM increments. Example: An input of 40 will display weather within 20 NM each
side of the route of flight.
108
FlightPrep™ User Manual
GE
G+
K
Pro
Briefing Type: Several optional weather selections and output weather briefing are
available. The system defaults to FAA Weather. Plain Language is optional. Either or both
may be selected. Other weather and NOTAM options may be offered in this block
depending on the type of weather briefing selected (Standard, Outlook, or Abbreviated)
FAA Weather: (Default) Standard FAA Aviation coded weather format.
Plain Language: (Optional) Selecting this option provides a plain English translation of the
FAA weather. When selecting Plain Language or Both the PLAIN LANGUAGE TIME ZONE
button will be available. Selection of a time zone will convert all times in the weather text to
the specified local time. Selecting a time zone here only applies to this briefing. The default
time zone selected during Setup Dialog will not be changed.
Advisories: There are several optional advisory notices available.
General FDC NOTAMs: (Optional) This box is only available when FDC NOTAMs are
selected as a Weather Type. Checking this box adds Flight Data Center (FDC) NOTAMs
that are not associated with an affected facility identifier to your briefing. These NOTAMs
are often worldwide in scope and may go on for many pages.
Adverse Weather: (Optional) Checking this box will provide adverse weather associated
with the requested route of flight or area. Weather types presented are:
FA, WW, WS, CWA, WST, and WA.
Tropical Depression/Hurricane Advisories: (Optional) Atlantic, Pacific, and Gulf advisories
are provided.
Plain Language Time Zone: (Optional) This box is only available when Plain Language or
Both is selected as a Briefing Type. A selection here only applies to this briefing. The
default time zone selected in Setup Dialog is not changed.
.
109
FlightPrep™ User Manual
GE
G+
K
Pro
Standard WX: Area
Automatically provides all available weather
types within a defined radius for a route of flight
and a defined radius around a selected location.
DUATS Weather Overview
Departure Time: (Required) Enter proposed
DEPARTURE TIME in Universal
Coordinated Time (UTC) as (hhmm), or
(+mmmm) format. For more information, see
Converting Local Time to UTC.
Example-1: hhmm - 2200. Example-2:
+mmmm, where mmmm is the number of minutes past the current time (e.g., +45). Valid
numbers are from +0 to +1439 minutes.
Aircraft ID: (Required) Enter aircraft registration number, or select one from the aircraft
database.
Departure Point: (Required) Enter LOCATION ID. Either three or four character identifier
may be used. Example: BOS or KBOS. If the flight planning chart was used this field will
already have the departure location id entered.
Radius: (Required) Determines the weather provided within a specified radius of a selected
location identifier. The default is 25 NM. User may select 10-100 NM in 5 NM increments.
Example: An input of 40 will display weather within a 40 NM radius of the selected location.
Briefing Type: The system defaults to FAA Weather. Plain Language is optional. Either or
both may be selected.
FAA Weather: (Default) Standard FAA Aviation coded weather format.
Plain Language: (Optional) Selecting this option provides a plain English translation of the
FAA weather. When selecting Plain Language or Both the PLAIN LANGUAGE TIME ZONE
button will be available. Selection of a time zone will convert all times in the weather text to
the specified local time. Selecting a time zone here only applies to this briefing. The default
time zone selected during Setup Dialog will not be changed.
Advisories: There are several optional advisory notices available.
General FDC NOTAMs: (Optional) Checking this box adds Flight Data Center (FDC)
NOTAMs that are not associated with an affected facility identifier to your briefing. These
NOTAMs are often worldwide in scope and may go on for many pages.
ATC Delay and Flow Control Advisories: (Optional) Measures designed to adjust the flow of
traffic into a given airspace, along a given route, or bound for a given aerodrome (airport) so
as to ensure the most effective utilization of the airspace.
Tropical Depression/Hurricane Advisories: (Optional) Atlantic, Pacific, and Gulf advisories
are provided.
Plain Language Time Zone: (Optional) This box is only available when Plain Language or
Both is selected as a Briefing Type. A selection here only applies to this briefing. The
default time zone selected in Setup Dialog is not changed.
110
FlightPrep™ User Manual
GE
G+
K
Pro
Outlook WX: Route
Provides certain FAA-selected weather
reports for a specified corridor along a selected
route. Departure time must be 6 or more hours
in the future to use this feature. The following
are provided: FA, WW, WS, WST, CWA, WA,
and TAF. Others may be added; see Optional
paragraph below.
When you select this type of briefing, the
Departure, Destination, and Route of Flight field
will automatically be filled in with the route you
planned on the flight planning chart. If you have
not planned a flight you can type in the
information.
DUATS Weather Overview
Departure Time: (Required) Enter proposed
DEPARTURE TIME in Universal
Coordinated Time (UTC) as (hhmm), or (+mmmm) format. For more information, see
Converting Local Time to UTC.
Example: hhmm - 2200. Example-2: +mmmm, where mmmm is the number of minutes past
the current time (e.g., +45). Valid numbers are from +0 to +1439 minutes.
Make sure the departure time is 6 or more hours in the future.
Altitude: (Required) Enter requested Flight Level.
Example 1: 120 for 12,000 feet.
Example 2: 80 for 8,000 feet. No "leading" zeros are required.
Aircraft ID: (Required) Enter aircraft registration number, or select one from the aircraft
database.
Estimated Time Enroute: (Required) Enter estimated time enroute as hhmm.
Example 0230 (2 hours and 30 minutes)
Departure: (Required) Enter LOCATION ID. Either three or four character identifier may be
used. Example: BOS or KBOS. If the flight planning chart was used this field will already
have the departure location id entered.
Destination: (Required) Enter LOCATION ID. Either three or four character identifier may be
used. Example: BOS or KBOS. If the flight planning chart was used this field will already
have the destination location id entered.
Route: (Optional) This field may already be filled in by Golden Eagle/ChartCase based on
the flight you have planned on the flight planning chart.
Weather Corridor Width: (Required) Determines the weather provided within a specified
corridor along the requested route of flight. The default is 50 NM. User may select 10-100
NM in 5 NM increments. Example: An input of 40 will display weather within 20 NM each
side of the route of flight.
111
FlightPrep™ User Manual
GE
G+
K
Pro
Alternate: (Optional) Enter LOCATION ID (Max of 5). Either three or four character identifier
may be used. Example: BOS or KBOS.
Briefing Type: Several optional weather selections and output weather briefing are
available. The system defaults to FAA Weather. Plain Language is optional. Either or both
may be selected. Other weather and NOTAM options may be offered in this block
depending on the type of weather briefing selected (Standard, Outlook, or Abbreviated)
FAA Weather: (Default) Standard FAA Aviation coded weather format.
Plain Language: (Optional) Selecting this option provides a plain English translation of the
FAA weather. When selecting Plain Language or Both the PLAIN LANGUAGE TIME ZONE
button will be available. Selection of a time zone will convert all times in the weather text to
the specified local time. Selecting a time zone here only applies to this briefing. The default
time zone selected during Setup Dialog will not be changed.
Plain Language Time Zone: (Optional) This box is only available when Plain Language or
Both is selected as a Briefing Type. A selection here only applies to this briefing. The
default time zone selected in Setup Dialog is not changed.
Outlook Weather Optional Weather Types:
METAR, UA, SD, FD, NO/FDC ATC. Checking a box will provide that specific
weather/NOTAM type. Selecting NO/FDC provides NOTAM Ds and FDC NOTAMs
associated with the specified corridor or area. Selecting ATC provides traffic flow control
messages and notices.
General FDC NOTAMs: (Optional) Checking this box adds Flight Data Center (FDC)
NOTAMs that are not associated with an affected facility identifier to your briefing. These
NOTAMs are often worldwide in scope and may go on for many pages.
Tropical Depression/Hurricane Advisories: (Optional) Atlantic, Pacific, and Gulf advisories
are provided.
112
FlightPrep™ User Manual
GE
G+
K
Pro
Outlook WX Area
Provides certain FAA-selected weather
reports for a specified radius around a specified
facility. Departure time must be 6 or more
hours in the future to use this feature. The
following are provided: FA, WW, WS, WST,
CWA, WA, and TAF. Others may be added;
see Optional paragraph below.
DUATS Weather Overview
Departure Time: (Required) Enter proposed
DEPARTURE TIME in Universal
Coordinated Time (UTC) as (hhmm), or
(+mmmm) format. For more information, see Converting Local Time to UTC.
Example: hhmm - 2200. Example-2: +mmmm, where mmmm is the number of minutes past
the current time (e.g., +45). Valid numbers are from +0 to +1439 minutes.
Make sure the departure time is 6 or more hours in the future.
Departure Point: (Required) Enter LOCATION ID. Either three or four character identifier
may be used. Example: BOS or KBOS. If the flight planning chart was used this field will
already have the departure location id entered.
Aircraft ID: (Required) Enter aircraft registration number, or select one from the aircraft
database.
Radius: (Required) Determines the weather provided within a specified radius of a selected
location identifier. The default is 25 NM. User may select 10-100 NM in 5 NM increments.
Example: An input of 40 will display weather within a 40 NM radius of the selected location.
Briefing Type: Several optional weather selections and output weather briefing are
available. The system defaults to FAA Weather. Plain Language is optional. Either or both
may be selected. Other weather and NOTAM options may be offered in this block
depending on the type of weather briefing selected (Standard, Outlook, or Abbreviated)
FAA Weather: (Default) Standard FAA Aviation coded weather format.
Plain Language: (Optional) Selecting this option provides a plain English translation of the
FAA weather. When selecting Plain Language or Both the PLAIN LANGUAGE TIME ZONE
button will be available. Selection of a time zone will convert all times in the weather text to
the specified local time. Selecting a time zone here only applies to this briefing. The default
time zone selected during Setup Dialog will not be changed.
Plain Language Time Zone: (Optional) This box is only available when Plain Language or
Both is selected as a Briefing Type. A selection here only applies to this briefing. The
default time zone selected in Setup Dialog is not changed.
Outlook Weather Optional Weather Types:
METAR, UA, SD, FD, NO/FDC ATC. Checking a box will provide that specific
weather/NOTAM type. Selecting NO/FDC provides NOTAM Ds and FDC NOTAMs
associated with the specified corridor or area. Selecting ATC provides traffic flow control
messages and notices.
113
FlightPrep™ User Manual
GE
G+
K
Pro
General FDC NOTAMs: (Optional) Checking this box adds Flight Data Center (FDC)
NOTAMs that are not associated with an affected facility identifier to your briefing. These
NOTAMs are often worldwide in scope and may go on for many pages.
Tropical Depression/Hurricane Advisories: (Optional) Atlantic, Pacific, and Gulf advisories
are provided.
Abbreviated WX: Location
"Abbreviated Weather" presents weather
types for any location or group of locations you
specify. Weather is available in both "Plain
Language" and standard FAA aviation formats.
Unlike the Standard briefing, the Abbreviated
briefing lets you get specific weather types.
DUATS Weather Overview
Departure Time: (Required) Enter proposed
DEPARTURE TIME in Universal
Coordinated Time (UTC) as (hhmm), or
(+mmmm) format. For more information, see
Converting Local Time to UTC.
Example: hhmm - 2200.
Example-2: +mmmm, where mmmm is the
number of minutes past the current time
(e.g., +45). Valid numbers are from +0 to
+1439 minutes.
Altitude: (Required) Enter requested Flight Level.
Example 1: 120 for 12,000 feet.
Example 2: 80 for 8,000 feet. No "leading" zeros are required.
Aircraft ID: (Required) Enter aircraft registration number, or select one from the aircraft
database.
Estimated Time Enroute: (Required) Enter estimated time enroute as hhmm.
Example 0230 (2 hours and 30 minutes)
Location(s): Enter up to 10 Location Identifiers separated by spaces.
How to get GPS and LORAN NOTAMs. Enter GPS and/or LRN as identifiers in the
Locations box. Choose Select Weather Types (described below) and request NOTAMs-D
(NO) from the Available Weather Types.
Briefing Type: Several optional weather selections and output weather briefing are
available. The system defaults to FAA Weather. Plain Language is optional. Either or both
may be selected. Other weather and NOTAM options may be offered in this block
depending on the type of weather briefing selected (Standard, Outlook, or Abbreviated)
114
FlightPrep™ User Manual
GE
G+
K
Pro
FAA Weather: (Default) Standard FAA Aviation coded weather format.
Plain Language: (Optional) Selecting this option provides a plain English translation of the
FAA weather. When selecting Plain Language or Both the PLAIN LANGUAGE TIME ZONE
button will be available. Selection of a time zone will convert all times in the weather text to
the specified local time. Selecting a time zone here only applies to this briefing. The default
time zone selected during Setup Dialog will not be changed.
Advisories: There are several optional advisory notices available.
General FDC NOTAMs: (Optional) Checking this box adds Flight Data Center (FDC)
NOTAMs that are not associated with an affected facility identifier to your briefing. These
NOTAMs are often worldwide in scope and may go on for many pages.
Adverse Weather: (Optional) Checking this box will provide adverse weather associated
with the requested route of flight or area. Weather types presented are:
FA, WW, WS, CWA, WST, and WA.
Tropical Depression/Hurricane Advisories: (Optional) Atlantic, Pacific, and Gulf advisories
are provided.
Select Weather: This is a scroll-list of all FAA Aviation Weather types. Click on the types to
select or unselect them (selected types have check marks). You can also use the arrow
keys to scroll to the desired item and select or unselect using the SPACEBAR. There are
options below the list to Select All or Clear All from the list. Types selected will be displayed
for the specific location selected if that location reports that type of weather. This option is
only available for the Abbreviated WX briefings
The weather types available are:
Surface Observations; Weather Trends; Terminal Forecasts; Winds aloft forecasts; Pilot
Reports; Radar Summaries; NOTAM summaries; FDC NOTAMS; NOTAMS-D; Area
Forecasts; SIGMETS; AIRMETS; Amended Severe WX Forecasts; Center Weather
Advisories; Convective SIGMETS; Flow Control Advisories; Hurricane/Tropical Depressions;
Severe WX Forecast Alerts; Severe Weather Outlooks
Not all weather types are available at all locations. If facilities in the list of locations
(discussed above) do not offer the weather types requested, you will not get those types of
weather reports.
115
FlightPrep™ User Manual
GE
G+
K
Pro
Abbreviated WX: State/Coll
Presents data for state, group of states, or
specified regions of certain large states.
Weather is available in both "Plain Language"
and Standard FAA Aviation formats. Unlike the
Standard briefing, the Abbreviated briefing lets
you get specific weather types.
DUATS Weather Overview
Departure Time: (Required) Enter proposed
DEPARTURE TIME in Universal
Coordinated Time (UTC) as (hhmm), or
(+mmmm) format. For more information, see
Converting Local Time to UTC.
Example: hhmm - 2200. Example 2:
+mmmm, where mmmm is the number of
minutes past the current time (e.g., +45). Valid
numbers are from +0 to +1439 minutes.
Altitude: (Required) Enter requested Flight
Level.
Example 1: 120 for 12,000 feet.
Example 2: 80 for 8,000 feet. No "leading" zeros are required.
Aircraft ID: (Required) Enter aircraft registration number, or select one from the aircraft
database.
Estimated Time Enroute: (Required) Enter estimated time enroute as hhmm.
Example 0230 (2 hours and 30 minutes).
State(s): Enter State abbreviations. (Up to 5 States can be requested) Large states can be
entered as a collective. All weather is displayed from West to East
Collective(s): (REQUIRED if state is California, Alaska, or Texas). Enter Collective id. (Up to
5 collectives can be requested) All weather is displayed from West to East. The current
Collective ids available are:
EAK, NOAK, SOAK (Alaska), CNTCAL, NOCAL, SOCAL (California),
CNTCN, MRTMCN, SECN, WCN (Canada), NOTX, SOTX, WTX (Texas).
Briefing Type: Several optional weather selections and output weather briefing are
available. The system defaults to FAA Weather. Plain Language is optional. Either or both
may be selected. Other weather and NOTAM options may be offered in this block
depending on the type of weather briefing selected (Standard, Outlook, or Abbreviated)
FAA Weather: (Default) Standard FAA Aviation coded weather format.
Plain Language: (Optional) Selecting this option provides a plain English translation of the
FAA weather. When selecting Plain Language or Both the PLAIN LANGUAGE TIME ZONE
button will be available. Selection of a time zone will convert all times in the weather text to
the specified local time. Selecting a time zone here only applies to this briefing. The default
time zone selected during Setup Dialog will not be changed.
116
FlightPrep™ User Manual
GE
G+
K
Pro
Advisories:
General FDC NOTAMs: (Optional) Checking this box adds Flight Data Center (FDC)
NOTAMs that are not associated with an affected facility identifier to your briefing. These
NOTAMs are often worldwide in scope and may go on for many pages.
Select Weather: This is a scroll-list of all FAA Aviation Weather types. Click on the types to
select or unselect them (selected types have check marks). You can also use the arrow
keys to scroll to the desired item and select or unselect using the SPACEBAR. There are
options below the list to Select All or Clear All from the list. Types selected will be displayed
for the specific location selected if that location reports that type of weather. This option is
only available for the Abbreviated WX briefings
The weather types available are:
Surface Observations; Weather Trends; Terminal Forecasts; Winds aloft forecasts; Pilot
Reports; Radar Summaries; NOTAM summaries; FDC NOTAMS; NOTAMS-D; Area
Forecasts; SIGMETS; AIRMETS; Amended Severe WX Forecasts; Center Weather
Advisories; Convective SIGMETS; Flow Control Advisories; Hurricane/Tropical Depressions;
Severe WX Forecast Alerts; Severe Weather Outlooks.
Not all weather types are available at all locations.
117
FlightPrep™ User Manual
GE
G+
K
Pro
Abbreviated WX: Route
Presents abbreviated weather within a
defined corridor. Weather is available in both
"Plain Language" and standard FAA aviation
formats. Unlike the Standard Route briefing, the
Abbreviated Route briefing lets you get specific
weather types. When you select this type of
briefing, the Departure, Destination, and Route
of Flight field will automatically be filled in with
the route you planned on the flight planning
chart. If you have not planned a flight you can
type in the information.
DUATS Weather Overview
Departure Time: (Required) Enter proposed
DEPARTURE TIME in Universal
Coordinated Time (UTC) as (hhmm), or
(+mmmm) format. For more information, see
Converting Local Time to UTC.
Example: hhmm - 2200. Example 2:
+mmmm, where mmmm is the number of
minutes past the current time (e.g., +45).
Valid numbers are from +0 to +1439
minutes.
Altitude: (Required) Enter requested Flight Level.
Example 1: 120 for 12,000 feet.
Example 2: 80 for 8,000 feet. No "leading" zeros are required.
Aircraft ID: (Required) Enter aircraft registration number, or select one from the aircraft
database.
Estimated Time Enroute: (Required) This box is only available when Winds Aloft are
selected as a Weather Type. Enter estimated time enroute as hhmm. Example 0230 (2
hours and 30 minutes)
Departure: (Required) Enter LOCATION ID. Either three or four character identifier may be
used. Example: BOS or KBOS. If the flight planning chart was used this field will already
have the departure location id entered.
Destination: (Required) Enter LOCATION ID. Either three or four character identifier may be
used. Example: BOS or KBOS. If the flight planning chart was used this field will already
have the destination location id entered.
Route: (Optional) This field may already be filled in by Golden Eagle or ChartCase based on
the flight you have planned on the flight planning chart.
See Route Elements for a list of what you can use for your route of flight.
Alternate: (Optional) Enter LOCATION ID (Max of 5). Either three or four character identifier
may be used. Example: BOS or KBOS.
118
FlightPrep™ User Manual
GE
G+
K
Pro
Weather Corridor Width: (Required) Determines the weather provided within a specified
corridor along the requested route of flight. The default is 50 NM. User may select 10-100
NM in 5 NM increments. Example: An input of 40 will display weather within 20 NM each
side of the route of flight.
Briefing Type: Several optional weather selections and output weather briefing are
available. The system defaults to FAA Weather. Plain Language is optional. Either or both
may be selected. Other weather and NOTAM options may be offered in this block
depending on the type of weather briefing selected (Standard, Outlook, or Abbreviated)
FAA Weather: (Default) Standard FAA Aviation coded weather format.
Plain Language: (Optional) Selecting this option provides a plain English translation of the
FAA weather. When selecting Plain Language or Both the PLAIN LANGUAGE TIME ZONE
button will be available. Selection of a time zone will convert all times in the weather text to
the specified local time. Selecting a time zone here only applies to this briefing. The default
time zone selected during Setup Dialog will not be changed.
Advisories: There are several optional advisory notices available.
General FDC NOTAMs: (Optional) This box is only available when FDC NOTAMs are
selected as a Weather Type. Checking this box adds Flight Data Center (FDC) NOTAMs
that are not associated with an affected facility identifier to your briefing. These NOTAMs
are often worldwide in scope and may go on for many pages.
Adverse Weather: (Optional) Checking this box will provide adverse weather associated
with the requested route of flight or area. Weather types presented are:
FA, WW, WS, CWA, WST, and WA.
Tropical Depression/Hurricane Advisories: (Optional) Atlantic, Pacific, and Gulf advisories
are provided.
Plain Language Time Zone: (Optional) This box is only available when Plain Language or
Both is selected as a Briefing Type. A selection here only applies to this briefing. The
default time zone selected in Setup Dialog is not changed.
Select Weather: This is a scroll-list of all FAA Aviation Weather types. Click on the types to
select or unselect them (selected types have check marks). You can also use the arrow
keys to scroll to the desired item and select or unselect using the SPACEBAR. There are
options below the list to Select All or Clear All from the list. Types selected will be displayed
for the specific location selected if that location reports that type of weather. This option is
only available for the Abbreviated WX briefings
The weather types available are:
Surface Observations; Weather Trends; Terminal Forecasts; Winds aloft forecasts; Pilot
Reports; Radar Summaries; NOTAM summaries; FDC NOTAMS; NOTAMS-D; Area
Forecasts; SIGMETS; AIRMETS; Amended Severe WX Forecasts; Center Weather
Advisories; Convective SIGMETS; Flow Control Advisories; Hurricane/Tropical Depressions;
Severe WX Forecast Alerts; Severe Weather Outlooks.
Not all weather types are available at all locations.
119
FlightPrep™ User Manual
GE
G+
K
Pro
Abbreviated WX: Def. Radius
"Abbreviated WX:" presents data within a
defined radius around any location or group of
locations you specify. Weather is available in
both "Plain Language" and. Standard FAA
Aviation formats. Unlike the Standard briefing,
the Abbreviated briefing lets you get specific
weather types.
DUATS Weather Overview
Departure Time: (Required) Enter proposed
DEPARTURE TIME in Universal Coordinated
Time (UTC) as (hhmm), or (+mmmm) format.
For more information, see Converting Local
Time to UTC.
Example 1: hhmm - 2200.
Example 2: +mmmm, where mmmm is the
number of minutes past the current time (e.g.,
+45). Valid numbers are from +0 to +1439
minutes.
Altitude: (Required) This box is only available when Winds Aloft are selected as a Weather
type. Enter requested Flight Level.
Example 1: 120 for 12,000 feet.
Example 2: 80 for 8,000 feet.
No leading zeros are required.
Aircraft ID: (Required) Enter aircraft registration number, or select one from the aircraft
database.
Estimated Time Enroute: (Required) This box is only available when Winds Aloft are
selected as a Weather Type. Enter estimated time enroute as hhmm. Example 0230 (2
hours and 30 minutes).
Location(s): Enter up to 10 Location Identifiers separated by spaces. Weather types
selected by clicking on the Select Weather Types button will be provided only if the selected
Location Identifier(s) report the weather type.
Radius: (Required) Determines the weather provided within a specified radius of a selected
location identifier. The default is 25 NM. User may select 10-500 NM in 5 NM increments.
Example: An input of 40 will display weather within a 40 NM radius of the selected location.
Briefing Type: The system defaults to FAA Weather. Plain Language is optional. Either or
both may be selected.
FAA Weather: (Default) Standard FAA Aviation coded weather format.
Plain Language: (Optional) Selecting this option provides a plain English translation of the
FAA weather. When selecting Plain Language or Both the PLAIN LANGUAGE TIME ZONE
button will be available. Selection of a time zone will convert all times in the weather text to
120
FlightPrep™ User Manual
GE
G+
K
Pro
the specified local time. Selecting a time zone here only applies to this briefing. The default
time zone selected during Setup Dialog will not be changed.
Plain Language Time Zone: (Optional) This box is only available when Plain Language or
Both is selected as a Briefing Type. A selection here only applies to this briefing. The
default time zone selected in Setup Dialog is not changed.
Advisories: There are several optional advisory notices available.
General FDC NOTAMs: (Optional) This box is only available when FDC NOTAMs are
selected as a Weather Type. Checking this box adds Flight Data Center (FDC) NOTAMs
that are not associated with an affected facility identifier to your briefing. These NOTAMs
are often worldwide in scope and may go on for many pages.
Adverse Weather: (Optional) Checking this box will provide adverse weather associated
with the requested route of flight or area. Weather types presented are:
FA, WW, WS, CWA, WST, and WA.
Tropical Depression/Hurricane Advisories: (Optional) Atlantic, Pacific, and Gulf advisories
are provided.
Select Weather: This is a scroll-list of all FAA Aviation Weather types. Click on the types to
select or unselect them (selected types have check marks). You can also use the arrow
keys to scroll to the desired item and select or unselect using the SPACEBAR. There are
options below the list to Select All or Clear All from the list. Types selected will be displayed
for the specific location selected if that location reports that type of weather. This option is
only available for the Abbreviated WX briefings
The weather types available are:
|Surface Observations; Weather Trends; Terminal Forecasts; Winds aloft forecasts; Pilot
Reports; Radar Summaries; NOTAM summaries; FDC NOTAMS; NOTAMS-D; Area
Forecasts; SIGMETS; AIRMETS; Amended Severe WX Forecasts; Center Weather
Advisories; Convective SIGMETS; Flow Control Advisories; Hurricane/Tropical Depressions;
Severe WX Forecast Alerts; Severe Weather Outlooks.
Not all weather types are available at all locations.
121
FlightPrep™ User Manual
GE
G+
K
Pro
Weather Charts
Weather charts are accessed within the DUATS tab. This
provides access to graphic based weather information. NEXRad,
satellite infrared, satellite visual and weather forecast images are
available. To retrieve the weather graphics, select the type of charts
you want to receive from the Commands list and click the <Add>
button. Note: double-clicking on the type of chart also works. The
Weather Graphics box will appear to let you choose which areas to
download. Some images (Satellite IR and Satellite Visual) are
national coverage. Remember the NEXRad code to the right for the
areas you select. These codes will be the identifiers after the
download.
TYPES OF W EATHER CHARTS
Selecting one will bring up its
own Weather Graphics window.
Click <OK> after selecting the area(s). Click on <Connect> and the download will start. The
more areas you select, the longer the download time. When complete, a dialog box will ask if
you want to view the weather charts or the text briefing. Select weather charts. Downloaded
weather charts and text briefings are stored on the computer for three days (default value). The
Weather charts are listed with the most recent at the top of the list. To view the most recent
charts, click the <+> button to the left of the top weather chart download time. The individual
charts will be indented below the chart’s date and time stamp. Click on an image to display it.
Contiguous 48 WX has surface analysis maps, 12 hour to 72 hour forecast maps and severe
weather outlooks.
Contiguous 48 Sat/NEXRAD has Infrared and visual satellite images as well as NEXRAD
radar images for individual regions. NEXRAD images may be displayed over any of the
navigation charts (vector or raster)
Alaskan and Hawaiian have surface analysis, forecasts, upper level depictions, freezing
levels, as well as satellite and radar images
Canadian has clouds, freezing levels and forecasts for the separate regions.
122
FlightPrep™ User Manual
GE
G+
K
Pro
Additional 48 WX gives the pilot access to a set of constant pressure charts and winds aloft
charts.
The Constant Pressure charts give a choice of altitudes: 200 Millibar (
300 Millibar (
500 Millibar (
700 Millibar (
850 Millibar (
FL 390)
FL 300)
FL 180)
10,000’)
5,000’)
123
FlightPrep™ User Manual
GE
G+
K
Pro
The Winds Aloft charts are available for different altitudes as of the latest reports as well as
forecasts for 12, 24, 36 and 48 hours out.
The altitudes for Winds Aloft are: 200 Millibar (
300 Millibar (
400 Millibar (
500 Millibar (
650 Millibar (
700 Millibar (
800 Millibar (
900 Millibar (
FL 390)
FL 300)
FL 240)
FL 180)
12,000’)
10,000’)
6,000’)
3,000’)
124
FlightPrep™ User Manual
GE
G+
K
Pro
Approaches Tab The Approach tab allows you to view Instrument Approach Procedure charts (IAP),
Departure Procedure charts (DP), Standard Terminal Arrival charts (STAR), and Airport
Diagrams. All of the charts have been geo-referenced by FlightPrep and will show your current
GPS position right on top of the chart if a GPS device is connected.
A list of all available charts is located on the left side of the screen.
This list is divided up by major geographical region, then by
City/Airport. The toolbar above the chart can be used to zoom in or
out, or rotate the chart.
* * Note: A small percentage of approaches do not have enough
reference data to be geo-referenced and therefore the GPS position
will not be shown. These approach charts will be clearly identified at
the top with “>>> IMAGE NOT GEO-REFERENCED <<<” in red.
When you click on the Approaches tab the main window will be
blank. The list of approaches is divided geographically. Clicking on
the + in front of a selection will expand to show the airports. Clicking
on the + in front of an airport will expand to show the take-off
minimums, approaches and possibly airport diagrams. When an
approach plate (or other information) is selected it will be displayed.
To directly select an airport, use the Search
(binoculars) tool to enter the name of the airport
or the city and let the software perform the
search for you!
125
FlightPrep™ User Manual
GE
G+
K
Pro
The following two tools are available only under the Approaches Tab.
Rotate Approach Plate Tool
Rotates the selected approach plate 90º counter-clockwise
Full Screen Tool
Selecting this tool uses the full screen for the approach plate. Airport list and menus are not
shown. Clicking on this tool again will return to a normal screen view.
The following two tools are displayed after the selection of the Full Screen Tool (above).
Maximum Width Tool
If you are in the Full Screen view of an approach plate, this will view the plate across the full
width of the screen.
Maximum Height Tool
If you are in the Full Screen view of an approach plate, this will view the complete plate (top
to bottom). This is best viewed in portrait mode – See Rotate tool above.
126
FlightPrep™ User Manual
GE
G+
K
Pro
Flight Guide Tab The addition of Flight Guide into ChartCase truly makes this an Electronic Flight Bag.
Instead of carrying the little brown book, all of the
information, and more, is included in the electronic version
within ChartCase. Go to flightprep.com for information on
ordering Flight Guide data. When you click on the Flight
Guide tab, you will first need to select the airport. This can
be done by airport identifier, airport name, city, or state. If
you give just a city (rather than city and state), you will be
given a list of all the airports from all the cities in the country
that have that name. If you give just a state (no city) you will
receive the list of all the airports in that state.
The Flight Guide will
present you with its normal,
complete information
presentation on the airport
selected. This information
may be printed by clicking on
the box in the upper right. If
you would like to print just the
airport diagram, or the
airspace diagram, these can
also be printed individually.
127
FlightPrep™ User Manual
GE
G+
K
Pro
If you click on the View Services at the bottom of
the Businesses On Field area, that area will expand
to show what each business (when available) offers
to the aviation community.
Selecting an airport may also be done through the
list along the left side of the screen. Clicking on a
state will expand that state to show the airports within
that state, in alphabetic order. Clicking on the airport
will bring up the main Flight Guide information page
for that airport.
128
FlightPrep™ User Manual
GE
G+
K
Pro
Reports Tab Various reports are available from the Reports Tab. Once you have created a route, all the
flight parameters such as waypoint information, course, distance, speed, fuel burn and so will be
inserted into the appropriate area on each report. All the reports can be printed. The two main
reports (accessed by the buttons located on the left hand side) are the Flight Log and FAA
Flight Plan:
• The Flight Log
report is in the familiar
FAA staggered
waypoint format. It
shows the waypoint
data, routing, altitude,
magnetic course, fuel
requirements, fuel
onboard, distance, time
and ground speed.
• The FAA Flight Plan form is an identical copy of FAA form 7233-1 filled out with the
pertinent flight plan information. Flightlog tool lets you view or print your Flight Log. The Flight
Log provides the detailed description of your flight arranged in a table. It shows the Waypoint,
Route, Altitude, Magnetic Course, Winds, Fuel, Distance, Time and Ground Speed data of your
flight plan.
The third button is the Trip Kit
• The Trip Kit tool lets you define what reports you wish to have
created. These include the FAA flight plan, Flight Log, overview
map, and strip maps. When you press this button it creates a PDF
file containing your selections.
You can view, email or print this file directly.
129
FlightPrep™ User Manual
GE
G+
K
Pro
Updater Tab –
The Updater tab is your gateway to ordering and monitoring your data subscriptions. Your
subscriptions can be for as little as one Sectional, one time all the way through all data –
Sectionals, WAC’s, TAC’s, Low Enroute, High Enroute and Approach Procedures – for 52
weeks. Coverage can include the contiguous United States and Alaska and Hawaii.
130
FlightPrep™ User Manual
GE
G+
K
Pro
In the left column at the top will be a list of your current subscriptions and their expiration
dates. Even a one-time purchase of data will have a download window of time. The data must
be downloaded within that window. A single download will usually have a time window of four
weeks. Below the Subscription window will be the Available Subscription window. The choice
for that window will be to display all subscriptions that FlightPrep offers, or present only those
charts that are not part of your current subscription (default mode). The main portion of the
Updater window is a list of data sets available. There will be a color code for the data.
For example, a single line item in the Updater might be for the Northwest Instrument
Procedure book. If this is within the valid time frame of the data it would be listed as Current and
be displayed with a white background.
NW1-Approach Book (ID, MT, OR, WA, WY)
07/30/2009
37.60 MB
Current
If the data was available, but has not been downloaded, it would have a yellow background.
This will happen approximately five to seven days before the existing data expires.
NW1-Approach Book (ID, MT, OR, WA, WY)
07/30/2009
37.60 MB
Update Available
When you elect to download the data (or have it automatically downloaded) the background
will change to blue.
NW1-Approach Book (ID, MT, OR, WA, WY)
07/30/2009
37.60 MB
Downloading
After the download – but before the activation date – the background will be green.
NW1-Approach Book (ID, MT, OR, WA, WY)
07/30/2009
37.60 MB
Update Ready
The four color pattern above is the normal progression through the data. This is how it
should work if your subscription for that data is up-to-date.
There are two other color codes. Red is for data that has expired or there is an error in the
download.
Washington Sectional
07/30/2009
78.62 MB
Expired
If there is no subscription for an item, it will have a grey background.
CONUS H-05 High Enroute
Never
Unknown
No Subscription
Downloading Charts
Your purchase of ChartCase probably came with an initial subscription that requires
regular updating. ChartCase will inform you when charts are either expired or not installed.
Charts will become available to download before the expiration of the old charts. In this case,
download but do not install until the activation date of the new chart(s).
131
FlightPrep™ User Manual
GE
G+
K
Pro
If you receive this message, the options at the bottom of the window are…
Use Expired Data – you are acknowledging that you are using expired data for this flight.
Update from Internet – this will begin the download process immediately and will take you to
the Updater page.
View – this takes you to the Updater page and allows you to view the data that is expired or
missing and possibly select which chart(s) you elect to download at this time.
The easiest way to get your charts is to simply click on the <ALL> button below the list of
Subscription Items.
132
FlightPrep™ User Manual
GE
G+
K
Pro
If your subscription is for the full continental US, VFR/IFR package a simple way to do the
download is to open ChartCase before retiring for the night and let the data come in. In the
morning all your charts will be current. Note: This assumes that you are on a direct connect
service for internet and not dial-up. The download time will depend upon a) the number of charts
in your subscription and b) the download speed of your internet connection.
If you are pressed for time, or are away from home, you might choose to download only the
charts that are necessary for the next flight. For example, you might be on a cross-country flight
when the instrument procedures expire. In your motel (or even Starbucks ) you could download
the approach book or books that are necessary for your flight and download the remainder
when you return home.
When the downloading process begins the progress bars near the bottom will show an
overall progress as well as the individual progress for two (if two or more charts are being
downloaded). The download process is designed to be working on two charts simultaneously.
The time indicated below the Overall Progress bar will be an approximate time for
completion. When it first starts it will show a much longer time than what will actually be needed.
The time is calculated using the current download speed into the computer. The time shown will
fluctuate – sometimes actually increasing – depending on the actual download speed available
from your internet provider.
133
FlightPrep™ User Manual
Purchasing Charts
If you need charts that are not part of your current
subscription, they may be purchased through the Updater page.
Start by making sure the Upgrades Only button is filled in. This
actually isn’t necessary but it eliminates the need to scroll
through the charts you already own. Scroll and select the chart
or chart package you would like to see then click on the <View
Info> button at the bottom of the window. The <View Info>
button only becomes available after a chart is selected. Clicking
the <View Info> button will take you to the internet subscription
service of FlightPrep.com. You will be given a description as
well as the prices for the subscription options for the chart(s)
you have selected as well as the package of charts that would
include your selection. If you want more than a couple of charts
it is usually less expensive to purchase a package.
The one-time “subscription” allow you to
download the chart any time during the next 4
weeks. This would allow you to purchase a chart
that will be out-of-date in a couple of weeks and
then download the new chart as it becomes
available (within the 4 weeks of your subscription).
GE
G+
K
Pro
134
FlightPrep™ User Manual
GE
G+
K
Pro
WebInfo –
The Internet tool is a self-contained web browser tool with a drop list of pre-selected
favorites. These include FlightPrep.Com, DUATS.Com, and the Feedback tool.
Buttons offer access to Back, Forward, Refresh, and Home commands.
▪ Back - takes you to the last page
viewed
▪·Forward - returns you from pages
replayed using the Back button
▪·Home - takes you to the home
page of the site shown in the drop list.
The link listed on the left will take
you directly to FlightPrep; Feedback;
DUATS; FAA Safety. This list may
change as we find additional links
useful to your flying safety.
The Feedback/ Bugs page takes you to the FlightPrep program development database web
site. If you have specific feedback for us about the operation of the program, feature or
enhancement requests, or problem reports, please use this page.
To use the database, you need to
create a user account. Click on the
"sign up for a new account" link on the
Welcome screen. Assign yourself a
Username and enter your email
address. The system emails you an
access password. Each time you visit
the Feedback site, login using your user
name and password to access the
system. You may change your
password after your first login if you
desire.
We hope you find the Feedback
database easy to use. It is the most
effective and fastest way to give us your input. Please investigate all the drop list options before
making your choice to best categorize the issue you are reporting. The time you spend in
accurately relaying any issues, the faster we can research and confirm your findings.
Remember, any issue we can reproduce, we can fix or improve upon.
You really do get the opportunity to help improve this product, so share your enhancement
requests. We will categorize all the input as it is received. FlightPrep will assign a priority score
and we’ll implement as fast as possible!
Note: If you click on a link on a web page that automatically creates a new window, your
default browser will launch and display the linked page.
135
FlightPrep™ User Manual
GE
G+
K
Pro
Tools
Tool layout for Golden Eagle FlightPrep, Golden Eagle Plus, ChartKey and Chart Case Pro
search
Tool
Display IFR
chart
map:
distance tool
Chart
preferences
map:
zoom in
map:
zoom out
Pan chart
router mode/
waypoint tool
Display VFR
chart
view
route
Toggle
NEXRad
overlay
Toggle profile
display
GE
G+
K
Pro
Tools available in ChartKey and ChartCase Pro
emergency
land
start in flight
mode
To the right of the tools are pull-down menus for selecting the map, level (scale) of the map
and the status of Winds and TFR information from DUATS.
The selection for the map may also be made
in the [Edit], [Preferences], [General] menu as well
as in the Route Planner area under the Map Layers
Tab.
136
FlightPrep™ User Manual
GE
G+
K
Pro
Toolbar Icons
Search Tool
See [Chart] [Search] – Initiates a search for airports, Navaids, waypoints, intersections.
Chart Preferences Tool
See [Edit] _ [Preferences] – This allows the user to customize the view and information
presented on the maps.
Hand Tool
This allows the user to move a chart on the screen. This can also be done with the scroll
bars on the bottom and right sides of the window.
Router Mode Tool
This allows placement of waypoints, rubber-band routing or positioning of route-of-flight
lines, zooming in, and navigation data and airport diagram pop-ups.
Ruler Tool
This tool can measure straight-line distances. Click and drag a line to read distance and
bearing in terms of the initial point.
Zoom-In Tool
Clicking with this tool
will zoom in one level each click. The new screen will be
center at the point of the click.
Zoom-Out Tool
Clicking with this will zoom out one level. The new image will be centered at the point of the
click.
View Route Tool
This tool will return the screen to provide a complete view of the planned route of flight.
Toggle Nexrad Tool
This will turn on/turn off the Nexrad weather images downloaded from DUATS. See Weather
Chart Tab.
Toggle Profile View
This will turn on / turn off the profile view below the chart screen. It may include cloud bases,
MEAs, TFRs, terrain and waypoints
137
FlightPrep™ User Manual
GE
G+
K
Pro
Emergency Land Tool
Brings up a dialog window listing the nearest facilities ordered by distance from the present
position. See also [GPS], [Emergency Land]
Start In-Flight Tool
Selecting this tool leaves the flight planning area to go to the In-Flight mode of ChartCase
Pro. See also [View], [Start InFlight]
138
FlightPrep™ User Manual
GE
G+
K
Pro
Tutorial - Flight Planning
This will be a sample VFR flight plan from Aurora, OR (the home of FlightPrep) to San
Francisco, CA with a fuel stop that you can work along on your computer with ChartCase and
check against the screen shots. Actually we will be flying in to Half Moon Bay (HAF) on the
western shore of San Francisco. The only difference will be you will select your own name from
the pilot list.
Under the File menu select New. This will clear the flight plan (if any) in process. Under the
Route menu, select Route Wizard. Select your name from the pilot list. I will be using Chet
Propeld. Chet is one of the many characters listed on the Car Talk radio program. Select the
Cessna 172 (Generic) from the aircraft list. Key in Aurora for the departure airport and hit
<Tab>. A window will pop up indicating that there are multiple airports connected to the name
Aurora. Scroll down and highlight Aurora State (KUAO). To verify this airport, hit the <Info>
button. The runway layout is correct but let’s look at some details by clicking on the NavInfo.org
or the Flight Guide tab. The location is correct and if you scroll down the thumbnail shot of a
WAC verifies that Aurora State is the correct airport. Close the NavInfo or the Flight Guide
window and select <OK> in the Select Waypoint box.
139
FlightPrep™ User Manual
GE
G+
K
Pro
Our Destination is Half Moon Bay, CA. Enter HAF in Dest. As you hit the <Tab> key,
FlightPrep entered the four-character identifier code KHAF. Click on the <Next> button. The
flight is too long for a C172 to make without a refueling stop. The Route Wizard is giving the
options on how we want to determine the duration of a leg of the flight. Regardless of the
capabilities of the airplane, the most I am comfortable flying without a stop is about three hours.
Click on the Time button and fill in 0245 in the box for 2 hours and 45 minutes (which will give
me choices for a stop between 2h45min and 3h15min) and hit the Find Stop button. Highlight
RBL Red Bluff Muni and click on Airport Info to see the runway diagram. Click on the
NavInfo.org tab and the detailed information as we did for Aurora Airport. The airport looks like a
good stop. Click on <Close> in the information box and <OK> to accept Red Bluff as the stop.
140
FlightPrep™ User Manual
GE
G+
K
Pro
Back in the Route Wizard box, we see
that we have only 159 miles for the final
leg of the flight. Click on the Next>> button
and we see that our flight has two legs.
The first leg takes us over the Siskiyou
Mountains, so have the Auto Router take
us VOR to VOR at 7500 feet. The second
leg is over central valley California so have
the Auto Router make it also a VOR to
VOR flight, but at 5500 feet. Click on
<Finish> and see the route.
The flight path has been marked out
on the chart along with a profile of the
flight.
The profile view shows the cloud bases (a few the Willamette Valley), wind barbs, MEA
(minimum enroute altitudes), some Class airspace and some Class B airspace (San Francisco).
It also indicates an altitude problem. In crossing the Siskiyou Mountains, it will be easier to go
around the peaks rather than over.
141
FlightPrep™ User Manual
GE
G+
K
Pro
Zoom in on the San Francisco area to Level 7. This can
be done with repeated clicks with the Zoom tool.
Or,
you can use the pull-down and go directly to Level 7. If you
use the Zoom Tool the screen will center on the click of the
tool. If you use the pull-down list it will center at the center of
the current screen. Some scrolling might be necessary.
Using the Router Mode Tool
hover over the line that indicates the Class B airspace
next to our route line. This shows that the floor of that sector is 1500 feet. Let’s move our route
out (West) to be in the next level (it has a floor of 3000 ft),
Continuing with the Router Mode Tool, right-click “comfortably” outside area I of the S.F
Class B airspace. See next page for graphic.
142
FlightPrep™ User Manual
Scroll down and select Add User Waypoint. You do not have to
name your waypoints but they are easier to edit and/or delete if you
do. A few seconds after you click on <ok> the waypoint will appear.
Use the Tool to click-and-drag the course line over to the waypoint.
Release. This is an example of rubber-band-routing.
ATC will be directing us to be “at or below…” as we get close to
the S.F. airspace, probably starting at the Sausalito VOR.
Remember we must not only have contact with ATC, but
permission before entering Class B airspace.
GE
G+
K
Pro
143
FlightPrep™ User Manual
GE
G+
K
Pro
Weather Graphics
Before downloading a pre-flight briefing and/or weather graphics, verify that the plane and
pilot are correct in the Properties box. Click on Properties (just below the Dept/Dest boxes in the
upper left). Use your own name in place of Chet’s but use the Cessna 172 (Generic) to match
the performance used in this example.
Weather graphics, as
well as a text briefing, can be
imported at the same time. The
weather graphics can be viewed separately or overlaid
onto the vector map. To import the weather charts for
our flight click on the DUATS tab. In the Commands
box select the Contiguous 48/NEXRAD for graphics
that will overlay the aviation chart. The Contiguous 48
WX selection will give a map of the lower 48 states
that shows major weather conditions, without much
detail. After selecting Contiguous 48/NEXRAD, a
dialog box will pop up asking for specific map
selections. Or, click on <Select All>. The area
mappings, Northeast, Great Lakes, Northern Plains,
etc., will give the maps that will overlay the chart. This
flight will need two of these maps. Click on Pacific
Northwest and (scroll down) Far West then click on
<OK>.
Before connecting to DUATS, select the
Standard WX: Route so that the weather graphics
and the briefing will come in on the same
connection. As you press the <Add> button to
select standard briefing a dialog box appears that
describes the flight. When it opens it shows the
destination for the first leg of the flight. Each leg
represents a different flight; a different flight plan. If
you wanted to get a briefing that covers the entire
flight change the KRBL in the Destination box to
KHAF. Clicking to <ok> button will add the weather
briefing to the Pending Commands area. Click on
Connect and ChartCase™ connects to DUATS for
the information.
144
FlightPrep™ User Manual
GE
G+
K
Pro
Once the download is complete a dialog box asks for you to select either the Weather charts
or the Text Briefing. Select charts. In the Weather Charts box on the left side, the downloads are
listed by date. Click on the current date then click on the (+) in front of the date. The possible
weather charts are listed. Click on nxnrego4 to display the Pacific Northwest NEXRAD weather
graphic. Obviously, the weather chart that you download will be different from the one pictured
here. The graphic below shows scattered rain over Northwest Oregon with heavier rains up
around the San Juan Island and in Northern Idaho. Obviously, your download will be different.
Go back to the Chart view
and then click on the Show Route (VIEW) Tool.
Click on the Toggle NEXRAD Overlay Tool
. As an option to the tool, pull down the
Chart menu and select Show NEXRAD. The NEXRAD weather will overlay the chart with the
route overlaying the NEXRAD. If you have areas of precipitation it may obscure references on
the map but the route line will always be visible.
The Vector Chart has the same
NEXRAD image as an overlay.
Notice that most of the detail of the
Puget Sound area is obscured by the
weather graphic. NEXRAD can also
overlay any of the raster charts
145
FlightPrep™ User Manual
GE
G+
K
Raster Charts are digitized versions of FAA Sectionals, WAC’s, Low Enroute, and High
Enroute maps. The FAA states that either paper or digital maps are legal in the cockpit – see
Advisory Circular 120-76A –go to www.flightprep.com for a link.
To see the route on a Sectional, simply use the pull-down list on the Tool Bar.
Pro
146
FlightPrep™ User Manual
GE
G+
K
Pro
Reports
Computers are reliable, but not 100%. Having a backup
in the cockpit is essential. We’re not talking about a second
computer; we’re talking about hard copies. ChartCase™
and Golden Eagle Plus™ make it easy. Click on the
Reports button. The simplest way to get everything you
need for a flight is in Trip Kit… In one spot you can select
and print the FAA Flight Plan, flight log, Overview Map,
Strip Maps as well as FAA-legal Sectionals, WAC’s, etc.
After you click on Trip Kit… button, the selections are
simple. For the Strip Map you can choose the scale (miles:
1 inch). For the sample flight from Aurora to Half Moon Bay,
all of the options, except for the 50 mile scale, would
produce two pages of strip map – one page for each flight
plan of the flight. The Sectional selection would produce the
most pages – 22 pages – due to the scale of a Sectional.
WACs would take slightly less, at 24 pages. But, you
probably would not need both sets. If you selected a full
complement of reports: Flight Plan Forms (2), Flight Logs
(2), Overview Maps (2), Strip Maps (2), and Sectionals (27)
for a total of 35 pages. For this flight the Overview maps and the Strip Maps might be
redundant, eliminating one or the other would only save 2 pages. The convenience of this
package is that it fits on a clip-board and the pages are just what are needed – no more. The
Strip Maps make it easy to from one page directly to the next. No map folding and re-folding. On
a flight like this, the Trip Kit is stowed in the pocket behind the passenger’s seat. In case of a
computer failure, it is within easy reach and all information to continue the flight is ready.
Sectionals
Sectionals
Strip Map
Overview Map
Flight Log
Strip Map
Overview Map
Flight Log
Flight Plan
Form
Flight Plan
Form
Trip Kit for
KUAO-KCIC
Trip Kit for
KCIC-KPRB
Save [File], [Save], this flight plan as it will be used in the In-Flight Tutorial. Use filenames such
as “Aurora Half Moon Bay” or “UAO HAF” or “KUAO KHAF” so that flight plans can easily be
sorted.
147
FlightPrep™ User Manual
GE
G+
K
Pro
In-Flight
Toggle and Max
The screen layout for In-Flight can be configured in one of two different ways. The whole
screen can be dedicated one information set, or it can be split, top and bottom, into two
information sets. These can include charts, profile view, Terrain Awareness, instruments, GPS
data, XMWX data, check lists, etc. The active screen, whether it is taking up the entire screen or
only half, will be indicated by a red border. When the screen is split there will be two additional
buttons on the border between the two halves – Max and T. The Max button will maximize the
active screen, making it a full screen. When activated, the Max button will become a Min button.
The T button will toggle, making the other half the active screen. If you have maximized a
screen and you toggle to the other half, it will appear as a whole screen.
See also Inflight Properties.
Main Screen Buttons
The main screen in the In-Flight mode will either be along the right side
of the screen or across the bottom. If you have your computer (tablet) set in
the landscape mode, they will be on the right. If you have your computer set
in the portrait mode, they will be on the bottom.
Page
Page will bring will bring up a menu
of available screen pages. This list
includes all the pages that are accessible
through the tabs at the top of the screen
as well as additional informational pages.
For descriptions of the individual pages see the
section on Screen Pages.
Changes to the standard pages may be done using
Menu/Menu/Configure Page.
See also Configure Page.
148
FlightPrep™ User Manual
GE
G+
K
Pro
The <Menu> button will cycle through different menus. The first click on
<Menu> will bring up the page specific menu (these used to be handled under
the <Options> button. These menus will vary depending on the page that is being
viewed. The second click on <Menu> will bring up the list of program-wide
configurations. These used to be handled under the <Menu System> button.
Below is an example of the first two clicks on the <Menu> button when on a
Chart page. A third click closes the menu.
Note: The descriptions of the
options available for individual pages are included in the Screen Pages area.
149
FlightPrep™ User Manual
GE
G+
K
The Hide Bar button removes the entire line of main buttons
and replaces them with a Show Bar button that will bring them
back. This also works on the tabs at the top of the screen.
With Bar
Without Bar
Pro
150
FlightPrep™ User Manual
GE
G+
K
Pro
NRST Find
The top of the display will be the <Nearest> button and the <Find> button.
You will always start with the Nearest page selected. The page will be populated
with a list of airports, VORs, NDBs, and waypoints, each listed with their bearing
and distance from the plane’s current position. These will change as the plane
moves. The list will be ordered from closest to farthest. If you only want to see
airports or VORs (or any other), click on its tab at the top of the column. Upon selecting an item
there will be a red flight path and circle over the selected item in the list. Selecting a different
item will highlight it on the map. Airports that have instrument approaches will be identified with
the approach plate icon in the right column.
Moving through the list may be
done with either the Up/Down
buttons below the list or the
mouse/stylus/finger (touch-screen
displays).
You can filter what is being
displayed by clicking on one of the
tabs at the top of the window.
Clicking on the airports tab (Apt)
will filter the display to only allow
airports to be shown.
The Up / Down scroll button
allow you to view beyond the list
that is currently displayed.
151
FlightPrep™ User Manual
GE
G+
K
The <Direct To> button inserts the selected item into the Route List between your current
position and the next waypoint.
Selecting a waypoint (airport,
VOR, NDB or waypoint) from the
list does not change the route.
You may simply want
information about the waypoint.
Clicking on the <Direct To>
button alters the existing route
list.
The result of the Direct To is
shown below.
The initial results of the Direct To would be shown in the revised Route List.
Pro
152
FlightPrep™ User Manual
If an airport with instrument
approaches is selected then the
Go IPs button at the bottom will
become active. This will take you
to the Instrument Procedure (IP)
page including the airports
nearest to your selection.
Salem/McNary Field (KSLE) in
the example above has
instrument approaches as
indicated by the icon in the right
column.
GE
G+
K
Pro
153
FlightPrep™ User Manual
GE
G+
K
If we simply wanted information about the waypoint – say, before we selected it for the
Direct To – we would select the <Info> button.
Pro
154
FlightPrep™ User Manual
GE
G+
K
Pro
Drct To
The <Drct To>button is how a waypoint may be added to the existing route of
flight. It will automatically be added along the current flight path and labeled
“Direct To >”. From there a route line will be drawn to the selected waypoint.
From the new waypoint on will be the existing flight plan. When you click on the
“Search” tab a keyboard will be presented. The top half of the screen will be
blank. As you enter the identifier that you are searching for, the list of possible matches will
appear. As seen below if we were searching for Aurora State airport and had entered just the U
and the A, Aurora would be included in the list. If we finished entering the O the only match
remaining would be Aurora State. Clicking on the <Go To> button in the lower right corner will
enter the waypoint into the route of flight. The course line will be updated. Be sure to hit the CLR
key if you have already done a search and are starting another.
The <Go To> behaves the same as <Direct To> on the NRST Find page. It inserts the
chosen waypoint into the route list between the current position and the next waypoint in the list.
The <Go IPs>, <Info>, and <Close> buttons are the same as on the NRST Find page.
Search is the default view in DRCT TO. The <Recent> tab at the top will keep a record of
your current searches.
155
FlightPrep™ User Manual
GE
G+
K
Pro
Charts
[Charts] gives easy access to the navigation charts: Sectionals, WACs,
TACs, Low Enroute and High Enroute. Clicking on the Charts button will take you
to the last viewed chart, aircraft centered on the moving map display. If you are
already viewing a chart, clicking on the Charts button will move to the next chart
in the sequence.
Note: The tabs will only indicate the charts that are available in your current subscription. If
your subscription is for the Full CONUS VFR + IFR Set, your tabs would reflect the subscription
to Sectionals, Terminal Area Charts and the Low Enroute Charts only. You would see the full
complement of available charts only by supplemental subscription(s).
Chart selection is solely dependent of your subscription – only those charts in your
subscription will be visible. See Updater to purchase addition charts.
156
FlightPrep™ User Manual
GE
IP
Instrument Procedures are accessed through the [IP] button.
Selecting an
instrument
procedure by the
may involves three steps. 1st scroll
and/or zoom in on the map so the
airport you want is within the
boundaries of the map. The closer
zoom you use will reduce the
scrolling in step two. 2nd click on
an airport from the list. You may
need to use the <Up>, <Down>
buttons in navigating the list.
You may use the
mouse/stylus/finger to scroll and
select from the list.
After the airport is selected the
approaches that are published for
that airport will be presented in
the bottom window. 3rd select the
approach.
1st
G+
K
Pro
157
FlightPrep™ User Manual
2nd
3rd
GE
G+
K
Pro
158
FlightPrep™ User Manual
GE
G+
K
One-click Airport Selection
The selection map is now
interactive. Click on the airport
within the selection map and the
approaches for that airport and
displayed. Click on the desired
approach and it is displayed!
Click on an
airport…
…and the airport is
selected with the
approaches displayed.
Note: See [Preferences], [Inflight]
for information on how to
increase usable screen area for
the display of approach plates.
Pro
159
FlightPrep™ User Manual
GE
G+
K
Reminder – Use the <Hide> buttons – two of them in this case – to increase the viewable
area on the screen.
The maximize for screen
width/height buttons are gone.
Approach charts are now
displayed maximized to screen
width. You may still zoom <In>
or <Out> using the buttons on
the bar. Use the <Show Bar> if
needed.
Pro
160
FlightPrep™ User Manual
Airport Diagrams
If an airport publishes an airport diagram with its
approaches it will be geo-referenced and the aircraft
position will be displayed on the runways and taxiways.
Not Geo-Referenced
Some charts cannot be geo-referenced by
FlightPrep or anyone else (departure and arrival
descriptions). They are not laid out in scale. These
charts are clearly marked at the top
>>> IMAGE NOT GEO-REFERENCED <<< The
aircraft position will not be displayed on these charts.
GE
G+
K
Pro
161
FlightPrep™ User Manual
GE
G+
K
Menu - Menu
Clicking on the Menu button twice allows the user to
access some items that would normally required exiting the inflight mode. In addition it allows the user to change the page
configuration (the pages displayed at the top of the in-flight
screen).
Load Flight Plan
Load opens a list of saved flight plans.
There is no limit (other than hard drive
space) to the number of flight plans that can
be on file.
Save Flight Plan
As a flight plan is completed save it for future use/reference. Flight plans can be “flown”
using the GPS’s Simulate Route List. See also Load.
Pro
162
FlightPrep™ User Manual
Set Desired Altitude
This allows you to change the altitude that was
established in the flight plan. If you are instructed (or choose)
to change altitude this will keep the HITS (Highway in the
Sky) and the profile coinciding with your flight.
GPS Status
GPS status indicates the number of
satellites that are currently being
received and their relative signal
strength. If the receiver has a good
lock on a satellite it will be indicated by
the dot after the satellite number. The
right portion of the screen will show the
satellites’ relative position in the sky
XM Status
The XM status is a time stamp of the
latest recorded data from the satellite. Some
data types will come in on a five minute cycle.
This a quick method to determine the validity
of the XM data. You may expand or collapse
entries in the list.
- indicates the items immediately below
may be collapsed into this selection.
- indicates there are additional items
within this selection.
GE
G+
K
Pro
163
FlightPrep™ User Manual
Traffic Status
Selecting Traffic Status will
bring up traffic screen as well as
the Connect/Disconnect and the
Preferences buttons.
The standard indicators would
be magnetic heading to each (up
to three) nearest aircraft,
approximate distance (NM), and
the relative altitude from your
aircraft. Also, and indicator (an
arrow) will show if the target
aircraft is climbing or descending.
All measurements are
approximations. Zaon’s published
range tolerances are:
2 NM when
6 NM
1 NM when 3.0 – 5.9 NM
0.5 NM when 2.0 – 2.9 NM
0.2 NM when 1.0 – 1.9 NM
0.1 NM when < 1 NM
Altitude is
200 feet.
GE
G+
K
Pro
164
FlightPrep™ User Manual
GE
G+
K
Pro
When traffic is detected a banner will be displayed across the top of screen. This banner will be
on any screen even though traffic will only overlay the Vector Map. The red banner will indicate
that traffic has been detected.
Traffic Detected
When traffic is within 2 NM and less than 1000 ft. the banner will change to…
Traffic Advisory – Monitor Closure Rate
When traffic is within 0.7 NM and less than 700 ft. the banner will change to…
TRAFFIC ALERT! OBTAIN VISUAL CONTACT!
Clicking on any of these banners will take you to the Traffic Status page.
The Zaon Traffic device must have a GPS reference point. All traffic is relative to the known
aircraft position. If a GPS signal is not present a banner will be displayed on the Traffic Status
page.
No GPS
165
FlightPrep™ User Manual
Visual Traffic Indicators
Traffic Detected:
Traffic < 2 NM and
Traffic < 0.7 NM and
1000 ft:
700 ft:
Bearing
250
Distance
2.5
-05
Relative Altitude
A vertical arrow to the right may be present to indicate
climbing or descending traffic.
As traffic targets get close to the aircraft
position on the Vector Chart or the Traffic
Status page the distance and bearing will not
be displayed so that they will not obscure the
aircraft’s position.
GE
G+
K
Pro
166
FlightPrep™ User Manual
GE
G+
K
If the connection between the computer and the Zaon XRX device is lost (or you click on the
<Disconnect> button) the Traffic Status page will show a red X across the screen.
Pro
167
FlightPrep™ User Manual
GE
G+
K
Configure Page
The Configure Page window allows the customization of
the pages that appear using the <Page> button. To change a
page first select the page that needs to be changed. Once the
page is displayed on the screen select the <Configure Page>
button. The options include a full page layout (one page on a
screen) or a split page displaying two pages on the same
screen. The first page in the default list of pages is an example
of a split screen between the Route List above the Vector
Chart.
Preferences
The top two items were put in for the
customers that use the smaller tablet PC’s
– i.e. Samsung Q1, Motion LS800, Fujitsu
1620/1620. By removing the tabs –
Route/Vector; WX; HITS/Profile; etc. –
and/or the red border that indicates the
active window it is possible to save some
pixels that can be devoted to chart display
– especially instrument procedure charts.
The three “Auto connect" options allow
for automatic connection of the GPS, the
XM/WX, and/or traffic receivers when
entering the Inflight mode. Note: If you do
not use XM Weather and/or the traffic do
not have them selected to be Auto
connected. This will allow you to maintain
your DUATS weather winds and cloud
bases to be available when you return to
the flight planning side of ChartCase.
By clicking on the appropriate tab, ALL preferences are accessible through this window.
There is no need to exit InFlight to go back and change a setting. See [Edit], [Preferences] in
the Flight Planning portion of this manual.
Pro
168
FlightPrep™ User Manual
GE
G+
K
Exit Inflight
This leaves the inflight mode and returns to the
Flight Planner portion of the program.
Close Menu
This closes the Menu options.
In Out
The In/Out button will allow the zooming in or out of charts/maps. These buttons will be
grayed out when not available for a particular application. Zoom level may also be set using
Zoom under the Menu button
Pro
169
FlightPrep™ User Manual
GE
G+
K
Screen Pages
The default selection of pages can be changed using the Configure Page option under the
Menu button on the main In-Flight screen.
Route List / Vector Chart
The options for the Route List include the tools for modifying
the route list during the flight. Click on Hold Waypoint if you
need to hold. To advance after a Hold click on the next
appropriate waypoint and select Activate Leg.
The Approach options will open the Instrument Procedure
[IP] page for that airport. In the case of a waypoint on the route
list it airports in the vicinity of the waypoint.
Pro
170
FlightPrep™ User Manual
Vector Chart
The options for Vector Charts are Background, Nav Layers, Details,
XM Layers, Wind, Surface Analysis, Satellite Visible, and Map Scale.
These are the same options that are available on the XM Weather Page.
Clicking on the in front of each option will expand to show the
individual items.
The options for Background include variations on the Vector chart
including a night viewable image (None) and two backgrounds suitable
for XM Weather displays. The Raster charts are also accessible through
this list.
Vector Chart with “None” as the background
GE
G+
K
Pro
171
FlightPrep™ User Manual
GE
G+
K
The standard vector chart may be displayed with a light or brown background. These do not
include terrain information but will include obstacle and airway information.
Pro
172
FlightPrep™ User Manual
See also [Preferences] / [Navigation]
These options are Level Specific. Each of the eight scale levels within
Vector Charts has its own set of Layer options. Each item in the list may
be displayed (), or not ( ) at each level. Resetting to the default
selections may be done in Preferences.
GE
G+
K
Pro
173
FlightPrep™ User Manual
GE
G+
K
Pro
XM Data can be displayed on the Vector chart, Raster charts as well on the XM page.
The instructions for the display of the weather data is the same, regardless of the base
map.
Details, XM Layers, Wind, Surface Analysis, and Satellite Visible are all part of XM data
set that comes to ChartCase via satellite.
Details
The Details option will present a list of reports that are available on the current view of the
map.
Airports will include METAR, TAF and
Forecast reports from reporting stations – based on
availability.
Clicking on the facility – KSLE (Mcnary Field) in
this case, will highlight the location with a red line
and circles about the location. It will also show the
reports that are available from that location.
Clicking on the METAR line will present the text.
Note: Some scrolling may be necessary to read the
entry.
full
174
FlightPrep™ User Manual
Clicking on the METAR line a second time
will contract the entry. Clicking on the TAF line
will present the TAF…
…and similarly for the Forecast.
Note: To clear the XM map of the list of
reporting facilities, simply first-click on <Menu>
and un-check Details
GE
G+
K
Pro
175
FlightPrep™ User Manual
GE
G+
K
Pro
XM Layers
XM Layers may be displayed over any of the backgrounds selected
above.
Radar
The radar image is similar to the NEXRAD images that can be
imported as part of the pre-flight DUATS information. The radar images
brought in through XM are updated every five minutes.
Radar Coverage
Radar coverage graphically shows the areas of the country that are
(and are not) currently covered by radar. In the image above there are a couple of “holes” in the
coverage – in Nevada, near the Four-Corners area and in south-central Oregon.
Radar
Coverage
176
FlightPrep™ User Manual
GE
G+
K
SCIT
The SCIT (Storm Cell
Identification and Tracking) will
display active cells with heavy
dots on the map.
SCIT
METAR
This map will indicate the
locations of current METAR
information. Each is color-coded
to show VFR (green) MVFR
(yellow), IFR (red) conditions,
LIFR (purple), or Unavailable
(tan). To read the METAR click
on the Details button or use the
1-Click method.
METAR
TAF
Airports that have forecast
information available are
presented on this map. To read
the text of the forecast click on
the Details button or use the 1Click method.
Pro
177
FlightPrep™ User Manual
GE
G+
K
Lightning
Lightning data is updated
every five minutes.
Lightning
AIRMETS
AIRMET
SIGMETS
TFRs
TFRs will show up on the
map as cross-hatched red
Pro
178
FlightPrep™ User Manual
GE
G+
K
areas. As shown around the D.C. area there may be overlapping circles included around one
area. Smaller TFRs may show simply as red dots.
TFRs
Two types of TFRs may pop up without advanced notice.
One, of course is Presidential TFRs. The one around Tampa
Bay is one. Another TFR that shows without warning is
range or forest fires. The rectangular TFR in southern
Georgia is for fire fighting. These may not be available when
doing a DUATS flight briefing but will show when they are
posted by the FAA.
TFRs
Pro
179
FlightPrep™ User Manual
GE
G+
K
Pro
PIREPS
This turns on and off the colored dots that represent PIREPs. They are colored blue or red.
If you see the dots then they will appear in the Details menu. Open the Details menu and
highlight the chosen report. See also Details.
AIREPS
AIREPS are indicated by magenta dots. They perform the same as PIREPs for reports from
(mostly) commercial airliners.
180
FlightPrep™ User Manual
GE
G+
K
Pro
Winds
Winds can be turned on or
off. If turned on altitude can be
selected from surface to 42,000
feet.
Winds 9,000
These two images show winds for the same area at different altitudes.
The image above shows winds at 9,000 feet and the image below shows
12,000 feet.
Winds 12,000
181
FlightPrep™ User Manual
GE
G+
K
Surface Analysis
The surface analysis
indicates weather fronts as well
as areas of high or low
pressure. The display can be
set for current conditions or up
to a 48 hour prediction.
Surface Analysis
Current
Surface Analysis
12 hour
Pro
182
FlightPrep™ User Manual
GE
G+
K
Satellite Visible
The visible satellite images
can give slices through the
atmosphere to show clouds
remaining at a given altitude. Or,
the layers can be combined to
show accumulation of cloud
coverage. XM weather can
indicate cloud tops while DUATS
weather will be showing cloud
bases.
From these three images of
slices taken at 10,000 feet,
25,000 feet and 40,000 feet it is
clear that the clouds over
Pennsylvania extend quite high.
See the Lighting image of the
same area.
Clouds 10,000
Clouds 25,000
Clouds 40,000
Pro
183
FlightPrep™ User Manual
Map Scale
Map Scale is an alternative to using the <In> or <Out> buttons.
It is an easy method to make several level changes at once.
GE
G+
K
Pro
184
FlightPrep™ User Manual
GE
G+
Other XM Weather
XM Weather data may be displayed over any of the charts. You may have XM start
automatically whenever you enter the In-Flight Mode (see Preferences).
K
Pro
185
FlightPrep™ User Manual
GE
G+
K
1-Click METAR
If you can see the METAR (or TAF) box on the XM Weather page you can single-click the
box and that METAR (or TAF) will automatically open the Details list and display the selected
weather information. Fast!
Ready…
..Go!
Pro
186
FlightPrep™ User Manual
GE
G+
K
Pro
TAWS - Profile
The Terrain Awareness Warning System (TAWS) color codes the terrain below the aircraft.
RED is from 100’ below the plane to everything above the plane. YELLOW is from 100 feet
below to 1,000 feet below the plane. Beyond 1,000 feet the base map (the Vector Chart) is
displayed. The only options for TAWS are the zoom level.
187
FlightPrep™ User Manual
GE
G+
K
Pro
Profile
The Profile view is similar to one that may be displayed on the flight planning screen. It will
show the terrain as well as controlled air spaces.
188
FlightPrep™ User Manual
GE
G+
K
Pro
Chart – Track Up / North Up Options
The Vector Chart page is now the home to all of the maps and charts as well as XM
weather. All of the charts may be displayed in a North Up or Track Up orientation. If you choose
Track Up, then you may also choose where on the screen the aircraft should be positioned. The
options are in the Preferences area – Menu-Menu-Preferences-General-Moving Map
189
FlightPrep™ User Manual
GE
G+
K
Pro
Track Up Options
The options for track up are found in Preferences/General/Moving Map area. In addition to
adding the Compass Arc (previous page), the plane’s position may be changed on the screen.
Position100
Position 50
Position 0
The Aircraft Screen Position will only change the plane position when view in the Track Up
orientation.
190
FlightPrep™ User Manual
GE
G+
K
Pro
Check List
Check Lists are built as part of the airplane description. It is done – along with you operation
handbook – for Performance, Moment Arms, CG Envelope and the Check Lists. The lists could
be directly out of the handbook or additional items you have in your “Hangar Habits.”
In operation the Check Lists can be called up with a couple of clicks at the appropriate time
during a flight.
191
FlightPrep™ User Manual
GE
G+
K
Pro
HITS
The options for the HITS display are divided into four different areas.
The top three, Vector, TAWS, and LandSat, control the base map of
HITS. When one of the three is selected, the other two will be grayed-out.
Each of the three maps are “stretched” over a “wire-frame” contour relief
map.
The next five items, Thumbnail, Boxes, Instruments, Airspace, and
Obstructions are On-Off switches. Each one can be either on or off.
Thumbnail is the small plan-view map in the upper left. It will also
show the scale that is selected in the View controls (the last four
controls).
Boxes are the endless series of boxes that you appear to be flying
through. In flying through these boxes it is your indication that you are ataltitude and on-course.
Instuments is the set of readouts around the edges of the screen.
Note that readings are generated by the GPS. The speed indicator is
ground speed, not airspeed. The altitude is not barometric compensated
and may not match the plane’s altimeter.
Obstructions are the indicated by the little triangles in the plan-view
of the Vector map. HITS turns them into three-dimensional by giving them
height.
Manual allows the pilot to control what is being seen outside the plane. Pan is as if the pilot
is turning his/her head looking at the terrain (map). There are no obstructions by the airframe.
The view is 360º.
Up/Down increase/decrease the altitude of the observations.
Move Forward/Move Backward. Moves the point of observation forward or back along the
flight path.
Tilt Up/Down pivots the observation up or down.
The various Manual controls can be combined; i.e. the point of observation can be moved
forward along the flight path, up in altitude and to the left/right as well as looking down at the
map.
The last four controls change the scale of the map (how near or far ahead of the aircraft’s
current position. Looking farther ahead will lose detail. Looking close will gain detail but lose
distance. The thumbnail will reflect the scale chosen with the View controls. The four view below
are all from the same point on a flight showing their relative scales.
192
FlightPrep™ User Manual
Landsat
The Landsat images have no layers. Zoom level is the only option.
GE
G+
K
Pro
193
FlightPrep™ User Manual
GE
G+
K
Pro
Appendices
Appendix A: Weight & Balance for old style
Owner’s Manual
If you have an Owner’s Manual, rather than a Pilot’s Operating Handbook and your
manual’s center of gravity graph looks similar to the one below, you may need to do some
additional calculations before entering data into your plane’s data in ChartCase.
Loaded Aircraft Weight
(pounds)
Center of Gravity Moment
Envelope
2400
2300
2200
2100
2000
1900
1800
1700
1600
1500
45
55
65
75
85
95 105 115
Loaded Aircraft Moment/1000
(pound-inches)
This data is similar to an older Cessna Owner’s Manual. Notice the value of the x-axis (the
horizontal axis) is in pound-inches. Usually this value is also divided by some constant, in this
case 1000. Mathematically the calculations for this would be:
weight arm
. Arm is the distance (in inches) aft of a reference point in the plane
moment
1,000
– usually the firewall. To determine the arm when the moment and weight are known, simply
multiply the moment by 1,000 (or whatever value is used in your Owner’s Manual) and divide
moment 1,000
that answer by the weight. In other words, arm
. For the graph pictured above,
weight
to determine the arm for the bottom-left point on the graph we read the moment is 53 poundinches when the weight is 1500 pounds. To calculate the arm,
multiply 53 x 1,000 and divide the results by 1500. The answer will
be 35.3333333 – round the answer to 35 inches (nearest inch).
When entering this as part of the plane’s CG Envelope, [Edit],
[Aircraft…], [select plane], [edit], [CG Envelope], [Add] – enter 1500
in the weight box and 35 in inches. Continue (i.e. clockwise) around
the graph in the Owner’s Manual to complete the CG Envelope.
Your completed graph will similar to the one below.
194
FlightPrep™ User Manual
GE
G+
K
Pro
For the weight and balance loading of the
aircraft the same calculations will need to be done
for each loading station in the aircraft. For example
in the Owner’s Manual for the same Cessna used
above the weight loading problem is illustrated
below.
Sample Airplane
Sample Loading Problem Weight
Moment arm calculations
Lbs
Lb-ins/1000 (rounded to the nearest tenth)
1.Licensed Empty Weight
1324
48.2
48.2 x 1000 1324 ≈ 36.4
2.Oil
15
-0.3
-0.3 x 1000 15 ≈ -20
3.Pilot & Front Passenger
340
12.2
12.2 x 1000 340 ≈ 35.9
4. Fuel (39Gal@6#/Gal)
234
11.2
11.2 x 1000 234 ≈ 47.9
5. Rear Passengers
340
23.8
23.8 x 1000 340 ≈ 70
6.Baggage
47
4.5
4.5 x 1000 47 ≈ 95.7
These weights and arms are entered in the [Moment Arm] part of [Edit], [Aircraft…]. You will
use the empty weight from your plane’s weight and balance sheet and enter actual fuel,
passenger and luggage weights in the preflight weight and balance calculations.
See [Weight and Balance] in the [Route] menu.
195
FlightPrep™ User Manual
GE
G+
K
Pro
Appendix B: USB GPS Device Installation
Adding a GPS to ChartCase increases the utility of the program significantly. A USB GPS
has an advantage over a Bluetooth version in that it draws its power from the tablet PC, which in
turn is normally drawing its power from the aircraft. Both USB and Bluetooth GPS’s can be
purchased from FlightPrep separately or as a package with your software and tablet PC http://www.flightprep.com/rootpage.php?page=pilotsupplies
The setup for the USB GPS is relatively simple, compared to the Bluetooth setup. Most USB
devices are plug-and-play, in that they need no additional software to run. One of the more
common units is the Pharos™ USB GPS – which is widely marketed by Microsoft along with
its Streets and Trips software. Turn on the computer and plug in the GPS. If you install the
Street and Trips software the GPS drivers will be included and the computer will recognize the
device. If you have not installed the Streets
and Trips software the computer will
prompt you via the Update Wizard.
1, Click on the No, not this time button.
We do not want Windows to search the
internet for the driver – we have it on the
disc. Click on the <Next> button to
proceed.
2. You will be prompted to insert the
disc – then click <Next>.
Windows will return and state that it is
finished and it recognizes the new
hardware. You may need to click on a
<Finish> button.
196
FlightPrep™ User Manual
3. Go to the GPS tab within ChartCase and select
Configure… This is where ChartCase is told what GPS
signal to expect and where it is located. Both USB and
Bluetooth GPS’s output an NMEA 0183 Protocol data
stream.
Click on the box at the top and scroll down and
select NMEA 0183 Protocol (Serial/USB) from the list. If
you are installing a Garmin USB device, select the
Garmin USB Protocol.
The only change that is needed on the Serial Port
Settings in the Com Port. Pull down the list and select
Microsoft GPS Port (Com 8). You will not have a
choice on the Com Port number.
Click on the <OKO button and the bottom and you are
finished.
When you want to start the GPS select the
Connect/Start feature from the GPS menu.
GE
G+
K
Pro
197
FlightPrep™ User Manual
GE
G+
K
Pro
USB XM Weather Installation
Connect the power cable and attach the USB cable between the WXWORX box and the
computer. Note: On new models the WXWORX box can be powered by the computer through
the USB cable. As you plug in the WXWORX receiver the computer will search for driver(s). It
may first say it is an unknown device but that should change and the computer should report
that the device has been successfully installed. These messages may appear for a couple of
seconds at the bottom of the screen. Once the device has been recognized by the computer
these messages will no longer appear
Go to C:\Program Files\Common
Files\XMLink|\XmLink.exe. As the computer and the XM
receiver begin communicating with each other the
computer will send power up to the radio and send a
signal (ping) that should be answered by the receiver.
Within a few seconds (15 second max), the details
should be filled in – Radio Serial number, Signal Quality
and Bit error rate (BER).
The Radio Serial Number should be the first to come
in. The Radio Status – Signal Quality needs to show
Good Locked, and the BER for the satellites need to be
less than 100. Once these three conditions have been
met you may proceed and
XmLink.exeShortcut
198
FlightPrep™ User Manual
GE
G+
K
Pro
New radio installations will then display the activation
mode screen.
At this point you are ready to contact XM and establish your
subscription service!
Activate your XM/WX account and WxWorx receiver:
You must subscribe to the XM/WX service separately.
Their different plans are listed http://www.wxworx.
com/aviation/service_pricing.php To establish an account with
XM/WX, select the data package you want to subscribe to
and call 1-800-985-9200. An XM representative will walk you
step-by-step through the process, which takes only a few
minutes. Please have your 8 digit radio ID Code as well as
your personal information and payment method available.
After the XM/WX representative creates your account,
they will enable your service and you must activate your WxWorx receiver within 36 hours. The
WxWorx device must be powered up and the antenna must have a clear view of the sky.
If the XM representative asks you to run the XMLink program, start it through the menu
[Start], [Programs], [FlightPrep], [ChartCase], [XMLink].
The XM Link software will probably jump directly to the Activation Mode window. This
process may take from 15 to 90 minutes. When the receiver is activated, you will be able to
download weather data from the satellite. You will see scrolling information in the main XMLink
window; this is normal.
199
FlightPrep™ User Manual
GE
G+
K
Pro
Appendix C: Bluetooth GPS Device Installation
ChartCase becomes even more powerful when it receives position and weather updates
from external receivers. Inexpensive GPS and weather receivers are found in our Pilot Supplies
web store; http://www.flightprep.com/rootpage.php?page=pilotsupplies
Most of our customers buy GPS and weather receivers with Bluetooth connections. Some
sample setup examples follow. Note: Your equipment may vary from these examples but this
guide should help you get moving in the right direction.
Bluetooth devices give us a new freedom from data cables and the ensuing tangles they
create in the cockpit. The exchange cost (there is always something!) is some additional
configuration during the installation process. These pages provide the key steps in setting up
your new device(s) and get you connected.
There are three common set of Bluetooth stacks (drivers) in portable computers –
TOSHIBA, WIDCOMM, and MICROSOFT. Toshiba is supplied with most of the tablet PC’s.
Widcomm is used by Samsung and Microsoft’s Bluetooth stack is an aftermarket option for all
PC’s.
To determine which Bluetooth stack is in your machine right-click on the Bluetooth
icon in your task bar (bottom-right). Compare the following images to your system.
Toshiba
Widcomm
Microsoft
Bluetooth Settings
Explore My Bluetooth Places
Add a Bluetooth Device
Wireless File Transfer
Bluetooth Setup Wizard
Show Bluetooth Devices
Remote Camera
Advanced Configuration
Send a File
Add New Connections
Quick Connect
Device Properties and Security…
Stop the Bluetooth Device
Receive a File
Join a Personal Area Network
Service Properties
Open Bluetooth Settings
Help
Remove Bluetooth Icon
Exit
First, we will go through the Toshiba installation as that is the most common (at this time).
The Widcomm installation will follow (Appendix D) and finally the Microsoft (Appendix E).
200
FlightPrep™ User Manual
GE
G+
K
Pro
Toshiba Bluetooth Stack Installation – Motion; Fujitsu
This assumes you are using a Motion Computing tablet or Fujitsu computer using the factory
installed Bluetooth support. This page will cover the Motion tablets. The Fujitsu will begin at the
top of the next page and then continue with the steps common to both computers.
Bluetooth troubleshooting - Please note that most tablet and notebook computers include a
switch that controls the wireless capability of the computer. Both Motion and Fujitsu computers
have a switch on the side that enables/disables the wireless function. If your Bluetooth device
does not work or suddenly stops functioning, check the switch. You may have inadvertently
turned it off.
If your Bluetooth device stops functioning, check your battery power. Computers may turn
off external devices when power drops below a critical level.
Motion Bluetooth Installation Review the Motion Computing page:
http://www.motioncomputing.com/support/tips_tricks/bluetooth.asp
GPS InstallationBoot up your Motion Computing tablet, logon and get to the desktop. Press the Dashboard
button (Hotkey #1 -or- the "square peg inside a circle") and ensure your "Bluetooth Wireless
Radio" feature is enabled. If your tablet buttons are not functioning, and there is not a desktop
icon for the Motion Dashboard, you can find the Dashboard by going to [Start] [All Programs]
[Motion Resources] and [Motion Dashboard]
Click Bluetooth [Properties] and view the existing
Devices. We suggest adding the Bluetooth GPS first
then add the WxWorx receiver.
201
FlightPrep™ User Manual
GE
G+
K
Pro
If no devices exist, make sure they are turned on and
located where you can see the status lights and click [New
Connection].
Make sure the GPS is turned on and is within range of
the Motion Computing tablet. Most GPS units will turn
themselves off if they have not received a response back
from the computer within several (10?) minutes. If the
computer is not detecting the unit, turn it on, again.
Fujitsu Bluetooth Installation –
Fujitsu computers running Windows XP do not come with the Bluetooth drivers installed.
The Bluetooth software is included with the tablet on a disk labeled “Bluetooth Driver CD.” If you
do not have the CD, the driver is available from support.fujitsupc.com. Enter type and model
computer and scroll down through the list for the Bluetooth driver.
Assuming the Bluetooth driver is installed…right-click on the Bluetooth icon in the
task bar at the bottom right of the screen.
Slide the cursor up to highlight Add New Connection.
202
FlightPrep™ User Manual
Both Motion and Fujitsu…
The "Add Bluetooth" wizard begins;
select "Custom Setup", check the
option "Your device is ready to be
found" and click [Next]. Click on the
Custom Mode button as this will allow
you to select the Com port to use.
Click on <Next>.
The wizard will search for
appropriate devices and return with a
window allowing you to select the
GlobalSat® BT-338 (or whatever GPS
you are installing). Click on <Next>.
GE
G+
K
Pro
203
FlightPrep™ User Manual
GE
G+
K
Pro
There is no service to select for a
GPS. Click on <Next>.
After you add the device serial connection, the wizard asks if you want to use the default
Com port. Un-Select the "Use default COM port" and acknowledge the warning.
Use the pull-down list to select a Com Port. FlightPrep recommends you use COM5 for the
GPS device and COM8 to the WxWorx device.
Un-Select
204
FlightPrep™ User Manual
GE
G+
K
Pro
The last three windows simply confirm the settings. Finish off with <Next>, <Next> and a
<Finish> to complete the installation. The window will appear showing the Bluetooth
connection(s). If you have multiple Bluetooth devices connected, they will all appear in this
window.
Close the Bluetooth setting window and open ChartCase. Go the [GPS] menu and select the
[Configure…] option. The Moving Map Settings window will open. Pull down and select NMEA
0183 Protocol (Serial/USB) setting. In the Com Port: window, select Toshiba BT Port (Com5)
to match the port setting on the GPS. Click on <OK>.
This completes the setup for a Bluetooth GPS. If you are not setting up a weather receiver,
go directly to Configure ChartCase.
205
FlightPrep™ User Manual
GE
G+
K
Appendix D: XM Receiver Installation with
Toshiba Bluetooth Drivers
This accounts for almost all of the hardware installations (with the exception of Samsung).
Motion Computers and Fujitsu use the Toshiba Bluetooth stack (drivers) unless you have
changed them on your own.
The WxWorx receiver requires a few more steps to configure the XMLink software.
1. Open XMLink (C:\Program Files\Common Files\XMLink\XMLink.exe)
2. XMLink will open but will not have the correct
communications.
3. Click <Yes> to Setup communications.
4. Set the communications to COM8 and change
the Data Rate to use 38400. Remember that
FlightPrep recommends using COM5 for the GPS
device and COM8 for the WxWorx device.
(See COM setup of GPS device installation)
Change to
38400
5. The XMLink window will be displayed. The important data to verify is:
Log shows "Radio answered ping" and “Sending Power Up to Radio" entries.
▪ If you get "Radio not found" or "No response to ping", reset the WxWorx receiver by
unplugging the power plug, wait 3 seconds and replace.
Radio Serial number becomes populated
Pro
206
FlightPrep™ User Manual
GE
G+
K
Pro
▪ If the radio serial number is not displayed within 15 seconds then data is not coming across.
Exit and restart the XM Link program – step #5 of this series of instructions.
▪ If the radio signal still does not display, go back and reset the WxWorx receiver again, by
unplugging the power plug, wait 3 seconds and replace.
Radio Status shows Signal Quality "Good Locked" and BER less than 100 for Sat1 & Sat2.
▪ If you have BER of "-" or 999, the antenna is not finding the satellite signal - reposition the
antenna to view the southern sky.
You must have all 3 conditions met to progress to the next step!
◄
►
►
◄
6. New radio installations will then display the activation
mode screen.
At this point you are ready to contact XM and establish your
subscription service!
7. Activate your XM/WX account and WxWorx receiver:
You must subscribe to the XM/WX service separately.
8. Their different plans are listed http://www.wxworx.
com/aviation/service_pricing.php To establish an account with
XM/WX, select the data package you want to subscribe to
and please call 1-800-985-9200. An XM representative will
walk you step-by-step through the process, which takes only
a few minutes. Please have your 8 digit radio ID Code as
well as your personal information and payment method
available.
9. After the XM/WX representative creates your account, they will enable your service and you
must activate your WxWorx receiver within 36 hours. The WxWorx device must be powered up
and the antenna must have a clear view of the sky.
10. If the XM representative asks you to run the XMLink program, start it through the menu
[Start], [Programs], [FlightPrep], [ChartCase], [XMLink].
207
FlightPrep™ User Manual
GE
G+
K
Pro
11. The XMLink program may prompt you for information about its Com Port and Rate.
* select the Com Port setting assigned to the WxWorx device from Com Port setting (above).
* select 38400 as the Rate setting and click [OK] to save your settings.
12. The XM Link software will probably jump directly to the Activation Mode window. This
process may take from 15 to 90 minutes. When the receiver is activated, you will be able to
download weather data from the satellite. You will see scrolling information in the main XMLink
window; this is normal.
208
FlightPrep™ User Manual
GE
G+
K
Pro
Appendix E: XM Receiver Installation with
Widcomm Bluetooth Drivers
Do not plug in the WxWorx receiver until instructed to do so in these instructions. Right-click
on the Bluetooth icon in the task bar. Select Advanced Configuration.
Explore My Bluetooth Places
Select the Client Applications tab. To add a port if none
are present then click on the Add COM port. If a port is already
installed, then in the column labeled COM Port, a number will
be listed for that port. If there are no numbers then highlight the
Bluetooth Serial Port and click on Properties.
Bluetooth Setup Wizard
Advanced Configuration
Quick Connect
Stop the Bluetooth Device
Bluetooth Configuration
General
Accessibility
Discovery
Local Services
Client Applications
Hardware
Specify how this computer will access services on other Bluetooth devices.
Double-click on application name to set its security and edit its properties.
Application Name
Human Interface Device
Printer
Audio Gateway
Headset
PIM Synchronization
FAX
File Transfer
Dial-up Networking
Network Access
Bluetooth Serial Port
Properties…
Secure Connection
Not Required
Not Required
Not Required
Not Required
Required
Required
Required
Required
Not Required
Required
COM Port
Add COM port
OK
Cancel
Delete COM port
Apply
Help
The Operating System will automatically assign a COM Port for this port which cannot be
changed. You can rename the port something specific that you can easily remember. We will
use this port for the WxWorx receiver. Select Apply to be returned to the configuration dialog
which will now reflect a COM port number. See the next two figures for this process with COM
port 12.
209
FlightPrep™ User Manual
GE
G+
Bluetooth Configuration
Bluetooth Properties
General
Accessibility
Discovery
Local Services
Client Applications
Hardware
General
Specify how this computer will access services on other Bluetooth devices.
Double-click on application name to set its security and edit its properties.
WxWorx Receiver
Application Name
Secure Connection
COM Port
Human Interface Device
Not Required
Printer
Startup Automatically Not Required
Secure Connection
Audio Gateway
Not Required
Headset
Not Required
PIM Synchronization
Required
COM Port:
COM 12Required
FAX
File Transfer
Required
Dial-up Networking
Required
Network Access
Not Required
GPS Receiver
Not Required
Delete
Properties…
COM port
Add COM port
OK
OK
Cancel
Cancel
Apply
Apply
Help
Bluetooth Configuration
General
Accessibility
Discovery
Local Services
Client Applications
Hardware
Specify how this computer will access services on other Bluetooth devices.
Double-click on application name to set its security and edit its properties.
Application Name
Secure Connection
COM Port
WxWorx Receiver
Human Interface Device
Printer
Audio Gateway
Headset
PIM Synchronization
FAX
File Transfer
Dial-up Networking
GPS Receiver
Bluetooth Serial Port
Properties…
Not Required
Not Required
Not Required
Not Required
Not Required
Required
Required
Required
Required
Not Required
Required
Add COM port
COM 12
OK
Cancel
COM 11
Delete COM port
Apply
Help
K
Pro
210
FlightPrep™ User Manual
GE
G+
K
Pro
Explore My Bluetooth Places
Next we will connect to the receiver and configure it for the
selected port. Plug in the WxWorx receiver. The blue LED on
the receiver will be blinking. Right click on the Bluetooth icon in
the taskbar and select Bluetooth Setup Wizard.
Bluetooth Setup Wizard
Advanced Configuration
Quick Connect
Stop the Bluetooth Device
Choose the second option in the list.
Bluetooth Setup
Welcome to the Bluetooth Setup
Wizard
This Wizard will help you set up your Bluetooth environment
What would you like to do?
I know the service I want to use and I want to find a Bluetooth
device that provides that service
I want to find a specific Bluetooth device and configure how this
computer will use its services.
I want to configure the Bluetooth services that this computer will
provide to remote devices.
I want to change the name and/or device type that this computer
displays to other Bluetooth devices.
< Back
Next >
Cancel
The computer will then search for devices. In the list of devices there may be more than one
device shown depending on what Bluetooth devices are near you and turned on. Look for the
device labeled WxWorx as show in the next figure.
211
FlightPrep™ User Manual
GE
G+
K
Bluetooth Device Selection
Select a device
Remote device must be in Discoverable mode for this computer to find them.
For assistance in making a remote device discoverable, refer to the remote
device’s documentation.
WxWorx
Search Again
Show all devices
If device you are looking for is not in the list, verify that the device has power and is
operational. Some devices require you to press a special button to be Discoverable.
< Back
Next >
Cancel
Make sure Show all devices is selected. Select WxWorx and click on <Next>.
Bluetooth Security Setup
Bluetooth Paring Procedure
The Pairing Procedure generates a secret key that will be used for authentication and
encryption in future connection to this device...
To pair with a remote device, the remote device must be in pairable mode and you must know the
PIN code. For information about the PIN code of the remote device, refer to that device’s
documentation.
For a brief description of pairing, click Pairing Help. For more detailed
information, consult your user’s manual.
Pairing Help
If the remote device does not require a PIN code or if you want to pair with
the device later, click Skip Pairing.
Skip Pairing
Initiate Pairing
To begin the pairing process, enter the PIN code and click Initiate Pairing.
PIN Code:
●●●●
Initiate Pairing
< Back
Enter the paring code 9679. Click on Initiate Paring.
Next >
Cancel
Pro
212
FlightPrep™ User Manual
GE
G+
K
Pro
Bluetooth Service Selection
Select the services you are interested in.
The following services are available through the selected Bluetooth Device.
Select the service that you want to access on the selected devices
XM Data
Establish a virtual serial port connection with a remote
Bluetooth device. The connection can then be used by any
application that supports the COM port number assigned.
Configure
Refresh
< Back
Finish
Cancel
Select the check box beside the XM DATA port and then click Finish.
Choose the COM Port number that you assigned to the receiver earlier. Write this number
down so that you can enter it in the Communication Setting dialog in the XMLink application.
Click <OK>. A window will appear informing you that a shortcut has been created in the My
Bluetooth Places.
My Bluetooth Places
Shortcuts for the selected services have been created on the My
Bluetooth Places screen of Windows Explorer.
Do not display this message again
OK
Open My Bluetooth Places from the desktop icon. There should be a serial port similar to
the entry below.
WxWorx
WxWorx XM DATA
Not Connected
213
FlightPrep™ User Manual
GE
G+
K
Pro
At this time right-click on the port and select Connect.
WxWorx
WxWorx XM DATA
Not Connected
Connect
Status
Delete
Rename
Properties
A pop-up window should indicate the connection to the correct port number as configure by
you during the initial setup.
The icon in the My Bluetooth Places should change to indicate a connection with the
receiver.
WxWorx
WxWorx XM DATA
Connected: COM 4
With the receiver plugged in, you are now ready to launch XM Link to set up
communications.
See XM Link Settings.
214
FlightPrep™ User Manual
GE
G+
K
Appendix F: XM Receiver Installation with
Microsoft Bluetooth Drivers
Start with the WxWorx receiver plugged in. Microsoft XP with SP2 natively supports
Bluetooth. As such, with display hardware in which the Bluetooth receiver is built into the
devices, you may find that the Microsoft drivers were installed in place of the manufacturer’s
driver. In this case start with the Bluetooth icon in the task bar. Right-click the icon and you
should see the following:
To connect the WxWorx receiver to the computer, start with
the Add a Bluetooth Device on the menu. When selected, the
Add a Bluetooth Device will launch the Device Wizard:
Add a Bluetooth Device
Show Bluetooth Devices
Send a File
Receive a File
Join a Personal Area
Network
Open Bluetooth Settings
Remove Bluetooth Icon
Add Bluetooth Device Wizard
Welcome to the Add Bluetooth
Device Wizard
Before proceeding, refer to the “Bluetooth” section of the
device documentation. Then set up your device so that your
computer can find it:
Turn it on
Make it discoverable (visible)
Give it a name (optional)
Press the button on the bottom of the device
(keyboards and mice only)
My device is set up and ready to found.
Add only Bluetooth devices that you trust.
< Back
Next >
Cancel
Plug power into the WxWorx receiver and then click the check box in the Device Wizard
window and select <Next>. The computer will search for the WxWorx receiver the any other
Bluetooth devices nearby. WxWorx should appear as a device and be identified correctly.
Pro
215
FlightPrep™ User Manual
GE
G+
Add Bluetooth Device Wizard
Select the Bluetooth device that you want to add.
WxWorx
New device
If you don’t see the device that you want to add, make sure that it is
turned on. Follow the setup instructions that came with the device,
and then click Search Again.
< Back
Next >
Cancel
Select WxWorx (as shown) and then click on <Next>.
Add Bluetooth Device Wizard
Do you need a passkey to add your device?
To answer this question, refer to the “Bluetooth” section of the documentation that came
with your device. If the documentation specifies a passkey, use that one.
Choose a passkey for me
Use the passkey found in the documentation
Let me choose my own passkey:
Don’t use a passkey
You should always use a passkey, unless your device does not support one. We
recommend using a passkey that is 8 to 16 digits long. The longer the passkey, the
more secure it will be.
< Back
Select the second options and enter the passkey 9679.
9679
Next >
Cancel
K
Pro
216
FlightPrep™ User Manual
GE
G+
K
Add Bluetooth Device Wizard
Windows is exchanging passkeys.
When instructed below, enter the passkey using your Bluetooth device.
For more information about entering a passkey, see the documentation that came with your
device.
Connecting…
Please enter the passkey on your Bluetooth device now.
Passkey:
9679
Installing Bluetooth device…
< Back
Next >
Cancel
The computer will connect and install the device in your computer.
Add Bluetooth Device Wizard
Completing the Add Bluetooth
Device Wizard
The Bluetooth device was successfully connected to your
computer. Your computer and the device can communicate
whenever they are near each other.
These are the COM (serial) ports assigned to your device.
Outgoing COM port:
COM5
Incoming COM port:
COM6
Learn more about Bluetooth COM ports.
To close this wizard, click Finish.
< Back
Finish
Cancel
Pro
217
FlightPrep™ User Manual
GE
G+
K
Pro
The drive will create both an Outgoing and an Incoming port, click <Finish>. Please note the
Outgoing port assigned, for setting up communications manually. We will delete the Incoming
com port. This will need to be done for each Bluetooth device you install.
Right-click on the Bluetooth icon in the tool bar (bottom right of the screen).
Click on the Show Bluetooth Devices option.
Click on the COM Ports tab.
Click on the Incoming Port line.
Click on the <Remove> button.
With the receiver plugged in, you are now ready to launch XM Link to set up
communications.
After you set up the XM Link you will start up the connection within ChartCase. The first
attempt will probably fail. Turn off the Bluetooth device (GPS or XM Receiver) and then turn it
back on. The second attempt at connect should succeed.
See XM Link Settings.
218
FlightPrep™ User Manual
GE
G+
K
Pro
Appendix F: USB XM Receiver Installation
USB devices are usually “plug-and-play”. The USB GPS receiver and the USB WxWorx
receivers should be “discovered” by the computer when they are plugged in. You may see some
messages such as device unknown, or looking for driver or installing driver, but in a short order
you will see a message similar to the one shown here (from a Windows Vista machine). This
one appeared in the lower right corner of the screen for a couple of seconds. The XM receiver
and the computer are ready to talk to
each other.
XM Link Settings
XM Link – which has a shortcut installed on the desktop – will not automatically find the XM
receiver. You will need to enter the communications settings mode and select the COM port the
receiver is connected on (depends on the Bluetooth stack installed – you wrote these down
when you did the installation, remember?). The Microsoft Bluetooth stack assigned both and
Outgoing COM port as well as an Incoming COM port. You should have recorded the Outgoing
port for this step.
If you do not have a desktop shortcut, it can be found in C:/Program Flies/Common
Files/XMLink.
After this initial procedure the only precaution you will need to have the next time you use it
is to ensure that the receiver is plugged in, BEFORE starting ChartCase. Start XM Link and
then start ChartCase.
Open XM Link. Under the Tool menu, select Communication settings. Opening the
Communications setting may be done for you by XMLink if it doesn’t find the receiver where it
thinks it should be.
Click [Yes] to Setup communications
219
FlightPrep™ User Manual
GE
G+
K
Pull down on the Communication Port list and
select the appropriate COM port (suitable for your
Bluetooth stack). If the Data Rate is not already set
for 38400 then you must change it to 38400.
Match the Communications Port with the one in the
USB Serial Port dialog box when you plugged in
the device.
The XMLink window will be displayed. The important data to verify is:
Log shows "Radio answered ping" and “Sending Power Up to Radio" entries.
▪ If you get "Radio not found" or "No response to ping", reset the WxWorx receiver by
unplugging the power plug, wait 3 seconds and replace.
Radio Serial number becomes populated
▪ If the radio serial number is not displayed within 15 seconds then data is not coming across.
Exit and restart the XM Link program – step #6 of this series of instructions.
▪ If the radio signal still does not display, go back and reset the WxWorx receiver again, by
unplugging the power plug, wait 3 seconds and replace.
Radio Status shows Signal Quality "Good Locked" and BER less than 100 for Sat1 & Sat2.
▪ If you have BER of "-" or 999, the antenna is not finding the satellite signal - reposition the
antenna to view the southern sky.
You must have all 3 conditions met to progress to the next step!
►
►
◄
◄
Pro
220
FlightPrep™ User Manual
GE
G+
K
Pro
New radio installations will then display the activation
mode screen.
At this point you are ready to contact XM and establish your
subscription service!
Activate your XM/WX account and WxWorx receiver:
You must subscribe to the XM/WX service separately.
Their different plans are listed http://www.wxworx.
com/aviation/service_pricing.php To establish an account with
XM/WX, select the data package you want to subscribe to
and please call 1-800-985-9200. An XM representative will
walk you step-by-step through the process, which takes only
a few minutes. Please have your 8 digit radio ID Code as
well as your personal information and payment method
available.
After the XM/WX representative creates your account, they will enable your service and you
must activate your WxWorx receiver within 36 hours. The WxWorx device must be powered up
and the antenna must have a clear view of the sky.
If the XM representative asks you to run the XMLink program, start it through the menu
[Start], [Programs], [FlightPrep], [ChartCase], [XMLink].
The XMLink program may prompt you for information about its Com Port and Rate.
* select the Com Port setting assigned to the WxWorx device from Com Port setting (above).
* select 38400 as the Rate setting and click [OK] to save your settings.
The XM Link software will probably jump directly to the Activation Mode window. This
process may take from 15 to 90 minutes. When the receiver is activated, you will be able to
download weather data from the satellite. You will see scrolling information in the main XMLink
window; this is normal.
If you call FlightPrep technical support for help with your XM/WX installation be sure to have
the name of your Bluetooth stack (Toshiba, Widcomm, or Microsoft) and the COM port assigned
to the device. Go through the Troubleshooting XM before calling. Without this information, we
cannot assist you quickly. 503.678.4360
221
FlightPrep™ User Manual
GE
G+
K
Pro
Appendix G: XMWX Deactivation Indicator
Some clients report they experience problems receiving XM/Wx data on their WxWorx
receivers. The symptoms appear as solid and stable connection to the receiver (either
Bluetooth –or- USB cable) and XMLink displaying a “Deactivation Indicator Received” error
message. This problem prevents successful Wx data reception.
The solution is to have the XM satellite system broadcast a “refresh signal” to your receiver.
This process resets the status of your receiver and restores normal data reception.
To correct the” Deactivation Indicator Received” problem;
First, confirm XMLink is running. Ensure you have good reception, permitting reception of
the refresh signal. Statistics are found in the XMLink program window as "Bit Error Rate.”
(Good signal reception show when the values for “Sat1” and “Sat2” are exactly or close to zero.
The lower the number of errors reported, the stronger the signal.) Record your Radio ID.
Next, click on the XM Link "Tools" menu option. In the drop-down menu, select "Activation
Mode" and the Activation Mode dialog window will open. Drag the Activation Mode window off to
one side so you can see both windows.
·
If you have Internet access at the location of your receiver;
you can send the signal yourself by opening a browser window, going to their web address
http://www.xmradio.com/refresh/. Enter your Radio ID and click "Submit." This refresh method
broadcasts the signal for only 15 minutes.
·
If you do not have Internet access at the location of your receiver;
call XM at (800) 985-9200; give the operator your Radio ID, and ask them to send a “Refresh
signal” to your receiver. This refresh method is good for up to 6 hours when you call it in.
After the Refresh signal is broadcast, in the Activation Mode window, look for your
subscription Service Level to appear in this window. You should see the boxes for the Product
Enable Groups for your service level check in the Activation Mode window. Note: these
boxes check themselves when the Refresh signal is received and processed.
·
For Aviator Lite service, the boxes that will check are Main and 1.
·
For Aviator service, the boxes that will check are Main, 1, 3, and 8.
When these check and you see the correct service level in the Activation Mode window,
click "Done." The service level will appear in the main XM Link program window. The
"Deactivated Indicator Received” error is now resolved.
222
FlightPrep™ User Manual
GE
G+
K
Pro
Troubleshooting XMWX
We have found there are certain things that the user can do to troubleshoot problems with
XMWX.
1 Time sync error. Make sure your computer’s clock is set to the correct time (and time
zone). The XM satellites have their own clocks and the receiving unit (your computer) needs to
be close
2 If you have run any programs, other than ChartCase, they may have moved the location
of the XM data files. The common location for this file type is C:\Program Files\Common
Files\XMLink\Data. The addition of any other XM weather program may change this. User must
search for file .X01 to locate new folder and point ChartCase to the new location. See XMLink
Configuration.
3
Troubleshooting steps for XM Weather issue
A Check Time stamps in software. These are found on the Chart screen, left column,
XM Tab, or Weather/XM WxWorx/XM Status (both in the Flight Planning mode), or
Page/XM Status in the In-Flight mode.
B Check data flow in XM Link. You should see files coming (and going) with the X01
suffix (file type) in the XMLink data folder (C:\Program Files\Common
Files\XMLink\Data).
C Check lights on XM Receiver.
D Reset Power to XM Receiver, Pull the power plug to the XM box, wait 10 seconds,
plug the power back in.
E Restart XMLink. You should have a shortcut to XM Link on your desktop. If not, go to
C:\Program Files\common Files\XMLink
F
Toggle XM Data off and on in ChartCase software
G Verify data transmission by watching for new timestamps.
223
FlightPrep™ User Manual
GE
G+
K
Pro
Appendix H: Configure ChartCase (one-time only)
Start ChartCase through the menu [Start] [Programs] [FlightPrep] [ChartCase] [ChartCase
Professional]
From the main menu, [GPS] [Configure]
* select [NMEA 0183 Protocol (Serial/ USB)] from the top drop list
* select the Com Port setting assigned to the GPS device from GPS Installation, step 9, verify
4800 as the Baud Rate and click [OK] to save your settings.
From the main menu, [Weather] [XM WxWorx] [XM Link Configuration]
* ensure X01 is enabled (X02 is only used if you ALSO use Wings on Wx software - not
included with ChartCase)
* confirm the XMLink Data Path is correct (only change if you know this directory exists
elsewhere on your system) and click [OK] to save your settings.
Your settings and initial configuration of ChartCase Professional, Bluetooth GPS, and
WxWorx Bluetooth devices is now complete.
Please refer to http://www.flightprep.com/rootpage.php?page=bluetooth_wx_startup for details on
how to start and run ChartCase and display the weather in the cockpit.
Notes:
* Your WxWorx receiver must communicate with your computer prior to viewing weather in
ChartCase.
* The Bluetooth communications permit wireless data transfer between the receiver device and
the tablet computer.
* XM/WX utility software is loaded during the ChartCase installation to “C:\Program
Files\Common Files\XMLink”. It consists of:
XMLink.exe software reads data from the receiver and creates files on your system hard disk.
XMLink.ini file stores the configuration settings used by XMLink.exe. There is typically no
need to modify this file. You can use the ChartCase menu [Weather] [WxWorx Weather]
[Configure XM] to view and modify the configuration if required.
XmLink-Help.htm file provides information about the operation of this utility software.
224
FlightPrep™ User Manual
GE
G+
K
Pro
Appendix I: Windows® 7 Bluetooth Setup
Windows® 7 Bluetooth Setup
Microsoft® has changed the way Bluetooth (BT) connections are created in Windows® 7.
Many will find that this new BT setup is much easier than any other BT configuration offered on
a Windows® platform in the past. Here are the steps associated with setting up a BT connection
on Windows® 7.
1- First turn on any BT devices that you would like to pair
with your computer. Then select the BT Icon from the taskbar
on the bottom right hand side of your desktop with a double
left click or stylus tap (next to the clock).
2- If you do not see a BT Icon in this area select the up arrow
from the taskbar and you should be able to see a BT Icon along
with other services. You may then double left click on the BT icon
to start.
3- If you happen to only single click/tap on the BT
icon you will see the screen below. If so, select "Show
Bluetooth Devices" from the menu.
225
FlightPrep™ User Manual
GE
G+
K
Pro
4- Next you will see a window open that will
display your BT devices. To start setup, please
select the button from the upper left corner that is
labeled "Add a device".
5- After selecting "Add a device" you will be presented with a window that will automatically
show the BT devices in range of the computer. If you do not see the device you would like to
setup ensure that the device is powered on and has a completely unobstructed view of the
computer. Do not attempt to setup or use a BT device through glass windows or doors. Once
you see the device you would like to setup and use please select it from this window and click
the "Next" button in the bottom right hand corner of the window.
226
FlightPrep™ User Manual
6- The next window that you should see
in the setup process will be for pairing the BT
device with your computer. Please select
"Enter the device's pairing code" then click
"next".
7- Enter the device's pairing
code into the text box available.
GlobalSat GPS units use the
pairing code "0000". WX WORX
Bluetooth units use the code
"9679". Zaon XRX Bluetooth units
use the code "0". Once you enter
the code click "Next".
GE
G+
K
Pro
227
FlightPrep™ User Manual
GE
G+
K
Pro
8- The computer and BT device will now pair with one another. If the pairing process fails for
any reason please reset the power on the BT device (turn it off then back on) and start this
process again from step 1. Once successfully paired you will see a page stating that your device
has been added to your computer. You may click "Close" on that window. You will also see a
device added to the list of BT devices. Windows will most likely pop up a small bubble/tip that it
is "Installing device driver software" and you will see a small clock icon affixed to the newly
added device. Please wait for these two indications to close/disappear prior to the next step,
Windows is creating the COM port connections needed to continue during this time.
9- After the install and clock indications
disappear, please right click on the newly
added device then select "Properties"
228
FlightPrep™ User Manual
GE
G+
K
Pro
10- Once the Properties window opens
you will see a list of tabs along the top.
Please select the services tab then ensure
that you do the following: 1-Make sure there
is a service 2-Ensure there is a check box
next to the service 3- Notate what "COM"
number Windows has assigned your device's
service, you will NEED this number to setup
your software with the device. Once these
three items are complete you may click "OK"
11- You are done with BT setup. If you have more devices repeat the process to add
another device. If you have added all of your BT devices for now you may close this window,
open your software (ChartCase to setup GPS or XRX) and WX WORX XM Link to setup with
WX WORX receiver) and setup the new com port to be read in the software. For instructions on
configuring ChartCase and XM Link please see the FlightPrep help manual. You will then be
ready to use your BT devices! The image below is ChartCase using three simultaneous BT
connections from GPS, Traffic, and WX WORX!
229
FlightPrep™ User Manual
GE
G+
K
Pro
Appendix J: Multiple Computers
Many ChartCase user have multiple computers. The Software End User License Agreement
(See EULA) permits up to three installations on computers you personally own. The “normal”
configuration might be a) a desk-top computer at home, b) a laptop that travels to and from the
office, and c) a tablet computer for use in the plane. This entry provides help on managing
ChartCase data files between the machines. Officially, “This procedure is not supported.”
First assumption: You download the data files over the internet when the computer tells you
“Portions of your navigation data are expired or not installed.” We recommend you perform
updates when you are not actively using the computer or Internet connection. Most customers
run their updates in the evening. Instead of turning off your system, start ChartCase and then
click on [Update from Internet] and let the system complete the update. Depending on your
connection speed, it may take from 30 minutes to a few hours to complete the download. This
assumes that you are using a 384kb or (preferably!) faster Internet connection. Dial-up
connections are not recommended due to the extended time required to download extended
data sets.
Second assumption: You have a portable storage device that has about 10 gigabytes of
available storage. This could be a USB hard drive or a USB flash drive (a.k.a. a dongle or
memory stick).
Third assumption: You are running Windows XP. See below for locations on Vista
machines.
There one primary set of files that update with the download – Ndata. It will take significantly
less time to copy these files from one computer to the others than to download the data into the
computers via the internet. (Note: If the system needs to apply a program update, we
recommend you apply this to each system individually.)
1. On the computer that received the new data update, click on Start, then My Computer.
Go to the Tools menu and click on Folder Options… You may also find Folder Options
in the Control Panel.
2. Click on the View tab and look for Hidden Files and Folders. You need to enable the
option Show hidden Files and Folders.
3. Click on <Apply> and <OK>.
4. Navigate to “C:\Documents and Settings\All Users\Application Data\FlightPrep”
In other words – Double-click on C:
Double-click on Documents and Settings
Double-click on All Users
Double-click on Application Data
Note: This was the hidden folder we needed to see.
Double-click on FlightPrep
5. Insert the portable device into a USB port.
6. Click-and-drag the NData folder to the portable device. Due to the relatively slow speed
of the USB port, this may take 10-15 minutes.
230
FlightPrep™ User Manual
GE
G+
K
Pro
When this is done, click on the icon at the bottom of the screen to safely remove the
device. Wait until you have the o.k. to remove it.
7. Take to portable device and repeat steps 1-6 above. When you get to step 7 you are
going to click-and-drag from the portable device into the FlightPrep folder on the second
computer (as located in steps 1-4). You will probably get a warning about a folder exists
by the same name. Click <Yes> or <Ok> to overwrite the existing folder.
When this is complete, click on the icon at the bottom of the screen to safely remove the
device. Wait until you have the o.k. to remove it. The update should be finished.
Start the software and confirm the program shows the data is current.
File transfer on a Vista machine.
1. On the computer that receives the data, go to the Control Panel and open Appearance
and Personalization, then Folder Options. Note: if you are using the Classic View of
the Control Panel, simply open Folder Options.
2. Click on the View tab and look for Hidden Files and Folders. You want to click on the
button Show hidden Files and Folders.
3. Click on <OK>.
4. Navigate to C: ProgramData FlightPrep.
5. Insert the portable device into a USB port.
6. Click-and-drag the NData folder to the portable device. Due to the relatively slow speed
of the USB port, this may take 10-15 minutes.
When this is done, click on the icon at the bottom of the screen to safely remove the
device. Wait until you have the o.k. to remove it.
8. Take to portable device and repeat steps 1-6 above. When you get to step 7 you are
going to click-and-drag from the portable device into the FlightPrep folder on the second
computer (as located in steps 1-4). You will probably get a warning about a folder exists
by the same name. Click <Yes> or <Ok> to overwrite the existing folder.
When this is complete, click on the icon at the bottom of the screen to safely remove the
device. Wait until you have the o.k. to remove it. The update should be finished.
Start the software and confirm the program shows the data is current.
If one machine is a Vista and the other is a XP then use the appropriate file location as
indicated above.