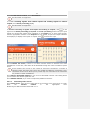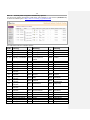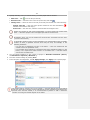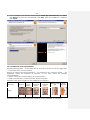
1
Administrator Guide Version 2.0 Ness Macroscop VMS System 2 Table of contents Introduction ................................................................................................................ 8 1. Macroscop features and products ............................................................................. 9 1.1. 1.2. 2. 1.1.1. Macroscop license types ....................................................................... 9 1.1.2. USB-key protection .............................................................................10 1.1.3. Software key protection .......................................................................10 Macroscop specification ...............................................................................11 1.2.1. Technical Characteristics ......................................................................11 1.2.2. Functional features .............................................................................11 1.2.3. Intelligent Modules ..............................................................................14 1.2.4. Integration with other systems .............................................................15 1.3. MacroscopSupply Package ...........................................................................15 1.4. What's new ................................................................................................17 How to install, update and delete Macroscop ............................................................20 2.1. Guidelines on hardware platform choosing and configuration ............................20 2.2. Guidelines on Windows settings .................................................................... 20 2.3. 2.4. 2.5. 3. Macroscop licenses ...................................................................................... 9 Installing Macroscop software.......................................................................21 2.3.1. Installing Macroscop Server ................................................................. 22 2.3.2. Installing Macroscop Standalone ...........................................................24 2.3.3. Installing Macroscop Client ................................................................... 26 2.3.4. Installing Macroscop Monitoring ............................................................27 Updating Macroscop software .......................................................................28 Removing Macroscop software ......................................................................29 2.5.1. Remove software and save the settings .................................................29 2.5.2. Complete removal of server products ....................................................30 Macroscop Configurator — Macroscop video surveillance system setup ........................31 3.1. Launching the Macroscop Configurator application ..........................................31 3.2. Installing and updating the license ................................................................36 3.2.1. Installing and updating the USB-key license ...........................................37 3.2.2. Installing and updating the software key license .....................................38 3.3. Applying settings and controlling configuration ...............................................39 3.4. Server settings ...........................................................................................40 3.4.1. Connecting servers to system ...............................................................42 3.4.1.1. Multiserver configuration: creating ................................................45 3.4.1.2. Multiserver configuration: connecting a new server .........................45 3.4.1.3. Multiserver configuration: connecting a server in operation ..............45 3.4.1.4. Multiserver configuration: distributing channels by servers ...............47 3.4.1.5. Multiserver configuration: settings features .................................... 48 3.4.1.6. Replication server settings ...........................................................48 3.4.2. Archive location settings ......................................................................50 3.4.3. Network server settings .......................................................................52 3.4.4. Connecting mobile devices ................................................................... 52 3 3.5. 3.4.5. Additional server settings .....................................................................54 3.4.6. Configuring network drives .................................................................. 54 3.4.7. Client autoupdate settings ................................................................... 54 3.4.8. Push-agent setup (connection to Cloud).................................................55 3.4.9. Server information ..............................................................................55 Camerasettings ..................................... 3.5.1. Camera auto search and connection ......................................................58 3.5.2. Channel connection settings ................................................................. 59 3.5.2.1. Connecting video servers .............................................................60 3.5.2.2. Connecting DVRs ........................................................................61 3.5.2.3. Configuring memory card access parameters .................................. 62 3.5.2.4. Connecting panoramic cameras ....................................................62 3.5.3. Configuring data streams .....................................................................63 3.5.3.1. Using two streams ......................................................................65 3.5.3.2. Archiving settings .......................................................................66 3.5.4. Intelligence analysis system settings .....................................................68 3.5.4.1. Motion detector settings ..............................................................68 3.5.4.2. Sound detector ...........................................................................71 3.5.4.3. Perspective settings .................................................................... 71 3.5.4.4. Configuring face detection module ................................................72 3.5.4.5. Configuring interactive search and object interception modules ........72 3.5.4.6. Configuring external intelligent modules ........................................72 3.5.5. Patrolling ...........................................................................................73 3.5.6. Scheduled tasks .................................................................................73 3.5.7. Scenarios (response to system events) ..................................................76 3.5.7.1. Limit by start time condition .........................................................77 3.5.7.2. Movement event .........................................................................77 3.5.7.3. Loud sound event .......................................................................77 3.5.7.4. Lost connection with camera event................................................77 3.5.7.5. Established connection with camera event .....................................77 3.5.7.6. Face detection event ................................................................... 77 3.5.7.7. Camera input signal event ...........................................................77 3.5.7.8. No connected camera event .........................................................78 3.5.7.9. Analog camera connection fail event..............................................78 3.5.7.10. User alarm event ........................................................................78 3.5.7.11. External alarm start event............................................................78 3.5.7.12. End of external alarm event .........................................................78 3.5.7.13. Lost luggage detected event .........................................................79 3.5.7.14. Inactive zone event .....................................................................79 3.5.7.15. Recognized license plates event ....................................................79 3.5.7.16. Request to open gate event..........................................................80 3.5.7.17. Request to close gate event .........................................................80 3.5.7.18. Large crowd of people event .........................................................80 3.5.7.19. Siemens DMS8000 event .............................................................80 4 3.5.7.20. Large number of people in the queue event .................................... 80 3.5.7.21. Smoke event ..............................................................................80 3.5.7.22. Fire event ..................................................................................81 3.5.7.23. Video surveillance sabotage event .................................................81 3.5.7.24. Moving objects tracking event ......................................................81 3.5.7.25. Add a record action .....................................................................81 3.5.7.26. Remove a record action ...............................................................81 3.5.7.27. Set a camera position action ........................................................82 3.5.7.28. Send an SMS notification action ....................................................82 3.5.7.29. Send an e-mail notification action .................................................83 3.5.7.30. Send a signal to the camera output action .....................................84 3.5.7.31. Run external application on the server action ................................. 85 3.5.7.32. Alarm generation function ............................................................86 3.5.7.33. Save frame action .......................................................................86 3.5.7.34. Pause action ...............................................................................86 3.5.7.35. Enable camera AF mode action .....................................................87 3.5.7.36. Activate camera washer action .....................................................87 3.5.7.37. Disable decimation when recording to the archive action ..................87 3.5.7.38. Barrier closed notification action ...................................................88 3.5.7.39. Barrier open notification action .....................................................88 3.5.8. Configuring multicast ..........................................................................88 3.5.9. Cloud broadcast settings ......................................................................89 3.5.10. Group settings ....................................................................................89 3.5.11. Indication of connected modules ...........................................................90 4. 3.6. User right settings ......................................................................................90 3.7. Object plans ...............................................................................................92 3.8. Setting screen profiles .................................................................................96 Setting Macroscop Client and Macroscop Standalone Viewer.......................................98 4.1. Autorun of Macroscop Client and Macroscop Standalone Viewer ........................98 4.2. Configuring the current workstation ..............................................................99 4.2.1. Interface.......................................................................................... 100 4.2.2. Video .............................................................................................. 101 4.2.3. Sound ............................................................................................. 103 4.2.4. Scheduled Guard mode...................................................................... 104 4.2.5. User alarm ....................................................................................... 106 4.2.6. Monitors .......................................................................................... 107 4.2.7. Network........................................................................................... 108 4.2.8. Available channels ............................................................................ 109 4.2.9. Available grids .................................................................................. 110 4.2.10. PTZ Cameras control panel ................................................................ 111 5. 6. Sabotage detection module: ................................................................................ 112 Moving object tracking module ............................................................................. 113 6.1. Description .............................................................................................. 113 6.2. Setting .................................................................................................... 113 5 7. 8. 6.2.1. Camera position ............................................................................... 113 6.2.2. Configuring the Macroscop motion detector for the module .................... 113 6.2.3. Configuring the moving object tracking module .................................... 113 People counting module ...................................................................................... 118 7.1. Description .............................................................................................. 118 7.2. Configuring cameras and the module .......................................................... 118 7.2.1. Camera position ............................................................................... 118 7.2.2. Configuring the Macroscop motion detector for the module .................... 118 7.2.3. Configuring the module ..................................................................... 119 License plates recognition module......................................................................... 121 8.1. Module description .................................................................................... 121 8.2. Licensing and module features ................................................................... 122 8.3. Installing and updating the module ............................................................. 123 8.4. 8.3.1. Installation....................................................................................... 124 8.3.2. Update ............................................................................................ 125 Configuring cameras and the module .......................................................... 126 8.4.1. Guidelines on camera choosing and configuration ................................. 126 8.4.1.1. Choosing a camera .................................................................... 126 8.4.1.2. Camera settings ....................................................................... 126 8.4.2. Camera position and field of view ....................................................... 126 8.4.3. Configuring the module ..................................................................... 127 8.4.4. Macroscop barrier operation ............................................................... 134 8.4.4.1. Testing camera alarm outputs .................................................... 134 8.4.4.2. Barrier control scenario .............................................................. 135 8.5. Troubleshooting and replacing of license plate recognition module protection key firmware ............................................................................................ 137 8.5.1. Troubleshooting ................................................................................ 137 8.5.1.1. HASP key driver ........................................................................ 137 8.5.1.2. License plate recognition module key options ............................... 139 8.5.1.3. License plate recognition library efficiency .................................... 140 8.5.1.4. Module operation ...................................................................... 141 8.5.2. 9. HASP key firmware ........................................................................... 143 Crowd counting module ....................................................................................... 145 9.1. 9.2. Description .............................................................................................. 145 Configuring cameras and the module .......................................................... 145 9.2.1. Camera position ............................................................................... 145 9.2.2. Configuring the software motion detector for the module ....................... 145 9.2.3. Perspective settings .......................................................................... 145 9.2.4. Configuring the module ..................................................................... 146 10. Heat map module ............................................................................................... 148 10.1. Description .............................................................................................. 148 10.2. Configuring cameras and the module .......................................................... 148 10.2.1. Camera position ............................................................................... 148 10.2.2. Configuring the Macroscop motion detector for the module .................... 150 6 10.2.3. Configuring the module ..................................................................... 150 11. Auto Zoom ........................................................................................................ 152 11.1. Configuring the function ............................................................................ 152 12. Face recognition module ...................................................................................... 153 12.1. Installing and licensing the module ............................................................. 153 12.2. Guidelines and requirements ...................................................................... 155 12.3. Configuring the module ............................................................................. 156 13. Abandoned object detector .................................................................................. 159 13.1.1. Configuring the module ..................................................................... 159 14. People counting in queuemodule .......................................................................... 162 14.1. Configuring cameras and the module .......................................................... 162 14.1.1. Camera position ............................................................................... 162 14.1.2. Configuring the module ..................................................................... 164 15. Fisheye cameras dewarping module ...................................................................... 166 15.1. Configuring the module ............................................................................. 166 16. Activity monitoring module .................................................................................. 168 16.1. Configuring cameras and the module .......................................................... 168 16.1.1. Camera position ............................................................................... 168 16.1.2. Configuring the module ..................................................................... 168 17. Smoke and fire detector ...................................................................................... 171 17.1. Configuring the module ............................................................................. 171 18. Macroscop Monitoring.......................................................................................... 173 18.1. Description .............................................................................................. 173 18.2. Launching Macroscop Monitoring ................................................................ 173 18.3. Configuring monitoring .............................................................................. 175 19. Additional features .............................................................................................. 176 19.1. Macroscop Status Info ............................................................................... 176 19.2. Macroscop Player ...................................................................................... 176 19.2.1. Viewing clips .................................................................................... 177 19.2.2. Clip export ....................................................................................... 180 19.2.2.1. Export to MCM .......................................................................... 181 19.2.2.2. Export to AVI ........................................................................... 182 19.3. Driver package for cameras and devices (DevicePack) ................................... 184 19.3.1. Installing DevicePack......................................................................... 184 19.3.2. Removing DevicePack........................................................................ 184 19.4. Macroscop Virtual Ip Camera utility ............................................................. 184 19.4.1. Installing Macroscop Virtual Ip Camera ................................................ 184 19.4.2. Configuring Macroscop Virtual Ip Camera ............................................. 185 19.4.3. Using Macroscop Virtual Ip Camera ..................................................... 187 19.4.3.1. Webcam broadcast .................................................................... 187 19.4.3.2. MCM clips broadcast .................................................................. 187 19.4.3.3. Connecting to Macroscop server .................................................. 187 19.5. Macroscop SDK ........................................................................................ 188 19.5.1. Creation of plugins by third-party developers ....................................... 188 7 19.5.2. Integration with external systems ....................................................... 189 19.5.3. Website video broadcasting ................................................................ 189 20. Applications ....................................................................................................... 190 20.1. Technical support service ........................................................................... 190 20.2. System log files ........................................................................................ 190 20.3. Viewing archives in case of failures ............................................................. 191 20.4. Optimal camera settings ............................................................................ 194 8 Introduction This guide describes the configuration process for the Macroscop software suite designed for intelligent processing, archiving and display of video data from distributed video surveillance systems based on IP cameras. The guide may contain screenshots of previous versions of Macroscop. In this case it is supposed that the functionality described in these screenshots have not changed in the current version of Macroscop. After the release and publication of the next version of Macroscop software the manual can be supplemented with changes not included in the version of the manual included in the Macroscop software installation package. To receive up-to-date documentation, please check the publication date of the Macroscop Administrator's Guide at www.macroscop.com and, if the newer version is available, download it from the Support / Documentation page. The documentation kit also includes the Macroscop User Guide describing the end-user experience with Macroscop software. 9 1. Macroscop features and products Macroscop is a software suite designed for intelligent processing, archiving and display of video data from distributed video surveillance systems based on IP cameras. 1.1. Macroscop licenses One of the two protection schemes is used to license Macroscop server software: USB-key or software key. One server can be protected with only one type of key. Licensing of Macroscop Client software is not required. Macroscop licenses vary in type, bit depth, number of channels and additional features. Product functionality is determined by the type of license and does not depend on the installation method of Macroscop server software. Thus, when changing the type of license there is no need to reinstall Macroscop server software — just reinstall the license file (or software key.) For more information on Macroscop features depending on the types of licenses see the Macroscop Specification. 1.1.1. Macroscop license types There are three types of Macroscop licenses: Macroscop ML — used to create a small IP video surveillance system with up to 20 IP cameras. It allows building a system with one server and two monitoring workstations. ML version does not support intelligent modules but, if necessary, can be extended to LS or ST versions. Macroscop LS — used to create an IP video surveillance system with up to 400 IP cameras. It allows combining up to 5 servers and 10 monitoring workstations into a single system; supports any intelligent modules. All modules for the LS version are available at an additional cost. If necessary, this version can be expanded to ST. Macroscop ST — used to create scalable IP video surveillance systems. It allows creating a system with an unlimited number of IP cameras, servers and monitoring workstations. This version includes free modules of face detection, object interception, interactive search in archive and tracking. All other modules for the ST version are available at an additional cost. 10 1.1.2. USB-key protection License protection using USB-key consists of two components: a USB-key itself and a license file. The license file is installed on the same server with the USB-key. One server can use only one Macroscop software protection USB-key. Key series and number are marked on the edge of the key (for example, 186Z 2B217205.) The license file has the extension *.lic and should conform to the USB-key: number on the key must match the number in the license file name. The table shows the explanation of the license file name: Explanation of the license file name on the example of 2B217205_MC_ST_x64_c100_f100_ s100_a100_p10_fr10_apr10_pcnt10_tr100_crwdcnt10_heat10_queue10_abnd100_ dvr10.lic Number of the key to be used with the file 2B217205 License type: ML / LS / ST ST Bit depth: x64 — for 64-bit Macroscop licenses; 32-bit Macroscop license do not have this x64 parameter in the file name The number of IP cameras (channels): c — total 100 100 f — with face detection support 100 s — with interactive search support 100 a — with sound support 10 p — with camera control support (PTZ) 10 fr — with face recognition support (using base) 10 apr — with license plates recognition support 10 pcnt — with people counting support 100 tr — with tracking moving objects support 10 crwdcnt — with people groups search support (crowd detector) 10 heat — with heat maps support 10 queue — with queue counting support 100 abnd — with left objects detector support 10 dvr — with DVR channel support (reserved) If any of the quantitative parameters = 0, it is not included in the license file name If you extend the license (increasing the number of channels, adding features), the USB-key should not be replaced — just install a new license file. USB-key is not assigned to a specific computer. For example, to move a video server from computer A to computer B, you need to remove the USB-key from the computer A and install it on the computer B — in this case the Macroscop server software on your computer A will cease to operate. 1.1.3. Software key protection License protection using a software key includes the key file assigned to a specific computer. After activation the key can not be moved to another computer. The key is assigned to server hardware components (equipment): On real machines the key is assigned to serial numbers of the system drive and the motherboard. On virtual machines the key is assigned to the MAC address, the CPU features and to the UUID of the virtual machine (the system will run only if all three parameters match.) 11 1.2. Macroscop specification 1.2.1. Technical Characteristics Feature Description Operating Systems Microsoft Windows: 7/8 Microsoft Server 2008 R2/2012 Microsoft Windows Embedded 8 Standard Windows Versions 32-bit (x86), 64-bit (x64) IP Camera, IP Video Server Brands, DVRs 3000+ models 100+ manufacturers Video Stream Formats MJPEG, MPEG-4, H.264 Audio Stream Formats PCM, G.711U, G.711A, G.722.1, G.726, G.729A, GSM-AMR, AAC Supported Standards ONVIF (Profile S), PSIA (ver. 1.2) Resolution Limited only by the camera Frame Rate Limited only by the camera License Types Feature Number of cameras on one server ML LS ST Up to 20 Up to 80 Not limited Number of servers in the system 1 Up to 5 Not limited Number of remote workstations Up to 2 Up to 10 Not limited 1.2.2. Functional features Feature Description Software Motion Detector Detects movement in the frame, including by creating several detection zones and limiting the dimensions of detected events individually for each zone and has a configurable detection rate Archival Storage Modes Constant; at the operator's request; when motion is detected by the camera; when Macroscop detector instructs it to; on a schedule (recording modes may be combined); upon a system event (scenario) Archive Materials Storage Format In the format received from the IP camera Archive Size You can create different archive sizes per any camera or any group of cameras. Archive Browsing Modes Browsing using a separate channel; several channels simultaneously; reverse playback File Playback Speed From single-frame playback up to x120 speed up Real Time Surveillance Directly on video surveillance server; from remote workstation connected to a server; from remote workstation connected to a camera Screen Profiles The ability to customize individual screen profiles, displaying a specific set of cameras in multiscreen mode Automatic change of screen profiles The ability to change the screen profiles automatically Multiple monitors support on a single remote workstation Limited only by the video card of a remote workstation 12 Feature Description Alert monitor Using one of the monitors as an Alert Monitor for the displaying of video streams of the channels assigned under protection when there is an alert event on these channels The ability to automatically exclude channels from the grid after a specified period of time passes after the alert. The ability to display alerts only on the alert monitor. System and alarm event log The list of system and alarm events, including missed alarms Two video streams support Archiving: high-resolution stream (default) or low-resolution stream (adjustable.) Displaying in the multiscreen mode: low-resolution stream (default) or high-resolution stream (adjustable.) Displaying in the full-screen mode: high-resolution stream (default) or low-resolution stream (adjustable.) Decoding H.264 on GPU Decoding H.264 video streams on graphic card to display video on the screen of remote workstation. It allows reducing the CPU load during display. The DXVA technology is used. Video Stream Buffering Increases the smoothness of the display due to frames buffering Video Export In AVI format; proprietary Macroscop format. Archive export via multiple channels (with the possibility of simultaneous browsing through exported fragments using a special tool) Digital Zoom Zoom in real time and while viewing archive Auto Zoom Displaying the separate enlarged area with moving objects Frame Export Saving frame and zoomed frame segment in JPEG, PNG, BMP; printing frame/frame segment Audio Broadcast Broadcast and archiving of audio from IP cameras Duplex Audio Mode Sound transmission from the operator workstation to the camera’s speaker or audio output Support of camera signal inputs Registration of alarm signals sent by camera PTZ cameras Control of PTZ cameras using the client interface: camera rotation, zoom in/out (optical zoom), focus Transition by presets Transition by presets of PTZ camera Auto patrolling (Tours) Creation of own tours (routes of transition by presents) MultiDome support Support of the MultiDome function implemented in some cameras AreaZoom support Support of the AreaZoom function implemented in some cameras Panoramic camera support Support of various modes used in panoramic cameras Expansion of a spherical image from the FishEye camera. Expands an image from the FishEye camera in three versions: as a pie pan, in simulation PTZ mode, in 4x90 mode. Expansion in real time and while playing archive SD card archive support Access to files located on the camera SD card, incl.: synchronous archive viewing from SD cards of multiple cameras; synchronization of video server archive with an SD card (for example, if a camera worked offline for some time, without server connection) Active Directory Integration Support of authentication with Active Directory accounts Access rights differentiation Differentiation of access rights of users to specific functions and cameras 13 Feature Description Object plans support 2D visualization of objects; binding cameras, sensors and relays to an object plan; binding external sensors to camera signal inputs; binding external devices to camera signal outputs; displaying camera fields of view; displaying data from certain intelligent modules on camera fields of view Web-based interface Surveillance of real time video and archive viewing through any browser with Silverlight support Mobile client Surveillance of real time video and archive viewing through devices based on iOS, Android, Windows Phone. iOS and Android clients support sound broadcast and PTZ management User scenarios The ability to customize the system response to various events: archiving management, notifications by e-mail and SMS, signals to the outputs of cameras, external applications launch, etc. Cameras auto search The ability to automatically search for cameras that support ONVIF or UPnP detection protocol in a local network Camera IP-address setup The ability to perform camera IP-address setup from Macroscop, without connection to a camera interface Camera network ports setup The ability to specify camera network ports (when using non-standard ports of cameras for video streaming) Archive replication Automatic replication (duplication) of an archive to a dedicated replication server Server backup Hot backup: in case of server failure, recording is redirected to a backup server Video streams proxy The ability to use one of the servers to broadcast video streams to remote workstations from other video servers System health monitoring Tracking the current status of various parameters of video servers and camera connections (server monitoring) IP audio co-encoders support Rea time archiving and playback of individual audio channels (currently only supported by CSA "Echolot") Version compatibility Interaction of client software with server software of other versions (other than the client software version) Client software auto-update Automatic auto-update of client software when connected to a server (adjustable) Driver package for cameras and devices (DevicePack) It provides backward compatibility of devices and cameras drivers DVR, video server and video decoder support The ability to view and archive video and audio from cameras (including analog) connected to video decoders, video recorders and video servers in real time; support of PTZ functions of such cameras. The ability to view DVR archive (devices must support data transfer in MJPEG, MPEG-4 or H.264; limited number of devices) IPv6 support Connecting cameras to IPv6 addresses, including auto search for such cameras in a network. Multicast The ability to broadcast by server separate channels Broadcast to the Cloud The ability to broadcast video streams from a server to the Cloud built on the basis of Macroscop Cloud Specified features are not available for all types of licenses or require special additional licenses. 14 1.2.3. Intelligent Modules License Types Feature ML Interactive Search in Archive: Search by position in frame, size, form, object color, by signs; including object search by multiple cameras and search for people in groups — Object Interception Module: object interception by photo, pattern.; including interception by several cameras — Inter Camera Tracking: tracking moving objects in the field of view of multiple cameras, with the possibility of constructing object movement route on object plans — Moving Object Tracking Module: tracking moving objects in a camera's field of view. Alert generation on intersecting lines and borders (one way or both ways), entering the dedicated zone, prolonged stay in the zone, alert search in archive; interactive archive search on intersecting lines set by an operator — People Counting Module: counting the number of entered and left visitors in real time — either through one or several inputs; creating reports — Face Detection Module: face detection in the frame — Face Recognition Module: face detection and person’s identification using the face database. — License Plates Recognition Module for 91 countries: detection of license plates in the frame; events archive; maintaining a database of license plates with different settings for each license plate; maintaining multiple lists; interception of license plates by the list; barrier control by the list or by an operator command; export to Excel; determining the movement direction; output of license plates on bases of different color, depending on groups; differentiation of access rights; import of license plates databases using external files — Crowd Detection Module: detects crowds of people in the frame — Sabotage Detection Module: detects camera defocusing, turnaway, illumination and overlap Heat Map Module: creates heat maps based on traffic in different areas of the frame — Lost Luggage Detector: detects left objects and highlights them up on the screen — Queue Control Module: counts people in queues; if necessary — it notifies the operator should the quantity of people exceed an indicated limit in a given queue, allows building temporary reports — Loud Sound Detector Personnel Activity Control Module: allows monitoring staff activity time at workstations Smoke and Fire Detection Module: detects the presence (emergence) of smoke and/or fire These features require additional licenses. — — LS ST 15 1.2.4. Integration with other systems License Types Feature ML LS ST Open SDK for developers: contains a list of API, Json- and XML-requests, as well as examples in C #; allows integrating Macroscop with various applications Flash-component for web-sites: allows broadcasting video and audio on a website, as well as controlling PTZs via the site Integration with Siemens DMS8000 access control and fire alarm system These features require additional licenses. 1.3. MacroscopSupply Package The latest version of Macroscop and its documentation are available at www.macroscop.com. Documentation — from the "Support / Documentation" page; installation packages — from the "Support / Software Installation Packages" page. Each computer with Macroscop server software installed requires the following: either a separate USB-key with an assigned license file or a software protection key. The software package with USB-key includes the following: • CD with Macroscop software suite and documentation; • Software protection USB-key; • License file. Depending on the product delivery scheme the license file can be delivered in the following ways: • On the CD with Macroscop software suite; • On a separate medium; • By email. Macroscop software suite disk contains eight installation packages: 32-bit Macroscop Server Package; 64-bit Macroscop Server Package; 32-bit Macroscop Client Package; 64-bit Macroscop Client Package; 32-bit Macroscop Standalone Package; 64-bit Macroscop Standalone Package; 32-bit Macroscop Monitoring Package; 64-bit Macroscop Monitoring Package. If the software protection key is selected, a customer receives only a key identifier when purchasing a license — software and documentation are to be downloaded from macroscop.com by the customer. Software installation packages Each installation package includes the basic software (with corresponding bit depth), as well as additional components required for the operation. 16 Software and additional components Macroscop Server Macroscop Client Macroscop Standalone Macroscop Monitoring Macroscop Configurator Macroscop Status Info Macroscop Player Archive local viewing and backup Log packing License installation "Enable/disable debug mode" command Server — — — Client — — — — — Package Standalone — — — — Monitoring — — — — — — — — Macroscop Server — server software for a distributed network video surveillance system used to receive, analyze and archive video data from IP cameras. It is installed on a single server computer, where the data are processed and the archive is stored. Macroscop Server is a Windows service; it is launched at computer startup and runs in the background. A computer must by highly reliable and ensure trouble-free operation. The server requires a USB-key and a license file (supplied) for operation. Macroscop Client — network client of a distributed video surveillance system that allows viewing video in real time and from the archive, controlling cameras, processing audio and intelligent modules. It is installed on the computers of operators, security chief and other surveillance system users. Macroscop Client does not require a USB-key and a license file for operation. Macroscop Standalone — software that combines the functions of a video surveillance system server and client. It is installed on a single server computer, where the data are processed, the archive is stored and real-time video streams are viewed. Macroscop Standalone is not a Windows service — it is separately launched software with window interface. A computer must by highly reliable and ensure trouble-free operation. Macroscop Standalone requires a USB-key and a license file (supplied) for operation. Macroscop Monitoring — software designed to monitor the condition of components of a distributed network video surveillance system. Macroscop Configurator — software used to configure the Macroscop video surveillance system. Macroscop Status Info — software used to notify a user about the current server state. Macroscop Player — software used for quick viewing of video files exported in the internal Macroscop format (*.MCM). Archive local viewing and backup — software used to view and copy archived files. Log packing — a tool used to extract system logs and record them in a single archive file. License installation — a tool used to install the license for Macroscop Server and Macroscop Standalone. Enable/disable debug mode command — enable/disable debug mode that allows recording more detailed information in system log files. 17 1.4. What's new Version 2.0 System Implemented the compatibility of different versions of server and client (only for 2.0 and later.) Implemented IPv6 support. Added the ability to save only reference frames for H.264 codec. Added system events (for scenarios): Analog camera connection failure; Smoke spread; Ignition. Added the action (to use in scenarios and scheduled tasks): Disable decimation when recording to the archive. Intelligent Modules Developed a smoke and fire detection module. Modified license plates recognition module configuration: added time settings of issuance of license plates. Macroscop Client Redesigned Macroscop Client. Added 4x90 expansion mode for FishEye. Implemented expansion for video archive playback for FishEye. Implemented archive export across multiple channels. Implemented Active Directory integration Improved the alert monitor functionality: - added the ability to automatically exclude channels from the grid after a specified period of time passes after the alert; - added the security regime option "Display only on alert monitor" (in this case alerts will not be displayed on other monitors.) Mobile clients Implemented PTZ management for Android mobile client. Tools and SDK Released a tool to view downloaded archive via several channels. Modified Flash-component to be used on websites for video broadcast and camera control: added support for sound, archive view, PTZ controls. Version 1.12 Implemented the video surveillance system event log. Implemented H.264 decoding in iOS mobile client. Developed a driver package for cameras and devices (DevicePack.) Modified an interactive search box. Modified object plans: ̶ display of sensors and relays; ̶ display of camera fields of view; ̶ display of heat maps. Implemented a loud sound detector. Implemented a personnel activity control module. 18 Introduced integration with Siemens DMS8000 access control and fire alarm system. Implemented display adaptive mode for clients. Implemented the possibility to import license plate database from external files. Version 1.11 Changed archive search tools: - implemented universal window; - search speed increased by 3 times. Implemented a lost luggage detector. Implemented a queue control module. Introduced an expansion of a spherical image from the FishEye camera. Added the ability to set up camera IP-addresses from Macroscop. Added the ability to specify camera network ports (when using non-standard ports of cameras for video streaming.) Added the ability to broadcast by server separate channels. Added the ability to broadcast video streams from a server to the Cloud built on the basis of Macroscop Cloud. Improved the camera auto search mechanism. Reworked an archiving subsystem: - you can create different archive sizes per any camera or any group of cameras; - implemented archive synchronization on SD cards; - archive reading speed increased by 3 times. Object plan settings now allow assigning external sensors to camera alarm inputs. Implemented H.264 decoding in Android mobile client. Modified the face recognition module installation package. Version 1.10 Added a Heat map module. Implemented the possibility of using perspective settings for interactive search modules and counting of people in groups, which increased the speed and accuracy of the said modules. Added the Auto Zoom function — displays a separate enlarged area with moving objects. Modified a license plates recognition module; added the following features: - determining the movement direction; - output of license plates on bases of different color, depending on groups; - access rights differentiation; - automatic saving of frames with recognized license plates on disc; - added license plate recognition for another 47 countries. Implemented sound support in Macroscop Client for Android. Modified user interface for PTZ cameras. Modified user interface for configuring digital inputs/outputs. Improved performance of server and client Macroscop software: through the optimization of display and data intelligence analysis technology. Provided access to the archive on SD card, including synchronous archive viewing from SD cards (for some camera models.) Added new actions to scenarios: "Turn on the washer" and "Add an event to the client log." 19 Added new rights in user and group rights settings: connection via mobile devices and Web client; editing intelligent module data. Added the event log to Macroscop Client. Optimized client software auto-update when an updated version is released on the server, the client software is automatically updated. Macroscop Player now supports export to AVI. Version 1.9 Implemented the ability to count people moving in groups in a people counting module. Modified a license plates recognition module: redesigned user interface for "Observation" and "Archive" tabs; added the ability to view video archive via channels to the "Archive" tab; implemented recognition template customization from Configurator. Improved automatic channel adjustment by ONVIF: if a camera supports PTZ, the "PTZ Camera" option is enabled; if a camera supports audio reception, the "Sound recording" option is enabled; if a camera is panoramic, multiple channels are created (for example, if a camera has 4 zones, 4 separate channels are created.) Added the AreaZoom function (zoom of the selected area) for PTZ cameras. Added panoramic camera support. The system event "Lost connection with camera" was added to scenarios; it is generated if the connection with camera is not restored after a specified period after breakage. Implemented partial H.264 decoding, thereby reducing the computational load during motion detector usage for video streams in H.264 (in previous versions partial decoding was implemented only for MJPEG.) Developed MacroscopWeb2IpCam utility designed to connect webcams to Macroscop and to create virtual IP cameras on the basis of video clips stored in MCM format. Developed Flash-component to be used on websites for video broadcast. 20 2. How to install, update and delete Macroscop 2.1. Guidelines on hardware platform choosing and configuration You can calculate the minimum hardware platform requirements can be calculated online on www.macroscop.com, on the "Software for IP Cameras / Calculator" page. While selecting the hardware platform consider, if necessary, the potential increase in the number of channels. The drive subsystem must comply with the design load. It is recommended to use RAID to increase system speed and reliability; take into account the performance in case of drive failure. The server drive subsystem must also provide a certain reserve bandwidth (read rate) to allow convenient archive search. It is recommended to install two network interface controllers (NIC); configure one of them for camera subnet and another for Macroscop Client requests. Benefits: camera isolation, reduced network traffic in a public network. If network storages (NAS, SAN) are used to store archives, we recommend installing an additional NIC for these purposes. Provide reserve computer resources in the amount of 3% of CPU load per connected client for fast client request serving. The server drive subsystem must also provide a certain reserve bandwidth (read rate) to allow convenient archive search. When using the hot backup function consider that in case of failure of one of the servers its load is distributed on the others. For example, if there are only 2 servers, they work together and "backup" each other; each must have a capacity sufficient to handle all video streams from all cameras. To achieve maximum performance disable processor power-saving technologies before installing the OS: Cool'n'Quiet for AMD and SpeedStep or EIST for Intel (configured in BIOS, usually in Advanced / CPU.) If you use SATA-drives, do not forget to set AHCI value for SATA Mode (configured in BIOS, usually in Advanced / SATA; only for controllers that support this mode.) 2.2. Guidelines on Windows settings The computer must use one of Microsoft Windows operating systems provided in specification. If RAM capacity is 4 GB or more, use a 64-bit operating system, as well as 64-bit Macroscop license, since 32-bit operating systems cannot use more than 3 GB of RAM and each process (program) can use no more than 1.3 GB of RAM. 64-bit operating systems support 32-bit Macroscop licenses but it should be borne in mind that Macroscop Server and Macroscop Standalone will not be able to make full use of CPU and RAM. Macroscop Client does not depend on the license type, so we recommend installing the same version as your operating system. Install all Windows updates and then turn off Auto-update. Select the appropriate server time zone, specify the exact time in this time zone. Guidelines on Windows settings (for Windows 7): Control Panel Power Options: High Performance. Control Panel User Accounts User Account Control Settings: Never notify. Control Panel Network Web Networking Adapter Properties: Disable IPv6. We recommend disabling the firewall on your computer. If the security policy does not allow disabling the firewall, open a network port 8080 and — for camera connection — 80 (if RTSP video stream is used — open port 554.) Some cameras can receive control commands and transmit video streams using other ports — in this case open the appropriate ports. 21 Installed anti-virus should not scan HTTP and RTSP traffic, including input video streams from IP cameras, as this significantly reduces the system performance. Add Macroscop module executables to the list of trusted applications of anti-virus and firewall, as video stream checking requires significant computing resources. Some anti-virus software (such as NOD32) blocks video streams even when disabled, since they "embed" their own components at the level of system drivers when installed. Thus, to ensure correct operation and performance we recommend deleting anti-virus software from Macroscop video servers, if possible. 2.3. Installing Macroscop software During the installation use the account that has full access rights to the local computer on which Macroscop software is installed. When using the multiserver configuration the version numbers of merged Macroscop Server and/or Macroscop Standalone must match If NAT is used to access Macroscop server via customizable network ports, specify the external ports, i.e. ports for access from an external network. For example, if port 8080 is configured on a video server but it is displayed through port 60007 for an external network, specify port 60007. The problem of interaction between servers and Macroscop software located inside the same LAN may arise since they will interact via specified external addresses. To resolve this problem, set up SNAT so that when addressing to specific external addresses (ports) components are connected to each other through a local network. Close all Windows applications before installing Macroscop software; insert the disk with Macroscop software suite in a CD/DVD-ROM — an installation package should run automatically. If it does not or the installation package was downloaded via the Internet, run the MacroscopInstaller.exe file located in the root directory of the package Do not install Macroscop from installation packages located in subfolders of the Packages folder, since in this case additional drivers and libraries required for proper operation would not be installed. 22 The installer window opens (Fig. 1). Fig. 1. Installer 2.3.1. Installing Macroscop Server 1. If you use a Macroscop USB-key, plug it into a server USB-port. 2. In the installer window (Fig. 1), click "Install Macroscop Server (32 bit)" if you have a 32bit operating system and Macroscop license or "Install Macroscop Server (64 bit)" if you have a 64-bit operating system and Macroscop license. 3. Data collection and component installation windows will open. Installation of some drivers can take a long time; it may seem that the program is not responding. In fact it is a standard situation. In any case, wait for the language selection window. 4. Select the installation language and click OK. 23 5. If you have already installed Macroscop Server, the installation program prompts to uninstall the previous version. If you select Yes the previous version will be automatically removed. 6. After the necessary components are installed, the Macroscop Server installation wizard starts. Follow the instructions: 24 7. To exit the wizard, click Finish. 8. You will be prompted to run the configurator: if you want to set up the system immediately, click Yes — the Macroscop Configurator will start (for more information on Macroscop Configurator see Section 3 on page 31); if you want to set up the system later, click No. After the Macroscop Server is installed it runs automatically as a Windows system service. 2.3.2. Installing Macroscop Standalone 1. If you use a Macroscop USB-key, plug it into a server USB-port. 2. In the installer menu (Fig. 1), click "Install Macroscop Standalone (32 bit)" if you have a 32-bit operating system and Macroscop license or "Install Macroscop Standalone (64 bit)" if you have a 64-bit operating system and Macroscop license. 3. Data collection and component installation windows will open. Installation of some drivers can take a long time; it may seem that the program is not responding. In fact it is a standard situation. In any case, wait for the language selection window. 4. Select the installation language and click OK. 5. If you have already installed Macroscop Standalone, the installation program prompts to uninstall the previous version. If you select Yes the previous version will be automatically removed. 25 6. After the necessary components are installed, the Macroscop Server installation wizard starts. Follow the instructions: 7. To exit the wizard, click Finish. 8. The Macroscop Standalone main window opens: if you want to set up the system immediately, click Configurator — the Macroscop Configurator will start (for more information on Macroscop Configurator see Section 3 on page 31.) For the launch and setup procedures of the Macroscop Standalone video surveillance system server see Section 3 on page 31. 26 2.3.3. Installing Macroscop Client Your Macroscop Client version number should match a connected Macroscop Server (Macroscop Standalone, Macroscop NVR) version number. 1. In the installer menu (Fig. 1), click "Install Macroscop Client (32 bit)" if you have a 32-bit operating system or "Install Macroscop Client (64 bit)" if you have a 64-bit operating system. 2. Select the installation language and click OK. 3. If you have already installed Macroscop Client, the installation program prompts to uninstall the previous version. If you select Yes the previous version will be automatically removed. 6. After the necessary components are installed, the Macroscop Client installation wizard starts. 27 7. To exit the wizard, click Finish. 2.3.4. Installing Macroscop Monitoring 1. In the installer menu (Fig. 1), click "Install Macroscop Monitoring (32 bit)" if you have a 32-bit operating system or "Install Macroscop Monitoring (64 bit)" if you have a 64-bit operating system. 2. Select the installation language and click OK. 3. If you have already installed Macroscop Monitoring, the installation program prompts to uninstall the previous version. If you select Yes the previous version will be automatically removed. 28 4. The Macroscop Monitoring installation wizard starts. Follow the instructions: 5. To exit the wizard, click Finish. 2.4. Updating Macroscop software Macroscop software is updated by installing the newest version of the product "on top" of the installed one (see Installing Macroscop software.) During the installation program files of the previous version are removed but all settings, the archive and the license are saved. Thus, no additional setup is required after update. Only software with the same name and bit depth can be updated. For example, if you previously installed Macroscop Server (32 bit), choose Macroscop Server (32 bit) for update. You can configure automatic update for Macroscop Client (see Client Autoupdate) The latest versions of Macroscop software are available on the Macroscop website in Support/Software Installation Packages, documentation — Support / Documentation. If you change the license but the product version and bit depth remain the same, software update is not needed — just install a new license file or software key (see License installation.) 29 2.5. Removing Macroscop software Depending on the purpose, Macroscop software can be removed in one or two steps: Step 1: Remove software and save the settings — only executable files and libraries are removed; all settings, the license and the archive are saved. This procedure is used only if it is planned to install Macroscop software with the same name and bit depth later (the same procedure is performed automatically when you update your Macroscop software.) Step 2: Complete removal of server products — all settings and the license are removed. This procedure is used if it is planned to install Macroscop server software of another name or bit depth later or completely remove it from the computer. 2.5.1. Remove software and save the settings Method 1 (via the Start Menu): Select Start / All Programs / (Macroscop product name) / Delete (Macroscop product name.) Method 2 (via the Control Panel): Open the Control Panel (Start / Control Panel.) If the Category option is selected — change it to Large icons or Small icons. Open Programs and Features. 30 Select the Macroscop product to be removed, right-click it and select Delete in the pop-up menu. 2.5.2. Complete removal of server products Complete removal of Macroscop server products can be performed only after the Remove software and save the settings option was used. Remove the Macroscop product installation folder from drive. The table below shows the (default) location of software installation folders depending on bit depth of Windows and Macroscop software: Bit depth Windows Macroscop 64-bit 64-bit 32-bit 64-bit 32-bit 32-bit 64-bit 64-bit 32-bit 64-bit 32-bit 32-bit Default location of installation folder Macroscop Server C:\Program Files\MacroscopServer C:\Program Files (x86)\MacroscopServer C:\Program Files\MacroscopServer Macroscop Standalone C:\Program Files\MacroscopStandalone C:\Program Files (x86)\MacroscopStandalone C:\Program Files\MacroscopStandalone 31 3. Macroscop Configurator — Macroscop video surveillance system setup The Macroscop video surveillance system is configured using the Macroscop Configurator application. Macroscop Configurator allows creating and editing Macroscop system configuration. This configuration includes: camera (channel) settings; server settings; user right settings; object plan settings; view (screen profile) settings. Furthermore, Macroscop Configurator allows you to: install licenses; save the current configuration to a file; download the previously saved configuration from a file; Below is a list of procedures that must be performed after installing Macroscop Server (or Macroscop Standalone) to start full-scale operation: 1. Start Macroscop Configurator, enter IP-address and server network port (default — 8080), user name and password (default — root with no password.) On first launch you will be prompted to install a license. The procedure for installing a license is given in 3.2 on page 36. 3. Configure server parameters using Macroscop Configurator (see Section 3.4 on page 40.) 2. Set up video surveillance cameras (connection, archiving settings, intelligent functions, etc.) using Macroscop Configurator (see Section Ошибка! Источник ссылки не найден. on page Ошибка! Закладка не определена..) 3. If necessary, use Macroscop Configurator to configure system user accounts (see Section 3.6 on page 90.) 4. Apply the configuration and close Macroscop Configurator (see Section 3.2.2 on page 38.) 5. Install and run Macroscop Client, if necessary — adjust display settings on a client workstation. 3.1. Launching the Macroscop Configurator application Macroscop Configurator is included in all Macroscop video surveillance system packages. Launch video surveillance servers before starting the configurator. For server configuration use Macroscop Configurator the same version as Macroscop Server. System configuration is stored on each assigned server. If you change the configuration Macroscop Configurator automatically uploads it to each server. 32 There are several ways to run the application: Method 1. Launch using the Start Menu or the desktop shortcut. Go to Start / All Programs / Macroscop Server (or Client) / Macroscop Configurator or run the program using the Macroscop Configurator shortcut on the desktop. Getting Started window opens, allowing you to select one of the following actions. 33 Available actions: connection to the server selected from the list; connection to the not listed server; editing server settings; license installation; creating an empty configuration; loading a configuration file. To show/hide the list of additional actions, click Other actions. If you select any action, an authorization window will open. To continue, enter a username with rights to configure the specified server (configuration) and password. You can use two types of accounts for authorization — Macroscop and Active Directory. When you first install Macroscop Server, a default root user with no password and full rights is created in the system (account type — Macroscop.) We recommend changing this username and password when setting up user rights. Client connection default port — 8080. If necessary, it can be changed in Macroscop Configurator. If you merge multiple servers into a single video surveillance system the configuration becomes common to all servers, so connection to any of the system server is considered as connection to the system. When you connect to a server can use any one of its corresponding IP-address. For example, if a server has two NICs — one with "internal" IP-address in the local company network, another with "external" IP-address on the Internet, you can use the "internal" IP-address when connecting to the local network, and the "external" one when connecting to the Internet. If you start the configurator directly on the server, you can use "local" IP-address 127.0.0.1. 34 Upon successful login the Macroscop Configurator Main window will open. Method 2. Launch from the Macroscop Client application. In the Control Panel of Macroscop Client click Settings and select Configurator. If you choose this method the Macroscop Configurator Main window will immediately open (see above.) 35 Method 3. Launch from the Macroscop Standalone initial window. If you are using Macroscop Standalone, select Configurator in the initial window. If you choose this method the Macroscop Configurator Main window will immediately open (see above.) 36 3.2. Installing and updating the license To install or upgrade the license (including the remote computer — for USB-key), follow these steps: 1. Run Macroscop Configurator. 2. Click Other actions... at the bottom of the window. In the list below, select Install license on server: 3. In the window that opens, enter a username and password with configuration rights, specify the server address and click OK. Below is the follow-up procedure depending on the method of licensing. 37 3.2.1. Installing and updating the USB-key license 4. In the window that opens, select the USB-key installation option. 5. Click Browse and select the license file. 6. Click Install. 38 3.2.2. Installing and updating the software key license To generate the request file and install the Macroscop software key run Macroscop Configurator directly on the server with Macroscop Server installed. Do not run Macroscop Configurator remotely using Microsoft Remote Desktop to connect to a remote desktop because in this case the request file is not properly formed and software key setup is not executed correctly. (This problem does not appear when using other remote access tools.) 4. In the window that opens, select the Soft-key installation option 5. Enter a key identifier received when purchasing a license. 6. Click Create File. This will create *.McKeyRequest. 7. Close Macroscop Configurator. 8. Send the received license request file to You will receive a license file with the extension *. McKey. 9. Run Macroscop Configurator, select the Soft-key installation option, click Browse and select the license file. 10. Click Install. the license request file with the extension [email protected]. 39 11. Close Macroscop Configurator. If you extend the license (add channels, intelligent modules, etc.), ask the organization that provided you with the Macroscop license for a new *.McKey file (license request file *.McKeyRequest is not required — just provide an original key identifier.) After receiving a new *.McKey file, repeat steps 9–11. 3.3. Applying settings and controlling configuration After making any changes to the configuration make sure to apply the settings — only then the new settings will take effect. If you try to exit Macroscop Configurator without applying the changes a warning window will appear. Select No to go back and apply the settings, Yes — to exit without saving. To apply the settings use the page that opens when clicking on the left part of the configurator 6. Apply settings. To apply the settings, click Apply. In case of incorrect configuration of modules or simultaneous usage of incompatible modules on one channel the Apply button is not active and the Configuration checking results list contains the appropriate warning. You can also use the controls located on this page to save settings to a separate file, check the current state of servers and get a list of configurations of all channels. 40 To check the current status of servers, click Server check — the following window displays the current status of each server in the system. To get a list of configurations of all channels in the system settings, select Channel list the following window displays the configuration of each channel in the system. To export the channel list to a CSV or XPS file, click Export... To save the configuration to a file, click Save. In the Save As window, select the folder, type in the file name for configuration file and click Save. To load a previously saved configuration file, use the Load configuration from file command in the Getting Started window. 3.4. Server settings Server settings define which servers are connected to the system, network settings of these servers, archive placement parameters on server hard drives and a number of other parameters. To open the server settings page, select 2. Servers in the left panel. 41 If you want changed server settings to take effect, click Apply server settings. The server restarts afterwards. A description of each server settings page block is given below. This description is for a single server configuration. If the configuration has two or more servers, settings and appearance of a number of blocks differ. For more information about the multiserver configuration see Section 3.4.1.1 on page 45. 42 3.4.1. Connecting servers to system In this block you can connect new servers to the system, disconnect the previously connected ones and change server connection addresses. Use one of the following to connect a new server to the current configuration: Method 1. Select in the list Server auto search. List of found servers a server with the Not configured status. The Connect button will appear under the list. Click this button and the selected server will be automatically connected to the current configuration. 43 Method 2. Enter the address in the Address field of the connected server and click Connect. If the specified server has not yet been connected to any configuration, it will be connected to the current one. If the specified server is already connected to a different configuration, a warning dialog box will appear and it will not be connected to the current configuration. If you have just installed Macroscop Server, the first time you connect to it a new configuration will be created automatically and the default server will appear in the Connecting servers to system section as the only server. To disconnect the server from the current configuration, select the server in the Connected servers list and click Disable. A warning window will open. If you select Yes the server will be disconnected from the current configuration. If a server is disconnected from a configuration, the video archive on this server will become unavailable for Macroscop Client. To view the archive on the non-configured server, use the Archive local viewing and backup application. If you connect a non-configured server to a certain configuration (or create a new configuration on this server), the previous archive may be lost. If you want to save the archive, rename or copy it to a disc that is not used for Macroscop archives. To change the IP-address, choose a server in the Connected servers list and click Change address. In the window that opens, enter the server IP-address and port; click OK to save the changes. 44 This operation does not change the IP-address of the NIC of the selected server; it only allows adding one of the previously assigned server IP-addresses to the configuration. To view information about the connected server, select it in the Connected servers list. The information about the license parameters of the selected server will appear: • Product type — ML, LS or ST. • IP-camera licenses — number of IP-channels that can be connected to this server. • Audio processing modules — the number of channels that can process sound. • PTZ modules - the number of channels that can control the PTZ cameras. • Interactive archive search modules — the number of channels subject to archive search. • Face detection modules — the number of channels that perform face detection. • 64-bit support — mark that specifies whether this server supports 64-bit operating system. • Face recognition modules — the number of channels that perform face recognition. • License plates recognition modules — the number of channels that perform license plates recognition. • People counting modules — the number of channels that perform people counting. • Tracking modules — the number of channels that track moving objects. • People groups search modules — the number of channels that can count people in groups. • Heat map modules — the number of channels that support heat maps. • Queue control modules — the number of channels that can count people in queues. • Lost luggage detection modules — the number of channels that can detect left objects. • DVR channels — reserved, not used in the current version. 45 3.4.1.1. Multiserver configuration: creating To use multiple servers in a single system, you should merge these servers to a common configuration, i.e., create a multiserver configuration. To create a multiserver configuration: 1. Use Configurator to connect to one of the servers (in this example, "Server 1.") If the server is assigned with IP-address 127.0.0.1 — change it to the real one (assigned by NIC), as described in 3.4.1 on page 42 (example — 192.168.100.31:8080). 2. Enter the IP-address 192.168.100.45:8080). of the second server to the Address field (example — 3. Click Connect — the specified server will appear in the Connected servers list. 4. Apply settings (page 39.) Close Configurator. 3.4.1.2. Multiserver configuration: connecting a new server To connect a new server to an existing multiserver configuration: 1. Use Configurator to connect to one of the servers in the multiserver configuration. 2. Enter in the IP-address of the new server to the Address field. 3. Click Connect — the specified server will appear in the Connected servers list. 4. Apply settings (page 39.) Close Configurator. 3.4.1.3. Multiserver configuration: connecting a server in operation Before connecting a server in operation with cameras to an existing multiserver configuration save the configuration of channels and security objects of this server. After it is connected load a saved configuration to the general configuration. To do this, follow these steps: 1. Use Configurator to connect to the server in operation (connected to the other configuration.) Go to camera settings (tab 1. Cameras.) Create the security object in the channel list root; add all other security objects and/or cameras connected to the server; save the root security object configuration to drive (see Ошибка! Источник ссылки не найден. on page Ошибка! Закладка не определена..) 46 2. Choose the server in operation (that you want to connect to the multiserver configuration) from the Connected servers list; click Disable. 3. In the warning box, click Yes — the server will be disconnected from the current configuration. Close Configurator. 4. Use Configurator to connect to one of the servers in the multiserver configuration. 5. Enter the IP-address of the new server to the Address field and click Connect — the specified server will be added to the Connected servers list. 5. Go to camera settings (tab 1. Cameras.) Select the root security object, right-click it to open a context menu, select Load to load the previously saved security object from file (see Ошибка! Источник ссылки не найден. on page Ошибка! Закладка не определена..) 6. Connect loaded channels to the added server (see 3.4.1.4 on page 47.) 7. Apply settings (page 39.) Close Configurator. 47 3.4.1.4. Multiserver configuration: distributing channels by servers Channel distribution by servers is configured in the server connection window. If the system uses only one server, the channel distribution block is not displayed, since in this case all channels are automatically bound to the server. Each channel can be bound to two servers. One server in this case will be main and the other — reserved. In case of main server failure the channel will be recorded to reserved server. Thus, the reliability of the video surveillance system is increased. To connect the channel to main (reserved) server: 1. Select Assert main Servers to channels (Assert reserved servers to channels); 2. Choose the server; 3. Choose the channel; 4. Click . To disconnect the channel: 48 1. Choose the server; 2. Choose the channel; 3. Click . To automatically distribute the channels evenly by main (reserved) servers, click Auto distribution. To disconnect all channels from main (reserved) servers, click Cancel. 3.4.1.5. Multiserver configuration: settings features If you use multiple servers in a single system, the settings of each server are edited not in the main window of Configurator but in separate server settings windows To go to server settings, select the server in the Connected servers list and click Setup below the list. The server settings window will open. To save the changes in server settings, click Apply server settings; to exit without saving, close the server settings window using the standard close box . In the multiserver configuration server addresses (in the Connected servers list) must be assigned so that each server is available for other servers using the specified address and port. 3.4.1.6. Replication server settings You can assign the role of Replication servers to one or more servers in the system. Replication server is a server that stores backup copies of archives from other servers in the system. If the server is used for replication, it can not be assigned as a main or reserved channel server. The replication server requires a USB-key and the license for at least one channel (of the same type as on other servers.) To configure the replication server: 49 1. Choose the server; 2. Select Replication server; 3. In the Replication settings box that appears to the right set the replication parameters and schedule; 4. Use to move channels subject to replication from "All system channels" to "Replication channels." 50 In the replication server settings window you can start and stop replication forcedly. 3.4.2. Archive location settings Archive of each server stores the data of only those channels that are bound to the server Archive has a ring structure. If free space ends the new archive files begin to replace the oldest ones, taking into account the archive size set for each channel (see 3.5.3.2 on page 66.) When using multiple drives, video archives are recorded simultaneously on all available drives. In case one of the drives fails, the recording of new data on it is interrupted and is redistributed to available drives. Similarly, if a previously unavailable drive becomes available, data recording resumes. One or more drives may be assigned as reserved. New data is recorded on reserved drives only if all main drives are unavailable. At the same time, as soon as one of the main drives becomes available again, the recording on reserved drives stops. The archive is located in the MacroscopArchive folder located in the root directory of each drive used to store the archive. 51 Archive parameters are defined in the Archive location settings block on the server settings page. Below is a list of parameters: Drive — logical drive letter. Disk mode — indicates how the Macroscop server will use the drive. Possible options: Main or reserved Video archive Event database — — — Archive only main Yes — Archive + database main Yes Yes reserved Yes — reserved Yes Yes Option Not used Backup archive Backup database archive + Size (MB) — total size of the drive. Free space (MB) — currently remaining free space. Min. Free space (MB) — minimum free space required when recording the archive. To set this value, double-click the current value, enter the new one and press Enter. Max. archive size (MB) — maximum size of the archive. To set this value, double-click the current value, enter the new one and press Enter. Drive type — information about the drive type: local (HDD) or network. Do not forget to click Apply server settings at the bottom of the page after making any changes! Default server settings are automatically created on first launch. Drive "C:\" is connected to the archive. If possible, assign other drives for the archive during the initial server setup, as we do not recommend storing the archive on the same physical drive with the operating system! It is not recommended to store a database on network drives. 52 3.4.3. Network server settings The Network server settings block contains the following settings: Server port — the port used for client connection to the selected server (for monitoring, playback, configuration.) SSL server port — the port used for client connection to the selected server using SSL protocol. Open Macroscop Server port automatically in Windows firewall — allows Macroscop Server to automatically open a port in Windows Firewall for external incoming connections. Allow UPnP Macroscop Server identification — enables UPnP protocol for Macroscop Server allowing server network identification using this protocol. Accept RTSP connections (to broadcast H.264 and Mjpeg) — allows you to receive a video stream and service information through direct server requests using RTSP. RTSP port — the port used for client connection to the selected server using RTSP protocol. Allow Mjpeg broadcasting via RTSP — enables Mjpeg broadcasting via RTSP protocol. Since RTSP supports only MJPEG frames encoded using the Baseline coding mode, video streams coded in other modes must be re-coded for transferring, which in turn will increase the server load. Moreover, MJPEG re-coding may result in reduced frame rate (compared to the frame rate sent directly by a camera.) Allow multicast-broadcast on server — enables multicast-broadcast on server for the channels that have the appropriate feature (see 3.5.8 on page 88.) 3.4.4. Connecting mobile devices The Connecting Mobile Devices block allows you to configure the Macroscop Server embedded video stream broadcast service for mobile devices and Web clients (mobile connection server.) This service is also used for web-site broadcasting. Connecting mobile devices — enables the video stream broadcast service for mobile devices. 53 Pressing the Advanced Settings button opens the advanced server settings for mobile connections. The Advanced settings window contains the following settings: Mode settings depending on the resolution of a mobile device or a web browser, as well as o the display mode: - Good quality (high resolution) — used for full-screen mode. Average quality (medium resolution) - used for multi-screen mode. Poor quality (low resolution) — used for multi-screen low resolution mode. Available settings for each mode: Resolution, which will be broadcasted by default for each channel. Transfer only anchor frames for H.264/MPEG-4 — only anchor frames will be transferred for these video formats. This setting allows you to reduce the amount of information transferred via networks with limited bandwidth. Enable video transfer speed limit — the frequency of transferred frames will be limited to the specified value. This setting allows you to reduce the amount of information transferred via networks with limited bandwidth. Other settings: Mobile Device server network port — allows you to configure which port will be used to connect to the video stream broadcast service for mobile devices. 54 Connecting to Mobile Devices server in proxy mode — enables broadcasting in proxy mode. If this mode is enabled on multi server configurations, video streams from all servers will be broadcasted to mobile devices connected to this server through this server. If this mode is disabled a mobile device will automatically connect to servers with requested cameras. Limit CPU usage time consumption — allows you to limit CPU usage time consumption by mobile services. 3.4.5. Additional server settings The Additional server settings block contains the button used to mount/unmount network drives (see below.) 3.4.6. Configuring network drives To connect a network drive: 1. Click Mount/unmount network drives in the Additional server settings block. 2. In the network drive configuration window that opens, select a letter, which will denote a network drive. 3. Enter the network drive path, username and password in the appropriate fields 4. Click Connect network drive. 5. Click OK. After you click OK, the server reboots. The network drive will be added to the list, which is displayed in the Server settings tab. It can be configured in the same manner as local drives. To disconnect a network drive: 1. Click Mount/unmount network drives in the Additional server settings block. 2. In the network drive configuration window that opens, select the drive you want to disconnect. 3. Click Disable network drive. 4. Click OK. 3.4.7. Client autoupdate settings If you select Allow client auto update clients will be checked when connecting to the server: if Macroscop Client version does not match Macroscop Server (Standalone) version, the client will be automatically updated. 55 3.4.8. Push-agent setup (connection to Cloud) Enable video transmission to the Cloud enables video broadcast from cameras connected to Macroscop server to the cloud based on Macroscop Cloud. Enter the address and connection port for Macroscop Cloud service in the Cloud address field. Enter Macroscop Cloud username and password in the appropriate fields. Macroscop Cloud users must be able to connect their own (external) Macroscop servers. To enable this feature, please contact the Macroscop Cloud provider. The broadcast will be made only for those channels with the appropriate option enabled (see 3.5.9 on page 89.) 3.4.9. Server information Server information is provided in the bottom of the server settings page (or server settings window — for multiserver configuration.) 56 3.5. Camera settings To open the camera settings page, select 1. Cameras. The channel settings tab will open on the right and the channel list on the left. Instead of the term Camera Macroscop system uses a broader concept of Channel because, in addition to cameras, video server and DVR channel may also be connected to the system. The hierarchical form of the channel list is easy to navigate, as it allows grouping channels by physical location of their respective cameras. Channels are bound to security objects — grouping elements (for example, Building 1 or Corridor of the 2nd floor.) Safety objects can also be bound to other security objects, which allow creating a hierarchical structure of any nesting. To add a security object, click . To add a security object bound to another security object, select the object to which you want to bind the new security object and click To add a channel, click . . To create a channel inside the security object, pre-select the object and then add the channel. To change the name of a channel or security object, double-click it or press F2; then enter the new name and press Enter. To delete a security object or a channel, select it and Click . 57 Features available to simplify channel hierarchy: drag security objects and channels from one security object to another using the mouse; copy channels and security objects by holding Ctrl and dragging; move channels up and down with the arrow keys on the keyboard, while pressing Ctrl; move and copy channels using the clipboard via the context menu or standard keyboard shortcuts: Ctrl+C — copy, Сtrl+X — cut, Ctrl+V — paste. To save settings for all channels on disk, click To load settings for all channels from disk, click . . If you load channel settings from disk, all current channel settings are deleted and replaced with the loaded ones. If you need to add settings from file to the existing ones, save and load single security objects or channels via the context menu, as described below. All the above steps can be performed from the context menu of channels and safety objects: to do this, select a security object or a channel and then right-click it to open the context menu. Besides, context menu commands provide additional options: save to disk and load from disk the configuration of a single security object or channel. To save the configuration of a single security object or channel to disk, select the security object you want to merge with a previously saved object or channel, right-click it and select Save. To load the configuration of a single security object or channel from disk, select the security object or channel, right-click it and select Save. These procedures can be useful if it is not necessary to save and load the whole configuration (for example, when merging servers — to configure channels of the added server.) To view video from a channel in browser, select a security object or channel, right-click to open the context menu and select Open in browser. To configure a specific channel, select it in the hierarchical list. Channel settings will be displayed on the right: 58 3.5.1. Camera auto search and connection To automatically search for cameras in a local network and add them to the configuration: 1. Click . 2. In the auto search window that opens, check the cameras you want to add. 3. Click Add devices. 4. Click Close to return to the main window of Configurator. Not all cameras support features that allow users to automatically find them in a local network. After a camera has been automatically added do not forget to manually enter camera administrator login and password and select the video format in data stream settings. Some cameras are assigned with wrong manufacturers or models after automatic search — in this case you may need to manually select the appropriate manufacturer or model afterwards. Configure addresses opens the camera IP-address settings window. You can change the IP-address using Macroscop Configurator without opening the camera web interface (this feature is currently available only for AXIS cameras.) Auto configuration option allows you to automate the process of configuring channels if your devices support ONVIF standard (preferably ONVIF Profile S.) For correct operation of this function we recommend to disable ONVIF authorization on a device, if possible. Auto configuration via ONVIF: if two channels are configured on a camera, the Use two channels option is enabled; if a camera supports PTZ, the PTZ Camera option is enabled; if a camera supports audio reception, the Sound recording option is enabled 59 3.5.2. Channel connection settings Channel connection settings are configured in the corresponding block. Enter the IP-address or URL of the device that will receive video data (prefix http:// not required.) In some cases, you may need to specify the device control/data port (for example, 192.168.1.55:8000). If the camera is connected via IPv6, select Connect via IPv6. To set ports other than the default; click Set network ports...; in the window that opens, uncheck By default and set the required ports; click Save. To set the manufacturer and model of the device that will receive video data, use the dropdown lists for Brand and Device model. If this device requires username and password, fill in the appropriate fields. To enable sound recording from the camera, check Sound ON. Not all models are supported To enable sound transmission from the camera, check Sound transmission. To test sound transmission, click Test and use the microphone connected to the computer. To select a particular sound device (driver) used on this computer, click . 60 To enable PTZ camera control, select PTZ Camera. Not all models are supported To enable recording signals from camera inputs and sending signals to camera outputs, check Event processing (I/O.) Not all models are supported To test the recording of signals from inputs and sending to outputs, click to the right from the Event processing (I/O) field. The Ports I/O testing window will open: input signals are marked with related green indicators on the Inputs line; to send output signals, click the appropriate indicator in the Outputs line. By default, 8 input and output indicators are displayed; to display more inputs or outputs, click located to the right. Check Connect via server, if there is no direct network access to cameras from client workstations. In this case, video data will be broadcast through the video surveillance system server. Some cameras have a limit on the number of concurrent connections. A number of cameras reduce the frame rate if there are multiple simultaneous connections. Thus, connection via the server allows you to provide only one connection to the camera for any number of client workstations. Check Narrow bandwidth channel, if you use a low bandwidth network. This setting allows you to increase the camera signal time-out. Check Disable channel, if you need to temporarily disable the channel. 3.5.2.1. Connecting video servers Check Video server, if the source of video data is not a camera, but a video server or a DVR. Enter the channel number in the appropriate field. Numbering for different models starts with 0 or 1. 61 3.5.2.2. Connecting DVRs For some DVRs the Video Recorder field is displayed instead of Video server. In this case you can view the archive located on a DVR — select Use Video Recorder archive to enable this function. If you select Synchronize archive, then the archive for the periods of time when there was no connection with a DVR or a server was idle will be downloaded to Macroscop server. Some models of DVRs have the DVR license mode available. If you check this option, all additional intelligence analysis modules and functions on this channel will be disabled. 62 3.5.2.3. Configuring memory card access parameters The interaction settings for the archive on a memory card are placed in Channel connection settings block. Not all models are supported To access the memory card, enable Use archive on memory card. To synchronize the memory card with the archive on the server, enable Synchronize with main archive. If you enable this function, then the archive for the periods of time when there was no connection with a DVR or a server was idle will be downloaded to Macroscop server. Archive (or its part) for the required period may be unavailable on the camera's memory card — for example, in the absence of movement, if a motion detector camera is used. In this case the archive (or its part) on the server will remain empty. 3.5.2.4. Connecting panoramic cameras Some models of panoramic cameras have the Panoramic camera option. In this case you can use the Mode drop-down list to select different display modes available for this model. Individual modes are provided for each manufacturer. For example, for Axis: Zone display, Overview, Panorama, Double Panorama, Quad View; only one mode is available for Arecont Vision — Zone display, therefore the Mode drop-down list is inactive. 63 If in the Device model field you select a position that relates not to an individual camera models but to a model line, the Panoramic camera option will be available if at least one model of the selected model line supports panoramic camera features — enable this option only if the connected camera is indeed panoramic. 3.5.3. Configuring data streams Channel data stream settings are configured in the corresponding block. To set the data stream format to be used for the configured channel, select an option from the Video format drop-down list. To check the connection parameters, click Test. In the absence of errors, the video from the configured channel will be displayed. Test mode is enabled by default when you select a channel in the channel list. 64 Video image in the test point will only appear if the tested camera is accessible from the computer with Configurator running. Thus, the situation may occur (for example, when cameras are located on one subnet and Configurator is running on a remote computer in another subnet) when the test image is not displayed but in fact the server receives and processes the video stream correctly. In this case, to check the correct connection of the channel, apply the configuration first, then run Macroscop Client on this computer and select the required channel in the main window — if the connection is correct, then video image from this camera will appear. If the channel has not been tested and you select another channel or switch to another tab Configurator will display a warning window. You can test the channel (click Yes) or refuse to do it (click No.) If you want this window to no longer appear in the current session, select Do not show again. To abort the test connection, click Abort. To view the camera connection event log, click Journal. To view troubleshooting when connecting to the camera, click Help. To change the volume level, move the slider to the desired position. To specify additional data stream settings, click Additional settings beneath the video format selection field — a data stream additional settings window will open. The options available in Additional settings may differ depending on a camera model. 65 To set resolution, frame rate and compression level, select the desired values in the appropriate fields. To use camera parameters for these values , check Use camera settings. A limited number of camera models can be configured via Macroscop. Please set data streams for all Axis cameras in Macroscop, since their own camera settings may disrupt stream parameters. To rotate the image from the camera, select the desired rotation type in the Rotate stream field. To specify custom connection parameters, type them in the Additional connection parameters field. This option is rarely used with a limited number of devices. To use an alternative decoder H.264/MPEG4 or decode H.264 on video card, check the appropriate options. H.264 decoding on video card is used only to display video in Macroscop Client. If this option is selected, Macroscop Client will decode this channel in H.264 on video card; otherwise Macroscop Client will use CPU resources for decoding. Use an alternative decoder H.264/MPEG-4 if camera image is not received, not displayed or has artifacts. Not all video cards can correctly handle H.264 streams with Use H.264 decoding on video card selected. 3.5.3.1. Using two streams Most modern IP cameras support two or more streams simultaneously. The use of two streams allows recording high quality frames in the archive and displaying low quality frames in the client, which can significantly reduce the equipment load. If two streams are used Macroscop records the main stream to the archive by default. If you want to use two streams, enable the Use two streams option. 66 When two streams are used, select the video format and, if necessary, configure additional settings for each of the streams. 3.5.3.2. Archiving settings Archiving of the selected channel is configured in the corresponding block. To enable the recording of video to the archive, select Archiving. To enable the recording of audio to the archive, select Sound recording. To enable sound recording, select the Sound recording option in the Channel connection settings section. 67 To set the archive size for a camera, specify the required values in the fields Store an archive not less than: days, hours (minimum size) and Store an archive not more than: days, hours (maximum size.) Consider that if there is no free space left, the system will delete the oldest records with a size more than the minimum for this channel. In general, the system analyzes minimum and maximum sizes selected for each camera bound to a server and tries to meet these limits. If it is impossible, then the oldest records for all cameras will be deleted to free drive space. If two streams are selected, you can choose which of the streams is to be recorded in the archive in the Select recording stream field. To select the recording mode, select the required field: Always on — permanent archiving. With detector + manual — archiving is conducted only when motion is detected in the frame (if sound detector is on — when sound level is exceeded.) In addition, the operator may enable/disable permanent archiving. Manual only — archiving is enabled/disabled only by the operator. Scheduled — allows flexible configuration of recording modes schedule. To set a recording speed limit, select Enable recording speed limit and set the required value in the Record speed field. Record speed limit is only valid for the MJPEG codec. MPEG-4 and H.264 have the Archive reference frames only option instead of this. The Re-recording parameter specifies the time interval during which the archiving must be conducted before the occurrence of an event of motion detection and sound level exceed. The Post-recording parameter specifies the time interval during which the archiving must be conducted after an event of motion detection and sound level exceed. To schedule recording modes, select Scheduled and click to the right. The archiving schedule window will open: vertical — days of the week, horizontal — time intervals. Then choose one of the modes by clicking the appropriate box in the upper part of the window. Then hold down the left mouse button and select time intervals for this mode — the gaps will be painted appropriately. 68 To specify a single recording mode for a day or copy the schedule from another day, click to the right of a day of the week and select the required option. When finished, click OK to save the changes. 3.5.4. Intelligence analysis system settings Intelligence video analysis settings are configured in the corresponding block. 3.5.4.1. Motion detector settings To enable a motion detector, check the appropriate box. To use a built-in motion detection, check the appropriate box. If the box is not checked, the Macroscop software motion detector will be used. If you select a built-in motion detector, intelligent modules become unavailable. 69 If the selected channel uses two streams, the Stream selection for analysis option is available — you can choose either main or alternate channel (Alternate is selected by default.) Recommendations for selecting a stream for analysis; if the main one has higher resolution than the alternate one (e.g., main — 1920x1080, alternate — 640x480): - Alternate — if no intelligence analysis modules except for Macroscop software detector are used. - Main — if at least one additional intelligence analysis modules, including external modules, is used with Macroscop software detector. To configure a Macroscop software motion detector, select the required setting: simple or expert. Simple mode allows setting the minimum size of an object to be detected for the entire frame. Analysis in this mode is carried out with the optimal frequency (see below.) The minimum object size can be set in two ways: Interactively: 1. Click Set in interactive mode — a minimum object size window will open. 2. Hold down the left mouse button to select an area, which size corresponds to the minimum object size. 3. Click OK. Use the sliders to specify the minimum width and height as a percentage of the frame size. 70 Expert mode allows setting the detection zones and the motion detection speed. To set the speed, select one of the options: Detect by using optimum frequency — video analysis and motion detection will be carried out at a frequency defined automatically according to the following rules: - if at least one intelligent module is enabled for a channel (interactive search in archive, object interception, face detection, people counting, tracking), the analysis is performed at 10 frames/s; - if no intelligence modules are enabled, the rate for MJPEG is 5 frames/s, for H.264 and MPEG-4 the frequency is automatically selected from the range of 0.4–5 frames/s. Use reference frames only — only reference frames will be checked for motion for H.264 and MPEG-4. Detect by using customized frequency — video analysis and motion detection will be carried out at a customized frequency. Detecting zone — an area of the frame used for motion detection. You can set several zones for a single channel; minimum object size is customizable for each zone. To add a new detecting zone, click , to remove it — . Detecting zone in the Zone mask area is filled with yellow squares. To change a detecting zone, use your mouse: the left button is used to select; the right button is used to deselect. To select the entire zone, click Fill all. 71 Click Clear to deselect the entire zone at once. Use the slider to change the selection brush size. To check the operation of a motion detector, click Test... 3.5.4.2. Sound detector Sound detector allows responding to the excessive sound level registered by a camera microphone. To activate the detector, check Sound detector. The activation controller and the logarithmic scale of sound level, which displays the level of sound registered in real time, will become available. Use the Threshold slider to specify the level at which the detector will activate. 3.5.4.3. Perspective settings A number of intelligence analysis modules (interactive search and object interception modules; crowd detection module) should take the frame perspective into account. The perspective settings block is used for these purposes. To adjust the perspective, check the Set perspective settings option. Then specify the size of people using two scale pieces ( ): use your mouse to move a piece to a corresponding frame area and adjust its size so that its height coincides with the height of people in this area: - Move figure — click the middle part of a figure and drag it while holding the mouse button. - Change size — click the top or bottom of a figure and move the mouse up or down while holding the mouse button. 72 3.5.4.4. Configuring face detection module To enable the face detection module, enable Face Detection. The face detection module quality settings will become available. The quality level affects the system resource consumption (CPU and RAM usage) — the consumption rate is higher for high quality. 3.5.4.5. Configuring interactive search and object interception modules To enable the interactive archive search and object interception modules, select Interactive archive search. Also select Indexing of moving objects by features. Advanced settings will become available. Use the sliders or interactively set the minimum and maximum size of indexed objects. For proportions search select the Enable proportion classification option. 3.5.4.6. Configuring external intelligent modules To enable external intelligent modules, check Use external intelligent modules. After that, a list of available intelligent modules will open below. The list contains only those modules that are available on this server under Macroscop license. Working procedure for external intelligent modules is given below — in the relevant sections. 73 3.5.5. Patrolling Terms: Preset — a preset position of the camera, implemented in many PTZs. Patrolling — automatic switching between presets, implemented in many PTZs. Settings: If your camera supports presets, you can create your own patrolling in Macroscop. To add a new patrolling, click To add a new preset, click above the patrolling list, to remove it click above the preset list, to remove it click To move a preset up or down in the list, use . to the right. to the right. You can use appropriate controls to customize the patrolling scenario — the delay between switching, the behavior after a preset is interrupted by a user. 3.5.6. Scheduled tasks Each channel can perform the following schedule tasks: Add a record to the archive. Remove a record from the archive. Set a camera position (preset.) Send an SMS notification. Send an e-mail notification (with a frame attached, if necessary.) Send a signal to the camera output; Run external application on the server. Save a frame to the drive. 74 Pause an action sequence. Enable camera AF. Activate camera washer. Add an event to the client application log. Send a notification if a barrier is lifted or lowered (if the license plates recognition module is used.) For more information on scheduled tasks see 3.5.7 on page 76. Scheduled tasks are configured in the Scheduled tasks block. To create a new task: 1. Click . A scheduled action wizard will open. 2. On the first step enter the task name to the Name field; you may also add its description to the Description field; click Next. 3. On the second step select when do you want to run the task. If you want to run it more often than 1 once a day, select Run by interval and specify the frequency. Click Next. 75 4. In the last step, add the actions to be performed: To add an action, click and select the desired task. To delete an action, select the required action in the Action list and click To edit an action, select the required action in the Action list and click To change the sequence, use 5. . . to the right from the Action list. Click Finish. The created task will appear in the list of scheduled tasks. Most actions include special specific parameters. For more information on scheduled tasks see 3.5.7 on page 76. 76 3.5.7. Scenarios (response to system events) Scenarios are configured in the Scenarios block. This setting allows you to specify the actions to be performed in response to video surveillance system events. To set an action for a specific event: 1. Select an event in the Event list; 2. Use the drop-down list to choose the action to be taken; 3. Click 4. Expand the drop-down list and configure the action. ; To remove an action for a specific event: 1. Select an event in the Event list; 2. Select the action; 3. Click . To change the action sequence use . Most actions include special specific parameters. To configure action parameters, expand the action description by clicking to the left of the action. 77 Action parameters may also include different conditions, depending on the type of event. In this case, the settings panel includes the Runtime conditions line. To add a condition, click (to the right), then adjust the conditions. Below are the descriptions of current events and the settings of existing actions: 3.5.7.1. Limit by start time condition This condition is applicable to all system events and for a predetermined interval of time allows avoiding repeated execution of an action in response to similar events on the same channel. 3.5.7.2. Movement event This event is generated if the software motion detector detects motion in the frame. You can modify the Zone condition (zone name is selected from the motion detector settings); if it is not specified, the event will be generated for every zone (according to the settings of that zone.) 3.5.7.3. Loud sound event This event is generated if the software audio detector detects an excessive audio level registered by the microphone. 3.5.7.4. Lost connection with camera event This event is generated in case of camera connection failure. Starting with version 1.9, we recommend using the Lost connection with camera event instead of it. Due to the features of networks (overloaded networks, networks with low bandwidth or signal quality) or network interfaces frequent short breaks and reconnection events may occur, which would lead to the generation of a large number of such events. 3.5.7.5. Established connection with camera event This event is generated in case of camera connection reactivation. Starting with version 1.9, we recommend using the Lost connection with camera event instead of it. Due to the features of networks (overloaded networks, networks with low bandwidth or signal quality) or network interfaces frequent short breaks and reconnection events may occur, which would lead to the generation of a large number of Camera connection reactivation events. 3.5.7.6. Face detection event This event is generated if a face is detected on the channel with face detection enabled. 3.5.7.7. Camera input signal event This event is generated if the signal (analog) camera input receives an electrical signal. Macroscop software must also support signal inputs for this IP camera model. For more information contact Macroscop technical support. 78 For this event you need to set the condition with mandatory attributes Input number and Alarm availability. 3.5.7.8. No connected camera event This event is generated if camera connection was not reactivated after a specified time period. The event requires the attributes Stream type and Breakage duration (in seconds.) Stream type can have the following values: Main video — no main stream. Alternate video — no alternate stream. Main sound — no main audio stream. Alternate sound — no alternate audio stream. Sound transmission — no sound transmission channels. Motion detection — no receiving channel from a camera motion detector. I/O — no communication channel with camera signal inputs/outputs. Archive video — no communication channel with the video archive. Archive sound — no communication channel with the audio archive. If the Stream type attribute not specified, the communication failure by any stream type will be registered. Breakage duration (in seconds) is compulsory. 3.5.7.9. Analog camera connection fail event This event occurs if the hybrid DVR or decoder channel loses communication with the analog camera bound to this channel. For this event you need to set the condition with mandatory attribute Channel number. 3.5.7.10. User alarm event This event occurs if a user presses the Alarm button in Macroscop Client. 3.5.7.11. External alarm start event This event occurs if the external system sends the External alarm start event. It is used to integrate external systems with Macroscop software. 3.5.7.12. End of external alarm event This event occurs if the external system sends the End of external alarm event. It is used to integrate external systems with Macroscop software. 79 3.5.7.13. Lost luggage detected event This event is generated if the lost luggage detection module is enabled — if a lost objects located in the frame over a specified time period is found (see 13.1.1 on page 159.) You can modify the Zone attribute (zone name is selected from the module settings); if it is not specified, the event will be generated for every zone (according to the settings of that zone.) If only one zone is selected, the condition is not required. 3.5.7.14. Inactive zone event This event is generated if the personnel activity control module is enabled — if no activity in the controlled zone. You can modify the Zone attribute (zone name is selected from the module settings); if it is not specified, the event will be generated for every zone (according to the settings of that zone.) If only one zone is selected, the condition is not required. 3.5.7.15. Recognized license plates event This event is generated if a license plate is detected on the channel with license plate detection enabled. For this event, you need to specify various attributes: for example, if one attribute is added — License plate identified = Yes, the event will be generated if any plate is identified. If any attribute is not used to generate the event, it is not required. 80 3.5.7.16. Request to open gate event This event is generated in three cases: if the operator pressed Open barrier on the screen; if the license plate from the group Open barrier for cars in this group was identified; if the Barrier open notification action was implemented. 3.5.7.17. Request to close gate event This event is generated in two cases: if the operator pressed Close barrier on the screen; if the Barrier closed notification action was implemented. 3.5.7.18. Large crowd of people event This event is generated if the crowd detection module is enabled and the number of people has reached or exceeded the maximum permissible level. You must modify the Zone attribute for this event (value from 0 to 5) to be generated. 3.5.7.19. Siemens DMS8000 event This event is generated if an event is received from Siemens DMS8000 (Ошибка! Источник ссылки не найден.is described in Ошибка! Источник ссылки не найден. on page Ошибка! Закладка не определена..) For this event, you need to specify various attributes. If any attribute is not used to generate the event, it is not required. 3.5.7.20. Large number of people in the queue event This event is generated if the queue control module is enabled and the number of people in the queue has exceeded the specified value (see 14.1.2 on page 164.) You can modify the Zone attribute (zone name is selected from the module settings); if it is not specified, the event will be generated for every zone (according to the settings of that zone.) 3.5.7.21. Smoke event This event is generated if the smoke and fire detection module is enabled and smoke is detected. 81 3.5.7.22. Fire event This event is generated if the smoke and fire detection module is enabled and fire is detected. 3.5.7.23. Video surveillance sabotage event This event is generated if the video surveillance sabotage module is enabled and of the sabotage detectors activates: camera defocusing; camera turnaway; camera illumination; camera overlap. 3.5.7.24. Moving objects tracking event This event is generated if the tracking module is enabled, in one of the following cases: intersection of a set line by an object; entry into a set area; - prolonged stay in a set area. 3.5.7.25. Add a record action It adds a video record to the archive. Action parameters: Run in channels — defines the channels for which the action will be performed. Options available for this parameter: - current channel (by default); - all channels; - selectively (in this case, the channel selection window opens, where you need to mark the required channels.) Recording time (in seconds) — sets the time interval for archiving. 3.5.7.26. Remove a record action It removes a video record from the archive. Action parameters: Run in channels — defines the channels for which the action will be performed. Options available for this parameter: - current channel (by default); - all channels; - selectively (in this case, the channel selection window opens, where you need to mark the required channels.) 82 3.5.7.27. Set a camera position action Moves a PTZ camera to a preset position. However, this preset should be pre-specified in camera settings. Action parameters: Run in channels — defines the channels for which the action will be performed. Options available for this parameter: - current channel (by default); - all channels; - selectively (in this case, the channel selection window opens, where you need to mark the required channels.) Preset order number — preset order number is specified. 3.5.7.28. Send an SMS notification action Sends an SMS to the specified number using a GSM modem inserted into a server USB-port. Before using the GSM modem in Macroscop software, install the drivers supplied with the modem; test the modem by sending a test message — either by using the software provided or the operating system. Action parameters: GSM modem — select the modem to be used to send an SMS. Initially this list is empty. To add, delete and edit the modem settings use , respectively. Below is a modem settings form: specify the actual values in this form (these values are set in the proprietary modem software.) Telephone number — phone number for SMS. 83 Message text — the text that will be sent to the specified number. To test sending from Macroscop, click Send message — in this case an attempt will be made to send an SMS via modem: depending on the result one of the two windows will appear: Message sent successfully or Message not sent. 3.5.7.29. Send an e-mail notification action Sends an e-mail from the server to the specified address. Action parameters: Mail server — specify the SMTP-server to be used to send a message. Initially this list is empty. To add, delete and edit the server settings use , respectively. Below is a mail server settings form: specify the actual server settings in this form (these settings can be obtained from a system administrator or an organization maintaining the mail server.) To — the e-mail address for messages. From — the e-mail address, from which messages will be sent (in general, it will be the same as the User Name field in the mail server settings window.) 84 Message text — the text that will be sent to the specified address. Attach frame to email — allows you to attach the frame recorded at the time of sending. Specify the Saved frame format: JPEG, PNG or BMP. To test sending from Macroscop, click Send message — in this case an attempt will be made to send a message via modem: depending on the result one of the two windows will appear: Message sent successfully or Message not sent. 3.5.7.30. Send a signal to the camera output action An electric signal is sent to the IP camera signal output. Macroscop software must also support signal outputs for this IP camera model. For more information contact Macroscop technical support. Action parameters: Run in channels — defines the channels for which the action will be performed. Options available for this parameter: - current channel (by default); - all channels; - selectively (in this case, the channel selection window opens, where you need to mark the required channels.) Output number — the number of the camera signal output. A majority of cameras with a single output use 0 or 1 values. 85 Output value — alarm output status: 1 (enabled) / 0 (disabled.) Depending on the circuit, the activation/deactivation of the alarm output may correspond to different physical states of contacts: closed/open circuit, presence/absence of voltage, etc. As a rule, information on the wiring diagram can be found in the camera technical documentation. 3.5.7.31. Run external application on the server action Launches an external application on the server. Action parameters: Path (on server) — the path to an application on the server. To select an application in Windows Explorer, you can click . Arguments — if an application must be launched with command line parameters, they are specified in this field. 86 3.5.7.32. Alarm generation function It generates an alarm for this channel. 3.5.7.33. Save frame action Saves a frame on the server. Action parameters: Folder (on the server) — the path to the folder used to store frames. To select a folder in Windows Explorer, you can click . Saved file format — allows you to select the image file format: JPEG or PNG. File names will be formed as follows: ChannelName DD_MM_YYYY hh.mm.ss.mmm.ext, where: DD_MM_YYYY — day, month, year; hh.mm.ss.mmm — hours, minutes, seconds, milliseconds ext — jpg, png. Restrict maximum size of the folder (MB) — allows you to set a maximum size of the folder: after reaching the maximum size, the oldest files will be deleted. 3.5.7.34. Pause action It allows setting a pause between actions within the scenario. Action parameter: Pause interval (sec) — sets the duration of the pause. 87 3.5.7.35. Enable camera AF mode action Focuses the camera assigned to this channel. Macroscop software must also support AF control for this IP camera model. For more information contact Macroscop technical support. 3.5.7.36. Activate camera washer action It activates camera washer. Macroscop software must also support camera washer control for this IP camera model. For more information contact Macroscop technical support. Action parameters: Run in channels — defines the channels for which the action will be performed. Options available for this parameter: - current channel (by default); - all channels; - selectively (in this case, the channel selection window opens, where you need to mark the required channels.) 3.5.7.37. Disable decimation when recording to the archive action Disables decimation while recording to the archive during the specified time interval. 88 3.5.7.38. Barrier closed notification action Generates the Barrier closed system event. Action parameter: Run in channels — defines the channels for which the action will be performed. Options available for this parameter: - current channel (by default); - all channels; - selectively (in this case, the channel selection window opens, where you need to mark the required channels.) 3.5.7.39. Barrier open notification action Generates the Barrier open system event. Action parameter: Run in channels — defines the channels for which the action will be performed. Options available for this parameter: - current channel (by default); - all channels; - selectively (in this case, the channel selection window opens, where you need to mark the required channels.) 3.5.8. Configuring multicast If this option is enabled the channel will be broadcasted to client computers in the multicast mode. Multicast-group address must begin with 224. The main stream port number must be even. Example of correct address — 224.3.2.1:4320. The broadcast will be made with the multicast option enabled (see 3.4.3 on page 52.) 89 The port number in the Alternate stream address field is automatically assigned based on the port number of the main stream — by increasing this number by 1. 3.5.9. Cloud broadcast settings Enabling Broadcast channel to the Cloud allows broadcasting the channel video stream to the cloud on the basis of Macroscop Cloud. The broadcast will be made only with the appropriate option enabled on Macroscop server (see 3.4.8 on page 55.) 3.5.10. Group settings To simplify the setting procedure of many channels with the same parameters you can set the parameters for all channels at once or for channels attached to a certain security object (including underlying objects and attached cameras.) To set the parameters for the channel group: 1. Select all channels by left-clicking an empty spot in the channel tree. Or choose channels belonging to a security object by selecting this object; 2. Adjust the parameters in one of the blocks: Channel connection settings (see 3.5.2); Archiving (see 3.5.3.2); 90 Intelligent analysis system settings (see 3.5.4); Scheduled tasks (see 3.5.6); Scenarios (see 3.5.7); 3. Click Apply settings; 4. Repeat steps 2 and 3 for all required blocks. 3.5.11. Indication of connected modules The channel tree contains icons that correspond to the functions used on the channel they are related to. — sound recording; — sound transmission; — PTZ management; — face detection; — interactive search in archive. If none of the icons is displayed, the above mentioned functions are not enabled for this channel. 3.6. User right settings In order to switch to user rights differentiation, click 3. Users and Groups. This will open the edit page for groups, users and rights. To add a new user group, click in the appropriate box, to remove it, click . To select the available actions for the selected group, check the appropriate boxes: Configuration. Close application. Observation mode change. 91 PTZ Camera management. Archiving management. Archive expert mode access (simultaneous viewing of archives from multiple cameras.) Access to the event log. Access to all users in the event log (if this option is disabled only events from the current user are available.) Received sound from camera. Broadcast sound to camera. Access to new added cameras (if the option is not enabled for a group, the newly added cameras will not be available this group until they are clearly marked in access windows to live video and archives.) Connection via mobile devices and Web-Client. Editing intelligent modules data (editing intelligent modules references.) To select channels with group access to real-time video, select the required channels in the Group access to real-time video list. To select channels with group access to archive, select the required channels in the Group access to video archive list. To add a new user, click in the appropriate box, to remove it, click . To change the name of a group or a user, double-click it, press F2 or right-click it to open up a context menu and select Rename; then type a new name and press Enter. The names of groups and users should only contain letters, numbers and underscores. Spaces, punctuation, arithmetic and other special characters are not allowed. To add a user to a group and set a user password: 1. Select a user; 2. Select a group in the Group drop-down menu on the right side of the block over Password. 3. Fill in the Password field; 4. Repeat the password in the Password confirmation field; 5. Click Apply password. 92 3.7. Object plans Working with object plans in Macroscop Client is described in the Macroscop User Guide. To configure object plans, click 4. Object plans in the left half of Configurator. This will open the edit page for object plans. This page contains object plans with cameras, sensors, relays, as well camera fields of view. The plan tree is at the top left of the page. Plans have a hierarchical structure. The top-level node is named Plans, it can not be renamed, moved or deleted under any circumstances. To create a plan hierarchy based on a security object hierarchy, click . To add a new plan, select a "parent" object for it and do one of the following: click ; press Ctrl+N; right-click to open a context menu and select Add plan. 93 To delete a plan, select an object you want to delete and do one of the following: click ; press Del; right-click to open a context menu and select Delete. To rename a plan, select an object and press Ctrl+R or right-click to open a context menu and select Rename; then enter a new name in the box and press Enter. To move a plan from one parent element to the other, select a plan, hold the left mouse button and drag it to another node. The channel tree and sensor and relay addition buttons are located at the top right of the page. Below is the drawing toolbar, which is located over the object plan. The following drawing and editing tools are available: Open image — Loads an image from a JPEG, PNG or BMP file. In this case all previously drawn and arranged items are removed from the plan. After the image is opened you can use drawing tools — hand-drawn elements will be placed on top of the image. Draw from scratch — Erases all items drawn before, including opened image and arranged elements. Undo — Undoes the last action. If you press it again it deletes the previous one, etc. The chain includes 20 actions. After applying the configuration the chain is reset. Redo — Restores the last earlier undone action. If you press it again it restores the previous one, etc. The chain includes 20 actions. After applying the configuration the chain is reset. Object selection pointer — Enables the cursor selection mode for cameras, sensors, relays and fields of view. Select area — Selects objects (cameras, sensors, relays) in a rectangular area. Set coordinate reference to another plan — Inserts (by pressing the left mouse button on the plan) an icon referencing to another plan. The other plan must also contain an icon referencing this plan. If you add an icon to the plan a menu to choose another plan appears; then this second plan is opened; after you add a second icon a dialog box indicating the distance between the plans in minutes appears. If the added icon is selected, right-click brings up a menu allowing you to change the distance or the "paired" plan. 94 Pencil — Allows drawing (with the left mouse button pressed) arbitrary lines of color and thickness specified in the Palette and Thickness fields. Eraser — Allows erasing (in white, with left mouse button pressed) images on the plan, including those loaded from a file. Its thickness in adjusted in the Thickness field. Draw line — Allows drawing (with the left mouse button pressed) straight lines of color and thickness specified in the Palette and Thickness fields. Draw rectangular — Allows drawing (with the left mouse button pressed) rectangular contours of color and thickness specified in the Palette and Thickness fields. Draw ellipse — Allows drawing (with the left mouse button pressed) elliptic contours of color and thickness specified in the Palette and Thickness fields. Add text — Inserts (using the left mouse button) a text box for text. The text color is set in the Palette field. The text size (height and width) is adjusted by selecting text and changing (using the left mouse button) its size — the text fits into a rectangular area. Palette — Allows selecting the line color. Thickness — Allows selecting the line thickness. Object length, m and Object width, m under the plan define the dimensions of the object to be displayed on the image. To place a camera on the plan, select it in the channel tree, hold the left mouse button and drag-and-drop it to the plan. When you select a camera with the Object selection pointer, you can: - move a camera over the plan by holding the left mouse button; - rotate a camera by clicking the green rotation node and moving the cursor with the left mouse button pressed; - remove a sensor (switch) from the plan by pressing Del; - open a camera context menu by right-clicking. This context menu includes the following commands: Show video — displays real-time video from the camera (a rectangle with the video appears.) You can move the video window over the plan with the left mouse button pressed. Select channel — allows selecting (reassigning) the channel for this camera. Set/delete field of view — displays the camera field of view. Camera field of view is a rectangle of arbitrary shape. If you view the plan with set fields of view in Macroscop Client, this fields display the image from the camera; if appropriate settings are configured, the intelligent module data is also displayed on top of the field of view. To change the size and orientation of the image in the field of view, select a camera using Object selection pointer; use the left mouse button to move the corners of the field of view. If you select a camera in the setting mode, the field of view displays real-time video — it allows you to properly adjust the zone orientation. You can also place sensors and relays on the plan. Sensors — devices connected to camera signal inputs. If a sensor is triggered via the channel connected to the camera the signal is sent to Macroscop system. 95 Relays (switches) — devices connected to camera signal outputs. Relays allow the Macroscop system operator to send a signal to external devices connected to the corresponding relays. To add a sensor or a switch to the plan: 1. Click the appropriate button . 2. In the Binding relay to a channel window that opens, select the camera to connect a sensor (switch) to; specify the Name that will appear on the plan for this sensor (switch); specify the Alarm input (output) number to use with this sensor (switch); click OK — the sensor (switch) will be added to the plan. You can select only cameras with Event processing (I/O) enabled (see 3.5.2 on page 59.) When you select a sensor (switch) with the Object selection pointer, you can: - move a sensor (switch) over the plan by holding the left mouse button; - change binding parameters by opening the Binding relay to a channel window; - remove a sensor (switch) from the plan by pressing Del. 96 3.8. Setting screen profiles To configure the screen profiles click 5. Views. To create a screen profile, click . To change the screen profile name, double-click it, press F2 or right-click it to open up a context menu and select Rename; then type a new name and press Enter. To delete a screen profile, click . To adjust the location of grids in a profile, select one of the possible layouts in the Grid field. To put a channel to a grid cell, drag the channel to the appropriate cell, or: 1. Select the cell; 2. Select the channel; 3. Click . To remove a channel from a grid cell: 1. Select the cell; 2. Click . In addition to profiles, Macroscop allows you to customize automatic grids switch templates. 97 To create an automatic grids switch template, click . To change the automatic grids switch template name, double-click it, press F2 or rightclick it to open up a context menu and select Rename; then type a new name and press Enter. To delete an automatic grids switch template, click . To add a profile to the automatic grids switch template, select one of the existing profiles from the drop-down list and click . To delete a profile from an automatic grids switch template, click To change the sequence of profiles in a template, use . . 98 4. Setting Macroscop Client and Macroscop Standalone Viewer This section contains configuration features for autorun and workstation for Macroscop Client and Macroscop Standalone viewer. The operating procedures for Macroscop video surveillance system using Macroscop Client, Macroscop Standalone viewer, as well as web and mobile applications are described in the Macroscop User Guide. 4.1. Autorun of Macroscop Client and Macroscop Standalone Viewer Below are the examples of autorun that do not require entering an explicit username and password in the login screen: - autorun of Macroscop Client at computer startup; - autorun of Macroscop Standalone viewer at computer startup; - autorun of Macroscop Client from a desktop shortcut; - autorun of Macroscop Standalone viewer from a desktop shortcut; The following parameters are shown as examples: Macroscop Client installation folder: C:\Users\UserName\AppData\Local\Programs\Macroscop Client\ Macroscop Standalone installation folder: C:\Program Files\Macroscop Standalone\ Server address: 192.168.0.100 Server port: 8081 Macroscop username: operator Macroscop password: qwerty77 Windows username: UserName Quotation marks in the full path to the file are required. 1. To configure Macroscop Client autorun at computer startup, go to the Windows registry and create a record in HKEY_LOCAL_MACHINE\SOFTWARE\Microsoft\Windows\CurrentVersion\Run: "C:\Users\UserName\AppData\Local\Programs\Macroscop Client\MacroscopClient.exe" -server 192.168.0.100 -port 8081 -user operator password qwerty77 2. To configure Macroscop Standalone viewer autorun at computer startup, go to the Windows registry and create a record in HKEY_LOCAL_MACHINE\SOFTWARE\Microsoft\Windows\CurrentVersion\Run: "C:\Program Files\Macroscop Standalone\Macroscop.exe" -server 192.168.0.100 port 8081 -user operator -password qwerty77 3. To configure Macroscop Client autorun from a desktop shortcut, select a shortcut, rightclick it, select Properties, go to the Shortcut tab and enter the following to Object: "C:\Users\UserName\AppData\Local\Programs\Macroscop Client\MacroscopClient.exe" -server 192.168.0.100 -port 8081 -user operator password qwerty77 4. To configure Macroscop Standalone viewer autorun from a desktop shortcut, select a shortcut, right-click it, select Properties, go to the Shortcut tab and enter the following to Object: "C:\Program Files\Macroscop Standalone\Macroscop.exe" -server 192.168.0.100 port 8081 -user operator -password qwerty77 99 4.2. Configuring the current workstation These settings allow you to specify operating parameters for Macroscop Client on the applied computer. To configure the current workstation, open the Control Panel in Macroscop Client and select Application settings under Settings. The Workstation settings menu item is available only if a user with configuration rights is logged in. The Workstation settings window will open. To implement the changes made, click Save Settings — Macroscop Client will reboot automatically. To return to default, click Reset settings. Below is a description of all tabs of the Workstation settings window. 100 4.2.1. Interface Window mode — if checked, Macroscop Client will run in the window mode; otherwise — fullscreen. Hide channels grid — if checked, the lines separating channel cells will not be displayed; otherwise they will be separated by thin lines. Display Alarm button — if checked, the Macroscop Client toolbar will contain the Alarm button; otherwise the button will not be displayed. Smooth grid switch in automatic mode — if checked, automatic grids switch templates will be switched smoothly (the computer load will increase significantly); otherwise small delays are possible (in this case the load will not increase.) Allow video proportions change from context menu — if checked, you will be able to choose video proportions in the cell context menu; otherwise this function will not be available. Prohibit Open in browser option in client mode — if checked, users of Macroscop Client on this computer will not be able to open cameras in browser from the context menu; otherwise the context menu will include the Open in browser option. Language selection — allows selecting one of the interface languages available for Macroscop Client. 101 4.2.2. Video Video proportions — you can select how images are scaled in cells: Stretch — the image will be stretched in a cell; Keep proportions — the image will be displayed with the proportions specified by the camera; Auto – the program automatically determines chooses whether to stretch the image or keep proportions. Preferred video stream for display — allows you to select which streams will be displayed on the screen and how: Auto — in the multiscreen mode all channels that use two stream will display an alternate one; in the uniscreen mode only the main stream will be displayed. Main — the main stream will be displayed for all channels in all modes. Alternate — the alternate stream will be displayed for all channels that support two streams in all modes. Optima — in both modes each channel that uses two streams will display the stream, which resolution is closest to the resolution of the current cell. Show info about codec, resolution, bitrate, frequency and IP-address — if checked, the appropriate information for the displayed stream will be located in the upper left corner. Show debug info — if checked, the debug information for each channel will be displayed in the upper left corner. Smooth video displaying (buffer) — if checked, the mechanism will be used to compensate uneven network operation. It can occur for the following reasons: - network path between the camera and the server is overloaded or has a low bandwidth; some frames are lost due to poor quality of the channel; - the camera sends frames unevenly or with errors. 102 If you select this option, the video will be displayed more smoothly but may have a short (up to 1/4 sec) lag from the real time. Using this option does not lead to a noticeable increase the CPU or RAM load. This option applies to a specific computer on which it is enabled and refers to the real-time viewing of video streams in Macroscop Client. Additional video buffering during monitoring — if checked, the mechanism will be used to compensate freezes due to high CPU usage or poor performance of the client computer. Enabling this option does not increase the CPU load but Macroscop Client uses more RAM (up to 30.) Therefore, if you are using a 32-bit version of Macroscop Client to simultaneously view a large number of channels, we recommend to disable this option. Use extended size buffer — if checked, the buffer size used to compensate uneven network operation will be increased. It may lead to a significant (up to 1 sec) lag from the real time. Using this option does not lead to a noticeable increase the CPU or RAM load. Use high quality — if checked, the image will be sharper but the CPU and RAM load will increase. Use DirectX acceleration — if checked, the DirectX technology will be used for display; otherwise — the WPF technology. Allow H.264 decoding on video card — if checked, H.264 video will be decoded on video card of the client computer; otherwise it will use CPU. Only the channels with this option enabled will be decoded on video card (see 3.5.2.1 on page 60.) Enable display speed limitation (only for MJPEG) — if checked, the image will adhere to the specified maximum frame rate. This limitation may be useful to reduce the CPU and RAM load on the client computer. It only applies to MJPEG This option has no effect on H.264 video streams. video streams. 103 4.2.3. Sound Play only for the active Channel — if checked, the sound will be played only for the active (currently selected) channel; otherwise the sound will be played for all the displayed channels. The Sound transmission setting group allows selecting the microphone and screen button operation modes for the channels that support sound transmission to the camera. 104 4.2.4. Scheduled Guard mode Scheduled Guard is the mode, in which a user is notified (in Macroscop Client) if the alarm is generated. If you want an alarm to generate in response to a specific event in the system, configure the appropriate scenario in Macroscop Configurator. Display only on the alarm monitor — if checked, visual and audible alerts will be displayed only on the alarm monitor; otherwise they will also be displayed on the monitors used for observation. Set the limit of an alarm display period on the alarm monitor — if checked, in the box on the right you can specify how long will the alarm be displayed; otherwise, the alarm will be displayed until the operator's response. In either case, an alert will be aborted if the operator responses to it. Disable alarm — if checked, the alarm state of any of the Scheduled Guard channels will not be indicated in the lower right corner of the screen by an exclamation mark. Alarm in Guard mode — if checked, the alarm state of any of the Guard channels will be indicated by an audio file. Only WAV files (*.wav) are supported. To select a file, click Select. To listen to the selected file, click Listen. Enable scheduled Guard mode — if checked, you can schedule Guard modes for the channels. To enable the Guard mode, select the camera in the list, click it and set up a schedule under the list. Use to show/hide the list of cameras and security objects. Use to select or deselect all cameras. The Searching cameras field allows you to quickly find and select cameras and security objects containing the entered text. 105 Blue periods mark when the channel should be in the Guard mode. Left-click the schedule to set a mark and right-click to remove it. If Use one schedule for all days of the week is selected, the schedule will be the same for the whole week. 106 4.2.5. User alarm User alarm is an alarm that is generated in Macroscop Client if the operator presses the Alarm button located on the Control panel near the clock. Action to be performed in this case is set in Configurator on page 1. Cameras in the Scenarios (response to system events) block (page 76.) To set cameras to generate User alarm after the Alarm button is pressed, select these cameras in the list. Use to show/hide the list of cameras and security objects. Use to select or deselect all cameras. The Searching cameras field allows you to quickly find and select cameras and security objects containing the entered text. 107 4.2.6. Monitors This tab displays all monitors connected Select monitors if you want Macroscop Client to use them. to the computer. If multiple monitors are connected, you can enable the Use as an alarm monitor option for one of them — in this case Alarm channels will be displayed on this monitor. 108 4.2.7. Network Connection in proxy mode — this option is used when the system includes several video servers: if checked, Macroscop Client will receive all real-time video streams and historical records by connecting to only one Macroscop server (this server, in turn, will receive data from other servers and send it to Macroscop Client); otherwise Macroscop Client will connect directly to those servers, which channels are displayed (i.e., simultaneous connection to multiple servers is possible.) Multicast setting — allows selecting a broadcasting mode for this computer. Multicast, if available — channels with all broadcasting modes will be received. Multicast only — only multicast channels will be received. Unicast only — only unicast (default) channels will be received. For information on activating the multicast mode, see 3.4.3 on page 52. 109 4.2.8. Available channels The Available channels tab indicates channels available for display on this computer — select the required cameras in the list. Use to show/hide the list of cameras and security objects. Use to select or deselect all cameras. The Searching cameras field allows you to quickly find and select cameras and security objects containing the entered text. 110 4.2.9. Available grids The Available grids tab indicates grids available for usage on this computer — select the required grids in the list. 111 4.2.10. PTZ Cameras control panel On the PTZ Cameras control panel tab you can configure the remote control or joystick parameters. 112 5. Sabotage detection module: The sabotage detection module allows detecting the following events: Camera defocusing. Camera turnaway. Camera illumination. Camera overlap, For more information on working with this module in Macroscop Client and Macroscop Standalone viewer see the Macroscop User Guide. To activate video surveillance sabotage detectors for the selected camera, perform the following steps in Configurator, channel settings, Intelligence analysis system settings: 1. Enable software motion detection as in 3.5.4.1 on page 68. 2. Mark Use external intelligent modules, the Sabotage detection module will become available. 3. Select the Sabotage detection module. 4. In the left pane of Configurator, click 6. Apply settings, click Apply on the opened page. If you want the system to signal when the detectors are triggered, configure the required actions in response for the Video surveillance sabotage event in scenario settings (for more information see 3.5.7 on page 76.) 113 6. Moving object tracking module 6.1. Description The moving object tracking module has the following features: Tracking of moving objects in the camera field of view. Generation of alarms for the following events: o intersecting a line o entering a zone o prolonged stay of an object in a zone. Search in the alarm archive. Interactive search in archive by intersecting any set line. The module is designed to monitor the territories without a dense stream of moving objects. Its correctness depends on the number and relative position of objects in the frame: the smaller objects are and the less they overlap each other, the better its result it. For more information on working with this module in Macroscop Client and Macroscop Standalone viewer see the Macroscop User Guide. 6.2. Setting For correct operation of the module you must position the camera correctly and set up the Macroscop motion detector and the module itself. 6.2.1. Camera position The camera should be positioned so that the objects in the frame overlap each other as small as possible. It is recommended to place it as high as possible and point to the ground under the steepest angle (recommended vertical deviation — not more than 30-40%.) It is also recommended to avoid perspective distortion in control zones. Frame resolution should be at least 480x384. The optimal frame resolution for this module — from 1280x960; a person should cover 33-50% of the frame. 6.2.2. Configuring the Macroscop motion detector for the module Select the minimum size of the object to eliminate false operation. 6.2.3. Configuring the moving object tracking module To configure the module: 1. Open Configurator, go to the channel settings and select Use external intelligent modules in the Intelligence analysis system settings block. The Moving object tracking module will become available. 114 If the Moving object tracking module is not on the list, it means that the server has no license for this module. To purchase the license, please contact the direct seller of Macroscop licenses for this server. The list of available licenses can be found in Configurator in 2. Servers in the Connecting servers to system block (see 3.4.1 on page 42.) 2. Select the Moving object tracking module — the Settings button will appear. 3. Click 4. These settings include two areas — Object sizes settings and Line and zone settings. It is necessary to adjust the size and set line and zones (see below.) 5. When finished, click Save and exit to save module settings. 6. In the left pane of Configurator, click 6. Apply settings, click Apply on the opened page. to open the module settings window. 115 Object sizes settings In the object sizes settings you can set the minimum and maximum size of objects. The minimum object size determines how the motion areas will be combined into objects. If objects are detected properly and one object is not split into several ones, this parameter can be reduced. If an object is split into several ones, this parameter should be increased. Note that if you reduce this parameter too much, object trajectories may cut short (since an object will pass a too large distance in one frame compared with a predetermined minimum size.) The maximum object size determines the internal characteristics of the algorithms, it should be approximately equal to the biggest object that can appear in the frame. To set the minimum or maximum object sizes: 1. Click Set.. to open a sizing window. 2. Hold down the left mouse button to select an area, which size corresponds to the minimum (maximum) object size. 3. Click Set size to apply the settings. 116 Line and zone settings To set an intersection line, click — a line will appear on the screen. You can change the location of the line by dragging it with you mouse. To set the moving direction, select one of the following values in the Moving direction field: Both directions, first direction or second direction — a perpendicular line will point in the selected direction. To set a zone, click — a zone will appear on the screen. You can change the location of the zone by dragging its base points with your mouse. To add a base point, click a line. To remove a base point, right-click it. To set an alarm type for moving objects, select Moving within zone in the Alarm type field. 117 To set an alarm type for objects that stay in the zone for too long, select Lengthy presence in the Alarm type field, then set the Staying time after which the alarm is triggered. To edit a line (zone), select it in the list and start editing. To remove a line (zone), select it in the list and click To display all added lines and zones, click . . 118 7. People counting module 7.1. Description The people counting module has the following features: Counting the number of entered and left visitors in real time — either through one or several (if multiple cameras are used) inputs. Creating reports on entered, left and present visitors — over various periods of time (from hours to years) for one or several cameras overseeing one area from different locations. Automatic and manual export of reports in CSV (supported, inter alia, by Microsoft Excel.) Counting of people in moving groups: i.e. few people moving as a group will be counted with a minimum error. The people counting module uses two mutually exclusive calculation methods: The method of counting separately moving people and the method of counting people moving in groups. The exact method to be used on a particular channel is determined when configuring this channel in Macroscop Configurator. For more information on working with this module in Macroscop Client and Macroscop Standalone viewer see the Macroscop User Guide. 7.2. Configuring cameras and the module For correct operation of the module you must position the camera correctly and set up the Macroscop motion detector and the module itself. 7.2.1. Camera position To guarantee a minimum error, we recommend to install the camera so that it would "look" at the heads of visitors. For example, a camera is located on the ceiling and its lens is pointing vertically downwards. The higher the camera is, the more favorable are module operating conditions. For a visitor to be counted, he/she must be detected in at least 8 frames. If the camera is located too low: if passing visitors cover more than 25% of the size of the frame in width or height a high counting error is possible. To reduce the likelihood of response to changes in the background and lighting, ensure smooth (no flicker and abrupt changes) lighting and the remove outside moving objects from the field of view (otherwise these objects will also be counted.) If you use the method of counting separately moving people and outsider moving objects come into the field of view, go to the motion detector software and adjust detection zones so that these objects would be away. To configure a detecting zone, use the detector expert mode (see 3.5.4.1 on page 68.) 7.2.2. Configuring the Macroscop motion detector for the module The module require the software motion detector to be enabled (see 3.5.4.1 on page 68.) Configure the motion detector as follows: The minimum size should possibly eliminate or minimize false detector triggering (for example, from shadows, glares or small objects that are not people.) If simple detector settings do not eliminate false triggering, perform the expert setting as described in 6.2.2 on page 113. For more information about the motion detector settings see 3.5.4.1 on page 68. 119 7.2.3. Configuring the module To configure the module, follow these steps: 1. Open Configurator, go to the channel settings and select Use external intelligent modules in the Intelligence analysis system settings block. The list of available modules will open, including the People counting module. If the People counting module is not on the list, it means that the server has no license for this module. To purchase the license, please contact the direct seller of Macroscop licenses for this server. The list of available licenses can be found in Configurator in 2. Servers in the Connecting servers to system block (see 3.4.1 on page 42.) 2. Select the People counting module — the Settings button will appear. 3. Click 4. Adjust the intersection line by dragging its ends. All entering/leaving objects bust intersect the line. 5. Adjust the entrance direction by selecting one of the values from the Entrance direction drop down list: First direction or Second direction. After selecting the direction an arrow perpendicular to the intersection line shall indicate the direction of entering objects. 6. Set the average object size by dragging the corners of the rectangular. The frame should cover the average counted object as accurately as possible, because this size is used during counting: if a large object — several times bigger than the frame area — is detected in the frame, it will be counted as several objects (for example, if the object is three times bigger, it is counted as three separate objects.) to open the module settings window. 120 You can stop the video by clicking Pause in order to set average object size. The average size adjustment rectangle can be located in any part of the frame, i.e. it is not necessarily to position it on the intersection line. 7. Set the counting method in the Choose method for people counting field: Counting separately moving people or Counting people moving in groups. The Method of counting separately moving people can be used if people move through the frame separately or at long intervals. The Method of counting people moving in groups can be used if people are moving through the frame in groups or a solid stream. The method of counting people moving in groups (as compared with the method of counting separately moving people), significantly increases the consumption of system resources (CPU and RAM.) For this reason, this method should be enabled in series, on one camera after another. Make sure to measure the system load after each new camera is added. 8. If you need to set up an automatic export of reports in CSV, enable the Automatically save data to csv-files option. Then specify the periods for people counting and data unloading, as well as choose the folder for reports. 9. Set Start time and Counter reset period — these parameters affect the way the counter will be displayed in Macroscop Client in real-time mode. 10. Save the module settings by clicking Save and exit. 11. In the left pane of Configurator, click 6. Apply settings, click Apply on the opened page. The module will be "learning" for 10-15 seconds — counting data for this period will be incorrect. Since this "learning" process includes the record of stationary background to provide more accurate results, it is recommended to perform it with a minimum number of moving and outside objects in the frame. 121 8. License plates recognition module 8.1. Module description The license plates recognition module has the following features: Recognition of license plates of moving cars and archiving of information about the time and date of recognition, the license plate, as well as the reference to the corresponding video frame. The module is designed to detect license plates on moving vehicles: if a vehicle is not moving a license plate is not recognized. Real-time interception of recognized license plates listed in a database. Support of the embedded database of license plates: adding and editing license plates, additional information (color, owner, etc.) on vehicles. License plate groups, including groups for interception and automatic barrier opening; one license plate can be assigned to one or more groups. Search of recognized license plates in the archive by time, date and details from a database. Export of the list of recognized license plates in Microsoft Excel or CSV formats. Users can export the list only in manual mode. To automate this process, use Macroscop API features described in Macroscop SDK (submit a request for SDK to [email protected].) Barrier control. Macroscop controls barriers through signal outputs of IP cameras. Module features: Video stream processing at 6 or 25 fps (depending on the installed license.) Maximum vehicle speed for recognition: at 6 fps — up to 20 km/h, at 25 fps — up to 150 km/h. Maximum number of license plates simultaneously detected in the frame — up to 10 pcs. Detection at a vertical tilt angle up to 40°. Recognition at a horizontal tilt angle up to 30°. Recognition at a license plate tilt angle relative to the roadway — up to 10°. Recognition of license plates from the following countries: Abkhazia, Austria, Azerbaijan, Albania, Algeria, Andorra, Angola, Argentina, Armenia, Belarus, Belgium, Bolivia, Bulgaria, Bosnia and Herzegovina, Brazil, Vatican, Great Britain, Hungary, Venezuela, Vietnam, Guatemala, Gibraltar, Honduras, Hong Kong, Grenada, Greece, Georgia, Denmark, Dominican Republic, Israel, Jordan, Ireland, Iceland, Spain, Italy, Kazakhstan, Cameroon, Canada, Cyprus, Kyrgyzstan, Colombia, Kosovo, Costa Rica, Cuba, Latvia, Lithuania, Luxembourg, Macedonia Malta, Mexico, Moldova, Nigeria, the Netherlands, Nicaragua, New Zealand, Norway, United Arab Emirates, Panama, Paraguay, Peru, Poland, Portugal, Transnistria, Puerto Rico, Russia, Romania, Serbia, Slovakia, Slovenia, Taiwan, Tunisia, Turkey, Turkmenistan, Uzbekistan, Ukraine, Uruguay, Philippines, Finland, France, Croatia, Montenegro, Czech Republic, Chile, Sweden, Sri Lanka, Ecuador, Equatorial Guinea, Estonia, South Africa; including special license plates — diplomatic, police, military, etc. (for more information on setting up recognizable templates for countries see 8.4.3 on page 127.) Separate search zones for load reduction during recognition. For more information on working with this module in Macroscop Client and Macroscop Standalone viewer see the Macroscop User Guide. 122 8.2. Licensing and module features License plate recognition module is licensed by license type and number of recognition channels. In addition, when you purchase a license, please specify the list of countries to be supported by the module. License type Parking Highway License plate recognition module licenses Description Allows recognizing license plates of vehicles moving at up to 20 km/h. The video stream is analyzed at up to 6 fps, regardless of the received frame rate. Allows recognizing license plates of vehicles moving at up to 150 km/h. Analysis is based on the actual received frame rate (or on the Detect by using customized frequency in Configurator, see 3.5.4.1 on page 68.) We recommend using 25 fps to recognize license plates of vehicles moving at high speed. The list of supported countries: Group 1: Abkhazia, Azerbaijan, Armenia, Azerbaijan, Belarus, Georgia, Kazakhstan, Kyrgyzstan, Moldova, Transnistria, Russia, Tajikistan, Turkmenistan, Ukraine, Uzbekistan, South Ossetia. Group 2: Australia, Austria, Albania, Andorra, Angola, Argentina, Belgium, Bolivia, Bulgaria, Bosnia and Herzegovina, Brazil, Vatican, Great Britain, Hungary, Venezuela, Vietnam, Guatemala, Germany, Gibraltar, Honduras, Hong Kong, Grenada, Greece, Denmark, Dominican Republic, India, Israel, Jordan, Iran, Ireland, Iceland, Spain, Italy, Cameroon, Canada, Cyprus, Colombia, Kosovo, Costa Rica, Cuba, Kuwait, Latvia, Lithuania, Luxembourg, Macedonia, Malaysia, Malta, Mexico Mongolia, Nigeria, the Netherlands, Nicaragua, New Zealand, Norway, the United Arab Emirates, Panama, Paraguay, Peru, Poland, Portugal, Puerto Rico, Romania, Serbia, Singapore, Slovakia, Slovenia, Taiwan, Turkey, Uruguay, the Philippines, Finland, France, Croatia, Montenegro, Czech Republic, Chile, Switzerland, Sweden, Sri Lanka, Ecuador, Equatorial Guinea, Estonia, South Africa. If you order a license that includes countries from Group 2, it may cost more — in this case, please address your Macroscop software vendor for the exact price. The license plate recognition module uses libraries developed by a third party and requiring separate licensing. Thus, this module technically requires two elements of license protection: Macroscop protection key and license plate module protection key. One license plate module protection key can support up to 20 countries. Macroscop key Name / Image Guardant USB-key + license file or HASP software key Description It allows using the license plate module with the number of channels specified in the license file or software key (also allows enabling the external license plate recognition module in Configurator.) The license file contains only the number of channels, not the license type (up to 20 or up to 150 km/h.) License plate module protection key Name / Image Description It allows actually recognizing license plates on the HASP USB-key number of channels specified in the USB-key firmware. The USB-key firmware also contains the license type ("parking" or "highway"), the number of channels and the list of countries. 123 The presence of two license protection elements is only a technical feature: you pay for one license per each server; this license indicates the type ("parking" or "highway") and the number of license plate recognition channels on this server. The license plate recognition module requires the license plate module protection key to be inserted in the Macroscop server with channels used for recognition. This server must also have the Macroscop USB-key (or software key), the license file (or software key) must indicate that the license plate recognition module is supported. One Macroscop server may have no more than one Macroscop USB-key (or software key) and not more than one license plate module protection key. One Macroscop server can run the module of only one type: "parking" or "highway". The number of recognition channels can be increased: to do this, purchase additional licenses from your Macroscop software vendor; then you will receive a new Macroscop license file (or software key) and a new module protection key firmware (in this case you need to take a cast of the current protection key.) License type of the license plate recognition module can be changed (from "parking" to "highway"): to do this, purchase a license extension from your Macroscop software vendor; then you will receive a new Macroscop license file (or software key) and a new module protection key firmware: if the number of channels stays the same, you can keep an old Macroscop license file (software key.) When using the multiserver configuration, you can configure the license plate recognition on channels assigned to different Macroscop server — in this case: each server must have a separate license plate recognition module protection key and Macroscop licenses should support the corresponding number of modules; a single configuration will use a single database and the archive of recognized license plates. For example, if four servers are merged into a single configuration: Server name Channels Server 1 10 Server 2 20 Server 3 30 Server 4 40 incl. license plate recognition channels 5 — up to 20 km/h 2 — up to 150 km/h 1 — up to 20 km/h — Macroscop license LS x64 for 10 cameras LS x64 for 10 cameras LS x64 for 10 cameras LS x64 for 10 cameras IP IP IP IP License plate recognition module license 5 "parking" channels 2 "highway" channels 1 "parking" channel — You need to purchase the following licenses (by keys): Macroscop LS software (64-bit (x64) version) for IP camera video surveillance systems. The license for processing the video stream from one IP camera. "Auto parking" Macroscop module. License for 5 IP channels "Auto highway" Macroscop module. License for 2 IP channels "Auto parking" Macroscop module. License for 1 IP channel 100 pcs. 1 pc. 1 pc. 1 pc. If Macroscop server has any third-party software that uses HASP license protection keys installed, Macroscop software with the license plate recognition module enabled may be unstable on this server. 8.3. Installing and updating the module The license plate recognition module is an external module: it is not included in the basic Macroscop installation package and requires separate installation. 124 This module should be installed on both the computer with Macroscop Server or Macroscop Standalone and on client computers with Macroscop Client used to display license plate recognition channels. Its version must match the version of Macroscop Server / Standalone / Client installed on your computer. The latest version of the installation package is available on Macroscop website, http://www.macroscop.com/support/downloads/. Installation files must be launched by an administrator. Default installation folder of the license plate recognition module: Bit depth Windows Macroscop 32-bit 32-bit 64-bit 64-bit 64-bit 32-bit 8.3.1. Default installation folder C:\Program Files\MacroscopAuto C:\Program Files\MacroscopAuto C:\Program Files (x86)\MacroscopAuto Installation To install the license plate recognition module, follow these steps: 1. Stop all running Macroscop applications on your computer: Macroscop Server, Macroscop Standalone, Macroscop Client. 2. Insert the license plate recognition module protection key into a USB-port of the computer. 3. Run installation file MacroscopAuto Installer.exe, if 32-bit Macroscop Server / Standalone / Client is installed; or MacroscopAuto Installer_x64.exe, if 64-bit Macroscop Server / Standalone / Client is installed. 4. Choose the language. 5. Follow the steps of the installation wizard. 125 6. Start Macroscop Server / Standalone; run Macroscop Configurator and configure the license plate recognition module (for more details see 8.4.3 on page 127.) 8.3.2. Update If you update the license plate recognition module from version 1.9.x or later, no settings are lost. If version 1.8.x or earlier is used, all the settings are saved except for the selected patterns of license plates. To update the license plate recognition module, follow these steps: 1. Stop all running Macroscop applications on your computer: Macroscop Server, Macroscop Standalone, Macroscop Client. 2. Run installation file MacroscopAuto Installer.exe, if 32-bit Macroscop Server / Standalone / Client is installed; or MacroscopAuto Installer_x64.exe, if 64-bit Macroscop Server / Standalone / Client is installed. A window saying that the license plate recognition module is already installed will appear; click OK. 3. A window prompting you to remove the module will appear; click Yes. Next window will ask you to confirm the removal; click Yes. 4. A window showing the removal process will open afterwards. After the module is removed a corresponding window will open; click OK. 5. This opens the installation wizard; click Next and follow the wizard steps. 6. Start Macroscop Server / Standalone. 7. If you were upgrading from version 1.8.x or earlier, run Macroscop Configurator and select templates of license plates to be recognized. If license plates are no longer recognized after the update, reinstall Macroscop Server / Standalone. You do not need to reinstall the recognition module. 126 8.4. Configuring cameras and the module For correct operation of the license plate recognition module you must position the camera correctly and set up the Macroscop motion detector and the module itself. 8.4.1. Guidelines on camera choosing and configuration 8.4.1.1. Choosing a camera Consider the following recommendations when choosing a camera: Your camera must support the B/W mode. Preference should be given to CCD cameras, if possible, of large size — not less than 1/3". We recommend using cameras with IR illumination (you can also use external IR illuminators.) Manual exposure and aperture settings are desirable. The camera should operate in a "day/night" mode; automatic switch to B/W mode is not important but such cameras have built-in automatic ICR filters (IR Cut Filter Mechanically Removable) that filter IR only in day mode (filtering is not performed at night.) 8.4.1.2. Camera settings In most cases, the license plate recognition is provided by default camera settings. In some cases, if recognition is efficient, you can use the following recommendations: Fully open the aperture. Set short or manual exposure — no more than 1/500. Turn off the auto-focus; adjust the focus to the desired recognition area. Enable the B/W mode. Disable additional information displayed in the frame (time, etc.) Disable AGC (Automatic Gain Control), if any, as this feature adds interference. Disable BLC (Back Light Compensation); this feature automatically prolongs the exposure. Disable DNR (Digital Noise Reduction.) Disable WDR (minimum level.) 8.4.2. Camera position and field of view Standard camera position on the road — 6 meters above the center of the controlled lane; the control zone center is 20 meters away from the installation location. Standard camera position to monitor entrances and exits from security areas — 3 meters over the edge of the lane; the control zone center is 11 meters away at the traffic lane. When you configure the field of view, consider the following limitations: Height of license plate characters (big digits) — not less than 15 pixels, line thickness — at least 2 pixels. 127 Camera vertical tilt — up to 40°. Camera horizontal tilt — up to 30°. License plate tilt angle relative to the roadway — up to 10°. 8.4.3. Configuring the module To configure the license plate recognition module, follow these steps: 128 1. Start Macroscop Configurator, go to tab 1. Cameras; in the channel list (on the left), select the channel to be used for license plate recognition; in the channel settings (on the right) open the Archiving settings block; select With detector + manual. 2. Open the Intelligence analysis system settings and enable software motion detector (see 3.5.4.1 on page 68.) Set the minimum object width and height — they should be smaller than a vehicle. When using the detector expert mode, we recommend to select the whole frame for motion detection in order to improve the reliability of recognition. 3. Open Configurator, go to the channel settings and select Use external intelligent modules in the Intelligence analysis system settings block. The list of available modules will open, including License plate recognition module. If the License plate recognition module is not on the list, it means that the module is not installed or the server has no license for this module. To purchase the license, please contact the direct seller of Macroscop licenses for this server. The list of available licenses can be found in Configurator in 2. Servers in the Connecting servers to system block (see 3.4.1 on page 42.) 4. Select the License plate recognition module — the Settings button 5. Click to open the module settings window. will appear. 129 The upper left corner contains the version of the library (SDK) used for recognition. If the module protection key is installed, the License plate recognition is selected: Parking (6 fps) or highway (25 fps.) 6. Configure the module: For the first test run, it is recommended to leave the default parameters The threshold of reliability, Number of unrecognized characters, Use auto scale and Use motion detector — they can be set later in order to achieve optimal recognition results. To use the module in the license plate recognition mode, check License plate recognition. If this option is selected, recognition will not be performed — if the module is used only to control a barrier. If the License plate recognition option is enabled, the Determine motion direction option becomes available. After selecting this option, click Set direction of entry, then select the arrow indicating the required direction: vehicles moving in the frame in the direction of the arrow will be considered as entering, in the opposite direction — as leaving. To use the module in the barrier control mode, check Barrier control. If you plan to use the module only for barrier control, the recognition license is not required (just as the license plate recognition module protection key); however, due to technical reasons the Macroscop license file (or software key) must support license plate recognition module for the appropriate number of channels — for this purpose contact the organization that sold you a Macroscop license for this server. If the Barrier control option is enabled, the following features are available: — Manual control — allows the operator to open a barrier in Macroscop Client. — Auto (by recognized license plate) — opens a barrier automatically if the recognized license plate is included in the "white list" (i.e., a group for automatic opening.) If automatic barrier control is enabled, the following features are available: - Open barrier — if the "white list" license plate is recognized it generates a command for opening a barrier. - Open and close through — if the "white list" license plate is recognized it generates a command for opening a barrier; then, after a specified number of seconds, it generates a command for closing. 130 Most of the modern barriers close automatically if a single vehicles passes through — simply choose Open barrier for such barriers. If you select Open and close through, a barrier must have an operating safety block (i.e., after the command for closing is received, it must check whether a vehicle is still and the barrier and close only if there is no vehicle.) The Database settings parameter indicates the location of a license plate database. If recognition is performed on only one server, it is recommended to check Local. When using the multiserver configuration, if recognition is performed on multiple servers, the database can be stored on a single server: in this case select Local for the channel assigned to the database server and enter the IP-address of this server for all other channels. (for more information about multiserver configurations and camera assignment see 3.4.1.1 – 3.4.1.5 on pages 45 – 48.) Default database connection port — 3050, username — SYSDBA, password — masterkey. For example: You have "Server 1" (IP-address: 192.168.1.1) and "Server 2" (IP-address: 192.168.1.2) merged together; channels "Channel 1" and "Channel 2" are assigned to "Server 1", "Channel 3" and "Channel 4" — to "Server 2"; all channels perform license plate recognition. If you want to store the database on "Server 1", enter "Database settings" = "192.168.1.1" for all channels of the license plate recognition module. No matter which server will be used to store the database, license plate recognition events (date/time of recognition; recognized at a specified date/time; frame with the recognized license plate) will always be stored on the server, to which the channel with this event is assigned. Minimum plate distribution time (sec) — the time from initial recognition of a plate to its archiving and displaying in Macroscop Client. It is not recommended to change this setting unless necessary, because the default value — 2 seconds — is optimal for most situations. If this parameter is lowered, not completely or incorrectly recognized license plates may appear, since the algorithm analyzes the sequence of frames to improve recognition. Do not recognize again for (sec) — the period within which the previously recognized license plate is not recognized again. This setting is useful, in particular, for automatic barrier opening: if a vehicle stops in front of a barrier and starts to move later its license plate can be recognized again. Such problem may also appear if a license plate was temporarily covered by some object. The threshold of reliability — internal module parameter that filters plates by recognition quality: if the quality is below a predetermined threshold, such license plate will be automatically rejected. This parameter should be selected experimentally — if the value is too low some plates can be recognized incorrectly; if it is too high — some plates may be not recognized at all, since the system will mark them as poor quality ones. Note that the higher the value is, the greater is the consumption of system resources (CPU, RAM used by the application.) Number of unrecognized characters — filters plates by the number of recognized characters: license plates with the number of unrecognized characters more than specified will be automatically rejected. Use auto scale — this option is recommended if license plates are more than 120 pixels wide (for example, if a camera records the close-up of only the lower part of a vehicle) — the analysis module will receive a reduced image, which in turn will reduce the load (RAM, CPU usage.) Use motion detector — only frame and areas with movement will be analyzed. Enabling this option allows reducing the computational cost (CPU and RAM usage.) 131 To set the minimum and maximum sizes of recognizable license plates, use the sliders to specify the size as a percentage of the frame size or specify the dimensions interactively. This setting affects only the horizontal dimension (width) of a plate. To set the minimum (maximum) size interactively, click Set interactively... below the corresponding slider — an interactive sizing window will open. The window will broadcast realtime video stream from the configured camera. To "stop" the video, click Pause at the bottom of the window. Hold down the left mouse button and select an area corresponding the minimum (maximum) size: the minimum size should be somewhat smaller than a plate frame in the background; maximum — slightly larger than a plate frame in the foreground. When finished, click Save. 132 To set license plate search zones, click Set search zones. The search zone setting window will appear. The window will broadcast real-time video stream from the configured camera. To "stop" the video, click Pause at the bottom of the window. Clicking the left mouse button to select the area in which plates will be recognized. You can set several zones to create a complex recognition zone. To delete an existing recognition zone, click in the top right corner of the zone. Click Save to save the settings. To select countries and plate templates to be recognized by the module: Use and to move the required countries from the Available Countries list to the Selected Countries list. If a country is not in the Selected Countries list, its license plates will not be recognized. If the list is empty, activate the module protection key. In this case save module settings, apply the configuration and close Macroscop Configurator. Reinstall and restart Macroscop Server / Standalone, then run Macroscop Configurator and continue to set up the module. 133 Arrange countries in the Selected Countries list in the order in which you want to analyze plates: when a plate is recognized, it will first be compared with samples from the first country in the list; if no match is found — with the second one, etc. You can change the order by dragging countries up or down. For each country, select plate templates that will be recognized. To do this, select the country in the Selected Countries list and use and to put the required templates from the Available Templates list to the Selected Templates list. If a template is not in the Selected Templates list, license plates of its type will not be recognized. The more countries and patterns you select, the higher the server load is. If over 80% of CPU are used recognition accuracy may be reduced. To adjust autosave of frames with recognized plates on disk, select Save frames on disk and click Configure autosave. In the window that opens, select the folder in which you want to store the frames, set its maximum size in the Folder maximum size, MB field and click Save. If the amount of saved files exceeds the maximum specified size, the oldest files will be overwritten with new ones. If Folder maximum size, MB is 0, the size will not be limited. We recommend to configure frame autosave directly on the server, because in case of remote settings the folder selection window will show the remote computer with Configurator launched. If you use a remote computer, enter the folder path by hand. The specified folder must already exist on the server. 7. Save the module settings by clicking OK or reset all settings to default by clicking Default. 134 8. In the left pane of Configurator, click 6. Apply settings, click Apply on the opened page. The plate in the frame will be recognized only if the following conditions are met: — license plate height is within the range between the specified minimum and maximum size; — license plate fits completely in the search zone; — Macroscop software motion detector has detected movement; — license plate corresponds to one of the standard templates selected in the module settings (see 10.4.3 on page 194); — all conditions and restrictions on the size of characters, tilt angles and camera position are met. If the recognition module on the server was enabled for the first time (during the previous start of Macroscop Server / Standalone the recognition was not enabled for any of the channels), then stop and restart Macroscop / Standalone server after configuring the module. In case you change the settings of the license plate recognition module later, restart of Macroscop Server / Standalone is not required. 8.4.4. Macroscop barrier operation Macroscop controls barriers through signal outputs of IP cameras: signal (analog) camera output is connected to barrier signal input — schematic connection diagram depends on the layout of camera and barrier contacts. To connect a barrier Macroscop software must support signal outputs for this IP camera model. For more information contact Macroscop technical support. To control a barrier: 1. Connect camera signal output to barrier signal input. 2. Set the barrier control scenario in Configurator (see below.) 8.4.4.1. Testing camera alarm outputs To check whether the signal reaches camera alarm outputs: 1. Follow the scheme provided in camera documentation to connect test load to the signal output (for example, tester or LED.) 2. Start Macroscop Configurator, go to tab 1. Cameras; in the channel list (on the left) select the tested channel (camera.) 135 3. In the Channel connection settings block enable Event processing (I/O.) 4. Click to the right from the Event Processing (I/O) button to open the digital input/output testing window. 5. Select the corresponding outputs — signals will be transmitted to camera outputs, test load should trigger. To disable the signal, click outputs again. 6. Click OK to close the testing window. 8.4.4.2. Barrier control scenario A barrier can be opened in two modes — manual and automatic. In the manual mode, the operator opens (closes) a barrier using the on-screen control interface. If Open is pressed, the system generates the Request to open gate event. If Close is pressed — Request to close gate. In automatic mode, a barrier opens if the license plate with the Open barrier for cars in this group indicator is recognized. In this case the system generates the Request to open gate event; if Open and close through is also enabled, then after a specified number of seconds the Request to close gate will be generated. In order to send an electric signal to the camera output after the Request to close (open) gate, configure the appropriate scenario. The scenario will perform the following after the Request to close (open) gate is generated: - signal camera input is activated (energized); - a short pause follow; - signal camera input is deactivated (deenergized); 136 To set up an opening scenario: 1. Start Macroscop Configurator, go to tab 1. Cameras; in the channel list (on the left) select the tested channel (camera) with screen control interface. 2. Go to the Scenarios block; in the event list (on the left), select Request to open gate; in the drop-down list (on the top right) Send signal to camera output; click to add the action. 3. Expand the action description by clicking on the left and adjust action parameters: Run in channels — by default the current channel is selected. If signal outputs of another camera are used to control a barrier, change the value in this field. Limit by start time — allows limiting the signal frequency to avoid conflict if the scenario is run for successive recognition events (set at least 2 seconds.) Output number — specify the camera signal output number. Output value — choose: 1 (Activated). Depending on the circuit, the activation/deactivation of the alarm output may correspond to different physical states of contacts: closed/open circuit, presence/absence of voltage, etc. 4. In the dropdown list select Pause; click enter 1 in the Pause Interval (sec) field. to add the action; go to action settings and 137 5. In the dropdown list select Send signal to camera output; click to add the action; enter 0 (Deactivated) in the Output value field; add other parameters from step 3. 6. In the left pane of Configurator, click 6. Apply settings, click Apply on the opened page. 8.5. Troubleshooting and replacing of license plate recognition module protection key firmware 8.5.1. Troubleshooting If the license plate recognition module does not work at all or does not work properly, use the following troubleshooting procedure: 1. Check if a protection key driver was installed and is working properly. 2. Check whether its sessions start. 3. Check the module settings. 8.5.1.1. HASP key driver You can check the installation procedure by typing the following in your browser: http://127.0.0.1:1947/_int_/devices.html the license plate recognition key must be inserted. Type in the complete address, including "http://". If you see a window similar to the one shown below, HASP driver is installed correctly. The Key ID contains the key identification number — in case of problems send this ID to our technical support service. Protection keys may have two Vendor values — 106763 (AAOTB series) and 107392 (EOAWT series.) 138 If the window does not open, try another browser. If attempts in other drivers are also unsuccessful, it is likely that HASP driver is not installed or is installed incorrectly. In this case, you can try to solve the issue in several ways: Restart your computer, since sometimes a reboot is required after driver installation. If the driver window does not appear again, reinstall Macroscop Server / Standalone — HASP driver will also be reinstalled. Restart your computer after reinstalling Macroscop Server / Standalone. All installation files must be run by an administrator. You can install HASP driver separately: To do this, go to Macroscop installation package — \Packages\Externals\HaspDrivers — and run haspdinst.exe installation file. 139 8.5.1.2. License plate recognition module key options You can access options through the HASP driver web interface in your browser (Features tab) or follow the following link: http://127.0.0.1:1947/_int_/features.html The table below lists the available options. 1 2 3 Highway 1 channel Highway 2 channels Highway 3 channels Cod e 214 215 216 4, 44 Highway 4 channels 4000 5 6 7 8 9 Highway 5 channels Highway 6 channels Highway 7 channels Highway 8 channels Highway 9 channels Highway 10 channels Highway 11 channels Highway 12 channels Highway 13 channels Highway 14 channels Highway 15 channels Highway 16 channels Parking 1 channel Parking 2 channels Parking 3 channels Parking 4 channels Parking 5 channels Parking 6 channels 4001 4002 4003 4004 4005 Parking 14 channels Parking 15 channels Parking 16 channels Recognition module core, required option Ukraine Russia USSR Bulgaria Colombia 4006 Code Meaning 10 11, 21 12 13 14 15 16 201 202 203 204 205 206 Meaning Cod e 4026 4027 4028 Meaning Lithuania France Slovenia 4029 Croatia 4030 4031 4032 4033 4034 Georgia Puerto-Rico Argentina Germany Spain Belarus 4035 Canada 4007 Mexico 4036 Belgium 4008 Italy 4038 Azerbaijan 4009 Finland 4039 Bosnia and Herzegovina 4010 Kazakhstan 4040 Hong Kong 4011 Moldavia 4041 Denmark 4012 South Ossetia 4042 Macedonia 4013 4014 4015 4016 4017 4018 Uzbekistan Turkey Taiwan Israel Hungary Romania 4043 4044 4045 4046 4047 4051 New Zealand United Kingdom Singapore Netherlands Switzerland Mongolia 140 Code Meaning 207 208 209 210 211 212 213 Parking Parking Parking Parking Parking Parking Parking 7 channels 8 channels 9 channels 10 channels 11 channels 12 channels 13 channels Cod e 4019 4020 4021 4022 4023 4024 4025 Meaning Brazil Transnistria Poland Slovakia Kyrgyzstan Czech Republic Latvia Cod e 4052 4053 4054 4055 4182 4198 4249 Meaning Sweden Albania Japan Malaysia Nigeria Portugal Venezuela Since the list of supported countries is constantly increasing, the table does not contain all codes. 8.5.1.3. License plate recognition library efficiency If Macroscop Server / Standalone is running and at least one channel is used for recognition, then the Session field should have a non-zero value — this indicates that the license plate recognition module is currently running. If the Session field is blank, it means that the module is not running. Possible causes and solutions: Cause 1 None of the channels has license plate recognition enabled. The configuration was not applied after enabling recognition. Macroscop was not restarted after applying the configuration. Solution 1.1 Enable license plate recognition for at least one channel in Configurator. Apply configuration. Restart Macroscop Server / Standalone (see 8.4.3 on page 127.) Cause 2 Key license validity period has expired. Solution 2.1 In some cases, a user may be given a testing protection key. The validity period for such keys is limited. If the license has expired, open the key driver web interface, go to Features and check Restrictions. It will say Expired. 141 Cause 3 HASP key conflict — license plate recognition module protection key conflicts with another HASP key on your Macroscop server. Solution 3.1 In order to make sure that Macroscop server does not use any other HASP keys for third-party software, open the HASP driver web interface, go to Configuration, Access to Remote License Managers (or follow the link: http://127.0.0.1:1947/_int_/config_to.html), deselect all. Then go to Sentinel Keys (http://127.0.0.1:1947/_int_/devices.html) and make sure there are no other HASP keys used. If other HASP keys are installed, remove them and leave only the license plate recognition module protection key (Vendor — 106763 or 107392.) Restart Macroscop Server / Standalone and check whether the module works. If the module is working after other keys have been removed (Session contains a non-zero value), reinstall Macroscop Server / Standalone or third-party software protected by HASP keys to another computer. 8.5.1.4. Module operation The following are typical problems that may arise during operation of the module, as well as the solutions for them. Problem 1 No license plates are recognized. License plates of a separate type or a particular country are not recognized. Most of the plates in the frame are not recognized. Solution 1.1 Customize license plate recognition templates, as specified in 8.4.3 on page 127. Solution 1.2 Minimum and maximum plate sizes in the module settings may be incorrect. Set minimum and maximum sizes so that they fit within the range between minimum and maximum limits (see 8.4.3 on page 127.) Solution 1.3 Search zone in the module settings may be incorrect. Customize it so that the plates were inside the zone. If multiple zones are used, then the license plate movement path in the frame should not have gaps between zones. One simple rectangular zone is preferable to a complex zone consisting of several smaller zones (see 8.4.3 on page 127.) 142 Solution 1.4 The software motion detector may be disabled or configured incorrectly. Enable and/or configure the detector (see 3.2.5.5 on page 62 and 8.4.3 on page 127.) Solution 1.5 Perhaps the image obtained from the camera does not allow recognizing the number (for example, it is not sharp enough, has interference or distorted fragments present.) Start Macroscop Client, open the archive of the channel used for recognition and go to the frame containing a license plate for recognition. Save this frame as TIFF or BMP; image resolution should match the resolution of the frame received from the camera. Open the file in any image editor, in 1:1. Image must be sufficiently sharp and distinguishable. If it is blurred or fragmented, configure the camera to get a sharper picture (may require lens focusing or camera codec compression rate adjustment.) Solution 1.6 The camera position or the field of view may not comply with the recommendations set out in 8.4.2 on page 126. Install the camera and adjust the field of view in accordance with these recommendations. Solution 1.7 If two streams are used by one camera, a high-resolution stream is required for recognition. Open the channel settings in Configuration. If the Use two streams option is enabled in Channel data stream settings, make sure that Main is selected in the Stream selection for analysis field in Intelligence analysis system settings (see 3.5.4.1 on page 68.) Problem 2 Not all of the license plates in the frame are recognized. Some of the plates of the same type and size and in the same zone are recognized and some are not. Solution 2.1 See solutions 1.5 - 1.7 above. Solution 2.2 Try to change the module settings (see 8.4.3 on page 127): decrease The threshold of reliability; increase the Number of unrecognized characters, enable/disable Use auto scale and Use motion detector. Solution 2.3 If the Parking license is used, recognition may not occur since vehicles move at a speed close to or higher than 20 km/h. In this case, if you want increase the number of plates recognized, we recommended changing the license type to Highway (note that the transition from Parking to Highway will significantly increase the processing load on server CPU.) Problem 3 Too many license plates are recognized incorrectly or incompletely (include asterisks "*".) Solution 3.1 Try to change the module settings (see 8.4.3 on page 127): increase The threshold of reliability; decrease the Number of unrecognized characters. 143 Problem 4 When you select a recognized license plate in the Archive tab of the recognition window, an empty frame or a frame with another plate is displayed. Solution 4.1 Perhaps the camera uses two streams and the low-resolution (Alternate) stream was selected for recognition (or archiving.) Open the channel settings in Configuration. If the Use two streams option is enabled in Channel data stream settings: - select Main in the Select recording stream field in Archiving settings (see 3.5.3.2 on page 66); - select Main in the Stream selection for analysis field in Intelligence analysis system settings (see 3.5.4.1 on page 68.) 8.5.2. HASP key firmware You may need to change the module protection key parameters. In this case, follow these steps: 1. Insert the key and open HASP driver web interface in browser, go to Sentinel Keys: http://127.0.0.1:1947/_int_/devices.html. Record field values for Key ID and Vendor and send them to the company you purchased Macroscop licenses from. 2. You will receive a utility (hasp_update.exe) to take a cast each Vendor has its own utility but their user interface is the same. 3. Insert the key and run the utility, go to Collect Key Status Information, click Collect Information and the file (*.c2v.) For convenience, we recommend naming it with the value from Key ID. 4. Send the file (*.c2v) to the company you purchased Macroscop licenses from. 5. You will receive a firmware file with the extension *.v2c. Save it to your computer drive. 6. Insert the key and open HASP driver web interface in browser, go to Update/Attach: http://127.0.0.1:1947/_int_/checkin.html. Click Browse and select the firmware file. Click Apply File. The firmware will be changed in several seconds. 7. For the changes to take effect, restart Macroscop Server / Standalone of your key: 144 145 9. Crowd counting module 9.1. Description The crowd counting module allows detecting crowds of people. When configuring the module you have to specify the frame area to be monitored, as well as two quantitative criteria (levels) — attention is required and allowable maximum levels. If the number of people in specified frame areas exceeds one of these levels, an appropriate system event will be generated. System events are used to configure scenarios, for example — for alarm generation (see 3.5.7 on page 76.) Besides generating system events the module allows you to construct a graph showing the number of people on a timeline. The number of people is estimated analytically, on the basis of special-purpose algorithms, so the estimated will be different from the actual one — degree of error may amount up to 30%. One of the factors that affect the estimate is the speed of movement of people in the frame: if people move fast enough — the estimated amount will be higher than the actual; if people in the frame move very slowly or stand still — the estimated amount will be lower than the actual. For more information on working with this module in Macroscop Client and Macroscop Standalone viewer see the Macroscop User Guide. 9.2. Configuring cameras and the module For correct operation of the module you must position the camera correctly and set up the Macroscop motion detector and the module itself. 9.2.1. Camera position For correct operation of the module it is recommended to install the camera as high as possible, at such angle that, firstly, allows distinguishing human figures; secondly — so that figures of people in the foreground do not overlap those in the background. Examples of correct camera images for crowd counting are given below. 9.2.2. Configuring the software motion detector for the module The minimum size should possibly eliminate or minimize false detector triggering (for example, from shadows, glares or small objects that are not people.) If simple detector settings do not eliminate false motion detector triggering, perform the expert setting as described in 6.2.2 on page 113. For more information about the motion detector settings see 3.5.4.1 on page 68. 9.2.3. Perspective settings Since in most cases — due to perspective distortion — the size of figures in the foreground and background will be different, it is necessary to set perspective. For more information on perspective settings see 3.5.4.3 on page 71. 146 9.2.4. Configuring the module To configure the module, follow these steps: 1. Open Configurator, go to the channel settings and select Use external intelligent modules in the Intelligence analysis system settings block. The list of available modules will open, including Crowd counting module. If the Crowd counting module is not on the list, it means that the server has no license for this module. To purchase the license, please contact the direct seller of Macroscop licenses for this server. The list of available licenses can be found in Configurator in 2. Servers in the Connecting servers to system block (see 3.4.1 on page 42.) 2. Select the Crowd counting module — the Settings button 3. Click to open the module settings window. will appear. 147 4. Specify detecting zone (no more than six), in which people will be counted: Add zone — click over the list (to the left.) Remove zone — select the zone in the list (to the left) and click . Change zone — select the zone in the list (to the left) and choose one of the following: - change zone size — click one of the square markers on the zone boundaries ( hold the mouse button and drag it; - move zone — click the zone, hold the mouse button and drag the zone. ), People are counted in each area independently, so zones should not overlap each other — otherwise people in the overlapped part will be counted twice. To select the whole frame, click Select full frame. By default, when you use the module for the first time it already has such zone (over the entire frame.) To eliminate counting errors at zone boundaries we recommending using a smaller number of zones, if possible. Several zones may be used, for example, in the following situations: 5. - if a road and a pedestrian area are in the frame — then you should limit the control zone to the pedestrian zone; - if a recreation area crossed by a pavement with heavy pedestrian traffic is in the frame; if it is required to avoid crowds in a recreation area — limit the control zone to this recreation area. You can specify limitation on the number of people in Allowable maximum ("Alert") and Attention is required ("Attention.") 6. Save the module settings by clicking Save. 7. In the left pane of Configurator, click 6. Apply settings, click Apply on the opened page. The module will be "learning" for 10-15 seconds — counting data for this period will be incorrect. Since this "learning" process includes the record of stationary background to provide more accurate results, it is recommended to perform it with a minimum number of moving and outside objects in the frame. 148 10. Heat map module 10.1. Description The heat map module is designed to visualize the traffic density in various areas of the frame. A heat map is formed by summing up the time during which a movement was observed in a certain point — as a result the areas where objects stay more often and for the longest time are highlighted. A color scale is used to visualize the traffic density: color areas stained according to the traffic density overlap a video image with a transparent layer. For example, if you use a four-color scale, red color denoted high density areas, blue — low density; green and yellow colors are transient. The heat map module can be used to determine the popularity of different places (racks, cabinets) in a store, preferred routes for people or vehicles, as well as to analyze visit statistics of various objects. There are three options for using heat maps: real-time mode, scheduled report and camera field of view overlap on an object plan. In the real-time mode only areas with movement recorded in the last 10 seconds are displayed in the frame. The scheduled report sets the interval of time used to analyze traffic density in the frame. Camera field of view overlap allows creating a heat map not only in the frame but also on an object plan. For more information on working with this module in Macroscop Client and Macroscop Standalone viewer see the Macroscop User Guide. 10.2. Configuring cameras and the module For correct operation of the module you must position the camera correctly and set up the Macroscop motion detector and the module itself. 10.2.1. Camera position For correct operation of the module it is recommended to install the camera as high as possible to minimize the effects of perspective — overlap of foreground objects on background. The ideal position is on top, at a right angle to the horizon. 149 150 10.2.2. Configuring the Macroscop motion detector for the module Macroscop motion detector settings: The minimum size should possibly eliminate or minimize false detector triggering (for example, from shadows, glares or small objects that are not people.) If simple detector settings do not eliminate false motion detector triggering, perform the expert setting as described in 6.2.2 on page 113. For more information about the motion detector settings see 3.5.4.1 on page 68. 10.2.3. Configuring the module To activate the module: 1. Open Configurator, go to the channel settings and select Use external intelligent modules in the Intelligence analysis system settings block. The list of available modules will open, including Heat map module. If the Heat map module is not on the list, it means that the server has no license for this module. To purchase the license, please contact the direct seller of Macroscop licenses for this server. The list of available licenses can be found in Configurator in 2. Servers in the Connecting servers to system block (see 3.4.1 on page 42.) 2. Select the Heat map module — the Settings button 3. If you want to save heat maps overlapping the field of view on an object plan to your will appear. computer drive, click ; in the module settings window select Automatically save plugin data on a plan; set the Unload data every parameter; if necessary — Choose directory to store the results (different from the default one); click Save. To save data on a plan, create an object plan with this camera and its field of view indicated (see 3.7 on page 92.) 151 4. In the left pane of Configurator, click 6. Apply settings, click Apply on the opened page. 152 11. Auto Zoom The Auto Zoom function displays a separate enlarged area with moving objects. For more information on working with this function in Macroscop Client and Macroscop Standalone viewer see the Macroscop User Guide. 11.1. Configuring the function To activate the function: 1. Open Configurator, go to the channel settings and select Use external intelligent modules in the Intelligence analysis system settings block. The list of available modules will open, including Auto zoom. Auto zoom does not require additional licensing. 2. Select Auto zoom. 3. In the left pane of Configurator, click 6. Apply settings, 4. click Apply on the opened page. 153 12. Face recognition module The face recognition module is designed for automatic person identification using the video image. It recognizes faces captured by a face detector by comparing them with a previously created database of reference images. The face recognition module provides a high percentage of recognition and can be used in conjunction with an access control system in order to improve the control of access to facilities with high security requirements, such as banks or classified facilities. Another important application field is the automation of face control in casinos, hotels, restaurants and other similar facilities. If you want to implement joint verification based on access cards and video image, use Macroscop in conjunction with one of the integrated third-party access control systems. The module is not designed to recognize individuals in a random stream of people — in the streets, railway stations, supermarkets, etc. For more information on working with this module in Macroscop Client and Macroscop Standalone viewer see the Macroscop User Guide. 12.1. Installing and licensing the module The face recognition module is an external module: it is not included in the basic Macroscop installation package and requires separate installation and license. Face recognition module license protection is provided by means of a software HASP key. When you apply a software key the license is assigned to a specific computer and can not be reinstalled to another computer later. It is assigned to computer motherboard and hard drive. The module is installed from the installation package MacroscopFace Installer_x64.exe (for 64-bit Windows и Macroscop) or MacroscopFace Installer_x86.exe (for 32-bit Windows и Macroscop.) If you need the installation package please contact Macroscop technical support. To install the face recognition module, follow these steps: 1. Stop all running Macroscop applications on your computer: Macroscop Server, Macroscop Standalone, Macroscop Client. 2. Run MacroscopFace Installer_x64.exe (or MacroscopFace Installer_x86.exe.) 3. In the window that opens, select the installation language and click OK: 154 4. This opens the installation wizard; click Next and follow the wizard steps. 5. In the installation step selection window select Generate key configuration file; click Next. Then choose the folder to save the configuration key; click OK. A window informing about the process of generating the configuration key will open. After the key is generated you will be prompted to proceed; click OK. The installation program will close. 6. Send the saved file hardwarekey.cfg to the organization you purchased the face recognition module from. You will receive a key activation file. 7. After receiving this file repeat steps 1-4. 155 8. In the installation step selection window select Install key activation file; click Next. Click Browse to select the activation file; click Next. After the installation is completed click Finish. 12.2. Guidelines and requirements Standard camera position — at the guard desk or at the door; at face level or at a slight angle — to provide the best overview of faces. Changes in lighting and facial expressions — as compared to the reference sample — can significantly reduce the likelihood of detection, so you must ensure the following recommendations: — provide uniform and constant lighting of recognized faces; — people must maintain a neutral expression during recognition. Examples of the effect of lighting on the probability of recognition: Parameter Original Glares from glasses Strong overhead lights Strong overhead lights Additional side light Strong daylight 1 0.94 0.65 0.32 0.41 0.03 Image Probability Examples of the effect of poses and facial expressions on the probability of recognition: 156 Camera Face databas e Recognition probability The distance between the pupils of recognized faces in the frame should be at least 60 pixels. 12.3. Configuring the module To configure the face recognition module, follow these steps: 1. Start Macroscop Configurator, go to tab 1. Cameras; in the channel list (on the left), select the channel to be used for license plate recognition; in the channel settings (on the right) open the Archiving settings block; select With detector + manual. 2. Open the Intelligence analysis system settings and enable software motion detector (see 3.5.4.1 on page 68.) Set the minimum object width and height — they should be smaller than a face. When using the detector expert mode, we recommend to select the whole frame for motion detection in order to improve the reliability of recognition. 3. Open Configurator, go to the channel settings and select Use external intelligent modules in the Intelligence analysis system settings block. The list of available modules will open, including Face recognition module. If the Face recognition module is not on the list, it means that the server has no license for this module. To purchase the license, please contact the direct seller of Macroscop licenses for this server. The list of available licenses can be found in Configurator in 2. Servers in the Connecting servers to system block (see 3.4.1 on page 42.) 4. Select the Face recognition module — the Settings button will appear. 157 5. Click to open the module settings window. 6. Configure the module; click OK when finished. (To set the default settings, click Default.) Below is the description of settings: Minimum and maximum size of the face — limits for recognized faces. Allow excluding too distant and too close face from recognition. These parameters can be configured interactively. Confidence coefficient — internal module parameter that filters faces by recognition quality: if the quality is below a predetermined threshold, such face will be automatically rejected. This parameter should be selected experimentally — if the value is too low some faces can be recognized incorrectly; if it is too high — some faces may be not recognized at all, since the system will mark them as poor quality ones. Note that the higher the value is, the greater is the consumption of system resources (CPU, RAM used by the application.) Balance between accuracy and speed of identification — the module inner parameter; it allows, depending on the available hardware resources, adjusting the balance between speed and accuracy with regard to RAM and CPU usage during recognition. 158 Card-file settings — specifies the location of a face database. If recognition is performed on only one server, it is recommended to check Local. When using the multiserver configuration, if recognition is performed on multiple servers, the database can be stored on a single server: in this case select Local for the channel assigned to the database server and enter the IP-address of this server for all other channels. (for more information about multiserver configurations and camera assignment see 3.4.1.1 – 3.4.1.5 on pages 45 – 48.) By default: database connection port — 3050, username — SYSDBA, password — masterkey. For example: You have "Server 1" (IP-address: 192.168.1.1) and "Server 2" (IP-address: 192.168.1.2) merged together; channels "Channel 1" and "Channel 2" are assigned to "Server 1", "Channel 3" and "Channel 4" — to "Server 2"; all channels perform face recognition. If you want to store the database on "Server 1", enter "Database settings" = "192.168.1.1" for all channels of the face recognition module. No matter which server will be used to store the database, face recognition events (date/time of recognition; recognized at a specified date/time; frame with the recognized face) will always be stored on the server, to which the channel with this event is assigned. 7. In the left pane of Configurator, click 6. Apply settings, click Apply on the opened page. 159 13. Abandoned object detector This intelligent module is designed to detect abandoned objects — if an object staying in the frame over the specified period of time is detected, the operator received a corresponding alarm and the object itself is "highlighted" on the screen. For more information on working with this module in Macroscop Client and Macroscop Standalone viewer see the Macroscop User Guide. 13.1.1. Configuring the module To activate the module, follow these steps: 1. Start Macroscop Configurator, go to tab 1. Cameras; in the channel list (on the left), select the channel to be used for license plate recognition; in the channel settings (on the right) open the Archiving settings block; select With detector + manual. 2. Open the Intelligence analysis system settings and enable software motion detector (see 3.5.4.1 on page 68.) 3. Open Configurator, go to the channel settings and select Use external intelligent modules in the Intelligence analysis system settings block. The list of available modules will open, including Abandoned object detector. If the Abandoned object detector is not on the list, it means that the server has no license for this module. To purchase the license, please contact the direct seller of Macroscop licenses for this server. The list of available licenses can be found in Configurator in 2. Servers in the Connecting servers to system block (see 3.4.1 on page 42.) 4. Select Abandoned object detector — 5. Click will appear. to open the module settings window. 160 6. Specify no more than three detection zones, in which to search for abandoned objects. To add a new detecting zone, click , to remove it — . Detecting zone in the Zone mask area is filled with yellow squares. To change a detecting zone, use your mouse: The left button is used to fill a zone and the right one to clear it. To select the entire zone, click Fill all; click Clear to deselect the entire zone at once. Use the slider to change the selection brush size. 7. Specify minimum and maximum object sizes for each zone in this module: To do this, select from the corresponding zone in the list and specify sizes — either by using sliders or interactively (Set in interactive mode...). 8. Indicate detection time for each zone — the time interval after which an object will be considered abandoned. The system provides two levels of triggering: Attention — an abandoned object is highlighted by an orange frame on the operator's screen. If the operator reacts to this warning (clicks the mouse inside the frame), the alarm for this object will not be generated. Alert — an abandoned object is highlighted by a red frame; at the same time an alarm is generated and the system creates a corresponding alarm event (see 3.5.7.13 on page 79.) 161 To set the detection time, select the appropriate zone in the list and then specify time periods for Alert and Warning. If Warning is not selected, this level will not be used for the corresponding zone. 9. Click Save to save module settings. 10. In the left pane of Configurator, click 6. Apply settings, click Apply on the opened page. 162 14. People counting in queue module The module is designed to count people in queues in the field of view of IP cameras connected to Macroscop servers. For more information on working with this module in Macroscop Client and Macroscop Standalone viewer see the Macroscop User Guide. 14.1. Configuring cameras and the module For correct operation of the module you must position the camera correctly and set up the Macroscop motion detector and the module itself. 14.1.1. Camera position For correct operation of the module it is recommended to install the camera as high as possible to minimize the effects of perspective — overlap of foreground objects on background. The ideal position is on top, at a right angle to the horizon. 163 164 14.1.2. Configuring the module To activate the module, follow these steps: 1. Start Macroscop Configurator, go to tab 1. Cameras; in the channel list (on the left), select the channel to be used for license plate recognition; in the channel settings (on the right) open the Archiving settings block; select With detector + manual. 2. Open the Intelligence analysis system settings and enable software motion detector (see 3.5.4.1 on page 68.) 3. Open Configurator, go to the channel settings and select Use external intelligent modules in the Intelligence analysis system settings block. The list of available modules will open, including People counting in queue module. If the People counting in queue module is not on the server has no license for To purchase the license, please contact the direct seller of this server. The list of available licenses can be found Servers in the Connecting servers to system block (see list, it means that the this module. Macroscop licenses for in Configurator in 2. 3.4.1 on page 42.) 4. Select the People counting in queue module — the Settings button 5. Click 6. Specify no more than six detection zones, in which to count people. will appear. to open the module settings window. To add a new detecting zone, click , to remove it — . To change a zone, select it in the list (to the left) and choose one of the following: - change zone size — click one of the square markers on the zone boundaries ( hold the mouse button and drag it; - move zone — click the zone, hold the mouse button and drag the zone. ), 165 7. Set unified sized of counted objects (people) for all zone using the green rectangle — its operation is similar to zones. 8. For each zone, specify the maximum number of people in a queue: if the number of people exceeds this value, an alarm is generated and the system creates a corresponding alarm event (see 3.5.7.20 on page 80.) 9. Click Save to save module settings. 10. In the left pane of Configurator, click 6. Apply settings, click Apply on the opened page. 166 15. Fisheye cameras dewarping module This intelligent module is designed to dewarp images from fisheye cameras. For more information on working with this module in Macroscop Client and Macroscop Standalone viewer see the Macroscop User Guide. 15.1. Configuring the module To activate the module, follow these steps: 1. Start Macroscop Configurator, go to tab 1. Cameras; in the channel list (on the left), select the channel to be used for license plate recognition; in the channel settings (on the right) open the Archiving settings block; select With detector + manual. 2. Open the Intelligence analysis system settings and enable software motion detector (see 3.5.4.1 on page 68.) 3. Open Configurator, go to the channel settings and select Use external intelligent modules in the Intelligence analysis system settings block. The list of available modules will open, including Fisheye cameras dewarping module. If the Fisheye cameras dewarping module is not on the list, it means that the server has no license for this module. To purchase the license, please contact the direct seller of Macroscop licenses for this server. The list of available licenses can be found in Configurator in 2. Servers in the Connecting servers to system block (see 3.4.1 on page 42.) 4. Select the Fisheye cameras dewarping module — the Settings button 5. Click to open the module settings window. will appear. 167 6. Specify the image radius and the direction of default view. To do this, click the image boundary: circumscribed circle should match with the boundary of the image from the camera; the arrow will point in the direction of default view. 7. Click Save to save module settings. 8. In the left pane of Configurator, click 6. Apply settings, click Apply on the opened page. 168 16. Activity monitoring module The module is designed to track the activity of employees at workplaces. Activity means recording movement in the working area, including minor changes. For more information on working with this module in Macroscop Client and Macroscop Standalone viewer see the Macroscop User Guide. 16.1. Configuring cameras and the module For correct operation of the module you must position the camera correctly and set up the Macroscop motion detector and the module itself. 16.1.1. Camera position The camera must be static. Most preferred position is a ceiling mount camera facing downward — to visually isolate the workplace of each employee. 16.1.2. Configuring the module To activate the module, follow these steps: 1. Start Macroscop Configurator, go to tab 1. Cameras; in the channel list (on the left), select the channel to be used for license plate recognition; in the channel settings (on the right) open the Archiving settings block; select With detector + manual. 2. Open the Intelligence analysis system settings and enable software motion detector (see 3.5.4.1 on page 68.) 3. Open Configurator, go to the channel settings and select Use external intelligent modules in the Intelligence analysis system settings block. The list of available modules will open, including Activity monitoring module. If the Activity monitoring module is not on the list, it means that the server has no license for this module. To purchase the license, please contact the direct seller of Macroscop licenses for this server. The list of available licenses can be found in Configurator in 2. Servers in the Connecting servers to system block (see 3.4.1 on page 42.) 4. Select Activity monitoring module — will appear. Примечание [ПАМ1]: 5. Click to open the module settings window. 169 6. Specify no more than six detection zones, in which to control activity. To add a new monitoring zone, click , to remove it — . Detecting zone in the Zone mask area is filled with yellow squares. Use the mouse to change monitoring zones: The left button is used to fill a zone and the right one to clear it. Requirements for zones: - zones should not overlap; - only one employee should be inside each zone (subject to small movements — leaned back, pulled back in a chair, etc.); - zones shall not include moving objects that do not depend on the activity of employees — fans, conveyors, moving equipment parts, etc. - zones shall not include monitors. 7. Set inactive time for each zone — period of time, after which the system will signal about inactivity. Inactivity does not an employee is absent — for example, a person can sit still or fall asleep. Activity, in turn, does not mean an employee is present — it can be connected, for example, to other employees in the zone. 8. Click Save to save module settings. 170 9. In the left pane of Configurator, click 6. Apply settings, click Apply on the opened page. 171 17. Smoke and fire detector The module is designed to detect smoke and open flames in the frame. For more information on working with this module in Macroscop Client and Macroscop Standalone viewer see the Macroscop User Guide. 17.1. Configuring the module To activate the module, follow these steps: 1. Start Macroscop Configurator, go to tab 1. Cameras; in the channel list (on the left), select the channel to be used for license plate recognition; in the channel settings (on the right) open the Archiving settings block; select With detector + manual. 2. Open the Intelligence analysis system settings and enable software motion detector (see 3.5.4.1 on page 68.) 3. Open Configurator, go to the channel settings and select Use external intelligent modules in the Intelligence analysis system settings block. The list of available modules will open, including Smoke and fire detector. If the Smoke and fire detector is not on the list, it means that the server has no license for this module. To purchase the license, please contact the direct seller of Macroscop licenses for this server. The list of available licenses can be found in Configurator in 2. Servers in the Connecting servers to system block (page 42.) 4. Select the Smoke and fire detector — the Settings button will appear. 172 5. Click to open the module settings window. 6. Select detection option: Smoke or fire, Only smoke or Only fire. 7. Click Save to save module settings. 8. In the left pane of Configurator, click 6. Apply settings, click Apply on the opened page. 173 18. Macroscop Monitoring Macroscop Monitoring is used to track the status of Macroscop video surveillance system. 18.1. Description Macroscop Monitoring allows users to: Track the following parameters of Macroscop servers in real time: o accessibility; o status; o CPU usage; o memory usage; o analysis system usage; o archiving system usage; o client-server system usage; o network usage; o hard drives status; o connected cameras status. Simultaneously monitor the parameters of multiple servers. Generate alarms for the following events: o server out of reach; o excessive CPU usage; o excessive memory usage; o excessive network usage; o alarm status of camera digital inputs; o camera failures. In the event of an alarm send messages by email, SMS or SNMP trap. 18.2. Launching Macroscop Monitoring To get started with Macroscop Monitoring: Go to Start / All Programs / Macroscop Monitoring and select a Macroscop Monitoring shortcut. In the program, enter the IP-address (URI) and monitoring server port, click OK. The Observation page of the main window of Macroscop Monitoring will open. Default monitoring server port — 8086. 174 The left part of the Observation page contains monitored servers and cameras connected to them. The right part of the page displays information about the current status of the selected server or camera. 175 18.3. Configuring monitoring Servers monitoring and tracking configuration is performed on the Settings page of the main window of Macroscop Monitoring. To go to the Settings page, click Settings at the top of the main window (to return to Settings page, click Settings.) To connect a server to the monitoring system, in the Connecting servers to system block enter the server address (with port), username and password of a user with rights to configure the specified server; click Connect — the server will appear in the Connected servers list. To disconnect a server from the monitoring system, select the server in the Connected servers list; click Disable — the server will be immediately removed from the list. To set alarm generation parameters for a specific server, select this server in the Connected servers list; then mark the appropriate options in the Selected server settings block and, if necessary, enter their limit values. To configure alarm signal actions, select the appropriate actions in the Alarm signal actions block and, if necessary, adjust the sending settings by clicking every action. to the right of To configure camera testing mode and frequency, select the relevant options at the bottom of the window. When finished, click Apply settings to save current configuration settings. 176 19. Additional features 19.1. Macroscop Status Info Macroscop Status Info — software used to notify a user about the current server state. By default, Macroscop Status Info is launched automatically on the computer with Macroscop Server installed. If, for some reason, Macroscop Status Info is not running, it can be launched manually from Start / All Programs / Macroscop Server / Macroscop Status Info. The program icon is located in Windows notification area. If you mouse over the icon it displays the current status of Macroscop server. If you right-click the icon the context menu opens. If you select Close Macroscop Status Info is closed and its icon disappears from Windows notification area. If you select Display or simply click the icon, Macroscop Status Info opens. The top part of the window contains the current status and settings of Macroscop server. Below is a video archive indicator — under very high load on archiving subsystem or subsystem failure it becomes red. The Start and Stop buttons, respectively, start or stop Macroscop Server service. If you close the window Macroscop Status Info continues to work and its icon appears in Windows notification area. 19.2. Macroscop Player Macroscop Player — software used for quick viewing of video files exported in the internal Macroscop format (*.MCM). In addition, Macroscop Player allows converting *.MCM files to AVI. 177 Macroscop Player allows simultaneously viewing the archive from several (not more than 25) cameras. Macroscop Player is installed automatically when you install Macroscop Client. Besides, when you export from Macroscop Client in MCM format, you can select Copy the Macroscop Player installer — in this case the installer (MacroscopPlayer Installer.exe, size — 29 MB) will be saved in the same location as the exported MCM-file. If you want to install Macroscop Player on your computer without installing Macroscop Client, open MacroscopPlayer Installer.exe and follow the instructions. 19.2.1. Viewing clips Macroscop Player can be launched in one of the following ways: using the Macroscop Player shortcut on your desktop; via Start / All Programs / Macroscop Player / Macroscop Player; when opening an *.MCM file in Windows Explorer. The Main window opens at startup. The main window of Macroscop Player consists of a Workspace (with channel grid) and a Control Panel. To open the Control Panel, click the Control panel show button located on the left edge of the window. To hide the Control Panel, click the Control Panel hide button or any of the cells in the Workspace. The channel grid selection buttons are located at the bottom of the Control Panel. 178 The Main menu is in the center of the Control Panel (under the clock.) To close the application, click Exit in the Main menu. When you select Cameras in the Main menu the Channel selection page opens, where you can select which cameras will be displayed in grid cells. Use to show/hide the list of cameras and security objects. Use to select or deselect all cameras. The Searching cameras field allows you to quickly find and select cameras and security objects containing the entered text. You can also choose cameras in two other ways: click in an empty cell and select a camera from the list that appears; click Select camera in the cell context menu (see below.) Add mcm clip allows adding other MCM-files to clips opened in Macroscop Player — this button open the file selection window. When you click Open in the current grid, the selected cameras are added to the current channel grid. When you click Open in the optimal grid, the grid allowing you to add all selected cameras with a minimal number of empty cells is automatically opened. Each Grid cells displays a single camera archive. All cells display video from the same point in time. Thus, if you view multiple cameras the archive will be played in synch. You can drag cameras from one grid cell to another with your left mouse button. If the grid cell you want to add camera to is used, cameras are swapped. One of the grid cells can be active. The active cell is framed and contains controls. Click a cell in order to make it active. 179 The Fragment panel is located at the bottom of the screen — it is a timeline indicating video clip fragments stored in the archive for each camera in the grid. The vertical bar indicates the archive part displayed at the moment. To go to the desired fragment, click the appropriate place of the panel. To move forward or backward, click the panel, hold the left mouse button and move the scale in the required direction. Time scale can be changed by rotating the mouse wheel. You can also use Calendar to go an archive fragment. If any camera has no stored archive for the current (selected) time period, you will see the No frames message. A common control unit for all cells is located in the lower right corner of the window, above the fragment panel. It includes the following elements: Playback buttons are used to start forward and backward playback, as well as to stop it. Calendar allows doing to a particular place in the archive by specifying the exact date and time. Playback speed — opens the controller allowing you to set the archive playback speed — from x0.1 to x120. For frame-by-frame playback, move the mouse pointer to the cell and scroll the mouse wheel (down — forwards, up — backwards.) Frames encoded in H.264 may freeze during playing, since only the reference frames are displayed. This is due to the specifics of H.264 codec, because the decoding of intermediate frames requires the whole chain, starting with the last reference frame; when playing backwards it can lead to unnecessary consumption of computer resources. Hide/show fragment panel — hides or shows the fragment panel. An active cell contains the following controls: Save frame — saves the frame (frame fragment.) Volume control — adjusts the archive volume, enables/disables audio playback. Click the speaker icon to display the controller. If there is no sound recorded in the archive or the sound is muted the recording enabled. icon is displayed. This icon is displayed only if the camera has sound 180 The context menu can be accessed in two ways: by clicking in the lower right corner of the cell; by right-clicking anywhere in the cell. The number of menu items may be different from below, depending on the settings of camera, archive and client workstation. Cell context menu: Select camera — allows selecting one of the available cameras to be displayed in a cell grid. Hide camera — hides the camera (frees the cell.) Remove selection — removes selection from the cell (makes it inactive.) Save frame — saves the frame (frame fragment.) Print frame — prints the frame (frame fragment.) Video proportions — allows selecting frame proportions. Volume control — displays the volume control element at the bottom of the cell. Export archive — exports the archive (see below.) Add mcm clip — allows adding other MCM-files to clips opened in Macroscop Player. 19.2.2. Clip export Macroscop Player allows exporting videos in two formats: MCM (Macroscop Media) — internal Macroscop format; you can view such files only in Macroscop Player; benefits of this format include export speed, which is several times greater compared to AVI (since frames do not have to be conversed), as well as the ability to export multiple archives in a single file and view them simultaneously. AVI — common format; most video players support this format. To export a clip, choose Export archive in the context menu of any cell — the Archive export window will open (see below.) 181 19.2.2.1. Export to MCM To export to MCM, select MCM in the Export parameters field of the Archive export window. In the cameras tree, select the cameras to be exported. If you open the Archive export window from the camera cell context menu, this camera will be automatically selected (you can change this selection prior to export.) In the Period from and to fields, specify the start and end date and time of the exported fragment. Other export parameters: Export sound — if checked, audio from the camera recorded to the archive is also exported. Copy Macroscop Player installer — if checked, then the Macroscop Player installer will be exported together with the archive (file name — MacroscopPlayer Installer.exe, size — 29 MB.) Use this parameter if there is no Macroscop Player installed on the computer you want to view MCM files on. Open file after export — if checked, Macroscop Player playing the newly exported file will be launched after export. Export to a single file — if checked, the archive from all selected cameras will be exported to a single file that can be viewed in Macroscop Player. Otherwise the archive for each camera will be exported to a separate file. When finished, click Start export; select the folder to store the exported files; if necessary — change the archive name in the File Name box; click Save. The export progress will be displayed on the Export status panel. To abort the export, click Stop export. 182 19.2.2.2. Export to AVI To export to AVI, select AVI in the Export parameters field of the Archive export window. In the cameras tree, select the cameras to be exported. If you open the Archive export window from the camera cell context menu, this camera will be automatically selected (you can change this selection prior to export.) In the Period from and to fields, specify the start and end date and time of the exported fragment. Other export parameters: Export sound — if checked, audio from the camera recorded to the archive is also exported. Open file after export — if checked, Windows Media Player playing the newly exported file will be launched after export. 183 If you click next to the Export parameters window, the Codec parameters window with the following settings will open: Video settings: Compression level — video compression quality. Fps — frame rate. Codec — video codec used. The following codecs are supported: MPEG-4 Macroscop (Macroscop Video Encoder) MS-CRAM (Microsoft Video 1) IYUV Codec (Intel IYUV) TSCC (TechSmith Screen Capture Codec) Click Codec settings to view codec system settings. Click Codec information to view codec information. Sound settings: Bitrate — audio stream quality. Codec — audio codec used. PCM and MP3 codecs are supported. Depending on the selected codec certain encoding settings may be unavailable. When finished, click OK to save the settings. When finished, click Start export; select the folder to store the exported files; if necessary — change the archive name in the File Name box; click Save. The export progress will be displayed on the Export status panel. To abort the export, click Stop export. 184 19.3. Driver package for cameras and devices (DevicePack) Starting with version 12.0, a driver package for cameras and devices (DevicePack) is provided separately along with the updates server and client Macroscop software. This package is designed primarily for backward compatibility with earlier versions of Macroscop server software. We do not recommend to use the package to operate new cameras and devices (without updating the Macroscop Server / Client / Standalone executable package.) DevicePack can only be used only for Macroscop software 1.12.* and more. Earlier versions (up to 1.11.*) are not supported. DevicePack is installed into a separate directory (by default — C:\Program Files\Macroscop IP Device Pack.) Thus, it can always be removed without affecting other installed Macroscop packages. DevicePack is installed on the computer with Macroscop server software installed (for multiserver configuration — on each server.) If certain channels have the Connect via server option disabled, DevicePack is also installed on each computer used to view these channels in Macroscop Client. Macroscop software interacts with DevicePack as follows: At startup Macroscop Server / Client / Standalone checks whether this computer has DevicePack installed; if yes, plugins from the DevicePack folder are used to connect to cameras; if no, plugins from the Macroscop Server / Client / Standalone installation folder are used. 19.3.1. Installing DevicePack To install DevicePack, run the installation file MacroscopIPDevicePack Installer_x64.exe if you have 32-bit Macroscop Server / Standalone / Client or MacroscopIPDevicePack Installer_x64.exe if you have 64-bit Macroscop Server / Standalone / Client. 19.3.2. Removing DevicePack You can remove DevicePack via Start / All Programs / Macroscop IP Device Pack / Remove IP Device Pack or by using standard Programs and Features from Windows Control Panel. Restart Macroscop server software after removing DevicePack. 19.4. Macroscop Virtual Ip Camera utility Macroscop Virtual Ip Camera utility allows users to: connect webcams to Macroscop Server / Standalone; create virtual IP-cameras on the basis of video clips stored in MCM format. The utility runs in the background — as a Windows service. Installation archive for Macroscop Virtual Ip Camera can be downloaded from Macroscop website, in Support/Software Installation Packages (direct link: Macroscop%20Virtual%20Ip%20Camera%20Installer.exe.) After downloading, extract the installation file — Macroscop Virtual Ip Camera Installer.exe — from the archive. Macroscop Virtual Ip Camera utility does not require Macroscop keys or license files. 19.4.1. Installing Macroscop Virtual Ip Camera Run Macroscop Virtual Ip Camera Installer.exe and follow the instructions. 185 19.4.2. Configuring Macroscop Virtual Ip Camera Click the Macroscop Virtual Ip Camera desktop shortcut or start the program via Start / All Programs / Macroscop Virtual Ip Camera / Macroscop Virtual Ip Camera. The main window will open. The channel selection field is at the top of the window — if you want to configure a channel, select it in this list. Name of each channel starts with a digital prefix: number of the channel before the colon is required for channel configuration in Macroscop Configurator. Below the channel selection list is a preview of the selected channel. If there is no image, you can enable the Preview option (see below.) The Settings panel is on the right. If the panel is hidden, click the triangle at the right edge of the window to open it. Below are the customization options. The System tab contains basic program settings. Preview — displays video from the selected channel. Service start — the utility will run as a Windows service. If this option is enabled, the Macroscop Virtual Ip Camera service will run after you close the main window. You can also use Windows Services to configure the installed Macroscop Virtual Ip Camera service (Start / Computer / (right-click) / Manage / Services and Applications / Services.) Here you can manually start/stop Macroscop Virtual Ip Camera, as well as enable/disable its autorun at system startup. Port — the network port, which, along with the IP-address or URL of this computer, will be used when configuring channels in Macroscop Configurator. By default, Macroscop Virtual Ip Camera uses port 9090. The Camera tab contains the settings for the selected channel. Three types of broadcasted channels are supported: MJPEG — broadcast of MCM-file encoded with MJPEG codec; H264 — broadcast of MCM-file encoded with H.264 codec; WEB — broadcast from a webcam connected to a computer. Since the settings for each channel are different, they are provided for each type separately. 186 For MCM encoded with MJPEG For MCM encoded with H.264 For MCM-files encoded with MJPEG codec: Alternate stream (MJPEG) — broadcasts alternate low-resolution stream. Recoding to H264 — recodes the main stream using H.264. If this option is disabled the main stream is broadcast in MJPEG. In any case, frame resolution remains the same as in the original MCM-file. Fps — broadcast rate, frames per second. For MCM-files encoded with H.264 codec: Alternate stream (MJPEG) — broadcasts alternate low-resolution stream. Recoding to MJPEG — recodes the main stream using MJPEG. If this option is disabled the main stream is broadcast in H.264. In any case, frame resolution and rate remain the same as in the original MCM-file. For webcams: Available for connections — permits to use this channel to connect to Macroscop Server / Standalone. If disabled, this channel can not be connected to Macroscop system, which may be useful for privacy purposes of the computer running Macroscop Virtual Ip Camera. Alternate stream (MJPEG) — broadcasts alternate low-resolution stream. Recoding to H264 — recodes the main stream using H.264. If this option is disabled the main stream is broadcast in MJPEG. In any case, frame resolution remains the same as on the webcam. Fps — broadcast rate, frames per second. Rotation — rotates the frame by a certain degree clockwise. Only 4 values are available: 0, 90, 180 and 270 degrees. Compression — specifies the compression ratio. The higher it is, the smaller stream size but the higher image quality is. Only 5 values are available: 5, 20, 50, 70 and 95. Text overlay — if checked, a certain text will overlay the broadcasted frame. Text — allows setting the mentioned text. Font — allows setting the text font. Click Color — allows setting the text color. Click to view font selection dialog. to view color selection dialog. Time/date overlay — if checked, the time and date of the computer running the utility will overlay the broadcasted frame. Font — allows specifying the font for the date and time. Click dialog. to view font selection 187 Color — allows specifying the color for the date and time. Click selection dialog. to view color Dynamic text overlay — if checked, a certain changing text will overlay the broadcasted frame. Sender address — IP-address (or URL) and port indicating the source of dynamic text. Font — allows setting the text font. Click Color — allows setting the text color. Click to view font selection dialog. to view color selection dialog. 19.4.3. Using Macroscop Virtual Ip Camera 19.4.3.1. Webcam broadcast To broadcast a webcam is connected to the computer (including built-in ones), perform the following: 1. Make sure that the webcam is connected to the computer, configured and enabled. Check whether its image is displayed by an operating system or proprietary software. 2. Install Macroscop Virtual Ip Camera. 3. Run Macroscop Virtual Ip Camera and open the settings panel. 4. Select Preview and Service start. 5. In the main window, select a webcam from the list; make sure its image can be viewed in the preview window; adjust the compression and frame rate and, if necessary, other parameters. 6. Close the main window of Macroscop Virtual Ip Camera. 7. Use Macroscop Configurator to set up the connection of the respective Macroscop Virtual Ip Camera channel to a Macroscop server (see below.) 19.4.3.2. MCM clips broadcast To open an MCM video clip in Macroscop Client, follow these steps: 1. Install Macroscop Virtual Ip Camera (you can your Macroscop server as a computer.) 2. Move MCM file(s) to the Videos subfolder of the Macroscop Virtual Ip Camera installation folder. By default, this folder is: for 64-bit OS — C:\Program Files (x86)\MacroscopIpCam\Videos; for 32-bit OS — C:\Program Files\ MacroscopIpCam\Videos. 3. Run Macroscop Virtual Ip Camera and open the settings panel. 4. Select Preview and Service start. 5. In the main window, select a channel from the list; make sure its image can be viewed in the preview window; adjust, if necessary, other parameters. 6. Close the main window of Macroscop Virtual Ip Camera. 7. Use Macroscop Configurator to set up the connection of the respective Macroscop Virtual Ip Camera channel to a Macroscop server (see below.) 19.4.3.3. Connecting to Macroscop server To connection the channel broadcasted by Macroscop Virtual Ip Camera to the Macroscop server, follow these steps: 1. Start Macroscop Configurator by connecting to the Macroscop server. 2. Go to the tab 1. Cameras; at the top left of the page, above the camera list, click and select the added channel in the list. 188 3. 4. Open the Channel connection settings on the right and adjust the following: in the Address box, enter the IP-address (or URL) and the port of the computer with Macroscop Virtual Ip Camera and the required channel launched; select Virtual Camera in the Manufacturer field; select Macroscop Virtual Ip Camera in the Model field; leave Username and Password fields empty. Disable Video server; enter the channel number to the Channel number field (see Macroscop Virtual Ip Camera settings above); Select Connect via server. Open the Channel data stream settings on the right and adjust the following: if Macroscop Virtual Ip Camera Channel uses Alternate stream (MJPEG), enable Use two streams; specify the video format for each stream; click Test to check whether the required streams are received from Macroscop Virtual Ip Camera. 5. If necessary, configure other settings for this channel. 6. In the left pane of Configurator, click 6. Apply settings, click Apply on the opened page. 19.5. Macroscop SDK Macroscop SDK package is designed to integrate Macroscop software with external systems. Third-party developers can use it to develop their own plugins that extend the functionality of Macroscop software. Macroscop SDK includes a text description (Macroscop SDK User Manual) and a package of classes and components (tools and examples) Macroscop SDK Examples. You can download Macroscop SDK User Manual from Macroscop website, in Support / Documentation (direct link: http://macroscop.com/assets/documentation/Macroscop-SDK-Guide-ru.pdf). If you want to receive Macroscop SDK Examples, contact our technical support service via [email protected]. 19.5.1. Creation of plugins by third-party developers This toolkit is intended for .NET programmers who want to create plugins for Macroscop. All source tools and examples are written for .NET using C#. Currently the tools include the following basic foundation classes (interfaces) that can be used by external developers: ExternalAction (action plugin.) Foundation class for adding new actions to scenarios and task scheduler. VideoAnalyst (video analysis plugin.) Foundation class for video analysis on a server. MotionDetector (motion detector plugin.) Foundation class for implementing a motion detector. Tracker (tracker plugin.) Foundation class for creating a tracker. RTVisualiser (visualiser plugin.) Visualiser foundation class for graphical display of specific information on a channel in Macroscop client. ClientMenuItem (menu item plugin.) Foundation menu item class that allows creating submenus in client settings. EventProcessor (event processor plugin.) Foundation event processor class. Allows registering and generating own events, receiving events from Macroscop, as well as executing commands on a channel. Plugins of this type can be used for integration with other systems. 189 IRealTimeFrameReceiver (frame receiver plugin.) Interface of a frame receiver from IP devices. It allows receiving video, audio, motion detection data, control PTZs. These types of foundation classes (interfaces), as well as some other additional entities are addressed in relevant chapters of the Macroscop SDK User Manual. 19.5.2. Integration with external systems The easiest way to receive data streams from Macroscop servers is to use HTTP-requests. Currently Macroscop server support the following HTTP-requests: Receive real-time video in the original format*. Receive video from the archive in the original format*. Receive real-time video transcoded into MJPEG. Receive video from the archive transcoded into MJPEG. Export the list of recognized license plates. *) The original format means the video stream format received directly from a camera (i.e. non-coded video stream in one of the formats — MJPEG, MPEG-4 or H.264.) In addition to HTTP-interface, you can use XML-interface that allows sending XML-requests and receiving data in XML format from Macroscop servers. Currently Macroscop server support the following XML-requests: Receive visitor counter data. Receive license plate recognition events in real-time. Working procedure for HTTP-requests and XML-interface is explained in the relevant chapter of the Macroscop SDK User Manual. 19.5.3. Website video broadcasting A special Flash component embedded in a web page was developed to set up website video broadcasting from cameras connected to Macroscop servers. This Flash component is supplied in Macroscop SDK Examples, working procedure is explained in the relevant chapter of the Macroscop SDK User Manual. 190 20. Applications 20.1. Technical support service In case of problems or other issues related to Macroscop software, please contact our technical support service: Phones: + 61 2 8825 9222 (Outside Australia) 1300 551 991 (Inside Australia) E-mail: [email protected] The latest version of www.nesscorporation.com Macroscop and its documentation are available at 20.2. System log files To fasten the technical support process we recommend you to send system log files to our support service. To do this, use the Log pack tool. Below is the procedure for packing and sending logs. Start the program by going to Start / All Programs / Macroscop Server (Client, Standalone) / Service Tools / Lock Pack. The program window opens: To archive all logs at once, click Process logs archiving.... The warning window will open, then the window where you will need to specify the destination folder and archive file name. Wait for the archiving to complete. To open a folder with logs and manually archive the required file, press Open logs folder. Send saved file(s) by e-mail to our technical support service. 191 20.3. Viewing archives in case of failures If you have problems viewing the archive in Macroscop Client, use the Local archive view and archive backing up application: 1. Start the program by going to Start / All Programs / Macroscop Server (Client, Standalone) / Service Tools / Local archive view and archive backing up. The program window opens. 2. Click Active folders auto search to automatically find all folders in which the archive is stored. 3. If folders are not found, click copy. to manually select a folder, which files you want to To export one channel archive: 4. Select the channel type from the list in Filter by channel type. 5. Select the name of the channel you want to copy. Click Archive export to export the archive in MCM or AVI. MCM file can be viewed in Macroscop Player. 192 193 To back up multiple channels: 4. Click Backup. 5. In the window that opens, select channels, set the required time interval and the folder to store the backup in. Click Start. To view a copied archive: 1. Start the program by going to Start / All Programs / Macroscop Server (Client, Standalone) / Service Tools / Local archive view and archive backing up. The program window opens. 2. Click 3. Select the channel in the Name field and play it using the controls at the bottom of the playback window. Available options: Play forward, Play backward, Stop, Set playback speed, Select date and time, Save frame to disk, Print frame. and select the backup folder. 194 You can save the backup on one computer, copy the backup folder to another computer and play it there. 20.4. Optimal camera settings Although Macroscop can operate with one or two streams from cameras of any resolutions, note that the load on video servers greatly depends on parameters of streams received from the cameras. It is also important to consider the configuration and operation process of Macroscop software itself. For most cameras, configure the video and audio parameters on the camera itself by means of web interface. This does not relate to Axis cameras that can be configured in Configurator. Software motion detector (Macroscop motion detector) Software motion detector analyzes the video stream received from the camera and signals the system if any motion is detected: the signal can mean, for example, start recording (e.g. motion detector recording.) Motion detector uses a certain amount of server system resources (CPU, RAM.) The usage rate is linearly dependent on the resolution and frame rate. For example, CPU load when using motion detector will be: for 1920x1080 — about 6 times higher than for 640x480; for analysis at 25 fps — 4 times higher than for 6 fps. At the same time, motion detector recording reduces the archive size since the stream is recorded only if there is a movement detected. For a software motion detector to not trigger at minor events (e.g., shaking leaves or birds), you can configure it to recorded moving objects over a certain size. In addition, it is used in all intelligent modules. Therefore, if intelligent modules are used, software motion detector must always be enabled. Many cameras have their own built-in motion detectors (in Macroscop terms — "camera motion detector.") System resources are almost not used if camera motion detector is operating. Recommendations for setting the motion detector: If you need continuous record and do not use intelligent modules, we do not recommend enabling the detector. Instead, you can select a permanent archiving mode. This is possible, for example, if objects move in the frame for 24 hours (continuous production, major railway station, etc.) If a camera has a built-in motion detector and intelligent modules are not used, it is recommended to use a camera motion detector. Although it is sometimes preferable to use the software motion detector: for example, if there is a large number of identical cameras and setting motion detection on each camera requires a lot of effort (in Macroscop you can enable motion detection for a group of cameras at once or set up one camera and then clone it by changing the network address.) If you use intelligent modules, software motion detector must always be enabled. Besides, you can configure the combined archiving mode (in Macroscop terms — scheduled mode.) For example, at the entrance to a shopping center constant movement is observed from 10:00 to 22:00 but at other times there should be no motion. Then you can adjust the schedule as follows: from 10:00 to 22:00 — continuous record (this will reduce server load); from 22:00 to 10:00 — motion record (this reduces video archive size.) In the software motion detector settings you can select two modes of operation: simple and expert. In simple mode, you can set the minimum object size for the entire frame. Analysis in this mode is carried out with the optimal frequency (see below.) In expert mode, you can set detection zones (minimum object sizes are defined separately for each zone.) You can also specify the analysis frequency: 195 Detect by using optimum frequency — video analysis and motion detection will be carried out at a frequency defined automatically according to the following rules: - if at least one intelligent module is enabled for a channel (interactive search in archive, object interception, face detection, people counting, tracking), the analysis is performed at 10 frames/s; - if no intelligence modules are enabled, the rate for MJPEG is 5 frames/s, for H.264 and MPEG-4 the frequency is automatically selected from the range of 0.4–5 frames/s. Detect by using customized frequency — video analysis and motion detection will be carried out at a customized frequency. Manual frequency makes sense if the optimal one is clearly above or below the value necessary and sufficient for analysis or when you required fixed analysis frequency for H.264 and MPEG4. Recommended frequency for a particular intelligence module is given in the documentation for each module. Using two streams Most modern IP cameras support two or more streams simultaneously. The use of two streams allows recording high quality frames in the archive and displaying low quality frames in the client, which can significantly reduce the equipment load. In terms Macroscop the first stream is called main and the second — alternate. When the channel configured to used two streams is displayed in Macroscop Client, the stream, which resolution is closest to the playback window size, will be selected. For example, there is a channel that receives two streams from the camera: 1920x1080 and 640x480. Client workstation is equipped with a 1920x1080 monitor. Then, in the multi-screen mode (channel grid), with a 3x3 grid, the resolution of a single cell will be 640x360 (1920/3 = 640, 1080/3 = 360); therefore, the 640x480 stream will be used. If you maximize the channel the 1920x1080 stream will be selected. If two streams are used Macroscop records the main stream to the archive by default. However, you can change this setting in Configurator and record the alternate stream. When using the software motion detector you can choose which of the streams will be analyzed. If, no intelligent modules except for software motion detector are used, we recommend selecting a lower resolution channel, as this can significantly reduce server load. However, if intelligent modules are used, a higher resolution stream should be used. This is due to the following factors: intelligent modules record the coordinates of objects corresponding to certain analysis parameters and record these coordinates to the archive; the alternate stream resolution may not be sufficient for analysis; the aspect ratio (frame proportion) of main and alternate stream may vary; streams of different resolutions sent by the camera often are not synchronized precisely, in some cases stream can be out of sync for a second or more. Thus, if you archive high-resolution stream and analyze low-resolution one, there can be a situation when a frame that does not contain the desired object will be extracted from the archive (for example, due to out of sync or different frame proportions.) Macroscop defines a first stream as the main one and the second — as the alternate one. We recommend selecting a high-resolution stream as the first (main) one and a low-resolution as the alternate one. Thus, whenever possible, the frame rate of the main stream should be sufficient. For example, if you record an office building and intelligent modules are not used, 6 fps is sufficient for a high-resolution archive (its size will be significantly lower than at 25 fps); low-resolution stream can be set at 12 or 25 fps. Camera settings Below is a list of terms that may be encountered in camera settings: Stream First (Main) stream Second (Alternate, Sub) stream Encode Mode, Codec Macroscop supports the following compression formats: MJPEG, H.264 and MPEG-4. 196 MJPEG, compared with others, requires fewer resources (less load on server and client computers.) On the other hand, MJPEG video stream has a substantially greater size: MJPEG video requires several times more bandwidth and MJPEG video archive uses several times more disk space than H.264 and MPEG-4 video with the same parameters (resolution and frame rate.) H.264 is the most "economical" in terms of format but it requires large, compared to MJPEG, computing costs for decoding. MPEG-4 is similar to H.264 but has a lower compression ratio (i.e., MPEG-4 has a bigger channel width and archive size than H.264 but much less than MJPEG.) In modern cameras MPEG-4 is almost never used — it is replaced by a more advanced H.264. Compression All formats use such concept as the compression rate: the higher its, the smaller is the video size. The size is reduced through the loss of image quality. Depending on surveillance conditions and camera hardware features, the acceptable compression rate may be from 30 to 60%, although it can be from 0 (minimum compression) to 70% (maximum compression.) Except for percent, the compression rate in camera settings can be described levels (Compression Level), for example, from 0 to 12. Besides, such concept as the quality or quality level can be used — it is the reciprocal of the compression rate (in simple words, Compression = 10% means to Quality = 90%.) Set the compression rate based on the quality of received image. Resolution Frame Rate (FPS) In addition to the above mentioned, the H.264 stream settings can include the following concepts: Profile: Baseline Profile, Main Profile, High Profile Bit Rate Type VBR, Variable Bit Rate. It provides set video stream parameters, the channel width may vary. This mode is recommended in most cases, if there are no problems with network bandwidth. CBR, Constant Bit Rate. It provides a set bandwidth but, depending on the camera model, may change separate video stream parameters, the channel width may vary. This mode is recommended only if you have problems with network bandwidth. Bit Rate — kbit/s, Mbit/s. GOV (VOP group) Specifies the length of a frame group (distance between reference frames.) For example, if GOV = 50, 50 transmitted frames will include one reference frame (i.e., there will be 49 intermediate frames); at 25 fps and GOV = 50 one reference frame is generated every 2 sec. The higher the GOV is, the smaller is the video stream but the bigger is RAM and CPU usage, because decoding of each successive frame requires a reference frame and all subsequent intermediate frames up to the next reference frame to be stored in memory. When GOV = 1 H.264, in fact, is no different from MJPEG.