1
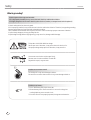
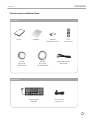
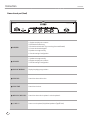
TKR-355P manual
- Make sure to read warning and instruction for proper use.
- Read out the instruction for use carefully from first to last to use this unit properly.
- Keep this instruction in a convenient place for further reference.
- Music and videos in the accompaniment can be added, changed or deleted without notice for the quality improvement or
by the request of copyright holder.
- The secondary copyright in music and videos in the accompaniment belonging to TJ media cannot be assigned, copied or
distributed to the third party.
The AD in the accompaniment can be added, changed or deleted without notice.
TJM-E-201208-00
Up to date accompaniment function -
HDD Based Multimedia Karaoke
TKR-355P
Ready to Enjoy?
Acoustic Real-Sound Brand New Premium HDD Karaoke.
Equipped with the best musical selection and sound system developed by TJ media
Enhanced sound quality of music using new and improved MIDI synthesizer with MP3 audio sound.
Includes Microphone Compressor Function
This newest function converts low voice volume into higher and clearer sound as well as converts overly loud
voice volume into lower volumes. Therefore, you can enjoy singing with more ease and stability.
Recording & Downloading
Record and download songs to USB storage.
Built-in User Storage : 200GB
Do-it-yourself personalize photo, video & new songs.
Licensed Contents
Licensed songs & video.
Smartcard Technology
Easy to carry & convenient authentication.
Index
USERMANUAL
Characteristics
Index
3
Safety
Instruction for safety
4-5
Instruction for grounding
6
Connection
Check accessories and Optional Items
7
Name of each part (front)
8
Name of each part (rear)
9
Function of remote control (TR-355P)
10-11
Function of Karaoke Keypad [TPR-300P]
12-13
Connection to amp/speaker and external device
14
Configuration
Setup of Configuration
14
1. Music Box
14
2. Karaoke operation status
15
3. Sound settings
16
4. Video settings
17
5. External device settings
17
6. User functions
18-21
7. Contents update
22
8. System re-boot
22
9. The First Authentication
23
Others
Trouble check and trouble shooting
24-25
On service and specification
26
Quality certificate and consumer compensation
3
Safety
USERMANUAL
Instruction for safety divides into "Warning" and "Caution".
Warning and Caution have following meanings.
This sign calls attention to dangerous matters and operations.
Warning : It may cause serious damage and death, if violated.
Caution : It may cause light damage if violated.
Danger for electric shock.
Danger for fire.
Warning
4
▶Do not pull power supply code or remove sheath.
• It may cause fire or electronic shock.
▶Ask the shop to change damaged code (exposure or cut).
• When installing, consider ventilation to keep certain distance from wall.
• It may cause fire by internal temperature increase.
• Leave over 10cm from wall, 2 cm from upper side and 5cm from rear side.
▶Use assigned voltage.
• It may cause fire or electronic shock.
▶Do not use in the bath or external area where easy water infiltration is made.
• It may cause fire or electronic shock.
▶Do not connect DC supply in ship etc.
• It may cause malfunction or fire.
• If you change power supply for special place installation, it may cause fire or electronic shock.
▶Connect grounding into terminal.
• No attachment or unstable attachment may cause fire or electronic shock.
• It may cause electronic shock by other units. (monitor, amp and microphone)
▶Do not use it in the poor ventilation like on carpet or blanket.
• It may cause fire by internal temperature increase with duct blocking.
▶If any smell or smoke, pull off power supply and contact shop.
• It may cause fire, electronic shock and injury.
▶If any foreign substance in the unit, pull off power supply and contact shop.
• It may cause fire or electronic shock.
▶If heavy thunder, turn off switch and pull off plug.
• It may cause trouble, fire and electronic shock.
▶Do not disassemble or remove cover.
• It may cause electronic shock and injury.
▶Use 100V~240V only.
• It may cause fire or electronic shock.
▶Do not put clip or metallic object inside the unit.
• It may cause trouble, fire and electronic shock.
▶This unit is designed for use in Philippines only.
• Do not connect DC supply in ship etc. It may cause malfunction or fire.
▶Do not open cabinet. Contact shop for maintenance, repair and other services.
• We are not responsible for any quality and performance if you open the cabinet.
▶Keep away from children.
• If a child swallows it, contact medical doctor.
▶Do not recharge battery.
• It may cause fire by leaking liquid.
Safety
USERMANUAL
Caution
▶Pull off plug to clean the unit for safety.
• It may cause accident or electronic shock.
▶Do not pull off forcefully, but pull off while gripping code.
• If line is cut, it may cause fire or electronic shock.
▶Connect power plug in a socket with grounding.
• It may cause fire or electronic shock.
▶Remove plug from socket if it is not used for long-term.
• It may cause accident.
▶In moving the unit, grip bottom firmly and keep horizontal.
• It may cause damage.
▶Do not touch plug or unit in a wet hand.
• It may cause electronic shock.
▶Use it in a well ventilated place.
• It may cause electronic shock.
▶Do not use in humid place.
• It may cause electronic shock.
▶Do not place it in a dust place.
• It may cause fire or electronic shock.
▶When connecting it to other devices (monitor, accompaniment, and microphone), remove plug from socket and connect.
• It may cause trouble or accident.
▶When moving it, remove all codes to prevent any damage.
• Code damage may cause fire or electronic shock.
▶Do not put things on the unit or seat on it.
• It may cause deform or trouble.
• It may cause injury, fire or electronic shock.
▶Do not install it near heating place like cooking counter or humidifier.
• It may cause fire or electronic shock.
▶Use designated code in case of connecting it to other device.
• Undesignated code or extended code may cause burn, fire or electronic shock.
▶Before connecting it to other devices (monitor, accompaniment, speaker & microphone), minimize master volume sound.
• It may cause hearing trouble by sudden high sound.
▶Do not use chemicals like wax, benzene, alcohol, thinner, repellent, air freshener, lubricant or detergent.
• It may cause peel of paint or deform.
• Do not put under direct light or spotlight or near heating devices.
• It may cause fire or electronic shock.
▶Be careful of packing handling in delivery, opening and disposal.
• It may cause injury or cut your hand.
▶Do not put liquid containers on the unit like pot, flower pot, cup, cosmetics and chemicals.
• It may cause fire or electronic shock.
・Do not use mobile or wireless device near to this unit to prevent any interfere by electronic wave.
・Remove foreign substance on the surface using cloth with neutral detergent, and wipe off with dried cloth.
・Do not lean or do not use reverse.
・Do not put liquid containers on the unit like pot, flower pot, cup, cosmetics and chemicals.
・Do not use the following conditions. [Temperature : 5~35°(In use) /Humidity : 45~80%]
・It may freeze the unit if it is contacted air conditioner wind directly. Relocate and install it.
5
Safety
USERMANUAL
What is grounding?
Connect ground wire to ground terminal.
If it is improperly installed, it may cause electronic shock or malfunction of device.
It is highly dangerous of electronic shock by other devices (monitor, accompaniment and microphone)
It is basic safety device for electronic goods.
If it is improperly installed, it may cause electronic shock or malfunction of device. Therefore, keep perfect grounding.
Improper grounding may cause overload, and troubles to device.
Thus, it disables circuit breaker that may cause electronic shock accident by improper movement of breaker.
It is particularly dangerous in heavy humidity like rain.
If rapid voltage change (billions V) by lightening, it may cause fire, damage and life damage.
CAUTION
This product is AC 100V~240V free voltage.
Do not open cover. Otherwise, it may cause electronic shock or fire.
Use proper voltage and proper fuse. Otherwise, it may cause fire.
Use remote control to the recipient part firmly.
Remote control can be used within 7m with 30°.
Beyond this scope, it may not work.
Caution to use remote control
Do not drop off. It may cause damage or deform.
Be careful not to contact heat or water. It may cause damage or deform.
Caution to use battery
1.Insert "AAA"battery with proper electrode.
2. Remove battery from remote control if it is not use for a long time.
Leaking liquid may cause corrode circuit.
3. If remote control is not properly operated, change two new batteries.
6
Connection
USERMANUAL
Check accessories and Optional Items
Accessories
❾
❶
❷
❸
❹
❿
❺
❻
❼
❽
TKR-304P R
Manual
3V cable
2Pin to PCB
[RED+BLACK)
Songbook
2 Batteries
(For Remote control)
12V cable
3Pin to PCB
[YELLOW+BLACK)
TKR-304P R
User's
remote control
Video and Audio cable
(RCA to RCA)
Optional Items
Karaoke Keypad
TPR-300P
External remote
control sensor
7
Connection
USERMANUAL
Name of each part (front)
1
1. Register and play user contents.
2. Download recorded song.
3. Renew the authentication. (by connecting Smartcard Reader)
4. Connect the karaoke keypad.
5. Update new songs monthly.
6. Save the setting of configuration.
1
❶ USB/REC
VIDEO
INPUT
❷ SD CARD
8
LIGHT
CONTROLLER
SIGNAL GND
+5V
OUTPUT
MIDI DIMMER
SIGNAL OUTPUT
1
INPUT
VIDEO
OUTPUT
MIC
2
POWER
L
EXT.MIC INPUT(SCORE)
2
2
AC INPUT
AC100V-240V~ 50/60Hz
COIN
1. Update new songs monthly.
2. Register and play user contents.
3. Save the setting of configuration.
EXT.
OUTPUT OUTPUT REMOTE
DC 3V/0.3A DC 12V/0.5A
MIC
GAIN
MIC INPUT
MIC 1
MIC 2
R
AUDIO
OUTPUT
❸ DISPLAY WINDOW
Display the playing song numbers.
❹ ECHO VOL.
Control the volume of the echo.
❺ ECHO TIME
Control the echo time.
❻ MIC1 VOL./ MIC2 VOL.
Control the volume of microphone 1 and microphone 2.
❼ 1 - MIC - 2
Connect to microphone.(Only 600Ω Impedance Type/55 Jack)
Serial NO.
2A25P00-
Connection
USERMANUAL
1
Name of each part (rear)
MIC
2
POWER
VIDEO
INPUT
EXT.
OUTPUT OUTPUT REMOTE
DC 3V/0.3A DC 12V/0.5A
LIGHT
CONTROLLER
SIGNAL GND
+5V
OUTPUT
MIDI DIMMER
SIGNAL OUTPUT
1
AC INPUT
AC100V-240V~ 50/60Hz
COIN
L
EXT.MIC INPUT(SCORE)
INPUT
2
VIDEO
OUTPUT
GAIN
MIC INPUT
MIC 1
MIC 2
Serial NO.
2A25P00-
R
AUDIO
OUTPUT
❶ OUTPUT
DC 3V/0.3A - Terminal for power of coin PCB.
DC12V/0.5A - Terminal for power of electric coin module.
❷ EXT.REMOTE
External remote control sensor terminal.
❸ LIGHT CONTROLLER
Connect to temporal light device, midi dimmer or light equipment.
❹ VIDEO INPUT,
COIN,
VIDEO OUTPUT,
AUDIO OUTPUT
VIDEO INPUT - Terminal to input separate video play device.
(DVDP, LDP, VCDP and VTR)
COIN - Use in interoperation with an exterior controller like a communication
general controllers etc.
VIDEO OUTPUT - Video output terminal.
AUDIO OUTPUT - Terminal to connect analog amp, connecting left/right.
❺ EXT.MIC INPUT(SCORE)
INPUT - Microphone input terminal from amplifier.
GAIN - Control the volume of microphone input level.
❻ MIC INPUT
Connect to microphone.(Only 600Ω Impedance Type/55 Jack)
❼ AC INPUT
Supply AC 100~240V free voltage with a power cord.
❽ POWER
System power ON/OFF control.
9
Connection
USERMANUAL
Function of remote control(TR-355P)
9
10
11
12
13
14
15
10
Connection
USERMANUAL
❶ SETUP
Enter configuration menu. (initial password : 1111)
❷ SONG SEARCH
Select the Song Search button (for TITLE, ARTIST, LYRICS,COUNTRY) on the
remote control and the search results will be displayed on the screen.
❸ NUMBER
Press number buttons to input song numbers.
❹ CANCEL
Press to stop the song.
❺ RES LIST
Display a list of reserved songs.
❻ KEY
Control the tune from -6 to +6 levels.
NEW SONG - Display a list of the latest songs.
MULTIPLEX - Display a list of multiplex songs.
MTV - Display a list of MTV songs.
❼ CONVENIENT
EXTRA FUNCTION
RS - Display a list of realsound songs.
FAVORITE - Display a list of TOP 100.
VOCAL - Set Vocals Assist-Vocals ON-Vocals OFF.
CHORUS - Display a list of chorus songs.
MELODY - Select the volume of melody playing.
❽ MUSIC, MIC, ECHO
❾ SPACE/SKIP
❿ START
APPLAUSE
RES/SEL,
DIRECTION MOVE
Control the volume of music, microphone and echo.
Playing - Jump a tune of a playing song.
Searching - Skip one space from previous letter.
Press to start a reserved song or a song after inputing numbers.
Create a mood with applause effect.
RES/SEL - Reserve a song to play.
Available to use the button as SELECT button in the configuration.
DIRECTION MOVE - Move up, down, left, right in the list or display function.
TEMPO
Control the speed of playing song.
REC
Users can record a song and hear it.
BGV - Set background screen to desired visuals to be displayed during songs.
BGV, USER
USER - Users can play MP3 songs or video and insert photos or video for background visual by using a USB memory stick.
11
Connection
USERMANUAL
Function of Karaoke Keypad (Optional Items)
This product is well supported to all TJ media's products.
❶ USB
1. Register and play user contents.
2. Download recorded song.
3. Renew the authentication. (by connecting Smartcard Reader)
4. Update new songs monthly.
5. Save the setting of configuration.
MEDLEY - Display a list of medley songs.
MEDLEY,
CHORUS,
MULTIPLEX,
NEW SONG,
❷
REAL SOUND,
FAVORITE,
DUET,
MTV,
USER
12
CHORUS - Display a list of chorus songs.
MULTIPLEX - Display a list of multiplex songs.
NEW SONG - Display a list of the latest songs.
REAL SOUND - Display a list of realsound songs.
FAVORITE - Display a list of TOP 100.
DUET - Display a list of duet songs.
MTV - Display a list of MTV songs.
USER - Users can play MP3 songs or video and insert photos or video for
background visual by using a USB memory stick.
Connection
USERMANUAL
DIRECTION MOVE,
❸ SELECTION,
PAGE UP/DOWN
VOCAL ON/OFF,
LIGHTING,
❹
RES LIST,
HIDDEN
MELODY,
TEMPO,
KEY,
❺
MUSIC,
MIC,
ECHO
RECORD SONG,
❻ RECORD LIST,
BGV
NUMBER,
START,
❼
CANCEL,
RESERVE
DIRECTION MOVE, SELECTION - Move up, down, left, right in the list or display function.
PAGE UP/DOWN - Move a page in list function.
VOCAL ON/OFF - Set vocals assist-Vocals ON-Vocals OFF.
LIGHTING - Set lighting effect ON-OFF.
RES LIST - Display a list of reserved songs.
HIDDEN[No label button] - Hold pressing for 3 seconds to enter configuration menu.
MELODY - Select the volume of melody playing.
TEMPO(speed) - Control the speed of playing song.
KEY - Control the tune from -6 to +6 levels.
MUSIC - Control the volume of the music.
MIC - Control the volume of microphone 1 and microphone 2.
ECHO - Control the volume of the echo.
RECORD SONG - Record the song.
RECORD LIST - Display a list of recorded songs.
BGV - Set background screen to desired visuals to be displayed during songs.
NUMBER - Press the number buttons to input song number.
START - Press to start a reserved song or a song after inputing numbers.
CANCEL - Press to stop the song.
RES - Reserve a song to play.
13
USER MANUAL
Connection
Connection to amp/speaker and external device
Coin PCB
power terminal
Video
OUTPUT
equipment
Terminal for
power of electric
coin module.
Monitor(SD)
External remote control sensor terminal.
AC power
INPUT
100~240V
Coin
equipment
AMPLIFIER
MIC 1, MIC 2
L-FRONT-R
MIDI dimmer or Simple light equipment.
AMP MIC OUTPUT
Configuration
Setup of Configuration :
Press the
button on the remote control or Hold pressing the
[no label] button on karaoke keypad to
enter configuration.
Initial password is 1111.
If you change configuration condition, you may enter configuration by entering password again.
If you forget password, you may have to send a unit to customer center. So, please remember password without fail.
In case of forgetting password, please contact installing company and management company.
1. Music Box
STEP 1
Music
Box
14
Description
Play songs by the chosen genre.
When the coin is not inserted, user can use the machine as music player
After choosing a genre, the machine will play built-in songs in the genre
continuously.
While playing music, it is not available to display the information and lyric of
song and to reserve a song.
When the coin is inserted during playing or when users press the cancel button,
the machine stop the music box function.
Configuration
USERMANUAL
2. Karaoke Operation Status
STEP 1
Display
STEP 2
Choose to either display or hide the list of new
songs from the screen at waiting status.
ON
Remaining
Time
Choose to either display or hide the remaining
time from the screen.
ON
End Time
Choose to either display or hide the announcement of the end time on the screen.
ON
Greetings
Choose to either display or hide the initial and
ending greetings.
Initial/
End
Adult Video
External
Video
Maintaining
Volume
Score
Score
Setup
Choose to either display or hide the functions on
the screen at waiting status.
ON
Set ON/OFF for the adult video as BGV.
Off
Determine the settings of external video.
Standard
Set the time for the music, mic, echo volume
control to be maintained.
Continued
Choose the settings for the level of
scores displayed after a song is finished.
High
Lowest Score
Choose the settings for the lowest possible
score.
Off
Perfect Score
Choose the settings for the probability of 100
point score to be given.
10%
Auto Delete
Recorded
Song
Setup
Standard
Setting
New Song
Banner
Display
Option
Description
Delete the recorded song automatically after
running out of coin/time or system reboot.
Manual Delete
Maintain the recorded song even after running
out of coin/time or system reboot. User can
select the recorded song to delete.
Reboot Delete
Recorded songs can be deleted by rebooting
the machine.
Manual
Delete
15
Configuration
USERMANUAL
3. Sound Settings
STEP 1
BGM
Setup
(Choose the
background
music
for stand-by
time)
Melody
Default
Setup
Sound
Effects
Sound effects
(Control
various sound
effects)
STEP 2
Description
BGM Type
Select BGM with voice without voice, or none.
BGM Start
Time
Set the BGM to start playing after
1min/3min/5min of standby/ idle time.
BGM Volume
Set the BGM volume to 10%, 20%, 30%, 40%,
50%, 60%, 80%, 100%.
Select “Off, Low, Mid, High” for volume of accompaniment music.
Standard
Setting
Voice
5 mins later
10%
Mid
Button
Effect
Set the volume of button sound effects.
Standard
Booting
Effect
Set the volume of song played when booting up
the machine.
Standard
Initial
Greeting
Set the volume of initial greeting sound when
karaoke time begins or when coin is inserted.
Standard
End
Greeting
Set the volume of end greeting when the time
expires or when the coin runs out.
Standard
Score Effect Set the volume of the score sound effect.
MIC Mixer
Choose to use the digital Mic mixer installed inside
the machine.
Standard
ON
Control the mic sound.
MIC
Setup
MIC EQ
Setup
Low : control the mic’s low sound.
Mid Low : control the mic’s midlow sound.
Mid : control the mic’s mid sound.
High : control the mic’s high sound.
Standby
mode
16
Set on/off mic effect during standby status.
Echo Off
Configuration
USERMANUAL
4. Video Settings
STEP 1
TV Setup
Description
Set the status of TV display setup as NTSC or PAL.
Standard
Setting
NTSC
5. External Device Settings
STEP 1
STEP 2
Managing
Type
Description
Standard
Setting
Select machine’s manage type.
None
Coin Per Song
Set the number of coins per song
when using coin mode.
1 Coin
Song Per Coin
Set the number of songs per coin when
using coin mode.
1 song
Time Setting
Per Coin
Set the time value per coin when using timemode.
5 min
Device
Manager
17
Configuration
USERMANUAL
6. User Functions
STEP 1
Greetings
Setup
Description
Greetings from the Business/Owner :
Use the keyboard to insert the greetings to be displayed on the screen during
stand-by time.
Insert photos, videos, MP3, Video files from USB into the machine to use as background visuals when singing.
(1) Registering user content : Photo - Video(BGV) - MP3 - Video
(2) Managing user contents : Photo - Video(BGV) - MP3 - Video
Contents
Photo
Video(BGV)
MP3
Video
File Format
- File Format : JPEG, JPG
- Image Size (Width x Height) : 720x480, 1920x1080
- File Format : MPEG4
- Audio File Speed : 312kbps
- Audio Sample Rate : 44.1kHz, 48kHz
- Video File Format : MPEG4
- Audio File Format : MP3(48kHz recommended)
[3] Converting program.
TJ media encoder is the PC program to convert video or photo file into the optimized format for TKR-355P.
User
Contents
Setup
1. TJ Media Encoder Installation
(1) Connect the TKR-355P with PC using USB cable and turn on the power.
(2) Directory named “TKR-355P U_M” will be created.
(3) Open the “TKR-355P U_M” folder and double click the “TJ
Media_Encoder.exe” to execute installation.
[4) Installation progress.
▶
1. Program Setup Start
18
2.Select Destination Location
Configuration
USERMANUAL
6. User Functions
STEP 1
Description
▶
3. Select Start Menu Folder
4. Select Additional Tasks
▶
5.Ready to Install
User
Contents
Setup
6.Setup Finished
2-1. Converting moving pictures
(1) Double click the TJ Media Encoder icon to start the program.
(2) Click [Video].
(3) Click [File Add] to load a file that you want to convert.
▶
2-2. Converting moving pictures
(4) Click [Option] if you want the converted files saved as an another file name and
or in different location.
(5) Click [Convert] to execute converting.
(6) After converting is finished, you can check the file in the saving folder.
(Initial saving folder : My Documents - TJMedia)
▶
19
USER MANUAL
Configuration
6. User Functions
STEP 1
Description
2-3. Converting Image files
(1) Start TJ Media_Encoder and click [Image].
(2) Click [File Add] to load an image file that you want to convert.
▶
User
Contents
Setup
(3) Click [Option] to save as an another file name and or in different location. You
can also spin the direction of the image.
(4) Click [Convert] to execute converting.
▶
20
USER MANUAL
Configuration
6. User Functions
STEP 1
User
Storage
Information
STEP2
Description
Information for each user contents saved in the user HDD space.
Change the configuration password.
Configuration *initial password : 1111
Change
Password
Contents
Manage
-ment
Settings
Change the password used to update contents. (additional songs)
*initial password : 0000
Upload
Transmit settings of configurations via SD card or USB .
Download
Receive settings of configurations via SD card or USB .
Initializing
of Settings
Initialize settings of configurations.
21
USER MANUAL
Configuration
7. Contents Update
STEP 1
STEP 2
Description
Check Data
Check the data of updated songs.
Sales Check
Check sales when using coin operated connection.
Check
Contents
Contents
Update
Menu for displaying contents of new songs using a SD card or USB.
Adding
New
Validity
Menu for extending the machine authentication period using the smart card.
8. System Reboot
STEP 1
System
Reboot
22
Description
Reboot the machine without shutting down the power.
USER MANUAL
Configuration
9. The First Authentication
STEP 1
Description
When entering menu, machine will display date of new song and authentication.
The First
Authenti
-cation
When pressing start button, date of authentication and additional authentication for 2 months are renewed.
After first authentication is done,
the menu will be disappeared.
23
Others
USERMANUAL
Trouble check and trouble shooting
Treat the product referring following cases if considered there are problems in the product.
Check other products because users can be inexperienced or other products connected can have problems.
After treating as following items and same problems are happened,
please, do not open a product for yourself and give a call to an agency to buy or a service center of our company.
This case
Power is not coming.
Do this
・Check whether a power plug is connected or not, please,
connect a plug well.
・Check whether a power switch is on or not.
・Check whether video input and output are changed or not.
Monitor screen is not shown.
・Check whether video input and output line are disconnected or
contact failure.
・Change them if they have problems.
・Check whether a wire connecting Amplifier and Karaoke is disconnected or contact failure. Change them if something is wrong
with them.
Sound is not coming.
・Check whether a wire connecting amplifier and speaker is disconnected or contact failure. Change them if something is wrong
with them.
・Check each switch position and adjust them because Amplifier
control status can be wrong.
・Check volume control of a Karaoke.
・Change a speaker if a speaker unit is bad.
・Check whether a line connected to other products such as a
Karaoke, amplifier, a speaker etc is connected well or not.
Sound is distorted.
・Clean a contaminated terminal because sound is not coming well
if a pin plug or amplifier input terminal are contaminated.
・Check whether volume control of a Karaoke, amplifier, and an
equalizer is set or not. Adjust volume of each equipment.
24
Others
USERMANUAL
Trouble check and trouble shooting
This case
Do this
・Check whether a power switch on a microphone is on or off and
switch on mic power.
Microphone sound is not coming.
・Check volume of amplifier mic set as minimum,
and control the volume.
・Check whether mic is bad. Change it if something is wrong with it.
・Check whether a line between a MIC output terminal of karaoke and
an amplifierMIC input terminal is good or contact failure. Connect correctly or change it if something is wrong.
Beep sound from speaker
when using a microphone.
・Feedback noise phenomenon when microphone and speaker are
at lose range.
・Microphone does not head to a speaker and is kept away from a
speaker.
・Check connection between main body and remote control module.
Remote control does not work
well.
・Check batteries of remote control. Change them if consumed
fully.
・Use a remote control within range of distance 7 m and left/right
30˚ degrees because a remote control can be out of usage range.
25
Others
USERMANUAL
On service
The following cases apply fee-paid service during the warranty period.
1. If a trouble is caused by inputting foreign substances. (water, drink, coffee, clip or coin)
2. If a trouble is caused by falling the product or adding shock the product.
3. If a trouble is caused by chemicals like thinner, benzene, alcohol or wax.
4. If a trouble is caused by using parts or consumables other than TJ media authentic product.
5. If a trouble is caused by the different voltage use.
6. If a trouble is caused by arbitrarily disassembly or modification.
7. If a trouble is caused by repairing in general electronic repair shop.
8. If a trouble is caused by natural disasters. (lightening, wind and water disaster, fire and salt disaster)
9. If a trouble is caused when violating "Instruction for Use" in the user guide.
10. If a trouble is caused by the mistake of customer.
Specification
This product's performance and external appearance can be changed for quality improvement without announcement.
Form
Karaoke
Voltage
AC 100V -240V~, 50/60Hz
Electric power
12W
Weight
3.6Kg
Main body
size
26
Width
420mm
Height
300mm
Depth
105mm
Frequency
20Hz ~ 20KHz±3dB
S/N
70dB (1KHz)
TV Receiving mode
NTSC/PAL
COMPOSITE video output
Impedance 75Ω1.0Vp-p
HDD
3.5" inch / 500GB
COMPUTER MUSIC PLAYER
TKR-355P