1
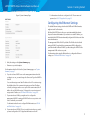
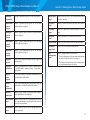
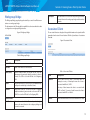
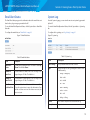
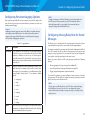
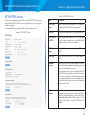
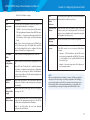
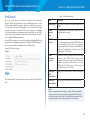
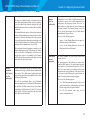
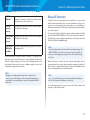
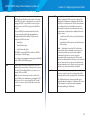
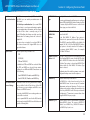
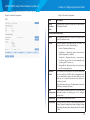
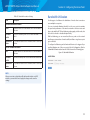
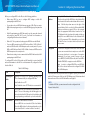
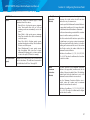
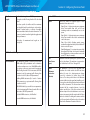
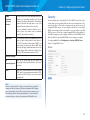
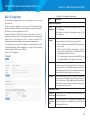
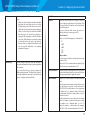
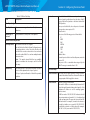
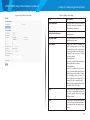
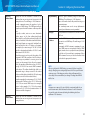
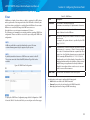
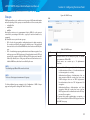
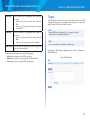
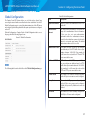
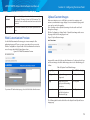
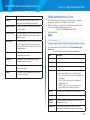
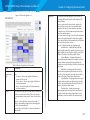
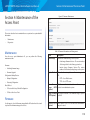
LAPAC1750PRO Access Point Software User Manual
Section 3: Configuring the Access Point
IPv6 Tunnel
Table 27: IPv6 Tunnel Settings
The access point supports the Intra-Site Automatic Tunnel Addressing
Protocol (ISATAP), which enables the AP to transmit IPv6 packets over the
LAN encapsulated within IPv4 packets. The protocol enables the access point
to communicate with remote IPv6-capable hosts even when the LAN that
connects them does not support IPv6. The access point acts as an initiator
of the tunnel and allows communication with remote IPv6 hosts. An ISATAP
router acts as the end of the tunnel within the network to help Access Point to
auto-configure ISATAP tunnel interface.
Field
Description
ISATAP Status
Select Enable or Disable for the administrative mode of
ISATAP.
ISATAP
Capable
Host
Specify the IP address or DNS name of the ISATAP router.
The default value is “isatap”.
From the IPv6 Tunnel page, you can enable, configure and display ISATAP global
operational and configuration parameters. To configure the ISATAP settings on
the access point, click the Configuration > LAN > IPv6 Tunnel tab.
ISATAP Query
Interval
Specify how often the AP should send queries to the
DNS server to attempt to resolve the ISATAP host name
into an IP address. The AP sends router solicitation
messages only when the IP address of an ISATAP router
is unknown. The valid range is 120–3600 seconds. (The
default value is “120” seconds.)
ISATAP
Solicitation
Interval
Specify how often the AP should send router solicitation
messages to the ISATAP router(s) it learns about
through the DNS query messages. The AP sends router
solicitation messages only when there is no active
ISATAP router. The valid range is 120–3600 seconds.
(The default value is “120” seconds.)
ISATAP IPv6
Link
Local Address
Displays Link Local IPv6 address of the ISATAP interface.
Figure 24: IPv6 Tunnel Settings
The following table describes the fields to view or configure on the IPv6 Tunnel
page.
ISATAP IPv6
Displays global IPv6 address of ISATAP the interface.
Global Address
NOTE:
After you configure the wired settings, you must click Save to apply the
changes and save the changes to startup configuration file. Changing
some settings might cause the AP to stop and restart system processes. If
this happens, wireless clients will temporarily lose connectivity.
32