1
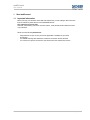
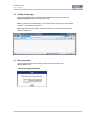
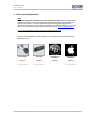
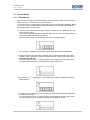
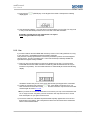
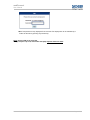
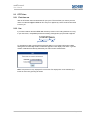
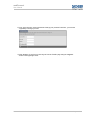
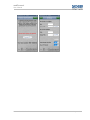
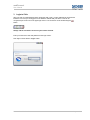
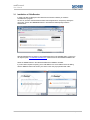
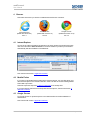
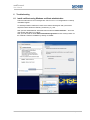
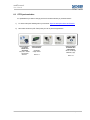
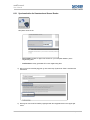
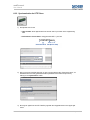
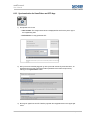
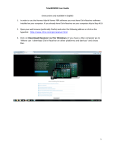
User
Manual
webConnect
Version 1.0
27. Aug 2014
webConnect
User Manual
Table of contents
1
1.1
1.2
1.3
2
Start webConnect ..................................................................................................................... 3
Important information ............................................................................................................... 3
Call-up of start page ................................................................................................................ 4
Enter user name ...................................................................................................................... 4
Select password generation .................................................................................................... 5
Secure Reader ........................................................................................................................ 6
2.1.1
First time use ................................................................................................................... 6
2.1.2
Use .................................................................................................................................. 7
2.2
OTP Token .............................................................................................................................. 9
2.2.1
First time use ................................................................................................................... 9
2.2.2
Use .................................................................................................................................. 9
2.2.3
Change PIN ................................................................................................................... 10
2.3
SmartToken on Blackberry .................................................................................................... 12
2.3.1
First time use ................................................................................................................. 12
2.3.2
Use ................................................................................................................................ 13
2.3.3
Change PIN ................................................................................................................... 13
2.4
SmartToken on iPhone / iPad................................................................................................ 14
2.4.1
First time use ................................................................................................................. 14
2.4.2
Use ................................................................................................................................ 16
2.4.3
Change PIN ................................................................................................................... 17
2.1
3
3.1
Login to Citrix ......................................................................................................................... 19
Installation of CitrixReceiver .................................................................................................. 20
4.1
4.2
4.3
Browser.................................................................................................................................... 21
Internet Explorer .................................................................................................................... 21
Mozilla Firefox........................................................................................................................ 21
Google Chrome ..................................................................................................................... 21
4
5
6
Application selection .............................................................................................................. 22
Troubleshooting ..................................................................................................................... 23
6.1
Install certificate using Windows certificate administration ................................................... 23
6.2
OTP Synchronisation ............................................................................................................. 24
6.2.1
Synchronisation for Smartcard and Secure Reader ...................................................... 25
6.2.2
Synchronisation for OTP-Token .................................................................................... 26
6.2.3
Synchronisation for SmartToken and OTP-App ............................................................ 27
Dachser GmbH & Co. KG
Page 2 of 27
webConnect
User Manual
1
1.1
Start webConnect
Important information
Before you login you should be aware that with webConnect you are making a data connection
from an external or private device to the DACHSER network.
This represents a security risk!
Therefore, after finishing your work, close the session, close all windows and delete the cache
of your browser.
Please note the following Restrictions:
-
Using webConnect you can only access the applications available via your Citrix
environment.
You cannot exchange files between the webConnect session and the terminal.
You cannot use a printer connected to your terminal from the webConnect session.
Dachser GmbH & Co. KG
Page 3 of 27
webConnect
User Manual
1.2
Call-up of start page
Open your terminal’s browser, preferably Internet Explorer and enter on the URL line
webconnect.dachser.com to reach the login screen.
Note: If you wish to use Mozilla Firefox you must first execute the steps up to and including
section 4.1 once with Internet Explorer!
Note: With a Dachser owned laptop, webConnect dial-in only works with Internet Explorer
which is installed on it.
1.3
Enter user name
The user name consists of the first letter of the forename, the surname and
“@DACHSER.DE.TD”.
[email protected]
Dachser GmbH & Co. KG
Page 4 of 27
webConnect
User Manual
2
Select password generation
Note:
Please do not generate a password if you are not really going to use it. The passwords are
calculated according to a secure algorithm and compared in the background with entries on a
Telekom security server. If you have generated some passwords without using them the
security server at Telekom can lose the synchronisation to the calculation sequence of your chip
card. In this case follow the synchronisation instructions in section 6.2 OTP Synchronisation.
If your OTP generator is lost, please notify the IT Service Desk at once!
There are various alternatives for the generation of your password, please select the method
appropriate for you.
Secure Reader
OTP Token
SmartToken on
Blackberry
SmartToken on
iOS Device
Chapter 2.1
Chapter 2.2
Chapter 2.3
Chapter 2.4
Dachser GmbH & Co. KG
Page 5 of 27
webConnect
User Manual
2.1
Secure Reader
2.1.1 First time use
When you have received your smartcard with the associated secure reader from the IT Service
Desk, on first use you must fix a PIN for your smartcard.
For security reasons, until this point in time all chip cards are protected with a ZEROPIN. Before
you use your card you need the secure reader (card reader), your personal chip card and the
following description of the procedure.
1) Insert your chip card (with the gold chip – similar to a telephone card - upward) into the card
reader as far as it will go.
Or you have a small chip (similar to a SIM card) which you can insert in the secure reader by
means of the holder included with the delivery.
The card reader switches on automatically and shows the following display:
This represents “1N000000” and indicates that the card is blocked with the ZEROPIN.
2) Using the keypad of the card reader you MUST enter a new 6 digit PIN which may not be
“000000”. Select a PIN which is easy to remember but which cannot be guessed by others.
Remember this PIN well!
For each number you enter a “-“(hyphen) appears on the display of the card reader. When
you have entered all 6 digits of your new PIN the display looks like this:
3) Now press the
display appears:
(ENTER) key on the keypad of the reader. Thereupon the following
4) In order to confirm your PIN you must now enter the same number combination again using
the keypad of the reader.
For each number you enter a “-“(hyphen) appears on the display of the card reader. When
you have repeated entry of all 6 digits of your PIN the display looks like this:
Dachser GmbH & Co. KG
Page 6 of 27
webConnect
User Manual
5) Now press the
display appears:
(ENTER) key on the keypad of the reader. Thereupon the following
6) This should read “READY”. Your chip card is now protected by your own PIN. You only need
to carry out the described procedure once on first use of the card and reader.
Remember your PIN and do not communicate it to anyone.
Never write your PIN on the chip card.
2.1.2 Use
If you wish to dial into the DACHSER data network by means of a PC using webConnect, to log
in you need a new, unrepeatable password consisting of 8 digits.
This protection currently represents the most secure procedure to protect our network against
external access. The OTP procedure (OTP = One Time Password) is officially certified and
represents the highest security standard.
1) Take your chip card and insert it into the secure reader up to the stop. To insert a small
format SIM card use the holder included in the delivery (with this the SIM card can only be
inserted in one position). The card reader switches on automatically and shows the following
display:
“0P000000” means that you now enter your 6 digit PIN using the keypad of the card reader.
2) Confirm the completed entry using the
key. If the display now shows “Error” you
have entered an incorrect PIN or mistyped. In this case remove the chip card from the reader
and start again at section 2.1.2 Use.
Note: If you enter an incorrect PIN three times in succession your chip card is deactivated and
can no longer be used. Only when you have received a new chip card from the IT Service
Desk in Kempten can you again use the service!
3) The secure reader now calculates the password which quickly appears in the form of an 8
digit number on the display. This is the password which must be entered in the marked line
shown in the illustration below.
Dachser GmbH & Co. KG
Page 7 of 27
webConnect
User Manual
Note: This password is only displayed for 40 seconds! The display time can be extended by a
further 40 seconds by pressing any number key.
Never write the PIN on the chip card.
Always keep the chip card, card reader and laptop separate from each other.
Dachser GmbH & Co. KG
Page 8 of 27
webConnect
User Manual
2.2
OTP Token
2.2.1 First time use
After the OTP token has been authorised for you by the IT Service Desk you receive your user
name “[email protected]” and your 4 digit PIN by e-mail. The OTP token itself
is sent to you.
2.2.2 Use
If you wish to dial into the DACHSER data network by means of a PC using webConnect, to log
in you need a new, unrepeatable password consisting of 8 digits and your personal 4 digit PIN.
12345678xxxx
generated OTP
PIN
To generate the 8 digit one time password hold the button on your token until the line is filled
with hyphens and the 8 digit number combination appears on the display of the token. Type this
number combination and directly afterwards your PIN in the line marked below.
Note: This password is only displayed for 40 seconds! The display time can be extended by a
further 40 seconds by pressing the button.
Dachser GmbH & Co. KG
Page 9 of 27
webConnect
User Manual
2.2.3 Change PIN
It is possible that you wish to change your PIN for technical security or personal reasons.
To do this call up the following link in your browser: https://onetimepass.telesec.de/TeleSec/
Now select the device (OTP Token) that you use for password generation.
1) Now enter under
- Token number:
the 8 digit number from rear of your token
- OneTimePass + Server-PIN: a newly generated OTP + your PIN
12345678xxxx
generated OTP
Dachser GmbH & Co. KG
PIN
(Server-PIN)
Page 10 of 27
webConnect
User Manual
2) Now, in the last entry screen with the title “Change your personal Token PIN”, you have the
opportunity to change your PIN.
3) After alteration of your PIN you must log out from the TeleSec page using the “Log out”
button in the upper right corner.
Dachser GmbH & Co. KG
Page 11 of 27
webConnect
User Manual
2.3
SmartToken on Blackberry
2.3.1 First time use
After filing of your user by the IT Service Desk you receive an e-mail from them which contains
your personal activation code for the OTP Token App.
Activate your OTP Token App with the following procedure:
1) First make sure that a mobile radio or WLAN connection has been made.
2) After starting the OneTimePass-App enter the activation code in the first line.
3) In the next line specify your e-mail address in the following form:
[email protected]
4) In the second and third lines you must enter your PIN. This is any number combination with
a length of four to eight digits.
5) In addition you must enter a random 8 digit number as PUK in the fourth and fifth lines. This
serves to unblock the blockage of the PIN.
6) Finally click on the “Activate” button.
Dachser GmbH & Co. KG
Page 12 of 27
webConnect
User Manual
2.3.2 Use
If you wish to dial into the DACHSER data network by means of a PC using webConnect, to log
in you need a new, unrepeatable password consisting of 8 digits.
This protection currently represents the most secure procedure to protect our network against
external access. The OTP procedure (OTP = One Time Password) is officially certified and
represents the highest security standard.
1) First start the OneTimePass-App on your Blackberry and then enter your PIN in the line.
Now click the “Login” button
2) In the next step click the “Generate OTP” button to display your one time password.
3) Now again switch to the login screen in the browser. Type in the 8 digit OTP just generated
in the line marked below and finally click on the “Login” button.
2.3.3 Change PIN
In order to change the PIN protecting your OTP App, after login go to Settings using the “Menu
key”.
Subsequently you can change this by the respective double entry of your new PIN or PUK.
Dachser GmbH & Co. KG
Page 13 of 27
webConnect
User Manual
2.4
SmartToken on iPhone / iPad
2.4.1 First time use
After filing of your user by the IT Service Desk you receive an e-mail from them which contains
your personal activation code for the OTP iOS Token.
Activate your iOS Token in the following way:
1) First make sure that a mobile radio or WLAN connection has been made.
2) After starting the OneTimePass-App enter the activation code in the first line.
3) In the second and third lines you must enter your PIN. This is any number combination with
a length of four to eight digits.
4) In addition you must enter a random 8 digit number as PUK in the fourth and fifth lines. This
serves to unblock the blockage of the PIN.
5) Finally click on the “Activate” button.
Dachser GmbH & Co. KG
Page 14 of 27
webConnect
User Manual
6) If you receive the message Activation successful, after clicking on “OK” you can
immediately create a first one time password by selecting the “Generate OTP” button.
Dachser GmbH & Co. KG
Page 15 of 27
webConnect
User Manual
2.4.2 Use
If you wish to dial into the DACHSER data network by means of a PC using webConnect, to log
in you need a new, unrepeatable password consisting of 8 digits.
This protection currently represents the most secure procedure to protect our network against
external access. The OTP procedure (OTP = One Time Password) is officially certified and
represents the highest security standard.
1)
First start the OneTimePass-App on your iOS device and then enter your PIN in the
line. Now click the “Login” button.
Dachser GmbH & Co. KG
Page 16 of 27
webConnect
User Manual
2) In the next step select the “Generate OTP” button to display your new one time password.
3) Now switch back to the login screen in the browser. Type in the 8 digit OTP just generated in
the line marked below and finally select the “Login” button.
2.4.3 Change PIN
In order to change the PIN protecting your OTP App, you have to select the “Settings” button in
the right top corner. Subsequently you can change your PIN or PUK by the respective double
entry of these.
Dachser GmbH & Co. KG
Page 17 of 27
webConnect
User Manual
Dachser GmbH & Co. KG
Page 18 of 27
webConnect
User Manual
3
Login to Citrix
After you enter your password and have confirmed it with “Login” you are redirected to the Citrix web
interface. From now you are logged in to the Dachser network with your device. This can be
recognised by the four icons in the upper right corner. The connection can be ended using the
button.
Always end the connection as soon as your work is finished.
Enter your Citrix user name and password in the login screen.
Then login to Citrix with the “Login” button.
Dachser GmbH & Co. KG
Page 19 of 27
webConnect
User Manual
3.1
Installation of CitrixReceiver
In order to be able to display the Citrix data from the Dachser network you need the
“CitrixReceiver” program.
As soon as you have confirmed that the Citrix licence agreement is accepted by clicking the
control box, click on the “Download” button to download and subsequently install the
CitrixReceiver.
With this CitrixReceiver is ready on your terminal and need not be installed again. In future you
can skip the point 3.1 Installation CitrixReceiver. Now execute the downloaded installation file.
Select the “Install” button in the started CitrixReceiver installation assistant.
If you should be required to specify your e-mail address or a server address close the dialog
with the “Cancel” button and confirm your choice in the next pop-up window with “Yes”.
Dachser GmbH & Co. KG
Page 20 of 27
webConnect
User Manual
4
Browser
Now select the browser you will use to establish the webConnect connection.
Internet Explorer
(tested with version 8.0)
see 4.1
4.1
Mozilla Firefox
(tested with version 21.0)
see 4.2
Google Chrome
(tested with version 27.0)
see 4.3
Internet Explorer
As soon as the yellow information bar appears in the upper border of the webConnect page,
click on this and select “Execute add-on” in the menu. With this you allow your browser to
automatically start the installation of CitrixReceiver.
Now continue with section 5 Application selection.
4.2
Mozilla Firefox
If you wish to use Mozilla Firefox to dial into the Dachser network, you must first dial in once
with Internet Explorer to the Dachser network in order to be able to use the following Mozilla
Firefox dial-in procedure.
Therefore repeat the steps from 1 Call-up of start page if not already done.
If you have already carried out these steps with Internet Explorer, continue with section 5
Application selection.
4.3
Google Chrome
For Google Chrome no special steps are to be observed after successful installation of
CitrixReceiver.
Now continue with section 5 Application selection.
Dachser GmbH & Co. KG
Page 21 of 27
webConnect
User Manual
5
Application selection
Now select your Citrix application as usual (e.g. Citrix DE).
Dachser GmbH & Co. KG
Page 22 of 27
webConnect
User Manual
6
6.1
Troubleshooting
Install certificate using Windows certificate administration
Follow the instructions if error messages with “SSL/TLS error” or “The application is currently
unavailable” appear.
To manually install the certificate for webConnect call the following link with your browser:
http://www.telesec.de/service/TeleSec_ServerPass_CA_1.der
Next open the downloaded file. Afterwards select the button “Install certificate…” and in the
next window click again on “Continue”.
Next you must select the folder “Zwischenzertifizierungsstellen” as the memory location for
the certificate. Finish the installation by clicking on “Finish”.
Dachser GmbH & Co. KG
Page 23 of 27
webConnect
User Manual
6.2
OTP Synchronisation
It is possible that you wish to change your PIN for technical security or personal reasons.
1)
To do this call up the following link in your browser: https://onetimepass.telesec.de/TeleSec/
2)
Now select the device (OTP Token) that you use for password generation.
Synchronisation
for Secure
Reader and
Smartcard
Chip card + reader
with keypad
See 6.2.1
Dachser GmbH & Co. KG
Synchronisation
for OTP-Token
Generates
8 digit number
Synchronisation
for SmartToken
and OTP-App
iPhone / iPad-App
Blackberry-App
See 6.2.2
See 6.2.3
Page 24 of 27
webConnect
User Manual
6.2.1 Synchronisation for Smartcard and Secure Reader
Now please enter for the
-
Card number: the last 12 digits of the number on your card (after 8949017) in the
neighbouring field.
-
OneTimePass a newly generated OTP in the neighbouring field.
3) After you have successfully logged in go to the last step “Synchronise Token” and follow the
instructions.
4) Next log out from the OTP-TeleSec page again with the “Log out” button in the upper right
corner.
Dachser GmbH & Co. KG
Page 25 of 27
webConnect
User Manual
6.2.2 Synchronisation for OTP-Token
1) Now please enter for the
- Token number: the 8 digit number from the rear side of your token in the neighbouring
field.
- OneTimePass + Server-PIN: a newly generated OTP + your PIN.
12345678xxxx
Generated OTP PIN (Server-PIN)
2) After you have successfully logged in go to the section with the title “Synchronise token”, as
described enter two newly generated onetime passwords and confirm the process by
clicking on the “Synchronise” button.
3) Next log out again from the OTP-TeleSec page with the “Log out” button in the upper right
corner.
Dachser GmbH & Co. KG
Page 26 of 27
webConnect
User Manual
6.2.3 Synchronisation for SmartToken and OTP-App
1) Now please enter for the
- Token number: The 8 digit number which is displayed after the PIN entry in the App in
the neighbouring field.
- OneTimePass: A newly generated OTP.
2) After you have successfully logged in go to the point with the title “Synchronise token”, as
described enter two newly generated onetime passwords and confirm the process by
clicking on the “Synchronise” button.
3) Next log out again from the OTP-TeleSec page with the “Log out” button in the upper right
corner.
Dachser GmbH & Co. KG
Page 27 of 27