1
Software
APAX-5522PE
Embedded Linux
User Manual
Copyright
The documentation and the software included with this product are copyrighted 2012
by Advantech Co., Ltd. All rights are reserved. Advantech Co., Ltd. reserves the right
to make improvements in the products described in this manual at any time without
notice. No part of this manual may be reproduced, copied, translated or transmitted
in any form or by any means without the prior written permission of Advantech Co.,
Ltd. Information provided in this manual is intended to be accurate and reliable. However, Advantech Co., Ltd. assumes no responsibility for its use, nor for any infringements of the rights of third parties, which may result from its use.
About This Manual
Thank you for using Advantech products. This manual is a supplementation to APAX5522 user manual, and it emphasizes on Linux for APAX-5522, other detail information about APAX-5522 hardware, jumper setting, serial port connection and so on,
please refer to the APAX-5522 Hardware manual.
Edition 1
October 2012
APAX-5071 Software Manual
ii
Contents
Chapter
Chapter
Chapter
Chapter
1
APAX-5522 features overview ............1
1.1
1.2
Hardware features..................................................................................... 2
Software features ...................................................................................... 2
2
APAX-5522 embedded Linux
configuration and usage .....................3
2.1
2.2
2.3
2.4
2.5
2.6
2.7
2.8
2.9
Basic Linux command ............................................................................... 4
2.1.1 ls: list the file information............................................................... 4
2.1.2 cp: copy file or directory ................................................................ 4
2.1.3 mv: move or rename file/directory................................................. 4
2.1.4 rm: delete file or directory ............................................................. 4
2.1.5 mkdir: create directory .................................................................. 4
2.1.6 rmdir: remove directory ................................................................. 4
2.1.7 pwd: show the current path........................................................... 4
2.1.8 chmod: change file mod bit ........................................................... 5
2.1.9 ./ : execution of your program ....................................................... 5
2.1.10 ps : report a snapshot of the current process ............................... 5
2.1.11 kill -9 PID: kill the process............................................................. 5
2.1.12 cd: change directory...................................................................... 5
2.1.13 clear: clear the screen................................................................... 5
2.1.14 reboot: reboot the APAX-5522...................................................... 5
Connecting the APAX-5522 Linux............................................................. 6
Configure IP .............................................................................................. 7
Configure RTC .......................................................................................... 8
Serial port.................................................................................................. 9
Mount the CF card .................................................................................... 9
Mount the USB storage device ................................................................. 9
Telnet service............................................................................................ 9
FTP service ............................................................................................. 10
3
Development guide ...........................13
3.1
3.2
Establish develop environment ............................................................... 14
Quick start to develop application ........................................................... 14
3.2.1 Compile HelloWorld.c ................................................................. 15
3.2.2 Upload “HelloWorld” to the APAX-5522...................................... 15
3.2.3 Execute “HelloWorld” on the APAX-5522 ................................... 16
3.2.4 Sample Makefile of HelloWorld.c ................................................ 16
4
APAX utility tool kit for Linux ...........19
4.1
4.2
Overview ................................................................................................. 20
Command introduction ............................................................................ 21
4.2.1 Display APAX utility information.................................................. 21
4.2.2 Get module list ............................................................................ 21
4.2.3 Get module information............................................................... 22
4.2.4 Get channel information.............................................................. 24
4.2.5 Set channel value ....................................................................... 28
4.2.6 Set channel range....................................................................... 33
4.2.7 Set DO module configuration...................................................... 35
iii
APAX-5071 Software Manual
4.2.8
4.2.9
4.2.10
4.2.11
Set AO module configuration...................................................... 37
Set CNT module configuration.................................................... 39
Get the APAX-5017PE AI module with timestamp ..................... 44
Get the APAX-5040PE DI module with timestamp ..................... 47
Appendix A
APAX 5000 I/O module range code
settings .............................................. 49
A.1
ADAM/APAX .NET Utility General Window ............................................ 50
APAX-5071 Software Manual
iv
Chapter
1
1
APAX-5522 features
overview
1.1 Hardware features
CPU: XScale PXA270, 520 MHz
Memory: Flash 32M bytes, SDRAM 64M bytes
Diagnostics LEDs: 1xPower, 1xRun, 1xError, 1xBattery, 2xLAN link/activity/
speed
Real-time Clock: Yes
Watchdog Timer: Yes
Power Consumption: 5 W @ 24 VDC (typical)
USB Ports: 1 (USB 1.1)
LAN Ports: 2 (10/100 Mbps)
Serial Ports: 2 (RS-232)
Serial Baud Rate: 9600 ~ 115200 bps
Storage: 1 x Type II Compact Flash card slot (internal)
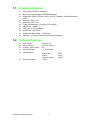
1.2 Software features
Boot loader:
Kernel version:
C library: glibc version:
OS boot up time:
Flash partition:
Root files system:
APAX-5071 Software Manual
U-boot-1.1.6
Linux 2.6.25.8-rt7
2.8
<= 40 seconds
Boot loader
Kernel
Root file system
JFFS2
2
512k
2.3 M
25.8 M
Chapter
2
2
APAX-5522 embedded
Linux configuration
and usage
2.1 Basic Linux command
2.1.1 ls: list the file information
Example:
# ls –l
list detailed information of file.
# ls –a
list all files including hidden files.
# ls –t
list the files that are arranged by time.
2.1.2 cp: copy file or directory
Example:
# cp test.c /home/user/
copy test.c file to /home/user/
# cp –a mywork /home/user/
copy mywork directory to /home/user/
2.1.3 mv: move or rename file/directory
Example:
# mv test.c main.c
rename file test.c to main.c
#mv workspace/ backup/
rename directory workspace as backup
2.1.4 rm: delete file or directory
Example:
# rm test.c
delete file test.c
# rm –r workspace
delete directory workspace
2.1.5 mkdir: create directory
Example:
# mkdir workspace
create workspace directory
2.1.6 rmdir: remove directory
Example:
# rmdir workspace
remove workspace directory
2.1.7 pwd: show the current path
Example:
# pwd
/home/user
APAX-5071 Software Manual
4
Example:
# chmod 754 test
# ls –l test
-rwxr-xr-- 1 adv adv 8004 Jan 1 1970 test
2.1.9 ./ : execution of your program
Example:
# ls –l test
-rwxr-xr-- 1 adv adv 8004 Jan 1 1970 test
# ./test
This is my test program!!
2.1.10 ps : report a snapshot of the current process
Example:
# ps
PID Uid
1 root
2 root
3 root
4 root
5 root
6 root
…
…
1309 root
1571 root
1593 root
1594 root
VmSize Stat Command
544 S init [5]
SW< [kthreadd]
SW< [ksoftirqd/0]
SW< [watchdog/0]
SW< [events/0]
SW< [khelper]
904 S
896 S
320 R
728 R
-sh
sh
./test
ps
2.1.11 kill -9 PID: kill the process
Example:
# kill -9 1593
kill the running test program. the PID is 1593
2.1.12 cd: change directory
2.1.13 clear: clear the screen
2.1.14 reboot: reboot the APAX-5522
5
APAX-5071 Software Manual
APAX-5522 embedded Linux configuration and usage
A combination of the letters controls which user can access to the file.
754 means: 111(read, write, execute) 101(read, write, execute) 100(read, write, execute).
The first number 7 is owner can read and write and execute file. The second number 5 is
group can only read and execute file. The third number 4 is all users can only read file.
Chapter 2
2.1.8 chmod: change file mod bit
2.2 Connecting the APAX-5522 Linux
Users can check the RUN LED lights when the APAX-5522 is powered on. Then can
use Telnet to connect to the APAX-5522’s console if you have known the IP address.
Once you connect to the APAX-5522 you can proceed to configure network settings,
as described in the next section. Telnet can be used locally by using a crossover
Ethernet cable to connect your computer to the APAX-5522, or over a LAN or the
Internet. The default IP address and netmask are shown below. To login, type the
Login name and password as requested. The default login name is root and no password.
Default IP Address
Default netmask
LAN1(eth0)
10.0.0.1
255.255.255.0
LAN2(eth1)
10.0.0.2
255.255.255.0
In addition, we also provide a PC-side client tool that users can use it to get the IP
address of all the APAX-5522 devices. Please plug the network cable to the LAN
(eth0) port of the APAX-5522 devices.
APAX-5071 Software Manual
6
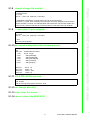
Users can configure IP and change LAN physical address in “/etc/rc”, OS then will
execute the shell script automatically when booting up. The default setting for Ethernet is static IP address.
If user wants to get the eth0 IP by dhcp, please mask and modify the “/etc/rc” file as
follows:
ifconfig lo 127.0.0.1
if [ -e /var/run/dhcpcd-eth0.pid ]; then
rm -f /var/run/dhcpcd-eth0.pid
fi
if [ -e /var/run/dhcpcd-eth1.pid ]; then
rm -f /var/run/dhcpcd-eth1.pid
fi
dhcpcd eth0 &
dhcpcd eth1 &
inetd &
cat /etc/motd
Sometimes, you may need to modify the IP routing table by manually that can route
to the correct LAN port out. Please refer to the following case, and manually modify
the rules of the IP routing table when the system startup. The red color words depend
on the routing table. You can type “route” instruction to know the current setting.
# route
Kernel IP routing table
Destination Gateway Genmask
10.0.0.0
*
255.255.255.0
10.0.0.0
*
255.255.255.0
default
10.0.0.254 0.0.0.0
default
10.0.0.254 0.0.0.0
#
Flags Metric Ref Use Iface
U 0
0
0 eth0
U 0
0
0 eth1
UG 0
0
0 eth0
UG 0
0
0 eth1
For example, I just use LAN2 case therefore, I need to remove the routing rules of the
LAN1(eth0) from the routing table. Type following instructions:
# route del –net 10.0.0.0 netmask 255.255.255.0 dev eth0
# route del default gw 10.0.0.254 eth0
7
APAX-5071 Software Manual
APAX-5522 embedded Linux configuration and usage
ifconfig lo 127.0.0.1
ifconfig eth0 10.0.0.1 netmask 255.255.255.0
ifconfig eth1 10.0.0.2 netmask 255.255.255.0
ip rule add from 10.0.0.1 lookup 10
ip route add table 10 default src 10.0.0.1 dev eth0
ip rule add from 10.0.0.2 lookup 11
ip route add table 11 default src 10.0.0.2 dev eth1
route add default gw 10.0.0.254 eth1
route add default gw 10.0.0.254 eth0
inetd &
cat /etc/motd
Chapter 2
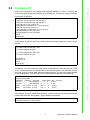
2.3 Configure IP
Now I can route to the correct LAN port out.
# route
Kernel IP routing table
Destination Gateway Genmask
Flags Metric Ref Use Iface
10.0.0.0
*
255.255.255.0 U 0
0
0 eth1
default
10.0.0.254 0.0.0.0
UG 0
0
0 eth1
#
IP routing table rules
System startup
Typing the Linux instructions
Just use LAN1 (eth0)
route del -net 10.0.0.0 netmask 255.255.255.0 dev eth1
route del default gw 10.0.0.254 eth1
[Note]
If you reinsert the network cable to LAN2, please type the following
commands to create the LAN1 routing table rules.
route add -net 10.0.0.0 netmask 255.255.255.0 dev eth1
route add default gw 10.0.0.254 eth1
Just use LAN2 (eth1)
route del -net 10.0.0.0 netmask 255.255.255.0 dev eth0
route del default gw 10.0.0.254 eth0
[Note]
If you reinsert the network cable to LAN1, please type the following
commands to create the LAN1 routing table rules.
route add -net 10.0.0.0 netmask 255.255.255.0 dev eth0
route add default gw 10.0.0.254 eth0
Both use LAN1&LAN2
No need to modify
2.4 Configure RTC
You may use the “date” command to print or set the system date.
SYNOPSIS:
date MMDDhhmmYYYY.SS
MM = Month
DD = Date
hhmm = hour and minute
YYYY = Year
SS = second
For example, Fri Apr 03 18:54:12 UTC 2009
# date 040318542009.12
Fri Apr 3 15:54:12 UTC 2009
In order to maintain the correct time when powering off, users should use the hwcolck
to write the current time to real time clock.
# hwclock ––systohc
Now if you reboot the APAX-5522, the time is still correct.
APAX-5071 Software Manual
8
APAX-5522 has two serial ports; the device node is /dev/ttyAP0 and /dev/ttyAP1. For
serial port test, APAX-5522 has built-in test program called st (serialtest) for user test
serial port functionality. Please see below example:
Use serial port to receive data at the Baud Rate of 115200.
# st /dev/ttyAP0 –r –b 115200
2.6 Mount the CF card
CF card is usually identified as hard disk, the device is /dev/mmcblk0, and the user
can use the mount command to mount the CF card to a folder. For example:
# mount /dev/hda1 /mnt
The system now support ext2, ext3 and fat32 file system. If your CF card’s file system is FAT32, you should mount it as follow
# mount –t vfat /dev/hda1 /mnt
2.7 Mount the USB storage device
Users also can mount the USB storage device to the APAX-5522, before they can
access the USB storage device. The steps are as follows:
List the partition tables for the specified devices and then exit.
#fdisk –l
USB storage device is usually identified as SCSI device, the device is /dev/sda1, and
the user can use the mount command to mount the USB device to a folder.
Mount USB Storage device
# mount /dev/sda1 /mnt
Unmount USB Storage device
#umount /mnt
2.8 Telnet service
When you boot up the APAX-5522, the telnet service is already started by default.
The users can telnet to APAX-5522 by telnet client in another computer. When you
first telnet the APAX-5522, you should create a user and set password, then you can
use the user as username and the password you set as password.
Create user
You may use the adduser command to create user account and password.
9
APAX-5071 Software Manual
APAX-5522 embedded Linux configuration and usage
Use serial port to send data at the Baud Rate of 115200.
#st /dev/ttyAP0 –s –b 115200
Chapter 2
2.5 Serial port
After setting, you can telnet to APAX-5522 by new user account.
Remove user
Use root id login to APAX-5522, The steps are as follows:
1. Delete user
# deluser adv
2. Remove user home directory
# rm –r /home/adv
2.9 FTP service
When you boot up the APAX-5522, the ftp service is already started by default. The
user can use the ftp client to connect APAX-5522, then download files from APAX5522 or upload files to APAX-5522 through network.
Example:
Upload file to APAX-5522
APAX-5071 Software Manual
10
Download file from APAX-5522
Chapter 2
APAX-5522 embedded Linux configuration and usage
Basic FTP command:
!: exit FTP back to pc temporarily
bin: transfer files in “Binary” mode
ascii: transfer files in “ASCII” mode
get: download file from APAX-5522
put: upload file from PC to APAX-5522
bye: exit FTP
11
APAX-5071 Software Manual
APAX-5071 Software Manual
12
Chapter
3
3
Development guide
3.1 Establish develop environment
To install cross compile tool, you should have the Linux distribution pre-installed in
your host computer, for example: Ubuntu Linux distribution. Then put the cross compile tool, arm-unknown-linux-gnueabi-4.2.2.tar.bz2, to the "/" folder and use root permission to execute the following command to install it:
# tar jxvf arm-unknown-linux-gnueabi-4.2.2.tar.bz2
After the installation, the development environment will be established.
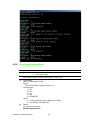
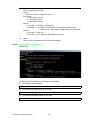
You may execute “arm-unknown-linux-gnueabi-gcc –v” to check the development
environment is successfully installed if you can see a similar message as below:
Up till now, user can use cross compile to compile your applications. Information
about how to develop applications will be introduced in later sections.
Note!
The cross tool chain is tested on following Linux distributions:
Fedora: Fedora10 Fedora11 Fedora12 Fedora13 Fedora14 Fedora15
Fedora16
Ubuntu: Ubuntu8.04 Ubuntu8.10 Ubuntu9.04 Ubuntu9.10 Ubuntu10.04
Ubuntu10.10 Ubuntu11.04 Ubuntu11.10
Debian: Debian5.0 Debian6.0
3.2 Quick start to develop application
Here we will give an example to show how to develop an application and transfer
your application to the APAX-5522 by using FTP or USB storage device.
The example is HelloWorld.c, the source code of this example is as follows:
#include <stdio.h>
int main(void)
{
printf(“Hello World!\n”);
return 0;
}
APAX-5071 Software Manual
14
Create HelloWorld.c on your Linux PC (for example: Ubuntu)
2.
Use “arm-unknown-linux-guneabi-gcc” command to compile HelloWorld.c to
HelloWord
3.2.2 Upload “HelloWorld” to the APAX-5522
1.
Upload HelloWorld to APAX-5522 by using FTP
Please refer to the above section 3.9 FTP service.
2.
Upload HelloWorld to APAX-5522 by using USB storage device.
a. List the partition tables. This USB storage device node is “/dev/sda1”.
b. Mount USB storage device.
15
APAX-5071 Software Manual
Development guide
1.
Chapter 3
3.2.1 Compile HelloWorld.c
c. Copy HelloWorld to APAX-5522.
3.2.3 Execute “HelloWorld” on the APAX-5522
1.
Change HelloWorld file mode bit as 755.
2.
Execute HelloWorld program on APAX-5522.
3.2.4 Sample Makefile of HelloWorld.c
The following example codes are the sample Makefile of HelloWorld.c.
For example, user can modify the Makefile on demand and put it on your host computer and enter that folder in the host computer, then execute “make” command. The
HelloWorld.c will be built.
# make
Execute “make clean” command will delete the HelloWorld program.
# make clean
APAX-5071 Software Manual
16
Chapter 3
Makefile sample for HelloWorld program
CC=arm-unknown-linux-guneabi-gcc
CFLAGS= -O
BINS=HelloWorld
$(BINS): % : %.c
$(CC) $(CFLAGS) -o $@ $<
When compiling, if message similar to “cannot find xxx.h files” appears, please make
sure the file is under the search directory. If not, please add the file through “-I path”.
Path means the path of the header file.
If “undefined reference to XXX” appears, this means the library of this function may
not be linked. Please make sure the library file is under the search directory. If not,
please add the file through “-L path”. Path means the path of the library.
17
APAX-5071 Software Manual
Development guide
clean:
rm -f *.o $(BINS)
APAX-5071 Software Manual
18
Chapter
4
4
APAX utility tool kit for
Linux
The APAX utility tool kit provides eleven instructions that make it convenient for users
to access the APAX-5000 I/O modules. They are located in the path: “/bin”. Please
see the description as following.
4.1 Overview
Instruction
Function description
apax_UtilityInfo
Display the utility version and support modules
apax_GetModuleList
Discovery the APAX-5000 modules
apax_GetModuleInfo
Get the APAX-5000 modules information
apax_GetChannelInfo
Get the APAX-5000 modules channel information
apax_SetChannelValue
Set the APAX-5000 modules channel output
apax_SetChannelRange
Set the APAX-5000 modules channel range
apax_SetDoConfig
Set the APAX-5000 DO modules configuration
apax_SetAoConfig
Set the APAX-5000 AO modules configuration
apax_SetCntConfig
Set the APAX-5000 CNT modules configuration
apax_TimeStampAI
Get the APAX-5017PE AI module channel with timestamp
apax_TimeStampDI
Get the APAX-5040PE DI module channel with timestamp
Note!
We recommend that when you use command apax_GetChannelInfo
which is periodically update function to show the APAX-5000 IO modules channel information, please use Putty or Pietty tool to connect to
the APAX-5522 and set the window size of columns and rows as follows
for a good display on channel information updating.
PuTTY download page
http://www.chiark.greenend.org.uk/~sgtatham/putty/download.html
APAX-5071 Software Manual
20
4.2 Command introduction
This section includes important information for users to use APAX utility tool kit.
Please refer to the parameters of each command in order to correctly use.
Chapter 4
PieTTY download page
http://ntu.csie.org/~piaip/pietty/
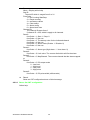
4.2.1 Display APAX utility information
Function description
apax_UtilityInfo
Display the utility version and support modules
Usage:
apax_UtilityInfo
Parameters:
None.
Result:
Display the utility version and support modules
4.2.1.1 Demo
4.2.2 Get module list
Instruction
Function description
apax_GetModuleList
Discovery the APAX-5000 modules.
Usage:
apax_GetModuleList
21
APAX-5071 Software Manual
APAX utility tool kit for Linux
Instruction
Parameters:
None.
Result:
Found that the APAX-5000 module name and slot ID.
[APAX PAC]
├ Module Name (Slot ID)
…
…
4.2.2.1 Demo: Discovery the APAX-5000 modules
4.2.3 Get module information
Instruction
Function description
apax_GetModuleInfo
Get the module information of the indicated slot.
Usage:
apax_GetModuleInfo SlotID
Parameters:
None = Display online help
Slot ID:
The slot ID which is ranged from 0 to 31
Slot ID = 255, show all found the APAX-5000 modules.
Result:
Found that the APAX-5000 module name and slot ID.
[Module Name]
Switch ID :
Description :
Firmware :
Channel Type :
APAX-5071 Software Manual
22
Chapter 4
4.2.3.1 Demo: Get the module information
Online help:
APAX utility tool kit for Linux
Get the one module information:
Get all found the module information: SlotID = 255
23
APAX-5071 Software Manual
4.2.4 Get channel information
Instruction
Function description
apax_GetChannelInfo
Periodically update the channel information of the indicated slot ID
and channel type.
Usage:
apax_GetChannelInfo slotID channelType [-p msec] [-n]
Parameters:
None = Display online help
Slot ID:
The slot ID which is ranged from 0 to 31
Channel type:
1 = DI
2 = DO
3 = AI
4 = AO
5 = COUNTER
option:
-p, --Polling interval (msec); default is no delay
-n, --No polling. Get data once
Result:
for example AI module
Module Name(Slot ID)
APAX-5071 Software Manual
24
Channel
ID
Channel
value
Channel
status
Channel
Range
[Note]
Press Esc key to exit the program.
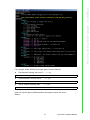
4.2.4.1 Demo: Get DI/DO/AI/AO/CNT channel values
Online help:
# apax_GetChannelInfo 3 1
25
APAX-5071 Software Manual
APAX utility tool kit for Linux
For example: APAX-5045 24-CH Digital Input / Output Module
Get DI channel info
Chapter 4
Channel
Type
Get DO channel info
# apax_GetChannelInfo 3 2
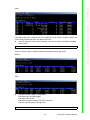
For example: APAX-5017 12-CH Analog Input Module
Get AI channel info
# apax_GetChannelInfo 4 3
APAX-5071 Software Manual
26
Chapter 4
For example: APAX-5028 8-CH Analog Output Module
Get AO channel info
# apax_GetChannelInfo 5 4
# apax_GetChannelInfo 2 1
Get DO channel info
# apax_GetChannelInfo 2 2
27
APAX-5071 Software Manual
APAX utility tool kit for Linux
For example: APAX-5080 4/8-CH High Speed Counter Module
Get DI channel info
Get CNT channel info
# apax_GetChannelInfo 2 5
4.2.5 Set channel value
Instruction
Function description
apax_SetChannelValue Set the module output value of the indicated slot.
APAX-5071 Software Manual
28
Parameters:
None = Display online help
Slot ID:
The slot ID which is ranged from 0 to 31
FuncType:
1 = set single DO value
3 = set single AO value
Channel ID:
The channel ID starts from 0
Value:
The channel value of the indicated channel
[DO module]
1 = High
0 = Low
[AO module]
The channel value specified by the channel range.
Result:
Show set channel output done or failed message.
Set multi channel values
Usage:
apax_SetChannelValue slotID funcType DataLen param0 param1 …
Parameters:
None = Display online help
Slot ID:
The slot ID which is ranged from 0 to 31
FuncType:
2 = set multi DO values
4 = set multi AO values
Data length:
The total of the parameter count.
if data length is 3, followed by 3 data (param0 param1 param2)
param0:
[DO module]
The DO values from channel 0 to 31 to be set.
It is DWORD value indicates the channel 0 to 31.
[AO module]
The channels mask. From LSB to MSB of the value indicate.
If the bit is 1, it means that the channel must change value.
For example: 11110000(0xf0) means the channel 4 to 7 must
change value.
29
APAX-5071 Software Manual
APAX utility tool kit for Linux
Chapter 4
Set single channel value
Usage:
apax_GetChannelInfo slotID channelType [-p msec] [-n]
param1:
[DO module]
The DO values from channel 32 to 63 to be set.
It is DWORD value indicates the channel 32 to 63.
Bit 0 indicates the channel 32 and bit 31 indicates the channel 63.
[AO module]
The channel value specified by the channel range.
param2:
[AO module]
The next channel value specified by channel range.
paramX:
[AO module]
The next channel value specified by channel range.
Result:
Show set channel output done or failed message.
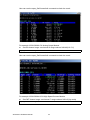
4.2.5.1 Demo: Set DO/AO channel output
Online help:
For example: APAX-5045 24-CH Digital Input / Output Module
Set single DO channel output: set channel 0 as HIGH
# apax_SetChannelValue 3 1 0 1
User can use the apax_GetChannelInfo command to check the result:
APAX-5071 Software Manual
30
Chapter 4
Set multi DO channels output:
Set channel 8 to 11 as HIGH
The DO values will be 111100000000 (0xf00)
# apax_SetChannelValue 3 2 1 0xf00
User can use the apax_GetChannelInfo command to check the result:
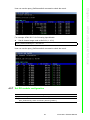
For example: APAX-5028 8-CH Analog Output Module
Set single AO channel output: set channel 0 output as 2.11 volts
# apax_SetChannelValue 5 3 0 2.11
31
APAX-5071 Software Manual
APAX utility tool kit for Linux
User can use the apax_GetChannelInfo command to check the result:
Set multi AO channels output:
Set channel 3 output as 5.89 mA
Set channel 5 output as 7.25 volts
Set channel 7 output as - 6.475 volts
The channel mask will be 10101000 (0xA8)
# apax_SetChannelValue 5 4 4 0xA8 5.89 7.25 -6.475
User can use the apax_GetChannelInfo command to check the result:
APAX-5071 Software Manual
32
Get DO channel info
Chapter 4
# apax_GetChannelInfo 2 2
4.2.6 Set channel range
Instruction
Function description
Usage:
apax_SetChannelRange slotID funcType channelID rangeCode
Parameters:
None = Display online help
Slot ID:
The slot ID which is ranged from 0 to 31
FuncType:
1 = set AI range code
2 = set AO range code
3 = set COUNTER range code
Channel ID:
The channel ID starts from 0
If channel ID = 255, which is apply to all channels range.
Range Code:
The range code is defined by the module.
Please refer to the online help or section of appendix A.
Result:
Show set channel range done or failed message.
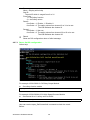
4.2.6.1 Demo: Set AI/AO/CNT channel range
Online help:
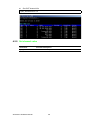
For example: APAX-5017 12-CH Analog Input Module
Set AI channel range: set channel 0 range code as 0x0181(+/- 20 mA)
# apax_SetChannelRange 4 1 0 0x0181
33
APAX-5071 Software Manual
APAX utility tool kit for Linux
apax_SetChannelRang Set the channel range of the indicated slot and channel
e
User can use the apax_GetChannelInfo command to check the result:
For example: APAX-5028 8-CH Analog Output Module
Set AO channel range: set channel 0 range code as 0x0146(0~2.5 V)
# apax_SetChannelRange 5 2 0 0x0146
User can use the apax_GetChannelInfo command to check the result:
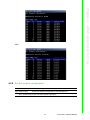
For example: APAX-5028 4/8-CH High Speed Counter Module
Set CNT channel range: set channel 7 range code as 0x01c2 (Up mode)
# apax_SetChannelRange 2 3 7 0x01c2
APAX-5071 Software Manual
34
Set all channel range code as 0x0143 (+/- 10 V)
# apax_SetChannelRange 4 1 255 0x0143
User can use the apax_GetChannelInfo command to check the result:
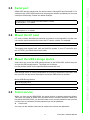
4.2.7 Set DO module configuration
Instruction
Function description
apax_SetDoConfig
Set the DO module configuration of the indicated slot
Usage:
apax_SetDoConfig slotID funcCode param0 [param1]
35
APAX-5071 Software Manual
APAX utility tool kit for Linux
For example: APAX-5017 12-CH Analog Input Module
Chapter 4
User can use the apax_GetChannelInfo command to check the result:
Parameters:
None = Display online help
Slot ID:
The slot ID which is ranged from 0 to 31
FuncCode:
1 = set Safety function
2 = set Safety values
Parm0:
funcCode = 1: Enable: 1 / Disable: 0
funcCode = 2: The safety values from channel 0 to 31 to be set.
The LSB indicates the channel 0.
Param1:
funcCode = 1: Not use
funcCode = 2: The safety values from channel 32 to 63 to be set
The LSB indicates the channel 32
Result:
Show set DO configuration done or failed message.
4.2.7.1 Demo: Set DO configuration
Online help:
For example: APAX-5060 12-CH Relay Output Module
Set safety function enable
# apax_SetDoConfig 1 1 1
For example: APAX-5028 4/8-CH High Speed Counter Module
Set channel 8 to 11 safety value as HIGH
# apax_SetDoConfig 1 2 0xf00
User can use the apax_GetChannelInfo command to check the result:
Before:
APAX-5071 Software Manual
36
Chapter 4
APAX utility tool kit for Linux
After:
4.2.8 Set AO module configuration
Instruction
Function description
apax_SetAoConfig
Set the AO module configuration of the indicated slot
Usage:
apax_SetAoConfig slotID funcCode param0 [param1]
37
APAX-5071 Software Manual
Parameters:
None = Display online help
Slot ID:
The slot ID which is ranged from 0 to 31
FuncCode:
1 = set Safety function
2 = set Safety values
3 = set Startup values
Parm0:
funcCode = 1: Enable: 1 / Disable: 0
funcCode = 2, 3: param0 is channel ID. The channel ID start from 0
If channel ID = 255, which is apply to all channels value.
Param1:
funcCode = 1: Not use
funcCode = 2: The value for the indicated channel
Result:
Show set AO configuration done or failed message.
4.2.8.1 Demo: Set AO configuration
Online help:
For example: APAX-5028 8-CH Analog Output Module
Set safety function enable
# apax_SetAoConfig 5 1 1
Set channel 0 safety value as 2.3 volts
# apax_SetAoConfig 5 2 0 2.30
Set channel 4 startup value as 2.5 volts
# apax_SetAoConfig 5 3 4 2.5
APAX-5071 Software Manual
38
Chapter 4
User can use the apax_GetChannelInfo command to check the result:
Before:
APAX utility tool kit for Linux
After:
4.2.9 Set CNT module configuration
Instruction
Function description
apax_SetCntConfig
Set the CNT module configuration of the indicated slot
Usage:
apax_SetCntConfig slotID funcCode channelID param0 [param1]…
39
APAX-5071 Software Manual
Parameters:
None = Display online help
Slot ID:
The slot ID which is ranged from 0 to 31
FuncCode:
1 = set Counting Start/Stop
2 = Reset counting
3 = set Startup values
4 = Clear status
5 = Alarm config
6 = Alarm latch clear
Channel ID:
The channel ID starts from 0
If channel ID = 255, which is apply to all channels.
Parm0:
funcCode = 1, Start: 1 / Stop: 0
funcCode = 2, Not use
funcCode = 3, The startup value for the indicated channel
funcCode = 4, Not use
funcCode = 5, Alarm mode (Enable: 1 / Disable: 0)
funcCode = 6, Not use
Param1:
funcCode = 5, Alarm type (High alarm: 1 / Low alarm: 0)
Param2:
funcCode = 5, Limit value. The counter limit which will fire the alarm.
Param3:
funcCode = 5, MapChannel. The counter channel that the alarm mapped
to.
Param4:
funcCode = 5, DO output mode
0 - Low level
1 - High level
2 - Low pulse
3 - High pulse
Param5:
funcCode = 5, DO pulse width (milliseconds)
Result:
Show set CNT configuration done or failed message.
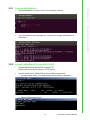
4.2.9.1 Demo: Set CNT configuration
Online help:
APAX-5071 Software Manual
40
Chapter 4
APAX utility tool kit for Linux
For example: APAX-5028 4/8-CH High Speed Counter Module
Set channel 0 startup value as 10. --------(1)
# apax_SetCntConfig 2 3 0 10
Reset channel 0 counter value.
--------(2)
# apax_SetCntConfig 2 2 0
Set all channel counting start.
--------(3)
# apax_SetCntConfig 2 1 255 1
User can use the apax_GetChannelInfo command to check the result:
Before:
41
APAX-5071 Software Manual
After:
If the count status abnormal. The counting will stop. Users can clear the status as following command:
Clear channel 0 count status.
# apax_SetCntConfig 2 4 0
User can use the apax_GetChannelInfo command to check the result:
Before:
APAX-5071 Software Manual
42
Chapter 4
After:
# apax_SetCntConfig 2 5 0 1
User can use the apax_GetChannelInfo command to check the result:
Before:
After:
Set the channel 0 alarm configuration.
Set Alarm type as High trigger.
Set Alarm limit as 20.
Set Alarm mapping channel as CNT channel 0.
Set DO output behavior as high level.
# apax_SetCntConfig 2 5 0 1 1 20 0 1
43
APAX-5071 Software Manual
APAX utility tool kit for Linux
The APAX-5028 DO channel can be configured as an alarm channel. When the
count value exceeds the limit, the alarm will occur.
Set DO channel 0 as an alarm channel. You can us below command to enable
alarm mode.
User can use the apax_GetChannelInfo command to check the result:
When the count value exceeds the limit, the alarm will occur and the DO channel 0
will remain at high level until the alarm flag is cleared to 0.
Clear channel 0 alarm flag
# apax_SetCntConfig 2 6 0
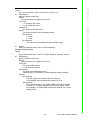
4.2.10 Get the APAX-5017PE AI module with timestamp
Instruction
Function description
apax_TimeStampAI
Get the APAX-5017PE AI channel values with timestamp
Usage:
apax_TimeStampAI slotID param
APAX-5071 Software Manual
44
Result:
Show the AI channel value with timestamp.
Single AI Data [Range code]
Channel index
Time offset (ms)
4.2.10.1 Demo
Online help:
For example: Get APAX-5017PE AI channel data within 1 second. (Slot id is 1)
# apax_TimeStampAI 1 1
45
APAX-5071 Software Manual
APAX utility tool kit for Linux
Parameters:
Slot ID:
The slot ID which is ranged from 0 to 31
Param:
Polling interval (sec). default is 60 sec.
If param is 0 means infinite
Chapter 4
APAX-5071 Software Manual
46
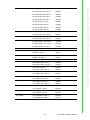
Instruction
Function description
apax_TimeStampDI
Get the APAX-5040PE DI channel values with timestamp
Usage:
apax_TimeStampDI slotID param
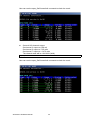
4.2.11.1 Demo
Online help:
For example: Get APAX-5040PE DI channel data within 5 second. (Slot id is 0)
# apax_TimeStampDI 0 5
47
APAX-5071 Software Manual
APAX utility tool kit for Linux
Parameters:
Slot ID:
The slot ID which is ranged from 0 to 31
Param:
Polling interval (sec). default is 60 sec.
If param is 0 means infinite
Result:
Show the DI channel values with timestamp.
DI Hex Data (32 bits): The LSB is channel 0, MSB is channel 31
Time offset (ms)
Chapter 4
4.2.11 Get the APAX-5040PE DI module with timestamp
The APAX-5040PE has 24 DI channels. If the DI 32 Data is 0x01 that means channel
0 is high level and the rest of channel 1 to 23 is low level.
APAX-5071 Software Manual
48
Appendix
A
A
APAX 5000 I/O module
range code settings
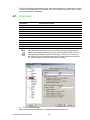
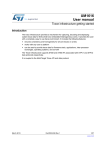
A.1 ADAM/APAX .NET Utility General Window
These ranges are provided for reference. Not all boards support all ranges. Please
see hardware manual for valid ranges for a particular board.
Millivolts DC (mV)
Milliamps (mA)
Counter settings
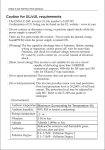
Pt-100 (3851)
Pt-200 (3851)
Pt-500 (3851)
Pt-1000 (3851)
APAX-5071 Software Manual
Setting Type
Value (Hex)
+/- 15mV
0x0100
+/- 50mV
0x0101
+/- 100mV
0x0102
+/- 150mV
0x0103
+/- 500mV
0x0104
0~150mV
0x0105
0~500mV
0x0106
4~20mA
0x0180
+/-20mA
0x0181
0~20mA
0x0182
Pulse/DIR
0x01C0
Up/Down
0x01C1
Up
0x01C2
Frequency
0x01C3
AB 1X
0x01C4
AB 2X
0x01C5
AB 4X
0x01C6
Pt-100 (3851) -200~850 'C
0x0200
Pt-100 (3851) -120~130 'C
0x0201
Pt-100 (3851) -200~200 'C
0x0202
Pt-100 (3851) -100~100 'C
0x0203
Pt-100 (3851) -50~150 'C
0x0204
Pt-100 (3851) 0~100 'C
0x0205
Pt-100 (3851) 0~200 'C
0x0206
Pt-100 (3851) 0~400 'C
0x0207
Pt-100 (3851) 0~600 'C
0x0208
Pt-200 (3851) -200~850 'C
0x0220
Pt-200 (3851) -120~130 'C
0x0221
Pt-500 (3851) -200~850 'C
0x0240
Pt-500 (3851) -120~130 'C
0x0241
Pt-1000 (3851) -200~850 'C
0x0260
Pt-1000 (3851) -120~130 'C
0x0261
Pt-1000 (3851) -40~160 'C
0x0262
50
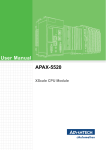
Pt-200 (3916)
Pt-500 (3916)
Pt-1000 (3916)
Balco 500
Ni 518
Pt-100 (3916) -200~850 'C
0x0280
Pt-100 (3916) -120~130 'C
0x0281
Pt-100 (3916) -200~200 'C
0x0282
Pt-100 (3916) -100~100 'C
0x0283
Pt-100 (3916) -50~150 'C
0x0284
Pt-100 (3916) 0~100 'C
0x0285
Pt-100 (3916) 0~200 'C
0x0286
Pt-100 (3916) 0~400 'C
0x0287
Pt-100 (3916) 0~600 'C
0x0288
Pt-200 (3916) -200~850 'C
0x02A0
Pt-200 (3916) -120~130 'C
0x02A1
Pt-500 (3916) -200~850 'C
0x02C0
Pt-500 (3916) -120~130 'C
0x02C1
Pt-1000 (3916) -200~850 'C
0x02E0
Pt-1000 (3916) -120~130 'C
0x02E1
Pt-1000 (3916) -40~160 'C
0x02E2
Balcon(500) -30~120
0x0300
Ni(518) -80~100 'C
0x0320
Ni(518) 0~100 'C
0x0321
Ni(508) 0~100 'C
0x0340
Ni(508) -50~200 'C
0x0341
Thermistor 3K
Thermistor 3K 0~100 'C
0x0360
Thermistor 10K
Thermistor 10K 0~100 'C
0x0380
Thermistor 10K -50~100 'C
0x0381
T/C TypeJ 0~760 'C
0x0400
T/C TypeJ -200~1200 'C
0x0401
T/C TypeK 0~1370 'C
0x0420
T/C TypeK -270~1372 'C
0x0421
T/C TypeT -100~400 'C
0x0440
T/C TypeT -270~400 'C
0x0441
T/C TypeE 0~1000 'C
0x0460
T/C TypeE -270~1000 'C
0x0461
T/C TypeR 500~1750 'C
0x0480
T/C TypeR 0~1768 'C
0x0481
T/C TypeS 500~1750 'C
0x04A0
T/C TypeS 0~1768 'C
0x04A1
T/C TypeB 500~1800 'C
0x04C0
T/C TypeB 300~1820 'C
0x04C1
Ni 508
T/C TypeJ
T/C TypeK
T/C TypeT
T/C TypeE
T/C TypeR
T/C TypeS
T/C TypeB
51
APAX-5071 Software Manual
Appendix A APAX 5000 I/O module range code settings
Pt-100 (3916)
www.advantech.com
Please verify specifications before quoting. This guide is intended for reference
purposes only.
All product specifications are subject to change without notice.
No part of this publication may be reproduced in any form or by any means,
electronic, photocopying, recording or otherwise, without prior written permission of the publisher.
All brand and product names are trademarks or registered trademarks of their
respective companies.
© Advantech Co., Ltd. 2012