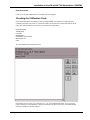
1
Installation on SunOS and HP 700 Workstations (CDROM)
Release Notes and Installation Guide for SunOS and HP700
Workstations
New To This Release:
New Devices Supported for V3.8*.
Device Name
Status
Support Level
Vantis MACH 221SP
Production Ready/Certified
Full optimization and device fitter.
Philips XPLA-3064/5064
Production Ready/Certified
Full optimization and device fitter.
Philips XPLA-3128/5128
Beta
Full optimization and device fitter.
Actel Act1, Act2/1200XL, Act3,
3200DX
Production
Full optimization and netlister (**).
Altera MAX5000, 7000, 9000,
Flex8000, EP, Flash Logic
Production
Full optimization and netlister (**).
Lattice pLSI, Gal
Production
Full optimization and netlister (**).
Xilinx 3000, 4000, 4000E, 5200,
7000
Production
Full optimization and netlister (**).
* Additional licenses may be required.
** Actel, Altera, Xilinx, and Lattice support requires additional vendor fitter software.
Please refer to the device list shipped with this product for a complete listing of devices supported.
Software Enhancements For V3.8:
1.
Optional VHDL and Verilog synthesis has been added to the PLD Synthesis II product. Please refer to the PDF Manual
4.pdf , vhdl.pdf and verilog.pdf sections located either on the CDROM or in $MINC_PATH/manual directory for
restrictions and library usage. You can also select "View Manual" from the PLDS 2 User Interface to view the manual.
VHDL Entry methods:
From within Design Architect.
1) Select "File" "Open" "PLDS II HDL FILE".
2) Use the browser to open your <design_name>.vhdl file. Note: Currently from within DA, MINC only
supports the .vhdl extension not a .vhd extension from the file browser. You can type in the <design name> .vhd file directly to open a design file with the .vhd extension.
3) When the Verilog or VHDL file opens within DA, you have two options:
a)
Create a DA schematic from the VHDL. Select "FILE" "Compile PLDS II HDL" from within DA.
A schematic with the name of your design will be created.
b) Export VHDL or Verilog directly to PLDS II. Select "FILE" "Export PLDS II HDL". A PLDS II
window will open. When "Build Design" or "Generate Solutions" is selected, the design will be
synthesized.
PLDSynthesis II Installation (CDROM)
(Version 3.8C)
1
Installation on SunOs and HP700 Workstations (CDROM)
4) A <design_name>.src file will be created after synthesis.
5) Multiple VHDL files can be synthesized by creating a <top_design_name>.prj file with all files in the
design listed. Place the top level file last in the list. The filenames must be separated by <CR>.
From within PLDS II standalone.
1) Select "FILE" "FILE BROWSER" "VHDL Source File" (or "Verilog Source File") to open your design.
.vhd or .vhdl extensions are allowed in VHDL. .v extensions are allowed in Verilog.
2) You can edit or view this VHDL or Verilog file within PLDS II.
3) Select "Build Design" or "Generate Solutions" to start the synthesis.
4) A <design_name>.src file will be created after synthesis.
5) Multiple VHDL files can be synthesized by creating a <top_design_name>.prj file with all files in the
design listed. Place the top level file last in the list. The filenames must be separated by <CR>.
The software was shipped with a one month evaluation license for VHDL entry. Please call for a Verilog
evaluation.
2.
Optional FPGA/CPLD device optimization and netlist capability for Xilinx, Actel, Altera, and Lattice has been
included with this release. Please select "View Manual" from the PLDS II GUI and refer to Appendix E.
To create an optimized netlist for an FPGA, open a design and select “Device”, “FPGA Mapping” from the Menu Bar.
A PLDesigner FPGA Interface window will open. Choose “Command” “Mapping” from the Menu Bar. When the
Mapping Parameters window opens, enter the Target Technology, Output Format, and Output Filename with the
appropriate extension (XNF, EDIF, AHDL). Next, choose Target Options to set device specific parameters. Select OK
to start optimization and netlist creation. Click on the help button from within any window for more assistance.
Currently, PI file support and automatic invocation of the place-and-route tools are not available. We are working on
supporting these features in future releases.
The software was shipped with a one month evaluation license.
3.
The report files for the M5 devices have been enhanced over what was available in the V3.7 release. If you constrain
your design to fit into a single device within the Constraints Menu, then statistical information on the design
requirements as they match up with the M5 resources will be added to the report file. This information can indicate
when an ERROR condition occurs which prevents a fit. It can also indicate WARN conditions when design
requirements are likely to be preventing a solution to be found. Finally, it presents INFO conditions that indicate
design/device resource usage. This information can be useful in debugging designs that fail to fit into M5 devices.
4.
The report files for the MACH 1-4 devices has been improved. The following items have been added.
a)
Fanout Table: This table indicates the routing of signal through the devices.
b ) Block Configuration Table: This table illustrates the configuration of a PAL block in a device.
2
(Version 3.8C)
PLDSynthesis II Installation (CDROM)
Installation on SunOS and HP 700 Workstations (CDROM)
5.
The static timing report has been improved.
a) Condensed Report: Following each timing path in the condensed report is a new description field
which contains additional information about how the delay was calculated. The additional
information includes:
1)
2)
3)
4)
Which device data-book timing characters were used to compute the path.
The product-term adder delay, if applicable.
Register asynchronous or pin clock information.
The number of device passes for the timing path if greater than one.
b) Verbose Report: The verbose report now includes the related design equations following each listed path.
c)
General Timing Report: The timing report now contains a listing of the databook timing characteristics and
associated delay values for the devices being modeled.
6) The incorrect initialization of the level 3 switch matrix directional fuses for MV320, MV384, and MV512 has been
fixed. V3.8 initializes these fuses correctly.
7) The Vantis MACH 131SP and Vantis MACH 231SP devices are listed under the MACH 131 and MACH 231 device
templates. These In-system programmable devices are I/O and pin compatible with the standard packages, unlike other
SP devices which are listed as separate device templates.
8) The User manual has been provided in PDF format for your convenience. The PDF files for the manual are located
in $MINC_PATH/manual. The top level file is main.pdf. From the GUI, select “View Manual” from the menu bar.
Known Problems With The V3.8 Release:
1) The FPGA Mappers currently do not support wired_buses or clock_enabled flip-flops for designs written in DSL. If
you need these features, please call or e-mail MINC Customer Support for an update patch.
2) PI file capability for the FPGA Mappers is currently under development. You can write optimized netlists for FPGAs
withinPLD Synthesis II and specify pinout information in the vendor tools.
3) If your designs are exclusively VHDL or Verilog, and you are mapping to Xilinx, Actel, Altera, or Lattice devices,
please call MINC Sales and Applications for a more efficient solution for targeting these devices. Currently, PLD
Synthesis II is structured for VHDL or Verilog entry to the CPLD’s and PLD’s directly supported by MINC fitters.
There is a more direct flow from VHDL and Verilog to the Xilinx, Actel, Altera, and Lattice devices supported by
the netlist/optimizers. Please call for more information.
4) PLDSynthesis II currently provides automatic linking with Logic Modeling Release 37 and 38 smart models for
physical sheet generation. If you are using Logic Modeling swift models Release 39 or greater, you must use the
methods described in the Logic Modeling documentation to create a simulation model from the PLDSynthesis II
programming files.
PLDSynthesis II Installation (CDROM)
(Version 3.8C)
3
Installation on SunOs and HP700 Workstations (CDROM)
Overview
About This Release
This is the V3.8C release of PLDSynthesis II, Mentor Graphics’ PLD/CPLD/FPGA design tool produced by
MINC Incorporated, Colorado Springs, CO, USA.
This release is available for the following configurations:
r Sun SPARC, OS V 4.1.X
r Hewlett-Packard HP9000/700, OS 9.X
It is designed to operate with the following Mentor Graphics’ design environments:
r A.1-F, A.2-F, A.3-F, A.4-F - Install as A.X-F
r B.1, B.2, B.3, B.4 - Install as B.X
System Requirements
To install PLDSynthesis II V3.8C, you will need the following:
r A.1-F, A.2-F, A.3-F, A.4-F, or B.1, B.2, B.3, B.4 IdeaStation
r Minimum 64M RAM
r Minimum 150M disk space
r Minimum 128M swap space
For licensing, you will need:
r New PLDSynthesis II V3.8C authorization codes. Interim Demo codes have been provided in the
$MINC_PATH/license directory.
r Two additional license features for timing models.
To create VHDL or Verilog designs for PLDSynthesis II, you must also have the following:
r PLDS II VHDL or Verilog Entry, or
r Exemplar Galileo or Leonardo, VHDL, or Verilog, or
r AutoLogic VHDL
4
(Version 3.8C)
PLDSynthesis II Installation (CDROM)
Installation on SunOS and HP 700 Workstations (CDROM)
To make PLDSynthesis II’s DSL schematics nice, you may need:
r Mentor’s Schematic Generator
To perform timing simulation using LMG models, you must have:
r Logic Modeling SmartModel timing models
Installation (CDROM)
Operating
System
Installation Instructions
HP-UX V9.0x
cd <PLDS2 install directory>
/etc/mount -rt cdfs /dev/dsk/c201dxs0 <CDROM mount path (usually /cdrom)>
<CDROM mount path>/”INSTALL;1” hp <A.X-F or B.X> <CDROM mount path>
(typically, for Mentor B releases, this command is:
/cdrom/”INSTALL;1” hp B.X /cdrom )
SunOS
V4.1.3, V4.1.4
Solaris
V1.3, V1.4
cd <PLDS2 install directory>
/etc/mount -rt hsfs /dev/srx <CDROM mount path (usually /cdrom)>
<CDROM mount path>/install sun <A.X-F or B.X><CDROM mount path>
(typically, for Mentor B releases, this command is:
/cdrom/install sun B.X /cdrom )
Note: the ’x’ denoted in the mount addresses is the SCSI address of the CDRom drive.
The installation process above allows the flexibility of installing from any machine on a network.
If you wished to install the HP-UX release of PLDS2 but only had a CDROM drive on a Sun machine on the same
network then,
1) The install could be performed on the Sun machine since only C-shell scripts are used for the install.
From the Sun machine: /cdrom/install hp A.X-F /cdrom
2) The installation could also be performed remotely from the HP machine.
From the HP machine: /net/Sun/cdrom/”INSTALL;1” hp A.X-F /net/Sun/cdrom
Post Installation
NOTE !
The following Installation steps must be performed on a machine that can run the
PLDS II executables and all environment variables must be set.
PLDSynthesis II Installation (CDROM)
(Version 3.8C)
5
Installation on SunOs and HP700 Workstations (CDROM)
Schematic Library Installation for Design Architect Schematic Design
1) Change the directory to $MINC_PATH
2) Type "./install_libs"
Install test
1) Change the directory to $MINC_PATH
2) Type "./plds2 _install_test"
Two additional directories have been installed from the CDROM into the install directory.
1) plds2_tutorial:
plds2_demo.tar.Z - PLDSII Tutorial design for Design Architect
2) plds2al2:
genlib_1.4.tar.Z - The GENLIB Autologic II libraries required for entering designs from
Autologic II
Licensing And Setting The Environment Variables
Evaluation License
For evaluations and short-term demonstrations, MINC provides a multi-user, node-locked license file
that will run on any HP9000/700 or SunOs machine. This file enables all features and device modules
for a short period of time. You can request these licenses by contacting MINC at the numbers listed at
the end of this Installation Guide. Please be sure to include the purpose of the request and the necessary
expiration date.
NOTE !
MINC has provided a short-term DEMO license on this tape to enable all PLDS II features. You do NOT need MINC’s license daemon when using the special evaluation
license. You WILL need it if using a floating license.
Single User, Node Locked Licenses
The procedure for single user (node locked) licensing is the same as for floating licenses, listed below.
6
(Version 3.8C)
PLDSynthesis II Installation (CDROM)
Installation on SunOS and HP 700 Workstations (CDROM)
Floating Licenses
A license file is shipped with your software; However, should you have problems with licensing, please
contact MINC at 719 590-1155. Please have the following information from your license file ready:
r Your name
r Your location
r Your platform (Sun / HP700)
r Your server information
r Documentation requirements
You can enable as many nodes or networks as necessary. All licenses are floating unless otherwise
requested. Redundant licenses are OK, but you must provide the node IDs for all servers involved.
For more information on using a floating license, refer to the appropriate Mentor Graphics
documentation.
NOTE !
No matter where MGLS_LICENSE_FILE is pointing, the variable
LM_LICENSE_FILE must point to the PLDSynthesis II license file.
To load your floating license files, use one of the following procedures:
1) Use MINC’s lmgrd.
Ø Point LM_LICENSE_FILE to the PLDSynthesis II license file.
Ø Point MGLS_LICENSE_FILE to the MGC license file.
Ø Change (cd) to the directory that contains $MINC_PATH/license and run one of the
following commands:
C-Shell
./lmgrd -c $LM_LICENSE_FILE >& /tmp/plds2.log &
Bourne
./lmgrd -c $LM_LICENSE_FILE > /tmp/plds2.log 2>&1 &
2) Integrate PLDSynthesis II’s licensing into the MGC license file:
Ø Point LM_LICENSE_FILE to the MGC license file.
Ø Verify that the server line is the same for both the MGC license file and the PLDSynthesis II license file.
Ø Copy the daemon line from the PLDSynthesis II license file to the the daemon area of
the MGC license file.
Ø Copy the feature lines from the PLDSynthesis II file to the feature area of the MGC
license file.
Ø Restart the MGC license manager.
PLDSynthesis II Installation (CDROM)
(Version 3.8C)
7
Installation on SunOs and HP700 Workstations (CDROM)
NOTE !
If you have a local expert on FLEX-LM, please ask them to assist you in these
steps!
Setting The Environment Variables
Once the license paths are set, you need to set enviroment variables. To ensure the environment
variables are set properly at boot up, the following MUST be defined in your login .cshrc (or .profile)
file (C-Shell and Bourne Shell examples are given at the end of these steps.)
NOTE !
A sample Bourne shell (setup_plds2.sh) and C-Shell (setup_plds2.csh) setup script was
created for you in the PLDS2 installation directory. The following section describes the
variables set in these files.
1) Set MINC_PATH to the directory where you have installed the release.
Example
/home/plds2
2) Set LD_LIBRARY_PATH (Sun) or SHLIB_PATH (HP) to $MINC_PATH/lib.
Example
$MINC_PATH/lib
3) Set LM_LICENSE_FILE to the licensing file provided by MINC.
Example
$MINC_PATH/license/license.dat
We recommend you use the MGLS_LICENSE_FILE variable for the MGC software rather than
concatenating the MGC and MINC license file locations on the LM_LICENSE_FILE variable.
Multiple applications that use the LM_LICENSE_FILE variable can be concatenated together with
colons (refer to the appropriate PLDSynthesis II documentation for more information.) You can also
incorporate the PLDSynthesis II license variables into the MGC license file, but we do not recommend
including the special evaluation license provided with this release.
4) Set the following variables:
AMPLE_PATH
to
$MINC_PATH/mentor/userware
TYPE_REGISTRY
to
$MINC_PATH/mentor/registry/type_registry/plds2.rgy
You can concatenate multiple AMPLE-based applications, as shown below:
AMPLE_PATH=/user4/mgcuw/cae/userware/cust_lms:/user4/mgcuw/cae/userware/
apps:/user4/mgcuw/cae/userware/libs:user7/mgcadmin/minc_V3.8C/plds2/mentor/
userware
5) Include $MINC_PATH in your path variable.
6) Include your environment setup to the Adobe Acrobat Reader to use the on-line manuals.
8
(Version 3.8C)
PLDSynthesis II Installation (CDROM)
Installation on SunOS and HP 700 Workstations (CDROM)
Example C-Shell Installation
setenv MINC_PATH /home/plds2
setenv LD_LIBRARY_PATH $MINC_PATH/lib ## SunOS ONLY ##
setenv SHLIB_PATH $MINC_PATH/lib
## HP ONLY! ##
setenv LM_LICENSE_FILE $MINC_PATH/license/license.dat
setenv AMPLE_PATH $MINC_PATH/license/license.dat
setenv TYPE_REGISTRY $MINC_PATH/mentor/registry/type_registry/plds2.rgy
set path=( $MINC_PATH $path )
Include the following line on SunOS machines only:
setenv XKEYSYMDB $MINC_PATH/Xfiles/XKeysymDB
## SunOS ONLY ##
Example Bourne-Shell Installation
MINC_PATH=/home/plds2
export MINC_PATH
LD_LIBRARY_PATH=$MINC_PATH/lib
## SunOS ONLY ##
export LD_LIBRARY_PATH
SHLIB_PATH=$MINC_PATH/lib
## HP ONLY! ##
export SHLIB_PATH
LM_LICENSE_FILE=$MINC_PATH/license/license.dat
export LM_LICENSE_FILE
AMPLE_PATH=$MINC_PATH/mentor/userware
export AMPLE_PATH
TYPE_REGISTRY=$MINC_PATH/mentor/registry/type_registry/plds2.rgy
export TYPE_REGISTRY
PATH=$MINC_PATH:$PATH
export PATH
Include the following lines on SunOS machines only:
XKEYSYMDB=$MINC_PATH/Xfiles/XKeysymDB
## SunOS ONLY ##
export XKEYSYMDB
## SunOS ONLY ##
Be sure to activate the variables by either logging-out and logging-in, or by sourcing your .cshrc or
.profile file. In C-Shell, you can type
source .cshrc
In Bourne Shell, you can type
. .profile
An install script is provided with this release to test environmental variables and directory structure.
Please see the section later in this Install Guide entitled Testing the Installation.
PLDSynthesis II Installation (CDROM)
(Version 3.8C)
9
Installation on SunOs and HP700 Workstations (CDROM)
MGC Location-Map Changes
To enable all features of PLDSynthesis II, you must add the following entries to your MGC location
map:
$MINC_PATH
$PLDS2_SYN_LIB
<hard_minc_path>/mentor/plds2_syn_lib
where <hard_minc_path> is the path to the directory where you have installed PLDSynthesis II. For
example, your entries might look like:
$MINC_PATH
$PLDS2_SYN_LIB
/usr1/mgc_tools/plds2/mentor/plds2_syn_lib
Installing Necessary X-Windows Drivers
PLDSynthesis II’s partitioning menus are implemented using X-Windows Motif, not AMPLE.
Therefore, you must setup some fonts and icons before operating PLDSynthesis II.
Installing Fonts and Icons
To install the fonts and icons for PLDSynthesis II, follow these steps:
SunOs OR HPUX 9.0x
cd $MINC_PATH/Xfiles
/bin/csh install_icons
You can ignore any messages about unknown encoding and compat.list.
HP9000/700RX X-Terminal
X-Terminals are much more difficult to set up. Have your System Adminstrator or local X-Windows
expert help you with this. From the HP700RX, try the following commands:
xhost +
cd $MINC_PATH/Xfiles
mkdir 700rx
/usr/bin/X11/700X/xtbdftosnf minc.icons.bdf > 700rx/minc.icons.snf
cd 700rx
/usr/bin/X11/700X/xtmkfontdir
/usr/bin/X11/xset +fp ‘pwd‘ (Use "‘", not "'")
/usr/bin/X11/xset fp rehash
10 (Version 3.8C)
PLDSynthesis II Installation (CDROM)
Installation on SunOS and HP 700 Workstations (CDROM)
Other X-Terminals
Contact your System Administrator or call MGC Customer Support.
Checking the X-Windows Fonts
Invoke the PLDSynthesis II menuing system by typing PLDS2. You should see a menu with title,
command, and status bars on the top, a transcript window on the left, and a toolbox with buttons on the
right. Each button should have an icon above it with the following names:
BUILD DESIGN
TEMPLATES
CONSTR.
PRIORITIES
GENERATE SOLUTIONS
MAP DEVICES
EXIT
The menu should look something like this:
If the buttons are not visible, or are named A, B, C, etc., the installation has failed. Your system may
require a different set of instructions to properly install the fonts. Please ask your System Administrator
for help or call MGC Customer Support.
PLDSynthesis II Installation (CDROM)
(Version 3.8C)
11
Installation on SunOs and HP700 Workstations (CDROM)
To exit the menuing system, use one of the following:
r Use the mouse to select the Exit button
r Use the mouse to select File, then Exit from the menu bar
r Press the F3 function key.
These steps will only enable the icons until your system is rebooted. To set the icons permanently, you
must add:
xset fp+ $MINC_PATH/Xfiles
to your initialization files (see the next section).
Defining the Backspace Key with XKEYSYMDB
To use the backspace key on SunOs computers, you must set the following variable in your .cshrc or
.profile file:
C-Shell
setenv XKEYSYMDB $MINC_PATH/Xfiles/XKeysymDB
Bourne
set XKEYSYMDB=$MINC_PATH/Xfiles/XKeysymDB
export XKEYSYMDB
If you followed the directions on installing PLDSynthesis II environmental variables above, these values are already set.
Permanent Installation of PLDSynthesis II X-Windows Drivers
The commands above will only remain active as long as X-Windows remains active on your system.
They will terminate upon reboot for HP computers and will terminate when you close OpenLook or
X-Windows on Sparc Machines.
To make the installation of PLDSynthesis II’s icons and fonts permanent, ask your System
Administrator (or local X-Windows expert) to install the above commands into the X-Windows
initialization files on your system. You may also call MGC Customer Support.
This process should take several minutes to complete. You will see the PLDSynthesis II module
PLComp execute several times. If any errors occur, check the installation of the variables and the
licensing listed above.
Testing the Installation
To ensure proper installation of PLDSynthesis V3.8C for the MGC A.1-X environments, an install
script named plds2_install_test is provided with this release. This script tests environmental variables,
directory structures, and PLDSynthesis II’s core synthesis and partitioning modules.
12 (Version 3.8C)
PLDSynthesis II Installation (CDROM)
Installation on SunOS and HP 700 Workstations (CDROM)
The script does not currently test the integration between PLDSynthesis II and the MGC tools. MINC is
working on additional tests to provide this functionality in the future.
The script terminates upon several different error conditions. These conditions, and the potential
causes, are documented below.
plds2_install_test - Simple script which invokes C-Shell and runs plds2_install_test.csh. Also reports any
errors found.
When finished, the script outputs a file named:
plds2_install_test.log - Output of plds2_install_test. Gives status, warning, and error messages from the
install test process.
Running the Test Script
To run the install test script, install PLDSynthesis II V3.8C using the installation notes (or readme file)
provided. Then run the script by typing:
cd $MINC_PATH
plds2_install_test
If any errors are reported, read the following sections and see the output file plds2_install_test.log.
Error and Warning Messages for the Test Installation Script
1)
/TMP DIRECTORY
The script will write to the /tmp directory of your system. If the directory does not exist, the script will
generate an error message and immediately terminate. Make sure that the script has write access to this
directory and that you have at least 4M of free space!
2) MACHINE TYPE
To determine whether the target machine is a SunOs or an HPUX 9.0x computer, the test script looks for
a file named /bin/arch. If this file does not exist, an HPUX 9.0x is assumed.
If your Sun machine does not have this file, and the assumption is wrong, the rest of the script will probably fail.
3)
ENVIRONMENTAL VARIABLES
The following environmental variables must be set up during the installation of PLDSynthesis II for the
install script to run:
$MINC_PATH
$LM_LICENSE_FILE
$AMPLE_PATH
$TYPE_REGISTRY
$path
PLDSynthesis II Installation (CDROM)
(Version 3.8C)
13
Installation on SunOs and HP700 Workstations (CDROM)
$XKEYSYMDB (Sun only)
Error messages will be generated if any of the above are not defined. In addition, limited testing is done
on each to see if it points to legal information.
For some of the above variables, a warning may be generated that indicates the variable does not
contain $MINC_PATH. The script assumes $MINC_PATH was used to define the variable. If you used
another method of referencing the PLDSynthesis II information, you may be able to ignore the message.
4) DIRECTORY STRUCTURE
The script next looks for components of the $MINC_PATH directory structure. This is not a
comprehensive test. It assumes if certain key files exist, the installation was properly performed and all
other files will also exist. If you had any problems during the install process (such as running out of
disk space), this test may not detect the problem.
5) MGC INSTALL
Before running this script, you should have run the install_plds2 script located at the root of
$MINC_PATH. This section of the script checks for various files and directories created by the
install_plds2 script. Again, it is not a comprehensive test and it may not find problems encountered
during the install script. If you get one of the following messages, try running the install_plds2 script
again:
$MINC_PATH/plds2_ver MISSING!
$DIRECTORY $MINC_PATH/$<dir_name> MISSING!
FILE $MINC_PATH/$<file> MISSING!
6) X-WINDOWS FONTS
PLDSynthesis II uses direct X-Windows calls rather than AMPLE functions. Therefore, you must set
environmental variables and X-Windows fonts during the installation. This part of the script looks at
those variables and fonts to verify proper installation.
To run on a Sparc, the variable $OPENWINHOME must be defined. This variable points to the location
of the X-Windows tree on your system and should be globally defined. In addition, the test for machine
type mentioned at the beginning of this section must pass, or an HP9000/700 computer will be assumed.
If the script ends in errors during this section, please try re-running the script $MINC_PATH/Xfiles/
install_icons mentioned in the install (or read.me) notes.
7) TEST LICENSING
PLDSynthesis II uses the same FLEX-LM licensing manager Mentor Graphics uses for A.1-F and
B.1. To run PLDSynthesis II, you must set environmental variables. You may also need to start a
license daemon. Refer to the installation notes for more information on setting up FLEX-LM on your
system.
This part of the script tests for the following key PLDSynthesis II features:
FEATURE PLDSynthesisII
FEATURE Auto_Partitioning
14 (Version 3.8C)
PLDSynthesis II Installation (CDROM)
Installation on SunOS and HP 700 Workstations (CDROM)
In addition, the script generates a printout of all features currently enabled in your system. This list may
be quite extensive if you have several FLEX-LM licensed-software packages running in your system.
Please check the list for any additional features you may have purchased with your PLDSynthesis II
system.
8) PLDSynthesis II CORE
This script tests the core modules of PLDSynthesis II. At this point, your licensing MUST be operating
and your variables MUST be properly set. The script will generate errors if they are not set or operating.
The script copies a test design, drink.src, to the /tmp directory and performs synthesis, optimization,
partitioning, and device mapping on it. If any of these steps fails, an error message will be generated.
9) GENLIB/TTL LIBRARIES
To use the schematic capabilities of PLDSynthesis II, you must run the script $MINC_PATH/install_libs
during installation. This script creates several binary reference files for PLDSynthesis II. The
installation test script checks for each of these files and generates an error message if any is not found.
10) SUCCESSFUL COMPLETION
If the script operates successfully, a trailing banner and error and warning counts will be issued. If you
find any errors or warnings, please refer to plds2_install_test.log for explanations.
Testing the Environment Variables and Licensing
Test the environmental variables and licensing. It will save you time later!
1) Check the environmental variables by listing them out and comparing them to above section.
These variables should be visible to any shell you invoke. You can list the variables in C-Shell
by typing env.
2) Make sure that MINC_PATH is pointing to the right directory by typing the following
command:
ls -l $MINC_PATH/plcomp
This should respond with the path of the file.
3) Change to another directory and verify that your path statement is correct by typing:
cd /any_directory_other_than_PLDS2
which plcomp
Again, it should respond with the file path.
4) Check the licensing by doing the following:
cd $MINC_PATH/license
./tstlock PLDSynthesisII
PLDSynthesis II Installation (CDROM)
(Version 3.8C)
15
Installation on SunOs and HP700 Workstations (CDROM)
This program should print out a "successful" message. If you get an error message when using the
special evaluation license, then the LM_LICENSE_FILE variable is wrong, the license has expired, or
there is a problem with the file itself.
If you are using a floating license, and receive an error message, you will need to first run the MINC
license manager, mincxld. If mincxld is running, you may have problems with your
LM_LICENSE_FILE variable, the expiration date, the file itself, or your server information may be
wrong. To get a list of all enabled features and device modules enabled for a floating license, type:
./lmstat -a
NOTE !
Your environment variables must use an MGC_LOCATION_MAP, and point to a
valid location map in order to use Design Architect with PLDSynthesis II.
The location map must contain an entry for $MGC_GENLIB. You may also want entries for the
various TTL libraries supported by PLDSynthesis II (see the PLDSynthesis II V3.8C Library
Component Support Guide that is part of Appendix A). Do not redefine the variables in your location
map as environmental variables. PLDSynthesis II will generate an error if any location map variable is
defined as an environmental variable.
Checking PLDSynthesis II Integration With Design Architect
To check Design Architect integration, change directories to $MINC_PATH/examples and boot Design
Architect. From the session window (no notepads, schematics, or symbols selected) select FILE, then
OPEN from themenu bar. You should see a PLDSynthesis II section with OPEN PLDS II SOURCE
FILE as an option.
Open any schematic and, with the schematic highlighted, select FILE again. You should again see a
PLDSynthesis II section with the option EXPORT TO PLDSynthesis II.
The command bar in Design Architect is context-sensitive and the options under FILE will change
based on the window (schematic, symbol, notepad) currently selected.
Integrating With Autologic/VHDL
You will need to create two directories for the Autologic GENLIB library. The first directory,
/<your_path1>, will contain the actual library files. The second directory, /<your_path2>/synlib, is the
location pointed to by a variable in your MGC_LOCATION_MAP and will be linked with the first
directory. Use the following steps:
1) Create a directory in which to install the genlib library.
2) UnTAR and uncompress the genlib library into this directory by typing:
zcat $MINC_PATH/../plds2al2/genlib_1.4.tar.Z | tar xvfYou should now have a genlib library in /<your_path1>/gen_lib.
16 (Version 3.8C)
PLDSynthesis II Installation (CDROM)
Installation on SunOS and HP 700 Workstations (CDROM)
3) Create a new directory /<your_path2>/synlib and edit your MGC_LOCATION_MAP to add
the variable MGC_SYNLIB. Add the entry:
$MGC_SYNLIB
/<your_path2>/synlib
where <your_path2> is the location pointed to by a variable in your MGC_LOCATION_MAP.)
4) Link the MGC_SYNLIB directory to the directory where the genlib library is contained by
typing:
cd /<your_path2>/synlib
ln -s /<your_path1>/gen_lib gen_lib
where <your_path1> is the path to the library files.
To check the link, type:
ls -l /<your_path2>/synlib.
You should see the following:
lrwxrwxrwx
1 you
lab
date time
gen_lib -> /<your_path1>/gen_lib
Compiling a .src File
1) Change directories to $MINC_PATH/examples. If you have MGC_WD selected, change it to
$MINC_PATH/examples, or unset it.
2) Boot Design Architect.
3) From the session window, select FILE, OPEN, then OPEN PLDS II SOURCE FILE from the
command bar.
4) Another menu will open asking for the name of the .src (DSL) file. Use the file navigator to
load the file segment. segment will have an icon that looks like a page of text. After selecting
the file with the navigator, accept the file in the Open .SRC menu.
5) Notepad will open with the file segment.src. Take a few minutes to examine this design. It
takes in a 7-bit binary number from 0 to 99 and changes it into two 4-bit BCD numbers. It then
generates 7-segment LED driver values for each of the 4-bit BCD values. Note that the design
is hierarchical and procedural. This hierarchical capability provides PLDSynthesis II
significant new capabilities over PLDS I.
6) Create an MGC schematic component for the design by selecting FILE, then COMPILE
PLD II SOURCE from the command bar.
NOTE !
The notepad editor must be selected before opening the command bar.
PLDSynthesis II Installation (CDROM)
(Version 3.8C)
17
Installation on SunOs and HP700 Workstations (CDROM)
PLDSynthesis II will open a window and perform a compile on the design. You should see the modules
PLComp and PLOpt run successfully and PLDSynthesis II start building a schematic for the design.
The schematic build will print out a large number of dots as it creates the schematic. Once the run has
completed, the windows will ask you to press RETURN.
If any error messages occur during the compile, check the installation to see if any variables are not
correctly set.
7) Load the schematic generated by PLDSynthesis II for segment.src by clicking the mouse in the
sessions window of Design Architect and then selecting the OPEN SHEET button from the
button bar. Use the navigator to find the new schematic for the design named segment.
8) Create a symbol for the design by selecting MISCELLANEOUS, then CREATE SYMBOL
while the schematic for segment is selected. We recommend sorting the I/Os by selecting the
sort option in the create symbol menu. Be sure to check and save the symbol.
PLDSynthesis II must have a symbol in order to read any schematic. If a symbol is not created for the
schematic, then a message will be generated stating that no symbol could be found, and the export of the
schematic will fail.
9) You can use the schematic and symbol created here in other schematic designs using the steps
listed in the next session. You can also avoid the schematic step and take the .src file directly
to partitioning by selecting FILE then EXPORT TO PLDS II from the command bar while the
notepad is selected. This may generate more efficient logic than possible through schematic
translation.
Exporting A Schematic
1) Use the steps above to create a GENLIB schematic for the DSL file segment. src. Load the
created schematic and create the symbol as noted above.
2) With the schematic selected, select FILE, then EXPORT TO PLDS II from the command bar.
PLDSynthesis II will open a window and begin building a design viewpoint. It will print out
several informational messages before opening the PLDSynthesis II partitioning menu. Refer
to the following section on partitioning designs.
PLDSynthesis II must have a symbol in order to read a schematic. If a symbol
is not created for the schematic, a message will be generated stating that no
symbol could be found, and the export of the schematic will fail.
NOTE !
3) You can create your own schematic designs by using a combination of GENLIB and TTL
components. Designs can be hierarchical and can span multiple sheets. Be sure to create
symbols for your schematics!
NOTE !
18 (Version 3.8C)
For a list of supported components in the Mentor GENLIB and TTL libraries,
please see the file $MINC_PATH/plds2_V3.8C_liblist.
PLDSynthesis II Installation (CDROM)
Installation on SunOS and HP 700 Workstations (CDROM)
Partitioning A PLDSynthesis II Design
1) Use the steps above to create a schematic for the DSL file segment.src. Be sure to create a
symbol for the design and export it to PLDSynthesis II.
2) When the PLDSynthesis II partitioning menu appears, select the BUILD DESIGN button from
the toolbox. This step will read the input schematic and will synthesize low-level, internal
logic for the design.
3) Set up the constraints and priorities for the design by first selecting the TEMPLATES button
from the toolbox. This menu allows you to specify which architectures can by used by the
partitioning module for this design. Select ALL (to enable all architectures) and Exit.
4) Set up the constraints for the design by selecting the CONSTR. button from the toolbox. Try
setting a limit of 4 devices in CMOS or TTL logic levels and DIP packaging. Exit the menu.
5) Select PRIORITIES to set up the optimization goals for the design by setting the slides
switches. For the first run, try finding the least expensive solution by setting PRICE to 10 (10
is highest priority, 1 is lowest, and IGNORE will exclude the category from consideration.)
6) Select GENERATE SOLUTIONS to partition the design. The partitioning will run for
approximately 2 minutes before showing a variety of different solutions ordered by the
priorities specified in Step 5. Once partitioning has completed, select one of the solutions and
exit the menu.
7) Select MAP DEVICES to specify the exact device to be used for each architecture. The new
menu will show a device for each of the architectures in the solution you selected in Step 6.
You can open any of these, and using the scroll bars and mouse, select an alternate device.
Note that all meet the constraints specified in Step 4 and are ordered by the priorities specified
in Step 5. Select GENERATE FUSEMAPS and Exit the menu when the process is complete.
8) Examine the output documentation file by selecting VIEW >> DOCUMENTATION from the
PLDSynthesis II menu bar. The documentation shows the inputs and outputs, the reduced
logic, the top ten solutions, pinout diagrams and alternate source lists for each device in the
solution, and a wiring chart.
9) Try an alternate solution by changing the constraints in Step 4, and the priorities in Step 5.
NOTE !
You can set constraints that cannot be met by the partitioning module. For example, asking for a 2 ns propagation delay with current consumption of less than 10mA
will prevent PLDSynthesis II from finding a solution for the design.
PLDSynthesis II Directory Structure
The directory structures generated by PLDSynthesis II will vary based upon the input method used to
create your design.
The following text assumes you have MGC_WD set to the directory from which you invoked Design
Architect.
PLDSynthesis II Installation (CDROM)
(Version 3.8C)
19
Installation on SunOs and HP700 Workstations (CDROM)
HDL Designs
There are two ways to create designs with PLDSynthesis II’s HDL languages. You can use
PLDSynthesis II to create a schematic component for the language, or you can directly export the
language to the partitioning module.
If you use PLDSynthesis II to create a schematic component for DSL, VHDL, or Verilog HDL language
file, and export the resulting schematic to PLDSynthesis II’s partitioning component, you will see the
following directory structure:
<working directory>
-|
|hdl_file.src hdl_file (component)
(or .vhd, .vhdl, .v)
|
|-- schematic
|-- symbol
|-- minc
|
|-- hdl_file.fb
|-- hdl_file.pi (physical info)
|-- hdl_file.doc (documentation)
|-- hdl_file.j1 (1st JEDEC file)
|-- hdl_file.j2 (2nd JEDEC file)
|-- hdl_file.xnf
|-- ...
If you export your DSL language file directly to the partitioning module, NO component will be
generated. Instead, the following directory structure will be created:
<working directory>
|-|-- hdl_file.src (DSL file)
|-- hdl_file.fb
|-- hdl_file.pi (physical info)
|-- hdl_file.doc (documentation)
|-- hdl_file.j1 (1st JEDEC file)
|-- hdl_file.j2 (2nd JEDEC file)
|-- hdl_file.xnf (1st XNF file)
|-- model
|--VHDL, Verilog, VITAL Timing Model ...
|-- ...
Schematic Designs
If you use a schematic to create your design, using a combination of hierarchical schematics, DSL components, GENLIB components, and TTL components, the following directory structure for your design
will be created:
20 (Version 3.8C)
PLDSynthesis II Installation (CDROM)
Installation on SunOS and HP 700 Workstations (CDROM)
<working directory>
|sch_design (component)
||-- schematic
|-- symbol
|-- phys_sheet (post-partitioning physical sheet)
|-- minc
||-- sch_design.fb
|-- sch_design.pi (physical info)
|-- sch_design.doc (documentation)
|-- sch_design.j1 (1st JEDEC file)
|-- sch_design.j2 (2nd JEDEC file)
|-- sch_design.xnf (1st XNF file)
|-- model
|--VHDL, Verilog, VITAL Timing Model ...
|-- ...
AutoLogic Designs
If you use AutoLogic-VHDL to create your design, the following directory structure will be created:
<working directory>
||vhdl_file.vhdl vhdl_file (component)
||-- schematic
|-- symbol
|-- minc
||-- vhdl_file.fb
|-- vhdl_file.pi (physical info)
|-- vhdl_file.doc (documentation)
|-- vhdl_file.j1 (1st JEDEC file)
|-- vhdl_file.j2 (2nd JEDEC file)
|-- vhdl_file.xnf (1st XNF file)
|-- model
|--VHDL, Verilog, VITAL Timing Model ...
|-- ...
PLDSynthesis II Installation (CDROM)
(Version 3.8C)
21
Installation on SunOs and HP700 Workstations (CDROM)
JEDEC and .pi Files
The .pi physical information file allows the user to control the partitioning process. Using it, you can
specify device usage, full or partial pin assignment, optimization methods, device utilization, and
critical net assignment. Whenever a design is partitioned, the software will automatically insert a default
.pi file (if one does not already exist.) You may want to modify this file by selecting EDIT PHYSICAL
INFORMATION from the PLDSynthesis II menu bar. The default editor is VI, but you can change editors in the FILE OPTIONS GENERAL menu from the PLDSynthesis II menu bar. Look for the .pi file
in the above directory structures.
The resulting JEDEC or FPGA netlist files will be necessary to perform system-level simulation with
LMC or MGC models and will be necessary to program the individual devices or run the FPGA vendors
place-and-route tool. Look for the .j1,. j2, .xnf, .adl, etc. files in the above directory structures.
Using PLDSynthesis II
DSL Designs
To create a DSL design, refer to the previous section entitled Testing the Installation.
Creating Schematics For DSL Designs
PLDSynthesis II automatically generates an ugly (but useful) schematic for designs created with
MINC’s DSL hardware description language. PLDSynthesis II will automatically attempt to invoke
AutoLogic’s SG schematic generator to make the schematic more attractive.
Unfortunately, SG can add several minutes to the compile time. You can skip the SG step with the following steps:
1) Edit the file $MINC_PATH/plds2_src_comp.
2) Locate the line which sets do_sg=1.
3) Change the line to do_sg=0.
4) Save the file and exit the editor.
To restore SG integration, set do_sg back to 1.
Schematic Designs
To create a schematic design, refer to the previous section entitled Testing the Installation.
22 (Version 3.8C)
PLDSynthesis II Installation (CDROM)
Installation on SunOS and HP 700 Workstations (CDROM)
AutoLogic/VHDL Designs
Please refer to the PLDSynthesis II tutorial in Chapter 3 of the PLDSynthesis II User’s Guide for a
graphical step by step process that brings a VHDL design into PLDSynthesis II. To create a VHDL
design using AutoLogic, follow these steps.
1) Make sure the GENLIB library located in your $MINC_PATH has been unTAR’d and the
MGC_SYNLIB variable in your location map has been properly defined. Please refer to the
Integrating with Autologic/VHDL section of this installation guide.
2) Invoke Design Architect in your working directory. Use the notepad editor to create a VHDL
file, or to use AutoLogic Blocks to create the VHDL source.
3) Set the synthesis option under select COMPILE then SET OPTIONS while the VHDL source
notepad is selected. Then select COMPILE then COMPILE.
4) When compilation is complete, start AutoLogic in another shell and load the design. Select
SYNTHESIZE DESIGN and set the OUTPUT TO EDDM NETLIST option in the submenu.
This step will create a schematic named syn_s.
5) Now optimize the design by selecting SETUP, SET DESTINATION TECHNOLOGY to
genlib. If you do not see genlib, recheck your MGC_SYNLIB and the library installation.
6) Select OPTIMIZE, SET OPT RECIPES to set up the optimization parameters important to you.
AREA is the recommended optimize parameter.
7) Select OPTIMIZE, OPTIMIZE DESIGN, and select the output to be schematic.
8) Go back to Design Architect, open the opt_s schematic created in the previous step. Use the
navigator to look under the component of the same name as the VHDL file. Find the opt_s file
and load it.
9) Export the syn_s file to PLDSynthesis II’s partitioning menu by selecting EXPORT TO
PLDSynthesis II from the menu bar while the syn_s schematic is active.
10) Follow the steps outlined for Partitioning a Design under the previous section entitled Testing
the Installation.
Automatic .pi File Generation
To target FPGAs and CPLDs which require vendor place-and-route software, you must first create a
physical information (.pi) file. For single device designs, PLDSynthesis II will automatically create the
.pi file for you. To invoke this feature, simply build your design, and select only one FPGA or CPLD
from the TEMPLATES menu. Select BUILD DESIGN from the pushbuttons or the pulldown menus.
PLDSynthesis II will copy a default template to the .pi file and generate a single solution for that device.
This feature will only work if:
r You have selected only one FPGA or CPLD in the TEMPLATES menu.
r Your current .pi file does not contain DEVICE statements.
PLDSynthesis II Installation (CDROM)
(Version 3.8C)
23
Installation on SunOs and HP700 Workstations (CDROM)
Because of these restrictions, you cannot use the feature more than once on a design without first editing
the .pi file to remove the DEVICE section.
After using the feature, look at the resulting .pi file by selecting EDIT .PI FILE or VIEW .PI FILE from
the pulldown menus. PLDSynthesis II will automatically build a DEVICE section with a list of all
possible devices for the corresponding architecture. All but the first of the devices will be commented
out with double quotes. You can change devices by commenting out the first device, and
uncommenting any other. Note that the DEVICE section does not specify pin assignments. Instead, the
DEFAULT statement is used to tell the partitioning module that ALL signals should be placed on this
device. If you would like to force the pin assignment, or would like more information on a specific
device, refer to the PLDSynthesis II User’s Guide.
Creating a VHDL or Verilog Timing Model
VITAL, standard VHDL, or Verilog timing models can be created for Mentor’s QuickHDL. Currently,
for Mentor’s A.X, B.1, and B.2 releases, it is recommended that standard VHDL models be used. You
can use the PLDS II VITAL models with Mentor releases B.3 or higher for more comprehensive
modeling. The procedure for creating a timing model is described below.
a)
Compile the MINC VHDL Libraries.
1) Copy the libraries from $MINC_PATH/modellib/combined/vhdl.vhd to a local location.
2) Change the directory to this new directory and compile the libraries at the UNIX prompt by
typing:
qhlib minc_vhd (this is the work directory under the new model directory.)
qhmap minc_vhd <hard_path_to_lib>/minc_vhd
qvhcom -source -93 -novital all -work minc_vhd vhdl.vhd
b)
Perform place and route and generate fusemaps for your design.
c)
Select Build Model
d)
Select Advanced, VHDL, and generate test bench from the pop-up.
e)
Exit PLDS2 and cd to the new model directory.
f)
Compile your design vhdl file (.vhd) and testbench file (.tb)
(or vital.vhd for Mentor B.3)
1) Copy quickhdl.ini from your local library directory to the timing model directory.
2) qhlib work
“ Creates a local work directory
3) qvhcom -source -93 -novital all design_name.vhdl
4) qvhcom -source -93 -novital all design_name.tb
g) Invoke QuickHDL with the following flags:
qhsim -<sdfmin or sdftyp or sdfmax> u0=<design_name>.sdf
<design_name>_<design_name>.
24 (Version 3.8C)
PLDSynthesis II Installation (CDROM)
Installation on SunOS and HP 700 Workstations (CDROM)
Creating A Physical Schematic For Timing Simulation in QuickSim
For more information please refer to timing_model_readme.txt on this tape or to the supplement entitled
Creating a Physical Schematic with Timing for Simulation in QuickSim. Once you have completed
partitioning your design, PLDSynthesis II V3.8C will create a human-readable schematic with your
selected devices for board simulation and board place-and-route. The physical sheet generator will also
automatically link your design with Logic Modeling timing simulation models. To run the generator, do
the following:
1) Partition your design and generate fusemaps (or run back-annotation for FPGAs).
2) Select your source schematic in Design Architect.
3) Select File / PLDS II PHYS SHEET GEN. PLDSynthesis II will build a physical sheet for
your design.
4) Select the desired timing models. Refer to Appendix M (m.pdf) entitled Verilog/VHDL and
QuickSim Timing Model Options for PLDSynthesis II.
5) The physical sheet will be located under your component with the name phys_sheet.
PLDSynthesis II Tutorial
The new tutorial in the PLDSynthesis II User’s Guide (Chapter 3) is an excellent quick-learning tool for
all of the features of PLDSynthesis II. The tutorial will lead you step-by-step through the different
methods of design entry for PLDSynthesis II. It also shows how to fit your design to the many PLDs,
CPLDs, and FPGAs supported in PLDSynthesis II. Please follow the procedure for unTARing and
unpacking the tutorial, listed in the beginning of the tutorial section of the PLDSynthesis II User’s
Guide. The tutorial was written for Mentor Graphics Design Environments V8.2_5, A.x-F, and B.1.
The Design Architect menus may appear slightly different than the tutorial graphics if you are running
A.x-F or B.1 due to slight changes between V8.2_5 and A.x-F/B.1. The tutorial design has been
installed in $MINC_PATH/../plds2_tutorial/plds2_demo.tar.Z.
If You Have Problems
If you have problems installing or running PLDSynthesis II, please contact one of the following individuals:
MGC CUSTOMER SUPPORT: Patrick Bryant
[email protected]
(503) 685-7000
1 800 547-4303
MGC MARKETING/SALES: Aaik vanderPoel
[email protected]
(503) 685-7000
1 800 592-2210
PLDSynthesis II Installation (CDROM)
(Version 3.8C)
25
Installation on SunOs and HP700 Workstations (CDROM)
MINC MARKETING/SALES: Kevin Bush
[email protected]
(719) 590-1155
(719) 590-7330 FAX
MINC SHIPPING /AUTH CODES: Kay Davis
[email protected]
(719) 590-1155
(719) 590-7330 FAX
We Welcome Your Input!
We welcome your comments about PLDSynthesis II and this document. We want to build the best
possible product, so please be honest and send all ideas. Send all responses to Kevin Bush and Aaik
vanderPoel at the numbers listed above.
Where Do I Go From Here?
Now that you’ve loaded PLDSynthesis II, the next step is to consult the PLDSynthesis II User’s Guide.
The User’s Guide is organized as follows:
Getting Started (A Good Starting Place)
Chapter 1 - Brushing Up on Programmable Logic
Chapter 2 - About PLDSynthesis II
Chapter 3 - PLDSynthesis II Tutorial
Chapter 4 - X-Windows Interface
Design Synthesis Language Reference (How to Express Your Design in DSL)
Chapter 5 - Conventions and Syntax
Chapter 6 - Signal Declarations and Modifiers
Chapter 7 - Expressions
Chapter 8 - Statements
Chapter 9 - Procedures and Functions
Chapter 10 - Text Processing
Compiling, Simulating, and Optimizing the Design (What to do After You’ve Finished
Entering Your Design)
Chapter 11 - Compiling the Design
Chapter 12 - Simulating the Design
Chapter 13 - Optimizing the Design
Partitioning and Selecting Devices (How to Implement the Design in Programmable Parts)
Chapter 14 - Partitioning the Design
Chapter 15 - Controlling Partitioning with a Physical Information File
Chapter 16 - Device-Dependent Partitioning Information
26 (Version 3.8C)
PLDSynthesis II Installation (CDROM)
Installation on SunOS and HP 700 Workstations (CDROM)
Programming and Testing Devices (Getting the Design Into ProgrammableDevices)
Chapter 17 - Programming and Testing Devices
Chapter 18 - Documenting the Design
Miscellaneous (Good Stuff to Know That Didn’t Fit Into the Other Sections)
Chapter 19 - Running From the Command Line
Chapter 20 - Design Tips
Appendices
Appendix A - Devices Supported by PLDSynthesis II
Appendix B - Language-Based Design Examples
Appendix D - Integrating PLDSynthesis II With Other Design Tools
Appendix E - FPGA Mapping
Appendix H - AMD MACH Support Supplement
Appendix K - Atmel ATV5000 CPLD Support Supplement
Appendix L - Using PLDSynthesis II V3.8C With LMG Models
Appendix M - Verilog/VHDL and QuickSim Timing Model Options for PLDSynthesis II
Appendix O - AMD M5 (MACH5) Support Supplement
Appendix P - Cypress Flash 37x Support Supplement
Appendix Q - Philips XPLA Support Supplement
PLDSynthesis II Installation (CDROM)
(Version 3.8C)
27