1
User Manual
MacSpeech Dictate™
License Agreement
IMPORTANT - READ CAREFULLY: Before installing this software, carefully read the following terms and conditions. This Software End-User License Agreement
(“License Agreement”) is a binding agreement between you (either an individual or an entity), the end-user, and MacSpeech, Inc. (“MacSpeech”) regarding use
of the software accompanying this Agreement, which includes computer software (“SOFTWARE”) and accompanying documentation, and may include “online”
or electronic documentation and a license key (collectively “SOFTWARE PRODUCT”). By installing, copying or otherwise using the SOFTWARE PRODUCT, or by
clicking on “yes”, or by directing any third party to do so, you agree to be bound by the terms of this License Agreement. If you do not agree with the terms of this
License Agreement, click on “no”, and the installation process will not continue.
1. Grant of License
If you are an individual, this License Agreement grants you (“Recipient”) a non-exclusive and non-transferable right to use one copy of the SOFTWARE PRODUCT
in the manner described in this License Agreement. If you are an entity, this License Agreement grants you (“Recipient”) the right to designate one individual
within Recipient’s organization to have the sole right on a non-exclusive and non-transferable basis to use one copy of the SOFTWARE PRODUCT in the manner
described in this License Agreement. For purposes of this License Agreement, an “entity” is defined as a corporation, limited liability company, partnership, firm,
association, trust, business, or anyone other than a natural person using the SOFTWARE PRODUCT for their own personal use.
2. Use Limitations
(a) Single Machine
Recipient may use the licensed copy of the SOFTWARE on a single computer. The SOFTWARE is in “use” on a computer when it is loaded into temporary memory
(i.e. RAM) or installed into permanent memory (e.g. hard disk, CD-ROM, or other storage device) of that computer. Use on a “single computer” permits you to
transfer the SOFTWARE from one computer to another computer, provided the SOFTWARE is in use on only one computer at a time.
(b) Copies Permitted
Recipient may make one copy of the SOFTWARE solely for backup or archival purposes provided that Recipient reproduces all copyright, confidentiality, and
other proprietary notices that are contained on the original copy of the SOFTWARE. Recipient shall not copy the printed materials accompanying the SOFTWARE.
(c) Transfer Prohibited
Recipient shall not rent, lease, sell, or otherwise transfer the SOFTWARE, whether on the media, if any, or otherwise, nor any copies of the SOFTWARE, or any
of the accompanying documentation. Recipient shall not disclose, make available, or otherwise redistribute all or any part of the SOFTWARE PRODUCT or any
copies thereof to third parties. In addition, Recipient shall not use the SOFTWARE or any part thereof, in any form, in software or other product that is or will be
distributed to a third party.
(d) Limitations on Reverse Engineering/ Modifications
Unless applicable law prohibits enforcement of this provision, Recipient shall not decompile, disassemble, reverse engineer, or create derivative works of the
SOFTWARE PRODUCT or of any part of the SOFTWARE PRODUCT. Recipient shall not alter or modify the SOFTWARE PRODUCT or any part thereof.
(e) Compatibility
The SOFTWARE PRODUCT is designed to execute properly on Intel-based Apple Macintosh computers running versions of Mac OS X 10.5.6 (“Leopard”) through
Mac OS X 10.6 (“Snow Leopard”).
3. Copyright Limitations
(a) Ownership
The SOFTWARE PRODUCT is licensed, not sold to Recipient, for use only under the terms of this License Agreement, and MacSpeech reserves all rights not expressly granted to Recipient. Recipient owns the media, if any, on which the SOFTWARE PRODUCT is recorded. MacSpeech or its suppliers own the SOFTWARE
and all copyright, trade secrets, and other intellectual property rights in the SOFTWARE PRODUCT (including but not limited to images, “applets”, photographs,
animations, video, audio, music and text incorporated into the SOFTWARE PRODUCT), the accompanying printed materials, and any copies of the SOFTWARE.
Under the terms of this License Agreement, Recipient receives only a limited right to use the SOFTWARE PRODUCT under all terms set forth by MacSpeech, Inc.,
which are subject to change. The SOFTWARE PRODUCT is protected by United States copyright laws and international copyright treaties, as well as by other
intellectual property laws and treaties. Therefore, Recipient must treat the SOFTWARE PRODUCT like any other copyrighted material and not unlawfully transfer
or distribute the SOFTWARE PRODUCT to others.
(b) No Copies
Except as expressly permitted under “Use Limitations” above, Recipient shall not copy the SOFTWARE PRODUCT or accompanying written materials.
4. Term
This License Agreement is effective until terminated. Recipient may terminate this License Agreement at any time by destroying the SOFTWARE PRODUCT and all
copies thereof, including any documentation. This License Agreement will terminate immediately without notice from MacSpeech if Recipient fails to comply with
any provision of this Agreement. In such event, Recipient must destroy the SOFTWARE PRODUCT and all of its component parts, and delete, remove, or otherwise destroy all copies of the SOFTWARE PRODUCT that are in Recipient’s possession or control, including installed SOFTWARE. All provisions of this License
Agreement relating to disclaimers of warranties, limitation of liability, remedies or damages, and all of MacSpeech’s proprietary rights shall survive termination.
5. U.S. Government Restricted Rights
The SOFTWARE PRODUCT is provided with Restricted Rights. Use, duplication, or disclosure by or to the United States Government is subject to restrictions as
set forth in subparagraph (c)(1)(ii) of the Rights in Technical Data and Computer Software clause at DFARS 252.227-7013 or subparagraphs (c)(1) and (2) of
the Commercial Computer Software - Restricted Rights at 48 CFR 52.227-19, as applicable. Manufacturer is MacSpeech, Inc. in Salem, New Hampshire, USA.
6. Export Restrictions
The SOFTWARE PRODUCT, including technical data, is subject to U.S. export control laws, including the U.S. Export Administration Act and its associated regulations, and may be subject to export or import regulations in other countries. Recipient agrees to comply strictly with all such regulations, and acknowledges that
Recipient has the responsibility to obtain licenses to export, re-export, or import the SOFTWARE PRODUCT. In addition, if the SOFTWARE PRODUCT is identified as an export controlled item under applicable export laws. Recipient represents and warrants that that they are not a citizen of or otherwise located in an
embargoed nation, and that Recipient is not otherwise prohibited from receiving the SOFTWARE PRODUCT.
7. Limited Warranty
The Recipient assumes the responsibility of selection of the SOFTWARE PRODUCT to achieve Recipient’s intended result and for the installation and use of the
SOFTWARE PRODUCT. MacSpeech does not warrant that the functions contained in the SOFTWARE PRODUCT will meet your requirements, or that its operation
will be uninterrupted or error-free. Recipient accepts and understands that speech recognition is a statistical process, and that recognition errors are inherent in
the speech recognition process.
MacSpeech warrants, for a period of sixty (60) days from the date of delivery to the Recipient (the “Warranty Period”), that any media on which the Software is
delivered to Recipient will be free from defects in materials and workmanship under normal use. Recipient’s sole remedy shall, at MacSpeech’s option, be repair
or replacement of the media. Any claims for warranty must be made to MacSpeech, or its designee, within thirty (30) days of the date of first defect, or the close
of the Warranty Period, whichever shall occur first. MacSpeech may require the return of any defective media in connection with any claim under the Warranty.
Any media replaced by MacSpeech shall be warranted for a period of thirty (30) days, or the remainder of the original Warranty Period, whichever is longer.
This warranty does not apply to defects arising out of accidents, abuse, incorrect application, overuse, modification, or tampering.
THE SOFTWARE PRODUCT IS PROVIDED IN “AS IS”, “WHERE IS” CONDITION WITH NO WARRANTY OF ANY KIND WHATSOEVER, EXCEPT AS EXPRESSLY SET
FORTH ABOVE. MACSPEECH AND ITS SUPPLIERS EXPRESSLY DISCLAIM AND DENY ALL OTHER WARRANTIES, WHETHER EXPRESS OR IMPLIED, INCLUDING
BUT NOT LIMITED TO, NON-INFRINGEMENT, FITNESS FOR A PARTICULAR PURPOSE, OR MERCHANTABILITY. THE SOLE WARRANTY WITH RESPECT TO THE
SOFTWARE PRODUCT IS THE WARRANTY PROVIDED BY MACSPEECH ABOVE. NO OTHER WARRANTY FOR A MACSPEECH SOFTWARE PRODUCT MAY BE
GIVEN BY ANY INDIVIDUAL OR ENTITY WHICH BINDS MACSPEECH. SOME JURISDICTIONS MAY NOT PERMIT THE EXCLUSION OF IMPLIED WARRANTIES
OR A LIMITATION ON HOW LONG AN IMPLIED WARRANTY IS, SO THE ABOVE LIMITATIONS MAY NOT APPLY TO RECIPIENT. TO THE EXTENT PERMITTED,
ANY IMPLIED WARRANTY WHICH CANNOT BE WAIVED IS LIMITED TO THIRTY (30) DAYS. THIS WARRANTY PROVIDES SPECIFIC LEGAL RIGHTS. THE
RECIPIENT MAY HAVE OTHER RIGHTS WHICH VARY FROM JURISDICTION TO JURISDICTION.
8. Disclaimer
TO THE MAXIMUM EXTENT PERMITTED BY APPLICABLE LAW, IN NO EVENT SHALL MACSPEECH, ITS SUPPLIERS, OR THE OWNERS OF THE RIGHTS IN THE
SOFTWARE PRODUCT, AND/OR ANY OF THE OFFICERS, DIRECTORS, OR EMPLOYEES, BE LIABLE FOR ANY INDIRECT, INCIDENTAL, CONSEQUENTIAL,
SPECIAL, PUNITIVE, OR OTHER LOSSES OR DAMAGES (INCLUDING, WITHOUT LIMITATION, ANY LOSS OF PROFIT OR SAVINSG, BUSINESS INTERRUPTION,
EXPENDITURES FOR SUBSTITUTE SERVICES OR SOFTWARE, AND ANY LOSS OF DATA) WHATSOEVER, IN CONNECTION WITH OR ARISING OUT OF THE
SOFTWARE PRODUCT, OR ANY LITIGATION UNDER THIS AGREEMENT HOWEVER IT ARISES, WHETHER FOR BREACH OF CONTRACT OR IN TORT, EVEN
IF MACSPEECH HAS BEEN ADVISED OF THE POSSIBILITY OF SUCH DAMAGES, OR FOR ANY CLAIM BY A THIRD PARTY. IN NO EVENT SHALL MACSPEECH
OR ITS SUPPLIERS BE LIABLE UNDER ANY PROVISION OF THIS AGREEMENT, WHETHER IN CONTRACT, TORT (INCLUDING NEGLIGENCE) OR OTHERWISE,
EXCEED THE PRICE ACTUALLY PAID BY RECIPIENT FOR THE SOFTWARE PRODUCT. THE FOREGOING LIMITATIONS SHALL APPLY EVEN IF THE ABOVESTATED WARRANTY FAILS OF ITS ESSENTIAL PURPOSE. SOME JURISDICTIONS PROHIBIT SUCH AN EXCLUSION OR LIMITATION OF LIABILITY OR SPECIAL
DAMAGES. THE ABOVE LIMITATION MAY NOT APPLY TO YOU. IN SUCH CASE, THE LIABILITY OF MACSPEECH SHALL BE LIMITED TO THE GREATEST EXTENT
PERMITTED BY LAW.
9. Special Provisions
This License Agreement shall be governed by and interpreted under the laws of the State of New Hampshire, United States of America, without regard to conflicts
of law provisions. By accepting this License Agreement, Recipient agrees to be subject to personal jurisdiction in New Hampshire, and to commence any action
arising under or relating to this License Agreement in the appropriate State or Federal Court in New Hampshire.
BY CONTINUING WITH THE INSTALLATION OF THE SOFTWARE, RECIPIENT ACKNOWLEDGES THAT RECIPIENT HAS READ AND UNDERSTOOD THIS
LICENSE AGREEMENT, AND THAT RECIPIENT AGREES TO BE BOUND BY ITS TERMS. RECIPIENT FURTHER AGREES THAT THIS LICENSE AGREEMENT IS THE
COMPLETE AND EXCLUSIVE STATEMENT OF THE AGREEMENT BETWEEN RECIPIENT AND MACSPEECH, AND SUPERSEDES ANY PROPOSAL OR PRIOR
AGREEMENT, ORAL OR WRITTEN, AND ANY OTHER COMMUNICATIONS RELATING TO THE SUBJECT MATTER OF THIS SOFTWARE END-USER LICENSE
AGREEMENT.
Copyright (c) 2008-2009 MacSpeech, Inc. and its licensors. All Rights Reserved. MacSpeech Dictate is a trademark of MacSpeech, Inc.
Credits
MacSpeech Engineering:
Jeff Ganyard
…and the rest of MacSpeech:
Chris Hardy
Jacob Hazelgrove
Paul Herzog
Eric Hon-Anderson
Jim Kelley
Robert Stuller
Hugh Brown
Anne Schwing
Stephane Gauthier
Michael Schwing
Jay Gonzales
Brenda Shiepe
Carla Hernandez
Jack Simonton
Sara Jennings
Carly Taylor
Andrew Taylor
Donald MacCormick
Colin Taylor
David Popovitch
Debra Schwartz
Special Thanks To:
Apple Inc. for the wonderful Mac OS X. Nuance Communications, Inc. for their phenomenal speech engine. Matt Neuburg for
his documentation expertise. Naomi Pearce and Ed Prasek for all their hard work introducing MacSpeech Dictate to the world.
And of course, THANKS to everyone who has ever been involved with MacSpeech. MacSpeech Dictate certainly wouldn’t be here
without your support!
Credit Given Where Credit Is Due:
Powered By Dragon®, the Dragon NaturallySpeaking® speech engine
from Nuance Communications, Inc.
The above are registered trademarks of Nuance Communications, Inc.
and are used here under license. All rights reserved worldwide.
AquaticPrime Framework
Copyright © 2006-2009, Lucas Newman
All rights reserved.
BDAlias
Copyright © 2001-2009, bDistributed.com, Inc.
All rights reserved.
CTGradient
Copyright © 2007-2008 Chad Weider.
Some rights reserved: <http://creativecommons.org/licenses/by/2.5/>
Log4Cocoa
Copyright © 2002-2009, Bob Frank
All rights reserved.
Shortcut Recorder
Copyright © 2006-2009, contributors to ShortcutRecorder.
Contributor details at <http://wafflesoftware.net/shortcut/contributors/>.
All rights reserved.
Table of Contents
Introduction
Installation and Making a Voice Profile
Initial Installation
Creating a Voice Profile
Microphone Setup
Voice Training
Interface
The Profiles Window
The Status Window
The Available Commands Window
The Dock Menu
The Status Menu Item
Keyboard Shortcuts
Speech
Modes and the Microphone
Microphone Off and On
Sleep Mode
Learning and Switching Modes
Dictation Mode
What You Can Say in Dictation Mode
Navigation and Editing Commands
Capitalization, Spacing, and Numbers
Title Case
1
3
4
10
13
16
23
23
24
24
25
25
26
26
27
28
30
31
33
33
35
37
37
Uppercase
Lowercase
Spaces
Numbers
Letter Names in Dictation Mode
Letters
Diacritical Letters
Ligatures and Non-Latin Letters
Spelling Mode
What You Can Say in Spelling Mode
Letter Names in Spelling Mode
Letters
Diacritical Letters
Ligatures and Non-Latin Letters
Numerals
Punctuation
Commands
Global Commands
The Web 100 Commands
Key Commands
How to Say a Key Command
Generated Commands
Launching Applications
Email Messages
Application-Based Commands
Finder Commands
38
38
39
39
44
44
46
47
48
49
49
49
51
52
52
53
63
64
70
70
71
73
73
74
75
76
TextEdit Commands
Safari Commands
Mail Commands
iChat Commands
iCal Commands
Windows
Note Pad Window
Profiles Window
Commands Window
Command Types
Creating a Command
Vocabulary Editor Window
Microphone Setup Window
Voice Training Window
Vocabulary Training Window
Status Window
Available Commands Window
Recognition Window
How to Train
Preferences Window
General Preferences pane
Appearance Preferences pane
Recognition Preferences pane
Dictation Preferences pane
Command Preferences pane
Shortcuts Preferences pane
81
86
93
103
104
108
108
110
112
114
116
118
121
123
124
126
128
130
132
134
134
135
136
137
137
138
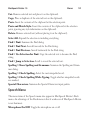
Menus
Dictate Menu
File Menu
Edit Menu
Speech Menu
Tools Menu
Format Menu
Window Menu
Help Menu
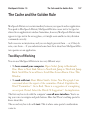
Tips on Speaking
The Cache and the Golden Rule
Two Ways of Working
Text and the Cache
The Golden Rule of MacSpeech Dictate
Why Note Pad Windows Are Special
Extra for Experts
Cache Commands
Cache
Purge
Note Pad Windows and the Cache
Sound Input Troubleshooting
What’s Installed Where
139
139
139
140
141
142
142
143
144
145
147
147
148
149
149
149
150
150
152
153
154
156
MacSpeech Dictate 1.5
Introduction
1
Introduction
MacSpeech Dictate is a speech recognition application. This means that you, the
user, speak into a microphone and MacSpeech Dictate interprets your speech as
actual words. It can then respond to those words. It can respond in one of two
ways:
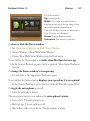
• It can interpret your words as a command, in which case it will obey the command. For example, you can tell Safari to select a link in the text of a page
you’re viewing, by saying Move to Next Link; then you can tell Safari to go
to the linked page, as if you had clicked that link with the mouse, by saying
Jump to This Link.
• It can interpret your words as dictation, in which case it will type what you
said, at the insertion point or selection in the frontmost application. For example, you can place the insertion point at the start of a new empty word processing document and say Good morning, period, and MacSpeech Dictate
will type: Good morning.
How does MacSpeech Dictate work? It isn’t magic or mysterious. Behind the
scenes, MacSpeech Dictate interprets the words you speak using a powerful and
highly accurate speech recognition engine with an extensive, flexible vocabulary.
To obey your commands or type your dictation, MacSpeech Dictate uses a combination of technologies built into Mac OS X, such as Accessibility and AppleScript.
You can get up and running with MacSpeech Dictate very quickly, but you will
have some preparation to do beforehand, and you will have some learning to do as
you go along. Here’s why:
Preparation. Before MacSpeech Dictate can interpret your speech, you must
provide a sample of your speech, so that MacSpeech Dictate knows what your
voice sounds like and how you pronounce your words.
MacSpeech Dictate 1.5
Introduction
2
Learning. MacSpeech Dictate can’t obey just any old commands. When you
start out, you won’t know MacSpeech Dictate’s built-in commands; you’ll
learn them as you go along (especially the ones you use most frequently).
When dictating, you won’t always know MacSpeech Dictate’s terms for punctuation that you want to use; these, too, you’ll learn as you go along. (Of
course you’ll have plenty of assistance along the way; MacSpeech Dictate
has a window listing its commands and punctuation, plus you can consult
this manual and the online help.) You’ll also learn to speak more clearly and
smoothly; speaking to a computer program takes practice.
With time, you’ll become more experienced, and most of the things you do with
MacSpeech Dictate will become second nature. You may even customize MacSpeech Dictate’s abilities to suit your needs. For example, you might add to its
repertory of commands. MacSpeech Dictate comes with built-in specialized commands for controlling itself plus six commonly used applications, along with a set
of general commands for use with any application. You can write your own
commands for inserting text, running a script, choosing a menu, and so forth.
And you’ll almost certainly customize MacSpeech Dictate’s understanding of your
speech. You can add to MacSpeech Dictate’s vocabulary, in case you use
words that it doesn’t already know. And when MacSpeech Dictate types what you
dictate and gets it wrong, you can train MacSpeech Dictate to understand
you better, telling it the right interpretation of what you said and improving its
ability to interpret your speech correctly in the future.
You’re probably eager to install MacSpeech Dictate and provide it with an initial
sample of your speech so that you can start controlling your computer by speaking.
The next chapter will guide you through the steps for doing so.
MacSpeech Dictate 1.5
Installation and Making a Voice Profile
3
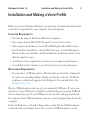
Installation and Making a Voice Profile
Before you can use MacSpeech Dictate, you must have two kinds of hardware that
conform to its requirements: your computer, and a microphone.
Computer Requirements
• You must be using an Intel-based Macintosh computer.
• Your system must be Mac OS X “Leopard” version 10.5.6 or later.
• The computer should have at least 1GB of RAM (preferably 2GB or more).
• Your hard drive should have at least 2GB of free space to install MacSpeech
Dictate and its associated files, and this installation should leave plenty of additional empty free space.
• As with any software application, a faster processor improves performance.
• Accessibility must be turned on your Universal Access system preferences.
Microphone Requirements
• You must have a USB microphone. This microphone should be of high quality, with noise-cancelling abilities. Ideally, it should be on the list of USB microphones certified and supported by MacSpeech. You can find a list at the
MacSpeech web site.
Plug the USB microphone into one of your computer’s USB ports. If you’re running short of open USB ports, it might be worth investing in a powered USB hub.
You can then plug some of your USB devices into the hub, and plug the hub into
the computer. Some USB microphones, however, must be plugged directly into the
computer.
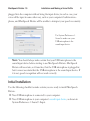
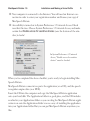
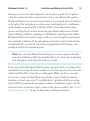
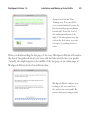
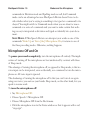
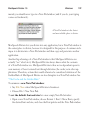
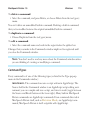
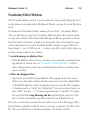
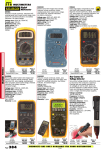
In System Preferences > Sound > Input, make certain that the USB microphone
is selected as the sound input device. This is crucial. A USB microphone can be
MacSpeech Dictate 1.5
Installation and Making a Voice Profile
4
plugged into the computer without being the input device; in such a case, your
voice will be input in some other way, such as your computer’s built-in microphone, and MacSpeech Dictate will be unable to interpret your speech accurately.
Use System Preferences >
Sound to make sure your
USB microphone is the
sound input device.
Note. You should always make certain that your USB microphone is the
sound input device before starting to use MacSpeech Dictate. MacSpeech
Dictate will ascertain, as it launches, that the USB microphone is plugged in;
but it cannot ascertain that the USB microphone is the sound input device. If
it is not, speech recognition will not work correctly.
Initial Installation
Use the following checklist to make certain you are ready to install MacSpeech
Dictate.
Your USB microphone is connected to your computer.
Your USB microphone is your computer’s sound input device, as shown in
System Preferences > Sound > Input.
MacSpeech Dictate 1.5
Installation and Making a Voice Profile
5
Your computer is connected to the Internet. You will need an Internet connection in order to enter your registration number and license your copy of
MacSpeech Dictate.
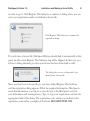
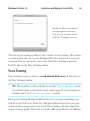
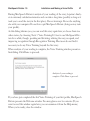
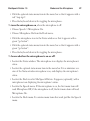
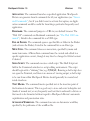
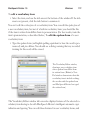
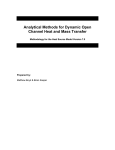
Accessibility is turned on in System Preferences > Universal Access. Check
now that this true. Choose System Preferences > Universal Access, and make
certain that Enable access for assistive devices (near the bottom of the window) is checked.
In System Preferences > Universal
Access, “Enable access for assistive
devices” must be checked.
When you’ve completed the above checklist, you’re ready to begin installing MacSpeech Dictate.
MacSpeech Dictate comes in two parts: the application (on a CD), and the speech
recognition engine data (on a DVD).
Insert the CD into the computer and copy the MacSpeech Dictate application
onto your hard disk. The Applications folder is a good place, and the CD includes
an alias for your Applications folder so you can drag the MacSpeech Dictate application icon onto the Applications folder icon as a way of installing the application
into your Applications folder. But you can put MacSpeech Dictate anywhere you
like.
MacSpeech Dictate 1.5
Installation and Making a Voice Profile
6
Eject the CD.
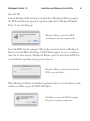
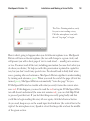
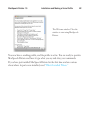
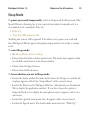
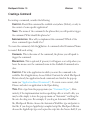
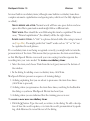
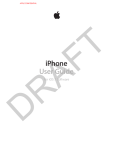
Launch MacSpeech Dictate from your hard drive. MacSpeech Dictate requests
the DVD containing the speech recognition engine data (“MacSpeech English
Data”). Leave the dialog up.
MacSpeech Dictate asks for the DVD
containing the speech recognition data.
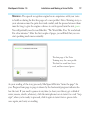
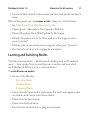
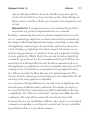
Insert the DVD into the computer. When it has mounted, return to MacSpeech
Dictate and click OK in the dialog. (The DVD may appear to you to contain no
data, but it’s there anyway.) MacSpeech Dictate copies the data from the DVD to
your hard drive, reporting its progress as it does so.
MacSpeech Dictate copies the data from the
DVD to your hard drive.
When MacSpeech Dictate has finished copying the data to your hard drive, it asks
whether you’d like to eject the DVD. Click Eject.
Click Eject to remove the DVD containing
the speech recognition engine data.
MacSpeech Dictate 1.5
Installation and Making a Voice Profile
7
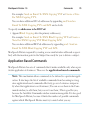
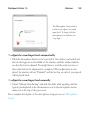
Installation is now complete, and MacSpeech Dictate displays the license agreement. Click Accept after reviewing it.
Click Accept after reviewing the license
agreement.
MacSpeech Dictate displays the Read Me window. Click Continue after reviewing
this information.
Click Continue after reviewing the Read Me
window.
MacSpeech Dictate now asks for your license. A license is a license file. You presumably don’t have such a file yet, so you need to enter your registration number
MacSpeech Dictate 1.5
Installation and Making a Voice Profile
8
in order to get it. Click Register This Software to summon a dialog where you can
enter your registration number and obtain a license file.
Click Register This Software to summon the
registration dialog.
If you do have a license file, MacSpeech Dictate should find it automatically at this
point, and the entire Register This Software step will be skipped. In that case, you
will see a dialog informing you that your license has been found and is valid.
The dialog that you see at this point if you
already have a license file.
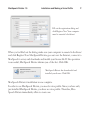
Since you don’t have a license file yet, you have clicked Register This Software,
and the registration dialog appears. Fill in the required information. (MacSpeech
needs this information to set up an account for you at the MacSpeech web site;
your information will remain private.) Type or copy your registration code into the
appropriate field of the dialog. The registration code, which you can find on the
registration code sticker, is roughly of this form: AB11-ABCD-EFGH-I123.
MacSpeech Dictate 1.5
Installation and Making a Voice Profile
9
Fill out the registration dialog and
click Register Now. Your computer
must be connected to the Internet.
When you’ve filled out the dialog, make sure your computer is connected to the Internet
and click Register Now. MacSpeech Dictate goes out over the Internet, connects to
MacSpeech’s server, and downloads and installs your license file. If this operation
is successful, MacSpeech Dictate informs you of the fact. Click OK.
MacSpeech Dictate has downloaded and
installed your license. Click OK.
MacSpeech Dictate’s installation is now complete.
In order to use MacSpeech Dictate, you need a voice profile. Since you have only
just installed MacSpeech Dictate, you have no voice profile. Therefore, MacSpeech Dictate immediately offers to create one.
MacSpeech Dictate 1.5
Installation and Making a Voice Profile
10
Creating a Voice Profile
A voice profile is a complete set of data on how you speak: what your voice sounds
like, and what vocabulary you use. In order to speak into MacSpeech Dictate, you
must have at least one profile.
In many cases, one profile is all you’ll need. But you’ll need multiple profiles in
certain situations:
• If different people are using MacSpeech Dictate, each will need their own
profile.
• If you use MacSpeech Dictate with different microphones, you’ll need a profile for each microphone.
Every profile has a name, which uniquely identifies it. When you create a profile,
you start by giving it a name.
Note. The data for a profile lives on your hard disk as a package whose file
extension is .dictateprofile. You are offered the chance to set a profile’s location
at the time you create it. You may place it anywhere you like, but a good idea
is to put all profiles together in a known location; for example, you might create a folder ~/Documents/MacSpeech Profiles. This allows the profile data to be
backed up easily. A symbolic link to each profile will be found in ~/Library/
Application Support/MacSpeech/MacSpeech Profiles.
The first time you use MacSpeech Dictate, you will be prompted to create a new
profile.
When MacSpeech Dictate sets out to create a profile, it starts with a File Save
dialog (“Name a New Profile”). Give the new profile a name. Specify a folder in
which to keep this profile. Click Choose.
MacSpeech Dictate 1.5
Installation and Making a Voice Profile
11
The Name a New Profile dialog. Give the
profile a name, specify a folder in which to
save it, and click Choose.
MacSpeech Dictate next presents a dialog describing the proper positioning of
your microphone. Position the microphone as shown. A checkbox lets you skip this
dialog in future, but don’t ignore the advice in this dialog! The microphone should
be near your mouth but not too close, and it should be slightly off to one side so
that puffs of breath, either from breathing or from articulation, are not interpreted
as speech. You should position the microphone correctly, and you should attempt
to recreate its position each time you use MacSpeech Dictate. Click OK when
you’re ready to proceed.
MacSpeech Dictate shows you the
correct microphone position. Read
it, do what it says, and click OK.
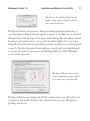
MacSpeech Dictate now displays the Profiles window, where you will set the characteristics of this profile. You have three characteristics to set up: Microphone,
Spelling, and Accent.
MacSpeech Dictate 1.5
Installation and Making a Voice Profile
12
Microphone. MacSpeech Dictate has already detected your USB microphone, and unless you have more than one USB microphone plugged into the
computer, this will be the only choice offered. Your chosen microphone will
be the only microphone that this profile will work with. If you start up MacSpeech Dictate and a microphone is not detected, the Profiles window will
report this fact and your only choice will be to quit.
Spelling. Choices are US and UK.
Accent. Choices depend upon your choice of spelling.
The Profiles window is where you
manage your profiles. Here, you’re
about to finish creating a new
profile. Choose the correct settings
and click Create.
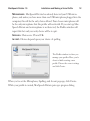
When you’ve set the Microphone, Spelling, and Accent pop-ups, click Create.
While your profile is created, MacSpeech Dictate puts up a progress dialog.
MacSpeech Dictate 1.5
Installation and Making a Voice Profile
13
While creating a profile,
MacSpeech Dialog puts up a
progress dialog.
After you create a profile, MacSpeech Dictate automatically proceeds to microphone setup.
Tip. You are about to begin speaking to MacSpeech Dictate. It might be a
good idea to read the “Tips on Speaking” section now. If your microphone is
a headset, put it on! Position the microphone correctly.
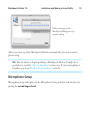
Microphone Setup
Microphone setup takes place in the Microphone Setup window, and involves adjusting the sound input level.
MacSpeech Dictate 1.5
Installation and Making a Voice Profile
14
The Microphone Setup window
is where you adjust your sound
input level. To begin, click the
microphone icon with the red
“stop sign.”
To begin adjusting your sound input level in the Microphone Setup window, click
the microphone icon with the red “stop sign.” The window changes to display a
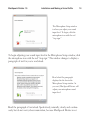
paragraph of text for you to read aloud.
Read aloud the paragraph
displayed in the box in the
Microphone Setup window. As
you read, MacSpeech Dictate will
adjust your microphone sound
input level.
Read the paragraph of text aloud. Speak slowly, naturally, clearly, and continuously, but do not worry about enunciation, because MacSpeech Dictate is not
MacSpeech Dictate 1.5
Installation and Making a Voice Profile
15
listening to your words; what’s important is how loudly you speak. Try to speak at
a natural, consistent loudness, representative of how you will normally speak to
MacSpeech Dictate in your current environment. As you speak, the level indicator
to the right of the microphone icon shows your sound input level, a combination
of how loudly you speak and how MacSpeech Dictate has adjusted the microphone sound input level; and the horizontal gain indicator slider moves left and
right as MacSpeech Dictate experiments with different sound input levels. When
MacSpeech Dictate has heard enough, and has set your microphone sound input
level optimally, it will turn off the microphone and switch away from this window
automatically. If you reach the end of the paragraph before that happens, start
reading aloud from the beginning again.
Note. You can check Manual Gain Setting if you want to operate the slider
yourself, but MacSpeech Dictate should be able to do a better job of adjusting
your microphone sound input level than you would.
In the next window, MacSpeech Dictate pauses, and plays back a recording of the
last little bit of your speech. Listen to make sure that your speech level is clear and
undistorted. Press Play to hear the recording again. Make sure there is no static,
excess noise, or hum. Such problems are probably a sign of faulty microphone
hardware or a bad connection. If you think there’s a problem with the recording,
and you’d like to perform the microphone sound level adjustment again, click the
left-arrow button at the lower right to return to the previous window. (See “Sound
Input Troubleshooting” for tips on diagnosing sound input problems.)
MacSpeech Dictate 1.5
Installation and Making a Voice Profile
16
MacSpeech Dictate has adjusted
your microphone sound input
level. If you’re creating a profile,
click Voice Training to proceed.
The next step in creating a profile is to do a session of voice training. This is where
you read aloud a little story, so that MacSpeech Dictate can learn how your voice
sounds and how you pronounce your words. Click Voice Training to proceed.
You’ll be taken to the Voice Training window.
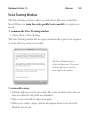
Voice Training
Voice training is a process where you read aloud a little story. It takes place in
the Voice Training window.
Tip. This would be a really good time to read the “Tips on Speaking” section
if you haven’t done so already. Or maybe read it again. If your microphone is
a headset, put it on! Position the microphone correctly.
During voice training, MacSpeech Dictate listens to your speech, matching it up
with the words of the story. In this way, MacSpeech Dictate learns how your voice
sounds and how you pronounce your words. Voice training is the most important
step in creating a profile. This is why you need a different profile for each different
MacSpeech Dictate 1.5
Installation and Making a Voice Profile
17
person and microphone. You might even need to create a new profile if your voice
changes temporarily — because you catch a cold, for instance.
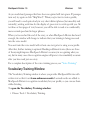
MacSpeech Dictate presents the Voice Training window, containing a description
of what’s about to happen. Click the right-arrow button, at the lower right, to proceed.
When you do voice training in an existing profile, you are shown a window where
you can select from among three stories to read from; stories you’ve previously
read are marked with a “green circle” icon. But when you first create a profile, the
first story is automatically selected for you.
The Voice Training window,
before reading a story. To proceed,
click the right-arrow button at
lower right of the window.
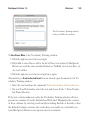
MacSpeech Dictate presents the window in which it will show you the story. The
microphone is off, signified by a red “stop sign” icon, and training will not begin
until you click the icon.
MacSpeech Dictate 1.5
Installation and Making a Voice Profile
18
The Voice Training window, ready
for you to start reading a story.
Click the microphone icon (with
the red “stop sign”) to begin.
Here’s what’s going to happen when you click the microphone icon. MacSpeech
Dictate will turn on the microphone (the icon will change to a green circle) and
will present you with a short page of text to read aloud — usually just a sentence
or two. You must read all the text, including punctuation (because that’s what you
do when you dictate). To help you with this, punctuation is printed in capital letters, but you don’t read it any special voice. You should read in fairly brief utterances, pausing after each utterance. MacSpeech Dictate signifies its understanding
by turning each utterance green. When you reach the end of the page (all text has
turned green), MacSpeech Dictate automatically “turns the page” for you.
If MacSpeech Dictate has trouble with what you said, it turns the current utterance red. If this happens, you need to read the red text again. If MacSpeech Dictate still doesn’t understand (the same text remains red), you can click Skip Word
to proceed past that text. If you feel that things are really going badly and that
you’d like to begin reading this story all over again, click the left-arrow button.
As you read, keep an eye on the sound input level indicator (the vertical bar to the
right of the microphone icon). Speak at a level that keeps this at about the middle
of the green section.
MacSpeech Dictate 1.5
Installation and Making a Voice Profile
19
Warning. The speech recognition engine has no experience with your voice
to build on during the first few pages of a new profile’s Voice Training story, so
your utterances must be quite short and careful, and the pauses between them
must be long, to give the engine a chance to catch up and turn the text green.
You will probably need to read like this: “We. Would like. You. To read aloud.
For a few minutes.” After the first couple of pages, you will find that you can
start speaking much more naturally.
The first page of the Voice
Training story for a new profile.
The first few words have been
read, and have turned green.
As your reading of the story proceeds, MacSpeech Dictate “turns the page” for
you. Progress from page to page is shown by the horizontal progress indicator below the text. If you need to pause at any time (to clear your throat, get a drink of
water, sneeze, stretch, whatever), click the microphone icon to turn it to a red “stop
sign”; when you’re ready to proceed, click it again to turn it into a green circle
once again, and carry on reading.
MacSpeech Dictate 1.5
Installation and Making a Voice Profile
20
A page late in the first Voice
Training story. You can tell the
story is nearly finished, because the
blue horizontal progress indicator
is nearly full. Notice the level of
the sound gain indicator at the
right of the microphone icon; this
is about the level where you want
to keep it, by speaking louder or
softer.
When you finish reading the last page of the story, MacSpeech Dictate will analyze
the data it has gathered about your voice and feed that analysis into your profile.
(Actually, this might happen in the middle of the last page, or an earlier page, if
MacSpeech Dictate feels it has sufficient data.)
MacSpeech Dictate analyzes your
reading of the story and feeds
the analysis into your profile. Be
patient while processing proceeds.
MacSpeech Dictate 1.5
Installation and Making a Voice Profile
21
During MacSpeech Dictate’s analysis of your reading of the story, be patient. Analysis is extremely calculation-intensive and can take a long time (possibly as long as it
took you to read the story in the first place). Do not interrupt. Do not do anything
else with your computer. Do not force quit MacSpeech Dictate (doing so may ruin
your profile).
As this dialog informs you, you can read this story again later, or choose from two
other stories, by choosing Tools > Voice Training. It’s best to use MacSpeech Dictate for a while, though, speaking and dictating, refining the way you speak, and
improving recognition through Recognition Training. Most users do not find it
necessary to do any Voice Training beyond the first story.
When analysis of your reading is complete, the Voice Training window presents a
final dialog. Click Done to proceed.
Analysis of your reading is
complete. Click Done to proceed.
If you have just completed the first Voice Training of your first profile, MacSpeech
Dictate presents the Welcome window. You may glance over its contents. (If you
want to read this window again later, you can summon it from the Help menu.)
When you’re ready, close the window.
MacSpeech Dictate 1.5
Installation and Making a Voice Profile
22
The Welcome window. Close the
window to start using MacSpeech
Dictate.
You now have a working profile, and the profile is active. You are ready to speak to
MacSpeech Dictate and have it type what you say and obey your commands.
If you have just installed MacSpeech Dictate for the first time and are curious
about where its parts were installed, read “What’s Installed Where.”
MacSpeech Dictate 1.5
Interface
23
Interface
MacSpeech Dictate’s basic interface is extremely simple. This chapter will tour its
key features; details on some of these features appear in later chapters.
You can use MacSpeech Dictate while working in any application, so the purpose
of MacSpeech Dictate’s interface is to be present (so that you can control MacSpeech Dictate’s behavior) without being in your way.
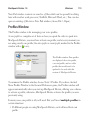
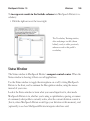
The Profiles Window
When you start up MacSpeech Dictate, you might see the Profiles window. Choose
your profile and click Make Active. If you’d like to avoid seeing the Profiles window at startup, uncheck Show Profiles Window in the General Preferences pane.
MacSpeech Dictate will then automatically use, when it starts up, the profile you
were using when you previously quit the application.
The Profiles window. If you see
this window at startup, choose
your profile and click Make Active.
MacSpeech Dictate 1.5
Interface
24
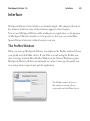
The Status Window
The Status window is your control center for MacSpeech Dictate. It floats over the
windows of all other applications. Here you can turn the microphone on and off,
change modes, and more. For details, see “Status Window.”
The Status window floats over all
applications.
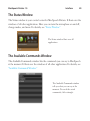
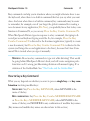
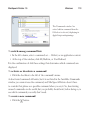
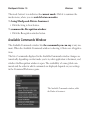
The Available Commands Window
The Available Commands window lists the commands you can say to MacSpeech
at the moment. It floats over the windows of all other applications. For details, see
“Available Commands Window.”
The Available Commands window
tells you what you can say at the
moment. To reveal the actual
commands, click a triangle.
MacSpeech Dictate 1.5
Interface
25
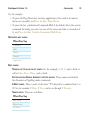
The Dock Menu
The MacSpeech Dictate Dock menu provides commands for showing and hiding
MacSpeech Dictate’s windows, and for controlling modes and microphone state.
The Dock menu is available no matter what application is frontmost.
The Dock Menu lets you control
MacSpeech Dictate no matter what
application is frontmost.
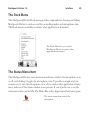
The Status Menu Item
The MacSpeech Dictate status menu item indicates whether the microphone is on
or off, and clicking it toggles the microphone state. It provides a simple and convenient way to turn the microphone on or off, no matter what application is frontmost, and even if the Status window is not present. If you’d prefer not to see the
status menu item, uncheck In The Menu Bar in the Appearance Preferences pane.
The status menu item controls the
microphone.
MacSpeech Dictate 1.5
Interface
26
Keyboard Shortcuts
MacSpeech Dictate lets you define global keyboard shortcuts (“hot keys”) to perform each of the following tasks:
• Turn the microphone on or off.
• Switch between Dictation mode, Spelling mode, and Command mode.
• Show or hide the Recognition window.
To set these keyboard shortcuts, use the Shortcuts Preferences pane.
These are all tasks that you can perform in other ways, such as using your voice, or
clicking in the Status window; the keyboard shortcuts are an optional convenience,
and many users happily ignore them or even disable them.
Speech
The most important way to interact with MacSpeech Dictate is to talk to it! To
talk successfully to MacSpeech Dictate, you need to know about microphone state
and the four modes, so that’s the subject of the next section.
MacSpeech Dictate 1.5
Modes and the Microphone
27
Modes and the Microphone
The most important thing that you need to be in control of and aware of when
using MacSpeech Dictate is its state. At all times, the microphone is either on or
off; and if the microphone is on, MacSpeech Dictate is in one of four modes.
These settings determine whether and how MacSpeech Dictate will respond to
your speech.
The Microphone
Microphone Off. MacSpeech Dictate is not listening at all. No sound can
affect it. The only change you can make is to turn the microphone on, and the
only way to do that is using the mouse or keyboard.
Microphone On. MacSpeech Dictate is listening, and how it responds to
your speech depends on what mode it is in.
The Four Modes
Dictation Mode. If MacSpeech Dictate can interpret your words as a command, it obeys the command. Otherwise, MacSpeech Dictate interprets your
words as dictation, and types those words at the insertion point in the frontmost application.
Spelling Mode. If MacSpeech Dictate can interpret your words as a command, it obeys the command. Otherwise, MacSpeech Dictate tries to interpret your words as a limited set of letters and punctuation, and types those
letters and punctuation at the insertion point in the frontmost document. If
MacSpeech Dictate can’t interpret your words as a command or as letters and
punctuation, nothing happens.
Command Mode. If MacSpeech Dictate can interpret your words as a command, it obeys the command. Otherwise, nothing happens. You can give
MacSpeech Dictate 1.5
Modes and the Microphone
28
commands in Dictation mode and Spelling mode as well, but Command
mode can be an advantage because MacSpeech Dictate doesn’t have to decide whether what you’re saying is something to be typed or a command to be
obeyed. You might switch to Command mode when you are about to issue a
command or a series of commands and you want to make certain that nothing you say is interpreted as dictation and typed accidentally into your document.
Sleep Mode. If MacSpeech Dictate can interpret your words as one of the
commands Wake Up or Turn [the] Microphone On, it returns to one of
the three preceding modes. Otherwise, nothing happens.
Microphone Off and On
To pause your work completely, turn the microphone off entirely. The implications of turning off the microphone are best understood by contrast with those
of Sleep mode.
The advantage of turning the microphone off, as opposed to Sleep mode, is that no
voice input can be interpreted, even accidentally, as a command to turn the microphone on. All voice input is ignored.
The disadvantage of turning the microphone off is that you can’t turn it on again
using your voice; you must use your hands. Sleep mode, on the other hand, lets you
speak to resume work.
To turn the microphone off:
• Say Microphone Off.
• Choose Speech > Microphone Off.
• Choose Microphone Off from the Dock menu.
• Click the microphone icon in the Status window so that it appears with a red
“stop sign”.
MacSpeech Dictate 1.5
Modes and the Microphone
29
• Click the optional status menu item in the menu bar so that it appears with a
red “stop sign”.
• Press the keyboard shortcut for toggling the microphone.
To turn the microphone on, when the microphone is off:
• Choose Speech > Microphone On.
• Choose Microphone On from the Dock menu.
• Click the microphone icon in the Status window so that it appears with a
green “go button”.
• Click the optional status menu item in the menu bar so that it appears with a
green “go button”.
• Press the keyboard shortcut for toggling the microphone.
To learn whether the microphone is on or off:
• Look at the Status window. The microphone icon displays the microphone’s
status.
• Look at the optional status menu item in the menu bar. It is a miniature version of the Status window microphone icon, and displays the microphone’s
status.
• Look at the Dock icon for MacSpeech Dictate. It appears (optionally) with a
microphone icon displaying the microphone’s status.
• Look in the Speech menu. If the microphone is on, the first menu item will
read Microphone Off; if the microphone is off, the first menu item will read
Microphone On.
• Look in the Dock menu. It contains menu items that work just like the Speech
menu.
MacSpeech Dictate 1.5
Modes and the Microphone
30
Sleep Mode
To pause your work temporarily, switch to Sleep mode. In Sleep mode, MacSpeech Dictate is listening, but it is in a special state where it responds only to a
very limited set of commands. They are:
• Wake Up
• Turn [the] Microphone On
Anything else you say will be ignored. This allows you to pause your work and
have MacSpeech Dictate ignore microphone input until you are ready to resume
work.
To enter Sleep mode:
• Say Sleep Mode, or Go to Sleep.
• Choose from the Status window mode menu. The mode menu appears when
you click the mode button in the Status window.
• Choose from the Speech menu.
• Choose from the Dock menu.
To learn whether you are in Sleep mode:
• Look at the Status window. Its mode button shows the Sleep icon, and the microphone appears with a blue “sleep balloon” with a crescent moon.
• Look at the Dock icon for MacSpeech Dictate. (Alternatively, use CommandTab to display the application switcher.) If you have chosen the option to
badge the Dock icon to display the microphone status, it appears with a crescent moon.
• Look at the optional status menu item. It appears with a crescent moon.
• Look in the Speech menu. The fourth mode menu item says “Wake Up”.
MacSpeech Dictate 1.5
Modes and the Microphone
31
• Look in the Dock menu. It contains menu items that work just like the Speech
menu.
When in Sleep mode, you can resume work by doing any of the following:
• Say Wake Up or Turn [the] Microphone On.
• Choose Speech > Microphone On or Speech > Wake Up.
• Choose Microphone On or Wake Up from the Dock menu.
• Click the microphone icon in the Status window so that it appears with a
green “go button”.
• Click the optional status menu item so it appears with a green “go button”.
• Press the keyboard shortcut for toggling the microphone.
Learning and Switching Modes
The three non-sleep modes — Dictation mode, Spelling mode, and Command
mode — form a group. You can switch from one to another, and learn which
mode MacSpeech Dictate is in, in a consistent manner.
To switch between modes:
• Say one of the following:
◦◦ Dictation Mode
◦◦ Spelling Mode
◦◦ Command Mode
• Choose from the Status window mode menu. The mode menu appears when
you click the mode button in the Status window.
• Choose from the Speech menu.
• Choose from the Dock menu.
• Press the keyboard shortcut for cycling between modes.
MacSpeech Dictate 1.5
Modes and the Microphone
32
To learn what mode you are in:
• Look at the Status window. The mode button’s icon represents the current
mode; and in the mode menu, which appears when you click the mode button, the current mode is checked.
• Look in the Speech menu. The current mode is checked.
• Look in the Dock menu. It contains menu items that work just like the Speech
menu.
MacSpeech Dictate 1.5
Dictation Mode
33
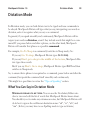
Dictation Mode
In Dictation mode, you can both dictate text to be typed and issue commands to
be obeyed. MacSpeech Dictate will type what you say, interpreting your words as
dictation, unless it recognizes what you say as a command.
In general, if you speak smoothly and continuously, MacSpeech Dictate will interpret your words as dictation, even if they include words that might be a command. If you pause before and after a phrase, on the other hand, MacSpeech
Dictate will consider that phrase as a possible command.
For example, Go To Sleep is a command (it switches to Sleep mode). So:
If you say Go. To sleep, MacSpeech Dictate types Go to sleep.
If you say Don’t go to sleep in the middle of the lecture, MacSpeech Dictate types those words.
But if you say Don’t. Go to sleep, MacSpeech Dictate types Don’t and then
switches to Sleep mode.
So, to ensure that a phrase is recognized as a command, pause before and after the
command, but speak the command itself smoothly and continuously.
This might be a good time to review the “Tips on Speaking” section.
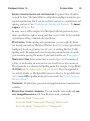
What You Can Say in Dictation Mode
Words and phrases to be typed. You can use the Vocabulary Editor window to view and edit the list of words that MacSpeech Dictate knows about.
You should try not to make any extraneous noises, but MacSpeech Dictate will
do its best to ignore the well-known hesitation noises “ah”, “er”, “uh”, and
“um”. (In fact, you may have to use Spelling mode to type such items.)
MacSpeech Dictate 1.5
Dictation Mode
34
Instructions for spacing and capitalization. In general there should be
no need for these; MacSpeech Dictate will perform intelligent automatic spacing and capitalization. But if you do need finer control over capitalization and
spacing, you have it. See “Capitalization, Spacing, and Numbers.” To insert
a space, say Space Bar.
In many cases it will be simpler to let MacSpeech Dictate perform its automatic capitalization, right or wrong, and then correct it after the fact with the
capitalization editing commands discussed below.
Punctuation. Unlike spacing and capitalization, you must explicitly dictate
any desired punctuation; MacSpeech Dictate doesn’t try to insert punctuation
intelligently based on grammar, tone of voice, or anything like that. Unlike
Spelling mode, Dictation mode does incorporate punctuation into its intelligent automatic spacing. For names of punctuation marks, see “Punctuation.”
Names of letters. Letter names may be used to type a word consisting of
a letter, or for dictating an acronym; but you should not use letter names in
Dictation mode as a substitute for Spelling mode. For example, to type An a-z
of animals, say An alpha hyphen zulu of animals. Even this approach is
not entirely reliable, as MacSpeech Dictate must allow for the possibility that
alpha means alpha. Spelling mode gets better results. See “Letter Names in
Dictation Mode.”
Commands. All global, key, generated, and application-based commands are
available.
Recognition training commands. You can train the voice model and correct recognition errors with these Dictation mode commands:
◦◦ Train the Word “Someword”
◦◦ Train the Words “Someword” Through “Otherword”
◦◦ Train the Words “Someword” to “Otherword”
MacSpeech Dictate 1.5
Dictation Mode
35
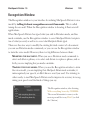
The words (or the utterance containing them) are selected and the Recognition window opens. See “Recognition Window.” When the Recognition window is open, additional Recognition window commands are available.
Navigation and editing commands. These are Dictation mode commands,
listed in the next section, designed for basic text navigation and editing, to
correct your own errors, to modify what you dictated, or to fix capitalization.
These are “proper” ways to work on your document; they do not violate the
Golden Rule (see “The Cache and the Golden Rule”).
If what you dictated was not correctly recognized by MacSpeech Dictate, it is
better to use the Recognition window. See “Recognition Window.”
Navigation and Editing Commands
You can move the insertion point with these commands:
• Move Backward(s) NN Word(s), Move Forward(s) NN Word(s) (where
“NN” is a number up to 99)
You can place the insertion point with these commands:
• Insert Before the Word “Someword”
• Insert Before the Words “Someword” Through “Otherword”
• Insert Before the Words “Someword” to “Otherword”
• Insert After the Word “Someword”
• Insert After the Words “Someword” Through “Otherword”
• Insert After the Words “Someword” to “Otherword”
You can control the selection with these commands:
• Select the Word “Someword”
• Select the Words “Someword” Through “Otherword”
• Select the Words “Someword” to “Otherword”
MacSpeech Dictate 1.5
Dictation Mode
36
You can select and delete a phrase with these commands:
• Delete the Word “Someword”
• Delete the Words “Someword” Through “Otherword”
• Delete the Words “Someword” to “Otherword”
You can select and change the case of a phrase with these commands:
• Capitalize the Word “Someword”
• Capitalize the Words “Someword” Through “Otherword”
• Capitalize the Words “Someword” to “Otherword”
• Lowercase the Word “Someword”
• Lowercase the Words “Someword” Through “Otherword”
• Lowercase the Words “Someword” to “Otherword”
• Uppercase the Word “Someword”
• Uppercase the Words “Someword” Through “Otherword”
• Uppercase the Words “Someword” to “Otherword”
In the above commands where you specify the words to select, if those words appear more than once in the document, MacSpeech Dictate selects the nearest instance. Position the insertion point near the desired words beforehand, to ensure
that they will be selected.
If you speak to delete or alter text and then change your mind (perhaps because
MacSpeech Dictate selected the wrong stretch of text), say Undo Dictation.
To remove the word last dictated or to the left of the cursor:
• Say Scratch Word (or Forget Word).
To remove the phrase last dictated or to the left of the cursor:
• Say Scratch That (or Forget That). MacSpeech Dictate’s notion of a
“phrase” depends upon how it detects pauses in your speech.
MacSpeech Dictate 1.5
Dictation Mode
37
If you “scratch” or “forget” and then change your mind (perhaps because MacSpeech Dictate removed more than you wanted), say Undo Dictation.
Capitalization, Spacing, and Numbers
In Dictation mode, you can say commands that apply special rules for capitalization, spacing and interpretation of numbers. This gives you finer control
when Dictation mode’s intelligent automatic behavior needs assistance. (For finest
possible control, though, use Spelling mode.)
Tip. MacSpeech Dictate comes with a large repertory of built-in words with
correct capitalization and spacing. So, before using these commands, try saying your word (or look it up in the Vocabulary Editor window) to see what
MacSpeech Dictate does. For example, MacSpeech Dictate handles correctly
such terms as “CD-ROM” and “FreeBSD” without your having to worry
about spacing, hyphenation, or capitalization.
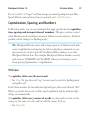
Title Case
To capitalize (title case) the next word:
• Say Cap. (To type the word “cap” you may need to switch to Spelling mode
and spell it out!)
In the Status window, the first indicator light will glow yellow and will read “Abc”.
When you say the next word, it will be typed capitalized, and the indicator light
will go out automatically.
To capitalize (title case) a series of words, you may prefer to turn on title
casing, say the series of words, and turn off title casing. To do so:
• Say Caps On.
MacSpeech Dictate 1.5
Dictation Mode
38
In the Status window, the first indicator light will glow green and will read “Abc”.
Say the series of words, which will be typed capitalized. Finally, say Caps Off.
The indicator light will go out.
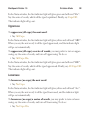
Uppercase
To uppercase (all caps) the next word:
• Say All Caps.
In the Status window, the first indicator light will glow yellow and will read “ABC”.
When you say the next word, it will be typed uppercased, and the indicator light
will go out automatically.
To uppercase (all caps) a series of words, you may prefer to turn on uppercasing, say the series of words, and turn off uppercasing. To do so:
• Say All Caps On.
In the Status window, the first indicator light will glow green and will read “ABC”.
Say the series of words, which will be typed uppercased. Finally, say All Caps Off.
The indicator light will go out.
Lowercase
To lowercase (no caps) the next word:
• Say No Caps.
In the Status window, the first indicator light will glow yellow and will read “abc”.
When you say the next word, it will be typed lowercased, and the indicator light
will go out automatically.
To lowercase (no caps) a series of words, you may prefer to turn on lowercasing, say the series of words, and turn off lowercasing. To do so:
• Say No Caps On.
MacSpeech Dictate 1.5
Dictation Mode
39
In the Status window, the first indicator light will glow green and will read “abc”.
Say the series of words, which will be typed lowercased. Finally, say No Caps Off.
The indicator light will go out.
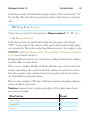
Spaces
To prevent automatic insertion of a space before the next word:
• Say No Space.
In the Status window, the second indicator light will glow yellow. When you say the
next word, it will be typed without a preceding space and the indicator light will go
out automatically.
To prevent automatic insertion of spaces while saying a series of words:
• Say No Space On.
In the Status window, the second indicator light will glow green. Say the series of
words, which will be typed without intervening spaces. Finally, say No Space Off.
The indicator light will go out.
To insert a space:
• Say Space Bar.
In general you should not need to suppress or control spacing merely because
of punctuation. For example, to hyphenate two words, say the first word, then
Hyphen, then the second word. There will be no space on either side of the hyphen, because there is a built-in rule governing how automatic spacing works next
to a hyphen.
Numbers
To force the next word to be interpreted as an Arabic digit (“1”, “2”, etc.):
• Say Numeral.
MacSpeech Dictate 1.5
Dictation Mode
40
In the Status window, the third indicator light will glow yellow and will read “123”.
Say the digit. The digit will be typed, and the indicator light will go out automatically.
Tip. To type 0, say Oh or Zero.
To force the next word to be interpreted as a Roman numeral (“I”, “II”, etc.):
• Say Roman Numeral.
In the Status window, the third indicator light will glow yellow and will read
“XIV”. Say the number. The number will be typed, and the indicator light will go
out automatically. This works even for large Roman numerals; for example, to type
MCMXCVII, say Roman Numeral One Thousand Nine Hundred and Ninety
Seven (in one smooth utterance).
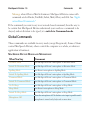
MacSpeech Dictate performs a lot of automatic intelligent formatting of numbers
and dates. Here are some details.
When you say a number, MacSpeech Dictate will either type out the words or the
number, depending on the context in which the number was used. If you want to
force the program to type a number instead of typing the words for the number,
say Numeral before saying the number.
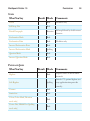
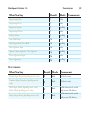
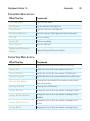
Here are some examples of MacSpeech Dictate’s automatic formatting and punctuation of numeric expressions.
Numbers (numerals) may be spoken using digits or full number names. Insert
punctuation as needed.
What You Say
Result
Numeral One
1
Numeral Five
5
Seventeen
17
MacSpeech Dictate 1.5
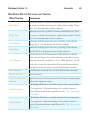
Dictation Mode
What You Say
Result
Forty Two
42
One Hundred Seventy Nine
179
Five Thousand Four Hundred and Twenty Three
5423
Numeral Five Comma No Space Four Hundred and Twenty
Three
5,423
Twelve Thousand Five Hundred and Thirty Seven
12,537
One Hundred and Forty Two Thousand and Fifteen
142,015
Thirty Five Point Two Three
35.23
Zero Point Zero Three
0.03
Forty-Three Point Twenty Eight Percent Sign
43.28%
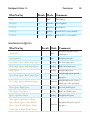
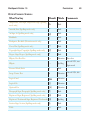
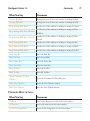
Fractions may be spoken normally, or you can clarify by saying Slash or Over
between the numerator and the denominator.
What You Say
Result
Numeral One Half
1/2
Numeral One Over Four;
Numeral One Quarter
1/4
Fifteen Sixteenths;
Fifteen Over Sixteen
15/16
Two and Three Fourths
2 3/4
Eleven Over Thirty Two
11/32
Eleven Thirty Seconds
11/32
Three and Seven Eights;
Numeral Three Seven Over Eight
3 7/8
41
MacSpeech Dictate 1.5
Dictation Mode
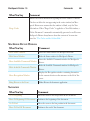
What You Say
Result
Nine Slash Twelve
Nine Over Twelve
9/12
Numeral Five Space Bar Three Slash Fifty Six
5 3/56
One Thirty Over Seventy
130/70
42
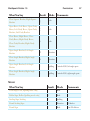
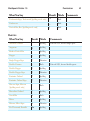
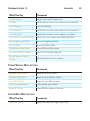
Currency may be spoken normally; the number will be parsed and punctuated in
response to your use of the currency name.
What You Say
Result
Ninety Nine Dollars and Fifty Five Cents
$99.55
Forty Five Euros and Thirty Five Cents
€45.35
Pound Sterling Sign One Hundred and Twenty Point Thirty Five
£120.35
Zip codes (US) may be spoken normally, digit by digit. For other postal code formats, the best approach is probably to switch to Spelling mode.
What You Say
Result
Oh Two Four Six Zero
02460
Oh Two Four Six Zero Hyphen One Four Five Eight
02460-1458
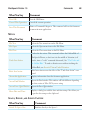
US telephone numbers may be spoken normally, digit by digit, and punctuation will be automatic; for other telephone number formats, say the punctuation
(you might like to experiment a bit).
What You Say
Result
Three Five Zero Zero Nine Zero Three
350-0903
Six Oh Three Three Five Oh Oh Nine Oh Three
603-350-0903
One Eight Hundred Five Five Five One Two One Two
1-800-555-1212
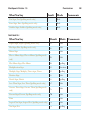
MacSpeech Dictate 1.5
Dictation Mode
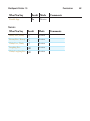
What You Say
Result
Open Parenthesis Six Zero Three Close Parenthesis Three
Five Zero Zero Nine Zero Three
(603) 350-0903
One Two One Two Five Five Five Twelve Twelve
1-212-555-1212
Open Parenthesis Oh One Six Two Eight Close
Parenthesis Eight Nine Four One Five Oh
(01628) 894150
Oh Two Seven Space Bar Six Two Nine Space Bar Eight
Nine Four Four
027 629 8944
Six One Hyphen Seven Hyphen Four Six Nine Five
Hyphen Two Zero Five Five
61-7-4695-2055
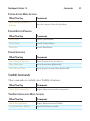
Dates and times may mostly be spoken normally. For times, the separator is a
colon, and this is entered automatically if you say AM or PM. Alternatively, say
punctuation explicitly.
What You Say
Result
Twenty Two January Nineteen Ninety Nine
22 January 1999
April Nine Comma Two Thousand And One
April 9, 2001
Fourteen Slash Oh Seven Slash Eighty Five
14/07/85
Three Slash Eleven Slash Zero Two
3/11/02
Three Slash Eleven Slash Two Thousand And Two
3/11/2002
April First
April 1
March Twenty Second
March 22
The Nineteen Eighties
the 1980s
The Nineteen Eighty Apostophe Ess
the 1980's
Seven Forty Five AM
7:45 AM
Three Colon Zero Zero
3:00
43
MacSpeech Dictate 1.5
Dictation Mode
44
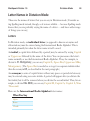
Letter Names in Dictation Mode
These are the names of letters that you can say in Dictation mode. (Consider using Spelling mode instead, though, as it is more reliable — because Spelling mode
knows that you are probably saying the name of a letter — and has a wider range
of things you can say.)
Letters
In Dictation mode, an individual letter (as opposed to known acronyms and
abbreviations) must be entered using the International Radio Alphabet. This is
intended primarily for when the letter name is itself a word.
An initial (a capital letter followed by a period) may be entered by saying Capital
or Uppercase followed by the name of the letter. You can pronounce the letter’s
name normally or use the International Radio Alphabet. Thus, for example, to
dictate L. M. Montgomery, you can say Capital L, Space Bar, Uppercase Mike,
Montgomery. (The Space Bar is needed so as to get two separate initials rather
than the acronym LM, as described in the next paragraph.)
An acronym (a series of capital letters without any spaces or periods in between)
may be entered using successive initials. A period will appear after you dictate the
first initial, but it will be removed when you dictate the second initial. Thus, for example, to dictate HAL 9000, you can say Capital H, Capital A, Capital L, Nine
Thousand.
Here are the International Radio Alphabet letter names:
What You Say
Alpha
Bravo
Charlie
MacSpeech Dictate 1.5
What You Say
Delta
Echo
Foxtrot
Golf
Hotel
India
Juliet
Kilo
Lima
Mike
November
Oscar
Papa
Quebec
Romeo
Sierra
Tango
Uniform
Whiskey
Xray
Yankee
Zulu
Dictation Mode
45
MacSpeech Dictate 1.5
Dictation Mode
46
Diacritical Letters
A diacritical letter is a letter with a marking above or below it. (Spelling mode has
a wider repertory of diacritical letters and is recommended.)
The following phrases, all involving the International Radio Alphabet, enter diacritical letters in Dictation mode:
What You Say
Result
Alpha-Accent-Acute
á
Alpha-Accent-Circumflex
â
Alpha-Accent-Grave
à
Alpha-Accent-Tilde; Alpha-Tilde
ã
Alpha-Accent-Umlaut
ä
Alpha-Ring-Above
å
Charlie-Accent-Cedilla
ç
Echo-Accent-Acute
é
Echo-Accent-Circumflex
ê
Echo-Accent-Grave
è
Echo-Accent-Umlaut
ë
India-Accent-Acute
í
India-Accent-Circumflex
î
India-Accent-Grave
ì
India-Accent-Umlaut
ï
November-Accent-Tilde
ñ
Oscar-Accent-Acute
ó
Oscar-Accent-Circumflex
ô
MacSpeech Dictate 1.5
Dictation Mode
What You Say
Result
Oscar-Accent-Grave
ò
Oscar-Accent-Tilde; Oscar-AccentTilde
õ
Oscar-Accent-Umlaut
ö
Oscar-Oblique-Stroke
ø
Uniform-Accent-Acute
ú
Uniform-Accent-Circumflex
û
Uniform-Accent-Grave
ù
Uniform-Accent-Umlaut
ü
Yankee-Accent-Acute
ý
Yankee-Accent-Umlaut
ÿ
Ligatures and Non-Latin Letters
You can say the following ligatures and non-Latin letters in Dictation mode:
What You Say
Result
A E Diphthong; A E Ligature
æ
O E Diphthong; O E Ligature
œ
Eszet; German Sharp S
ß
S With Caron
š
Icelandic Eth
ð
Icelandic Thorn
þ
47
MacSpeech Dictate 1.5
Spelling Mode
48
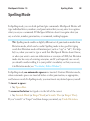
Spelling Mode
In Spelling mode, you can both spell and give commands. MacSpeech Dictate will
type individual letters, numbers, and punctuation that you say, unless it recognizes
what you say as a command. If MacSpeech Dictate doesn’t recognize what you
say as a letter, number, punctuation, or command, nothing happens.
Tip. Spelling mode enables a slightly different set of punctuation marks from
Dictation mode, which can be useful. Spelling mode is also good for typing
words that Dictation mode will misinterpret (such as “cap” or “uh”). It is helpful, too, when you want to type a word that MacSpeech Dictate doesn’t know,
or when you want to enter an abbreviation or acronym or URL; but Dictation
mode also has ways of entering acronyms, and if you frequently use a word,
you should consider adding it to your profile’s vocabulary so that you can say
it in Dictation mode (see “Vocabulary Editor Window”).
In Spelling mode, no automatic spaces are inserted. Contrast Dictation mode,
where automatic spaces are inserted before or after punctuation, as appropriate,
and between words. In Spelling mode, you must insert any desired spaces yourself.
To insert a space:
• Say Space Bar.
To remove the letter last typed or to the left of the cursor:
• Say Scratch Word (or Forget Word) or Scratch That (or Forget That).
If you “scratch” or “forget” and then change your mind, say Undo Dictation.
MacSpeech Dictate 1.5
Spelling Mode
49
What You Can Say in Spelling Mode
The names of letters and numerals. (For letter names, see the next section,
“Letter Names in Spelling Mode.”) To capitalize a letter:
◦◦ Say Cap followed by the name of the letter.
Punctuation. See “Punctuation.”
Commands. All global, key, generated, and application-based commands are
available.
Navigation commands. You can control the insertion point with these
Spelling mode commands:
◦◦ Move Backward(s) NN Letter(s) and Move Forward(s) NN Letter(s)
(where “NN” is a number up to 99)
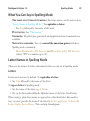
Letter Names in Spelling Mode
These are the names of letters and numerals that you can say in Spelling mode.
Letters
Letters are lowercase by default. To capitalize a letter:
• Say Cap followed by the name of the letter.
To type a letter in Spelling mode:
• Say the name of the letter, e.g. A, B, etc.
• Or, say the International Radio Alphabet name of the letter (listed below).
When saying a plain letter name (as opposed to a diacritical letter, discussed below), you may precede the name of the letter by Letter, e.g. Letter A, Letter B,
Letter Alpha, Letter Bravo. This can help disambiguate.
MacSpeech Dictate 1.5
Spelling Mode
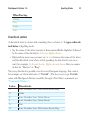
To repeat a letter (that is, to say a letter that appears twice in succession):
• You may say the letter name preceded by Double, e.g. Double A, Double
Alpha. (In case of “u”, say Double Letter U to disambiguate from “w”.)
Here are the International Radio Alphabet letter names:
What You Say
Alpha
Bravo
Charlie
Delta
Echo
Foxtrot
Golf
Hotel
India
Juliet
Kilo
Lima
Mike
November
Oscar
Papa
Quebec
Romeo
Sierra
Tango
Uniform
50
MacSpeech Dictate 1.5
Spelling Mode
51
What You Say
Whiskey
Xray
Yankee
Zulu
Diacritical Letters
A diacritical letter is a letter with a marking above or below it. To type a diacritical letter in Spelling mode:
• Say the name of the letter (normal or International Radio Alphabet) followed
by the name of the diacritical: A-Acute, Alpha-Acute.
• Optionally, in most cases you may say Accent between the name of the letter
and the diacritical (even when, strictly speaking, the diacritical is not an accent): for example, A Accent-Acute, Alpha Accent-Acute. But you cannot
do this for “Dieresis” or “Ring”.
Not every diacritical is possible, even for every European language. You cannot,
for example, say the fourth letter of “Dvořák”. (The best way to type Dvořák’s
name with MacSpeech Dictate would be through a Text Macro command; see
“Commands Window.”)
Letter
Diacriticals
A
Acute, Circumflex, Grave, Tilde, Umlaut; Dieresis, Ring
C
Cedilla
E
Acute, Circumflex, Grave, Umlaut; Dieresis
I
Acute, Circumflex, Grave, Umlaut; Dieresis
N
Tilde
O
Acute, Circumflex, Grave, Tilde, Umlaut; Dieresis, Ring
MacSpeech Dictate 1.5
Letter
Diacriticals
U
Acute, Circumflex, Grave, Umlaut; Dieresis
Y
Acute, Umlaut; Dieresis
Spelling Mode
52
Ligatures and Non-Latin Letters
You can say the following ligatures and non-Latin letters in Spelling mode:
What You Say
Result
A E Diphthong; A E Ligature; Ligature A E
æ
O Slash
ø
O E Diphthong; O E Ligature; Ligature O E
œ
Eszet; Sharp S; German Sharp; German Sharp S
ß
S Wedge
š
Icelandic Eth
ð
Icelandic Thorn
þ
Numerals
Numerals are individual digits. To type a digit in Spelling mode:
• Say the name of the digit, e.g. Zero, One, etc.
• Or, say Numeral followed by the name of the digit, e.g. Numeral Zero,
Numeral One, etc. (Do not say Number, which signifies the hash sign, “#”.)
Some numeric symbols are discussed as punctuation; see “Punctuation.”
MacSpeech Dictate 1.5
Punctuation
53
Punctuation
In both Dictation mode and Spelling mode, you can say the names of punctuation
marks that MacSpeech Dictate should type. This chapter lists the names of these
symbols. These names are listed also in the Available Commands window (and, for
Dictation mode, in the Vocabulary Editor window).
There are some broad differences between saying a punctuation mark in Dictation
mode and saying it in Spelling mode.
In Dictation mode, MacSpeech Dictate will attempt to insert intelligent automatic
spacing. (For example, it will probably put a space before “open quote” and after
“close quote”.) You may be able to prevent this by switching No Space on. But for
finest control, use Spelling mode.
In Spelling mode, on the other hand, MacSpeech Dictate types the symbol and
that’s all. Also, Spelling mode has a larger repertory of punctuation marks (and of
things you can say to type them).
Spaces
What You Say
Result Mode
Comments
Space Bar
Both
Space character
No-Break Space; Non-Breakable Space;
Unbreakable Space
Spelling
New Line; Next Line
Dictation
Single return character
New Paragraph; Next Paragraph
Dictation
Double return character
Tab Key
Dictation
Tab character
MacSpeech Dictate 1.5
Punctuation
54
Stops
What You Say
Result Mode
Comments
Period
.
Both
US dialect only
Full Stop; Dot
.
Both
Period Paragraph
.
Dictation
Exclamation Mark
!
Both
Exclamation Point
!
Both
Inverted Exclamation Point
¡
Both
Inverted Exclamation Mark
¡
Spelling
Question Mark
?
Both
Inverted Question Mark
¿
Both
Full stop followed by double return
character
US dialect only
Pauses and Joins
What You Say
Result
Mode
Hyphen
-
Both
Soft Hyphen
Spelling
Comma
,
Both
Semicolon
;
Both
Colon; Colon Mark (Dictation
mode only)
:
Both
Center Dot; Middle Dot (Spelling
mode only)
·
Both
Comments
No space before or after in Dictation mode
Unicode 173, optional hyphen (not
every application interprets this
correctly)
MacSpeech Dictate 1.5
Punctuation
What You Say
Result
Mode
Comments
Dash
--
Both
Two hyphens
Em-Dash
---
Dictation
Three hyphens
En-Dash
--
Dictation
Two hyphens
Em-Dash
—
Spelling
Unicode 8212, a true em-dash
En-Dash
–
Spelling
Unicode 8211, a true en-dash
55
Apostrophe and Quotes
What You Say
Result Mode
Comments
Apostrophe
'
Both
Straight apostrophe (no preceding space)
Apostrophe-Ess
's
Both
Straight apostrophe
Open Single Quote; Begin Single Quote
‘
Spelling
Left curly single quote
Close Single Quote; End Single Quote
’
Spelling
Right curly single quote
Single Quote
'
Spelling
Straight single quote
Open Single Quote; Begin Single Quote
'
Dictation
Close Single Quote; End Single Quote
'
Dictation
Open Quote; Begin Quote
“
Spelling
Left curly double quote
Close Quote; End Quote
”
Spelling
Right curly double quote
Quote; Quotation Marks
"
Spelling
Straight double quote
Open Quote; Open Quotes; Begin
Quote; Begin Quotes; Open Double
Quote; Open Double Quotes; Begin
Double Quote; Begin Double Quotes
"
Dictation
Straight double quote (preceding space)
Straight single quote (preceding space)
Straight single quote (no preceding space, like apostrophe)
MacSpeech Dictate 1.5
Punctuation
56
What You Say
Result Mode
Comments
Close Quote; Close Quotes; End Quote;
End Quotes; Close Double Quote; Close
Double Quotes; End Double Quote;
End Double Quotes
"
Dictation
Straight double quote (no preceding space)
Open Euro Quote; Open Euro Quotes
«
Both
Close Euro Quote; Close Euro Quotes
»
Both
Begin Angle Quote; Begin Angle
Quotes; Open Angle Quote; Open
Angle Quotes
«
Spelling
End Angle Quote; End Angle Quotes;
Close Angle Quote; Close Angle Quotes
»
Spelling
Enclosures
What You Say
Result
Mode
Comments
Open Paren; Left Paren; Open
Parenthesis; Left Parenthesis
(
Both
Close Paren; Right Paren; Close
Parenthesis; Right parenthesis
)
Both
Open Bracket; Left Bracket
(
Both
Non-US dialects, like parenthesis
Close Bracket; Right Bracket
)
Both
Non-US dialects, like parenthesis
Open Bracket; Left Bracket
[
Both
US dialect, like square bracket
Close Bracket; Right Bracket
]
Both
US dialect, like square bracket
Open Square Bracket; Left Square
Bracket
[
Both
MacSpeech Dictate 1.5
Punctuation
57
What You Say
Result
Mode
Comments
Close Square Bracket; Right Square
Bracket
]
Both
Open Brace; Left Brace; Open Curly
Brace; Left Curly Brace; Open Curly
Bracket; Left Curly Bracket
{
Both
Close Brace; Right Brace; Close
Curly Brace; Right Curly Brace;
Close Curly Bracket; Right Curly
Bracket
}
Both
Open Angle Bracket; Left Angle
Bracket
<
Dictation
Close Angle Bracket; Right Angle
Bracket
>
Dictation
Open Angle Bracket; Left Angle
Bracket
‹
Spelling
Unicode 8249, left angle quote
Close Angle Bracket; Right Angle
Bracket
›
Spelling
Unicode 8250, right angle quote
Money
What You Say
Result
Mode
Comments
Cents Sign; Cent (Spelling mode only)
¢
Both
Dollar Sign; Dollar (Spelling mode only)
$
Both
Sterling Sign; Sterling
£
Spelling
Pound Sterling Sign
£
Dictation
US dialect
Pound Sign
£
Both
Non-US dialects
MacSpeech Dictate 1.5
Punctuation
What You Say
Result
Mode
Yen Sign; Yen (Spelling mode only)
¥
Both
Euro Sign; Euro (Spelling mode only)
€
Both
Guilder Sign; Guilder (Spelling mode only)
ƒ
Both
58
Comments
Arithmetic
What You Say
Result
Mode
Equals Sign; Equal (Spelling mode only)
=
Both
Plus Sign; Plus (Spelling mode only)
+
Both
Minus Sign
-
Both
Plus or Minus Sign; Plus or Minus (Spelling mode
only)
±
Both
Plus Minus Sign; Plus Minus
±
Spelling
Multiplication Sign
×
Dictation
Multiply Sign; Multiply; Times sign; Times
×
Spelling
Division Sign
÷
Both
Divide Sign; Divide
÷
Spelling
Less Than Sign; Less Than (Spelling mode only)
<
Both
Greater Than Sign; Greater Than (Spelling mode
only)
>
Both
Percent Sign; Percent (Spelling mode only)
%
Both
Point
.
Both
Logical Not Sign; Logical Not (Spelling mode only)
¬
Both
Not Sign; Not
¬
Spelling
Comments
MacSpeech Dictate 1.5
Punctuation
What You Say
Result
Mode
Superscript One
¹
Both
Superscript Two
²
Both
Squared; Square
²
Spelling
Superscript Three
³
Both
Cubed; Cube
³
Spelling
One-Half Sign
½
Both
Half Sign; Half; One Half
½
Spelling
One-Quarter Sign
¼
Both
Quarter Sign; Quarter; One Quarter
¼
Spelling
Three Quarters Sign
¾
Both
Three Quarters
¾
Spelling
59
Comments
Octothorpe
What You Say
Result Mode
Comments
Pound Sign; Pound (Spelling mode only)
#
Both
US dialect only
Number Sign; Number (Spelling mode
only)
#
Both
US dialect only
Hash Sign; Hash (Spelling mode only);
Hash Mark (Spelling mode only)
#
Both
In Dictation mode, works
only in non-US dialects
Sharp Sign; Sharp (Spelling mode only)
#
Both
In Dictation mode, works
only in non-US dialects
MacSpeech Dictate 1.5
Punctuation
60
Other Common Symbols
What You Say
Result
Mode
Comments
Ampersand; And-Sign; Ampersand Sign (Spelling
mode only)
&
Both
Asterisk; Star (Spelling mode only)
*
Both
At Sign; At (Spelling mode only)
@
Both
Backslash
\
Both
Backquote; Backtick (Dictation mode only)
`
Both
Caret; Hat (Spelling mode only)
^
Both
Copyright Sign; Copyright (Spelling mode only)
©
Both
Degree Sign; Degree (Spelling mode only)
°
Both
Ellipsis; Dot-Dot-Dot
...
Dictation Three dots
Ellipsis
…
Spelling
Forward Slash; Slash
/
Both
Large Center Dot
•
Dictation
Logical And
&&
Dictation
Logical Or
||
Dictation
Optional Ess
(s)
Dictation
Paragraph Sign; Paragraph (Spelling mode only)
¶
Both
Registered Sign; Registered (Spelling mode only)
®
Both
Registered Trademark Sign; Registered Trademark
®
Spelling
Section Sign; Section (Spelling mode only)
§
Both
Tilde
~
Both
Unicode 8230, true
ellipsis mark
Unicode 8226, bullet
MacSpeech Dictate 1.5
Punctuation
What You Say
Result
Mode
Trademark Sign; Trademark (Spelling mode only)
™
Both
Underscore
_
Both
Vertical Bar; Bar (Spelling mode only)
|
Both
Comments
Rarities
What You Say
Result Mode
Comments
Alternate Comma
‚
Spelling
Unicode 8218, lowered single quote
Angstrom
å
Spelling
Broken Vertical Bar
¦
Spelling
Dagger
†
Spelling
Single Dagger Sign
†
Dictation
Double Comma
„
Both
Double Dagger
‡
Spelling
Double Dagger Sign
‡
Dictation
Feminine Ordinal
ª
Spelling
Feminine Ordinal Sign
ª
Dictation
Macron Sign; Macron
(Spelling mode only)
¯
Both
Masculine Ordinal
º
Spelling
Greek Mu
µ
Both
Micro
µ
Spelling
Micron; Micro Sign
µ
Dictation
Per Thousand; Permille
‰
Spelling
Unicode 8222, lowered double quote
61
MacSpeech Dictate 1.5
Punctuation
What You Say
Result Mode
Permille Sign
‰
Comments
Dictation
Smilies
What You Say
Result
Mode
Smiley Face; Smiley
:-)
Dictation
Frowny Face; Frowny
:-(
Dictation
Winky Face; Winky
;-)
Dictation
Laughing Face
:oD
Dictation
Winky Laughing Face
;oD
Dictation
Comments
62
MacSpeech Dictate 1.5
Commands
63
Commands
To learn what commands are available at any moment, use the Available
Commands window. See “Available Commands Window.”
Commands may be edited — modified, created, activated and deactivated, and
deleted — in the Commands window. See “Commands Window.”
Commands come in six categories:
Mode-based commands. Individual modes may have commands built into
them. For example, Capitalize the Word “Valley” is something you can
say in Dictation mode only. For more information, see the discussion of each
mode.
Window-based commands. Some commands become available only when a
certain window is open. For example, Pick 2, to insert the second alternative
from the Recognition window into your document, is available only when the
Recognition window is open. See “Recognition Window.”
Global commands. Some commands are global, meaning that they are always available (except in Sleep mode). See “Global Commands.”
Key commands. Key commands are global commands that let you say the
names of keyboard keys or modifier-key combinations for MacSpeech Dictate
to type. See “Key Commands.”
Generated commands. MacSpeech Dictate, as it starts up, will optionally
generate additional global commands that let you launch applications or create an email message addressed to someone in your Address Book. See “Generated Commands.”
Application-based commands. Some commands become available only
when a certain application is frontmost. For example, you can say Send
MacSpeech Dictate 1.5
Commands
64
Message when iChat or Mail is frontmost. MacSpeech Dictate comes with
command sets for Finder, TextEdit, Safari, Mail, iChat, and iCal. See “Application-Based Commands.”
If the command you want to say is not a mode-based command, then the way to
be certain that MacSpeech Dictate understands your words as a command to be
obeyed, and not dictation to be typed, is to switch to Command mode.
Global Commands
These commands are available in every mode (except Sleep mode). Some of them
control MacSpeech Dictate; others control the computer as a whole, or whatever
application is frontmost.
MacSpeech Dictate Modes and Microphone
What You Say
Comment
Dictation Mode
Sets MacSpeech Dictate’s microphone to Dictation Mode.
Switch To Dictation Mode
Sets MacSpeech Dictate’s microphone to Dictation Mode.
Spelling Mode
Sets Dictate’s microphone to Spelling Mode.
Switch To Spelling Mode
Sets MacSpeech Dictate’s microphone to Spelling Mode.
Command Mode
Sets MacSpeech Dictate’s microphone to Command Mode.
Switch To Command Mode
Sets MacSpeech Dictate’s microphone to Command Mode.
Go To Sleep
Sets MacSpeech Dictate’s microphone to Sleep Mode.
Sleep Mode
Sets Dictate’s microphone to Sleep Mode.
Switch To Sleep Mode
Sets MacSpeech Dictate’s microphone to Sleep Mode.
Microphone Off
Turns the microphone off. No further voice input is possible until
microphone is turned on by keyboard or menu item.
MacSpeech Dictate 1.5
Commands
65
MacSpeech Dictate Dictation and Training
What You Say
Scratch That
Forget That
Scratch Word
Forget Word
Undo Dictation
Comment
Deletes the utterance or portion of utterance immediately to the left of
the cursor or selection. An utterance is a phrase that you spoke. “Forget
That” is an alternative name for this command.
Deletes the utterance or portion of utterance immediately to the left of
the cursor or selection. An utterance is a phrase that you spoke. “Scratch
That” is an alternative name for this command.
Deletes the word just prior to the cursor or left edge of the selection. “Forget Word” is an alternative name for this command.
Deletes the word just prior to the cursor or left edge of the selection. “Scratch Word” is an alternative name for this command.
Reverses the effect of the last dictation or delete dictation command
(Delete, Scratch, Forget). Use of this command removes the correction
information from the text involved, so if you “Redo Dictation” you will
not be able to correct the replaced text. If your last dictation replaced
text, that text is restored, but no correction information is restored.
Redo Dictation
Redo Dictation reverses the effect of the Undo Dictation command.
Play the Selection
Play the Selection
Train Vocabulary from
Selection
Copies the current selection and opens the Vocabulary Training window
and uses the copied text as input.
Cache Document
Cache Selection
Tells MacSpeech Dictate to record the contents of the current window
as “user typed text”. All prior knowledge of the window contents is
replaced (dictation information, spelled letters). See “The Cache and the
Golden Rule.”
Tells MacSpeech Dictate to record the selection of the current window
as “user typed text”. All prior knowledge of the window contents is
replaced (dictation information, spelled letters). See “The Cache and the
Golden Rule.”
MacSpeech Dictate 1.5
Commands
66
What You Say
Comment
Purge Cache
Removes all cached information regarding the active window’s contents.
This does not delete the text appearing in the active window, but MacSpeech Dictate now assumes that the window is blank, except for Note
Pad windows. When “Purge Cache” is applied to a Note Pad window, a
“Cache Document” command is automatically generated as well because
MacSpeech Dictate always knows about the contents of its own windows. See “The Cache and the Golden Rule.”
MacSpeech Dictate Windows
What You Say
Comment
Show Status Window
Shows the Status window for MacSpeech Dictate.
Hide Status Window
Hides the Status window for MacSpeech Dictate.
Show Available Commands Window
Hide Available Commands Window
Show Recognition Window
Bring Dictate to the Front
Shows the Available Commands window for MacSpeech
Dictate.
Hides the Available Commands window for MacSpeech
Dictate.
Displays the Recognition window containing alternatives
for the current selection or the utterance to the left of the
cursor.
Makes Dictate the frontmost application.
Navigation
What You Say
Comment
Go To Beginning
Moves the cursor to the first position in the document.
Move To Beginning Of Document
Positions to the beginning of the document.
Go To End
Moves the cursor to the last position in the document.
Move To End Of Document
Positions to the end of the document.
MacSpeech Dictate 1.5
What You Say
Next Field
Previous Field
Commands
67
Comment
Moves the cursor to the next field by sending a tab and
purges the cache.
Moves the cursor to the previous field by sending a shift tab
and purges the cache.
Copy and Paste
Outside of a Note Pad window (that is, in an application other than MacSpeech
Dictate), these commands are the same as if you had used your hands, and therefore they are violations of the Golden Rule of MacSpeech Dictate. Dictation
mode navigation commands won’t work properly afterwards; if this causes a problem, issue a “cache” command. See “The Cache and the Golden Rule.”
What You Say
Copy Selection
Cut Selection
Paste from Clipboard
Select All
No Leading Space
Comment
Mimics the Command-C keypress, which copies whatever is selected to the
clipboard in most applications.
Mimics the Command-X keypress, which cuts whatever is selected to the
clipboard in most applications.
Pastes the contents of the clipboard at the insertion point.
Mimics a Command-A keypress. Specifically, this command is intended to
select all text within a text document or object, or all objects in the frontmost document.
All spaces are removed before the word immediately after the cursor or left
edge of the selection. Does not apply to words that have not been dictated
yet. Use “No Space” for those.
Button and Keyboard Pressing
What You Say
Comment
Press Cancel
Press the Cancel Button.
Press Don’t Save
Press the Don’t Save Button.
MacSpeech Dictate 1.5
Commands
68
What You Say
Comment
Press OK
Press the OK Button.
Cancel This Operation
Cancels the current operation.
Save This Document
Mimics a Command-S keypress. This command will save the frontmost
document in most applications.
Menus
What You Say
Comment
File New
Selects the New menu item on the File Menu.
File Open
Selects the Open menu item on the File Menu.
File Close
Selects the Close menu item on the File Menu.
Undo Last Action
Redo Last Action
Undoes the last action. This command violates the Golden Rule of
MacSpeech Dictate, so don’t use it in the middle of dictation (or if
you do, issue a “cache” command afterwards). See “The Cache and
the Golden Rule.” To undo a dictation error without violating the
Golden Rule, use Scratch That or Undo Dictation.
Redo last action reverses the effect of the “Undo Last Action” command.
About this Application
Displays information about the frontmost application.
Access Find Window
Opens the Find window. This window will look different depending
on what version of Mac OS X you are using.
Access Force Quit Window
Opens the Force Quit window.
Show Date and Time
Displays a dialog box with the date and time stamp. Also allows you
to put the date stamp on the clipboard.
Spaces, Exposé, and Screen Capture
What You Say
Comment
Switch To Space One
Switches directly to the Space 1.
MacSpeech Dictate 1.5
Commands
69
What You Say
Comment
Switch To Space Two
Switches directly to the Space 2.
Switch To Space Three
Switches directly to the Space 3.
Switch To Space Four
Switches directly to the Space 4.
Expose All Windows
Uses Exposé to expose all windows.
Expose Application Windows
Uses Exposé to expose windows for the active application.
Expose Desktop
Uses Exposé to expose the Desktop.
Capture Screen
Takes a snapshot of the entire screen and saves it on the desktop.
Capture Selection
Allows you to capture a snapshot of a selection.
Application and Window Navigation
What You Say
Comment
Hide This Application
Hides the frontmost application.
Hide Other Applications
Hides all applications except the frontmost application.
Hide All Applications
Hides all applications except the Finder.
Show All Applications
Shows all applications.
Switch To Next Application
Switches to the next application that is running.
Switch To Previous Application
Switches to the previous application that is running.
Next Application Window
Activates the next window in the active application.
Previous Application Window
Activates the previous window in the active application.
Quit This Application
Activate [Name of Application]
Quits the frontmost application, except if it is MacSpeech Dictate. MacSpeech Dictate must be quit using menu or keyboard.
Brings the named application to the front. “Activate” commands are automatically generated for all running applications and appear in the Applications subgroup of the Available
Commands window.
MacSpeech Dictate 1.5
Commands
70
What You Say
Comment
Quit [Name of Application]
Quits the named application. “Quit” commands are automatically generated for all running applications except the Finder
and MacSpeech Dictate, and appear in the Applications subgroup in the Available Commands window.
Computer As a Whole
What You Say
Comment
Turn Dock Hiding On
Turns on Dock hiding.
Turn Dock Hiding Off
Turns off Dock hiding.
Put Computer to Sleep
Puts the computer to sleep.
Special Sleep
Forces the computer to go to sleep.
Restart the Computer
Restarts the computer.
Special Restart
Restarts the computer without waiting for other tasks to complete.
The Web 100 Commands
The Web 100 commands are global commands that take you in your browser to
any of a hundred commonly used web sites. For example, you can say Jump to
Bartleby to go to the bartleby.com Great Books Online site.
These commands are enabled as a group if you have checked Enable Web Site
Commands in the Command Preferences pane. If enabled, they will appear in the
Available Commands window in the Web 100 subgroup of the Global group.
Key Commands
Key commands are global commands that let you tell MacSpeech Dictate to enter a keystroke, as if you had typed that keystroke manually.
MacSpeech Dictate 1.5
Commands
71
Key commands can help you in situations where you might otherwise have to use
the keyboard, when there is no built-in command that lets you say what you want
done. And even when there is a built-in command, key commands may be easier
to remember; for example, even if you forget the global command for creating a
new document in any application (File New), you probably know that its key combination is Command-N, so you can say Press the Key Combo Command N.
When MacSpeech Dictate types in response to a key command, the typing is directed just as real keyboard typing would be. So, for example, Press the Key
Combo Command N is directed to the frontmost application (typically to create
a new document), but Press the Key Combo Command Tab is directed to the
system (and brings the second application to the front), because that’s how Command-Tab is treated when you type it manually.
Warning. Do not use key commands to type text while dictating! That would
be going behind MacSpeech Dictate’s back, and will create navigation problems later on. It’s wrong, just like mixing dictation with manual typing. It’s a
violation of the Golden Rule. See “The Cache and the Golden Rule.”
How to Say a Key Command
What you say depends on whether you want to press a single key or a key combination involving modifier keys:
Single key. Say Press the Key KEYNAME, where KEYNAME is the
name of the key.
Key combination. Say Press the Key Combo MODIFIER KEYNAME
or Press the Keys MODIFIER KEYNAME, where KEYNAME is the
name of the key, and MODIFIER is any combination of modifier key names.
(Key names and modifier key names are shown later in this section.)
MacSpeech Dictate 1.5
Commands
72
So, for example:
• To press the Page Down key (in many applications, this scrolls a document
down one screenful), say Press the Key Page Down.
• To press the key combination Command-Shift-4 (by default, this is the system
command for letting you select an area of the screen and take a screenshot of
it), say Press the Key Combo Command Shift Four.
Modifier key names
What You Say
Command
Shift
Option
Control
Caps Lock
Key names:
Normal letter and digit names. So, for example, A, B, C, and so forth, as
well as One, Two, Three, and so forth.
International Radio Alphabet letter names. These names are listed in
the discussion of Spelling mode commands.
F-Key names. These consist of the letter “F” followed by a number from 1 to
20. So, for example, F One, F Two, and so on through F Twenty.
Named keys. These are as follows:
What You Say
Left Arrow
Right Arrow
Up Arrow
MacSpeech Dictate 1.5
Commands
73
What You Say
Down Arrow
Home
End
Page Up
Page Down
Return
Enter
Tab
Space
Escape
Forward Delete
Help
Generated Commands
MacSpeech Dictate, as it starts up, will optionally generate global commands that
let you launch an application or create an email message addressed to
someone in your Address Book.
Launching Applications
To generate commands for launching applications:
• Check Generate Application Launch Commands in the Command
Preferences pane.
Nothing will happen immediately; you need to quit MacSpeech Dictate and start
it up again. When you do, as it starts up, MacSpeech Dictate will look through all
the applications on your computer and generate commands of the form Activate
MacSpeech Dictate 1.5
Commands
74
XXX, where “XXX” is the name of the application. So, for example, if you have
Automator on your computer, a command Activate Automator will be generated, and you’ll be able to say Activate Automator to launch it.
The commands for launching applications will appear in the Available Commands
window in the Applications subgroup of the Global group.
Email Messages
To generate commands for creating pre-addressed email messages:
• Check Generate Email Commands in the Command Preferences pane.
The Email Commands subgroup will appear in the Global group in the Available
Commands window. The Email commands are globally available (you do not have
to be in Mail to use one). To learn what Email commands are available, consult
your Address Book; MacSpeech Dictate lets you say the name of any person or
group having an email address in your Address Book.
To create an email message:
• Say Send an Email To XXX or Create a Note For XXX, where “XXX”
is the primary addressee.
Hybrids such as Send a Note To and Create an Email For are also legal.
To specify multiple addressees:
• Append and as you give your command.
For example: Send an Email To XXX and YYY or Create a note for
XXX and YYY. You can have more than two addressees: Send an Email
To XXX and YYY and ZZZ and so forth.
To specify an addressee to be CC’ed:
• Append Copying after the primary addressee(s).
MacSpeech Dictate 1.5
Commands
75
For example: Send an Email To XXX Copying YYY or Create a Note
For XXX Copying YYY.
You can have additional CC’ed addressees by appending and: Send an
Email To XXX Copying YYY and ZZZ and so forth.
To specify an addressee to be BCC’ed:
• Append Blind Copying after the primary addressee(s).
For example: Send an Email To XXX Blind Copying YYY or Create a
Note For XXX Copying YYY Blind Copying ZZZ.
You can have additional BCC’ed addressees by appending and: Send an
Email To XXX Blind Copying YYY and ZZZ.
MacSpeech Dictate responds by creating a new email window addressed as specified, with the insertion point in the Subject line ready for you to dictate a subject.
Application-Based Commands
MacSpeech Dictate has sets of commands that it makes available only when a particular application is frontmost. These are the application-based commands.
Note. This mechanism allows commands to be tailored to a particular application. It also keeps the list of available commands from becoming too long,
since application-based commands effectively go out of existence temporarily when that application is not frontmost. (You can access them in the Commands window, to edit them; but you can’t use them.) This is good for you,
because the Available Commands window remains manageable. It’s also good
for MacSpeech Dictate, because it limits the number of possible commands
against which MacSpeech Dictate must try to match what you say.
MacSpeech Dictate 1.5
Commands
76
MacSpeech Dictate comes with command sets for the following applications:
• Finder
• TextEdit
• Safari
• Mail
• iChat
• iCal
You can create your own application-based commands in the Commands window.
The rest of this section lists the application-based commands that ship with MacSpeech Dictate. You can find this same information in the Available Commands
window.
Finder Commands
These commands are available when the Finder is frontmost.
Finder Application Menu Actions
What You Say
Comment
About The Finder
Displays information about the Finder.
Access Preferences Window
Opens the Preferences dialog box.
Empty Trash
Empties the trash.
Secure Empty Trash
Securely empties the trash.
Hide This Application
Hides the Finder.
Hide Other Applications
Hides other applications.
Show All Applications
Shows all applications.
MacSpeech Dictate 1.5
Commands
Finder File Menu Actions
What You Say
Comment
New Finder Window
Makes a new Finder window.
Make New Folder
Makes a new folder.
Make New Smart Folder
Make New Smart Folder
Make New Burn Folder
Makes a new Burn folder.
Open Selection
Opens the selected item(s).
Print This Document
Prints the selected document.
Close This Window
Closes the active Finder window.
Close All Windows
Closes all Finder windows.
Get Info
Displays information on the selected item(s).
Show Inspector
Shows the Inspector window.
Hide Inspector
Hides the Inspector window.
Compress Selection
Compresses the selection.
Duplicate Selection
Duplicates the selection.
Make Alias
Makes an alias of the selected item(s).
Quick Look Selection
Opens the Quick Look heads up display for the selection.
Slideshow Selection
Shows a slideshow of the selected items.
Show Original
Shows the original of the selected alias(es).
Add To Sidebar
Adds the selection to the Sidebar.
Move To Trash
Moves the selected item(s) to the trash.
Eject Selection
Ejects the selected item.
Access Burn Disc Window
Allows you to access the Burn Disc window.
Access Find Window
Opens the Find dialog box.
77
MacSpeech Dictate 1.5
Commands
78
Finder Edit Menu Actions
What You Say
Comment
Undo Last Action
Undoes the last action.
Cut Selection
Cuts the selection to the clipboard.
Copy Selection
Copies the selection to the clipboard.
Paste From Clipboard
Pastes the contents of the clipboard at the insertion point.
Select All
Selects everything.
Deselect All
Deselects everything.
Show Clipboard
Shows the clipboard.
Display Special Characters
Window
Displays the Special Characters window.
Finder View Menu Actions
What You Say
Comment
View As Icons
Switches the view of the current window to Icon view.
View As List
Switches the view of the active window to List view.
View As Columns
Switches the view for the active window to Column view.
View as Cover Flow
Switches the view of the current window to Cover Flow view.
Clean Up This Window
Cleans up the active window. If no window is active, then it
cleans up the desktop.
Clean Up Selection
Cleans up the selected item(s).
Arrange By Name
Arranges the view of the active window or desktop by name.
Arrange By Date Modified
Arrange By Date Created
Arrange By Size
Arranges the view of the active window or desktop by date
modified.
Arranges the view of the active window or desktop by date
created.
Arranges the view of the active window or desktop by size.
MacSpeech Dictate 1.5
Commands
What You Say
Comment
Arrange By Kind
Arranges the view of the active window or desktop by kind.
Arrange By Label
Arranges the view of the active window or desktop by label.
Keep Arranged By Name
Sets the view of the window or desktop to arrange by Name.
Keep Arranged By Date Modified
Keep Arranged By Date Created
Sets the view of the window or desktop to arrange by Date
Modified.
Sets the view of the window or desktop to arrange by Date
Created.
Keep Arranged By Size
Sets the view of the window or desktop to arrange by Size.
Keep Arranged By Kind
Sets the view of the window or desktop to arrange by Kind.
Keep Arranged By Label
Sets the view of the window or desktop to arrange by Label.
Show Path Bar
Shows the Path Bar.
Hide Path Bar
Hides the path Bar.
Show Status Bar
Shows the Status Bar.
Hide Status Bar
Hides the status bar.
Show Toolbar
Shows the Toolbar.
Hide Toolbar
Hides the Toolbar.
Access Customize Toolbar
Window
Opens the Customize Toolbar dialog box.
Show View Options
Shows the View Options window.
Hide View Options
Hides the View Options window.
Finder Go Menu Actions
What You Say
Comment
Go Back
Goes back to the previous view in the active window.
Go Forward
Goes to the next view in the active window.
Go To Enclosing Folder
Opens the Enclosing folder for the selected item.
79
MacSpeech Dictate 1.5
Commands
What You Say
Comment
Go To Computer
Switches to the main Computer view.
Go Home
Switches the view in the active window to your home folder.
Go To Desktop
Goes to the Desktop.
Go To Network
Switches the view in the active window to the Network view.
Go To My iDisk
Switches the view in the current window to your iDisk.
Access Other Users Public Folder
Allows you to access another user’s iDisk public folder.
Go To Applications Folder
Goes to the Applications folder.
Go To Utilities
Goes to the Utilities folder.
Clear Recent Folders Menu
Clears the Recent Folders menu
Access Go To Folder Window
Opens the Go To Folder dialog box.
Access Connect to Server
Window
Opens the Connect to Server window.
Finder Window Menu Actions
What You Say
Comment
Minimize This Window
Minimizes the active window.
Minimize All Windows
Minimizes all open Finder windows.
Zoom This Window
Zooms the active Finder window.
Cycle Through Windows
Cycles through open windows.
Bring All To Front
Brings all Finder windows to the front.
Finder Help Menu Actions
What You Say
Comment
Display Mac Help
Displays Mac Help in the Apple Help Viewer.
80
MacSpeech Dictate 1.5
Commands
Finder Action Menu Actions
What You Say
Comment
Show Package Contents Of
Selection
Shows the contents of the selected package.
Finder Button Pressing
What You Say
Comment
Press Cancel
Press the Cancel Button
Press Connect
Press the Connect Button
Press Done
Press the Done Button
Finder Selection
What You Say
Comment
Select Name Of Selection
Selects the name of the selected icon.
Select Next Name
Selects the next item alphabetically.
Select Previous Name
Selects the previous named item alphabetically.
TextEdit Commands
These commands are available when TextEdit is frontmost.
What You Say
Comment
About This Command Set
Displays information about this command set.
TextEdit Application Menu Actions
What You Say
Comment
About This Application
Displays information about TextEdit.
Access Preferences Window
Opens the Preferences window.
81
MacSpeech Dictate 1.5
Commands
What You Say
Comment
Hide This Application
Hides TextEdit.
Hide Other Applications
Hides other applications.
Show All Applications
Shows all applications.
Quit This Application
Quits TextEdit.
TextEdit File Menu Actions
What You Say
Comment
Make A New Document
Makes a new document.
Open A Document
Allows you to open an existing document.
Clear Recent Menu
Clears the recent menu.
Close All Windows
Closes all TextEdit windows.
Close This Window
Closes the active window.
Save This Document
Saves the active document.
Save All Documents
Saves all the documents.
Access Save As Window
Opens the Save As dialog box.
Revert To Last Saved Version
Reverts to the last saved version of the current document.
Show Properties Window
Shows the Properties window.
Hide Properties Window
Hides the Properties window.
Access Page Setup Window
Opens the Page Setup window.
Print This Document
Prints the active document.
TextEdit Edit Menu Actions
What You Say
Comment
Undo Last Action
Undoes the last action.
Redo Last Action
Redoes the last action.
82
MacSpeech Dictate 1.5
Commands
83
What You Say
Comment
Copy Selection
Copies the selection to the clipboard.
Cut Selection
Cuts the selection to the clipboard.
Paste From Clipboard
Pastes the contents of the clipboard at the insertion point.
Paste And Match Style
Matches the style at the insertion point when pasting the
contents of the clipboard.
Delete Selection
Deletes the selection.
Complete Selection
Auto-completes the selection.
Select All
Selects everything.
Insert Line Break
Inserts a line break at the insertion point.
Insert Page Break
Inserts a Page Break at the insertion point.
Insert Paragraph Break
Inserts a Paragraph Break at the insertion point.
Access Find Window
Opens the Find dialog box.
Find Next
Finds the next occurrence of the find string.
Find Previous
Finds the previous occurrence of the find string.
Use Selection for Find
Uses the selection for the find string.
Jump to Selection
Jumps to the selection.
Access Select Line Window
Opens the Select Line window.
Show Spelling And Grammar
Window
Shows the Spelling and Grammar window.
Hide Spelling And Grammar
Window
Hides the Spelling and Grammar window.
Check Spelling And Grammar Of
This Document
Allows you to check the spelling and grammar of the active
document.
Turn Check Spelling While Typing
Off
Turns off the Check Spelling While Typing feature.
MacSpeech Dictate 1.5
Commands
84
What You Say
Comment
Turn Check Spelling While Typing
On
Turns on the Check Spelling While Typing feature.
Turn Check Grammar With
Spelling Off
Turns off the Check Grammar with Spelling feature.
Turn Check Grammar With
Spelling On
Turns on the Check Grammar with Spelling feature.
Turn Substitutions Smart Copy And
Paste Off
Turns off the Smart Copy and Paste feature.
Turn Smart Copy And Paste On
Turns on the Smart Copy and Paste feature.
Turn Smart Links Off
Turns off the Smart Links feature.
Turn Smart Links On
Turns on the Smart Links feature.
Turn Smart Quotes Off
Turns off the Smart Quotes feature.
Turn Smart Quotes On
Turns on the Smart Quotes feature.
Start Speaking
Starts speaking the selection using the built-in text-to-speech
capabilities of Mac OS X.
Stop Speaking
Stops speaking.
Display Special Characters Window
Displays the Special Characters palette.
TextEdit Format Menu Actions
What You Say
Comment
Show Fonts Palette
Shows the Fonts Palette.
Hide Fonts Palette
Hides the Fonts Palette.
Make Selection Bold
Makes the selection bold.
Make Selection Italic
Makes the selection italic.
Make Selection Outline
Makes the selection outlined.
Make Selection Underlined
Makes the selection underlined.
MacSpeech Dictate 1.5
Commands
What You Say
Comment
Make Selection Plain Text
Makes the selection plain text.
Make Selection Bigger
Makes the selection bigger.
Make Selection Smaller
Makes the selection smaller.
Show Colors Palette
Shows the Colors Palette.
Hide Colors Palette
Hides the Colors Palette.
Align Text Center
Aligns the text to the center.
Align Text Left
Aligns the text to the left.
Align Text Right
Aligns the text to the right.
Justify Selection
Justifies the selected text.
Change Text Writing Direction
Changes the writing direction.
Show Text Ruler
Shows the Text Ruler.
Hide Text Ruler
Hides the Text Ruler.
Copy Text Ruler
Copies the Text Ruler for the selection.
Paste Text Ruler
Applies the formatting settings copied with the “Copy Text
Ruler” command to the selection.
Access Text Spacing Window
Opens the Text Spacing window.
Access Link Window
Allows you to assign a URL to a selection of text.
Access List Window
Allows you to format the selected text as a list.
Access Table Window
Allows you to format the selection as a table.
Convert Document To Plain Text
Converts the active document to plain text.
Convert Document To Rich Text
Converts the active document to rich text.
Turn Prevent Editing Off
Turns Prevent Editing off.
Turn Prevent Editing On
Turns Prevent Editing on.
Wrap Text To Page
Toggles whether the text is wrapped to the page or not.
Turn Hyphenation Off
Turns Hyphenation off.
85
MacSpeech Dictate 1.5
Commands
What You Say
Comment
Turn Hyphenation On
Turns Hyphenation on.
TextEdit Window Menu Actions
What You Say
Comment
Bring All Windows To Front
Brings all TextEdit windows to the front.
Minimize This Window
Minimizes the active window.
Minimize All Windows
Minimizes all TextEdit windows.
Zoom This Window
Zooms the front-most window.
TextEdit Help Menu Actions
What You Say
Comment
Display Help
Displays Help about TextEdit.
Safari Commands
These commands are available when Safari is frontmost.
What You Say
Comment
About This Command Set
Opens a dialog box describing this command set.
Safari Application Menu Actions
What You Say
Comment
About This Application
Displays information about Safari.
Access Report Bugs to Apple
Window
Opens the window for reporting bugs in Safari to Apple.
Access Preferences Window
Access Preferences window
Turn Block Pop Up Windows Off
Turns off the Block Pop-up Windows feature.
86
MacSpeech Dictate 1.5
Commands
What You Say
Comment
Turn Block Pop Up Windows On
Turns on the Block Pop-up Windoows feature.
Turn Private Browsing Off
Turns off the Private Browsing feature in Safari.
Turn Private Browsing On
Turns on the Private Browsing feature in Safari.
Reset Safari
Allows you to completely reset Safari.
Empty The Cache
Empties Safari’s Cache.
Hide This Application
Hides Safari.
Hide Other Applications
Hide Other Applications
Show All Applications
Shows all applications.
Quit This Application
Quits Safari.
87
Safari File Menu Actions
What You Say
Comment
Make New Browser Window
Opens a new browser window.
Make A New Tab
Makes a new untitled tab in the current window.
Access Open File Window
Access Open Location Window
Allows you to open a file, typically a web page stored locally,
on any attached storage device.
Selects contents of URL field in the current window. (TIP:
use spelling mode to enter complex URLs.)
Close This Window
Closes the front window in Safari.
Close All Windows
Closes all open Safari windows.
Close This Tab
Closes the current tab.
Close Other Tabs
Closes all tabs except the current one.
Access Save As Window
Opens the Save As dialog box.
Mail Contents Of This Page
Mails the contents of the current web page using your preferred email client.
MacSpeech Dictate 1.5
Commands
What You Say
Comment
Mail Link To This Page
Mails a link to the current web page using your preferred
email client.
Access Open In Dashboard
Window
Allows you to open a portion of the current web page in
Dashboard.
Access Import Bookmarks Window
Allows you to import bookmarks from a file.
Access Export Bookmarks Window
Allows you to export your bookmarks to an XML file.
Access Page Setup Window
Opens the Page Setup dialog box.
Print This Document
Prints the current web page.
Safari Edit Menu Actions
What You Say
Comment
Undo Last Action
Undoes the last action.
Redo Last Action
Redoes the last action.
Cut Selection
Cut Selection
Copy Selection
Copy Selection
Paste From Clipboard
Paste the contents of the clipboard at the insertion
point.
Delete Selection
Deletes the selection.
Select All
Selects everything.
Auto Fill This Form
AutoFills the Current Form.
Do Google Search
Puts the cursor in the Google Search field.
Show Find Toolbar
Opens the Find window.
Find Next
Finds the next instance of the Find string.
Find Previous
Finds the previous occurrence of the Find string.
Hide Find Banner
Hides the Find Banner.
Use Selection for Find
Uses the current selection as the Find string.
88
MacSpeech Dictate 1.5
Commands
What You Say
Comment
Jump to Selection
Jumps to the selection in the current window.
Access Spelling And Grammar Window
Opens the Spelling and Grammar window.
Show Spelling And Grammar Window
Shows the Spelling and Grammar window.
Hide Spelling And Grammar Window
Hides the Spelling and Grammar window.
Check Spelling And Grammar Of This
Document
Allows you to check the spelling and grammar of the
active document.
Turn Check Spelling While Typing Off
Turns off the Check Spelling While Typing feature.
Turn Check Spelling While Typing On
Turns on the Check Spelling While Typing feature.
Turn Check Grammar With Spelling
Off
Turns off the Check Grammar with Spelling feature.
Turn Check Grammar With Spelling On Turns on the Check Grammar with Spelling feature.
Display Special Characters Window
Displays the Special Characters palette.
Safari View Menu Actions
What You Say
Comment
Show Bookmarks Bar
Shows the Bookmarks Bar.
Hide Bookmarks Bar
Hides the Bookmarks Bar.
Show Status Bar
Shows the Status Bar.
Hide Status Bar
Hides the Status Bar.
Show Tab Bar
Shows the Tab Bar.
Hide Tab Bar
Hides the tab bar.
Show Toolbar
Shows the Toolbar.
Hide Toolbar
Hides the Toolbar.
Access Customize Toolbar Window
Opens the Customize Toolbar window.
Stop Loading This Page
Stops loading the current page.
89
MacSpeech Dictate 1.5
Commands
What You Say
Comment
Reload This Page
Reloads the current web page.
Make Text Bigger
Makes the text bigger.
Make Text Normal Size
Makes the text normal size.
Make Text Smaller
Makes the text smaller.
View Source For This Page
Displays the source code for the current web page.
90
Safari History Menu Actions
What You Say
Comment
Jump Back
Goes back to the last location visited.
Jump Forward
Jumps forward to the next location visited (typically used
after you have already used the “Jump Back” command
to view a previous page again).
Jump Home
Takes you to your home page.
Mark This Page For Snap Back
Marks the current web page for SnapBack.
Jump To Snap Back Page
Takes you to the page you previously marked as the
SnapBack page.
Jump To Search Snap Back
Takes you to the Search Results SnapBack page.
Reopen Last Closed Window
Reopens the last closed window.
Reopen All Windows From Last Session
Reopens all the Safari windows that were open during
the last session.
Jump To Bookmark One
Jumps to the first bookmark in the Bookmark Bar.
Jump To Bookmark Two
Jumps to the second bookmark in the Bookmark Bar.
Jump To Bookmark Three
Jumps to the third bookmark in the Bookmark Bar.
Jump To Bookmark Four
Jumps to the fourth bookmark in the Bookmark Bar.
Jump To Bookmark Five
Jumps to the fifth bookmark in the Bookmark Bar.
Jump To Bookmark Six
Jumps to the sixth bookmark in the Bookmark Bar.
MacSpeech Dictate 1.5
Commands
What You Say
Comment
Jump To Bookmark Seven
Jumps to the seventh bookmark in the Bookmark Bar.
Jump To Bookmark Eight
Jumps to the Eighth bookmark in the Bookmark Bar.
Jump To Bookmark Nine
Jumps to the ninth bookmark in the Bookmark Bar.
Show All History
Show All History
Clear History
Clears the history of locations visited.
91
Safari Bookmarks Menu Actions
What You Say
Comment
Show All Bookmarks
Shows the Bookmark Manager.
Hide All Bookmarks
Hides the Bookmark manager.
Access Add Bookmark Window
Adds a bookmark to the current page, allowing you to rename
it.
Add Bookmark For These Tabs
Add Bookmark For These Tabs
Add Bookmark Folder
Adds a Bookmark Folder to the Bookmark collection.
Bookmark This Page
Adds the current page to the Bookmark menu without asking
to rename it.
Access Save As Window
Opens the Save As dialog box.
Move To Next Cell
Moves to the next editable cell while in Bookmarks view.
Open Selected Bookmark
Opens the selected bookmark when in Bookmark view.
Delete Selected Bookmarks
Deletes the selected Bookmarks when in Bookmarks view.
Safari Window Menu Actions
What You Say
Comment
Minimize This Window
Minimizes the current window.
Minimize All Windows
Minimizes all windows.
Zoom This Window
Zooms the current window.
MacSpeech Dictate 1.5
Commands
What You Say
Comment
Select Next Tab
Selects the next tab in the current window.
Select Previous Tab
Selects the Previous Tab in the current window.
Merge All Windows
Merges all windows.
Move Tab To New Window
Moves the current tab to a new window.
Open Downloads Window
Opens the Downloads window.
Show Activity Window
Shows the Activity window
Bring All Windows To Front
Brings all Safari windows to the front.
92
Safari Help Menu Actions
What You Say
Comment
Display Safari Help
Displays Safari’s Help file in a new window.
Display Acknowledgments
Displays the Acknowledgments document in a new window.
Display Installed Plug ins
Displays the installed plug-ins in a new window.
Display License
Displays the license agreement in a new window.
Safari Links and Navigation
What You Say
Comment
Create a command for this page
Creates a command for this page
Jump To This Link
Takes you to the web page for the selected link.
Move To Next Link
Moves to the next link while in normal view.
Move To Previous Link
Moves to the previous link while in normal view.
Move To Next Text Field
Moves to the next editable text field while in normal view.
Move To Previous Text Field
Moves to the previous editable text field while in normal view.
Scroll Up
Scrolls the page up by a small amount, but more than clicking
on the scroll bar up arrow.
MacSpeech Dictate 1.5
Commands
93
What You Say
Comment
Scroll Down
Scrolls the page down by a little, but more than by clicking the
scroll down arrow.
Scroll To Top
Scrolls to the top of the current page.
Scroll To Bottom
Scrolls to the bottom of the current page.
Scroll Left
Scroll Right
Scrolls the page left by a little, but more than by clicking the
scroll left arrow.
Scrolls the page right by a litte, but more than by clicking the
scroll right arrow.
Scroll One Screen Down
Scrolls down one screenfull.
Scroll One Screen Left
Scrolls left one screen.
Scroll One Screen Right
Scrolls right one screen.
Scroll One Screen Up
Scrolls up one screenfull.
Mail Commands
These commands are available when Mail is frontmost.
What You Say
About This Command Set
Mail Application Menu Actions
What You Say
About This Application
Access Preferences Window
Hide This Application
Hide Other Applications
Show All Applications
Quit This Application
MacSpeech Dictate 1.5
Mail File Menu Actions
What You Say
New Message
New Viewer Window
Close This Window
Save As Draft
Access Save As Window
Access Attach File Window
Access Save Attachments Window
Access Add Account Window
Access Import Mailboxes Window
Access Page Setup Window
Print This Document
Mail Edit Menu Actions
What You Say
Undo Last Action
Redo Last Action
Cut Selection
Copy Selection
Paste From Clipboard
Delete Selection
Select All
Complete Entry
Paste As Quotation
Paste As H T M L
Commands
94
MacSpeech Dictate 1.5
What You Say
Paste and Match Style
Append Selected Messages
Access Add Hyperlink Window
Include Original Attachments in Reply
Exclude Original Attachments in Reply
Access Find Window
Find In Selected Mailboxes
Use Selection for Find
Find Next
Find Previous
Jump to Selection
Access Spelling Window
Check Spelling
Turn Check Spelling As You Type Off
Turn Check Spelling As You Type On
Turn Check Spelling When You Click Send On
Speak Selection
Stop Speaking
Access Special Characters Window
Mail View Menu Actions
What You Say
Show Attachments Column
Show Buddy Availability Column
Show Date Received Column
Commands
95
MacSpeech Dictate 1.5
What You Say
Show Date Sent Column
Show Flags Column
Show From Column
Show Mailbox Column
Show Number Column
Show Size Column
Show To Column
Hide Attachments Column
Hide Buddy Availability Column
Hide Date Received Column
Hide Date Sent Column
Hide Flags Column
Hide From Column
Hide Mailbox Column
Hide Number Column
Hide Size Column
Hide To Column
Sort By Attachments
Sort By Buddy Availability
Sort By Color
Sort By Date Received
Sort By Date Sent
Sort By Flags
Sort By From
Sort By Mailbox
Commands
96
MacSpeech Dictate 1.5
What You Say
Sort By Message Status
Sort By Number
Sort By Size
Sort By Subject
Sort By To
Turn Organize by Thread Off
Turn Organize by Thread On
Collapse All Threads
Collapse This Thread
Expand All Threads
Expand This Thread
Hide B C C Address Field
Show B C C Address Field
Hide Reply To Address Field
Show Reply To Address Field
Select All Messages In This Thread
Select Next Message in this Thread
Select Previous Message in this Thread
Go To Next Message In Thread
Go To Previous Message In Thread
Show Long Headers
Show Default Headers
View Plain Text Alternative
View Next Alternative
View Previous Alternative
Commands
97
MacSpeech Dictate 1.5
What You Say
View Best Alternative For Selected Message
View Raw Source For Selection
View Original Content For Selection
Display Selected Messages Only
Display All Messages
Hide Mailboxes
Show Mailboxes
Hide Deleted Messages
Show Deleted Messages
Hide Toolbar
Show Toolbar
Access Customize Toolbar Window
Use Large Mailbox Icons
Use Small Mailbox Icons
Mail Mailbox Menu Actions
What You Say
Go Offline
Go Online
Get All New Mail
Synchronize All Accounts
Erase Deleted Messages In All Accounts
Erase Deleted Messages On My Mac
Erase Junk Mail
Make New Mailbox
Commands
98
MacSpeech Dictate 1.5
What You Say
Make New Smart Mailbox
Edit Selected Smart Mailbox
New Smart Mailbox Folder
Rename Selected Mailbox
Delete This Mailbox
Go To In Box
Go To Out Box
Go To Drafts
Go To Sent Box
Go To Junk
Go To Trash
Use This Mailbox For Drafts
Use This Mailbox For Junk
Use This Mailbox For Sent
Use This Mailbox For Trash
Rebuild Selected Mailbox
Mail Message Menu Actions
What You Say
Send Message
Send This Message Again
Reply To This Message
Reply All To This Message
Reply With I Chat
Forward Selection
Commands
99
MacSpeech Dictate 1.5
What You Say
Forward This Message
Redirect This Message
Bounce Selection
Mark As Flagged
Mark As Unflagged
Mark As High Priority
Mark As Low Priority
Mark As Normal Priority
Mark As Junk Mail
Mark As Read
Mark As Unread
Move To Last Used Mailbox
Apply Rules
Add Sender to Address Book
Remove Attachments
Mail Format Menu Actions
What You Say
Show Font Palette
Hide Font Palette
Show Color Palette
Hide Color Palette
Make Selection Bigger
Make Selection Smaller
Make Selection Bold
Commands
100
MacSpeech Dictate 1.5
What You Say
Make Selection Italic
Make Selection Outline
Make Selection Underline
Make Selection Plain Text
Make Selection Rich Text
Copy Style Of Selection
Paste Style
Access Styles Window
Align Selection Center
Align Selection Left
Align Selection Right
Justify Selection
Change Writing Direction From Left To Right
Change Writing Direction From Right To Left
Increase Quote Level
Decrease Quote Level
Mail Window Menu Actions
What You Say
Minimize This Window
Zoom This Window
Show Message Viewer
Show Address Panel
Show Previous Recipients
Show Activity Viewer
Commands
101
MacSpeech Dictate 1.5
What You Say
Show Connection Doctor
Bring All to Front
Arrange In Front
Mail Help Menu Actions
What You Say
Display Mail Help
Display What’s New in Mail
Mail Navigation and Selection
What You Say
Move To Beginning Of Message
Move To End Of Message
Move Down One Page
Move Up One Page
Move Down One Paragraph
Move Up One Paragraph
Move Left One Word
Move Right One Word
Move To Beginning Of This Line
Move To End Of This Line
Move Left One Character
Move Right One Character
Extend Selection to Beginning Of Message
Extend Selection To End Of Message
Commands
102
MacSpeech Dictate 1.5
Commands
What You Say
Extend Selection To End Of This Window
Extend Selection Down One Page
Extend Selection Up One Page
Extend Selection To End Of Paragraph
Extend Selection Up One Paragraph
Extend Selection To Beginning Of Word
Extend Selection To End Of Word
Extend Selection Up One Line
Extend Selection Down One Line
Extend Selection To Beginning Of Line
Extend Selection To End of Line
Extend Selection Left One Character
Extend Selection Right One Character
Open Drafts Mailbox
Open In Box
Open Out Box
Open Sent Mailbox
Open Trash Mailbox
iChat Commands
This command is available when iChat is frontmost.
What You Say
Comment
Send Message
Sends the message currently being dictated.
103
MacSpeech Dictate 1.5
iCal Commands
These commands are available when iCal is frontmost.
What You Say
About This Command Set
iCal
Application Menu Actions
What You Say
About This Application
Access Preferences Window
Hide This Application
Hide Other Applications
Show All Applications
Quit This Application
iCal
File Menu Actions
What You Say
Make New Event
Make New To Do
Make New Calendar
Make New Calendar Group
Show Info
Hide Info
Access Import Window
Access Export Window
Close This Window
Access Back Up Window
Commands
104
MacSpeech Dictate 1.5
What You Say
Access Restore Window
Print This Document
iCal
Edit Menu Actions
What You Say
Undo Last Action
Redo Last Action
Cut Selection
Copy Selection
Paste Selection
Delete Selection
Select All
Duplicate Selection
Put Focus In Find Field
Display Special Characters Palette
iCal
Calendar Menu Actions
What You Say
Access Subscribe Window
Publish This Calendar
Unpublish This Calendar
Access Send Publish Email Window
Refresh This Calendar
Refresh All Calendars
Access Change Location Window
Commands
105
MacSpeech Dictate 1.5
What You Say
Find Shared Calendars
iCal
View Menu Actions
What You Say
Switch To Day View
Switch To Week View
Switch To Month View
Go To Next Day
Go To Next Month
Go To Next Week
Go To Previous Day
Go To Previous Month
Go To Previous Week
Go to Today
Go to Date
Show Mini Months
Hide Mini Months
Show Notifications
Hide Notifications
Show Search Results
Hide Search Results
Show To Dos
Hide To Dos
Show All Day Events
Hide All Day Events
Commands
106
MacSpeech Dictate 1.5
iCal
Window Menu Actions
What You Say
Minimize This Window
Zoom This Window
Show Address Panel
Hide Address Panel
Bring All Windows To Front
iCal
Help Menu Actions
What You Say
Display Help
Display Keyboard Shortcuts
iCal
Navigation and Display
What You Say
Display Calendar
Show Events On This Calendar
Hide Events On This Calendar
Hide Other Calendar Events
Scroll Up
Scroll Down
Select Next
Select Previous
Commands
107
MacSpeech Dictate 1.5
Windows
108
Windows
MacSpeech Dictate’s windows are:
Note Pad window. Like a word processor that takes dictation.
Profiles window. Different users, different microphones, different profiles.
Commands window. Manage what commands are available, and create new
ones.
Vocabulary Editor window. Manage what individual words MacSpeech
Dictate can recognize, along with their automatic punctuation behavior.
Microphone Setup window. Set your sound input level.
Voice Training window. Perform additional training to help MacSpeech
Dictate better recognize your speech.
Vocabulary Training window. Add words that you want MacSpeech Dictate to know.
Status window. Your compact floating command center.
Available Commands window. A list of all commands you can say right now.
Recognition window. Improve MacSpeech Dictate’s accuracy when it misrecognizes your speech.
Preferences window. Some useful options live here.
Note Pad Window
MacSpeech Dictate comes with its own built-in word processor — Note Pad.
A Note Pad window is a word processing window. But it’s a special kind of word
processor: it is specifically aimed at dictation through MacSpeech Dictate. In fact,
you should control the contents of the window entirely through dictation and com-
MacSpeech Dictate 1.5
Windows
109
mands; you should never type in a Note Pad window (and if you do, your typing
comes out backwards).
A Note Pad window is the fastest
and most reliable place to dictate.
MacSpeech Dictate lets you dictate into any application, but a Note Pad window is
the easiest place to dictate, because it is designed for this purpose. A common technique is to dictate into a Note Pad window and then copy and paste into another
application.
Another big advantage of a Note Pad window is that MacSpeech Dictate can
actually “see” what’s in it; MacSpeech Dictate always knows what the contents
of a Note Pad window are. MacSpeech Dictate is thus not as dependent upon its
own memory of how it entered text through dictation (the cache) as in other applications. Therefore, actions that would otherwise be considered violations of the
Golden Rule of MacSpeech Dictate are less disruptive in a Note Pad window. See
“The Cache and the Golden Rule.”
To summon a new Note Pad window:
• Say File New when MacSpeech Dictate is frontmost.
• Choose File > New Note Pad.
To set the default font and size for a new empty Note Pad window:
• Open a new Note Pad window, choose Format > Font > Show Fonts, specify
the desired font and size, and close the Font palette and the Note Pad window.
MacSpeech Dictate 1.5
Windows
110
Note Pad window contents are saved as .rtf files which can be opened for editing
later with another word processor (TextEdit, Microsoft Word, etc.). You can also
open an existing .rtf file into a Note Pad window (choose File > Open).
Profiles Window
The Profiles window is for managing your voice profiles.
A voice profile is a complete set of data on how you speak. In order to speak into
MacSpeech Dictate, you must have at least one profile; and at every moment you
are using exactly one profile (the active profile or current profile, marked in the Profiles
window with a
icon).
The Profiles window. Four profiles
are displayed: the active profile,
a second profile, and two older
profiles that would need to be
updated to be used with this
version of MacSpeech Dictate.
To summon the Profiles window, choose Tools > Profiles. If you have checked
Show Profiles Window in the General Preferences pane, the Profiles window will
appear automatically when you start up MacSpeech Dictate, offering you a chance
to activate a profile; otherwise, MacSpeech Dictate activates the profile you were
previously using.
In many cases, one profile is all you’ll need. But you’ll need multiple profiles in
certain situations:
• If different people are using MacSpeech Dictate, each will need their own
profile.
MacSpeech Dictate 1.5
Windows
111
• If you use MacSpeech Dictate with different microphones, you’ll need a profile for each microphone.
• If you use MacSpeech Dictate in different environments (home and office,
for example), you should have a profile for each environment, as the ambient
sound characteristics may differ.
Every profile has a name, which uniquely identifies it. The name of the active profile is visible in the Status window (as its title bar).
The data for a profile lives on your hard disk as a package whose file extension is
.dictateprofile. You are offered the chance to set a profile’s location at the time you
create it. You may place it anywhere you like, such as ~/Documents/MacSpeech Profiles (you may wish to create this folder). This allows the profile data to be backed
up easily. A symbolic link to the profile will be found in ~/Library/Application Support/MacSpeech/MacSpeech Profiles.
The first time you use MacSpeech Dictate, or the first time you use a different microphone, there will be no profile, and you will be prompted to create one.
To create a profile:
• In the Profiles window, click the button. A File Save dialog appears (“Name
a New Profile”); specify a name and place to save this profile, and click
Choose. Back in the Profiles window, choose a microphone, spelling system,
and accent from the pop-up menus at the right. Click Create. You will then be
taken to the Microphone Setup window and the Voice Training window for
further preparation of the microphone and voice model. For a full discussion
of the profile creation process, see “Installation and Making a Voice Profile.”
To delete a profile:
• Select the profile’s listing in the Profiles window and click the button. You
can’t do this if there is only one profile. You can’t delete the active profile.
MacSpeech Dictate 1.5
Windows
112
To set which profile should be the active profile:
• Select the profile’s listing in the Profiles window and click Make Active.
• Double-click the profile’s listing in the Profiles window.
Profiles for this version of MacSpeech Dictate are incompatible with earlier versions of MacSpeech Dictate. Profiles from an earlier version of MacSpeech Dictate are marked in the Profiles window with a special icon ( ). You can make such
a profile active; when you do, it is updated for use with this version of MacSpeech
Dictate and will no longer work with earlier versions.
To dismiss the Profiles window:
• Create or activate a profile, as previously described.
• Click Close (at the lower right).
The Profiles window contains a checkbox letting you determine whether MacSpeech Dictate, as it starts up, should automatically check, over the Internet, to
see if your version of the application is the newest available. This checkbox is also
present in the General Preferences pane. You can also check for updates manually
by choosing Dictate > Check for Updates.
Commands Window
The Commands window is your interface for management of global and application-based commands. This is where commands may be edited — modified,
created, activated and deactivated, and deleted.
To open the Commands window:
• Choose Tools > Commands.
• Choose File > New Command. This is the same as choosing Tools > Commands and then pressing the button to create a new command.
MacSpeech Dictate 1.5
Windows
113
The Commands window. An
active built-in command from the
Global set is selected, displaying its
AppleScript underpinnings.
To switch among command lists:
• In the left column, select a command set — Global, or an application context.
• At the top of the window, click All, Built-in, or User Defined.
It is the combination of both these settings that determines which commands are
displayed.
To activate or deactivate a command:
• Click the checkbox to the left of the command’s name.
A deactivated command still exists, but it is not listed in the Available Commands
window, you cannot issue the command, and MacSpeech Dictate doesn’t have
to consider that phrase as a possible command when you say it. So, deactivating
unused commands can be useful; but you probably should wait, before doing so, to
see which commands you really don’t need.
To create a new command:
• Click the button.
MacSpeech Dictate 1.5
Windows
114
To delete a command:
• Select the command, and press Delete, or choose Delete from the tool (gear)
menu.
You can’t delete an unmodified built-in command. Deleting a built-in command
that you’ve modified restores the original unmodified built-in command.
To duplicate a command:
• Choose Duplicate from the tool (gear) menu.
To edit a command:
• Select the command name and work in the region below the splitter bar.
Changes that you make in the Commands window might not be registered until
you close the Commands window.
Note. You don’t need to read any more about the Commands window unless
you are thinking of creating or modifying a command.
Command Types
Every command is of one of the following types (as listed in the Type pop-up
menu in the Commands window):
AppleScript. The command executes a script written in AppleScript. The
Source field in the Commands window is an AppleScript script editing environment; you can compile and run a script, and view its result (toggle between
the Source and Result buttons at the lower right). Many built-in MacSpeech
Dictate commands are AppleScript commands. Even commands directed at
MacSpeech Dictate itself, such as Dictation Mode, are AppleScript commands; MacSpeech Dictate is itself scriptable with AppleScript.
MacSpeech Dictate 1.5
Windows
115
Application. The command launches a specified application. MacSpeech
Dictate can generate launch commands for all your applications (see “Generated Commands”), but if you didn’t want to activate that option, an Application command would be useful for launching a particular frequently used
application.
Bookmark. The command jumps to a URL in your default browser. The
“Web 100” commands are Bookmark commands (see “The Web 100 Commands”). Listed in the command list as a URL type.
File or Folder. The command opens a specified file or folder in the Finder
(and activates the Finder). Listed in the command list as an Alias type.
Menu Item. The command chooses a menu item, specified by menu and
menu item name. A Menu Item command must be created and edited in a
specific application context, though it may later be changed to Global context
if desired.
Shell Script. The command executes a shell script. The Shell Script text
field in the Commands window is a script editing environment. The script
should begin with a “shebang” line (e.g. #!/bin/sh). Running a shell script does
not open the Terminal, and there is no means of viewing output; a shell script
to be run from within MacSpeech Dictate should generally be created and
tested elsewhere.
Text Macro. The command inserts specified text at the insertion point of
the frontmost document. This is a good way to store and enter boilerplate text
(hunks of named text) or any frequently used text that is awkward to dictate or
that needs to be formatted without regard to MacSpeech Dictate’s automatic
capitalization and punctuation rules.
Automator Workflow. The command executes an Automator workflow,
specified by the pathname of the workflow file.
MacSpeech Dictate 1.5
Windows
116
Creating a Command
In creating a command, consider the following:
Context. Should this command be available everywhere (Global), or only in
the context of some specific application?
Name. The name of the command is the phrase that you will speak to trigger
the command. What should this phrase be?
Implementation. How will you implement this command? Which of the
above command types should it be?
To create the command, click the button. A command called Command Name
is created. Edit each setting:
Command. This is the name of the command, the phrase you will speak to
trigger the command.
Description. This is optional; if present, it will appear as a tooltip when you
hover the mouse over the command name in the Available Commands window.
Context. This is the application in which you want the command to be
available. For all applications, choose Global. Contexts for which MacSpeech
Dictate already has application-based commands are listed in the pop-up
menu (see “Application-Based Commands”). To create a new context, click
Choose and select an application in the Open dialog.
Type. Pick a type from the pop-up menu (see “Command Types”). Alternatively, if the implementation involves specifying a file or is itself a file, you
may be able simply to leave the pop-up menu on “Automatic” and drag the
file onto the drag area. For example, if you drag an Automator Workflow
file, MacSpeech Dictate chooses the Automator Workflow type and points to
that file; if you drag an AppleScript compiled script file, MacSpeech Dictate
chooses the AppleScript type and copies the script into the Source field; if you
MacSpeech Dictate 1.5
Windows
117
drag text, MacSpeech Dictate chooses the Text Macro type and copies the
text into the Text field; if you drag a miscellaneous file or folder, MacSpeech
Dictate switches to the File or Folder type and points to the dragged item; and
so forth.
Implementation. If an implementation was not automatically provided by
the previous step, provide an implementation for your command.
Providing a command implementation is generally straightforward, because the
use of a command type implies that you already understand that command type.
For example, a Shell Script implementation requires a knowledge of shell scripts.
The AppleScript command type is the most flexible, and therefore the most involved. Teaching you AppleScript is beyond the range of this manual (you can
learn the language from any of a number of books, such as AppleScript: The Definitive Guide, published by O’Reilly Media). You can study the built-in AppleScript
commands to get an idea of how they are implemented. Except for Global commands directed at MacSpeech Dictate itself, the built-in commands tend not to
talk AppleScript at an application, even when it is scriptable; rather, they use GUI
scripting, by way of System Events, to manipulate the target application’s interface. Whenever possible, the Menu Item type is the preferred approach. This,
however, should not discourage you from writing your own commands that do take
advantage of the target application’s scriptability.
As a convenience, MacSpeech Dictate lets you easily create an AppleScript command that issues modifier-keystroke combination. (For example, you might create a Log Out This User command that types Shift-Command-Q.) Set the Type
to AppleScript, click “Click to record shortcut”, and type the modifier-keystroke
combination. The script will be automatically created in the Source field.
In general, the more you arm MacSpeech Dictate with a repertory of user-defined
commands corresponding to your frequently executed tasks, the more useful MacSpeech Dictate will be as a speech-driven assistant.
MacSpeech Dictate 1.5
Windows
118
Vocabulary Editor Window
The Vocabulary Editor window is your interface for viewing and editing the list of
words, phrases, and symbols that MacSpeech Dictate can type for you in Dictation
mode.
To summon the Vocabulary Editor window, choose Tools > Vocabulary Editor.
The very first time you open the Vocabulary Editor window when a given profile
is active, there will be a brief delay while MacSpeech Dictate generates an initial
list of the built-in dictation vocabulary for that profile. Once this initial list is generated, subsequent access to the Vocabulary Editor window is rapid. (The list is
long, though — over 150,000 words — so there can still be a brief delay when you
perform certain actions in the window.)
To switch among vocabulary lists:
• Click All, Built-In, or User. User vocabulary can come from vocabulary training (analysis of written text, see “Vocabulary Training Window”) or from
direct editing in this window. An icon distinguishes built-in vocabulary from
user vocabulary.
To filter the displayed list:
• Type in the search field and press Return. The pop-up menu in the search
field lets you determine whether the filter operation is Contains, Begins With,
or Ends With. Both the written and spoken forms are searched. For example,
a Contains search on “dash” lists “balderdash”, because its written form contains “dash”, but also “‑‑‑”, because its spoken form is “em-dash.” To empty
the search field and stop filtering the list (displaying the entire list), click
the “x” in the search field or press Esc when the search field has focus.
If you do a search and no match is found, and if you’re in the All category, MacSpeech Dictate will offer to add the term to your user vocabulary. To add it, click
Yes. (You can edit this new vocabulary item later.) To decline, click No.
MacSpeech Dictate 1.5
Windows
119
To edit a vocabulary item:
• Select the item, and use the info area at the bottom of the window. If the info
area is not present, click the info button to summon it.
You can’t edit the written form of a vocabulary item. You can edit the spoken form of
a user vocabulary item, but not of a built-in vocabulary item; you should do this
if the item’s written form differs from its pronunciation. (For best results, train the
item’s pronunciation, as described below.) To edit the spoken form of a user
vocabulary item:
• Type the spoken form (an English spelling equivalent to how the word is pronounced) and press Return. You should see a dialog warning that any recorded
training for this word will be erased.
The Vocabulary Editor window,
showing a user vocabulary item
whose spoken form differs from
its written form. (Behind, a Note
Pad window demonstrates that this
vocabulary item is indeed working;
the user has said the spoken form
and MacSpeech Dictate has typed
the written form.)
The Vocabulary Editor window info area also displays features of the selected vocabulary item having to do with MacSpeech Dictate’s intelligent automatic capitalization and spacing. You can edit these features for user vocabulary items, and
MacSpeech Dictate 1.5
Windows
120
for most built-in vocabulary items (although some built-in vocabulary items have
complex automatic capitalization and spacing rules, which can’t be fully displayed
or edited):
Spaces before and after. Normal words will have one space before and one
space after. But a punctuation mark might follow a different rule.
Next word. How should the word following this item be capitalized? In most
cases, “Natural capitalization” (the default) will be the right choice.
Lower case in titles. A “title” is a phrase dictated while title casing is turned
on (Caps On). You might prefer that “small” words such as “of ” or “in” not
be capitalized in such phrases.
If a vocabulary item is not being recognized correctly, you might wish to train the
pronunciation of the item. This means that you pronounce the item several times,
so that MacSpeech Dictate can record your voice saying it and incorporate the
recording into your voice model. To train a vocabulary item:
• Select the item, and choose Train from the tool (gear) menu at the bottom of
the window.
• In the dialog for adding a new vocabulary item, click Train.
MacSpeech Dictate presents a sequence of training dialogs:
1.A dialog explaining that you are about to pronounce the item three times
(click Train to proceed).
2.A dialog where you pronounce the item three times, watching for feedback in
the dialog so you know MacSpeech Dictate has heard you.
3.A dialog where you are informed that the training process is over.
To create a new user vocabulary item:
• Click the button. Type the word, as written, in the dialog. To add a description of how the word is spoken, or to train the word’s pronunciation by speaking, click Advanced to reveal the rest of the dialog.
MacSpeech Dictate 1.5
Windows
121
To delete a user vocabulary item:
• Select the word and press Delete (or choose Delete from the gear menu). A
dialog appears giving you an opportunity to change your mind.
To export and import vocabulary items:
• To export, select the item(s) and choose Export from the gear menu. An XML
file is created. To import, choose Import from the gear menu and specify an
exported XML file. User vocabulary, when created, belongs to the current
profile, so this is a way to copy user vocabulary from one profile to another.
Microphone Setup Window
The Microphone Setup window is where you adjust the sound input level.
Tip. Optimal sound input level is crucial to speech recognition. It’s a good
idea to summon the Microphone Setup window and adjust the sound input
level each time you begin a session using MacSpeech Dictate, and even each time
you’ve taken off your microphone headset and put it back on, because the microphone position or the background noise conditions may have changed.
To show the Microphone Setup window:
• Choose Tools > Microphone Setup.
The Microphone Setup window will also appear automatically when you create a
profile.
MacSpeech Dictate 1.5
Windows
122
The Microphone Setup window
is where you adjust your sound
input level. To begin, click the
microphone icon with the red
“stop sign.”
To adjust the sound input level automatically:
• Click the microphone button at the lower left of the window, and read aloud
the text that appears in the middle of the window, until the window informs
you that the level is adjusted. You might have to read the entire text two or
three times before the adjustment is completed. When adjustment is completed, the window will say “Finished” and the last few seconds of your speech
will be played back.
To adjust the sound input level manually:
• Check “Manual Gain Setting” and slide the slider while speaking until the
typical gain displayed in the thermometer next to the microphone button
maxes out at the top of the green area.
For a complete description of the microphone setup process, see “Microphone
Setup.”
MacSpeech Dictate 1.5
Windows
123
Voice Training Window
The Voice Training window is where you read aloud a little story so that MacSpeech Dictate can train the active profile’s voice model to recognize your
speech.
To summon the Voice Training window:
• Choose Tools > Voice Training.
The Voice Training window will also appear automatically as part of the sequence
of events when you create a new profile.
The Voice Training window,
before reading a story. To proceed,
click the right-arrow button at
lower right of the window.
To train with a story:
1.Click the right-arrow at the lower right. The stories are listed; stories that you
have not trained for this profile are unmarked.
2.Select a story and click the right-arrow again.
3.When you’re ready to begin, click the microphone button at the lower left.
Read the story aloud.
MacSpeech Dictate 1.5
Windows
124
As you read aloud, passages that have been recognized will turn green. If passages
turn red, try again or click “Skip Word”. When you first start to train a profile,
you will need to read quite slowly, in very short distinct phrases (but smoothly and
naturally), waiting each time for the display of green text to catch up with you. After three or four pages of text, however, you will be able to read at a considerably
more normal speed and in larger phrases.
When you’ve reached the end of the story, or when MacSpeech Dictate has heard
enough, the window will change to indicate that your training is being processed
into the voice model.
You must train the voice model with at least one story prior to using a new profile.
After that, further training is optional. Reading additional stories (there are three
of them) might improve MacSpeech Dictate’s accuracy in recognizing what you
say, but in many cases the recognition engine will prove to be remarkably accurate
after you have read just one story.
For a complete description of the voice training process, see “Voice Training.”
Vocabulary Training Window
The Vocabulary Training window is where you provide MacSpeech Dictate with
written text so that it can learn unknown words. Learned words are added to
MacSpeech Dictate’s recognition vocabulary for your profile, so you can use them
while dictating.
To open the Vocabulary Training window:
• Choose Tools > Vocabulary Training.
MacSpeech Dictate 1.5
Windows
125
The Vocabulary Training window,
ready to add files for analysis.
To feed text files to the Vocabulary Training window:
1.Click the right-arrow at the lower right.
2.Click Add to select files to add to the list of files to be analyzed. MacSpeech
Dictate can read the same standard formats as TextEdit, such as text files, .rtf,
.doc, and .odt files.
3.Click the right-arrow at the lower right once again.
Alternatively, to feed selected text from an already open document to the Vocabulary Training window:
• Select the text and issue the command Train Vocabulary from Selection.
• Or, in a Note Pad window, select the text and choose Tools > Train Vocabulary From Selection.
If the text contains unknown words, the Vocabulary Training window will now
present two columns of words: Included and Excluded. Manipulate the contents
of these columns (by selecting words and then clicking Exclude or Include) so that
the Included column contains only words that you actually use, and which you
want MacSpeech Dictate to incorporate into its vocabulary.
MacSpeech Dictate 1.5
Windows
126
To incorporate words in the Include column into MacSpeech Dictate’s vocabulary:
• Click the right-arrow at the lower right.
The Vocabulary Training window,
after analyzing a text file (shown
behind), ready to add a previously
unknown word to this profile’s
vocabulary.
Status Window
The Status window is MacSpeech Dictate’s compact control center. When the
Status window is showing, it floats over all applications.
Use the Status window to toggle the microphone on or off, to bring MacSpeech
Dictate to the front, and to summon the Recognition window, using the mouse
instead of your voice.
Look at the Status window to learn what your sound input level is, what mode
MacSpeech Dictate is in, whether you’re using a capitalization, spacing, or numeral command, what profile is currently active, what the current dictation context is
(that is, where MacSpeech Dictate would type your dictation at this moment), and
(optionally) to see how MacSpeech Dictate interprets what have said.
MacSpeech Dictate 1.5
Windows
127
The Status window. Top: Current profile.
Middle, left to right: microphone button;
sound input level; mode button; bring to front
button; Recognition window button. (Under the last three buttons are indicators for
Caps, No Space, and Numeral.) Bottom: Current dictation context.
Underneath: Last utterance (optional).
To show or hide the Status window:
• Say Show Status Window or Hide Status Window.
• Choose Window > Show/Hide Status Window.
• Choose Show/Hide Status Window from the Dock menu.
To set whether the Status window is visible when MacSpeech starts up:
• In the General Preferences pane, check or uncheck “Show Status Window at
Startup”.
To change the Status window’s transparency:
• Use the slider in the Appearance Preferences pane.
To set whether the Status window displays your speech as it is recognized:
• In the General Preferences pane, check or uncheck “Show Recognized Text”.
To toggle the microphone on or off:
• Click the microphone button.
The microphone button’s icon indicates the microphone’s status:
• Green circle: The microphone is on.
• Red stop sign: The microphone is off.
• Blue balloon with crescent moon: The microphone is asleep.
MacSpeech Dictate 1.5
Windows
128
The mode button’s icon indicates the current mode. Click it to summon the
modes menu, where you can switch between modes.
To bring MacSpeech Dictate frontmost:
• Click the bring to front button.
To summon the Recognition window:
• Click the Recognition window button.
Available Commands Window
The Available Commands window lists the commands you can say at any moment. When the Available Commands window is showing, it floats over all applications.
The list of commands displayed in the Available Commands window changes automatically depending on what mode you’re in, what application is frontmost, and
whether the Recognition window is open. The availability of some global commands and the order in which commands are displayed depends on your settings
in the Command Preferences pane.
The Available Commands window, while
the Finder is frontmost.
MacSpeech Dictate 1.5
Windows
129
To show the Available Commands window:
• Say Show Available Commands Window.
• Choose Window > Show Available Commands.
• Choose Show Available Commands from the Dock menu.
The Available Commands window will automatically appear when you start up
MacSpeech Dictate if it was showing when MacSpeech Dictate last quit.
Scroll through the window, or use the search field, to discover commands.
Tip. If there is text in the search field, the list of commands is filtered to display only commands containing that text. To be certain that all commands are
displayed, empty the search field; a quick way is to click in the search field and
press Esc.
To issue a command:
• Say the command.
• For a global or application-based command, double-click the command’s
name in the Available Commands window.
Hover the mouse over a command’s name in the Available Commands window to
see a tooltip displaying its description.
To hide the Available Commands window:
• Say Hide Available Commands Window.
• Choose Window > Hide Available Commands.
• Choose Hide Available Commands from the Dock menu.
• Click the close button at the top left of the Available Commands window.
MacSpeech Dictate 1.5
Windows
130
Recognition Window
The Recognition window is your interface for refining MacSpeech Dictate’s voice
model by telling it about recognition errors it has made. This is called
training the voice model. When the Recognition window is showing, it floats over all
applications.
When MacSpeech Dictate has typed what you said in Dictation mode, and has
made a mistake, use the Recognition window to correct MacSpeech Dictate’s interpretation of what you said, as well as to correct what MacSpeech Dictate typed.
There are thus two ways to modify the existing dictated content of a document:
you can use Dictation mode commands, or you can use the Recognition window
to train the voice model. However, there is a big difference between them:
Modifying the document. When you use a Dictation mode command to
select and delete a phrase, or to select and dictate to replace a phrase, and so
forth, you are implying that you made a mistake.
Training the voice model. When you use the Recognition window to train
the voice model, you are implying that MacSpeech Dictate made a mistake; it
misrecognized your speech, or didn’t know a word you used. Use training, in
other words, to teach MacSpeech Dictate and to improve its accuracy in recognizing your speech and the kinds of things you say.
The Recognition window, after dictating
With everything bone dry COMMA.
The second alternative is correct, so the
next step would be to say Pick 2 (or click
the 2 button).
MacSpeech Dictate 1.5
Windows
131
To summon the Recognition window:
• Say Show Recognition Window.
• In Dictation mode, say one of the following:
◦◦ Train the Word “Someword”
◦◦ Train the Words “Someword” Through “Otherword”
◦◦ Train the Words “Someword” to “Otherword”
• Click the Recognition window button in the Status window.
• Press the Recognition window keyboard shortcut.
• If “Show Recognition Window when dictating” is checked in the Recognition Preferences pane, the Recognition window will open automatically when
you are dictating in Dictation mode or Spelling mode as soon as the insertion
point is within or after a phrase capable of being trained. Usually this will be
as soon as you dictate anything.
Note. The Recognition window (and voice model training in general) operates on dictated utterances. MacSpeech Dictate has its own ideas about what
constitutes an utterance, based partly on where you paused while dictating.
Therefore, the phrase that is selected when you say Train the Word(s)…, or
the phrase that appears in the Recognition window (and is selected when you
summon the Recognition window), might be longer or shorter than what you
initially specified.
To close the Recognition window:
• Say Hide Recognition Window.
• Say Cancel Training.
• Say Cancel Recognition.
• Click the close button at the top left of the Recognition window.
MacSpeech Dictate 1.5
Windows
132
• Press the Recognition window keyboard shortcut.
• If “Close Recognition Window after each choice” is checked in the Recognition Preferences pane, the Recognition window will close automatically as
soon as you use it to replace a dictated phrase with its correct version.
Try different Recognition Preferences pane settings and different ways of summoning and closing the Recognition window as you train your dictation. You’ll
soon settle on a favorite way of working (which might depend on external factors,
such as the size of your screen).
You can adjust the transparency of the Recognition window. Say Increase
Transparency or Decrease Transparency, or move the slider at the upper right
of the window.
How to Train
The Recognition window presents alternative interpretations of the phrase
containing the current selection or insertion point in the dictation document. The
first alternative is the interpretation that MacSpeech Dictate entered in the document. The number of additional alternatives is limited by your setting for “Maximum number of alternatives” in the Recognition Preferences pane.
You can use the Recognition window to train what you just dictated, because the
insertion point is still at the end of that phrase, so that is the phrase shown in the
Recognition window. You can also select a dictated phrase (using Dictation mode navigation commands); if MacSpeech Dictate still has cached dictation information for
this part of the document, the Recognition window will change to show alternatives for that phrase.
Thus, one way of working with the Recognition window is to train phrases as
soon as you dictate them; another is to dictate a larger amount, such as a
paragraph or two, and then go back and train.
MacSpeech Dictate 1.5
Windows
133
In most cases, MacSpeech Dictate will have preserved the recording of your
speech from when you dictated the phrase. To play the recording of the phrase
selected in your text:
• Say Press Play.
• Click the Play button at the top left of the window.
This can be a useful precaution, because you may not have said what you think
you said. You do not want to mistrain MacSpeech Dictate by using the Recognition window to enter a trained phrase that is not a correct interpretation of what
you actually said! If you made a mistake, don’t use the Recognition window!
If one of the Recognition window’s alternatives is correct, enter it in the document in place of the alternative that’s already there. To do so:
• Say Pick 2 or Choose 2 (or whatever the actual number at the left of the correct alternative is — but most of the time, it probably will be 2!).
• Click the numbered button at the left of the correct alternative.
You have now performed phrase training. Internally, MacSpeech Dictate will
modify its speech model, and will save this information into your profile the next
time your profile is saved.
If none of the Recognition window’s alternatives is correct, you can edit one of the
alternatives so that it is correct, and then enter the edited, correct alternative as in
the previous step. It doesn’t matter which of the alternatives you edit; edit whichever is most convenient. To edit an alternative:
• Say Edit 1 (or whatever the actual number at the left of the desired alternative is).
• Click once to select the alternative, pause, and then click once inside the text
of the alternative.
The alternative you are editing is now the “target” for dictation and commands.
You can edit using Dictation mode or Spelling mode (and it is also fine to use your
MacSpeech Dictate 1.5
Windows
134
fingers to type in the Recognition window). The only standard command that
doesn’t work is “Scratch that”; instead, use Scratch Word or Forget Word.
To exit editing mode without entering the corrected phrase into your document:
• Say Cancel Edit or click elsewhere.
Preferences Window
The Preferences window lets you set certain options for MacSpeech Dictate. To
show the Preferences window:
• Choose Dictate > Preferences.
To close the Preferences window:
• Click the close button at the top left of the window.
General Preferences pane
The General Preferences pane assembles some miscellaneous options, having
mostly to do with the state of things when MacSpeech Dictate is launched.
Startup Mode
Use the radio button to determine what mode MacSpeech Dictate should
be in when it starts up, or whether the microphone should simply be off.
Startup Actions
Check Check for Updates if you want MacSpeech Dictate to go online
at launch time and automatically communicate over the Internet with MacSpeech to see whether your version of MacSpeech Dictate is the most recent.
If a newer version is available, you will be offered a chance to download and
install it. You can also check for updates manually by choosing Dictate >
Check for Updates.
MacSpeech Dictate 1.5
Windows
135
(This checkbox does the same thing as the checkbox in the Profiles window. If
one is checked, the other is automatically checked.)
Check Show Profiles Window if you want MacSpeech Dictate to pause
and display the Profiles window at launch time; the main reason for doing this
would be so that you can select a profile as the active profile. If unchecked,
MacSpeech Dictate will automatically activate the profile you were using previously.
Check Show Status Window if you want the Status window to be visible at
launch time.
When Activating a Profile
Check Open a New Note Pad Window if you want a new empty Note Pad
window to open when a profile is activated. This includes opening a Note Pad
window at launch time, because a profile is always activated at launch time.
Feedback
Check Show Recognized Text if you want the Status window to display the
text of each phrase that MacSpeech Dictate understands you to have uttered
(as shown in the illustration on page 127).
Appearance Preferences pane
The Appearance Preferences pane assembles some miscellaneous options having
to do with microphone icons and the Status window.
Show Microphone Status
Check In the menu bar if you want the MacSpeech Dictate status menu
item to appear in the menu bar. This status menu item is an icon that displays
whether the microphone is on or off, or asleep; plus, you can click it to toggle
the microphone on or off.
MacSpeech Dictate 1.5
Windows
136
Check In the Dock if you want MacSpeech Dictate’s Dock icon (and its
Command-Tab application switcher icon) to be badged with a microphone
icon showing whether the the microphone is on or off, or asleep.
Status Transparency
Use the slider to govern how opaque or transparent the Status window should
be.
Recognition Preferences pane
The Recognition Preferences pane governs some behaviors of the Recognition
window, and of the recognition engine.
Recognition Window Options
If Show Recognition Window When Dictating is checked, the Recognition window will open automatically when you are dictating in Dictation mode or Spelling mode as soon as the insertion point is within or after
a phrase capable of being trained. Usually this will be as soon as you dictate
anything.
If Close Recognition Window After Each Choice is checked, the Recognition window will close automatically as soon as you use it to replace a
dictated phrase with its correct alternative.
Use Maximum Number of Alternatives to set the number of alternatives shown in the Recognition window. Fewer alternatives might be shown (as
few as one, in fact), depending on how certain MacSpeech Dictate feels about
its interpretation of what you said.
Recognition Behavior
Use the slider to trade off between speed and accuracy of speech recognition. The middle (50) is a good initial setting, but given the speed of today’s
Intel-based machines you can probably opt for more accuracy with no ap-
MacSpeech Dictate 1.5
Windows
137
preciable increase in response time. Feel free to experiment. After you’ve done
a good deal of dictation and honed your voice model using the Recognition
window, MacSpeech Dictate will probably be both faster and more accurate,
so you can then afford to move the slider to the right a bit.
Dictation Preferences pane
The Dictation Preferences pane allows the Auto Cache Document feature to be
enabled or disabled for certain applications.
TextEdit
By default, Auto Cache Document is enabled for TextEdit. To disable,
uncheck the box next to TextEdit.
Microsoft Word
By default, Auto Cache Document is enabled for Microsoft Word. To disable, uncheck the box next to Microsoft Word.
Command Preferences pane
The Command Preferences pane affects the behavior and contents of the Available Commands window, as well as what commands are actually available.
Available Commands Window
Check Show Global Commands at Top to make the global commands
appear above the application-based commands in the Available Commands
window.
Check Enable Web Site Commands to cause the Web 100 global commands to be enabled (and to be present in the Available Commands window).
MacSpeech Dictate 1.5
Windows
138
Command Generation
Check Generate Application Launch Commands to cause global commands for launching applications to be generated the next time you start up
MacSpeech Dictate.
Check Generate Email Commands to cause global commands for creating and addressing an email message to be generated the next time you start
up MacSpeech Dictate.
Shortcuts Preferences pane
The Shortcuts Preferences pane lets you set global keyboard shortcuts (hot
keys) for three MacSpeech Dictate actions. They are:
• Toggle Microphone. Turns the microphone on or off.
• Select Speech Mode. Cycles through the modes: Dictation mode, Spelling
mode, and Command mode.
• Show Recognition Window. Shows and hides the Recognition window.
To set a shortcut:
• Click in the oval shortcut region and type the desired shortcut.
To delete a shortcut:
• Click the “X” at the right end of the oval shortcut region.
MacSpeech Dictate 1.5
Menus
139
Menus
This section lists MacSpeech Dictate’s menus and menu items.
Dictate Menu
About MacSpeech Dictate. Summon the About window.
Preferences. Summon the Preferences window.
Visit MacSpeech’s Web Site. Go, in your default browser, to http://www.macspeech.com.
Check for Updates. Communicate over the Internet with MacSpeech to see
whether your version of MacSpeech Dictate is the most recent. If a newer version
is available, you will be offered a chance to download and install it. MacSpeech
Dictate can also optionally check for updates automatically as it starts up; to control whether it does this, use the checkbox in the Profiles window or the General
Preferences pane.
File Menu
New Note Pad. Open a new empty Note Pad window.
New Command. Open the Commands window in the same state as if you had
pressed the button to start creating a new command.
Open. Summon a standard File Open dialog where you can open an existing .rtf
file as a Note Pad window.
Open Recent. Open a document recently edited as a Note Pad window.
Close. Close the active window (offering a chance to save if necessary).
Save. Save the current Note Pad window (as an .rtf file).
MacSpeech Dictate 1.5
Menus
140
Save As. Summon a standard File Save dialog where you can save the current
Note Pad window as an .rtf file, specifying the file’s name and location.
Save Profile. Save the currently active profile’s data. Enabled only if you have
done something (such as training the voice model) to affect the active profile. The
active profile is saved automatically when you activate a different profile or quit
MacSpeech Dictate; this menu item is just a “safety valve” for those wishing to
make certain that changes in the profile are not lost in case of a power failure or
similar unforeseen event.
Command Import. Summon a standard File Open dialog where you can open
a .commandstext file (as created by the Command Export menu item). Opening such
a file will incorporate the commands it contains, so that they will appear in the
Commands window and the Available Commands window.
Command Export. Summon a dialog where you can select commands (from
the Commands window) to export, followed by a standard File Save dialog where
you can specify a name and location to save the commands as a .commandstext file.
This is an XML file, but it is not intended to be user-editable; its purpose is to be
imported with the Command Import menu item. Thus you can transfer custom
commands between computers and users.
ScriptPak Import. Like Command Import, but the type of file you can open is
a ScriptPak, as exported from or created for iListen, MacSpeech’s previous speech
recognition application.
Edit Menu
The Edit menu items are a subset of those that are standard and familiar in any
Mac OS X word processing application, such as TextEdit.
Undo. Undo the previous action.
Redo. Redo the previously undone action.
MacSpeech Dictate 1.5
Menus
141
Cut. Remove selected text and place it on the clipboard.
Copy. Place a duplicate of the selected text on the clipboard.
Paste. Insert the contents of the clipboard at the selection point.
Paste and Match Style. Insert the contents of the clipboard at the selection
point, ignoring any style information on the clipboard.
Delete. Remove selected text (without placing it on the clipboard).
Select All. Expand the selection to including everything.
Find > Find. Summon the Find dialog.
Find > Find Next. Search forwards for the Find string.
Find > Find Previous. Search backwards for the Find string.
Find > Use Selection for Find. Copy the selected text to become the Find
string.
Find > Jump to Selection. Scroll to reveal the selected text.
Spelling > Show Spelling and Grammar. Summon the Spelling and Grammar dialog.
Spelling > Check Spelling. Select the next misspelled word.
Spelling > Check Spelling While Typing. Toggle whether misspelled words
are marked.
Special Characters. Summon the Special Characters input palette.
Speech Menu
The menu items of the Speech menu also appear in MacSpeech Dictate’s Dock
menu. An advantage of the Dock menu is that it works even if MacSpeech Dictate
is not frontmost.
Microphone On/Off. Toggle the microphone on or off.
MacSpeech Dictate 1.5
Menus
142
Dictation. Switch to Dictation mode. Checked if MacSpeech Dictate is already
in Dictation mode.
Command. Switch to Command mode. Checked if MacSpeech Dictate is already in Command mode.
Spelling. Switch to Spelling mode. Checked if MacSpeech Dictate is already in
Spelling mode.
Sleep / Wake Up. Switch into or out of Sleep mode.
Tools Menu
Profiles. Summon the Profiles window.
Commands. Summon the Commands window.
Vocabulary Editor. Summon the Vocabulary Editor window.
Microphone Setup. Summon the Microphone Setup window.
Voice Training. Summon the Voice Training window.
Vocabulary Training. Summon the Vocabulary Training window.
Train Vocabulary from Selection. Analyze the text selected in the current
Note Pad window and then, if the text contains unknown words, summon the Vocabulary Training window displaying Included and Excluded columns.
Format Menu
The Format menu items are a subset of those that are standard and familiar in any
Mac OS X word processing application, such as TextEdit. They work in a Note
Pad window.
Font > Show Fonts. Show the Font palette. Changes will be applied to the selection.
Font > Bold. Toggle the bold styling of the selection.
MacSpeech Dictate 1.5
Menus
143
Font > Italic. Toggle the italic styling of the selection.
Font > Underline. Toggle the underlined styling of the selection.
Font > Bigger. Increase the font size of the selection.
Font > Smaller. Decrease the font size of the selection.
Font > Show Colors. Show the Color palette. Changes will be applied to the
selection.
Font > Copy Style. Move styling information from the selection to the clipboard.
Font > Paste Style. Apply style information from the clipboard to the selection.
Text > Align Left. Align the selected text against the left margin.
Text > Center. Center the selected text between the margins.
Text > Justify. Align the selected text against both margins.
Text > Align Right. Align the selected text against the right margin.
Window Menu
Minimize. Minimize the active Note Pad window to the Dock.
Minimize All. Option-key version of the above. Minimize all Note Pad windows
to the Dock.
Zoom. Toggle the size of the active Note Pad window.
Zoom All. Option-key version of the above. Toggle the size of all Note Pad windows.
Bring All to Front. Bring all MacSpeech Dictate windows in front of windows
of other applications.
Arrange in Front. Option-key version of the above. Bring all MacSpeech Dictate windows in front of windows of other applications, and arrange them neatly
overlapping in the middle of the screen.
MacSpeech Dictate 1.5
Menus
144
Show / Hide Status Window. Toggle the visibility of the Status window.
Show / Hide Available Commands. Toggle the visibility of the Available
Commands window.
The preceding two menu items also appear in MacSpeech Dictate’s Dock menu.
An advantage of the Dock menu is that it works even if MacSpeech Dictate is not
frontmost.
Individual Windows. Individual open windows (not including the floating Status window, Available Commands window, and Recognition window) are listed;
choose one to switch to it. The active window is checked. Note Pad windows containing unsaved changes are marked with a bullet.
Help Menu
MacSpeech Dictate Help. Summon the online help.
Welcome. Display a brief document with advice on getting started with MacSpeech Dictate.
Tips & Tricks. Display miscellaneous advice for using MacSpeech Dictate.
Release Notes. Display notes on the current version of MacSpeech Dictate.
Quickstart Guide. Display a brief PDF document with instructions on getting
started with MacSpeech Dictate.
User Manual. Display this PDF User Manual for MacSpeech Dictate.
Send Email to Tech Support. Create a new message in your default email client, addressed to MacSpeech Technical Support.
MacSpeech Dictate 1.5
Tips on Speaking
145
Tips on Speaking
Speech recognition, while it has become far faster and better over the past several
years, does not work like the human brain. The speech recognition engine identifies the words you speak, using its knowledge of how you pronounce sounds, along
with a rudimentary notion of grammatical and lexical context, but it doesn’t know
the meaning of the words, nor does it have the understanding of your speech that
a person does.
Thus, while the speech recognition engine’s accuracy can be improved to respond
to the unique characteristics of your voice, you also need to let MacSpeech Dictate
train you. Your use of MacSpeech Dictate will be much more successful if you
bear in mind, and put into operation, a few simple tips.
Train honestly. When you create a profile, you will use Microphone Setup
to set your microphone input level, and then you will use Voice Training to
read a story. Speak in the same manner and choose the same environment in
which you will primarily use MacSpeech Dictate.
Be consistent. This tip is a continuation of the previous one. Having trained
MacSpeech Dictate with Voice Training, you should carry on speaking the
same way, as you proceed to use MacSpeech Dictate. Stressing your words,
or speaking expressively, is apt to alter your pronunciation and mislead the
speech recognition engine.
Pause. MacSpeech Dictate hears and thinks in “utterances,” which are
stretches of speech with pauses in between. When you say Scratch That,
MacSpeech Dictate deletes the previous utterance. The Recognition window
displays complete utterances. Utterances can be phrases or even complete
sentences. Since MacSpeech Dictate thinks in utterances, you should speak in
utterances. Pause fairly often.
MacSpeech Dictate 1.5
Tips on Speaking
146
Speak clearly. Don’t mumble. Imagine you’re speaking over a radio connection from the International Space Station, that the signal is undependable and
static-prone, and that you’re calmly explaining to a disbelieving ground crew
at Houston that a large green alien monster is trying to break in. Clarity is key.
Speak naturally. Speak clearly, but speak calmly and naturally. Don’t overemphasize any sounds. Don’t over-emphasize the divisions between words.
Don’t pronounce “fat cat” as “ffatt-uh, catt-uh;” run words and sounds together in a linguistically natural way. Don’t pronounce “the” as “thee,” or “a” as
“aye,” unless that’s how you actually speak. MacSpeech Dictate needs to hear
sounds and words in their natural linguistic context. Speak in utterances, but
make each utterance natural and smooth.
Dictate, don’t talk. Talking and dictating are different. Conversation is a
bit like mind-reading; we guess at what our interlocutor means. MacSpeech
Dictate can’t read your mind; it tries to transcribe faithfully what you actually say. Make up your mind what you want to say, then say it. Don’t stumble.
Don’t add any extra noises or interjections, like “You know.” Pause between
utterances, but try not to hesitate in the middle of an utterance.
Relax. Tension in your voice and mouth can cause sounds to emerge in an
artificial, strained way. Posture might matter. It can even be helpful to have on
hand a glass of water, or warm tea, and to take frequent sips. Breathe gently
so that your breath is not heard as an utterance. Turn the microphone off and
shake out your tension from time to time.
MacSpeech Dictate 1.5
The Cache and the Golden Rule
147
The Cache and the Golden Rule
MacSpeech Dictate acts as intermediary between your speech and an application.
You speak to MacSpeech Dictate; MacSpeech Dictate causes text to be typed or
altered in an application’s window. Sometimes, however, MacSpeech Dictate may
appear to type text in the wrong place, or it might seem unable to obey dictation
commands correctly.
Such cases are not mysterious, and you can largely prevent them — or, if they do
arise, cure them — if you understand some basic facts about how MacSpeech Dictate operates on an application.
Two Ways of Working
You can use MacSpeech Dictate in two very different ways:
• To boss around your computer. Open Safari. Jump to Bookmark
One. Move to Next Link. Move to Next Link. Jump to This Link. Jump
Back. Scroll One Screen Down. Scroll One Screen Down. Close This
Window.
• To work with text. Dear Mister Smith. Colon. New Paragraph. I am
concerned about the report of the committee. Period. Capitalize the
Word “Committee”. Go to End. There is a suggestion of wrongdoing
on our part. Period. Select the Words “A Suggestion”. An implication.
The first way has to do with the computer’s overall user interface. You’re using your voice to navigate and push buttons. Have fun! There’s nothing special to
know about this.
The second way has to do with text. This is where some special considerations
come in.
MacSpeech Dictate 1.5
The Cache and the Golden Rule
148
Text and the Cache
Look at the second example above: think about the command Capitalize the
Word “Committee”. How does MacSpeech Dictate know where the word “committee” is? It knows because it typed it in the first place. How does MacSpeech
Dictate know where the cursor is now? (It must know this, so that it can know
how far to jump back in order to select the word “committee” and capitalize it.) It
knows because it did the typing that put the cursor there.
Look at what the second example above does not do. When the user has told MacSpeech Dictate to capitalize the word “committee” and she wants to resume dictating at the end of the sentence, does she click the mouse after the the final Period and start dictating? No! She says Go to End. That way, MacSpeech Dictate
moves the insertion point, and MacSpeech Dictate still knows where it is. When
the user wants to replace “a suggestion” with “an implication”, does she use the
mouse to select the words “a suggestion”? No! She tells MacSpeech Dictate to
select those words, so that when she says “an implication”, MacSpeech Dictate
knows where the selection is and what’s being replaced.
MacSpeech Dictate can send signals to an application. But MacSpeech Dictate
can’t actually “see” what’s going on. It doesn’t know what the current document
window looks like, or what you do there. MacSpeech Dictate knows only what it
has done there. As it works with text, MacSpeech Dictate memorizes its own actions: the text it types, the navigation it performs. This memory is called the cache.
The cache is how MacSpeech Dictate keeps track of what text is in the window
and where the selection or insertion point is located within that text.
When you’re using MacSpeech Dictate to work with text, therefore, you shouldn’t
do anything that goes behind MacSpeech Dictate’s back. Don’t use the mouse and
keyboard to navigate, select, cut and paste, or type. If you do, the cache will get
out of sync with reality. (That’s not a disaster! You can tell MacSpeech Dictate to
MacSpeech Dictate 1.5
The Cache and the Golden Rule
149
throw away the current cache, read the document’s contents afresh, and start a
new cache. But it’s better not to get the cache out of sync if you can help it.)
The Golden Rule of MacSpeech Dictate is designed to keep you aware of the
cache:
The Golden Rule of MacSpeech Dictate
When you’re working with text, don’t mix your voice with
your hands.
Why Note Pad Windows Are Special
MacSpeech Dictate comes with its own special word-processing windows — Note
Pad windows. When you work in a Note Pad window, the Golden Rule is more
relaxed. That’s because a Note Pad window belongs to MacSpeech Dictate, so MacSpeech Dictate can see what’s in the window — pretty much all the time. So selecting and navigating text with the mouse and keyboard, which would spell trouble
for the cache in any other application, is pretty much okay in a Note Pad window.
Note Pad windows are easier, then, because they are more forgiving. A Note Pad
window is a great place to work with text when you’re just getting started with
MacSpeech Dictate. Even as an experienced user, you may find it simple and fast
to work in a Note Pad window and then copy the text and paste it into some other
application.
Extra for Experts
You might be tempted to read the Golden Rule too literally. You might think: “As
long I keep my hands off the keyboard, I can’t possibly violate the Golden Rule.”
That’s not so. The Golden Rule is more subtle than that. The fact is, you can use
MacSpeech Dictate 1.5
The Cache and the Golden Rule
150
your voice to violate the Golden Rule. (But you should try not to, of course.) How
can this be?
Recall that there are two ways of working with MacSpeech Dictate: bossing your
computer around, and working with text. Most of the time, bossing your computer
around and working with text don’t interfere with one another. You can dictate
text for a while, and then you can say Open Safari and so on. But you might boss
your computer around in such a way that text is affected! If this is text that you’re
already working with (so that it’s in the cache), you’ve violated the Golden Rule.
Here’s an example of what can go wrong. Assume you’re not in a Note Pad window; you’re in TextEdit or Apple Mail or something. And you say: This is a very
bad situation. Select the Word “Very”. Cut Selection. You’ve just violated the
Golden Rule, even though you used only your voice.
Why? Because the command Cut Selection means: “Tell the current application
to choose Edit > Cut.” That’s bossing the computer around. So this is exactly the
same as if you had chosen Edit > Cut — using your hands. The cache-conscious
way to delete a word is Delete the Word “Very”. That’s working with text (and
you know this because Delete the Word “Very” is a Dictation mode command).
Cache Commands
MacSpeech Dictate includes the global commands Cache Document, Cache
Selection, and Purge Cache. They can help you if the Golden Rule is accidentally violated, and in many other situations where MacSpeech Dictate needs to get
“in sync” with a document that it can’t “see.”
Cache
As you dictate, and as MacSpeech Dictate types text for you, it also remembers the
text that it types for you. That’s why you can use commands like Go To End or
Move Backward Five Words to navigate and edit your text: MacSpeech can
MacSpeech Dictate 1.5
The Cache and the Golden Rule
151
navigate this text because it created this text. MacSpeech Dictate also maintains
recordings of your voice, and alternative interpretations of what you said. That’s
why voice playback and phrase training are possible. All of this information is kept
in the cache.
But MacSpeech Dictate knows nothing about text that it didn’t enter for you. This
could make it tricky to use MacSpeech Dictate to edit a document that already
exists, or to edit distinct parts of a large document. If you accidentally violate the
Golden Rule by making a manual change to a document where you’ve been dictating, MacSpeech Dictate won’t know you’ve done this, and navigation and editing
commands may misbehave. The “Cache” commands help you handle such situations:
• When you say Cache Document, you’re telling MacSpeech Dictate to read
the whole document’s contents, no matter how those contents were created. MacSpeech Dictate forgets what it entered in this document, throws
away its recordings of your voice (so training on existing text is no longer possible), and just reads the document. Now it knows what the document contains, so now you can tell MacSpeech Dictate to navigate the document and to
enter and edit text.
• Alternatively, you can say Cache Selection. This is like Cache Document,
but it works on just the currently selected text. MacSpeech Dictate now
knows about a limited region of the document. Commands for navigation,
and entering and editing text, will work within this region. (To work with MacSpeech Dictate outside this region, you’d need to issue another “Cache” command.) Note that after Cache Selection, the commands Go To Beginning
and Go To End mean: Go to the beginning or end of the cached region.
Saying Cache Document or Cache Selection can be a simple way to resume
working after deliberately violating the Golden Rule. Why might you do
that? For one thing, accidents can happen, and sometimes violating the Golden
Rule is the only way to repair them. On rare occasions, you might need to make
MacSpeech Dictate 1.5
The Cache and the Golden Rule
152
an alteration in the document where vocal commands just won’t do. That’s no
crime; simply remember that afterwards you should issue a “Cache” command.
For example, sometimes when using the Recognition window to train the voice
model and emend some text you’ve already dictated, MacSpeech Dictate might
become confused and get the spacing or capitalization wrong, so that you must use
the mouse and keyboard to fix the document. Even more dramatic, suppose you
tell MacSpeech Dictate to select a large swatch of text, and then your next spoken
command is misinterpreted as dictation and the whole selected passage is accidentally replaced! Clearly, this is no time to be worrying about the Golden Rule;
just press Command-Z (Edit > Undo) and fix the document. Afterwards, though,
to resume dictating, you’ll want to issue a “Cache” command so that MacSpeech
Dictate can once again “see” the document contents correctly.
Purge
To empty MacSpeech Dictate’s cache completely is called purging the cache:
• When you say Purge Cache, it’s like doing just the first half of a Cache
Document command: MacSpeech Dictate forgets what it entered in this
document, and doesn’t read the document. It just assumes the document is
empty.
Consider, for example, a dialog consisting of two text fields. You dictate text into
the first text field, then tab to the second text field and dictate text there. MacSpeech Dictate can’t “see” that there are two text fields; in its cache, it considers
the first text and the second text to be part of one continuous stretch of text. This
is going to lead to navigation errors! The solution is: As you start to work on the
second text field, say Purge Cache. Now MacSpeech forgets what it did in the
first text field and treats the second text field as a new empty world.
MacSpeech Dictate 1.5
The Cache and the Golden Rule
153
Tip. Tabbing from field to field is such a common thing to do that MacSpeech
Dictate includes two commands to help you with it: Next Field and Previous
Field. These commands are in fact a combination of Purge Cache and
pressing Tab or Shift-Tab. (Conversely, you should not use New Line or New
Paragraph to move from field to field — or if you do, say Purge Cache immediately afterwards.)
Note Pad Windows and the Cache
A Note Pad window is exceptional. MacSpeech Dictate always knows the contents
of a Note Pad window, because the window “belongs” to MacSpeech Dictate. So,
in effect, the Cache Document command is automatically executed for you as
required. When you open an existing document into a Note Pad window, or when
you paste text into a Note Pad window, Cache Document is automatically executed. When you say Purge Cache in a Note Pad window, Cache Document is
automatically executed. And Cache Selection is meaningless.
Still, Cache Document is useful in a Note Pad window, since you might want
MacSpeech Dictate to forget how text was entered in the document, remove its
recordings of your voice, and just start over, learning about the whole document
from scratch. This could be helpful, for instance, when dictating a long document.
MacSpeech Dictate 1.5
Sound Input Troubleshooting
154
Sound Input Troubleshooting
If MacSpeech Dictate doesn’t respond to your voice or doesn’t seem to be working
at all, check your sound input. The problem might be software (your USB microphone might not be your sound input device) or hardware (your USB microphone
might not be working at all).
Begin by quitting MacSpeech Dictate if it is running. You might restart the computer just in case. Now try the following:
• Look in System Preferences > Sound > Input and make sure your USB microphone is the sound input device. Speak into the microphone. The input
level indicator should respond to your voice. If it does not, try unplugging the
USB microphone or adapter from the USB port and plug it back in again. Remember, most USB microphones must be plugged directly into your computer
(not into a USB hub). Also, check to see whether your microphone has a Mute
switch and make sure it is not engaged.
• Look in System Preferences > Speech > Speech Recognition > Settings and
switch the microphone to your USB microphone. Click Calibrate. Speak into
the microphone. You should see the level indicator rise and fall (to the right)
in response to your speech. The indicator can be a little stubborn; you might
have to click Cancel and then click Calibrate again to bring it to life. Speak at
random, moving the slider right or left until the high point of the slider is consistently at about the middle of the green region. Now try saying each phrase
in succession and see if the computer understands you.
If things appear to be working, quit System Preferences and try MacSpeech Dictate again. Choose Tools > Microphone Setup and go through the microphone
setup procedure (see “Microphone Setup,” earlier). You should now be able to use
MacSpeech Dictate.
MacSpeech Dictate 1.5
Sound Input Troubleshooting
If things do not appear to be working, suspect the microphone. If possible, try
plugging the microphone into a different computer and running the same tests
there to confirm this.
155
MacSpeech Dictate 1.5
What’s Installed Where
156
What’s Installed Where
In case you’re wondering where all the pieces of MacSpeech Dictate live on your
hard disk, or if perhaps for some reason you’d like to uninstall it, here’s a list of the
pieces and where they live (and how big they are).
The Application. It lives wherever you put it when you installed MacSpeech
Dictate — typically in the top-level /Applications folder, but it could be anywhere. It’s approximately 30MB in size.
The Support Folder. This is in your user’s Library/Application Support/MacSpeech. It is nearly 1GB in size, because it includes the speech recognition engine data. If you decide to delete this folder, it might be a good idea to look in
the Dictate folder and find your license file and set it aside. It will be convenient
to have on hand if you decide to install MacSpeech Dictate again later.
The Preferences File. This is in your user’s Library/Preferences, and is called
com.macspeech.dictate.plist. It maintains a record of the state of the application
each time you quit. It’s very small.
Your Profile(s). Each profile is wherever you put it when you created the
profile. It could be anywhere. A Spotlight search on “dictateprofile” should
find your profiles. A profile is about 30MB in size.