1
Version 3.0 English-Spanish Standard Edition
User Manual
Say what you mean. Mean what you say.™
Bi-directional Translation
System for Spanish <>
English via typing,
writing, pointing . . .
even speech*!
TM
*Can be used with Dragon NaturallySpeaking™
for speech-to-speech translation.
TM
ESPAÑOL • INGLÉS
ENGLISH • SPANISH
TM
© Copyright 2007 by Spoken Translation, Inc. All rights reserved.
Copyright protection claimed includes all forms and matters of copyrightable material
and information now allowed by statutory or judicial law or hereinafter granted, including
without limitation, material generated from the software programs which are displayed
on the screen such as icons, screen display looks, etc.
Converser is a trademark of Spoken Translation, Inc.
All other company and product names are trademarks of their respective owners.
Table of Contents
CHAPTER 1
Introduction to Converser for Healthcare 3.0
Converser “Quickstart” Tutorial
SCENE 1. . . . . . . . . .
SCENE 2. . . . . . . . . .
SCENE 3. . . . . . . . . .
SCENE 4. . . . . . . . . .
SCENE 5. . . . . . . . . .
SCENE 6. . . . . . . . . .
SCENE 7. . . . . . . . . .
SCENE 8. . . . . . . . . .
SCENE 9. . . . . . . . . .
SCENE 10 . . . . . . . . .
SCENE 11 . . . . . . . . .
SCENE 12 . . . . . . . . .
SCENE 13 . . . . . . . . .
SCENE 14 . . . . . . . . .
SCENE 15 . . . . . . . . .
SCENE 16 . . . . . . . . .
CHAPTER 2
.
.
.
.
.
.
.
.
.
.
.
.
.
.
.
.
.
.
.
.
.
.
.
.
.
.
.
.
.
.
.
.
.
.
.
.
.
.
.
.
.
.
.
.
.
.
.
.
.
.
.
.
.
.
.
.
.
.
.
.
.
.
.
.
.
.
.
.
.
.
.
.
.
.
.
.
.
.
.
.
.
.
.
.
.
.
.
.
.
.
.
.
.
.
.
.
.
.
.
.
.
.
.
.
.
.
.
.
.
.
.
.
.
.
.
.
.
.
.
.
.
.
.
.
.
.
.
.
.
.
.
.
.
.
.
.
.
.
.
.
.
.
.
.
.
.
.
.
.
.
.
.
.
1
.
.
.
.
.
.
.
.
.
.
.
.
.
.
.
.
.
.
.
.
.
.
.
.
.
.
.
.
.
.
.
.
.
.
.
.
.
.
.
.
.
.
.
.
.
.
.
.
.
.
.
.
.
.
.
.
.
.
.
.
.
.
.
.
.
.
.
.
.
.
.
.
.
.
.
.
.
.
.
.
.
.
.
.
.
.
.
.
.
.
.
.
.
.
.
.
.
.
.
.
.
.
.
.
.
.
.
.
.
.
.
.
.
.
.
.
.
.
.
.
.
.
.
.
.
.
.
.
.
.
.
.
.
.
.
.
.
.
.
.
.
.
.
.
.
.
.
.
.
.
.
.
.
.
.
.
.
.
.
.
.
.
.
.
.
.
.
.
.
.
.
.
.
.
.
.
.
.
.
.
.
.
.
.
.
.
.
.
.
.
.
.
.
.
.
.
.
.
.
.
.
.
.
.
Registering Users, Managing
Conversations, and Saving Transcripts
Registering New Users. . . . . . . . . .
Why Register? . . . . . . . . . . .
How to Register . . . . . . . . . .
The Converser Registration Dialog
Managing Conversations. . . . . . . . .
The Startup Conversation . . . . .
Adding Participants . . . . . . . .
Removing Participants . . . . . . .
Ending a Conversation . . . . . . .
—Taking Turns . . . . . . . . . .
Hiding the Conversation Panel. . .
I
.
.
.
.
.
.
.
.
.
.
.
.
.
.
.
.
.
.
.
.
.
.
. 1
. 2
. 2
. 3
. 3
. 5
. 6
. 6
. 7
. 8
. 9
.10
.10
.12
.13
.14
.14
15
.
.
.
.
.
.
.
.
.
.
.
.
.
.
.
.
.
.
.
.
.
.
.
.
.
.
.
.
.
.
.
.
.
.
.
.
.
.
.
.
.
.
.
.
.
.
.
.
.
.
.
.
.
.
.
.
.
.
.
.
.
.
.
.
.
.
.
.
.
.
.
.
.
.
.
.
.
.
.
.
.
.
.
.
.
.
.
.
.
.
.
.
.
.
.
.
.
.
.
.
.
.
.
.
.
.
.
.
.
.
.
.
.
.
.
.
.
.
.
.
.
.
.
.
.
.
.
.
.
.
.
.
.
.
.
.
.
.
.
.
.
.
.
.
.
.
.
.
.
.
.
.
.
.
.
.
.
.
.
.
.
.
.
.
.
.15
.15
.17
.19
.20
.21
.22
.24
.25
.26
.28
II
Unhiding the Conversation Panel
Closing the Conversation Panel .
Restoring the Conversation Panel
Transcripts of Conversations . . . . .
Saving a Transcript . . . . . . . .
What’s in a Transcript? . . . . . .
Opening Saved Transcripts. . . .
Unmasking Saved Transcripts . .
CHAPTER 3
.
.
.
.
.
.
.
.
.
.
.
.
.
.
.
.
.
.
.
.
.
.
.
.
.
.
.
.
.
.
.
.
.
.
.
.
.
.
.
.
.
.
.
.
.
.
.
.
.
.
.
.
.
.
.
.
.
.
.
.
.
.
.
.
.
.
.
.
.
.
.
.
.
.
.
.
.
.
.
.
.
.
.
.
.
.
.
.
.
.
.
.
.
.
.
.
.
.
.
.
.
.
.
.
.
.
.
.
.
.
.
.
.
.
.
.
.
.
.
.
.
.
.
.
.
.
.
.
.
.
.
.
.
.
.
.
Input Methods—Typing, Writing
Handwriting in the Writing Pad . . . . . . . . . . .
Correcting Text before Insertion . . . . . . .
Scratching Out Text . . . . . . . . . . . . . .
Adding Words to a Dictionary . . . . . . . . .
Correcting Text after Insertion . . . . . . . .
Inputting Words or Phrases With the Character Pad
Correcting Text Before Insertion . . . . . . .
Correcting Text after Insertion . . . . . . . .
Entering Text With the On-screen Keyboard. . . .
Correcting Text After Insertion . . . . . . . .
Entering Text in Spanish . . . . . . . . . . . . . .
English or Spanish Keyboard Layout? . . . . .
Standard Keyboard (Spanish layout) . . . . . .
Standard Keyboard (English layout) . . . . . .
Tablet PC On-Screen Keyboard . . . . . . . .
Spanish Handwriting Recognition . . . . . . .
Correcting Inserted Text . . . . . . . . . . . . . .
CHAPTER 4
.
.
.
.
.
.
.
.
.30
.30
.31
.31
.31
.32
.33
.35
37
.
.
.
.
.
.
.
.
.
.
.
.
.
.
.
.
.
.
.
.
.
.
.
.
.
.
.
.
.
.
.
.
.
.
.
.
.
.
.
.
.
.
.
.
.
.
.
.
.
.
.
.
.
.
.
.
.
.
.
.
.
.
.
.
.
.
.
.
.
.
.
.
.
.
.
.
.
.
.
.
.
.
.
.
.
.
.
.
.
.
.
.
.
.
.
.
.
.
.
.
.
.
.
.
.
.
.
.
.
.
.
.
.
.
.
.
.
.
.
.
.
.
.
.
.
.
.
.
.
.
.
.
.
.
.
.
.
.
.
.
.
.
.
.
.
.
.
.
.
.
.
.
.
.
.
.
.
.
.
.
.
.
.
.
.
.
.
.
.
.
.
.
.
.
.
.
.
.
.
.
.
.
.
.
.
.
.
Input Methods—Voice
.38
.39
.40
.40
.41
.41
.41
.42
.42
.43
.43
.43
.43
.44
.44
.45
.45
49
Preparations for Speech Input Mode . . . . . . . . . . . . . .
Installing Dragon NaturallySpeaking . . . . . . . . . . .
Creating and Opening a NaturallySpeaking User . . . . .
Naming NaturallySpeaking Users . . . . . . . . . . . . .
Voice Training for NaturallySpeaking Users . . . . . . . .
Customizing Keys and Buttons for Microphone Control .
Alternatives for Tablet Hot Buttons. . . . . . . . . . . . .
Assigning NaturallySpeaking Key Combinations . . . . . .
Customizing Tablet Hot Key Buttons . . . . . . . . . . . .
Dictation and Vocal Correction . . . . . . . . . . . . . . . . .
.
.
.
.
.
.
.
.
.
.
.
.
.
.
.
.
.
.
.
.
.
.
.
.
.
.
.
.
.
.
.
.
.
.
.
.
.
.
.
.
.
.
.
.
.
.
.
.
.
.
.50
.50
.51
.52
.52
.55
.56
.56
.57
.58
SPOKEN TRANSLATION, INC.
iii
Beginning a Turn in Speech Input Mode . . . . .
Dictation . . . . . . . . . . . . . . . . . . . . . .
Correcting Dictation Errors . . . . . . . . . . . .
Learning the Voice Commands . . . . . . . . . .
Voice Commands . . . . . . . . . . . . . . . . . . . .
Vocal Control of the Microphone . . . . . . . . .
Turning the Microphone Off . . . . . . . . . . . .
Putting the Microphone to Sleep . . . . . . . . . .
Summary of Voice Commands for Microphones . . .
Vocal Control of Converser Buttons . . . . . . .
Summary of Voice Commands for Converser Buttons.
Vocal Control of Menus . . . . . . . . . . . . . .
Summary of Voice Commands for Converser Menus .
Operating Keys and Mouse by Voice . . . . . . .
CHAPTER 5
.
.
.
.
.
.
.
.
.
.
.
.
.
.
.
.
.
.
.
.
.
.
.
.
.
.
.
.
.
.
.
.
.
.
.
.
.
.
.
.
.
.
.
.
.
.
.
.
.
.
.
.
.
.
.
.
.
.
.
.
.
.
.
.
.
.
.
.
.
.
.
.
.
.
.
.
.
.
.
.
.
.
.
.
.
.
.
.
.
.
.
.
.
.
.
.
.
.
.
.
.
.
.
.
.
.
.
.
.
.
.
.
Translating
.
.
.
.
.
.
.
.
.
.
.
.
.
.
.
.
.
.
.
.
.
.
.
.
.
.
.
.
.
.
.
.
.
.
.
.
.
.
.
.
.
.
.
.
.
.
.
.
.
.
.
.
.
.
.
.
.
.
.
.
.
.
.
.
.
.
.
.
.
.
.
.
.
.
.
.
.
.
.
.
.
.
.
.
.
.
.
.
.
.
.
.
.
.
.
.
.
.
.
.
.
.
.
.
.
.
.
.
.
.
.
.
.
.
.
.
.
.
.
.
.
.
.
.
.
.
. 70
. 70
. 70
. 71
. 72
. 74
. 74
. 74
. 75
. 76
. 76
. 76
. 78
. 79
.
.
.
.
.
.
.
.
.
.
.
.
.
.
.
.
.
.
.
.
.
.
.
.
.
.
.
.
.
.
.
.
.
.
.
.
.
.
.
.
.
.
.
.
.
.
.
.
.
.
.
.
.
.
.
.
.
.
.
.
.
.
.
. 83
. 84
. 86
. 86
. 87
. 87
. 88
Translation Shortcuts
The Translation Shortcuts Browser . . . . . . . . .
Selecting a Translation Shortcuts Category . .
Expanding and Contracting Shortcut Categories .
Selecting Shortcut Categories Manually . . . . .
Selecting Shortcut Categories Automatically . . .
Using Translation Shortcuts in the Browser . .
Manipulating the Translation Shortcuts Panel .
STI CONVERSER USER GUIDE
. 59
. 60
. 60
. 61
. 62
. 63
. 63
. 63
. 63
. 64
. 65
. 65
. 66
. 67
69
Preparations for Open-ended Translation . . . . . . .
Selecting the Active Participant . . . . . . . . . .
Entering Text to be Translated . . . . . . . . . .
Removing Distractions. . . . . . . . . . . . . . .
Translating . . . . . . . . . . . . . . . . . . . . . . . .
The Back-Translation Window . . . . . . . . . .
Verifying the Translation via the Back-Translation
The Meaning Cues Window . . . . . . . . . . . .
The Change Meaning Dialog . . . . . . . . . . .
The Translation Window . . . . . . . . . . . . .
The Pronounce Translation Button . . . . . . . .
Accepting the Verified Translation . . . . . . . .
Revising the Input and Retranslating . . . . . . .
Skipping Verification . . . . . . . . . . . . . . . .
CHAPTER 6
.
.
.
.
.
.
.
.
.
.
.
.
.
.
81
.
.
.
.
.
.
.
.
.
.
.
.
.
.
iv
Revealing the Translation Shortcuts Panel . . . . . . .
Hiding the Translation Shortcuts Panel . . . . . . . .
Unhiding the Translation Shortcuts Panel . . . . . . .
Closing the Translation Shortcuts Panel . . . . . . . .
Restoring the Translation Shortcuts Panel . . . . . . .
The Translation Shortcuts Search Facility. . . . . . . . .
Selecting the Category for Search . . . . . . . . . .
Search Methods . . . . . . . . . . . . . . . . . . .
By Initial Characters . . . . . . . . . . . . . . . .
By Keywords . . . . . . . . . . . . . . . . . . . .
No Search . . . . . . . . . . . . . . . . . . . . .
Selecting the Search Mode . . . . . . . . . . . . . .
Using Shortcuts in the Translation Shortcuts Search
Drop-down Menu . . . . . . . . . . . . . . .
The Accept Translation Shortcut Button . . . . . .
APPENDIX A
.
.
.
.
.
.
.
.
.
.
.
.
.
.
.
.
.
.
.
.
.
.
.
.
.
.
.
.
.
.
.
.
.
.
.
.
.
.
.
.
.
.
.
.
.
.
.
.
.
.
.
.
.
.
.
.
.
.
.
.
.
.
.
.
.
.
.
.
.
.
.
.
.
.
.
.
.
.
.
.
.
.
.
.
.
.
.
.
.
.
.
.
.
.
.
.
. . . . . . . . . 95
. . . . . . . . . 96
Navigation and Control Methods
What Can You Do? . . . . . . . . . . . . . . . . . .
Using Tab . . . . . . . . . . . . . . . . . . . . . . .
Using Enter . . . . . . . . . . . . . . . . . . . . . .
Using Up and Down Arrow Keys or Tablet Buttons .
Using Right and Left Arrow Keys or Tablet Buttons.
Clicking the Mouse Buttons . . . . . . . . . . . . . .
Index . . . . . . . . . . . . . . . . . . . . . . . . . .
. 88
. 89
. 90
. 90
. 90
. 91
. 92
. 93
. 93
. 93
. 95
. 95
99
.
.
.
.
.
.
.
.
.
.
.
.
.
.
.
.
.
.
.
.
.
.
.
.
.
.
.
.
.
.
.
.
.
.
.
.
.
.
.
.
.
.
.
.
.
.
.
.
.
.
.
.
.
.
.
.
.
.
.
.
.
.
.
.
.
.
.
.
.
.
100
100
101
102
102
103
105
SPOKEN TRANSLATION, INC.
CHAPTER 1
Introduction to
Converser for
Healthcare 3.0
Converser for Healthcare™ 3.0, a software system designed by Spoken
Translation, Inc., helps patients with limited English to communicate directly
with English-speaking caregivers——doctors, nurses, and other healthcare staff.
This chapter introduces Converser by stepping through a typical short session,
presented as a scenario or script. We call it the “Quickstart” Tutorial, since it
includes all of the necessary elements for basic use of the system:
•
•
•
•
•
•
•
logging in to Converser and beginning a Conversation
entering text to be translated using a standard keyboard
making and verifying translations
sending translations to be transcribed and pronounced
taking turns by changing the Active Participant
saving a transcript of the Conversation
ending the Conversation and logging out
You can see an animated version of the same session by navigating to the
Quickstart item on the Help > Tutorials menu.
• Converser “Quickstart” Tutorial
The “Quickstart” session scenario shows a Conversation between Dr. John Smith
(who speaks only English) and Señora (Sra.) María Gonzáles (who speaks only
Spanish). Each takes one conversational turn.
Dr. Smith has previously registered as a Converser user, and will participate in the
Conversation under his own name. Sra. Gonzáles has not yet registered, and will
participate as a Guest User (see Chapter 2, “Registering Users, Managing Conversations,
and Saving Transcripts” for a full explanation of registration issues and procedures).
1
2
CHAPTER 1
INTRODUCTION TO CONVERSER FOR HEALTHCARE 3.0
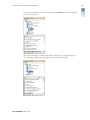
SCENE 1
Dr. Smith has already registered as an English speaker. He logs into Converser.
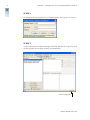
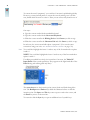
SCENE 2
A new Conversation automatically begins. Since Dr. Smith is the Login User, he is
the first speaker. He can begin entering text immediately.
Active Participant
SPOKEN TRANSLATION, INC.
CONVERSER “QUICKSTART” TUTORIAL
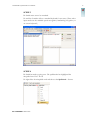
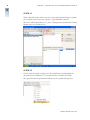
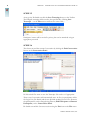
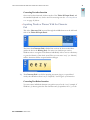
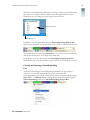
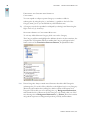
SCENE 3
Dr. Smith enters text to be translated.
He and Sra. González will use a standard keyboard for text entry. (Three other
input modes are also available: speech recognition, handwriting recognition, or
on-screen keyboard.)
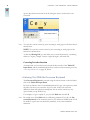
SCENE 4
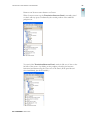
Dr. Smith has made a typing error. The spellchecker has highlighted the
misspelled word “hsi’” in red.
He right-clicks the misspelled word and chooses the Spellcheck... feature:
STI CONVERSER USER GUIDE
3
4
CHAPTER 1
INTRODUCTION TO CONVERSER FOR HEALTHCARE 3.0
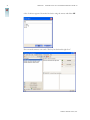
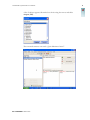
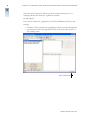
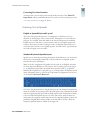
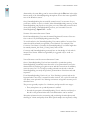
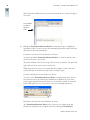
A list of choices appears. He makes his choice using the mouse and clicks OK.
The corrected sentence now reads “The boy has broken his right foot.”
SPOKEN TRANSLATION, INC.
CONVERSER “QUICKSTART” TUTORIAL
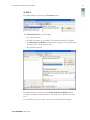
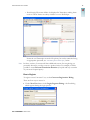
SCENE 5
Dr. Smith translates by clicking the Translate button.
The Translation Screen opens, showing
• the original sentence
• the Back-Translation (a translation of the translation back into English)
• the Meaning Cues Window (indicating the meaning of each expression in
the input, as Converser understood it)
• the translated sentence
Dr. Smith checks the translation in the Back-Translation Window, which
contains a translation of the translation: “The little boy has broken his correct
foot.”
Unfortunately, the word “correct” doesn’t convey the intended meaning.
STI CONVERSER USER GUIDE
5
6
CHAPTER 1
INTRODUCTION TO CONVERSER FOR HEALTHCARE 3.0
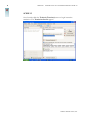
SCENE 6
Dr. Smith fixes any word meaning errors. Here, the meaning of “right” is
inappropriate; so he double-clicks this word in the Meaning Cues Window.
The Change Meaning Dialog box opens, and Dr. Smith selects the intended
meaning for the word “right”—the second one (“right-handed, right-hand, ...”).
SCENE 7
Dr. Smith retranslates the input, this time using the selected meaning for “right,”
by clicking the Retranslate button.
SPOKEN TRANSLATION, INC.
CONVERSER “QUICKSTART” TUTORIAL
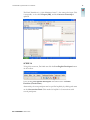
SCENE 8
Dr. Smith re-checks the Back-Translation Window. Word meaning selection
may have affected it. Here, “right-hand foot” has replaced “correct foot,”
indicating that the translator has now used the intended meaning.
He clicks the OK button when satisfied. The original text and its corrected
translation will be sent to the Converser Transcript Window.
STI CONVERSER USER GUIDE
7
8
CHAPTER 1
INTRODUCTION TO CONVERSER FOR HEALTHCARE 3.0
SCENE 9
Dr. Smith and Sra. Gonzáles can now see both the original and the translated text
in the Converser Transcript Window.
They can also listen to the pronunciation of the translation.
In addition, any selected text in either language can be pronounced automatically
by clicking the Pronounce Selection button.
SPOKEN TRANSLATION, INC.
9
CONVERSER “QUICKSTART” TUTORIAL
SCENE 10
Now Sra. Gonzáles wants to respond. She has not yet registered as a Converser
User, so she can take her turn as a Guest User.
She opens the Conversation Panel and clicks on Visitante Feminina (Female
Guest).
New Active Participant
STI CONVERSER USER GUIDE
10
CHAPTER 1
INTRODUCTION TO CONVERSER FOR HEALTHCARE 3.0
SCENE 11
When a Spanish speaker takes a turn, the screen and keyboard change to Spanish.
Sra. González types in her own response: “¿Qué deberiamos hacer?”
She uses standard Spanish keys for ¿ and é. Transparent keyboard labels can help
Spanish typists to find these keys.
SCENE 12
Sra. Gonzáles has made a typing error. The spellchecker has highlighted the
misspelled word “deberiamos’” in red (because the i should be accented).
She right-clicks the misspelled word and chooses the spellchecking feature.
SPOKEN TRANSLATION, INC.
CONVERSER “QUICKSTART” TUTORIAL
A list of choices appears. She makes her choice using the mouse and clicks
Aceptar (OK).
The corrected sentence now reads “¿Qué deberíamos hacer?”
STI CONVERSER USER GUIDE
11
12
CHAPTER 1
INTRODUCTION TO CONVERSER FOR HEALTHCARE 3.0
SCENE 13
Sra. González clicks the Traducir (Translate) button to begin interactive
translation. The Translation Screen appears.
SPOKEN TRANSLATION, INC.
CONVERSER “QUICKSTART” TUTORIAL
The Back-Translation is “¿Qué deberíamos hacer?”—the same as the input. This
is acceptable, so she clicks Aceptar (OK), and the Converser Transcript is
updated.
SCENE 14
To begin his next turn, Dr. Smith can click the Last English Participant button
on the toolbar.
Later, clicking Last Spanish Participant will switch back to Visitante
Feminina (Female Guest).
Alternatively, the next participant can be specified explicitly by clicking and name
on the Conversation Panel. This method is helpful for Conversations with
several participants.
STI CONVERSER USER GUIDE
13
14
CHAPTER 1
INTRODUCTION TO CONVERSER FOR HEALTHCARE 3.0
SCENE 15
At any point, Dr. Smith can click the Save Transcript button on the Toolbar.
The bilingual transcript will be saved to the specified file. (Clicking Save
Transcript ... on the File menu would have the same effect.)
Participants’ names will be masked for privacy, but can be unmasked using an
appropriate password.
SCENE 16
The doctor can end the current Conversation by clicking the End Conversation
button on the Conversation Panel.
He’ll be asked if he wants to save the Transcript. He can do so if appropriate.
Then a new Conversation will automatically start. At first, its participants will be
the Login User (Dr. Smith) and the two Spanish-speaking Guest Users. However,
the participant list can be changed using buttons (Add Participants and Remove
Participants) on the Conversation Panel.
Dr. Smith can end this Converser session using the Exit item on the File menu.
SPOKEN TRANSLATION, INC.
CHAPTER 2
Registering Users,
Managing
Conversations, and
Saving Transcripts
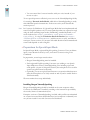
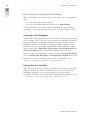
This chapter explains
1 how and why to register as a Converser User, thus creating a personal User
Profile;
2 how to edit the User Profile of a registered User in order to modify the
associated information;
3 how to manage a Converser Conversation:
• how to start and end the Conversation;
• how to add participants to it or remove participants from it;
• how to take a turn as the current writer or speaker (the Active Participant);
• and how to manage the Conversation Panel
4 how to save a bilingual Transcript of the Conversation, and how to view saved
Conversations from within Converser.
• Registering New Users
This section explains how and why to register as a regular Converser User.
Why Register?
To log in and begin a Converser session, you must be a registered Converser User,
with a username and password. Thus each Converser Conversation has at least
one registered User—the Login User.
The other participants may also be registered; however, they can instead
participate as Guest Users—as Male Guest, Female Guest, Visitante
Masculino, or Visitante Feminina. Guest Users are typically temporary or one-
15
16
CHAPTER 2
REGISTERING USERS, MANAGING CONVERSATIONS, AND SAVING TRANSCRIPTS
time users of the system, for whom a personal record is unnecessary—for
example, patients who walk up to a pharmacy window.
So why register?
In Converser Version 3.0, registration is useful for friendliness and for recordkeeping.
• Friendliness: If the system knows a participant’s name, the name will appear in
the status bar in the lower right-hand corner of the screen whenever he or
she is taking a turn.
Active Participant
SPOKEN TRANSLATION, INC.
REGISTERING NEW USERS
• Record-keeping: The name will also be displayed in Transcripts, making them
easier to follow. Names are always visible in on-screen Transcripts.
Names in saved Transcripts are masked for privacy, but can be unmasked using
an appropriate password; see “Unmasking Saved Transcripts”, below.
Note
In future versions, Converser will have additional reasons for recognizing you
personally whenever you take a turn as a speaker/writer. For example, it will be
possible to create Personal Translation Shortcuts (for quick and easy execution
of your most frequent inputs).
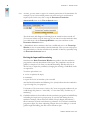
How to Register
To register a new Converser User, use the Converser Registration Dialog.
There are four ways to access it:
1 Via the New User button in the Login/Ingresar Dialog—the first dialog
which appears during the login process.
STI CONVERSER USER GUIDE
17
18
CHAPTER 2
REGISTERING USERS, MANAGING CONVERSATIONS, AND SAVING TRANSCRIPTS
2 Via the Register New User ... item in the User menu (or use the keyboard
shortcut Ctrl+Shift+N).
3 Via the Register New User icon in the Converser Toolbar.
4 Via the Add Participants dialog reached through the Add Participants
button on the Conversation Panel.
SPOKEN TRANSLATION, INC.
REGISTERING NEW USERS
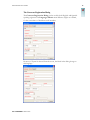
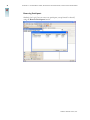
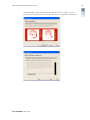
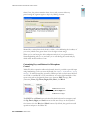
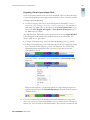
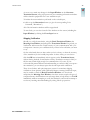
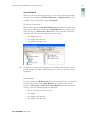
The Converser Registration Dialog
The Converser Registration Dialog can be used by both English- and Spanishspeaking registrants. Its Language/Idioma menu indicates English as a default,
for the convenience of healthcare staff members.
However, if Español is selected from the menu, the labels in the dialog change to
this language.
STI CONVERSER USER GUIDE
19
20
CHAPTER 2
REGISTERING USERS, MANAGING CONVERSATIONS, AND SAVING TRANSCRIPTS
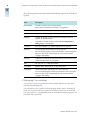
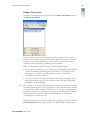
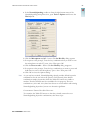
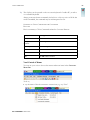
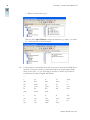
The following information fields should be filled during registration. All fields are
required.
Field
Description
Date of Birth
Needed to verify the User’s unique identity.
Dates can be set with the mouse/stylus, or by typing in.
First Name
The User’s forename, e.g. John or Juan. To be typed in.
Gender
M (Male) or F (Female). Radio buttons.
Language
English (the default, for the convenience of healthcare staff) or
Spanish. A drop-down menu.
If Spanish is selected, the labels in the Converser Registration
Dialog change to this language.
Last Name
Password
The User’s surname, e.g. Smith or Martinez. To be typed in.
An invented password for this User. To be typed in.
To be used when logging in if this User starts the Converser program.
However, other Users can participate in Conversations without
logging in individually.
Physician
If this User is a Patient (as indicated by User’s Role field), the name
of his or her physician. To be typed in.
Title
Mr., Ms., Dr., etc. A drop-down menu.
User’s Role
Patient, doctor, other staff, etc. A drop-down menu.
Login Name
An invented unique name for this User. To be typed in.
To be used when logging in if this User starts the Converser program.
However, other Users can participate in Conversations without
logging in individually.
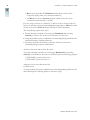
• Managing Conversations
A Converser Conversation provides the context within which Users take turns
entering and translating text.
A Conversation is also useful as a record-keeping device: when a Transcript is
saved, the record includes the current Conversation’s Login User, its start and
save time, and its set of participants (with the real names masked for privacy, but
accessible with a password).
SPOKEN TRANSLATION, INC.
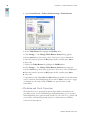
MANAGING CONVERSATIONS
Conversations are managed using the Conversation Panel, one of two sliding
panels on the left side of the Converser screen. Using this panel, the Login User
can add or remove conversational participants.
The Startup Conversation
As soon as you log in to Converser, an initial Conversation is automatically
started. It always includes three participants:
u
u
u
the Login User, who may be English- or Spanish-speaking
the male Guest User speaking the opposite language (Male Guest or Visitante
Masculino)
the female Guest User speaking the opposite language (Female Guest or
Visitante Feminina)
STI CONVERSER USER GUIDE
21
22
CHAPTER 2
REGISTERING USERS, MANAGING CONVERSATIONS, AND SAVING TRANSCRIPTS
This set of participants is visible in the Conversation Panel.
Note
Male and female Guest Users behave identically; so the choice between them will
be based only upon courtesy and friendliness (since your patients may prefer to
be recognized as male or female in onscreen Transcripts), or upon your recordkeeping preferences.
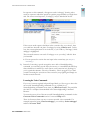
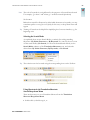
Adding Participants
The Login User (but no one else) can add a participant at any time by clicking the
Add Participants button in the Conversation Panel. A list will appear, showing
all registered Users. You can use the associated check boxes to indicate which of
SPOKEN TRANSLATION, INC.
MANAGING CONVERSATIONS
these should be added to the current Conversation as new participants. Then click
the Add button.
As each participant is added, his or her name appears in the Conversation Panel.
Any number of participants can join a Conversation, although a given User can
join a given Conversation only once. This limitation also applies to Guest Users,
like Male Guest. However, if necessary, several male guests can take turns using
the Male Guest account. The other Guest User accounts (Female Guest,
Visitante Masculino, and Visitante Feminina) can similarly handle several
temporary Participants by turns.
STI CONVERSER USER GUIDE
23
24
CHAPTER 2
REGISTERING USERS, MANAGING CONVERSATIONS, AND SAVING TRANSCRIPTS
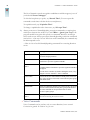
Removing Participants
Similarly, the Login User can remove any participant (except himself or herself)
using the Remove Participants button.
SPOKEN TRANSLATION, INC.
MANAGING CONVERSATIONS
Ending a Conversation
To end a Conversation, the Login User can use the End Conversation button on
the Conversation Panel.
You can end the current Conversation whenever convenient for your recordkeeping—for example, when the current patient departs. However, you can also
continue a Conversation indefinitely, e.g. for a series of Guest Users, such as
temporary clients appearing at a pharmacy pick-up window.
When a Conversation ends, two actions will automatically be taken:
1 You’ll be offered the opportunity to save a Transcript of the completed Conversation. If
at some intermediate point during the Conversation you’ve already saved a
Transcript to a certain file, you’ll be asked if you want to append any
subsequent turns to that same file.
2 A new Conversation will be started, containing the same three participants as the
initial Conversation: the Login User and two Guest Users (male and female)
speaking the opposite language.
Note
Don’t confuse a Converser Conversation with a Converser session–the time between
launching and exiting the Converser program. You can start and end any number
of Conversations before exiting a Converser session. To start a session and begin
an initial Conversation, a registered User must log in with the proper Username
and Password; but no login is required to add participants to an ongoing
Conversation or to start a new one.
Only the Login User can end a Conversation. Thus, during other Users’ turns, the
End Conversation button will be greyed out to indicate that it is deactivated.
STI CONVERSER USER GUIDE
25
26
CHAPTER 2
REGISTERING USERS, MANAGING CONVERSATIONS, AND SAVING TRANSCRIPTS
—Taking Turns
A Conversation proceeds by turns: Dr. Smith may take the first turn as the current
writer or speaker (or Active Participant); Sra. González may take the next turn; and
so on.
Whenever a new turn begins, three actions are taken automatically:
• the words and messages in the interface change to the Active Participant’s
native language;
• the keyboard keys change into that language.
• the handwriting and touchscreen interfaces change into that language;
There are three ways of indicating whose turn will be next:
1 You can specify the next Active Participant explicitly by clicking and
highlighting the relevant name in the Conversation Panel. The new turn will
then begin (as indicated by the name in the status bar in the lower right-hand
corner of the Converser screen).
New Active Participant
SPOKEN TRANSLATION, INC.
MANAGING CONVERSATIONS
2 You can bring back the most recent English or Spanish participant using the
Last English Participant or Last Spanish Participant items on the User
menu.
3 You can use the Last English Participant or Last Spanish Participant
buttons on the Converser Toolbar.
If a Conversation is just beginning, it may be that no English or Spanish
participant has yet taken a turn. In such cases, there is no “last” English or
Spanish participant; so the male Guest Users (Male Guest and Visitante
Masculino) will become the default turn-takers.
Explicit specification of the next Active Participant via the Conversation Panel
will be necessary for a new speaker’s first turn. However, the Last
English/Spanish Participant method of turn-taking will be useful for turns
after the first one, especially for switching back and forth between speakers in
Conversations with only two participants.
STI CONVERSER USER GUIDE
27
28
CHAPTER 2
REGISTERING USERS, MANAGING CONVERSATIONS, AND SAVING TRANSCRIPTS
Hiding the Conversation Panel
When Converser starts up, the Conversation Panel is normally open and in view.
Further, it is pinned so that it will stay open, as indicated by the vertical position of
the window’s pushpin icon.
To hide the Conversation Panel—to make it slide out of view on the left side of
the screen—you can
1 Click on the pushpin so that the pin becomes horizontal.
SPOKEN TRANSLATION, INC.
MANAGING CONVERSATIONS
2 Then move the cursor out of the Panel.
3 If the panel doesn’t close immediately, just click outside it.
When the panel is hidden in this way, its tab will remain in view on the left edge of
the screen.
Tab for hidden
Conversation
Panel
Tip
The Conversation Panel will be used mainly by staff members when initiating a
Conversation. Patients will rarely need to manipulate it. Hiding it can help to
simplify the appearance of the Converser screen, thus minimizing distractions and
confusions, especially for first-time participants.
STI CONVERSER USER GUIDE
29
30
CHAPTER 2
REGISTERING USERS, MANAGING CONVERSATIONS, AND SAVING TRANSCRIPTS
Unhiding the Conversation Panel
To unhide the hidden Conversation Panel—to slide it back into view—simply
hover the cursor over its tab. The panel will then stay in view as long as the cursor
stays within it. The panel will again slide shut if the cursor moves outside of it.
While the panel is in view, you can again click the pushpin, so that it becomes
vertical. The panel will then stay open until you unpin it again.
Sometimes the Conversation Panel will be obscured by the open and pinned
Translation Shortcuts Panel (see “Manipulating the Translation Shortcuts Panel” on
page 88). In this case, the two Panels’ tabs are horizontal and below them. Just
click either tab to bring the desired panel into view.
Conversation Panel tab
Closing the Conversation Panel
You can close the Conversation Panel, or temporarily remove it from the
Converser screen, by clicking the standard Close Window (X) icon in the panel’s
upper right-hand corner. In this case, no tab will be visible. To make the panel
visible again for use, you’ll need to restore it (see below).
SPOKEN TRANSLATION, INC.
TRANSCRIPTS OF CONVERSATIONS
Restoring the Conversation Panel
The Conversation Panel can be restored to its original open and pinned state
and placed in its original location by clicking the Conversation Panel item in the
View menu. Alternatively, you can restore both the Conversation Panel and the
Translation Shortcuts Panel by clicking the Restore Panels item in the same
menu.
Restoration will be necessary if the panel has been closed (temporarily removed
from the Converser screen), whether on purpose or by accident. It may also be
necessary if either of the panels has been moved from its original location.
• Transcripts of Conversations
At any point during a Conversation, you can save a bilingual Transcript, or record,
of all of the turns taken since the Conversation began. In addition, whenever you
end a Conversation, you’ll be offered the chance to save a Transcript of it.
Saving a Transcript
To initiate the saving of a Transcript during a Conversation, select the Save
Transcript... item on the File menu (or with the keyboard shortcut Ctrl+S).
Equivalently, you can use the corresponding icon on the Toolbar.
STI CONVERSER USER GUIDE
31
32
CHAPTER 2
REGISTERING USERS, MANAGING CONVERSATIONS, AND SAVING TRANSCRIPTS
A standard Windows Save As ... dialog will appear, so that you can indicate a file
name and location for the new Transcript.
The default name of the new Transcript file includes
• the Login Name of its Login User
• its exact save time
For example, here’s the default name of a Transcript saved by Login User Dr.
John Smith, with Login Name JSmith, at 08:08:55 AM on July 05, 2006:
JSmith_07052006_080855
However, you can rename the file as desired.
If you re-save a Conversation for which a Transcript has already been saved, you’ll
be asked whether you want to update the existing file or specify a new one.
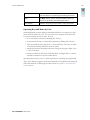
What’s in a Transcript?
To help you identify its Conversation, each Transcript includes an informational
header indicating
•
•
•
•
the exact start time
the exact time when the current Save operation was ordered
the Login User
the participants and their roles (Physician, Staff, Patient, Guest, etc.)
Here’s the informational header of a sample Transcript.
Start Timestamp: 6/29/2006 11:34:33 AM
SPOKEN TRANSLATION, INC.
TRANSCRIPTS OF CONVERSATIONS
Save Timestamp: 6/29/2006 11:57:21 AM
Login User: user7 (role: Staff)
Participants: user7 (role: Staff); user4 (role: Guest)
Also included in a Transcript file are bilingual transcriptions of all of the
conversational turns up to the save point. For each turn, the original or input
language is shown on one line, and the verified translation appears on the
following line. Turns are separated by blank lines.
Here are the first two turns of the sample Transcript. The first turn was taken by
English speaker user7; and the second was taken by Spanish speaker user4.
user7: Good morning.
user7: Buenos días.
user4: Hola.
user4: Hello.
Within a saved Transcript, User Names are masked—replaced by opaque
identifiers like user7 or user4—in order to comply with privacy regulations (e.g.
those of HIPAA). To learn how to unmask a saved Transcript, or restore the
original User Names, see the immediately following sections.
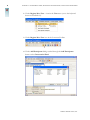
Opening Saved Transcripts
Transcripts are saved as standard text files, in format filename.txt, and thus can be
opened for inspection in standard word processing applications such as Notepad,
Wordpad, etc.
However, they can also be opened from within the Converser interface. For this
purpose, use the Open Transcript ... item in the File menu (keyboard shortcut
Ctrl+O).
Equivalently, you can use the corresponding icon on the Toolbar.
STI CONVERSER USER GUIDE
33
34
CHAPTER 2
REGISTERING USERS, MANAGING CONVERSATIONS, AND SAVING TRANSCRIPTS
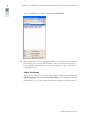
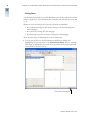
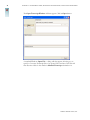
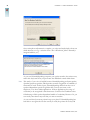
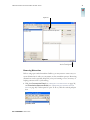
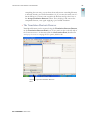
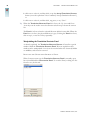
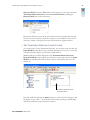
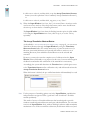
The Open Transcript Window will then appear. Click its Open button.
A standard Windows Open File ... dialog will then appear, allowing you to
specify a Converser Transcript file to be opened. The contents of this file will
then become visible in the window’s Masked Transcript subwindow. As
SPOKEN TRANSLATION, INC.
TRANSCRIPTS OF CONVERSATIONS
explained above, User Names in the saved file are masked—replaced by opaque
identifiers like user7 or user4.
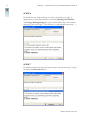
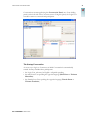
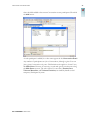
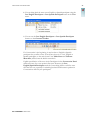
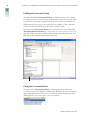
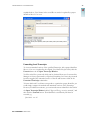
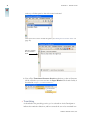
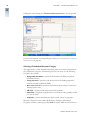
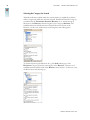
Unmasking Saved Transcripts
To view an unmasked version of the specified Transcript, with opaque identifiers
like user 12 or user 4 replaced by the original User Names like John Smith, click the
Unmask button in the Open Transcript Window.
You’ll be asked for a password, which can be obtained from your Converser Site
Manager or from a representative of Spoken Translation, Inc. Once the password
has been supplied, the unmasked version of the file will become visible in the
Unmasked Transcript subwindow.
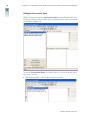
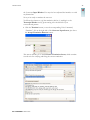
To learn which real User Name corresponds to a particular opaque identifier, you
could simply compare the masked and unmasked versions of the Transcript.
However, for added convenience, you can instead enter an identifier in the field of
the Open Transcript Window labeled “Type an ID (e.g. user4) to unmask,” and
then click the Unmask button. That identifier’s secret identity will then be
revealed, e.g.
John Smith - user 12
STI CONVERSER USER GUIDE
35
36
CHAPTER 2
REGISTERING USERS, MANAGING CONVERSATIONS, AND SAVING TRANSCRIPTS
SPOKEN TRANSLATION, INC.
CHAPTER 3
Input Methods—
Typing, Writing
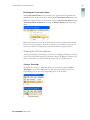
Converser supports four methods for inputting text by typing or writing:
1 standard keyboard.
2 on-screen keyboard
3 handwriting (Writing Pad)
4 single character input (Character Pad)
(You can also input text with your voice. See Chapter 4, “Input Methods—Voice.”)
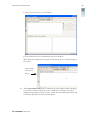
Input modes 2, 3, and 4 are provided by the Windows XP Tablet operating
system. They’re accessed through the Tablet PC Input Panel. To open this
Panel, click the icon next to the Windows Start button.
The Input Panel looks like this:
You can dock it at the top or bottom of your screen, using the small gear icon in
the middle of the right-hand side of the panel.
37
38
CHAPTER 3
INPUT METHODS—TYPING, WRITING
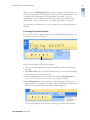
To switch between input modes, use the buttons at the top left of the Panel:
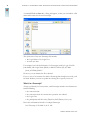
• Handwriting in the Writing Pad
This is the Writing Pad, accessed using the top button on the left-hand side of
the Tablet PC Input Panel:
To use the Writing Pad, just write in the box with the stylus:
Windows’ recognition of your handwriting is shown as typed text in small
rectangles below the handwriting. When you’re satisfied that this text is correct,
click the Insert tab. The text will then be inserted at the insertion point in the
active field or window.
Note
When you click Insert, if there is no active field or window containing a flashing
cursor, the text will disappear and be lost.
Tip
Instead of clicking the Insert tab, you can click (or tap) in the window where you
want the text to appear.
SPOKEN TRANSLATION, INC.
39
HANDWRITING IN THE WRITING PAD
When you use the Writing Pad, Windows tries to recognize the words that you
write by comparing them to words its own dictionary. For each handwritten word,
it seeks the closest dictionary word. For example, if you write “eezy” (as a
misspelling for “easy”), Windows will find “lazy” as the closest match. If you
really wanted “eezy” for some reason, you would need to make a correction.
You can correct text either before or after you insert it into a waiting text field or
window.
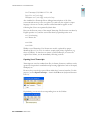
Correcting Text before Insertion
If one of the words in a small rectangle below your handwriting is incorrect, you
can click it to open a correction panel:
Correction Panel
In the correction panel, you have four options:
1 Choose one of the alternative recognition candidates listed across the top of
the panel.
2 Click Delete Text. The text will be deleted, leaving a space in your handwriting
input where you can re-enter the word.
3 Correct individual letters, as you would when using the Character Pad (see
“Inputting Words or Phrases With the Character Pad” on page 41, below).
4 Select Recognize as to open a small list of other languages that this word
might belong to. For example, you might tell the system that the current word
should be recognized as French, Spanish, or British English.
If you’re using Spanish as the Interface Language, your choices will include
STI CONVERSER USER GUIDE
40
CHAPTER 3
INPUT METHODS—TYPING, WRITING
American English, British English, South American Spanish, or French.
Whichever correction facility you choose, click OK when you’re finished.
Note
When correcting text in the Writing Pad, if you switch to the Character Pad or
the On-screen Keyboard, you’ll lose your current text.
SCRATCHING OUT TEXT
To delete characters, words, or entire phrases, you can “scratch them out.” Simply
rub the stylus back and forth (right and left) like this:
You’ll need to scratch back and forth horizontally. Scratching at an angle or
scribbling may not work. A simple three-stroke—right-left-right—works very
well. A blank will be left where you scratched something out. You can enter new
handwriting there.
ADDING WORDS TO A DICTIONARY
When a handwritten word is misrecognized, it’s often because the word is not in
Windows’ dictionary. Medical words, such as drug names, are sometimes
misrecognized for this reason. (Try “Cozaar,” for an example.) To avoid future
mistakes, following a failed recognition attempt, you can add your word to the
dictionary.
SPOKEN TRANSLATION, INC.
INPUTTING WORDS OR PHRASES WITH THE CHARACTER PAD
Correcting Text after Insertion
Once text has been inserted, all three modes of the Tablet PC Input Panel, and
the standard keyboard too, can be used for correcting text. See “Correcting Inserted
Text” on page 45, below.
• Inputting Words or Phrases With the Character
Pad
This is the Character Pad, accessed through the middle button on the left-hand
side of the Tablet PC Input Panel:
The line in the Character Pad is divided into sections by short vertical lines
(unlike the line in the Writing Pad). You write one character per section.
Windows tries to recognize each character individually: it does not use a dictionary
to guess the identity of the whole word. Thus you can enter “eezy” (or “Motrin”)
and the characters will be accepted without changes:
Tip
The Character Pad is useful for inputting acronyms, jargon, or specialized
words, since Windows doesn’t try to “helpfully” second-guess your intention.
Correcting Text Before Insertion
You can correct individual character recognition errors. In the “eezy” example, if
Windows (1) misrecognizes the first character and (2) capitalizes the ‘z’, you can
STI CONVERSER USER GUIDE
41
42
CHAPTER 3
INPUT METHODS—TYPING, WRITING
open a drop-down correction list by hovering the stylus over the letter to be
corrected.
Note
You can also correct a letter by just re-entering it, writing right over the letter that is
already there.
NOTE: You can also correct a letter by just re-entering it, writing right over the
letter that is already there.
As with the Writing Pad, you can delete one or more characters by “scratching
them out.” Again, a simple 3-stroke—right-left-right—will work well.
Correcting Text after Insertion
As mentioned, once text has been inserted, all three modes of the Tablet PC
Input Panel, and the standard keyboard too, can be used for correcting text. See,
“Correcting Inserted Text” on page 45, below.
• Entering Text With the On-screen Keyboard
The On-screen Keyboard is accessed using the lowest button on the left-hand
side of the Tablet PC Input Panel.
Its layout is similar to that of a standard keyboard. To type, just tap the keys with
the stylus. However, on-screen the Shift, Ctrl, and Alt keys are used a bit
differently from their physical counterparts: the on-screen control keys stay
depressed until you tap another key.
For example, to type a capital ‘P’, you first click Shift and then click P.
Note
Be careful not to click Shift without a following character. If you do, the Onscreen Keyboard, and the standard keyboard as well, will freeze in Shift mode. You’ll
be unable to type lower case characters, numbers, or any other unshifted
characters.
SPOKEN TRANSLATION, INC.
ENTERING TEXT IN SPANISH
Correcting Text After Insertion
As mentioned, once text has been inserted, all three modes of the Tablet PC
Input Panel, and the standard keyboard too, can be used for correcting text. See,
“Correcting Inserted Text” on page 45, below.
• Entering Text in Spanish
English or Spanish Keyboard Layout?
The layout of the physical keyboard—its assignment of characters to keys—
depends on the language of the current Active Participant in a Conversation in
progress. For example, when Dr. Smith is the Active Participant, the standard
English layout is used, since Converser knows that he’s an English speaker. By
contrast, when Sra. González is taking her turn, the Spanish keyboard layout is
used, since she’s known to be a Spanish speaker, and will need to type characters
not used in English, such as ñ and á.
Standard Keyboard (Spanish layout)
Spanish text is normally typed using the Spanish keyboard layout. As mentioned,
this layout is automatically enabled by Converser whenever a Spanish speaker
becomes the Active Participant.
Many of the key assignments for Spanish are the same as for English; but there
are some important differences. For instance, the key which gives an equal sign
(=) in English would produce the upside down question mark (¿) in Spanish.
Similarly, the English key for the plus sign (+) would produce the Spanish upside
down exclamation point (¡). The full set of Spanish key assignments can be seen
on the Spanish On-screen Keyboard.
Of course, the physical labels on the physical keys can’t be changed automatically
when the software layout changes. Thus Spanish typists using a standard keyboard
with the English physical layout will normally require stick-on Spanish key labels,
to be used when the Spanish layout is in effect. Since these stick-on labels are
transparent, they augment rather than obscure the original English key labels: the
permanent English labels remain visible on the left side of the keys, while the
temporary Spanish labels are added on the right side.
STI CONVERSER USER GUIDE
43
44
CHAPTER 3
INPUT METHODS—TYPING, WRITING
Stick-on labels are not necessary for all keys, since many have the same character
assignments in English and Spanish layouts.
Even with the stick-on labels, typing in Spanish can be confusing. Thus some
users will prefer to use the Spanish Writing Pad or the Spanish On-screen
Keyboard.
Note
Staff members may occasionally need to type Spanish, using the Spanish keyboard
layout, on a computer lacking stick-on labels. Here are the necessary keys in this
case:
[ (left square bracket), followed by e or E produces é or É
; (semicolon) or : (colon) produce ñ or Ñ
+ produces ¿ and = produces ¡
- (hyphen), followed by e or E produces è or È
{ (left curly bracket), followed by u or U produces ü or Ü
Standard Keyboard (English layout)
Staff members may occasionally need to enter accented Spanish text with the
standard English keyboard layout. This is possible, but of course you won’t see the
special Spanish characters on the keys. Here are the relevant keys:
Ctrl + ' (apostrophe), followed by e or E produces é or É
Ctrl + Shift + ~ (tilde), followed by n or N produces ñ or Ñ
Alt + Ctrl + Shift + ? produces ¿
Alt + Ctrl + Shift + ! produces ¡
Ctrl + ` (back-apostrophe), followed by e or E produces è or È
Ctrl + Shift + : (colon), followed by u or U produces ü or Ü
Tablet PC On-Screen Keyboard
To enter Spanish text via the Tablet PC Input Panel, you can select Spanish (ES)
in the Panel’s drop-down language menu. However, Converser makes this
selection automatically when a Spanish speaker’s turn starts.
Then, to use the Spanish On-screen Keyboard, select the lowest of the three
buttons on the left-hand side of the Panel.
SPOKEN TRANSLATION, INC.
CORRECTING INSERTED TEXT
The Spanish keyboard looks like this:
The Spanish special characters and accents are on the right-hand side of the
keyboard:
For example, to enter an é, choose
and then type ‘e’. To enter a ü,
choose
, then
, and then type ‘u’.
The typing sequence for other special characters is self-explanatory.
Spanish Handwriting Recognition
To enter Spanish text via the Tablet PC Input Panel, you can select Spanish (ES)
in the Panel’s drop-down language menu. However, this selection is automatic
when a Spanish speaker’s turn starts.
Then, to use the Spanish Writing Pad or Character Pad, select the top or
middle button of the three buttons on the left-hand side of the Panel.
Text entry and correction procedures are the same as for English (explained
above), except that a Spanish dictionary rather than an English one is used for
word recognition in the Writing Pad.
Insert the text into Converser using the Panel’s Insert button, or by clicking (or
tapping) in the window where text should appear.
• Correcting Inserted Text
When you correct text which has already been inserted into Converser, you can
use any input method (standard keyboard, On-screen Keyboard, Writing Pad,
or Character Pad) for new text entry. For example, in the following inserted text,
the word “symptoms” is incorrect:
STI CONVERSER USER GUIDE
45
46
CHAPTER 3
INPUT METHODS—TYPING, WRITING
To correct the word “symptums,” you could use Converser’s spellchecking facility.
However, you may instead prefer to correct the error by writing over it. In this
case, double-click the error to select it. Then you can correct it by hand in one of
four ways:
1 Type the correct word with the standard keyboard.
2 Type the correct word with the On-screen Keyboard.
3 Write the correct word in the Writing Pad and click Insert (or click or tap).
4 Write the correct word in the Character Pad and click Insert (or click or tap).
In each case, the correct word will replace “symptums.” (You can also enter
corrections using your voice. See “Dictation and Vocal Correction” on page 58.)
Note
You could also highlight the letter ‘u’ and use any of the four methods to replace
it with ‘o’.
NOTE: You could also highlight the letter ‘u’ and use any of the four methods to
replace it with ‘o’.
For editing text which has already been inserted into Converser, the Tablet PC
Input Panel offers several special keys. They appear on the right-hand side of the
Panel during such editing (and only then):
The arrow keys move the insertion point (cursor) back and forth through the
text. The Backspace and Delete keys delete the character before or after the
insertion point. The Space and Tab keys enter a space or tab at the cursor, and
the Enter key moves to the next line.
You can also click the Sym key to open an additional set of symbol keys:
SPOKEN TRANSLATION, INC.
CORRECTING INSERTED TEXT
Likewise, the Num key opens a set of number keys.
STI CONVERSER USER GUIDE
47
48
CHAPTER 3
INPUT METHODS—TYPING, WRITING
SPOKEN TRANSLATION, INC.
CHAPTER 4
Input Methods—
Voice
Converser for Healthcare 3.0 offers four input modes, or ways to enter text into the
Input Window:
•
•
•
•
handwriting
on-screen keyboard
standard, physical keyboard
speech
The first three input modes are provided by the Windows XP, Tablet PC Edition,
operating system, and are discussed in a separate chapter (“Input Methods—Typing,
Writing”).
The last input mode, speech, is provided by Converser, in cooperation with
Dragon NaturallySpeaking. NaturallySpeaking, the only speech recognition
program that has been tested with Version 3.0, is produced and sold by Nuance
Communication, Inc. Converser has been designed to work closely with
NaturallySpeaking in order to take full advantage of its features, although the two
software products are installed separately.
Note
Installation of NaturallySpeaking is optional: Converser for Healthcare 3.0 can be
used without it. In this case, Speech Input Mode will be unavailable, but the three
text-only input modes (standard keyboard, handwriting, and on-screen keyboard)
can be used without modification.
Converser offers several exciting facilities for speech input and control.
• It can type what you say, just like a secretary. In other words, it can take
dictation.
• It can also obey spoken commands for correcting dictation errors.
49
50
CHAPTER 4
INPUT METHODS—VOICE
• You can control the Converser interface with your voice instead of your
mouse or stylus.
To use speech input most effectively, users can use the NaturallySpeaking facility
for creating a Personal Audio Model, which allows NaturallySpeaking to study
their individual speech characteristics. In the next section, we’ll describe this
creation process.
Note
In Converser for Healthcare 3.0, Speech Input Mode has been implemented and
tested for English speakers only. For now, Spanish speakers are expected to reply
using the three remaining input modes (handwriting, standard keyboard, or onscreen keyboard (see Chapter 3, “Input Methods—Typing, Writing”“Input Methods—
Typing, Writing”)), or using the Translation Shortcuts Browser (see Chapter 6,
“Translation Shortcuts”“Translation Shortcuts”) with the mouse or stylus, and without
text input. Future versions of Converser will enable dictation and command-andcontrol with Spanish as well as English.
• Preparations for Speech Input Mode
In Speech Input Mode, registered English-speaking Converser Users can dictate
input, correct dictation errors by voice, and control Converser using Voice
Commands.
In preparation, several steps must be taken:
• Dragon NaturallySpeaking must be installed.
• Each registered English-speaking Converser user wishing to use Speech
Input Mode must create a NaturallySpeaking User including a personal
audio profile. (As part of this profile creation, the microphone to be used for
speech recognition must be adjusted.)
• Optionally, you can set up keyboard shortcuts or customize tablet buttons to
allow the microphone to be easily turned on and off, and to enable Push-toTalk functionality.
We now examine these steps individually.
Installing Dragon NaturallySpeaking
Dragon NaturallySpeaking should be installed on the same computer where
Converser for Healthcare is installed, according to the instructions provided by
the vendor, Nuance Communication, Inc.
Enterprise versions of NaturallySpeaking, in which audio profiles are maintained
on a central server and then downloaded onto local computers on demand, have
not yet been tested for use with Converser for Healthcare.
SPOKEN TRANSLATION, INC.
51
PREPARATIONS FOR SPEECH INPUT MODE
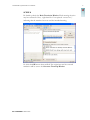
When the NaturallySpeaking application is running, it can be controlled through a
microphone icon which is always visible in the lower right-hand area of the
Windows screen. To bring up a menu, right-click on this icon.
Right-click menu
Microphone icon
In addition, you can optionally display the NaturallySpeaking Dragon Bar,
which can be docked at the top or bottom of the screen or allowed to float freely.
The lower button bar (containing Correction ... etc.) can be turned on and off by
clicking the double arrow at the right of the menu bar.
In the images shown in this chapter, the NaturallySpeaking Dragon Bar is
docked at the top of the screen and Converser fills the rest of the screen under it.
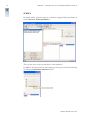
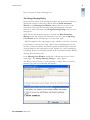
Creating and Opening a NaturallySpeaking
User
At the end of the Dragon NaturallySpeaking installation, an opportunity is
offered to create the first NaturallySpeaking User. Thereafter, new
NaturallySpeaking Users can be created at any time by using NaturallySpeaking’s
Open User ... or Manage Users... dialogs. Both can be accessed through the
NaturallySpeaking menu in the NaturallySpeaking Dragon Bar.
STI CONVERSER USER GUIDE
52
CHAPTER 4
INPUT METHODS—VOICE
Alternatively, the same dialogs can be accessed through the File item in the rightbutton menu of the NaturallySpeaking microphone icon in the lower-right-hand
area of the Windows screen.
Once NaturallySpeaking has successfully created a new User account for you,
you’ll have a chance to open it, or load it, when NaturallySpeaking starts up, so that
NaturallySpeaking can prepare to recognize your voice, rather than someone else’s.
At any time during a NaturallySpeaking session, you can switch Users via
NaturallySpeaking’s Open User ... action.
NAMING NATURALLYSPEAKING USERS
Each NaturallySpeaking User must be named. Registered Converser Users are
free to choose any NaturallySpeaking names they like.
To avoid confusion, the NaturallySpeaking User names and the Converser User
names should be mutually recognizable, if not identical. For example, if the
Converser User Name is johnsmith, the NaturallySpeaking User Name might also
be named johnsmith, John Smith, J. Smith, JSmith, and so forth.
Converser and NaturallySpeaking currently have no knowledge of each other’s
internal User Names. Mutual recognizability is suggested only to avoid user
confusion.
VOICE TRAINING FOR NATURALLYSPEAKING USERS
Once a NaturallySpeaking User has been created for a particular speaker,
NaturallySpeaking continually learns about his or her pronunciation and voice
characteristics by studying recognition errors and their corrections. In addition,
users can carry out Voice Training by reading selected texts aloud, so that the
NaturallySpeaking can study the speakers’ pronunciation of known words and
sequences.
From NaturallySpeaking Version 9.0 on, Voice Training is optional, and can be
bypassed when a new User is created. In earlier versions, it is required for each new
user. Since even optional Voice Training can increase recognition accuracy, we’ll
describe it here.
The process generally requires 5 to 10 minutes, and proceeds in two stages:
• First, microphone set up and adjustment is verified.
• Second, the prospective NaturallySpeaking User is asked to read aloud, so
that his or her pronunciation and vocal characteristics can be studied.
Microphone adjustment involves connecting and positioning the microphone and
checking its volume and quality. Some brief speech samples are requested, to help
SPOKEN TRANSLATION, INC.
PREPARATIONS FOR SPEECH INPUT MODE
NaturallySpeaking judge whether the microphone level is too high, too low, or
just right, and to gauge the level of background noise in comparison with speech.
STI CONVERSER USER GUIDE
53
54
CHAPTER 4
INPUT METHODS—VOICE
Once microphone adjustment is complete, you select and read aloud a short text
which interests you (e.g. a selection from Alice in Wonderland, John F. Kennedy’s
inaugural address, etc.).
As you read, NaturallySpeaking compares your spoken words to the written ones,
and in this way learns how you pronounce the individual sounds within them.
Note
This study of your voice is helpful because NaturallySpeaking performs speakerdependent speech-recognition, which permits accurate recognition of hundreds of
thousands of word. In this respect, NaturallySpeaking differs from the sort of
speaker-independent speech recognition that you may encounter on the
telephone, or in other similar applications. In these applications, the range of
vocabulary to be recognized is much narrower. Converser for Healthcare takes
full advantage of this speaker-dependent breadth of vocabulary. Because of it, you
can vocally enter almost any text that you want to translate.
As you read aloud, an arrow pointer keeps your place. If NaturallySpeaking has
been able to recognize the last few words you read, the pointer moves beyond
SPOKEN TRANSLATION, INC.
55
PREPARATIONS FOR SPEECH INPUT MODE
them; if not, the pointer remains where it was, and you must either try
pronouncing the segment again or skip it by clicking a button.
Meanwhile, a microphone level check is visible—a bar indicating the loudness of
your voice, which turns green when it’s in the right volume range.
When you’ve read enough to allow adequate analysis of your pronunciation,
NaturallySpeaking tells you so, and asks you to wait during the actual analysis,
which takes another minute or two.
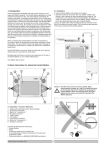
Customizing Keys and Buttons for Microphone
Control
Tablet PCs allow operation without keyboards, since it’s possible to provide input
using handwriting or the on-screen keyboard (see Chapter 3, “Input Methods—Typing,
Writing”). To aid keyboard-free operation, Tablets provide several control buttons
not found on standard PCs. The extra buttons are on the right-hand side of the
screen unit, and are designated (from top to bottom) ESC (Escape), Fn
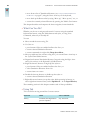
(Function), Enter, Up, Down, Right, Left, Hot 1, and Hot 2.
Enter button in center.
Up, Down, Right, and
Left buttons on edges.
The ESC, Fn, and Enter buttons behave like their keyboard counterparts, and
the Up, Down, Right, and Left buttons act like arrow keys on the keyboard.
Our interest is in the Hot 1 and Hot 2 buttons. By default, they perform useful
operations unique to the Tablet PC:
STI CONVERSER USER GUIDE
56
CHAPTER 4
INPUT METHODS—VOICE
• Hot 1 opens the Tablet PC Dashboard (which allows control of the
computer’s display, audio, pen, and other attributes);
• and Hot 2 executes the mcrotate program (which rotates the screen
orientation from horizontal to vertical).
If you’re using Converser on a Tablet PC, it will be useful to customize both hot
buttons so that they control the NaturallySpeaking microphone: Hot 1 will switch
the mic on and off; and Hot 2 will provide Push-to-Talk functionality.
This customizing requires three steps:
1 Provide alternative methods of accessing the Dashboard and executing
mcrotate, in order to free up the two hot buttons for other uses.
2 Assign keyboard keystroke combinations in NaturallySpeaking which have the
desired microphone switching behaviors.
3 Customize the Tablet PC buttons so that they virtually execute these
NaturallySpeaking keystroke combinations.
ALTERNATIVES FOR TABLET HOT BUTTONS
To provide alternative methods of accessing the Dashboard and executing
mcrotate, create Windows shortcuts on the Desktop for the following programs:
C:\WINDOWS\system32\dashboard.exe
C:\WINDOWS\system32\mcrotate.exe
ASSIGNING NATURALLYSPEAKING KEY
COMBINATIONS
To assign keyboard keystroke combinations in NaturallySpeaking which have the
desired microphone switching behaviors, take these steps:
SPOKEN TRANSLATION, INC.
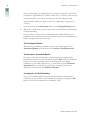
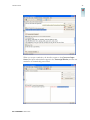
PREPARATIONS FOR SPEECH INPUT MODE
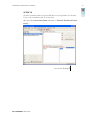
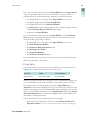
1 In the NaturallySpeaking toolbar or from the right-button menu of the
NaturallySpeaking microphone icon, open Tools > Options and choose the
Hot keys tab.
2 Click the Microphone on/off ... button. The Set Hot Key dialog appears.
3 In response to the prompt, “Press the key combination that you want to turn
the microphone on and off,” press Alt+o. Then press OK.
4 Click the Press-to-talk ... button. The Set Hot Key dialog reappears.
5 In response to the prompt, “Press the key combination you want to press and
hold down to turn on the microphone,” press Alt+t. Then press OK.
6 Click OK to close the Options dialog.
Note
As you may have noticed, NaturallySpeaking already provides default keystroke
combinations for the two actions in question. Unfortunately, these default
combinations employ keystrokes which the Tablet PC buttons are unable to
emulate. Thus the defaults must be overridden for our purposes. The new
combinations (Alt+o and Alt+t) have been chosen to avoid conflicts with existing
NaturallySpeaking keystrokes, but are not otherwise significant.
CUSTOMIZING TABLET HOT KEY BUTTONS
To customize the Tablet PC buttons so that they virtually execute the new
NaturallySpeaking keystroke combinations, take these steps:
STI CONVERSER USER GUIDE
57
58
CHAPTER 4
INPUT METHODS—VOICE
1 Open Control Panels > Tablet and Pen Settings > Tablet Buttons.
2 In the Tablet Button list, highlight the HotKey 1 line.
3 Click Change ... The Change Tablet Button Actions dialog appears.
4 In the Action drop-down menu, select “Press a key or key combination”.
5 Place the insertion point in the Keys input buffer, and then press Alt+o.
6 Press OK.
7 Back in the Tablet Button list, highlight the HotKey 2 line.
8 Click Change ... The Change Tablet Button Actions dialog reappears.
9 In the Action drop-down menu, again select “Press a key or key combination”.
10 Place the insertion point in the Keys input buffer, and then press Alt+t.
11 Press OK.
Congratulations! The Tablet Hot 1 and Hot 2 buttons should now provide handy
ways to switch the NaturallySpeaking mic on and off. Hot 1 now acts as a toggle,
or standard on/off switch, while the Hot 2 now provides Push-to-Talk
functionality.
• Dictation and Vocal Correction
We assume that you’ve prepared for Speech Input Mode as described in the
preceding section: you’ve installed Dragon NaturallySpeaking; you’ve created a
NaturallySpeaking User (personal audio profile) for your own use, e.g. JSmith; and
you may have customized keyboard shortcuts or tablet buttons to facilitate
control of the microphone.
SPOKEN TRANSLATION, INC.
DICTATION AND VOCAL CORRECTION
Beginning a Turn in Speech Input Mode
You’re now ready to dictate some text to be translated. There are three final steps
to take when beginning a turn in Speech Input Mode—one in Converser, and two
in Dragon NaturallySpeaking:
1 In Converser, begin a new turn as Active Participant as described in Chapter 2,
“Registering Users, Managing Conversations, and Saving Transcripts”: you can click on
your name (e.g. Smith, John or Dr. Smith) in the Conversation Panel, or you
can use the Last English Participant or Last Spanish Participant item on
the User menu or toolbar).
To enable dictation, the insertion point must be in the Converser Input Window.
It should appear in this window automatically when a new turn begins. If it
doesn’t, click once to put it there.
2 In Dragon NaturallySpeaking, open your NaturallySpeaking User (e.g. JSmith).
3 In Dragon NaturallySpeaking, turn on the microphone. If you’ve prepared custom
keys or buttons for this purpose, you use can them now. You can click the
NaturallySpeaking microphone icon (just once!) at any time to turn the
microphone on or off.
or you can use the command in the NaturallySpeaking NaturallySpeaking
menu item
When the microphone is on, the microphone icon will switch from prone to
upright and a message in the NaturallySpeaking toolbar will show its status as
“Normal mode.”
Tip
If you’ve customized NaturallySpeaking keyboard combinations as suggested
above, you can use the custom combination Alt+o to switch the mic on and off,
and can use Alt+t for Push-to-Talk functionality. (If you haven’t customized, and
STI CONVERSER USER GUIDE
59
60
CHAPTER 4
INPUT METHODS—VOICE
if your keyboard has a number pad on the right-hand side, you can use
NaturallySpeaking’s default combinations: the plus (+) key on the number pad
switches the mic on and off, and the slash (/) key on the number pad gives Pushto-Talk.)
Dictation
You can then start to dictate—to pronounce the words that you want to translate.
Speak “announcer-style”—loud and clear.
For example, you might say “I’m happy to see you again PERIOD.” You’ll see the
words and punctuation appear on the screen in the Input Window as you speak.
You don’t need to shout (assuming that the microphone is set up correctly), but
the speech recognition program does need to hear each sound.
You should not say … one … word … at … a … time. In fact, the dictation
program prefers whole phrases (several words together), since it recognizes words
by their neighbors.
Likewise, you should not break words in … to … syl … la … bles—because the
program will assume that they're separate words.
Punctuation marks like “PERIOD,” “QUESTION MARK,” or “COMMA” are
helpful for the translation program, but it often succeeds without them.
Correcting Dictation Errors
Assume that the speech recognition program has made an error: for instance, you
said “I’m happy to see you again,” but the program heard “Unhappy to see you
again.” No problem—you can easily fix the error with your voice.
Several different NaturallySpeaking commands could be used to make the
correction. Here, you can choose the “Correct <dictated words>” command.
1 Say “Correct unhappy”.
SPOKEN TRANSLATION, INC.
DICTATION AND VOCAL CORRECTION
In response to this command, a list appears under “unhappy,” showing other
words or sequences which the speech recognition program thinks you might have
said. The correct word sequence, “I’m happy,” may be included in the list.
If the correct word sequence had been in the correction list, say as item 2, then
you could have inserted it in place of unhappy by saying “Choose two”. In this
case, the correct replacement is not in the list, so you could say “I’m happy” while
unhappy is highlighted.
The corrected sentence now reads “I’m happy to see you today,” which is what
you intended.
2 You can proceed to translate the new input in the normal way (see Chapter 5,
“Translating”).
Tip
Instead of correcting a speech recognition error with a NaturallySpeaking
command, you can always use the stylus, the mouse, or a standard keyboard. Keep
these alternatives in mind if for some reason vocal correction isn’t working for
you in a particular instance. The rule of thumb is, “Don’t struggle!” If you find
yourself correcting the correction of the correction, stop fighting and simply use
another correction mode.
Learning the Voice Commands
If you use Converser regularly in Speech Input Mode, you’ll soon get to know the
most useful NaturallySpeaking commands. To see a partial list of
NaturallySpeaking commands at any time, say “What can I say?” The partial list
also links to a complete list maintained in the NaturallySpeaking Command
Browser.
You can also access a list of the most useful NaturallySpeaking commands via the
Converser Voice Commands item in Converser’s Help menu.
There is often more than one way to correct text with voice commands. For
example, instead of saying “Correct unhappy,” you could say “Select unhappy”
and then “Correct That”.
STI CONVERSER USER GUIDE
61
62
CHAPTER 4
INPUT METHODS—VOICE
The list of alternative speech recognition candidates would then appear, just as if
you had said “Correct unhappy”.
To delete the last phrase you spoke, say “Scratch That” (You can repeat this
command several times to delete the last several phrases.)
To capitalize words, say “Capitalize That”
To change a capitalized word to lower-case, say “No-caps That”.
Tip
Always pronounce a NaturallySpeaking correction command as a complete phrase,
without pauses between the words. If you said “What …[pause] can I say?,” the
program wouldn't recognize this speech as a command. Instead, it would type
those words as text. Always pronounce NaturallySpeaking correction commands
loud and clear – all the way to the end. If the last word is mumbled, the command may
be misinterpreted as text.
—Here is a list of useful NaturallySpeaking commands for correcting dictation
errors:
You say
This happens
"Capitalize That"
Capitalizes the first letter of each word in a selection (except
for articles and prepositions).
"Choose <number>"
Chooses among numbered alternatives. Can be used to select
an alternative speech recognition candidate.
"Correct <dictated
words>"
Corrects incorrect words in the dictated text.
A numbered menu of alternative speech recognition candidates
will appear.
You can choose a number by double-clicking the mouse, or by
using the “Choose <number>” Voice Command.
"Correct That"
Corrects incorrect words which have already been selected (if
any). If no text has been selected, corrects the last pause group
in the dictated text.
"No-caps That"
Lower-cases the first letter of each word in a selection.
"Scratch That"
Deletes text which has already been selected (if any). If no text
has been selected, deletes the last pause group in the dictated
text. This command can be repeated in order to delete
successive pause groups.
"Select <dictated
words>"
In the input field, selects words in the dictated text. You can
also select text using the stylus or mouse.
• Voice Commands
Voice Commands can be used not only to correct dictation, but to control
Converser in general. In Version 3.0, you can
SPOKEN TRANSLATION, INC.
63
VOICE COMMANDS
• control the microphone by turning it off, or by putting it to sleep and waking it
up;
• control the buttons on the Converser Input Screen and Translation
Screen;
• control all of the menus and their menu items;
• operate keys and mouse buttons with your voice—for example, to move around
the screen by controlling the Tab key, or to move up and down lists of
Translation Shortcuts.
Vocal Control of the Microphone
NaturallySpeaking includes built-in voice commands for turning off the
microphone, and for putting it to sleep and waking it up. (When the microphone
is sleeping, it ignores everything except the wake-up commands.)
TURNING THE MICROPHONE OFF
To turn the microphone off, you can say “Microphone off ”.
The microphone icon moves to a horizontal position and turns red to indicate
that it’s turned off.
There’s no command for turning it on again—since it’s off, it can't hear you!—so
you'll have to turn it on manually.
PUTTING THE MICROPHONE TO SLEEP
Assume that you’re dictating with the microphone on and you want to pause—for
example, to talk to someone without NaturallySpeaking mistaking your words for
text. You can say either “Go to sleep” or “Stop listening”. This puts the
microphone in sleep mode. The microphone icon turns yellow and leans at a 45°
angle. Now you can talk without activating NaturallySpeaking. Until you say the
wake-up phrase, NaturallySpeaking pays no attention.
To awaken the microphone, say either “Wake up” or “Listen to me.” The
microphone turns on and the icon stands upright again.
SUMMARY OF VOICE COMMANDS FOR MICROPHONES
Here’s a summary of voice commands related to the microphone:
STI CONVERSER USER GUIDE
64
CHAPTER 4
INPUT METHODS—VOICE
You say
This happens
“Microphone off”
Turns off the microphone. (Note that there is no Voice
Command to turn on the microphone; the mike must be turned
on manually.)
“Go to sleep”
Puts the microphone into sleep mode, so that it will react to
nothing except the “Wake up/Listen to me” command. This is a
way to turn off the microphone temporarily, so that it can be
reawakened by voice.
or
“Stop listening”
“Wake Up”
or
Awakens the microphone from sleep mode, so that dictation
and Voice Commands can resume.
“Listen to me”
Vocal Control of Converser Buttons
You can use your voice to “press” the enabled buttons on the Converser Input
Screen and Translation Screen.
To do so, say the relevant button name, e.g. say “Translate”.
Always pause before and after pressing a button by voice, as in “... [pause]
Translate [pause] ...”. If the intended command immediately follows or
immediately precedes dictated text, it may be misunderstood as part of that input
text. A brief pause—less than a second—will be sufficient.
If a button-pressing command contains several words, always pronounce them as
a complete phrase, without pauses between the words. If you said “Pronounce
…[pause] Selection,” the program would assume that these words were part of
the input text to be transcribed.
On the other hand, what if your actual intent is to dictate the word “translate” (or
“pronounce selection” or some other button name) as part of the input text, as in
“Converser was unable to translate that sentence”? There are two ways to obtain
this result:
1 You can purposely pronounce the word “translate” without a pause either
before and after it.
2 You can hold down the Shift key while speaking.
SPOKEN TRANSLATION, INC.
65
VOICE COMMANDS
Tip
The Shift key can be pressed on the on-screen keyboard of a tablet PC, as well as
on a standard keyboard.
Always pronounce button commands loud and clear—all the way to the end. If the last
word is mumbled, the command may be misinterpreted as text.
SUMMARY OF VOICE COMMANDS FOR CONVERSER
BUTTONS
Here’s a summary of Voice Commands related to Converser Buttons:
You say
This happens
“Translate”
The Translate button is clicked.
“Accept Translation
Shortcut”
The Accept Translation Shortcut button is clicked.
“Erase Input”
The Erase Input button is clicked.
“Pronounce Selection”
The Pronounce Selection button is clicked.
“Retranslate”
The Retranslate button is clicked.
“OK”
The OK button is clicked.
Vocal Control of Menus
You can use your voice to choose the menus and menu items in the Converser
Menu Bar.
To do so,
1 say the name of the relevant menu or menu item, e.g. say “User”.
STI CONVERSER USER GUIDE
66
CHAPTER 4
INPUT METHODS—VOICE
2 Then say the name of the desired item or submenu, e.g. say “Register New
User”.
You can continue opening submenus by voice if necessary. For instance, say
“Help,” “Tutorials,” “English,” and “Quickstart” in succession.
Pronunciation advice: (1) Pause before and after choosing a menu or menu item by
voice. (2) If a menu or item name command contains several words, pronounce
them as a complete phrase, without pauses between the words. (3) Pronounce button
commands loud and clear—all the way to the end.
Your words will be interpreted as dictated text rather than as commands if you (1)
purposely pronounce the words without a pause both before and after them, or (2)
hold down the Shift key while speaking.
If you open a menu with your voice and then say the name of a different menu,
the first menu will close and the second one will open.
To force the closure of an open menu at any time, you can click the Escape key or
use your voice by saying “Press Escape”.
SUMMARY OF VOICE COMMANDS FOR CONVERSER
MENUS
Here’s a summary of Voice Commands related to Converser Buttons:
You say
This happens
“File”
The File menu is opened. All items within this menu can
likewise be operated by pronouncing their names.
“Edit”
The Edit menu is opened. All items within this menu can
likewise be operated by pronouncing their names.
“View”
The View menu is opened. All items within this menu can
likewise be operated by pronouncing their names.
“User”
The User menu is opened. All items within this menu can
likewise be operated by pronouncing their names.
“Translation Shortcuts” The Translation Shortcuts menu is opened. All items within
this menu can likewise be operated by pronouncing their
names.
SPOKEN TRANSLATION, INC.
67
VOICE COMMANDS
“Text-to-Speech”
The Text-to-Speech menu is opened. All items within this
menu can likewise be operated by pronouncing their names.
“Help”
The Help menu is opened. All items within this menu can
likewise be operated by pronouncing their names.
“Press Escape”
Clicks the Escape key to force closure of any open menus.
Operating Keys and Mouse by Voice
NaturallySpeaking contains built-in commands which let you operate keys and
mouse buttons with your voice. You can use them to navigate and control the
Converser interface in various ways. You can
• move around the screen by controlling the Tab key;
• execute button actions or selected list elements by clicking the Enter key.
• move up and down lists using the Up Arrow and Down Arrow keys, in order
to traverse Translation Shortcuts or menu items;
• expand and contract Translation Shortcut Categories using the Right Arrow
or Left Arrow keys;
• click mouse buttons (left click, left double click, and right-click) to execute
selected list elements or access certain menus
Operating these keys by voice is exactly equivalent to operating them physically.
These voice-driven navigation and control methods are explained and compared
with other methods of achieving the same results in Appendix A, “Navigation and
Control Methods”.
STI CONVERSER USER GUIDE
68
CHAPTER 4
INPUT METHODS—VOICE
SPOKEN TRANSLATION, INC.
CHAPTER 5
Translating
This chapter describes Converser’s main translation processes, and the ways in
which you can supervise them.
Our concentration here is upon Converser’s “open-ended” or “full-strength”
translation facility, as opposed to its Translation Shortcuts facilities. We can begin by
clarifying the difference.
• Converser’s “open-ended” translation programs can translate almost any
text which is entered into the Input Window. This will often be text that the
programs have never translated before. For this reason, Converser provides
several powerful tools for verifying a brand-new translation before sending it
to other participants in the Conversation. This chapter explains these
verification and sending procedures in detail.
• By contrast, a Translation Shortcut is a prepared or prepackaged translation.
Because a Shortcut’s accuracy has been verified in advance, you can send it
to other conversational participants immediately and with full confidence,
without further checking. An appropriate Translation Shortcut can often be
found and used very quickly by using the Translation Shortcuts Browser
or Translation Shortcuts Search facility. It’s also possible to use
Translation Shortcuts through the Translation Shortcuts Browser using
the mouse or stylus only, without entering any text; and this mode of use can
be very helpful for less literate participants (see Chapter 6, “Translation
Shortcuts”).
The chapter first covers preparations for open-ended translation, and then goes
on to discuss translation and its verification.
69
70
CHAPTER 5
TRANSLATING
• Preparations for Open-ended Translation
Before performing open-ended translation, you’ll need to take a few preparatory
steps:
• the Active Participant must be selected
• the text to be translated must be entered into the Input Window
You may also want to make a few interface adjustments to avoid distractions,
especially if you’re a beginning user of Converser, or are instructing a beginner.
Selecting the Active Participant
To determine which language to translate to and from, Converser needs to know
who is speaking—that is, who is the Active Participant. For example, if Dr. Smith is
speaking, translation from English to Spanish is expected, since the doctor is a
registered Converser User whose native language is English. Likewise, if Sra.
González is the Active Participant, translation will be from Spanish to English.
The four Guest Users (Male Guest, Female Guest, Visitante Masculino, and
Visitante Feminina) indicate the translation direction in the same way.
Selection of the Active Participant is carried out using the Conversation Panel,
or via the Last English Participant and Last Spanish Participant items on the
User menu (or the corresponding Toolbar icons), as explained in Chapter 2,
“Registering Users, Managing Conversations, and Saving Transcripts”.
Entering Text to be Translated
There are several ways to enter text to be translated via Converser’s open-ended
translation facilities: you can use a standard keyboard; you can use Windows’
handwriting recognition or on-screen keyboard; or you can use speech
recognition. All of these text entry modes are explained in other chapters: Chapter
3, “Input Methods—Typing, Writing” and Chapter 4, “Input Methods—Voice”.
SPOKEN TRANSLATION, INC.
71
PREPARATIONS FOR OPEN-ENDED TRANSLATION
Input text
Input text
Active Participant
Removing Distractions
Before using open-ended translation facilities, you may want to remove any onscreen distractions in order to concentrate on the translation process. Removing
distractions can be especially helpful if you’re just learning to use Converser, or
helping someone who is just learning.
1 Hide the Conversation Panel (see “Hiding the Conversation Panel” on page 28)
and Translation Shortcuts Panel (see “Manipulating the Translation Shortcuts
Panel” on page 88) if either panel is open. To do so, click the vertical pushpin
icon
STI CONVERSER USER GUIDE
72
CHAPTER 5
TRANSLATING
at the top of either panel so that it becomes horizontal.
Then move the cursor outside the panel (see “Hiding the Conversation Panel” on
page 28).
Tab for re-opening
the Conversation
Panel
2 Turn off the Translation Shortcuts Search mechanism, so that no Shortcuts
will be offered as you enter text into the Input Window. The Search facility is
described in Chapter 6, “Translation Shortcuts”.
• Translating
As described in the preceding section, you’ve selected an Active Participant to
indicate the translation direction, and have entered the text to be translated into
SPOKEN TRANSLATION, INC.
73
TRANSLATING
the Converser Input Window. You may also have adjusted the interface to avoid
any distractions.
Now you’re ready to translate the new text.
You’ll have the chance to verify the translation before (1) sending it to the
Transcript Window and (2) pronouncing it for the benefit of your
conversational partner.
1 Click the Translate button (or use the corresponding Voice Command,
“Translate”). It’s on the right side of the Converser Input Screen, just above
the Accept Translation Shortcut button.
This action will take you to the Converser Translation Screen, which contains
several tools for verifying and fixing the current translation.
STI CONVERSER USER GUIDE
74
CHAPTER 5
TRANSLATING
The Back-Translation Window
Just below the Input Window in the Converser Translation Screen is the
Back-Translation Window. It contains a specially controlled translation of the
translation—a paraphrase (or rewording) of your input as Converser understands
it.
Your input was “The boy has broken his right foot.” The Back-Translation (or
paraphrase) is “The little boy has broken his correct foot.”
Note
Normally, you’ll want to read this Back-Translation silently to yourself, to help
you to evaluate the translation’s correctness. At times, however, you may want to hear
it pronounced automatically as soon as it’s produced, in order to keep your eyes free
for other tasks. In this case, click or tap the Pronounce Back-Translation
Automatically item on the Text-to-Speech menu. A check mark will indicate
that the switch has been turned on. (You can turn it off in the same way.)
Alternatively, to prompt pronunciation manually, you can click or tap the
Pronounce Back-Translation button at any time, or use the associated Voice
Command, “Pronounce Back-Translation”.
Verifying the Translation via the BackTranslation
Does the Back-Translation Window express more or less what you meant to
say? True, some of the wording may change in unimportant ways—in the current
example, “boy” has been replaced by “little boy,” for example, which still conveys
your meaning. On the other hand, some wording changes may require
correction—here, “right foot” has been replaced by “correct foot,” which does
not convey the right meaning.
To double-check the correctness of the translation, you can examine the
Meaning Cues Window.
The Meaning Cues Window
The Meaning Cues Window shows a set of Meaning Cues which allow you to
judge the meanings of words and expressions in the input, as the translation
program currently understands them. For our sample input, “The boy has broken
his right foot,” the Meaning Cues set appears as follows:
SPOKEN TRANSLATION, INC.
75
TRANSLATING
Here, synonyms are used as Meaning Cues.
The Change Meaning Dialog
Despite the best efforts of the translation program, the input will not always be
understood correctly on the first try. When either the Back-Translation
Window or the Meaning Cues Window indicates that one or more of the
expressions in the input has been temporarily misunderstood, it becomes
necessary to make corrections. The Change Meaning Dialog can be used for
this purpose.
With “The boy has broken his right foot” as input, the Back-Translation
Window shows “The little boy has broken his correct foot” and the Meaning
Cues Window shows this Meaning Cue for the word “right”:
RIGHT (Adjective): due, appropriate, proper, suitable, correct, fit, convenient
Unfortunately, it’s clear that the word “right” has been misinterpreted. For the
moment, Converser’s machine translation program mistakenly believes that this
word should mean “due, appropriate, proper, suitable, etc.,” and is translating it
accordingly. However, you actually want the word to be translated with a different
meaning. What should you do?
In the Meaning Cues Window, double-click or double-tap the entry for the
word “right”. The Change Meaning Dialog for “right” appears.
This dialog contains a listing of all the meanings of “right” which Converser’s
translation program can understand and translate:
STI CONVERSER USER GUIDE
76
CHAPTER 5
TRANSLATING
The second meaning is the appropriate one to translate “right foot” (even if the
combination “right-hand foot” would be a little funny). To select it, click or tap it.
You’re now ready to retranslate the current input, this time using the newly
specified word meaning for “right” (in this case, “right-hand,” as opposed to
“correct”).
To do so, click or tap the Retranslate button in the Change Meaning dialog.
Tip
There’s also a quicker way to get the same effect: just double-click (or double-tap)
the desired meaning.
Converser then re-executes both the translation and its Back-Translation, or
paraphrase. You can recheck both, and then either accept the new translation (see
below) or begin another correction cycle.
The Translation Window
The tentative or preliminary translation of the current input appears in the
Translation Window, at the bottom of the Converser Translation Screen.
The Pronounce Translation Button
Normally, you’ll wait until verification of the translation is complete before
prompting pronunciation of the translation using the OK button (see just below).
However, you may occasionally want to hear the pronunciation during
verification, e.g. for study purposes. If so, you can click or tap the Pronounce
Translation button (or use the associated Voice Command, “Pronounce
Translation). It’s just below the Translation Window.
Accepting the Verified Translation
Once you’ve confirmed that the input has been understood and translated
acceptably, you can accept the current translation by clicking or tapping the OK
button (or using the associated Voice Command, “OK”).
SPOKEN TRANSLATION, INC.
77
TRANSLATING
.
When you accept a translation, the interface returns to the Converser Input
Screen, the input and translation appear in the Transcript Window, and the new
translation is automatically pronounced.
STI CONVERSER USER GUIDE
78
CHAPTER 5
Note
TRANSLATING
At times, you may want to suppress the automatic pronunciation of the translation–for
example, if your conversational partner can read it and your work situation
requires quiet. In this case, click or tap the Pronounce Translation
Automatically item on the Text-to-Speech menu.
The check mark will disappear, indicating that the switch has been turned off.
(You can turn it back on in the same way.) If you want to hear the translation later,
you could select it in the Transcript Window at any time and then use the
Pronounce Selection button.
Tip
—Immediately after a translation has been verified and sent to the Transcript
Window, its text is automatically selected (darkened). Thus you can easily repeat
the pronunciation of the last translation any number of times by repeatedly using
the Pronounce Selection button.
Revising the Input and Retranslating
Sometimes the Back-Translation Window may indicate that the translation
program has seriously misunderstood the input. The paraphrase may then be
garbled, or simply too far from your intended meaning; and there may be no
obvious way to repair the problem by changing the meaning of individual words
or expressions.
Your best option then is to:
1 revise or rephrase the input,
2 retranslate,
3 repeat the revise/re-translate cycle as needed
until the Back-Translation and Meaning Cues jointly indicate that the translation
is good enough for your purposes.
For instance, if for some reason “twice a day” were not properly understood, you
could change this phrase to “twice daily” or “two times daily” and then try retranslating.
Tip
Garbled translations often indicate that the translation program has had difficulty
in breaking the input into its proper parts. To ease this task during the next
translation attempt, follow this motto: KISS (“Keep It Simple, Sweetheart!”).
Short sentences are much easier than long sentences for Converser’s translation
program to digest. So, when rephrasing, imagine that you’re talking to a second
grader: bright and willing, but with a short attention span.
SPOKEN TRANSLATION, INC.
79
TRANSLATING
As soon as you make any changes in the Input Window on the Converser
Translation Screen (using any input mode), the remaining information windows
will be cleared in preparation for a new translation cycle.
To initiate the new translation cycle based on the revised input,
4 click or tap the Retranslate button (or give the corresponding Voice
Command, “Retranslate”).
All of the information windows will be repopulated.
To start fresh, you can also clear all of the windows on the screen, including the
Input Window, by clicking the Erase Input button.
Skipping Verification
Should you verify the translation, using the Back-Translation Window, the
Meaning Cues Window, and perhaps the Translation Window? In general, yes.
Verification will increase the overall accuracy of your communication and—just
as important—increase your confidence that you have in fact said what you mean
to say.
On the other hand, there are times when you’re in a hurry, or when the accuracy
of the translation just isn’t terribly important. At those times, you can elect to
click the OK button immediately after it appears on the Translation Screen,
without having checked for translation accuracy. Translation accuracy is likely to
fall, but may remain high enough for communication. Of course, if your
conversational partner indicates misunderstanding or confusion and you suspect a
mis-translation, you can always repeat the relevant input with verification.
There is one further, and quite important, reason for sometimes skipping
verification. Some patients, while sufficiently literate to manage initial text input,
may be unable to check the Back-Translation Window or to check and
manipulate the Meaning Cues Window, since these actions require a degree of
computer literacy. Staff members can encourage them (or help them) to click OK
immediately without attempting to verify the translation, and can then attempt to
resolve any resulting misunderstandings by asking follow-up questions.
STI CONVERSER USER GUIDE
80
CHAPTER 5
TRANSLATING
SPOKEN TRANSLATION, INC.
CHAPTER 6
Translation
Shortcuts
Converser's open-ended translation facilities (see Chapter 5, “Translating”) can be
used to translate an unlimited set of inputs that Converser has never seen before.
The system’s unique verification facilities can be used to verify translation
accuracy, even for wide-ranging conversations.
While verification can be crucial for accurate translation, it can be timeconsuming. Further, you may find yourself verifying the same translation
repeatedly. Thus it’s often convenient to use Translation Shortcuts—frequently used
input sentences which have previously been translated and corrected, and thus
are known in advance to be accurate.
Here are some examples, grouped by their Shortcut Categories (Symptoms and Small
Talk).
81
82
CHAPTER 6
TRANSLATION SHORTCUTS
Translation Shortcuts are automatically presented in the language of the current
Active Participant:
When you use a Shortcut, since there’s no need to check the translation, the
Converser Translation Screen is bypassed. The Shortcut is immediately displayed
in the bilingual Transcript Window and pronounced in the target language.
Translation Shortcuts are bidirectional: if you use the English Shortcut, you get
the prepared Spanish translation, and vice versa.
In addition to pre-verified accuracy, Translation Shortcuts have two other
important advantages:
• Speed. As their name suggests, Shortcuts can be used very quickly. It isn’t
necessary to enter the entire input text to be translated, since it can be
retrieved by a quick automatic search based on only part of the text. When the
complete input text is found, the pre-checked translation will be instantly
retrieved along with it.
• Activation without input text. In fact, it may be unnecessary to enter any text at
all, since the desired input can instead be indicated by pointing with the mouse
or stylus. This input-free mode of using Shortcuts can be especially
important for less literate participants in Converser conversations.
There are two ways to access Converser’s Translation Shortcuts:
1 Via the Translation Shortcuts Browser. The Browser presents a tree of
Translation Shortcut Categories. When a Category is selected, a list of the
Shortcuts it contains appears in the lower section of the Browser.
2 Via the Input Window. As you type, Converser can automatically search for
Translation Shortcuts which match the text you’re entering. Without
SPOKEN TRANSLATION, INC.
THE TRANSLATION SHORTCUTS BROWSER
completing the text entry, you can then select and execute a matching Shortcut
to instantly obtain a pre-verified translation. Or, if you enter the entire text of a
known Shortcut, Converser can recognize the Shortcut and give the focus to
the Accept Translation Shortcut button. Then, clicking it will execute the
completed Shortcut, once again supplying a pre-verified translation.
• The Translation Shortcuts Browser
Translation Shortcuts can be accessed using the Translation Shortcuts Browser
on the Translation Shortcuts Panel, one of two panels on the on the left side of
the Converser screen—it alternates with the Conversation Panel, described in
“Managing Conversations” on page 20. To open it, click its tab.
Click here to open the Translation Shortcuts
Panel
STI CONVERSER USER GUIDE
83
84
CHAPTER 6
TRANSLATION SHORTCUTS
Clicking the tab will bring the Translation Shortcuts Panel to the foreground.
For more information on manipulating the Panels, see “Manipulating the Translation
Shortcuts Panel” on page 88.
Selecting a Translation Shortcuts Category
The upper section of the Translation Shortcuts Browser contains a hierarchical
tree of Shortcut Categories and subcategories. In Converser 3.0, the following
Categories are offered:
• Background information—questions and answers for filling out patient
information forms
• Giving directions—questions and answers useful for finding important
locations around a healthcare facility
• How to use Converser—questions and answers about using Converser, for
assisting novice users
• OB-GYN—questions and answers about this specialty
• Small Talk—frequently used phrases in conversation: hello, goodbye, thank
you, and so forth
• Symptoms—questions and answers about a wide variety of symptoms
Shortcut Categories can be further divided into subcategories. Most major
Categories contain a subcategory called Staff for inputs which are most likely to
SPOKEN TRANSLATION, INC.
THE TRANSLATION SHORTCUTS BROWSER
be used by staff members, and a subcategory called Patient for inputs more likely
to be used by patients.
The Small Talk category, on the other hand, contains only a single subcategory
All, containing expressions equally likely to be used by both groups.
STI CONVERSER USER GUIDE
85
86
CHAPTER 6
TRANSLATION SHORTCUTS
EXPANDING AND CONTRACTING SHORTCUT
CATEGORIES
You can expand or collapse a parent Category to examine or hide its
subcategories by using the plus (+) and minus (-) symbols to the left of the
Category name, just as you would with any other Windows tree.
Tip
A Category can also be expanded or collapsed by selecting it and then using the
Right Arrow or Left Arrow keys.
SELECTING SHORTCUT CATEGORIES MANUALLY
To select any visible Shortcut Category, click once on the Category.
The Category will become highlighted to indicate selection. At the same time, the
complete list of Translation Shortcuts within that Category will appear in the
lower section of the Translation Shortcuts Browser, in alphabetical order.
Note
Parent Categories always contain more Shortcuts then their child Categories
(subcategories). To see this effect, click first on the highest-level, or root, Category
(Shortcuts) and examine the resulting list, which contains all Shortcuts in all
Categories. Then click one of its subcategories, e.g. Background Information,
and examine the list of Shortcuts for this Category only. Finally, click one of the
two subcategories of Background Information, e.g. Patient, whose list contains
only patient responses to background questions posed by staff members.
SPOKEN TRANSLATION, INC.
THE TRANSLATION SHORTCUTS BROWSER
SELECTING SHORTCUT CATEGORIES AUTOMATICALLY
Converser can automatically select Translation Shortcut Categories when a new
turn begins. The intent is to facilitate turn-taking between staff and patients, so
that appropriate Shortcuts become available for each when a turn begins.
The selection procedure depends on (1) the Category currently selected and (2)
the Role of the new Active Participant, as indicated within his or her User Profile
(see “Registering New Users” on page 15).
Consider the Symptoms Category as an example. Like most Categories, it
contains Staff and Patient subcategories. Automatic selection operates as follows
when a new turn begins:
• If either Staff or Patient was selected as a subcategory for the last turn, then
Staff or Patient will be chosen automatically for the new turn, according to
the Role of the new Active Participant.
• If the new Active Participant’s Role is Physician or Other Staff, then Converser
will automatically select Staff.
• If the new Active Participant’s Role is Patient, then Converser will
automatically select Patient.
For example, if Dr. Smith (a Physician) has selected Symptoms > Staff, in order to
ask questions about symptoms, then when Sra. Gonzáles (a Patient) begins a new
turn, Symptoms > Patient will automatically be selected, so that appropriate
Shortcut responses will become available for her use. When the doctor takes his
turn again, Symptoms > Staff will once again be automatically chosen; and so
on.
Most Categories other than Symptoms (e.g. Background Information, OBGYN, etc.) behave in the same way. (Small Talk is an exception, since it contains
no Staff and Patient subcategories.)
Automatic subcategory selection can be overridden by manual selection at any
time. For example, even if Staff was automatically selected for Dr. Smith when his
turn began, he can manually select Patient.
Note
You may at times want to specify a group of Shortcuts appropriate for both sides
of the conversation. Simply select an entire Category (such as Symptoms,
Background Information, OB-GYN, or the root Category Shortcuts). In this
case, automatic selection will not operate. To re-initiate automatic selection, you’ll
need to select a Staff or Patient subcategory.
Using Translation Shortcuts in the Browser
There are three ways to use a Translation Shortcut from the Translation Shortcuts
Browser:
1 double-click (or double-tap) it, or
STI CONVERSER USER GUIDE
87
88
CHAPTER 6
TRANSLATION SHORTCUTS
2 click once to select it, and then click or tap the Accept Translation Shortcut
button (or use the equivalent Voice Command, “Accept Translation Shortcut”),
or
3 click once to select it, and then click, tap, press, or say “Enter.”
Tip
When the Translation Shortcuts Panel is in focus, the Up Arrow and Down
Arrow keys can be used to move the Shortcut selection up or down the current
list.
The Panel is in focus when the selected Shortcut within it turns dark. When the
Panel is not in focus, the selected Shortcut is grey. To bring the Panel into focus,
click or tap it, or use the Tab key repeatedly.
Manipulating the Translation Shortcuts Panel
As already explained, the Translation Shortcuts Browser is found in a special
window called the Translation Shortcuts Panel. We now explain how this
window can be manipulated—how it can be revealed when it is obscured, hidden
or unhidden, and closed or restored.
REVEALING THE TRANSLATION SHORTCUTS PANEL
When Converser starts up, the Translation Shortcuts Panel is normally open,
but obscured behind the Conversation Panel. To reveal the Panel, or bring it to the
front for use, click its tab.
SPOKEN TRANSLATION, INC.
THE TRANSLATION SHORTCUTS BROWSER
HIDING THE TRANSLATION SHORTCUTS PANEL
When Converser starts up, the Translation Shortcuts Panel is normally pinned
so that it will stay open, as indicated by the vertical position of the window’s
pushpin icon.
You can hide the Translation Shortcuts Panel—make it slide out of view on the
left side of the screen—by clicking on the pushpin so that the pin becomes
horizontal, and then moving the cursor out of the Panel. (If the panel doesn’t
close immediately, just click outside it.)
STI CONVERSER USER GUIDE
89
90
CHAPTER 6
TRANSLATION SHORTCUTS
When the panel is hidden in this way, its tab will remain in view on the left edge of
the screen.
Tab for hidden
Translation
Shortcuts
Panel
Tip
Hiding the Translation Shortcuts Panel can sometimes help to simplify the
appearance of the Converser screen, thus minimizing distractions and confusions,
especially for first-time participants.
UNHIDING THE TRANSLATION SHORTCUTS PANEL
To unhide the hidden Translation Shortcuts Panel—to slide it back into view—
just hover the cursor over its tab.
The panel will then stay in view as long as the cursor stays within it. The panel will
again slide shut if the cursor moves outside of it.
While the panel is in view, you can again click the pushpin, so that it becomes
vertical. The panel will then stay open until you unpin it again.
CLOSING THE TRANSLATION SHORTCUTS PANEL
You can close the Translation Shortcuts Panel, or temporarily remove it from
the Converser screen, by clicking the standard Close Window (X) icon in the
panel’s upper right-hand corner. In this case, no tab will be visible. To make the
panel visible again for use, you’ll need to restore it (see immediately below).
RESTORING THE TRANSLATION SHORTCUTS PANEL
The Translation Shortcuts Panel can be restored to its original open and
pinned state and placed in its original location by clicking the Translation
SPOKEN TRANSLATION, INC.
91
THE TRANSLATION SHORTCUTS SEARCH FACILITY
Shortcuts Panel item in the View menu. Alternatively, you can restore both the
Translation Shortcuts Panel and the Conversation Panel by clicking the
Restore Panels item in the same menu.
Restoration will be necessary if the panel has been closed (temporarily removed
from the Converser screen), whether on purpose or by accident. It may also be
necessary if either of the panels has been moved from its original location.
• The Translation Shortcuts Search Facility
As a second way of using Translation Shortcuts, you can enter some text into the
Input Window (using any text entry method) and allow Converser to search in the
currently selected Category for Shortcuts which match it.
Matching Shortcuts will be displayed in the Translation Shortcuts Search
Drop-down Menu, which appears just below the current input text in the Input
Window. A matching Shortcut can then easily be selected from the menu for
instant use.
Translation Shortcuts Search
Drop-down Menu
Here Dr. Smith has selected the Staff subcategory of the OB-GYN Category, and
has begun to type “Wh...”. All of the Shortcuts in this subcategory which begin
with these characters are presented for selection.
STI CONVERSER USER GUIDE
92
CHAPTER 6
TRANSLATION SHORTCUTS
Selecting the Category for Search
Translation Shortcuts which match the search criteria (as explained just below)
will be sought only within the currently selected Translation Shortcuts Category,
as indicated in the Translation Shortcuts Browser. So, to search among all
Shortcuts in the Browser, select the highest (root) Category, Shortcuts. The
candidate Shortcuts will then be those listed in the lower section of the
Browser—in this case, all Shortcuts in all Categories and subcategories.
To search only among the Shortcuts in e.g. the Staff subcategory of the
Directions Category, select this subcategory in the Browser. A shorter set of
candidate matches will be listed in the Browser’s lower section—in this case, only
the Shortcuts in this subcategory.
SPOKEN TRANSLATION, INC.
THE TRANSLATION SHORTCUTS SEARCH FACILITY
Search Methods
When you search for matching Shortcuts, you can use two different matching
criteria, or Search Methods—By Initial Characters, or By Keywords. It’s also
possible to turn off searching entirely (No Search).
BY INITIAL CHARACTERS
When search is performed By Initial Characters, Shortcuts will match if they
begin with the characters currently in the Input Window. For example, if the
selected Category is Directions > Staff and the Input currently contains the
characters “Go” then the following Shortcuts will match:
• “Go straight this way.”
• “Go straight, then turn left.”
• “Go straight, then turn right.”
Note
Capitalization is ignored for the purpose of search by initial characters. In the
present example, the initial character strings “Go” and “go” would be treated
equivalently.
BY KEYWORDS
If search is performed By Keywords, Shortcuts will match if they contain all of
the keywords currently in the Input Window. For example, if the selected
Category is Directions > Staff and the Input Window currently contains the
word “go” then the following Shortcuts will match:
•
•
•
•
“Do you know where you need to go?”
“Go straight.”
“Go straight, then turn left.”
“Go straight, then turn right.”
STI CONVERSER USER GUIDE
93
94
CHAPTER 6
TRANSLATION SHORTCUTS
• “Where would you like to go?”
However, if the Input Window contains the characters “go where” (or “where
go”), then only two of these will match.
Note
For the purposes of search by keywords, a keyword is any word not included on a
short list of stop words–words so common that almost any input might contain
them, such as “the,” “a,” etc. Following is a full list of current stop words for
keyword-based search in English and Spanish:
—
a
the
me
you
he
they
an
this
mine
your
his
them
at
that
my
yours
she
their
of
these
we
our
her
from
I
us
ours
hers
a
ese
la
esta
de
este
los
ésta
el
éste
usted
estas
él
estos
yo
éstas
ella
éstos
las
SPOKEN TRANSLATION, INC.
THE TRANSLATION SHORTCUTS SEARCH FACILITY
Note
The order of keywords is not significant for the purposes of keyword-based search.
For example, “go where” and “where go” would be treated equivalently.
NO SEARCH
Rather than search for Shortcuts by either initial characters or keywords, you may
sometimes prefer to turn off the search facility. In this case, no drop-down menu will
appear.
Tip
Turning off search can be helpful for simplifying the Converser interface, e.g. for
beginning users.
Selecting the Search Mode
As explained, there are two Search Modes, or criteria for seeking matching
Shortcuts—By Initial Characters or By Keywords. You can also choose to turn
off the search facility (No Search). To select the desired Search Mode, use the
Search Mode submenu of the Translation Shortcuts menu, and select the
desired item: By Initial Characters, By Keywords, or No Search.
Tip
The selection can also be made using the corresponding icons on the Toolbar:
Using Shortcuts in the Translation Shortcuts
Search Drop-down Menu
There are three ways to use a Translation Shortcut from the Translation
Shortcuts Drop-down Menu:
1 double-click (or double-tap) it, or
STI CONVERSER USER GUIDE
95
96
CHAPTER 6
TRANSLATION SHORTCUTS
2 click once to select it, and then click or tap the Accept Translation Shortcut
button (or use the equivalent Voice Command, “Accept Translation Shortcut”),
or
3 click once to select it, and then click, tap, press, or say “Enter.”
Tip
When the Input Window is in focus, the Up Arrow and Down Arrow keys can be
used to move into and out of the drop-down menu, and to move the Shortcut
selection up or down the list of matching Shortcuts.
The Input Window is in focus when the flashing insertion point is visible within
it. To bring the Input Window into focus, click or tap it, or use the Tab key
repeatedly.
The Accept Translation Shortcut Button
As described in “The Translation Shortcuts Search Facility” on page 91, you can access
Translation Shortcuts through the Input Window by using the Translation
Shortcuts Search facility. It’s usually unnecessary to enter the entire text of a
Shortcut, since initial characters or keywords will suffice to retrieve a set of
matching Shortcuts, from which the desired Shortcut can be selected and
executed.
However, you may also enter the complete text of a Shortcut into the Input
Window, either accidentally or on purpose. In this case, Converser will recognize
the Shortcut and realize that verification of the translation is unnecessary.
Accordingly, the system will deactivate the Translate button (which gives access
to the Translation Screen and its verification tools) and will instead activate the
Accept Translation Shortcut button.
When this button is clicked, the pre-verified translation will immediately be used.
Note
For the purposes of matching against text in the Input Window, capitalization
and punctuation are ignored. Thus “good luck” and “Good luck!” would be
treated equivalently.
This mode of access to Translation Shortcuts has been designed to provide
seamless transition between Shortcuts and open-ended translation. You can enter
text into the Input Window freely, without deciding in advance which translation
mechanism to use. If the text matches a Shortcut, the Shortcut will be used, and
SPOKEN TRANSLATION, INC.
THE TRANSLATION SHORTCUTS SEARCH FACILITY
time will be saved; if not, the full power of open-ended translation is at your
service.
STI CONVERSER USER GUIDE
97
98
CHAPTER 6
TRANSLATION SHORTCUTS
SPOKEN TRANSLATION, INC.
APPENDIX A
Navigation and
Control Methods
You can navigate around Converser for Healthcare 3.0 and issue its commands in three
ways:
1 Using a standard keyboard and mouse.
2 Using the Tablet PC’s stylus and buttons.
Enter button in center.
Up, Down, Right, and
Left buttons on edges.
3 Using Voice Commands (when Converser is used in conjunction with Dragon
NaturallySpeaking (see Chapter 4, “Input Methods—Voice”)).
In most cases, a given action, e.g. pressing Enter, can be carried out via any of the
three navigation methods. You can choose the navigation/control method freely.
Here are examples of this three-way choice among methods:
Keyboard
Tablet
Voice Commands
Press Enter key
Press Enter button
Tap on-screen keyboard Enter
Say “Press Enter”
Press Up Arrow key
Press Up button
Say “Move Up”
The three navigation/control methods can be freely alternated or combined. For
example, if you’re using a Tablet PC which includes a standard keyboard, then all
three methods can be available simultaneously. You might
99
100
APPENDIX A NAVIGATION AND CONTROL METHODS
• move down a list of Translation Shortcuts (see “Using Translation Shortcuts in
the Browser” on page 87) using the Down Arrow key on the keyboard,
• move back up the Shortcut list by saying “Move up,” “Move up two,” etc., or
• execute the currently selected Shortcut by pressing the Tablet’s Enter button.
This chapter describes and compares the three navigation/control methods.
• What Can You Do?
Whether you choose to navigate and control Converser using the standard
keyboard and mouse, using the Tablet buttons and stylus, or using Voice
Commands, what can you actually do?
You can
1 Move around the screen using Tab.
2 Use Enter to:
3
4
5
6
7
• press buttons if they are enabled and have the focus, or
• execute selected Translation Shortcuts
• execute commands in a right-click, Drop-down Menu
Move up and down lists or menus using the Up Arrow and Down Arrow keys or
the Up and Down Tablet buttons.
Expand and contract Translation Shortcut Categories using the Right Arrow
and Left Arrow keys or the Right and Left Tablet buttons.
Single-click mouse buttons or single-tap the stylus to:
• press buttons if they are enabled and have the focus, or
• select Translation Shortcuts from a list
• execute items on a menu
Double-click mouse buttons or double-tap the stylus to:
• execute selected Translation Shortcuts
Right-click mouse buttons (or tap the stylus while squeezing its button) to
access right-button menu items (such as Spellcheck ... in the Input Window)
The remaining sections in this chapter examine each of these possibilities.
• Using Tab
Tab is useful for moving around the Converser screen.
Keyboard
Tablet
Voice Commands
Tab key
Fn button, then Right button
Say “Press Tab”
(press in sequence)
SPOKEN TRANSLATION, INC.
101
USING ENTER
If you start with the insertion point in the Input Window on the Input Screen,
using Tab repeatedly will move the focus around the Converser screen in a
clockwise direction, progressing through elements in the following order:
•
•
•
•
the enabled buttons to the right of the Input Window, one at a time
the Spanish (right) half of the Transcript Window
the English (left) half of the Transcript Window
any Panel which is open (visiting first the lower and then the upper sections
of the Translation Shortcuts Panel if appropriate)
• and back to the Input Window
If you start with the insertion point in the Input Window on the Translation
Screen, using Tab repeatedly will again move the focus around the Converser
screen clockwise, progressing as follows:
•
•
•
•
•
•
the enabled buttons to the right of the Input Window, one at a time
the Back-Translation Window
the Pronounce Back-Translation button
the Meaning Cues Window
the Translation Window
the Pronounce Translation button
If you start with any menu open, the Tab key will cycle through the menu items,
without progressing to other menus.
• Using Enter
Enter can be used to execute the action of an enabled Converser button that is
highlighted to indicate that the button is currently in focus.
Keyboard
Tablet
Voice Commands
Press Enter key
Press Enter button
Say “Press Enter”
While you can always set the focus using the Tab key, sometimes the button focus
is set automatically by Converser according to the program’s state or situation.
For example, when you begin entering text into the Input Window, the
Translate button becomes highlighted. Using Enter at that point will execute the
translation program, just as if you had clicked the button. Similarly, if you type the
entire text of a Translation Shortcut into the Input Window window, the Accept
Translation Shortcut button will become highlighted. then Enter will have the
same effect as clicking this button.
Enter is also helpful for executing list elements, for example
• previously selected Translation Shortcuts in the Translation Shortcuts
Drop-down Menu (see “The Translation Shortcuts Search Facility” on page 91)
STI CONVERSER USER GUIDE
102
APPENDIX A NAVIGATION AND CONTROL METHODS
and the lower section of the Translation Shortcuts Browser (see “The
Translation Shortcuts Browser” on page 83)
• previously selected Meaning Cues in the Meaning Cues Window or
Change Meaning Window (see “The Meaning Cues Window” on page 74)]
• menu items
• Using Up and Down Arrow Keys or Tablet
Buttons
The Up Arrow and Down Arrow keys (or Up and Down Tablet buttons) are useful
for moving up and down lists, e.g. in
• The Translation Shortcuts Drop-down Menu (see “The Translation Shortcuts
Search Facility” on page 91).
• The lower section of the Translation Shortcuts Panel (see “The Translation
Shortcuts Browser” on page 83).
• The items in any menu.
Keyboard
Tablet
Voice Commands
Up Arrow key
Up button
Say “Move up
(number*)”
Down Arrow key
Down button
Say “Move down
(number*)”
*number is optional, as in e.g. “Move down two”
• Using Right and Left Arrow Keys or Tablet
Buttons
The Right Arrow and Left Arrow keys (or Right and Left Tablet buttons) are useful
for expanding and contracting Translation Shortcut Categories in the upper
section of the Translation Shortcuts Browser.
They’re also useful during dictation to move the insertion point left and right. For
example, to move the insertion point two words to the left, say “Move left two
words”.
Keyboard
Tablet
Voice Commands
Right Arrow key
Right button
Say “Move Right
((number (words)*)”
Left Arrow key
Left button
Say “Move Left
((number (words)*)”
* number and “words” are optional—as in “Move left,” “Move right two,” or
“Move left two words”
SPOKEN TRANSLATION, INC.
103
CLICKING THE MOUSE BUTTONS
• Clicking the Mouse Buttons
Like Enter, mouse clicks and double-clicks are useful for selecting and/or
executing list elements.
Keyboard Mouse
Tablet Stylus
Voice Commands
Click left once
Tap stylus once
Say “Mouse click”
Click left twice
Tap stylus twice
Say “Mouse double
click”
The right mouse button is useful for opening drop-down menus. For example,
right-clicking on a selected word or word sequence in the Input Window opens
the Edit menu. Edit operations such as Select All and Spellcheck ... can be
accessed in this way.
Keyboard
Tablet
Voice Commands
Click right
Tap stylus while
squeezing stylus button
Say “Mouse right click”
STI CONVERSER USER GUIDE
104
APPENDIX A NAVIGATION AND CONTROL METHODS
SPOKEN TRANSLATION, INC.
Index
A
D
active participant
selecting 70
audio
adjustment 65
dictation
correcting 58, 60
tips 60
Dragon NaturallySpeaking
assigning key combinations 56
creating users 51
installing 50
naming users 52
opening users 51
voice training 52
B
back translation
English 5
pronounce 74
Spanish 13
back translation window 74
G
C
guest users 9, 15
change meaning dialog box 75
English 6
retranslate 6
change word meaning window 75
character pad 41
correcting text after insertion 42
correcting text before insertion 41
inputting words 41
conversation panel
closing 30
hiding 28
restoring 31
unhiding 30
conversations
adding participants 22
ending 14, 25
entering text 3
managing 20
number of participants 23
removing participants 24
starting 2, 21
taking a turn 26
transcripts 31
H
handwriting 38
adding words to a dictionary 40
correcting text after insertion 41
correcting text before insertion 39
inserting text 38
scratching out text 40
Spanish 45
writing pad 38
I
input modes
choosing 38
input panel
opening 37
input window
spellchecking 3
K
keyboard, on screen 44
entering text 42
keyboard, standard
English layout 44
Spanish layout 43
105
106
L
S
last participant button 13
logging into Converser 2
Spanish
handwriting recognition 45
speech input mode
beginning a turn 59
speech recognition
personal audio model 50
preparation for 50
spellchecking 3, 10
Spanish 10
M
meaning cues 74
English 6
meaning cues window 74
microphone
customizing controls 55
putting to sleep 63
turning off 63
vocal control 63
voice commands summary 63
N
navigation
choices 100
using Enter 101
using mouse buttons 103
using right and left arrow keys or Tablet PC
buttons 102
using Tab 100
using up and down arrow keys or Tablet PC
buttons 102
new users 2
new users, registering 15
P
paraphrase 74
paraphrase window 5
pronounce selection button 8
pronounce translation button 76
R
registering 2
registration
how to 17
new users 15
why do it? 15
registration dialog box
English 19
Spanish 19
retranslate button 79
retranslating 78
retranslation modes 76
T
Tablet PC
hot buttons 56
hot buttons, customizing 57
input panel 37
text
correcting 43, 45
entering in Spanish 43
text-to-speech, listening to 8
transcript window 7
transcripts 31
opening 33
saving 14, 31
unmasking 35
what’s in them? 32
translation 5, 72
accepting 76
correcting 75
entering text for 70
from Spanish 12
open-ended 69
removing distractions 71
shortcuts 69
skipping verification 79
to Spanish 5
translate button 73
translation screen 73
verifying with back translation 74
translation screen 5, 73
SPOKEN TRANSLATION, INC.
107
translation shortcuts
accept translation shortcuts button 96
browser 83
no search 95
search by initial characters 93
search by keywords 93
search facility 91
search methods 93
selecting a category 84
selecting categories automatically 87
selecting the category for search 92
selecting the search mode 95
using 87, 95
translation shortcuts panel 88
closing 90
hiding 89
restoring 90
revealing 88
unhiding 90
translation window 76
translation, open-ended
preparing for 70
U
user dialog box 2
V
visitante femina 9
visitante masculino 9
voice commands 62
arrow keys 102
buttons 64
buttons, summary 65
Enter 101
keys and mouse 67
learning 61
menus 65
menus, summary 66
mouse buttons 103
Tab 100
voice training 65
W
word meanings window 74, 75
writing pad 38
STI CONVERSER USER GUIDE
108
SPOKEN TRANSLATION, INC.