1
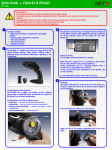
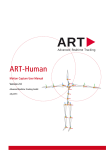
Quick-Guide Fingertracking & DTrack2 01 / 2012 Security advice: Do not use any components if looking damaged! Do not use any different cables than supplied with the system! Fingertracking will not work correctly when modulated flash is not in sync group 1! i 1 Included in delivery: ✔ 2 active hand targets ✔ 6 active finger thimble sets (different sizes) ✔ 4 battery packs ✔ 2 battery chargers ✔ 2 power supplies for chargers (100-240 Volt, 50-60 Hz) 3 Camera and Fingertracking settings: Select “Settings” → “Cameras” → “All cameras” and activate the modulated flash for a camera of sync group 1. Select “Settings” → “Fingertracking” Fingertracking hand target: Carries five infrared LEDs, two status LEDs, a configuration dial with ten switching positions, an IR receiver for the sync signal and a connector for the finger LEDs. infrared sync receiver status LEDs Define the desired number of hands to be used. The hand geometry remains 'none' until you completed the calibration of the Fingertracking. Press “OK”. infrared LEDs infrared LEDs power switch configuration dial 4 The configuration dial is used to select the LED brightness and the number of fingers used in the setup. The status LEDs provide the following information: ● green LED ... sync received ● red LED ... no sync ● red and green LED flashing ... battery low or discharged Inserting the battery: Slide the battery in with the contact side first and then gently press the battery into the compartment until the battery snaps in. Please refer to the user manual for more details. 2 Fingertracking license: Select “DTrack2” → “Licenses”. Add license key for your Fingertracking device. If you don't have a license key, yet, please click on the “hardware info“ button to find out the serial number of your Synccard2. Please contact ART. We will provide a license key consistent with your Synccard2 serial number. 5 Body calibration: First of all, a body calibration (“Calibration” → “Body”) of the hand target has to be carried out. Therefore, select the body name “Fingertracking hand body 01” for the hand target of the first hand. Press “Calibrate” → the calibration starts within 5 seconds. Quick-Guide 6 Fingertracking & DTrack2 Connect the finger thimble sets by plugging in the connector into the hand target. 8 9 Apply the finger thimbles to your thumb and fingers. Please observe the order when using the 5-finger AR set: Fingertracking display: In DTrack2 select “Display” → “Fingertracking” to see the measured coordinates of the fingers. Output settings: In DTrack2, select “Settings“ → “Output“. You can either select “this computer” or enter an IP address of the computer you want to send data to. Please make sure that the checkbox for Fingertracking data is ticked. Otherwise, the data will not be transmitted. Press “Start” to start measurement. 10 7 Finger calibration: Select “Calibration” → “Fingertracking” Enter a name for the hand geometry. Select handedness and the type of fingerset. The calibration process is divided into two steps: ● Step 1: ● put forth your hand and keep it still ● make sure that the markers are seen by all cameras ● fingers must be stretched and not spread ● the thumb must be spread ● Step 2: ● ● ● ● Display tool “Fingertracking Viewer” The “Fingertracking Viewer” is a small graphical tool which shows the hand and finger position. Optionally, it can be installed on the remote PC to perform a quick test of the Fingertracking setup. After starting the viewer, click the “Go Online” button and specify on which data port the viewer has to listen, then click ”OK” to connect the viewer to DTrack. Afterwards choose the Hand ID you want to display. If this ID is tracked or not is shown by the light right next to the “Hand-ID” setting (green=tracked, red=not tracked). Then click on one of the hand signs to see your tracked fingers. To start a small demo showing the handling of a virtual object push the “Demos” button, this opens the demos menu. You have a small number of simple demos available, e.g. you can handle a virtual sphere or cube. To insert the virtual object in the tracking volume, place the tracked hand at a convenient position and press the “Grab object” button. The Fingertracking Viewer is only for demonstration and testing purposes and is only available as a 2D Viewer. fingers must be stretched and not spread all the time gently move your fingers (together!) up and down simultaneously until calibration process is finished do not bend your fingers the thumb must be spread and must not be moved fingers up fingers down i Press “Calibrate” → the calibration starts within 5 seconds. Repeat these steps for other hands. Please refer to the user manual for a more detailed description of the ART tracking system. If you need further assistance please do not hesitate to contact our support: ART GmbH +49 (0)881-92530-00 http://www.ar-tracking.de © Copyright 2012 ART GmbH