1
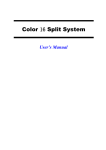
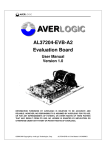
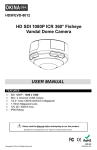
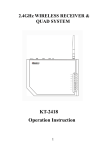
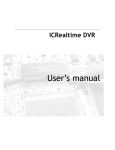
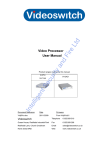
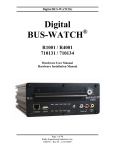
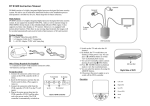
System Features - Connects up to 4/8 Video Camera Adjustable Brightness, Contrast, Saturation, Hue and Sharpness - High Resolution 720X480 60Hz for NTSC 720X576 50Hz for PAL - Various Display Modes QUAD Split Mode Full Screen Mode PIP Screen Mode Non-realtime 8 Split Mode Dual Split Mode Auto Sequence Mode - High Performance Freeze Function Flicker Free Image Capture - High Performance Zoom Function Selectable Zoom Area - Various Overlay Information Camera Title Real Time and Date Alarm/Loss/Motion Message - Playback in QUAD or Full Screen Image - Provide Various Event Input and Detection Video Loss Detection Motion Detection 60 Event Report Built-in Buzzer and Relay Output Rear Panel Installation Camera Connection Accept 8 composite video inputs from the camera. Monitor Connection Provide 1 composite video output for the main monitor. VCR OUT Connection 1 Provide 1 composite video output for recording in the VCR. VCR IN Connection Accept 1 composite video input for playback from the VCR. Power Jack Connection DC ~12V, Center is positive. Front Key Operation Key Definition Short key Press it in less than 1second long key press it in more than 1 second Setup Menu Function Refer to the Setup Menu Operation section. Zoom Function A zoomed area can be moved by pressing 4 arrow keys when zoom function is invoked. Freeze function can also be invoked while zoom function is invoked. Freeze Function All displayed channel is frozen when freeze function is invoked. Zoom function can also be invoked while freeze function is invoked. Playback Function When playback function is running, 4 channel keys select camera to be displayed as single full screen and the MODE key makes quad display mode. Quad A or B Display Key A/B selects page to be displayed. Page A and B is toggled for each A/B key. Multi Channel Display The display modes are circulated as the following sequence, Non-realtime 8 Split, 2 Picture-in-Picture, 1 Picture-in-Picture and Dual Split for each MODE key. 2 UP and DOWN key selects the channel in 2 Picture-in-Picture, 1 Picturein-Picture and Dual Split mode, and then the selected channel boundary is blinked. The camera in the selected channel can be chosen by LEFT and RIGHT key Auto Sequence Display AUTO key invokes auto sequence display mode and this mode can be maintained until any other display mode is selected. Single Channel Display Each channel button selects camera to be display as full screen. When pushing same button, camera is toggled to the other page. PAL/NTSC System System can be defined as NTSC or PAL standard with the following method. The first method is to power on with pressing RIGHT or LEFT key and the second one is to define in the setup menu. Setup Menu Operation The system provides a built-in GUI setup screen. For each menu, the key function is described in the lower region to help operation. The following figure shows the structure of GUI menu. SETUP MENU SYSTEM SETUP FACTORY RESET DISPLAY SETUP AUTO SEQUENCE CAMERA SETUP MOTION SETUP EVENT SETUP EVENTLIST CLEAR EVENTLIST 3 Setup Main menu SETUP MAIN MENU SYSTEM DISPLAY Factory AUTO Reset Menu SETUP SETUP SEQUENCE CAMERA MOTION EVENT SETUP SETUP SETUP EVENT REPORT Press UP or DOWN, LEFT or RIGHT button to select, press ENTER button to confirm, use MENU button to exit. System Setup Menu SYSTEM SETUP DATE:YYYY-DD 2004:01:01 TIME: HH-MM-SS 12-00-00 SYSTEM FORMAT: PAL SYSTEM IDFactory NUMBER:01 Reset Menu KEY LOCK:OFF FACTORY RESET:NO Press UP or DOWN button to select, use LEFT or RIGHT button to adjust Press ENTER button to confirm, press MENU to exit. Factory Reset Menu FACTORY RESET WARNING! THIS SYSTEM GETS TO LOSE THE CURRENT SETTING VALUE AND WILL BE INITIALIZED WITH FACTORY RESET MODE. ARE YOU SURE? YES NO 4 Press LEFT or RIGHT button to select, press ENTER button to confirm, Press MENU button to exit. Display Setup Menu DISPLAY SETUP DISPLAY ON SCREEN TITLE DATE TIME SCREEN POSITION X: 0 Y: 0 BORDER LINE COLOR: BLACK GRAY1 GRAY2 WHITE OFF Press UP or DOWN button to select, use LEFT or RIGHT button to adjust, press MENU button to exit. Camera Setup Menu CAMERA SETUP TITLE:CAMERA1 BRIGHTNESS:0 CONTRAST:0 SATURAST:0 HUE:0 SHARPNESS:0 MIRRORING:OFF Press UP or down button to select, LEFT or RIGHT button to adjust, press MENU button to exit. Auto Sequence Setup Menu 5 AUTO SEQUENCE SWELL TIME PAGE A QUAD:3SEC PAGE B QUAD:3SEC CAMERA1:3SEC CAMERA5:3SEC CAMERA2:3SEC CAMERA6:3SEC CAMERA3:3SEC CAMERA7:3SEC CAMERA4:3SEC CAMERA8:3SEC Press UP or down button to select, LEFT or RIGHT button to adjust, Press MENU button to exit. Motion Setup Menu MOTION SETUP DETECTION TIME ALWAYS OFF ON:11:00:00 OFF:12:00:00 SENSITIVITY:0 VELOCITY:0 MASKING AREA [X,Y]=(0,0) Press UP or down button to select, LEFT or RIGHT button to adjust, Press MENU button to exit. Event Setup Menu EVENT SETUP BUZZER/REPORT CONTROL CHANNEL 1 2 3 4 5 6 7 8 ALARM LOSS MOTION BUZZER HOLD TIME:05SEC REPORT HOLD TIME:60SEC Press UP or DOWN, LEFT or RIGHT button to select, press ENTER button to enable, press MENU button to exit. 6 FREEZE 1 POWER VCR MENU QUAD/ENTER AUTO CAM1/▲ CAM2/▼ CAM3/+ CAM4/ZOOM 4 3 2 Event Report EVENT REPORT 1 OF 6 PAGE NO YY-MM-DD HH:MM:SS CH EVENT 1 04-07-30 16:56:03 1 LOSS 2 04-07-30 16:56:03 2 ALARM 3 04-07-30 16:56:03 3 MOTION 4 04-07-30 16:56:03 4 LOSS 5 04-07-30 16:56:03 5 ALARM 6 04-07-30 16:56:03 6 MOTION 7 04-07-30 16:56:03 7 LOSS 8 04-07-30 16:56:03 8 ALARM 9 04-07-30 16:56:03 1 MOTION 10 04-07-30 16:56:03 2 LOSS LIST CLEAR:ON Press UP or DOWN button to select, press LEFT or RIGHT button to select page, press MENU button to exit. Event List Clear Menu LIST CLEAR WARNING! THIS SYSTEM GETS TO LOSE THE CURRENT EVENTLIST AND WILL BE INITIALIZED WITH BLINK ARE YOU SURE? YES NO Press LEFT or RIGHT button to select, press ENTER button to confirm, press MENU button to exit. 7