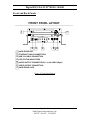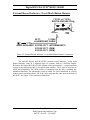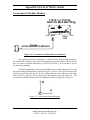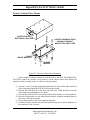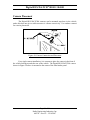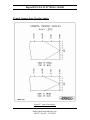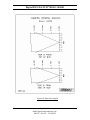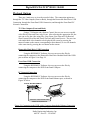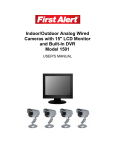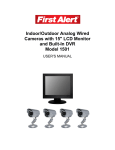
1
Digital BUS-WATCH®
Digital
®
BUS-WATCH
R1001 / R4001
710131 / 710134
Hardware User Manual
Hardware Installation Manual
Page 1 of 96
Radio Engineering Industries, Inc.
640370 -- Rev B -- 12/14/2007
Digital BUS-WATCH® R1001 / R4001
Table of Contents
List of Figures.................................................................................................................... 4
Introduction....................................................................................................................... 6
System Overview ............................................................................................................ 8
Front and Back Panels .................................................................................................... 9
Remote Control............................................................................................................. 11
Initial Set Up ................................................................................................................. 14
Removable Hard Drive Modules .................................................................................. 14
DVR Loading and Unloading ............................................................................................... 14
Hard Drive Module Directory Structure............................................................................... 16
Hard Drive Record Times..................................................................................................... 17
USB Security Lockout.......................................................................................................... 18
Automatic Hard Drive Heater............................................................................................... 19
Long Term Storage ....................................................................................................... 19
Installation ....................................................................................................................... 20
System Wiring – Power and Camera Cables ................................................................ 20
External Record Indicator / Event Mark Button Harness ............................................. 22
GPS Antenna Module Harness ..................................................................................... 23
Vehicle Sensor Options Harness................................................................................... 24
Speedometer Harness Wiring Instructions ........................................................................... 25
Vehicle Sensor Options Harness Vehicle Connections ........................................................ 25
Accelerometer Module Harness.................................................................................... 27
Physical Mounting Requirements ................................................................................. 28
L Bracket Mounting.............................................................................................................. 28
Security Cabinet Mounting................................................................................................... 29
Camera Placement ........................................................................................................ 34
Typical Camera Lens Viewing Angles................................................................................. 37
Page 2 of 96
Radio Engineering Industries, Inc.
640370 -- Rev B -- 12/14/2007
Digital BUS-WATCH® R1001 / R4001
Table of Contents (continued)
Recording & Playback.................................................................................................... 39
System Start-Up ............................................................................................................ 39
System Shut-Down ....................................................................................................... 39
Playback Options .......................................................................................................... 40
Menu Configuration ....................................................................................................... 41
Installers Mode Page..................................................................................................... 41
Main Menu Page ........................................................................................................... 42
System Setup ........................................................................................................................ 43
Time/Date Search ................................................................................................................. 80
Event Search ......................................................................................................................... 83
Advertising ........................................................................................................................... 84
Movies .................................................................................................................................. 85
Music .................................................................................................................................... 86
DVR Firmware Upgrading ............................................................................................ 87
Removable Hard Drive Module USB Firmware Upgrade............................................ 87
Front Panel USB Firmware Upgrade............................................................................ 88
Ethernet Firmware Upgrade.......................................................................................... 88
Systems Related Part Numbers ..................................................................................... 89
Troubleshooting Guide................................................................................................... 93
Specifications ................................................................................................................... 96
Page 3 of 96
Radio Engineering Industries, Inc.
640370 -- Rev B -- 12/14/2007
Digital BUS-WATCH® R1001 / R4001
List of Figures
Figure 1: R1001/R4001 Expanded System Overview..................................................................... 8
Figure 2: Front Panel Layout........................................................................................................... 9
Figure 3: Rear Panel Layout.......................................................................................................... 10
Figure 4: DVR Remote Control .................................................................................................... 11
Figure 5: Remote Control Button Description .............................................................................. 12
Figure 6: Remote Control Navigation Arrows .............................................................................. 12
Figure 7: Remote Control Numeric Input Keys ............................................................................ 13
Figure 8: Removable Hard Drive Module Loading and Unloading .............................................. 15
Figure 9: Hard Drive Module Directory Structure ........................................................................ 16
Figure 10: Hard Disk Drive Module USB Security Lockout ........................................................ 18
Figure 11: System Wiring – Power and Camera Cables ............................................................... 21
Figure 12: External Record Indicator / Event Mark Button Harness Connection ......................... 22
Figure 13: GPS Antenna Module Harness Connection ................................................................. 23
Figure 14: GPS Notification Icon.................................................................................................. 23
Figure 15: Vehicle Sensor Options Harness Connection .............................................................. 24
Figure 16: Accelerometer Module Harness Connection ............................................................... 27
Figure 17: 3 Axis Inertia Sensor Directions .................................................................................. 27
Figure 18: L Bracket Floor Mounting ........................................................................................... 28
Figure 19: REI’s Industrial Grade DVR Security Cabinet ............................................................ 29
Figure 20: Physical Mounting Clearance Requirements ............................................................... 30
Figure 21: Security Cabinet Under-Seat Mount ............................................................................ 31
Figure 22: Security Cabinet Mount Conversion............................................................................ 32
Figure 23: Security Cabinet Floor Mounting ................................................................................ 33
Figure 24: Camera Connection and Placement ............................................................................. 34
Figure 25: Potential Single and Two Camera Placement Options ................................................ 35
Figure 26: Potential Multiple Camera Placement Options ............................................................ 36
Figure 27: 4mm Lens Angles ........................................................................................................ 37
Figure 28: 8mm Lens Angles ........................................................................................................ 38
Figure 29: Connecting to the DVR with a Computer through the Ethernet Connection............... 40
Figure 30: Installers Mode Screen Shot ........................................................................................ 41
Figure 31: Main Menu Screen Shot............................................................................................... 42
Figure 32: System Setup Screen Shot ........................................................................................... 43
Figure 33: System – Date/Time Screen Shot................................................................................. 44
Figure 34: Custom DST Triggers .................................................................................................. 45
Figure 35: System – General Screen Shot ..................................................................................... 46
Figure 36: System – Hard Disk Format – Start Screen Shot ......................................................... 47
Figure 37: System – Hard Disk Format – Are You Sure? Screen Shot......................................... 48
Figure 38: System – Hard Disk Format – Formatting HDD Screen Shot ..................................... 48
Figure 39: System – Hard Disk Format – Formatting Successful Screen Shot............................. 48
Figure 40: System – Network Screen Shot.................................................................................... 49
Figure 41: System – Server Setup Screen Shot ............................................................................. 50
Figure 42: System – Security Screen Shot .................................................................................... 51
Figure 43: Security Password Setting Error Message ................................................................... 52
Figure 44: Security Password Screen Shot.................................................................................... 52
Figure 45: Security DVR Unit ID Error Message ......................................................................... 52
Figure 46: Security DVR Password Error Message ...................................................................... 52
Page 4 of 96
Radio Engineering Industries, Inc.
640370 -- Rev B -- 12/14/2007
Digital BUS-WATCH® R1001 / R4001
List of Figures (continued)
Figure 47: Security DVR Operator Password Correct Message ................................................... 52
Figure 48: Security DVR Administrator Password Correct Message ........................................... 52
Figure 49: System – USB Mode – Device Mode Screen Shot ...................................................... 53
Figure 50: System – USB Mode – Host Mode Screen Shot.......................................................... 54
Figure 51: USB Host Mode – Upload Data Screen Shot .............................................................. 55
Figure 52: USB Host Mode – Flash Drive File List Screen Shot.................................................. 55
Figure 53: USB Host Mode – File Destination Screen Shot ......................................................... 56
Figure 54: USB Host Mode – Copying File Message ................................................................... 56
Figure 55: USB Host Mode – Copy Successful Message ............................................................. 56
Figure 56: USB Host Mode – Restart Messages ........................................................................... 56
Figure 57: System – Driver Information Screen Shot ................................................................... 57
Figure 58: Data Entry Keyboard Screen Shot ............................................................................... 58
Figure 59: System – Audible Alerts Screen Shot .......................................................................... 59
Figure 60: System – Default Setup – Warning Screen Shot.......................................................... 60
Figure 61: System – Default Setup – Restoring Screen Shot ........................................................ 61
Figure 62: System – Configuration Setup – Save Successful Screen Shot ................................... 62
Figure 63: Camera Menu Screen Shot........................................................................................... 63
Figure 64: Camera – 4 Camera Recording Parameters Screen Shot ............................................. 64
Figure 65: Record Parameter Group Resources ............................................................................ 65
Figure 66: Camera – 1 Camera Recording Parameters Screen Shot ............................................. 66
Figure 67: Camera – 2 Cameras Recording Parameters Screen Shot............................................ 66
Figure 68: Camera – Camera Name Screen Shot .......................................................................... 67
Figure 69: System Setup – Schedule Screen Shot......................................................................... 68
Figure 70: Event Setup – Sensor Screen Shot ............................................................................... 69
Figure 71: Event Setup – Sensor – IO Input – School Bus Screen Shot ....................................... 70
Figure 72: Event Setup – Sensor – IO Input – Transit Bus Screen Shot ....................................... 71
Figure 73: Event Setup – Sensor – IO Input – Custom Screen Shot ............................................. 72
Figure 74: Event Setup – Sensor – Accelerometer Screen Shot.................................................... 73
Figure 75: Event Setup – Sensor – Speedometer Screen Shot ...................................................... 74
Figure 76: Event Setup – Event Record Mode Screen Shot.......................................................... 75
Figure 77: System Setup – System Information Screen Shot........................................................ 76
Figure 78: System Information – HDD Information Screen Shot................................................. 77
Figure 79: System Information – System Information Screen Shot.............................................. 78
Figure 80: System Information – Maximum Accelerometer Readings Screen Shot..................... 79
Figure 81: Time/Date Search – Date Selection Screen Shot ......................................................... 80
Figure 82: Time/Date Search – Available Video Calendar Screen Shot....................................... 81
Figure 83: Time/Date Search – File Selection Screen Shot .......................................................... 82
Figure 84: Event Search Screen Shot ............................................................................................ 83
Figure 85: Advertisement Screen Shot.......................................................................................... 84
Figure 86: Movie Playback Screenshot......................................................................................... 85
Figure 87: Music Playback File Selection Screen Shot................................................................. 86
Figure 88: Firmware Upgrading In Progress Screen Shot............................................................. 87
Figure 89: Firmware Upgrade Success Screen Shot ..................................................................... 88
Page 5 of 96
Radio Engineering Industries, Inc.
640370 -- Rev B -- 12/14/2007
Digital BUS-WATCH® R1001 / R4001
Introduction
All of us at Radio Engineering Industries, Inc. would like to thank you for
purchasing a Digital BUS-WATCH® surveillance system. This manual is intended to
provide the user with the information required for proper installation, initial setup and
explanation of the individual programming options. If you have any questions, or need
assistance, please call:
SERVICE HOT LINE
USA & CANADA
1-877-726-4617 Toll Free
1-402-339-2200
The R1001 and R4001 are a series of cost effective, fanless, embedded mobile
DVR PC platform solutions supporting up to 4 camera inputs. These systems feature a
unique compact rugged design engineered to meet the demands of harsh mobile
environments. These mobile DVRs feature the latest technologies including removable
USB hard disk drive modules, Ethernet, and GPS. The R1001/R4001 have the ability to
perform DVR functions for safety and security purposes, along with managing media
advertising for education and entertainment, or to create extra value-added services for all
public and commercial transportation in the current and future markets.
Features
● Ultra compact extruded aluminum housing, low weight, high temperature
and vibration resistant
● Low-voltage, low-current architecture designed for harsh mobile environments
● USB removable hard drive modules with tamper-resistant lock and secure
controls
● All DVRs fully support NTSC and PAL, Fahrenheit and Celsius, KM/H and
MPH
● Communications are supported through a TCP / IP network interface and a
USB connection to PCs
● Each DVR comes with a hand-held IR remote control with on-screen display
(OSD) for configuration and control of the DVR
● The DVR features a 2.5" removable mobile HDD module with internal antivibration and shock resistance
● 4 channels for video input, full-motion (30 FPS / camera) continuous video
recording and display. 4 channels for high-fidelity, digitally recorded, 4
independent synchronized audio channels matched to 4 independent video
channels
Page 6 of 96
Radio Engineering Industries, Inc.
640370 -- Rev B -- 12/14/2007
Digital BUS-WATCH® R1001 / R4001
● Secure, constant recording while system is powered with event bookmarks for
easy event searching
● Utilizes MPEG-4 video compression for high video quality, low storage
requirements, and long record times
● User-selectable settings for quality and audio record enable / disable for each
video channel
● Multi-level password protection for settings, playback, remote access, and more
● Integrated and filtered power supply for cameras, sensors, relays and other
accessories
● Selectable idle frame rate with event-triggered burst recording speeds up to
30fps / camera
● Multiple alarm inputs with selectable pre-alarm and post-alarm recording
● Full event logging of every operation controlled by the DVR
● TV output channel for recorded, live, and advertising video
Video Viewing
● Streaming video output for advertising, entertainment, and information
● DVD-quality steaming audio / video channel with independent NTSC or PAL
television output
● Convenient HDD, USB, or TCP / IP media updating and status file
downloading
● Simultaneous and independent operation of DVR and streaming advertising
Video Retrieval and Archiving
● Ethernet port on the front panel for easy video retrieval on the vehicle with a
notebook computer
● Two sets of RCA video and stereo audio outputs for monitor viewing on the
vehicle
● USB 2.0 connections on both DVR and removable hard drives for fast file
transfer utilizing PC-based file formats
● Easy to use PC-based software application for playback, file transfer, archiving
management, and video file format conversion
● Vehicle management PC software interprets audio, video, and vehicle data for
driver and vehicle use assessment
● Video event search software allows intelligent searching of video based on
event information
Supplemental Data and Driver Management Modules
● External GPS antenna module for embedded digital information of GPS
location, speed, heading, and time
● External 3-axis inertia sensor for embedded digital information or trigger of
video-matched motion events for accident reconstruction
Page 7 of 96
Radio Engineering Industries, Inc.
640370 -- Rev B -- 12/14/2007
Digital BUS-WATCH® R1001 / R4001
System Overview
DIGITAL BUS-WATCH
CAMERAS
STANDARD
R
R1001/R4001 MOBILE DVR SYSTEMS
*CAMERA CABLES
(VARIOUS LENGTHS AVAILABLE)
710133
LOCK BOX
(OPT)
OR
DOME
**ADD CAMERA SWITCH DEVICE
(710030) FOR MORE THAN 4 CAMERAS
POWER CABLE
(VARIOUS LENGTHS AVAILABLE)
512001 - 35 FT.
512002 - 16 FT.
*710134
4 CH DIGITAL BUS-WATCH
POWER
R4001
OR
HR-SERIES
C
FC
GPS
SENSORS
CAM1
CAM2
CAM3
CAM4
R
AUDIO OUT
VIDEO
OUT
ETHERNET
USB 2.0
HTR
REC
710144
GPS RECEIVER
HDD FAULT HDD
FULL
L
R
AUDIO OUT
VIDEO
OUT
AUDIO
USB
2.0
USB
FLASH
DRIVE
(OPT)
512196
USB 2.0 CABLE
(OPT)
710143
ACCELEROMETER MODULE
FRONT
VIEW
CAM1 CAM2 CAM3 CAM4
VEHICLE SENSOR HARNESS (OPT)
512209 - 20 FT.
512208- 50 FT.
VIDEO
ACC
3 FT.
530068
ETHERNET CABLE
(OPT)
AFTERMARKET
512024 - 20 FT.
512025 - 40 FT.
511986 - 20 FT.
512023 - 40 FT.
ALARM/PANIC CABLE
R4001
PWR
TRIGGER
ACC GPS SENSORS
**RCA CABLE - COMPOSITE A/V
REAR
VIEW
TRIGGER
HARD DRIVE
MODULE
ICP
L
POWER
OEM
VARIOUS LENS SIZES
AVAILABLE
CAM CAM CAM CAM
1
2
3
4
USB
PORT
690484
LCD COLOR
VIDEO MONITOR (OPT)
AV IN
COMPUTER
(OPT)
Figure 1: R1001/R4001 Expanded System Overview
Page 8 of 96
Radio Engineering Industries, Inc.
640370 -- Rev B -- 12/14/2007
VARIOUS
SIZES
AVAILABLE
80-160 GB
REMOTE
(COMES W/MONITOR)
OR
WEDGE
*NOTE:
CAMERAS 2, 3, & 4
ARE NOT
APPLICABLE WITH
R1001 DVR SYSTEM.
Digital BUS-WATCH® R1001 / R4001
Front and Back Panels
FRONT PANEL LAYOUT
1
7
PWR
ETHERNET
USB 2.0
CAM1 CAM2 CAM3 CAM4
HTR
2 3
REC
HDD FAULT HDD
FULL
4
L
R
AUDIO OUT
VIDEO
OUT
5 6
1 HARD DRIVE BAY
2 ETHERNET CABLE CONNECTION
3 USB 2.0 CABLE CONNECTION
4 LED STATUS INDICATORS
5 AUDIO OUTPUT CONNECTIONS, L (Left) AND R (Right)
6 VIDEO OUTPUT CONNECTION
7 HARD DRIVE LOCK
Figure 2: Front Panel Layout
Page 9 of 96
Radio Engineering Industries, Inc.
640370 -- Rev B -- 12/14/2007
Digital BUS-WATCH® R1001 / R4001
REAR PANEL LAYOUT
8
ICP
L
POWER
C
FC
TRIGGER
ACC
GPS
SENSORS
9 10 11 12
CAM1
CAM2
CAM3
13
R
AUDIO OUT
VIDEO
OUT
14 15
8 POWER CABLE CONNECTION
9 TRIGGER (ALARM/PANIC CABLE CONNECTION)
10 ACC (ACCELEROMETER MODULE CONNECTION)
11 GPS (GPS RECEIVER CONNECTION)
12 SENSORS (VEHICLE SENSOR CABLE CONNECTION)
13 CAMERA INPUTS (CAM1 ON R1001 MODEL; CAM 1-4 ON R4001 MODEL)
14 AUDIO OUTPUT CONNECTIONS, R AND L
15 VIDEO OUTPUT CONNECTION
Figure 3: Rear Panel Layout
Page 10 of 96
Radio Engineering Industries, Inc.
640370 -- Rev B -- 12/14/2007
Digital BUS-WATCH® R1001 / R4001
Remote Control
REMOTE
7
1
2
8
3
4
5
6
9
10
11
12
Figure 4: DVR Remote Control
Page 11 of 96
Radio Engineering Industries, Inc.
640370 -- Rev B -- 12/14/2007
Digital BUS-WATCH® R1001 / R4001
I.D.
1
2
3
LABEL
FUNCTION
POWER
Turn DVR On/Off
Numeric
"1" through "4" Select Camera
NEXT
Volume UP
4
REW
Playback Function, X2, X4
5
PREV
Volume DOWN
6
7
Playback Functions
LOGIN/LOCK
Access Menu
8
"0"
9
ENTER
10
FWD
11
SETUP
Menu
12
EXIT
Exit
Quad Screen
Installers Mode
Playback Function, X2, X4
Figure 5: Remote Control Button Description
NAVAGATION ARROWS
Use the ARROW keys to
move between selections,
input fields and icons. Press
ENTER to select and EXIT to
return. NEXT and PREV is
also used to increase or
decrease volume.
Figure 6: Remote Control Navigation Arrows
Page 12 of 96
Radio Engineering Industries, Inc.
640370 -- Rev B -- 12/14/2007
Digital BUS-WATCH® R1001 / R4001
NUMERIC INPUT KEYS
Use the numbers to input
values in the system setup
screen or switch through the
channels in live and playback
modes.
Figure 7: Remote Control Numeric Input Keys
Page 13 of 96
Radio Engineering Industries, Inc.
640370 -- Rev B -- 12/14/2007
Digital BUS-WATCH® R1001 / R4001
Initial Set Up
The Digital BUS-WATCH® system will operate prior to any user setup with the
default settings. However, it may not show the correct time and date (factory set to
Central Standard Time). To set the correct date and time, and program the system
operation to your requirements, please refer to the Menu Configuration section of this
manual.
When accessing the menu, it is necessary to connect a video monitor to the video
jack on the front or back of the unit. REI recommends our battery-powered 7-inch Color
LCD monitor, P/N 690554.
Removable Hard Drive Modules
DVR Loading and Unloading
Inserting the Hard Drive: Turn the hard drive key to the unlocked and
off position. Insert the hard drive into the bay. Turn the hard drive key to
the locked and on position, as shown in Figure 8 on Page 15.
Removing the Hard Drive: Turn the hard drive key to the unlocked and
off position. Gently remove the hard drive from the bay.
Note: The Digital BUS-WATCH® R1001 & R4001 will not function
properly if the hard drive key is in the unlocked or off positions. If there is
no hard drive present in the bay but the key is in the locked and on
position, the Digital BUS-WATCH® will still power up normally, the
menus can be accessed, etc.; however, the unit will not be able to record
any video.
Page 14 of 96
Radio Engineering Industries, Inc.
640370 -- Rev B -- 12/14/2007
Digital BUS-WATCH® R1001 / R4001
Figure 8: Removable Hard Drive Module Loading and Unloading
Page 15 of 96
Radio Engineering Industries, Inc.
640370 -- Rev B -- 12/14/2007
Digital BUS-WATCH® R1001 / R4001
Hard Drive Module Directory Structure
Figure 9: Hard Drive Module Directory Structure
The Directory structure of the Removable Hard Drive Module is shown above in Figure 9.
Listed below are the general purposes of the files and folders.
ads:
ads_log:
alarm1:
bak:
movie:
music:
record:
Recycled:
ReportStation:
Stationblank:
tmp:
dvdplayermsg:
RecordInfo.log:
time.bin:
The folder for advertising files.
The folder for the advertising logs.
The folder with the recorded video associated with alarms.
For internal DVR use only.
The folder for movie files.
The folder for music files.
The folder with the recorded video.
Windows file.
Future use.
Future use.
For internal DVR use only.
For internal DVR use only.
For internal DVR use only.
For internal DVR use only.
Page 16 of 96
Radio Engineering Industries, Inc.
640370 -- Rev B -- 12/14/2007
Digital BUS-WATCH® R1001 / R4001
Hard Drive Record Times
1 Camera with a 160GB Hard Drive (in Hours)
D1
FPS
Quality
1
2
3
4
5
6
7
8
30
15
8
4
2
1
92
104
116
136
160
196
252
352
184
208
236
272
320
392
504
708
372
416
472
544
644
788
1012
1420
748
836
944
1092
1292
1576
2028
2840
1496
1672
1892
2184
2584
3156
4060
5684
2992
3344
3788
4372
5168
6316
8120
11368
30
15
8
4
2
1
184
208
236
272
320
392
504
708
372
416
472
544
644
788
1012
1420
748
836
944
1092
1292
1576
2028
2840
1496
1672
1892
2184
2584
3156
4060
5684
2992
3344
3788
4372
5168
6316
8120
11368
5984
6688
7580
8744
10336
12632
16244
22740
30
15
8
4
2
1
252
296
352
444
592
708
888
1012
504
592
708
888
1184
1420
1776
2028
1012
1184
1420
1776
2368
2840
3552
4060
2028
2368
2840
3552
4736
5684
7104
8120
4060
4736
5684
7104
9472
11368
14212
16244
8120
9472
11368
14212
18952
22740
28424
32492
HD1
FPS
Quality
1
2
3
4
5
6
7
8
CIF
FPS
Quality
1
2
3
4
5
6
7
8
32492 hours = 3 years, 8 months, & 18 days of constant 24 hour recording
Page 17 of 96
Radio Engineering Industries, Inc.
640370 -- Rev B -- 12/14/2007
Digital BUS-WATCH® R1001 / R4001
USB Security Lockout
HDD
REAR VIEW
USB
PORT
(B)
GREEN
DOT
NOTE LOCK
POSITION
USB
2.0 PORT
(A)
PENTIUM COMPUTER
USB A-B CABLE
Figure 10: Hard Disk Drive Module USB Security Lockout
The REI Removable Hard Drive Module comes with an enhanced security feature
that allows the property to lock out the USB port on the back of the module. This is
shown above in Figure 10. This feature provides another level of protection to ensure
that information stored on the drive will not be tampered with or erased. When the key
lock on the back of the DVR is switched into the green dot position, the USB port
functions normally and the hard drive will be recognized by a PC as an external USB
hard drive. When the key lock is switched into the red dot position, the USB port is
disabled and a computer will not be able to access the files stored on the drive.
Regardless of the position of the key lock switch, the DVR is always able to access the
drive, so the switch can be left in the red dot (USB off) position during normal DVR
operation with no adverse effects. In this situation, the hard drive USB keys can be
safely kept with the proper personnel for added assurance of video evidence integrity.
Page 18 of 96
Radio Engineering Industries, Inc.
640370 -- Rev B -- 12/14/2007
Digital BUS-WATCH® R1001 / R4001
Automatic Hard Drive Heater
In order to prevent the possibility of hard-drive damage during cold periods,
the Digital BUS-WATCH® is equipped with a temperature sensor. The heater is
activated when the temperature is below 40° F and the Digital BUS-WATCH® is
turned on via system switch or timer. The red LED labeled HTR on the front panel
indicates this. The colder the temperature, the longer the heater remains on, with a
maximum of fifteen minutes at the coldest temperatures. When the unit has completed
its heating cycle, it will restart and operate normally. As the temperature inside the
unit drops during operation, the heater will periodically come on to maintain a
working operating temperature. The unit can operate to temperatures below -40° F.
The menus and the installer’s mode are still operational during the initial drive
warming period.
Long Term Storage
Although the Digital BUS-WATCH® systems draw very little current in the
stand-by mode, if the systems are installed but not used for an extended period of time
(longer than 2 weeks) it is recommended that the power be disconnected from the
DVR to avoid draining the vehicle battery. The DVR internal clock will hold time and
date for up to 10 years sitting on a shelf, and the daylight saving time functions will
kick in upon re-initialization when power is applied.
Page 19 of 96
Radio Engineering Industries, Inc.
640370 -- Rev B -- 12/14/2007
Digital BUS-WATCH® R1001 / R4001
Installation
WARNING
DISCONNECT VEHICLE BATTERY VOLTAGE BEFORE INSTALLING
SYSTEM WIRING
WARNING
DISCONNECT POWER TO THE DIGITAL BUS-WATCH® BEFORE
JUMP STARTING VEHICLE
WARNING
INSTALL DVR HORIZONTALLY. USE EXTERNAL SHOCK AND
VIBRATION DAMPENING IF NEEDED.
System Wiring – Power and Camera Cables
Note: All cables should be hidden from view.
For the basic system (shown in Figure 11 on Page 21), there are five cables, one
power (P/N 512002 – 16 Feet, or 512001 – 35 Feet) and 4 camera (P/N 510993 or any
different length cable). For external record indication and alarm/event marking, the
record indicator / event mark button harness (P/N 511986) is available (shown in Figure
12 on Page 22). The GPS harness (P/N 710144) is used for satellite location and
movement information (shown in Figure 13 on Page 23). For additional vehicle
monitoring, the BUS-WATCH® vehicle sensor options harness (P/N 512008) is
available (shown in Figure 15 on Page 24).
Connect the camera(s) using cable P/N 510781, or equivalent. There is no specific
orientation for camera cables to be installed. If multiple types of cameras are installed in
a single system, be careful to note which cameras are located where. Use lenses with
more magnification (8mm) to bring objects closer. Use lenses with less magnification
(4mm) for wide angle viewing.
Connect power using cable P/N 512002, or equivalent. The black wire connects to
the negative terminal of the battery. The white wire (labeled 12V Battery) connects
directly to the positive terminal of the battery. The white wire should be fused at 10
Page 20 of 96
Radio Engineering Industries, Inc.
640370 -- Rev B -- 12/14/2007
Digital BUS-WATCH® R1001 / R4001
Amps if using a 7 or more camera system with a Quad Video Processor (P/Ns
700483 or 700848). See Figure 11.
Connect Camera Switching Devices (P/N 700462 or 710030) as needed for
multiple camera systems.
IF THE SYSTEM OPERATES IN THE MANUAL RECORD MODE, connect
the red wire (labeled 12V SW), to the switched side of the ignition switch. The red wire
should be fused at 1 A. The red wire does not need to be connected if the system is in
TIMER record mode.
System Wiring
*SWITCH MAY BE VEHICLE IGNITION
OR USER INSTALLED TOGGLE SWITCH
*IGN
TO BATTERY
VIA IGN SWITCH
TO BATTERY
(UNSWITCHED)
RED
WHT
POWER CABLE
BLK
*710134
POWER 4 CH DIGITAL BUS-WATCH
*Connect WHITE wire DIRECTLY to the positive
terminal of the battery.
*Connect BLACK wire DIRECTLY to the negative
terminal of the battery.
ICP
L
POWER
C
FC
REAR
VIEW
TRIGGER
ACC
GPS
SENSORS
CAM1
CAM2
CAM3
CAM4
R
AUDIO OUT
VIDEO
OUT
CAM1 2 3 4
CAMERAS
CAMERA CABLES
Note: White wire fused @ 7A (1-6 Cameras), 10A for more cameras; Red wire fused @ 1A.
Figure 11: System Wiring – Power and Camera Cables
Page 21 of 96
Radio Engineering Industries, Inc.
640370 -- Rev B -- 12/14/2007
Digital BUS-WATCH® R1001 / R4001
External Record Indicator / Event Mark Button Harness
710131 or 710134
DIGITAL BUS-WATCH R
ICP
L
POWER
C
FC
TRIGGER
ACC
GPS
SENSORS
CAM1
CAM2
CAM3
TRIGGER
CAM4
R
AUDIO OUT
VIDEO
OUT
REAR
VIEW
20 FT.
511986
ALARM/PANIC CABLE
ALSO AVAILABLE: 512023 40 FT. (AFTERMARKET)
512024 20 FT. (OEM)
512025 40 FT. (OEM)
Figure 12: External Record Indicator / Event Mark Button Harness Connection
The optional Digital BUS-WATCH® external record indicator / event mark
button harnesses come in 2 different types of switches, both in 2 different lengths.
Reference the Digital BUS-WATCH® systems related part numbers – system harnesses
section of this manual on Page 89 for specific part numbers. The 2 types of switches are
OEM and aftermarket. The OEM switch is rectangular and fits into a standard size
dashboard knockout. The aftermarket switch is round, for easier installation in vehicles
without spare switch knockouts. All of the cables plug into the same port on the back of
the DVR. See Figure 12 for connection illustration.
Page 22 of 96
Radio Engineering Industries, Inc.
640370 -- Rev B -- 12/14/2007
Digital BUS-WATCH® R1001 / R4001
GPS Antenna Module Harness
710131 or 710134
DIGITAL BUS-WATCH R
ICP
L
POWER
C
FC
TRIGGER
ACC
GPS
SENSORS
GPS
710144
CAM1
CAM2
CAM3
CAM4
R
AUDIO OUT
VIDEO
OUT
REAR
VIEW
GPS RECEIVER
Figure 13: GPS Antenna Module Harness Connection
The optional Digital BUS-WATCH® GPS antenna module harness plugs into the
back of the DVR as shown in Figure 13 above. This module will track up to twelve
satellites at a time while providing one-second navigation updates at low power
consumption. The GPS antenna module is housed in a black, water-resistant case and
designed to withstand rugged operating conditions. Information provided to the DVR
system includes longitude, latitude, speed, heading, date, and time. Internal memory
backup allows the GPS antenna module to retain critical data such as satellite orbital
parameters, last position, date, and time, to reduce valid data acquisition time.
When the GPS System is recognized by the DVR, a notification icon will appear
on the DVR video outputs to allow the installer or end user to verify proper operation.
See Figure 14 below.
Figure 14: GPS Notification Icon
Page 23 of 96
Radio Engineering Industries, Inc.
640370 -- Rev B -- 12/14/2007
Digital BUS-WATCH® R1001 / R4001
Vehicle Sensor Options Harness
FROM
FLASHER
710131 or 710134
DIGITAL BUS-WATCH
FROM
FLASHER
FROM
FLASHER
ICP
L
POWER
C
FC
REAR
VIEW
TRIGGER
ACC
GPS
SENSORS
CAM1
CAM2
CAM3
CAM4
FROM
FLASHER
R
AUDIO OUT
VIDEO
OUT
FROM
FLASHER
SENSORS
(OPTIONAL) Vehicle Sensor Options
Harness (Shown as School Bus)
FROM BRAKE
PEDAL SWITCH
Figure 15: Vehicle Sensor Options Harness Connection
The BUS-WATCH® Vehicle Sensor Options Harness (shown in Figure 15 above)
connects to various locations in the vehicle to provide on-screen information regarding
vehicle performance. Vehicles have different sets of signals that can be monitored.
Three levels of on-screen displays are available to the installer: SCHOOL BUS,
TRANSIT, and CUSTOM.
The default SCHOOL BUS monitored points in the vehicle are:
•
•
•
•
•
•
•
Vehicle speed
Brake activation
Amber warning lamp operation
Red warning lamp operation
Stop arm lamp operation
Front and Back Doors
Turn Signals
The default TRANSIT monitored points in the vehicle are:
•
•
•
Vehicle speed
Brake activation
Warning lamp operation (de-acceleration lights)
Page 24 of 96
Radio Engineering Industries, Inc.
640370 -- Rev B -- 12/14/2007
Digital BUS-WATCH® R1001 / R4001
•
•
•
•
Turn signals
Front door switch operation
Back door switch operation
Optional point with Auxiliary (Aux 1 is user-defined and may be used to
monitor points such as wheelchair lifts, inertia sensors, etc.)
The CUSTOM vehicle sensor option allows for most other situations. The
letters that appear on the screen are settable through the menu system. The default
settings are blank.
When using these options, the DEFAULT condition is that the Digital BUSWATCH® considers a low voltage (or ground) the OFF state. A high voltage (515 VDC) is interpreted as the ON state. To switch the polarity of these signals,
reference the Vehicle Sensor Levels Options menu page as shown in Figure 71 on
Page 70.
Speedometer Harness Wiring Instructions
Refer to the vehicle service manual for speedometer type, exact wire
location, and transmission manufacturer warnings.
The BUS-WATCH® speedometer input wires are designed to be spliced directly
onto the transmission speedometer transducer wires. In some installations, this may not
be possible (i.e. mechanical speedometer, transmission manufacturer warnings, etc.). The
BUS-WATCH® Vehicle Speed Sensor Kit (P/N 750086) may be required.
Vehicle Sensor Options Harness Vehicle Connections
(Shown as School Bus)
WIRE COLOR
BLACK
BROWN
RED
ORANGE
YELLOW
GREEN
BLUE
VIOLET
WIRE DESCRIPTION
RED WARNING LAMP
YELLOW WARNING LAMP
LEFT TURN SIGNAL
RIGHT TURN SIGNAL
STOP ARM
BRAKES
FRONT DOOR
REAR DOOR
Page 25 of 96
Radio Engineering Industries, Inc.
640370 -- Rev B -- 12/14/2007
Digital BUS-WATCH® R1001 / R4001
Yellow Warning Lamps
Connect the BROWN wire to the Warning Lamp Flashers’ Yellow lamp output.
Red Warning Lamps
Connect the BLACK wire to the Warning Lamp Flashers’ Red lamp output.
Stop Arm Lamps
Connect the YELLOW wire to the switched side of the top stop arm lamp.
Brake Lamp
Connect the GREEN wire to the switched side of one brake lamp.
Turn Signals
Connect the RED and ORANGE wires to the left and right turn signal lamps.
Front and Back Doors
Connect the BLUE and VIOLET wires to the switched side of the door switches.
On-Screen Information with Vehicle Sensor Options Harness
The Digital BUS-WATCH® Surveillance system, when equipped with the BUSWATCH® Option Harness, will display information on-screen in the Installers Mode
when the vehicle’s monitored switches are activated and signals are applied to the
monitored sensors.
ACTIVE SWITCH OR SIGNAL
BRAKE APPLIED
STOP ARM DEPLOYED
YELLOW WARNING LAMPS ON
RED WARNING LAMPS ON
LEFT TURN SIGNAL ON
RIGHT TURN SIGNAL ON
FRONT DOOR OPEN
REAR DOOR OPEN
SPEEDOMETER
(SEE NOTE 1)
ON-SCREEN DISPLAY
BR
SA
YW
RW
LT
RT
FD
RD
XX MPH
NOTE:
1.
The XXs represent the vehicle speed (i.e. 35).
Page 26 of 96
Radio Engineering Industries, Inc.
640370 -- Rev B -- 12/14/2007
Digital BUS-WATCH® R1001 / R4001
Accelerometer Module Harness
710131 or 710134
DIGITAL BUS-WATCH R
ICP
L
POWER
C
FC
TRIGGER
ACC
GPS
SENSORS
CAM1
ACC
CAM2
CAM3
CAM4
R
AUDIO OUT
VIDEO
OUT
REAR
VIEW
710143
ACCELEROMETER MODULE
Figure 16: Accelerometer Module Harness Connection
The optional external Accelerometer, or Inertia Sensor, must be hard mounted to
the vehicle floor, frame, or some other non-dampened part of the vehicle. The reason for
this is so that if external dampening is used for the DVR, it will not throw off the
Accelerometer readings.
To properly install the Accelerometer Module, the user must align the device with
the picture on top of the module as shown in Figure 17 below. The X axis is drawn from
the back to the front of the bus, the Y axis is drawn from the side of the bus to the other
side of the bus, and the Z axis is drawn from the bottom to the top of the bus. The
Accelerometer Module then needs to be calibrated as shown in Figure 80 on Page 79.
Figure 17: 3 Axis Inertia Sensor Directions
Page 27 of 96
Radio Engineering Industries, Inc.
640370 -- Rev B -- 12/14/2007
Digital BUS-WATCH® R1001 / R4001
Physical Mounting Requirements
L Bracket Mounting
Figure 18: L Bracket Floor Mounting
The DVR has 3 holes on each side for easy mounting with the included L
Brackets, as shown in Figure 18 above. The mounting holes are positioned so that the L
Brackets can be flipped for a hanging mount installation if necessary, required, etc. This
type of installation is recommended for vehicles that have a secured compartment, such
as a radio box, where the DVR cannot be tampered with.
Page 28 of 96
Radio Engineering Industries, Inc.
640370 -- Rev B -- 12/14/2007
Digital BUS-WATCH® R1001 / R4001
Security Cabinet Mounting
There may be installations that require the DVR be enclosed in its own protective
enclosure. The R1001 and R4001 DVRs can be installed in REI’s industrial grade
security cabinet (P/N 710133) as shown in Figure 19 below.
Figure 19: REI’s Industrial Grade DVR Security Cabinet
Page 29 of 96
Radio Engineering Industries, Inc.
640370 -- Rev B -- 12/14/2007
Digital BUS-WATCH® R1001 / R4001
Security Cabinet Clearance Requirements
When using the DVR Protective Enclosure (P/N 710133) the Installers need to
ensure the correct amount of open space in front of the installation so that the DVR may
be removed from the slide bracket, as shown in Figure 20 below.
TOP VIEW
9.00 IN.
15.50 IN.
15.50 IN.
Figure 20: Physical Mounting Clearance Requirements
Page 30 of 96
Radio Engineering Industries, Inc.
640370 -- Rev B -- 12/14/2007
Digital BUS-WATCH® R1001 / R4001
Security Cabinet Hanging Mount
SEAT FRAME
(1 IN. DIA TUBE)
USE REI HARDWARE PACK
#060113 TO MOUNT BRACKET
UNDER-SEAT
540857
MOUNT BRACKET
SLIDE RAILS
ON TOP
Figure 21: Security Cabinet Under-Seat Mount
There are two common ways to mount the Digital BUS-WATCH® Security
Cabinet. First is the under-seat, or hanging, method. This method mounts the slide
bracket to the underside of a seat as shown in Figure 21 above. Second is the floormount method. This method mounts the Digital BUS-WATCH® to the floor of the bus
as shown in Figure 23 on Page 33.
1) Find a suitable location under the first seat behind the driver or under the driver’s
seat. An area 15-1/2 inches should be unobstructed in front of the slide bracket to
allow sliding the security cabinet onto the slide bracket.
2) If necessary, modify the slide rails according to the instructions on Page 32.
3) Position the slide bracket on the frame of the seat in the desired location. Firmly
secure to the seat either by using clamps or drilling 5/16th inch holes through the
frame using the bracket as a guide.
4) Attach slide bracket to clamps or seat frame using nuts and bolts.
IMPORTANT:
Check local, state, and federal guidelines as to
modification of the existing structures within the vehicle.
Page 31 of 96
Radio Engineering Industries, Inc.
640370 -- Rev B -- 12/14/2007
Digital BUS-WATCH® R1001 / R4001
Security Cabinet Mount Conversion
SLOTS FACE
OUTWARD
TOP
BOTTOM
Figure 22: Security Cabinet Mount Conversion
To change the protective enclosure from Hanging Mount to Floor Mount, remove
the 8 thread protection caps from the bottom side of the Security Cabinet. Next, reverse
the placement of the slide rails and screws from top to bottom of the Digital BUSWATCH® Security Cabinet. Put the 8 thread protection caps into the 8 holes on top of
the enclosure.
Page 32 of 96
Radio Engineering Industries, Inc.
640370 -- Rev B -- 12/14/2007
Digital BUS-WATCH® R1001 / R4001
Security Cabinet Floor Mount
SLIDE RAILS ON
BOTTOM OF LOCK BOX
USE REI HARDWARE PACK
#060094 TO MOUNT
BRACKET ON THE FLOOR
540857
MOUNT BRACKET
RUBBER
MOUNTS
Figure 23: Security Cabinet Floor Mounting
Find a suitable location to mount the slide bracket on the floor. The Digital BUSWATCH® should not present a trip hazard or head impact hazard and should not
interfere with the seating, safety, or comfort of the passengers.
1) An area 15 and 1/2 inches should be unobstructed in front of the slide bracket to
allow sliding the Digital BUS-WATCH® onto the bracket.
2) Position the slide bracket on the floor and drill four 3/16th inch holes into the
floor using the mounting holes as a guide.
3) Set aside the slide bracket. Position four rubber shock mounts over the pilot holes.
4) Place the slide bracket over the rubber shock mounts. Align the mounting holes to
the center of the shock mounts.
5) Secure slide bracket to the floor using four lag bolts.
6) Carefully slide the cabinet onto the slide bracket being sure to check alignment of
the connector. Lock to secure.
Page 33 of 96
Radio Engineering Industries, Inc.
640370 -- Rev B -- 12/14/2007
Digital BUS-WATCH® R1001 / R4001
Camera Placement
The Digital BUS-WATCH® cameras can be mounted anywhere in the vehicle,
unless this does not give a stable mount or it vibrates excessively. Use outdoor cameras
for exterior placement.
Figure 24: Camera Connection and Placement
For a single camera installation, it is common to place the camera in the front of
the vehicle looking towards the rear of the vehicle. The Digital BUS-WATCH® camera
shown in Figure 24 above is mounted to the center of the front header panel.
Page 34 of 96
Radio Engineering Industries, Inc.
640370 -- Rev B -- 12/14/2007
Digital BUS-WATCH® R1001 / R4001
Figure 25: Potential Single and Two Camera Placement Options
Page 35 of 96
Radio Engineering Industries, Inc.
640370 -- Rev B -- 12/14/2007
Digital BUS-WATCH® R1001 / R4001
4 CAMERAS
INTERIOR
4 CAMERAS
EXTERIOR
Figure 26: Potential Multiple Camera Placement Options
Page 36 of 96
Radio Engineering Industries, Inc.
640370 -- Rev B -- 12/14/2007
Digital BUS-WATCH® R1001 / R4001
Typical Camera Lens Viewing Angles
Figure 27: 4mm Lens Angles
Page 37 of 96
Radio Engineering Industries, Inc.
640370 -- Rev B -- 12/14/2007
Digital BUS-WATCH® R1001 / R4001
Figure 28: 8mm Lens Angles
Page 38 of 96
Radio Engineering Industries, Inc.
640370 -- Rev B -- 12/14/2007
Digital BUS-WATCH® R1001 / R4001
Recording & Playback
System Start-Up
To start the recording process, place the system switch in the ON
position (this will be done automatically if the system switch is connected to
the ignition switch and the ignition switch is in the ON position). Upon turning
the system switch ON, the Digital BUS-WATCH® will commence recording.
System Shut-Down
To stop the recording process, place the system switch in the OFF
position. If the OFF DELAY option is enabled, the Digital BUS-WATCH®
will continue to record for the prescribed number of minutes. When the offdelay expires, the camera and Digital BUS-WATCH® shut off.
Page 39 of 96
Radio Engineering Industries, Inc.
640370 -- Rev B -- 12/14/2007
Digital BUS-WATCH® R1001 / R4001
Playback Options
There are 4 main ways to view the recorded video. The connection options are:
through the TV Video Outputs (Front or Back), through the Removable Hard Drive USB
Connection, through the Front Panel USB Connection, and through the Front Panel PC
Network Connection.
TV Video Outputs (Front and Back)
Using a TV Monitor and a Remote Control, the user can access recorded
video files by Date and Time or by Event. After selecting the appropriate file, the
user can review the video using Play, Stop, Pause, Fast Forward, Fast Rewind,
Slow Forward, Slow Rewind, Frame Forward, and Frame Reverse. The user can
select individual video channels to be displayed full screen by pressing the
numeric button on the remote corresponding to that channel, or view all channels
at the same time by pressing the zero button on the remote.
Removable Hard Drive USB Connection
Using the REI RMS PC Software, the user can access the files by
connecting the computer to the Removable Hard Drive Module Back Panel USB
port as shown in Figure 10 on Page 18.
Front Panel USB Connection
Using the REI RMS PC Software, the user can access the files by
connecting the computer to the DVR Front Panel USB port.
PC Network Connection
Using the REI RMS PC Software, the user can access the files by
connecting the computer to the DVR Front Panel Ethernet port, as shown in
Figure 29 below.
DIGITAL BUS-WATCH DVR
PWR
ETHERNET
USB 2.0
HTR
CAM1 CAM2 CAM3 CAM4
REC
HDD FAULT HDD
FULL
R
L
AUDIO OUT
VIDEO
OUT
FRONT
VIEW
ETHERNET
PORT
PC
NETWORK CROSSOVER CABLE
530068 OR EQUIVALENT
Figure 29: Connecting to the DVR with a Computer through the Ethernet Connection
Page 40 of 96
Radio Engineering Industries, Inc.
640370 -- Rev B -- 12/14/2007
Digital BUS-WATCH® R1001 / R4001
Menu Configuration
Installers Mode Page
Figure 30: Installers Mode Screen Shot
The Installers Mode Page is a display that is brought up and taken away by
pressing the ENTER button on the remote control and is displayed on the video output
RCA ports. The purpose of this on-screen text overlay mode is to give the installers an
easy way to see some of the important information relating to the proper installation of
the DVR. Any of the vehicle sensor options that are being currently activated, such as
brakes or turn signals, would display on the screen in this mode. No text placed over the
screen, either in this mode or any other, is ever recorded to the video. All of the data
associated with the video is digitally embedded into the video frames, creating a
proprietary format that requires REI PC Software to decode and display.
Page 41 of 96
Radio Engineering Industries, Inc.
640370 -- Rev B -- 12/14/2007
Digital BUS-WATCH® R1001 / R4001
Main Menu Page
Figure 31: Main Menu Screen Shot
The DVR Configuration Menu can be accessed by pressing the SETUP button on
the remote control. Using the UP, DOWN, and ENTER buttons on the remote control,
the user can access all of the different options of the DVRs. SYSTEM SETUP is where
all of the various record configuration settings can be viewed or set. TIME/DATE
SEARCH is where the user can play back video by choosing the specific Time and Date
they would like to view. EVENT SEARCH allows the user to select video playback by
pre-defined event triggers. ADVERTISING shows all of the files that have been put on
the Hard Disk Drive Module for playback during recording. MOVIES and MUSIC also
show the files that have been put onto the HDD Module and are the access points for the
user to select playback during recording.
Page 42 of 96
Radio Engineering Industries, Inc.
640370 -- Rev B -- 12/14/2007
Digital BUS-WATCH® R1001 / R4001
System Setup
This Section, SYSTEM SETUP, describes where all of the various record
configuration settings can be viewed or set using a video monitor and a remote
control.
The SYSTEM SETUP Section of the Menu is subdivided into 5 main
categories, SYSTEM, CAMERA, SCHEDULE, EVENT SETUP, and SYSTEM
INFO.
System
Figure 32: System Setup Screen Shot
The SYSTEM Section of the SYSTEM SETUP Sub-Menu is subdivided
into 11 subcategories, DATE/TIME, GENERAL, HDD FORMAT, NETWORK,
SERVER SETUP, SECURITY, USB MODE, DRIVER INFO, AUDIBLE
ALERTS, DEFAULT SETUP, and CONFIG SETUP.
Page 43 of 96
Radio Engineering Industries, Inc.
640370 -- Rev B -- 12/14/2007
Digital BUS-WATCH® R1001 / R4001
Date/Time
Figure 33: System – Date/Time Screen Shot
The DATE/TIME subsection of the SYSTEM Sub-Menu presents the user
configurable options for setting the Date and the Time. All REI DVRs use high
accuracy, extended temperature range Real Time Clocks with 10 year internal
battery backup for consistent and reliable time keeping over the life of the DVR
system. Using the arrow, enter, and numeric buttons (as shown in Figure 6 on
Page 12 and Figure 7 on Page 13) on the remote control, the user can change
these settings.
The first line in this subsection gives the user a place to manually enter the
date and also to change the format of the date as it appears on the OSD overlay of
the video feed-through.
The second line allows the user to manually change the time and the time
display format from AM/PM to 24 Hour.
TIME SYNC SOURCE allows the user to use a time synchronization
system, either GPS, or NTP (Network Time Server), or NONE.
SYNC TIME gives the option to set a specific time.
Page 44 of 96
Radio Engineering Industries, Inc.
640370 -- Rev B -- 12/14/2007
Digital BUS-WATCH® R1001 / R4001
Date/Time (continued)
GMT OFFSET is for use with the GPS and TIME SYNC, as GPS satellite
time comes in as GMT and needs to be offset for your time zone for proper
automatic time synchronization.
DST, when set to Yes, will make the system clock change automatically
with Daylight Saving Time. If your region does not use Daylight Saving Time,
setting this item to No disables the Daylight Saving Time function.
DST MODE can be changed from AUTO to CUSTOM. The Energy
Policy Act of 2005 changed the time change dates for Daylight Saving Time in
the U.S. DST begins on the second Sunday of March and ends the first Sunday of
November. Because Congress retains the right to revert Daylight Saving Time
back to the 1986 time schedule, certain real-time clock embedded systems need to
have the ability to be changed. Figure 33 shows the default Daylight Saving Time
settings sanctioned by the EPA of ‘05. The DST Mode can be set from ‘AUTO’ to
‘CUSTOM’. When the DST Mode is set to ‘AUTO’, the Daylight Saving Time
triggers will conform to the EPA of ’05 rules. When the DST Mode is set to
‘CUSTOM’, the Daylight Saving Time triggers can be changed to any of the first,
second, third, fourth, or last week of any month, not overlapping, as shown in
Figure 34 below.
Figure 34: Custom DST Triggers
Page 45 of 96
Radio Engineering Industries, Inc.
640370 -- Rev B -- 12/14/2007
Digital BUS-WATCH® R1001 / R4001
General
Figure 35: System – General Screen Shot
UNIT ID: the identification number of the DVR is changeable. This is used in
conjunction with the Security Function as shown in Figure 42 on Page 51.
VIDEO TYPE: can be changed to either NTSC or PAL.
RECORD FILE SIZE: selectable to 15 or 30 minutes.
HDD OVERWRITE: when set to YES, the DVR overwrites the hard drive, first
in, first out, as the DVR needs more room for storage. When this is set to NO, the
DVR will write once and then stop, lighting the HDD FULL LED on the face of
the DVR. When this setting is set to NO, the user must manually delete files off
the hard drive, or format the drive for more record time.
RECORD MODE can be set to IGNITION, TIMERS, IGN or TIMER, and IGN
and TIMER. The record timers are set in the SCHEDULE section as shown in
Figure 69 on Page 68.
Page 46 of 96
Radio Engineering Industries, Inc.
640370 -- Rev B -- 12/14/2007
Digital BUS-WATCH® R1001 / R4001
SHUTDOWN DELAY: the number of hours and minutes the DVR will continue
recording after the RECORD MODE expires.
IDLE TIME: how long the DVR will stay in the menus before timing out. This
feature ensures that the advertising media (if applicable) will always play during
routes, even if the last user of the DVR did not exit out of the menus.
HDD Format
Figure 36: System – Hard Disk Format – Start Screen Shot
HDD FORMAT: the user can completely erase the video and audio files off of the
DVR. The HDD FORMAT function will rebuild the basic directory structure of the drive
to allow for continued and immediate recording of audio and video. All advertising,
movies, and music will also be erased from the drive if this is executed.
Page 47 of 96
Radio Engineering Industries, Inc.
640370 -- Rev B -- 12/14/2007
Digital BUS-WATCH® R1001 / R4001
HDD Format (continued)
Figure 37: System – Hard Disk Format – Are You Sure? Screen Shot
Figure 38: System – Hard Disk Format – Formatting HDD Screen Shot
Figure 39: System – Hard Disk Format – Formatting Successful Screen Shot
Page 48 of 96
Radio Engineering Industries, Inc.
640370 -- Rev B -- 12/14/2007
Digital BUS-WATCH® R1001 / R4001
Network
Figure 40: System – Network Screen Shot
In the NETWORK subsection of the SYSTEM section, the user can
change the network address settings of the DVR. Contact your system
administrator or IT department for a suitable network addressing format.
IP ADDRESS: the IP address of the DVR
MASK: the net mask of the DVR
GATEWAY: the gateway address on the local network
CENTER IP: the IP address of the central server
PORT: the corresponding port of the central server
CLIENT PORT: the corresponding port of the DVR
Page 49 of 96
Radio Engineering Industries, Inc.
640370 -- Rev B -- 12/14/2007
Digital BUS-WATCH® R1001 / R4001
Server Setup
Figure 41: System – Server Setup Screen Shot
In the SERVER SETUP subsection of the SYSTEM section, the user can
change the network address settings for the Network Server. Work with your
System Administrator or IT Department for a suitable network addressing scheme.
MEDIA SERVER IP: the IP address of the Media Server
CONTROL PORT: the control port of the Media Server
DOWNLOAD PORT: the download port of the Media Server
NTP IP: the IP address of the Network Time Synchronization Server
AUTO DOWNLOAD SERVER IP: the address of the Download Server
CONTROL PORT: the control port of the Download Server
DOWNLOAD PORT: the download port of the Download Server
Page 50 of 96
Radio Engineering Industries, Inc.
640370 -- Rev B -- 12/14/2007
Digital BUS-WATCH® R1001 / R4001
Security
Figure 42: System – Security Screen Shot
In the SECURITY subsection of the SYSTEM section, the user can
configure the DVR menus to only be accessed by password. There are 3 levels of
security: USER, ADMIN, & REI.
The USER password allows a user to access the main menu as shown in
Figure 31 on Page 42, but will not allow the user to access any of the SYSTEM
SETUP pages as shown in Figure 32 on Page 43. This would be useful for a user
who needs to use the remote control to play movies or music, but not to change
any of the recorder settings.
The ADMIN password allows the user to gain full access to all the menus,
as if there were no password protection.
The REI password is used by REI service personnel to gain access to the
menus during any field service work or repairs. The REI password cannot be
changed through the menu configuration pages and will not be given out to end
users. However, the DVRs can be sent in to REI for password resetting.
To enable password security protection, the person configuring the DVR
must enter the password twice. If the passwords are not entered correctly, the
person configuring the DVR will see an error message, as shown in Figure 43 on
Page 52.
Page 51 of 96
Radio Engineering Industries, Inc.
640370 -- Rev B -- 12/14/2007
Digital BUS-WATCH® R1001 / R4001
Security (continued)
Figure 43: Security Password Setting Error Message
When the DVR is password enabled, the user will see a password prompt
when trying to access the menu system, as shown in Figure 44 below. If the user
enters the wrong unit ID or password, the user will see an error message towards
the bottom of the screen, as shown in Figure 45 and Figure 46 below. If the
operator password is entered correctly, the user will see an affirmation message
towards the bottom of the screen, as shown in Figure 47 below. If the
administrator password is entered correctly, the user will see an affirmation
message towards the bottom of the screen, as shown in Figure 48 below.
Figure 44: Security Password Screen Shot
Figure 45: Security DVR Unit ID Error Message
Figure 46: Security DVR Password Error Message
Figure 47: Security DVR Operator Password Correct Message
Figure 48: Security DVR Administrator Password Correct Message
Page 52 of 96
Radio Engineering Industries, Inc.
640370 -- Rev B -- 12/14/2007
Digital BUS-WATCH® R1001 / R4001
USB Mode
Figure 49: System – USB Mode – Device Mode Screen Shot
USB MODE: There are two options available with the USB operation: Device
mode and Host mode.
DEVICE MODE: The DEVICE MODE allows a PC (or laptop PC) to connect to
the DVR via USB cable. Once connected, the drive appears as a regular hard
drive to the computer. Normal Windows operations could be performed (example:
download the recorded data from the unit to the computer hard drive, upload
advertisement clips from the computer to the DVR, etc). The DVR will present 2
drives to the computer: the removable hard drive, and an internal compact flash
slot. Make sure your computer has enough drive letters available for this or you
may not be able to see the drives. Contact your system administrator or IT
department for help with drive letters. For a complete file description of the DVR
hard drive layout, please reference Figure 9 on Page 16.
NOTE for USB Operation: To maintain a live connection between the Windows
PC and the DVR via USB cable, the device mode menu screen needs to stay
active. Exiting the option will interrupt the connection.
Page 53 of 96
Radio Engineering Industries, Inc.
640370 -- Rev B -- 12/14/2007
Digital BUS-WATCH® R1001 / R4001
USB Mode (continued)
Figure 50: System – USB Mode – Host Mode Screen Shot
HOST MODE: HOST MODE allows an external USB flash drive to be
connected. Once the connection is established, the contents of the jump drive can
be uploaded to the DVR hard drive. For a description of the files and folders on
the hard drive module, please reference Figure 9 on Page 16.
To upload files from the USB flash drive, select APPLY. Depending on
how big, or how many files on the flash drive, it may take a few minutes for the
DVR to access the flash drive. After the DVR accesses the flash drive, the DVR
needs to upload the files, as shown in Figure 51 on Page 55. After the DVR
uploads the files, a list of the files and folders on the flash drive will appear on the
screen, as shown in Figure 52 on Page 55. After using the up and down arrow
buttons to choose the file, use the right arrow to bring up the file destination
options, as shown in Figure 53 on Page 56. The DVR will then upload the file,
giving the user status messages, as shown in Figure 54 and Figure 55 on Page 56.
When done uploading the desired files, press the EXIT key on the remote control.
The DVR will then restart. Upon restarting, a series of affirmation messages will
appear, as shown in Figure 56 on Page 56.
Page 54 of 96
Radio Engineering Industries, Inc.
640370 -- Rev B -- 12/14/2007
Digital BUS-WATCH® R1001 / R4001
USB Mode (continued)
Figure 51: USB Host Mode – Upload Data Screen Shot
Figure 52: USB Host Mode – Flash Drive File List Screen Shot
Page 55 of 96
Radio Engineering Industries, Inc.
640370 -- Rev B -- 12/14/2007
Digital BUS-WATCH® R1001 / R4001
USB Mode (continued)
Figure 53: USB Host Mode – File Destination Screen Shot
Figure 54: USB Host Mode – Copying File Message
Figure 55: USB Host Mode – Copy Successful Message
Figure 56: USB Host Mode – Restart Messages
Page 56 of 96
Radio Engineering Industries, Inc.
640370 -- Rev B -- 12/14/2007
Digital BUS-WATCH® R1001 / R4001
Driver Information
Figure 57: System – Driver Information Screen Shot
COMPANY NAME, VEHICLE NO. and DRIVER/ROUTE NAME (as
shown in Figure 57 above): Use arrow keys to select the option for modification.
Press ENTER at the highlighted line.
The screen will pop up a text entry keyboard as shown in Figure 58 on
Page 58. Use arrows to choose characters and press ENTER to type. Press
APPLY and EXIT to return to the previous menu.
Press EXIT to return to the SETUP list.
Page 57 of 96
Radio Engineering Industries, Inc.
640370 -- Rev B -- 12/14/2007
Digital BUS-WATCH® R1001 / R4001
Driver Information (continued)
Figure 58: Data Entry Keyboard Screen Shot
Page 58 of 96
Radio Engineering Industries, Inc.
640370 -- Rev B -- 12/14/2007
Digital BUS-WATCH® R1001 / R4001
Audible Alerts
Figure 59: System – Audible Alerts Screen Shot
The DVRs come with audible alarm options, as shown in Figure 59 above.
These audible alarms can be configured to on or off. The audible alarm options
are as follows:
CAMERA 1 FAILURE:
CAMERA 2 FAILURE:
CAMERA 3 FAILURE:
CAMERA 4 FAILURE:
SYSTEMS ERROR:
SENSOR TRIGGER:
DISK ERROR:
YES / NO
YES / NO*
YES / NO*
YES / NO*
YES / NO
YES / NO
YES / NO
*NOTE: Cameras 2, 3, & 4 do not appear as options on the R1001 Single
Channel DVR.
Page 59 of 96
Radio Engineering Industries, Inc.
640370 -- Rev B -- 12/14/2007
Digital BUS-WATCH® R1001 / R4001
Default Setup
Figure 60: System – Default Setup – Warning Screen Shot
The DVRs have the option to have all of the configuration settings reset to the
factory defaults. Executing this function is irreversible, and once the settings have been
changed, the user must either manually change the settings using the USB flash drive to
upload the new configuration file, placing the configuration file on the hard drive with
Windows Explorer, or using the PC remote management software to change the
configuration.
To reset the unit to the default settings, select DEFAULT SETUP, then select
APPLY. The unit will display RESTORING, PLEASE WAIT…as shown in Figure 61
on Page 61. Once this message disappears, the unit has been reset to the default settings.
Page 60 of 96
Radio Engineering Industries, Inc.
640370 -- Rev B -- 12/14/2007
Digital BUS-WATCH® R1001 / R4001
Default Setup (continued)
Figure 61: System – Default Setup – Restoring Screen Shot
Page 61 of 96
Radio Engineering Industries, Inc.
640370 -- Rev B -- 12/14/2007
Digital BUS-WATCH® R1001 / R4001
Configuration Setup
Figure 62: System – Configuration Setup – Save Successful Screen Shot
The DVRs have the option to have the current configuration settings saved to a
file on the hard drive, as shown in Figure 62 above. The file is named rsconfig.cfg and is
put in the root directory of the hard drive (Reference Figure 9 on Page 16).
Page 62 of 96
Radio Engineering Industries, Inc.
640370 -- Rev B -- 12/14/2007
Digital BUS-WATCH® R1001 / R4001
Camera
Figure 63: Camera Menu Screen Shot
The CAMERA section of the menu is subdivided into 2 main categories,
RECORDing PARAmeters and CAMERA NAME.
Page 63 of 96
Radio Engineering Industries, Inc.
640370 -- Rev B -- 12/14/2007
Digital BUS-WATCH® R1001 / R4001
Recording Parameters
Figure 64: Camera – 4 Camera Recording Parameters Screen Shot
The RECORDing PARAmeters subsection of the CAMERA section allows the
user to change the way the video is compressed before it is recorded to the removable
disk drive module. The parameters of this section are: CHANNEL, RESolution,
QUALITY, FrameRate, AUDIO, and LIVEMODE.
CHANNEL:
RESolution:
QUALITY:
Frame Rate:
AUDIO:
LIVEMODE:
a check represents that this channel will be recorded*
CIF, HD1, D1**
1-8, 1 being the best video quality
1, 2, 4, 8, 15, or 30 frames per second
ON or OFF for audio recording for each channel***
a check represents that this channel will be previewed on the video
monitor output feeds through the front and back video ports of the
DVR.
* Channels 2-4 are not shown on the R1001 Single Channel DVR
** CIF: (360H x 283V), HD1: (720H x 283V), D1: (720H x 486V)
*** Each audio channel is recorded independently
Page 64 of 96
Radio Engineering Industries, Inc.
640370 -- Rev B -- 12/14/2007
Digital BUS-WATCH® R1001 / R4001
Figure 65: Record Parameter Group Resources
The Digital BUS-WATCH® R1001 single channel DVR default settings are for
the best video quality (and least amount of record time) which is configured with a
resolution of D1, a record quality of 1, and a frame rate of 30 FPS, as shown in Figure 66
on Page 66. For the Digital BUS-WATCH® R4001 4-channel DVR, there is a maximum
bandwidth that can affect how the DVR is configured, as shown in Figure 65 above. If
the DVR is set to record at a resolution of D1, the maximum frame rate for each of the 4
cameras is 8 frames per second (or 30 frames composite). If the DVR is set to record at a
resolution of HD1 (or ½ D1), the maximum frame rate for each of the 4 cameras is 15
frames per second (or 60 frames composite). If the DVR is set to record at a resolution of
CIF (or ¼ D1), the maximum frame rate for each of the 4 cameras is 30 frames per
second (or 120 frames composite).
When using the Digital BUS-WATCH® R4001 4-channel DVR with only 3
cameras, the group resources are the same as with 4 cameras. The 3 cameras must
conform to the same group resolution, quality, and frame rate resource pool. However,
record times are longer with any given size hard drive when using 3 cameras as opposed
to 4.
When using the Digital BUS-WATCH® R4001 4-channel DVR with only 2
cameras, the group resources can now be split differently. If the DVR is set to record at a
resolution of D1, the maximum frame rate for each of the 2 cameras is 15 frames per
second. If the DVR is set to record at a resolution of either HD1 or CIF, the maximum
frame rate for both cameras is 30 frames per second, as shown in Figure 67 on Page 66.
Page 65 of 96
Radio Engineering Industries, Inc.
640370 -- Rev B -- 12/14/2007
Digital BUS-WATCH® R1001 / R4001
Figure 66: Camera – 1 Camera Recording Parameters Screen Shot
Figure 67: Camera – 2 Cameras Recording Parameters Screen Shot
Page 66 of 96
Radio Engineering Industries, Inc.
640370 -- Rev B -- 12/14/2007
Digital BUS-WATCH® R1001 / R4001
Camera Name
Figure 68: Camera – Camera Name Screen Shot
The CAMERA NAME subsection of the CAMERA section allows the user to
change the camera on-screen display settings. The parameters of this section are:
CAMERA1, CAMERA2, CAMERA3, CAMERA4, and CLOCK INSERT. Camera
names are entered using the data entry keyboard, as shown in Figure 58 on Page 58. The
names are limited to 8 characters. The CLOCK INSERT function overlays the time and
date across the top of the video feed-through screen coming out of the video output ports
on the front and back of the DVR. The inserted clock overlay is not recorded onto the
video images, but the time and date information is always digitally embedded into the
video frames.
CAMERA1:
CAMERA2:
CAMERA3:
CAMERA4:
CLOCK INSERT:
Camera 1 On-Screen Display Name
Camera 2 On-Screen Display Name*
Camera 3 On-Screen Display Name*
Camera 4 On-Screen Display Name*
ON or OFF
*NOTE: Cameras 2, 3, & 4 do not appear as options on the R1001 Single Channel
DVR.
Page 67 of 96
Radio Engineering Industries, Inc.
640370 -- Rev B -- 12/14/2007
Digital BUS-WATCH® R1001 / R4001
Schedule
Figure 69: System Setup – Schedule Screen Shot
The SCHEDULE section of the menu is where the user can set the times that the
DVR will automatically turn on and shut off. There are 3 subsections of this section:
DATE, SCHEDULE 1, and SCHEDULE 2. The DVR start mode is configured in the
SYSTEM – GENERAL – RECORD MODE section of the SYSTEM SETUP portion of
the menu, as shown in Figure 35 on Page 46.
DATE:
EVERY, SUN, MON, TUE, WED, THU, FRI, SAT, or *****.
SCHEDULE1: Start Time – Stop Time
SCHEDULE2: Start Time – Stop Time
Note: ***** represents a disabled timer slot.
Page 68 of 96
Radio Engineering Industries, Inc.
640370 -- Rev B -- 12/14/2007
Digital BUS-WATCH® R1001 / R4001
Event Setup
EVENT SETUP contains all of the various input settings that the DVR can log or
use to trigger alarms or events.
The EVENT SETUP section of the menu is subdivided into 2 main categories;
SENSOR and EVENT RECORD MODE.
Figure 70: Event Setup – Sensor Screen Shot
The SENSOR subsection of the EVENT SETUP SECTION is subdivided into 3
categories; IO INPUT, ACCELEROMETER, and SPEED, as shown in Figure 70 above.
Page 69 of 96
Radio Engineering Industries, Inc.
640370 -- Rev B -- 12/14/2007
Digital BUS-WATCH® R1001 / R4001
Sensor
IO Input – School Bus
Figure 71: Event Setup – Sensor – IO Input – School Bus Screen Shot
The IO INPUT subsection of the SENSOR section is used to change the vehicle
sensor options that are associated with the vehicle sensor options harness, as shown in
Figure 15 on Page 24, and the event mark / external record indicator harness, as shown in
Figure 12 on Page 22.
The IO INPUT sections are sub-sectioned into 3 main options: SCHOOL BUS, as
shown in Figure 71 above, TRANSIT BUS, as shown in Figure 72 on Page 71, and
CUSTOM, as shown in Figure 73 on Page 72.
The purpose of the 3 main options is ease of setup for the installer. The installer
can wire the vehicle sensor options harness directly for the type of bus in question, or
they can use the CUSTOM settings to wire the bus any way that is appropriate. Using the
CUSTOM setting requires data entry be properly set.
Page 70 of 96
Radio Engineering Industries, Inc.
640370 -- Rev B -- 12/14/2007
Digital BUS-WATCH® R1001 / R4001
IO Input – Transit Bus
Figure 72: Event Setup – Sensor – IO Input – Transit Bus Screen Shot
Each of the SCHOOL BUS, TRANSIT BUS, and CUSTOM screens has 4
settings: NAME, DISPLAY, SET, and ALARM.
NAME:
The name of the signal connected to the DVR. The names of the
signals are entered using the data entry keyboard, as shown in
Figure 58 on Page 58, and are limited to 8 characters.
DISPLAY:
The characters that are displayed on the Installers Mode Page, as
shown in Figure 30 on Page 41. The display characters of the
signals are entered using the data entry keyboard, as shown in
Figure 58 on Page 58, and are limited to 2 characters.
SET:
Active HIGH, active LOW, or OFF for SENSORs 1-8,
N.O. (normally open circuit), N.C. (normally closed), or OFF for
SENSOR 9.
ALARM:
YES or NO
Page 71 of 96
Radio Engineering Industries, Inc.
640370 -- Rev B -- 12/14/2007
Digital BUS-WATCH® R1001 / R4001
IO Input – Custom
Figure 73: Event Setup – Sensor – IO Input – Custom Screen Shot
ACTIVE HIGH:
When set to this state, a voltage above 4 volts (generally 12
volts DC) on the given sensor input is interpreted by the
DVR that the signal is activated; a voltage below 4 volts
(generally 0 volts DC or ground) is interpreted as
inactivated.
ACTIVE LOW:
When set to this state, a voltage below 4 volts (generally 0
volts DC or ground) on the given sensor input is interpreted
by the DVR that the signal is activated; a voltage above 4
volts (generally 12 volts DC) is interpreted as inactivated.
The ACTIVE LOW setting is very useful on certain types of vehicles and
can be used so that (brakes, for example) the Installers Mode Screen says BR
when the brakes are being applied; as opposed to saying BR all the time, until the
brakes are applied.
Page 72 of 96
Radio Engineering Industries, Inc.
640370 -- Rev B -- 12/14/2007
Digital BUS-WATCH® R1001 / R4001
Accelerometer Setup
Figure 74: Event Setup – Sensor – Accelerometer Screen Shot
The ACCELEROMETER subsection of the SENSOR section, shown in
Figure 74 above, is used to calibrate the accelerometer readings coming out of the
accelerometer / inertia sensor harness, as shown in Figure 16 on Page 27.
Because of the varying nature of the installation options, the installer should go to
this page and select CALIBRATE, and then APPLY, to zero out the readings on
the display. This should be done when the vehicle is not moving and the engine is
not running. If properly installed, the accelerometer should read about 1 G in the
Z axis before calibration.
Page 73 of 96
Radio Engineering Industries, Inc.
640370 -- Rev B -- 12/14/2007
Digital BUS-WATCH® R1001 / R4001
Speedometer Setup
Figure 75: Event Setup – Sensor – Speedometer Screen Shot
The SPEEDOMETER subsection of the SENSOR section, shown in Figure 75
above, is used to set speed thresholds and to calibrate the speedometer readings coming
out of the vehicle sensor options harness, as shown in Figure 15 on Page 24.
SOURCE:
SPEED UNIT:
SPEED CAL:
SPD:
P/S:
CALIBRATE:
THRESHOLD:
ENABLE:
SPEED:
ALARM:
VEHICLE or GPS
MPH or KM/H
For calibration of analog speedometer pulses
The target speed of the bus (i.e. 030 MPH)
The number of pulses/second that the DVR is counting
Press ENTER when vehicle is going the set speed
LOW and HIGH speed limits
ON or OFF
Usually set to 0 for tagging stops and to the highest legal
speed limit the vehicle will travel (i.e. 50, 60, 75 MPH)
YES or NO. Alarm set to YES will log file in event search
Page 74 of 96
Radio Engineering Industries, Inc.
640370 -- Rev B -- 12/14/2007
Digital BUS-WATCH® R1001 / R4001
Event Record Mode
Figure 76: Event Setup – Event Record Mode Screen Shot
The EVENT RECORD MODE subsection of the EVENT SETUP
SECTION has 4 options; NON-EVENT RECORD RATE, PRE RECORD, POST
RECORD TIME, and EVENT DURATION, as shown in Figure 76 above. The
EVENT RECORD MODE is an option that allows the user to save on hard drive
space by recording all cameras using a low frame rate (about 1/64th the rate set in
the CAMERA section in Figure 64 on Page 64) until a pre-defined alarm(s) is
triggered. When in this mode, the DVR changes to the quality and frame rate
settings, as shown in the CAMERA section in Figure 64 on Page 64, for the set
amount of time. Depending on the record settings set in Figure 64 on Page 64, the
amount of pre-record time will vary, as the pre-record memory buffer is a set size.
The DVR will always give the maximum amount of pre-record time available,
which is often around 10 seconds. The event record mode is disabled by setting
the NON-EVENT RECORD RATE to NORMAL.
NON-EVENT RECORD RATE:
PRE RECORD:
POST RECORD TIME:
EVENT DURATION:
NORMAL or I FRAME
YES or NO
30 – 300 Seconds
1 – 15 Seconds
Page 75 of 96
Radio Engineering Industries, Inc.
640370 -- Rev B -- 12/14/2007
Digital BUS-WATCH® R1001 / R4001
System Info
Figure 77: System Setup – System Information Screen Shot
SYSTEM INFO contains recorded information about the DVR system, as
shown in Figure 77 above.
The SYSTEM INFO section of the menu is subdivided into 3 main
categories; HDD INFOrmation, SYSTEM INFOrmation, and ACCelerometer
INFOrmation.
Page 76 of 96
Radio Engineering Industries, Inc.
640370 -- Rev B -- 12/14/2007
Digital BUS-WATCH® R1001 / R4001
HDD Information
Figure 78: System Information – HDD Information Screen Shot
The HDD INFO subsection of the SYSTEM INFO section, shown in Figure 78
above, is used to display information about the DVR operating systems and hard drive
module. The HDD INFO subsection is also where the user can go to clear the EVENT
and ADVertising logs.
The HDD INFORMATION section shows the capacity of the drive in Gigabytes,
the amount of free space left on the hard drive module and the record capacity (total) in
hours.
Page 77 of 96
Radio Engineering Industries, Inc.
640370 -- Rev B -- 12/14/2007
Digital BUS-WATCH® R1001 / R4001
System Information
Figure 79: System Information – System Information Screen Shot
The SYSTEM INFO subsection of the SYSTEM INFO section, shown in Figure
79 above, displays information about the DVR’s operating environment. The
information delineated here: high and low SYSTEM VOLTAGES, high and low
SYSTEM TEMPERATURES (inside the DVR enclosure), TOTAL RECORD HOURS
for the life of the DVR, and the HIGHEST RECORDED SPEED.
Page 78 of 96
Radio Engineering Industries, Inc.
640370 -- Rev B -- 12/14/2007
Digital BUS-WATCH® R1001 / R4001
Accelerometer
Figure 80: System Information – Maximum Accelerometer Readings Screen Shot
The ACC INFO subsection of the SYSTEM INFO section, shown in Figure 80
above, is used to display information about the DVR operating environment. The
information is subdivided into the X, Y, and Z axis. In a proper installation, (reference
Figure 17 on Page 27) the X axis is drawn from the back to the front of the bus, the Y
axis is drawn from one side of the bus to the other side of the bus, and the Z axis is drawn
from the bottom to the top of the bus. The date and time of the maximum readings are
associated with the accelerometer data.
Page 79 of 96
Radio Engineering Industries, Inc.
640370 -- Rev B -- 12/14/2007
Digital BUS-WATCH® R1001 / R4001
Time/Date Search
Figure 81: Time/Date Search – Date Selection Screen Shot
The TIME/DATE SEARCH section of the main menu is where the user can go to
select a video file that has been recorded to the DVR for playback, as shown in Figure 81
above. These files are selectable (using the arrow buttons, the numeric buttons, and the
ENTER key on the remote control) by entering in a date (and optionally a time) of the
recorded files that the user wishes to view.
The DVR always records based upon the RECORD MODE settings, as shown in
Figure 35 on Page 46, even when playing back video files.
Page 80 of 96
Radio Engineering Industries, Inc.
640370 -- Rev B -- 12/14/2007
Digital BUS-WATCH® R1001 / R4001
Time/Date Search (continued)
Figure 82: Time/Date Search – Available Video Calendar Screen Shot
There may be times when the user is not sure what dates worth of video are
present on the drive. By pressing the SETUP button on the remote control, calendars of
available video pop up to help the user pick the right date, as shown above in Figure 82.
The dates that have video present are highlighted in yellow, and the dates that do not
have any video files are highlighted in green.
Page 81 of 96
Radio Engineering Industries, Inc.
640370 -- Rev B -- 12/14/2007
Digital BUS-WATCH® R1001 / R4001
Time/Date Search (continued)
Figure 83: Time/Date Search – File Selection Screen Shot
After the correct date has been chosen, a list of record files appears for video file
selection, as shown in Figure 83 above. The size of the video file is determined by the
RECORD FILE SIZE, as shown in Figure 35 on Page 46.
Use the arrow buttons and the ENTER key on the remote control to select and
activate a video file playback. The DVR always records based upon the RECORD
MODE settings as shown in Figure 35 on Page 46, even when playing back video files.
Page 82 of 96
Radio Engineering Industries, Inc.
640370 -- Rev B -- 12/14/2007
Digital BUS-WATCH® R1001 / R4001
Event Search
Figure 84: Event Search Screen Shot
The Event Search section of the main menu is where a user goes to select a video
file that has been associated with an alarm event for playback, as shown in Figure 84
above. These files are derived when the DVR senses an input signal that has been set up
previously, such as in the EVENT SETUP subsection of the main menu; reference Figure
75 on Page 74.
Use the arrow buttons and the ENTER key on the remote control to select and
activate a video file playback. The DVR always records based upon the RECORD
MODE settings as shown in Figure 35 on Page 46, even when playing back video files.
Page 83 of 96
Radio Engineering Industries, Inc.
640370 -- Rev B -- 12/14/2007
Digital BUS-WATCH® R1001 / R4001
Advertising
Figure 85: Advertisement Screen Shot
The REI R1001 and R4001 both come equipped with stereo DVD quality
audio/video playback functions. The DVRs have A/V outputs on the rear of the DVR for
connection of video monitors and stereo equipment for advertising, education, or
informational purposes. These added features are ready to work with REI’s extensive
lines of motorcoach audio/video entertainment systems, LCD and CRT monitors,
amplifiers and speakers.
The advertising section of the main menu is where a user goes to view the
advertising files on the DVR, or select an advertising file to manually playback, as shown
in Figure 85 above. The video files must be in MPEG2 format. The advertising files
must be put on the hard drive in the ads directory through the USB flash drive upload or
manually by using Windows Explorer. The DVR always records based upon the
RECORD MODE settings, as shown in Figure 35 on Page 46, even when playing back
audio or video. The video files placed in this directory will automatically loop play in the
order as shown on the screen. An ADS log file is also created for accounting purposes.
Press EXIT on the remote control to access the menus during advertising playback.
It is the end user’s responsibility to ensure that all copyright protection laws
are not violated.
Page 84 of 96
Radio Engineering Industries, Inc.
640370 -- Rev B -- 12/14/2007
Digital BUS-WATCH® R1001 / R4001
Movies
Figure 86: Movie Playback Screenshot
The Movie section of the main menu is where a user goes to select a video file to
playback. The video files must be in MPEG2 format. The video files must be put on the
hard drive through the USB flash drive upload or by using Windows Explorer to
manually put the files in the movie directory. The DVR always records based upon the
RECORD MODE settings, as shown in Figure 35 on Page 46, even when playing back
audio or video.
It is the end user’s responsibility to ensure that all copyright protection laws
are not violated.
Page 85 of 96
Radio Engineering Industries, Inc.
640370 -- Rev B -- 12/14/2007
Digital BUS-WATCH® R1001 / R4001
Music
Figure 87: Music Playback File Selection Screen Shot
The Music section of the main menu is where a user goes to select a music file to
playback, as shown in Figure 87 above. The audio files must be in MP3 format. The
music files must be put on the hard drive through the USB flash drive upload or by using
Windows Explorer to manually put the files in the music directory. The DVR always
records based upon the RECORD MODE settings, as shown in Figure 35 on Page 46,
even when playing back audio or video.
It is the end user’s responsibility to ensure that all copyright protection laws
are not violated.
Page 86 of 96
Radio Engineering Industries, Inc.
640370 -- Rev B -- 12/14/2007
Digital BUS-WATCH® R1001 / R4001
DVR Firmware Upgrading
Due to improvements in technology and the availability of new features, the
R1001/R4001 series of DVRs comes with the ability to have the firmware (DVR
operating system) be easily upgraded in the field. There are several ways this can be
done: through the Ethernet connection, through the front panel USB connection, or
through the removable hard drive module USB connection.
Removable Hard Drive Module USB Firmware Upgrade
To upgrade the firmware on the DVR, you must put the upgrade file in the
ads directory on the hard drive. The DVR will recognize this file and
automatically perform the upgrade, as shown in Figure 88 below. Once the DVR
has finished upgrading itself, a success message will appear (as shown in Figure
89 on Page 88) and a bootstrap algorithm will restart the DVR.
Figure 88: Firmware Upgrading In Progress Screen Shot
Page 87 of 96
Radio Engineering Industries, Inc.
640370 -- Rev B -- 12/14/2007
Digital BUS-WATCH® R1001 / R4001
Hard Drive USB Firmware Upgrade (continued)
Figure 89: Firmware Upgrade Success Screen Shot
Front Panel USB Firmware Upgrade
PC -
Put the upgrade file in the ads directory on the hard drive; reference
Figure 49 on Page 53. The DVR will automatically upgrade upon
exiting the menu system.
Flash Drive -
Put the upgrade file in the ads directory on the hard
drive; reference Figure 50 on Page 54. The DVR will
automatically upgrade upon exiting the menu system.
Ethernet Firmware Upgrade
When using the REI R1001/R4001 PC software to upgrade the firmware,
please reference the REI RMS PC software users manual (REI P/N 640372).
Page 88 of 96
Radio Engineering Industries, Inc.
640370 -- Rev B -- 12/14/2007
Digital BUS-WATCH® R1001 / R4001
Systems Related Part Numbers
Digital Video Recording Units & Protective Enclosures
710131
710134
710133
BUS-WATCH® Single Channel DVR, R1001
BUS-WATCH® 4 Channel DVR, R4001
BUS-WATCH® Decoy, Lock Box-R1001/R4001
Hard Drives
710128
710129
710130
710132
Hard Drive, 80 GB, R1001/R4001
Hard Drive, 100 GB, R1001/R4001
Hard Drive, 120 GB, R1001/R4001
Hard Drive, 160 GB, R1001/R4001
Quad Video Processors & Camera Switch Devices
700483
700848
12V Black & White Quad Processor
12V Color Quad Processor
710030
710082
Mode Selectable 2 Camera Solid State Switch Device
Time Selectable 2 Camera Solid State Switch Device
Digital BUS-WATCH® System Harnesses
512001
512002
512209
512208
511986
512023
512024
512025
512086
512196
530062
530068
530070
710143
710144
750086
710095
Power Cable, 35 Feet
Power Cable, 16 Feet
Vehicle Sensor Options Cable, 20 Feet
Vehicle Sensor Options Cable, 50 Feet
External Record Indicator / Event Mark Cable, Aftermarket, 20 Feet
External Record Indicator / Event Mark Cable, Aftermarket, 40 Feet
External Record Indicator / Event Mark Cable, OEM, 20 Feet
External Record Indicator / Event Mark Cable, OEM, 40 Feet
RCA Cable, Stereo Male/Male (3x), 10 Feet
USB 2.0 Type ‘A’ Male / Type ‘A’ Male Cable, 6 Feet (DVR to PC)
USB 2.0 Type ‘A’ Male / Type ‘B’ Male Cable, 10 Feet
Network Crossover Cable CAT5E, 3 Feet
USB Type ‘A’ Male / Type ‘A’ Male / Type ‘B’ Male Cable, 3 Feet
Accelerometer Module, 3 Feet
GPS Antenna Module, 16 Feet
BUS-WATCH® Magnetic Pickup Vehicle Speed Sensor Kit
Covert Microphone
Page 89 of 96
Radio Engineering Industries, Inc.
640370 -- Rev B -- 12/14/2007
Digital BUS-WATCH® R1001 / R4001
Digital BUS-WATCH® Camera Harnesses
512014
512166
511158
512167
511965
512168
511966
511967
512169
510993
512170
BUS-WATCH® Camera Cable, 1 Foot
BUS-WATCH® Camera Cable, 6 Feet
BUS-WATCH® Camera Cable, 12 Feet
BUS-WATCH® Camera Cable, 15 Feet
BUS-WATCH® Camera Cable, 20 Feet
BUS-WATCH® Camera Cable, 25 Feet
BUS-WATCH® Camera Cable, 30 Feet
BUS-WATCH® Camera Cable, 35 Feet
BUS-WATCH® Camera Cable, 40 Feet
BUS-WATCH® Camera Cable, 50 Feet
BUS-WATCH® Camera Cable, 60 Feet
510804
511344
511918
512150
512151
511667
BUS-WATCH® Camera Cable to Camera Cable Connector, 5 Feet
BUS-WATCH® Decoy Camera Live Microphone ‘Y’ Cable
BUS-WATCH® Cable, Disable Camera Audio
BUS-WATCH® Covert Microphone ‘Y’ Cable
BUS-WATCH® Voice Band Pass Filter
Rear Observation Camera to BUS-WATCH® Cable, 2 Feet
Digital Bus-Watch® ΙΙ to Digital Bus-Watch® R1001/R4001 Transfer Harnesses
512015
512017
512018
512026
BUS-WATCH® Vehicle Sensor Options Transfer Harness, BW to DBW4
BUS-WATCH® Power Transfer Harness, BW to DBW4
BUS-WATCH® External Record Signal Transfer Cable, DBW2 to DBW4
BUS-WATCH® Event Signal Transfer Cable, DBW2 to DBW4
Cube Cameras
710086
710080
710084
710096
710081
Black & White 6mm Fixed Iris
Black & White 8mm Fixed Iris
Color 4mm Fixed Iris
Color 6mm Fixed Iris
Color 8mm Fixed Iris
Box Cameras
690321
690457
Exterior Rear Observation B/W Camera (requires 511667)
Exterior Rear Observation Color Camera (requires 511667)
710135
710137
710138
710139
HR Series 2.8mm IR Day/Night with Audio
HR Series 4mm IR Day/Night with Audio
HR Series 6mm IR Day/Night with Audio
HR Series 8mm IR Day/Night with Audio
Page 90 of 96
Radio Engineering Industries, Inc.
640370 -- Rev B -- 12/14/2007
Digital BUS-WATCH® R1001 / R4001
Dome Cameras
710009
710004
710008
710059
710054
710127
710058
710023
710029
710041
Dome Camera, Black & White 2.9mm
Dome Camera, Black & White 4mm
Dome Camera, Black & White 8mm
Dome Camera, Color 2.9mm
Dome Camera, Color 4mm
Dome Camera, Color 6mm
Dome Camera, Color 8mm
Dome Camera, Color Dual Lens - 4mm & 8mm
Dome Camera, Color Dual Lens - 4mm & 4mm
Dome Camera, Black & White Dual Lens - 4mm & 8mm
Exterior Wedge Cameras – Roadside Rear Facing / Curbside Front Facing
710064
710066
710068
710001
710034
710036
Exterior Wedge Camera, Color 4mm
Exterior Wedge Camera, Color 6mm
Exterior Wedge Camera, Color 8mm
Exterior Wedge Camera, Black & White 4mm
Exterior Wedge Camera, Black & White 6mm
Exterior Wedge Camera, Black & White 8mm
Exterior Wedge Cameras – Roadside Front Facing / Curbside Rear Facing
710063
710065
710067
710002
710033
710035
Exterior Wedge Camera, Color 4mm
Exterior Wedge Camera, Color 6mm
Exterior Wedge Camera, Color 8mm
Exterior Wedge Camera, Black & White 4mm
Exterior Wedge Camera, Black & White 6mm
Exterior Wedge Camera, Black & White 8mm
Replacement Keys
170100
170102
170103
Lock Box & Slide Bracket Keys
Hard Disk Drive Module USB Keys
DVR Face HDD Module Keys
Replacement Handheld Remote Controls
690555
Rx001 Remote Control
Page 91 of 96
Radio Engineering Industries, Inc.
640370 -- Rev B -- 12/14/2007
Digital BUS-WATCH® R1001 / R4001
PC Software & Documentation
621005
CD, R1001/R4001 BUS-WATCH® SOFTWARE
640369
640370
640371
640372
R4001 EXPANDED SYSTEM DIAGRAM
R1001/R4001 USER MANUAL & INSTALLATION GUIDE
R1001/R4001 PC SOFTWARE INSTALLATION GUIDE
R1001/R4001 PC SOFTWARE USERS MANUAL
Installer’s Equipment
690554
MONITOR 7" COLOR LCD W/BATTERY HOLDER
Optional Advertisement / Media Equipment
LCD Monitors
700990
700995
710024
MONITOR, 10.4" LCD LOW PROFILE, 12V
MONITOR, 10.4" LCD LOW PROFILE, 24V
MONITOR, 15.4" LCD LOW PROFILE, 12/24V
Coaxial Video Cables
511062
511160
511623
511879
COAX CABLE, 15' (M/M) BNC
COAX CABLE, 27' (M/M) BNC
COAX CABLE, 37' (M/M) BNC
COAX CABLE, 40' (M/M) BNC
Amplifiers
690143M
700887
AUDIO AMPLIFIERS, 12 VOLT 200 WATT
VIDEO DISTRIBUTION AMPLIFIER - LOW PROFILE
Speakers
231010
231005
231002
SPEAKER ASSEMBLY, 5-1/4" 100W
SUBWOOFER SPEAKER ASSEMBLY
TWEETER SPEAKER ASSEMBLY
Please Visit www.radioeng.com for a complete and current product catalog.
Page 92 of 96
Radio Engineering Industries, Inc.
640370 -- Rev B -- 12/14/2007
Digital BUS-WATCH® R1001 / R4001
Troubleshooting Guide
Troubleshooting, as a rule of thumb, is basically a process of elimination. In a
complex electrical system with many components, it can be sometimes difficult to
determine exactly why the system is not working the way you want it to. If you only
have one DVR system, the maintenance person may need to understand the entire DVR
system to logically deduce the exact cause of the problem. If you have multiple systems
installed on your vehicles, then troubleshooting is a lot easier. A good way to discover
which part of the system is not operating properly is to swap components and see which
component the problem follows. For example, if you suspect there may be a problem
with a hard drive, you can put the hard drive into a different DVR, and if the drive works
in that DVR, then you know it is not the drive.
In most cases, we find the reason the DVR is not doing what the end user wants it
to is because the DVR is not configured to operate in that manner. A good example of
this is if the DVR was placed in timer mode, and the operator wanted the DVR to go on
and off with the ignition.
Radio Engineering Industries has a world-class team of technical support
specialists available 24/7 to assist you with getting your system running the way you need.
In addition to this valuable service, provided below is a quick guide to help assist you
with some common problems.
TROUBLESHOOTING GUIDE
PROBLEM
Not Powering On
(No Power LED)
POSSIBLE CAUSE
CORRECTION
Power Cable Improperly
Installed
Check 12VDC on Memory
(White Wire), Check
Chassis Ground (Black
Wire), Check 12VDC on
Ignition (Red Wire)
Incorrect Record Mode
Setting
Check Record Mode Setting
See Figure 35 on Page 46
Hard Drive Not Installed
and Properly Locked into
Place
Install Hard Drive and Lock
into Place
Page 93 of 96
Radio Engineering Industries, Inc.
640370 -- Rev B -- 12/14/2007
Digital BUS-WATCH® R1001 / R4001
TROUBLESHOOTING GUIDE (Continued)
PROBLEM
Not Recording
(No Record LED)
POSSIBLE CAUSE
CORRECTION
Incorrect Record Mode
Setting
Check Record Mode Setting
See Figure 35 on Page 46
Hard Drive is Full
See HDD Full LED On
In Section Below
Configure DVR to
Overwrite Video
See Figure 35 on Page 46
HDD Full LED On
Hard Drive is Full of Video
Remove Some Video Files
See Figure 9 on Page 16
Format Hard Drive
See Figure 36 on Page 47
Fault LED On
Camera(s) Not Connected
Verify Camera Connection
Remote Control Does Not
Work
Check Batteries
Try a Different Remote
DVR is in Installers Mode
Exit Installers Mode
See Figure 30 on Page 41
Cannot Access Menu
Page 94 of 96
Radio Engineering Industries, Inc.
640370 -- Rev B -- 12/14/2007
Digital BUS-WATCH® R1001 / R4001
TROUBLESHOOTING GUIDE (Continued)
PROBLEM
POSSIBLE CAUSE
CORRECTION
Wrong Network Cable
Type
Use Crossover Cable
(REI P/N 530068)
DVR IP Settings not
Configured Correctly
Configure Network Settings
See Figure 40 on Page 49
PC IP Settings not
Configured Correctly
Configure Network Settings
(Contact your System
Administrator or IT
Department)
USB Connection Not
Working
DVR in Wrong USB Mode
Change USB Mode
See Figure 49 on Page 53
No Video Out
Camera(s) Not Connected
Verify Camera Connection
Audio Recording Disabled
Enable Audio
See Figure 64 on Page 64
Volume Turned All The
Way Down
Use UP ARROW on
Remote Control to Increase
Volume
Ethernet Connection Not
Working
No Audio Out
Page 95 of 96
Radio Engineering Industries, Inc.
640370 -- Rev B -- 12/14/2007
Digital BUS-WATCH® R1001 / R4001
Specifications
Mobile DVR
■ Recording Medium: 2.5” Removable Hard Disk Drive Module
■ Display Capability: On Screen Display and embedded video stream data
■ GPS: Time Synchronization, Latitude, Longitude, Speed, Heading & Mapping
■ Video Input: 4 Channel Inputs, 1V pp / 75 ohm
■ Video Output: 2 x Composite Video, 1x Ethernet, and 2 x USB 2.0
■ Image Resolution: 720 (H) x 486 (V)
■ Video Compression: MPEG-4 (8 quality settings)
■ Frame Rate: 1 to 30fps Selectable
■ Audio Input : 4 independent channel inputs
■ Recording Modes: Continuous, Ignition, Scheduled & Event Triggered
■ Playback: Search by Alarm, Date, Time & Camera
■ Video Loss Detection
Advertisement System
■ Video Playback Format: MPEG
■ Video Out: BNC Out on the back panel, RCA Out on the front panel
■ Play List Method: By Sequence & Rolling Message Displaying
■ Updating Method: Removable Hard Drive, Ethernet, and USB
Input / Output
■ 2 x USB 2.0 Ports (one Host, one Slave)
■ 1 x 10/100base-T Ethernet Port
■ 8 x Vehicle Sensor Inputs
■ 1 x GPS Input
■ 1 x Accelerometer Input
■ 1 x Transmission Pulse Speedometer Input
Environment
■ Relative Humidity: 10%~95% at 40.C, Non-Condensing
■ Operating Temp.: -40C ~ +65C
■ Shock: 225Gs 2ms (Operating) / 900Gs 1 ms (Storage / Transit)
■ Vibration: 1.0G, 5 ~ 500Hz (Operating), 5.0G, 5 ~ 500Hz (Storage / Transit)
■ Power Requirement: 12VDC @ 2A / 24VDC @ 1A
■ Power Consumption: 24W Maximum
■ EMC and Safety: CE, FCC
Page 96 of 96
Radio Engineering Industries, Inc.
640370 -- Rev B -- 12/14/2007