1
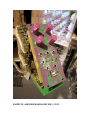
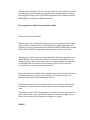
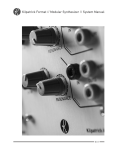
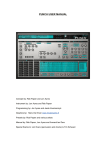
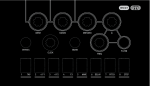
SNAZZY FX : ARDCORE MANUAL REV ONE //2012 ARDCORE CONTROL LAYOUT: 1 2 3 4 6 5 7 9 8 11 10 12 SNAZZY FX ARDCORE INPUTS AND OUTPUTS: 1. A0 0-5 VOLTS : used in most sketches as a pitch or level control 2. A1 0-5 VOLTS: used in most sketches as a pitch or level control 3. A2 0-5 VOLTS : with no input plugged in/OR ATTENUATOR FOR (5. )WHEN CABLE PLUGGED IN 4. A3 0-5 VOLTS: with no cable plugged in/OR ATTENUATOR for (7.) WHEN CABLE PLUGGED IN 5. A2 JACK: CV IN 1 (turn knob A2 all the way up for full level) used as an audio input in some sketches 6. CLOCK: plug in a clock source here for sketches that need a clock. If you want to write a program that uses an external interrupt, you would use this input. 7. A3 JACK: CV IN 2 (turn knob A3 all the way up for full level) used as an audio input in some sketches 8. D0: Gate/Trigger Out (green LED lights on gate) 9. D1: Gate/Trigger Out (red LED lights on gate) 10. 8 bit DAC output JACK (jack one) 11. 8 bit DAC output JACK (jack two) 12. USB JACK (can be used for two way serial communication between ARDUINO software and the ARDCORE) use this to load sketches from the Arduino Software. If this is working, the “data leds” will light up briefly when a program transfers. WHAT IS ARDCORE?????? *******ArdCore ****** An Arduino-based Compute Device for Modular Synthesizers Getting Started IMPORTANT INFO!!!!! (ALL LINKS ARE ON LINKS PAGE) 1.DOWNLOAD ARDUINO SOFTWARE 2.DOWNLOAD USB DRIVER 3.SETUP ARDUINO SOFTWARE 4.DOWNLOAD ARDCORE CODE FROM GITHUB 5.PLACE CODE FOLDERS INTO MASTER “ARDCORE” FOLDER (YOU CAN MAKE THIS YOUR “SKETCHBOOK” IN ARDUINO SOFTWARE <under preferences>IF YOU WISH) 6.OPEN ARDUINO SOFTWARE 7.UNDER TOOLS MENU SELECT “ARDUINO UNO” AS BOARD 8.OPEN UP A SKETCH 9.CONNECT USB CABLE TO ARDCORE 10.HIT “UPLOAD BUTTON” IF YOU HAVE ANY ARDUINO SOFTWARE QUESTIONS PLEASE REFER TO ARDUINO SETUP GUIDE LINK BELOW FOR PROGRAMMERS OR WOULD BE PROGRAMMERS…GET INVOLVED!!! CHECK OUT THE ARDCORE THREADS ON MUFFWIGGLER….CHECK OUT THE ARDUINO FORUMS…WRITTEN A COOL PROGRAM? EMAIL IT TO [email protected] and WE CAN ADD IT TO THE GITHUB SITE! IT’S SUPER EASY TO START MESSING WITH THE INCLUDED ARDCORE PROGRAMS…MAYBE START BY CHANGING SOME NUMERIC VALUES...CUT AND PASTE….GET SOME BOOKS ON ARDUINO PROGRAMMING….AND SOON ENOUGH IT MAKES SENSE! START BY READING THE “20 OBJECTS” SKETCHES BACKWARDS AND FORWARDS….PRINT EM OUT, FOLLOW ALONG….YOU WILL LEARN!!! SNAZZY FX ARDCORE: WHAT IS IT???? The ARDCORE-whatever you need your modular to be TODAY. Have you ever been in the middle of a patch and thought, “I sure wish I had a _____ in my modular”. Or how about, “I sure wish I had another ______. Well start filling in the blanks with the Snazzy FX ARDCORE. Built around an Arduino compatible chipset with all the controls you need for a Eurorack Module, the ARDCORE can fill almost any role you need it to. With its built in USB port, CV ins, Gate outs, DAC outs and CLOCK in, you have everything you need to begin experimenting with programming, or simply browsing the library of over 55 included programs, each of which turns the ARDCORE into a completely different module! For programmers AND non-programmers alike: All the code is freely available. With an open source software foundation, you can be guaranteed that other people in the community will be contributing their own programs as well. And since it can be programmed from within the FREE Arduino IDE program, (OSX, LINUX, OR PC) its compatible with whatever computer you have. And for people who have never programmed but think they might like to try, ARDCORE gives you a whole lot of material to mess around with. You can change a value or delete some lines, save it as a new program and Upload it to the ARDCORE in no time at all. Who knows, maybe you’ll even teach yourself how to write an amazing new module. Many of the sketches include clear commenting as well as reusable functions, so in many cases all you have to do to write a new sketch is copy a few functions, add a few values and debug a little bit. Each program uses the same familiar hardware. So no matter what you are working on, you always have the same knobs and jacks being used in the code. This makes it easy to USE the programs too. And if you decide you need the pitch control to be on the top left knob instead of the bottom right, all you have to do is open up the program and change two values. SIMPLE. PROGRAMS: The current list of programs is pretty amazing. It is a bit hard to believe sometimes that the little AVR chip can do so much. While designed with CV in mind, the ARDCORE does have some audio abilities. Included in the library is a delay FX program, a bit-‐crusher, a few waveshapers, a distortion or two, and a ring modulator. There is also a white noise generator, a Square-‐Wave VCO, an FM oscillator, a bunch of glitchy/noisy programs, and a really amazing Drum Sample player complete with a program for uploading the samples. On the CV side of things, the list is enormous, with quantizers, pattern generators, sequencers, CV recorders, scale generators, drunken walks, clock dividers, a really nice arpeggiator, a triple output LFO, a waveshaped LFO, random gates, glissando, a shift register, and more. And since the Ardcore is open source, more programs will be coming. Or you can write your own! Check out the videos on our youtube page. Or head on over to http://arduino.cc/en/Guide/HomePage The purpose of the ARDCORE is three-fold: - To allow programming-savvy artists to pursue synthesis options that aren't currently available (either because they are too difficult or too idiosyncratic). - To allow for temporary-use function that are not often needed (and hence not worth the expense or space) but may be important for a specific composition. - To provide a simple platform for functions that are much easier to accomplish in the digital domain than in the analog domain. SNAZZY FX ARDCORE Design Decisions 1. focus on CV generation and manipulation, and low-fidelity explorations of audio output. If you don’t mind dirty, the Ardcore can do plenty of audio. 2. produce output with 8-bit resolution, and do so by the direct manipulation of digital output pins (one pin per bit). This makes programming quite a bit easier as everything is immediate. 3. limit both input and output ranges to a 0-5 Volt range. This is the most useful range for control voltages to affect oscillators and filters, and is therefore our main targeted connection. 4. fit the module into the Eurorack format These decisions were made for a number of reasons. Part of it is to simplify the programming of Arduino sketches that would make for useful output. Finally, we want this module to be usable in a lot of different environments (performance, studio, installation), so having a minimal space footprint was very important. Some may question the use of 8-bit output, but it is a compromise that we ended up appreciating once we saw that a) it made programming very easy, and b) the resolution was sufficient (especially if paired with a slew limiter) for every sort of output we needed. Test results have been very positive, and the result is used in our systems every day. ******************************************************** Setup Instructions for the SNAZZY FX Ardcore PLEASE READ THIS BEFORE YOU PLUG THE ARDCORE INTO YOUR SYSTEM! We’ve taken appropriate steps to ensure that you can’t burn out the ArdCore system very easily. But it can still happen, because the Arduino UNO is a microprocessor system, and all micro systems can be damaged. Here are a few hints about proper handling: • Don’t plug in the ArdCore power connector into a rack power supply that is turned on. It’s never a good idea, but particularly not for a microprocessor device. The surface of the Ardcore module is packed full of circuitry. Don’t let the face of the board touch metal or another conductive material when the ArdCore is receiving power. Watch for static electricity when you are handling the module. The AVR chip is very sensitive. Make sure to install the USB DRIVER (FTD vcp )driver for your OS. (osx or win) it is available at • http://www.ftdichip.com/Drivers/VCP.htm Arduino Programming Interface There's only one thing you can use to get software loaded on, the Arduino IDE. Get it at http://arduino.cc/en/Main/Software There's a really good walk through here http://arduino.cc/en/Guide/HomePage Ardcore is powered by an Arduino UNO You'll also need to get the FTDI driver installed on your computer http://www.ftdichip.com/Drivers/VCP.htm (Make sure you scroll down a little - the D2XX drivers at the top are *not* what you want to use. If you scroll down, you will see download instructions for each OS that is available...) !"#$%&%$'(%)*+&),+-,./%*)01'2#+3#*#,'4+5)6"/('(%)*'4+ 7/2%$+7)./4#+8+(9#+-,.5),#+6).#4+ ARDCORE PIN DESIGNATIONS*********VERY VERY IMPORTANT!!!! THIS WILL HELP YOU UNDERSTAND THE INPUT AND OUTPUT DESIGNATIONS FOR !"#$%#&'(( )*+)*+,)**( &&-( PROGRAMMING ./&010#&'( 23/3#4( ! !"#$"%#&+ 56#(7"#$%0/3(/1(%608(΋#(08($(:#%6/&(%/(;"/90&#(80:;<010#&(=$3&(-#3#"$<0>#&?( ;"/-"$::03-(1@37%0/3$<0%A(%/(%6#(B/"<&(/1($3$</-(8A3%6#808C(5/(&$%#D(:/8%(7/:;@%#( :/&@<#8(6$9#(E##3(;@";/8#+8;#70107(=.FGF+%/+!H(7/39#"80/3D(8#I@#3703-?J(B60<#( %608(08(@8#1@<D(0%(&/#8(3/%(;"/90&#($3($&#I@$%#(/;;/"%@30%A(1/"(%6#($"%08%(%6$%(037<@( ;"/-"$::03-K7/&03-(03(%6#0"(;"$7%07#C( 5608(8;#70107$%0/3(08(%/(;"/90&#(%6#($3$</-(:/&@<$"(7/::@30%A(B0%6($(8%$3&$"&0>#&( @8#(/1(%6#(L"&@03/(:07"/7/3%"/<<#"(8A8%#:D($3&(B0<<(037<@&#($(<$"-#(3@:E#"(/1( #M$:;<#(8N#%76#8(=;"/-"$:8?(%6$%($77/:;<086(%$8N8(B0%603(%6#(:/&@<$"(B/"<&C(L3A( L"&@03/(@8#"(7$3(@%0<0>#(%6#8#(8;#70107$%0/38(%/(7"#$%#(:/&@<#8D(7/3%"/<(8A8%#:8(/"( 7/:;@%#"(03%#"1$7#8D($3&(B0<<(E#($E<#(%/(@8#($3A(;"/-"$:8(%6$%(/%6#"8(:$A(7/:#(@;( B0%6C( '$()%*+,-./0#, 56#(:/8%(0:;/"%$3%(І%0/3(1/"(%6#(@8#(/1($3(L"&@03/(03(%608(#390"/3:#3%(08(%/( g#(%6#(;03(@8$-#C(56#(L"&!/"#(:/&#<(B0<<(@8#(%6#(;038(03(%6#(1/<</B03-(B$A'( "#$%&'!()#*+( ANALOG IN 0 = A0: KNOB A0 0-5 VOLTS ANALOG IN 1 = A1:KNOB A1 0-5 VOLTS L3$</-(F3()( L3$</-(03;@%()(O(N3/E(/"(9/<%$-#( L3$</-(F3(*( L3$</-(03;@%(*(O(N3/E(/"(9/<%$-#( L3$</-(F3(,( L3$</-(03;@%(,(O(N3/E(/"(9/<%$-#( ANALOG IN 3 = A3: KNOB A3 0-5 VOLTS OR SWITCHED CV INPUT A3 W/ ATTENUATOR L3$</-(F3(P( L3$</-(03;@%(P(O(N3/E(/"(9/<%$-#( L3$</-(F3(Q(=3$3/($3&(:#-$?( L3$</-(03;@%(Q(O(N3/E(/"(9/<%$-#( L3$</-(F3(R(=3$3/($3&(:#-$?( L3$</-(03;@%(R(O(N3/E(/"(9/<%$-#( DIGITAL PIN 0= UNUSED (TX) L3$</-(F3(S(=3$3/($3&(:#-$?( L3$</-(03;@%(S(O(N3/E(/"(9/<%$-#( L3$</-(F3(T(=3$3/($3&(:#-$?( L3$</-(03;@%(T(O(N3/E(/"(9/<%$-#( DIGITAL PIN 1=UNUSED (RX) ( ANALOG IN 2 = A2:KNOB A2 0-5 VOLTS OR SWITCHED CV INPUT A2 WITH ATTENUATOR DIGITAL PIN 2= CLOCK INPUT/DIGITAL IN (INTERRUPT DRIVEN) ,)')-$%!()#*+( DIGITAL PIN 3= DIGITAL OUT 0=D0 (TRIGGER/GATE OUT) G0-0%$<(U03()( V3@8#&(=$9/0&03-(7/31<07%(B0%6(5W(1@37%0/3?( G0-0%$<(U03(*( V3@8#&(=$9/0&03-(7/31<07%(B0%6(XW(1@37%0/3?( DIGITAL PIN 5= LSB 8 BIT 1 D2A OUTPUT G0-0%$<(U03(,( !</7N(F3;@%(=03%#""@;%+&"09#3?( G0-0%$<(U03(P( G0-0%$<(Y@%;@%()(O(-$%#K%"0--#"(@8#( DIGITAL PIN 6=BIT 2 G0-0%$<(U03(Q( G0-0%$<(Y@%;@%(*(O(-$%#K%"0--#"(@8#( DIGITAL PIN 7=BIT 3 G0-0%$<(U03(R( Z+E0%(L3$</-(Y@%;@%(+([\]( DIGITAL PIN 4= DIGITAL OUT 1=D1 (TRIGGER/GATE OUT) DIGITAL PIN 8=BIT 4 DIGITAL PIN 9=BIT 5 DIGITAL PIN 10=BIT 6 DIGITAL PIN 11=BIT 7 DIGITAL PIN 12=MSB BIT 8 D2A OUTPUT DIGITAL PIN 13=UNUSED IMPORTANT LINKS: ARDUINO SETUP GUIDE http://arduino.cc/en/Guide/MacOSX http://arduino.cc/en/Guide/Windows ARDUINO SOFTWARE DOWNLOAD: http://arduino.cc/en/Main/Software DRIVER DOWNLOAD: http://www.ftdichip.com/Drivers/VCP.htm ARDCORE CODE DOWNLOAD: https://github.com/darwingrosse/ArdCore-Code Limited WARRANTY: Snazzy FX w arrants this product to be free of defects in m aterials or construction for a period of one Year from the date of purchase. M alfunction resulting from incorrect pow er supply voltages, im proper pow er cable conn ection, im proper use or abuse of the product, or any other causes determ ined by Snazzy FX to be the fault of the user, are not covered by this w arranty, and service rates w ill be determ ined at such tim e. During the w arranty period, any defective products w ill be repaired or replaced by Snazzy FX if the product is shipped to Snazzy FX at the custom er’s expense. If any issue w ith your Snazzy FX product does arise, please contact Snazzy FX or your Snazzy FX dealer. SNAZZY FX accepts no responsibility for harm to person or apparatus caused through operation of this product. Please take proper precautions to protect your speakers, as the Dream boat is capable of large jum ps in volum e and or sounds exhibiting extrem e bass. CONTACT: Please contact [email protected] for help with any questions, technical issues, product comments, patches/ patch tips, or to shower us with gifts of vintage synthesizer equipment. All CONTENT: 2012 SNAZZY FX ALL RIGHTS RESERVED