1
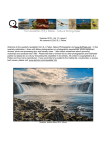
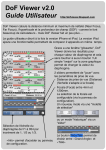
Newsletter of E.J. Peiker, Nature Photographer and www.EJPhoto.com http://www.EJPhoto.com
All contents ©2010 E.J. Peiker
Summer 2010
(Vol. 8, Issue 4)
Welcome to the quarterly newsletter from E.J. Peiker Nature Photography and www.EJPhoto.com http://
www.EJPhoto.com. In this quarterly email publication, I will keep subscribers posted on upcoming workshops
including the DuckShop Workshop Series as well as sharing some photos and experiences with you. I will also
give you brief impressions on any new equipment that I get the opportunity to use and any other general
information in the world of digital nature photography. Please feel free to forward this along to other
photographers and interested parties but please do so only by forwarding this newsletter in its entirety. Note that
all content is copyrighted by E.J. Peiker. If you would like to be added or deleted to the mailing list, just send me
an email message at [email protected] mailto:[email protected]. Back issues are available online at http://
www.ejphoto.com/newsletter.htm
1
Photoshop CS5 Is Here
The much anticipated release of Photoshop CS5 is here! I have been using both the Mac and the
Windows version for a couple of months now. It is a great update in several ways and falls short of
expectations in others. While the features that have been updated or changed significantly are
numerous, I'm going to focus on the ones that have most impact to Nature Photographers.
Lens Profiles - CS5 now includes lens profiles for many of the most popular consumer and professional
lenses for Nikon and Canon, with others coming in the future. The profiles correct inherent short
comings such as linear distortions, chromatic aberration, corner light falloff and more. The correction
can be done either in Adobe
Camera Raw (capability
available with version 6.1 of
ACR or later) or via the Lens
Correction filter in Photoshop
itself after RAW conversion..
I find it easiest just to turn it
on for every one of my
camera bodies in ACR and
then saving that as one of
the default Camera Raw
settings. This automatically
applies the corrections to
every image for which Adobe
has supplied profiles. In
testing this, I fed it some
shots from lenses with
significant issues, such as
the strong linear distortion of
the Nikon AF-S 24-70mm f/
2.8 lens at 24mm. Sure
enough, the Adobe lens
profile cured the issue. I
also fed it some shots with strong chromatic aberration so prevalent in Canon wide angle zooms.
Again, it did a good job of dramatically reducing these color distortions. Lens profiles will be a huge
time saver as it is now no longer necessary to correct these inherent lens problems manually in every
shot. If you have a lens that Adobe does not provide profiles for, such as the Panasonic Lumix
14-45mm on my beloved Panasonic Lumix GF1, Adobe labs provides a method to create your own. I
feel lens profiles are the single most beneficial upgrade in Photoshop CS5.
Content Aware Fill - Most of the marketing hype from Adobe for CS5 was in Content Aware Fill. In
theory, either through use of the Fill Tool or the Healing Brush with Content Aware check boxes
selected, Photoshop should be able to eliminate undesirable elements in a photo simply by selecting
the undesired area and then applying content aware fill or simply by painting over it with the healing
brush. In practice, it works great for repairing blemishes, dust spots, or small imperfections, but for
removing entire elements, it often makes very bad choices. Even for filling in simple areas such as the
blank area left in the corners after a slight rotation in a photo, at times it works and at other times it
does a surprisingly poor job. Experiment with this on your own for when it is best to use but for me, I
will only be using this for standard dust removal from photos since I generally don't remove things from
my photos.
Improved HDR - HDR or High Dynamic Range imaging is the process where a photographer shoots a
high dynamic range scene in two or more exposures to insure that detail is captured in the brightest
2
areas, the darkest areas and everything in between. The previous two versions of Photoshop have had
a difficult to use and rudimentary HDR tool that allows putting such a series of images together into a
single image. However the tool was cumbersome, required a lot of curve tweaking and then still left
you with a photo that left a lot to be desired. Most serious landscape photographers gave up on the
included tool almost immediately and use tools such as the industry leading Photomatix
(www.hdrsoft.com). With CS5, Adobe has completely revamped the HDR function making it much
easier to use. You simply choose your series of photos in Bridge and then using Photoshop Tools,
select Merge to HDR Pro (the name of the new HDR function) and after the computer churns a bit
putting the images into a single document in Photoshop and aligning it, a box pops up that allows you
to make a number of changes including the HDR algorithm, curve adjustments, etc. Overall it does a
pretty decent job compared to the older HDR Merge tool; however, serious HDR practitioners will
continue to use tools such as Photomatix as the control over the final image is infinitely more
customizable. But this is a major improvement and will work for many photographers without having to
spend an extra $100 for Photomatix.
Refine Mask - The new
Refine Mask Tools replace
the old Refine Edge tools
and this is a major
improvement. It has
always been extremely
difficult in Photoshop to
make complex selections
that involve very fine
detail such as stray hair,
feathers, etc. The new
Refine Mask tool makes
this largely a thing of the
past. There are several
sliders that allow you to
make very complex
selections virtually
automatically and even
feather the selections
appropriately and then
output them to a separate
adjustment layer - all in a
single dialog box. It works
very well right from the beginning and as we gain experience with this tool, some amazing selections
will be possible. Definitely spend some time with this tool.
Noise Reduction - The ACR noise reduction algorithms have been completely redone and are much
more effective now allowing a decent amount of noise reduction before critically robbing detail. The
Luminance Noise section now analyzes the image and is able to determine, in most cases, what is an
image feature versus what is noise. It provides a good amount of user control too in case you want to
adjust the settings. For example, in some cases you may be willing to give up a little bit of detail for
more aggressive noise reduction but in others, you may except a bit more noise for more detail. Yes,
this is how most noise reduction programs work but this one is more effective than a lot of other noise
reducers I've seen in wiping out noise without wiping out detail. The downside is that this is only
available in ACR and the Noise Reduction tool within Photoshop itself is unchanged. I wish this would
have also been implemented inside Photoshop so that selections of specific areas where noise
reduction is applied would be easier while leaving others alone.
3
Straighten Button - While this may be a small refinement, CS5 adds a button to the ruler tool,
automating the straightening of photos and saving several mouse clicks whenever you have to
straighten an image. If you have a slightly wonky horizon, simply draw a line along the horizon in the
ruler tool and hit the straighten button. PS immediately straightens the image and crops off the dead
space that is created. Simple and very effective.
Mini Bridge - A new convenient feature is Mini Bridge. Basically, Mini Bridge is a small browser panel
that resides within Photoshop and it quickly let's you browse through a folder and retrieve photos
without having to go into Bridge or getting an image into Photoshop via the Open command.
64 Bit Operation for Mac - Windows users have been enjoying a full 64 bit version of Photoshop since
the release of CS4 in 2008 giving the photographer access to huge amounts of memory if installed on
your system. This can really speed up many Photoshop tasks and require much less work by the
program to be carried out on a very slow scratch disk. Up until now, Macintosh users, have only had a
32 bit version and thus were limited to about 3GB of memory after OS-X and any other programs were
loaded. With CS5, Adobe now also supports 64 bit memory addressing on the Mac giving Mac users
the same kind of memory access as Vista 64 or Windows 7 users have had for some time. However,
the Mac 64 bit version is not as complete as the Windows version as some of Adobe's own tools
available for Windows 64 do not work for Mac. While most users will never notice, if you are one that
uses such a tool, you will be forced to switch back to the 32 bit mode. It is not as simple to launch the
32 bit mode on the Mac as it is on Windows. In Windows, Adobe gives you two different launch icons,
one for each version. In order to switch to 32 bit mode on a Mac, you must open the applications
folder, navigate to the Photoshop Folder, right click on Photoshop CS5, select Get Info, find and check
the box that says "launch in 32 bit mode", exit and then launch Photoshop. Then to go back to 64 bit
you have to do this all over
again - not a very elegant
solution and many will tire of
it quickly and just run 32 bit
to get access to their 32 bit
only plug-ins. To add insult
to injury, the addressable
memory in the Mac version
of CS5 has been reduced by
nearly 1GB down to just a
bit over 2GB. In some
ways, it does seem that the
CS5 release for Mac was a
bit rushed and hopefully
future maintenance updates
will bring it closer to the
Windows version. The third
party plug-in situation for
both platforms, while getting
better, is still not where it
needs to be. Many of the
best and most popular plugins still do not come in a 64
bit version. This is
unfortunate and I feel that plug-in manufacturers have now had almost two years since the launch of 64
bit Photoshop CS 4 (Windows only) and it is high time all plug-ins worked in 64 bit mode.
There you have it! There are many other features and refinements but these are the ones that will
immediately affect how I and many Nature Photographers work. I look at CS5 as being the Photoshop
release that speeds things up for me. I no longer need to spend a ton of time removing lens
4
imperfections or the large amount of time making complex selections for layer masks. Straightening is
much faster and Noise reduction is much better.
Photoshop CS5 For Nature Photographers – A Workshop in a Book
Ellen and Josh Anon are back with a new edition of the acclaimed Photoshop for Nature Photographers
book. The new version fully updated and enhanced for Photoshop CS5 includes access to a website
where the reader can download many of the exercises in the book so that they can follow along and
have a more interactive learning experience. This replaces the accompanying DVD found in earlier
versions of this book. I find the new book to be a significant improvement from the already excellent
older books. Not only do they cover all of the new functions in Photoshop of interest to Nature
Photographers, they have also enhanced some of the older sections and have beefed up the sections
for Photoshop Elements users. Adobe no longer ships Photoshop CS5 with a tutorial on the new
functions as it did with previous versions, so a book like this is even more essential than before and it
becomes the defacto User Manual for me when I want to look up a function that maybe I haven’t used
in a while, learn more about new functionality such as HDR Pro, or just brush up as I often like to do.
As with previous versions, the book follows a photo workflow by teaching you the basics of digital
capture first, followed by Bridge - Photoshop's image browser and organizer. Since this is the first
place you interact with images on your computer it is a great starting point and the chapter on it comes
early in the book. Next it is on to Adobe Camera Raw and it's new capabilities, followed by Photoshop
in depth. Detailed setup
instructions for the many
different Preference
sections in the different
modules that make up
Photoshop CS5 are
included. Unfortunately this
book was published before
ACR 6.1 was released
which includes lens profiles
for automatically fixing many
lens weaknesses and
design shortcomings.
However, the book does
cover Photoshop's Lens
Correction filter which
utilizes identical technology
and settings so you can just
apply your learning from
that section of the book to
the new ACR 6.1. The in
depth Photoshop sections
take you step by step
through almost anything you
would ever want to do. I found the section on the new Refine Edge command extremely useful since
this is a very powerful new function but it is a case of a single equation in many unknowns. The Anon’s
guide the reader through how to best use this tool to make truly excellent selections previously not
possible in older versions of Photoshop. I felt the discussion on the new Content Aware Fill to very
balanced. Many things I have read make it sound almost like a panacea which, in my own experience,
it is not. Ellen and Josh clearly indicate it’s shortcomings and the additional work required after using
the tool to make your selection perfect. I also found the section on HDR Pro extremely useful and
following the steps will even allow the HDR novice, to produce some very nice HDR images. Beyond
5
the normal adjustments one makes to images, the book also tackles the more complex subjects such
as Composites, creative Black and White, Filters, Multiple Exposures, and an enjoyable section on
painterly mages that gave me some new ideas to try. Photoshop CS5 for Nature Photographers
concludes with a chapter on how to get the best output and a Tie Savers chapter which tackles some
major time saver functions.
Throughout, the book, many of the images have been upgraded including many stunning new photos
taken by the authors themselves. Additionally
short technique articles from notable
photographers including George Lepp, Joe
McDonald, Arthur Morris, John Shaw and more
are included.
My only complaint is that the index of the book is
not as effective as it could be. As an example, I
wanted to find HDR Pro when I first got the book.
The index does not have an entry for this but
does have one for HDR imaging. It takes you to a
single page, in the middle of a very complete multi
page section on HDR Pro. It doesn’t even take
you to the first page of that section. I found on
several occasions where the index got me close
but missed by a little bit. The eBook version
would not have this problem since most eReaders
offer content aware search.
List price or Photoshop CS5 for Nature
Photographers is $49.99 however the paper
version can be had at Amazon and Barnes and
Noble for $30 to $35 and the eBook version is
below $30. For that, you get nearly 500 pages of
jam packed with easy to understand and easy to
apply information about CS5. The eBook version
is already available through the Kindle store at
Amazon but is not available on iBooks. I
downloaded the free sample which includes all of
the preliminaries and the first chapter using the
Kindle App on my iPad. The formatting of some of
the pages is strange when viewing in horizontal
mode but it all clears up in vertical mode. This
book would definitely be better in iBooks or the
Barnes and Noble reader on the iPad than it is using the Kindle reader as both of those are better
designed for the iPad.
One always wonders if a new version of a book that one already owns is worth the money. This book
provides, in one place, all of the information to use the new tools in Photoshop CS5 as well as providing
an excellent manual for all of the other functions that a Nature Photographer is likely to use. In addition
to covering the new areas that were introduced into Photoshop with the release of CS5, many of the
functions that were new to CS4 are now covered more thoroughly. In this case, I must conclude that it
is worth purchasing the new version of Photoshop for Nature Photographers as it is a much more
complete reference than it has ever been in the past.
6
How Do I Select an Aperture for a Landscape Photo?
This was a question posed in a recent NatureScapes Live Podcast (see below for access to the
podcasts). While on the surface this may seem to be a fairly simple question, it turns out the answer is
quite complex. In photography, we are always dealing with compromises and the answer to this
represents the classic exposure compromise. On the one hand, for most landscape photographs, a
fairly extreme depth of field is needed - everything sharp from a foreground object perhaps just a foot or
two from the lens to something at a great distance that is essentially at infinity distance from your lens's
perspective.
To get a large depth of field (DOF), traditionally we have simply stopped down the lens to f/16 or f/22.
While this does result in a very large DOF, there are a number of undesired effects associated with it. If
there is even the slightest breeze, the slow shutter speeds required to properly expose an early
morning or late evening "sweet light" photo, can result in object movement such as grasses or other
plants thereby blurring the photo. A potential solution to that is to start increasing the ISO however this
can result in ever increasing objectionable digital noise (or grain if using higher ISO film). While noise
reduction algorithms can
mitigate this, they usually
also end up reducing fine
micro detail. In addition
to these challenges, the
smaller the aperture, the
more resolution robbing
diffraction effects come
into play from the lens.
Newer, smaller pixel
sensors, are more prone
to record these effects.
In an ideal world, most
shots will have the most
resolution when lenses
are in the neighborhood
of f/5.6 to f/8 so this
would be a great aperture
to shoot with, but then the
DOF is often not great
enough.
So what can we do?
The first and most important thing a photographer must understand to begin to deal with this problem is
the concept of a hyperfocal distance setting on your lens. Wikipedia offers an excellent definition for
hyperfocal distance:
"The hyperfocal distance is the closest distance at which a lens can be focused while keeping objects at infinity
acceptably sharp; that is, the focus distance with the maximum depth of field. When the lens is focused at this
distance, all objects at distances from half of the hyperfocal distance out to infinity will be acceptably sharp."
Basically what this means is that you need to focus your lens somewhere short of infinity to maximize
the depth of field. But how do we know where this focus point, the hyperfocal distance, is? It varies
with aperture and with focal length making it a complex calculation. Before I had an iPhone, I use to
carry hyperfocal distance charts with me in my wallet. It was basically a table that had all of the
common focal lengths and the hyperfocal distance setting for every aperture. But in the age of the
7
Smart-phone, I now use an app called DOF Master. It is just $1.99 and I find it an indispensable aid in
the field and it works for every focal length, every aperture and every sensor size.
But even with hyperfocal settings, and even if you have a distance scale accurate enough on your lens
to actually set that value precisely (zoom lenses generally do not), you still run into the problem of
having to shoot at f/16 or f/22 often to get the needed DOF or perhaps it still isn't possible to get
everything in focus. There are two remaining options:
The first is to use Tilt-shift (T/S) lenses. Tilt-shift lenses allow you to tilt the front element thereby
changing the focal plane from parallel to the front element to an angle from the front element. By doing
this, you can dramatically increase the DOF at a given aperture. It is not unusual to be able to get the
same DOF at f/5.6 with a T/S lens that you would get at f/16 with a non T/S lens of the same focal
length. Both Canon and Nikon make outstanding T/S lenses but they do have their limitations. They
are by definition manual focus lenses, they are very expensive, and there are no T/S zooms so you are
stuck with the focal lengths made for your camera mount. However, a kit of a 17mm, 24mm, 45mm,
and 90mm T/S lens is all that some landscape photographers need. See my Spring 2005 Newsletter
for more on T/S lenses - www.ejphoto.com/quack_2_05.htm
As with most things these days, the other solution, and by far the cheapest, is to use digital technology
to handle this problem. Just like we can bracket for light, we can also bracket for focus. When
confronted with a large DOF requirement, you can take several shots focused at different distances
through the scene. In a mountain landscape with wildflowers in the foreground and a mountain in the
distance, with perhaps some trees in the middle ground, you can take three or more exposures focused
on each of the areas of interest. You can then merge these shots digitally. Helicon Focus is one such
program that automates this merging. Photoshop also has a Photomerge facility that has this capability
however it is very rudimentary and sometimes misses quite badly. These programs analyze all of the
shots that you feed into the program and selects the sharpest areas from each frame and then merges
them into a single shot. The concept is similar to HDR where you are taking shots at different
exposures and then merging them into a single shot but here you are taking shots at different focus
points and then merging them into a single shot. HDR and DOF maximization can even be combined
for a real challenge in the digital darkroom.
The iPad Arrives
This entire newsletter
was produced on an
Apple iPad! You read
that right, I did the
whole thing on an iPad
using Apple's Pages
word processing app for
the iPad. Much of it
was written while
traveling between the
northernmost point in
the USA - Barrow
Alaska and Phoenix,
Arizona (I will let you
know all about this trip
and several others in
the next edition of
Quack). The iPad is an
awesome little device
8
and redefines web surfing and email as well as online media consumption. About the only time I turn
on a computer anymore is when I need to print something or need to work on photos in Bridge, ACR, or
Photoshop. With just a 2 or 3 hour 11 Watt charge needed every couple of days, it is saving a ton of
electricity too.
While I have yet to find any compelling photo editing programs for the iPad for anything but the casual
photographer or those that want to turn their photos into stylized photo art, I do find it a useful tool for
browsing the web, catching up on news, even watching the latest TV programs. Many of the iPad
specific apps are quite rich and sophisticated. There are some excellent sunrise/sunset apps including
those that show you on a map exactly where the sun will rise and set relative to your position, the
iPhone version of DOF master works fine on the iPad, and there are many other tools beneficial to the
photographer but certainly the iPad is not a must have to stay competitive in the photo game. It is
however an incredible convenience and is way more capable than I ever imagined.
One word of caution for
those putting a portfolio
on the iPad, the iTunes
upload of your photos
automatically scales your
photos to 1024 pixels
along the longest side.
So if you do not want it to
change resolution of your
shots, thereby making
photos not look their best,
it is best to save any
photos intended for the
iPad to 1024 pixels along
the longest side - just like
most do for digital
projectors. As long as
you do that, the iPad view
of your photos is quite
stunning and will wow
anyone looking at them.
You can even have it act
as a digital frame (an
expensive one) when you
are not using it.
Nikon Scan in 64 Bit versions of Windows
If you are a Nikon film scanner owner and have been frustrated by Nikon's lack of support for 64 bit
versions of Windows, you can rejoice. A third party, Andrew D. Minton, has come along and offers a
replacement driver for Nikon's that now allows you to use your scanner with Win 7 or Vista 64. Give it a
try, it works perfectly. You won't be able to scan within Photoshop since Nikon would have to provide a
64 bit TWAIN driver to do that but you can certainly regain full use of Nikon scan. Here's how:
www.exposedvisions.com/Win7%20Scans.htm
NatureScapes Radio Live Podcasts
Greg Downing and I have started to do monthly Podcasts. We talk all things Nature Photography and
have notable special guests. We have a lot of fun and at the same time get serious on many topics
9
near and dear to Nature Photographers. From technique, to locations, to environmental issues, we talk
about it all and answer many questions from our audience. Click on the following link to gain access
and you can even subscribe on iTunes to get every new issue automatically downloaded to your
computer: www.naturescapes.net/docs/index.php/naturescapes-radio-live-podcast or simply search for
NatureScapes Radio Live in iTunes
Facebook Page
On my Facebook Fan Page, I am keeping those interested up to date on what photo excursions I go on
as well as short commentaries on a variety of photo related subjects and tools. I also have a number of
galleries accessible through there. Please visit:
www.facebook.com/pages/EJ-Peiker-Nature-Photographer/150804446733
and if you like what you see, please click the "Like" button.
Private Photography Instruction
In addition to the successful private DuckShops which I launched last winter after many years of group
instruction workshops, I am now also offering private instruction in Wildlife and Landscape photography
at the place of your choosing within the USA and Canada. All DuckShops and private Workshops will
be of the one on one variety (or two on one). Clients may schedule time in 4 hour time blocks for either
classroom or field sessions. With just two people, a number of shooting locations become possible that
aren’t possible for larger groups and thereby making it possible to photograph some species or
locations that are not attainable with larger groups. More specific instruction, based on the client’s
specific needs, can be given using this delivery method in either the classroom or in the field. For more
information please see the following link: http://www.ejphoto.com/duckshop_private.htm
Photo Index
Page 1:
Page 2:
Page 3:
Page 4:
Page 5:
Page 6:
Page 7:
Page 8:
Page 9:
King Eider on Tundra - Barrow, Alaska; Nikon D300, 500mm
Arctic Ocean - Barrow, Alaska; Panasonic GF1, 14-45mm
Female Red Phalarope - Barrow, Alaska; Nikon D300, 500mm, 1.4x
Kelp - Otago Peninsula, New Zealand; Nikon D300, 500mm
Resting Walrus - Aleutians, Alaska; Canon EOS 1D Mark II, 500mm, 1.4x
Big Island Sunset - Hawaii; Canon EOS 1Ds, 70-200mm
Sossusvlei - Namibia; Nikon D700, 24-70mm
Dunlin - Barrow, Alaska; Nikon D300, 500mm, 1.4x
Torres del Paine - Chile; Canon EOS 1Ds Mark II, 70-200mm
Disclaimers:
E.J. Peiker writes for and is supported by Singh-Ray Filters and receives non-monetary compensation
from Singh-Ray Filters.
E.J. Peiker is a Wimberley Professional Services featured photographer and receives non-monetary
compensation from Wimberley.
E.J. Peiker is a member of Nikon Professional Services and receives some free services from Nikon
Corp.
E.J. Peiker is a founding partner in NatureScapes.net and receives non-monetary compensation from
Naturescapes.net
10
Those that know me, know I would not endorse a product even for compensation if I did not feel it were
a superior product.
Notice:
EJPhoto will be closed August 2 - August 14, 2010. All orders and inquiries will be processed in the
order in which they were received.
Legal Notice: Written and Photographic Content © E.J. Peiker, Nature Photographer. The text and
photographs contained herein may not be copied or reproduced without written consent. This
newsletter may be forwarded without restriction unaltered and in its entirety only.
11