1
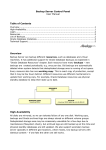
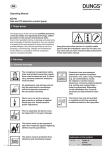
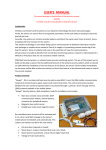
Monitor player
Installation and user manual
Kurkshop Electronics
0613980354
[email protected]
Contents
1
2
3
4
Options ............................................................................................................................................ 3
1.1
Never remove the SD card ....................................................................................................... 3
1.2
Accessing the system ............................................................................................................... 3
1.3
Parts ........................................................................................................................................ 3
1.4
Where you put your system? ................................................................................................... 3
1.5
IP address of the system .......................................................................................................... 4
1.6
Starting the first time ............................................................................................................... 4
1.7
Login ........................................................................................................................................ 4
Program........................................................................................................................................... 5
2.1
Shifting daily ............................................................................................................................ 5
2.2
Changing the program.............................................................................................................. 6
2.3
Adding a picture, text or mp4 to the program .......................................................................... 6
2.4
Texts ........................................................................................................................................ 7
Files ................................................................................................................................................. 8
3.1
Uploading files and movies....................................................................................................... 8
3.2
List of available files ................................................................................................................. 9
Settings.......................................................................................................................................... 10
4.1
General .................................................................................................................................. 10
4.2
Password administrator ......................................................................................................... 11
4.3
Only one monitor, master or client......................................................................................... 11
4.4
Wifi ........................................................................................................................................ 12
4.5
Retrieve new software ........................................................................................................... 12
1 Options
The possibilities of the system are:
1. Show pictures, movies and texts in a sequence as you have choosen
2. You can specify which pictures you want at what time: in the morning coffee, at lunch some
toast, in the afternoon a diner. In the weekend a differtent program as in the week.
3. Easy webinterface. No need for computer knowledge.
4. Can use a fixed internet connection or wifi.*)
5. Secured with a password
6. If you open your router, you have access from anywhere via internet.
*) the wifi occasionaly can prevent the system to start. A wired (fixed) connection is to be preferred.
1.1 Never remove the SD card
NEVER remove the SD card while the system still has power. The software can be damaged and become
unusable. First stop the power on the system, and then remove the SD card.
1.2 Accessing the system
The system has no screen of its own. You have to use a computer in your network. If you open your
router such that it forwards requests to the system, you can reach the system from anywhere (port
forwarding; this is not a part of this manual).
1.3 Parts
The system consists of:
- a computer and power supply
- a case
- an SD card with software
- optional: wifi dongel
- optional: RJ45 ethernet wire
1.4 Where you put your system?
Looking for a place for your system, remind:
a. The best place is behind your monitor.
b. The system needs internet, so there has to be internet near the system. Or a wifi network.
c. There is no need to be able to look at the system. You can not see anything.
d. The place has to be easily accessible for wires.
1.5 IP address of the system
During startup the system shows the IP address on the screen, for instance:
Starting your computer. Your IP address: 192.168.178.73
The number 192.168.178.73 will be different in your case. Write down the number. You can access the
system using this number. Enter the number in your internet browser and add it to your favorites.
If the system doesn’t show the IP address, it has no internet. Without internet the system cann’t start.
1.6 Starting the first time
Every time you start the system, it needs internet. If the system doesn’t have internet (wired or wifi) it
cann’t start.
The easiest is a wired connection: the system shows you the IP address on the monitor.
If you cann’t use a wired connection, probably you can make a wifi using your smartphone: “portable
wifi”. If you specify the portable wifi like this, you can access the system as well:
Network name: s91
Password: aaaaabbbbb
Turn on the portable wifi first, next turn on the system.
Connect another computer to the portable wifi and enter the IP address from the monitor. The initial
password is a single ‘a’: we will change that later.
At settings/ wifi you can enter your own networkname and password. Take care: case sensitive.
1.7 Login
The initial password is a single ‘a’. Please change the password, because we deliver all systems with the
same password.
2 Program
2.1 Shifting daily
Every day at 00:02 the system checks if there is a program for today. It uses the following rules:
- A program for today will be untouched.
- If there is no program for today, the system will copy the yesterday program to today. The
yesterday program will be used again today.
- If there is only a program in the past (possibly you didn’t use the system for some time), the
system copies the last program to today.
- Programs from the past will be remove.
2.2 Changing the program
You can add a line with the plus. The sequence you can change with ‘edit’. If you skip some numbers you
can add a picture later easily.
The following program should be understood like this:
- There are two program: The first one starting at 07:00 AM. It plays the pictures until 09:00
hours. At 9 o'clock the second program starts until 7 AM the next day.
- The 9 o'clock program contains 2 pictures and one text. First the system shows water1.jpg for 4
seconds. Next water4.jpg six seconds and water1.jpg four seconds. Finally text1 sever seconds.
- If you work on a master, there is a button "publish" to send the data (pictures, movies, texts and
settings) to clients system. Once every hour the clients retrieves the data from the master.
A change in the program is not active immediately. The system checks the program every two minutes.
2.3 Adding a picture, text or mp4 to the program
Click at the plus in the previous screen. The system shows the data from the last line because these will
probably be close to the data you want to add. You can change all data in this screen. It is possible to use
a picture several times in one program. You can play pictures 1 2 1 3 1 and 4 in one program. You can
use the same picture in different programs: maybe you want a picture all day in the program.
If you only want to show one picture, the showtime doesn’t matter. The system doesn’t use the
showtime if there is only one picture or text in the program.
2.4 Texts
In these screens you can specify your texts. As soon as you add a text to a program or you change a
tekst, the system will show it within 2 minutes.
A text screen shows also your logo (see files/ upload) and the name of your organisation (settings/
general). You can specify the colors (backgroundcolr and textcolor) at settings/ general.
If you have choosen a background and font color but the screens uses black and white anyway, please
check wether you have specified the color correctly. It should be : number- comma-number-commanumber.
2.5 More systems
If you have two or more systems, and you want the same content : this is possible. You choose one
system as master, preferrably the one you can see while you are working on your laptop. The other
system is the client: it follows the master.
For every system you have to specify on that system wether it is a client or master. At the clients you
have to specify the IP address of the master.
At the master you changte your contents. The changes are not active immediately. As soon as you are
happy with the new pictures, movies, texts and settings, you click the button publish:
De knop publiceren is er alleen op de hoofdmonitor. Zodra u op publiceren klikt, zet de hoofdmonitor de
inhoud klaar voor de volgende monitoren. Deze controleren de inhoud iedere minuut.
The button publish is only available at the master. As soon as you click publish, the master makes the
content available for the clients. The clients check every minute for new contents.
3 Files
3.1 Uploading files and movies
Before you can use a picture or movie, you have to upload it first. The system makes every picture fit
using the width. If the height is not enough, you will have a black line at the bottom of the screen. If
your picture is too high, the bottom of the picture will not be in the monitor. The best size for pictures is
1920 x 1080 pixels. Small pictures will show blocks.
The system makes the movies fit to the screen anyway.
Upload your files here. Click browse, choose the file and click save.
You can upload your logo here: change to “is this your logo” = yes and proceed as normal. The system
will use the logo in the text screen.
3.2 List of available files
The system shows the available pictures and movies. Pictures and movies which you don’t use
temporarily, you can leave them here. If you don’t use them for a longer time, you better remove the to
give the system enough diskspace.
4 Settings
4.1 General
The first field is the company name. This will be on the text screens.
You can specify wether you use the system for landscape or portrait.
The field black edges has to do with several monitor types. If the pictures don’t fit exactly on the
monitor, you can try another number. Make a program with only the picture ‘testcircles.jpg’ and check
wether the circles fit on the monitor.
The background color and font color are used in the text screens. It should be number-comma-numbercomma-number. If you make a mistake, the system will display a message: “Colors wrong. Backgr: xxxxxx
font: xxxxxx” in which xxxxxx will be the input form the colors you have entered.
4.2 Password administrator
Please change the password because we deliver all system with the same password. The initial password
is a single “a”.
4.3 Only one monitor, master or client
Here you specify how you use the system:
Only one monitor
Your system has only one monitor.
Client
This monitor depends on an other system for the program and files. This
system willl copy pictures, texts and movies from another system: the
master. You have to specify the IP address of the master. A client checks
every hour wether something has changed on the master.
If you access the client and change something, it will be overwritten within
one hour from the master.
Master
This monitor is the source for the clients. You specify your program here and
the program, pictures, texts and movies will be copied to the clients.
4.4 Wifi
Remind that the SSID and password are case sensitive.
4.5 Retrieve new software
The system will check for new software. Check the log for the result.