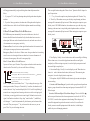
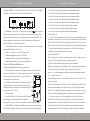
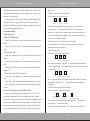
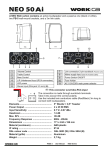
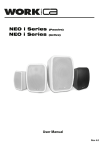
1
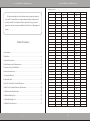
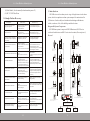
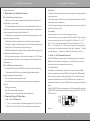
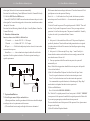
Limits Of This Safe System As an advanced technical guard system, although it can reduce the occurrence of theft, robbery and fire, it can not promise to have no any above-mentioned accidents happen or have no any personnel casualty and property losses happen. And we invite you understanding that any alarm system ,whether it is used in business or at home, it may alarm wrongly or failure to alarm because of various reasons. We remind you to pay attention to the following possible reasons: 100-Zone Wireless Alarm System 1.The system is not armed because of carelessness. 2.User or installation personnel misunderstand user’ manual or operate wrongly so that the system can not work normally. 3.Intruder intrude the place where is beyond the detect areas or he can pass by the alarm detector or make it malfunction. Passive infrared detector only can detect the areas like the introduction picture shows. it can not detect hidden places, like behind wall, inside ceiling, inside floor, behind door, glass partition, glass door or being glazing. 4.The detect sensitivity of passive infrared detector will automatically change according to the changed environment temperature. when the temperature of protected area reach to 32℃-40℃,the performance of infrared detector (detect distance) will reduce. So we suggest you to check its working performance carefully when it reaches to such a temperature, and then adjusting it. 5.There are no power or the battery is used out or damaged. 6.Alarm trumpet is installed at the other side of the door closed, so it may not be able to warn or wake the sleeper. 7.There are something wrong with telephone line which transfer alarm signals to alarm center ,or the lines are busy so that it can not transfer signals in time. 8.When there are someone intrude ,the common reason why system can’t alarm is that the system don’t get normal maintenance . Like other electrical equipments , the electronic elements of this equipment also may be damaged. Therefore, user should check the system periodically everyday. 9.Other unpredicted reasons. If you don’t agree with the above clauses ,within three days from you purchase, you can send it back if only it is not damaged, and we will refund all money. Otherwise, we view it as that you agree with the above clauses. You should known that alarm equipment is not insurance substitution .So the users must be careful to protect your life and property. V1.0 User Manual 100-Zone Wireless Alarm System 100-Zone Wireless Alarm System Defense Area Table Zone No. We are honored that you select Karassn security products, thank you very much. To make full use of its performance and keep it stable, please Zone Location Zone No. Zone Location Zone No 1 35 69 2 36 70 3 37 71 carefully read this “User Manual” before operation. For any questions, 4 38 72 please don’t hesitate to contact with Karassn Client Service Department or 5 39 73 Agents. 6 40 74 7 41 75 8 42 76 9 43 77 10 44 78 11 45 79 Table Of Contents 1.Introduction……………………………………………………………………… 2 2.Definition………………………………….……………………………………… 4 3.Operate Precautions……………………………………………………………… 4 4.Main Functions And Characteristics………………………………………………5 5.Name And Usage Of Main Parts……………………………………………………5 6.Interfaces Instruction……………………….…………………………………… 9 7.System Installation……………………………………………………………… 9 12 46 80 13 47 81 14 48 82 15 49 83 16 50 84 17 51 85 18 52 86 19 53 87 20 54 88 21 55 89 22 56 90 23 57 91 24 58 92 8.Operation Guide………………………………………………………………… 11 25 59 93 9.How To Learn/Delete Codes Of Detectors……………..……………………… 19 26 60 94 27 61 95 28 62 96 10.How To Set Transmit Functions Of Detectors…………..…………………… 20 11.Main Technical Specification………………………………………………… 22 12.Standard Packing List …………..…………………………………………… 22 13.Optional Packing List………………………………………………………… 22 14.Simple Failure Recovery……………………………………………………… 23 -1- 29 63 97 30 64 98 31 65 99 00 32 66 33 67 34 68 -24- Zone Location 100-Zone Wireless Alarm System 100-Zone Wireless Alarm System Failure Recovery No indicative sound and clock display when power on. 1.The socket is badly connected or the socket has no power. 2.Fuse has burnt out. 1.Check the plug and socket, 2.Check the fuse and replace it. Backup battery can’t work normally when power failure. 1. The polarity of backup battery is wrongly connected. 2.Backup battery fuse has burnt out? 1.Check the polarity connection of backup battery is correct . 2. Check the fuse and replace it. There is low-voltage warning tone when alarm host provides power by backup battery. 1.Backup battery power lower. 2.Backup battery is invalid. 1.Recharge backup battery. 2.Change backup battery. 1.Antenna is damaged. 2.It shares the same socket with TV, micro oven and etc. 3.It closes to TV, micro oven and etc. 1.Replace the antenna. 2.it is recommended to use an independent power socket. 3.Avoid closing to devices with high electromagnetic radiation. 1.Recover it under the direction of the distributor. 2.Arm this zone again (refer to user manual). The receive distance of alarm host becomes shorter 1.The code in this zone has been It can not alarm in some defense area. deleted. 2.This zone has been disarmed. 1.The height of installationdoesn’t comply withrequirements. 2.The jumper of de tector to adjust the detect distance has been changed. 3.The environment temperature is larger than temperature of hu man body. 1.Adjust the installation angle according to installation requirements. 2.Change the jumper of detect distance to improve detect sensitivity. 1.Is the installation angle of the detector suitable? Is the environment temperature higher than that of human body? Adjust installation angle. Recovery the detection jumper of the detector change the detection jumper of the detector and change the infrared sensitivity The distance of remote controller become shorter. The emit indicator light doesn’t flash when emitting. Battery power lower, it needs to change battery. Transmit function is abnormal. 1.The address jumper has been changed. 2.Is the forward detector code deleted or changed? Recover the jumper setup: Recovery the code under the directions of the distributor. Can’t enter setting state 1.The code entered is wrong. 2.The telephone is not the type of double-tone. 1.Enter the correct code. 2.Change the telephone to be the type of double-tone. Dialing function is abnormal 1.The telephone is not the type of double-tone.2.Outside line is connected with extension socket on telephone. 1.Change the telephone to be the type of double-tone. 2.Outside line should be connected with line socket. electrograph makes out urgent “Beep” sound when working. The outside line of alarm host don’t connect with extension output of electrograph. Connect electrograph with extension output of electrograph. Detector Misinformation The detect distance of detector becomes shorter. KS-200B alarm system is composed of KS-200B main unit, KS-200 series wireless infrared detectors and KS-50 series wireless emitter (Show as picture 1) Picture 1 Wired Emergency Button KS -2 00D CT Wireless PIR Detector KS-200AT /KS-200ACT Wireless PIR Detector KS-50AI Wireless Emitter Wired KS-20BW Wireless Door Sensor KS-200ATI Wireless PIR Detector Active PIR Detector KS-50AI Wireless Emitter KS - 20 0D CT Wireless PIR Detector Wireless Smoke Detector KS-200BTI Wireless PIR Detector KS-50AI Wireless Emitter KS-20BW Wireless Door Sensor KS-10 Series Wireless Remote Controller Micro-wave/PIR Detector KS-200ATI/KS-200BTT Wireless PIR Detector …… Failure Reason Wired Fault Symptom KS-200B series wireless alarm system is a type of long-distance wireless alarm system, which is a complete area alarm system composed of a main unit and 1 to 100 detectors. It can be widely used in industrial and mining establishments, schools, warehouse, villas, office buildings and other locations. Diagram Of System Components …… 14.Simple Failure Recovery 1. Introduction …… (9)Clock Module ( It works normally when alarm host power off) (10) DC 12V 15W Wired Siren 10 0- Zo ne W ir el es s Al ar m Sy st em TI ME KS-10 Series Wireless Remote Controller Wireless Caller Wireless Emergency Button Tele co m m u nication O f f ice T e l e p h o ne -23- ORIENTATION Beeper -2- Mob i l e Phon e 100-Zone Wireless Alarm System 100-Zone Wireless Alarm System 1、The transmit address code should not be empty (0000); otherwise, it cannot transmit signals. 2、The detector being transmitted must be 315MHZ VD5026; it does not support other forms. 3、It only can transmit in arm state, it cannot transmit in disarm state. 11. Main Technical Specification 1. KS-200B Series Alarm Host Wireless Receive Sensitivity:≤0.2μV (12dB) Working Voltage: AC 220V ±15% 50Hz, DC 12V-13.8V Working Current: standby current≤75mA, Alarm Current≤350mA. Working Environment: -10℃ ~50℃ Alarm Loudness:≥100 dB within 1m 2. Wireless PIR Detector Working Voltage: AC 220V ±15% 50Hz, DC 12V-13.8V Working Current:: standby current≤10mA, Alarm Current≤500mA. Working Environment: -10℃~50℃ Infrared Detector Distance: 1-12m, 60°up and down, 110°right and left. 12. Standard Packing List (1) KS-200B Alarm Host (2) Antenna (3) KS-200B User Manual (4) Maintenance Card 1PC 1PC 1PC 1PC 13. Optional Packing List (1)KS-200AT Wireless PIR Detector (2)KS-200ACT Wireless PIR Detector (3)KS-200ATI Wireless PIR Detector ( It can be armed independently, and it has transmit function. (4)KS-200BCT ( It can alarm on the spot) (5)KS-200BTI Wireless PIR Detector ( It can be armed independently, and it can alarm on the spot, moreover, it has transmit function.) (6)KS-50AI Wireless Emitter ( It can transmit wired/wireless detectors) (7)KS-10A Wireless Remote Controller (8)12V 1.2Ah Backup Battery -3- -22- 100-Zone Wireless Alarm System 100-Zone Wireless Alarm System For example: Set the transmit address of KS-200ATI/BTI detector to be “0 TH, 1 TH, 3 TH, 4 TH, then the transmit address code of KS-200DCT detector, KS20BW detector, KS-11A Emergency Button should be set as picture 2. D0 D1 D2 D3 3TH 4TH 1TH KS-50AI Wireless Emitter adopts 8-bit single chip as processing core, and it provides wired detectors with working power, and transmit on-off alarm signals of wired detectors to the signal which can be recognized by KS-200B series alarm host, and it can transmit and be armed/disarmed by remote controller. and it selects rechargeable battery as backup power, and it can charge by itself, and also can automatically exchange between AC and DC, and it will indicate when battery power lower. 2. Definition 1 2 D0 D1 D2 D3 9 1 18 + - + 4TH D0 D1 D2 D3 1T H - 1TH 4TH D3 D2 D1 D0 D3 D2 D1 D0 between AC and DC, and it will indicate when battery power lower. 1.3 Wireless Emitter 0TH 0TH Picture 2 Picture 1 (It is OTH when it is not inserted) Picture 2 (KS-200DCT Passive PIR Detector It is OTH when it is not connected) (KS-20BW Wireless Door Sensor KS-11A Wireless Emitter It is 3TH when it is not inserted It is 3TH when it is not inserted Note: The address code can be read according to the position of address jumper. If it is not inserted, which means it 0TH. It only can be transferred when the address code of being transferred detector is exactly the same as that of KS-200ATI/BTI detector. The power must be off when modifying transfer address code. Make sure it is right, and power it on to see if the code is right, after modifying the code, it is valid when powered on again. Transmitter only can transmit alarm signal in arm state. So it must be armed in time to make sure the reliability of system. Remark: -21- Transmit Wirelessly The detector (emitter) can transmit signals of short-distance wireless detector to the signals which can be recognized by KS-200B series alarm host. It has advantages of emit wirelessly and save cost. For example, some building needs to install 10 PIR detectors, in old way, you need install 10 KS-200ACT detectors, and you need to consider the backup power and AC power of 10 detectors. If you adopt transmit wirelessly, you can use one KS-200ATI detector, other 9 detectors can use short-distance PIR detectors produced by our company (such as KS-200DCT and so on). So it greatly save cost. 3. Operate Precautions 3.1 Please carefully read this User Manual and pay more attention to labels and directions on main unit before operation. Check whether all wire connections are correct and then turn it on to test so as to prevent occurring accidents. 3.2When alarm host is not equipped with backup power or clock module, the time should be readjusted if power failure occurs. 3.3This alarm host can be equipped with 12V 1.2Ah sealed-acid storage cell. standby time is longer than 24 hours, if power failure often occurs in some defense area, batteries with larger capacity are recommended to serve as backup power. 3.4Please don’t disassemble alarm host at will so as not to cause accidents or damage the apparatus. 3.5If failure occurs during operation, please carry with warranty card to contact with Karassn client service department or Karassn agents. Remember not to disassemble or repair it by yourself. 3.6Please periodically perform test so as to clear troubles in time to avoid -4- 100-Zone Wireless Alarm System 100-Zone Wireless Alarm System omitting alarm signals. Precautions: 4. Main Functions And Characteristics 1.Please don’t press emergency button on remote controller to trigger the detector when learning code. 2.For being transmit code of detector, the code signal alarm host receives should be transmit by emitter (transmitter). 3.To avoid wrongly learning code, please trigger detector to test to see if the code has been learned successfully. For example: KS-200B-A Function Introduction 4.1Detector (wireless emitter) can automatically learn codes with alarm host. And dilatancy is easy and quick. 4.21-100 independent wireless defense area can be defined and the defense of each defense area can be activated or deactivated independently. Common defense area and emergent defense area can be defined at will. 4.3Alarm host has two groups of timer-open time and two groups of timer-close time, and it indicates present time. 4.4Three kinds of alarm sound and four levels of alarm volume are optional. 4.5Ten pieces of up-to date alarm messages can scroll to display simultaneously. 4.6The 60 pieces of latest alarm message can be inquired. 4.7Build-in backup battery is optional. And it equips with floating charge device, and it indicates when battery power lower. 4.8A set of normal open output, a set of normal close output and +12V DC output are provided to control other devices (e.g. startup alarm siren, alarm light, alarm linkage and etc.) KS-200B-B Function Introduction Based on KS-200B-A host, KS-200B-B host increases functions as following: * It can automatically dial six groups of alarm telephone numbers and two groups of pager numbers when alarming. *The system dailer with distinguish function. *It rushes to inform you the alarm message by cutting your speaking on the telephone. *Dailing pause function. *Record 20 seconds alarm sound preset. *Telephone short or cut report function can be opened/closed. Learning a detector in zone 2, set it to be emergency zone type. Firstly, turn detector on, power alarm host off. Press “Function” Key, at the same time, power alarm host, then release “Function” Key. It will show “01 : 0- 09”. Press “< ” key to select the zone number 02, The screen will show “ 02 : 0- 09. Press “> ” key, it will show 02 : 1- 09. Then press “Function” key and trigger the detector to emit. It will make two indicative “beep, beep” sound, and “–” (middle line) will change to “_” (under line), which means the setting is successful. 10. How To Set Transmit Function KS-200ATI, BTI detector support wireless transmitting which can transmit 315 MHz detectors produced by our company (e.g., wireless door sensor, wireless infrared detector, wireless smoke detector and so on) Transmit Regulations If the address code transmitted by transmitter is the same as that of 315MHz detectors, transmitter will transmit VD5026 code signal to KS-200B alarm host. Detector transmit signals according to the address code, so the address code of transmitter should be the same as that of 315MHz detector. A transmitter can transmit the alarm signal of several315MHz detectors, the quantity is unlimited in theory. Each KS-200ATI/BTI detector (transmitter) has 4 bits transmit address code. that is D0,D1,D2,D3 and each address code has four states, that is “OTH, 1TH, 3TH, 4 TH” as picture 1 3TH 4TH 1TH 5. Name And Usage Of Main Parts 5.1 KS-200B-A/B Alarm Host 1、“ < ” key: It is used to complete setup function together with “Function” key. 3TH 4TH 1TH D0 D1 D2 D3 2、“Function” key: Press “Function” key to switch between setup functions. Picture 1 -5- -20- 100-Zone Wireless Alarm System 100-Zone Wireless Alarm System will hang up automatically, and go on dialing other alarm telephone numbers. Note: 1、 If you press“2#” ,it will stop alarming and stop dialing other alarm telephone numbers. 2、If you don’t do any operations ,the alarm unit will hang down this telephone and dial the next one. And it also will dial this telephone number in next dialing circle. 9.How To Learn/Delete Code Of Detectors KS-200B alarm system automatically learn code with detectors, the code of detector should be learned to alarm host firstly, then the alarm host can receive alarm signal. Each zone can be learned on detector code, and each zone can be set to be common zone or emergency zone freely. Common Zone: It can’t receive alarm signal when alarm host in disarm state, but it still response to emergency button on remote controller. Emergency Zone: It also refers to 24 hours zone. as long as alarm host is in working state, It can receive alarm signal whatever alarm host is in arm or disarm state. It also can use the emergency call to ask for emergency help. How To Learn/Delete Code Of Detector In power-off states, press “Function” Key, and power alarm host at the same time, then release the “Function” key, the screen will show as following: Function menu 9, learning code state, it is flashing Learning display, “ ” (over line) it means the zone have been learned. “ it means the zone is empty or the code has been deleted. Zone type: “0” is common zone. “1” is emergency zone. Zone number display ” (middle line) Press “ <” key to choose zone number. Press “ >” key to change the zone type. After choosing zone number, Then press “Function Key” to confirm, the alarm host will make an indicative “beep” sound and display like 01:0- 09. and 09 stop flashing, It means the zone is empty and enter learning code state to wait for receiving signals. At this time, you can trigger the detector to emit signal. If alarm host receives the signal, it will make two indicative “beep, beep” sound. And the “ “ (middle line) will change to “- ” (under line) automatically, which means you have learned code successful. Then you can press“< ” key to learn code in other zones, or you can press “Reset” key to exit learning code state. -19- There are eight functions altogether. Please refer to “ Operation Guide” chapter for specific operations.. 3、“ > ” key: It is used to complete setup function together with “Function” key. 4、“Reset” key: When alarm occurs, press this key to stop alarming, and alarm message will be automatically kept in record. When entering into setup state, press this key to exit. KS-200B-B alarm host, when alarm occurs, press this key to stop alarming, at the same time, it stops dialing other telephone numbers, and alarm message will be automatically kept in record. When entering into setup state, press this key to exit. 1 100-Zone Wireless Alar m System 2 3 TIME ORIENTATION 4 7 6 5 5、Time Display: Usually, it is used to show time, and the second light is flashing. When alarm occurs, it is used to display alarm time and the second light is completely on. When entering setup state, it is used to display setup contents and the second light is completely on. 6、Orientation Display: Usually, it is used to display second. When there is an alarm, it is used to indicate alarm location (defense area). When entering into setup state, it is used to display function setup items. 7、Microphone: Only KS-200B-B have this function, please aim at microphone when recording. 1、Interface Of Alarm Output: It provides with a group of normal open alarm output, a group of normal close alarm output and a group of uncontrolled DC+12V 300mA output. Interface Of Normal Open/Close Alarm Output: There is a label like on the rear panel of main unit, the alarm output contact it can load is 1A 120VC or 3A 30VDC, it controls other equipments when alarming. When the power of controlled equipments larger then the contact it can load, it is not allowed to directly connect controlled equipments with this interface, it should adopt middle relay to avoid damaging main unit. -6- 100-Zone Wireless Alarm System 100-Zone Wireless Alarm System Interface Of DC: V+and C end provide other devices with+12V-13.8V300mA DC output. V+end is anode of DC, and C end is cathode of DC. C 62 73 V+ V+ P US E 2 1 3 4 4 5 2、DC Input: Interface of +12V DC input, the polarity is .When it needs to collocate with large capacity battery, it can be connected with backup power. This interface has self-charge device and it can automatically between AC and DC. This interface should not be short-circuit. If build-in backup battery is adopted, this interface should not be connected with power. 3、Power Switch: When it is turned off, the main unit doesn’t work, but backup battery still self charge with AC power. 4、Fuse: AC powr fuse, it is AC 220V1A tube fuse. 5、AC Power Input: It adopts AC 220V 50Hz. 6、Extension Socket: It connects with telephone set. 7、Outside Line Socket: It connects with outside line 5.2 KS-200AT Wireless PIR Detector It sends alarm signal once when it is powered on. 1、Infrared Sensitivity Selection: If the jumper is inserted at “H” position, the distance it can detect is 8 to 12 m. If the jumper is inserted at “L” position, the distance it can detect is about 4 to 8 m. Lower sensitivity is recommended under satisfaction. 2、Backup Power Input: There are floating charge devise, if backup battery is not selected, it can be connected with rechargeable battery or storage cell and allowable voltage of input power is DC 12-13.8V. H 3、AC Power Input. L 4、Forced Emit Control: If it is short-circuit, the detector will continuously send alarm signal till the jumper is disconnected. Usually, it is used to test whether the emission circuit is normal. 5、Double PIR Sensor: The surface should be kept clear and it is not allowed to touch the surface by hand. If the surface is dirty, clear it with a cotton ball dipped -7- Press 12# # to delete the 2nd group of informed telephone number. Press 13# # to delete the 3rd group of informed telephone number. Press 14# # to delete the 4th group of informed telephone number. Press 15# # to delete the 5th group of informed telephone number. Press 16# # to delete the 6th group of informed telephone number. Press 17# # to delete the 7th group of informed pager number. Press 18# # to delete the 8th group of informed pager number. Press 19# # to delete all 8 groups informed telephone numbers. (5) How To Record Press 30 #, after hearing indicative “beep” sound, aim at the Microphone on the front panel to speak what you like. The record time should not beyond 10 seconds, Press # to finish. If the record is beyond 10 seconds or don’t press “#” key to stop after 10 seconds, it will cause the un-completion or loss. You should record it again. Each time enter this operation, the original voice will be lost. But the latest record will be save permanently if no power failure. (6) How To Play Record Press 31# to play your record for 10 seconds at most. After 10 seconds, there is an indicative “beep” sound, then you can go on other operations. (7) How To Operate When Receiving Alarm Telephone Numbers While receiving alarm, pick up telephone receiver, it will report in pure English to tell you “which zone” occurs alarm. After an indicative “beep” sound, press:2#------to stop alarming and stop dialing other inform telephone numbers. 5#-----re-play alarm record If your command is effective, there should be an indicative “beep” sound, or you have to press again. E.g. There is alarm occurs in the 25th zone at No.3 building in XX garden. When answering alarm telephone, you will hear the voice alert “Ding dong, attention please!!!< No.3 building, XX garden in quanzhou city, fujian province> the 25th zone occurs the anti-theft alarm, please do some effective operations quickly!!!”. ( <> is what you pre-record). After hearing the voice alert, you will hear an indicative short “beep” sound, the system will wait for 20 seconds to receive commands. Enter“5#”to replay if the alarm voice is not clear. After an indicative short“ beep” sound, enter“2#”to stop alarming, and stop dialing other alarm telephone numbers. If there are no operations within 20 seconds, the main unit -18- 100-Zone Wireless Alarm System Press 11# CCCCCC # to set the 1st group of informed telephone number. Press 12 # CCCCCC # to set the 2nd group of informed telephone number. Press 13 # CCCCCC # to set the 3rd group of informed telephone number. Press 14 # CCCCCC # to set the 4th group of informed telephone number. Press 15 # CCCCCC # to set the 5th group of informed telephone number. Press 16 # CCCCCC # to set the 6th group of informed telephone number. Press 17 # CCCCCC # to set the 7th group of informed pager number. Press 18 # CCCCCC # to set the 8th group of informed pager number. The above “CCCCCC” is the telephone (or mobile phone or pager) number. Note: 1、During the course of entering telephone numbers (mobile phone, pager), Use a “*” as a pause for two seconds. The number of * is subject to the type of telephone exchanger, e.g.: mobile phone, group telephone. Semi-automatic pager station, etc. 2、Each group of number (including *) should not beyond 27 digits. 3、 It is unnecessary to enter superabundance phone numbers. If wrong numbers has been entered, it can be directly cover with or be deleted. 4、When alarm host dials the pager. It will automatically add the signal code. But it should be operated according to the local pager station formula. E.g.: How To Set Pager In Middle Northern Of Quanzhou City Press “95951 1234567”, there is indicative voice “hang up to answer the same phone number, information code press 1 and press # to finished”. So the users shall be enter into “1”, the pager formula as follows” 17#959511234567* * * * * * 1 * * # The above * is a pause. Every * has 2 seconds pause time. The * number is subject to time of the pager indicative voice. E.g.: If the users want to set the first group telephone number to be “1234567”,The second group to be “1234567” with the extension number is 801,the third group to be 13900000012. You can press as following: 11#1234567# 12#1234567**801# 13#13900000012# (4) How To Delete Informed Telephone Numbers Press 11# # to delete the 1st group of informed telephone number. -17- 100-Zone Wireless Alarm System in 90% alcohol. 6、Alarm Indicator: It lights when emitting alarm signal. Usually, to protect wireless emission circuit, the alarm emission duration is controlled within 5 seconds, and the alarm interval is about 10 seconds. During the alarm interval duration, the infrared detector doesn’t respond to alarm signals. 5.3 KS-200ACT Series Wireless PIR Detector When KS-200ACT wireless PIR detector is powered on, it will be automatically blocked for 20 seconds and won’t receive infrared signals. After 20 seconds, it will automatically enter arm state. 1、Forced Emit Control: If it is short-circuit, the detector will continuously send alarm signal till the jumper is disconnected. Usually, it is used to test whether the emission circuit is normal. 2、Infrared Sensitivity Selection: If the jumper is 9 6 inserted at “H” position, the distance it can detect is 8 1 to 12 m. If the jumper is inserted at “L” position, the L H 8 distance it can detect is about 4 to 8 m. Lower sensitivity is recommended under satisfaction. 3、AC Power Input. 4、DC Input: There are floating charge devise, if backup battery is not selected, it can be connected with rechargeable battery or storage cell and allowable voltage of input power is DC 12-13.8V. 5、Double PIR Sensor 6、Transmit Address Code: It is used to change the address code of detector, and only KS-200ATI,KS-200BTI have this function. They can transmit the signal of KS-200DCT wireless PIR detector, KS-20BW wireless door sensor, smoke detector to KS-200B-A/B series main unit. 7、Arm Indicator: It lights when it is in arm state, which means it enters defense state, only KS-200ATI, KS-200BTI detectors have this function. 8、Alarm Indicator: It lights when it alarms. 5.4 KS-200ATI Wireless PIR Detector Base on KS-200ACT, KS-200ATI wireless PIR detector increase functions to arm/disarm/emergency alarm and transmit wirelessly. The detector is blocking by itself for 20 seconds when powered on. And during the time, it doesn’t receive any -8- 100-Zone Wireless Alarm System 100-Zone Wireless Alarm System alarm signal. After which, it enters arm state automatically. Functions: Infrared Detecting, Control By Remote Controller, Transmit Wirelessly. 5.5 KS-200BTI Wireless PIR Detector Base on KS-200ATI, KS-200BTI increase functions to alarm on the spot, it sends alarm signal for 5 seconds when triggered, at the same time, it make alarm sound on the spot for 30 seconds. Functions: Infrared Detecting, Alarm On The Spot, Control By Remote Controller, Transmit Wirelessly. 6. Interfaces Instruction Interfaces Instruction Of KS-200B Main Unit V+ Terminal -------- Anode of DC 12V—13.8V output. C Terminal -------- Cathode of DC 12V—13.8V output. DC Input --------- If build-in backup battery has been selected, it is not need to connect with outer power. Alarm Horn --------- Active alarm horn is adopted, which will not affect the operation of built-in speaker in alarm host. The horn is optional according to specific requirements. C V+ V+ PU S E 3 12V 1.2Ah 7. System Installation 7.1 Basic Requirements Of System Installation (1)During installation, suitable types and models of detectors should be adopted according to the user’s requirements on defense areas. (2)The installation location, angle and height of detector are determined -9- Well connect alarm host according to the charter of “ Interface Instruction”. Pick up telephone receiver and operate as following: Press # # # -------- It will make a short “beep” sound, which means system has entered setup state. Press AAAAAA# ------ It means enter the password and confirm it. “AAAAAA” stands for password. The original password is “000000”. There will be a short “beep” sound if the password is correct. Then you can go on the next operations. Or it will exit the setup state. The password is modifiable. To modify it, please refer to the “ password modification” charter. Note 1、 After press # # #, the outside line will be cut off. The power of telephone is provided by alarm host. There should be no dialing tone and other voice signals. Or it shows the outside line still be connected, and should press again or change the telephone set. 2、 After press # # #, if there are rapid “beep---beep---”sound. Usually, it is because that the extension socket and line socket are wrongly connected. And cause alarm because of line cut-off. 3、 If no any operations within 20 seconds in setup state, the system will automatically exit. Note: All the following operations should be done in setup state. And press 0 # 0 # to exit when finished. (1)How To Set Alarm When Telephone Line Short Circuit Or Open Circuit Press 6# to open the function to test line short circuit and open circuit. Press 7# to close the function to test line short circuit and open circuit. It is recommended to open this function, it will make urgently “Beep, Beep” sound when it test telephone line short circuit or open circuit. (2) Password Modification Press 9 # AAAAAA # BBBBBB # BBBBBB #. The “AAAAAA” is original password, the ex-factory state is “000000”. “BBBBBB” is new password. After password is modified, the original password will be invalid. If you want to program again you should enter the new password. The users should take care of their password. If the password is lost, please contact the agent to ask for help. (3)How To Set Inform Telephone Number -16- is 120 ambulance warming sound and “03” is 119 fire warning sound. And there are four levels of alarm volumes, which gradually increase from “00” to “03”. (9)Open/Close Alarm Host By Hand Close Alarm Host By Hand: In turn on state, if it needs to turn off at the moment, but you don’t want to turn power off ( to avoid setting time again after power off), you can operate as following: in standby time (as picture A), press “ < ” key for 3 seconds, it will make two short “ Beep” sound, and second display become empty (as picture B), then the alarm host enters turn-off state, but the time still works normally, and alarm host don’t receive any signals (except for emergency zone) until turn it on by hand. Open by hand: Press “ > ” for 3 seconds Picture A Picture B Close by hand: Press“ < ” for 3 seconds Open Alarm Host By Hand: In turn off state ( as picture B), press “ > ” for 3 seconds, it will make a short “Beep” sound, at the same time, second display works normally, and return to the normal state as picture A. Note: The alarm host enter disarm state, second display like “-------”, after entering turn-off by hand state, second display is empty till turn on by hand. 8.3 How To Set Telephone Of KS-200B-B Alarm Host The operation of KS-200B-B alarm host is the same as KS-200B-A. Telephone should be connected with alarm host to set telephone alarm function, you can set as following: Precautions: 1、 The telephone used to program should be DTMF (Double Tone MultiFrequency) phone. Please turn P/T switch to “T” position. 2、The host should be in disarm state to avoid interrupt settings when alarm occurs. 3、 Every step has indicative sound A short “beep” sound ---means the operation is valid. A long “beep” sound ----means the operation is invalid. If something wrong are entered, please press “*” key to cancel. 4、 When system enters setup state, the power of telephone is provided by alarm host, yet the current supply is limited. If you set alarm by hand-free, you may fail or can’t hear any sound. Therefore you’d better pick up telephone receiver to set. Program Operations -15- 100-Zone Wireless Alarm System according to the effective zone of the detector. The detector should be installed in hidden location which must in compliance with the defense requirements as far as possible. (3)The wiring should be as hidden as possible so as not to be damaged. If the exposed wiring is inevitable, conduits or plastic pipes should be used to protect the wires from damaging by rodents (e.g. mouse). (4)The model and specification of detectors and cables in each zone as well as the usage of every color wire of inside cables should be labeled on the constructional drawings. (5)The constructional drawings should be archived for system maintenance. 7. 2 System Installation And Debugging (1) Installation Requirements Of PIR Detector The PIR detector has the highest sensitivity when human body moves parallelly with the mirror surface and the sensitivity is the lowest when human body moves vertically against the lens. As a result, the angle and height against the horizontal surface should be noted during installation, which will greatly affect the defense area. The installation height and angle are shown as follows: *Stand off hot or cold sources, e.g. hot /cold air outlet, air-condition outlet, electric radiators, air-cooling machines and etc. Stand off windows. *There should be no any barriers within the defense area of detector. *The detector should be parallel with the wall surface. *The detector has not waterproof, fog-proof function, so don’t used it outdoors. 2m 100-Zone Wireless Alarm System 门 (2) Installation Of Alarm Host *The alarm host should be placed on table which is near to window as far as possible. *The alarm host has not explosion-proof function, which cannot be directly -10- 100-Zone Wireless Alarm System installed in the locations where have Hazard Gases Of Class I, II or III ( i.e. have certain thickness of flammable gas, explosive steam gas, dusts, fibers and etc). Otherwise, it is very dangerous. *In order to ensure the receive effect of radio signal, neither should the alarm host share the same power supply with TVs, micro ovens and other electric appliances with high radiation nor close to these electric appliances. At the same time, the radio antenna should be pull out. 8.Operation Guide 8.1Warning Sound (1)KS-200B-A Alarm Host A long “beep” sound when it is powered on, which means self-test of system is normal. Two short “beep, beep” sounds every 30 seconds, which means battery power lower. (2) KS-200B-B Alarm Host A long “beep” sound when it is powered on, which means self-test of system is normal. Two short “beep, beep” sounds every 30 seconds, which means battery power lower. A short “beep” sound every second, which means alarm caused by telephone line cut-off. (3) Wireless Infrared Detector (Wireless Emitter) Two short “beep, beep” sounds every 30 seconds, which means battery power lower. A short “beep” sound, which means armed by remote controller is effective. Two short “beep, beep” sounds, which means disarmed by remote controller is effective. 8.2 How To Program KS-200B-A and KS-200B-B After powered on, the display screen of alarm host shows “12:00 00”. The second light is flashing and the last two bits display second. Press “Function” key to enter setup state, at the same time, the second light is continuously on and the last two bits are flashing, which is the function menu. At this time, the alarm host won’t receive any alarm signals of detector. In setup state, press “Function” key to switch among functions. And press “Reset” key to exit the setup state. In -11- 100-Zone Wireless Alarm System turn-off state. (6)How To Set Arm/Disarm In Different Zones Press “Function” key, It displays as below: Zone No: press Zone state press Function 6 < key to set > key to set Zone state After entering “Arm/Disarm” setting state, press “ < ” key to select the zone number and press “ > ” key to select arm/disarm state. “00” means this zone is disarmed, “01” means this zone is armed. It should be noted that, no matter the defense zone is common zone or emergency zone, all the alarm signals won’t be received if it is disarmed by alarm host. The default factory state is that all defense zones are armed. It is recommended to recover the defense state in time when a defense zone is disarmed so as not to omit any alarms. (7)How To Inquire Logs Press “Function” key, it displays as following: Alarm Record Alarm No. location Function 7 Alarm record inquiry Enter “alarm record inquiry” state, press “ < ” key to display alarm record number and alarm location, press “ > ” key to display alarm time, If there are no alarm records, it will display like “------”. Alarm time Hour Alarm time Minute Function 7 Alarm record inquiry Press “ > ”again to display the record number and the alarm location of the previous alarm record. Continuously press “ > ” to display the alarm time of the previous alarm record. (8)How To Set Alarm Sound And Alarm Volume Press “Function” key , it displays as following: alarm sound selection Press “ < ” to set alarm volume selection Press “ > ” to set Function8 Alarm sound/volume setting Enter function 8 to set alarm sound and alarm volume. press “ < ” to select alarm sound and press “ > ” to select alarm volume. There are three types of alarm sound. “01” is 110 police car warning sound, “02” -14- 100-Zone Wireless Alarm System press “Function” key, it displays as following: Hour: press Minute press < key to set > key to set Function 4 The second group of Timer-open Enter “The second group of Timer-open” setup state, press “ < ” or “ > ” key to adjust the time. After setup is finished, press “Reset” key to exit or press “Function” key to set “The second group of Timer-close”. The above figure shows that the second group of Timer-open time is 18:00. (5)How To Set The Second Group Of Timer-close press “Function” key, it displays as following: Hour: press < key to set Minute press > key to set Function 5 The second group of Timer-close Enter “The second group of Timer-close” setup state, press “ < ” or “ > ” key to adjust the time. After setup is finished, press “Reset” key to exit or press “Function” key to set “Arm/Disarm”. The above figure shows that the second group of Timerclose is 18:00. For example, if the working time of a company is 8:00 am, and the check out time is 12:00 pm, the check in time is 14:00 pm and the check out time is 18:00 pm, the startup and shutdown time should be set as follows: The startup time of the first group is 12:00, the shutdown time of the first group is 14:00. The startup time of the second group is 18:00, the shutdown time of the second group is 8:00. It is recommended to reserve some time for employees to check in ahead of schedule and stop off after check out so not to cause unnecessary alarms. 1、If you want the alarm host to guard continuously for 24 hours per day, set the same time for “auto timer-open” and “auto timer-close ”, e.g., “12:00”. Usually, the ex-factory state is 24-hour continuous defense. 2、After setting timer-open/timer-close time, the system only can enter close state when timer-close time arrives. From the time the screen shows to the turn off time, during this period of time, the system still be on state. For example, you want the timer-close time to be 8:00, you can set the clock to be 7:59, then set the timerclose time to be 8:00, and press “Reset” key to exit setting state, after entering turn-off state, and adjust the clock to the present time, at this time, the system is in -13- 100-Zone Wireless Alarm System setup state, if there are no any operations within 30 seconds, the system will automatically exit the setup state and return to display time. (1)How To Set Time In time display state, press “Function” key, it will show as following: Hour: press < key to set Minute press > key to set Function 1 clock setup at this time, press “ < ” or “ > ” to adjust the time. Press “Reset” key to exit setup state, or press “Function” key to set the first group of timer-open time. (2)How To Set The First Group Of Timer-open Hour: press < key to set Minute press > key to set Function 2 The first group of Timer-open Press “Function” key to enter “The first group of Timer-open time “setup state, press “ < ” or “ > ” key to adjust the time. After setup is finished, press “Reset” key to exit setup state or press “Function” key to set “The first group of Timer-close time” setup state. The above figure shows that the first group of Timer-open time is 12:00. Note: Timer-open means the alarm host will automatically enter defense/arm state and begin to receive alarm signals when the time pre-set arrives. (3)How To Set The First Group Of Timer-close Press “Function” key, it displays as following: Hour: press < key to set Minute press > key to set Function 3 The first group of Timer-close Enter “The first group of Timer-close ” setup state, press “ < ” or “ > ” key to adjust the time, After setup is finished, press “Reset” key to exit or press “Function” key to set “ the second group of timer-open “The above figure shows that the first group of Timer-close time is 14:00. Note: Timer-close time means the alarm host will automatically enter disarm state and don’t receive any alarm signals, but it still response to emergency buttons and alarm signal in emergency zone. Enter auto shutdown state, the alarm host will display as following: Hour Minute Shutdown (4)How To Set The Second Group Of Timer-open -12-