1
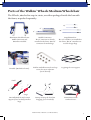
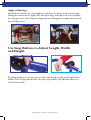
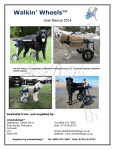
Walkin’ Wheels®
Medium
Owner’s Manual
With instructions for optional Fully Supportive
Front Wheel Kit
Walkin’ Wheels® is a registered trademark of Wheels for Pets, LLC
US Patent 7,549,398. Canada 2,641,092
Euro 2050418, Japan 5385584, other patents pending.
HandicappedPets.com • 105 Rt 101A – Suite 18 • Amherst, NH 03031 • (603) 577-8854
Thank you for purchasing Walkin’ Wheels® Medium dog wheelchair. Questions
or comments? Call us (603) 577-8854 or email us at:
[email protected].
Contents
Parts of the Walkin’ Wheels Medium Wheelchair..............................................................................3
Tips to Teach Your Dog to Use Walkin’ Wheels® ...............................................................................4
Setting Up the Dog Wheelchair..............................................................................................................6
Use Snap Buttons to Adjust Length, Width and Height....................................................................7
Adjusting the Length.................................................................................................................................9
Is the Length Correct?..............................................................................................................................9
Adjusting the Width............................................................................................................................... 10
Attaching the Struts and Wheels......................................................................................................... 11
Adjusting the Height.............................................................................................................................. 11
Stirrups...................................................................................................................................................... 11
Clip the Leg Rings to the Wheelchair................................................................................................. 12
Front Harness Attachment.................................................................................................................... 13
Is the Wheelchair Adjusted Properly? ............................................................................................... 14
Optional Set Screws for Noise Reduction......................................................................................... 15
Belly Belt, if Needed .............................................................................................................................. 15
Wheel Options ....................................................................................................................................... 16
Foam Wheels 4”, 8”, 12” and 16” ....................................................................................................... 16
Air Tires Only Available in 12” and 16” ............................................................................................. 17
Walkin’ Wheels® Front Leg Attachment ............................................................................................ 17
In the Package.......................................................................................................................................... 18
Assembling the Fully Supportive Wheelchair.................................................................................. 19
Putting the Dog Into the Fully Supportive Wheelchair.................................................................. 22
Wear, Maintenance, Liability and Guarantee ................................................................................... 23
Limited Liability ..................................................................................................................................... 23
Optional Items and Accessories........................................................................................................... 24
2
Walkin’ Wheels® Medium User Manual ©2015
Parts of the Walkin’ Wheels Medium Wheelchair
The Wheels, attached to snap-in struts, are either packaged inside the box with
the frame, or packed separately.
15”
6”
9”
26”
Length Extenders.
The 15” extenders are installed in
the frame. The 26” extenders are
used for longer dogs
Aluminum wheelchair frame
Width Connector and
Extenders installed
Width Connectors.
The 6” connector is already
installed in the frame. Extra 9”
connector for wider dogs.
Knuckle (attached to frame).
Tool kit with Allen wrench and cup
screws for noise reduction
(use if desired).
Leg Rings for rear support.
Stirrups to keep the feet from
dragging, (use if needed).
Front Harness with
comfort sleeves.
Small
Large
One Belly Belt for mid-section
support (use if needed), small or
large.
Walkin’ Wheels® Medium User Manual ©2015
3
Wheels attached to Struts
(one set for each wheelchair)
Several sizes shown here.
Instructional video and
just-for-fun movies.
Tote Bag and Handles to allow you to use
leg rings as a lifting harness.
Tips to Teach Your Dog to Use Walkin’ Wheels®
We created the Walkin’ Wheels ® with the intention that you will adjust the
wheelchair, put your pet in it, and in a few moments watch him or her running
and playing again. It can happen that way, but it doesn’t always. A wheelchair
can be an adjustment for an animal. To some, there
is a strange device following him or her around
making odd noises and getting caught on furniture
and doorways. They will adapt to these changes, but
need a little time. We recommend you be calm, quiet,
and slow when putting on the wheelchair for the first
time. Lots of stroking and reassurance is needed here.
Treats help, too! Let the dog get used to the harness
before attaching it to the wheelchair. It may take a few minutes or a few hours for
him or her to get used to the harnesses.
4
Walkin’ Wheels® Medium User Manual ©2015
1.When starting this process we suggest that you use the dog’s favorite treats
to reward your dog for walking forward. You won’t need to keep using these
treats every day, just in the beginning of the training process. A hungry dog
is a motivated dog! Work with your dog before you have fed him a meal. He
will be more eager to pay attention and earn the food reward if he is hungry.
2.Do not immediately put your dog in the wheelchair. Assemble the wheelchair and leave it in an area where your dog can see it, smell it and touch it.
3.Once the dog is comfortable near the wheelchair, put the front harness on
and heave him or her alone for a while. Let the dog get used to the feeling of
the straps.
4.When your dog is comfortable, try putting him in the leg ring support
system and attach the front harness to the wheelchair. Give him a treat for
positive association.
5.After your dog is in the wheelchair hold the food reward right at his nose
level. Feed him several pieces. Then you can move one foot backwards,
again holding the food reward in front of you. He should then walk toward
you to get the treat. Before you know it, he is walking in his Walkin’ Wheels!
Again, give him a treat and positive praise.
6.Work in very short (5-10) minute sessions, several times a day. Give your
dog rest periods between each session.
Note: Keep in control of the dog’s movement at first. Keep the dog in a clear
area and keep him on a short leash. If the dog does become frightened, then
disconnect the harness from the wheelchair and try again later.
Until your dog gets used to the Walkin’ Wheels, limit the amount of time
spent in it. The Walkin’ Wheels is designed to allow your dog to get exercise
and physical therapy. Dogs cannot lie down in the wheelchair but will be able
to urinate and defecate while in the wheelchair. Start with short periods and
increase slowly. Make sure you don’t overdo it the first day.
Walkin’ Wheels® Medium User Manual ©2015
5
Setting Up the Dog Wheelchair
Adjusting the Knuckle
The frame is shipped flat. Set the legs perpendicular to the frame by turning the
dial caps counter-clockwise to loosen the knuckle assembly. Don’t remove the
dial caps. Move the leg to the correct position using the raised indicators as your
guide. The inside indicator should be in the center of the two outside indicators
as shown in the photo below. Once the leg is in the correct position, tighten the
dial cap by turning clockwise.
Right
Correct
Straight
Leg Position
Wrong
If you only see two
raised indicator
marks, then the
wheelchair is upside
down. Flip the leg
180 degrees.
For active dogs, you
can angle the wheels
back a notch.
Right
Wrong
6
Don’t angle the wheels
too far back as it will
put too much pressure
on their shoulders.
Walkin’ Wheels® Medium User Manual ©2015
Angle of the legs
Normally, the wheels are set straight up and down as shown on the brown dog.
Setting the wheels back slightly, like the white dog, will offer a bit more stability
for stronger, more active dogs, or dogs who are shifting their weight back toward
their hindquarters.
Use Snap Buttons to Adjust Length, Width
and Height.
The Snap buttons are an easy way to adjust the length, width, and height of the
Walkin’ Wheels dog wheelchair. Use a pen to push the Snap Button when it is
inside the knuckle.
Walkin’ Wheels® Medium User Manual ©2015
7
Replacing the Length Extenders and width connectors.
The Walkin’ Wheels comes with two sizes of width connectors and length
extenders. For larger or smaller dogs you may need to switch them. To remove
an extender or connector, depress the snap button until extender or connector
slides out of the wheelchair tube. Use the guidelines below to choose the right
one.
1) Short (6 inch) Width Connector snaps into the back of the wheelchair
for dogs less than 9 ½” wide (measured at the widest point of the dog).
This is already installed in the frame.
2) Short (15 inch) Length Extenders snap in to the sides of the
wheelchair for dogs less than 19” in length (measured from the back of
the front leg to back of the rear leg). These come installed in the frame.
3) Long (9 inch) Width Connector snaps into the back of the wheelchair
for dogs greater than 9 ½ inches wide (measured at the widest point of
the dog). This is included in the box.
4) Long (26 inch) Length Extenders snap into the sides of the wheelchair
for dogs greater than 18” long (measured from the back of the front leg
to back of the rear leg). These are included in the box.
8
Walkin’ Wheels® Medium User Manual ©2015
Adjusting the Length
The extenders are for length adjustments. The kit comes with two sets, one set is
15” and the other set is 26” long. Start by using the set that is already installed in
your wheelchair.
Is the Length Correct?
The end of the extenders (black cap) should be positioned at the center of the
dog’s shoulder blades. The extenders should be touching the neoprene pads on
the front harness and not pulling outward.
If the sides tilt up, then loosen the blue strap on
the front harness over the dog’s back and tighten
up the red bottom strap.
If the extenders tilt down, loosen the red bottom
strap and tighten the blue strap over the dog’s back.
INCORRECT
INCORRECT
Walkin’ Wheels® Medium User Manual ©2015
9
The side extenders should be parallel
to the ground and in the middle of the
dog’s body.
CORRECT
Adjusting the Width
Use the snap buttons on the width connector to adjust the wheelchair to the
proper width. There should be at least ½” on each side of the hips. The width
adjustment will be determined by the widest part of the dog which is usually
the chest. The width connector that is attached to the frame is 6” long and
will extend to 9.5”. If you need additional width, we have also included a 9”
connector that adjusts to 13”.
10
Walkin’ Wheels® Medium User Manual ©2015
Attaching the Struts and Wheels
You received your wheelchair with the correct size strut
and wheel combination according to your dog’s fold of
flank measurement. Insert the strut into the wheelchair leg
and adjust to the height needed. If you need a different size
wheel and strut, contact us.
Adjusting the Height
The correct height setting is based on both the height and
the condition of the dog. If the dog has some use of his/
her back legs, then use the snap buttons to adjust the height
so the dog’s toe pads are on the ground and the dog can
participate in the walking motion. If the back legs are very
weak then the paws can scrape on the ground or knuckle
under. In this case put the legs in the stirrups or protect
them with Walkin’ Pet Boots.
Stirrups
Stirrups are optional for paws that are dragging or knuckling under. The stirrups
attach to the back of the wheelchair on each silver metal loop (also called “eye
pads”). The rubber tubes on the stirrups need to be
above the dog’s hock. Use the push lock to adjust to a
snug fit. The dog’s leg should be several inches off the
ground. You can adjust the length of the cord by retying the knot. If you use the stirrups, use both. Using
only one stirrup causes the dog to feel unbalanced.
IMPORTANT: When taking the dog out of the wheelchair, make sure
to release the stirrups FIRST.
Rear Support Leg Rings
The Leg Rings support the dog’s hindquarters. They will take the weight off
your pet’s legs while still allowing him or her to use their legs to maintain muscle
mass. The leg rings need to be tight to create a firm
‘seat’ or saddle for the dog in order to support the dog
properly. The leg rings should hang no lower than 1”
below the frame.
Walkin’ Wheels® Medium User Manual ©2015
11
When the dog is in the leg rings, the wheelchair knuckle should be at mid-hip
level. The leg rings should look like two C’s and not two V’s with the center
connector holding them together.
Clip the Leg Rings to the Wheelchair
The leg ring straps go over the frame and the black plastic harness clips have a
slot that fits over the shoulder socket screws. Put your thumb into the round
circle and push upward to lock (you will hear it click into place). The round
circle will face the ground. The dog’s legs go through each ring. To release, put
your thumb in the circle and pull downward. Now, you can slowly lower your
dog to the ground. The excess Velcro strapping will cross over the dogs back or
use the excess strapping to form handles.
The Velcro center connector can be moved forward or backward to avoid putting
pressure on the dog’s genitals (ideal for intact dogs). In addition, the Velcro
connector can be wrapped loosely so there is space between the rings. The
Velcro center connector MUST be used.
Adjust for
best comfort
and fit.
12
Walkin’ Wheels® Medium User Manual ©2015
The rubber tubing can be cut shorter if needed (do not cut the strapping).
Try cutting about an inch off all four ends of the rubber then adjusting the
tri-glides on the straps to tighten them up.
Front Harness Attachment
Adjust the extenders so they reach the
harness clips on the front harness. The
extenders will go through the D-rings and
then clip into the front harness. The D-rings
should be positioned just behind the
shoulder blades.
Adjusting the Front Harness:
• Take the 3 comfort sleeves off the harness so you can make sizing
adjustments.
• The dog’s head goes between the black strap and the blue strap.
• Blue strap goes over the dogs shoulder.
• Red strap goes behind the front legs and clips into the side of harness.
• Black strap goes under neck across front of chest.
• Male prong clips point to the back.
• All three straps should be snug.
Comfort sleeves can be cut for smaller dogs and
excess straps tucked in.
This material will not fray.
Walkin’ Wheels® Medium User Manual ©2015
13
Is the Wheelchair Adjusted Properly?
When the wheelchair is adjusted properly, the dog stands in a natural position.
Here is what to check:
A Knuckles should be in line with the hips.
B Front harness D-Ring clips clip into extenders behind shoulder
blade. Back should be straight.
C Extenders parallel to the ground and do not extend past the
front legs.
D/E
Toe pads touching the ground or put into stirrups.
If you are unsure whether the wheelchair is fitted properly, please email rear
view and side view photograph of your dog in the wheelchair to: messages@
handicappedpets.com and we will evaluate the fitting. Make sure you include
the name the wheelchair was ordered under and your phone number.
14
Walkin’ Wheels® Medium User Manual ©2015
Optional Set Screws for Noise Reduction
Using the set screws will tighten up your wheelchair and reduce any rattling
noises. The set screws also keep the wheelchair tight after it has been adjusted
for your dog. When you tighten up the wheelchair, the side arms called
extenders will be able to move up and down as your pet turns corners. This is
completely normal. The flexibility also allows for ease of movement on uneven
terrain. There are six places to put the set screws using the Allen Key. Do not
overtighten. They are indicated below showing arrows.
Note: Make sure the set-screws shown
below are loosened or removed before
adjusting. Belly Belt, if Needed
Some animals will need additional support under their belly. You can tell the
dog needs additional support if their spine bows downward. It is also helpful for
overweight dogs or dogs with spinal or disc issues. One end of the belly belt has
a tri-glide (rectangular with bar in the middle) attached and the other side has
Velcro strapping. Both sides have a rope with a push button adjuster.
Figure A
Figure B
Walkin’ Wheels® Medium User Manual ©2015
Figure C
15
A. Take the side with the tri-glide and put the extender through the end
loop.
B. Take the rope and put over the harness clip on the extender. After you
attach the front harness to the harness clip, the rope will be secured.
This will keep the belly belt from sliding backwards. Now, adjust the
belly belt so it is in the middle of the dog’s belly.
C. Secure the other side over the extender and Velcro to bottom of belly
belt. The purpose of the belly belt is to provide support for your dog’s
mid-section
Wheel Options
We offer four size wheels, 4”, 8”, 12”& 16”
Air Filled vs Foam Filled
Air-Filled
Foam
Foam Wheels 4”, 8”, 12” and 16”
• Lightweight, high density foam material that offers a smooth ride
• These wheels wear extremely well and will never go flat
• They are made for all terrain
• 4” & 8” wheels have ¼” hub, 12” & 16” have ½” hub with bearings
• True closed cell technology/ no water absorption
• Easy to clean
16
Walkin’ Wheels® Medium User Manual ©2015
Air Tires Only Available in 12” and 16”
• Active dogs that do off-road hiking
• Offer more shock absorbency
• Similar to mountain bike tire with deep treads
• Will need to replace tubes or wheels if punctured
• Require 30 PSI air
• 12” & 16” wheels have ½” hub with bearings
• Additional cost
If you switch from an 8” wheel to a 12” wheel, you will need to purchase the
appropriate struts and hardware. Call us if you have any questions.
Saltwater, mud and sand can cause rust or erosion to the hardware and bearings.
We suggest hosing the wheels down after exposure to prolong the life of your
wheelchair.
Walkin’ Wheels® Front Leg Attachment
The Walkin’ Wheels® Front Wheel attachment gives mobility to dogs with front
leg weakness or weakness in all four legs. It is ideal for helping disabled pets get
exercise and for rehabilitation while they are healing.
Like the rest of the Walkin’ Wheels®
products, the front wheel attachment is
adjustable so it will fit the Walkin’ Wheels
wheelchair for any size dog from 20 to 150
pounds and can be easily removed at any
time.
This attachment will not work with the Walkin’ Wheels Mini Dog Wheelchair.
Walkin’ Wheels® Medium User Manual ©2015
17
In the Package
The front wheel kit attachments are easy to assemble and snap into the
wheelchair. You will need a Phillips Head Screwdriver.
The package contains:
A – Left and Right Extenders (2)
B – Struts and Casters (2)
C –Legs (2)
D –Chin Bar & Extension pieces (3)
E – Allen Key/Wrench (2)
F – Front Bar Screws (2)
G – Chin Bar Comfort Cover (1)
H – Front Leg Rings (1 Pair)
IMPORTANT: The LEFT and RIGHT Struts and Casters (B) must
match the LEFT and RIGHT Legs (C). If they are not installed
correctly the wheelchair will be extremely wobbly. We refer to L and R
as if you are in the wheelchair.
18
Walkin’ Wheels® Medium User Manual ©2015
Assembling the Fully Supportive Wheelchair
Video instructions also available: http://hpets.net/qa.htm
Step 1. Attaching the legs (C) to the extenders (A)
The top of each leg is labeled with an L or an R. It is crucial that the legs are
installed on the correct side. The extenders are not labeled L or R but the
shoulder socket screws face the outside.
Attach the leg to the extender with (2) screws using the larger Allen key. The
legs will be at a forward angle.
Step 2. Side Extenders
Remove the existing side extenders from your rear Walkin’ Wheels and snap in
the left and right front extenders (A).
Step 3. Insert the Strut and Caster Assembly (B) into the Leg (C)
These are marked with “L” and “R”. It is very important that they are installed on
the correct sides.
Important! Notice the ledge on the Caster Connector. This needs
to be facing outward in order for the front wheel attachment to
work properly.
Step 4. Adjust the Chin Bar (D).
Note: Use of the Chin Bar is optional. The Chin Bar adds stability and rigidity
to the front wheel attachment. It needs to approximately match the width of
the back of the Walkin’ Wheels. Use a Philips head screwdriver to remove the
two screws on the Chin Bar and adjust it so that the width of the Chin Bar is
approximately the same as the width of the back of the wheelchair. Insert screws
to secure in place.
20
Walkin’ Wheels® Medium User Manual ©2015
The chin bar attachment only has threads on one side of the bar. You will notice
that the bar with the large holes has no thread. That is the side the screw needs to
feed through.
Attach the extension piece to the outside of the chin bar using the included
screws and washers.
Insert the Chin Bar into the openings at the front of the Left and Right
Extenders using the thumbscrews. The Chin Bar is held on by the two Chin
Bar Screws (F). Put the Chin Bar Comfort Cover (G) on the Chin Bar. Chin
Bar is attached after the dog is in the wheelchair.
Step 5. Clip on the Front Leg Rings (H) the same way you
attached the rear leg rings.
Walkin’ Wheels® Medium User Manual ©2015
21
Putting the Dog Into the Fully Supportive
Wheelchair
There are many ways to get your dog into the fully supportive wheelchair. We
suggest that you view the videos below for some ideas:
http://hpets.net/qb.htm
http://hpets.net/qc.htm
Height – Set the height so that the dog’s toe pads are touching the ground.
Extenders need to be parallel to the ground.
Length – Dog’s front leg should be centered between the two shoulder socket
screws.
Width –The width is determined by the widest part of the dog (generally the
dog’s chest). Allow at least an inch of space on both sides.
Leg Rings – The leg rings in the front generally need to be a bit lower than in the
rear, to accommodate the dog’s deeper chest. Adjust the leg rings accordingly.
22
Walkin’ Wheels® Medium User Manual ©2015
Wear, Maintenance, Liability and Guarantee
Maintenance
With proper use and maintenance, the wheelchair is designed to last a lifetime.
When you need replacement parts for the wheels, harnesses, stickers, and other
wear-and-tear items, they may be purchased at HandicappedPets.com. The
wheelchair frame will not rust. If dirt or sand gets inside the wheelchair, you
can hose it off. All components can be removed and cleaned. Oiling is not
necessary.
Limited Liability
Walkin’ Wheels ® is provided as a walking aid for animals that are under the care
of a veterinarian and for which a dog wheelchair has been recommended. Wheel
for Pets, LLC, and its affiliates, agents, and distributors make no representation
to the effectiveness or appropriateness of this product.
Guarantee
Walkin’ Wheels® is guaranteed by the manufacturer, Wheels for Pets, LLC, for
five years from the date of purchase against defects in material or workmanship
of the frame (with the exception of normal wear and tear of the harness and
wheels). If something breaks, please let us know and we will repair or replace the
wheelchair at our option. You are responsible for all shipping charges. Warranty
is non-transferable.
Return Policy
If you try the wheelchair and it does not work for your pet because of the design
or fit, call us with 14 days from the day the wheelchair arrived. If we can’t correct
it, we will issue a return material authorization number (RMA). See the website
for the refund amount calculation. If refurbishing is needed due to scratches or
wear, this will reduce your refund. The RMA# must be written on the outside of
shipping box or a refund will not be considered.
Return Authorization Form (REQUIRED) for returns
This form is included in the “Important Document” plastic sleeve on the outside
of the shipping box.
http://www.handicappedpets.com/form/Return-Form.pdf
Walkin’ Wheels® Medium User Manual ©2015
23
Optional Items and Accessories
The Drag Bag™
http://www.handicappedpets.com/walkin-drag-bag
The Walkin’ Wheels Drag Bag is
designed for pets to use in the home
when they are not in their chairs.
Great for protecting the chest and
limbs.
Prevents abrasions and sores that can
be caused by scraping against carpets,
floors, and rough surfaces. Keeps
bedding and blankets dry. Mesh panel for ventilation, Made of Nylon. Machine
washable.
Walkin’ Lift Harness
www.handicappedpets.com/walkin-wheels-rear-harness
The Walkin’ Lift Harness is used to
support your dog’s hind quarters.
This harness is compatible with the
Walkin’ Wheels Wheelchair, and can
be used instead of the Leg Rings. This
rear harness is great to use to assist
your dog. The clip-in handles are used
with this harness.
Walkin’ Lift Combo Harness
http://www.handicappedpets.com/lift-and-assist-harness.html
The Walkin’ Lift Combo Harness
provides complete lifting assistance
and mobility support for a dog’s
front and rear legs. Fully compatible
with the Walkin’ Wheels rear dog
wheelchair. Front and Rear can be
sold separately.
24
Walkin’ Wheels® Medium User Manual ©2015
Walkin’ Pet Boots
www.handicappedpets.com/walkin-wheels-boots
High-quality, stay-on boots keep dogs from tracking dirt, mud, or snow into
the house. Helps injured, disabled,
or elderly pets that drag their paws
and provides confidence on slippery
surfaces like hardwood floors. Ideal
for dogs with cuts, bruises or sensitive
paws. Comfortable, water resistant,
and fashionable!
Walkin’ Pet Boots and Stirrup Kit
www.handicappedpets.com/walkin-wheels-stirrupkit
Combining the Walkin’ Pet Boots with our stirrup adapter
provides the most comfortable wheelchair experience for
your Handicapped Pet.
Amputee Cover
www.handicappedpets.com/amputee-legringcover
The amputee cover is for pets with a smooth amputation. It
works with the leg rings.. The cover slips over the leg ring to
close off one side for comfort.
License Plate for Walkin’ Wheels Wheelchair
www.handicappedpets.com/photo-licenseplate
For on and off-road use, you can purchase a
license plate for your dog’s Walkin’ Wheels.
Choose from dog breeds or upload your very
own photo for a custom license plate. The
license plate can be placed on the back of the
dog wheelchair to make the perfect accessory
to personalize your Walkin’ Wheels.
Walkin’ Wheels® Medium User Manual ©2015
25
Notes
26
Walkin’ Wheels® Medium User Manual ©2015
Notes
Walkin’ Wheels® Medium User Manual ©2015
27
Love the inspirational stories?
Take a look at the best-selling dog
wheelchair book ever!
“Miracle Dogs, Adventures on Wheels”
by Sandy Johnson.
Available on our website or at Amazon.com
HandicappedPets.com
105 Rt 101A – Suite 18 • Amherst, NH 03031 • (603) 577-8854