1
Installation
Flush-Mount Installation Procedure:
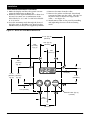
1. Make the display and three-key panel cutouts
using the dimensions in Figure 3a.
2. Drill four of the eight labeled holes to allow for a
#6 stud. You must use a combination of the
holes labeled 1, 3, 5, and 7 or the holes labeled
2, 4, 6, and 8.
3. Press the mounting studs through the front of
the holes prior to installing your decal/overlay.
(NOTE: Decal/overlay is not supplied by Watlow.
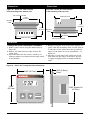
4. Remove the timer from the collar.
5. Remove the gasket and discard, then firmly
reinsert the timer into the collar. The tabs on
the timer must lock into the ridges on the
collar — see Figure 1b.
6. Attach timer/collar to the panel by installing
and tightening the nuts on the mounting
studs.
Figure 3a – Series 321 Flush Mount dimensions.
3.175" Typ. (2)
(80.6mm)
1.50" Typ. (2)
(38.0mm)
.838"
(21.3mm)
Typ. (2)
CL
.750"
(19.1mm)
1
2
.838"
(21.3mm)
Typ. (2)
3
8
.288" (7.32mm)
CL
Of Display
1.50"
3.175"
(80.6mm) (38.0mm)
Typ. (2)
Typ. (2)
1.125"
(28.58mm)
Start
7
Stop
4
.175" (4.44mm)
6
5
Diameter .550" Typ. (3)
(14.0mm)
.750"
(19.1mm)
CL
1.5"
(38.0mm)
WATLOW Series 321 User's Manual
3