1
Operation
Power On
Memory Operation
Memory Feature
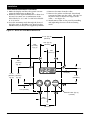
Apply power to the Series 321 — see Figure 4a.
The numeric display is always active when power is
applied to the timer.
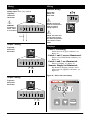
Increase Time
Pressing this key increases the countdown time. If
the Increase Time button is pressed when the
maximum time, 9959, is displayed, the unit will
wrap to the minimum number, 000, and continue
increasing.
The memory feature is always active.
Storing — Every time the countdown sequence is
initiated, the beginning countdown time, as shown
in the display, will be stored in memory. This will
replace any previously stored countdown time.
Recalling — The time stored in the memory is
recalled by pressing the Start/Stop key while a
countdown sequence is not in process and the
display is at 000. The time recalled from the
memory will be shown on the display.
Decrease Time
Modifying — Once the recalled time is shown on
This key is used to decrease the countdown time.
If the Decrease Time button is pressed when the
minimum time, 000, is displayed, the unit will
wrap to the maximum number, 9959, and continue
decreasing.
the display and the countdown sequence has not
begun, it can be modified using the Increase or
Decrease Time keys. If you modify the recalled
time it will replace the stored time when the Start/
Stop key is pressed.
ç
NOTE: Actuation of the Increase or Decrease keys
will not be recognized when a countdown sequence is in progress.
Start
Start/Stop
Using — When the timer is in the Hold/Ready
state and the memory time or the modified memory
time is displayed, pressing the Start/Stop key will
begin the countdown sequence.
Stop
This key is used to start and stop the countdown
sequence, enter a countdown time into memory,
recall a countdown time from memory, and
deactivate Relay 1 or Relay 2.
• Pressing this key when a countdown sequence is
in progress will cause the timer countdown to stop
and Relay 1 to de-energize. The unit will then go
into the Hold/Ready condition.
• Pressing this key when a countdown time greater
than 0 is selected and the timer is in a Hold/
Ready condition will cause Relay 1 to energize
and the timer to begin counting down in one
second intervals.
• Pressing this key while Relay 2 is energized after
completing a countdown sequence will cause
Relay 2 to de-energize prior to the 30 second time
out. Relay 2 will remain de-energized until next
countdown sequence is completed.
Troubleshooting
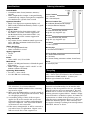
• Display is not illuminated:
Check for proper power wiring – see Figure 4a.
• Upper left decimal point is flashing:
Interlock condition has opened during a countdown sequence – see Figure 4e.
• Timer will not initiate a countdown:
Interlock has opened.
• Other:
Check all wiring connections – see Page 2,
Contact your Watlow Sales Agent,
Contact us;
Phone: 507-454-5300
Fax: 507-452-4507
For technical support, ask for an Applications
Engineer. To place an order, ask for customer
service. To discuss a custom option ask for a
Series 321 Product Manager.
Removing the Series 321
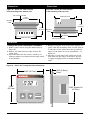
Through-the-Panel Mount Removal:
Flush-Mount Removal:
1. To remove the Series 321, you must first remove
the mounting collar.
2. To remove the mounting collar, slide a thin tool,
such as a putty knife, between all three mounting tabs and the ridges on both sides of the
Timer at once — see Figure 1b.
3. While lifting the tabs, push on the back of the
Timer and slide it out of the mounting collar.
1. Remove the four nuts on the mounting studs
that you previously installed to attach the
Timer to the panel.
2. Remove the Timer and mounting collar from the
panel.
3. Then follow the "Through-the-Panel Mount
Removal" procedure for removing the mounting
collar.
WATLOW Series 321 User's Manual
5