1
OSD (cont.)
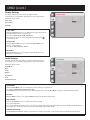
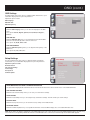
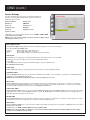
Service Settings
The Service Settings menu offers options to determine fundamental
settings of your Séura Mirror Display based on personal preferences.
Adjustment options include:
Boot Power Option
Volume Limit
OSD Access
HDMI CEC
Start Logo
RS-232 Access
IR Address Code
Baud Rate
Input Scan
Change Password
Signal Loss Timer
Additionally you can (de-) activate the Input Source ports HDMI 1, HDMI 2, HDMI
3., Input Component and USB.
NOTE: To access the Service Settings menu please enter the 4-digit password.
The default password is: 1 22010
3 4.Remote Redesign
Final
BOOT POWER OPTION
The Boot Power Option setting determines how the Séura Mirror Display boots after a power interruption.
Your options:
Power on, Standby, Last.
cc
guide
last
Power on: Standby: Last: Mirror Display always starts with power on
Mirror Display always starts in standby
Mirror Display will start to the state it had before power failure
mute
sleep
ok
OSD ACCESS
With the OSD Access setting you can deactivate the OSD menu. This will deny users access to the OSD.
zoom
If OSD Access has been set to Off access can only be reestablished as follows:
input
display
menu
exit
1. Press
2. When the window with the message “Not Available” appears, enter the 4-digit password.
The default password is: 1234.
channel
START LOGO
With the Start Logo setting you can (de-)activate the Séura start-up logo for the Séura Mirror Display.
volume
IR ADDRESS CODE
enter
Within the IR Address Code menu you can determine an individual remote address code according to your preferences. Available parameter is
from 0 to 61. The preset IR Address Code is 0.
NOTE: Please bear in mind to program your remote control according to the set code.
INPUT SCAN
With the Input Scan setting turned to On you can activate the automatic scan of the input ports for input sources. If there is no signal at the
currently selected port the Mirror Display searches for a signal on the other ports in the following order: HDMI 1, 2, 3, Component. If a signal is
waterproof
found
then the Mirror Display will select this port. See also Signal Loss Timer below.
SIGNAL LOSS TIMER
With the Signal Loss Timer setting you can set the time the Input Scan will be performed. If Signal Loss Timer is set off the search will continue
indefinitely or until a signal is found. If Signal Loss Timer is set to 5, 10, 30, 60, 120 seconds the Mirror Display switches to standby mode if no
alternative signal was found within the chosen time.
VOLUME LIMIT
With the Volume Limit setting you can determine a maximum volume according to your preferences. This setting is useful to prevent a user from
increasing the volume above a certain level e.g. in a hotel not to disturb neighboring rooms.
INPUT PORTS
Within the Service Settings menu you also have the possibility to (de-)activate the input ports. If an input port is set Off it will not be accessible in
the Input Source Selection.
Available input ports: HDMI 1, HDMI 2, HDMI 3, Component (YPbPr), USB.
NOTE: Please notice that if USB is set Off this does not affect the Software Update function. The Software Update function is always
possible even if the USB input port is set Off.
14