1
IMbook.book Page 2 Friday, November 17, 2000 9:22 AM
user manual
bio-imaging documentation
ImageMaster VDS-CL
multi-purpose imaging system for biological applications
um
18-1149-01AA, 2000-11
IMbook.book Page 1 Friday, November 17, 2000 9:22 AM
to order:
Asia Pacific Tel: +852 2811 8693 Fax: +852 2811 5251 Australasia Tel: +61 2 9894 5152 Fax: +61 2 9899 7511
Austria Tel: 01 576 0616 20 Fax: 01 576 0616 27
Belgium Tel: 0800 73 888 Fax: 03 272 1637 Canada Tel: 1 800 463 5800 Fax: 1 800 567 1008 Central, East, South East Europe Tel: +43 1 982 3826 Fax: +43 1 985 8327
Denmark Tel: 45 16 2400 Fax: 45 16 2424 Finland Tel: 09 512 3940 Fax: 095121710 France Tel: 0169 35 67 00 Fax: 0169 41 9677
Germany Tel: 0761 4903 401
Fax: 0761 4903 405 Italy Tel: 02 27322 1 Fax: 02 27302 212 Japan Tel: 81 3 5331 9336 Fax: 81 3 5331 9370 LatinAmerica Tel: +55 11 3667 5700
Fax: +55 11 3667 87 99 Middle East and Africa Tel: +30 (1) 96 00 687 Fax: +30 (1) 96 00 693 Netherlands Tel: 0165 580 410 Fax: 0165 580 401 Norway Tel: 2318 5800
Fax: 2318 6800 Portugal Tel: 01 417 7035 Fax: 01 417 3184 Russian Federation Tel: +7 (095) 232 0250,956 1137 Fax: +7 (095) 230 6377 South East Asia Tel: 60 3 724 2080
Fax: 60 3 724 2090 Spain Tel: 93 594 49 50 Fax: 93 594 49 55 Sweden Tel: 018 612 00 00 Fax: 018 612 12 00 Switzerland Tel: 01 802 81 50 Fax: 01 802 81 51
UK Tel: 0800 616 928 Fax: 0800 616 927 USA Tel: +1 800 526 3593 Fax: +1 800 329 3593
ImageMaster, Multiphor, PhastGel and ImageQuant are trademarks of Amersham Biosciences Limited or its subsidiaries. Amersham Biosciences is a trademark of Amersham plc.
Microsoft and Windows 95 are trademarks of the Microsoft Corporation. Pentium is a trademark of
the Intel Corporation.Fuji is a trademark of the Fuji Photo Film Co., Ltd. Photoshop is a trademark of Adobe Systems Incorporated. Amersham Biosciences Björkgatan
30, SE-751 84 Uppsala, Sweden. Amersham Biosciences UK Limited Amersham Place, Little Chalfont, Buckinghamshire HP7 9NA, England. Amersham Biosciences
800 Centennial Avenue, PO Box 1327, Piscataway, NJ 08855 USA. Amersham Biosciences Europe GmbH Munzinger Strasse 9, D-79111 Freiburg, Germany.
All goods and services are sold subject to the terms and conditions of sale of the company within the Amersham Biosciences group that supplies them. A copy of these terms
and conditions is available on request. © Amersham Biosciences 2000 - All rights reserved.
IMbook.book Page iii Friday, November 17, 2000 9:22 AM
Preface
Preface
About this manual
This manual provides a full reference to the ImageMasterTM VDS-CL
bio-imaging system. ImageMaster VDS-CL, together with the
ImageMaster analysis software, is a complete package for
documentation and analysis of sample images in visible light,
fluorescence and chemiluminescence. ImageMaster utilizes software
that runs on an integrated PC compatible along with an IntelTM
processor under MicrosoftTM Windows 95TM, and hardware for
interfacing the controlling PC to the imaging system.
The manual is organised in 8 chapters and 1 appendix:
Introductory
material
1. Introduction
2. Unpacking and installation
3. System overview
System
operation
4. Screen functions
5. Touchpad
6. Printer
System
management
7. Troubleshooting
8. System Maintenance
Appendix
A. Technical specifications
Assumptions
Two broad assumptions are made in this manual:
1. You should be familiar with the fundamentals of bio-imaging. For
background on any particular imaging function, please refer to the
appropriate Help Menu, which provides more extensive details.
2. You should be familiar with the general principles of using
Microsoft Windows 95 on your PC. Although ImageMaster VDSCL is a self-contained program package and does not require any
direct interaction by the user with Windows 95, the user interface
principles follow the conventions set by Windows 95 programs.
iii
IMbook.book Page iv Friday, November 17, 2000 9:22 AM
Preface
Typographical conventions
Menu commands, the names of dialogue boxes and windows, the
contents of dialogue boxes and windows, and option buttons are
written with a bold helvetica typeface. Menu commands are written in
the order of the menu name and then the command, separated by a
colon. For example:
“Select File:Save Image to display the Save Image dialogue. Locate the
destination drive and folder and enter a file name. Click on Save.”
This directs you to click on the File menu and select the command Save
Image. A dialogue called Save Image is displayed in which you must
locate the destination folder for the saved file, give the file a name, and
choose the image format. You then click on the button called Save in
the dialogue to execute the save command.
iv
IMbook.book Page v Friday, November 17, 2000 9:22 AM
Contents
CONTENTS
Preface
About this manual . . . . . . . . . . . . . . . . . . . . . . . . . . . . . . . . . . .iii
Assumptions . . . . . . . . . . . . . . . . . . . . . . . . . . . . . . . . . . . . . . .iii
Typographical conventions . . . . . . . . . . . . . . . . . . . . . . . . . . .iv
1 Introduction
2 Unpacking & Installation
2.1 Unpacking Procedure . . . . . . . . . . . . . . . . . . . . . . . . . . . . . 3
2.2 Packing List . . . . . . . . . . . . . . . . . . . . . . . . . . . . . . . . . . . . . 4
2.2.1 System Components . . . . . . . . . . . . . . . . . . . . . . . . . . . . . . 4
2.2.2 Documents . . . . . . . . . . . . . . . . . . . . . . . . . . . . . . . . . . . . . . 5
2.2.3 Manuals . . . . . . . . . . . . . . . . . . . . . . . . . . . . . . . . . . . . . . . . 5
2.3 Installation . . . . . . . . . . . . . . . . . . . . . . . . . . . . . . . . . . . . . . . 5
2.3.1 Precautions . . . . . . . . . . . . . . . . . . . . . . . . . . . . . . . . . . . . . 5
2.3.2 Installation procedures . . . . . . . . . . . . . . . . . . . . . . . . . . . . . 6
3 System overview
3.1 The Screen Interface . . . . . . . . . . . . . . . . . . . . . . . . . . . . . . 9
3.2 Toolbar . . . . . . . . . . . . . . . . . . . . . . . . . . . . . . . . . . . . . . . . . 9
3.3 Status Bar . . . . . . . . . . . . . . . . . . . . . . . . . . . . . . . . . . . . . . 11
3.4 Camera Control Bar . . . . . . . . . . . . . . . . . . . . . . . . . . . . . . 12
3.5 Getting Started . . . . . . . . . . . . . . . . . . . . . . . . . . . . . . . . . . 12
3.6 On-line Help Menu . . . . . . . . . . . . . . . . . . . . . . . . . . . . . . . 14
3.7 Other system functions . . . . . . . . . . . . . . . . . . . . . . . . . . . 15
3.7.1
3.7.2
3.7.3
3.7.4
3.7.5
3.7.6
Lights . . . . . . . . . . . . . . . . . . . . . . . . . . . . . . . . . . . . . . . . .
Cutting option . . . . . . . . . . . . . . . . . . . . . . . . . . . . . . . . . . .
Positioning of samples . . . . . . . . . . . . . . . . . . . . . . . . . . . .
Camera. . . . . . . . . . . . . . . . . . . . . . . . . . . . . . . . . . . . . . . .
Save options. . . . . . . . . . . . . . . . . . . . . . . . . . . . . . . . . . . .
Filters . . . . . . . . . . . . . . . . . . . . . . . . . . . . . . . . . . . . . . . . .
15
15
15
15
15
15
v
IMbook.book Page vi Friday, November 17, 2000 9:22 AM
Contents
4 Screen functions
4.1 File Menu . . . . . . . . . . . . . . . . . . . . . . . . . . . . . . . . . . . . . . .17
4.1.1 Default State . . . . . . . . . . . . . . . . . . . . . . . . . . . . . . . . . . . . . . . . 18
4.1.2 Save Image. . . . . . . . . . . . . . . . . . . . . . . . . . . . . . . . . . . . . . . . . . 18
4.1.3 Incremental Save. . . . . . . . . . . . . . . . . . . . . . . . . . . . . . . . 19
4.1.4 Time Lapse Save . . . . . . . . . . . . . . . . . . . . . . . . . . . . . . . . . . . . . 20
4.1.5 Illumination Correction . . . . . . . . . . . . . . . . . . . . . . . . . . . . . . . . 21
4.1.6 Save Current Frame as Bitmab . . . . . . . . . . . . . . . . . . . . . . . . . 21
4.1.7 Image Viewer . . . . . . . . . . . . . . . . . . . . . . . . . . . . . . . . . . . . . . . . 22
4.1.8 Export to Photoshop standard. . . . . . . . . . . . . . . . . . . . . . . . . . 23
4.1.9 Interpolate . . . . . . . . . . . . . . . . . . . . . . . . . . . . . . . . . . . . . 23
4.1.10 Optional Text to Saved Images . . . . . . . . . . . . . . . . . . . . 24
4.1.11 Exit. . . . . . . . . . . . . . . . . . . . . . . . . . . . . . . . . . . . . . . . . . 24
4.1.12 System Shut Down . . . . . . . . . . . . . . . . . . . . . . . . . . . . . 24
4.2 Edit Menu . . . . . . . . . . . . . . . . . . . . . . . . . . . . . . . . . . . . . . .25
4.3 Lights Menu . . . . . . . . . . . . . . . . . . . . . . . . . . . . . . . . . . . . .25
4.3.1
4.3.2
4.3.3
4.3.4
4.3.5
Lights Off . . . . . . . . . . . . . . . . . . . . . . . . . . . . . . . . . . . . . . . . . . .
Upper Light On/Off . . . . . . . . . . . . . . . . . . . . . . . . . . . . . . . . . . .
Lower Light On/Off . . . . . . . . . . . . . . . . . . . . . . . . . . . . . . . . . . .
Guide Light On/Off . . . . . . . . . . . . . . . . . . . . . . . . . . . . . . . . . . .
25
26
26
26
Cut Light On/Off. . . . . . . . . . . . . . . . . . . . . . . . . . . . . . . . . 27
4.4 Camera Menu . . . . . . . . . . . . . . . . . . . . . . . . . . . . . . . . . . . .27
4.4.1 Freeze . . . . . . . . . . . . . . . . . . . . . . . . . . . . . . . . . . . . . . . . . . . . . . 28
4.4.2 Block System on First Exposure . . . . . . . . . . . . . . . . . . . . 29
4.4.3 Default Digital Parameters. . . . . . . . . . . . . . . . . . . . . . . . . 29
4.4.4 Contrast . . . . . . . . . . . . . . . . . . . . . . . . . . . . . . . . . . . . . . . 29
4.4.5 Brightness . . . . . . . . . . . . . . . . . . . . . . . . . . . . . . . . . . . . . 29
4.4.6 Sharpness . . . . . . . . . . . . . . . . . . . . . . . . . . . . . . . . . . . . . 29
4.4.7 Y Gain . . . . . . . . . . . . . . . . . . . . . . . . . . . . . . . . . . . . . . . . 30
4.4.8 Zoom . . . . . . . . . . . . . . . . . . . . . . . . . . . . . . . . . . . . . . . . . 30
4.4.9 Auto Focus . . . . . . . . . . . . . . . . . . . . . . . . . . . . . . . . . . . . 30
4.4.10 Iris . . . . . . . . . . . . . . . . . . . . . . . . . . . . . . . . . . . . . . . . . . 30
4.4.11 Filter. . . . . . . . . . . . . . . . . . . . . . . . . . . . . . . . . . . . . . . . . 31
4.4.12 Gain . . . . . . . . . . . . . . . . . . . . . . . . . . . . . . . . . . . . . . . . . 31
4.4.13 Exposure Time . . . . . . . . . . . . . . . . . . . . . . . . . . . . . . . . 31
4.4.14 Date and Time Display . . . . . . . . . . . . . . . . . . . . . . . . . . 31
4.4.15 Display Text. . . . . . . . . . . . . . . . . . . . . . . . . . . . . . . . . . . 31
4.5 View Menu . . . . . . . . . . . . . . . . . . . . . . . . . . . . . . . . . . . . . .32
4.5.1 Toolbar . . . . . . . . . . . . . . . . . . . . . . . . . . . . . . . . . . . . . . . 33
4.5.2 Status Bar . . . . . . . . . . . . . . . . . . . . . . . . . . . . . . . . . . . . . 33
vi
IMbook.book Page vii Friday, November 17, 2000 9:22 AM
Contents
4.5.3
4.5.4
4.5.5
4.5.6
Analog Dialog Bar. . . . . . . . . . . . . . . . . . . . . . . . . . . . . . . .
Digital Dialog Bar . . . . . . . . . . . . . . . . . . . . . . . . . . . . . . . .
Optics Dialog Bar . . . . . . . . . . . . . . . . . . . . . . . . . . . . . . . .
Default View . . . . . . . . . . . . . . . . . . . . . . . . . . . . . . . . . . . .
33
33
33
33
4.6 Presets Menu . . . . . . . . . . . . . . . . . . . . . . . . . . . . . . . . . . . 34
4.6.1 Load Procedure . . . . . . . . . . . . . . . . . . . . . . . . . . . . . . . . . 34
4.6.2 Save Current Procedure As . . . . . . . . . . . . . . . . . . . . . . . . 34
4.6.3 System Presets . . . . . . . . . . . . . . . . . . . . . . . . . . . . . . . . . 35
4.7 Help menu . . . . . . . . . . . . . . . . . . . . . . . . . . . . . . . . . . . . . . 36
4.7.1 Help Topics. . . . . . . . . . . . . . . . . . . . . . . . . . . . . . . . . . . . . 36
4.7.2 About IM VDS-CL . . . . . . . . . . . . . . . . . . . . . . . . . . . . . . . . 37
4.8 Spot Filtering Tool . . . . . . . . . . . . . . . . . . . . . . . . . . . . . . . 37
5 Touchpad
5.1 The Taps panel . . . . . . . . . . . . . . . . . . . . . . . . . . . . . . . . . . 39
5.1.1
5.1.2
5.1.3
5.1.4
5.1.5
5.1.6
Learning to tap on the touchpad. . . . . . . . . . . . . . . . . . . . .
Pointers Tab . . . . . . . . . . . . . . . . . . . . . . . . . . . . . . . . . . . .
Assign Buttons (on the right hand side of the touch pad). .
Test Area . . . . . . . . . . . . . . . . . . . . . . . . . . . . . . . . . . . . . .
Single-Tap Duration . . . . . . . . . . . . . . . . . . . . . . . . . . . . . .
Double-Click Speed . . . . . . . . . . . . . . . . . . . . . . . . . . . . . .
39
40
40
41
41
41
5.2 Motion Tab . . . . . . . . . . . . . . . . . . . . . . . . . . . . . . . . . . . . . 42
5.2.1 Pointer Trails . . . . . . . . . . . . . . . . . . . . . . . . . . . . . . . . . . . 42
5.2.2 Relative Speed . . . . . . . . . . . . . . . . . . . . . . . . . . . . . . . . . . 42
5.2.3 Acceleration . . . . . . . . . . . . . . . . . . . . . . . . . . . . . . . . . . . . 42
5.3 Scrolling Tab . . . . . . . . . . . . . . . . . . . . . . . . . . . . . . . . . . . . 42
5.3.1 Scrolling Method. . . . . . . . . . . . . . . . . . . . . . . . . . . . . . . . . 43
5.3.2 Scrolling Types . . . . . . . . . . . . . . . . . . . . . . . . . . . . . . . . . . 43
5.3.3 How do I use Scrolling? . . . . . . . . . . . . . . . . . . . . . . . . . . . 43
5.4 Options Tab . . . . . . . . . . . . . . . . . . . . . . . . . . . . . . . . . . . . . 43
5.4.1 Autojumps . . . . . . . . . . . . . . . . . . . . . . . . . . . . . . . . . . . . . 43
5.4.2 Rotation . . . . . . . . . . . . . . . . . . . . . . . . . . . . . . . . . . . . . . . 44
5.4.3 Motion extenders . . . . . . . . . . . . . . . . . . . . . . . . . . . . . . . . 44
5.5 General Tab . . . . . . . . . . . . . . . . . . . . . . . . . . . . . . . . . . . . . 45
vii
IMbook.book Page viii Friday, November 17, 2000 9:22 AM
Contents
6 Printer
6.1 Film types and film loading . . . . . . . . . . . . . . . . . . . . . . . .47
6.1.1 Loading a roll of film . . . . . . . . . . . . . . . . . . . . . . . . . . . . . 48
6.1.2 Film select setting . . . . . . . . . . . . . . . . . . . . . . . . . . . . . . . 50
6.1.3 Tone setting. . . . . . . . . . . . . . . . . . . . . . . . . . . . . . . . . . . . 50
6.2 Removing a roll of film . . . . . . . . . . . . . . . . . . . . . . . . . . . .50
6.3 Clearing a film jam . . . . . . . . . . . . . . . . . . . . . . . . . . . . . . . .51
6.4 Cleaning the Printer . . . . . . . . . . . . . . . . . . . . . . . . . . . . . .52
6.4.1 Thermal head . . . . . . . . . . . . . . . . . . . . . . . . . . . . . . . . . . 52
6.4.2 Rubber roller . . . . . . . . . . . . . . . . . . . . . . . . . . . . . . . . . . . 53
6.5 Printer pre-sets . . . . . . . . . . . . . . . . . . . . . . . . . . . . . . . . . .54
6.5.1 Restoring default printer parameters . . . . . . . . . . . . . . . . . 57
6.5.2 UV transillumination procedure . . . . . . . . . . . . . . . . . . . . . 58
6.5.3 White light imaging procedure . . . . . . . . . . . . . . . . . . . . . . 58
7 Troubleshooting
8 System maintenance
8.1 Care and cleaning . . . . . . . . . . . . . . . . . . . . . . . . . . . . . . . .61
8.2 Replacing parts . . . . . . . . . . . . . . . . . . . . . . . . . . . . . . . . . .61
8.2.1 UV Lamps . . . . . . . . . . . . . . . . . . . . . . . . . . . . . . . . . . . . . 61
8.2.2 White light lamps . . . . . . . . . . . . . . . . . . . . . . . . . . . . . . . . 62
8.2.3 Replacing fuses . . . . . . . . . . . . . . . . . . . . . . . . . . . . . . . . . 63
A System Specifications
B System Accessories
Index
viii
IMbook.book Page 1 Friday, November 17, 2000 9:22 AM
Introduction
1
Introduction
The ImageMaster VDS-CL is a multifunction bio-imaging station
designed for quick and accurate photo-documentation of
electrophoretic and Chemiluminescent results. The system includes:
-
a 312-nm ultraviolet (UV) transilluminator sample tray for
documentation of ethidium bromide-stained agarose and
polyacrylamide gels, as well as excitation of fluorophorescent
samples.
-
a Chemiluminescent tray for documentation of chemiluminescence
samples.
-
a white light sample tray and various filters for documentation of
polyacrylamide gels, Coomassie blue, silver-stained gels,
membranes, films, blots, thin-layer chromatography (TLC) plates,
autoradiographs and more.
The tray area is 21 x 25 cm, with a maximum image transmission size
of 17.5 x 21 cm. This accommodates the developed area of one full size
MultiphorTM gel, 8 mini-gels, or up to 15 PhastGelTM gels.
The imaging system comprises a highly sensitive, charged coupled
device (CCD) camera connected to a monitor, which allows for image
viewing and manipulation of camera controls before the image is
printed or saved. A PentiumTM computer controls the system and the
interface is based on Windows 95. The camera, lens, lights, filters and
all other functions are controlled automatically. This imaging system
is contained in a free-standing "dark-room" that includes UV and
white light sources for obtaining images in transmitted or reflected
light conditions. Once the image is optimised, it can be printed on the
integrated thermal printer. Two grades of film are available: the higher
grade Super VDS film is thermally activated and fixed, and the regular
VDS film is thermally activated and UV-light fixed. Both use a polymer
emulsion technology that produces a sharp image on tough plastic and
both have a storage life of 2 years (under proper storage conditions:
temperature of 10 to 23 C and relative humidity of 45% +/- 15%). In
addition, the information can be stored on a floppy disk, on the
integrated hard-disk, or to a connected network. The system can be
directly connected to a 10baseT or 100baseT Network through the
network connector on the back panel.
• p1
1
IMbook.book Page 3 Friday, November 17, 2000 9:22 AM
Unpacking & Installation
2
Unpacking & Installation
The ImageMaster VDS-CL should be handled carefully during the
unpacking procedure, and care should be taken when installing and
connecting the system. Please follow the directions outlined below.
2.1 Unpacking Procedure
Unwrap all packages carefully and compare the contents with the
packing list, making sure all items arrived. Inspect all components for
damage that may have occurred while the unit was in transit. If any
part appears damaged, immediately contact the carrier.
Be sure to keep all packing material for re-packing, should it become
necessary to move the unit.
Use the following steps to unpack the ImageMaster VDS-CL.
1. Gently remove the box lid and the upper cardboard/foam material.
2. Take out all items from the upper foam and put them in a safe
place. Remove the upper foam damper.
3. Take out the monitor box.
4. Take out the film holders (a pair of green holders near the monitor
box).
5. Remove the film roll from the foam near its holders.
6. Remove the keyboard box and any additional cardboard/foam
material.
7. Remove the surrounding cardboard sleeve.
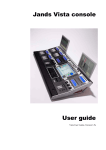
Caution: Lifting the ImageMaster VDS-CL from the shipping box requires at least
2 persons. Maintain the instrument in an upright, balanced position follow the directions below with particular care.
8. Placing one hand on the groove on the lower side of each end (see
Fig 2.1), and another hand on the upper back side of the system,
carefully lift the instrument out of the lower foam and place it on
a clean surface in a ventilated room. Be careful not to tip the
instrument while moving it - rather keep it upright or tilted slightly
back with the weight against your upper hand.
• p3
2
IMbook.book Page 4 Friday, November 17, 2000 9:22 AM
2
Unpacking & Installation
Fig 2-1. Proper positioning of hands when moving the system.
9. If necessary, correct the level of the system by adjusting the
extension of the feet.
10. Remove the two foam holders from the internal UV drawer before
use.
2.2 Packing List
While unpacking, verify that each of the following components was
delivered:
2.2.1
System Components
1. VDS-CL system
2. LCD Monitor, AC adaptor for the monitor, VGA cable, AC adaptor
power cord
um
18-1131-81AA • p4
IMbook.book Page 5 Friday, November 17, 2000 9:22 AM
Unpacking & Installation
3. Keyboard
4. Power cable
5. Thermal film
6. Film holders (2 pcs.)
7. Drawers: WL, UV, CL
8. 3m, twisted network cable.
9. Field calibrator
2.2.2
Documents
1. Microsoft license
2.2.3
Manuals
1. User manual
2. Monitor manual
3. Printer manual
2.3 Installation
2.3.1
Precautions
Before installing the system, make sure that the following points are
considered carefully.
-
Under normal operation of the VDS-CL system, the user is not
exposed to UV light. All UV lamps automatically turn off when
any door is opened or when the sample tray is pulled out.
-
Exposure to UV light is harmful. If you choose to operate the UV
Cutting option (360nm), put the UV drawer in the cutting position
and be sure to wear UV-blocking glasses to shield your eyes.
-
Due to the danger of exposure to high voltage, the rear panels
should only be removed by trained service technicians.
-
The AC power outlet must be properly grounded to protect both
personnel and the equipment.
-
All devices must be turned off before connecting to any other
device (such as a computer). Making connections with devices
turned on may damage both devices.
• p5
2
IMbook.book Page 6 Friday, November 17, 2000 9:22 AM
2
Unpacking & Installation
-
Shut down the system properly according to Windows 95
procedures. Disconnecting the system prematurely may result in
damaged system files.
-
Store film in a cool place away from sunlight.
-
Do not leave objects on the top cover as it may interfere with
proper ventilation.
-
Do not look directly at the laser source, and avoid positioning your
head directly within sight of the laser while the door is open.
-
Locate instrument at a minimum distance of 30cm from the wall
and ceiling.
-
The ideal operating conditions for the instrument are 25 C (78 F)
and 55% relative humidity (recommended).
-
Do not replace UV and WL lamps while the instrument is
connected to the mains power outlet.
-
There is a lithium battery in the computer motherboard. This
battery is not replaceable by the customer.
-
Use only an S.B 4amp fuse - there is one spare fuse in fuse housing.
-
Please be absolutely certain that you are using the correct mains
voltage (100 - 240 VAC ±10%, 50/60 Hz).
2.3.2
Installation procedures
During system installation, follow the steps in order as given below.
1. Remove the monitor from its box and place it on its base on the
upper right side of the system.
2. Attach the monitor power supply connection cables to the monitor
power inlet and the system’s power outlet.
3. Plug the monitor VGA cable into the monitor socket.
4. Place the keyboard on the extendable keyboard holder
(underneath the instrument base plate) and plug the keyboard
cable into the keyboard socket.
5. If the system will be connected to a network, plug the network
cable into the network connector.
um
18-1131-81AA • p6
IMbook.book Page 7 Friday, November 17, 2000 9:22 AM
Unpacking & Installation
D
C
A
A
D
C
B
B
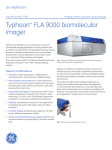
Fig 2-2. Layout of the power panel, with On/Off switch (A), power inlet (B),
power outlet (C), and the fuse holder (D) with spare fuse.
6. Attach the power cable to the mains outlet.
7. Insert the film into the printer as outlined in Chapter 6.
The system is now operational.
D
A
E
B
C
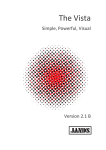
Fig 2-3. Layout of the computer panel showing port connections for the
monitor (A), serial cable (B), parallel (C), keyboard (D) and network (E).
• p7
2
IMbook.book Page 9 Friday, November 17, 2000 9:22 AM
System overview
3
System overview
The ImageMaster VDS-CL software was designed for advanced
imaging functionality within a user-friendly environment. This chapter
provides a brief overview of the system layout and functions.
3.1 The Screen Interface
All system functions are controlled from the screen. Details of the
system functions can be found in the following chapters. Users should
be familiar with the Windows 95 interface and functions. Two aspects
of the screen interface, the Toolbar and the Status bar, are described in
more detail below.
3.2 Toolbar
The toolbar is displayed across the top of the application window,
below the menu bar. The toolbar provides quick mouse access to many
tools used in the ImageMaster VDS-CL.
Toolbar
Fig 3-1. The screen Interface with Toolbar and Status bar
To hide or display the Toolbar, choose Toolbar from the View menu
(ALT, V, T). The following items are available on the toolbar:
• p9
3
IMbook.book Page 10 Friday, November 17, 2000 9:22 AM
3
System overview
Function
Toolbar Icon
Keyboard
shortcut
Default State
<Ctrl + N>
Load Procedure...
<Ctrl + O>
Save Current
Procedure as...
Upper Light On/Off
Lower Light On/Off
Guide Light On/Off
Cut Light On/Off
Copy
Freeze
Lap Time Save...
Incremental Save...
Save Image...
Illumination
correction...
Save image as
Bitmap...
Interpolate...
Image Viewer
um
18-1131-81AA • p10
<Ctrl + C>
IMbook.book Page 11 Friday, November 17, 2000 9:22 AM
System overview
3.3 Status Bar
The status bar is displayed at the bottom of the onscreen window. To
display or hide the status bar, use the Status Bar command in the View
menu.
The left area of the status bar describes actions of menu items as you
use the arrow buttons to navigate through menus. This area similarly
shows messages that describe the actions of toolbar buttons as you
depress them, before releasing them. If after viewing the description of
the toolbar button command you wish not to execute the command,
then release the mouse button while the pointer is off the toolbar
button.
The right areas of the status bar indicates which of the following
functions are activated:
Live, Freeze, Saving Image - indicates the current system video
situation.
Lights - indicates the light and light sensors state. In case one of the
lamps is burned and the matched light is operated, the system will state
error, the light type and the number of the burned lamp.
Doors - indicates if door is open or closes. The system will operate
lights only if the door is closed.
Drawer - Indicates the drawer type and position.
• p11
3
IMbook.book Page 12 Friday, November 17, 2000 9:22 AM
3
System overview
3.4 Camera Control Bar
The Image Master VDS-CL contains the following Dialogue Bars:
Digital Dialogue Bar
Optics Dialogue Bar
Analog Dialogue Bar
The Dialogue Bars are located on the left portion of the screen and
provides a quick access to most of the functions listed under Camera
drop-down menu. As the functions of the Digital, Analog and Optics
Dialogue bars are dealt with in detail in Chapter 4, the user is referred
to that chapter for a detailed description of the functions.
Fig 3-2. The Camera Control Dialogue Bar.
3.5 Getting Started
These directions are designed as a quick introduction to the initial
steps involved in acquiring an image. After setting up the system and
turning it on (see Chapter 2), follow the steps below:
1. Check to make sure the system is not in Freeze state (the left panel
in the status bar should read "Live").
2. Move into Default state using the Default toolbar icon.
um
18-1131-81AA • p12
IMbook.book Page 13 Friday, November 17, 2000 9:22 AM
System overview
3. Unfreeze the image using the Freeze toolbar icon.
4. Open the door and pull the current drawer out to the edge. The
drawer must be lifted gently at the end and fixed into position. The
right-most pane in the Status bar should read "Guide".
5. Place your sample in the middle of the drawer. For the positioning
of the sample, use the Guide light toolbar icon.
6. Insert the drawer in the chamber, but do not close the chamber
door.
7. Increase the Gain value in the Analog Dialogue bar to 200 and
press Set to set it.
8. Unfreeze the image using the Freeze toolbar icon.
9. Set the camera Zoom in the Optics Dialogue bar to fit the size of
the sample-the less irrelevant space in the image, the better the
resolution.
10. Close the door and focus the camera by pressing the AF button in
the Optics Dialogue bar.
11. From this point, you can select the right preset that matches your
application from the Presets drop-down menu or continue
through step 12
12. Choose the appropriate filter for your application (the CL
application uses No Filter)
13. Set the Gain value in the Analog Dialogue bar to the appropriate
value or 0.
14. Unfreeze the image using the Freeze toolbar icon.
15. Choose the right illumination for your application (for CL, No
illumination is used).
From this point, you set the optimal conditions depending on which
application you choose:
• p13
3
IMbook.book Page 14 Friday, November 17, 2000 9:22 AM
3
System overview
CL Applications
FL Applications
1. Set the Iris value to 1.2
using the Iris combo box
in the Optics Dialogue bar.
1. If there is too much light,
increase the Iris value and then,
if necessary, increase/decrease
the Exposure Time through the
Analog Dialogue bar.
2. Set the Gain value to
180 and press Set to set it.
2. If there is not enough light,
increase the Exposure Time
through the Analog Dialogue
bar and then if necessary,
increase the Gain value.
3. Set the Exposure TIme
through the Analog
Dialogue bar to match the
application notes.
4. If the resulting image is
unsatisfactory, either try
Auto Y Gain, Contrast or
Brightness from the
Digital Dialogue bar or
change Exposure Time and
Gain parameters to obtain
a new image.
3.6 On-line Help Menu
This manual is designed as an introduction to the layout and
functioning of the ImageMaster VDS-CL system. More detailed
instructions on the following functions can be directly accessed via the
online Help Menu:
- Menus
- Dialogue Boxes
- Dialogue Bars
- Toolbar
- Status Bar
um
18-1131-81AA • p14
IMbook.book Page 15 Friday, November 17, 2000 9:22 AM
System overview
3.7 Other system functions
3.7.1
Lights
The user can operate upper or lower white lights only when the white
light tray is inserted and the door is closed. Upper and lower UV lights
can only be operated when the UV drawer is in and the door is closed.
3.7.2
Cutting option
The UV drawer can be used to cut the sample on it. To perform the
cutting operation, the UV drawer is inserted and pulled towards the
user until the right panel in the status bar reads "Cut & Guide". The
Cut Light icon on the screen is then depressed, triggering a 360 nm
light from the lower lamp field. This function is performed with the
door open, but the user MUST use visual protection.
3.7.3
Positioning of samples
When the drawer is inserted, but the door still open, the user can use
the Guide Light icon on the screen to produce a laser spot. The laser is
directed to the center of the drawer and facilitates proper positioning
of the blot.
3.7.4
Camera
The user can control all of the important camera parameters including
focus, iris, zoom, shutter or exposure time and gain.
3.7.5
Save options
The system allows the user to save files in a variety of formats
including 8, 10, 12, 16 bit images in TIFF formats. In addition, the
Incremental Save and Lap Time Save functions allow the user to save
and view images in different time increments, thus allowing for the
optimisation of image quality.
3.7.6
Filters
The user can control a filter wheel automatically and , depending on
the desired result, choose various filter colours. For Chemiluminescent
work, use the CL filter, which means No Filter is employed.
• p15
3
IMbook.book Page 17 Friday, November 17, 2000 9:22 AM
Screen functions
4
Screen functions
Most of the system functions for the ImageMaster VDS-CL system are
available within one of the drop-down menus. This summary will lead
you through the following onscreen menus:
- File
- Edit
- Lights
- Camera
- View
- Presets
- Help
4.1 File Menu
Fig 4-1. The File drop-down menu.
The File menu is used to organize and save the results of your analysis
and documentation. The drop down menu consists of the following
options:
• p17
4
IMbook.book Page 18 Friday, November 17, 2000 9:22 AM
4
Screen functions
4.1.1
Default State
Set the system to the initial position of all parameters.
When turning the ImageMaster VDS-CL system on (not through user
defined procedure) it will automatically be set to default state.
After manipulating the settings of an image, the user can return to the
default state by selecting File:Default State, or by selecting the
Default State
Shortcut <CTRL+N>
The default position of each parameter is:
Sharpness = 0
Gain = 0
Contrast = 0
Iris = 1.2
Filter = No Filter
Exposure Time = 20 msec
Zoom = Out
Procedure Name = Default
Brightness = 125
Y-Gain = 256
User Defined Text To Add To Image = None
4.1.2
Save Image
Use this command to save the active image. When you save an image,
ImageMaster VDS-CL displays the Save As dialogue box for you to
name your image.
Images can be saved in TIFF (*.tif) formats in 8, 10, or 12 bit
resolution and can be also stretched to 16 bits by default.
The following options allow you to specify the name and location of
the file you're about to save:
- File Name
Type a new filename to save a document with a different name.
The system supports long file names (using Windows 95
standards) and an extension of up to three characters.
ImageMaster VDS-CL adds the extension you specify in the
Save File As Type box.
- Drives
Select the drive in which you want to store the document.
- Directories
Select the directory in which you want to store the document.
- Network...
Choose this button to connect to a network location, assigning
it a new drive letter.
um
18-1131-81AA • p18
IMbook.book Page 19 Friday, November 17, 2000 9:22 AM
Screen functions
4.1.3
Incremental Save
Use this command to save images with incremented exposure times.
Select File:Incremental Save or click on the Incremental Save toolbar
icon, and then choose among the following options:
Starting Exposure Time: - The Starting Exposure Time can be altered
by either inputting the desired values directly in the windows, or by
clicking on the sliders to the right of each window
End Exposure Time: - The End Exposure Time can be altered by either
inputting the desired values directly in the windows, or by clicking on
the sliders to the right of each window
Multiply Factor: - Use this Combo Box to choose a multiply factor i.e.
incremental increase, for the Exposure Times. The user can set the
Start and End Exposure Times, and then adjust the Multiply Factor to
arrive at the proper number of images or iterations.
Use this Combo Box to choose a multiply factor for the Exposure Time.
Start From End Exposure Time: - Use this Check Box to start taking
your images from the end of the Exposure Time to the beginning
Fig 4-2. The Incremental Save Dialogue Box.
Start - Once the desired parameter values have been set, use this button
to start the Incremental Save process. The system will then display Save
As dialogue box asking for a File name, Directory and image file format.
Abort - Use this button to stop the incremental save process.
Cancel - Use this button to leave the Incremental Save dialogue box.
• p19
4
IMbook.book Page 20 Friday, November 17, 2000 9:22 AM
4
Screen functions
4.1.4
Time Lapse Save
This command is used for time lapse imaging. Select File:Time Lapse
Image Save or click on the Time Lapse toolbar icon, and then choose
among the following options:
Exposure Time: - Exposure Time can be chosen either by directly
inputting values in the windows, or by using the sliders buttons to the
right of each window.
Number of iterations - Use this function to choose how many images
will be taken.
Delay - Use the edit box and buttons to choose the time delay between
images.
Note: The minimum time resolution is 1 second.
Averaged Sum: - Use this check box to average a series of images into
one image in each iteration.
Sum Images: - Use this check box to sum your images into one image
in each iteration.
Start - When all parameters have been set, push this button. The system
will then display a Save As dialogue box allowing the user to assign a
file name, image format, and directory location.
Abort - use this button to Abort the Time Lapse Save operation.
Cancel - use this button to return to the main menu.
Fig 4-3. The Time Lapse Image Save dialogue
um
18-1131-81AA • p20
IMbook.book Page 21 Friday, November 17, 2000 9:22 AM
Screen functions
Note: When using either Incremental Save or Time lapse Image Save, two
figures in consecutive order will be added to the given file name for
each image (e.g. filenamexx.tif).
4.1.5
Illumination Correction
Illumination correction is used to correct light source aberrations
within saved images. A second image is generated from the original,
according to the user defined criteria in the dialogue box. The new
image is given the same name, but with an "_FFC" suffix. To initiate
illumination correction, select File:Illumination Correction or click on
the Illumination Correction toolbar icon, and then use the following
buttons:
Acquire Image - Use this button to choose the name and format of the
images you wish to save.
Flat Field - Use this button to acquire the reference image for the flat
field calculation.
Cancel - Use this button to return to the main menu.
Fig 4-4. The Illumination Correction dialogue.
Note: When using the white light (WL) drawer, the user will be asked to
remove the image media and close the door before the FlatField button
will be enabled. When using the UV drawer, replace the image media
with the "Field Calibrator" before the second exposure.
4.1.6
Save Current Frame as Bitmab
Use this command to save the active frame. When you save a bitmap,
ImageMaster VDS-CL displays the Save AS dialog box for you to
name your bitmap.
• p21
4
IMbook.book Page 22 Friday, November 17, 2000 9:22 AM
4
Screen functions
4.1.7
Image Viewer
Use this command to view saved images.
To initiate the Image Viewer, select File:ImageViewer or click on the
Image Viewer toolbar icon. ImageMaster VDS-CL system displays the
Image Viewer dialog box for the user to choose one of the following:
- Adding an image to the Image Viewer.
- Creating a procedure form the viewed image.
- Print the viewed image in the video printer or a regular printer.
- Change the values of the black and white range.
- Zoom the viewed image.
In this way the user has the ability to view saved images, print the
images and create new procedures using the saved images parameters.
Add Image - use this button to add an image to the Image Viewer.
The selected image will be added to the image's list in upper part of the
Dialog Box.
Create Procedure - use this button to create a procedure from the
parameters that are listed in the right side of the Dialog Box.
Remove Image - use this button to delete the selected image in the
viewer.
Print - use this button to print the image in a regular printer (e.g. ink,
laser, etc…) connected to the system through the parallel port.
Video Printer - use this button to print the image in the system's video
printer.
Fit to window - use this button to fit the image to the viewer's window
size.
Set Values - use this button to set the maximum and minimum values
of the slider as shown in the matching Edit Boxes.
Invert - use this check box to invert the image.
Zoom - use this check box to change the pointer from a zooming mode
to a shifting mode and back.
Images List: use this list to change the image in the view window.
View Window: use this window to view the image, zoom in and out and
shift the image in the window.
um
18-1131-81AA • p22
IMbook.book Page 23 Friday, November 17, 2000 9:22 AM
Screen functions
Parameters List: use this list to view the image parameters. Those are the
parameters that will be used in the created procedure.
Fig 4-5. The Image Viewer window
4.1.8
Export to Photoshop standard
Select File:Export to Photoshop standard to export an ImageMaster
TIFF file to meet Photoshop 16 bit grayscale file format by changing a
tag on the image. This is useless if the files are stretched to 16 bits by
default. In both cases, the format is compatible with ImageQuant™..
The new file will be stored in the same directory and is given a "_PS"
suffix.
Note: It is not possible to change files not created by the ImageMaster
VDS-CL.
4.1.9
Interpolate
Use this command to increase the resolution of an image you selected
by four (twice in the width and twice in the height). When you
interpolate an image, ImageMaster VDS-CL display the Open File
dialog box for you to choose the file. After interpolation completion,
it saves the image with a suffix of _IT to the image name.
Before using this tool, we recommend to use the noise filtering feature
as described in Chapter 4.8. This will remove unwanted single pixel
noise from the image and enhance the results.
• p23
4
IMbook.book Page 24 Friday, November 17, 2000 9:22 AM
4
Screen functions
4.1.10 Optional Text to Saved Images
Select File:Optional Text to Saved Images to add text to the bottom of
the image in the saved file. The text is added without altering the
original file information.
Fig 4-6. The Text to Add dialogue box
4.1.11 Exit
Choose File :Exit to end your ImageMaster VDS-CL session without
shutting down the system.
Mouse: Double-click the application's Control menu button (on the
upper right corner).
Fig 4-7. The window Exit button
Keyboard: <ALT+F4>
4.1.12 System Shut Down
The System Shut Down dialogue is displaed when the user chooses
File:System Shut Down. The system will always prompt the user to
save any opened, but unsaved documents. Choose the Yes button to
shut down the system, or the No button to return to the previous
window.
um
18-1131-81AA • p24
IMbook.book Page 25 Friday, November 17, 2000 9:22 AM
Screen functions
Note: It is important to wait for the "It is now safe to turn off your
computer" prompt before turning off the mains power to your system.
Turning off the power before this dialogue appears may damage
system files.
4.2 Edit Menu
The Edit menu contains the Copy command. Select Edit:Copy or click
on the Copy toolbar icon to copy the current image onto the clipboard.
Copying an image to the clipboard erases any data that were
previously stored there..
Keyboard: <CTRL+C>
4.3 Lights Menu
Fig 4-8. The Lights drop-down menu.
4.3.1
Lights Off
Select Lights:Lights Off to turn off all lights in the system housing.
When selected, the Lights Off option displays a check mark next to the
menu text. In addition, the lamps box in the Status bar should read
“Sensors OK”.
• p25
4
IMbook.book Page 26 Friday, November 17, 2000 9:22 AM
4
Screen functions
4.3.2
Upper Light On/Off
Selecting Lights:Upper or clicking on the Upper Light toolbar icon
turns the Upper lighting source on or off. When another light is on and
the user chooses to turn the Upper light on, the current light is switched
off. There are 3 onscreen indicators visible when the Upper light is
turned on:
1. A check mark is visible next to the Upper menu text.
2. The Upper Light icon on the toolbar is depressed.
3. The Lamps box in the status bar indicates “W-Upper OK” if the
White drawer is used, or “U-Upper OK” if the UV drawer is used.
4.3.3
Lower Light On/Off
Selecting Lights:Lower or clicking on the Lower Light toolbar icon
turns the Lower lighting source on or off. When another light is on and
the user chooses to turn the Lower light on, the current light is
switched off. There are 3 onscreen indicators visible when the Lower
light is turned on:
1. A check mark is visible next to the Lower menu text.
2. The Lower Light icon on the toolbar is depressed.
3. The Lamps box in the status bar indicates “W-Lower OK” if the
White drawer is used, or “U-Lower OK” if the UV drawer is used.
4.3.4
Guide Light On/Off
Selecting Lights:Guide or clicking on the Guide Light toolbar icon
turns the laser pointer on or off. This laser pointer is only available
when the drawer is positioned above the Cut light and the Drawer
panel in the status bar reads "Guide". There are 3 onscreen indicators
visible when the Guide light is turned on:
1. A check mark is visible next to the Guide menu text.
2. The Guide Light icon on the toolbar is depressed.
3. The Lamps box in the status bar indicates "Guide OK".
um
18-1131-81AA • p26
IMbook.book Page 27 Friday, November 17, 2000 9:22 AM
Screen functions
4.3.5
Cut Light On/Off
Selecting Lights:Cut or clicking on the Cut Light toolbar icon turns the
Cut light on or off. This cut light is only available when the drawer is
positioned above the Cut lamps and the Drawer panel in the status bar
reads "Cut & Guide". There are 3 onscreen indicators visible when the
Cut light is turned on:
4. A check mark is visible next to the Cut menu text.
5. The Cut Light icon on the toolbar is depressed.
6. The Lamps box in the status bar indicates "Cut OK".
4.4 Camera Menu
The Camera menu contains the following commands:
- Freeze
- Block the system on the first exposure time
- Default Digital Parameters
- Contrast
- Brightness
- Sharpness
- Y Gain
- Zoom
- Auto Focus
- Iris
- Filter
- Gain
- Exposure Time
- Date and Time Display
- Display Text
Note: With the exceptions of Freeze, Block the system on the first exposure
time, Default Digital Parameters, Date and Time Display and Display
Text, all of the camera functions can also be accessed directly in the
camera function box on the left side of the main screen.
• p27
4
IMbook.book Page 28 Friday, November 17, 2000 9:22 AM
4
Screen functions
Fig 4-9. The Camera drop-down menu.
4.4.1
Freeze
The Freeze command can be accessed either by selecting
Camera:Freeze, or by clicking on the Freeze toolbar icon. When any
of the following functions are used, the system automatically employs
the Freeze command:
- Setting the Exposure Time.
- Setting the Gain.
- Setting a new Procedure.
- Setting a new Preset.
- Activating Default State.
There are 2 onscreen indicators alerting the user that the Freeze
function is on:
1. A check mark appears next to the Freeze menu item in the Camera
menu.
2. The Freeze icon on the Toolbar is pushed in.
um
18-1131-81AA • p28
IMbook.book Page 29 Friday, November 17, 2000 9:22 AM
Screen functions
4.4.2
Block System on First Exposure
Use this command to block the system on every time a new exposure
time is set.
When Block is on, ImageMaster VDS-CL system will display Blocking
Dialog box allowing the user to cancel the blocking.
4.4.3
Default Digital Parameters
Use this command to reset all digital parameters to their default values
i.e. : Contrast = 0, Brightness = 125, Sharpness = 0 and Y-Gain = 256.
4.4.4
Contrast
The following Contrast Values are available from the Menu
Camera:Contrast: -1023, -512, -256, -125, 0, 125, 256, 512, 1023.
This setting will only affect the displayed or printed image. You can
adjust the Contrast slider into the Digital dialogue bar on the left part
of the screen.
4.4.5
Brightness
The following Brightness Values are available from the Menu
Camera:Brightness: 0, 50, 100, 125, 150, 200, 255 (which is the
maximum Brightness value available).This setting will only affect the
displayed or printed image. You can adjust the Brightness slider into
the Digital dialogue bar on the left part of the screen.
4.4.6
Sharpness
The following Sharpness Values are available from the Menu
Camera:Sharpness: 0, 10, 20, 30, 40, 50, 60, 67 (which is the maximum
sharpness value available). This setting will only affect the displayed or
printed image. You can adjust the Sharpness slider into the Digital
dialogue bar on the left part of the screen.
• p29
4
IMbook.book Page 30 Friday, November 17, 2000 9:22 AM
4
Screen functions
4.4.7
Y Gain
The following Y Gain Values are available from the Menu Camera:Y
Gain: 10, 20, 40, 100, 200, 256, 400, 800 (which is the maximum Y Gain
value available).
Another option is Auto Y Gain (Camera->Y Gain->Auto Y Gain), the
system will decrease the Y Gain automatically to meet the optimum
brightness.
This setting will only affect the displayed or printed image. You can
adjust the Y Gain slider into the Digital dialogue bar on the left part of
the screen or push the Auto Y Gain button.
4.4.8
Zoom
This function allows the user to quickly zoom in or out in graded steps,
from wide angle ("Out") to the tightest zoom ("In"). The following
Zoom Values are available from the Menu Camera:Zoom: Out, 2, 3, 4,
5, In.
You can adjust the Zoom into the Optics dialogue bar on the left part
of the screen.
4.4.9
Auto Focus
Use this command to automatically focus the camera. Activating Auto
Focus initiates several other functions while the focus is set, including
turning the Upper White Light On. However, once the auto focus has
been achieved, the system will return to the previous settings.
Adjust the Focus through the Camera:Auto Focus drop-down menu
or with the onscreen Focus buttons:
4.4.10 Iris
The following Iris Values are available from the Menu Camera:Iris: 1.2,
1.4, 2, 2.8, 4, 5.6, 8 and 11 or from the onscreen Iris combo box:
um
18-1131-81AA • p30
IMbook.book Page 31 Friday, November 17, 2000 9:22 AM
Screen functions
4.4.11 Filter
The following Filter options can be chosen either with the Camera:Filter
drop-down menu, or with the onscreen Filter combo box:
- UV Low - Band Pass 520 nm, FWHM: 50 nm.
- UV High - Band Pass 580 nm, FWHM: 50 nm
- Green - High Pass 490 nm
- Blue - Low Pass 450 nm
- Red - Low Pass 590 nm.
4.4.12 Gain
The following Gain Values are available from the Menu Camera:Gain:
0, 25, 50, 75, 100, 125, 150, 175, 200, 225, 250. or by choosing a value
and then pressing Set on the onscreen Gain controls:
4.4.13 Exposure Time
This commands allows the user to choose among available exposure
times, ranging from 20 msec to 20 minutes. Adjust these values either
with the Camera:Exposure Time drop-down menu, or with the
onscreen Exposure Time setting controls:
4.4.14 Date and Time Display
This menu allows the user to enable or disable the camera's Date and
Time Displays
4.4.15 Display Text
Use this command to display and remove text from the camera image
memory. The user may choose between:
• p31
4
IMbook.book Page 32 Friday, November 17, 2000 9:22 AM
4
Screen functions
On - Choosing On prompts the Display Text dialogue box, allowing
the user to insert text. The text is then displayed on the screen and is
available on the printout from the thermal printer.
Off - Removes the Text from the camera image memory.
4.5 View Menu
The View menu allows the user to toggle various screen views on and
off, thereby optimising the workspace on the screen. The View menu
contains the following commands:
- Toolbar
- Status bar
- Analog Dialog Bar
- Digital Dialog Bar
- Optics Dialog Bar
- Default View
Fig 4-10. The View drop-down menu.
um
18-1131-81AA • p32
IMbook.book Page 33 Friday, November 17, 2000 9:22 AM
Screen functions
4.5.1
Toolbar
Use this command to display or hide the Toolbar. A check mark
appears next to the Toolbar menu item when the Toolbar is displayed.
4.5.2
Status Bar
Use this command to display or hide the Status Bar at the lower right
hand corner of the screen. A check mark appears next to the menu item
when the Status Bar is displayed.
4.5.3
Analog Dialog Bar
Use this command to display or hide the Analog Dialog Bar at the left
of the screen. A check mark appears next to the menu item when the
Analog Dialog Bar is displayed. The Analog Dialog Bar allows to set
the Gain value and the Exposure Time.
4.5.4
Digital Dialog Bar
Use this command to display or hide the Digital Dialog Bar at the left
of the screen. A check mark appears next to the menu item when the
Digital Dialog Bar is displayed. The Digital Dialog Bar is used to
control the look of the image on screen and on a printer by changing
the Contrast, Brightness, Y Gain and Sharpness.
4.5.5
Optics Dialog Bar
Use this command to display or hide the Optics Dialog Bar at the left
of the screen. A check mark appears next to the menu item when the
Optics Dialog Bar is displayed. The Optics Dialog Bar is used to control
the camera optics. User can set the focus, Iris, Filter and Zoom from
this dialogue box.
4.5.6
Default View
Use this command to set the system to default view status.
• p33
4
IMbook.book Page 34 Friday, November 17, 2000 9:22 AM
4
Screen functions
4.6 Presets Menu
The Presets menu contains the following commands:
- User Defined: Load Procedure...
- User Defined: Save Current Procedure As...
- System Presets
Fig 4-11. The Presets drop-down menu.
4.6.1
Load Procedure
Use this command to load existing Procedure. The ImageMaster VDSCL system will change the current system parameters to the loaded
parameters. When loading a Procedure, the system displays the File
Open dialogue box prompting you to choose the stored Procedure to
load. Note that you cannot reload the same procedure name that the
one already in memory.
4.6.2
Save Current Procedure As
Use this command to save and name the active setting. The system
displays the Save As dialogue box, allowing the user to name the
procedure and choose a destination directory for saving. To save the
current, updated procedure with its existing name and directory, use
the Save command
um
18-1131-81AA • p34
IMbook.book Page 35 Friday, November 17, 2000 9:22 AM
Screen functions
4.6.3
System Presets
Use one of the presented system Presets as a first approach to optimise
the chosen kit.
Brightness
Contrast
Drawer
ExpTime
Filter
Gain
Iris
Light
Shrp
-ness
Y gain
Zoom
CDP-Star large size
blots
125
0
ECL
10:00:00
No
Filter
250
1.2
None
0
50
Out
CDP-Star medium
size blots
125
0
ECL
5:00:00
No
Filter
220
1.2
None
0
50
3
CDP-Star small size
blots
125
0
ECL
5:00:00
No
Filter
200
1.2
None
0
50
5
ECL large size blots
125
0
ECL
5:00:00
No
Filter
250
1.2
None
0
50
Out
ECL medium size
blots
125
0
ECL
5:00:00
No
Filter
220
1.2
None
0
50
3
ECL small size blots
125
0
ECL
4:00:00
No
Filter
200
1.2
None
0
50
5
ECL Plus Western
large size blots
125
0
ECL
2:00:00
No
Filter
180
1.2
None
0
130
Out
ECL Plus Western
medium size blots
125
20
ECL
1:00:00
No
Filter
180
1.2
None
0
130
3
ECL Plus Western
small size blots
125
20
ECL
1:00:00
No
Filter
180
1.2
None
0
130
5
ECF Western large
size blots
125
0
UV
0:30:00
UV
High
0
4
Upper
0
250
out
ECF Western
medium size blots
125
0
UV
0:30:00
UV
High
0
4
Upper
0
250
3
ECF Western small
size blots
125
0
UV
0:30:00
UV
High
0
4
Upper
0
250
5
AlkPhos Direct ECF
large size blot
100
-50
UV
0:30:00
UV
High
180
4
Upper
0
450
out
AlkPhos Direct ECF
medium size blot
100
-50
UV
0:30:00
UV
High
180
4
Upper
0
450
3
AlkPhos Direct ECF
small size blot
100
-50
UV
0:30:00
UV
High
180
4
Upper
0
450
5
Sypro Ruby gels
20 x 18 cm
125
0
UV
0:01:00
UV
High
150
1.2
Lower
0
250
out
Sypro Ruby gels
10 x 8 cm
125
0
UV
0:01:00
UV
High
150
1.2
Lower
0
250
3
EtBr Large gels
100
0
UV
0:05:00
UV
High
150
4
Lower
0
250
out
EtBr small gels
100
0
UV
0:05:00
UV
High
150
4
Lower
0
250
4
Name
• p35
4
IMbook.book Page 36 Friday, November 17, 2000 9:22 AM
4
Screen functions
Brightness
Contrast
Drawer
ExpTime
Filter
Gain
Iris
Light
Shrp
-ness
Y gain
Zoom
Coomassie Gels
20 x 18 cm
100
-50
White
0:00:080
No
Filter
0
4
Lower
0
250
out
Coomassie Gels
10 x 8 cm
100
-50
White
0:00:080
No
Filter
0
4
Lower
0
250
3
Silver stained gels
20 x 18 cm
100
-50
White
0:00:080
No
Filter
0
4
Lower
0
250
out
Silver stained gels
10 x 8 cm
100
-50
White
0:00:120
No
Filter
0
4
Lower
0
250
3
Name
4.7 Help menu
The Help menu contains the following commands:
- Help Topics
- About IM VDS-CL
Fig 4-12. The Help drop-down menu.
4.7.1
Help Topics
Use this command to view the system’s Help menu topics.
um
18-1131-81AA • p36
IMbook.book Page 37 Friday, November 17, 2000 9:22 AM
Screen functions
4.7.2
About IM VDS-CL
Use this command to display the copyright notice and version number
of your copy of ImageMaster VDS-CL.
Fig 4-13. The About IM VDS-CL dialogue box.
4.8 Spot Filtering Tool
There is a tool provided from version 2.01 of the software that allows
the noise filtering on images.
On the VDS-CL desktop, there is an icon called SP Filter.
By clicking on this icon, a File Open dialogue box pops up. Choose the
file you will to clean up and press Enter key. A new file will be created
into the same directory with a similar name and a suffix _SF.
This application is only removing single high intensity pixels from the
image and improves the quality for further quantitation or for eventual
publication if combined with Interpolation.
It is recommended to use this feature before using the Interpolate
feature in Chapter 4.1.9.
• p37
4
IMbook.book Page 39 Friday, November 17, 2000 9:22 AM
Touchpad
5
Touchpad
The ImageMaster VDS-CL utilizes a Touch Pad interface that allows
the user to navigate the on-screen menu system. You can access the
Touch Pad control panel by clicking on the Windows Start button
(lower left hand corner of screen) and then choosing Settings: Mouse.
Fig 5-1. The Touch Pad control panel.
5.1 The Taps panel
To configure the taps functions, click on the Taps panel.
These options allow you to adjust functions related to the touchpad's
buttons and touchpad tapping features. These options can also be used
to configure other detected pointing devices.
5.1.1
Learning to tap on the touchpad
Click, double-click, drag and highlight functions of the left-click and
right-click mouse buttons can be activated by tapping directly on the
surface of the pad. Remember, the touchpad responds best to a light,
quick tap.
• p39
5
IMbook.book Page 40 Friday, November 17, 2000 9:22 AM
5
Touchpad
To "click", lightly and quickly tap the surface of the pad once.
To "double-click", rapidly tap on the pad twice.
To "drag", draw, or highlight, double-tap and hold your finger down
on the second tap. Then glide your finger to move.
To "drag" further than the touchpad surface, simply lift your finger
and reposition after reaching the textured edge of the pad.
5.1.2
Pointers Tab
If the touchpad control panel is open, click on the Pointer tab now.
This group of options allows you to change the pointer's appearance.
This section is identical to the Microsoft Pointer options.
To change all of the pointers at once, select a different scheme.
To change the appearance of a specific pointer, click on the pointer to
be changed and select Browse to locate other pointer styles.
5.1.3
Assign Buttons (on the right hand side of the
touch pad)
This option becomes available when the Custom option has been
selected.
When you click on Assign Buttons, you will be asked what button or
tap you would like to assign. You can choose any of the available
buttons and can also use the Ctrl key on your keyboard plus any of the
touchpad buttons or tapping features.
Once you have selected a button or tap, you will be asked to select a
function to attach to the selected button or tap.
Follow the steps below to make an assignment:
Make sure the touchpad control panel is open.
1) Click the Taps tab and click Custom.
2) Click Assign Buttons.
3) Press a touchpad button of your choosing.
4) Select a function (for example, select "double-click").
um
18-1131-81AA • p40
IMbook.book Page 41 Friday, November 17, 2000 9:22 AM
Touchpad
5) Click Finish.
6) Click Apply to store your settings.
The button that you selected should now function as a double click
button.
To test it out, place your cursor on an application icon and press the
button you selected as "double-click".
5.1.4
Test Area
The test area is designed to quickly display your current button
configuration.
By putting your cursor in the Test Area portion of the touchpad control
panel and pressing the touchpad's buttons (or taps), you will get an
indication of your current button configuration.
Below are the standard mouse button functions and what they do in
Windows 95:
Left-click (Primary)- is used to open applications, drag and select
items.
Right-click (Secondary)- is used for extended menu functions and
special drag operations.
Middle-click (Auxiliary)- is currently an application specific function.
5.1.5
Single-Tap Duration
This option allows you to set the single-tap duration of the touchpad.
Personalize your single-tap speed and duration by tapping once on the
Earth icon (the Earth icon should spin). You can verify your setting in
the test area (the Moon icon).
Click on the Use Defaults button to set your single-tap duration back
to its original setting.
5.1.6
Double-Click Speed
This option allows you to set the double-click speed of the current
pointing device.
This setting affects the touchpad buttons as well as the touchpad
tapping features.
• p41
5
IMbook.book Page 42 Friday, November 17, 2000 9:22 AM
5
Touchpad
Personalize your double-click speed by double clicking or doubletapping on the Earth icon. You can verify your setting in the test area
(the Moon icon). If you would like to set your double-click or doubletap speed back to it's original setting, click on the Use Defaults button.
5.2 Motion Tab
If the touchpad control panel is open, click on the Motion tab now. The
options that are available in Motion allow you to adjust the pointing
device's motion characteristics and pointer trails.
5.2.1
Pointer Trails
Pointer trails provide visual feedback by leaving a distinctive cursor
trail. This may help if you have difficulty locating the cursor on your
screen.
You may adjust the length of the trails from short to long.
The Show pointer trails check box is used to enable or disable the
pointer trails option.
5.2.2
Relative Speed
This adjustment allows you to increase the motion sensitivity of the
pointing device. The higher the speed setting, the faster the cursor
moves as you glide your finger across the touchpad. This setting is
helpful for fine tuning the pointing device's range of motion and
responsiveness.
5.2.3
Acceleration
This adjustment allows you to change the pointing device's
acceleration. Acceleration allows the cursor to move faster on the
screen with increased movement from the pointing device.
Acceleration increases in increments depending on how the adjustment
is set. Acceleration allows quick cursor movement while maintaining
cursor accuracy with small amounts of movement.
Setting acceleration to none disables the acceleration feature.
5.3 Scrolling Tab
If the touchpad control panel is open, click on the Scrolling tab now.
These options control the available methods of scrolling.
The touchpad activated scrolling is compatible with many Windows
applications including '97 applications that support advanced
scrolling and zooming.
um
18-1131-81AA • p42
IMbook.book Page 43 Friday, November 17, 2000 9:22 AM
Touchpad
Scrolling also incorporates audible feedback that may be applied to
each of the scrolling options and types.
5.3.1
Scrolling Method
These settings allow you to choose the scrolling method to use.
None disables the touchpad scrolling options.
5.3.2
Scrolling Types
This group of options allows you to enable or disable specific scrolling
functions.
You can enable or disable the following:
- Vertical
- Horizontal
- Zoom
- Back/forward
5.3.3
How do I use Scrolling?
Scrolling enables you to quickly access the scroll bars in most
Windows applications, Zoom in many '97 applications and move Back
and Forward in many applications such as web browsers.
The touchpad surface displays vertical and horizontal arrows that
designate the areas in which the touchpad activates the scroll
commands.
If the cursor is in a window that has a scroll bar, scroll functions can
be activated.
5.4 Options Tab
If the touchpad control panel is open, click on the Options tab now.
This group of settings allows you to adjust various touchpad features.
5.4.1
Autojumps
Autojumps are designed to help you save time by automatically
moving the cursor to predefined locations when applications or
dialogue windows are opened.
• p43
5
IMbook.book Page 44 Friday, November 17, 2000 9:22 AM
5
Touchpad
The following autojumps are available:
No Autojumps
Default Button - The autojump features setting causes the cursor to
jump to the default button (such as the OK button) in the newly opened
window or dialogue box
System menu box - This setting causes the cursor to jump to the system
menu box (the small icon in the top left corner) of a newly opened
window.
Window center - This setting causes the cursor to jump to the center of
a newly opened window or dialogue box.
5.4.2
Rotation
Rotation sets the orientation for the direction of motion. This feature
is useful if you intend to use the touchpad in a different position.
For example, if you prefer to use the touchpad upside down, you
would click Set Rotation, turn the touchpad upside down and move
your finger from the bottom of the touch surface to the top. This will
set the direction of motion to match the way the touchpad is
positioned.
The Use Defaults button is used to set the rotation back to the standard
setting.
5.4.3
Motion extenders
Motion extenders help you drag efficiently and easily. Motion
extenders only work with tap engaged drag functions.
No extend disables all Motion extenders.
GlideExtend, when enabled, virtually eliminates the edge of the pad
when dragging. For example, if you drag an item and hit the edge of
the touchpad's surface, GlideExtend will hold the drag while you lift
and reposition your finger to complete the drag function. GlideExtend
will time out after 3 seconds. GlideExtend can be released at the edge
of the pad by tapping once or releasing the drag away from the edge of
the pad.
Drag lock, when enabled, holds the drag function indefinitely until a
primary button is pressed or until you tap on the pad.
Motion extenders can be found in the touchpad control panel on the
Options tab.
um
18-1131-81AA • p44
IMbook.book Page 45 Friday, November 17, 2000 9:22 AM
Touchpad
5.5 General Tab
If the touchpad control panel is open, click on the General tab.
This group of options allows you to change pointing device drivers and
the current pointing device (the device being adjusted by the control
panel settings).
The Name field allows you to change the currently installed pointing
device driver. Changing the driver from the GlidePoint driver will
disable the touchpad control panel, returning the standard mouse
control panel.
The Choose a device to customize setting allows you to select a
pointing device from a list of currently connected devices that can be
adjusted with the various options included in software.
Tapping on the Touchpad's touch surface will simulate button clicks.
Right-clicks - can be activated by tapping the upper right corner of the
touch surface.
Left-clicks - can be activated in the remainder of the pad.
Drag features - can be activated by double-tapping and holding your
finger on the pad.
Enable a scrolling method that is compatible with most Windows
based applications.
Enables a scrolling method that is compatible with most 97 compatible
applications that support advanced vertical scrolling. Office 97 type
applications offer not only horizontal and vertical scroll options, but
also a Zoom control that allows you to increase or decrease the current
view in an Office 97 application.
To scroll vertically - lift and place finger on the right edge of the
touchpad and glide your finger up or down.
To scroll horizontally - lift and place finger on the lower edge of the
touchpad (excluding the corners) and glide your finger left or right.
To zoom in or out - lift and place finger on the left edge of the touchpad
and glide your finger your finger up or down (applicable in many 97
applications).
To go back or forward pages - on the world wide web lift and place a
finger on the upper edge of the touchpad and glide your finger left or
• p45
5
IMbook.book Page 46 Friday, November 17, 2000 9:22 AM
5
Touchpad
right. Each 1/8 inch movement will activate a page change. Note: the
back/forward feature also may be used in some applications such as
time management software for moving from day to day.
um
18-1131-81AA • p46
IMbook.book Page 47 Friday, November 17, 2000 9:22 AM
Printer
6
Printer
The ImageMaster VDS-CL utilizes a Fuji Thermal Imaging System to
produce printouts of user selected images. A complete technical
reference to the printer is contained in the accompanying Printer
technical manual. This chapter is designed as a “quick-start” review of
the printer’s basic operating procedures.
6.1 Film types and film loading
Two types of film are available for the ImageMaster VDS-CL system.
The high-grade Super VDS film is installed at the factory and the
printer is set to process this thermally fixed film. The regular-grade
film is UV fixed, so the Film Select setting must be adjusted if switching
film types.
Latch for opening and closing the front panel
(for film loading and roller cleaning)
Printer power switch
Press the REPRINT key
for additional copies of
the image displayed on
the monitor
Press the PRINT key
for a print of the image
displayed on the
monitor
The FUNC key accesses
all the printer settings
The LED displays
print number or
the printer settings
if using the FUNC
keys
The arrow keys increase
or decrease the value
displayed on the LED
Slide the stacking tray into
this slot, holding the tray
level. When properly installed,
the tray snaps into place with
a click
Fig 6-1. Layout and functions of the thermal-imaging printer.
• p47
6
IMbook.book Page 48 Friday, November 17, 2000 9:22 AM
6
Printer
6.1.1
Loading a roll of film
This section describes how to install a new roll of film when no film is
currently installed, or when the film roll is empty. To switch to a
different type of film, first remove the installed film by following the
instructions in the next section “Removing a roll of film”.
Note the type of film you are installing. Super VDS film is included
with the unit, and the printer is originally set to LCr to process it.
Regular VDS film can be ordered, and if used, the setting must be
changed to TFF (see step 9 below).
Note: Keep film away from direct sunlight during loading. Always store film
in a cool, dark place.
1
The VDS mains power switch must be on, the secondary power
switch must be turned to ON, and the printer power switch must
be on.
2
Release the printer cover by pressing the PUSH button on the upper
left corner.
Lever in RELEASE
position
Fig 6-2. Removing an empty roll of film.
um
3
Move the thermal head release lever down to the RELEASE
position.
4
Lift the film roll out of the holder rails. Remove the flanges from
both ends of the spool and insert them into the new roll of film.
18-1131-81AA • p48
IMbook.book Page 49 Friday, November 17, 2000 9:22 AM
Printer
Holder rails
PRINT position
Film spool
RELEASE position
Fig 6-3. Loading a new roll of film.
5
Seat the new film spool into the holder rails. Once the spool seats,
the rubber roller will start rotating. Guide the film to the back of
the compartment and gently press the middle of the spool just until
the film starts to self-feed.
6
Allow the film to feed until it emerges at the stacking tray and then
stop the roller by lifting the thermal head release lever into the
PRINT position.
Film
Rubber roller
Fig 6-4. Feeding the film through the roller.
• p49
6
IMbook.book Page 50 Friday, November 17, 2000 9:22 AM
6
Printer
7
Close the front cover.
8
Optional step: Reset the counter to zero by simultaneously
pressing the up arrow and PRINT keys.
Note: Each film roll will produce 170 images at the default 4:3 aspect ratio.
9
If you are switching to a different film type, change the two settings
as follows:
6.1.2
Film select setting
When the printer is in normal or standby state (showing the print
number), press the down arrow key and then also the FUNC key. This
will switch to a sub-menu in which 6 parameters can be set.
Forward through the menu 5 steps by pressing the FUNC key until
either LCr (required setting for the Super VDS film) or TFF (required
setting for VDS film) appears. Press either the down arrow key or the
up arrow key to toggle between the two choices. Press and hold the
FUNC key for longer than 0.5 s to set the current value and then exit.
6.1.3
Tone setting
When the printer is in normal or standby state, press the FUNC key to
enter the Print mode submenu.
Forward through the menu 3 steps by pressing the FUNC key until
either T3 (recommended setting for Super VDS film) or T7
(recommended setting for VDS film) appears. Please note that the
setting that results in the closest approximation of the image on the
monitor may vary slightly from these values.
Press either the down arrow key or the up arrow key to scroll through
the tone setting options until the desired setting appears. Press and
hold the FUNC key for longer than 0.5 s to set the current value and
then exit.
6.2 Removing a roll of film
Allow the printer to rewind the film - never pull the film out while the
printer is ON, or while the lever is in the Print position.
1
um
18-1131-81AA • p50
Set the printer to service mode: The ImageMaster VDS mains
power switch must be ON, the secondary power switch must be
ON, and the printer power switch must be OFF. Simultaneously
hold down both the PRINT and FUNC keys and turn the printer
power switch ON. The LED will indicate “SEV”.
IMbook.book Page 51 Friday, November 17, 2000 9:22 AM
Printer
2
Release the printer cover by pressing the PUSH button on the upper
left corner of the cover.
3
To rewind the film, press the FUNC key. If necessary, apply gentle
pressure to the film drum to help feed the film at the proper rate.
The LED will indicate “PrU” (Printer unwind). Once the film edge
is free, release the FUNC key.
4
If loading a new roll of film: Go to step 3 of the “Loading a new
roll of film” section above. If cleaning the printer roller, go to step
2 of the “Cleaning the rubber roller” section below. If cleaning the
thermal head, go to step 2 of the “Cleaning the thermal head”
section below.
6.3 Clearing a film jam
Allow the printer to rewind the film - never pull the film out while the
printer is ON, or while the lever is in the PRINT position.
1
The VDS mains power switch must be on, the secondary power
switch must be switched to ON, and the printer power switch must
be ON. Release the printer cover by pressing the PUSH button on
the upper left corner.
2
Inspect the spool for proper placement, the film path for
obstructions, and the film for signs of bunching or buckling.
To remove a damaged section of film, lower the thermal head release
lever into the RELEASE position and allow the roller to advance the
film into the stacking tray. If the printer is unable to feed the film, try
rewinding the film as follows:
Return the lever to the PRINT position and switch the printer power
OFF.
Simultaneously hold down both the PRINT and FUNC keys and turn the
printer power switch ON. The LED will indicate SEV.
Note: If a section of film is stuck in the exit, pressing the down arrow key in
the SEV mode will trim it off.
To rewind the film, apply gentle pressure to the film drum (to help feed
the film at the proper rate) and then press the FUNC key to start
rewinding. The LED will indicate “PrU” (Printer unwind). Once the
film is free, release the FUNC key. Move the thermal head release lever
down to the RELEASE position. Reload the film according to
instructions in the “Loading a roll of film” section above.
• p51
6
IMbook.book Page 52 Friday, November 17, 2000 9:22 AM
6
Printer
If the roller is still unable to fed the damaged film, turn the power to
the printer OFF and lower the lever into the RELEASE position. Lift
the roll of film out and slowly but firmly pull the film free of the roller.
Once the film is free, cut off the damaged section (It may be easier to
reload the film if you angle the cut slightly.). Turn the printer power
back ON. Reload the film according to instructions in the “Loading a
roll of film” section above.
Note: It is advisable to clean the roller (see below) after a jam to remove
particles that may streak the film.
6.4 Cleaning the Printer
6.4.1
Thermal head
It is good practice to run the cleaning sheet after every roll of film to
prevent printing quality problems such as blotches and streaks. The
maximum recommended interval between cleaning sheet runs is three
rolls of film (approximately 500 prints).
Important: Use only the accessory cleaning sheet to clean the thermal head.
1
Remove the film according to the instructions in the “Removing a
roll of film “section above.
2
Lift the roll of film out. Turn the printer power OFF and then ON
to reset the printer mode. The LED will indicate error condition 1
and an audible beep will sound.
3
Make sure the thermal head release lever is in the PRINT position.
4
Note the instructions on the cleaning sheet: Do not touch the
cleaning section of the sheet, be sure to insert the sheet with the
cleaning surface facing up (the printed side of the sheet will be
against the rubber roller, and the matte side will contact the
thermal head), and take care to align the sheet.
The positioning line on the cleaning sheet should align along the
entire length of the edge just above the rubber roller. The sheet
must be fed evenly to ensure proper alignment. Also, make sure
that the sheet makes contact with the rubber roller - gently edge the
sheet down as far as it will go.
5
um
18-1131-81AA • p52
Simultaneously press the FUNC and up arrow keys. The cleaning
sheet will advance but not pass all the way through. As the sheet
advances, the LED will switch from indicating error 1 to indicating
cleaning mode CL3.
IMbook.book Page 53 Friday, November 17, 2000 9:22 AM
Printer
If the cleaning sheet does not begin to feed, move the thermal head
release lever to the RELEASE position and reposition it.
Cleaning sheet
Align
Guide protrusion
Lever
RELEASE
position
Rubber roller
Fig 6-5. Cleaning the thermal head.
When the cleaning sheet begins to enter the stacking tray, an
audible beep will sound and the LED will display cleaning mode
CL2. Move the thermal head release lever to the RELEASE
position. The printer will then eject the cleaning sheet and the LED
will first display cleaning mode CL1 and then error 1 for about 30
seconds.
If the sheet becomes stuck because it engaged with the roller too
late, turn the power to the printer OFF and lower the thermal head
release lever into the RELEASE position. Slowly but firmly pull the
sheet free. Go back to step 3 above.
6
Repeat steps 3 to 5 as often as required.
7
To reload the film, see the Loading a roll of film section above.
6.4.2
Rubber roller
White vertical lines or black spots on your prints may indicate that the
rubber roller and/or the thermal head require cleaning. If cleaning
doesn’t improve the photo quality, contact a qualified service
technician to replace the thermal head or roller.
• p53
6
IMbook.book Page 54 Friday, November 17, 2000 9:22 AM
6
Printer
1
Remove the film according to the instructions in the “Removing a
roll of film” section above.
2
Turn the printer power OFF and then ON to reset the printer
mode. The LED will indicate error condition 1 and an audible beep
will sound,
3
Moisten a cotton swab with water to clean the roller - do not use
gauze or cloth because they may catch in the roller.
Cotton swab
Lever
RELEASE
position
Rubber roller
Fig 6-6. Cleaning the rubber roller.
4
Press the REPRINT key to start the rubber roller rotating. It will
rotate for about 30 seconds. (The LED will first indicate error 1,
and then cleaning mode CL1). Clean the roller with the cotton
swab as it rotates.
5
Allow the roller to dry.
6
Move the thermal head release lever into the RELEASE position.
7
Reload the film as described in the “Loading a roll of film” section
above.
6.5 Printer pre-sets
Printer parameters are preset for ImageMaster VDS-CL system
applications. The factory set parameters for the system are listed below
for your reference.
um
18-1131-81AA • p54
IMbook.book Page 55 Friday, November 17, 2000 9:22 AM
Printer
Menu available by pressing the FUNC key only (PRINT mode)
Brightness
b0*
Contrast
C0*
Tone
T3 (Super VDS film) or
T7 (regular VDS film)
Gain select
G_n
Gain
G28
*The available range for these settings is -9 to 9. However, 0 is the
default (and nominal) setting, and settings outside the -3 to 3 range are
not recommended.
Menu available by pressing both the FUNC and the down arrow key
simultaneously (FUNCTION mode 1)
Output
THr
Enhance
EoF
H-size
5_0
Format
F10
H-posi
H0C
V-posi
U0E
Menu available by pressing both the FUNC and the up arrow key
simultaneously (FUNCTION mode 2)
Aspect
A43
Int/Noint
in
Odd/Even
odd
Mono/color
Cro
Signal select
S_A
Film select
LCr (Super VDS film) or
TFF (Regular VDS film)
• p55
6
IMbook.book Page 56 Friday, November 17, 2000 9:22 AM
6
Printer
Menu available by pressing the FUNC, up arrow, and down arrow keys
simultaneously (First set the LED display for S3 with the up arrow and
down arrow keys and then press FUNC to access FUNCTION mode 3)
Direction
d0
Posi/Nega
PoS
Film cutsize
C_n
Cutter
Con
Mirror
obu
Gradation
G_8
Menu available by pressing the FUNC, up arrow, and down arrow keys
simultaneously (First set the LED display for S4 with the up arrow and
down arrow keys, and then press FUNC to access FUNCTION mode 4)
LED display select
d50
Print no. print
Con
T/H temp print
ToF
EPDT
9A8
VSDT
5Cd
Filter select
5F1
Menu available by pressing the FUNC, up arrow, and down arrow keys
simultaneously (First set the LED display for S5 with the up and down
arrow keys, and then press FUNC to access FUNCTION mode 5)
ID print
Pon
ID character set
050
Note: The 16 available characters are programmed at the factory to spell
“APBiotech”. To re-program, see the Fuji Thermal Imager manual.
um
18-1131-81AA • p56
IMbook.book Page 57 Friday, November 17, 2000 9:22 AM
Printer
6.5.1
Restoring default printer parameters
If the printer settings are in an unknown state, restore default
parameters according to the instructions below. For a full description
of all printer options and settings, see the FujiTM Thermal Imager
instruction manual accompanying the ImageMaster VDS-CL system.
1
To initialize all printer parameters, hold down both the down
arrow and PRINT keys while turning the printer mains power
switch ON.
2
After printer initialization (step 1), each print will be labelled “Fuji
film”. To program the 16-character label to read “APBiotech”,
follow the procedure below. For additional codes to program your
preferred text, refer to the Fuji printer manual.
a Press the FUNC key while holding down both the up and down
arrow keys to access “FUNCTION mode 3”. Then select “S5”
(FUNCTION mode 5) by pressing the up arrow key twice.
b Press the FUNC key two times to access the ID character set. The
position (0) and character (46) code for “F” in Fuji film will
appear: 046.
c In this position, use the up and down keys to select the desired
character code for the first (0) position. For A, the code should be
041, as shown in the table below. Press the FUNC key to accept.
The next set of character codes automatically appears. The table
below lists all position and character codes required to program
an“APBiotech” label on each print.
Character
Position/Character code
A
0/41
P
1/50
B
2/42
i
3/69
o
4/67
t
5/74
e
6/65
c
7/63
h
8/68
d Press the FUNC key for more than 0.5 s to set the selected values
• p57
6
IMbook.book Page 58 Friday, November 17, 2000 9:22 AM
6
Printer
and exit.
3
Check that the film type setting matches the film type in the
printer.
4
To match the print to the monitor image, follow the procedures
(outlined below) for UV transillumination or for white light
imaging.
6.5.2
UV transillumination procedure
1
Make sure you have chosen the UV sample tray, that the sample is
in place, and that the tray is properly installed.
2
Adjust the desired picture size (using the Zoom function).
3
Adjust the focus (using the Focus controls or Auto Focus).
4
Print the image by pressing PRINT on the printer.
While printing, the printer displays “P” and does not accept further
commands. Once the print number displays, the printer is ready to
print.
6.5.3
um
White light imaging procedure
1
Make sure you have chosen the while sample tray, that the sample
is in place, and that the tray is properly installed.
2
Adjust the desired picture size (using the Zoom function).
3
Adjust the Focus (using the Focus controls or Auto Focus)
4
Print the image by pressing PRINT on the printer. While printing,
the printer displays “P” and does not accept further commands.
Once the print number displays, the printer is ready to print.
18-1131-81AA • p58
IMbook.book Page 59 Friday, November 17, 2000 9:22 AM
Troubleshooting
7
Troubleshooting
This section provides advice on steps to be taken if you encounter
problems with the operation of the ImageMaster system.
Symptom: The system will not turn on
1
Check that the main power switch is ON.
2
Check that the mains power inlet is properly connected.
3
Check the main fuse (an extra fuse is located in the fuse holder).
Symptom: The monitor does not function
1
Check that the monitor power switch is ON.
2
Check the power inlet to the monitor.
Symptom: The printer does not function
1
Check that the printer power switch is ON.
Symptom: One of the lower, upper, or cutting lamps does not function
1
Check that the lamp is properly seated in it’s socket.
Symptom: The laser pointer does not function
1
Check that the drawer is in the Guide position - pull the drawer out
to optimise the positioning.
Symptom: The Touchpad does not function
1
Check that the mouse driver is properly set up.
Symptom: The computer does not detect the PS2
1
Check the computer default setting.
Symptom: The system and monitor work, but there is no image on the
monitor
1
Make sure the connector RGB from the monitor is connected.
• p59
7
IMbook.book Page 60 Friday, November 17, 2000 9:22 AM
7
Troubleshooting
2
Check that the monitor’s green lamp is on.
3
Check the power cable to the monitor.
Symptom: The computer does not detect the keyboard
1
Check that the keyboard connector is properly connected.
2
Check the computer default setting for the keyboard.
Printer problems
Symptom: After pressing the PRINT key, no film emerges
1
Turn the printer power OFF. Check that the film is properly
loaded.
2
If the printer is out of film, reload.
Symptom: Printout is spotty
1
Send a cleaning sheet through the printer to clean the thermal
head.
Symptom: Printout quality is poor
1
Check the printer settings - there are two film types and the proper
setting must be chosen.
2
Store the film in a cool, dry place to preserve film quality.
Symptom: Error message
um
1
Refer to the separate Fuji Thermal Imager instruction manual
accompanying the ImageMaster VDS-CL system. It contains an
error code key on page 16.
2
Reset the printer by turning the printer power switch OFF and then
press the DOWN arrow + the PRINT button, then press ON.
18-1131-81AA • p60
IMbook.book Page 61 Friday, November 17, 2000 9:22 AM
System maintenance
8
System maintenance
8.1 Care and cleaning
Use a soft cloth dampened with water or a mild cleaning solution to
clean the outside cabinet, display, and labels.
Wipe sample trays after each use to remove all residual materials. Use
only a damp cloth and a mild cleaning solution. Do not mark sample
the sample tray surface by cutting gel on it or scraping gel away.
See the printer section (Chapter 6) for instructions on cleaning the
printer.
8.2 Replacing parts
8.2.1
UV Lamps
Whenever the lights are turned on, the ImageMaster VDS-CL system
automatically checks that all UV lamps are working. To perform a
check of the UV lamps:
1) Install a UV tray and switch the Lower illumination to ON.
2) Check the status bar window for an error message.
3) Repeat this procedure for the Upper illumination.
4) Replace any non-working lamp with an 8W, 312 nm standard UV
lamp.
To replace a lamp:
IMPORTANT: Turn the system OFF and disconnect the power cord from the mains
outlet.
Remove the sample tray and open the compartment door. Note that
there are 8 lamps (4 UV and 4 white light) ordered as follows (from the
inside out): WL, UV, WL, UV, WL, UV, UV, WL (see Fig 8-1).
Remove the malfunctioning lamp by carefully rotating it about 1/4
turn counterclockwise until the pins align vertically. Carefully pull the
lamp upward.
To insert the new lamp, hold it so that the metal pins align vertically.
Place the lamp in the sockets at each end of the unit and lightly push it
into place. Rotate the tube about 1/4 turn clockwise until it locks into
place.
• p61
8
IMbook.book Page 62 Friday, November 17, 2000 9:22 AM
8
System maintenance
Lamp codes:
First letter = Light type (W = White, U = UV, C = Cut)
Second letter = Lamp location (L = Lower, U = Upper)
Number = Lamp number
Fig 8-1. Layout of the lamp locations within the system.
8.2.2
White light lamps
1) Install a White light tray and switch the Lower illumination to ON.
2) Check the status bar window for an error message.
3) Repeat this procedure for the Upper illumination.
um
18-1131-81AA • p62
IMbook.book Page 63 Friday, November 17, 2000 9:22 AM
System maintenance
4) Replace any non-working lamp with an 8W white lamp.
To replace a lamp:
IMPORTANT: Turn the system OFF and disconnect the power cord from the mains
outlet.
Remove the sample tray and open the compartment door. Note that
there are 8 lamps (4 UV and 4 white light) ordered as follows (from the
inside out): WL, UV, WL, UV, WL, UV, UV, WL.
Remove the malfunctioning lamp by carefully rotating it about 1/4
turn counterclockwise until the pins align vertically. Carefully pull the
lamp upward.
To insert the new lamp, hold it so that the metal pins align vertically.
Place the lamp in the sockets at each end of the unit and lightly push it
into place. Rotate the tube about 1/4 turn clockwise until it locks into
place.
8.2.3
Replacing fuses
Fuses do not require maintenance, but may fail due to fatigue under
normal operating conditions. Fuses protect equipment by
disconnecting loads too large for the instruments circuit design. For
continued protection, replacement fuses must be of the specified
voltage and current ratings (4A Slow Blow).
The fuse holder, situated above the main power cord, holds two fuses
(one is a spare).
To replace the fuse:
1) Caution: Set the power switch to OFF and detach the power cord
before replacing fuses.
2) Insert a small, flat-blade screwdriver into the slot on the fuse
holder, depress, and pull the holder door forward.
3) Pull the fuse out of its holder and inspect it. If the fuse element is
burned or broken, replace the fuse with an identical type. If the
fuse appears to be intact, check it with an ohmmeter.
4) Insert a good fuse into the holder and press the holder door shut.
• p63
8
IMbook.book Page 65 Friday, November 17, 2000 9:22 AM
System Specifications
A
System Specifications
The following table summarizes the specifications for the ImageMaster
VDS-CL system. System specifications are subject to change without
notice.
Instrument Type:
Thermo-electrically cooled CCD digital camera with micro lens technology
Built-in Computer:
Pentium MMX Processor, 233Mhz
32 Mb Ram
6.4 Gb Hard drive
48 bit I/O card
SVGA card, 2Mb VRAM
Ethernet
Serial & Parallel ports
Interfacing:
Integrated, industry standard PC Pentium 233 with Ethernet 10/100 Mbits,
floppy disk & hard drives, RS232 C
and parallel output, keyboard and
mouse.
Wavelengths:
6 filters, motorized turret.
Selectable emission filters:
“Green” - 99% @ 555 nm (high pass)
“Blue” - 99% @ 495 nm (high pass)
“Red” - 99% @ 595 nm (high pass)
“UV low” - 520 nm (band pass)
“UV high” - 580 nm (band pass)
Gel positioning:
By laser beam.
Gel cutting facility:
Yes, by additional UV tubes.
Sample Illumination
(standard):
UV (312 nm) and “white light” (in
reflection or transmission mode).
Spatial resolution at maximum magnification:
4 lp/nm
Temperature controlled
CCD:
752 x 582 pixels
Lens:
Motorized for zoom, aperture and
focus.
• p65
A
IMbook.book Page 66 Friday, November 17, 2000 9:22 AM
A
System Specifications
um
18-1131-81AA • p66
Focus:
Automatic in any mode.
Image file format:
TIFF 12, 10, or 8 bits.
Printout:
Built-in high quality video printer and
parallel port.
Sample drawers:
Chemiluminescence, fluorescence and
white light.
Sample drawer size:
21 x 25 cm
Voltage:
100 - 240 V
Frequency:
50 - 60 Hz
Power consumption:
300 W
Dimensions (HxWxD):
88x80x41
Operating temperature/
humidity:
+ 10 to + 30 °C/max. 80% Rh
(according to IEC 1010-1)
Weight:
Approx. 50 kg
EMC and Safety:
CE 89/336/EEC (EMC directive)
CE 73/23/EEC (LV directive)
EN-50081-1, EN 61326-1
IEC/EN-61010-1
IMbook.book Page 67 Friday, November 17, 2000 9:22 AM
System Accessories
B
System Accessories
The following table gives a list of the ImageMaster VDS-CL
accessories and their code numbers.
Description
Quantity
Code Number
CL drawer
1
18-1137-93
UV drawer
1
18-1137-91
White light drawer
1
18-1137-92
VDS film (TFF)
4 rolls/14m
80-6249-67
Super VDS film (HG)
4 rolls/14m
80-6249-86
Tube white light 6 W (top)
2
18-1134-10
Tube UV 6 W 254 nm (top)
2
18-1134-04
Tube UV 6 W 312 nm (top)
2
18-1134-05
Tube UV 6 W 360 nm (top)
2
18-1134-11
Tube white 8 W (bottom)
2
18-1139-27
Tube UV 8 W 254 nm (bottom)
2
18-1134-03
Tube UV 8 W 312 nm (bottom)
2
18-1139-28
Tube UV 8 W 360 nm (bottom)
2
18-1134-15
Field calibrator
1
18-1137-90
• p67
B
IMbook.book Page i Friday, November 17, 2000 9:22 AM
Index
Index
A
autofocus 26
C
camera control bar
display or hide 29
layout 11
camera functions
auto focus 26
contrast 25
date and time display 28
display text 28
exposure time 27
filter 27
freeze 25
gain 27
iris 26
remaining time display 28
sharpness 25
zoom 26
Cut
overview 14
D
default parameters 16
default view
reset 29
dialogue
About IM VDS-CL 32
Illumination correction 19
Incremental save 17
System shut down 20
Text to add 20
Time lapse image save 18
E
edit menu
copy 21
exposure time settings 27
i
IMbook.book Page ii Friday, November 17, 2000 9:22 AM
Index
F
file menu
default state 16
export to Photoshop standard 19
illumination correction 18
incremental save 16
optional text 19
save image 16
time lapse save 17
film
clearing a jam 45
loading 42
removing 44
setting selection 44
tone setting 44
types 41
filters
overview 14
types 27
freeze
functions activating 25
on screen indicators 25
G
gain settings 27
H
help menu
online 13
topics 31
update presets 32
I
illumination correction 18
installation
precautions 5
procedures 6
iris settings 26
L
lights
cut 23
guide 23
ii
IMbook.book Page iii Friday, November 17, 2000 9:22 AM
Index
lower 23
off 22
replacing UV 55
replacing white 56
upper light 22
M
manual
assumed skills of user i
bold typeface entries ii
contents overview i
P
presets
load procedure 30
save current procedure as 30
user defined 30
printer
cleaning rubber roller 47
cleaning thermal head 46
default parameters 51
film removal 44
film types 41
loading film 42
presets 48
UV procedures 52
white light procedures 52
R
replacing parts
fuses 57
UV lamps 55
white light lamps 57
S
sample
cutting 14
positioning 14
save
current procedure 30
incremental 16
options 14
time lapse 17
screen functions 15
iii
IMbook.book Page iv Friday, November 17, 2000 9:22 AM
Index
sharpness settings 25
status bar
display or hide 29
system
accessories 61
functions 1
presets 31
shut down 20
specifications 59
version number 32
system maintenance
cleaning 55
T
text
display toggle 28
optional image 19
toolbar
display or hide 29
icons 9
layout 9
touch pad
control panel 33
touchpad
general controls 39
motion control 36
options 37
scrolling 36
tapping 33
troubleshooting 53
typographical conventions ii
U
unpacking
procedure 3
Z
zoom function 26
iv