1
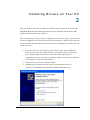
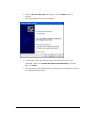
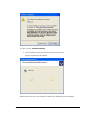
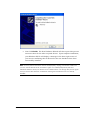
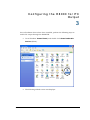
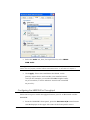
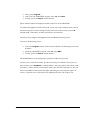
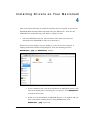
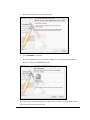
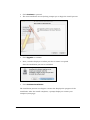
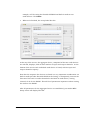
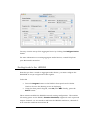
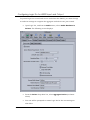
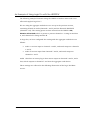
H8000FW
FireWire Interface Manual
Part No: 142133
Manual Release 1.1
26 January, 2006
©2004-2006 Eventide Inc., One Alsan Way, Little Ferry, NJ, 07643 USA
H8000 Driver Installation
1
Eventide, and the next step are registered trade marks of Eventide Inc.
Harmonizer is a registered trademark of Eventide Inc. for its audio special effects
devices incorporating pitch shift. H7600, H8000, H8000A, H8000FW, UltraShifter
and Eve/Net are trademarks of Eventide Inc. FireWire is a trademark of Apple Inc.
Compact Flash is a trademark of Sandisk Inc.
H8000 Driver Installation
2
TTaa bb ll ee oo ff C
C oo nn tt ee nn tt ss
1 INTRODUCTION ............................................................................................... 4
Using the H8000FW with a computer .........................................................................................4
Making connections between the H8000FW and the computer. ...........................................5
Setting the sample rate and buffer size for the system ............................................................5
Synchronizing connected audio devices .................................................................................7
2 INSTALLING DRIVERS ON YOUR PC ................................................................ 9
3 CONFIGURING THE H8000 FOR PC OUTPUT ................................................. 13
Configuring the H8000FW for Throughput ................................................................................14
4 INSTALLING DRIVERS ON YOUR MACINTOSH.............................................. 16
5 CONFIGURING THE H8000 FOR MACINTOSH OUTPUT................................. 20
Viewing the H8000FW’s Configuration .....................................................................................20
Setting Up the H8000FW for Default Audio Output ..................................................................21
Configuring the H8000FW for Output with Logic Pro ...............................................................23
6 ROUTING AUDIO BETWEEN LOGIC PRO & THE H8000FW ............................ 26
Creating an Aggregate Audio Device....................................................................................26
Routing Audio to the H8000FW ................................................................................................29
Configuring Logic Pro for H8000 Input and Output.................................................................30
An Example of Using Logic Pro with the H8000FW..................................................................31
Step-by-Step Descriptions of the Routing Process Flow.........................................................34
H8000 Driver Installation
3
II nn tt rr oo dd uu cc tt ii oo nn
1
Welcome!
This manual covers use of the H8000FW with a PC or a Macintosh. If you
don’t plan to use your H8000FW with a computer you don’t need to read it unless
interested. We apologize to those readers already familiar with the subject matter.
Before the H8000FW can be used to connect to a PC or Mac, suitable device driver
software must be installed as described in the following chapters. The necessary
software will be found on the included “H8000FW Drivers” CD. The purpose of
these drivers is to tell the computer about the H8000FW and how to talk to it.
From time to time the drivers will be upgraded and new ones available at
www.eventide.com. These are currently available to registered owners only, so be
sure to send in the enclosed registration card.
You should also be aware that in many cases new drivers must be installed in
tandem with associated new H8000FW software so be sure to read all relevant
release notes before installing updates.
Using the H8000FW with a computer
The H8000FW can be set as a sound device on any PC running Windows XP
(service pack 2 or later is recommended) or any Mac running OSX 10.4 or later.
For serious multichannel use a fast computer will be necessary, such as a 2.4GHz
or faster PC or a G4 Mac or better.
The H8000FW can be used with any application that supports Core Audio, ASIO
or WDM devices. This will usually be a workstation application such as Logic,
ProTools, Cubase or Nuendo. An example of the use of the H8000FW with Logic is
provided later in this document but otherwise, questions about the operation and
H8000 Driver Installation
4
configuration of these applications should be referred to their manufacturer’s
personnel. Eventide is not able to provide such support.
There a few general issues that will apply to the use of the H8000FW with any
workstation application or computer. Among these are:
•
Making connections between the H8000FW and the computer.
•
Setting the sample rate and buffer size for the system.
•
Synchronizing connected audio devices.
Making connections between the H8000FW and the computer.
All recent Macs and many PCs support FireWire. Those PCs that do not support
FireWire can usually be upgraded with an inexpensive plug-in card.
The H8000FW is connected to the computer using an IEEE1394A FireWire cable
which is widely available from computer stores and typically ranges in length
between 3 and 15 feet. Cables longer than 15 feet (4.5m) are not supported by
FireWire without the use of special adaptors. This cable can be connected to
either FireWire connector on the H8000FW, allowing the other one to connect to a
following FireWire device if desired.
While FireWire is designed to be hot-pluggable (meaning that it can be connected
to powered-on systems), Eventide recommends that where possible it be
connected between units when their power is switched off. The reason for this is
to avoid certain rare conditions which can damage the unit being connected.
Setting the sample rate and buffer size for the system
A number of settings can be made that affect the performance of your system. The
first of these is sample rate, which is the rate at which the audio is converted from
the analog world to discrete digital values (or the other way around). This is
usually expressed in kHz or samples per second.
The sample rate is normally defined by the computer operating system or by the
workstation application and can be set from a menu or dialog box. See the
manual for your application to find out how to change the sample rate. You
H8000 Driver Installation
5
should not change the sample rate directly from the H8000FW when it is
connected to the computer as this can cause problems for some applications –
change it on the computer and the computer will automatically change the
H8000FW setting where necessary. Higher sample rates give better audio
performance but use more disk space for recording and place heavier demands
upon the computer.
The buffer size setting determines the latency of the system. Latency in this
context is a measure of the delay introduced by sending audio to and from a
computer and an external device such as the H8000FW.
To help explain this, an analogy may be helpful. Picture a large pile of coal
representing the digital information stored in the computer. Each piece is one
digital value. The job here is to fill buckets (the buffers) with coal from the pile,
and pass them to a colleague who then empties them into a chute leading to the
outside world. The chute must be kept partially full but not allowed to overflow.
The chute may be thought of as the feed to an external digital to analog converter
feeding a speaker, while the passing of the buckets represents the FireWire
connection.
So, if the chute becomes empty the speaker will pop or click, while if it overflows
things may get in the wrong order. It also takes time for any given piece of coal to
get from the pile to the chute, as the buckets have to be filled and emptied before
this can happen. This time is the latency mentioned above.
It will be apparent that the size of the buckets directly affects the latency, as
smaller buckets can be filled and emptied more quickly. But, to avoid the chute
becoming empty (bad!), they will have to be passed more quickly, which may be
tiring. So, there is probably an optimum size for these buckets, to provide a good
compromise between the latency on one side, and the energy requirement
(computer power) needed to pass them.
Enough of coal for now. The latency is usually almost directly proportional to the
buffer size, but the use of small buffers requires more computer power. The
default setting is usually a good compromise, but if low latency is important and
you have a fast computer it may pay to reduce it.
Some simple math for those so inclined: if you are running at 48kHz, a 1024
sample buffer will introduce a latency in the order of 1024/48000 seconds, or
H8000 Driver Installation
6
21mS (milliseconds). So, to send and return to a FireWire device will take 42mS,
which is noticeable. Those systems that offer delay compensation can resolve the
problem painlessly, but otherwise the use of smaller buffers is worth considering.
Synchronizing connected audio devices
For audio purposes, a computer can be thought of as a device that shuffles
processed data between its disk drives, memory and peripherals. As such, it
neither has nor needs the concept of a sample rate (except for calculating delays
or filters and such-like). This concept only becomes necessary when it is
necessary to output audio to or from the outside world, in which case it is set by
the hardware conversion devices.
Things become more complex when you have more than one device that cares
about the sample rate because if a device gets data at the wrong sample rate it
will have to drop samples or insert extra samples to keep up. This will cause
clicks or distortion, depending on its severity. To avoid this, we allow one device,
known henceforth as the clock master, to define the sample rate and any other
devices have to follow its lead.
If you are using just one external audio device (or an internal one such as a
sound card) everything is easy. This device becomes the clock master (usually
automatically) and the computer does what it has to do.
If you have more than one device, commonly a sound card and one or more
external audio thingies, life is more complicated. As before, you have to define one
device as being the clock master and must synchronize the others to it so that
they all run at the same sample rate. This is made more difficult by the fact that
some devices (sound cards especially) cannot accept synchronization and must be
made the clock master, obliging the other devices to be synchronized to them. All
audio devices used together in a system MUST be synchronized to run at the
same sample rate.
Synchronization is typically achieved by either hardware or software measures:
•
Hardware synchronization is achieved by connecting AES, S/P DIF or
Wordclock cables from the outputs of the clock master to a corresponding
H8000 Driver Installation
7
input of the other devices and configuring these devices to use this signal
as a sync source.
•
Software synchronization employs the use of sample rate conversion
(which uses a lot of computer power) to make disparate devices compatible
with the master sample rate. It is available on Macs when creating
Aggregate Devices, or on some Windows applications using WDM drivers.
Again, see your computer manuals for more details on these.
The FireWire link contains a sample clock to which the H8000FW can be
synchronized if all other approaches fail, but this is not recommended except as a
last resort as the quality of this clock is not high and it can increase jitter or other
bad things. Note that on Macs this is not always available.
So, to sum up:
•
One audio hardware device must be configured as the clock master
•
Any other audio devices in the system must be synchronized to the clock
master by (preferably) hardware or software means.
H8000 Driver Installation
8
II nn ss tt aa ll ll ii nn gg D
D rr ii vv ee rr ss oo nn Y
C
Yoo uu rr P
PC
2
This section describes how to install the software drivers required to operate the
H8000FW Multi-Channel Effects System with your Windows XP-based PC. Mac
people should skip ahead to chapter 4.
Prior to beginning, be sure your PC is equipped with a Firewire port. If your PC did
not come equipped with a Firewire port, you must purchase a Firewire PCI card and
install it. Follow the manufacturer’s instructions for installation, and then proceed
to the next step.
•
Insert the Firewire cable into your PC’s Firewire port, and the H8000’s
Firewire port, which is located directly to the right of the AC power cord
port. (Windows XP will generate a two-tone audio signal when it
recognizes a Firewire connection. Similarly, when a connection is disabled,
it will sound a reverse two-tone signal.)
•
Turn on your PC and the Eventide H8000.
•
Windows will automatically detect that a new hardware device is
connected., and display the first New Hardware Wizard screen:
H8000 Driver Installation
9
•
Click the No, not this time radio button, then the Next button to
proceed.
•
The second Wizard screen now displays:
•
At this point, insert the software drivers CD that arrived with your
H8000FW. Make sure Install the software automatically is selected,
then click Next.
•
The following screen subsequently may display when installing the drivers
on a Windows XP-based PC:
H8000 Driver Installation
10
If it does, select Continue Anyway.
•
The installation now proceeds for the first of the three
drivers required by the H8000:
When the first driver is successfully installed, the following screen displays:
H8000 Driver Installation
11
•
Now click Finish. The New Hardware Wizard will then repeat this process
two more times for the other required drivers. Upon complete installation,
your Windows XP PC will display a message in the lower right corner of
your screen confirming that all drivers for the new hardware have been
successfully installed.
Note: If for any reason the drivers did not install properly, unplug your Firewire cable from
your PC, wait several seconds, and insert it again. You will be prompted by the New
Hardware Wizard to insert your drivers CD as outlined above. Go through the process again
until you receive the Windows confirmation message that all drivers were successfully
installed.
H8000 Driver Installation
12
C
C oo nn ff ii gg uu rr ii nn gg tt hh ee H
H 88 00 00 00 ff oo rr P
C
PC
O
O uu tt pp uu tt
3
Once all software drivers have been installed, perform the following steps to
enable PC output through the H8000FW.
•
Go to Windows’ Control Panel, and double-click Sound and Audio
Devices (below):
•
The following tabbed screen now displays:
H8000 Driver Installation
13
•
Select the Audio tab, then, for Default Device, select H8000
WDM Audio.
Warning: If this option does not display in the Default Device’s drop-down list, the software
drivers were not properly installed. Please reinstall the drivers, as described in chapter 1.
•
Click Apply. This action establishes the H8000 as the
primary output device and overrides your installed sound
card. (In this example, it overrides SoundMAX Digital Audio;
on your machine, it will be whatever sound card is installed
on your PC.)
Configuring the H8000FW for Throughput
Follow these steps to enable throughput between your PC or Macintosh and the
H8000FW:
•
From the H8000FW’s front panel, press the Processor A/B control button
until A: displays in the upper left corner of the front panel’s screen.
H8000 Driver Installation
14
•
Next, press Program.
•
Now, from the H8000FW’s keypad, enter 12, then ENT.
•
Finally, press the Select control button.
These actions enable throughput on DSP channel A of the H8000FW.
To enable throughput on DSP channel B, repeat the steps outlined above, except
when selecting the channel using the Processor A/B control button, select B:
instead of A:. Otherwise, all other procedures are identical.
You must also configure throughput from the H8000’s Routing screen.
To access the Routing screen,
•
Press the Program control button until it flashes; the Routing screen now
displays.
•
From the H8000FW’s keypad, enter 14, then ENT.
•
Finally, press the Select control button.
The HW8000FW is now configured to playback audio from your PC.
To test if your connection works, go ahead and play an audio file from your PC.
(For instance, go to My Music > Sample Music, and play either of the short audio
clips there.) After you have selected an audio clip, the LED indicators on the left
side of the H8000’s front panel will light, indicating it’s receiving the signal. Of
course, if speakers are connected to the H8000 you’ll hear the output, too.
H8000 Driver Installation
15
II nn ss tt aa ll ll ii nn gg D
D rr ii vv ee rr ss oo nn Y
Yoo uu rr M
M aa cc ii nn tt oo ss hh
4
This section describes how to install the software drivers required to operate the
H8000FW Multi-Channel Effects System with your Macintosh. Note that the
HW8000FW is compatible only with OSX 10.4 (Tiger) or later.
•
Insert the H8000 drivers CD. (Your Firewire cable does not need to be
attached to the H8000FW in order to perform this.)
When the CD icon displays on your desktop, click it to view the contents. A
loading notification window briefly displays, then the following two files,
H8000audio_*.pkg and H8000Clean, display:
¾
If your computer has a previous installation of H8000FW drivers, they
must be removed prior to installing the new drivers. Click H8000Clean
to perform this action.
¾
If this is a new installation of H8000FW drivers, or an update and you
have removed the existing drivers using H8000Clean, click
H8000audio_*.pkg to proceed.
H8000 Driver Installation
16
•
The first installation screen now displays:
•
Click Continue to proceed.
•
The next installation screen (below) prompts you for the destination drive to
which to install the H8000FW drivers:
Note that if your Macintosh has more than one hard drive, the H8000FW drivers
must be installed to your boot drive.
H8000 Driver Installation
17
•
Click Continue to proceed.
•
The next installation screen (below) prompts you to begin the install process.
•
Click Upgrade to continue.
•
Next, a window displays to inform you that a restart is required
after the installation process is concluded:
•
Click Continue Installation.
The installation process now begins. A status bar displays the progress of the
installation. After the install completes, a prompt displays to restart your
computer (next page):
H8000 Driver Installation
18
•
Click Restart to restart your computer and conclude the
installation.
H8000 Driver Installation
19
C
C oo nn ff ii gg uu rr ii nn gg tt hh ee H
H 88 00 00 00 ff oo rr
M
O uu tt pp uu tt
M aa cc ii nn tt oo ss hh O
5
Once all software drivers have been installed, perform the following steps to
enable Macintosh audio output via the H8000FW.
Note: Before proceeding, be sure your Firewire connection between the Macintosh and the
H8000FW is established, and the H8000FW is configured for throughput (see page 15).
Viewing the H8000FW’s Configuration
To view the configuration of the H8000FW, click Show All from the Sounds
screen to return to System Preferences. Then click H8000FW from the Other
category (below):
The following screen displays, which lists the device settings for the
H8000FW:
H8000 Driver Installation
20
Note: Initially, the Available Devices, Device Nickname, and Master Device will read
something cryptic like “MyProduc12345456.” Feel free to rename it to something a little
more descriptive.
After the H8000 is selected as your output device, go ahead and test your
connection.
•
From the Sounds screen, select the Sound Effects tab. Beneath the
listing of installed sound files, select Eventide H8000 from the dropdown list following “Play Alerts and Sound Effects Through.”
•
Now, click on any listed sound file, and you should see the LEDs on the
left side of the front panel light up; this reflects that the signal has been
received and is being processed by the H8000. Of course, if you have
speakers connected, you’ll hear the output as well.
Setting Up the H8000FW for Default Audio Output
•
Click on the System Preferences icon; when its window displays, select
Sound:
H8000 Driver Installation
21
The Sound options screen now displays:
H8000 Driver Installation
22
After selecting the Output tab, Eventide H8000 displays as an output device,
along with its port type, Firewire. Highlight it to select it as your output
device and to override the default output device on your computer.
Configuring the H8000FW for Output with Logic Pro
If you wish to use Logic Pro as your audio editing and authoring platform in
tandem with the H8000, do the following:
•
Open Logic Pro, and from the Audio drop-down menu, select Audio Hardware
and Drivers:
H8000 Driver Installation
23
The following screen displays:
H8000 Driver Installation
24
•
From the Core Audio tab, be sure the Enabled checkbox is selected, and
Eventide H8000 is selected as your driver.
•
You now will be prompted to restart your computer for the new settings to
take effect.
H8000 Driver Installation
25
R
R oo uu tt ii nn gg A
w ee ee nn LL oo gg ii cc P
A uu dd ii oo B
B ee tt w
P rr oo
aa nn dd tt hh ee H
W
H 88 00 00 00 FF W
6
This section describes how to establish a functional interface between the
H800FW and Logic Pro, which permits you to seamlessly route audio to and from
either environment. The final section provides the logical overview of the process,
and includes a process diagram for you to better grasp the steps involved.
Because Logic Pro supports only one core audio device at a time, and because
only one sample clock can be in effect, we must combine audio sources into a
single, aggregate audio source, described below.
Creating an Aggregate Audio Device
Before you proceed, you must first create an aggregate audio device that allows
Logic Pro to employ more than a single audio interface. To do this,
•
Select your Macintosh HD icon. When the Finder window displays, go to
Applications > Utilities > Audio MIDI Setup. The following screen displays:
H8000 Driver Installation
26
•
From the Audio drop-down menu, select Open Aggregate Device Editor.
•
The following window now displays (below). It is from here that you
designate which audio input devices to include in the new aggregate.
•
Click the “+’ button beneath the Aggregate Devices area. A listing of all
installed audio device drivers subsequently displays. Click in the
checkbox to the left of the device to select it for this aggregate device. Also
select one of the devices for the aggregate’s internal clock. For this
H8000 Driver Installation
27
example, we’ll be using the Eventide HW8000 and Built-in Audio as our
audio devices. Click Done
•
When we’re finished, the setup looks like this:
At the top of the screen, the aggregate device, comprised of the two audio devices
we selected, displays, with its total number of input and output channels. At the
bottom of the screen each individual audio device is listed, with its input and
output channels capacity.
Note that the sequence the devices are listed is a very important consideration. As
Built-in Audio precedes Eventide H8000 in the listing, it consequently reserves the
first two of the total 18 audio channels for the Built-in Audio device, leaving
channels 3-18 for the H8000. This will be of paramount importance when routing
the audio to the H8000.
After all parameters for the Aggregate Device are established, your Audio MIDI
Setup screen will display like this:
H8000 Driver Installation
28
You may view the setup of the Aggregate Device by clicking the Configure Device
button.
For more information on creating Aggregate Audio Devices, consult Help from
your Macintosh’s menu bar.
Routing Audio to the H8000FW
Now that you have created an Aggregate Audio Device, you must configure the
H8000FW to accept and generate audio signals.
To do this
•
Press the Program button on the H8000’s front panel until it blinks.
Check to be sure the Routing screen is displaying.
•
Using the front panel’s keypad, enter 20, then ENT. Finally, press the
Select button.
These actions establish the H8000’s internal routing configuration.. The number
20 routing preset on the H8000, Firewire 8Track AB, supports 8-track input and
output: channels 1-4 are routed to and from the H8000’s machine A, channels 58 are routed to and from its machine B.
H8000 Driver Installation
29
Configuring Logic Pro for H8000 Input and Output
To permit Logic Pro to send and receive audio from the H8000, you must change
to audio its settings to recognize the aggregate audio device we just created.
•
Open Logic Pro, and from its Audio menu, select Audio Hardware &
Drivers. The following screen displays:
•
From the Driver drop-down list, select Aggregate Device (as shown
above).
•
You now will be prompted to restart Logic Pro for the new settings to
take effect.
H8000 Driver Installation
30
An Example of Using Logic Pro with the H8000FW
The following example illustrates using the H8000 as both an insert and a bus
effect with Apple’s Logic Pro 7.
We are using the aggregate audio device we set up in the previous section,
consisting of Built-in Audio (channels 1 and 2) and the Eventide H8000FW
(channels 3-18). The routing preset we have selected on the H8000 is 20,
Firewire 8 Track AB, which is preset to process channels 1-4 using its machine
A, and channels 5-8 using machine B.
In Logic Pro, we have configured the routing with the aggregate audio device as
follows:
•
Audio 1 receives input in channels 1 and 2, and sends output to channels
1 and 2;
•
Audio 2 receives input from channels 7 and 8, and sends output to
channels 1 and 2.
Audio 1 also has an insert plug-in that routes output to channels 3 and 4, and a
bus, which outputs to channels 7 and 8 on the aggregate audio device.
These settings are reflected in the following illustration of the Logic Pro Mixer
screen:
H8000 Driver Installation
31
The following diagram provides the logical overview of the routing between Logic
Pro, the aggregate audio device, and the H8000FW. Each step, numbered 1-10 in
the diagram, is duly described in the next section. The numbers display in the
diagram at or near the initiation point of the process.
Note that each directional line between entities represents a single stereo pair.
H8000 Driver Installation
32
H8000 Driver Installation
33
Step-by-Step Descriptions of the Routing Process Flow
1. The audio source from the hard drive is sent to Audio 1. Once it is received, it
encounters the I/O plug-in insert, a plug-in that routes the audio to an
external audio device.
2. The insert outputs the audio to channels 3 and 4 of the aggregate audio
device, since channels 1 and 2 are reserved for final speaker output.
3. The aggregate audio device subsequently sends the output from its channels 3
and 4 to the H8000’s input channels 1 and 2. As the aggregate audio device’s
first two channels are internal audio, its input channels 3 and 4 correlate to
the H8000’s channels 1 and 2, its channels 5 and 6 with the H8000’s
channels 3 and 4, and so on. As defined in its Routing Preset 20, the H8000’s
DSP machine A processes channels 1-4; its DSP machine B process channels
5-8.
4. Processing is performed to the audio on the H8000, and the processed audio
is output from its channels 1 and 2 to the aggregate audio devices input
channels 3 and 4.
5. The audio is now input back to I/O plug-in on Audio 1. The audio now
proceeds to encounter the bus we inserted.
6. The bus routes the audio and sends one stream to the Audio 1 output and a
second stream to the Bus 1 input.
7. The bus audio is subsequently sent to the aggregate audio device’s channels 7
and 8 outputs, as defined in the Logic Pro session.
8. From here, it is routed to the H8000’s input channels 5 and 6.
9. Processing is performed on the audio using the H8000’s machine B, after
which it is sent through the H8000’s output channels 5 and 6 back to the
aggregate audio device input channels 7 and 8.
10. This audio stream now is routed to Audio 2, as defined in the Logic Pro
session.
11. Finally, outputs from Audio 1 and Audio 2 are mixed, as defined in the Logic
Pro session, and returned to the aggregate audio devices output channels 1
and 2, which are in fact the speakers. All that’s now left to do is listen.
H8000 Driver Installation
34