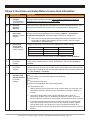
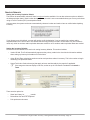
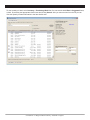
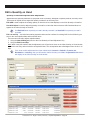
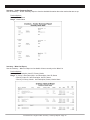
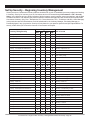
1
IDEXX Cornerstone* Practice Management System Cornerstone 8.1 Single Location Inventory Table of Contents Cornerstone 8.1 Single Location Inventory Table of Contents Introduction Introduction.....................................................................................................................................5 Prerequisites...................................................................................................................................6 Help.................................................................................................................................................6 On Window Help/Information.........................................................................................................................6 Cornerstone Reference Resources................................................................................................................7 Using Cornerstone Help................................................................................................................................7 Using Cornerstone Administrator’s Manual and Cornerstone User’s Manual..............................................7 Online Cornerstone Customer Support Center.............................................................................................7 Getting Started: Phases and Setup Phase 1: Understand Basic Workflow and Unique Capabilities..................................................9 Phase 2: Decisions and Setup Before Invoice Item Information.................................................10 Accessing Inventory Management................................................................................................11 Access Inventory from the Cornerstone Menu bar........................................................................................11 Set Up Vendors, Locations, Cost Centers, and Units of Measure...............................................11 Vendor List Overview......................................................................................................................................11 Adding a New Vendor....................................................................................................................................12 Adding a Location..........................................................................................................................................13 Adding a Cost Center.....................................................................................................................................13 Set Up Adjustment Reasons..........................................................................................................14 Adding an Adjustment Reason......................................................................................................................14 Adjustment List Overview...............................................................................................................................14 Phase 3: Invoice Item Information Changes - Mass and Single Changes..................................15 Single Changes - Maintain QOH....................................................................................................................15 Single Changes - Special Buy/Sell Scenarios...............................................................................................16 Mass Changes...............................................................................................................................................17 Phase 4: Invoice Item Counts and Costs, Then Defaults.............................................................21 Checklist - Invoice Item Counts and Costs....................................................................................................21 Practice Defaults............................................................................................................................................22 Staff Inventory Defaults..................................................................................................................................23 Go Live. Communication and Training. Adjustment Report..........................................................................24 Phase 5: Deplete/Adjust/Move.......................................................................................................26 Purchase Adding Items to the Want List........................................................................................................................28 Want/Suggested List Overview......................................................................................................................29 Purchasing Work List.....................................................................................................................................30 Arrange Columns...........................................................................................................................................31 Inventory Item Search Overview....................................................................................................................32 Basic Search for an Inventory Item................................................................................................................32 Advanced Search for an Inventory Item........................................................................................................33 Deleting a Want List Item...............................................................................................................................33 Cornerstone* 8.1 Single Location Inventory • Page 2 Table of Contents Transfer Wanted/Suggested Items to Purchase Order.................................................................34 Viewing Item History and Item Information....................................................................................................35 Item Details Overview.....................................................................................................................................36 Order List........................................................................................................................................................38 Purchase Order Overview..............................................................................................................................39 Creating Purchase Orders.............................................................................................................................40 Modifying a Purchase Order..........................................................................................................................41 Modifying Purchase Orders...........................................................................................................................42 Special Purchase Scenarios: Rabies Vaccines, Heartworm, Flea/Tick Prevention......................................43 Receive Receipt Management......................................................................................................................45 Receipt List Overview.....................................................................................................................................45 Receive Order Overview................................................................................................................................46 Adding a New Receipt - Receive Order.........................................................................................................48 Backorder List Overview................................................................................................................................50 Modifying Inventory Receipts.........................................................................................................................50 Editing a Backordered Item...........................................................................................................................51 Posting Inventory Receipts............................................................................................................................52 Return an Item to Vendor...............................................................................................................53 Return to Vendor Overview............................................................................................................................53 Returning Inventory to a Vendor....................................................................................................................54 Deplete/Adjust/Move View Quantity on Hand Window.....................................................................................................57 Edit a Quantity on Hand.................................................................................................................58 Adjustment List...............................................................................................................................61 Adjust Quantity on Hand from Adjustment List............................................................................62 Adjust Vendor Cost of Item............................................................................................................62 Other Depletion Activities: Patient Visit List, Whiteboard, Invoice, and Voids............................63 Deplete Internal Stock....................................................................................................................64 Inventory Reports Reports Overview...........................................................................................................................67 Printing Reports Overview..............................................................................................................................67 Inventory Reports...........................................................................................................................................69 Skill Assessment & Training Evaluation Single Location Inventory Skill Assessment for Cornerstone 8.1...........................................................................................81 Appendix 15 Steps to Inventory Setup...........................................................................................................86 Set Up Security – Beginning Inventory Management...................................................................88 Cornerstone* 8.1 Single Location Inventory • Page 3 Section 1 Introduction Cornerstone* 8.1 Single Location Inventory • Introduction • Page 4 Introduction Purpose The purpose of this training tool is to provide a way for users to learn Cornerstone Inventory. This print-based tool can be used as a self-paced training option. Course Description The Single Location Inventory training is designed for inventory managers at all levels, whether you are just getting started or want to maximize utilization. Getting Started Important! Throughout the workbook, you will be working in your live Cornerstone database. This will allow you to make changes and learn using your inventory items and setups. Training Content Content of the training includes these sections: • Introduction • Cornerstone Resources • Getting Started • Purchasing • Depleting, Adjusting and Receiving • Inventory Reports Key Learning Features The sections in this training tool are presented in a chapter/lesson format and include these key learning features: • Demonstrations • Example Images This icon refers to tips that are provided to enhance the basic information covered in the content. This icon refers to notes that are provided to include additional information of special note. This icon refers to important information; read this information carefully. Trainer-Led Demonstrations provide specific instructions and tasks for you to complete in the Cornerstone Training Files. These demonstrations provide a “hands on” training activity. [ ] Use the information in the brackets for Cornerstone data entry. Trainer-Led Explanations provide an explanation of the concepts. • Skill Assessment & Training Evaluation • Appendix Cornerstone* 8.1 Single Location Inventory • Introduction • Page 5 Prerequisites The following prerequisites are needed by a learner who will use this training tool: 1. Cornerstone 8.1 installed at practice. 2. Basic Cornerstone navigation. Help On Window Help/Information Instructional information can be found in two places: under the window title and in the lower right-hand corner of many of the Cornerstone Inventory windows. Cornerstone* 8.1 Single Location Inventory • Introduction • Page 6 Cornerstone Reference Resources There are three reference resources for you to access if you have questions while using Cornerstone. Cornerstone Help can be accessed with the Cornerstone software. The Cornerstone Administrator’s and User’s Manuals are available from icons located on your desktop or from the Start menu. The Online Cornerstone Customer Support Center is a website designed to provide you with general information for questions you may have, training materials, and it is accessible through Cornerstone or any internet browser. Using Cornerstone Help Cornerstone Help can be accessed three ways. You can: • Press F1 for content-specific help. • Click the Help toolbar button • Select Help on the Menu bar and select either Contents or Search For Help On. Observe MicroHelp that displays on the left side of the Status Bar. Using Cornerstone Administrator’s Manual and Cornerstone User’s Manual The Cornerstone Administrator’s and User’s Manuals are accessed through the Cornerstone Program menu rather than through the Cornerstone software. Use the manuals to supplement your learning, gain additional information on a topic or help to answer questions you have in the future that you can’t find the answers to in this book. To access either manual, click on Start > All Programs > Cornerstone > Manuals. Online Cornerstone Customer Support Center You can access the support center 24 hours a day, 7 days a week, 365 days a year just by: • Selecting Cornerstone > Help > Support Center • Clicking the Support Center toolbar button. • Typing Cornerstonehelp.com in any internet browser Cornerstone* 8.1 Single Location Inventory • Introduction • Page 7 Section 2 Getting Started: Phases and Setup Cornerstone* 8.1 Single Location Inventory • Getting Started: Phases and Setup • Page 8 Phase 1: Understand Basic Workflow and Unique Capabilities Cornerstone Inventory Management has these unique capabilities that allow you to reach your desired level of total inventory cost, profit margins, turnover and accurate quantities: • Follows a basic inventory management workflow of purchase, receive and deplete • Single location inventory tracking whereby one invoice item is tracked at one location (i.e. Invoice Item A @ Location 1, Invoice Item B @ Location 2) or multi-location inventory tracking whereby one invoice item tracked at two locations (i.e. Invoice Item A @ Location 1 and Invoice Item A @ Location 2) • Ability to order by want list and/or suggest list • Key reports such as the Cost of Goods Sold Report Single Location Single Location Per Invoice Item Multiple Location Multi-Location Per Invoice Item Cornerstone* 8.1 Single Location Inventory • Getting Started: Phases and Setup • Page 9 Phase 2: Decisions and Setup Before Invoice Item Information Checklist Item Explanation 1. Pick a Beginning Category (Classification or Subclassification) For a manageable project, select one classification or subclassification to begin tracking inventory quantities on hand. A recommended classification is food. It is straightforward for a beginner to set up and count. 2. Set Initial Inventory Security Turn on security for staff who are responsible for inventory management setup. Use the OM column found on the Inventory Security Setting Guide in the Appendix. 3. Review and move items within the chosen category Evaluate/move invoice items within these classes/subclasses, if needed. 4. Review and set up units of measure for chosen category Print the Invoice Item Setup Report for this category: Reports > Invoice Item > Invoice Item Setup Report. Select the range of Class ID or Subclass ID. Some of the items may need to be changed from service to inventory. Some items might not belong in this category and you’ll need to move to another classification or subclassification. Identify the normal buy and minimum sell quantities for chosen category. Item Examples Buy Minimum Sell Injectables Vial CC Heartworm Box Package Heartworm Box 1 Dose Ensure they are set up. Review and set up under Controls > Units of Measure. 5. Set up vendors for chosen category Collect vendors and information for this category: Vendor name, address, website, contact name, contact phone #, contact email address. Set up under Inventory > Vendors. 6. Set up locations for chosen category Set up the locations where this category is kept. Keep in mind that you can print various reports by location, such as the Inventory Counts Report, and then hand that location report to individual staff members when physical counts need to be taken. Set up under Inventory > Locations. 7. Make lot and expiration date tracking decision for chosen category Make management decision and choose one of the four tracking options: Track neither lot nor expiration date but only quantities Track lot only Track expiration date only Track lot and expiration date, along with quantities Use this decision criteria: 1. Staff will need to enter or select the level of inventory detail you set at any of the consumption windows: (Patient Visit List, Whiteboard, Prescription, Rabies, or Invoice). 2. Cornerstone allows staff to enter a lot and expiration date on the fly at consumption (Patient Visit List, Whiteboard, Prescription, Rabies, or Invoice), which means they could enter an invalid option and it would need to be corrected. 3. A manually entered lot/exp, will require a manual correction by inventory staff, even if the manually entered info is correct or the result will create a negative QOH for those items. You can print the Invoice Item Sales Information for a specific lot number to see a list of clients that purchased an item with a given Lot Number. Cornerstone* 8.1 Single Location Inventory • Getting Started: Phases and Setup • Page 10 Accessing Inventory Management Access Inventory from the Cornerstone Menu bar. Set Up Vendors, Locations, Cost Centers, and Units of Measure Vendor List Overview To open the Vendor List window, select Inventory > Vendors. The Vendor List displays active vendors used by the practice to place orders, receive and return inventory. From the Vendor List window, add new vendors, edit existing vendors, and delete unused vendors. You may NOT delete a vendor that has previously been used; vendor status can be set to inactive. When looking for a specific vendor, enter information in one or more of the criteria fields provided and click Search. Vendors that match the criteria display on the Vendor List. Search for a Vendor fields include: • Vendor field: Type the beginning letters or the full name of a vendor. The Vendor field is not case sensitive. Use the % sign followed by a combination of letters to find any vendor whose name contains the combination. Searches cannot be performed on vendor IDs. • Status list: Select the status of the vendor. Choices include All, Active Only or Inactive Only. Cornerstone* 8.1 Single Location Inventory • Getting Started: Phases and Setup • Page 11 Adding a New Vendor In this exercise, you will add or modify vendor information using the information on a vendor’s invoice. 1. Select Inventory > Vendors. The Vendor List displays active vendors set up by the practice. 2. Click Add New or Edit. The Vendor Information window displays. 3. Complete the information in the Vendor Information window. If the ID entered already exists, the field label will display in red (ID). The system will not allow a user to enter further vendor information until the ID is unique. 4. Click Save. 5. Close the Vendor List window. Cornerstone* 8.1 Single Location Inventory • Getting Started: Phases and Setup • Page 12 Adding a Location More than one location can be set up by the practice for tracking inventory. Each inventory item can be assigned to one location. Examples of locations include: room names, room numbers, shelf numbers, reception areas, stockrooms, trucks, refrigerators, lock boxes, kennels, and controlled substance cabinets. Notes: • At least one location is required if your practice wishes to track the quantity on hand of inventory items. • Check to see if you have ‘Central Storage’ as a location and if you intend to have only one location for all inventoried items, skip this lesson. • You may only receive inventory items (regardless of QOH tracking status) into inventory (not service, group, dispensing, or pick items). Locations can be deleted if not used or inactivated if no longer used and items are moved out of the location. In this demonstration, we will review or modify your location list. 1. Select Inventory > Locations. The Locations List displays all existing locations. 2. Click Add New or Edit. The Add a Location window displays. 3. Complete the details in the location information window. 4. Click Save. The Locations List displays. 5. Close the Locations List window. Adding a Cost Center Inventory items that are consumed by the practice but not invoiced to the clients can be depleted from inventory using the Internal Stock Use window. A cost center is required in order to track and report the cost of the items used internally. Some examples of cost centers may include: expired products, laboratory supplies and treatment supplies. Use this method versus invoicing a practice account, which negatively impacts your average invoice metrics. In this demonstration, we will review or modify your cost center list. 1. Select Inventory > Cost Center. 2. Click Add New or Edit. 3. Complete the details in the Cost Center Information window. 4. Click Save. 5. Close the Cost Center List window. Cornerstone* 8.1 Single Location Inventory • Getting Started: Phases and Setup • Page 13 Set Up Adjustment Reasons Adding an Adjustment Reason Adjustment reasons are used to explain why a quantity on hand cost, expiration date or lot number adjustment was performed for an inventory item. This information can be tracked using the Inventory – Adjustment Report. In this demonstration, we will review or modify your adjustment reasons. 1. Select Inventory > Adjustment Reasons. The Adjustment Reasons List displays all existing adjustment reasons. 2. Click Add New or Edit. 3. Complete the details in the Adjustment Reasons Information window. 4. Click Save. 5. Close the Adjustment Reasons List window. Adjustment List Overview This lesson highlights the Adjustment List. To open the Adjustment List window, select Inventory > Adjustment List. The Adjustment List displays all adjustments. If practice defaults are not set to auto-confirm quantity on hand or expiration date adjustments, each adjustment performed by other staff members in the View Quantity on Hand window will display on the Adjustment List with an Unconfirmed status. Adjustments can be Confirmed or Voided. While performing a basic or advanced search, to narrow the list of items, enter criteria in any of the fields in the Find adjustments area and click Search. Cornerstone* 8.1 Single Location Inventory • Getting Started: Phases and Setup • Page 14 Phase 3: Invoice Item Information Changes - Mass and Single Changes Single Changes - Maintain QOH 1. Select an inventory item from the invoice item list. 1.1 Confirm the Sell UOM on the Information tab. 1.2 Select the Inventory tab. 2. Fill in the following fields, if applicable: • Optional: NDC/DIN Code: Enter the NDC (National Drug Code) or DIN (Drug Identification Number), if applicable. • Optional: Serial number: Enter the Serial number for this item, if applicable. • Maintain QOH: To maintain quantity on hand for this item, select the Maintain QOH check box. If your practice is using Cornerstone Inventory, you may find it useful to maintain Quantity on Hand (QOH) for various items. When the quantity on hand check box is selected, other fields on this tab become active: • Track expiration dates; Track lot numbers; Buy/sell ratio; Buy barcode; Stock at locations; Reorder information by location. • Optional: Track expiration date: If you want to track expiration dates select the check boxes for Track expiration dates. Expiration dates can only be tracked if the QOH is being maintained for this item. • Optional: Track lot numbers: If you want to track lot numbers select the check boxes for Track lot numbers. Lot numbers can only be tracked if the QOH is being maintained for this item. • Buy/sell ratio: Fill in the Buy/sell ratio. If your purchase and selling unit of measures are different, select the Buy UOM and select the number of Sell UOM included in each Buy UOM. For this demonstration select the buy/sell ratio as l box = 12 tubes. Notes: The Sell UOM is set up in the Information tab. The UOM for Reorder Quantity will update to reflect the Buy UOM. The UOM for Reorder Point and overstock Point are listed with the Sell UOM. If items are bought in various quantities, for example an item is purchased in a bottle of 250 or 500 tables, set the buy/sell ratio to 1 tablet = 1 tablet. • Optional: Enter Buy barcode: You can enter a Buy barcode if the buy and sell numbers for the Buy/sell ratio are different. If the numbers are the same (ex. I box= I box; I tube = I dose) a Buy barcode cannot be listed. Barcodes are optional. • Stock at locations: Select (highlight) the locations where you will stock this item. Locations are unique to each practice and are set up at Inventory > Locations. • Vendor button: If applicable, select the Item Vendor button to enter the information regarding the vendors for this item on the Item Vendor Information window: • Vendor ID and Name; Designate if this is the Primary vendor; Lead time for product ordering and receipt; Cost; Date; Vendor Item ID; Contact; Item Vendor Notes (click the yellow note button) Cornerstone* 8.1 Single Location Inventory • Getting Started: Phases and Setup • Page 15 3. Click OK to save the vendor information. Vendors are set up at Inventory > Vendors. The Overstock Point must be at least 1 greater than the number of vials in the Reorder Point, plus the number of vials ordered in the Reorder Quantity. Remember, you’ll need to continue to list the reorder information for each of the locations highlighted on the Stock at locations list. To determine the Overstock Pt value, add the Reorder point plus the Reorder quantity. Be sure to convert the Reorder quantity to individual units when adding. For example, if the Reorder point is 3 cans, and the Reorder quantity is 1 case (24 cans), then the Overstock point would be 28 (3 + 24 + 1). 4. In the Link Items tab, you can list any items, and the appropriate quantities, that will be removed from inventory as a result of the sale of this item. 5. In the Travel tab, you can select any travel sheets that this item should be listed on. 6. When the information regarding the setup of the inventory item is complete, click OK to save. Single Changes - Special Buy/Sell Scenarios There are times when you may need to purchase different quantities of a product or want to sell the product in varying amounts. You will need to make a decision as to how best to set them up for inventory. Example #1: Flea/tick or heartworm prevention These products can be set up in two ways. The optimal method to set up this type of item is to sell it per dose. This will ensure the staff is always entering the number of doses the client is purchasing and inventory counts will remain correct. Item Buy/Sell Ration Heartgard 1 carton = 60 dose Heartgard 1 carton = 10 packages If the buy/sell ratio is set as 1 carton = 60 doses, you may still sell the doses with quantity price breaks. Example #2: Tablets that come in different sized bottles There are times when you may want to purchase products in varying quantities. You will need to determine which buy/ sell ratio is the most appropriate to allow your staff to invoice the item as well as accounting for the inventory quantities efficiently. There are two scenarios that could apply: Item Buy/Sell Ration Deramaxx 25mg 1 tablet = 1 tablet Deramaxx 25mg 1 bottle = 90 tablets Cornerstone* 8.1 Single Location Inventory • Getting Started: Phases and Setup • Page 16 Mass Changes Moving Items It is so important to make a backup prior to making changes that you’ll be reminded to make one before making any changes. This lesson highlights the Move Items tab of the Inventory Setup window. This tab allows the user to move reorder information and quantity on hand from one location to another. You will learn how to move an invoice item’s reorder information and quantity on hand from one location to another. Access the Move Items tab by selecting Tools > Inventory Setup > Move Items tab. Inventory items can be moved to active or inactive locations; however, inventory items can only be depleted from active locations. In this demonstration, you will move the reorder information and quantity on hand for (07170) Heartgard® Plus Blue 68 mcg (12) from Pharmacy Main to Supplies West. 1. From Cornerstone, select Tools > Inventory Setup > Move Items tab. 2. Click Yes on the backup message window after making an appropriate backup. For demonstration purposes, assume a backup was made. 3. In the Item ID field enter 07170 for Heartgard® Plus Blue 68 mcg (12). 4. In the Location list, select Pharmacy Main (RX). 5. In the Move items to this location list, select Supplies West (W). 6. Click Retrieve. 7. Click OK. 8. Click OK on the Inventory Setup pop-up window that shows Items Saved = 1. If the system encountered errors in the process of moving items, this window would indicate the number of errors and direct you to the Inventory - Setup Error Report. Cornerstone* 8.1 Single Location Inventory • Getting Started: Phases and Setup • Page 17 This icon indicates where a barcode scanner could be utilized to improve efficiency in entering Item IDs. Setting Reorder Points This lesson highlights the Set Reorder Points tab of the Inventory Setup window. This tab allows the user to set reorder points for multiple items at one time. You will learn how to set multiple reorder points for a location. Access the Set Reorder Points tab by selecting Tools > Inventory Setup > Set Reorder Points tab. In this demonstration, you will change the reorder point, reorder quantity and overstock point for (07170) Heartgard® Plus Blue 68 mcg (12). 1. Select Tools > Inventory Setup > click Yes at the Backup Warning > Set Reorder Points tab. 2. In the Item ID field enter 07170 for Heartgard® Plus Blue 68 mcg (12). 3. In the Location list, select Supplies West (W). 4. Click Retrieve. 5. For Heartgard® Plus Blue 68 mcg (12) (07170) set the reorder point to 12 packages, the reorder quantity to 3 boxes, and the overstock point to 50 packages for all locations listed and press Tab. If the overstock point is less than the reorder point plus the value of the reorder quantity, you will receive a message. Change the numbers and quantities appropriately and continue. 6. Click OK. 7. Click OK on the Inventory Setup pop-up window that show Items Saved = 1. If the system encountered errors in the process of moving items, this window would indicate the number of errors and direct you to the Inventory - Setup Error Report. After QOH tracking and buy/sell ratios are set up for an inventory item, use the Inventory set up tool to set reorder points and expiration date and lot number tracking. Cornerstone* 8.1 Single Location Inventory • Getting Started: Phases and Setup • Page 18 Setting Barcodes, Expiration Dates and Lot Numbers This lesson highlights the Set Barcodes, Expiration Dates and Lot Numbers tab of the Inventory Setup window. This tab allows the user to set buy and sell barcodes as well as set invoice items to track expiration dates and lot numbers. You will learn how to set barcodes, expiration dates and lot numbers for a specific location. Access the Set Barcodes, Expiration Dates and Lot Numbers tab by selecting Tools > Inventory Setup > Set Barcodes/ Expdate/Lotnbr tab. • When QOH tracking and buy/sell rations are set up for individual inventory items, use the Inventory Setup tool (from the Tools menu) to set reorder points and expiration date and lot number tracking. • When turning on expiration date or lot number tracking for first time, and existing QOH are already listed it is advisable to immediately update the current QOH with expiration date and lot number information. (Update from the View Quantity on Hand window. • It is important that your staff knows how to correctly complete the task of inventory verification if the expiration date and/or lot number do not readily appear. This is done by double-clicking in the location or lot number field of inventory details window. • The Expiration Date check box must be selected for items for which you will track expiration dates. To update a single item’s expiration date checkbox, go to Lists > Invoice Item > Inventory tab. • To update multiple item expiration dates, go to Tools > Inventory Setup > Set Barcode/Expdate/Lotnbr tab. • Initially when one or more items have been marked to track expiration dates, a message will display asking if you want your existing expiration dates copied into inventory where dates are available. • If expiration dates have been changed on any of the invoice items prior to entering Tools, those invoice item expiration dates will remain unchanged. In this demonstration, you will add a buy and sell barcode for (07170) Heartgard® Plus Blue 68 mcg (12). You would make an appropriate backup before continuing. 1. Select Tools > Inventory Setup > click Yes at the Backup Warning > Set Barcodes, Expiration Dates and Lot Numbers tab. 2. A window will display a warning message: If you deselect the Track Exp Dates check box for an item, all the expiration dates for the item will be lost. If you deselect the Track Lot Nbrs check box for an item, all the lot numbers for the item will be lost. Read the warning message and click OK. 3. In the Item ID field enter 07170 for Heartgard® Plus Blue 68 mcg (12). Cornerstone* 8.1 Single Location Inventory • Getting Started: Phases and Setup • Page 19 4. Click Retrieve. 5. In the Buy Barcode field, use your barcode reader to scan and enter the number. If you do not have a barcode reader, manually enter this number: 80984805861. For information about barcode readers, which can automatically scan and enter these barcodes for you, please contact the IDEXX Computer Systems at 1-800-283-8386. 6. Click OK. 7. Click OK on the Inventory Setup pop-up window that show Items Saved = 1. If the system encountered errors in the process of moving items, this window would indicate the number of errors and direct you to the Inventory - Setup Error Report. Cornerstone* 8.1 Single Location Inventory • Getting Started: Phases and Setup • Page 20 Phase 4: Invoice Item Counts and Costs, Then Defaults Checklist - Invoice Item Counts and Costs These instructions are designed to assist you in the inventory clean up procedure. Task Details 1. Review the Invoice Item Setup Report. • Are there items that you no longer sell or should be inactivated. • Are there items that are in the wrong classification? 2. Choose a class to begin working on (ex: Food or Nutritional) and complete setup on each item in this class. • Information tab: Set the correct selling unit of measure and pricing information. Be sure to include price breaks, as needed. • Inventory tab: Select the Maintain QOH, Location and set reorder information (reorder point, reorder quantity, overstock point). Select Track Expiration Dates and Track Lot Numbers, as needed. 3. Receive any vendor invoices that have not been entered in Cornerstone. • Enter receipts to ensure cost history is up-to-date prior to adjusting. This will ensure quantities will not be incorrect again after adjustments are made. 4. Print the Inventory – Counts Report for the class of items you setup. • Use this report to do a physical count of your inventory items. 5. Using the count totals written on the Inventory-Counts Report, adjust your quantity on hand. • Make adjustments using the View Quantity on Hand or Adjustment List windows. You will want to adjust immediately after counting and befoe any other invoicing is completed. 6. Review the cost on hand of the inventory items adjusted. Adjust the average cost of each inventory item, as needed. 7. Repeat - beginning at step #2 for another class. • View the inventory cost on hand in the View Quantity on Hand window. • Complete cost adjustments in the Adjustment List. Begin by working on the item classes that have the most activity. Cornerstone* 8.1 Single Location Inventory • Getting Started: Phases and Setup • Page 21 Practice Defaults Setting the Inventory Depletion Default The location be automatically selected if there is only one location available. You can also select an option to default in the oldest expiration date in each location during depletion, but this is not recommended unless you are very strict about using a First-In First-Out (FIFO) consumption method. In these cases, the system can be set to automatically choose a location and mark an item as verified when depleting inventory. If you choose to use this default, you may still need to verify the depletion if you are tracking lot numbers and/or expiration dates for the invoice item. This default selection may primarily be used in clinics where only one location is used, only a few lot numbers and/or expiration dates are tracked or no lot numbers and/or expiration dates are tracked. Setting the Inventory Defaults On the Invoice Item tab there is a section for setting Inventory defaults. This section includes: • Vendor ID field: The ID will automatically appear as the primary vendor in the Item Vendor Information window when setting up inventory information on invoice items. • Order ID field: Enter a beginning number used to track purchase orders in Inventory. This is the number to begin numbering new purchase orders. • Usage Tax list box: Select the tax(es) that apply to items used internally by the practice if applicable. If the usage tax does not display on the list, set the tax up in Cornerstone Foundation in Controls > Taxes. There are also options for: • Show item history for _______ months • Delete Want List items on completed • Print purchase order notes Cornerstone* 8.1 Single Location Inventory • Getting Started: Phases and Setup • Page 22 When inventory details need to be verified for items tracking lot numbers and expiration dates: • Prescriptions field: The default selection is Not required. Other options include: Warn if not verified and Required. • Not required: You will not be required to enter lot numbers and expiration dates on the Prescription window. • Warn if not verified: A warning will appear if lot numbers and expiration dates are not entered giving you the option on the Prescription window. • Required: You will be required to enter lot numbers and expiration dates on the Prescription window. • Performed PVL items and Saved Invoices field: The default selection is Warn if not verified. Other options include: Not required and Required. • Not required: You will not be required to enter lot numbers and expiration dates on the PVL or saved invoices. • Warn if not verified: A warning will appear if lot numbers and expiration dates are not entered giving you the option to enter lot numbers and expiration dates on the PVL or saved invoices. • Required: You will be required to enter lot numbers and expiration dates on the PVL or saved invoices. • Performed Document Items field: The default selection is Not Required. Other options include: Warn if not verified and Required. • Not required: Does not require inventory details to be verified at the time that the invoice items are sent from the document to the PVL. (The inventory details would still need to be verified later on the PVL or invoice.) • Warn if not verified: Displays a warning if inventory details are not filled in and verified at the time that the invoice items are sent from the document to the PVL. (The inventory details would still need to be verified later on the PVL or invoice.) Staff Inventory Defaults In this demonstration we will review the default inventory’s save and deplete preferences depletion location for the staff member logged in. 1. From the Cornerstone menu bar, select Controls > Defaults > Staff. 2. In the Staff field, select the appropriate staff ID; press Tab. 3. Select the Inventory tab. 4. To auto save changes without prompting for this staff member select the Auto save changes without prompting check box. For this demonstration, select the check box. 5. To auto delete changes without prompting for this staff member, select the Auto delete changes without prompting check box. For this demonstration, select the check box. 6. Click Save to save the settings. 7. Click OK to exit Staff Defaults. Cornerstone* 8.1 Single Location Inventory • Getting Started: Phases and Setup • Page 23 Go Live. Communication and Training. Adjustment Report. Communication and Decision-Making Communicating the implementation of the new inventory process to your staff and careful decision making in the inventory setup process will be important for your success in implementing Cornerstone* Inventory. View the Sample Inventory Communication Plan on the next page. Depending on how you use the features in inventory, it may impact how you use Cornerstone* Foundation. If you plan to track lot numbers and expiration dates, you will be required to enter those prior to, or during*, the invoice process. It is important to have a plan in place for communicating these lot numbers and/or expiration dates to the staff responsible for prescription labels and entering the charges on the Patient Visit List or invoice. *If expiration dates and lot numbers are manually entered during invoicing, negative quantities on hand for the lot number that was manually entered and will have to be manually adjusted. Therefore, manually entering QOH is not recommended. To learn more about how inventory affects your use of Cornerstone*, please refer to the Self-Paced Release Training or the What’s New in Cornerstone* 8.1 document. As you progress through this Self-Paced Inventory Training, think about how you are going to set up inventory to work best for your practice. Cornerstone* 8.1 Single Location Inventory • Getting Started: Phases and Setup • Page 24 Sample Inventory Communication Plan An Inventory Communication Plan is a beneficial tool for staff members. Any employee who receives or uses tracked inventory will need to be prepared to enter inventory details (tracking information). The following sample memo may be used to communicate changes to your staff. Memo Date: Fall 2010 To: Practice Staff From: Practice Management Team RE: New IDEXX Cornerstone* 8.1 Inventory Features Dear Staff, Memo Purpose You will soon experience a new improved look, feel, and functionality in Cornerstone related to inventory tracking. We want to prepare you for this, communicate the benefits, and provide you with action to take that will be necessary in order to achieve this new level of performance. Benefits The benefits to our practice are multi-fold. When inventory tracking is used for an invoice item, it could mean: • Inventory in locations can be monitored and we’ll be alerted when a certain location is low • If a product is recalled by the vendor, we’ll be able to identify which clients were sold an invoice item with a specific lot number or expiration date in order to take proper action Your Action We need your help to make this happen. Please take action in the following ways: • Complete the training when prompted • When entering inventory information, either during purchasing or providing patient care, ensure the inventory information is entered accurately • Encourage and support others as they utilize inventory-related Cornerstone* features • Consider operational changes that we may need to make and bring to management’s attention so proper procedures can be adjusted Our Actions Together Together, we will review performance and make necessary adjustments to meet our patient care needs. Sincerely, Practice Management Team © 2010 IDEXX Laboratories, Inc. Cornerstone* is a trademark or registered trademark of IDEXX Laboratories, Inc. in the United States and/or other countries. Cornerstone* 8.1 Single Location Inventory • Getting Started: Phases and Setup • Page 25 Phase 5: Deplete/Adjust/Move 1. Purchasing Work List 2. Purchase Order 3. Receive Order 4. Return to Vendor 5. Deplete • Adjustments • Internal Stock Use • Performed PVL or Document Items Cornerstone* 8.1 Single Location Inventory • Getting Started: Phases and Setup • Page 26 Section 3 Purchase Cornerstone* 8.1 Single Location Inventory • Purchase • Page 27 Adding Items to the Want List In this demonstration, we will add an item to the Want List. 1. Select the Want List toolbar button. 2. Enter the Item ID or select the ‘No ID’ option and type a description. 3. Enter the Quantity requested. 4. In the Reason field, enter a reason if appropriate. Enter For Training Purposes. 5. Click OK. 6. Repeat steps 2-5 and add another item to the Want List. 7. Click Cancel to close the window. If you have appropriate security, you can view the list of items that users have placed on the Want List by selecting Inventory > Purchasing Work List, and the Want List Report by selecting Reports > Inventory > Want List Report. Items without an ID code can be added to the Want List. If an Item ID is added more then once to the Want List, the list expands and shows who added it, how much and when it was added. Details added into the Reason field will appear on the Purchase Order. Cornerstone* 8.1 Single Location Inventory • Purchase • Page 28 Want/Suggested List Overview The Want/Suggested List is used to display items that have been requested by employees and items that are below the reorder point. Items can be deleted from the Purchasing Work List on the Want/Suggested List. When looking for specific items in the Want/Suggested List on the Purchasing Work List, select an option from one of the available criteria lists. Items requested that match the criteria will display. Want List fields include: • Status list: Select a status to view items with the specified status only. Options include Not Done or Complete. • Want items check box: Select this option to include want list items. • Suggested items check box: Select this option to view items that are at or below the reorder points set up by the practice. Reorder points are set up on individual item records (Lists > Invoice Item > Select the Item > Select Update > Inventory tab). Cornerstone* 8.1 Single Location Inventory • Purchase • Page 29 Purchasing Work List This lesson highlights the Purchasing Work List. Open the window by selecting Inventory > Purchasing Work List. The Purchasing Work List displays the Want/ Suggested List. 1. The Purchasing Work List is used to view items requested by staff or suggested by the system. • The Purchasing Work List’s Want/Suggested List can be used to view: • Items requested by staff. • Items suggested by Cornerstone. 2. The Item details area displays general information for an item. 3. The Add to Order area is used to add one or more items to a Purchase Order. Cornerstone* 8.1 Single Location Inventory • Purchase • Page 30 Arrange Columns In this demonstration, you will arrange a list of items in the Purchasing Work List by description and then add an additional column to view the vendor for each product. 1. Select Inventory > Purchasing Work List. 2. The Want/Suggested List displays. Click Search. 3. Click the Description column header. The items are sorted by description in ascending order. 4. Click the Description column header again. The items are sorted by description in descending order. 5. Right click the Description column header and a list of potential columns displays. 6. Click Vendor. The selection will remove Vendor as a column. This will prevent a user from viewing the primary vendor for an item. Reselect the Vendor option so you can view Vendors in the list. These selections are based on user log-in. Once a selection is made by a user it will remain in that user’s preferences. Inventory windows can be sorted by clicking on any of the column headers. Cornerstone* 8.1 Single Location Inventory • Purchase • Page 31 Inventory Item Search Overview This lesson introduces the Search for Inventory Item window, which is used in Cornerstone Inventory to search for and select items. In order to access this window, press F2 or double click in one of the searchable item fields located throughout Inventory or click the magnifying glass icon located next to the Item field. Basic Search for Inventory Item window If a flag icon Advanced Search for Inventory Item window displays next to an item, the item is marked to Maintain QOH. Basic Search for an Inventory Item In this demonstration, you will perform a search for Acepromazine from the View Quantity on Hand window. 1. Select Inventory > View Quantity on Hand. 2. Press F2 in the Item field. 3. Type: acep in the Description field. Any inventory items that match the search criteria display in the list. 4. Click on one of your Acepromazine items. 5. Click Select and the item displays in the Item field on the View Quantity on Hand window. 6. Close all open windows. Cornerstone* 8.1 Single Location Inventory • Purchase • Page 32 Advanced Search for an Inventory Item In this demonstration, you will perform an advanced search for IV Catheters from the View Quantity on Hand window. 1. Select Inventory > View Quantity on Hand. 2. Press F2 in the Item field. The Search for Inventory Item window displays. 3. Click Advanced search. 4. Type cat in the Description field. 5. Click Search and the inventory items that match the above criteria display. Click Clear to remove the current search criteria and begin a new search. 6. Click to select a catheter. 7. Click Select and the item displays in the Item field on the View Quantity on Hand window. 8. Close all open windows. Deleting a Want List Item In this demonstration, we will delete an item from the Want List. 1. Select Inventory > Purchasing Work List. 2. Deselect the Suggested items check box. 3. Click Search. 4. Select the item that does not need to be ordered. 5. Click Delete. • A confirmation window may display. 6. Click Yes. 7. Close any open windows. When selecting more than one item to delete, use Shift to select a consecutive group of items and Ctrl to select non-consecutive items on the list. Cornerstone* 8.1 Single Location Inventory • Purchase • Page 33 Transfer Wanted/Suggested Items to Purchase Order In this demonstration, you will add an item to a purchase order from the Want List. 1. Select Inventory > Purchasing Work List. 2. Deselect the Suggest items check box. 3. Click Search. 4. Select the item you added to the Want List. 5. In the Add to Order area, select the vendor where the item will be ordered from the Vendor list. 6. Enter the quantity in the Order qty field. 7. Optional: Select the buying unit of measure for the product being ordered in the UOM list. 8. Optional: Enter or update any notes about the order. You may see notes here based on tasks in a previous lesson. 9. Click Add to create a new purchase order. The Add a New Purchase Order window displays. If a purchase order already exists for the vendor, the Edit Purchase Order for [Vendor name] window displays and the item will be added to the existing purchase order. 10. Tab past the Purchase order number field for Cornerstone to assign a purchase order number. 11. Press Tab to leave the field. The item is now listed on the purchase order. 12. Click Save . 13. Close the Purchasing Work List. Multi-Location is not turned on if you don’t see the Locate an Item and Location tabs. (Use arrows/graphics to point to these tabs.) Cornerstone* 8.1 Single Location Inventory • Purchase • Page 34 Viewing Item History and Item Information In this demonstration, you will view the Item History and Item Information for a/d Canine/Feline in the Purchasing Work List. 1. Select Inventory > Purchasing Work List and the Purchasing Work List displays the Want/Suggested List. 2. Deselect the Suggest items check box. 3. Click Search. 4. Select an item on the Want/Suggested List. 5. Click the Expand button (located in the lower right area of the window). The Item History displays. 6. Click the Item Information tab. View the information. 7. Click the Collapse button. The Item Information and Item History tabs are minimized. 8. Close the Purchasing Work List window. Cornerstone* 8.1 Single Location Inventory • Purchase • Page 35 Item Details Overview The Item details area displays stocking levels and reorder point information for an item selected in the Purchasing Work List. Item details information include: • Item ID/Description: The selected item’s ID and description display when it is selected within the Purchasing Work List tab. Stocking Levels information includes: • Qty on hand: The quantity currently available • Qty on order: The amount currently on a placed purchase order • Qty on backorder: The amount currently on backorder • Qty on unsent orders: The amount currently on a saved, but not placed, purchase order • Sales History link: View the Sales History window for this item. This window displays the sales history for the last three years and includes year-to-date and month-to-date totals. Today’s Reorder Points information includes: • Reorder point: The reorder point for the location. • Reorder qty: The recommended amount to order when the reorder point is reached. • Overstock point: The overstock point of the item. • View Details link: If seasonal reorder point information exists for the item, this option will be available. Cornerstone* 8.1 Single Location Inventory • Purchase • Page 36 To view quantity on hand, select Inventory > Purchasing Work List. You can search within Want or Suggested items, or both, by selecting the appropriate check boxes and clicking Search. After you select an item from the list you can View the quantity on hand information in the Item details area. Cornerstone* 8.1 Single Location Inventory • Purchase • Page 37 Order List To track items on order with vendors and orders that have been partially received from vendors within Cornerstone, use the Order List window. Access the Order list by selecting Inventory > Order List. The Order List window displays orders managed by staff/ management within the past two weeks. When looking for specific purchase orders, enter information in one or more of the criteria fields in the Find orders area and click Search. Orders that match the criteria display on the Order List. Find orders fields include: • Vendor list: Select a vendor to view purchase orders for the specified vendor only. • Status list: Select the status of the order. Options include All, Not sent, Sent, Partial and Closed. • From field: The date two weeks prior to the current system date displays in the field. If necessary, manually type a beginning date or use the calendar in order to find orders on or after the selected date. • To field: The current system date displays. If necessary, manually type an ending date or use the calendar in order to find orders on or after the selected date. Order List columns include: • Vendor: The vendor with whom the order was placed. • PO number: The purchase order number. • Status: The status of the order. Options include All, Not sent, Sent, Partial and Closed. • Total value: The total cost of the order. • Ordered by: The name of the staff member who was logged in at the time the order was initially entered. • Date: The last date on which the order was worked. A Not sent status indicates an order has been saved but not placed. This is useful if more items will be added to the order at a later point. A Sent status indicates the order is ready for the vendor and has been placed. A Partial status indicates the practice has received some of the items on the placed order from the vendor. A Closed status indicates all items on the order were received or the order was manually deleted by the practice. Cornerstone* 8.1 Single Location Inventory • Purchase • Page 38 Purchase Order Overview To open the Purchase Order window, select Inventory > Order List > click Add New Order or Edit. Purchase Order fields include: • Purchase order number field: A purchase order number is a unique number that is used to track each order entered in Inventory. • Vendor list: Select the vendor with whom the order will be placed. • Total value field: The total cost of all items on the order. Purchase Order columns include: • ID: The item ID of the product to be ordered. • Description: The name of the item to be ordered. The description can be manually changed but, when printing the purchase order, the original description displays. • Qty: The total amount of the item to be ordered based on UOM. If the buy/sell ratio is set for the item and unit is changed to the selling unit, the quantity is calculated according to the ratio. • UOM: The unit of measure for the item being ordered; the default is the buy UOM. • Special price: If the item will be purchased at a special price, select Yes from the list. The item’s vendor cost will not update when received which, in turn, will not affect the item markup. Examples of items purchased at special cost include free samples and promotional items. • Cost: The unit cost of the item being ordered. • Status: The state of the item being placed on an order. Options include Ordered and Backorder. • Ordered by: Lists the name of the staff member who was logged in when the item was placed on the order. • Notes: General information pertaining to the item being ordered. An asterisk (*) indicates a required field. If the field is left blank or the information in the field is a duplicate of another entry, a message will display. Cornerstone* 8.1 Single Location Inventory • Purchase • Page 39 Creating Purchase Orders In this demonstration, you will create and save a new purchase order. 1. Select Inventory > Order List and the Order List window displays orders managed within the last two weeks. 2. Click Add New Order. The Add a New Purchase Order window displays. 3. Enter your purchase order in the Purchase order number field and press Tab. 3.1 Manually enter a purchase order number or you can press Tab to have Cornerstone automatically assign a purchase order number. 4. From the Vendor list, select the vendor with whom the order will be placed. 5. Search for and select the items to be ordered from the vendor. 6. Enter the quantity to be ordered in the Qty field. 7. Optional: Change the unit of measure. The buying unit of measure automatically displays. Change the buying unit of measure if you are ordering a nonstandard quantity. 8. Optional: If this is an item being purchased at a special price which shouldn’t affect the item markup or vendor cost, select Yes in the list of the Special price column. 9. Optional: Enter the unit cost of the product, if known. The last cost entered for the item will automatically appear in the cost field. Any inventory item can be ordered, regardless of QOH tracking status. 10. Verify the status is Ordered. 11. Click the Note icon and type the information. A paper icon displays indicating a note is attached. 12. Continue placing the rest of items on your purchase order. 13. Click Save to save the order (and be able to return and edit it) or click Place Order to place the order. For this demonstration, click Save. The Order List window displays the new order. 14. Close all open windows. Cornerstone* 8.1 Single Location Inventory • Purchase • Page 40 Modifying a Purchase Order In this demonstration you will modify a new purchase order. 1. Select Inventory > Order List and the Order List window displays orders managed within the last two weeks. 2. Click Add New Order. The Add a New Purchase Order window displays. 3. Type 7563 in the Purchase order number field and press Tab. Manually enter a purchase order number or you can press Tab to have Cornerstone automatically assign a purchase order number. 4. From the Vendor list, select the vendor with whom the order will be placed. For this demonstration, select My Vendor. 5. Search for and select the items to be ordered from the vendor. For this demonstration, in the ID field type 02441 for Clavamox® Drops and press Tab. 6. Enter the quantity to be ordered in the Qty field. For this demonstration, type 6.00. 7. Optional: Change the unit of measure. The buying unit of measure automatically displays. For this demonstration, the unit of measure will not be changed. Verify the UOM is bottle. 8. Optional: If this is an item being purchased at a special price which shouldn’t affect the item markup, select Yes in the list of the Special price column. For this demonstration, verify the special price is set to No. 9. Optional: Enter the unit cost of the product, if known. For this demonstration, type 7.500. 10. Verify the status is Ordered. 11. Click the Note icon and type the information. A paper icon displays indicating a note is attached. For this demonstration, type Only 1 left and click Save to save the note. 12. Continue placing the following items on your purchase order. Item and ID Toothbrush (09042) Clavamox® 375mg (02438) Bordetella Vaccine (01010) HistaCalm Shampoo 8oz (7368) Qty UOM Notes 3 Box None 4 Bottle None 72 Dose None 10 Bottle None 14. Click Save to save the order (and be able to return and edit it) or click Place Order to place the order. For this demonstration, click Save. The Order List window displays the new order. 15. Close all open windows. Cornerstone* 8.1 Single Location Inventory • Purchase • Page 41 Modifying Purchase Orders In this demonstration, you will be adding an item to an existing order and placing the order. 1. Select Inventory > Order List. 2. Select an order that has a status of Not sent or Sent. For this demonstration, select the order that was created in the previous exercise. 3. Click Edit. The Edit Purchase Order for [Vendor Name] window displays. 4. Make any necessary changes to the order. 5. Verify the following: • Qty • UOM • Special price • Cost • Status 6. Save or place the order. For this demonstration, click Place Order. 7. The Order List window displays the purchase order with a status of Sent. 8. Close the Order List window. Cornerstone* 8.1 Single Location Inventory • Purchase • Page 42 Special Purchase Scenarios: Rabies Vaccines, Heartworm, Flea/Tick Prevention There are times when you will need to purchase items in quantities that are different than your buy/sell ratio. For those types of items it is recommended to complete the following steps: 1. On the Order window, select and enter the inventory item. 2. Change the unit of measure to the selling unit of measure. 3. Enter the order quantity, keeping in mind the unit of measure. 4. Enter the item’s cost, if available. By entering the purchase in this way, you will be able to determine when an item has been ordered and received in the nonstandard quantity. When receiving the item, you will need to ensure the cost is entered as the selling unit’s cost. Cornerstone* 8.1 Single Location Inventory • Purchase • Page 43 Section 4 Receive Cornerstone* 8.1 Single Location Inventory • Receive • Page 44 Receipt Management Receipt List Overview This lesson highlights the Receipt List window. Open the Receipt List window by selecting Inventory > Receipt List. The Receipt List window displays receipts entered in the past two weeks and is sorted by date. When looking for a specific receipt, enter information in one or more of the criteria fields provided in the Find receipts area and click Search. Receipts that match the selected criteria display in the Receipt List window. Find receipts fields include: • Vendor list: View receipts for a specific vendor only. • Status list: View receipts with a specific status (All, Posted and Not Posted). Posted indicates the receipt is complete and has been processed; information cannot be changed. Not Posted indicates item information for a receipt has been saved but not processed; information can be edited and posted. • From list: The two weeks prior to the current system date displays in the field. Manually type a beginning date or click the arrow and select a date from the calendar in order to find receipts on or after a certain date. • To list: The current system date displays in the field. If necessary, type an ending date or click the arrow and select a date from the calendar in order to find receipts on or before a certain date. Cornerstone* 8.1 Single Location Inventory • Receive • Page 45 Receive Order Overview This lesson highlights the Receive Order window. From the Receipt List window click Receive an Order to open the Receive Order window. Receive Order fields include: • Vendor list: Select the vendor from which the items are being received. • Receipt number field: Type the invoice or packing slip number provided by the vendor. • Date field: This is the date the shipment is received. The current system date will automatically display but can be changed if necessary. • Open receipts for vendor box: If you have any open, unfinished receipts for this vendor, they will display here. To finish one of these receipts, select the receipt from the box. • Purchase order number list: Select an order to find the items on a specific purchase order. • Sort in Original PO Sequence check box: Select this check box to sort the items in the original purchase order sequence. • Shipping field: Enter any shipping charges that apply. • Total tax field: Type the total amount of tax that applies to the shipment. If entering tax for the individual items on the receipt, the total for all line items is calculated and displays in the field. • Total field: View the total cost of the items on the receipt. This total should match the total provided by the vendor on the invoice or packing slip. Cornerstone* 8.1 Single Location Inventory • Receive • Page 46 Columns on the receipt include: • ID: The item ID of the product placed on a purchase order. • Description: The name of the item placed on a purchase order. • Note: A note added to the line item. • PO number: The numerical code assigned the purchase order the item was placed on. • Qty: The total quantity for the item placed on the purchase order. Based on the unit of measure. • UOM: The buying unit of measure for the item. • Cost: The unit cost of the item • Special price: If the item is purchased at a special price, click the will not update. The special price will still figure into the average cost. icon. As a result, the item’s vendor cost • Tax: The individual tax that applies to the item (if applicable) • Status: The status of an item; statuses are available when receiving a purchase order. You can sort columns by clicking on the column headers. Receive Order buttons include: Receipt item detail is used to enter additional information for an item including lot numbers and/or expiration dates and quantity. Items in red on the Receive Order window require this information be entered. If the information is not entered, the receipt cannot be posted. Remove item is used to remove a manually-added item. In other words, if an item wasn’t on the original purchase order but you manually added it on your Receive Order window, it creates a manually-added item. To delete that item, select the line to remove and click Remove Item. Note: To remove an item that is listed on the receipt but originated from the purchase order, set the Status to Cancelled. Receive all is used to change the status of all items on the receipt to received. View order is used to look at the purchase order for the item. Select the item and click View purchase order. The View Purchase Order for [Vendor name] window displays the detailed information for the order. Click Back to return to the Receive Order window. Save is used to save, but not post, the receipt on the Receive Order window. Because the receipt has not been posted at this point, staff can open and work on the receipt. Save and Print is used to print a receipt. Click Save and Print and a Receipt Report displays the current details of the receipt. Preview, print or save a copy of the receipt and click Back to return to the Receive Order window. Items on saved receipts do not update QOH. Post is used to process a completed receipt. Click Post. The Change prices window displays each item being received except items designated as special price items. Make any necessary changes to the pricing information for the items and click Post. QOH and cost information is updated and items are received into the correct locations. Cancel is used to discontinue a receipt. Click Cancel and, if the confirmation window displays, click Yes. The Receipt List window displays. Cornerstone* 8.1 Single Location Inventory • Receive • Page 47 Adding a New Receipt - Receive Order In this demonstration, you will create a receipt containing multiple items and save it. 1. Select Inventory > Receipt List. The Receipt List window displays receipts entered in the last two weeks. 2. Click Receive an Order. The Receive Order window displays. 3. From the Vendor list, select the vendor from which items are being received. If there are open receipts for the vendor, they will display in the Open Receipts for Vendor box. 4. Type the invoice or packing slip number provided by the vendor in the Receipt number field. • This number must be unique for the vendor. If the number entered is a duplicate, a message will display. 5. Enter a receipt date in the Date field. 6. Items on purchase orders will display in the grid. Mark the items shown below as received; select Received in the Status field. 7. Adjust the receipt information for the items in the Receive Order columns. Change the quantity, UOM and cost to match your vendor invoice. • You will not receive ALL of the items on the original purchase order. Select the status of Back Order on one item. • An asterisk () indicates a required field. If the field is left blank or the information in the field is a duplicate of another entry, a message will display. 8. Click Receipt item detail to add the details (location where the item is being received, lot numbers and expiration dates). • The Enter receipt item detail window displays. • Items that appear in black do not require lot number or expiration date information. Items that appear in red DO require lot number and/or expiration date information. Fields that must be filled in contain a red “(?)” in the field. • If multiple lot numbers and/or expiration dates were received, copy the line first then add the lot numbers and expiration dates appropriately. Cornerstone* 8.1 Single Location Inventory • Receive • Page 48 9. Click Done. • You will return to the Receive Order window. Some items did not arrive in the shipment. They will remain on the order and no details will be filled in. 10. Save or Post the receipt. For this demonstration, click Save. • The Receipt List window displays the new receipt with a status of Not Posted. 11. Close the Receipt List. Posting receipts with some items still backordered or not received changes the status on order list to partial, but does not update the quantity on hand for the items received. Cornerstone* 8.1 Single Location Inventory • Receive • Page 49 Backorder List Overview This lesson highlights the Backorder List. Backordering can only be used if purchase orders are entered. To open the Backorder List, select Inventory > Backorder List. Backorders appear on the list if an item placed on a purchase order has a status of Backordered or if the item is placed on backorder when it is received. An item cannot be added to this list but the quantity on backorder may be modified or the backordered item may be cancelled. You can also add an expected receipt date or notes about the item. To narrow the list of items, enter criteria in any of the Find backorder items area fields and click Search. Find backordered items area fields include: • Vendor list – View a list of backorders for a specific vendor. • Classification list – View a list of backorders for a specific classification. Modifying Inventory Receipts In the demonstration, you will be placing 02441 Clavamox® Drops on backorder and saving the receipt. Only items that were placed on a purchase order can be placed on backorder. 1. Select Inventory > Receipt List, select a receipt that has not been posted. For this demonstration, select 58624 and click Edit. 2. On the Clavamox® Drops (02441) line select Backordered from the Status field. 3. Click Save. The Receipt List window displays. 4. Close the Receipt List. Cornerstone* 8.1 Single Location Inventory • Receive • Page 50 Editing a Backordered Item In this demonstration, you will edit a backordered item. 1. Select Inventory > Backorder List. 2. Select the backordered item to edit. 3. Click Edit Backorder. 4. Optional: In the Backorder qty field, enter a new quantity on backorder. 5. The Cancelled qty, Received qty and Original Order qty fields are updated to note the changes. 6. Optional: In the Expected delivery list, manually type a date or click the arrow to display a calendar and choose a date the item is expected to be delivered. 7. Optional: Type (or add) a note pertaining to the backordered item in the Notes field. 8. Click Save. 9. Close the Backorder List window. Cornerstone* 8.1 Single Location Inventory • Receive • Page 51 Posting Inventory Receipts For this demonstration, you will post your inventory receipt. 1. Select Inventory > Receipt List. 2. Select your receipt click Edit. 3. Click Post. The Change prices window displays. Your results may appear different due to various staff using the training or prior missed demonstrations. 4. Optional: To change price information, select the item on the Change prices list. The current and new pricing information for the item displays in the Detailed pricing information for [Name of Item] area. • The new pricing unit cost equals the cost of the item from the Receive Order window. When receiving an item with more than one unit cost, the highest cost becomes the new unit cost. You may enter new markup information for the item in order to calculate a new price for the item or enter a new price to calculate the markup of the product. • Prices will not change if the item isn’t set to Auto-calculate price (Lists > Invoice Item). 5. Optional: Enter a dispensing fee for the item in the Dispensing Fee field if appropriate. 6. Optional: Enter a minimum price for the item in the Minimum price field if appropriate. 7. Click Post. The quantity on hand and cost information for each item is updated and the items are received into the correct location. The Receipt List window displays the posted receipt. Multiple items can be selected at once using the Shift or Control keys then clicking Return. 8. Close the Receipt List. Cornerstone* 8.1 Single Location Inventory • Receive • Page 52 Return an Item to Vendor Return to Vendor Overview This lesson highlights the Return to Vendor window. The Return to Vendor window contains several fields, a list of items to be returned to the vendor, and a Find items to return area used to search for and select items that need to be added to the list of returns. To access this window select Inventory > Return to Vendor. It is only possible to return items that are marked to maintain QOH. Cornerstone* 8.1 Single Location Inventory • Receive • Page 53 Returning Inventory to a Vendor In this demonstration, we will return an invoice item from your invoice to the vendor. 1. Select Inventory > Return to Vendor. 2. In the Vendor list, choose the vendor to which the inventory items will be returned. 3. Optional: Type the Return Merchandise Authorization number provided by the vendor in the RMA number field. This is an identification number provided by the vendor. 4. Optional: Enter a return date in the Return date list. This date field automatically inputs the current system date. 5. In the Find items to return area, enter the description of the item in the field or press F2 in the Item field to search for the item to be returned. 6. Choose your item and click Select. 7. In the Find items to Return area select the line for the item. 8. Click Return. The item is added to the Return items to a Vendor area. 9. Optional: Adjust the Qty, UOM, Lot no., Exp. date, Cost, and Tax information. For this demonstration there are no adjustments. 9.1 For this demonstration verify the following: • Quantity • Unit of Measure • Lot number Cornerstone* 8.1 Single Location Inventory • Receive • Page 54 • Expiration Date • Cost • Tax 10. Optional: Verify/Enter the Restock fee, Shipping, and Total tax. 11. Click Save. 12. Close the Return to Vendor window. Cornerstone* 8.1 Single Location Inventory • Receive • Page 55 Section 5 Deplete/Adjust/Move Cornerstone* 8.1 Single Location Inventory • Deplete/Adjust/Move • Page 56 View Quantity on Hand Window This lesson highlights the View Quantity on Hand window. To access the View Quantity on Hand window from Inventory, select Inventory > View Quantity on Hand. The View Quantity on Hand window displays all items marked to maintain quantity on hand. To narrow the list of items, enter criteria in the available fields and click Search. Items with quantity on hand of zero will automatically be removed from this window after 14 days. There is no way to remove those items from the window without turning off quantity on hand tracking. However, call Support at 1-800-283-8386 to have a technician perform a setting modification so that items with a zero QOH will be removed after 1 day. When quantity on hand is edited for an item, it will create multiple listings in the View Quantity on Hand window. Review this window for negative quantities on hand on any items. Then review its cost. If an adjustment is needed, make the adjustement under Adjustment > Adjustment List. Cornerstone* 8.1 Single Location Inventory • Deplete/Adjust/Move • Page 57 Edit a Quantity on Hand Quantity on Hand and Expiration Date Adjustments Adjustments are generally made due to a physical count of inventory, damaged or expired products, and entry errors. This lesson will explain how to adjust the quantity on hand for an inventory item. Edit QOH is used to adjust the existing quantity on hand for an item that displays on the View Quantity on Hand list. New QOH Adjust is used to adjust the quantity on hand for an item that does not have a QOH listed and does not appear on the View Quantity on Hand list. Use Edit QOH when a quantity on hand is already recorded. Use New QOH if no quantity on hand is recorded. Edit Lot and Exp - use this when entering expiration dates and lot numbers for existing QOH for the QOH will go to zero for the non-expiration date and lot number items. There are two methods to adjust expiration dates: 1. Using the New QOH Adjust (found on the View Quantity on Hand Adjustment List) 2. Using the Edit Lot and Exp Note: When using this method, after the adjustment you will notice two lines on the View Quantity on Hand window. One for the new entry and one with the old expiration date. The old expiration date will disappear from the list in 14 days. If the ‘Auto confirm adjustments’ box isnot marked under Controls > Defaults > Practice and Workstation > Inventory, then you will need to confirm the entry uner Lists > Adjustment List before it will display on the View Quantity on Hand window. Cornerstone* 8.1 Single Location Inventory • Deplete/Adjust/Move • Page 58 Entering a number in either the Actual or Change field will result the other to populate with the quantity modification. Editing Quantity on Hand (QOH): In this demonstration, you will adjust the quantity on hand for Amoxicillin 50mg, 100mg, 150mg, 200mg and 400mg in the Pharmacy location. 1. Select Inventory > View Quantity on Hand. The View Quantity on Hand window displays all items marked to maintain quantity on hand. 2. Optional: Click Advanced Search to enter additional search information. 3. From the Location list, select Pharmacy Main. In the item field type amoxi and click Search. A list of items that match the specified criteria display. 4. Hold the Ctrl key and select Amoxicillin 50mg, Amoxicillin 100mg, Amoxicillin 150mg, Amoxicillin 200mg, and Amoxicillin 400mg. Click Edit QOH. The Make Adjustment window displays the items. The first item is selected. 5. Enter a new quantity on hand of 1,450 tablets for Amoxicillin 50mg in the Actual field. Press Tab to view the Change quantity. 6. Select the reason for the adjustment as Cycle count in the Adjustment reason list. 7. Click Next Record or Previous Record to navigate to the next item to be adjusted. 7.1 Make any necessary changes to each of the records. • Amoxicillin 100mg: 1327 tablets; Cycle count • Amoxicillin 150mg; 1489 tablets; Cycle count • Amoxicillin 200mg; 1527 tablets; Cycle count • Amoxicillin 400mg; 1440 tablets; Cycle count Cornerstone* 8.1 Single Location Inventory • Deplete/Adjust/Move • Page 59 8. Click Save. 9. Close the View Quantity on Hand window. Cornerstone* 8.1 Single Location Inventory • Deplete/Adjust/Move • Page 60 Adjustment List This lesson highlights the Adjustment List. To open the Adjustment List window, select Inventory > Adjustment List. The Adjustment List displays all quantity on hand adjustments. Cost Adjustments do not appear on the list. If practice defaults are not set to confirm quantity on hand adjustments, each adjustment performed by other staff members in the View Quantity on Hand window will display on the Adjustment List with an Unconfirmed status. Adjustments can be Confirmed or Voided. While performing a basic or advanced search, to narrow the list of items, enter criteria in any of the fields in the Find adjustments area and click Search. Cornerstone* 8.1 Single Location Inventory • Deplete/Adjust/Move • Page 61 Adjust Quantity on Hand from Adjustment List New Quantity on Hand (QOH) Adjust: The inventory manager has completed a physical count and discovers that an item exists on the shelf, but is showing a quantity of 0 in Cornerstone*. In this demonstration, you will adjust the quantity on hand for an inventory item. 1. Select Inventory > Adjustment List. 2. Click New QOH Adjust and the Make Quantity on Hand Adjustment window displays. 3. In the Item field, press F2 to search for the item.Highlight the item and click Select. 4. In the Expiration date field, if tracking, enter the expiration date for the item. 5. In the Lot number field, if tracking, enter the lot number for the item. 6. In the Actual field, enter the new quantity on hand and press Tab. • The adjusted quantity displays in the Change field (Ex. 200.00). 7. From the Adjustment reason list, select reason for the adjustment. 8. Click Save. 9. Close the Adjustment List window. Adjust Vendor Cost of Item In this demonstration, you will adjust the cost for an inventory item. 1. Select Inventory > Adjustment List and then click New Cost Adjust. 2. In the Item field search for and select an inventory item. 3. In the Avg. cost field, type the average unist cost of the product and press Tab. • The total cost is calculated and displays in the Current total cost field. As an alternative, you can also enter the total cost to automatically calculate average cost. 4. Click Save. 5. Close the Adjustment List window. Cornerstone* 8.1 Single Location Inventory • Deplete/Adjust/Move • Page 62 Other Depletion Activities: Patient Visit List, Whiteboard, Invoice, and Voids It is important to understand how inventory quantities are depleted from Cornerstone. 1. Patient Visit List – The Patient Visit List will only deplete inventory quantities when the item has been performed and inventory details have been verified. 2. Whiteboard – When treatments are completed on the whiteboard inventory items are performed and there is an opportunity to verify inventory details. These charges will be transferred to the Patient Visit List. 3. Invoice – Inventory quantities are depleted on saved and posted invoices when the inventory details are verified. Voiding Prescriptions Voiding prescriptions does three things: 1. The prescription is voided and hidden in the patient’s medical record (unless Hide voided items check box is unchecked). 2. The quantity of the items is added back into inventory. 3. The charge is deleted from the Patient Visit List. Use this step when returning prescriptions to the shelf that have not been picked up by your client. When using the Patient Visit List and declining an item to history, using the blue PVL line to record “client did not pick up prescription”, is a best practice option for patient record documentation and for returning inventory to stock. Voiding the prescription would be the next step. Cornerstone* 8.1 Single Location Inventory • Deplete/Adjust/Move • Page 63 Voiding Invoices Voiding an invoice reverses all charges on the invoice and returns the quantity of the inventory items to inventory stock. Voiding does not reverse any special actions that were completed (ex. sex modification, mark as deceased, etc) or reminders updated during the invoicing process. If there are payments attached to the invoice, Cornerstone will ask if you want to reverse them. Deplete Internal Stock To open the Internal Stock Use, select Inventory > Internal Stock Use. Internal stock usage is considered complete when saved. An adjustment is required to reverse it. Internal Stock Use buttons include: Save is used to process the depletion of stock for items used internally by the practice. Print is used to access the Inventory – Internal Usage Report. Click Print, select sort order and range information then decide whether to preview, print or save the report. Click Back until the Internal Stock Use window displays. Cancel is used to discontinue an internal use of stock depletion. Cornerstone* 8.1 Single Location Inventory • Deplete/Adjust/Move • Page 64 In this demonstration, we will perform an internal use stock transaction using an inventory item from your vendor invoice. 1. Select Inventory > Internal Stock Use. 2. In the Item field, search for and select the item to deplete. • The UOM field automatically displays the selling unit of measure for the item. The Cost field displays the average cost of the item if tracking quantity on hand or the last received cost if the item is not marked to maintain quantity on hand. The Total cost field displays the cost multiplied by the quantity entered. 3. Enter the quantity to remove from stock in the Quantity field. 4. If tracking, enter the lot number. 5. If tracking, enter the expiration date. 6. Enter the date the item was removed from inventory in the Date used list. If a date confirmation window displays, select Yes. 7. Select the cost center that will be charged for the item in the Charge to cost center list. Charge to cost center is a required field; a cost center must be selected from the list. 8. Optional: Select the usage taxes that apply to the item in the Usage taxes to apply list box. Taxes are listed in this box and are selected when they are highlighted. 9. Optional: Modify the unit cost of the item if necessary. 10. Click Save. • The depletion is processed. Internal Usage Report 1. Click Print to view the range screen. 2. Click Preview to view the report. 3. Click Back twice to get back to the Internal Stock Use window. 4. Close the Internal Stock Use window. Cornerstone* 8.1 Single Location Inventory • Deplete/Adjust/Move • Page 65 Section 6 Inventory Reports Cornerstone* 8.1 Single Location Inventory • Inventory Reports • Page 66 Reports Overview Printing Reports Overview Access the reports by selecting Reports > Inventory. The Reports window displays the reports available. Select the report and click Run to preview the report. Select the sort order and range information, if applicable, and then preview, print or save the report. Report buttons include: Preview is used to view a report before printing or saving it. Print Now is used to print the report immediately to the default printer. Print is used when you want to choose which printer the report will print to. Back is used to return to the Inventory Reports window. Remove Range is used to clear the range information in the Set report range area of the window. Cornerstone* 8.1 Single Location Inventory • Inventory Reports • Page 67 In this demonstration, you will preview the Inventory Cost Report. 1. Select Reports > Inventory. The Inventory Reports window displays the available reports. 2. Select a report. For this demonstration, select Inventory - Cost Report. 3. Click Run. The preview window displays. 4. Optional: Arrange the report by selecting an option in the Sort by list. For this demonstration select Class ID and press Tab. 5. Optional: Specify the information displayed on the report by selecting range information in the Set report range area of the window. • Description list: Select the information to display on the report. For this demonstration select Class ID. • Starting value: Establish the beginning criteria that will be used to narrow the report by entering a value. Press F2 to select from a list of options. For this demonstration type PHA to choose the classification: Pharmaceuticals. • Ending value: Select the ending criteria that will be used to narrow the report by entering a value. Press F2 to select from a list of options. For this demonstration type PHA to choose the classification: Pharmaceuticals. • And/Or list: If the report is to include more than one search criteria, select And to include all the description ranges entered or select Or to include any of the description ranges entered. For this demonstration leave this field blank. Click Remove Range if the information entered within the Set report range area of the window is inaccurate. This will clear the fields. 6. Preview or Print the report. For this demonstration, Preview the report. 7. Click Back until you return to the to the Inventory Reports window. 8. Close the Inventory Reports window. The Inventory Cost Report does not contain items that have a zero or negative quantity or a negative cost. Reports can be saved as a .csv files then opened in Excel so that you have additional sorting options to use. Cornerstone* 8.1 Single Location Inventory • Inventory Reports • Page 68 Inventory Reports This lesson highlights the reports available in Cornerstone* Inventory. Inventory – Adjustment Report Use the Inventory – Adjustment Report to view a list of quantity or price or expiration date and lot number adjustments in inventory. Preview Options Sort by: Date, Item Description Range: Adjustment Reason, Date, Item Description Inventory – Audit Open Details Report Use the Inventory – Audit Open Items Report to display an itemized listing of inventory items that have item details completed including location, expiration date and lot number and marked as verified but have not been finalized yet. Preview Options Sort by: Item Description Range: Item Description; Item ID Inventory – Audit Report Use the Inventory – Audit Report to display an itemized listing of all inventory item transactions in Cornerstone*. This list can be used as a reference if re-keying data is necessary. When printing this report, enter ranges to filter the report to avoid printing a large report. Preview Options Sort by: Item Description Range: Date Range, Item Description, Item ID Cornerstone* 8.1 Single Location Inventory • Inventory Reports • Page 69 Inventory – Backorder Report Use the Inventory – Backorder Report to view all items on backorder. Preview Options Sort by: Item Description, Vendor Name Range: If sort order is by Item Description: Item Description, Item ID, Vendor Name If sort order is by Vendor Name: Item Description, Item ID, Vendor Name Inventory – Cost Report Use the Inventory – Cost Report to display the cost of inventory on hand. This is a good report to print when processing end-of-year. If the practice does not perform an EOY cycle count, print this report to obtain the value of EOY inventory information. Preview Options Sort by: Item Description, Class ID, Vendor Name Range: If Sort by is Item Description: Item Description, Item ID If Sort by is Class ID: Class ID, Item Description, Item ID, Subclass ID, Vendor Name If Sort by is Vendor Name: Item Description, Item ID, Vendor Name Cornerstone* 8.1 Single Location Inventory • Inventory Reports • Page 70 Inventory – Cost Totals Report The Inventory – Cost Totals Report displays the total cost of inventory on hand summarized by item classification. Preview Options Sort by: Class ID Range: If Sort by is Class ID: Class ID Inventory – Counts Report Use the Inventory – Counts Report when performing a cycle count of inventory items marked to maintain quantity on hand. The report lists the current quantity on hand for each item and provides a space to write the actual number of items physically available for each item. Preview Options Sort by: Item Description, Location, Class ID Range: If Sort by is Item Description: Class ID, Item Description, Item ID, Location If Sort by is Location: Class ID, Item Description, Item ID, Location If Sort by is Class ID: Class ID, Item Description, Item ID Cornerstone* 8.1 Single Location Inventory • Inventory Reports • Page 71 Inventory – Evaluation Report Use the Inventory – Evaluation Report to view information about each inventory item marked to maintain quantity on hand. Preview Options Sort by: Item Description, Class ID, Vendor Name Range:If Sorted Order is Item Description: Class ID, Item Description If Sort by is Class ID: Class ID, Item Description, Subclass ID If Sort by is Vendor Name: Item Description, Vendor Name Inventory – Expiration Date Report Use the Inventory – Expiration Date Report to view a list of inventory items that will expire before a specified date. Preview Options Sort by: Location, Item ID, Item Description, Class ID Range: Class ID, Expiration Date, Item Description, Item ID, Location Inventory – Internal Usage Report Use the Inventory – Internal Usage Report to view all the items and their associated costs that were used internally by the practice. Preview Options Sort by: Item Description, Class ID, Cost Center, Staff ID Range: If Sort by is Item Description: Date, Item Description, Item ID If Sort by is Class ID: Class ID, Date, Item Description, Item ID If Sort by is Cost Center: Cost Center, Date, Item Description If Sort by is Staff ID: Date, Item Description, Item ID, Staff ID Cornerstone* 8.1 Single Location Inventory • Inventory Reports • Page 72 Inventory – Item Vendor Information Report Use the Inventory – Item Vendor Information Report to view a list of vendors and associated information assigned to inventory items through the Invoice Item List. Preview Options Sort by: Item Description, Vendor Name Range: Item Description, Vendor Name Inventory – Items Profit Analysis Report Use the Inventory – Items Profit Analysis Report to determine profitability of inventory items sold. Note: End-of-month must be processed twice and end-of-year once before data displays for the appropriate columns for this report. The data in this report corresponds to the data in the EOM Inventory Sales Report. Preview Options Sort by: Class ID, Location ID, Revenue Center Range: If sort by is Class ID: Class ID, Item Description, Item ID If sort by is Location ID: Item Description, Item ID, Location ID If sort by is Revenue Center: Item Description, Item ID, Revenue Center Cornerstone* 8.1 Single Location Inventory • Inventory Reports • Page 73 Inventory – Linked Items Report The Inventory – Linked Items Report lists all of the invoice items that have inventory items linked to them. Preview Options Sort by: Item Description Range: Item Description, Item ID Inventory – On Order Report Use the Inventory – On Order Report to view detailed order information for items currently on order. Preview Options Sort by: Vendor Name, Item Description, Class ID Range: If Sort by is Vendor Name: Item Description, Vendor Name If Sort by is Item Description: Item Description, Vendor Name If Sort by is Class ID: Class ID, Item Description, Vendor Name Cornerstone* 8.1 Single Location Inventory • Inventory Reports • Page 74 Inventory – Overstock Report The Inventory – Overstock Report displays a list of inventory items that are above their overstock point, according to reorder information set up at the practice. Preview Options Sort by: Item Description, Class ID Range: If Sort by is Item Description: Item Description If Sort by is Class ID: Class ID, Item Description Inventory – Partial Receipts Report The Inventory – Partial Receipts Report lists orders that have been partially filled but remain open because some items on the order have not been received yet. Preview Options Sort by: Vendor Name Range: Date, Item Description, PO Number, Vendor Name Cornerstone* 8.1 Single Location Inventory • Inventory Reports • Page 75 Inventory – Purchase History Report Use the Inventory – Purchase History Report to view a list of past vendor transactions, including the receipt and return of inventory items, for the practice. Preview Options Sort by: Item Description, Class ID, Vendor Name, Vendor by Order, Vendor by Reciept. Range: If Sort by is Item Description: Date, Item Description, Item ID If Sort by is Class ID: Class ID, Date, Item Description, Item ID If Sort by is Vendor Name: Item Description, Vendor Name If Sort by is Vendor by Order: Item Description, PO Number, Vendor Name If Sort by is Vendor by Receipt: Item Description, Receipt Number, Vendor Name Inventory – Receipt Report Use the Inventory – Receipt Report to view detailed information about items the practice has received. Preview Options Sort by: Vendor by Receipt. Range: Item ID, Receipt Date, Receipt Number, Vendor Name Cornerstone* 8.1 Single Location Inventory • Inventory Reports • Page 76 Inventory – Reorder Report Use the Inventory – Reorder Report to view a list of inventory item, marked to maintain quantity on hand that are at or below their reorder points. This report contains the same information that displays on the Purchasing Work List. Preview Options Sort by: Item Description, Vendor Name, Class ID Range: If Sort by is Item Description: Item Description, Item ID If Sort by is Vendor Name: Item Description, Item ID, Vendor Name If Sort by is Class ID: Class ID, Item Description, Item ID Inventory – Returns Report The Inventory – Returns Report lists all of the items that have been returned to a vendor. Preview Options Sort by: Date, Vendor Name Range: If sort by is Date: Date, Item Description, Vendor Name If sort by is Vendor Name: Item Description, Item ID, Vendor Name Cornerstone* 8.1 Single Location Inventory • Inventory Reports • Page 77 Inventory – Turnover Report The Inventory - Turnover Report helps track how many times inventory completes a cycle of being received or sold. Use the ratios to adjust purchase patterns and to help optimize cash flow. Note: The ratio that displays is the amount of the item depletion divided by the item’s average quantity on hand. The validity of the report depends on the accuracy of the QOH. If receipts, returns, and internal usage are not used correctly, the turnover ratio may not be accurate. On the Inventory – Turnover Report preview window, select the Beginning Period Date Processed and the Ending Period Date Processed to calculate the turnover ratio for the specified months date range. Click OK. The Set report range area displays. If applicable, select a range of information and then preview or print the report. Note: End-of-month (EOM) must be processed to have date selections. Preview Options Sort by: Item Description, Class ID Range: Beginning Period Date Processed, Ending Period Date Processed Inventory – Usage Tax Report Some states require practices to pay taxes on items used internally. Use the Inventory – Usage Tax Report to show the cumulative amount of tax owed based on internal use. Preview Options Sort by: Date Range: Date Cornerstone* 8.1 Single Location Inventory • Inventory Reports • Page 78 Inventory – Vendor Summary Report Use the Inventory – Vendor Summary Report to view the detailed information about the vendors that are set up. Preview Options Sort by Vendor Name Range: Vendor Name Inventory – Want List Report Use the Inventory – Want List Report to view details of items currently on the Want List. Preview Options Sort by: Item Description, Item ID, Primary Vendor Range: If Sort by is Item Description: Item Description, Item ID, Status If Sort by is Item ID: Item Description, Item ID, Status If Sort by is Primary Vendor: Item Description, Status, Vendor Name Cornerstone* 8.1 Single Location Inventory • Inventory Reports • Page 79 Section 7 Skill Assessment & Training Evaluation Cornerstone* 8.1 Single Location Inventory • Skill Assessment & Training Evaluation • Page 80 Single Location Inventory Skill Assessment for Cornerstone 8.1 Practice Name: Your Name: Completion Date: Instructions: After completing your training, please read each of the following skill assessment statements and evaluate your ability to perform each task. Mark only one “x” for each skill statement. When complete, please fax this Skill Assessment and Knowledge Check to the Education Department at 715-855-7482 to receive your certificate of completion for the Cornerstone Inventory - Advanced Using course. Can’t Perform Can Perform With or Without Resources Section 1 - Introduction 1. I can access Help. 2. I can locate Cornerstone Reference manuals. 3. I can access online customer support. Section 2 - Getting Started: Phases and Setup 4. I understand the inventory workflow. 5. I can list inventory decisions that need to be made prior to invoice item inventory setup. 6. I can access Cornerstone Inventory. 7. I can add/modify vendors. 8. I can add/modify locations. 9. I can add/modify cost centers. 10. I can add/modify adjustment reasons. 11. I can perform modifications to multiple inventory items at one time (reorder information, track expiration dates or lot numbers). 12. I can perform modifications to individual inventory items (buy/sell ratio, maintain QOH, reorder information, etc.). 13. I can maintain inventory defaults. Section 3 - Purchase 14. I can add an item to the Want List. 15. I can use the Suggested items check box on the Purchasing Work List to view inventory items that need to be reordered. 16. I can perform a basic search for an inventory item. 17. I can perform an advanced search for an inventory item. 18. I can arrange and adjust the columns on an Inventory window. 19. I can view Item History and Item Information for an inventory item. 20. I can delete an item from the Want List. 21. I can use the Purchasing Work List to add an item to a purchase order. 22. I can create a purchase order using the Order List. 23. I can modify a purchase order using the Order List. Cornerstone* 8.1 Single Location Inventory • Skill Assessment & Training Evaluation • Page 81 N/A for my Position Section 4 - Receive 24. I can receive an order. 25. I can modify an inventory receipt. 26. I can post an inventory receipt. 27. I can edit backordered items. 28. I can return an item to the vendor. Section 5 - Deplete/Adjust/Move 29. I can edit Expiration dates and lot number. 30. I can adjust quantity on hand. 31. I can adjust an item’s cost. 32. I can identify features that deplete an item’s quantity. 33. I can utilize internal stock use. Section 6 - Inventory Reports 34. I can access the Inventory Reports window. 35. can print an inventory report. 36. I can access the Inventory Reports window. 37. I can print an Inventory report. Results of skill assessment _____ Total N/A _____ Total Can’t Perform _____ Total Can Perform Reminder: Please fax this assessment to the Education Department at 715-855-7482 to receive your certificate of completion for the Cornerstone Inventory - Advanced Using Course. If you’d prefer, you can mail this information to: IDEXX Computer Systems Education Department 2536 Alpine Road Eau Claire, WI 54701 Cornerstone* 8.1 Single Location Inventory • Skill Assessment & Training Evaluation • Page 82 IDEXX Cornerstone Training Evaluation Cornerstone 8.1 Single Location Inventory Training Evaluation We Value Your Opinion! - Tell us what you think about the Single Location Inventory training. Practice: Trainer: Date: Feedback received from you regarding the training is vital to our continued improvement. Description This Single Location Inventory training is designed for inventory managers at all levels, whether you are just getting started or want to maximize utilization. You’ll learn: • Inventory Assessment and Goals • Inventory Settings, Preparation & Cleanup • Purchasing, Receiving & Depleting Inventory • Adjustments and Transfers • Multi-Site and Single Location Tips • Best Practice Concepts, Techniques and • Improvement Steps 1. How likely would you be to recommend IDEXX Cornerstone training to a friend or colleague? 2. Why did you select this rating? 3. Tell us how we did with: Poor Fair Excellent Course content matching the course description. 1 2 3 4 5 6 7 8 9 10 N/A Professional looking course materials. 1 2 3 4 5 6 7 8 9 10 N/A Providing course materials that were valuable. 1 2 3 4 5 6 7 8 9 10 N/A Arriving well prepared & using appropriate examples. 1 2 3 4 5 6 7 8 9 10 N/A Using effective communication skills. 1 2 3 4 5 6 7 8 9 10 N/A Answering all of my questions effectively. 1 2 3 4 5 6 7 8 9 10 N/A Enabling our practice to expand our use of Cornerstone’s features. 1 2 3 4 5 6 7 8 9 10 N/A Providing good value for the cost. 1 2 3 4 5 6 7 8 9 10 N/A Comments: Cornerstone* 8.1 Single Location Inventory • Skill Assessment & Training Evaluation • Page 83 IDEXX Cornerstone ® Training Evaluation 4. Tell us what you think about the length of the course: Too short Too long Just right 5. Did you follow along with the participant workbook during the course presentation? Yes - I followed the participant workbook the majority of the time. No - I didn’t use the participant workbook. Sometimes - I used the participant workbook some, but not most, of the time. 6. When prompted, did you complete the training exercises? (You may have shared a computer with another participant to complete the training exercises) Yes - I/we completed the majority of the training exercises. No - I/we didn’t complete the training exercises. Sometimes - I/we completed some, but not the majority, of the training exercises. 7. What was the most valuable aspect of this course? 8. What suggestions do you have for future revisions of this course? 9. Will this course allow you to move forward in completing Inventory Setup? Yes No 10. How many participants from your practice attended some, or all, of this course? 1 2 3 4 or more 11.What is your position in your practice? Veterinarian Technician/ Nurse Veterinarian/Practice Owner Office/Practice/Business Manager Reception/Client Services Other (specify) Thank you! We appreciate your feedback. Please Print: Testimonial Permission: (Please check the box below) Please have an IDEXX Computer Systems Representative contact me to discuss featuring my comments in promotional materials. Your Name: Practice Name: Practice City, State: Practice Telephone #: Please return this Training Evaluation using one of the following methods: Fax this information to: Learning & Performance Department at 715-855-5820. Mail this information to: IDEXX Computer Systems Attn: Learning & Performance Department 2536 Alpine Road Eau Claire, WI 54703 Cornerstone* 8.1 Single Location Inventory • Skill Assessment & Training Evaluation • Page 84 Section 8 Appendix Cornerstone* 8.1 Single Location Inventory • Appendix • Page 85 15 Steps to Inventory Setup 1. Classifications/Subclassifications (Lists > Invoice Item Class) Classifications and subclassifications can be used to categorize invoice items in order to generate more specific information in reports, markup or markdown entire groups of similar invoice items, narrow invoice item searches, and create pick lists to use in invoicing. Use this option to add, modify or inactivate classification and subclass information. 2. Departing Instructions (Lists > Departing Instructions) Use departing instructions to explain the patient care after treatment, surgery or after administering medications or vaccinations. These educational paragraphs recommend needed services and to advise when a return visit is necessary. Invoicing an item that has departing instructions linked automatically prints the departing instructions on the invoice. 3. Prescription Instructions (Lists > Prescription Instructions) Setting up prescription instructions includes creating a list of instructions and then linking a specific instruction to an invoice item. You can link one (1) prescription instruction per invoice item. 4. Units of Measure (Controls > Units of Measure) Units of measure are used to designate how invoice items are bought and sold. 5. Price Change Reasons (Controls > Price Change Reasons) Use price change reasons to specify if invoice item prices can be changed. If prices can be changed, your practice can set up codes to track the reasons prices were changed. 6. Vendor Setup (Inventory > Vendors) Set up vendors to manage the ordering source for inventory items, placed orders, and received orders. You can link vendors to an individual invoice item. 7. Locations (Inventory > Locations) Use this feature to designate areas where inventory is being stored. Examples of locations include: Pharmacy, Central Storage, Refrigerator A, Refrigerator B. 8. Cost Center (Inventory > Cost Centers) Use cost centers to track inventory costs associated with specific areas in your practice for items used within your practice but not invoiced. Examples of cost centers include boarding/kennel, lab supplies, expired drugs, breakage, and truck. 9. Adjustment Reasons (Inventory > Adjustment Reasons) Adjustment reasons are used to track adjustments of quantity on hand (QOH) within inventory. Examples of adjustment reasons include: broken, cycle count, free sample, unaccounted for, expired, entry error. 10. Inactivate Invoice Items Not Used (Lists > Invoice Item) Inactivating items not used by the practice will help keep your lists smaller and more pertinent. To inactivate an inventory or service, from the Invoice Item List locate the item and click Update. Inventory items must have the Maintain QOH check box deselected to be marked as inactive. 11. Setup Inventory Items (Lists > Invoice Item) Setting up inventory items can take a substantial amount of time. Try to pick a category of inventory (Example: canned foods or antibiotics) and complete the setup of those items. Setup includes reorder information and marking the item to Maintain QOH for tracking purposes. Most of the details on inventory reports include QOH information. 12. Link Inventory Items (Lists > Invoice Item) Inventory items can be linked to services or other inventory items. Linking items can be helpful when you do not want items listed separately on invoices. Examples of inventory items to link include: canine and feline vaccination services should have a dose of the appropriate vaccine linked and the Heartgard® services should have Heartgard® chewable linked. 13. Receive Past Invoices (Inventory > Receipt List) Enter past invoices from the vendors to allow your facility to see receipt and cost history for the items. Warning: DO NOT input past invoices after a physical count has been adjusted within Cornerstone, since receiving orders will add to the current quantity on hand. Cornerstone* 8.1 Single Location Inventory • Appendix • Page 86 14. Cycle Count Physically count the inventory items marked to maintain quantity on hand. 15. Adjust Quantity on Hand, Cost and/or Expiration Dates (Inventory > Adjustment List) When you’ve completed taking a physical inventory, adjust the quantities on hand, cost, and expiration date information. For expiration date adjustments, see the lesson titled Quantity on Hand and Expiration Date Adjustments. Cornerstone* 8.1 Single Location Inventory • Appendix • Page 87 Set Up Security – Beginning Inventory Management Security access to Cornerstone Inventory features should be set up prior to establishing Inventory settings and working in Inventory. Security for Inventory is set in Cornerstone and can be located through Cornerstone > File > Security Setup. In the following grid you will find a listing of all the Inventory security settings, access suggestions, and the path to locate that feature. It is ultimately the practice’s decision-maker that decides who has access to certain areas within Cornerstone Inventory. (Key: Rec = Receptionist, DA = Doctor Associate, TEC = Technician, and OM = Office Manager). In this particular case the OM selections could be substituted for the Inventory Manager, Purchasing Manager, or Purchasing Agent in any give practice. Security will vary based on your practice dynamics and job responsibilities. For security to take affect you will need to close out of Cornerstone and reopen. Inventory Dialog Security Access Suggestions REC DA TEC OM Path to Locate Inventory X Inventory menu Inventory - Adjustment List X Inventory > Adjustment List Inventory - Adjustment Reason List X Inventory > Adjustment Reasons Inventory - Adjustment Reason Maintenance X Inventory > Adjustment Reasons Inventory - Backorder List X Inventory > Backorder List Inventory - Backorder Maintenance X Inventory > Backorder List Inventory - Cost Adjustment Maintenance X Inventory > Adjustment List Inventory - Cost Center List X Inventory > Cost Centers Inventory - Cost Center Maintenance X Inventory > Cost Centers Inventory - History Purge X Tools > History Purge Inventory - Internal Stock Use X Inventory > Internal Stock Use Inventory - Inventory Details X Inventory > Order List Inventory - Inventory Reports X Reports > Inventory X Inventory > Item History and Item Information Tab Inventory - Location Group List X Inventory > Location Groups Inventory - Location Group Maintenance X Inventory > Location Groups Inventory - Location List X Inventory > Locations Inventory - Location Maintenance X Inventory > Locations Inventory - Location Type List X Inventory > Location Types Inventory - Location Type Maintenance X Inventory > Location Types Inventory - Order List X Inventory > Order List Inventory - Order Maintenance X Inventory > Order List Inventory - Purchasing Work List X Inventory > Purchasing Work List Inventory - QOH Adjustment Maintenance X Inventory > View Quantity on Hand Inventory - Receipt List X Inventory > Receipt List Inventory - Receipt Maintenance X Inventory > Receipt List Inventory - Return to Vendor X Inventory > Return to Vendor Inventory - Stock Transfer List X Inventory > Stock Transfer List Inventory - Transfer Items X Inventory > Find and Transfer Items Inventory - Vendor List X Inventory > Vendors Inventory - Vendor Maintenance X Inventory > Vendors Inventory - View Quantity on Hand X Inventory > View Quantity on Hand X Inventory > Want List X Tools > Inventory Setup Inventory - Item History and Item Information Inventory - Want List Inventory Setup X X X X X X Cornerstone* 8.1 Single Location Inventory • Getting Started: Phases and Setup • Page 88 Inventory Reports Security Access Suggestions REC DA TEC OM Path to Locate Inventory - Adjustment Report X Reports > Inventory > Inventory - Adjustment Report Inventory - Audit Open Details Report X Reports > Inventory > Inventory - Audit Open Details Report Inventory - Audit Report X Reports > Inventory > Inventory - Audit Report Inventory - Backorder Report X Reports > Inventory > Inventory - Backorder Report Inventory - Cost Report X Reports > Inventory > Inventory - Cost Report Inventory - Cost Totals Report X Reports > Inventory > Inventory - Cost Totals Report Inventory - Counts Report X Reports > Inventory > Inventory - Counts Report Inventory - Evaluation Report X Reports > Inventory > Inventory - Evaluation Report Inventory - Expiration Date Report X Reports > Inventory > Inventory - Expiration Date Report Inventory - Internal Usage Report X Reports > Inventory > Inventory - Internal Usage Report Inventory - Item Vendor Information Report X Reports > Inventory > Inventory - Item Vendor Information Report Inventory - Item Profit Analysis Report X Reports > Inventory > Inventory - Item Profit Analysis Report Inventory - Linked Items Report X Reports > Inventory > Inventory - Linked Items Report Inventory - On Order Report X Reports > Inventory > Inventory - On Order Report Inventory - Overstock Report X Reports > Inventory > Inventory - Overstock Report Inventory - Partial Receipts Report X Reports > Inventory > Inventory - Parital Receipts Report Inventory - Purchase History Report X Reports > Inventory > Inventory - Purchase History Report Inventory - Receipt Report X Reports > Inventory > Inventory - Receipt Report Inventory - Reorder Report X Reports > Inventory > Inventory - Reorder Report Inventory - Returns Report X Reports > Inventory > Inventory - Returns Report Inventory - Setup Error Report X Report will display if an inventory setup task fails. Inventory - Turnover Report X Reports > Inventory > Inventory - Turnover Report Inventory - Usage Tax Report X Reports > Inventory > Inventory - Usage Tax Report Inventory - Vendor Summary Report X Reports > Inventory > Inventory - Vendor Summary Report Inventory - Want List Report X Reports > Inventory > Inventory - Want List Report Cornerstone* 8.1 Single Location Inventory • Getting Started: Phases and Setup • Page 89 Proprietary Rights Notice Information in this document is subject to change without notice. Companies, names and data used in examples are fictitious unless otherwise noted. No part of this document may be reproduced or transmitted in any form or by any means, electronic, mechanical or otherwise, for any purpose, without the express written permission of IDEXX Laboratories. IDEXX Laboratories may have patents or pending patent applications, trademarks, copyrights or other intellectual or industrial property rights covering this document or subject matter in this document. The furnishing of this document does not give a license to these property rights except as expressly provided in any written license agreement from IDEXX Laboratories. © 2011 IDEXX Laboratories, Inc. All rights reserved. • 03182011 Cornerstone*, Patient Clipboard* and SmartLink® are trademarks or registered trademarks of IDEXX Laboratories, Inc. or its affiliates in the United States and/or other countries. Microsoft, Windows and Windows Server are trademarks or registered trademarks of Microsoft Corporation in the United States and/or other countries. Epson® is registered trademark of the Seiko Epson Corporation. Adobe and Reader are either registered trademarks or trademarks of Adobe System Incorporated in the United States and/or other countries. DICOM is the registered trademark of the National Electrical Manufacturers Association for its standards publications relating to digital communication of medical information. Accelerated Payment Technologies and X-Charge are trademarks or registered trademarks of Accelerated Payment Technologies, Inc. Topaz, ClipGem and SigLite are trademarks of Topaz Systems, Inc. in the U.S. and/or other countries. All other product and company names and logos are trademarks of their respective holders. Published by IDEXX Laboratories, Inc. IDEXX Computer Systems Eau Claire, Wisconsin 54703, USA idexxcornerstone.com Printed in the United States of America. CS81_SLI_03182011_REV09 Support: 800-695-2877 • Sales: 800-283-8386 idexx.com/cornerstone © 2011 IDEXX Laboratories, Inc. All rights reserved.